
Home
Hardware
By
Anup Thapa
Gigabyte provides multiple Fan Control utilities from the BIOS-based Smart Fan 5 to programs that you can run from Windows like Gigabyte SIV and GCC.
If you want a quick and easy setup process, you can use the Automatic Fan Profiles in these utilities. These let you set the fans to different speed ranges at the click of a button. Or if you prefer customization over convenience, you can always use Manual mode to fine-tune the speeds.
I’ll cover the steps to use these different methods, and what you should and shouldn’t do during manual configuration in this article.
Note: This guide is for controlling the CPU and case fans. If you’re trying to control your GPU fan speed, you’ll want to use programs like MSI Afterburner instead.
Use Smart Fan 5 In BIOS
I strongly recommend the Smart Fan utility for controlling fan speeds. The Windows-based methods covered later are convenient, but they’re nowhere as stable/reliable.
Note: The latest Gigabyte boards support Smart Fan 6. But besides the UI change, it’s mostly similar to Smart Fan 5. So, you can use the same process and principles shown here to control the fan speed with Smart Fan 6 as well.
Open Smart Fan 5 Utility
Power on your PC and repeatedly press F2/Del to boot to the Gigabyte BIOS/UEFI interface.
Select Fan & Speed Control Mode
The first two settings you must configure are the Monitor Target and the Speed Control Mode.
The default target is the CPU fan (connected to the CPU_FAN header). But you can also monitor and configure case fans connected to the SYS_FAN headers.

As for the Fan Speed Control function, you have four options:
- Normal (Default): The fan operates at different speeds depending on the temperature.
- Silent: The fan runs at slow speeds.
- Full Speed: The fan runs at max speed regardless of the temperature.
- Manual: The fan runs according to the curve graph set by you.

The first 3 modes automatically set the fan RPM for you. As long as you pick the appropriate speed profile according to your usage intensity, these work pretty well.
But if you want to calibrate the fan speed to your exact needs, you can customize the fan curve in Manual mode.
Manually Setting the Fan Speed Curve
Note: If you selected one of the Automatic profiles instead of Manual, skip this section.
In Manual mode, the fan curve becomes unlocked for customization. The vertical axis represents the fan RPM (in %) while the horizontal axis represents the temperature.
Smart Fan 5 provides six curve nodes. You can adjust their position on the graph to create a curve that determines the fan speed according to the temperature.
For reference, here’s how I’ve configured it:

The first node sets a 0% duty cycle at 20°C. The second node sets a 30% duty cycle at 35°C, and so on. Finally, the sixth node sets a 100% duty cycle at 70°C.
Here are the main takeaways from this reference:
- At temps under 20°C, the fan runs at up to 30% of the max RPM. This is the default behavior. If the Fan Stop setting is enabled (covered later), the fan will not run while the temp is under 20°C.
- When the temp increases from 35°C to 45°C, the duty cycle also increases proportionately from 30% to 45%. You’ll notice the RPM change in real-time.
- As the temp increases, the fan RPM increases in the same pattern until it reaches the max speed at 70°C.
This was just a config that I use on one of our Gigabyte systems. If you want to find what works best for you, you’ll have to experiment. Just keep a couple of things in mind when creating your own fan curve:
- The nodes should always be set in ascending order. The opposite would mean that the fan RPM decreases as the temp increases, which is not what we want.
- Set the final node to 100% at 75°C or lower. Letting your system get to temps above 75°C is not good for your components in the long run. You also want to ensure the fan is running at max RPM after reaching the final temp threshold.
Configuring Additional Fan Settings
After selecting an automatic speed profile or manually setting the speed curve, you can check out a few more settings before finalizing your configuration.
You can also manage some optional settings like Temperature Warning or Fan Fail Warning from the right side.
When you’re satisfied with your configuration, press F10 to save the changes and exit the BIOS.
Gigabyte Fan Control with SIV
As I mentioned earlier, I’m not a fan of Windows-based utilities like Gigabyte System Information Viewer (SIV). They’re incompatible with many systems, and even when they do work, user reception has not been good due to frequent crashes.
So, I’d recommend you use Smart Fan 5 over this. But if convenience is a priority, here’s how you can use Gigabyte SIV to control the fan speed:
- Use the
msinfo32run command to find your Gigabyte board model.
- Search for your motherboard model on Gigabyte’s site and click on Utility.

- Download, extract, and install the Gigabyte App Center.

- Open the App Center and press the LiveUpdate button from the top-right.

- Select the SIV utility here. Uncheck any other packages that you don’t want, then press Install at the bottom.

- After installing SIV, launch it from the home page.

- SIV will calibrate your system fans on the first launch.

- After calibrating, you can click to use Automatic profiles from the Smart Fan 5 Auto page.
- The Smart Fan 5 Advanced page is similar to the Manual configuration covered earlier. You can select the fan to configure and set the fan curve, temperature interval, etc. from here. Don’t forget to press Apply after making the changes.
- You can also use some SIV-exclusive features here. These include auto-calibrating the fans, saving and loading config profiles, and resetting. You can even switch to RPM Fixed Mode (The fan runs at the set RPM until it reaches a temperature threshold like 70°C. After that, it runs at max speed).


Use Gigabyte Control Center (GCC)
GCC is a utility for monitoring and modifying hardware-related configurations. For fan tuning specifically, it’s slightly less customizable compared to the other two options. But if SIV isn’t compatible with your system and you want a Windows-based method, GCC can still get the job done.
- Go to the Gigabyte Control Center page. If your board is supported, you can download and install it.

- Launch GCC and switch to the Fan Control tab.
- You can switch between the various Automatic Profiles here (Eco, Normal, Turbo, etc.).
- You can also set the fan curve yourself in Customize mode. Dynamic mode is for creating the sloped curve, while Fixed mode is for setting a fixed RPM.

Other Ways to Control Fan Speed
While these were Gigabyte-specific ways to control the fan speed, these aren’t your only options. You can also use OEM tools like AMD Software: Adrenalin Edition or third-party tools like FanControl to customize your fan configurations.
There are other niche methods too like hardware fan controllers that I won’t cover here. If you’re interested in any such methods, I recommend checking out our detailed guide on controlling fan speed on a PC.
Утилита EasyTune™
GIGABYTE EasyTune™ – фирменная утилита с простым и наглядным пользовательским интерфейсом, которая позволяет корректировать настройки системы без необходимости перезагрузки ПК (регулировка тактовой частоты и напряжения питания ключевых компонентов в среде Windows).
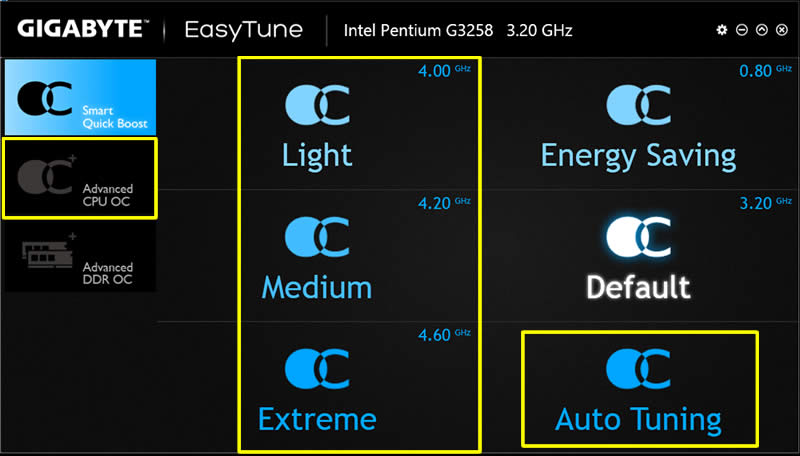
С помощью функции Smart Quick Boost можно в автоматическом режиме выполнить процедуру оверклокинга в тех случаях, когда необходим прирост производительности системы.
(Примечания) : Прежде чем устанавливать утилиту, пожалуйста, выполните инсталляцию приложения APP Center.
Получите моментальный прирост производительности
Оцените новый уровень производительности вашего ПК, воспользовавшись фирменными функциями GIGABYTE для оверклокинга.
|
Расширенные настройки: |
Профили Easy OC: |
Авто-Тюнинг: |
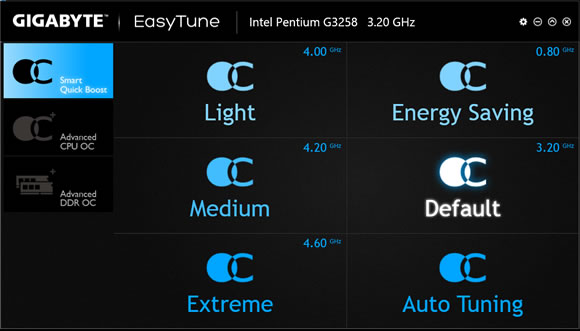
Smart Quick Boost Функция Smart Quick Boost дает возможность пользователю выбрать необходимую частоту ЦП для достижения требуемого уровня производительности системы.
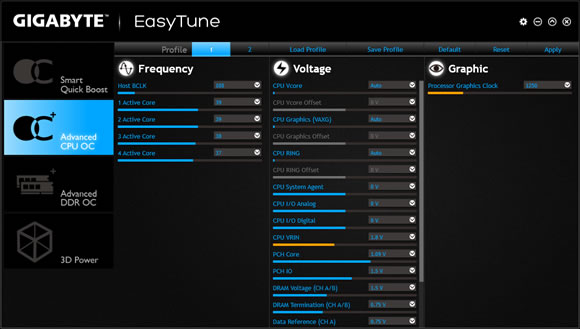
Advanced CPU OC Функция Advanced CPU OC позволяет пользователям устанавливать базовую тактовую частоту и напряжение центрального процессора, а также частоту интегрированного графического ядра.
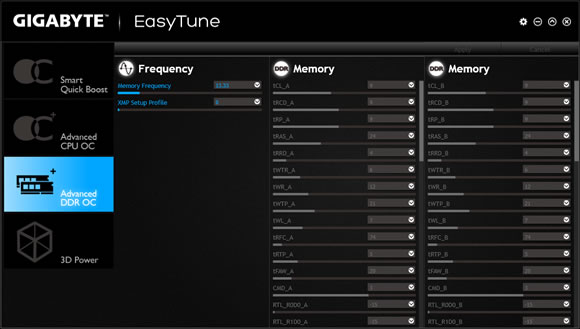
Advanced DDR OC Функция Advanced DDR OC дает возможность пользователю установить частоту, на которой будут работать модули ОЗУ под управлением выбранного XMP-профиля.
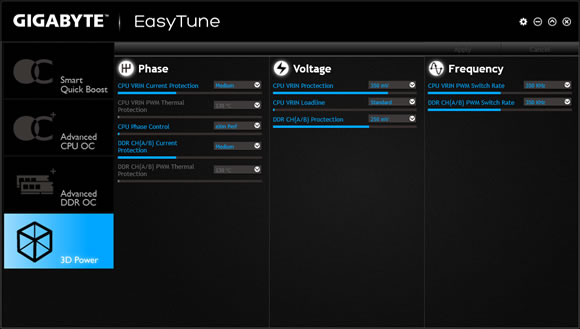
3D Power Функция 3D Power позволяет изменить значение параметра Фаза, Напряжение питания и Частота для PWM-модуля.
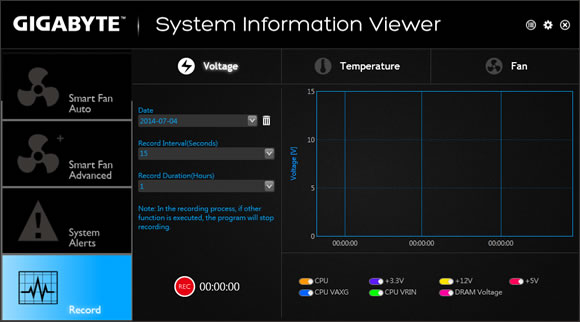
Обозреватель SIV
Обозреватель GIGABYTE System Information Viewer (SIV) – одна из ключевых функций, которая осуществляет мониторинг и информирует пользователя о текущем состоянии системы. Мониторингу, в частности, подлежат системные часы и процессор, скорость вращения вентилятора под управлением заданного профиля, системные оповещения о превышении температура или соответствующая запись в системном журнале; все эти и другие параметры отображаются в соответствующем окне интерфейса обозревателя информации о системе.
(Примечания) : Прежде чем устанавливать утилиту, пожалуйста, выполните инсталляцию приложения APP Center.
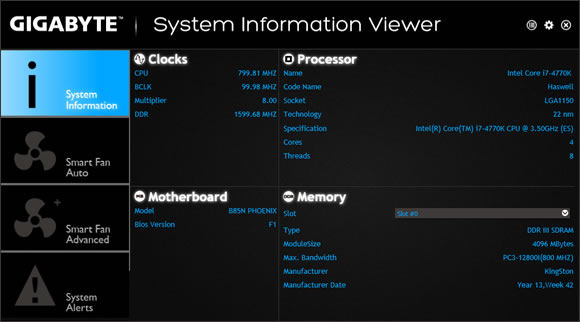

В разделе В разделе System Information предоставлена информация о ЦП, модели материнской платы, версии BIOS и установленной памяти.
В разделе Smart Fan Auto пользователям предоставлен доступ к четырем различным режимам функции Smart Fan.
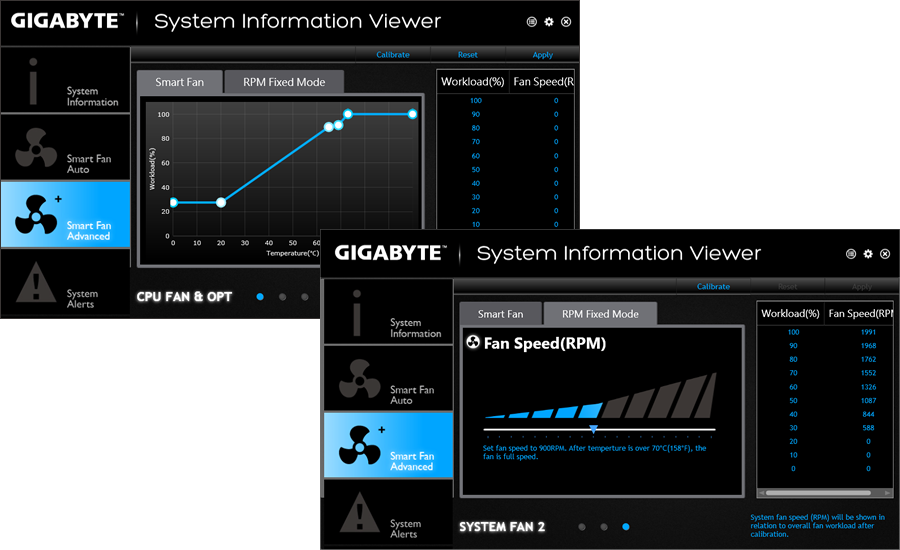
В разделе Smart Fan Advance пользователь может вручную настроить рабочий профиль каждого вентилятора с функцией калибровки для синхронизации всех системных вентиляторов.
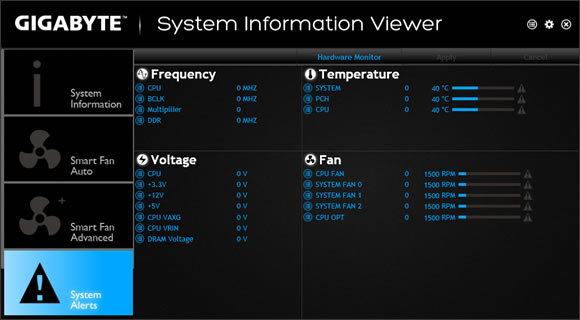
В разделе System Alerts предусмотрена возможность создавать предупреждающие оповещения, уведомляющие об изменениях в системе.
В разделе Record присутствует функция записи файла отчета о статусе состояния всего оборудования в течение установленного периода времени.e.
Функциональность зависит от модели.
Приведенные изображения экранов могут быть изменены без предварительного уведомления пользователей.
Средствами раздела Fast Boot
можно активировать и выбрать вариант быстрой загрузки или последующей загрузки ПК в результате нештатного отключения питания, непосредственно находясь в среде ОС Windows.
(Примечания) : Прежде чем устанавливать утилиту, пожалуйста, выполните инсталляцию приложения APP Center.
|
BIOS Fast Boot: Режим AC OFF: * Эта функция совместима только с ОС Microsoft Windows версии 8 / 8.1 |
Шаг 1 из 3. Цели и пожелания
01. Цели и пожелания
02. Сроки и бюджет
03. Контакты
Цели использования
Можно выбрать несколько
вариантов
Игры в 2K
Игры в 4К
Стриминг
Анимация и 3D графика
Фото и графический дизайн
Видеомонтаж
Визуализация и рендеринг
Машинное обучение
Пожелания
Можно выбрать несколько
вариантов
Персональный дизайн
Дерзкий и яркий
Без RGB подсветки
Минималистичный дизайн
Сделайте все по красоте!
В белом исполнении
Компактный размер важен
Кастомное водяное охлаждение
Самый мощный, VIP
Лимитированная версия
Ноутбук
Свой вариант
-
Back -
Language
Events
CSR
Member
Enter anything, it might just be it
Enter at least 2 characters to improve your results
Enter at least 2 characters to improve your results
Our Recommendations
Solutions
Seek Solutions & Frequently Asked Questions (FAQ)
How to set up the fan speed?
Please follow the steps below:
- Press combo key [Fn] + [ESC] to activate CONTROL CENTER and select [QUIET], [POWER SAVING], [PERFORMANCE] or [EMTERTAINMAENT].
- Check [SYSTEM PROGRAM].
- Select a «FAN SPEED» mode:
- [AUTOMATIC]: According to system temperature.
- [MAXMUM]: Always run at maximum speed.
Gigabyte EasyTune
для Windows
Gigabyte EasyTune — фирменная утилита, призванная облегчить процесс разгона систем, собранных на базе материнских плат от компании Gigabyte.
Присутствует возможность изменения значения множителя системной шины, частот AGP, PCI и DRAM, а также имеется возможность восстановления настроек по умолчанию. Кроме того с помощью программы пользователь получает массу исчерпывающей информации о ЦП (частота, вольтаж, производитель, кэш и пр.), оперативной памяти, температуре, напряжении и скорости вращения кулеров. Доступна функция задания пороговых значений и оповещения при их нарушении.
ТОП-сегодня раздела «Настройка, оптимизация»
CCleaner 6.35.11488
CCleaner — популярное приложение для оптимизации ПК, чистки реестра и удаления различного…
MSI Afterburner 4.6.5
MSI Afterburner — настоящая находка для истинного оверклокера, с помощью которой можно…
Mem Reduct 3.5
Mem Reduct — небольшая портативная утилита, которая позволяет высвободить до 25% используемой…
Process Hacker 2.39.124
Process Hacker — мощное приложение для полного контроля над задачами, процессами и службами, с…
CCleaner Portable 6.35.11488
CCleaner Portable — портативная (переносная, не требующая инсталляции на компьютер) версия утилиты CCleaner для чистки системного мусора…
Отзывы о программе Gigabyte EasyTune
Серёга про Gigabyte EasyTune B20.0214.1 AMD / B19.1202.1 Intel [07-05-2023]
Народ, Спасибо за отзывы !!!
6 | 8 | Ответить
Сергей про Gigabyte EasyTune B15.0210.1 [23-07-2020]
Не устанавливайте эту утилиту
Вызывает синий экран
Меняет контроллер SATA
5 | 35 | Ответить
слава про Gigabyte EasyTune B13.1114.1 [05-03-2018]
Скачивал перед этим 6 версию проги,при установке вырубается с дребованием какогото апп центра. Сырая программа какбудто школьник ее делал..
11 | 10 | Ответить
Олег в ответ слава про Gigabyte EasyTune B15.0210.1 [30-04-2019]
Объясняю школьнику. Вы скачивали версию EasyTune более позднюю, не 6-ю. она не работает без AppCenter. В более новых версиях программы мониторинг кулеров перенесен в другую прогу SIV, работающую тоже только с APPCenter
12 | 9 | Ответить
Дмитрий про Gigabyte EasyTune B13.1114.1 [24-10-2015]
Попытался установить, чёрный экран, комп не подаёт жизни, нажал на ребут, пишет что винда эрорила, отправил данные в майкрасофт.
9 | 14 | Ответить
Виктория про Gigabyte EasyTune B13.1114.1 [08-06-2014]
Прога вызывает синий экран
15 | 30 | Ответить