
(Image credit: Future)
Although you can manage many aspects of wireless networks using the Settings app (and Control Panel), sometimes, you may still need to perform more advanced tasks. For example, recover the wireless password for a particular profile, view detailed information about saved profiles, or create a report to troubleshoot issues, which are not common tasks available with other tools.
Whatever the reason it might be, if you have to complete more advanced networking tasks, Windows 10 includes the netsh (network shell) command-line tool that you can use to view, troubleshoot, and configure virtually every network adapter on the device.
This guide will walk you through the steps to manage wireless networks with the netsh command-line tool on Windows 10.
How to view Wi-Fi network profiles stored on Windows 10
To view the wireless network profiles on Windows 10, use these steps:
- Open Start.
- Search for Command Prompt, right-click the top result, and select the Run as administrator option.
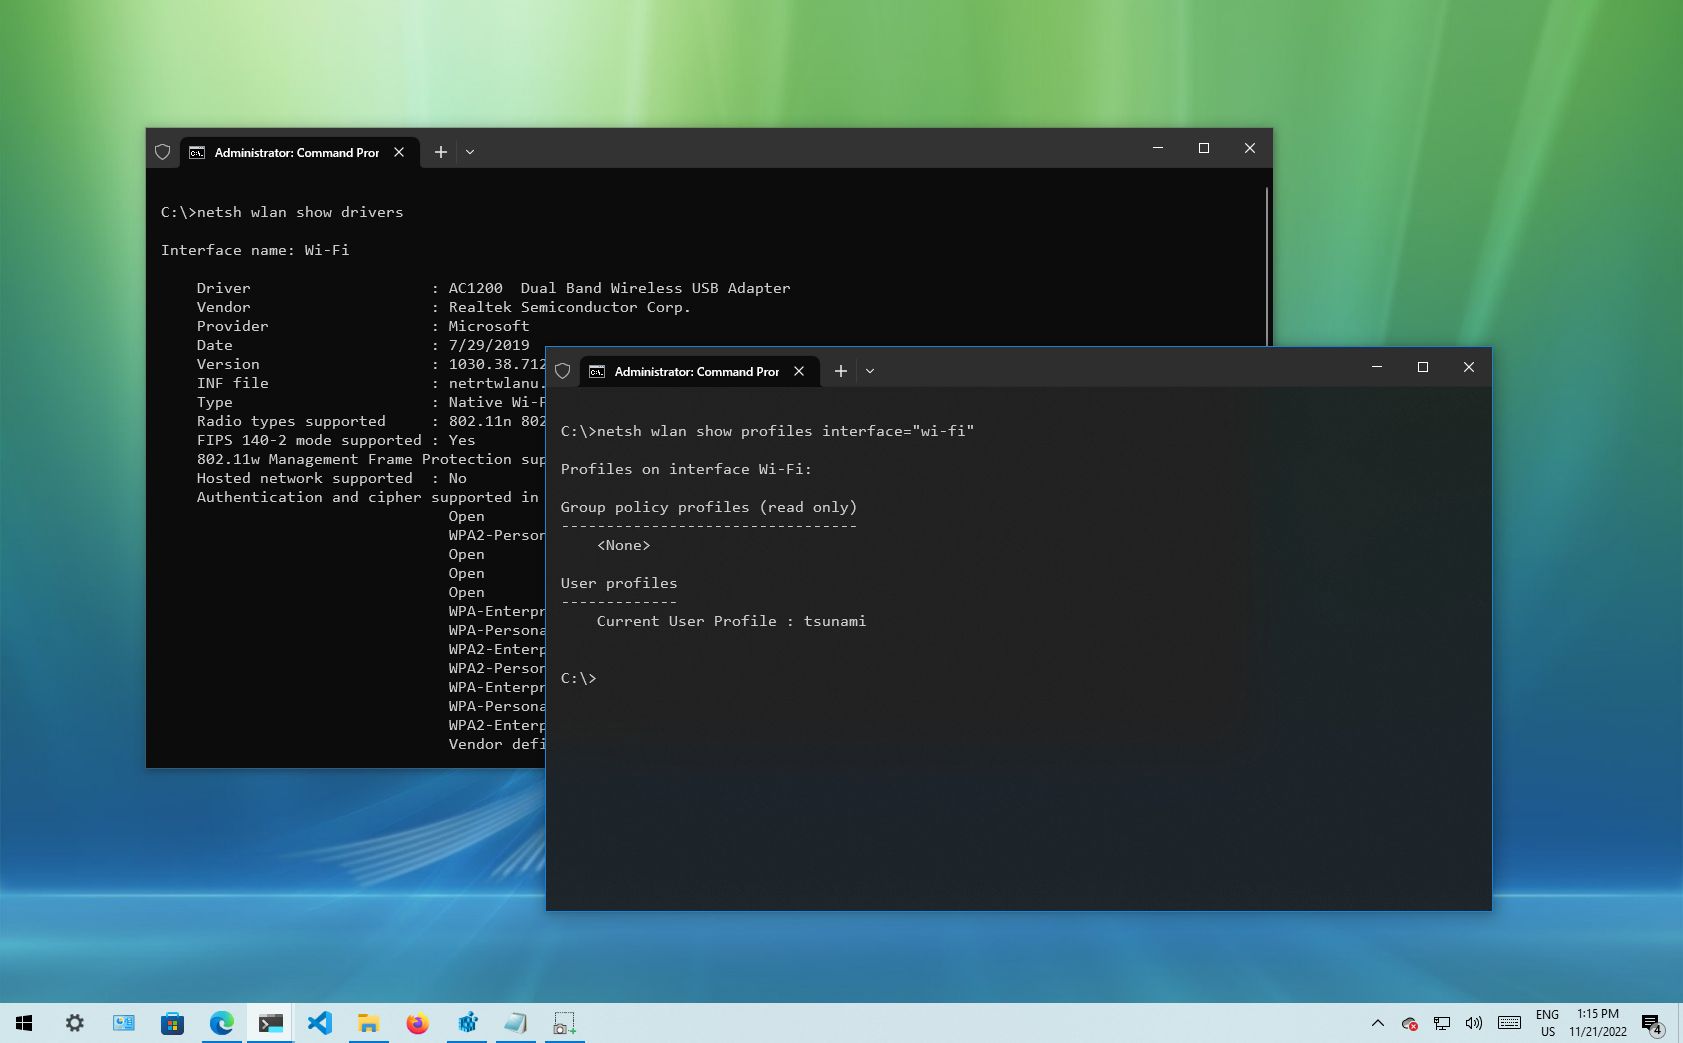
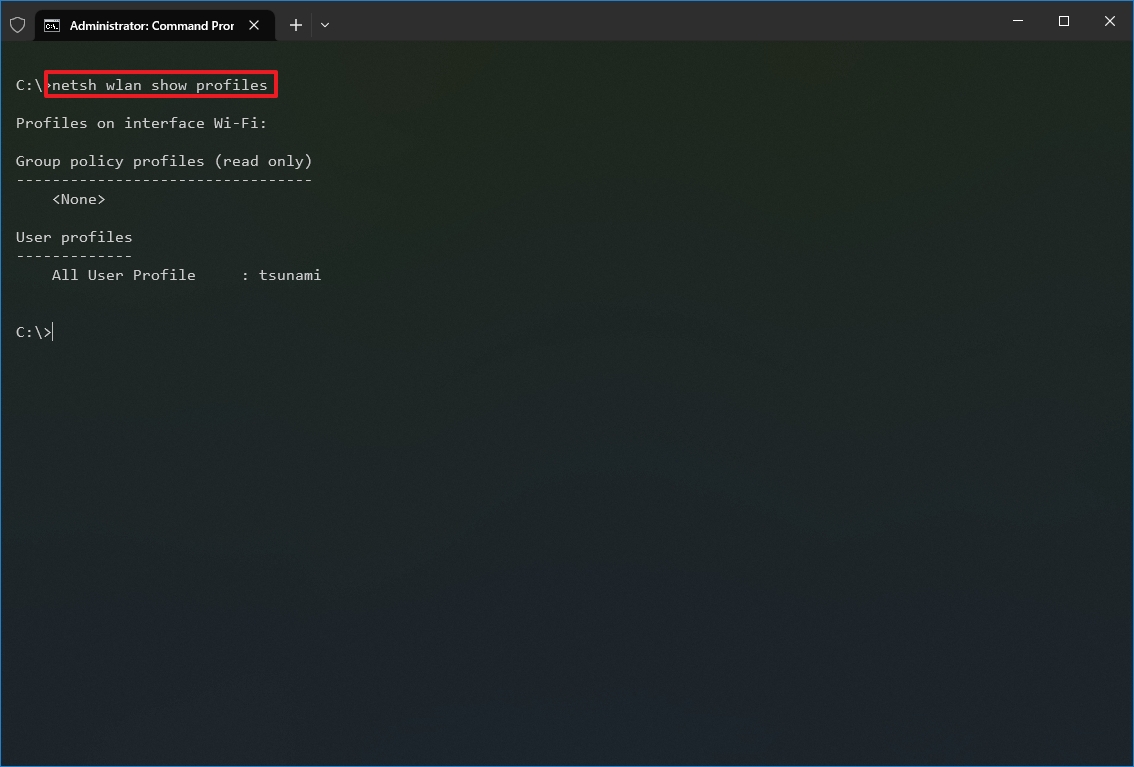
- Type the following command to view the wireless network profiles saved on your computer and press Enter: netsh wlan show profiles
- (Optional) Type the following command to view the saved profiles for a specific interface and press Enter: netsh wlan show profiles interface=»WLAN-INTERFACE-NAME»
In the command, replace the WLAN-INTERFACE-NAME for the actual name of the interface. You can use the netsh interface show interface command to find out the exact name. For example, this command shows the profiles saved for the «Wi-Fi» interface: netsh wlan show profiles interface=»wi-fi»
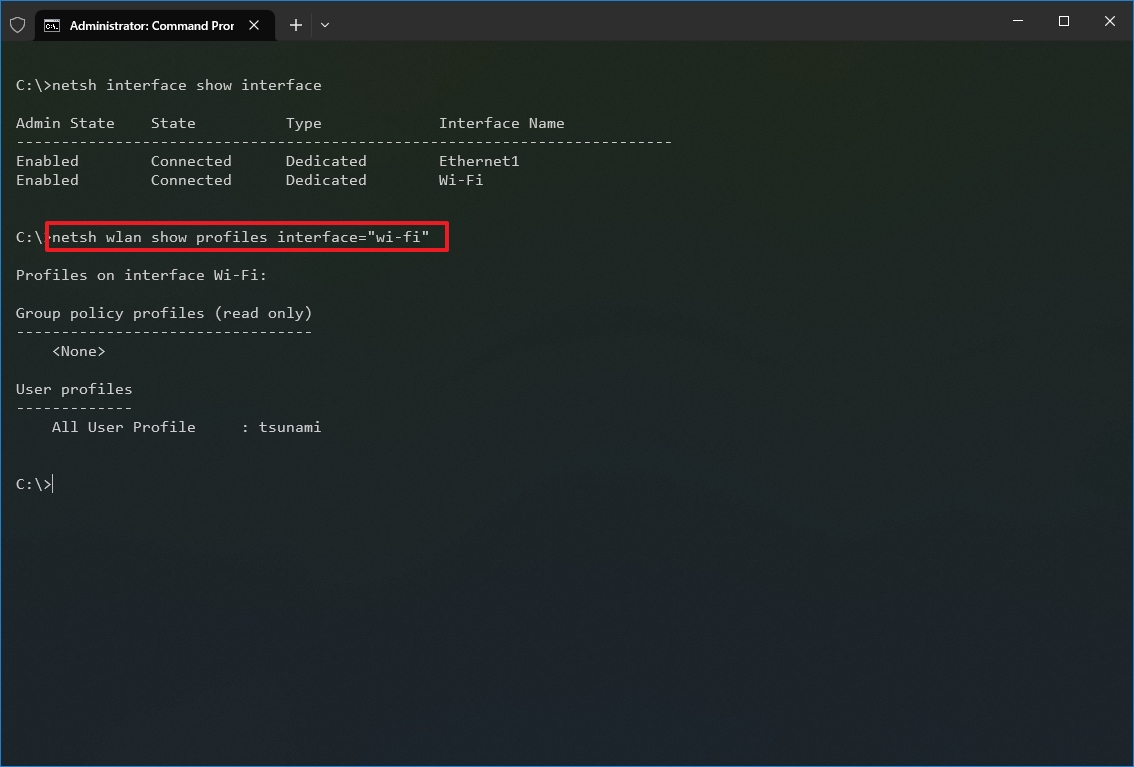
Once you complete the steps, the command will output the profiles from all the wireless networks you connected to in the past on every adapter installed on the computer.
How to view Wi-Fi network driver info on Windows 10
To view the wireless adapter driver information, use these steps:
All the latest news, reviews, and guides for Windows and Xbox diehards.
- Open Start.
- Search for Command Prompt, right-click the top result, and select the Run as administrator option.
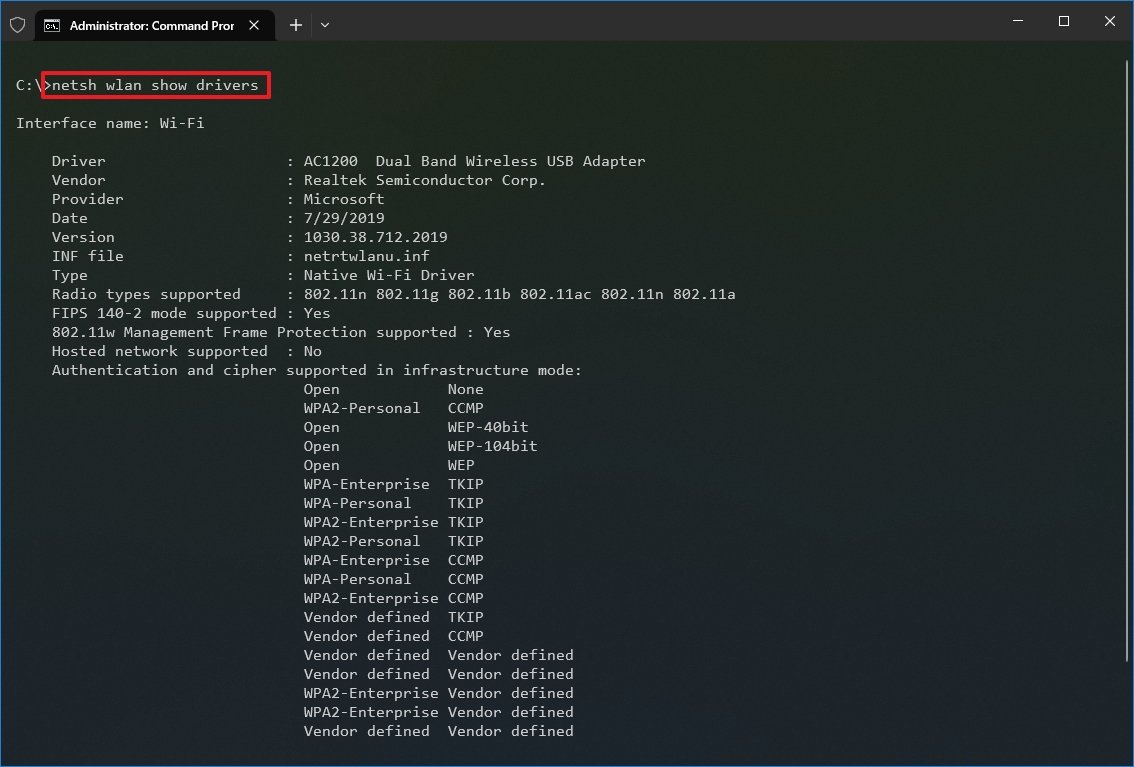
- Type the following command to view the wireless network profiles saved on your PC and press Enter: netsh wlan show drivers
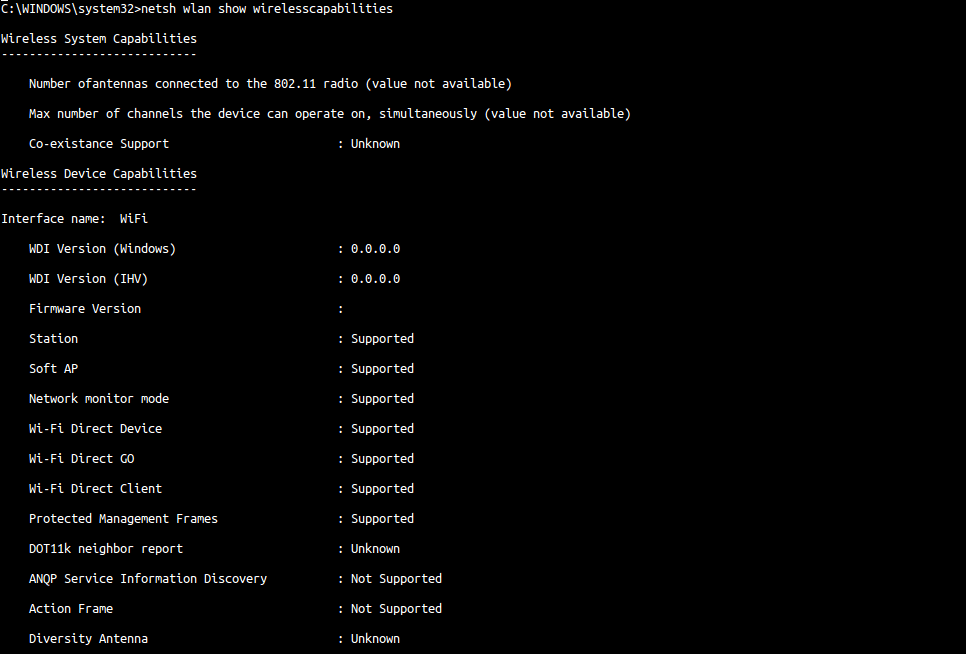
- (Optional) Type the following command to view the adapter capabilities and press Enter: netsh wlan show wirelesscapabilities
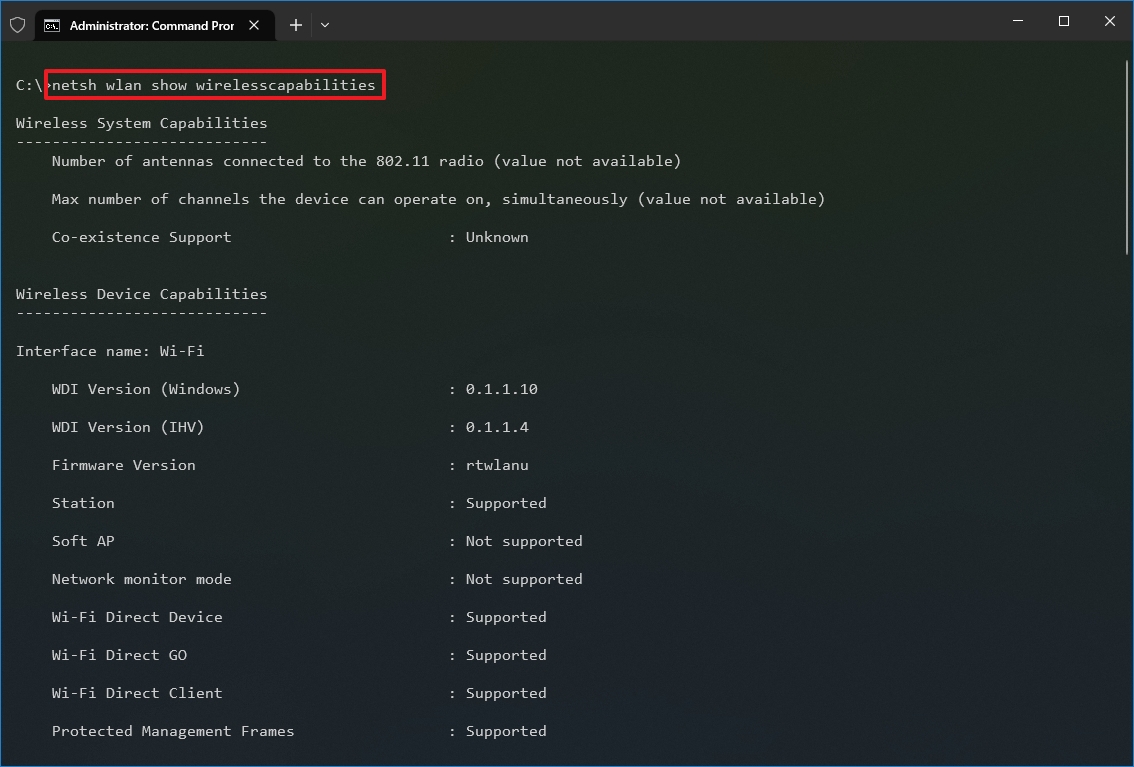
After you complete the steps, the command will provide relevant information about the driver, including vendor, version, radio type (for example, 802.11ax, 802.11a, 802.11n, etc.) and wireless authentication support, and more.
If you use the command to view the capabilities, you will see a list of all the wireless features available and those supported by the adapter.
How to view Wi-Fi network adapter settings on Windows 10
To check the wireless adapter settings on Windows 10, use these steps:
- Open Start.
- Search for Command Prompt, right-click the top result, and select the Run as administrator option.
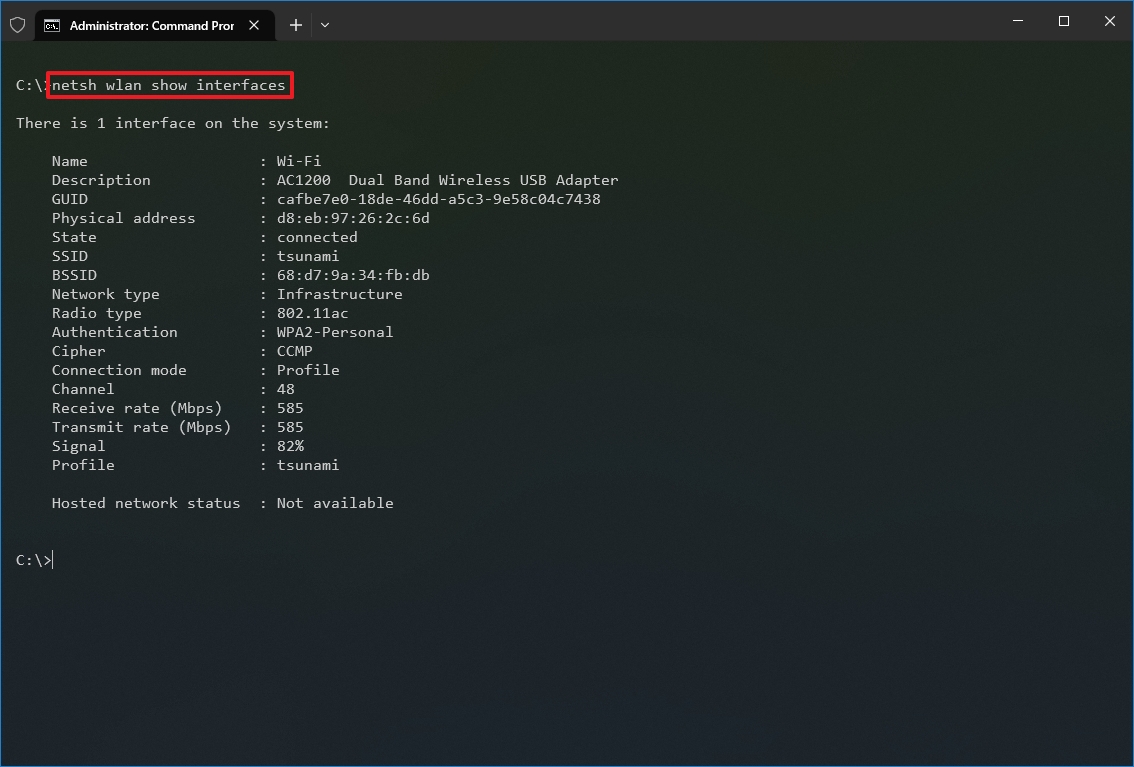
- Type the following command to view wireless settings and press Enter: netsh wlan show interfaces
- (Optional) Type the following command to view the settings for a specific interface and press Enter: netsh wlan show interface name=»WLAN-INTERFACE-NAME»
In the command, replace the WLAN-INTERFACE-NAME for the actual name of the interface. You can use the netsh interface show interface command to find out the exact name. For example, this command shows the profiles saved for the «Wi-Fi» interface: netsh wlan show interface name=»wi-fi»
Once you complete the steps, the netsh tool will display the current wireless settings for one or all the adapters, including name, description, physical address, SSID, radio type (for example, 802.11ac), security authentication method, and the current transmission rates, and signal strength.
How to view Wi-Fi network security key on Windows 10
To find out the wireless security key (also known as the Wi-Fi password), use these steps:
- Open Start.
- Search for Command Prompt, right-click the top result, and select the Run as administrator option.
- Type the following command to view the wireless password and press Enter: netsh wlan show profile name=»WLAN-PROFILE-NAME» key=clear
In the command, replace the WLAN-PROFILE-NAME with the profile name you want to see its security key. For example, this command shows the password for the tsunami network: netsh wlan show profile name=»tsunami» key=clear
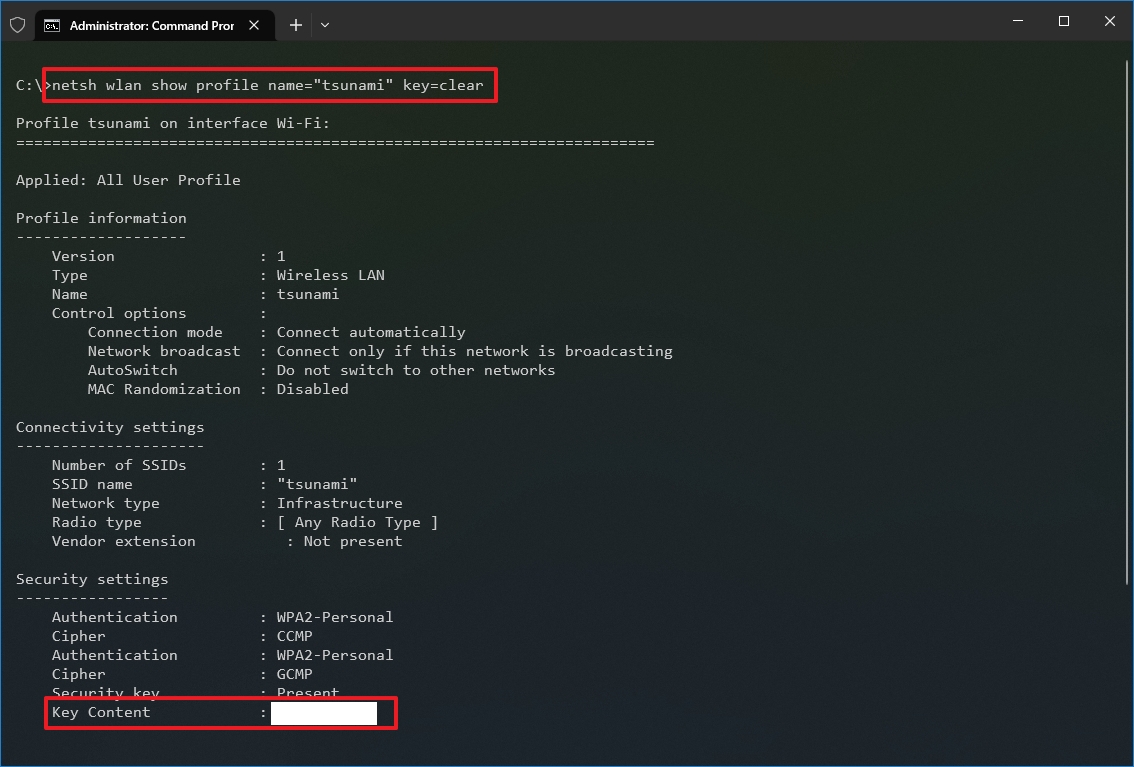
After completing the steps, you will know the network security key for the specified profile.
Although you can view the current network password through the wireless adapter properties in Control Panel, you can use this command to recover any network security key of any profile stored on the device.
How to stop Wi-Fi network automatic connection on Windows 10
Sometimes, you may have a device configured to connect to different wireless networks automatically, but you then realize that it always connects to the access point even when it offers poor connectivity or the network is out of range. In those cases, you can run a command to stop connecting to known networks automatically.
To prevent a device from connecting to a Wi-Fi network automatically, use these steps:
- Open Start.
- Search for Command Prompt, right-click the top result, and select the Run as administrator option.
- Type the following command to disable auto-connect and press Enter: netsh wlan set profileparameter name=»WLAN-PROFILE-NAME» connectionmode=manual
In the command, replace WLAN-PROFILE-NAME with the name of the wireless profile. For example, this command disables automatic connections for the tsunami network: netsh wlan set profileparameter name=»tsunami» connectionmode=manual
- (Optional) Type the following command to change the network priority and press Enter: netsh wlan set profileparameter name=»WLAN-PROFILE-NAME» connectionmode=auto
In the command, replace WLAN-PROFILE-NAME with the wireless profile name you are trying to change its priority. For example, this command makes the tsunami profile a priority: netsh wlan set profileparameter name=»tsunami» connectionmode=auto
- Quick note: Windows 10 will always make a priority for those networks you choose to connect automatically. You can use the above command if you want to move up a network in the precedence list.
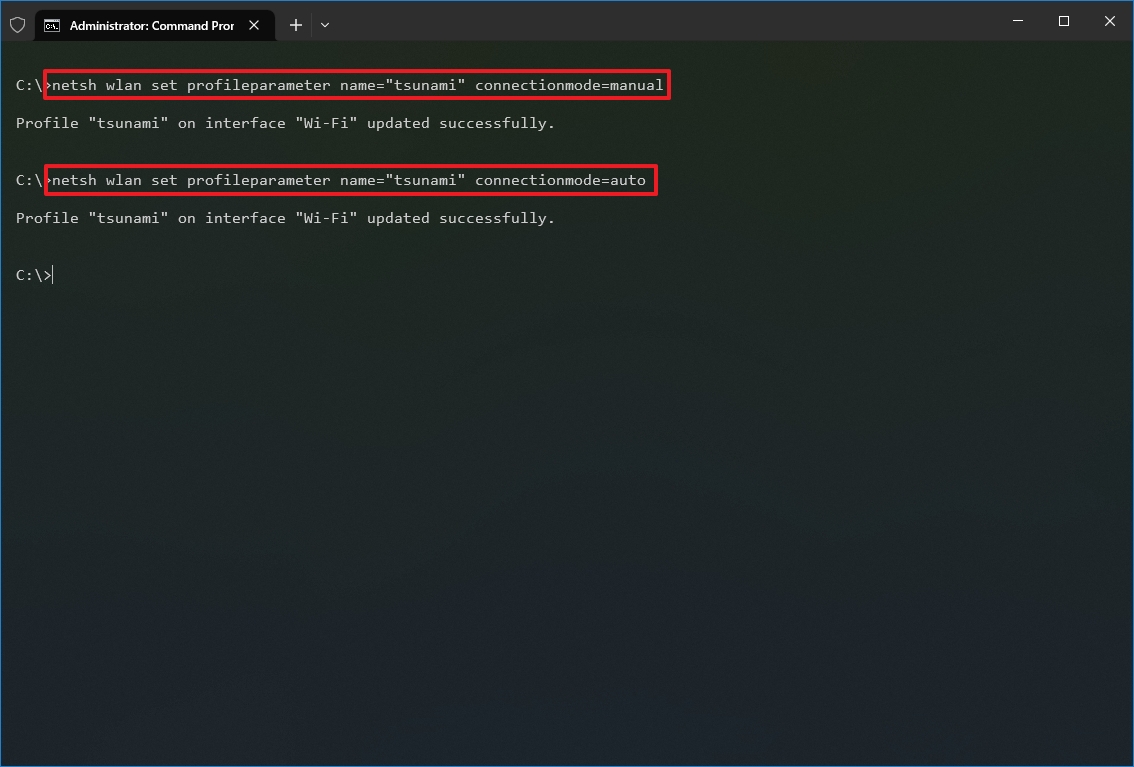
Once you complete the steps, Windows 10 will no longer try to connect to wireless networks automatically.
How to delete Wi-Fi network profile on Windows 10
When you no longer need to connect to a particular wireless network, the access point is no longer available, or you need to reset the network profile settings, you can use the netsh command-line tool to delete any profile stored on your computer.
To delete a Wi-Fi profile on Windows 10, use these steps:
- Open Start.
- Search for Command Prompt, right-click the top result, and select the Run as administrator option.
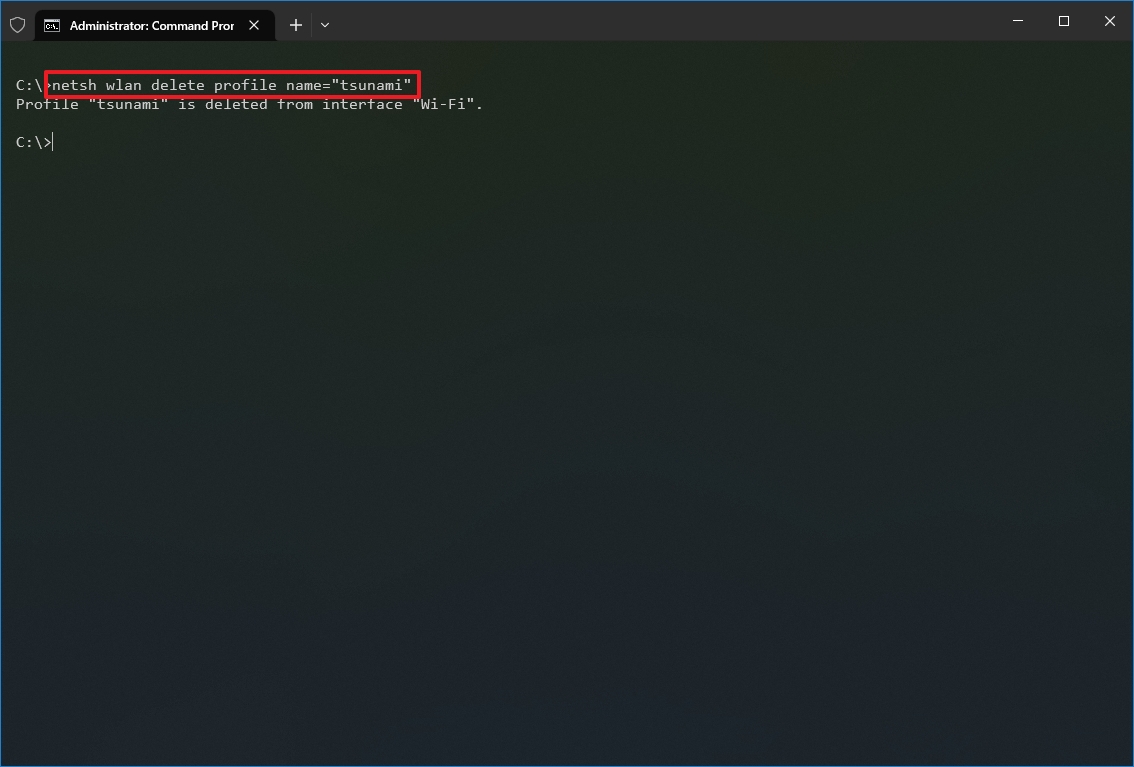
- Type the following command to delete a network profile and press Enter: netsh wlan delete profile name=»WLAN-PROFILE-NAME»
In the command, replace WLAN-PROFILE-NAME with the name of the wireless profile. For example, this command deletes the tsunami profile: netsh wlan delete profile name=»tsunami»
After you complete the steps, the wireless profile will be deleted from the device. If you need to reconnect, you will need to go through the connection process again, and you will have to provide the network password as necessary.
How to export and import Wi-Fi network profiles on Windows 10
There was an option in Control Panel in previous versions of Windows to export and import wireless network profiles. However, the feature was removed on Windows 8.1 and Windows 10 in favor of the new feature to sync these settings using a Microsoft account. But it is still possible to export and import the Wi-Fi settings using the netsh command-line tool.
Export wireless settings
To export the wireless settings, use these steps:
- Open Start.
- Search for Command Prompt, right-click the top result, and select the Run as administrator option.
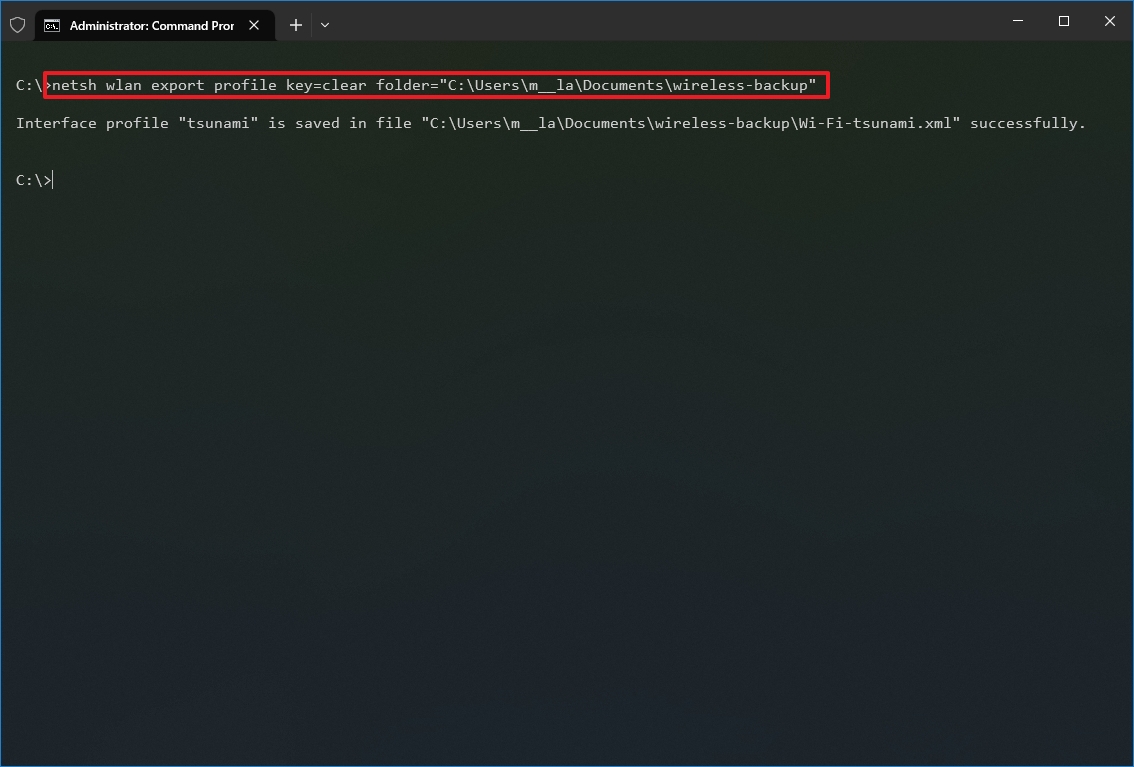
- Type the following command to export the wireless profiles stored on the device and press Enter: netsh wlan export profile key=clear folder=»FOLDER-PATH»
In the command, replace FOLDER-PATH with the path to the export destination folder. For example, this command export the profiles to the «wireless-backup» folder: netsh wlan export profile key=clear folder=»C:\Users\username\Documents\wireless-backup»
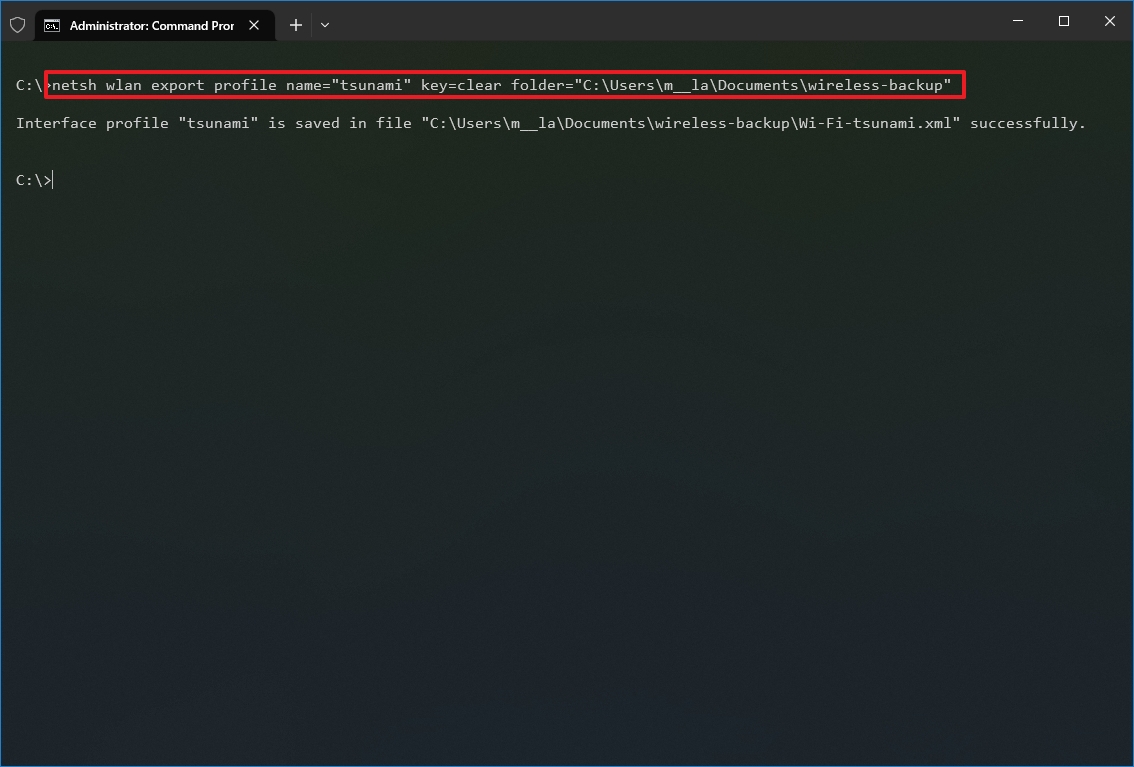
- (Optional) Type the following command to export a specific profile and press Enter: netsh wlan export profile name=»WLAN-PROFILE-NAME» key=clear folder=»FOLDER-PATH»
In the command, replace the WLAN-PROFILE-NAME with the profile name you want to export and the FOLDER-PATH with the folder location to export the information. For example, this command exports only the tsunami profile to the «wireless-backup» folder: netsh wlan export profile name=»tsunami» key=clear folder=»C:\Users\username\Documents\wireless-backup»
Once you complete the steps, all the profiles will be exported to your specified location. The output will also show the name and path for each XML file backup.
The export command will create an XML file for each wireless network profile stored on the device. Also, we are using the «key=clear» option, which will request to store the network security key for each network in the XML file. As a result, keep these records secure, as they can easily be viewed or edited using any text editor.
Import wireless settings
To import the wireless settings on Windows 10 with command lines, use these steps:
- Open Start.
- Search for Command Prompt, right-click the top result, and select the Run as administrator option.
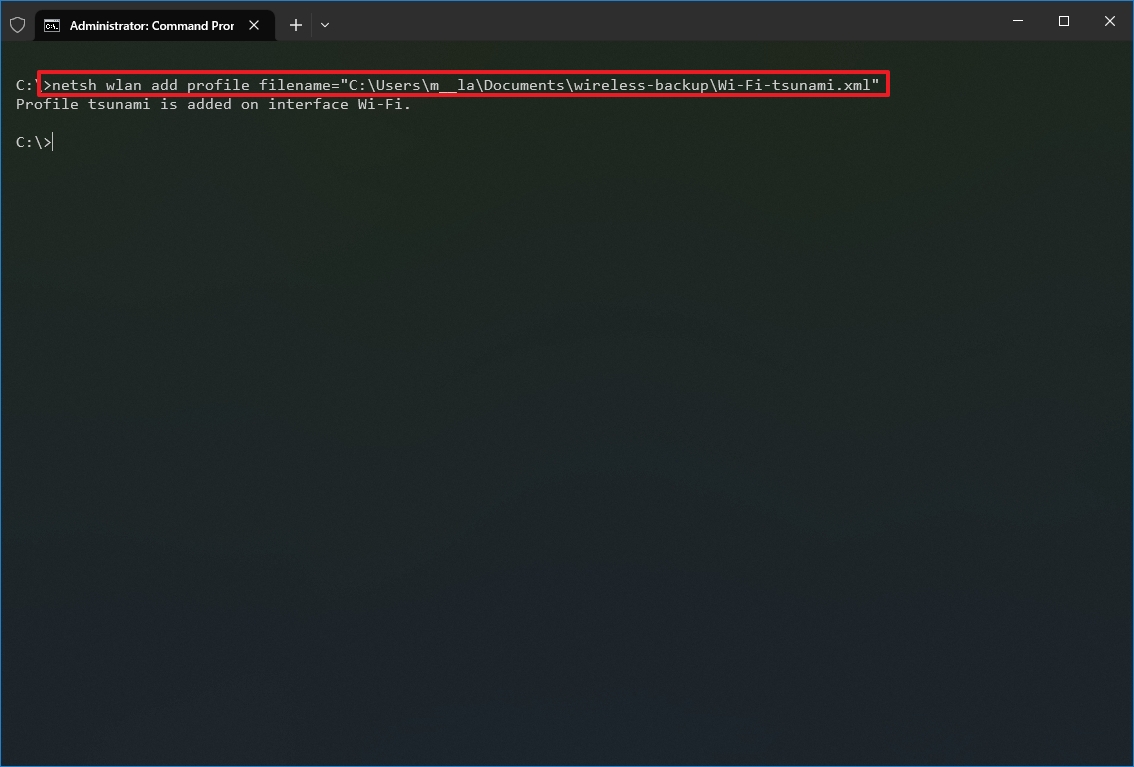
- Type the following command to import the wireless profiles and press Enter: netsh wlan add profile filename=»FOLDER-PATH\WLAN-EXPORTED-FILE»
In the command, replace FOLDER-PATH\WLAN-EXPORTED-FILE with the path and file name for the exported file. For example, this command imports a specific profile stored in the «wireless-backup» folder: netsh wlan add profile filename=»C:\Users\username\Documents\wireless-backup\Wi-Fi-tsunami.xml»
- Quick tip: If you have multiple profiles, then repeat the steps and make sure to update the file path and filename of the exported profile.
- (Optional) Type the following command to import a profile to a particular wireless interface and current user and press Enter: netsh wlan add profile filename=»FOLDER-PATH\WLAN-EXPORTED-FILE» Interface=»WLAN-INTERFACE-NAME» user=current
In the command, change FOLDER-PATH\WLAN-EXPORTED-FILE for the exported file’s path and name containing the profile information and WLAN-INTERFACE-NAME with the name of the interface you want to import the settings. For example, this command imports the settings to the Wi-Fi interface: netsh wlan add profile filename=»C:\Users\username\Documents\wireless-backup\Wi-Fi-tsunami.xml» Interface=»Wi-Fi» user=current
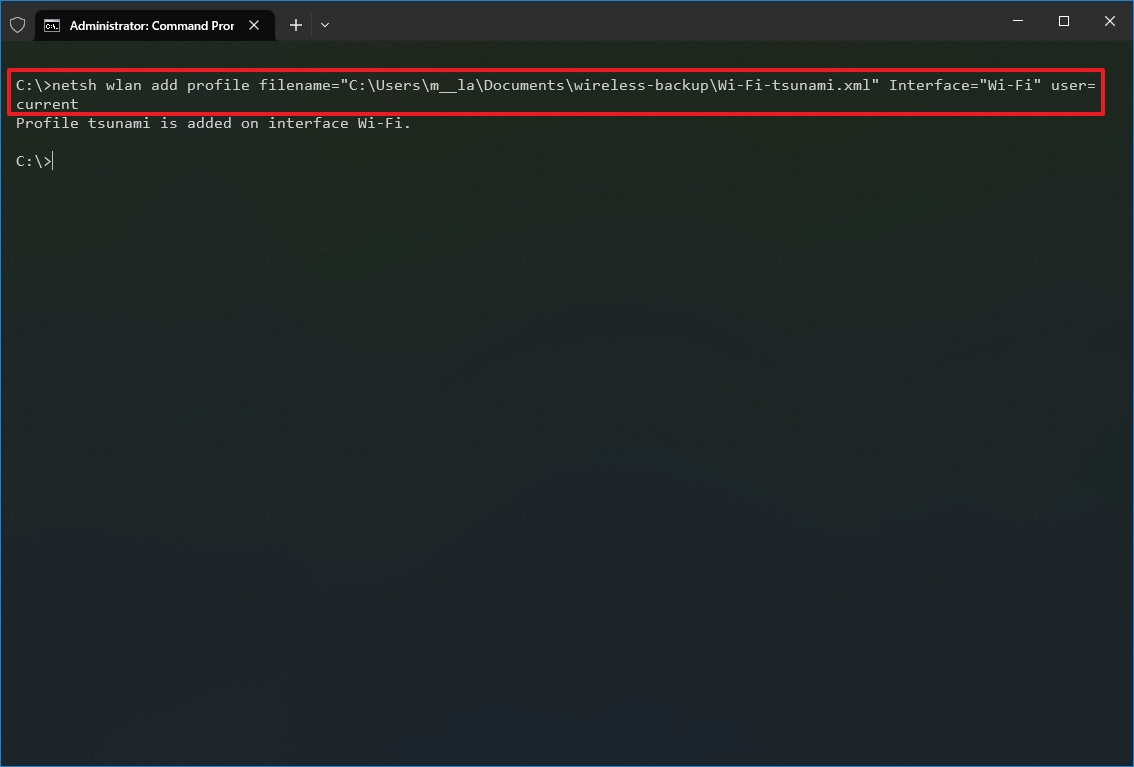
After you complete the steps, the profile will be imported, allowing the device to connect to the wireless network without additional configuration.
How to create Wi-Fi network adapter report on Windows 10
If you need to troubleshoot the wireless connectivity to an access point, netsh also includes a command to create a detailed report with many important details.
To create a wireless report, use these steps:
- Open Start.
- Search for Command Prompt, right-click the top result, and select the Run as administrator option.
- Type the following command to create a wireless adapter report and press Enter: netsh wlan show wlanreport
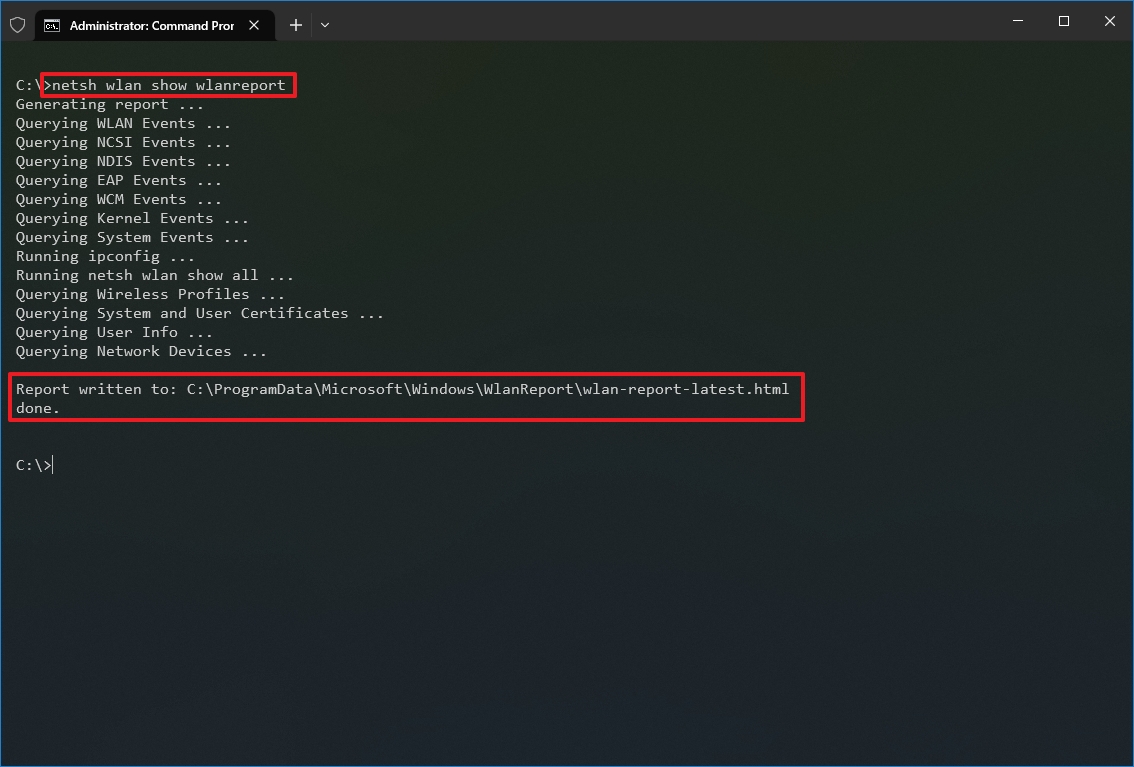
- Type the following command to open the report and press Enter: C:\ProgramData\Microsoft\Windows\WlanReport\wlan-report-latest.html
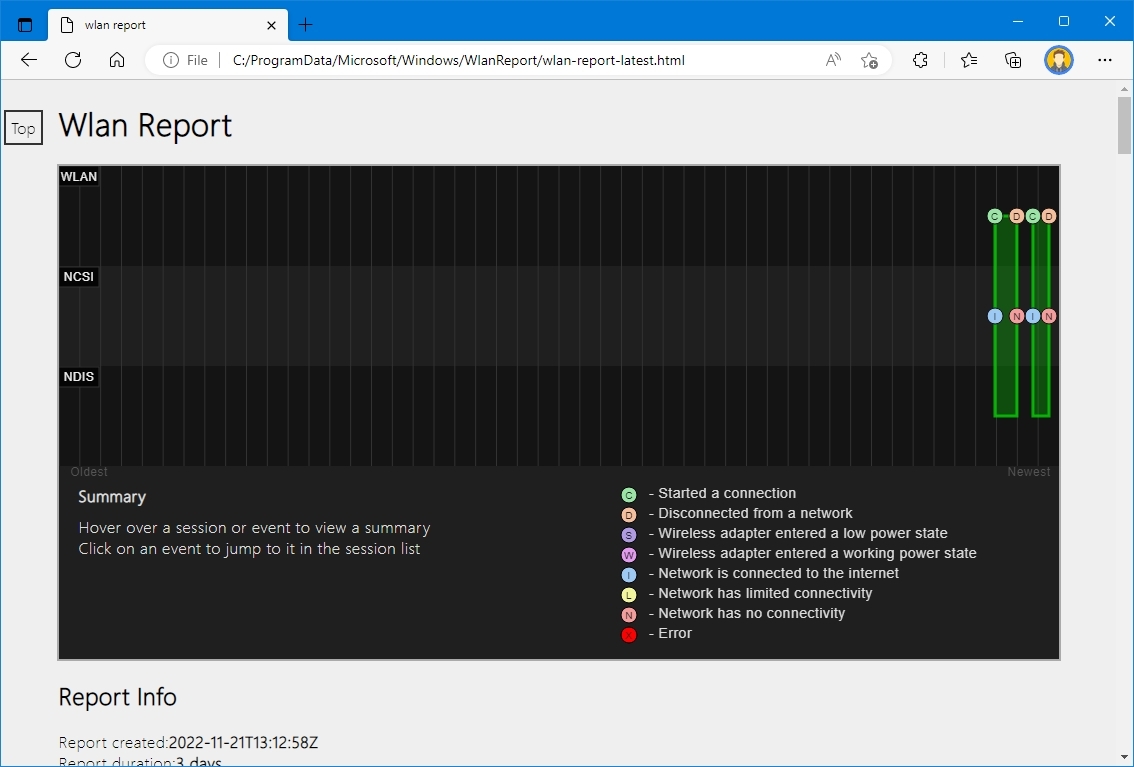
Once you complete the steps, the report will open with the default web browser.
The wlan reports contain a graph of the connectivity status, including information such as when the connection started, when it got disconnected, errors, and more. The report also summarizes the network adapters’ information configured on your system, successful and failed sessions, disconnect reasons, and more. It is a detailed report that can help you ping point many Wi-Fi connectivity issues.
While you can manage many wireless settings through the Settings app, the netsh command-line tool gives you more advanced tools to view, configure, and troubleshoot Wi-Fi and Ethernet connections.
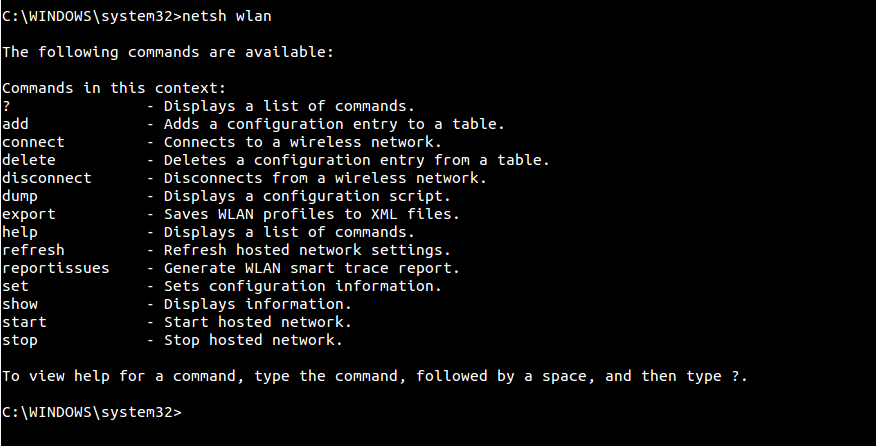
We only focus on the most common commands, but you can always use the «netsh wlan» command to view all the available options.
More resources
For more helpful articles, coverage, and answers to common questions about Windows 10, visit the following resources:
- Windows 11 on Windows Central — All you need to know
- Windows 10 on Windows Central — All you need to know
Mauro Huculak has been a Windows How-To Expert contributor for WindowsCentral.com for nearly a decade and has over 15 years of experience writing comprehensive guides. He also has an IT background and has achieved different professional certifications from Microsoft, Cisco, VMware, and CompTIA. He has been recognized as a Microsoft MVP for many years.

Максим aka WisH
Высшее образование по специальности «Информационные системы». Опыт работы системным администратором — 5 лет.
Задать вопрос
Через беспроводные сети работает много разного оборудования. К вайфаю подключаются компьютеры, телефоны, телевизоры и даже некоторая бытовая техника. Проблемы возникают в том случае, когда перестает работать роутер и нет возможности его быстро починить. В качестве временного решения создать беспроводную сеть на основе компьютера, всего одна команда «netsh wlan start hostednetwork» позволит запустить раздачу вайфай, а дальше её потребуется настроить.
Содержание
- Немного о наборе команд netsh
- Правильный запуск командной строки
- Проверка беспроводного адаптера
- Настройка точки доступа средствами Windows
- Создание
- Запуск сети и остановка
- Раздача интернета
- Автоматизация ввода
- Другие полезные способы применения команд netsh
- Решение проблем
Немного о наборе команд netsh
Утилита сетевой оболочки NETSH (NETwork SHell) появилась еще в Windows XP и с того времени этот набор команд переходит из системы в систему с некоторыми изменениями синтаксиса. Сама утилита является одним из лучших инструментов управления сетью и сетевыми адаптерами, которые только доступны в Windows 10 или Windows 7.
При использовании утилиты не придется использовать приложения из неизвестного источника. Это повышает вероятность правильной работы точки доступа и убирает шанс на получение вируса.
С помощью утилиты NETSH можно раздать Wi-Fi, настроить интернет, управлять сетевым адаптером, задавая для него несколько пакетов сетевых настроек. Доступно создание своей точки доступа и её настройка, управление фаерволлом и многое другое. Только обычный пользователь редко сталкивается с командной строкой, а еще реже использует встроенные утилиты из неё. Сегодня поговорим о настройке беспроводной сети и о самой утилите NETSH.
Правильный запуск командной строки
Перед работой с утилитой следует запустить командную строку. Некоторые путают стандартную консоль с PowerShell, который тоже активно начал использоваться, начиная с семерки. В десятке же вообще большинство работы ведется через него. В нем тоже можно запускать подобные команды, но мы остановимся на работе с консолью. Для того, чтобы устранить все недопонимания, расскажем как правильно открыть командную строку для настройки сети.
Командную строку запускайте от имени администратора, чтобы избежать проблем с применением команд.

Для разных версий виндовс алгоритм действий различается, но есть способ, подходящий для всех систем, начиная с семерки. Нажмите на меню Пуск, щелкните по нижней строке, которая служит для поиска информации. Напишите в ней «cmd», подождите, пока компьютер найдет требуемую программу и покажет её в списке. Теперь нажмите на неё правой кнопкой мыши и выберите из выпавшего меню «Запустить от имени администратора».
Запуск консоли с соответствующими правами позволит избежать проблем в будущем. Иногда для применения команд требуется изменение каких-то системных настроек или файлов, без разрешения администратора это сделать не получится. Будет обидно, если на середине настройки консоль начнет писать ошибки и отказы из-за недостатка прав.
Проверка беспроводного адаптера
Теперь перейдем к проверке возможностей вашего компьютера. Запустите консоль так, как рассказывали выше, а потом начинайте печатать команды по одной. Сначала вводите «ipconfig /all». В этом же окне отобразится информация о всех интерфейсах подключения и о том, активны они или нет. Здесь будет и кабельное подключение, и другие, если они есть.

Вторая команда звучит так: netsh wlan show interface. Эта команда покажет только беспроводной интерфейс. В этом окне узнаете его название, подключенную беспроводную сеть, скорость и некоторую другую информацию.

Теперь пишем третью команду: netsh wlan show driver. С помощью этой команды получится узнать установленный драйвер у беспроводного модуля, а также поддерживаемые им стандарты. Лучше проверьте на сайте разработчика, нет ли новых драйверов. Это важно при создании точки доступа из компьютера.

Посмотрите на раздел «Поддержка размещенной сети», если там стоит «Нет», то адаптер не поддерживает создание точки доступа. Попробуйте обновить драйвер, если не получилось, то остается использовать другой адаптер.
Настройка точки доступа средствами Windows
Теперь перейдем к самой настройке будущей беспроводной сети. Создать точку доступа из компьютера или ноутбука можно несколькими способами. Есть сторонние программы, которые почти всю работу сделают за вас, потребуется только ввести имя и пароль. С ними просто работать, но они отнимают много ресурсов от компьютера. Это заметно на слабых системах, из которых обычно и создают локальные точки доступа.
Второй способ заключается в использовании стандартных средств системы. Как раз мы разобрались, как можно запустить консоль, чтобы она правильно работала. Этот способ потребует чуть больше времени на настройку, а также некоторое время на то, чтобы разобраться с тем, как все это работает. Зато он менее затратен по системным ресурсам.
Создание
Не забудьте открыть консоль, перед тем как начинать настройку. Первым делом набирайте: «netsh wlan set hostednetwork mode=allow ssid=”Имя сети” key=”Пароль” keyUsage=persisten». Только укажите свое название сети и пароль. Выставьте те, которые вам удобнее запоминать или вводить. Если поставите mode=disallow, то это отключит поддержку размещенной сети.

Теперь вводим «netsh wlan start hostednetwork», она запустит сеть в работу. После этого можно будет перейти к настройке самой сети. Полностью настройку выполнить через консоль не получится, некоторые вещи потребуется сделать из панели управления.
Запуск сети и остановка
Запуск и остановка сети выполняются через консоль. Хотя, иногда можно использовать стандартные средства, доступные в панели управления для включения и отключения адаптера. Команда для включения уже известна – это «netsh wlan start hostednetwork».
Для отключения стоит поменять одно слово, получится «netsh wlan stop hostednetwork». Введите команду, дождитесь окончания её применения, в самой консоли текстом отобразится результат выполнения операции. В случае проблем сможете узнать из-за чего возникла ошибка.
Еще пара слов про команды, которые могут потребоваться для включения и отключения точки доступа. Ввод команды «netsh wlan set hostednetwork allow» позволит включить поддержку размещенной сети, а «netsh wlan set hostednetwork disallow» послужит для отключения. Такие команды пригодятся, если потребуется отключить всех остальных абонентов от раздаваемой сети, чтобы что-то сделать на самом компьютере.
Раздача интернета
Сейчас у нас имеется созданная и включенная сеть, но сама она к интернету не подключена. Дальнейшие действия будут совершаться с помощью системных средств, но уже не в командной строке. Сначала потребуется перейти в настройки сети. Перейдите в Панель управления, далее в «Сеть и интернет», выберите “Центр управления сетями и общим доступом”, выберите «Изменение параметров адаптера». Откроется окно со всеми доступными подключениями.

Найдите то подключение, которое используется для доступа в интернет. Обычно это кабельное соединение. Щелкните по нему правой кнопкой мыши, выберите из выпавшего меню «Свойства». Открывается новое окно, в верхней части которого есть две вкладки, выберите вкладку с названием «Доступ». Поставьте галку в верхнем пункте «Разрешить другим пользователям использовать подключение к интернету данного компьютера».
Внизу откроется еще одна строка, в которой вам нужно указать ваш созданный адаптер. Также еще ниже поставьте галку, в которой другим подключениям разрешается управлять этим подключением. Далее нажмите на «Ок» и подождите завершения применения настроек. Теперь перезагрузите компьютер или перезапустите созданную виртуальную сеть.
Автоматизация ввода
Сеть придется запускать после каждого выключения компьютера или его перезагрузки. В некоторых случаях это потребуется для нормальной работы устройств, а в других случаях причиной будет зависание самой раздачи. Все действия совершаются через командную строку, что не очень удобно. Если вы поняли, что придется часть использовать какую-то команду или же потребуется часто регулировать настройки, то создайте файл для автоматизации процесса.
Если запускать точки доступа нужно всегда после включения компьютера, то добавьте созданный файл в автозагрузку. Нажмите клавишу с логотипом Windows + R, напечатайте shell:startup, кликните по «Ок». Откроется папка, в неё переместите созданный файл, отвечающий за запуск точки доступа.

Откройте блокнот. Наберите в блокноте те команды, какие хотите применить. Например, для включения сети достаточно команды «netsh wlan start hostednetwork». Введите её, нажмите на «Файл», потом на «Сохранить как». Откроется окно с сохранением. Введите имя файла, а после имени не забудьте приписать расширение .bat.
После этого переместите файл в любое удобное место. Кликните по нему два раза, чтобы запустить команду. После открытия файла появится командная строка, в которой будет прописана команда. В ней же покажут результат выполнения, после чего она автоматически закроется. Для всех созданных файлов проделайте следующую процедуру: кликните по ним правой кнопкой, выберите «Свойства», откройте вкладу «Совместимость» и поставьте галку о запуске от имени администратора.
Другие полезные способы применения команд netsh
Теперь поговорим еще о нескольких полезных возможностях утилиты netsh:
- netsh interface tcp show global. Показывает список параметров TCP, в котором узнаете включенные и отключенные функции. Например, здесь можно посмотреть включена или отключена функция автотюнинга. Она отвечает за повышение скорости обмена информацией, но иногда из-за сбоев начинает наоборот замедлять работу.

- netsh int tcp set global autotuninglevel=disabled. Отключается функцию автотюнинга, используйте для проверки корректности её работы. Для включения опции поменяйте последнее слово на normal.
- Netsh wlan disconnect – отключает компьютер от текущего беспроводного подключения.
- netsh winhttp set proxy proxy-server=”адрес прокси:порт” – устанавливать прокси в указанное значение для подключения.

Далее перечислим все возможные команды для этой утилиты.
| Команда | Отображение списка команд | Пример ввода | Что делает команда |
| add | Добавление нового пункта | netsh add sslcert [ ipport= ] | Добавляет SSL-сертификат |
| advfirewall | Уровень настройки и изменения фаерволла в новом синтаксисе | netsh advfirewall firewall add rule | Добавление нового правила |
| branchcache | Настройка branchcache, отвечающего за пропускную способность | netsh exportkey branchcache [ outputfile = ] FilePath [ парольная фраза = ] | Экспорт файла ключа |
| bridge | Уровень настройки моста | netsh bridge show adapter | Показывает адаптеры, задействованный в организации моста |
| delete | Используется для удаления | netsh delete sslcert [ ipport= ] | Удаляет ssl-сертификат |
| dhcpclient | Используется для настройки DHCP | netsh DHCP client Enable | Включает DHCP |
| dnsclient | Позволяет задать параметры DNS | netsh dnsclient set dnsservers [name=] [source=]dhcp|static | Устанавливает указанные dns сервера |
| dump | Создает сценарий в конфигурации | netsh dump | |
| exec | Позволяет запустить на выполнение сценарий | netsh exec | Укажите путь до файла сценария утилита выполнит его |
| firewall | Вторая команда для настройки фаерволла, в разных версиях утилиты используются разные команды уровня | netsh firewall firewall add rule | Команда для добавления правилф фаерволла с устаревшим синтаксисом. Использовалась до Windows Server 2012 |
| help | Показывает полный список доступных команд | netsh help | |
| http | Для настройки http | netsh http add urlacl url=http://server1:1234/ | Добавление адреса в файл http.sys |
| interface | Для настройки одного из интерфейсов, людям привычнее называть это «портом» или «адаптером» | netsh interface ip set address local static | Устанавливает указанный статический адрес для порта |
| ipsec | Используется для настройки ipsec | netsh ipsec show all | Показывает все установленные политики |
| lan | Служит для настройки проводной сети | netsh lan add profile filename=путь до файла профиля interface=Имя интерфейса | Добавляет новый интерфейс для LAN |
| mbn | Настройка на уровне ‘netsh mbn’ | netsh mbn add dmprofile [interface=] [name=] | Добавление нового подключения через широкополосный мобильный интернет |
| namespace | Настройка пространства имен и связанных объектов | Netsh namespace SampleNamespace; class{} | Позволяет создавать и настраивать классы |
| nap | Настройка клиента защиты доступа к сети | netsh nap reset | Сбрасывает текущую конфигурацию |
| p2p | Настройка p2p(peer-to-peer) | netsh p2p group | Группировка пиров, для их последующей настройки |
| ras | Настройка ras(маршрутизация и удаленный доступ) | netsh ras show client | Показывает список клиентов, удаленно подключенных к этому компьютеру |
| rpc | Настройка rpc(удаленный вызов процедур) | netsh rpc add filter | Добавляет новый фильтр для вызова процедур |
| set | Установка параметров и их обновление | netsh interface ipv4 set address name=”LAN” static 10.253.0.35 | Используется в других командах для установки каких-то параметров |
| show | Отображение данных о подключении | В разных командах для отображения списка каких-то значений | |
| trace | Служит для анализа сетевого трафика | netsh trace start | Начинает анализ сетевого траффика |
| wfp | Диагностика подключения | netsh wfp show netevents | Показывает недавние события в сети |
| winhttp | Настройка winhttp, трафика, идущего через это протокол | netsh winhttp set proxy proxy-server | Установка прокси-сервера |
| winsock | Настройка способов взаимодействия приложений, работающих через один из интерфейсов | netsh winsock reset | Сбрасывает все текущие протоколы взаимодействия |
| wlan | Настройка беспроводного подключения | netsh wlan start hostednetwork | Запуск сети вай фай |
Решение проблем
При настройке сети могут возникать проблемы. Обычно они бывают следующие:
- Проблемы с созданием сети. Проверьте версию драйвера вашего адаптера, посмотрите, что он вообще может работать на передачу. Проверьте, что при настройке запустили консоль от имени админа.
- Сеть получилось создать, но команда запуска выдает ошибку. Перезагрузите компьютер. Проверьте, что консоль запускаете так, как рассказывали.
- Не получается подключится к созданному и запущенному вайфай. Проверьте правильность введенного пароля. Проверьте, что установили то, что хотели при настройке точки доступа. Можно попробовать вручную прописать клиента на сервере и наоборот, но в этой ситуации это не лучший выход.
- Есть подключение к вайфай, а интернет не работает. Проверьте, что вы сделали доступным для всех то подключение, через которое идет интернет к ноутбуку или компьютеру. Проверьте, что вписали имя DNS-сервера в своем подключении.
Попробуйте использовать следующие команды:
- netsh int ip reset c:\reset.log – сбросит все настройки TCP/IP будьте готовы ввести их заново.
- netsh advfirewall reset – сбросит настройки фаерволла до стандартных. Поможет, если что-то накрутили в самом фаерволле.
- ipconfig /flushdns;
- ipconfig /registerdns;
- ipconfig /release;
- ipconfig /renew;
- netsh winsock reset.
Последний набор команд почистит кэш и сбросит все возможные настройки. Если и это не поможет, то останется только задуматься о том, чтобы использовать какую-то стороннюю программу. Или о том, что у вас неисправен сам модуль беспроводной связи из-за чего к нему никто не может подключиться.
На этом разбор способа создания точки доступа из компьютера закончен. Помните, что беспроводные модули не предназначены для создания таких точек, из-за чего их радиус покрытия будет невелик, а скорость может оказаться меньше заявленной. Тем не менее, создание такой точки решит проблему отсутствия маршрутизатора и позволит протянуть какое-то время. Использовать для создания точек сторонние программы или консольные команды, решать вам. Помните о преимуществах и недостатках обоих методов.
Wireless networks have now mostly replaced wired LAN and you will find an abundance of wireless networks everywhere. Windows 11/10 offers various ways to manage your wireless networks using the taskbar, control panel, settings app, and Command Prompt.
Of all the options mentioned, the Command Prompt helps to efficiently manage and control your wireless networks. The command-line utility helps perform advanced functions, troubleshoot, and solve major wireless network issues in Windows 11/10.
Command-line tools to manage Wireless Networks
In this article, we list some of the useful commands to manage wireless networks using Command Prompt in Windows 11/10:
- PING
- TRACERT
- PATHPING
- IPCONFIG
- GETMAC
- NSLOOKUP
- NETSH
- ROUTE
- NETSTAT
- ARP.
Let us take a look at their functions in brief.
1] PING
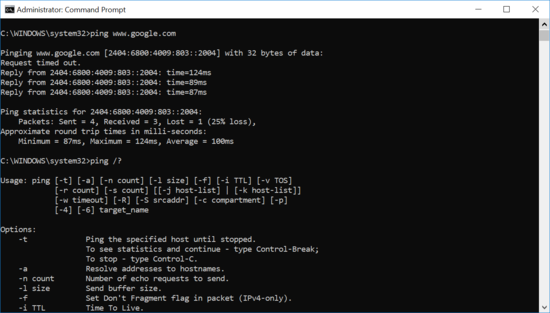
Ping is a command-line utility used to test network connectivity. The ping command sends a data packet to a specific domain name or a destination IP address over the network and checks if it receives a response successfully from the target address. Additionally, it estimates the approximate round trip time it takes for the data packets to travel destination address and return back. Type ping www.google.com (or type internet server you want to test )
You can also use the ping command with advanced switches for troubleshooting. To know the advanced options execute the following in CMD:
command ping /?
For example, type the following (or type the internet server and packet size you want to send ) to increase the number of packets:
ping www.google.com - n 10
2] TRACERT
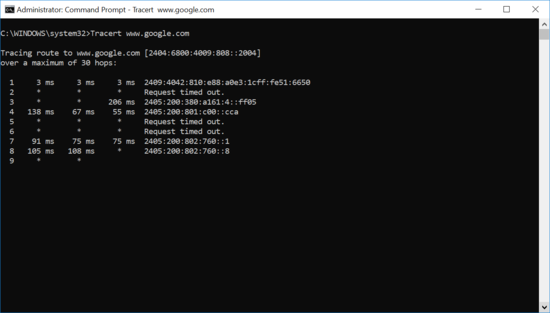
Tracert is a command-line utility used to trace the route of the data packets sent over the network. Just like ping, Tracert is used to test network connectivity issues. The command traces the route of the data packets to reach the destination and tells you how many nodes it encountered to reach the destination server. If you are facing network connectivity issues, this command tells you on which hop the problem is occurring.
Type the following (or type internet server you want to test)-
tracert www.google .com
The output shows the detailed list of each hop along with the IP address of the node and latency between your Windows and that particular hop.
3] PATHPING
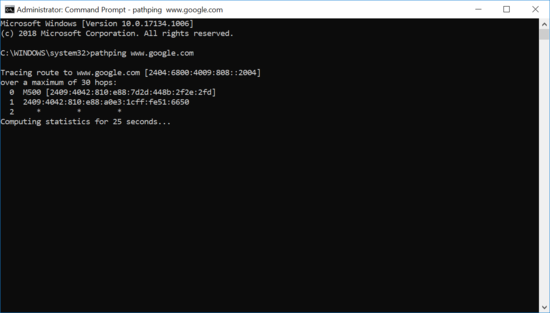
Pathping is a command-line utility used to troubleshoot network connectivity issues. This command is similar to Tracert in function but more detailed information of the data packet route.
The command sends data packets to a destination address and analyzes the route in detail. It computes packet loss on a per-hop basis and helps find out the problematic hop.
Execute the following (or type domain server you want to test):
pathping www.google.com
4] IPCONFIG
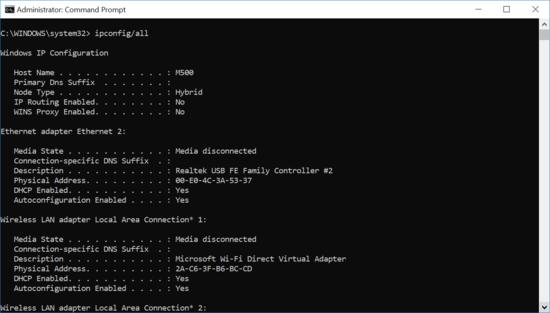
Ipconfig is a popular command-line utility used to test network connectivity issues on a TCP/IP network. It gives detailed information about the IPv4 address, WLAN Adapter, and Ethernet Adapter. It is often used with switches to execute certain tasks.
Execute the following to view connection configurations-
ipconfig/all
Execute the following to know more about the advanced switches-
ipconfig /?
Read: Troubleshoot Windows Server Network connectivity issues.
5] GETMAC
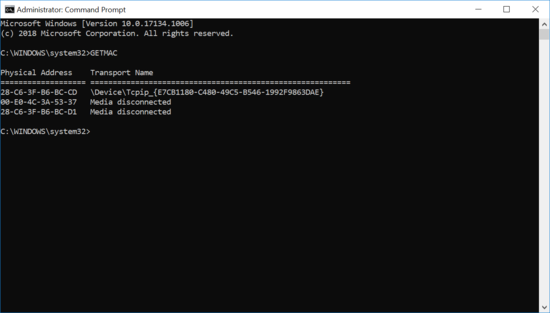
Getmac is a command-line utility used to retrieve the mac address of your computer as well as remote computers. In Windows, MAC address is nothing but a physical address used to identify devices connected to your computer network. You can use a mac address to limit the hardware devices connected to the network.
Type the command to get mac addresses of each hardware connected to the network:
getmac
6] NSLOOKUP

Nslookup is a command-line utility for finding out the Domain Name System to obtain information like domain name, IP address or DNS records. This command is basically used to find the IP address of a certain host.
For example, type this (or type the hostname you want to query)-
nslookup www.google.com
7] NETSH
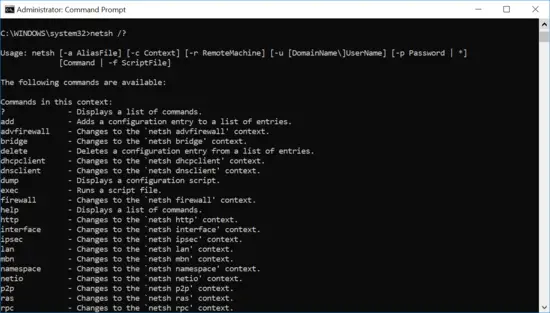
Netsh is a command utility used to display the network configuration of every network adapter in your system. Using this command with switches you can modify the network settings on a local as well as a remote computer.
To know all the commands type:
netsh /?
Read: Advanced Command Prompt or CMD Tricks.
8] ROUTE
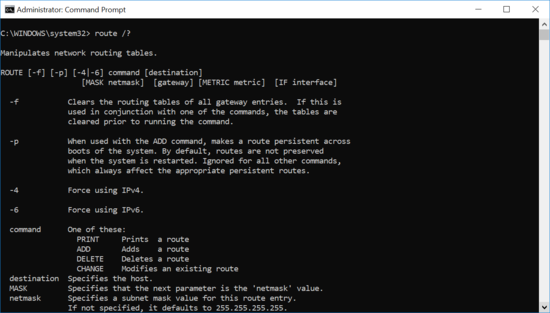
The Route command is used to view, add, or delete the row contents of the routing table. It is also used with other switches to view, add, delete, or modify the existing route.
Type this command in the command prompt to know more:
route /?
9] NETSTAT

Netstat is a networking utility command used to display the network and protocol statistics. It lists the information about endpoints of TCP/UDP, routing table and network interface. It displays all the active TCP/UDP connections on your computer and helps you know on which port address are open for tasks.
Type this in the command prompt to view all the port addresses on which TCP/UDP connections are running-
netstat /?
Read: Basic PowerShell commands that every Windows 10 user should know.
10] ARP
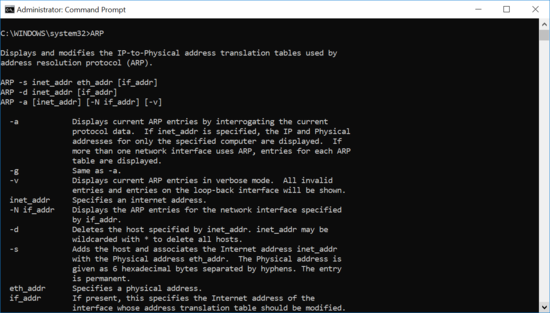
ARP is a command-line utility used to display a resolved Mac address. It displays and modifies the IP address to physical address translation tables used by address resolution protocol. Every time your computer uses ARP to find out the Mac address for an IP address and stores the mapping in arp cache for future lookups.
This command is useful to find if there is any duplicate IP assignment. To display the cache entry type:
arp -a
That’s all.
How to connect, delete and manage WiFi networks using command prompt (cmd) in your Windows PC/laptop using netsh wlan commands
Nowadays internet connectivity is everything. For the Internet, we have Wi-Fi connections that we manage and use through the network settings on Windows 7/8.1/10 computers.
You can also connect, manage, and delete your WiFi networks using the command prompt.
In fact, the command prompt offers many more features than the standard network connection settings in Windows 10.
Also Read- A-Z Windows CMD Commands List
To do this we only require a CMD(Command Prompt) with Administrator privileges and will have to use netsh wlan commands.
Table Of Contents
- How to connect to wifi using cmd with netsh wlan commands-
- 1# View various wireless network profiles saved on your PC
- 2# View WiFi adapter driver information
- 3# View wireless adapter settings
- 4# Recover your WiFi password from any of the WiFi connection profiles saved on your PC
- 5# Connecting to a WiFi network using command prompt
- 6# Stop your PC connecting automatically to a wireless network out of range
- 7# Delete wireless network profile stored on your PC
- 8# Export and import wireless network profiles
- 9# Generate a complete report of the wireless adapters on your PC/laptop
How to connect to wifi using cmd with netsh wlan commands-
Before we dive into the guide. You’ll need to open the Command Prompt with administrator rights to perform most of the commands. To do this, use the Windows key + X keyboard shortcut, and select Command Prompt (Admin).
Or search cmd and right click run as administrator
1# View various wireless network profiles saved on your PC
Command > Netsh WLAN show profiles
Every time you connect to a wireless access point, the operating system creates a “wireless network profile”, and it’s stored on your computer, you can view all these profiles using the following command line on the Command Prompt Netsh WLAN show profiles.
Alternatively, you can use the “interface” parameter to show the list of profiles for a particular wireless adapter:
Netsh WLAN show profiles interface=”your WiFi interface name”
2# View WiFi adapter driver information
Command > Netsh WLAN show drivers
When you need to get driver information about your computer’s wireless adapter, you can use the the above command. The result will show the exact drivers being used, the WiFi radios on your PC/laptop alongwith driver version number.
You can further use this command to check your WiFi capabilities. Type in the following command
C:\Netsh WLAN show wirelesscapabilities
The results will show you exactly what your WiFi connection is capable of including WiFi Direct service capabilities.
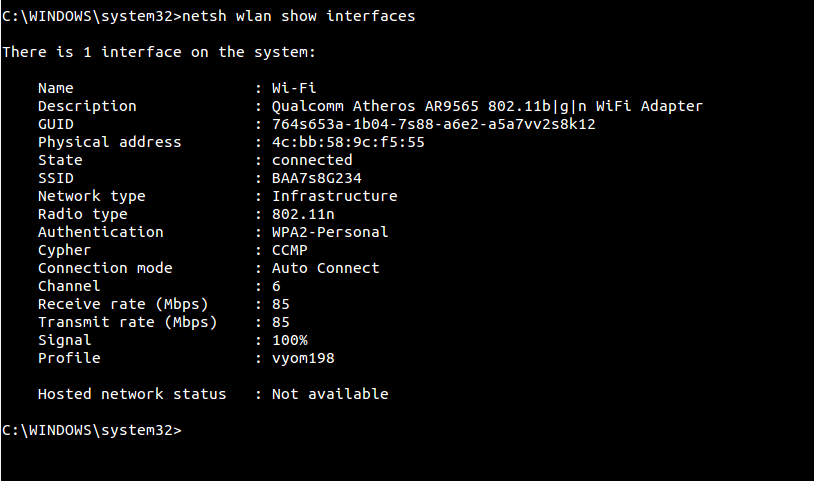
3# View wireless adapter settings
Command > Netsh WLAN show interfaces
You can see the details of your WiFi interfaces using above command. The results will show you description of the interface, SSID, BSSID, Cipher, authentication type, channel, average receive and transmit rate and radio type.
If you have multiple WiFi connections saved on your PC, the “Show interfaces” command will display the information for all the wireless adapters on your computer. If you only need to see the information for one adapter, you can use the following command:
Netsh WLAN show interface name=”your wifi connection name”
4# Recover your WiFi password from any of the WiFi connection profiles saved on your PC
Command > Netsh WLAN show profile name=”your WiFi connection name” key=clear
If you lost and cannot remember your network security key to connect another device to a particular Wi-Fi access point, you can use the above command to view your WiFi password. You can also use this command to see the data limits if you have set them.
5# Connecting to a WiFi network using command prompt
Command > netsh wlan set hostednetwork mode=allow ssid=”your WiFi connection name” key=”your WiFi connection password”
You can use the above command to sign into your WiFi network. The above command is particularly useful if your WiFi settings in Windows 10 is not visible/cannot be connected due to some reasons. The additional commands are C:\netsh wlan start hostednet and C:\netsh wlan stop hostednetwork These two commands will start and stop your WiFi hotspot connection.
6# Stop your PC connecting automatically to a wireless network out of range
Command > Netsh WLAN set profileparameter name=”your WiFi connection name” connectionmode=manual
Normally, you would have configured your Windows 10 PC to connect to different WiFi networks automatically. While this is the best way to connect, sometimes notice that your laptop connects automatically to a WiFi connection that has zero or poor connectivity instead of an available full network WiFi connection. In such a case you can use the above command to prevent your computer from connecting to different networks automatically. If you want to move again to the automatic mode use the following command C:\Netsh WLAN set profileparameter name=” your WiFi connection name” connectionmode=auto
7# Delete wireless network profile stored on your PC
Command > Netsh WLAN delete profile name=”the WiFi connection you want to delete”
When you no longer need to connect to a particular wireless network, the access point is no longer available, or you need to reset the network profile settings, you can also use Netsh WLAN to delete any profile stored on your computer using the above command. If you can’t remember the name of the network profile, you can use the C:\Netsh WLAN show profiles command to list all the available profiles and select the one you want to delete.
8# Export and import wireless network profiles
Command > Netsh WLAN export profile key=clear folder=”the folder you want to save this report”
Sometimes you need to export and import wireless profiles. The above command exports all your wireless network profiles available on your PC. If you want to export a specific WiFi connection profile to a specific location, use this command > C:\Netsh WLAN export profile name=”your WiFi connection name” key=clear folder=”the folder you want to save this report”
9# Generate a complete report of the wireless adapters on your PC/laptop
Command > Netsh WLAN show WLANreport
Trouble shooting WiFi connection problems is very difficult as Internet has lots of conflicting tutorials and troubleshooting guide. Also you should know the exact problem you are facing while connecting to WiFi.
Using the above command will generate a full detailed WiFi networks report to the following location > C:\ProgramData\Microsoft\Windows\WLANReport\WLAN-report-latest.html.
Once the WLAN report has been created, copy and paste the path into your web browser’s address bar to open the report.
You can use this report to troubleshoot the problems, ask help on tech forums. The WLAN reports contain a graph with details of the connectivity status, including information, such as when the connection started, when it got disconnected, errors, and more.
The report also summarizes network adapters information configured on your system, session success/failures, disconnect reasons, and a lot more. It’s a very detailed report that can help you to ping point many Wi-Fi connectivity issues.
ALSO READ:
- How to Hack WiFi Password Using New WPA/WPA2 flaw
- How To Find WiFi Password When Forgot It
CONCLUSION:
So this was how to connect to wifi using cmd (command prompt) with netsh wlan commands
If you are using a Windows 10 computer with a wireless network connection, you can use the Settings app and Control Panel to manage various aspects of your wireless network connections.
However, you may need to perform some advanced tasks such as show wireless network profile information, generate wireless connection report, and find the security key from different Wi-Fi profiles. In these cases, you can not perform those tasks offered by the Settings app and Control Panel.
For these reasons, Microsoft offers a Netsh command-line utility to manage your wireless and wired network settings. You can view, troubleshoot, and configure virtually every network adapter on a local or remote computer using this utility.
You can use Netsh WLAN command to view your wireless settings, generate reports, import, export and delete wireless profiles from your computer.
In this tutorial, we will show you how to use Netsh WLAN command-line tool to manage Wireless connections in Windows 10.
View Wireless Adapter Settings
You can see the detailed information about your wireless adapter including, radio type, channel, wireless signal, and type of authentication your computer is currently using with the netsh wlan command.
First, log in to Windows 10 with an Administrator account. Open Start menu, search for Command Prompt, right-click on the search result and select the Run as administrator.
Now, run the following command:
netsh wlan show interfaces
You should see the detail information of your wireless adapter in the following screen:
View Wireless Driver Information
In some cases, you may also need to get driver information about your computer’s wireless adapter. You can get it with the following command:
netsh wlan show drivers
You should see the following screen:
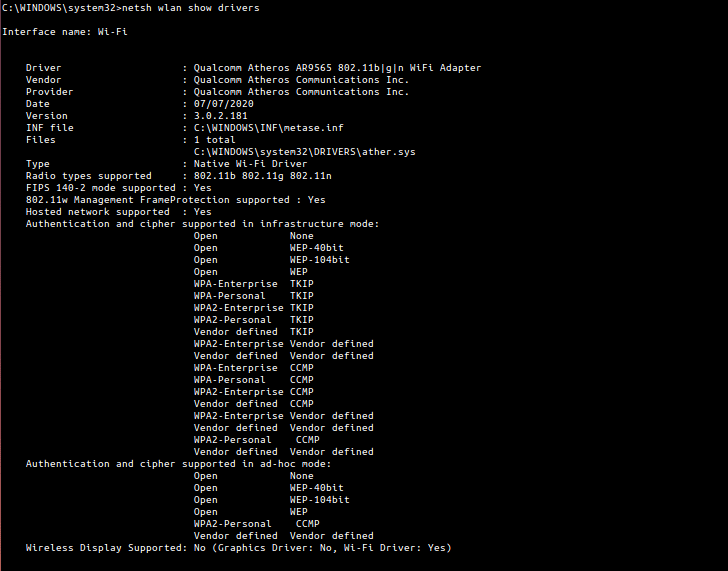
You will get relevant information about the driver currently installed on your system, including vendor, version, radio type, and wireless display support, and much more.
Wireless Adapter Capabilities
You can also use the following command to view all supported wireless adapter capabilities:
netsh wlan show capabilities
You should see the detail information in the following screen:
View Wireless Network Profiles
When you connect to any wireless network, windows creates a wireless network profile and store it on your computer.
You can view all these profiles stored in your computer with the following command:
netsh wlan show profiles
You should see the following screen:

If you want to delete any wireless network profile, run the following command:
netsh wlan delete profile name=[profile name]
You can also remove all profiles with the following command:
netsh wlan delete profile *
Export and Import Wireless Profile
You can export your wireless network profile to the XML file with the following command:
netsh wlan export profile name="profile name" key=clear folder=c:\
If you want to import the wireless profile from the XML file, run the following command:
netsh wlan add profile filename="path_and_filename.xml" interface="interface_name"
Find/View Wireless Network Password (no Software needed)
Some times, you may need to find your wireless network password if you forgot it or would like to share your wi-fi password with another user in your network.
If you forgot your wireless network password then you can recover it from the wireless network profile saved in your computer.
You can display it with the following command:
netsh wlan show profile name="vyom198" key=clear
You should see the following screen:
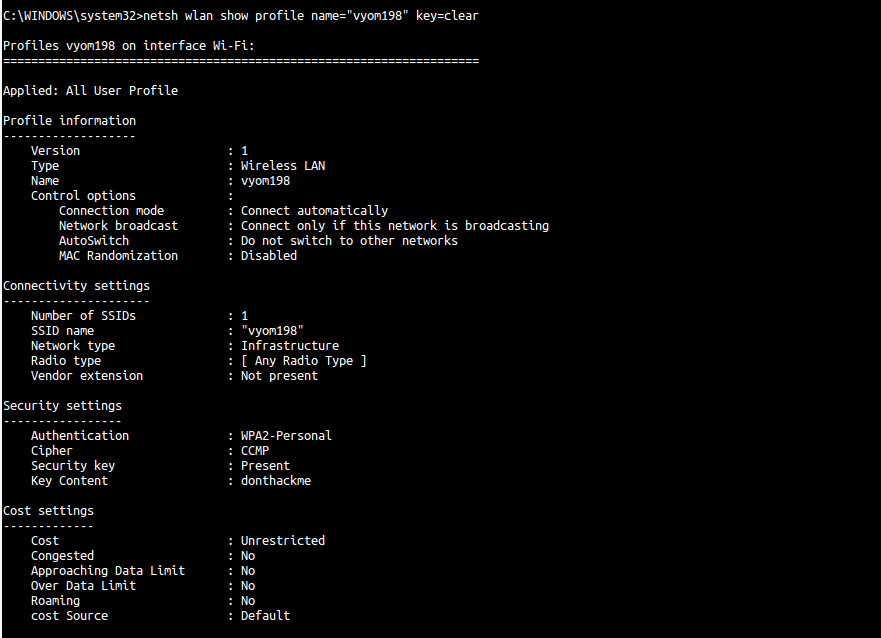
You can see the Wi-fi password/key in the Key Content field above.
Generate Wireless Adapter Report
If you have any wireless connectivity issue then you can troubleshoot it by generating a detailed report with many important details.
You can create a wireless report with the following command:
netsh wlan show wlanreport
This will generate a report and save in the WlanReport folder.
You can view this report in your web browser. The reports contain a graph with much useful information such as, connectivity status, errors, summery of the network adapter, session success/failures, disconnect reasons, and a lot more.
Netsh WLAN Help
Netsh is a simple and very powerful utility that comes with many useful options. If you don’t remember all commands, you can list all available options with the following command:
netsh wlan
You should see the following screen:
Conclusion
In this tutorial, you learned how to manage a wireless network with netsh command on Windows 10. We hope this will help you troubleshoot wireless network issues and perform day-to-day tasks.