
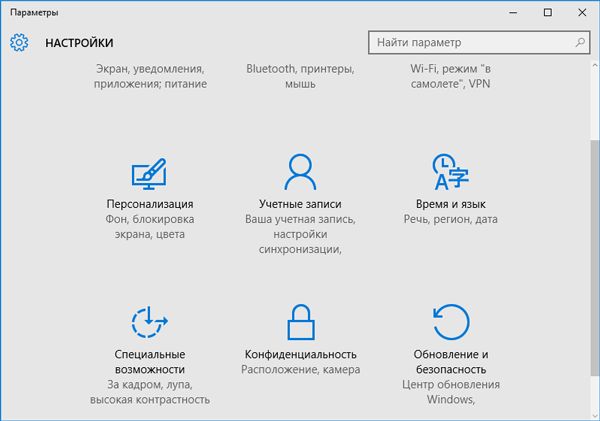
Applies ToWindows 11 Windows 10
Windows позволяет добавлять несколько учетных записей пользователей для использования одного устройства, позволяя каждому пользователю иметь свои собственные параметры, документы и приложения.
Например, родители могут иметь собственные учетные записи с правами администратора для управления параметрами и установки программного обеспечения, в то время как у детей могут быть стандартные учетные записи с включенным родительским контролем для мониторинга и ограничения использования. Это гарантирует, что каждый член семьи имеет персонализированный интерфейс с собственными файлами, параметрами и соответствующими уровнями доступа, а также обеспечивает конфиденциальность и защиту данных членов семьи друг от друга.
Для личного и рабочего или учебного использования наличие отдельных учетных записей пользователей может помочь сохранить четкую границу между личными файлами и действиями, связанными с работой или учебой. Например, у пользователя может быть одна учетная запись с личными электронными письмами, социальными сетями и приложениями для отдыха, а также другая учетная запись с рабочими или учебными письмами, программным обеспечением для повышения производительности и доступом к профессиональным или образовательным ресурсам. Такое разделение не только помогает упорядочить и сосредоточиться на задаче, но и добавляет дополнительный уровень безопасности, сохраняя разделение конфиденциальных рабочих или учебных данных.
-
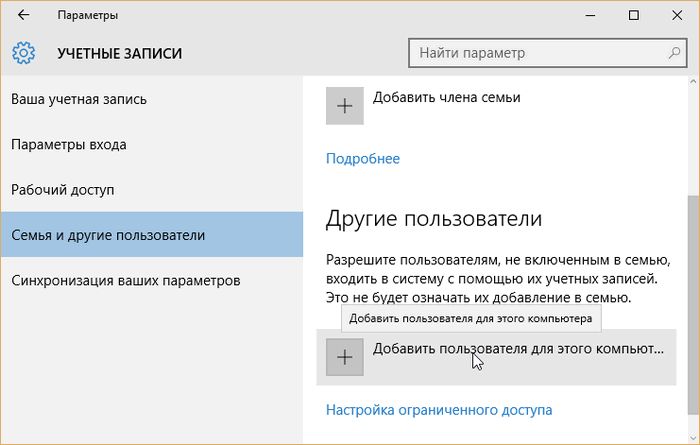
В приложении «Настройки» на устройстве с Windows, выберите Учетные записи > Другой пользователь или используйте следующий ярлык:
Другие пользователи
-
В разделе Добавление другого пользователя выберите Добавить учетную запись.
-
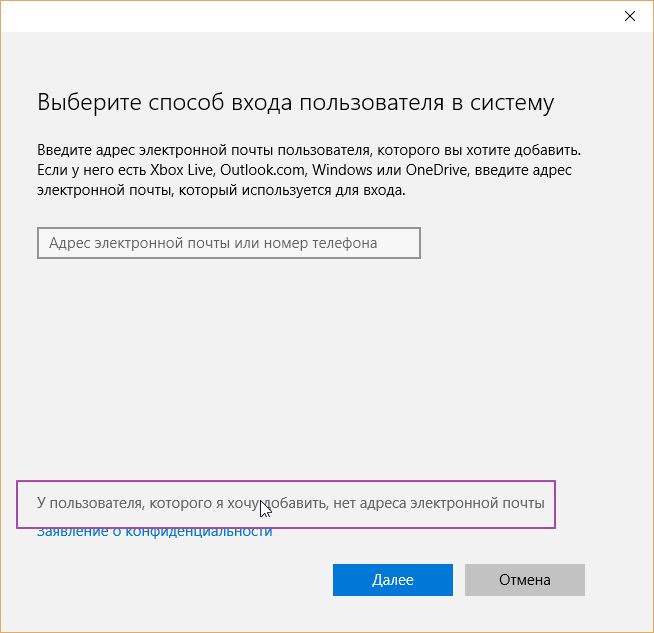
Введите сведения об учетной записи для входа этого пользователя:
-
Если у добавляемого пользователя уже есть учетная запись Майкрософт, введите адрес электронной почты.
-
Если у пользователя нет учетной записи Майкрософт, создайте ее, используя адрес электронной почты пользователя. Введите адрес электронной почты, который человек использует чаще всего, и выберите Зарегистрироваться для получения нового адреса электронной почты.
-
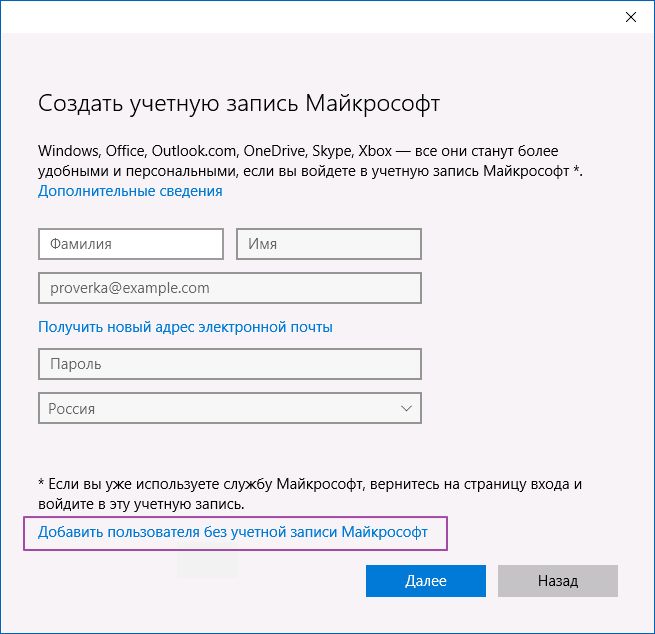
Если вы выберете параметр У меня нет сведений для входа этого человека, вы можете зарегистрироваться для получения нового адреса электронной почты и создать новую учетную запись Майкрософт. Если вы хотите создать локальную учетную запись, выберите параметр Добавить пользователя без учетной записи Майкрософт.
-
-
Следуйте инструкциям, чтобы завершить настройку учетной записи.
Важно:
-
Корпорация Майкрософт рекомендует использовать учетную запись Майкрософт, а не локальную учетную запись при входе в Windows. Использование учетной записи Майкрософт в Windows обеспечивает беспроблемную интеграцию служб Майкрософт, повышенную безопасность и синхронизацию между устройствами, в отличие от локальной учетной записи.
-
Подробные сведения об учетных записях Майкрософт см. в разделе Войти с помощью учетной записи Майкрософт.
Если вы являетесь членом семейной группы, вы также можете добавить членов семьи в Windows изПриложение «Настройки» > Учетные записи > семья или с помощью следующего сочетания клавиш:
Семья
Дополнительные сведения см. в статье Начало работы с Microsoft Family Safety.
-
В приложении «Настройки» на устройстве с Windows, выберите Учетные записи > Другой пользователь или используйте следующий ярлык:
Другие пользователи
-
В разделе Другие пользователи выберите всплывающее меню для учетной записи, которую вы хотите удалить.
-
Рядом с полем Учетная запись и данные выберите Удалить.
Примечание: Удаление учетной записи не приводит к удалению учетной записи Майкрософт пользователя. Он удаляет данные о входе и данные с устройства.
Если вы используете одно и то же устройство с Windows как для личной, так и для учебной или бизнес-работы, возможно, потребуется подключить учетные записи, чтобы упростить доступ к файлам, электронной почте, приложениям и сведениям, связанным с каждой учетной записью. При подключении рабочей или учебной учетной записи вы будете подключены к своей организации и получите доступ к ее ресурсам.
Примечание: чтобы подключить рабочую или учебную учетную запись, ваша организация должна поддерживать личные устройства или использовать собственные сценарии устройств (BYOD).
-
В приложении «Настройки» на устройстве с Windows, выберите Учетные записи > Доступ к рабочей или учебной работе или используйте следующий ярлык:
Доступ к работе или учебному заведение
-
Рядом с полем Добавление рабочей или учебной учетной записи выберите Подключиться.
-
Введите сведения об учетной записи, выберите тип учетной записи и нажмите кнопку Добавить.
-
В приложении «Настройки» на устройстве с Windows, выберите Учетные записи > Доступ к рабочей или учебной работе или используйте следующий ярлык:
Доступ к работе или учебному заведение
-
Выберите раскрывающийся список рядом с рабочей или учебной учетной записью и выберите Отключить.
-
Выберите Да , чтобы подтвердить
Примечание: Отключение рабочей или учебной учетной записи не приводит к удалению учетной записи. Он удаляет сведения о входе и данные с устройства.
Чтобы упростить и ускорить вход в учетные записи, можно добавить учетные записи для разных приложений.
-
В приложении «Настройки» на устройстве с Windows, выберите Учетные записи > Email & учетные записи или используйте следующий ярлык:
учетные записи Email &
-
Добавление учетной записи, используемой по электронной почте. календарь или контакты, выберите Добавить учетную запись в разделе Учетные записи, используемые электронной почтой, календарем и контактами.
-
Для других приложений выберите Добавить учетную запись Майкрософт или Добавить рабочую или учебную учетную запись.
-
Следуйте инструкциям, чтобы добавить учетную запись.
При необходимости учетную запись пользователя можно настроить в качестве администратора.
Важно: Необходимо ограничить число администраторов на устройстве с Windows, так как администраторы имеют полный контроль над системой. Администраторы могут изменять параметры, устанавливать программное обеспечение и получать доступ ко всем файлам. Если этот уровень доступа слишком много людей, это может привести к рискам безопасности, таким как установка вредоносных программ или нежелательные изменения в системе. Безопаснее иметь меньше администраторов и использовать учетные записи стандартных пользователей для повседневных действий.
-
В приложении «Настройки» на устройстве с Windows, выберите Учетные записи > Другой пользователь или используйте следующий ярлык:
Другие пользователи
-
В разделе Другие пользователи выберите всплывающее меню для учетной записи, которую вы хотите изменить.
-
Рядом с полем Параметры учетной записи выберите Изменить тип учетной записи.
-
В раскрывающемся списке выберите тип учетной записи и нажмите кнопку ОК.
Нужна дополнительная помощь?
Нужны дополнительные параметры?
Изучите преимущества подписки, просмотрите учебные курсы, узнайте, как защитить свое устройство и т. д.
Все способы:
- Управляем учетными записями в Windows 10
- Способ 1: Меню Параметры
- Способ 2: Панель управления
- Способ 3: Локальная политика безопасности
- Способ 4: Вкладка «Безопасность» в свойствах файлов, папок и дисков
- Вопросы и ответы: 8
Как правило, часто за одним компьютером работает несколько пользователей по очереди. Разработчики операционных систем специально для таких случаев добавляют возможность создания разных учетных записей с индивидуальными настройками и правами доступа. Администратору предоставляются все полномочия для управления такими профилями, включая их удаление или полную блокировку на определенный период времени. Осуществляется такое взаимодействие через специальные меню в Windows. Именно о них мы и хотим поговорить далее.
Управляем учетными записями в Windows 10
В рамках этой статьи мы предлагаем изучить несколько меню и оснасток, встроенных в Windows 10, чтобы понять, как именно производится управление профилями через такие средства. Ознакомившись с последующими инструкциями, вы поймете, где можно отыскать нужный для изменения параметр и как именно производится необходимое редактирование. После этого уже можно будет приступить к непосредственной реализации требуемых действий, например, к созданию новой учетной записи или изменению прав доступа.
Способ 1: Меню Параметры
В первую очередь остановимся на одном из разделов в меню «Параметры». Сейчас там находятся еще не все опции, которые позволяли бы взаимодействовать с учетными записями, поскольку разработчики постепенно переносят все пункты из Панели управления. Однако имеющихся там функций будет достаточно, чтобы справиться с некоторыми задачами. Давайте вкратце пробежимся по каждому из них.
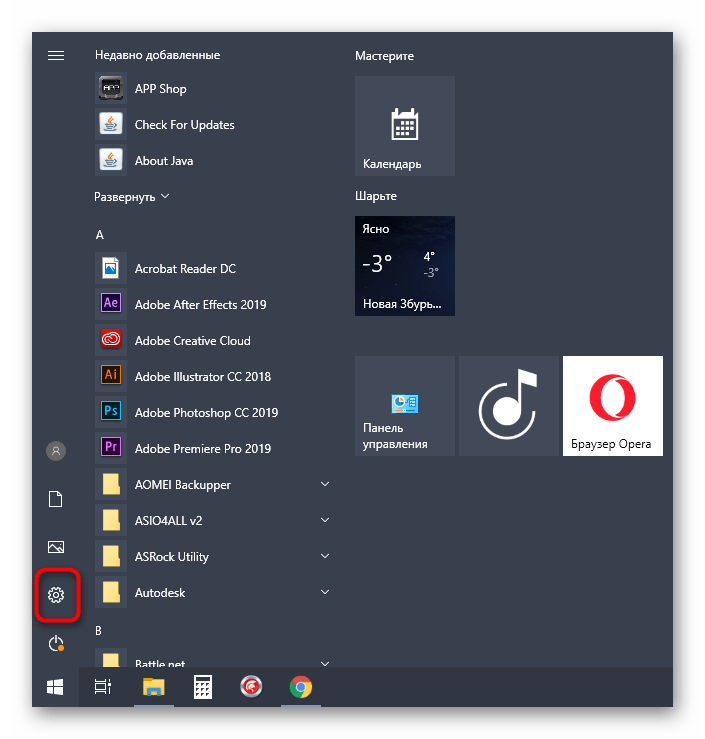
- Для начала откройте «Пуск» и перейдите в меню «Параметры», кликнув по соответствующему значку в виде шестеренки.
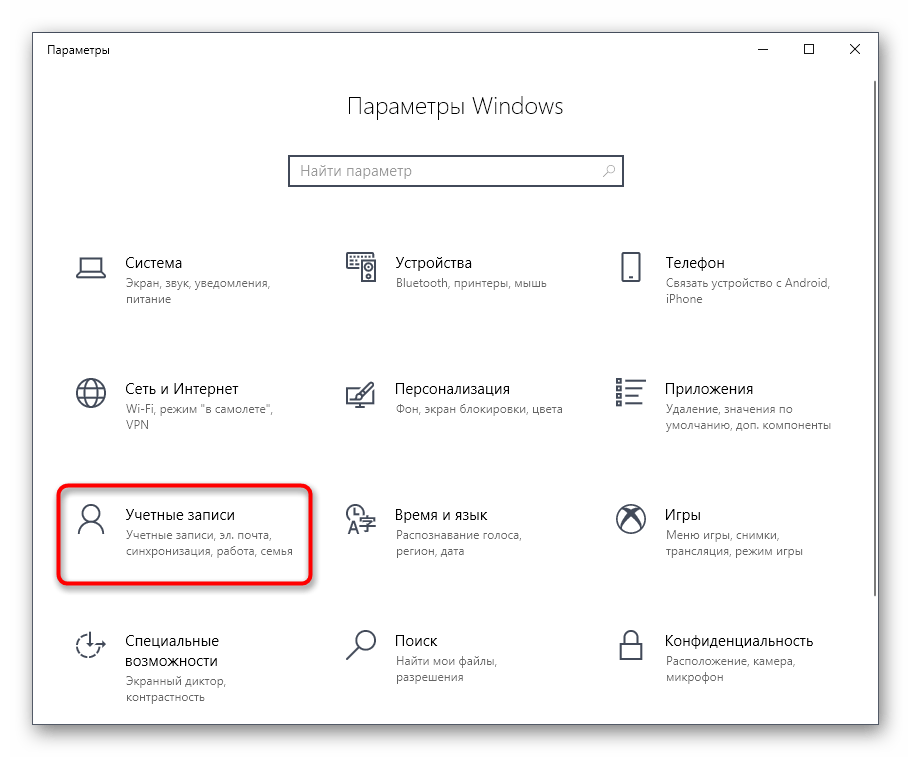
- Здесь вас интересует раздел «Учетные записи».
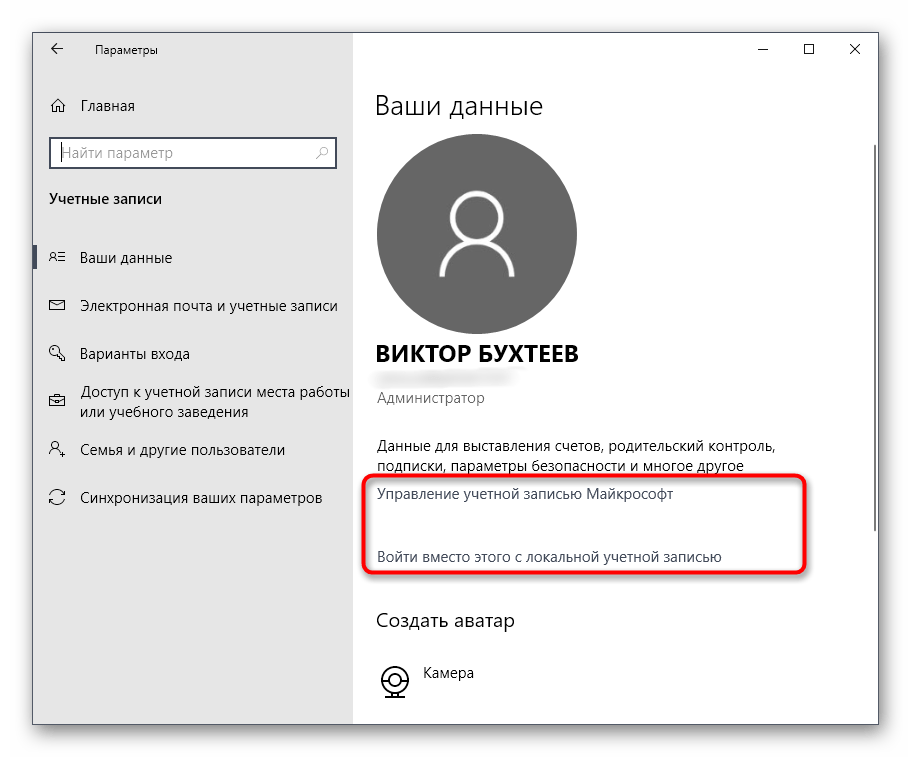
- В первой категории левой панели «Ваши данные» осуществляется редактирование текущего профиля. Например, можно перейти к настройке учетной записи Майкрософт через браузер. Там редактируется имя профиля, год рождения, устанавливается фото и изменяется пароль. Дополнительно в этой категории есть надпись «Войти вместо этого с локальной учетной записью». Она позволяет переключиться на привычный профиль администратора, который не связан с аккаунтом Microsoft.
- Ниже присутствует опция создания аватара. Это можно сделать прямо с веб-камеры или через Проводник выбрать уже имеющееся изображение нужного формата.
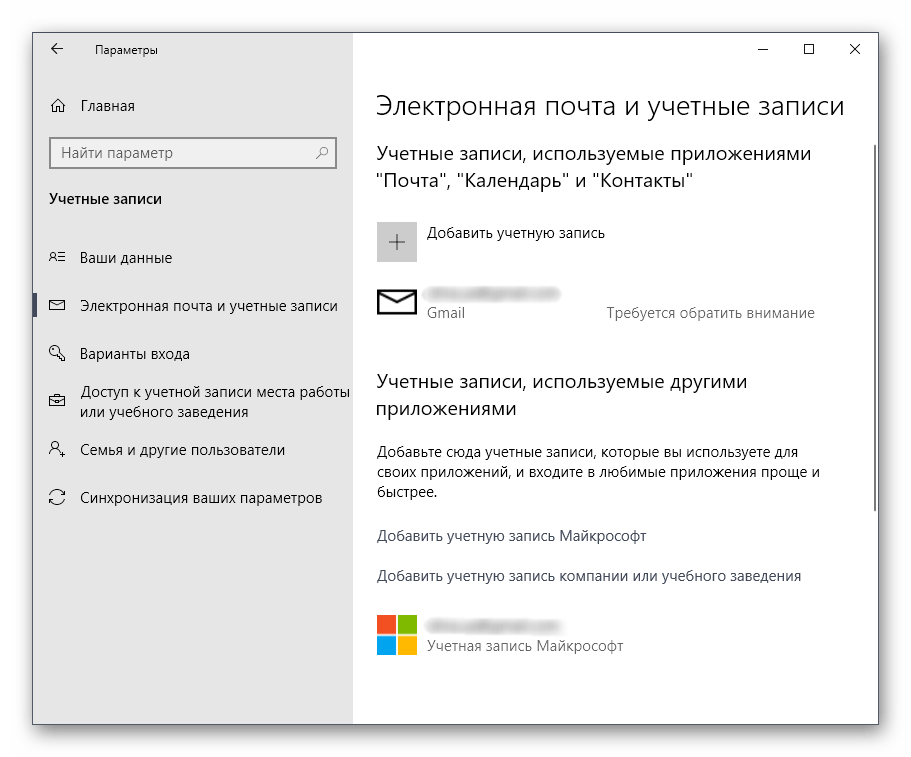
- Вторая категория под названием «Электронная почта и учетные записи» тоже относится к текущему профилю Windows. Именно отсюда осуществляется добавление аккаунтов Microsoft, которые связаны со стандартными приложениями и сторонними программами.
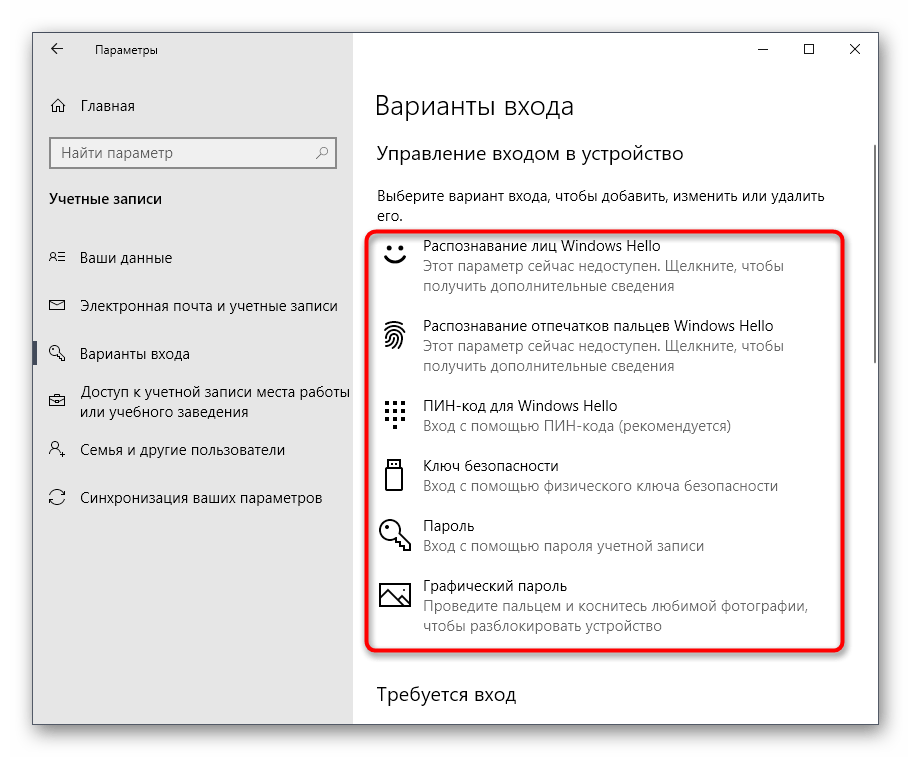
- Далее идет категория «Варианты входа». В ней вы самостоятельно выбираете принцип авторизации учетной записи при запуске операционной системы. На данный момент существует огромное количество разнообразных вариантов для всех типов устройств. В этом же окне находятся детальные описания каждого варианта, поэтому мы предоставим выбор оптимального средства вам.
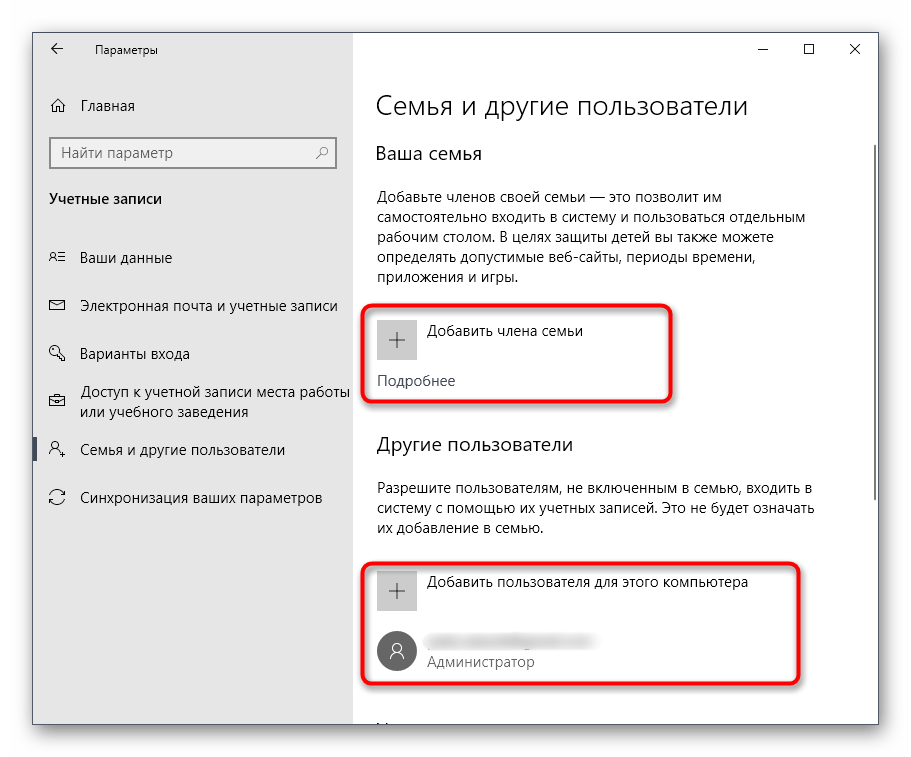
- Ключевой раздел этого меню — «Семья и другие пользователи». Именно отсюда выполняется управление другими учетными записями, например, создание, изменение названия, установка ограничений или изменение типа профиля. Добавить можно как уже существующий аккаунт Microsoft, так и создать локальный аккаунт.
Как видно, это меню по большей части рассчитано на изменение личной учетной записи, хотя в случае с аккаунтом Microsoft все равно произойдет перенаправление на страницу в браузере. Скорее всего, при выходе следующих обновлений содержимое данного раздела поменяется и в нем будет больше опций, перенесенных из Панели управления.
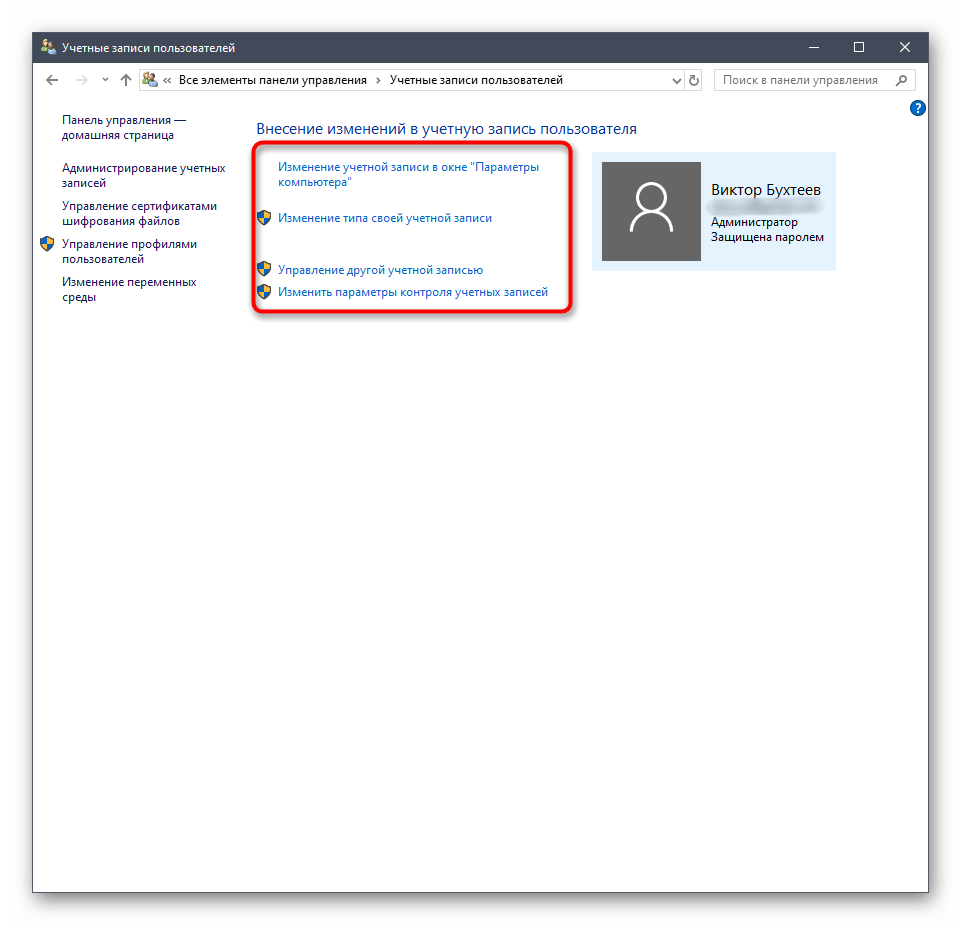
Способ 2: Панель управления
Только что мы упоминали Панель управления как средство, из которого все пункты переносятся в «Параметры» с новой реализацией. Однако пока что это коснулось далеко не всех настроек, включая опции, отвечающие за управления учетными записями, поэтому давайте остановимся на этом меню более детально.
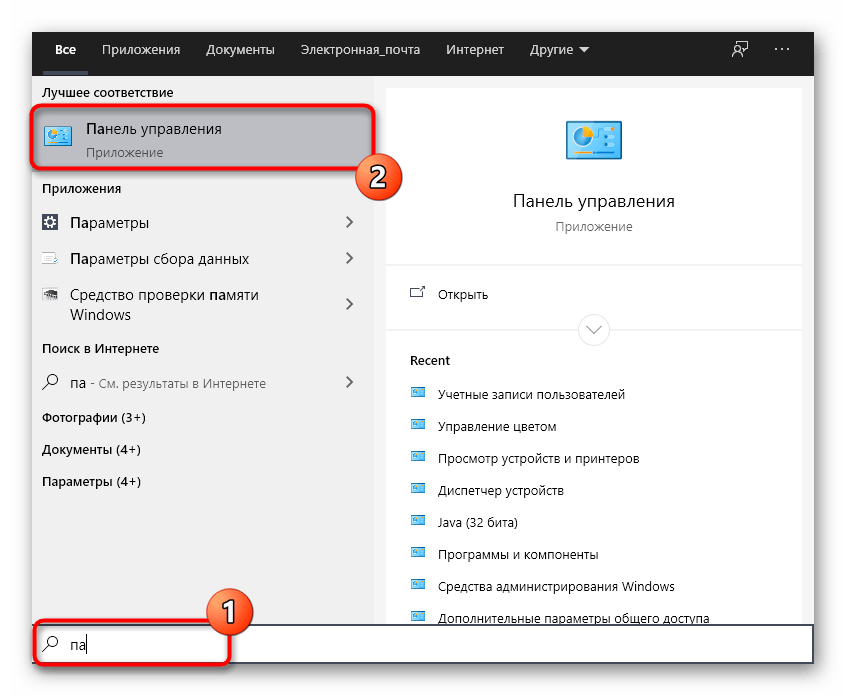
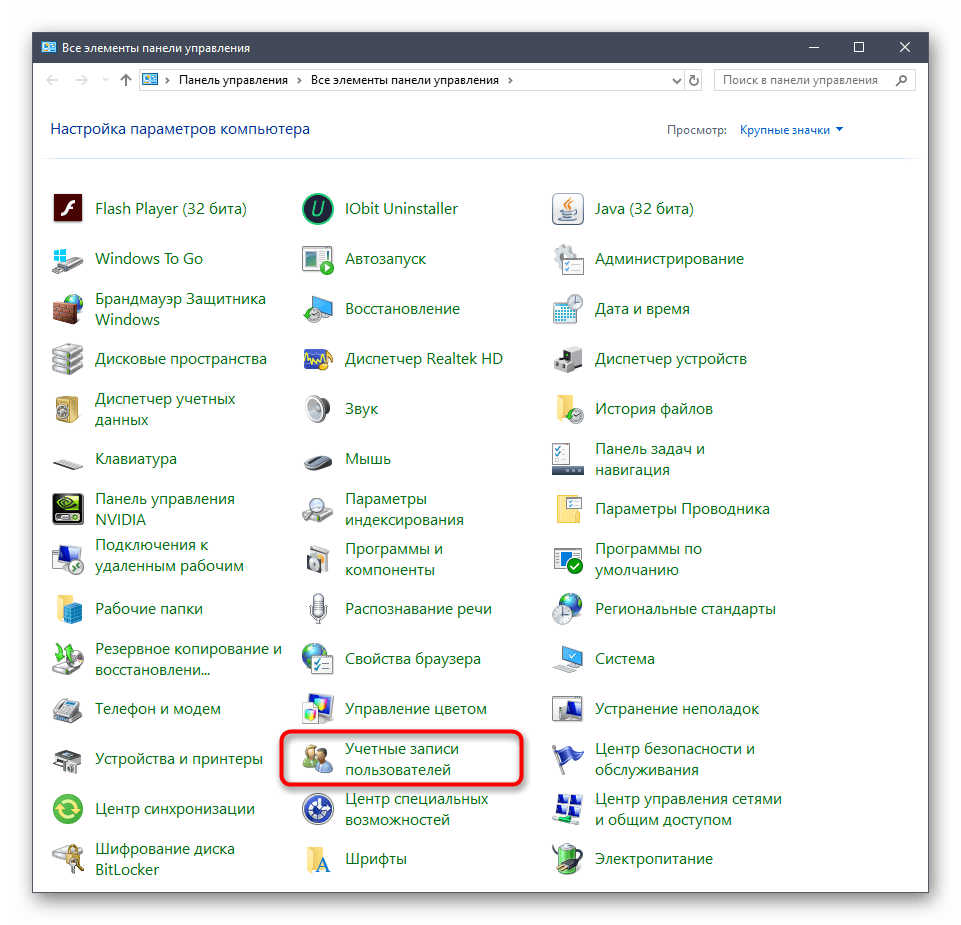
- Откройте «Пуск», через поиск отыщите приложение «Панель управления» и перейдите в него.
- Среди списка всех разделов отыщите «Учетные записи пользователей».
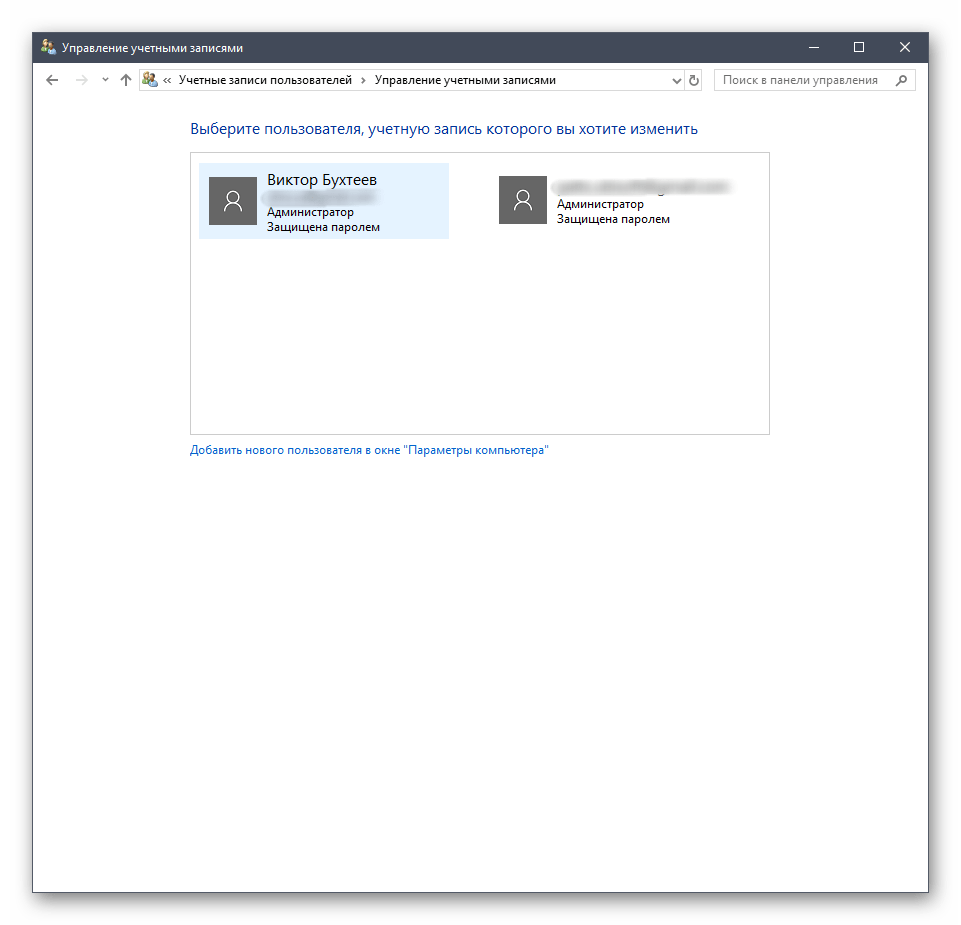
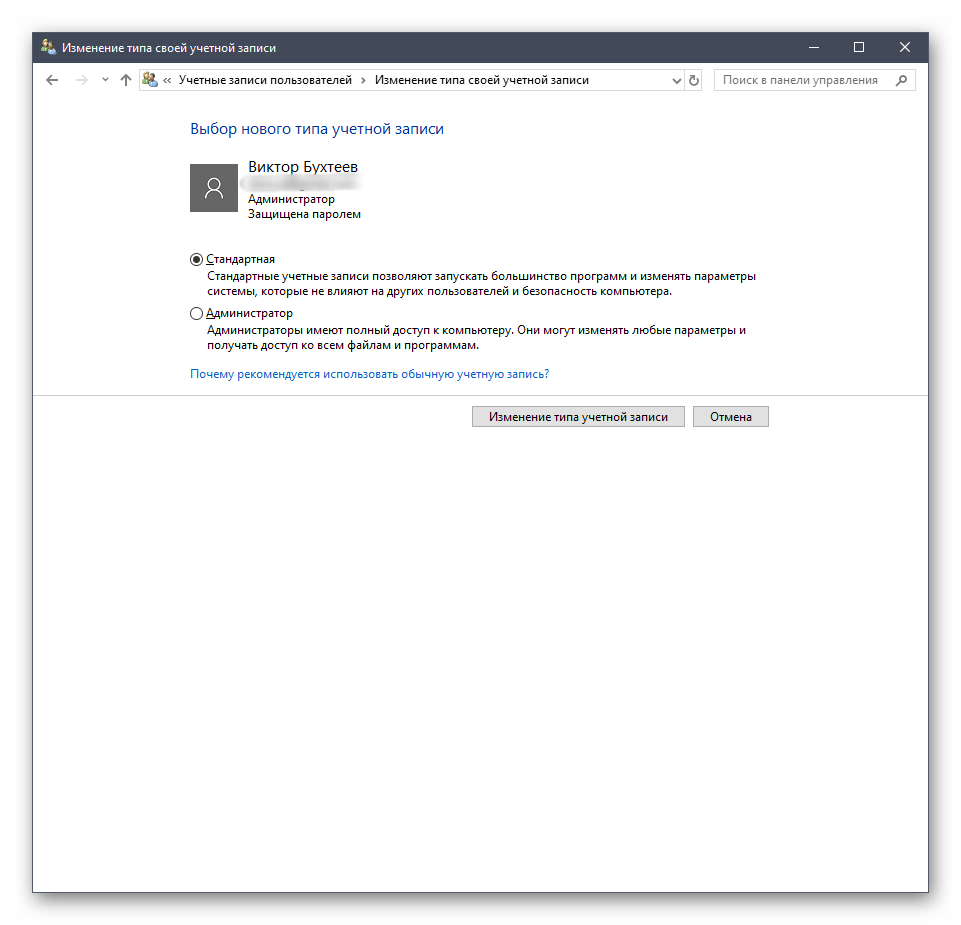
- В главном меню вы можете перейти для изменения текущей учетной записи в меню Параметры, о котором уже шла речь ранее, изменить тип своего профиля, перейти к управлению другим пользователем или изменить особенности контроля учетных записей.
- При переходе к изменению других профилей откроется отдельное меню, где производится выбор.
- Теперь вы можете сменить тип профиля, например, на администратора, или задать новое имя.
Более детально обо всех этих процессах рассказывалось в других статьях на нашем сайте. О них мы еще поговорим после рассмотрения всех сегодняшних методов, а пока переходим к следующему меню, в котором можно управлять учетными записями.
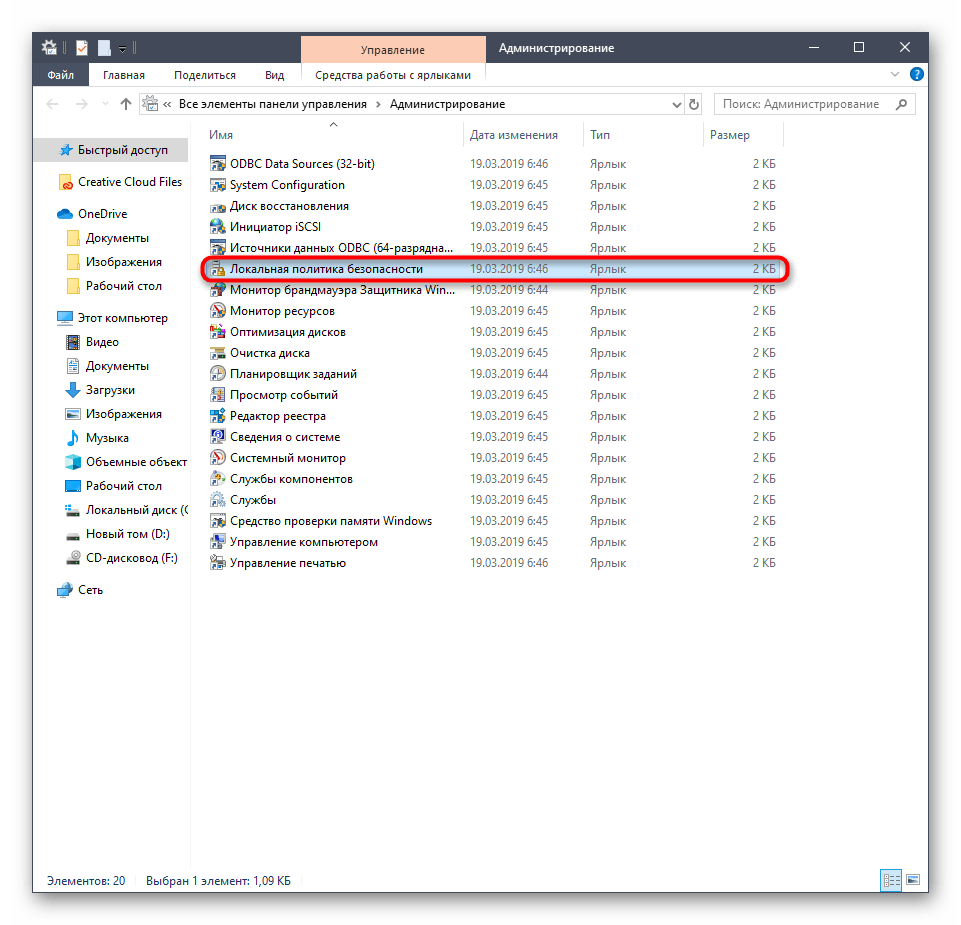
Способ 3: Локальная политика безопасности
В каждой сборке Windows 10 имеется оснастка под названием Локальная политика безопасности. В ней осуществляются различные действия, связанные с обеспечением надежности системы, включая настройки для существующих профилей. Благодаря этой оснастке можно установить ограничения на пароли или заблокировать один из профилей. Выполняется это следующим образом:
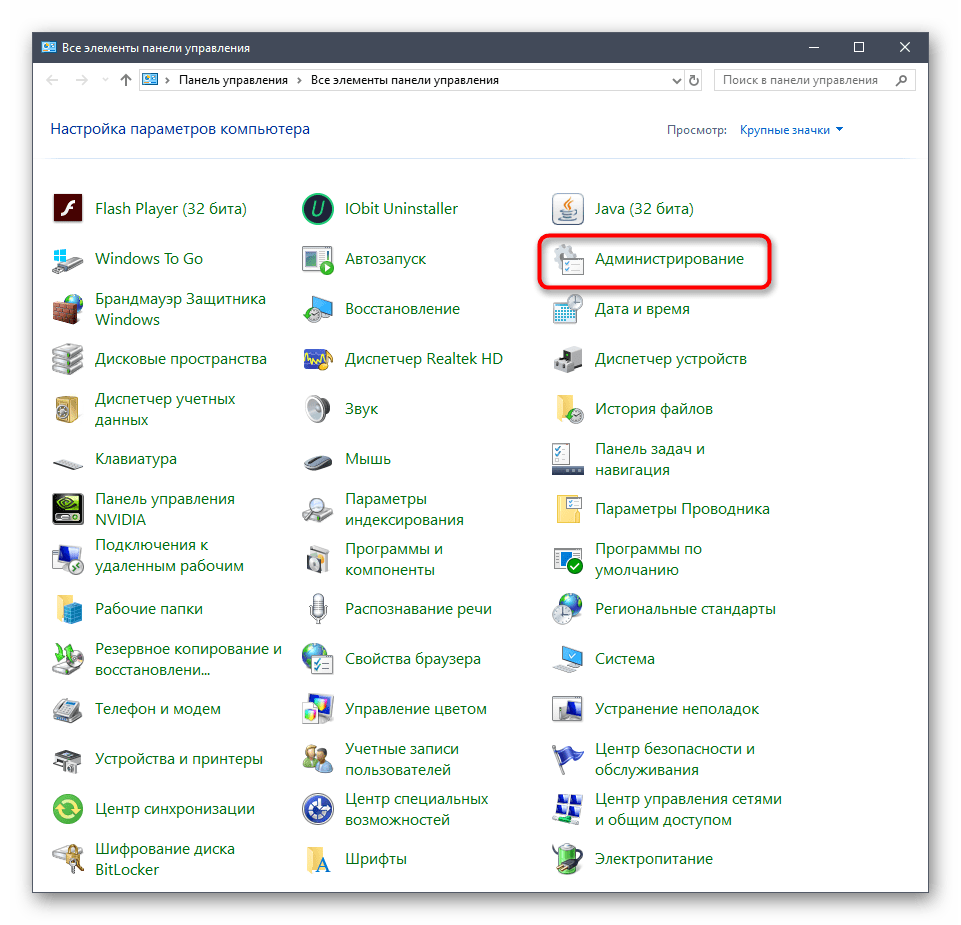
- В меню «Панель управления» перейдите в раздел «Администрирование».
- Здесь вас интересует пункт «Локальная политика безопасности».
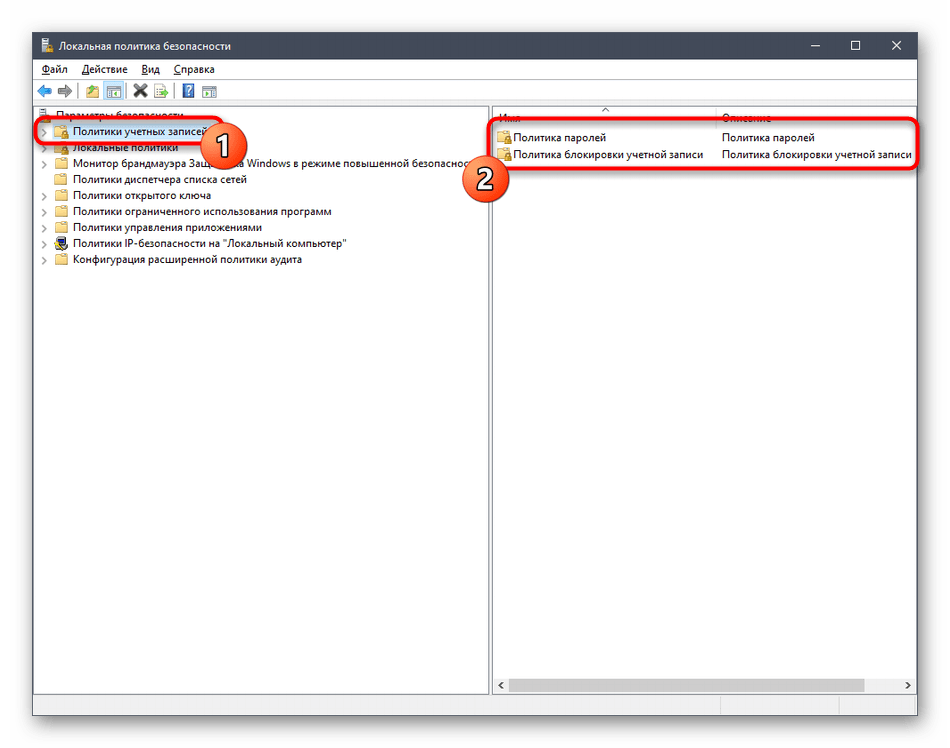
- Разверните каталог «Политики учетных записей». В нем вы видите две папки: «Политика паролей» и «Политика блокировки учетной записи». Эти названия уже говорят сами за себя, поэтому не будем останавливаться на каждой из них.
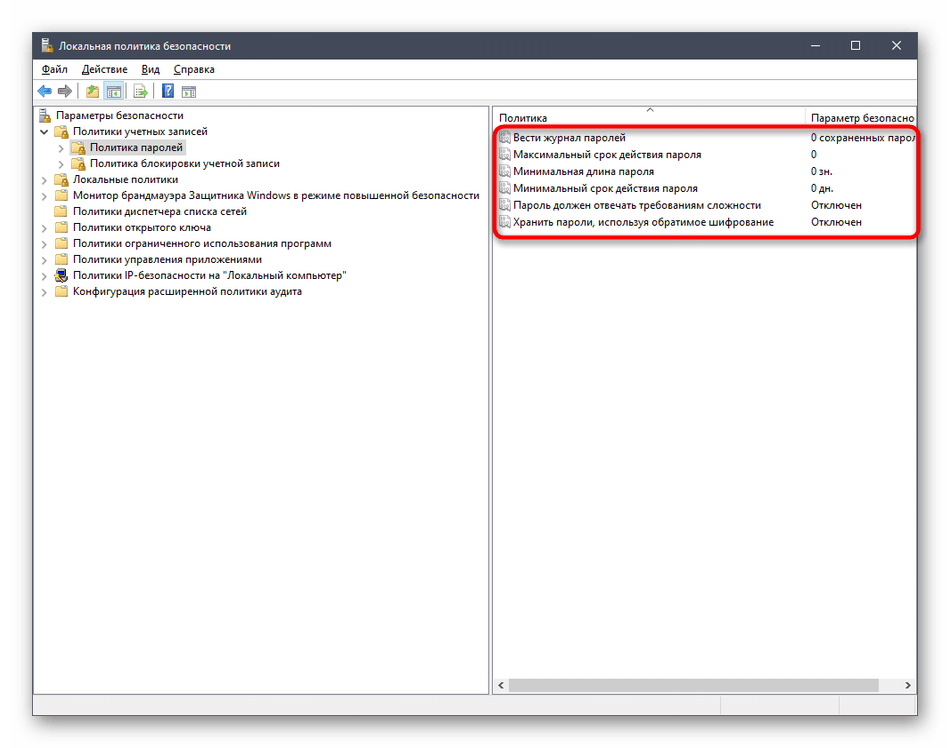
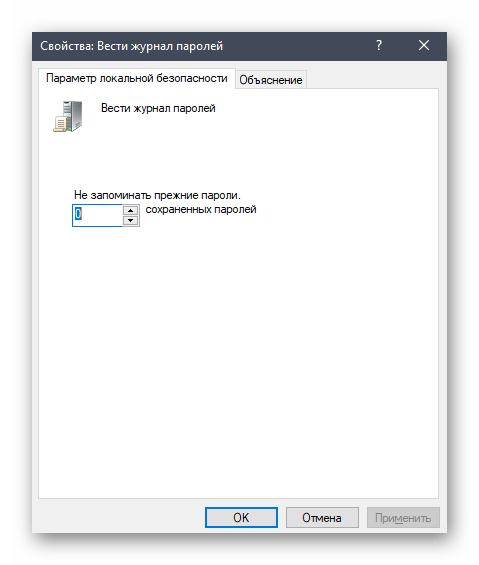
- При открытии такой директории появляется список доступных политик. Их названия как раз и означают опции или действия, осуществляемые через данные параметры. Возьмем за пример «Вести журнал паролей». Как видно, по умолчанию этот параметр не сохраняет вообще никакие пароли. Для редактирования значения нужно дважды кликнуть по строке, чтобы открыть свойства.
- Здесь можете указать, какое количество паролей должно в операционной системе. То же самое происходит и с другими политиками. Например, можно задать срок действия пароля или изменить минимальную длину в символах.
- Дополнительно обратите внимание на каталог «Параметры безопасности». Здесь имеется отдельный раздел «Контроль учетных записей». Он отвечает за предоставление прав доступа для учетных записей без прав администратора. Более детальные описания имеются в окнах свойств данных политик.
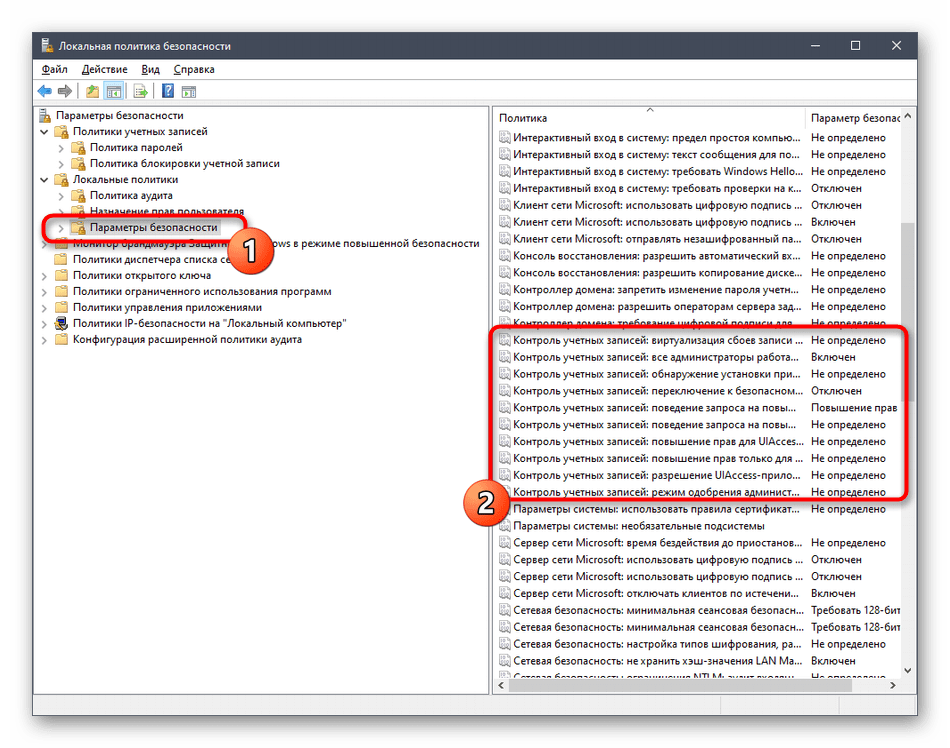
Учитывайте, что подобные изменения в Локальной политике безопасности может производить только администратор. К тому же не стоит изменять значения случайных параметров, не изучив их значения, поскольку это может привести к необратимым последствиям.
Способ 4: Вкладка «Безопасность» в свойствах файлов, папок и дисков
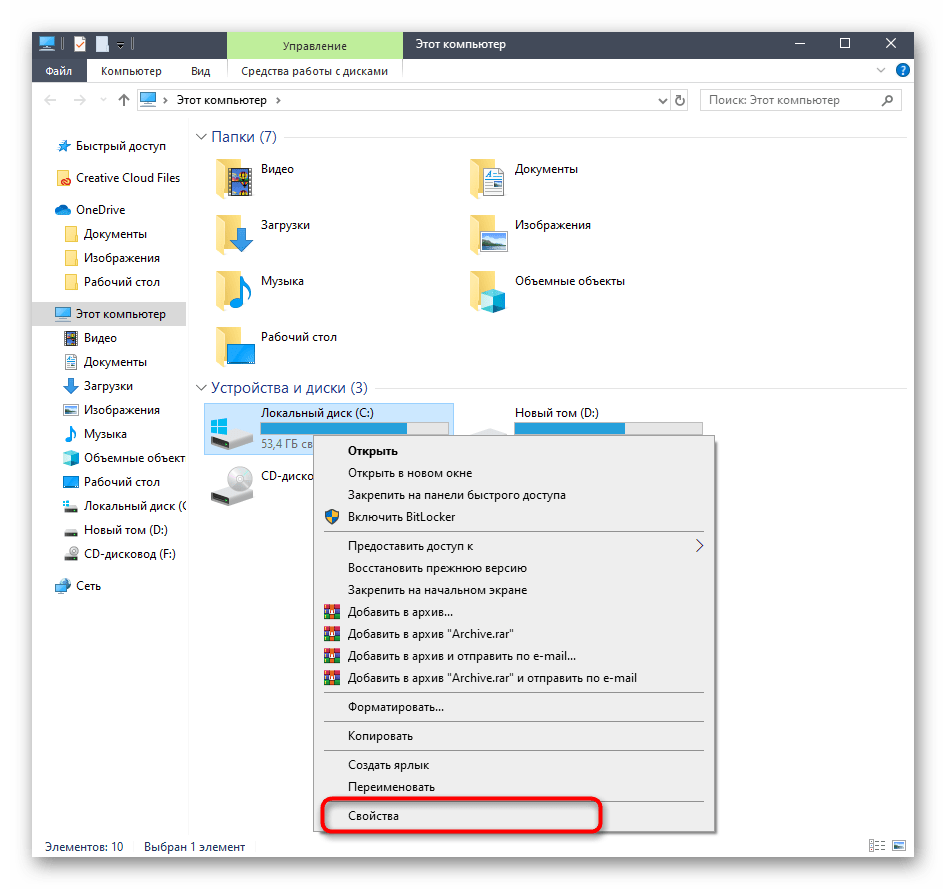
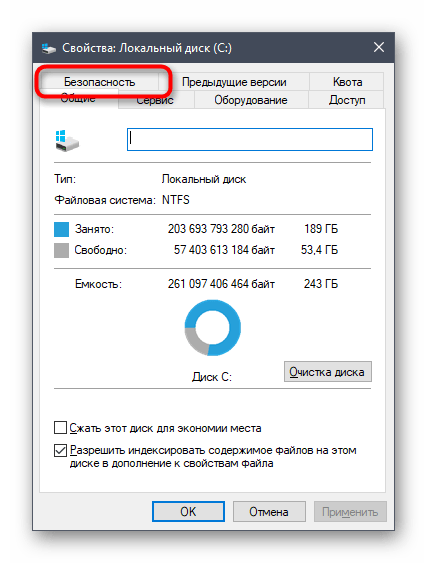
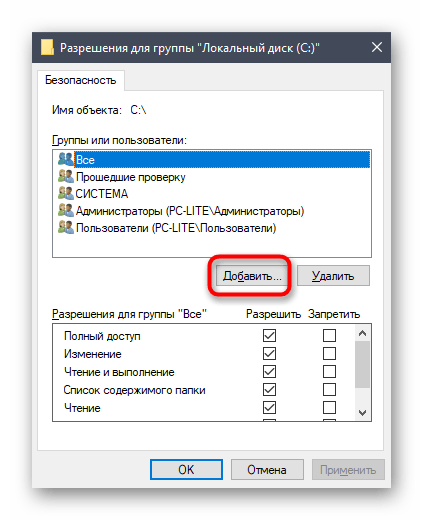
Отдельного внимания заслуживает настройка доступа для определенных файлов, папок и дисков, которая осуществляется через меню «Свойства». Там имеется вкладка «Безопасность». Через нее администратор может решить, какие именно действия с указанным объектом разрешить выполнять одному юзеру или целой группе. На примере это выглядит так:
- Щелкните по необходимому объекту правой кнопкой мыши и выберите «Свойства». Учитывайте, что все изменения для папок применяются автоматически и для всех хранящихся там файлов, что касается и логических разделов.
- В появившемся меню вас интересует вкладка «Безопасность».
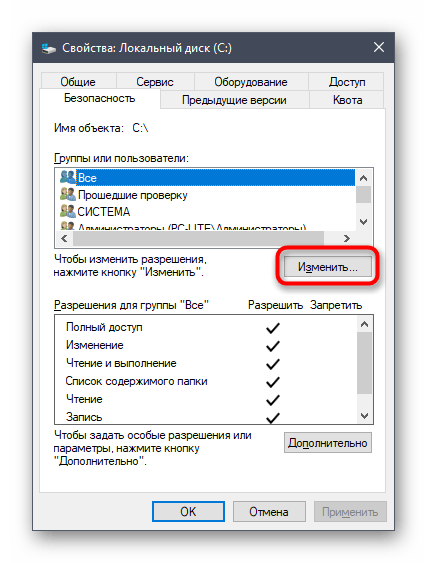
- Нажмите на кнопку «Изменить», которая находится под блоком «Группы или пользователи».
- Вы можете редактировать уже добавленные учетные записи, устанавливая разрешения либо запреты, или нажать на «Добавить», чтобы перейти к выбору профиля.
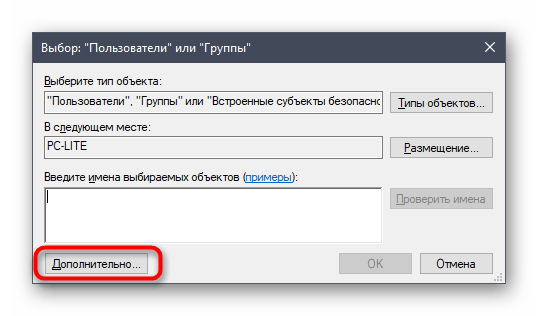
- Введите имена объектов в специально отведенное поле, а затем проверьте их. В качестве альтернативы можно использовать встроенную опцию поиска. Она открывается через «Дополнительно».
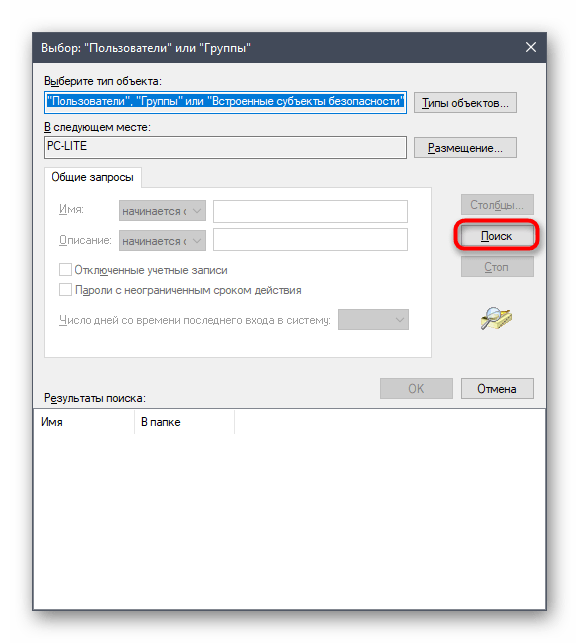
- Щелкните по кнопке «Поиск» и подождите несколько секунд.
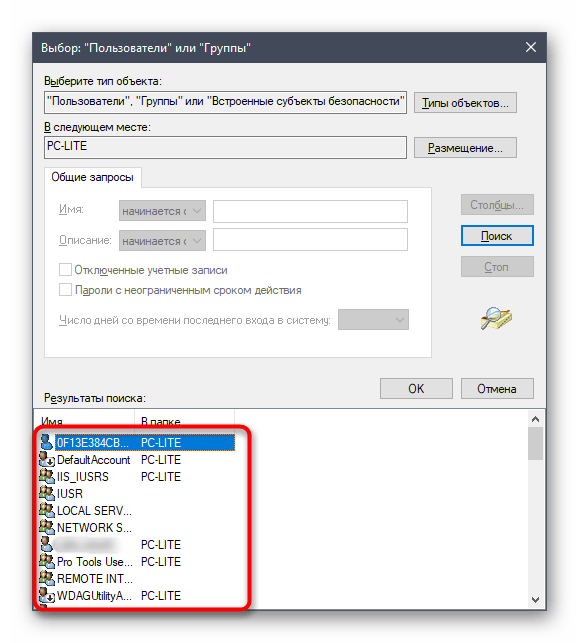
- Выберите необходимый профиль или группу из отобразившихся результатов, чтобы потом установить для этого объекта правила доступа к директории или файлу.
В конце давайте затронем тему взаимодействия с учетными записями при помощи рассмотренных выше инструментов. Существует огромное количество задач, которые возникают перед обычными юзерами и администраторами. Их решение просто не уместится в рамках одного материала, поэтому мы предлагаем ознакомиться с отдельными инструкциями на нашем сайте, воспользовавшись указанными далее ссылками. Просто прочтите заголовки и выберите подходящую для себя статью. Там вы найдете все необходимые руководства, позволяющие справиться с поставленной целью разными методами.
Читайте также:
Изменение имени учетной записи администратора в Windows 10
Управление правами учетной записи в Windows 10
Переключение между учетными записями пользователей в Windows 10
Создание новых локальных пользователей в Windows 10
Меняем имя папки пользователя в Windows 10
Отключение UAC в Windows 10
Сбрасываем пароль для учетной записи «Администратор» в Windows 10
Удаление администратора в Windows 10
Вы были ознакомлены с принципами управления учетными записями в Windows 10, а также получили необходимые руководства по решению самых частых задач, связанных с профилями. Осталось только перейти к соответствующему материалу, чтобы изучить и реализовать инструкции.
Наша группа в TelegramПолезные советы и помощь
Rick Akura
User accounts in Microsoft Windows 10 go beyond Microsoft and Local accounts. Learn how to add, change, or remove users in Windows 10.
If you’ve already read our Get Started with Windows 10 article, you’ll know that Windows 10 allows users to set up multiple local user accounts.
These accounts can be customized and separated from one another, creating unique personal environments on one computer.
Whether you’re planning to share a device with friends or family, or simply want to create more than one account for yourself, follow our guide.
Manage User Accounts in Windows 10
In summary, to manage a user account in Windows 10, do the following:
- In the Settings window, click Accounts, and then click Family & other users.
- Click the account you want to modify, to display your options. Then click Change account type. Click to view a larger image. Any account can be an Administrator account.
- In the Account type list, click Administrator. Then click OK.
Let’s discuss these in detail
It’s important to note that there are two types of user accounts: administrator and standard user. Each computer needs at least one administrator account in order to install new applications, apply updates, and manage system settings.
In this guide, we’ll show you how to change your account to an administrator if needed.
In Windows 10 terminology, a local user refers to an account created without a Microsoft account. This means that you won’t be able to use the same account on a different device and lose some cloud functionality. However, you can still customize and manage your account on your computer locally.
How to manger user accounts in Windows 10.
How to create a new local user in Windows 10
Creating a new user account is easy using Windows 10’s Settings application. You may also create a Microsoft account to be able to transfer accounts and files between computers.
- Click on the Start menu in your taskbar. This icon has the Windows 10 logo on it. If you’re not familiar with the Windows 10 interface, we recommend reading the Get Started with Windows 10 article on our website.
-
Select the Settings icon, indicated by a gear. Alternatively, you can use the Windows + I keyboard shortcut to reach this application quicker.

-
Click on the Accounts tile.
- Switch to the Family & other users category using the panel on the left side of the screen. You should see a list of all the current users on your computer.
-
Click on the Add someone else to the PC button.
-
To add a new local user, select the I don’t have this person’s sign-in information option.
-
Click on the Add a user without a Microsoft account option.
-
Enter the desired username. If needed, you can also include a password and a password hint. This will give extra privacy to the user of the account. In the future, you’re always able to change all of this information.
- Click Next to finalize the new account.


How to customize a local user on Windows 10
Each user account on your computer can change username, picture, and password at any time. The guide below will show you how to customize your local user on a Windows 10 device.
-
Click on the Start menu in your taskbar.
-
You’ll see your current user picture on the left side of the panel. Click on it and select Change account settings from the context menu.
- Here, you can modify your profile picture or take a new one using your camera, and manage your local account.
- If you have a Microsoft account connected, click on the Manage my Microsoft account link to be able to modify settings such as password and security.

You can always come back to this menu and make changes whenever needed.
How to make a local user an administrator in Windows 10
When you create a new account on Windows 10, it’ll automatically be assigned as a standard account without administrative permissions. This means that most accounts on a device won’t be able to install new applications and change system settings without reaching out to an administrator.
If you want to change an existing account into an administrator account with full access, follow the guide below.
- Click on the Start menu in your taskbar.
-
Select the Settings icon, indicated by a gear. Alternatively, you can use the Windows + I keyboard shortcut to reach this application quicker.
- Click on the Accounts tile.
- Switch to the Family & other users category using the panel on the left side of the screen. You should see a list of all the current users on your computer.
-
Select the account you want to modify by clicking on it once. Click on the now visible Change account type button.
-
Click on the drop-down menu and switch from Standard User to Administrator.
- Click the OK button. The account now has full access and administrative permissions on your device.


How to remove a local user in Windows 10
If an account is no longer needed, you can easily remove it using the guide below. Make sure that you save all files stored on the account before permanently deleting it from the device, as this action is not reversible.
When you’re ready to remove a local user, follow this guide.
-
Click on the Start menu in your taskbar.
- Select the Settings icon, indicated by a gear. Alternatively, you can use the Windows + I keyboard shortcut to reach this application quicker.
- Click on the Accounts tile.
-
Switch to the Family & other users category using the panel on the left side of the screen. You should see a list of all the current users on your computer.
-
Select the account you want to delete by clicking on it once. Click on the now visible Remove button.
- Make sure to read the warning before clicking the Delete account and data button. Wait for Windows 10 to process your request and remove the local user.

Final thoughts
We hope that this guide was able to show you everything you need to know about managing user accounts in Windows 10. If you ever need further assistance, our customer service is happy to guide you through any issues you might have.
Do you want to learn more about the Windows 10 operating system? We recommend proceeding with our Set Up Security in Windows 10 article or backtracking to our main Windows 10 tutorials page to find your next lesson.
If you’re looking for more guides or want to read more tech-related articles, consider subscribing to our newsletter. We regularly publish tutorials, news articles, and guides to help you.
On Windows 10, you would usually create an account during the initial setup experience. However, there are many other settings you can configure to enhance the account and make it even more personal and secure.
In addition, you can also create additional accounts with different permission levels to share the computer with family and close friends. This means everyone would have a personal space with a personalized experience and a separate area to store files.
If you want to share a device with a young person, Windows 10 also includes the ability to create a child account with features specifically designed to protect them from content (such as apps, games, and websites) that may not be appropriate for their age.
In this how-to guide, I’ll explain how to create and manage user accounts on your computer.
Recent updates
These instructions has been updated to ensure accuracy and reflect changes to the process in the operating system.
How to view account details on Windows 10
In the Settings app, the «Your Info» page includes your account information and the option to connect your local account to a Microsoft account. On this page, you can also change the profile picture.
View account information
To view your Windows 10 account details, use these steps:
- Open Settings.
- Click on Accounts.
- Click on Your info.
- Confirm your account details, including account type (Administrator or Standard) and whether you’re using a local account or Microsoft account.
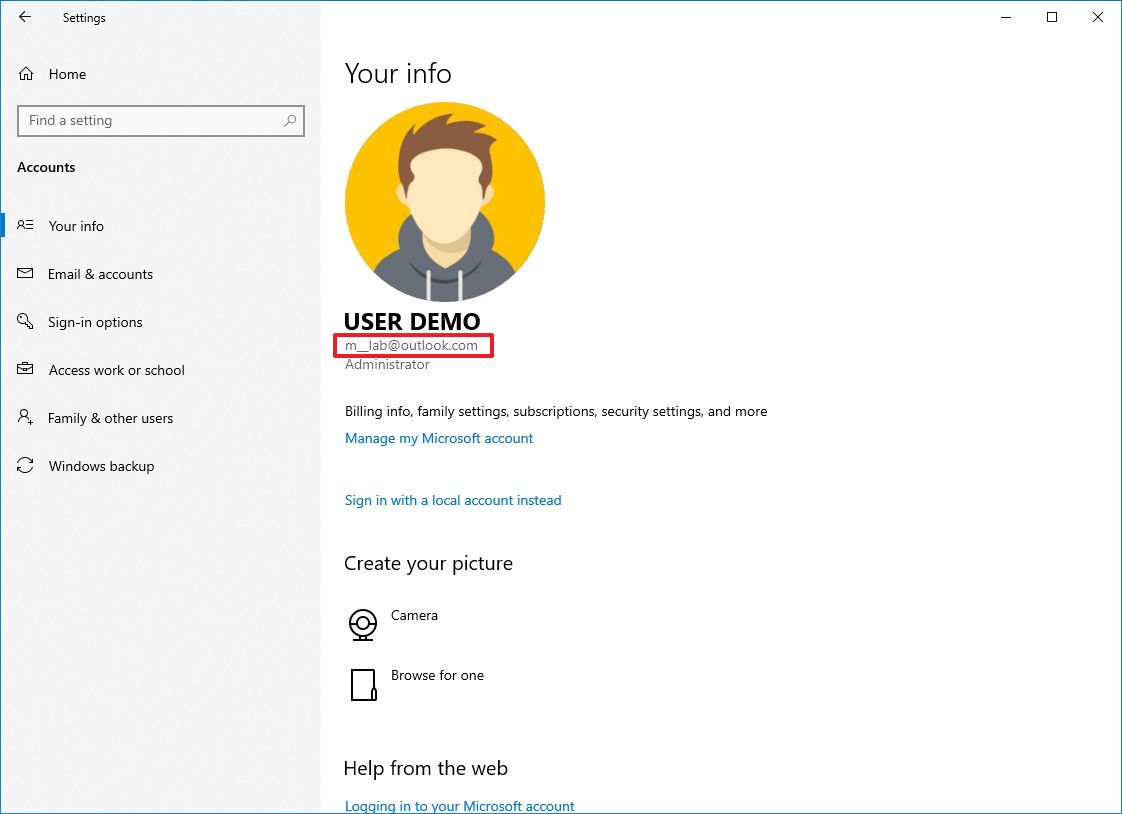
- Quick note: If the page reads «Local account» under your username, the account isn’t connected to a Microsoft account. If your email address appears on this page, you’re using a Microsoft account.
- (Optional) Click the «Manage my Microsoft account» option to adjust billing details, family and security settings, and other settings online.
Once you complete the steps, you’ll better understand the account information on Windows 10.
All the latest news, reviews, and guides for Windows and Xbox diehards.
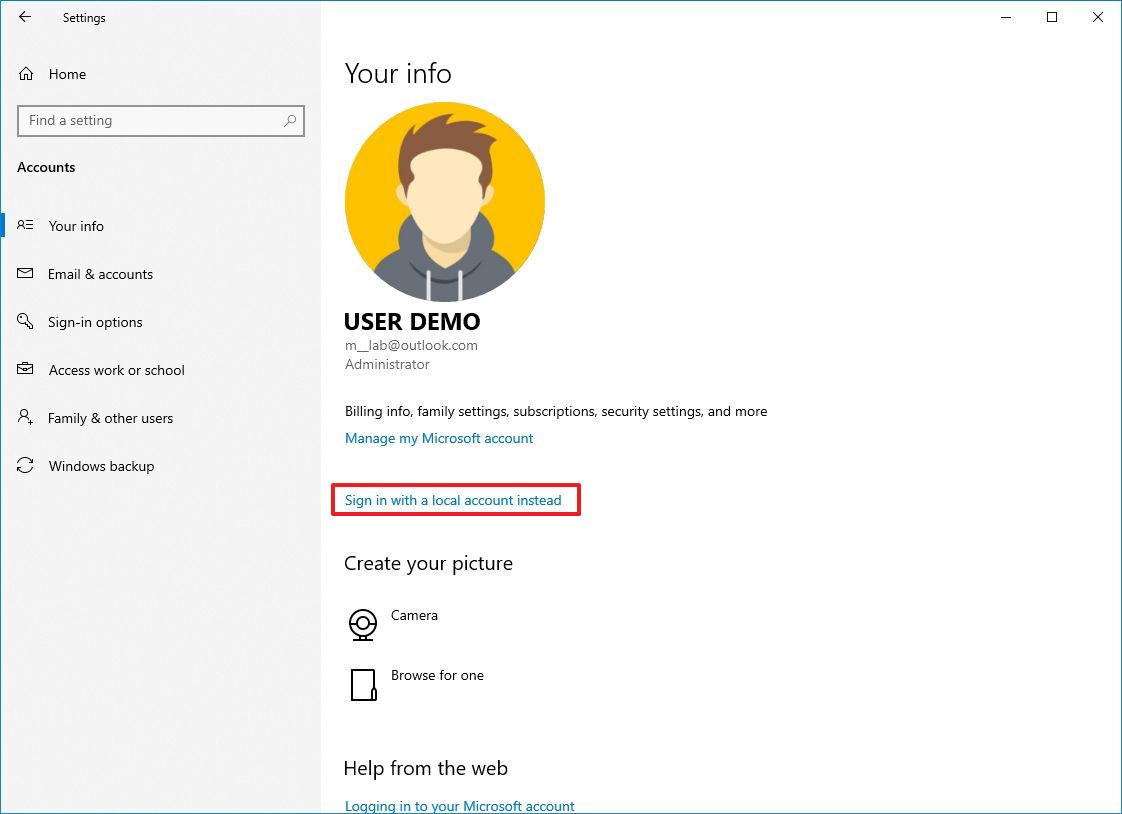
Switch to local or Microsoft account
To switch from a local account to a Microsoft account, use these steps:
- Open Settings.
- Click on Accounts.
- Click on Your info.
- If you have a local account, click the «Sign in with a Microsoft account instead» option to link it to a Microsoft account.
- Continue with the on-screen directions.
- Quick tip: If this is a new account, you may need to click the «Verify» button to verify the account. Only after entering the verification code will you be able to have full access to the account.
- If you have a Microsoft account, click the «Sign in with a local account instead» option to switch to a local account.
- Continue with the on-screen directions.
After you complete the steps, the account will switch to a Microsoft or local account, depending on your configuration.
Change account picture
To change your Windows 10 account picture, use these steps:
- Open Settings.
- Click on Accounts.
- Click on Your info.
- Click the Browse for one button under the «Create your picture» section.
- Quick tip: You can also use the «Camera» option to take a picture with the webcam and set it as your profile picture.
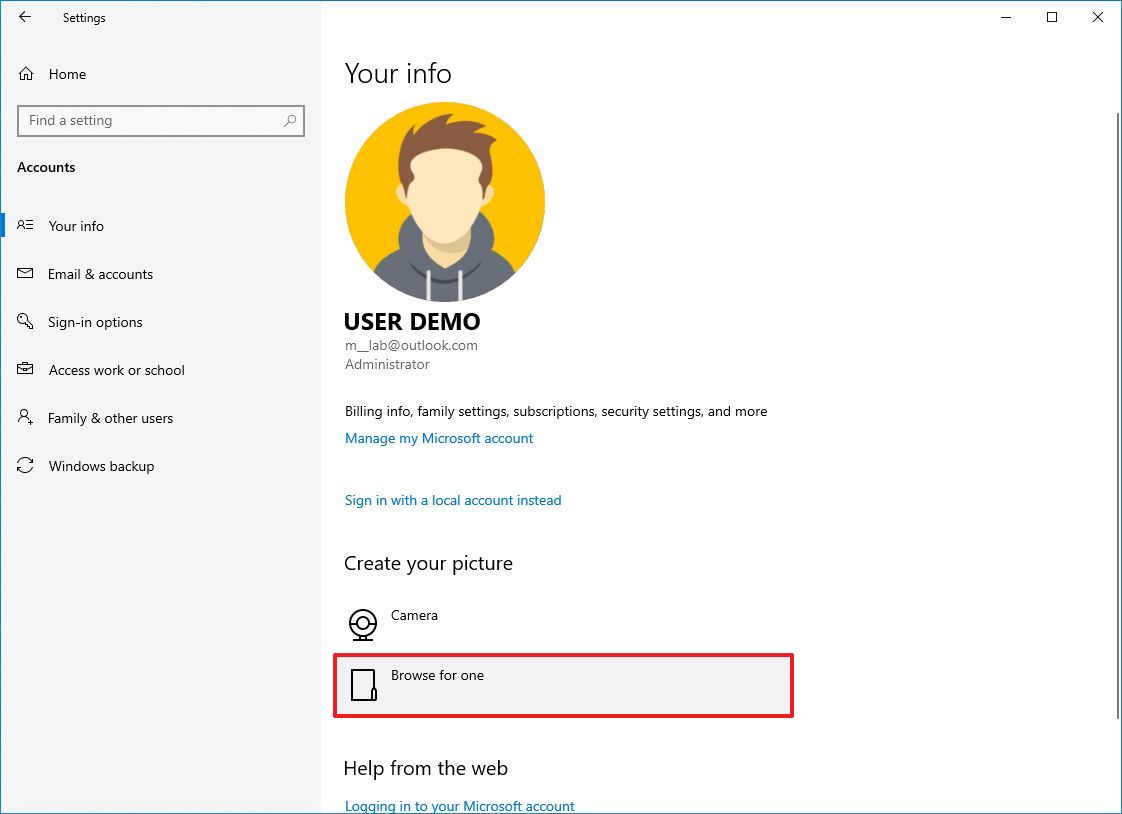
- Select a new image for the account.
- Click the Choose Picture button.
Once you complete the steps, the account pictures will appear across Windows 10 experience, including the Sign-in screen.
How to add more email and app accounts on Windows 10
Windows 10 also allows you to add multiple accounts, so you don’t have to re-enter the same information to access an app or service.
Add accounts for apps
To set up additional email and app accounts on Windows 10, use these steps:
- Open Settings.
- Click on Accounts.
- Click on Email & accounts.
- Click the Add an account button under the «Accounts used by email, calendar, and contacts» section.
- Quick note: If you want to add another Microsoft account, the system will also list it under the «Accounts used by other apps» section.
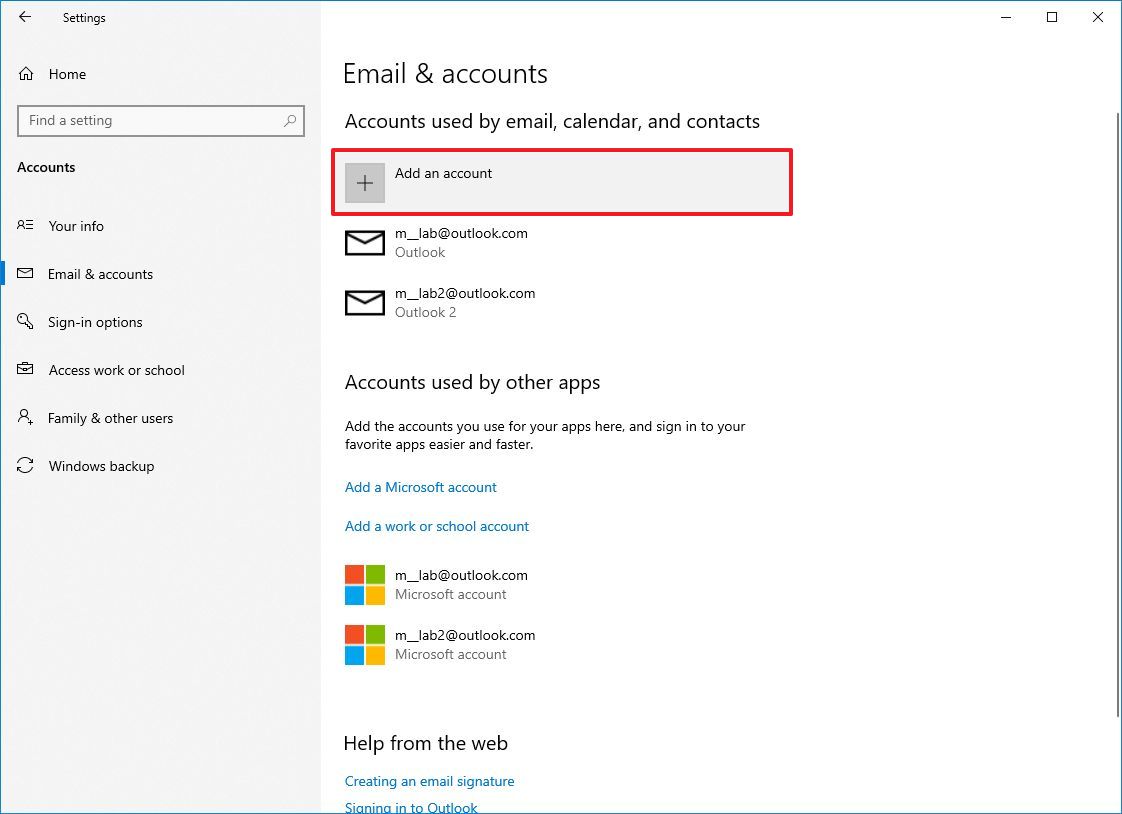
- Select the service provider — for example, Outlook, Google, or iCloud.
- Continue with the on-screen directions.
After you complete the steps, the account information will be available to connect with Microsoft Store apps.
Add accounts for work
To add work accounts for apps, use these steps:
- Open Settings.
- Click on Accounts.
- Click on Email & accounts.
- Under the «Accounts used by other apps» section, click the «Add a Microsoft account» or «Add a work or school» account.
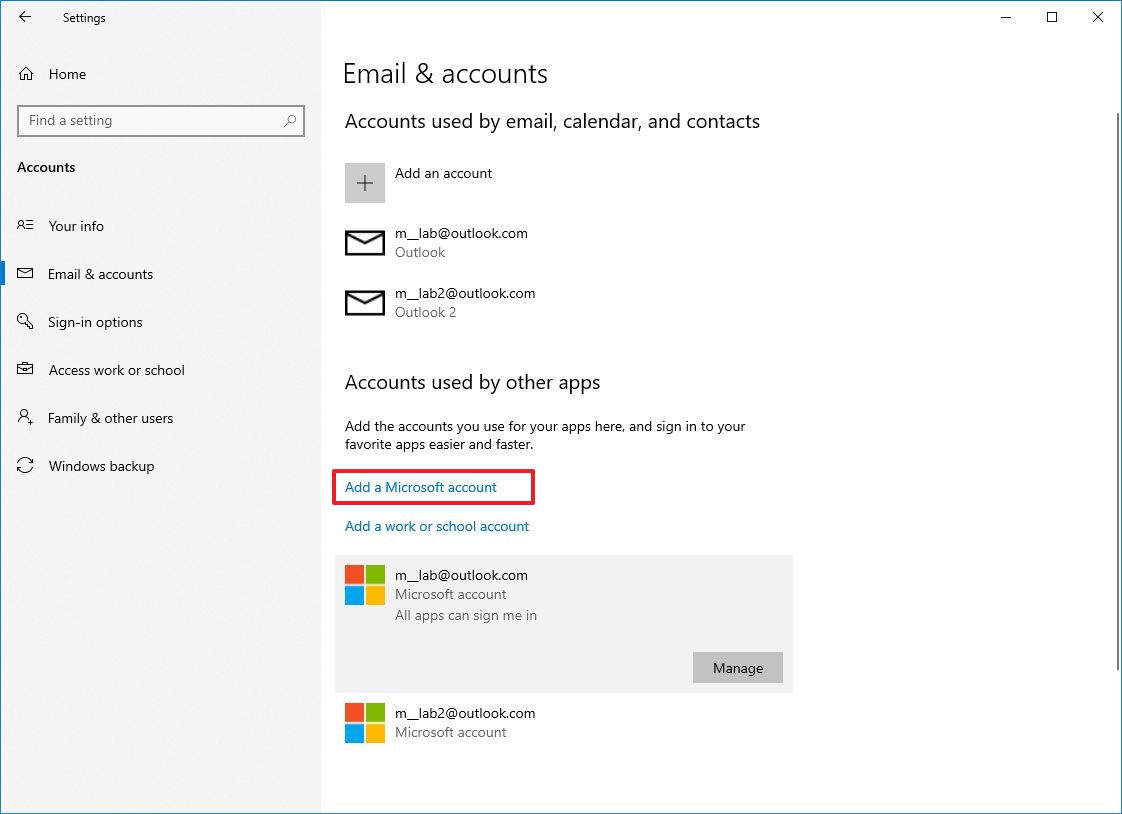
- Select the correct service.
- Continue with the on-screen directions.
Once you complete the steps, you will be able to quickly set up apps for work, such as OneDrive for business.
How to manage account sign-in options on Windows 10
On the Sign-in options page, you can also manage different authentication methods. For instance, you can change your account password, configure Windows Hello Face, PIN, Security Key, or Picture password, and you can even set up Dynamic Lock to lock the computer as you step away from the room.
Change account password
The option to change the password is only available for local accounts. If you have a Microsoft account, the option to change your password or picture password won’t be available. In this case, you will need to change your account password online.
To change the account password on Windows 10, use these steps:
- Open Settings.
- Click on Accounts.
- Click on Sign-in options.
- Select the Password option under the «Manage how you sign in to your device» section.
- Click the Change button.
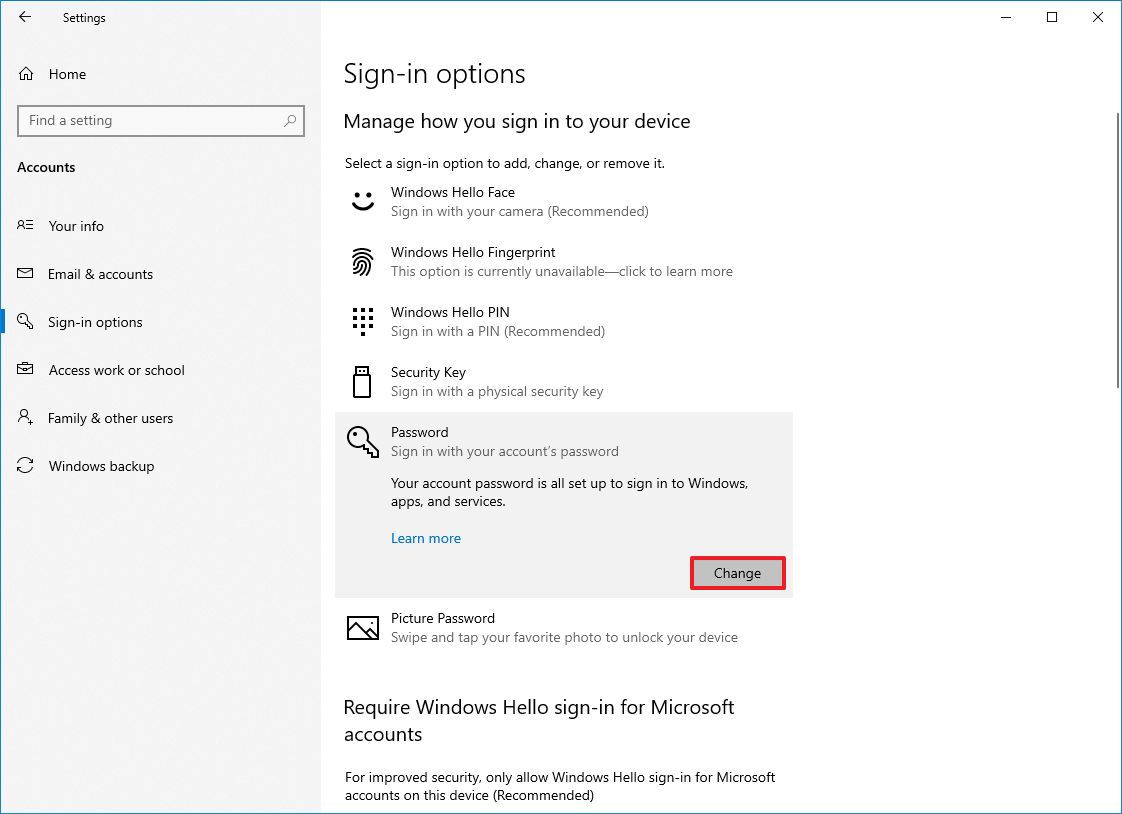
- Confirm the current password.
- Confirm the new password.
- Quick note: You can’t re-use a previous password. You must enter a new password.
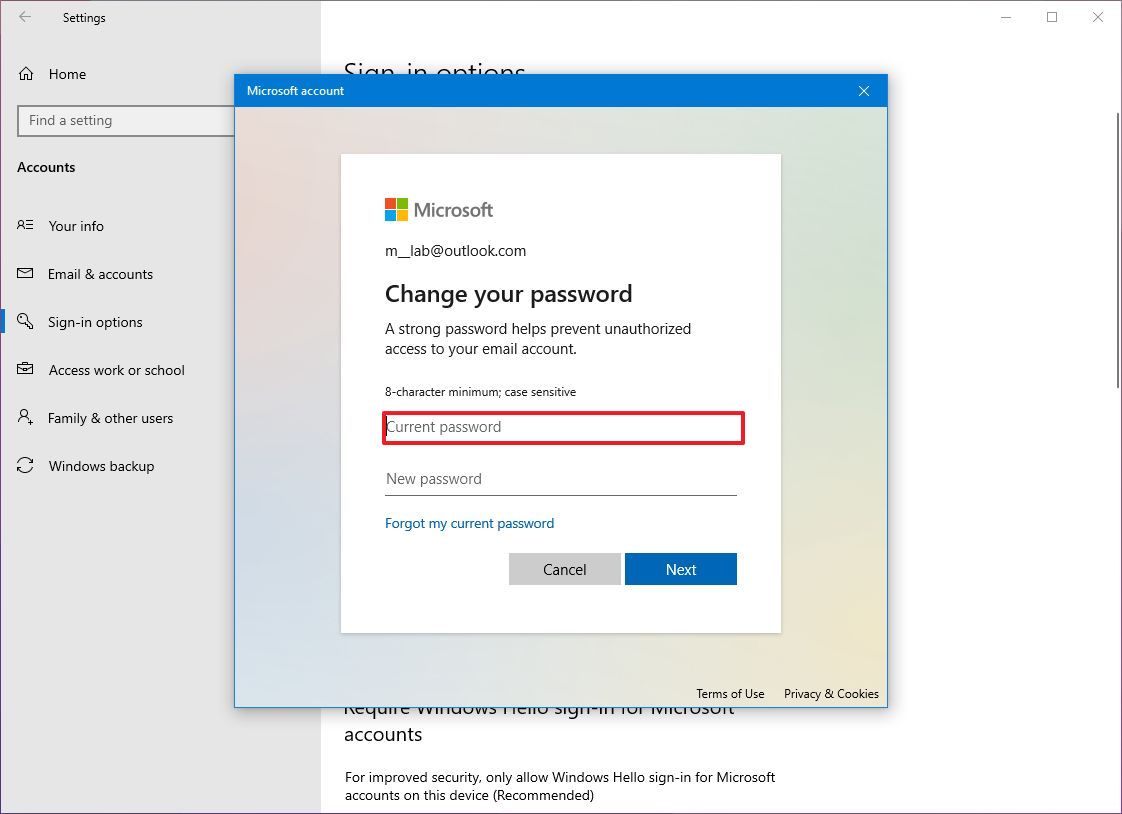
- Click the Next button.
- Continue with the on-screen directions (if applicable).
After you complete the steps, the new password will apply to the account and across devices and other Microsoft services.
Create Windows Hello PIN
On Windows 10, during the setup, the system should prompt you to create a PIN if you don’t have any other biometric hardware available on the computer, but you can also create a PIN manually.
To create a PIN on your Windows 10 account, use these steps:
- Open Settings.
- Click on Accounts.
- Click on Sign-in options.
- Select the «Windows Hello PIN» option under the «Manage how you sign in to your device» section.
- Click the Add button.

- Confirm your current password (if applicable).
- Click the Next button.
- Create a new PIN for your Windows 10 account.
- Quick tip: You can also check the available option to allow letters and symbols as part of your PIN to create something similar to a password but locally available.
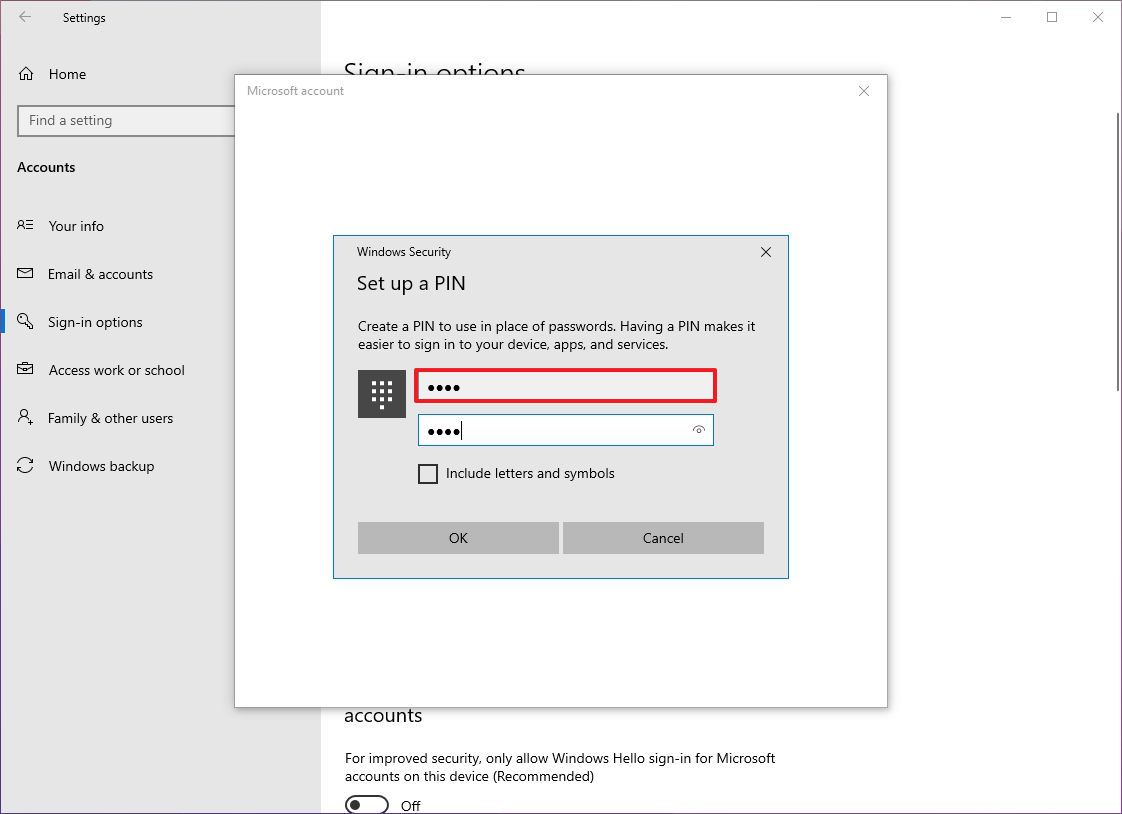
- Click the OK button.
Once you complete the steps, you can start using the PIN instead of a password to sign into your account.
Generally speaking, a PIN is more secure than a password because it’s only tied to one device, and it’s never transmitted over the network, and it only works locally. You can’t use it to access your device remotely, and you need to set it per device.
It’s worth noting that in a Microsoft account, you will only find an option to change your PIN since the system now forces you to create a PIN during the account setup.
Create picture password
If you are using a local account on a touch-enabled device, Windows 10 includes a feature that lets you use a picture as a password.
To configure a picture password on Windows 10, use these steps:
- Open Settings.
- Click on Accounts.
- Click on Sign-in options.
- Select the Picture Password option under the «Manage how you sign in to your device» section.
- Click the Add button.
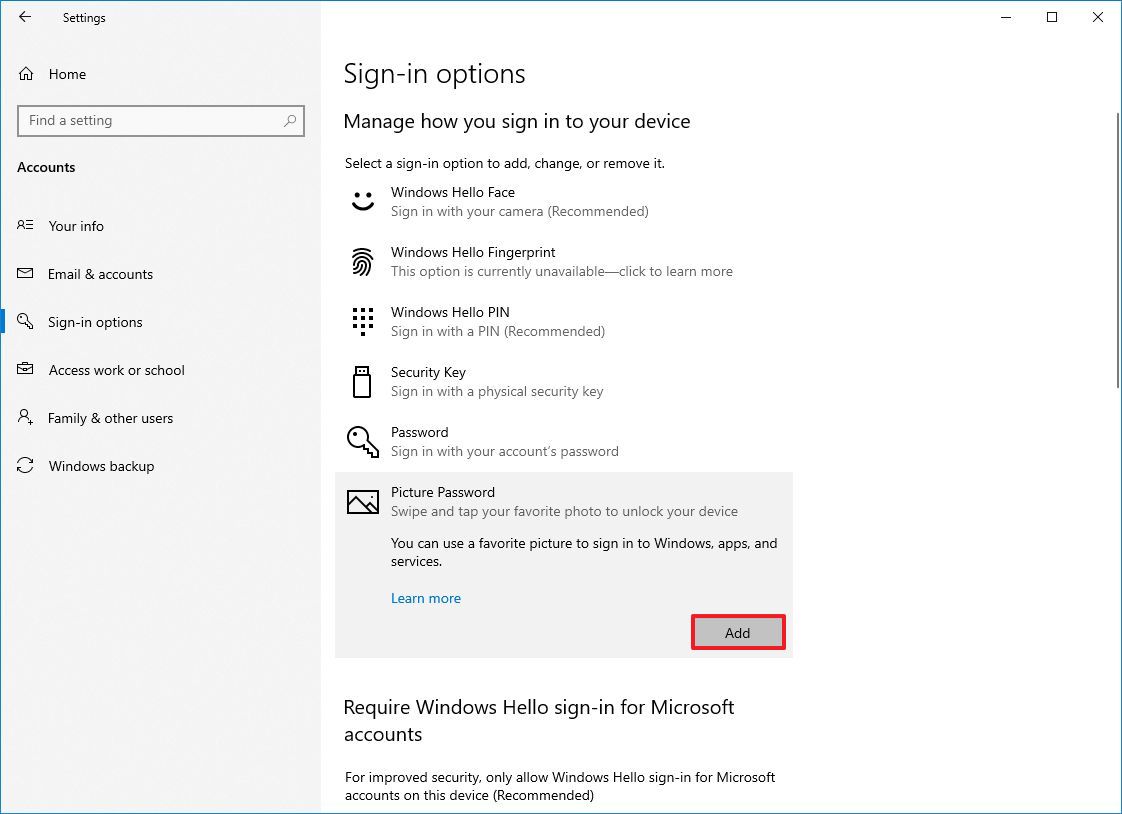
- Confirm the current password.
- Click the «Choose picture» button from the left pane.
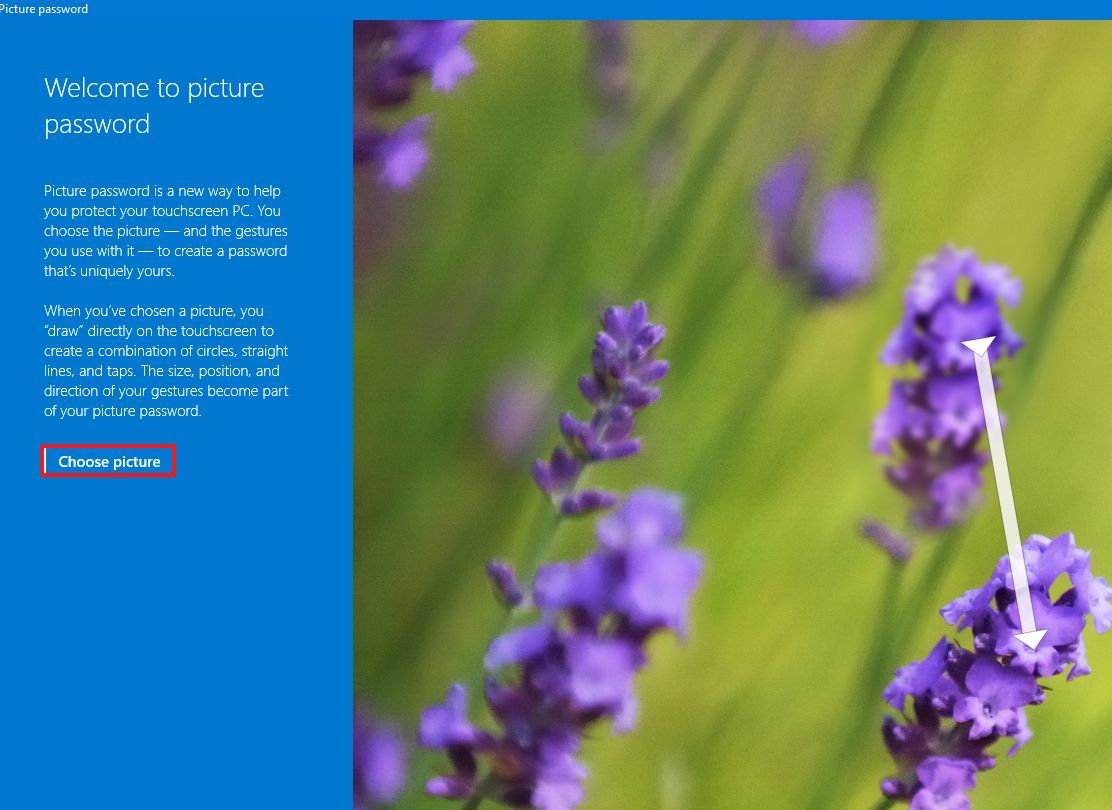
- Select a new image to set as a password.
- Click the Open button.
- Click the «Use this picture» button.
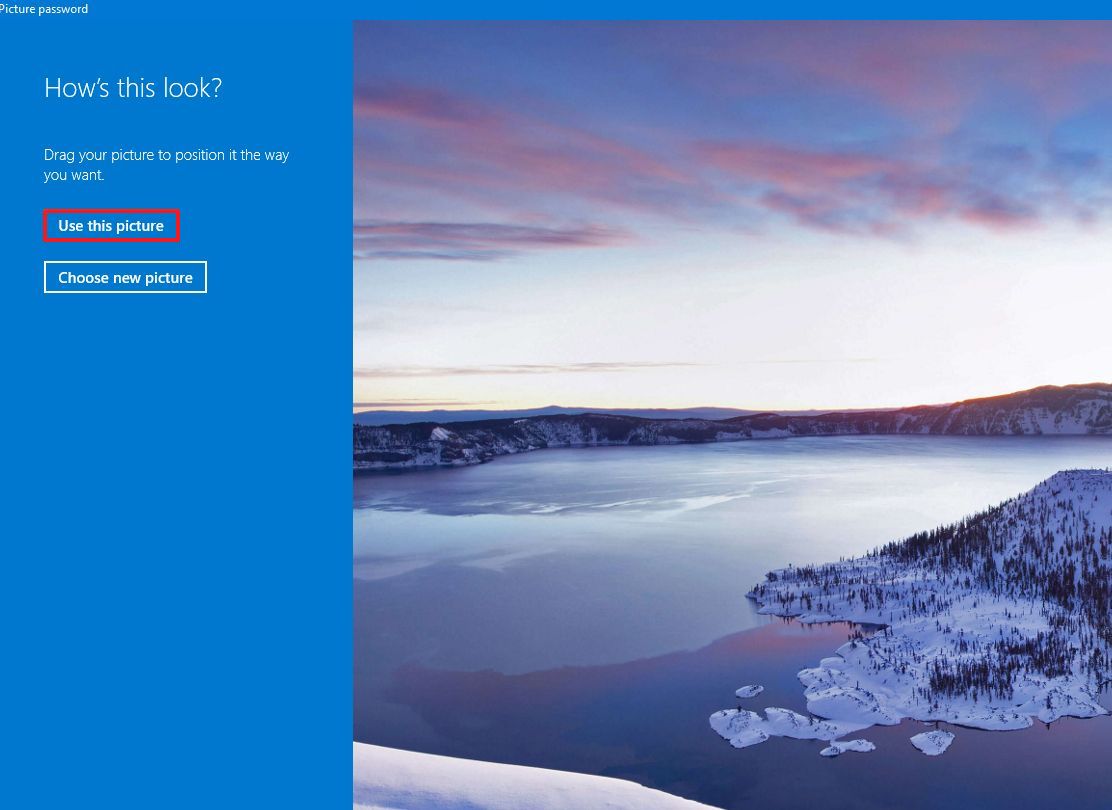
- Confirm three gestures on the image, including circles, straight lines, taps, or a combination of the three, which you’ll use as a password.
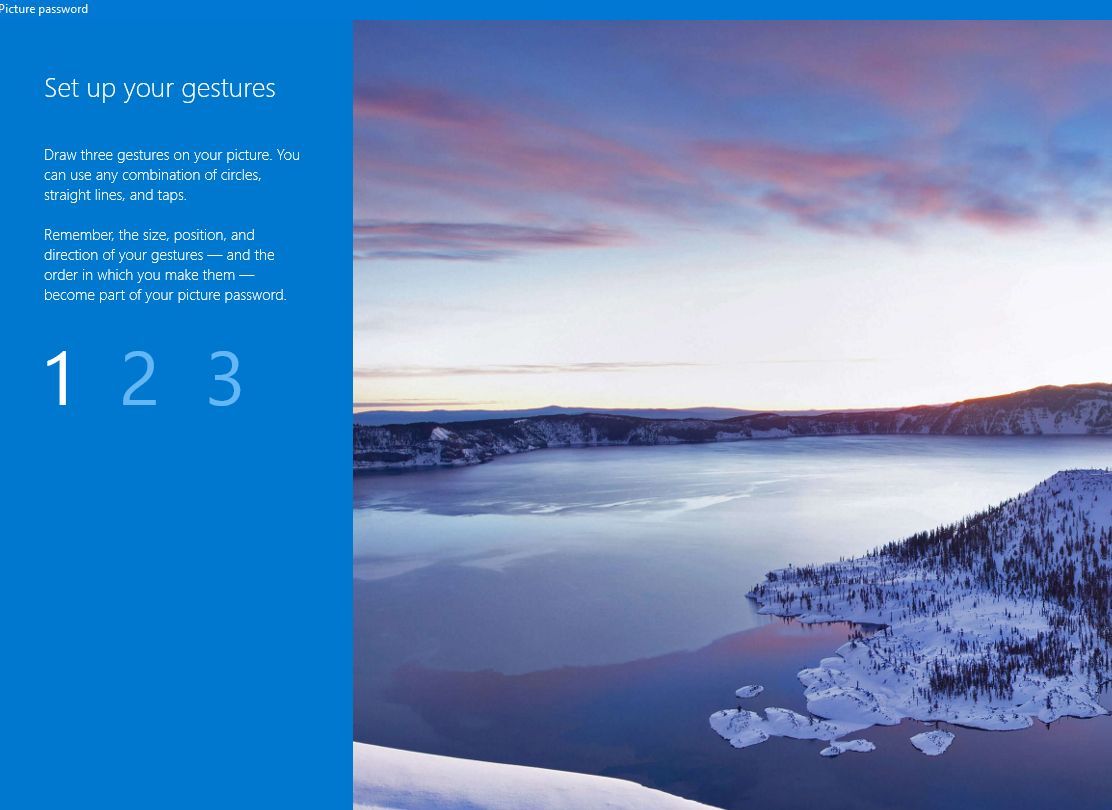
- Repeat the gestures to confirm.
- Click the Finish button.
After you complete the steps, sign out of the account, and when you try to sign back in, you will use the gesture patterns you configured to sign in.
On compatible devices, you can also configure Windows Hello Face to sign into your device using facial recognition.
If your device doesn’t include biometric authentication hardware, you can always get a fingerprint scanner add-on or a camera with Windows Hello support.
Require password on wake
You can also decide whether the system should prompt you to enter a password when the computer wakes up from sleep.
To enable or disable sign-in on wake on Windows 10, use these steps:
- Open Settings.
- Click on Accounts.
- Click on Sign-in options.
- Under «Require sign-in,» use the drop-down menu and select:
- Never — a password won’t be required after the computer resumes from sleep.
- When PC wakes up from sleep — you will need to enter a password when your computer resumes from sleep.
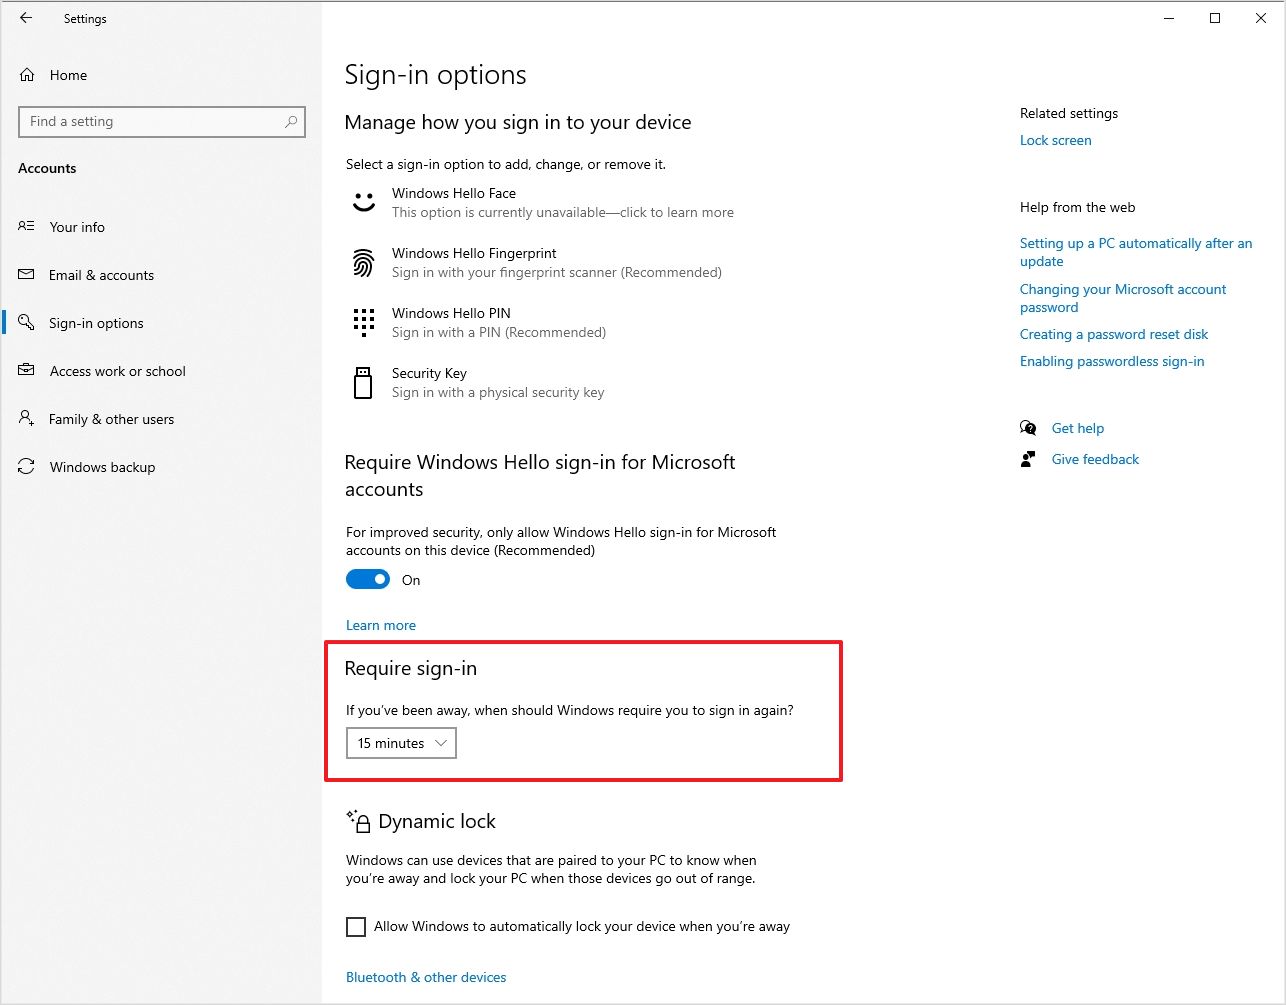
Once you complete the steps, sign-in will be required when the device wakes up from sleep, depending on your configuration.
Enable Dynamic lock
Dynamic Lock is a security feature that locks your computer when you step away from the room. The feature uses proximity technology, which means that you’ll need to connect a Bluetooth device like a phone or wearable before you can configure it. After it’s enabled, if you step away with the Bluetooth device, after 30 seconds, Windows 10 will lock automatically.
To enable Dynamic Lock on Windows 10, use these steps:
- Open Settings.
- Click on Devices.
- Click on Bluetooth & other devices.
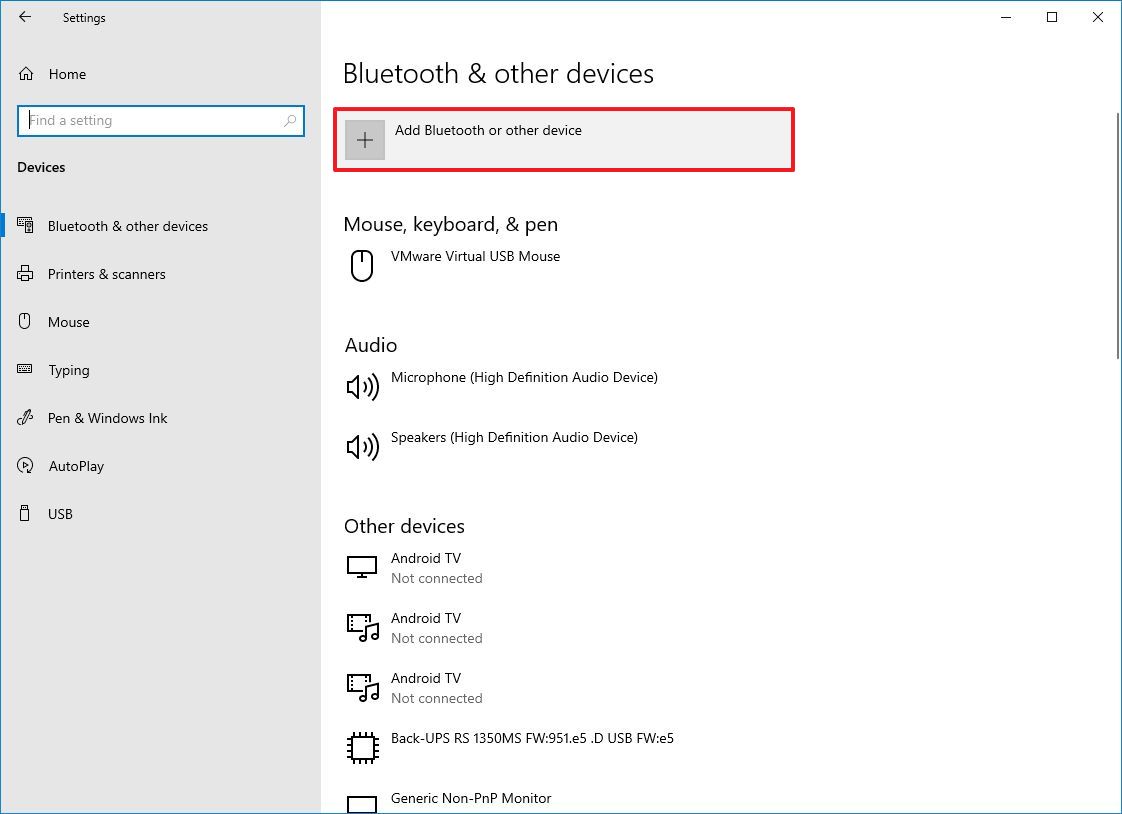
- Click the Bluetooth option.
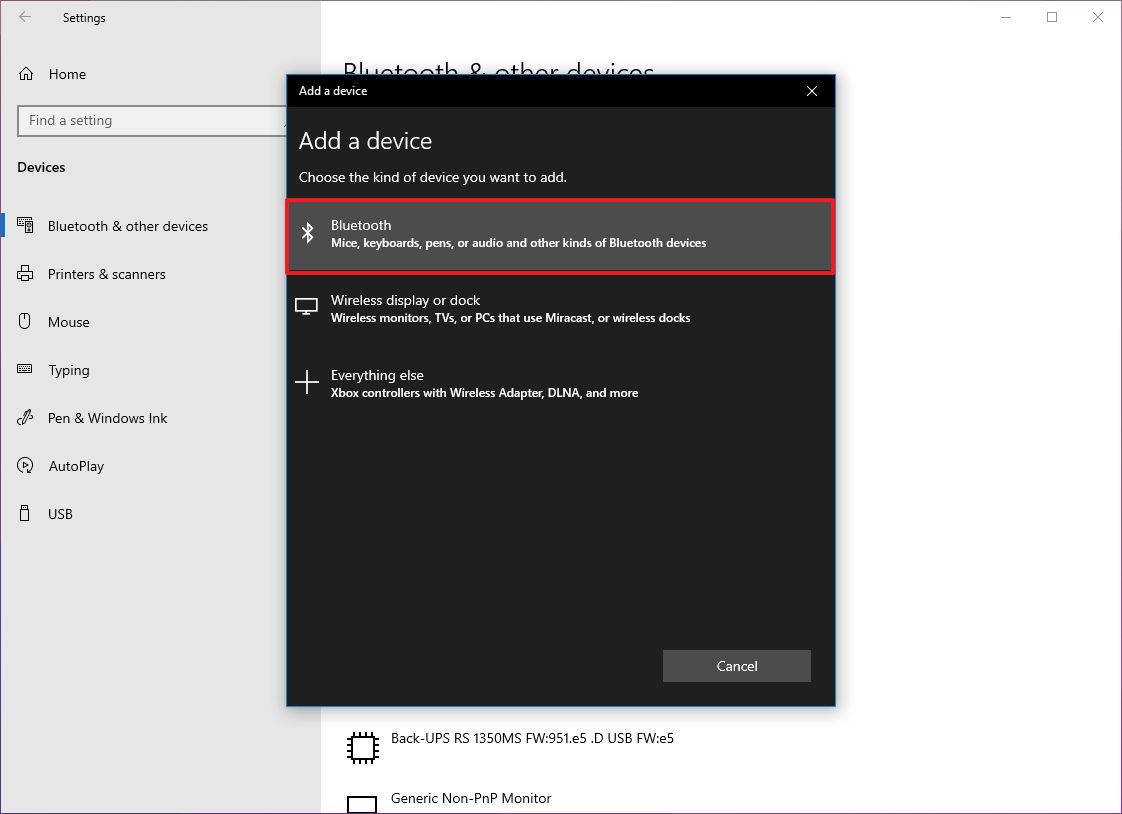
- Turn on Bluetooth on the device you want to pair.
- Select the device from the list.
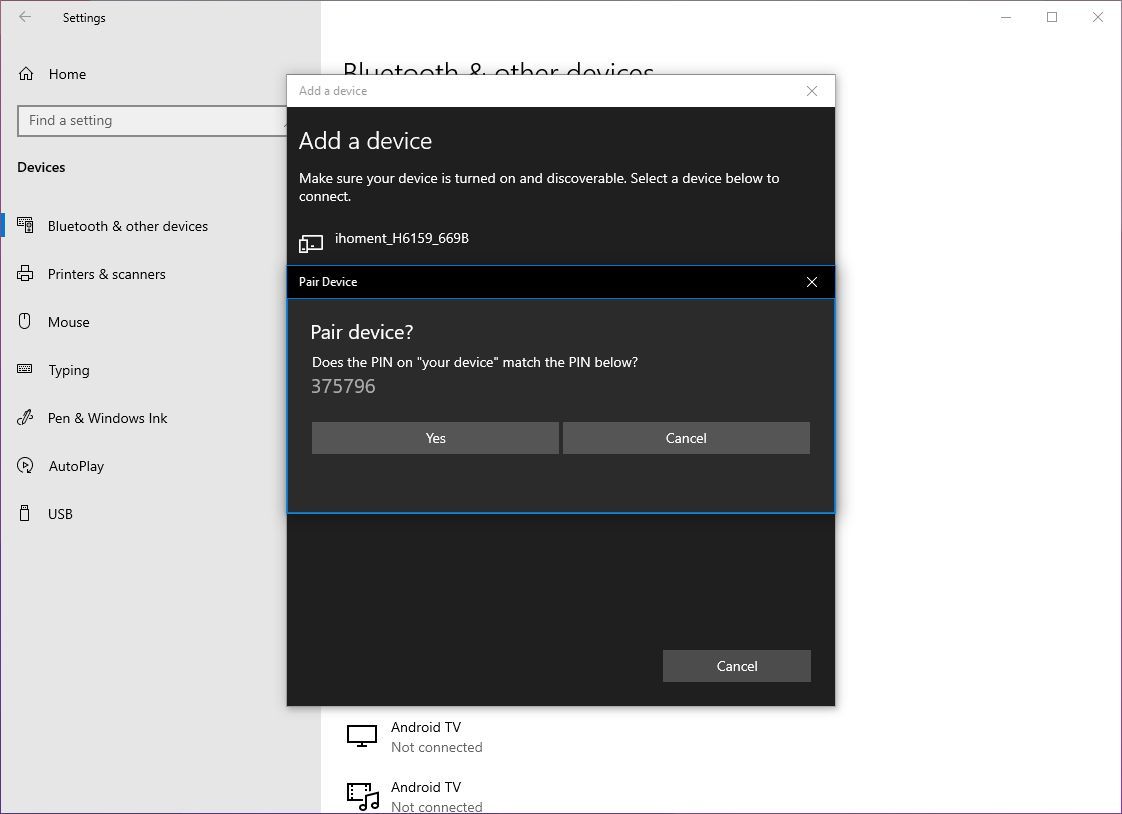
- Continue with the on-screen directions to complete the pairing.
- Click the Home button.
- Click on Accounts.
- Click on Sign-in options.
- Check the «Allow Windows to automatically lock the device when you’re away» toggle switch under the «Dynamic lock» section.
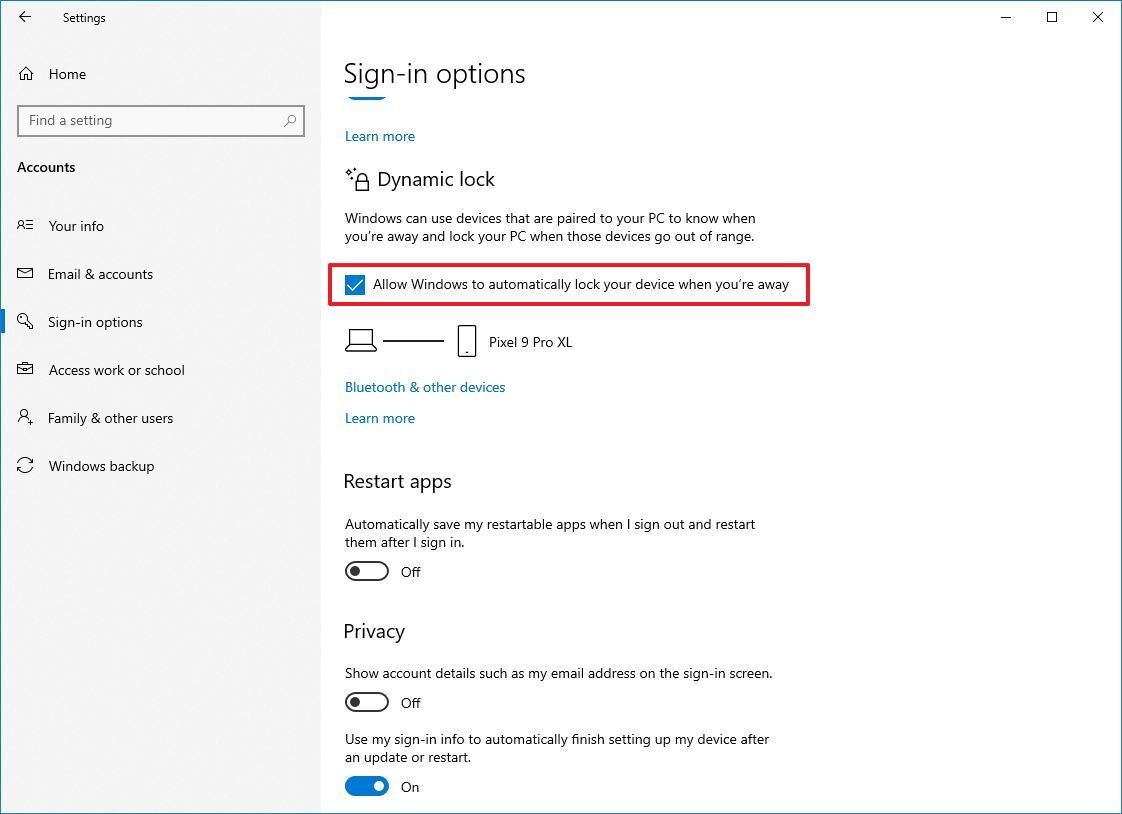
Once you complete the steps, you can test the feature by stepping away from the room with your Bluetooth device, and then after 30 seconds, Windows 10 should lock the laptop automatically.
How to connect to an organization on Windows 10
On the «Access work or school» page, you will find the settings to connect to an organization to access shared resources, such as network resources, apps, and emails.
Typically, if you work in an organization, the network administrator will provide the information to add the device to the network.
To connect a device to the network, use these steps:
- Open Settings.
- Click on Accounts.
- Click on Access work or school.
- Click the Connect button.
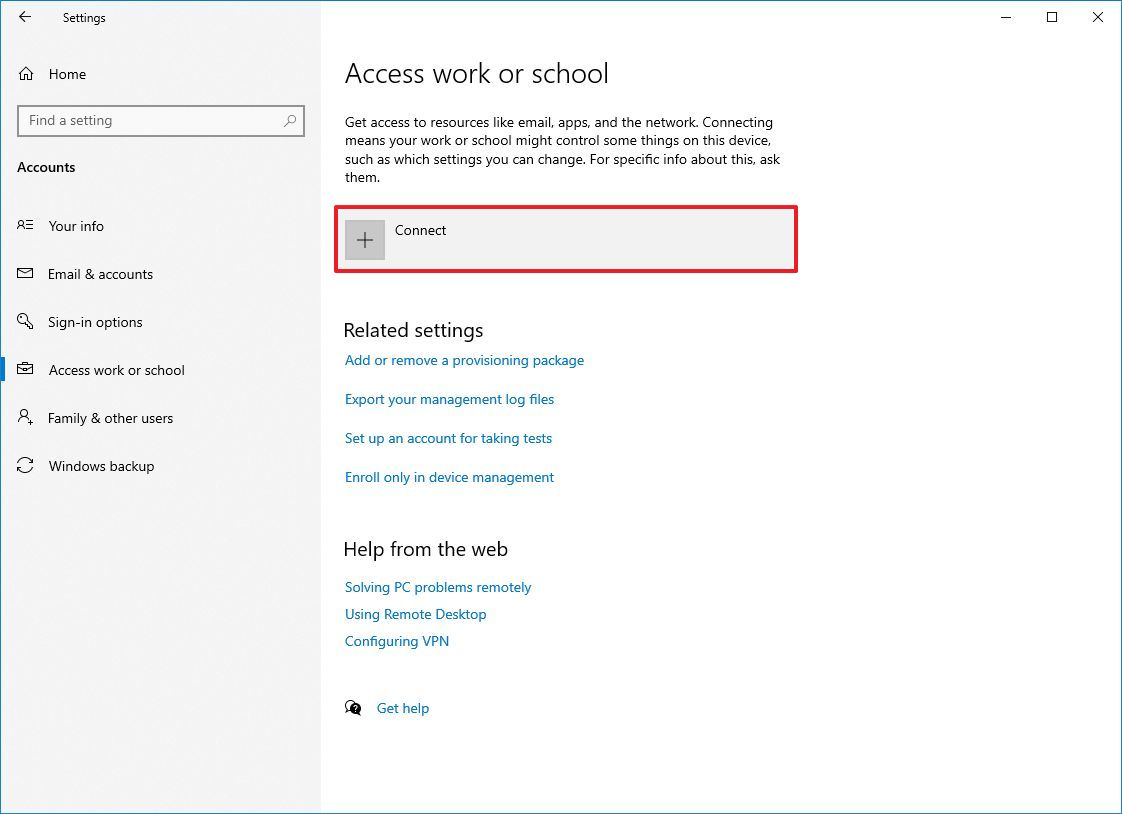
- Confirm your work or school account.
- Quick note: You can also select the option to join an Azure Active Directory or local Active Directory domain from this page.
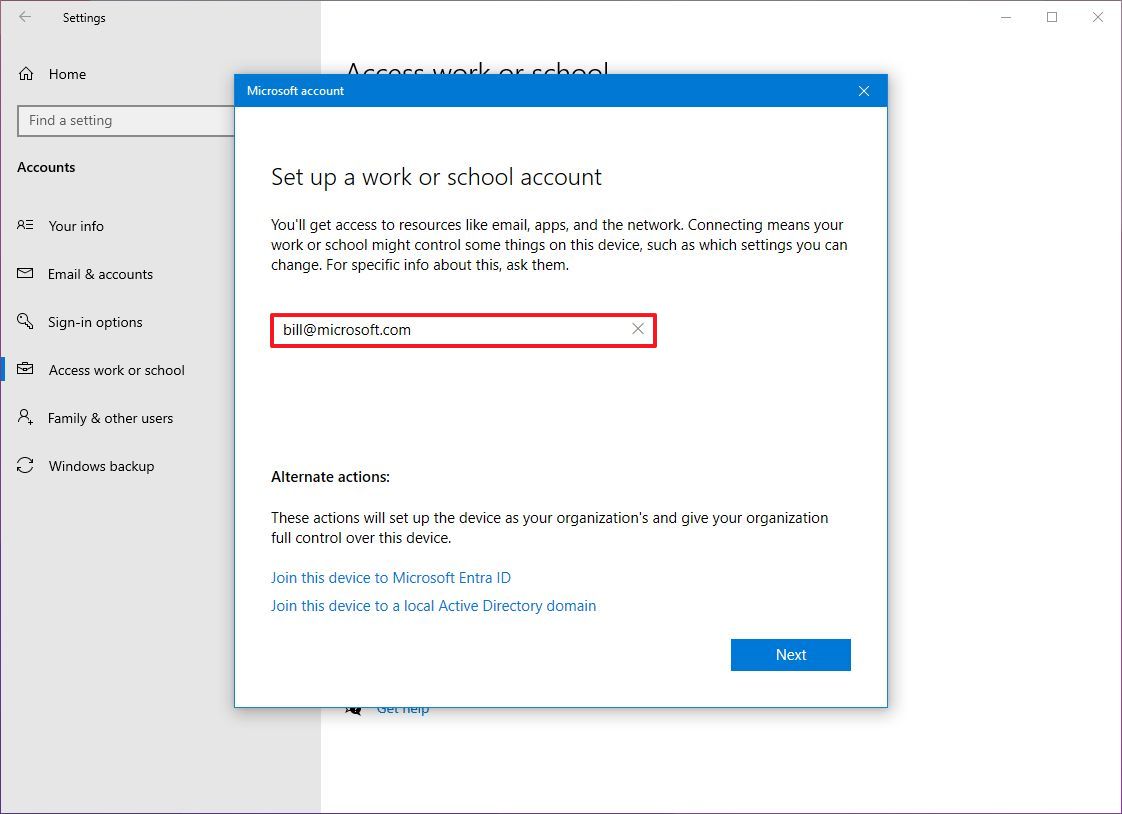
- Click the Next button.
- Continue with the on-screen directions (if applicable).
After you complete the steps, you will have access to the organization’s resources as configured by the network administrator. Usually, these are not settings you’ll be customizing on a computer you use at home.
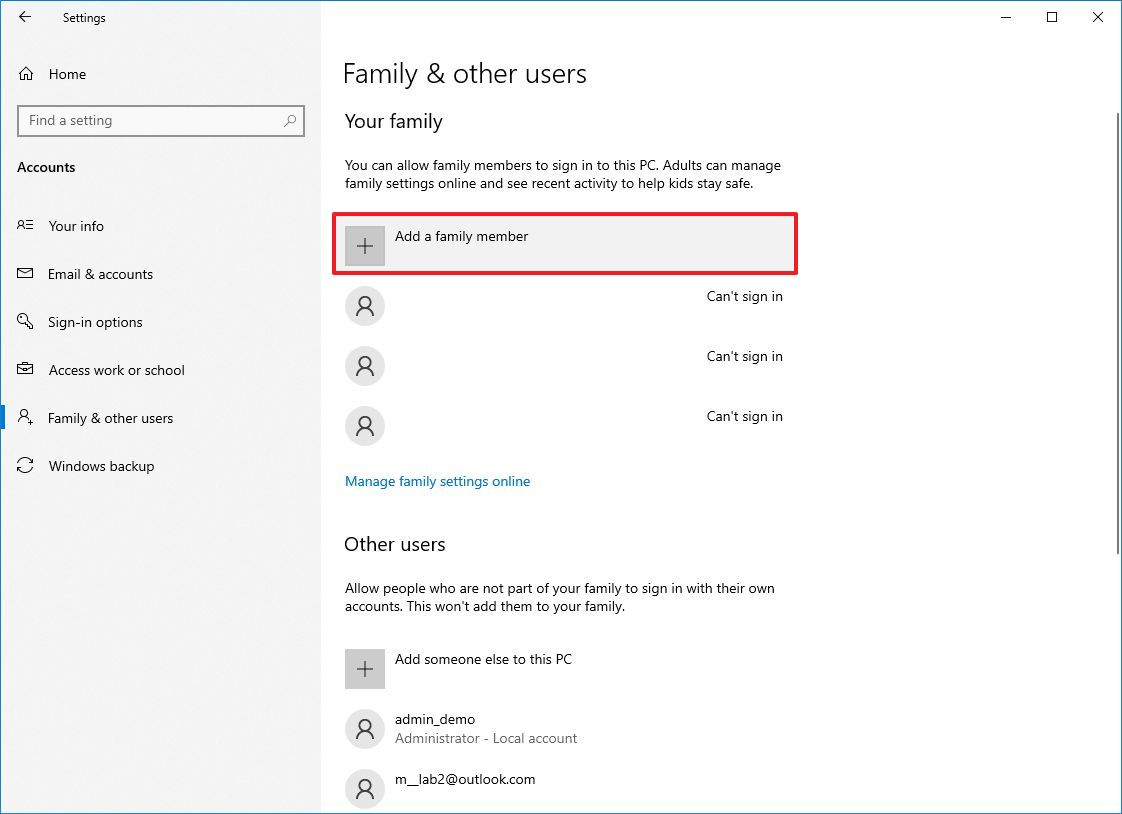
How to create multiple accounts on Windows 10
If you have to share a computer with multiple people, the «Family & other people» page includes the settings to add, remove, and manage multiple user accounts.
Add family accounts
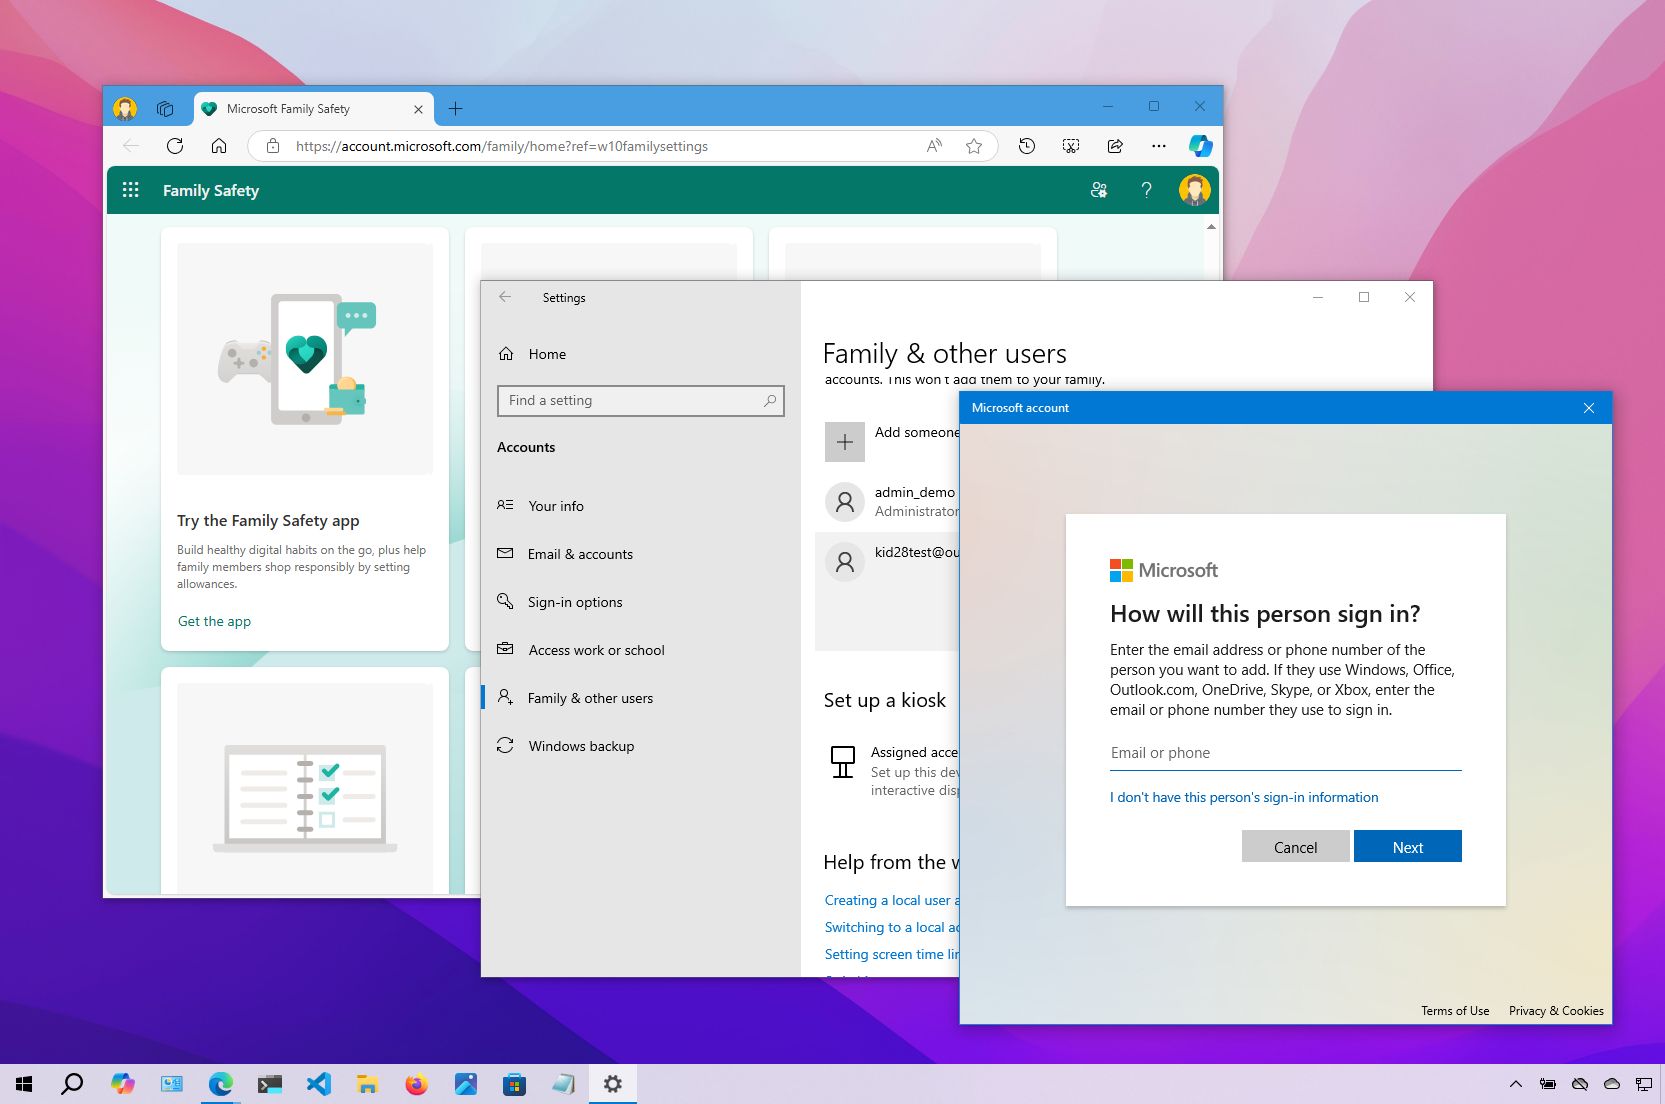
Under the «Your family» section, you can add family members to the device, allowing each person to have their own experience, settings, apps, and a place to store files separately from everyone else.
You can add two types of family accounts, including a «Child» and «Adult,» and each account type provides different features.
Creating child account
On Windows 10, a Child account provides a controlled environment with features to keep young members safe while using apps, playing games, and browsing the internet. When using this account type, the person will be able to use the computer, personalize the desktop, launch applications, create and store files, and safely browse the internet using Microsoft Edge. Also, you’ll be able to control their activities, enforce limits on apps and games, control screen time, and more using the Microsoft family dashboard online.
To create a child account on Windows 10, use these steps:
- Open Settings.
- Click on Accounts.
- Click on Family & other users.
- Click the «Add a family member» button under the «Your family» section.
- Quick note: If the young person already has an account, you can enter it in the email field to continue with the setup.
- Click the «Create one for a child» option.

- Confirm the email address of the young person you want to add.
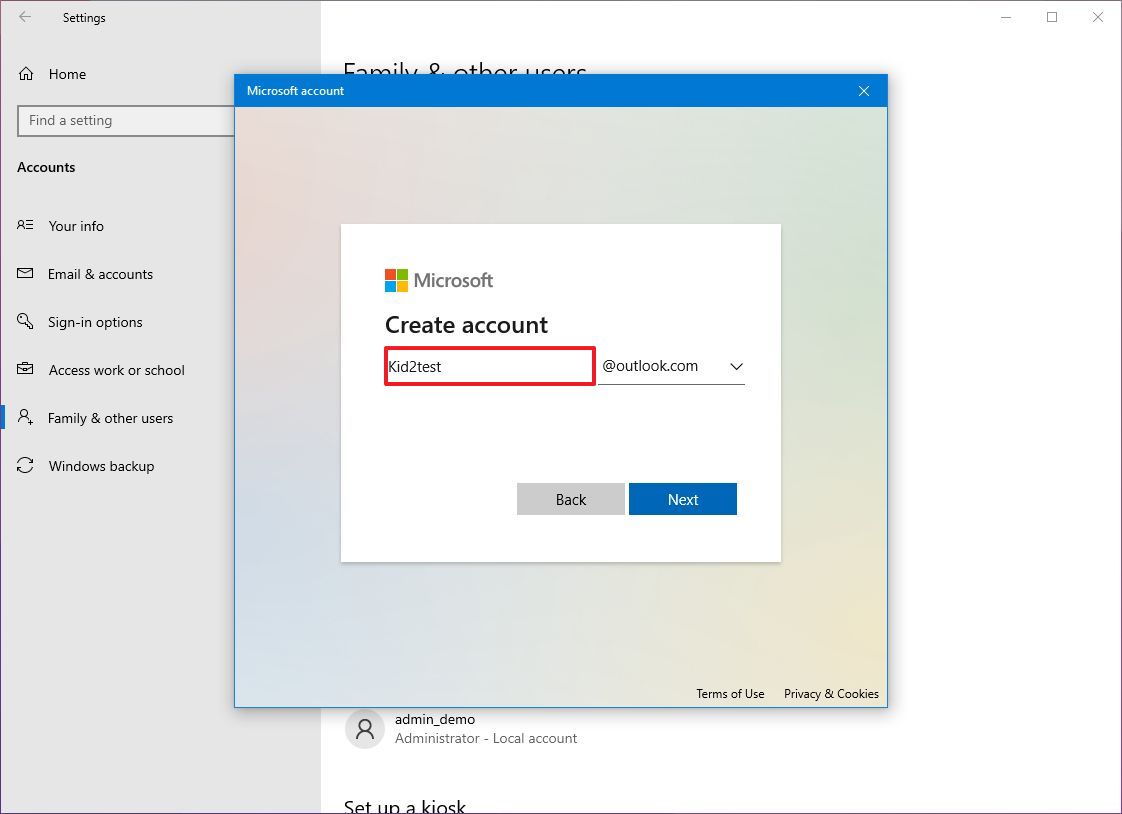
- Click the Next button.
- Create a new password for the child’s account.
- Click the Next button.
- Confirm the name of the person.
- Click the Next button.
- Confirm the person’s birthday.
- Click the Next button.
- Resolve the I’m a robot puzzle.
- Continue with the on-screen directions (as applicable).
Once you complete the steps, the account with limited access will be configured on Windows 10, and the user will be able to sign in immediately.
If you have to configure a kid-friendly account in Windows 10, this guide walks you through everything you need to know.
Create adult account
An adult account is very similar to a traditional profile. However, adding someone as part of your family allows them to manage child accounts.
To create an adult account on Windows 10, use these steps:
- Open Settings.
- Click on Accounts.
- Click on Family & other users.
- Click the Add a family member option under the «Your family» section.
- Confirm the family member’s email address you want to add.
- Click the Next button.
- Select the Organizer option.
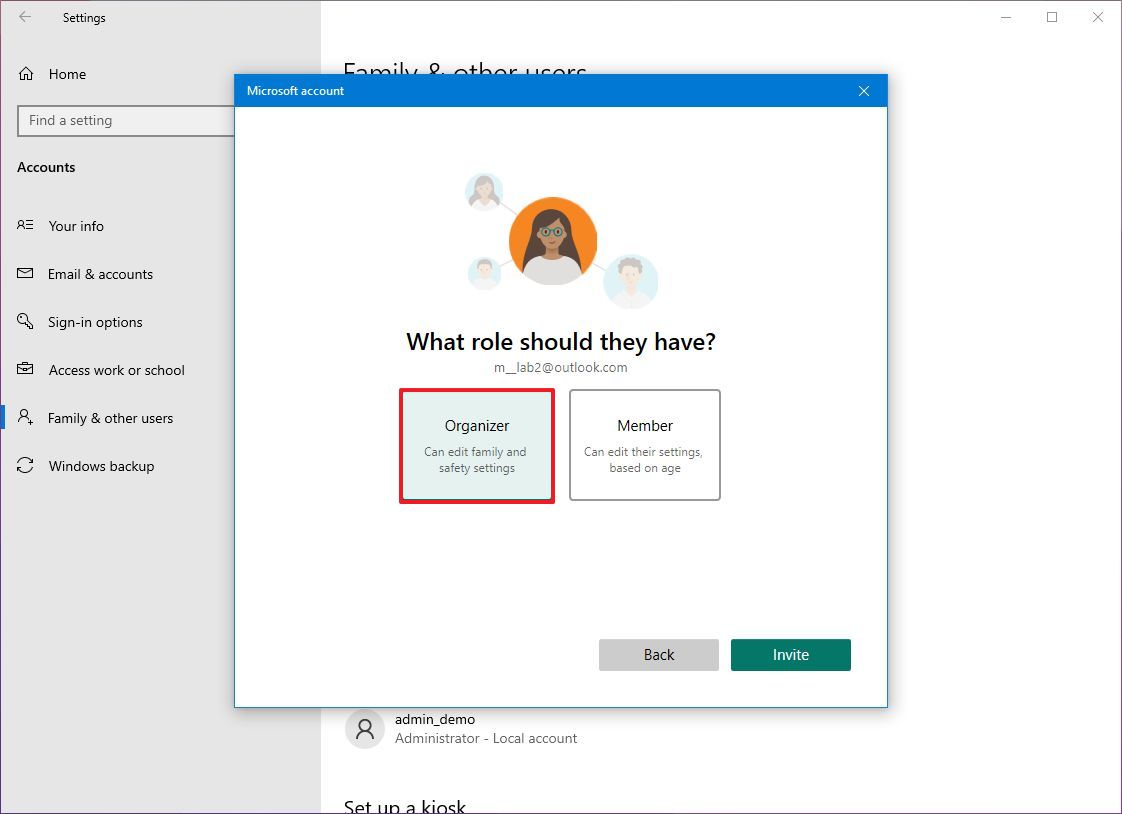
- Click the Invite button.
After you complete the steps, the new family member will receive an email invitation that they must accept to use the computer and manage parental control settings using the online dashboard.
Similar to a traditional account, this account is a Standard type, which allows the user to complete most tasks. However, they can’t change security settings, install apps, or modify anything that could affect other users.
If you want to change the account type, you can learn more about this process in this guide.
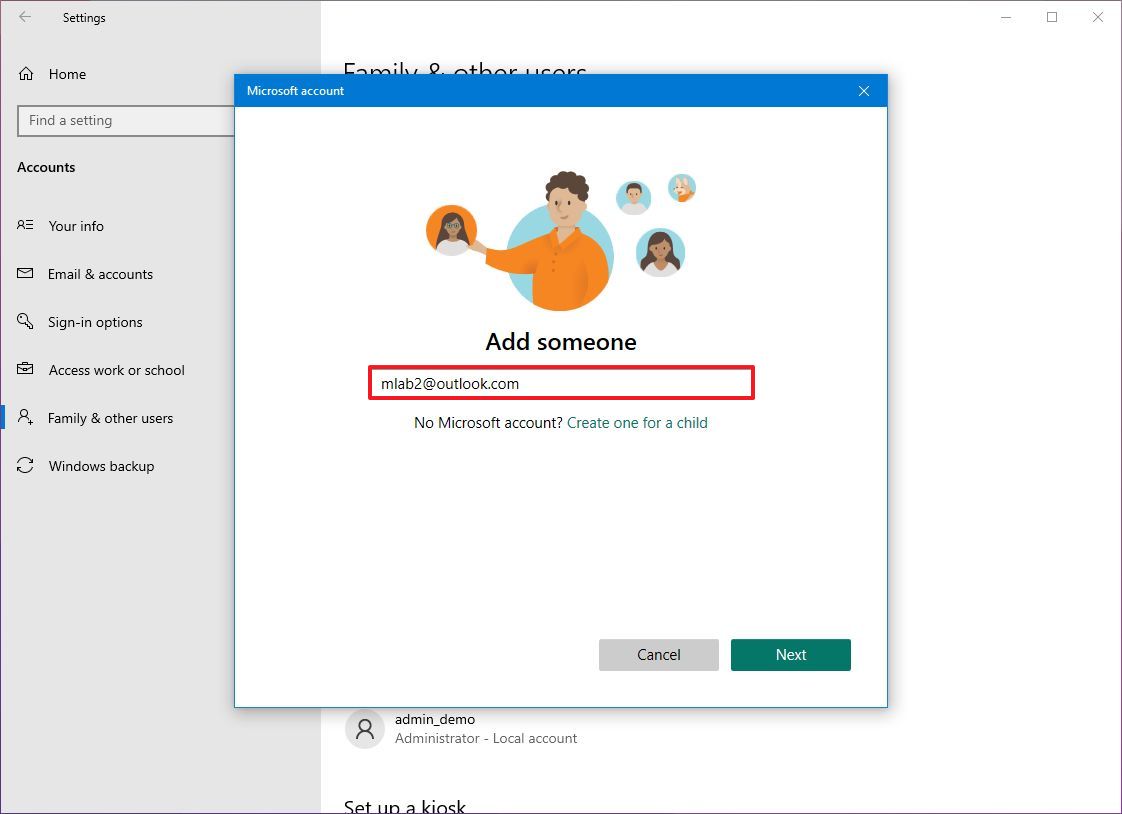
Creating non-family member account
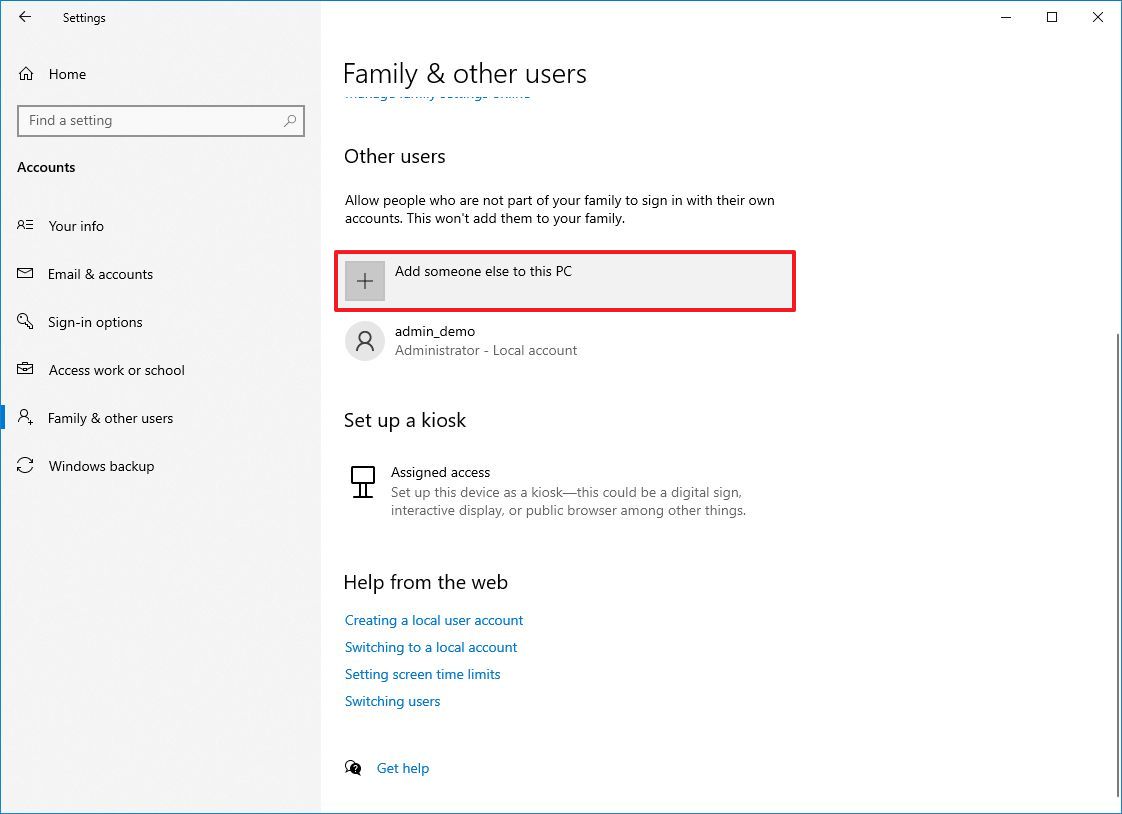
On the same «Family & other users» page, under the «Other users» section, you will find the settings to create new accounts for people who are not part of your family. Typically, these are the settings you would use to add anyone to your computer.
Set up Microsoft account
When you need to create a Windows 10 account, using a Microsoft account is the recommended method because it’s easier to set up, settings will sync across devices, and users can recover their passwords quickly.
To add a new Windows 10 member using a Microsoft account, use these steps:
- Open Settings.
- Click on Accounts.
- Click on Family & other users.
- Click the «Add someone else to this PC» option under the «Other users» section.
- Confirm the email address or phone number of the person you want to add.
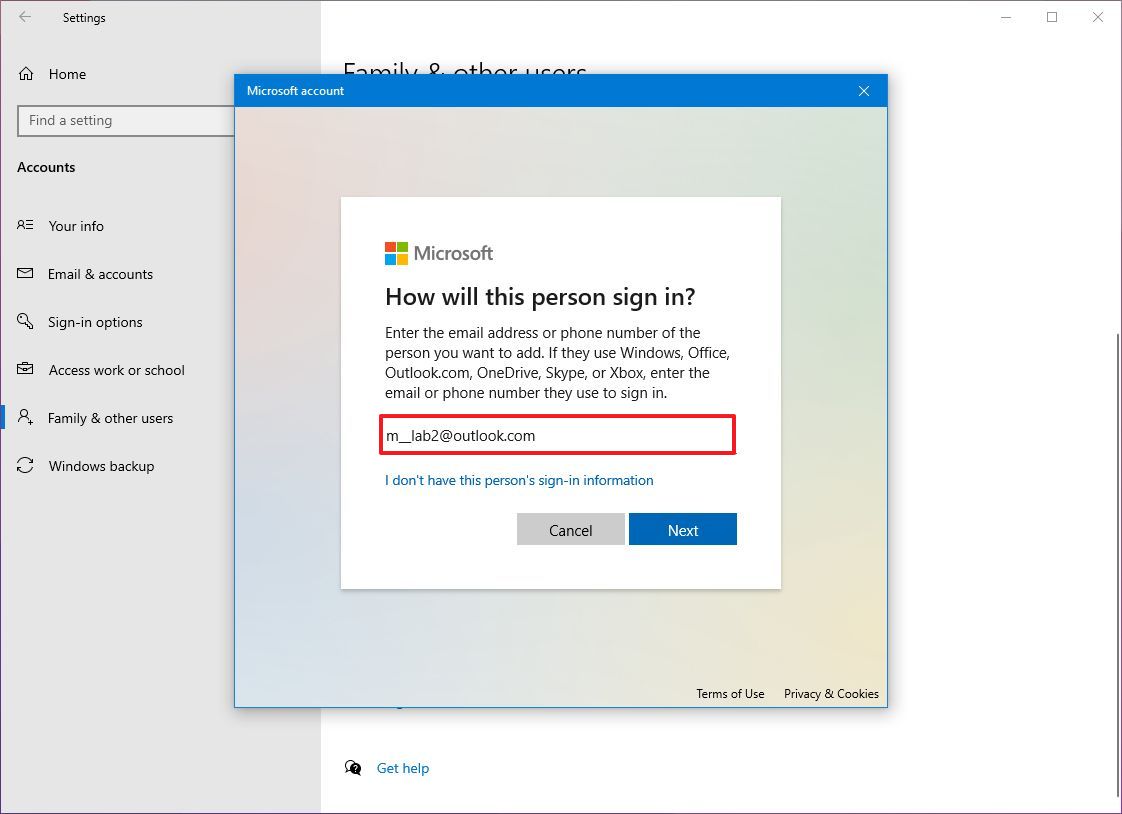
- Click the Next button.
- Click the Finish button.
Once you complete the steps, the user can start using the device immediately as a standard user. If you want to change the account type to administrator, you need to select the account, click the «Change account type» button, select the «Administrator» option, and click the «OK» button (usually not recommended).
Set up local account
If you prefer to use a more traditional account approach, you can still create a local account without the benefits of cloud integration that are available with a Microsoft account.
To create a local user account on Windows 10, use these steps:
- Open Settings.
- Click on Accounts.
- Click on Family & other users.
- Click the «Add someone else to this PC» option under the «Other users» section.
- Click the «I don’t have this person’s sign-in information» option.
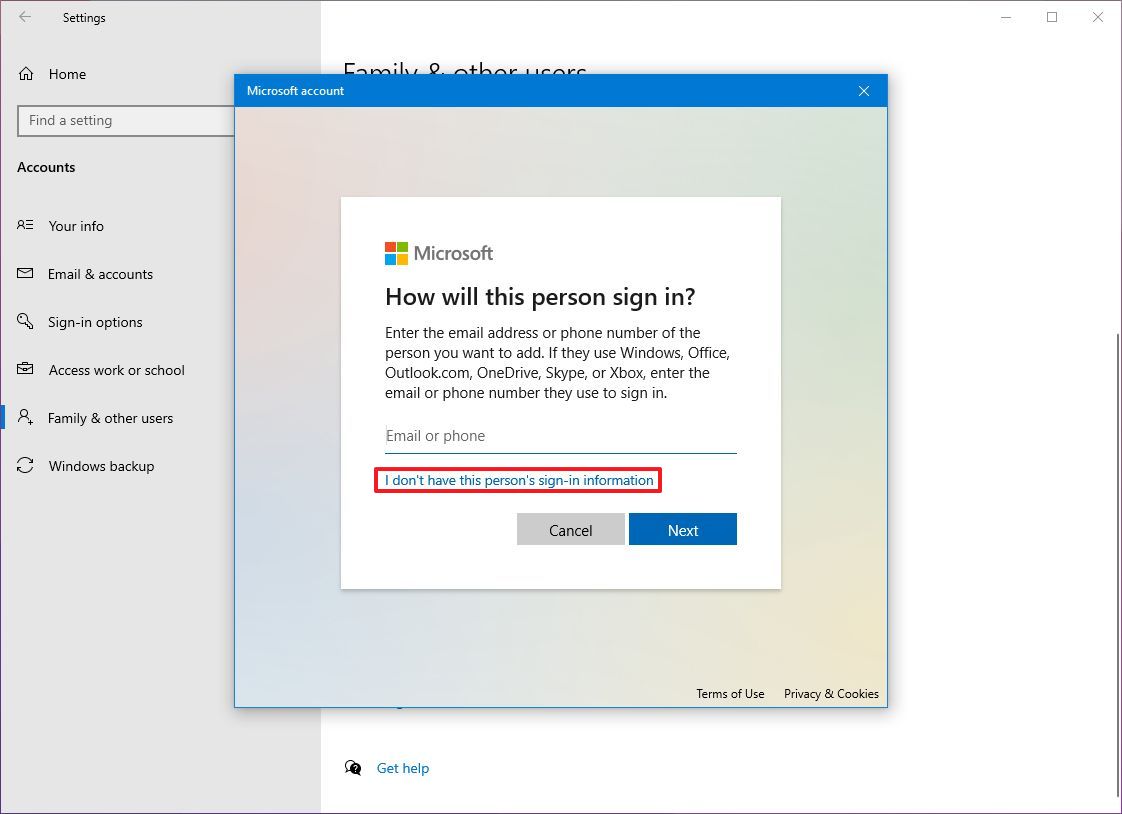
- Click the «Add a user without a Microsoft account» option.
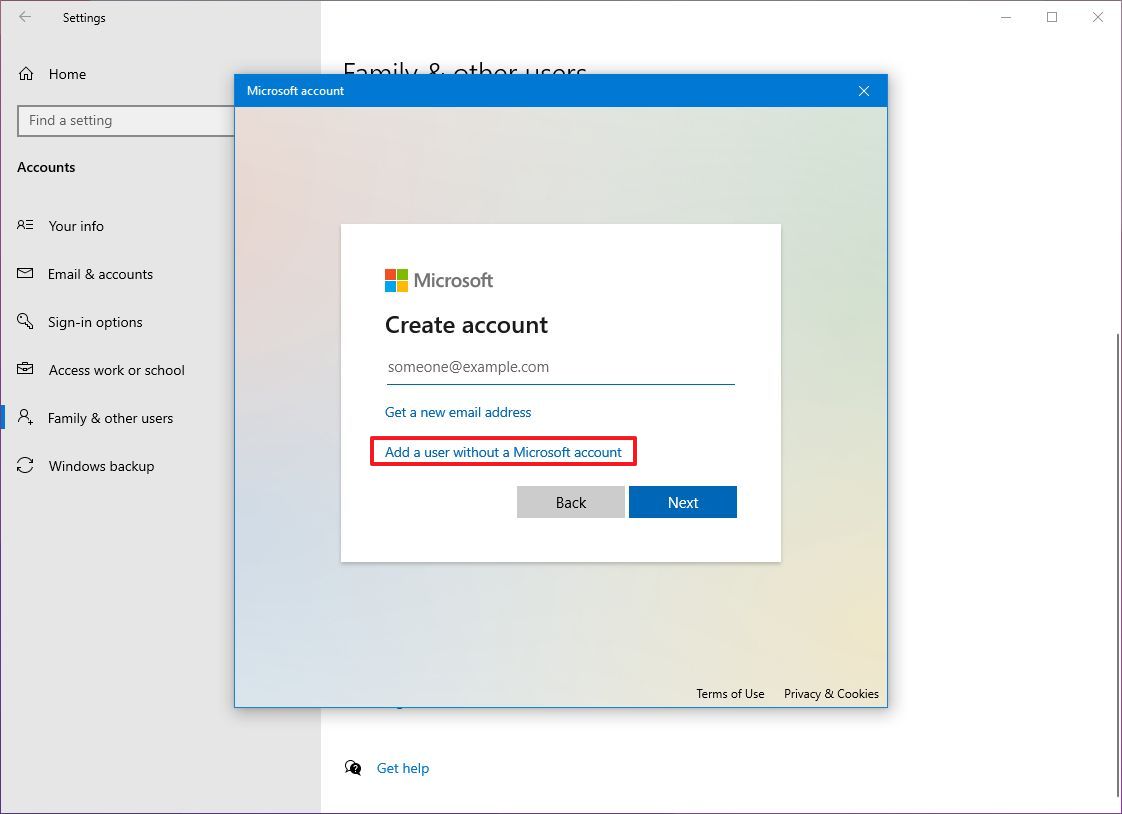
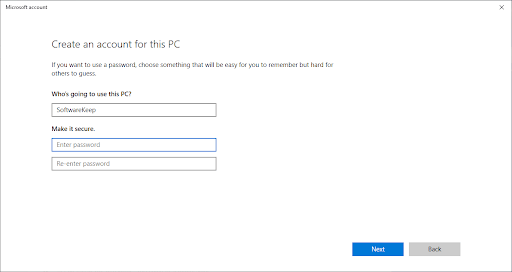
- Confirm the username.
- Create a strong password.
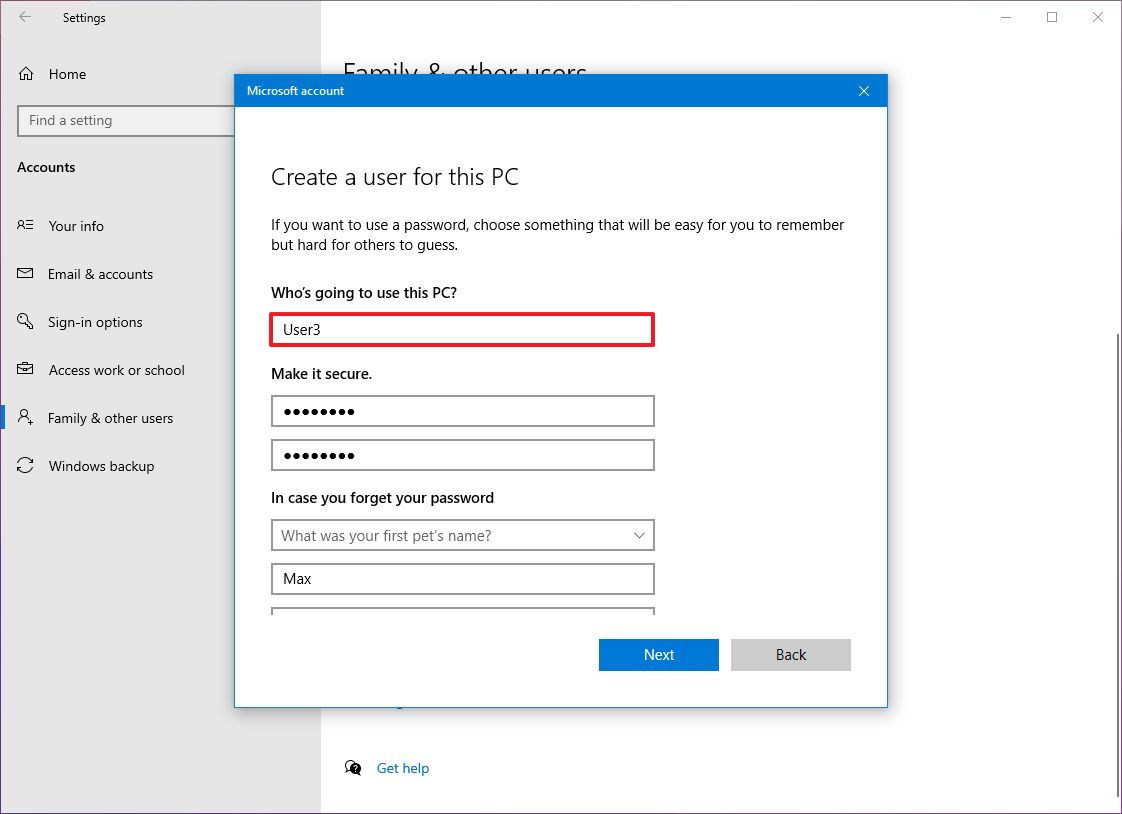
- Complete the security questions to have the ability to reset the password from the Sign-in screen.
- Click the Next button.
After you complete the steps, the local account will be created as a Standard account type without the benefits of a cloud-connected account.
In addition, from this page, you can also set up a kiosk account, which allows network administrators to configure a computer as a kiosk device to serve a specific purpose in the organization.
How to remove an account and data on Windows 10
When you need to delete an account, the steps will be slightly different depending on the type of account.
Remove family account
To delete a family member account, use these steps:
- Open Settings.
- Click on Accounts.
- Click on Family & other users.
- Click the «Manage family settings online» option under the «Your family» section.
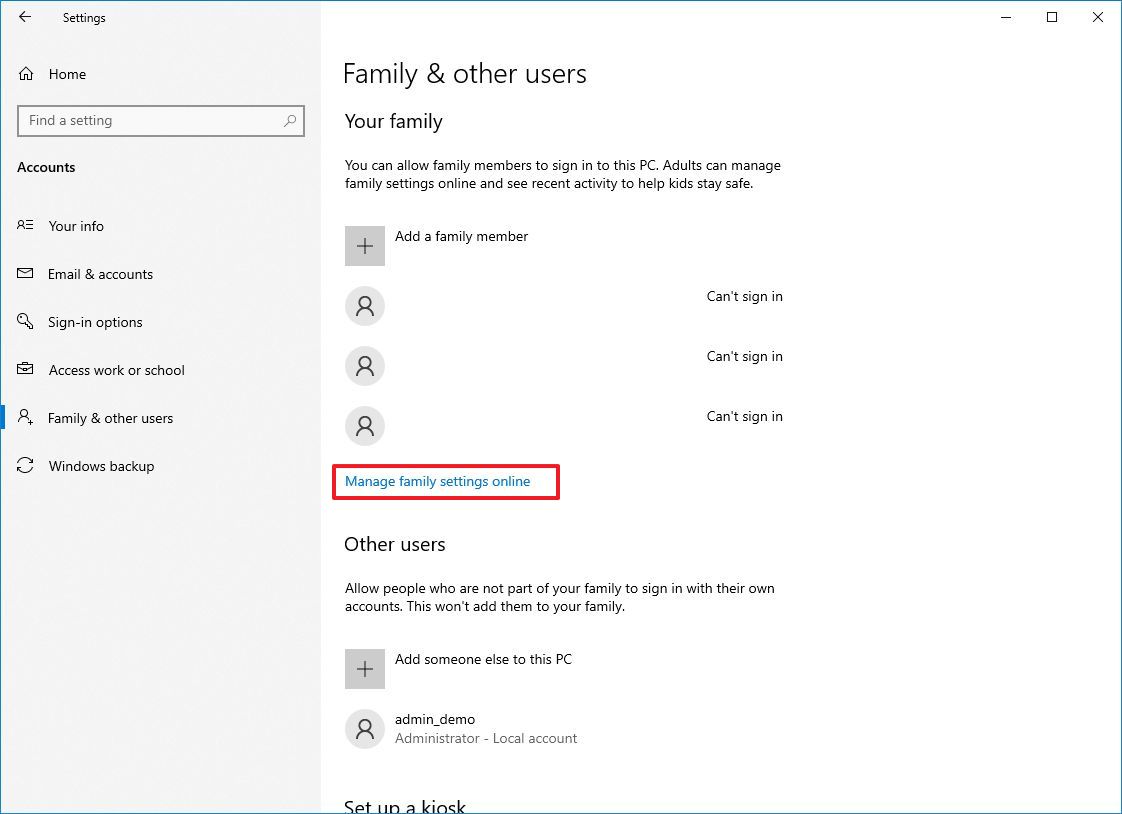
- Sign in with your Microsoft account (if applicable).
- Click the menu (three-dotted) menu button in the right corner of the user account and select the «Remove from family group» option under the «Your family» section.
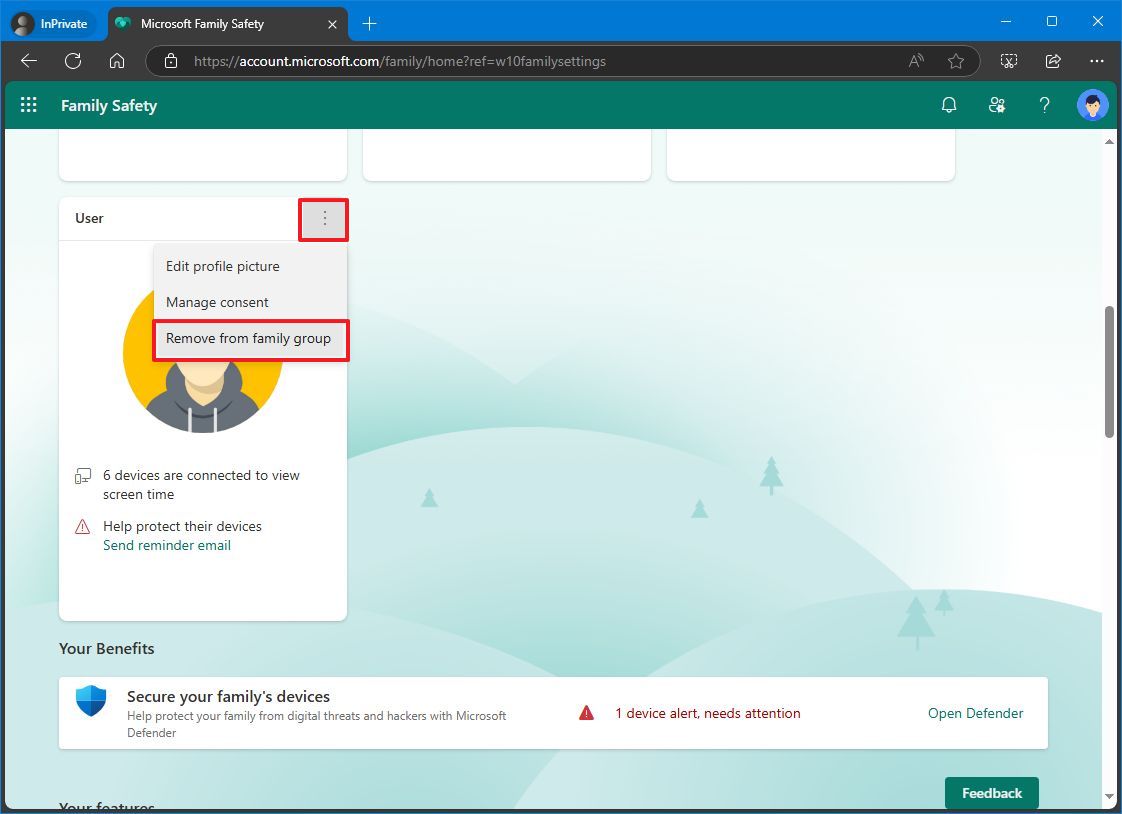
- Click the Remove button.
Once you complete the steps, the user account and data will be erased from the device.
Remove non-family account
To remove a local account or Microsoft account, use these steps:
- Open Settings.
- Click on Accounts.
- Click on Family & other users.
- Select the account that you want to remove under the «Other people» section.
- Click the Remove button.
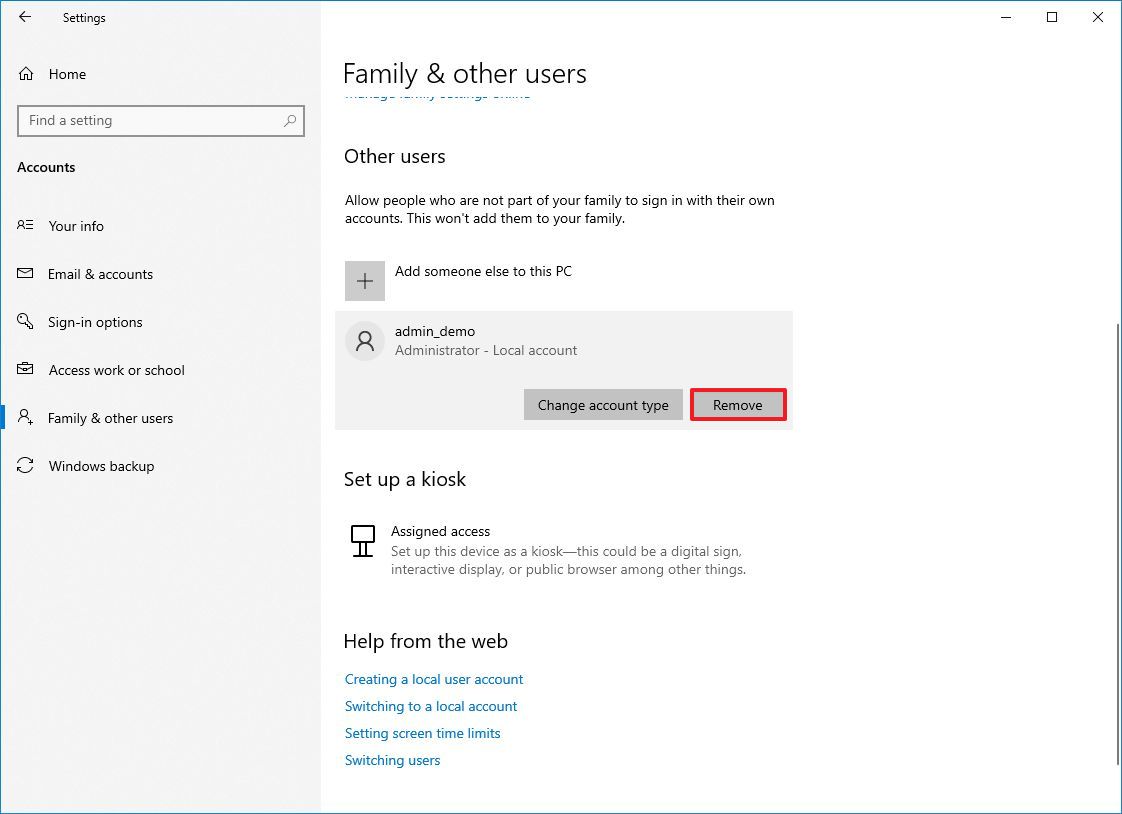
- Click the «Delete account and data» button.
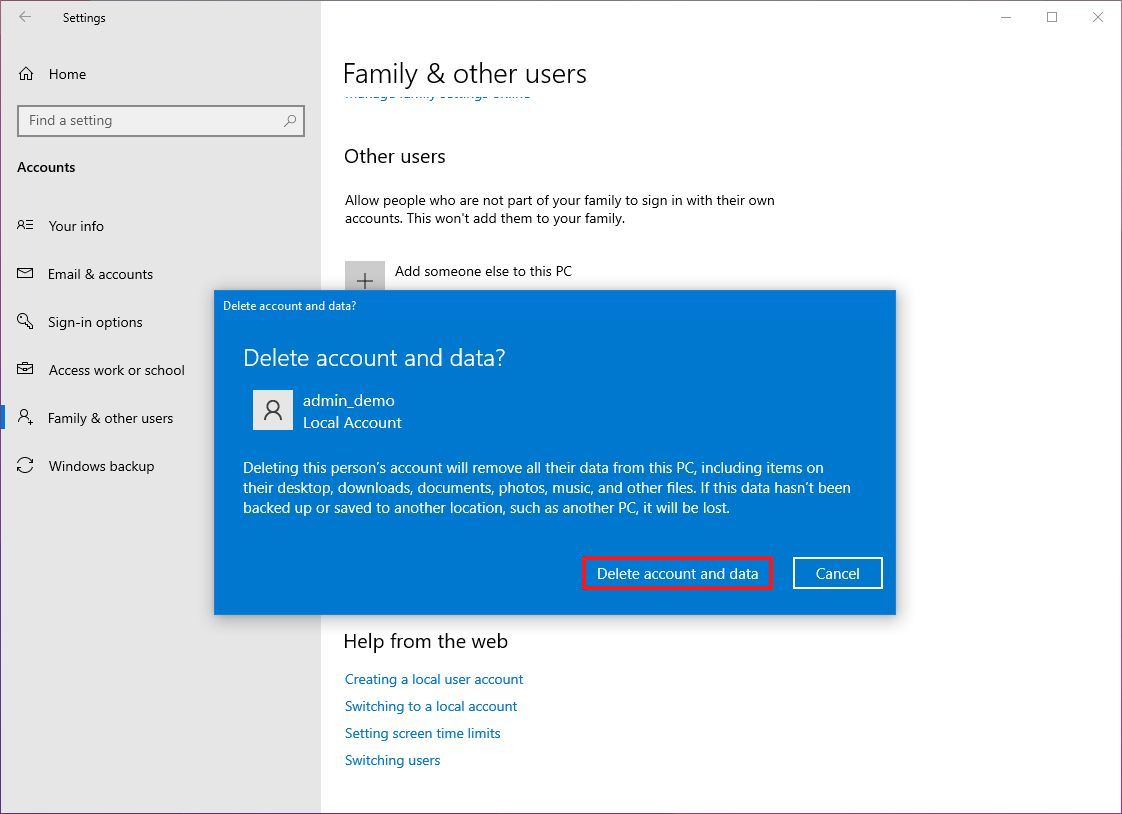
After you complete the steps, the account and data will no longer be available on the computer.
How to manage account sync settings on Windows 10
If you use a Microsoft account, you can use the «Windows backup» page to enable, disable, or specify which settings should sync to the cloud and across your laptops, desktops, and tablets.
To change sync settings on Windows 10, use these steps:
- Open Settings.
- Click on Accounts.
- Click on Sync your settings.
- Turn on the Windows backup toggle switch.
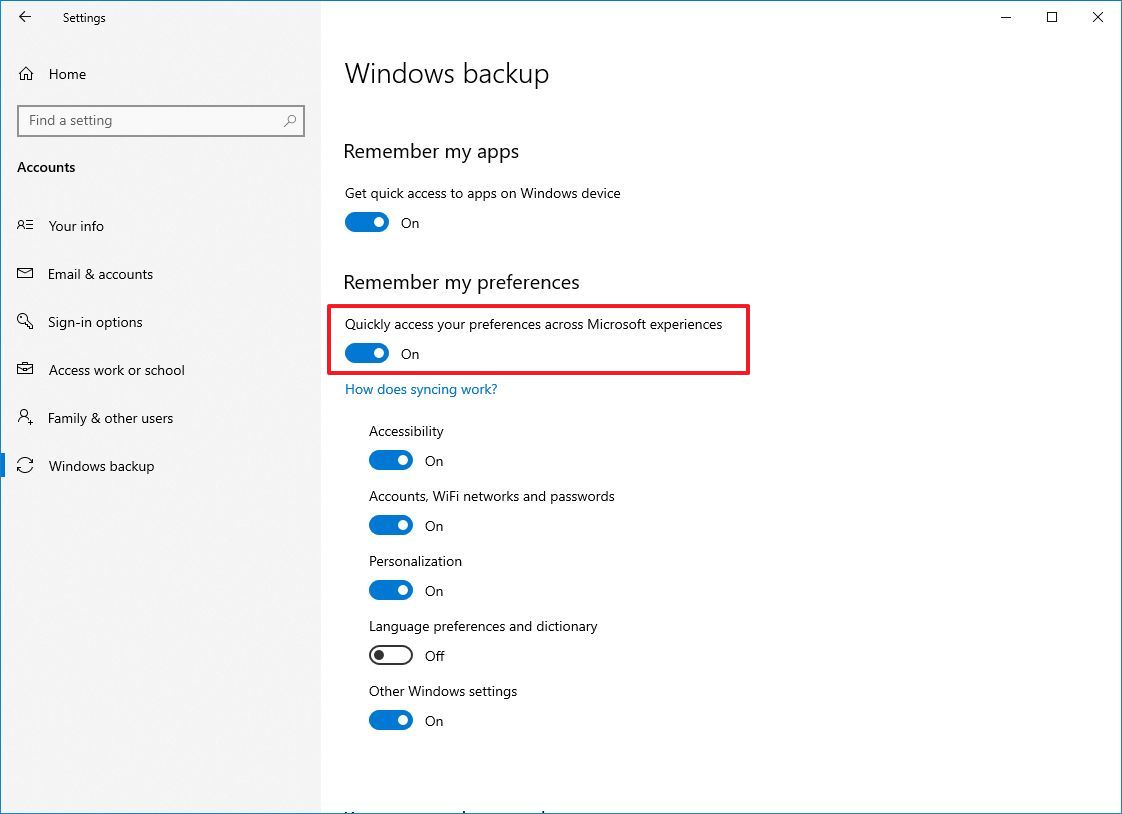
- (Optional) Turn on or off the settings you want to sync.
Once you complete the steps, only the settings you specified will roam across all your devices.
If you can’t manage these settings, you likely haven’t verified your account from the «Your info» page or have one or more work or school accounts connected in the «Access work or school» settings page.
More resources
For more in-depth insights, troubleshooting tips, and the latest updates on Windows 11 and 10, be sure to explore these resources:
- Windows 11 on Windows Central — All you need to know
- Windows 10 on Windows Central — All you need to know
Mauro Huculak has been a Windows How-To Expert contributor for WindowsCentral.com for nearly a decade and has over 15 years of experience writing comprehensive guides. He also has an IT background and has achieved different professional certifications from Microsoft, Cisco, VMware, and CompTIA. He has been recognized as a Microsoft MVP for many years.
Добавить учетные записи для других членов семьи в Windows 10 можно по-разному. Покажем пять различных способов, как добавить учетную запись в Windows 10.
Windows 10: добавление новой учетной записи пользователя
-
Откройте меню «Пуск» в Windows 10 и выберите Параметры со значком шестеренки.

Windows 10: параметры системы -
Откройте категорию Учетные записи. Здесь вы можете настроить учетную запись Microsoft или локальную учетную запись.

Настройка учетных записей в Windows 10 -
Перейдите к категории Семья и другие пользователи слева и нажмите Добавить пользователя для этого компьютера.

Windows 10: добавление нового пользователя - По умолчанию Microsoft хочет, чтобы вы добавили нового пользователя через учетную запись Microsoft. Если для вас это не проблема, просто введите его e-mail или номер телефона, использовавшийся при регистрации учетной записи, и нажмите Далее. Новый пользователь будет добавлен автоматически, вся его информация будет взята из учетной записи Microsoft.
Как создать пользователя в Windows 10 без учетной записи Microsoft?
Если же вам нужно создать пользователя в Windows 10 для человека без учетной записи Microsoft, выполните следующее:
-
В окне выбора способа входа в систему нажмите У пользователя, которого я хочу добавить, нет адреса электронной почты.

Windows 10: создание локального пользователя - В следующем окне выберите один из двух вариантов, который вам наиболее удобен: либо создайте для человека учетную запись Microsoft, введя имя, пароль и выбрав страну, либо нажмите Добавить пользователя без учетной записи Microsoft.

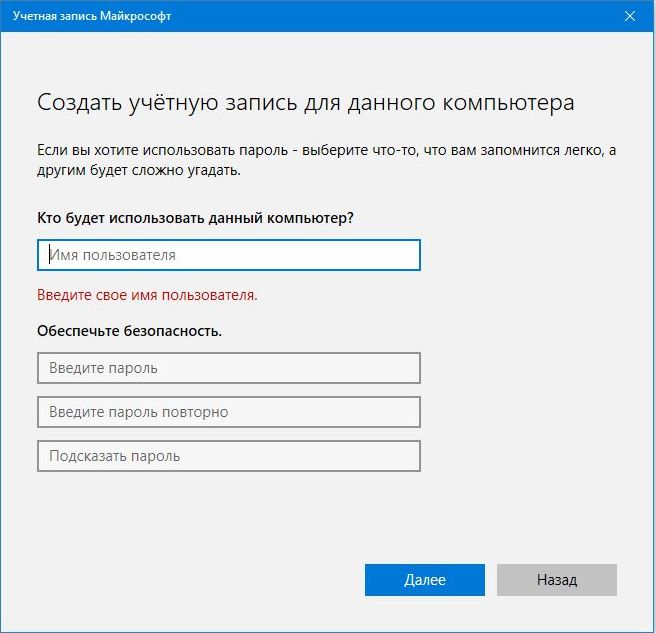
Windows 10: добавление пользователя без учетной записи Microsoft - Откроется окно создания локальной учетной записи Windows 10. Введите имя, пароль, подтверждение и подсказку, нажмите Далее. Пользователь будет создан.
Как создать пользователя в Windows 10 через утилиту управления учетными записями?
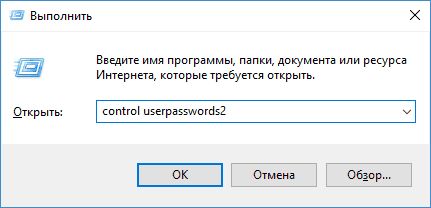
Еще один способ добавления пользователя в Windows 10, которым мало кто пользуется. Заключается он в том, чтобы запустить утилиту управления учетными записями пользователей.
- Нажмите Win + R и в окне Выполнить введите: control userpasswords2 и нажмите Enter.

Запуск управления учетными записями в Windows 10 - В отобразившемся окне нажимаем кнопку добавления нового пользователя.
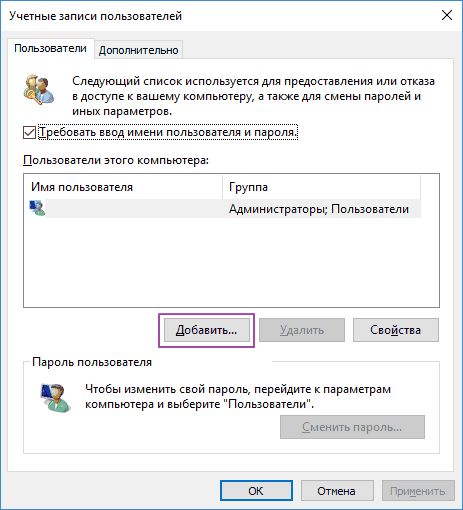
Дальнейшая процедура полностью аналогична тому, что описано выше — либо добавляем пользователя с учетной записью Microsoft, либо без.
Как добавить пользователя в Windows 10 через групповые политики?
Еще один способ создания учетной записи — использовать элемент управления «Локальные пользователи и группы».
- Нажмите клавиши Win+R, в окне Выполнить введите: lusrmgr.msc и нажмите Enter.
- Выберите Пользователи на панели слева, кликните правой кнопкой мыши списке пользователей и нажмите Новый пользователь.

Создание пользователя через управление групповыми политиками в Windows 10 - Задайте параметры для нового пользователя.

При использовании этого способа созданный пользователь будет локальным — то есть, он позволяет создать пользователя без учетной записи Microsoft.
Как добавить пользователя в Windows 10 через командную строку?
Последний способ создать пользователя — с помощью командной строки Windows 10. В этом случае новая учетная запись также будет локальной.
- Запустите командную строку от имени администратора (например, через меню правого клика по кнопке «Пуск»).
- Введите команду (если имя пользователя или пароль содержат пробелы, используйте кавычки):
net user имя_пользователя пароль /add
3. Нажмите Enter. Пользователь с заданным именем и паролем будет добавлен.
Этот способ всегда сработает, если не добавляется пользователь в Windows 10 стандартными средствами — например, после неудачного обновления.
Читайте также:
- 5 ошибок при запуске Windows 10, и что с ними делать
- Что лучше, Windows 7 или Windows 10: сравнительная таблица
- Локальная учетная запись Windows: как ее создать, удалить или изменить
Фото: авторские, pixabay.com