
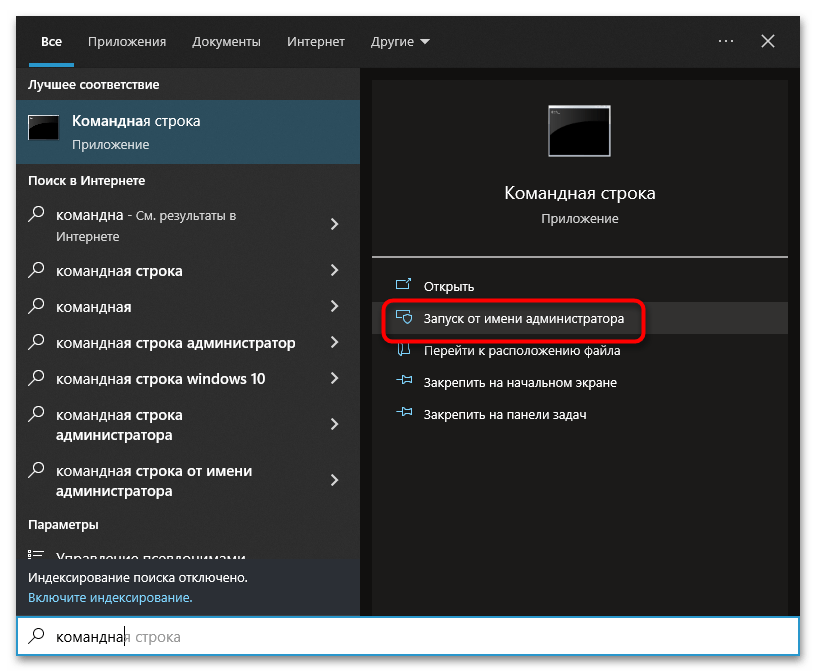
Способ 1: Классическая «Командная строка»
За создание и управление пользователями из оболочки «Командной строки» в Windows 10 отвечает консольная утилита net.exe, способная принимать порядка двадцати параметров. Чтобы создать с ее помощью пользователя, выполните следующие действия.
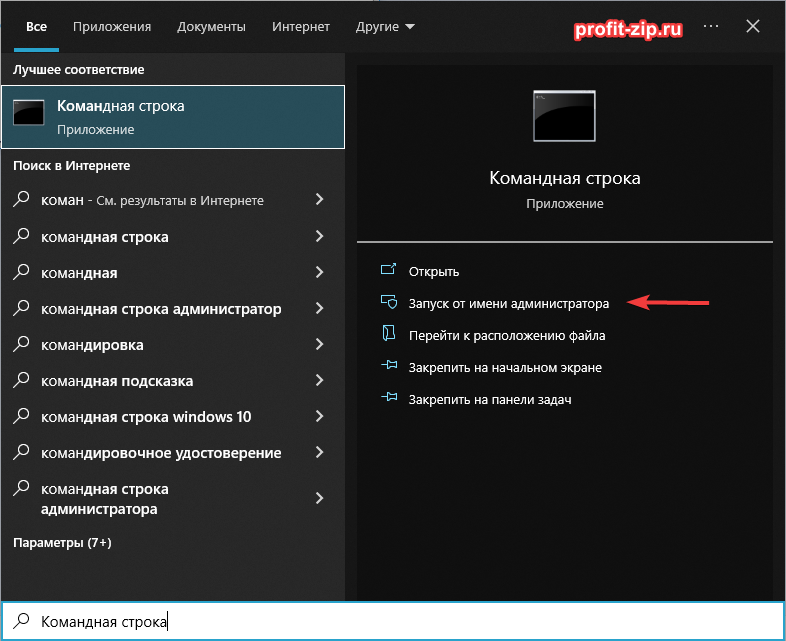
- Откройте «Командную строку» от имени администратора из поиска Windows или любым другим известным способом.
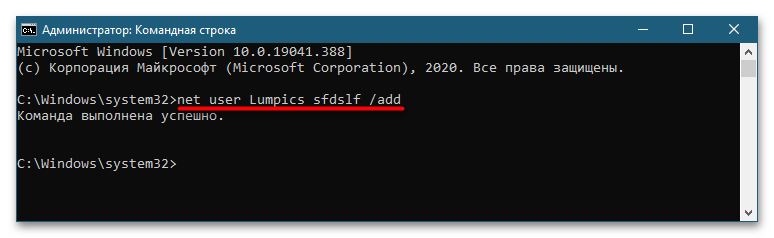
- Выполните команду
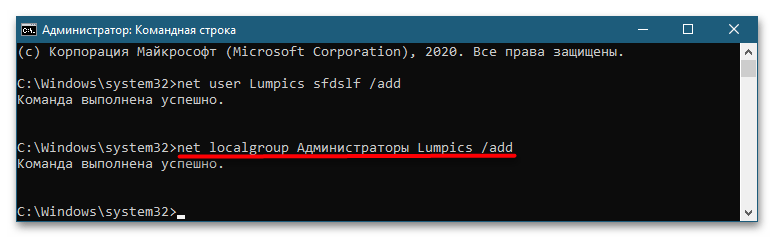
net user UserName Password /add, где UserName – имя пользователя, а Password – пароль. - В результате в системе будет создан новый пользователь с обычными правами. Если вы хотите сделать его администратором, выполните команду
net localgroup Администраторы UserName /add, где UserName — имя только что созданного пользователя.
В имени пользователя допускается использование кириллицы, а если имя содержит пробел, его следует заключить в двойные прямые кавычки. Наконец, чтобы Windows 10 создала для пользователя необходимые файлы, выйдите из текущей учетной записи и войдите в созданную.
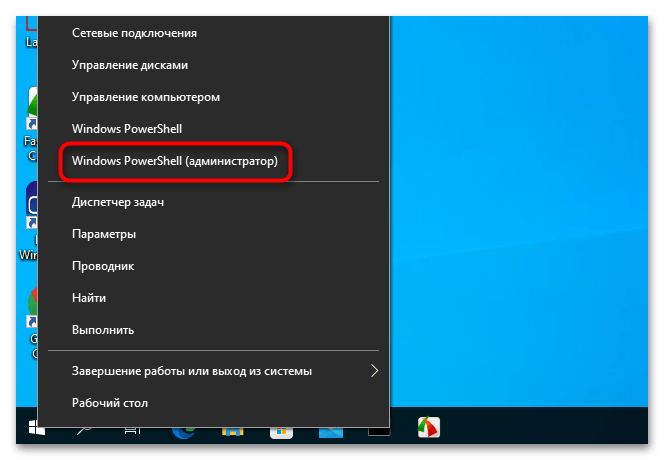
Способ 2: Консоль «PowerShell»
Расширяемое средство автоматизации «PowerShell» позиционируется как продвинутая версия классической «Командной строки». Укомплектованная интерфейсом «Командной строки», консоль «PowerShell» обладает более широкими возможностями, чем интерпретатор CMD. Естественно, в них входит и создание в системе новых пользователей.
- Запустите «PowerShell» от имени администратора из контекстного меню кнопки «Пуск».
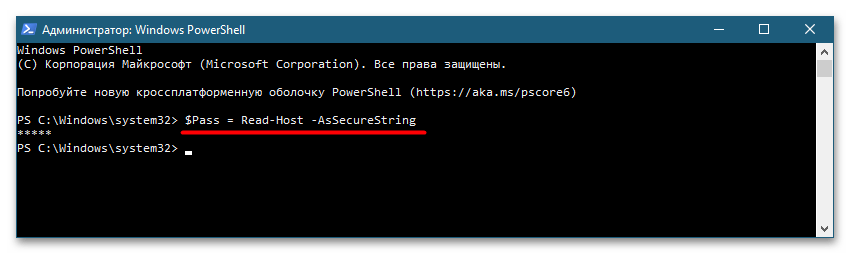
- Придумайте для создаваемого пользователя пароль и сохраните его во временную переменную pass, для чего выполните команду
$Pass = Read-Host -AsSecureString, введите в новой строке пароль и нажмите клавишу ввода. - Теперь выполните команду создания нового пользователя
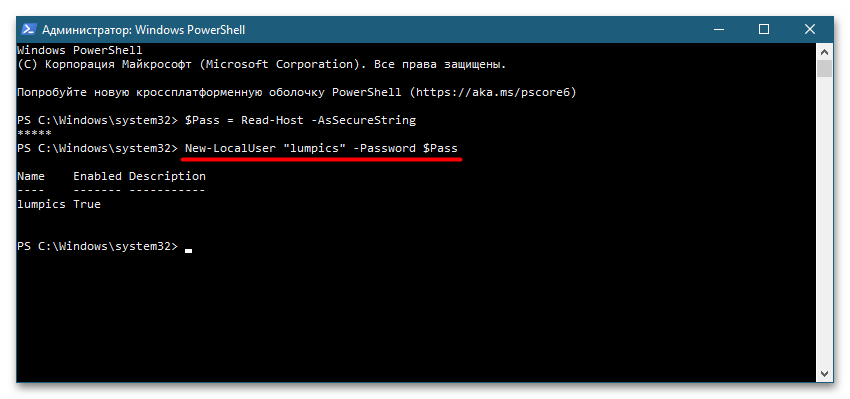
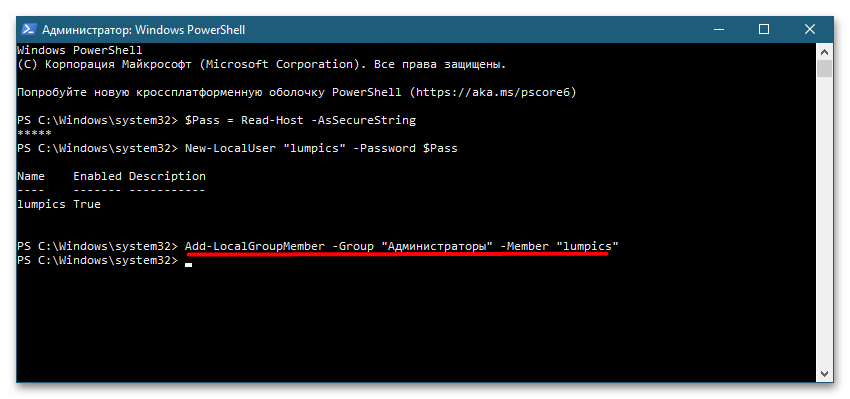
New-LocalUser "UserName" -Password $Pass, где UserName – имя пользователя. При желании можно добавить полное имя пользователя и описание учетной записи. В этом случае команда будет выглядеть так:New-LocalUser "UserName" -Password $Pass - FullName "полное имя" -Description "описание аккаунта". - Если в этом есть необходимость, можете добавить созданного пользователя в группу Администраторов. Для этого выполните команду
Add-LocalGroupMember -Group "Администраторы" -Member "UserName", заменив UserName именем пользователя.
Готово, осталось только перезагрузить компьютер и зайти в новую учетную запись, чтобы Windows 10 создала для нее все необходимые файлы.
Наша группа в TelegramПолезные советы и помощь
В версиях Windows, отличных от Professional (например Windows 10 Home) отсутствует раздел «Локальные пользователи и группы» в оснастке «Управление компьютером». Однако иногда возникает необходимость создать/удалить/изменить ещё одного пользователя в данной операционной системе. Разберём, как это сделать.
Самым простым вариантом создать пользователя в не-Pro редакциях Windows – через командную строку.
Открытие командной строки
Для следующих манипуляций необходимо запустить командную строку от имени администратора.
Открыть командную строку можно несколькими способами:
-
Для версий Windows 8-11
Нажмите по кнопке «Пуск» правой кнопкой мыши и выберите «Командная строка (администратор)», «Powershell (администратор)» или «Терминал (администратор»).
При появлении диалога UAC – согласитесь на запуск. -
Для всех версий Windows
Найдите «Командная строка» в списке программ в меню «Пуск» или через Поиск среди приложений. Нажмите правой кнопкой мыши по приложению «Командная строка» и/или в контекстном меню выберите «Запуск от имени администратора».

-
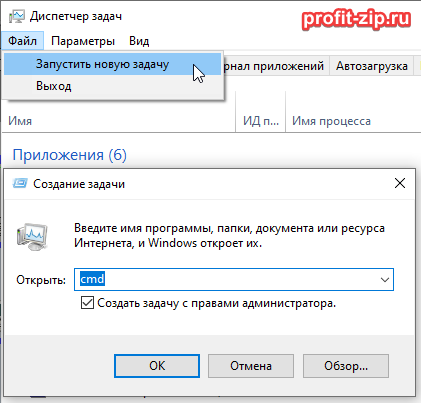
Для всех версий, через Диспетчер задач
Запустите Диспетчер задач. Сверху нажмите Файл – Запустить новую задачу.
В появившемся окне «Создание задачи» введите напротив поля «Открыть» –cmd, установите галочку «Создать задачу с правами администратора» и нажмите «ОК»
Команды управления пользователями через CMD
Заполните данные и команды изменятся автоматически:
- Создать пользователя:
net user "Пользователь" /add
- Создать пользователя с установленным паролем:
net user "Пользователь" "Пароль" /add
- Удалить пользователя:
net user "Пользователь" /delete
- Отключить пользователя:
net user "Пользователь" /active:no
/active:yes – включает пользователя.
Отключенный пользователь остаётся стандартным пользователем системы, но действия от его имени становятся недоступны. Авторизоваться от имени отключенного пользователя также нельзя. - Изменить пароль уже существующего пользователя:
net user "Пользователь" "Пароль"
- Отключить обязательную смену/установку пароля при первом входе пользователя:
net user "Пользователь" /passwordreq:no
/passwordreq:yes – включает обязательную смену/установку пароля.
- Установить срок действия пароля пользователя – неограниченным (убрать срок действия пароля):
wmic useraccount where "name='Пользователь'" set passwordexpires=false
set passwordexpires=true – включает ограничение срока действия пароля
- Изменить срок действия пароля:
net accounts /maxpwage:30
Вместо 30 – количество дней. Применяется ко всем пользователям системы, у которых срок действия пароля – НЕ неограничен.
Значение по умолчанию – 42 дня, максимальное – 999 дней. - Запретить смену пароля пользователем:
net user "Пользователь" /passwordchg:no
/passwordchg:yes – разрешить смену пароля пользователем
- Добавить пользователя в локальную группу:
net localgroup "Администраторы" "Пользователь" /add
- Удалить пользователя из локальной группы:
net localgroup "Администраторы" "Пользователь" /delete
- Установить рабочее время учётной записи:
net user "Пользователь" /times:X
/times:X – отвечает за установку времени, в которое учётной записью можно пользоваться.
X может принимать значения вида:
Дни_недели, диапазон_времениилиДни_недели, диапазон_времени; Дни_недели, диапазон_времени
Дни недели принимают следующие значения и указываются через символ «дефис» ( — ):- M – понедельник
- T – вторник
- W – среда
- Th – четверг
- F – пятница
- Sa – суббота
- Su – воскресенье
Время может быть в формате
8:00-17:00или8am-5pmКроме того, можно перечислять несколько интервалов через точку с запятой ( ; )
Пример:
M-F,8:00-17:00– учетная запись будет доступна с понедельника по пятницу, с 8:00 до 17:00M-F,8:00-17:00;Sa,8:00-12:00– учетная запись будет доступна с понедельника по пятницу, с 8:00 до 17:00, а также в субботу с 8:00 до 12:00M-F,8:00-17:00;Sa,8:00-15:00;Su,8:00-12:00– учетная запись будет доступна с понедельника по пятницу с 8:00 до 17:00, в субботу с 8:00 до 15:00, в воскресенье – с 8:00 до 12:00M-F,8:00-12:00;M-F,13:00-17:00– учетная запись будет доступна с понедельника по пятницу, с 8:00 до 12:00 и с 13:00 до 17:00 (стандартная рабочая неделя, исключая обеденное время)
Несколько деталей
При создании пользователя, каталог пользователя (по умолчанию C:\Users\Username) не создаётся. Каталог создастся в момент первого входа пользователя в систему.
Создать пользователя с именем уже существующего пользователя нельзя.
При удалении пользователя, каталог удаляемого пользователя не удалится. Все файлы пользователя останутся доступны в каталоге пользователей.
При создании пользователя с именем уже существовавшего ранее пользователя (при условии, что папка удалённого пользователя не удалена), папка пользователя приобретёт название вида Username.PCname (где Username – имя пользователя, а PCname – имя компьютера), а если такая уже существует – название каталога будет иметь вид Username.PCname.000 (где Username – имя пользователя, PCname – имя компьютера, а 000 – порядковый номер папки)
Имя пользователя, пароль и названия групп пользователей, по хорошему, должны обрамляться в кавычки (например: ««Пользователь»»), однако не запрещается ими не пользоваться, но только при условии, что в выражении нет пробелов. В случае, если в имени пользователя, пароле или названии группы пользователей присутствует пробел, использование кавычек обязательно, т.к. иначе команды могут сработать неправильно или не сработать вовсе.
In this tutorial, you will learn how to use the net user command to create, delete and change user accounts in the Windows command prompt (CDM).
We can perform the following tasks using the net user command:
- View user accounts.
- Add and Remove user accounts.
- Activate and Deactivate user accounts.
- Change the user password.
If you are operating in an Active Directory domain environment, always use the /domain command switch to execute the net user command on the domain controller rather than on the local computer.
Examples
List users on the local computer:
net userList users on the domain controller:
net user /domainThis command displays detailed information about the Administrator account:
net user AdministratorCreate a user named user1 with a password of strongPassword:
net user /add user1 "strongPassword"Delete the user user1 from the computer:
net user /delete user2This command enables the built-in Administrator account on Windows 10/11:
net user Administrator /active:yesThis command sets (changes) the Administrator account password:
net user Administrator "adminPassWord"Execute the following command to disable the Administrator account on Windows 10/11:
net user Administrator /active:noThis command forces the user user1 to change the password at the next logon:
net user user1 /logonpasswordchg:yesCreate a user; the user must change the password at the next logon:
net user /add user1 "strongPassword" /logonpasswordchg:yesCreate a new user; the account expires on January 31st:
net user /add user1 "strongPassword" /expires:01/31/2023Command Options
| username | The name of the user to create, delete, view, or modify. |
| password | Password for the user. |
| * | Use this option to produce a prompt for the password. |
| /add | Use this option when you want to create a new user. |
| /delete | Use this option to remove a user from the Windows system. |
| /active:{yes | no} | Activates or Deactivates a user. The default is yes when creating a new user. |
| /expires:{date | never} | Use this option to set the expiration date (mm/dd/yy) for an account. The default is never. |
| /fullname:»name» | Full name of the user. |
| /passwordchg:{yes | no} | Specifies whether users can change their own password. The default is yes. |
| /passwordreq:{yes | no} | No means the user can log in without a password. The default is YES. |
| /logonpasswordchg:{yes|no} | Specifies whether the user should change the password at the next logon. The default is NO. |
| /homedir:path | The home directory location. |
| /comment:»text» | Use this option to add a description to the user’s account. |
You can view the manual page by typing net help user at the command prompt.
View a User
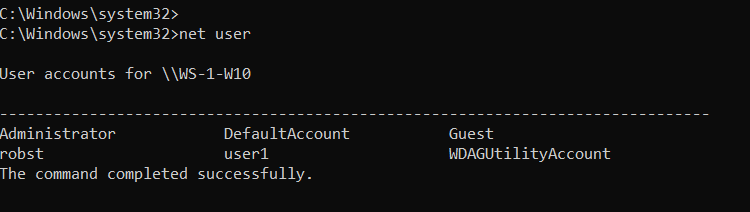
When you execute the net user command without any options, it displays a list of user accounts on the computer.
net userYou will see an output similar to the following:
Add the /domain command switch if you want to list users on the Active Directory Domain controller.
net user /domainTo see detailed information about a particular user, execute the command net user Username, where the Username is the name of the user you want to view. For example, you can view the Administrator account by running the following command:
net user AdministratorCreate and Delete User Accounts
To create a user account, use the following syntax:
net user /add UserName PasswordFor example, the following command creates a user named user1 with a password of strongPassword:
net user /add user1 "strongPassword"Use an asterisk (*) in place of the password to produce a prompt, as shown in the following example:
net user /add user1 *
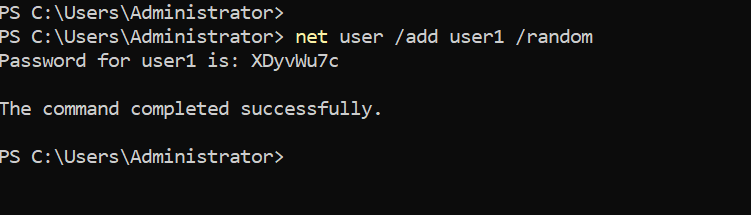
Alternatively, you can also use the /random option to generate a strong random password, as shown in the following example:
net user /add user1 /randomThe randomly generated password will be displayed on the command prompt after you execute the command.
To delete a user, use the following syntax:
net user /delete UserNameThe following command deletes the user user1 from the computer:
net user /delete user2Change Passwords
To change passwords, use the following syntax:
net user UserName New-PasswordUse an asterisk (*) or /random in place of the password to produce a prompt or generate a random password:
net user UserName *
net user user1 /random
Notes
The net user command is most of the time used in Windows Server to manage Active Directory users.
Windows 10/11 uses a new Settings pane to manage users, but the net user command is still useful for some tasks. For example, if you want to activate the built-in Administrator account, it is easy to do that using this command.
While working at the command prompt, run the net help user command to see all available command options.
In the next tutorial, we are going to learn how to manage Windows groups using the net localgroup CMD command.
Managing user account and groups with “net” command line. The Net user command line is a built-in Windows Command tool. It uses for creating, deleting and managing user account in Windows operating system. Managing user account using command line and graphical interface both are easy. But the command line is high-speed and powerful. The net command utility works on command prompt and PowerShell.
To learn more about Powershell, just read the PowerShell articles on technig.com. And let’s start managing user account with a command line.
Managing user account using command line in Windows 10:
- Net user command review.
- Add a user account with command.
- Set Password to a user account with command.
- Change user account password using a command line.
- Upgrade standard user to an Administrator account.
- Delete a user account and profile with command.
To run net user command, open command prompt or PowerShell with typing “cmd” on Windows Run.
- Press Windows+R to open the run.
- Type “cmd” and press enter for command prompt. And for Powershell just type “Powershell.”
- Now, type “net user /?” and press enter to see the net user command line help.
Note: If you want to execute net user to add a new user or bring changes, you must run cmd or Powershell as administrators. It does not work as standard users. To run them as an administrator, just press Windows and search Powershell then press Shift+Ctrl and press enter.
Managing User Account using Command Line
To understand the structures of a command prompt command, get the help by typing “/?” at the end of any command on command prompt and PowerShell. It will show you the help documents.
PS C:\> net user /?
The syntax of this command is:
NET USER
[username [password | *] [options]] [/DOMAIN]
         username {password | *} /ADD [options] [/DOMAIN]
         username [/DELETE] [/DOMAIN]
         username [/TIMES:{times | ALL}]
         username [/ACTIVE: {YES | NO}]
PS C:\>
Add a New User Account with Command Line
Let’s start and create a new user account with the net user command, named Ali with Password 123, and press enter. Type the following command to add a new user account with the command line in Windows 10.
PS C:\> net user ali  123 /add
The command completed successfully.
PS C:\>
The user Ali has been created successfully. If it shows the Access denied error, it means that the command prompt is running as standard users, like below error.
PS C:\Users\Shais> net user Ali 123 /add
System error 5 has occurred.
Access is denied.
To view the complete information for a newly created user account, just type “net user Ali” and press enter. It will show you the user local group membership, Global group membership, date of creation, etc.
PS C:\> net user ali
User name                    ali
Full Name
Comment
User's comment
Country/region code          000 (System Default)
Account active               Yes
Account expires              Never
Password last set            10/10/2017 9:12:47 PM
Password expires             11/21/2017 9:12:47 PM
Password changeable          10/10/2017 9:12:47 PM
Password required            Yes
User may change password     Yes
Workstations allowed         All
Logon script
User profile
Home directory
Last logon                   Never
Logon hours allowed          All
Local Group Memberships      *Users
Global Group memberships     *None
The command completed successfully.
PS C:\>
Set Password to User Account with command
To set a password to a user account or changing the password of a user account, type “net user Ali *” command then press enter and type the new password twice.
PS C:\> net user Ali *
Type a password for the user:
Retype the password to confirm:
The command completed successfully.
PS C:\>
You can use this method to change any user account password in Windows 10 and other Windows operating systems.
Change Standard User to Administrator in Windows 10
You have successfully created a new standard user account and now try to add this user account to an Administrators group. The administrator privilege gives you the ability to bing changes to Windows 10 system and settings. With a standard user account, you cannot run the command, install software and change Windows settings. To change standard user to Administrator in Windows 10, just type the following command.
On the user information, you saw that Ali was only a member of the Users group, a standard group. You can add a user account to a group with “Net Localgroup” command.
PS C:\> net localgroup administrators ali /add
The command completed successfully.
PS C:\>
To remove a user group membership, type the following command and press enter
PS C:\> net localgroup administrators ali /delete
The command completed successfully.
PS C:\>
Delete a User account with Net User Command
If you don’t need a user account anymore, don’t leave it away. Delete or disable it for security reasons. Someone might crack the password and log in to your system. To delete a user type “net user Ali /delete” command.
PS C:\> net user ali /delete
The command completed successfully.
PS C:\>
Note: When you remove a user with a net user command line, the profile’s deleted user account remains in the user profiles folder. You must delete it manually from the user profile setting. Read this article “Remove User Profile correctly in Windows 10“.
I hope you find the article managing user account using command line in Windows 10 helpful. If you have any problem or question about the managing user account using command line feel free and ask through comment. If you don’t like to use command line, try to read the article about creating a user account with a graphical interface in Windows 10.
Обновлено:
Опубликовано:
В инструкции описаны способы создания локальной учетной записи для входа в Windows 10. Методы с использованием командной строки также подойдут для Windows 8 и 7.
Оконный интерфейс
Командная строка (cmd)
Powershell
Графический интерфейс
Кликаем по Пуск — Параметры:
В открывшемся окне выбираем Учетные записи:
В меню слева переходим в Другие пользователи:
В разделе «Другие пользователи» кликаем по Добавить пользователя для этого компьютера:

Если откроется окно «Выберите способ входа пользователя в систему», кликаем по У меня нет данных для входа этого человека:
И в следующем окне по Добавить пользователя без учетной записи Майкрософт:

Должно открыться окно с возможностью ввода имени учетной записи и пароля — необходимо заполнить все поля:

* если поля с паролем оставить пустыми, учетная запись будет создана без пароля.
и затем нажимаем кнопку Далее. В списке пользователей появится еще один:

Кликнув по нему, появится возможность сменить тип учетной записи на администратора:

Командная строка (cmd)
Для начала запускаем командную строку от имени администратора.
Для этого кликаем по значку поиска (1) и вводим cmd (2) — среди результатов в разделе «Приложения» кликаем правой кнопкой мыши по Командная строка (3) и выбираем Запустить от имени администратора (4):
Теперь вводим команду:
> net user «Дмитрий Моск» password /add
где «Дмитрий Моск» — имя учетной записи; password — пароль, который будет использоваться для входа в систему.
Чтобы выдать административные права учетной записи, вводим следующую команду:
> net localgroup Администраторы «Дмитрий Моск» /add
* в английской версии Windows группа будет назваться administrators.
Powershell
Для начала, запускаем Powershell от имени администратора.
Создать пользователя
Задаем пароль:
$Password = Read-Host -AsSecureString
***********
Создаем запись:
New-LocalUser «dmosk» -Password $Password -FullName «Дмитрий Моск» -Description «Моя локальная учетная запись»
* где dmosk — логин; $Password — переменная с паролем, которую мы создали на предыдущем шаге.
В ответ должны увидеть что-то на подобие:
Name Enabled Description
—- ——- ————
dmosk True Моя локальная учетная запись
Чтобы пользователь появился и под ним можно было войти в систему, добавляем его в группу.
а) В качестве администратора:
Add-LocalGroupMember -Group «Администраторы» -Member «dmosk»
б) Обычный пользователь:
Add-LocalGroupMember -Group «Пользователи» -Member «dmosk»
Другие полезные команды
Несколько команд на Powershell, которые могут оказаться полезными.
1. Список пользователей:
Get-LocalUser
2. Список групп:
Get-LocalGroup
3. Члены группы:
Get-LocalGroupMember «Администраторы»
4. Переименовать учетную запись.
Логин:
Rename-LocalUser -Name «dmosk» -NewName «dmosk2»
Full Name:
Set-LocalUser -Name «dmosk» -FullName «Дмитрий Моск 2»
5. Поменять пароль пользователя.
Задаем пароль:
$Password = Read-Host -AsSecureString
***********
Меняем пароль:
Set-LocalUser -Password $Password dmosk
* в данном примере для пользователя dmosk.
6. Удалить пользователя:
Remove-LocalUser -Name «dmosk»