
This post shows students and new users steps to change their computer’s power button action settings in Windows 11. Your PC power button action settings specify the action to take when the system power button is pressed.
One can select different actions to specify what to do when the PC power button is pressed. These include doing nothing, sleeping, hibernating, or shutting down when the power button is pressed.
Changing how the power button works in Windows 11 requires you to log in as an administrator and open the Control Panel app in Windows 11.
Below is how to configure one’s PC power button action in Windows 11.
Here are the different options one can specify what to do when the power button is pressed on one’s PC:
- Do Nothing: No action is taken when the power button is pressed.
- Sleep: Your PC goes into a low-power sleep mode.
- Hibernate: Your PC saves its session in a memory disk and shuts down.
- Shut Down: Shut down the PC when the power button is pressed.
- Turn off the Display: Your display turns off, but your PC keeps running.
How to change the power button action in Windows 11
As mentioned above, the button action settings specify the action to take when the system power button is pressed.
Below is how to configure that.
First, launch the Control Panel in Windows 11.
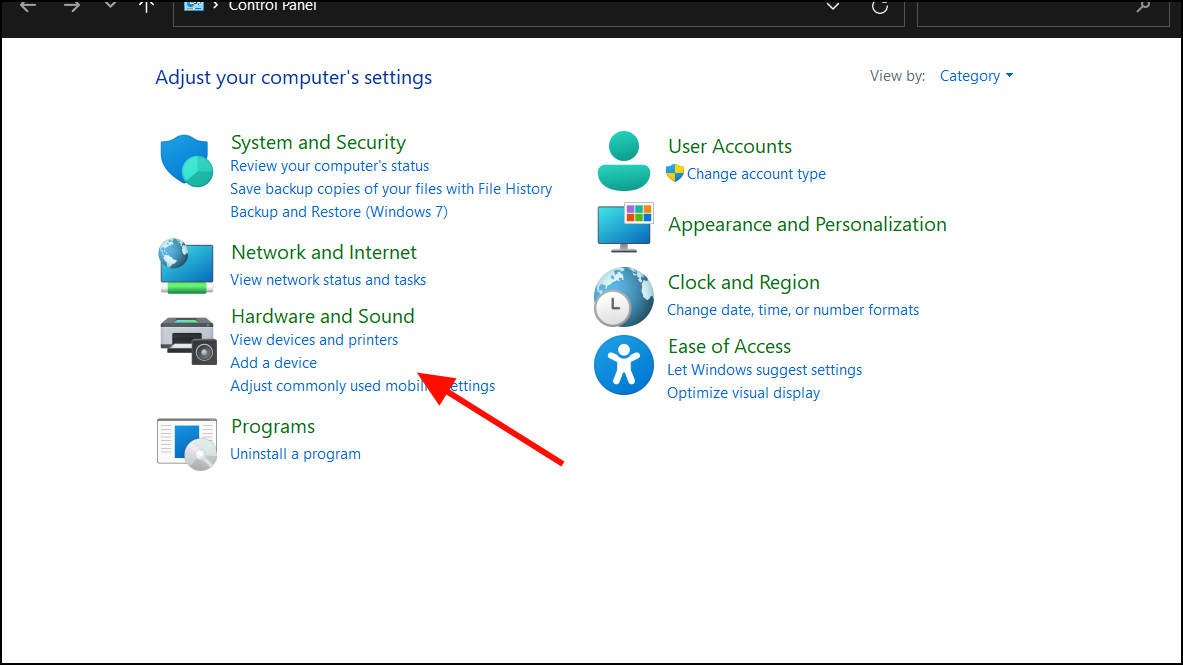
In the Control Panel, select the Hardware and Sound category.
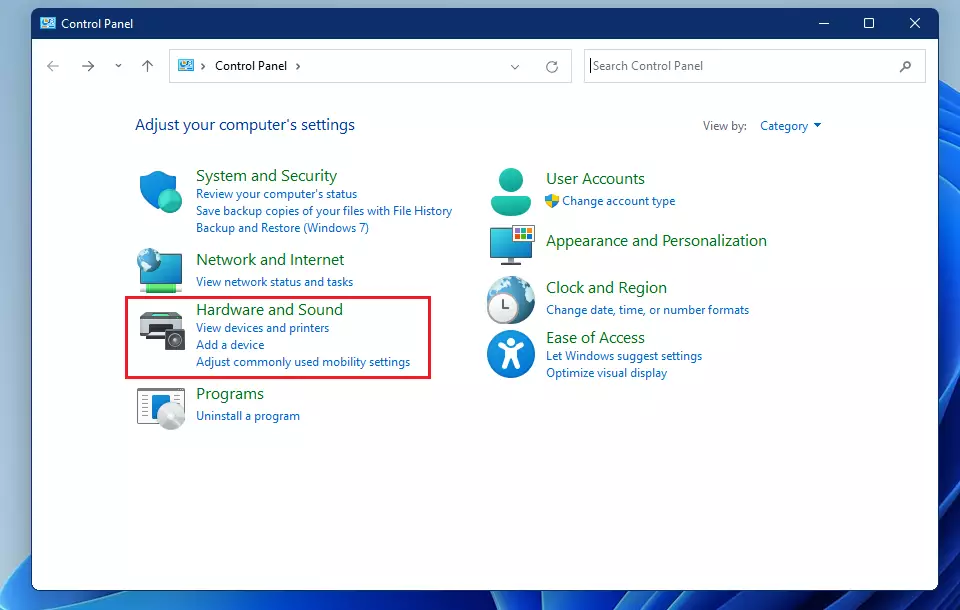
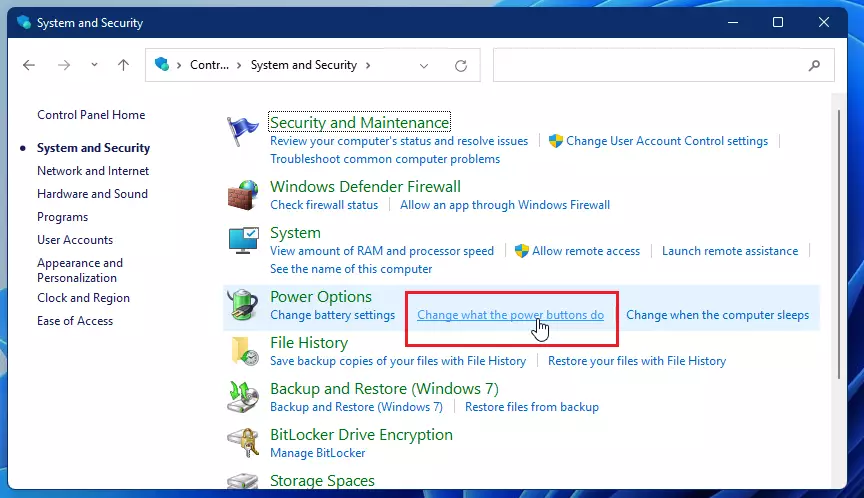
In the Hardware and Sound category, locate the Power Options section and click Change what the power buttons do.
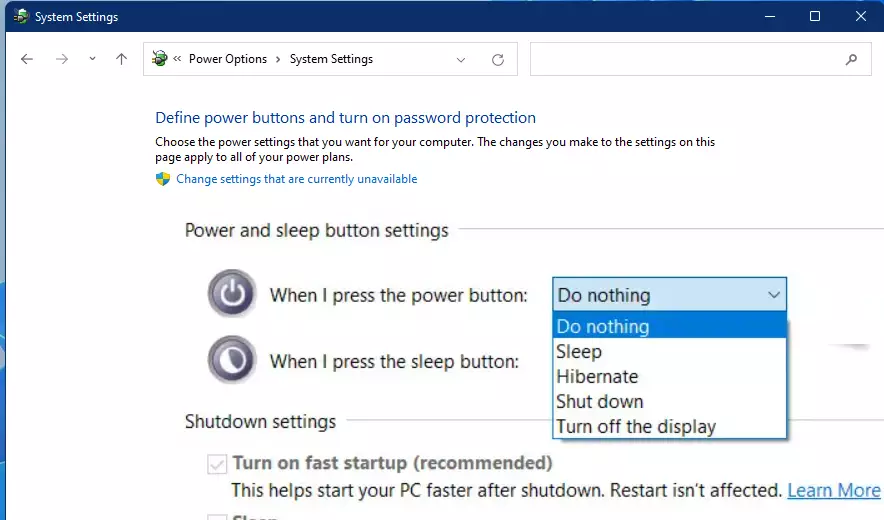
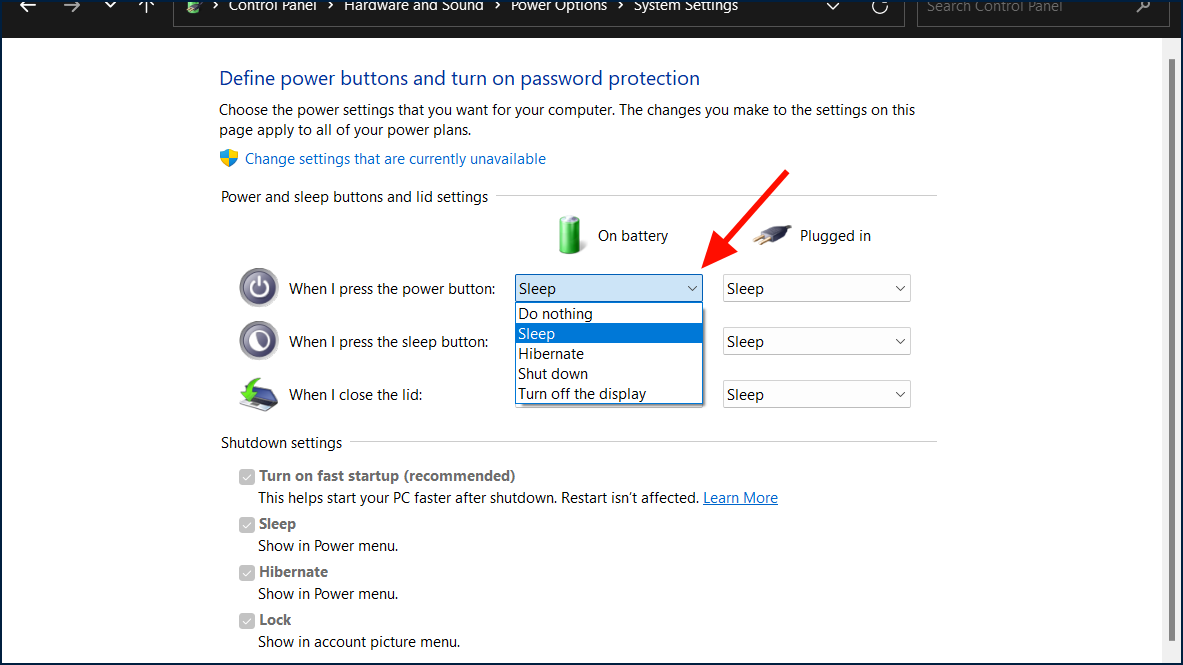
On the next page, you can choose the power settings you want for your computer. Then, under the Power and Sleep Button Settings, locate the power button icon next to When I Press the Power Button.
Using the drop-down for the power button selection, you’ll have these options available to choose from:
- Do Nothing: Nothing happens when the power button is pressed.
- Sleep: Your PC goes into a low-power sleep mode.
- Hibernate: Your PC saves its session in a memory disk and shuts down.
- Shut Down: Shuts down the PC when the power button is pressed.
- Turn off the Display: Your display turns off, but your PC keeps running.
Alternatively, use the steps below to change the settings.
First, select the Power Options settings group highlighted below in the Hardware and Sound category.

Next, select the Change plan settings link in the Power Options pane, as highlighted below.

Next, click Change advanced power settings link as highlighted below.

Expand the Power buttons and lid and Power button action settings as highlighted below. Under the Power button action, choose what action to take when the laptop lid close:
- On battery:
- Do nothing
- Sleep
- Hibernate
- Shutdown
- Plugged in:
- Do nothing
- Sleep
- Hibernate
- Shutdown

Make your selection and click OK to save your settings.
That should do it!
Conclusion:
- Changing power button action settings in Windows 11 provides users with control over the system’s response to the power button being pressed.
- By accessing the Control Panel and navigating to the Hardware and Sound category, users can modify settings to dictate whether the power button action results in nothing, sleep, hibernation, shutting down, or turning off the display.
- Users also have alternative options via the Power Options settings group, which allows further customization for actions when the power button is pressed.
- Ultimately, understanding and configuring the power button action settings in Windows 11 can help users tailor their computer’s behavior to best suit their preferences and needs.
Кнопка питания может сделать больше, чем просто выключить компьютер, хотя на большинстве ноутбуков именно это она делает по умолчанию. Вы можете выбрать, что будет делать кнопка питания ПК при ее нажатии, например: ничего не делать, переход в спящий режим, режим гибернации, выключение дисплея или завершение работы.
Изменить действие кнопки питания очень просто, независимо от используемого метода. Это занимает меньше минуты, и пользователи ноутбуков могут даже изменить настройки для каждого режима питания.
Существует множество способов изменить настройки кнопки питания, каждый из которых имеет свой приоритет. В это руководство мы включили 4 способа сделать это. Прочтите внимательно и выберите тот, который лучше всего соответствует вашим потребностям.
Использование параметров электропитания
Параметры электропитания — это функция панели управления, которая позволяет изменять параметры электропитания вашего компьютера. Для изменения поведения кнопки питания в Windows 11 необходимы права администратора, поэтому обязательно войдите в учетную запись администратора, прежде чем изменять настройки.
Чтобы настроить поведение кнопки питания в Windows 11, выполните следующие действия:
Начните с открытия панели управления в вашей системе Windows 11, выполнив поиск «Панель управления» в меню «Пуск».
Когда откроется панель управления, перейдите в категорию «Оборудование и звук».
В разделе «Оборудование и звук» найдите раздел «Электропитание» и нажмите ссылку «Изменить действие кнопок питания».

На следующей странице вы сможете установить предпочтительные параметры питания. В раскрывающемся меню «Когда я нажимаю кнопку питания» выберите действие для компьютеров «От батареи» и «От сети». Вы можете выбрать один из следующих вариантов:
- Ничего не делать: при нажатии кнопки питания ничего не происходит. Это может быть полезно, если вы хотите избежать случайного выключения компьютера.
- Спящий режим: компьютер переходит в спящий режим с низким энергопотреблением. Это означает, что ваш компьютер будет потреблять меньше энергии, но вы все равно сможете быстро возобновить работу после его пробуждения.
- Спящий режим: ваш компьютер сохраняет сеанс на диске памяти и выключается. Это означает, что когда вы снова включите компьютер, он возобновит работу именно с того места, на котором вы остановились. Режим гибернации потребляет меньше энергии, чем режим сна, но выход из режима гибернации занимает больше времени.
- Выключение: это действие полностью выключает компьютер при нажатии кнопки питания.
- Выключить дисплей: это отключает дисплей вашего компьютера, но компьютер продолжает работать. Это может быть полезно, если вы хотите сэкономить заряд батареи или избежать случайного выключения компьютера.
После выбора параметров нажмите «Сохранить изменения», чтобы применить настройки.

Параметры электропитания могут различаться в зависимости от вашего устройства. Например, у пользователей ноутбуков будет дополнительная настройка «Когда я закрываю крышку». Пользователи настольных компьютеров могут не увидеть опцию «Выключить дисплей», если их компьютер не поддерживает стандарт S3 и имеет современный режим ожидания.
Кроме того, у пользователей настольных компьютеров не будет отдельных вариантов питания «От батареи» и «От сети», если их компьютер не подключен к ИБП. Любые изменения, внесенные вами в настройки параметров электропитания, будут применяться ко всем планам электропитания.
Использование командной строки или PowerShell
Если вам удобно использовать инструменты командной строки, такие как Windows PowerShell или CMD, возможно, вам будет проще изменить эти параметры с помощью этого инструмента.
Вы можете использовать интерфейс командной строки, чтобы изменить действие кнопки питания для нескольких компьютеров одновременно, что может быть полезно для системных администраторов. Вы также можете использовать интерфейс командной строки для создания сценария для автоматизации процесса изменения действия кнопки питания, что может быть полезно для развертывания изменений на большом количестве компьютеров.
- Откройте командную строку или Windows PowerShell с правами администратора. Следующие команды будут работать в обоих случаях.
- Теперь вставьте одну из следующих команд и нажмите Enter, в зависимости от действия кнопки питания, которое вы хотите применить в Windows 11.
Настройки батареи
Ничего не делайте:
powercfg -setdcvalueindex SCHEME_CURRENT 4f971e89-eebd-4455-a8de-9e59040e7347 7648efa3-dd9c-4e3e-b566-50f929386280 0Спать:
powercfg -setdcvalueindex SCHEME_CURRENT 4f971e89-eebd-4455-a8de-9e59040e7347 7648efa3-dd9c-4e3e-b566-50f929386280 1
Гибернация:
powercfg -setdcvalueindex SCHEME_CURRENT 4f971e89-eebd-4455-a8de-9e59040e7347 7648efa3-dd9c-4e3e-b566-50f929386280 2Неисправность:
powercfg -setdcvalueindex SCHEME_CURRENT 4f971e89-eebd-4455-a8de-9e59040e7347 7648efa3-dd9c-4e3e-b566-50f929386280 3Отключить дисплей:
powercfg -setdcvalueindex SCHEME_CURRENT 4f971e89-eebd-4455-a8de-9e59040e7347 7648efa3-dd9c-4e3e-b566-50f929386280 4
Подключено в настройках
Ничего не делать:
powercfg -setacvalueindex SCHEME_CURRENT 4f971e89-eebd-4455-a8de-9e59040e7347 7648efa3-dd9c-4e3e-b566-50f929386280 0Спать:
powercfg -setacvalueindex SCHEME_CURRENT 4f971e89-eebd-4455-a8de-9e59040e7347 7648efa3-dd9c-4e3e-b566-50f929386280 1Спящий режим:
powercfg -setacvalueindex SCHEME_CURRENT 4f971e89-eebd-4455-a8de-9e59040e7347 7648efa3-dd9c-4e3e-b566-50f929386280 2Неисправность:
powercfg -setacvalueindex SCHEME_CURRENT 4f971e89-eebd-4455-a8de-9e59040e7347 7648efa3-dd9c-4e3e-b566-50f929386280 3Выключить дисплей
powercfg -setacvalueindex SCHEME_CURRENT 4f971e89-eebd-4455-a8de-9e59040e7347 7648efa3-dd9c-4e3e-b566-50f929386280 4В приведенной выше команде — 4f971e89-eebd-4455-a8de-9e59040e7347 это GUID настроек питания и 7648efa3-dd9c-4e3e-b566-50f929386280 GUID действия кнопки питания. Единственное, что меняется, — это данные значения в конце.
Использование редактора реестра
Вы также можете изменить поведение кнопки питания, изменив ее настройки реестра. Эти настройки имеют приоритет над настройками электропитания. Прежде чем это сделать, рекомендуется сделать резервную копию всех файлов реестра и создать точку восстановления системы в вашей системе.
Чтобы изменить действие кнопки питания в Windows 11 с помощью реестра:
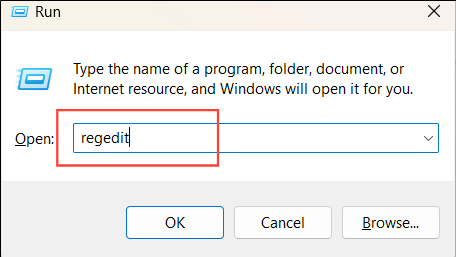
Нажмите Windows+ R, чтобы открыть «Выполнить» regedit, введите и нажмите «ОК», чтобы запустить редактор реестра.
Нажмите «Да» в командной строке UAC.
Перейдите по указанному ниже пути, используя панель навигации или вставив его в адресную строку и нажав Enter:
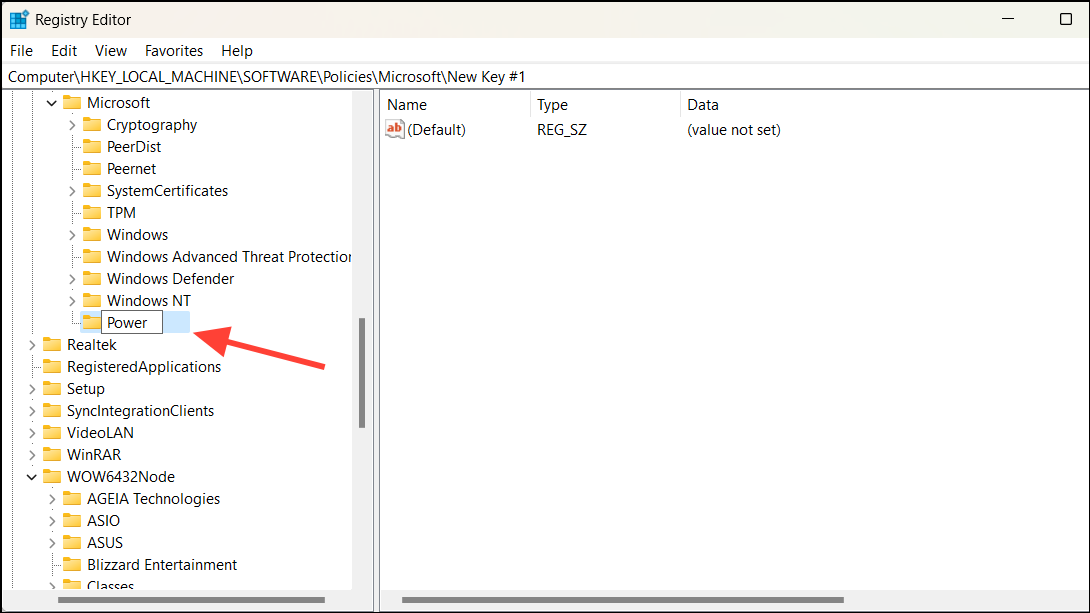
HKEY_LOCAL_MACHINE\SOFTWARE\Policies\Microsoft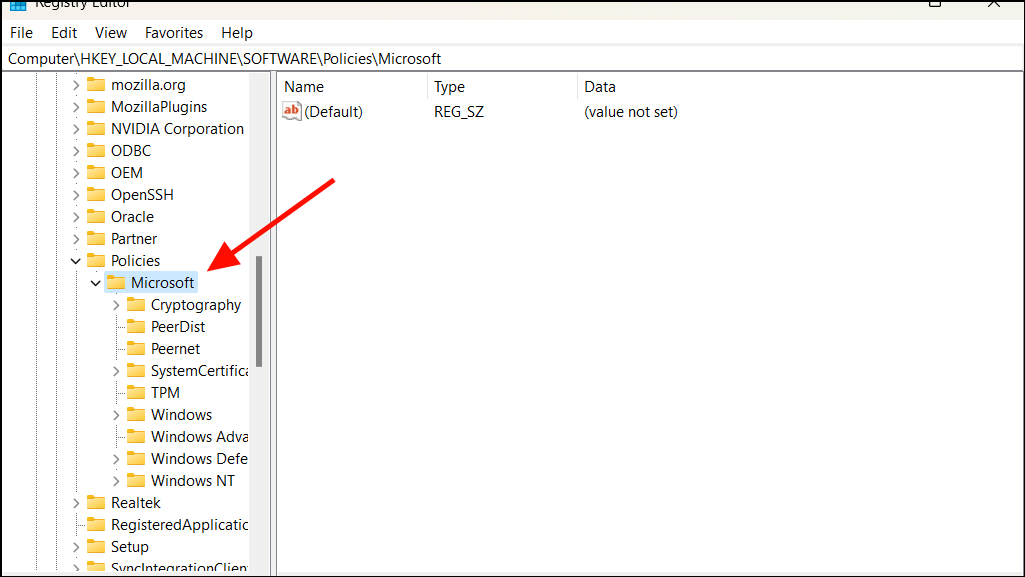
Щелкните правой кнопкой мыши ключ «Microsoft» и выберите «Создать» > «Ключ».
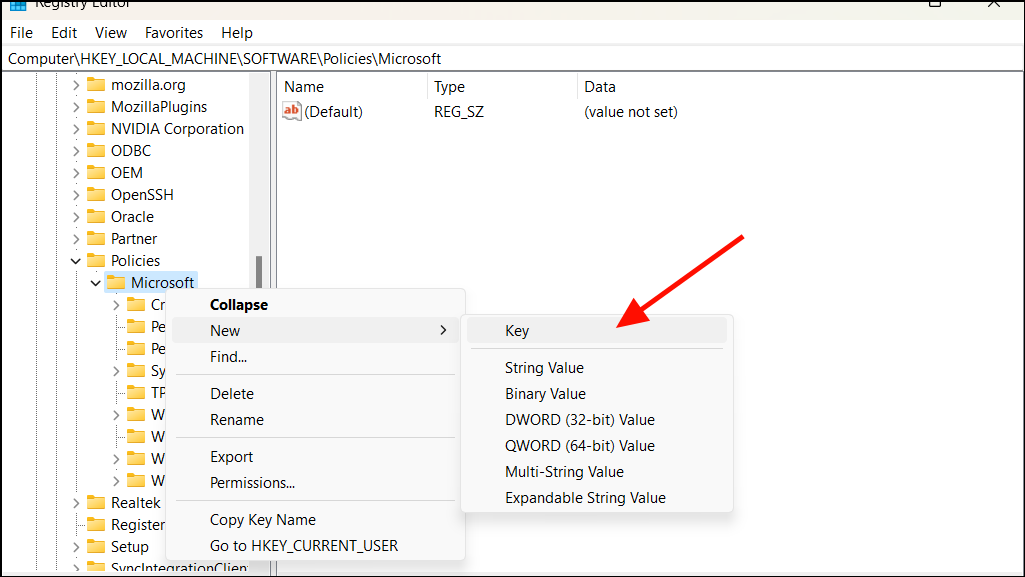
Переименуйте вновь созданный ключ в «Power».
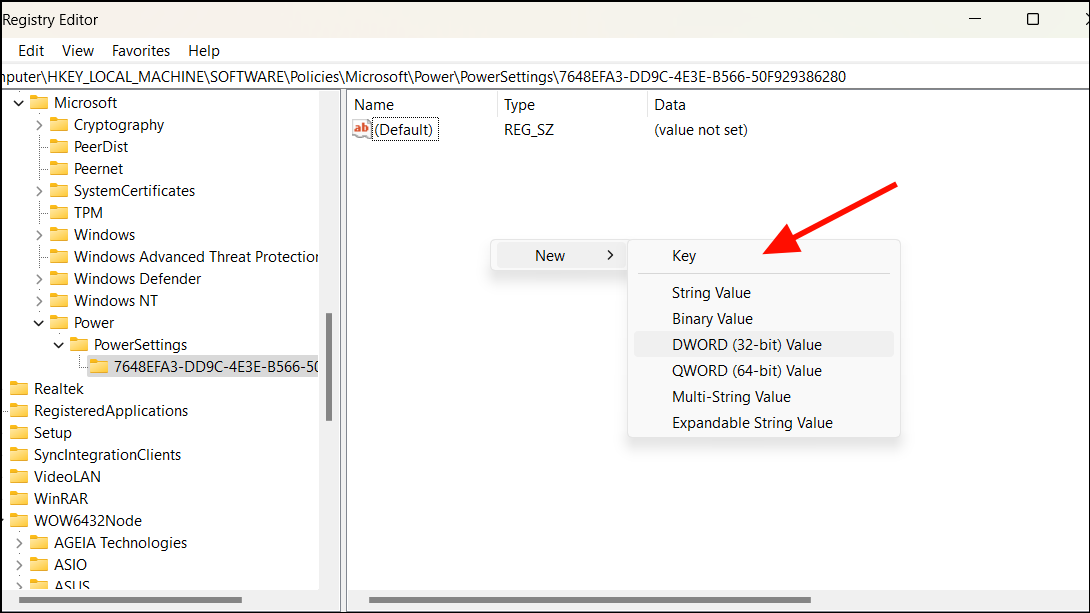
После этого создайте новый ключ и переименуйте его в PowerSettings Power. Для этого щелкните правой кнопкой мыши «Питание» и выберите «Создать» > «Ключ».

Снова создайте новый ключ, на этот раз внутри ключа PowerSettings, и назовите его 7648EFA3-DD9C-4E3E-B566-50F929386280. Затем войдите в этот ключ. Если все эти ключи уже есть, вы можете пропустить эти шаги и сразу перейти к 7648EFA3-DD9C-4E3E-B566-50F929386280ключу.

Выбрав 7648EFA3-DD9C-4E3E-B566-50F929386280ключ, щелкните правой кнопкой мыши пустую область справа и выберите «Создать» > «Значение DWORD (32-разрядное)».
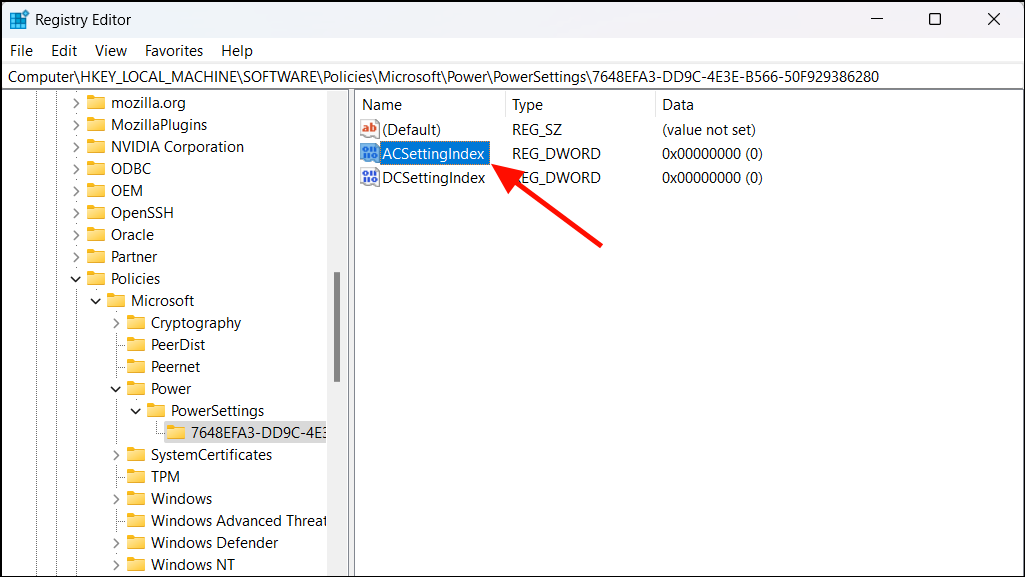
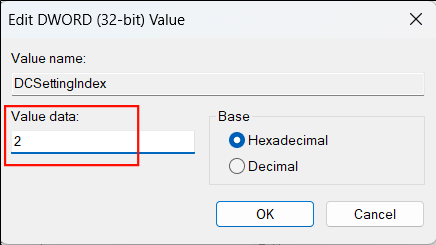
Затем назовите DWORD как ACSettingIndex или DCSettingIndex.

ACSettingIndex контролирует, что происходит, когда вы нажимаете кнопку питания, когда компьютер подключен к сети, а DCSettingIndex контролирует, что происходит, когда вы нажимаете кнопку питания, когда компьютер работает от батареи. Вы также можете добавить оба ключа в реестр, но это не обязательно. Если вы добавите только один ключ, выбранная вами настройка будет применяться как к режиму питания от сети, так и к режиму питания от батареи.
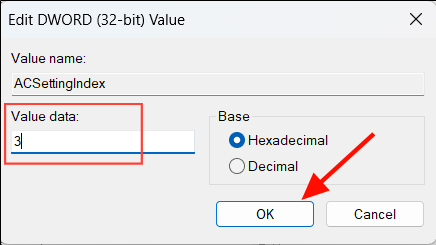
Чтобы изменить функцию кнопки питания в Windows 11 на работу от батареи, дважды щелкните или щелкните правой кнопкой мыши ACSettingIndexDWORD и выберите «Изменить».
Введите следующее значение в поле Значение для желаемой настройки:
- Спать:
1 - Спящий режим:
2 - Неисправность:
3 - Ничего не делать:
0
Чтобы изменить поведение кнопки питания в Windows 11 при подключении к сети, дважды щелкните DWORD DCSettingIndex.

Затем введите следующее значение в поле «Значение» для желаемой настройки:
- Спать:
1 - Спящий режим:
2 - Неисправность:
3 - Ничего не делать:
0
Помните, что эти изменения отразятся на всех планах электропитания (например, «Сбалансированный», «Высокая производительность»).
Вот пример того, как вы можете использовать обе клавиши для установки различных действий кнопки питания для режимов от сети и от батареи — ACSettingIndex=’3′ (Выключение) и DCSettingIndex=’2(Hibernate).
Это приведет к тому, что ваш компьютер перейдет в спящий режим при нажатии кнопки питания, когда он подключен к сети, и выключится при нажатии кнопки питания, когда он работает от батареи.
Использование редактора локальной политики
Изменения, внесенные вами в настройки кнопки питания на панели управления, будут применяться только к текущему пользователю. Это означает, что ваши изменения не затронут других пользователей на том же компьютере. Если вы хотите изменить настройки кнопки питания для всех пользователей компьютера, вы можете использовать редактор групповой политики.
Используя редактор групповой политики, вы можете изменить поведение кнопки питания, изменив настройки ее политики. Эти настройки переопределяют настройки электропитания на панели управления. Для этого выполните следующие действия:
Откройте редактор групповой политики, выполнив поиск «Редактор локальной групповой политики» в поиске Windows и выбрав соответствующий результат.
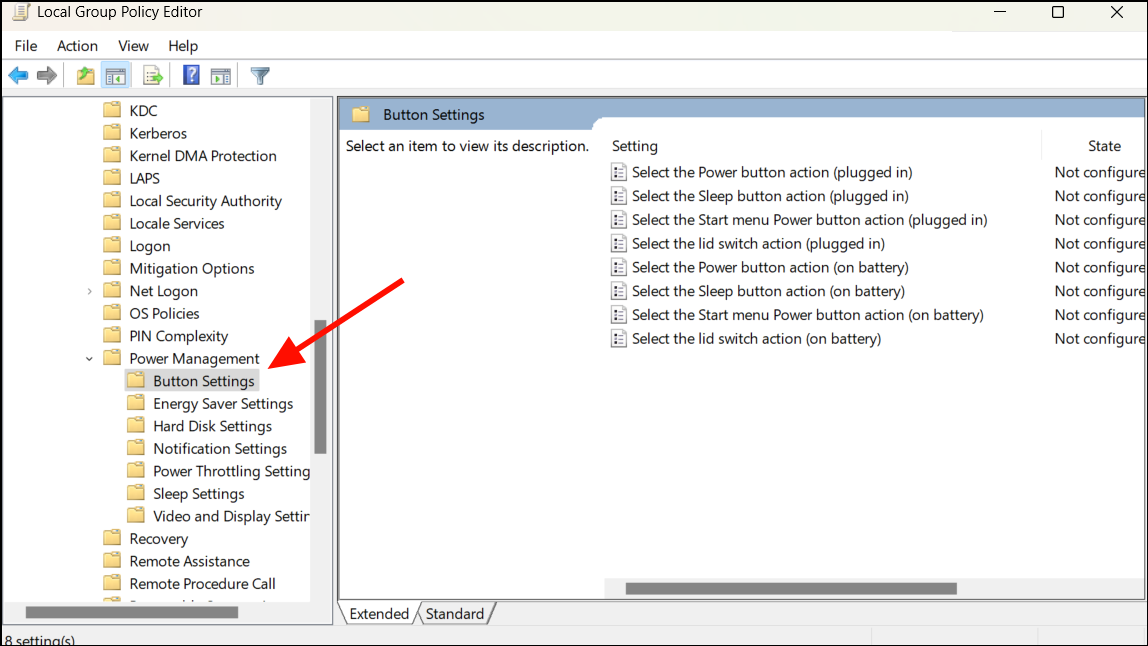
В редакторе групповой политики перейдите в раздел Computer Configuration > Administrative Templates > Windows Components > Power Management > Power Settings.
На правой панели «Настройки кнопок» дважды щелкните «Выбрать действие кнопки питания (от сети)», чтобы определить, что будет делать кнопка питания, когда компьютер работает от батареи.

Затем выберите «Включено» в левом верхнем углу, а затем выберите нужное действие в раскрывающемся меню «Действие кнопки питания» ниже.
После этого нажмите «Применить», а затем «ОК».
Затем нажмите политику «Выбрать действие кнопки питания (от батареи)», чтобы указать, что будет делать кнопка питания, когда компьютер подключен к сети.
Выберите «Включено» в левом верхнем углу, выберите нужное действие в раскрывающемся меню «Действие кнопки питания» и нажмите «Применить» и «ОК», чтобы сохранить настройки.

Редактор локальной групповой политики также включает политики для других параметров, таких как закрытие крышки на ноутбуках. Если на вашем компьютере нет редактора локальной групповой политики, проверьте версию вашей ОС. Если это Windows 11 Home, вы можете использовать описанные выше методы, чтобы изменить настройки кнопки питания. Любые внесенные вами изменения будут применяться ко всем планам электропитания.
Вот и все.
Просмотров: 1 443
The power button in your PC is not merely to power up your PC. You can also press it while your PC is on to perform certain tasks, such as shutdown or restart. Many users set such functions, but you can also set it to do nothing if you’re afraid of pressing it unintentionally.
It’s very easy to change the setting for the power button action. Regardless of the method you use, it takes less than a minute. Laptop users can also change the setting for each power mode (plugged in or on battery).
So, let’s move on to the possible methods for this process on a Windows 11 PC.
How to Change the Keyboard Power Button Settings
This section deals with changing your system’s action if you press your keyboard’s power button. If you want to change the options for the power button on the GUI (e.g., Start Menu), head over to the next section.
There are many ways to change the power button settings. These methods have different precedence. So read carefully and pick one according to your preference.
Through Power Options
This is the default method of changing the power button settings using the GUI. Power Options is a Control Panel feature that configures all power settings. You can either change the power button actions for all power plans or a specific one.
For All Power Plans
Here are the steps for this method:
- Press Win + R to open Run.
- Type
powercfg.cpland press Enter. It will load Power Options. - Click Choose what power buttons do.
- Click on the drop-down boxes next to When I press the power button.

- Select the option you want.
- Click Save Changes.

For Specific Power Plan
Follow the steps below to change power button settings for a specific plan:
- Open Power Options.
- Click on Change plan settings for your power plan.
- Select Change advanced power settings.
- Expand Power buttons and lid > Power button action.

- Click the drop-down boxes for On battery and Plugged in, and set the option you want.
- Click Apply and Ok.

If you can’t see the Power buttons and lid option, open Command Prompt as admin and enter the following command:
REG ADD HKLM\SYSTEM\CurrentControlSet\Control\Power\PowerSettingsf971e89-eebd-4455-a8de-9e59040e7347ca83367-6e45-459f-a27b-476b1d01c936 /v Attributes /t REG_DWORD /d 2 /f
Using Group Policy Editor
Another way to change power button actions is by changing its policy settings. Such policies take precedence over the Power Options settings. To change the power button policies,
- Open Run and enter
gpedit.mscto open the Local Group Policy Editor. - Go to Computer Configuration > Administrative Templates > System > Power Management > Button Settings.
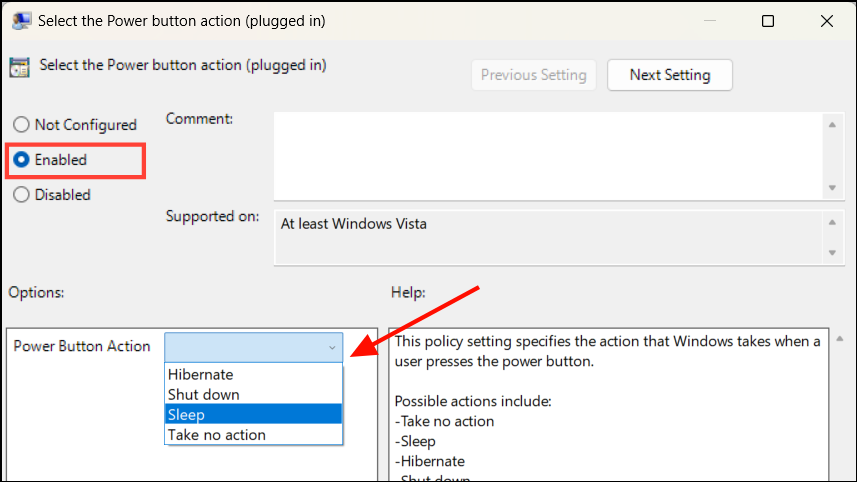
- Double-click on Select the Power button action (plugged in).

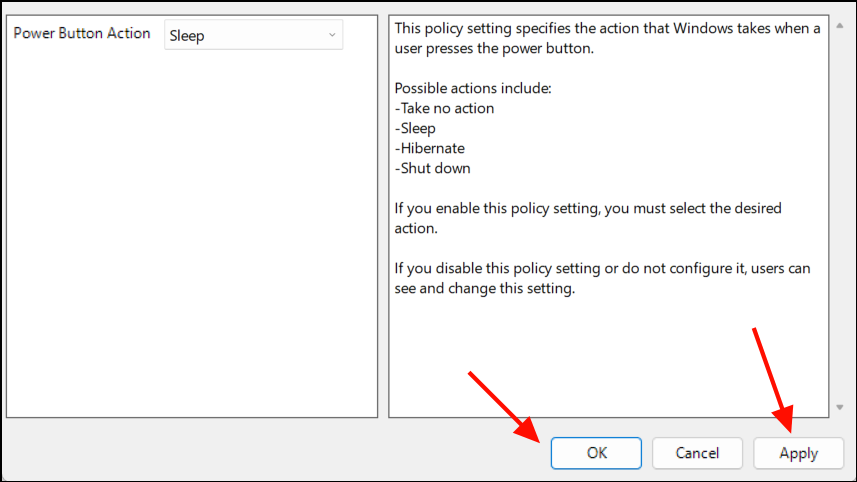
- Check Enabled and set Power Button Action to your preference.
- Click Apply and Ok.
- Apply the same process for Select the Power button action (on battery).

With Registry Editor
You can also change the Power Button Settings in the registry configuration. You can do so by using the Registry Editor. First, back up your registry and then, follow the steps below:
- Launch Run and enter
regedit. It directs you to the Registry Editor. - Navigate to
Computer\HKEY_LOCAL_MACHINE\SOFTWARE\Policies\Microsoft\ - Right-click on Microsoft and select New > Key.
- Set its name to Power.
- Create a new key
PowerSettingsinside Power. - Create new key
7648EFA3-DD9C-4E3E-B566-50F929386280inside PowerSettings and go inside this key. - Right-click on an empty area and select New > DWORD (32-bit) Value.
- Set its name it
ACSettingIndex. - Create another DWORD value and name it as
DCSettingIndex. - Double-click on the entries to set their Value data to any of the following options:
- Take no action = 0
- Sleep = 1
- Hibernate = 2
- Shut down = 3
ACSettingIndex specifies the power button action for the plugged-in mode. And the other entry determines the action for the on battery power mode.
You don’t need to create the keys and entries if they already exist. Simply change their values.
Using Command-line Interface
If you’re familiar with the CLI, you might find it easier to use it to change such settings. You can change the power button settings for the current or any specific power plan. Pick one according to your need.
For the Current Power Plan
Here are the steps to change power button actions for your current power plan using a CLI:
- Open the Command Prompt or Windows PowerShell.
- Enter the following commands:
powercfg -setdcvalueindex SCHEME_CURRENT 4f971e89-eebd-4455-a8de-9e59040e7347 7648efa3-dd9c-4e3e-b566-50f929386280 “Option Index”powercfg -setacvalueindex SCHEME_CURRENT 4f971e89-eebd-4455-a8de-9e59040e7347 7648efa3-dd9c-4e3e-b566-50f929386280 “Option Index”- Make sure to replace “Option Index” with a value as follows:
- Do nothing – 0
- Sleep – 1
- Hibernate – 2
- Shutdown – 3
- Turn off display – 4

- Type
powercfg -SetActive SCHEME_CURRENTand press Enter.

For a Specific Power Plan
You need to know the GUID of a power plan to change its setting. The complete process of altering power button settings is as follows:
- Open the Command Prompt or Windows PowerShell.
- Enter
powercfg /land note the GUID number for the plan you want. - Enter the same commands as the above method while replacing SCHEME_CURRENT with the GUID number.
How to Change the GUI Power Button Options
If you want to change the GUI Power Menu options rather than the power key settings, this is the section for you. The power menu always contains Restart and Shut down. But you can choose if you want to show the Hibernate or Sleep options.
There are many ways of doing so, such as:
Through Power Options
Using the Power Options is always the usual method of making any changes to your power settings. Here’s what you need to do to change the power menu options:
- Open Run and enter
powercfg.cpl. - Click Choose what power buttons do.
- Select Change settings that are currently unavailable.
- Under Shutdown settings, check/uncheck Sleep and Hibernate for the Power Button menu.
- Click Save Changes.

With CLI
You can also enable or disable the two options using the Command-line Interface. Follow the instructions below to use the Command Prompt for this purpose:
- Press Win + R to open Run.
- Type
cmdand press Ctrl + Shift + Enter to open the elevated Command Prompt. - Enter the following options to change the hibernate/sleep options in the Power menu:
Enable Hibernate: powercfg /hibernate onDisable Hibernate: powercfg /hibernate offEnable Sleep: powercfg /sleep onDisable Sleep: powercfg /sleep off
Using Group Policy Editor
Another way to change the power menu options is through their policy settings. To do so,
- Enter
gpedit.mscon Run. - Head over to Computer Configuration > Administrative Templates > Windows Components > File Explorer.
- Double-click on Show hibernate in the power options menu or Show sleep in the power options menu.
- Check Enabled or Disabled according to your preference and click Ok.
With Registry Editor
You can also go to the Registry Editor and change the entries corresponding to the options. Follow the directions below to do so:
- Enter
regediton Run. - Go to
Computer\HKEY_LOCAL_MACHINE\SOFTWARE\Microsoft\Windows\CurrentVersion\Explorer\FlyoutMenuSettings - Set ShowHibernateOption and ShowSleepOption to 1 to enable and 0 to disable them.
If you don’t see FlyoutMenuSetting, create the key. Then, create the two DWORD entries as we mentioned above and set their value accordingly.

This tutorial will show you how to change the default action to take when pressing the power button in Windows 10 and Windows 11.
The power button action setting lets users specify the default action to take when the system hardware power button on the PC is pressed.
Users can specify one of the following actions to take:
- Do Nothing = No action is taken when the power button is pressed.
- Sleep = The system enters sleep when the power button is pressed. This is usually the default setting for laptops and tablets.
- Hibernate = The system enters hibernate when the power button is pressed.
- Shut Down = The system shuts down when the power button is pressed. This is usually the default setting for desktops.
- Turn off the display = All displays will be turned off when the power button is pressed.
Reference:
Contents
- Option One: Change Power Button Action for Current Power Plan in Settings
- Option Two: Change Power Button Action for Current Power Plan in Power Options
- Option Three: Change Power Button Action for Specific Power Plan in Advanced Power Options
- Option Four: Change Power Button Action for Current Power Plan in Windows Terminal
- Option Five: Change Power Button Action for Specific Power Plan in Windows Terminal
- Option Six: Specify Power Button Action for All Power Plans in Local Group Policy Editor
- Option Seven: Specify Power Button Action for All Power Plans using REG file
Option One
Change Power Button Action for Current Power Plan in Settings
This option is only available starting with Windows 11 build 25309.
1 Open Settings (Win+I).
2 Click/tap on System on the left side, and click/tap on Power & battery on the right side. (see screenshot below)

3 Click/tap on Power button controls to expand it open. (see screenshot below step 4)
4 Select Do nothing, Sleep, Hibernate, Shut down, or Display Off for what you want in the Pressing the power button will make my PC drop menus for Plugged in and On battery. (see screenshot below)

Option Two
Change Power Button Action for Current Power Plan in Power Options
1 Open the Control Panel (icons view), and click/tap on the Power Options icon.
2 Click/tap on the Choose what the power buttons do link in the left pane. (see screenshot below)

3 In both the On battery and Plugged in drop menus for the When I press the power button setting, select Do nothing, Sleep, Hibernate, Shut down, or Turn off the display for what you want, and click/tap on Save changes.
Desktop computers will not have separate On battery and Plugged in options available unless it has a data connection to a UPS.

Option Three
Change Power Button Action for Specific Power Plan in Advanced Power Options
1 Open the Control Panel (icons view), and click/tap on the Power Options icon.
2 Click/tap on the Change plan settings link for the power plan you want to apply this to. (see screenshot below)
3 Click/tap on the Change advanced power settings link. (see screenshot below)

4 Expand open the Power buttons and lid and Power button action settings. (see screenshot below step 5)
You can add Power button action to Power Options if you do not have it available.
5 In both the On battery and Plugged in drop menus for the Power button action setting, select Do nothing, Sleep, Hibernate, Shut down, or Turn off the display for what you want, and click/tap on OK.
Desktop computers will not have separate On battery and Plugged in options available unless it has a data connection to a UPS.

Option Four
Change Power Button Action for Current Power Plan in Windows Terminal
1 Open Windows Terminal, and select either Windows PowerShell or Command Prompt.
2 Copy and paste the command below you want to use for when on battery and/or plugged in into Windows Terminal, and press Enter. (see screenshot below)
(Do nothing)
powercfg -setdcvalueindex SCHEME_CURRENT 4f971e89-eebd-4455-a8de-9e59040e7347 7648efa3-dd9c-4e3e-b566-50f929386280 0
OR
(Sleep)
powercfg -setdcvalueindex SCHEME_CURRENT 4f971e89-eebd-4455-a8de-9e59040e7347 7648efa3-dd9c-4e3e-b566-50f929386280 1
OR
powercfg -setdcvalueindex SCHEME_CURRENT 4f971e89-eebd-4455-a8de-9e59040e7347 7648efa3-dd9c-4e3e-b566-50f929386280 2
OR
(Shut down)
powercfg -setdcvalueindex SCHEME_CURRENT 4f971e89-eebd-4455-a8de-9e59040e7347 7648efa3-dd9c-4e3e-b566-50f929386280 3
OR
(Turn off the display)
powercfg -setdcvalueindex SCHEME_CURRENT 4f971e89-eebd-4455-a8de-9e59040e7347 7648efa3-dd9c-4e3e-b566-50f929386280 4
AND/OR
You would use this option for a desktop computer, since desktop computers will not have separate On battery and Plugged in options available unless it has a data connection to a UPS.
(Do nothing)
powercfg -setacvalueindex SCHEME_CURRENT 4f971e89-eebd-4455-a8de-9e59040e7347 7648efa3-dd9c-4e3e-b566-50f929386280 0
OR
(Sleep)
powercfg -setacvalueindex SCHEME_CURRENT 4f971e89-eebd-4455-a8de-9e59040e7347 7648efa3-dd9c-4e3e-b566-50f929386280 1
OR
powercfg -setacvalueindex SCHEME_CURRENT 4f971e89-eebd-4455-a8de-9e59040e7347 7648efa3-dd9c-4e3e-b566-50f929386280 2
OR
(Shut down)
powercfg -setacvalueindex SCHEME_CURRENT 4f971e89-eebd-4455-a8de-9e59040e7347 7648efa3-dd9c-4e3e-b566-50f929386280 3
OR
(Turn off the display)
powercfg -setacvalueindex SCHEME_CURRENT 4f971e89-eebd-4455-a8de-9e59040e7347 7648efa3-dd9c-4e3e-b566-50f929386280 4
3 Copy and paste the powercfg -SetActive SCHEME_CURRENT command into the Windows Terminal, and press Enter.
4 Restart the computer to apply.

Option Five
Change Power Button Action for Specific Power Plan in Windows Terminal
1 Open Windows Terminal, and select either Windows PowerShell or Command Prompt.
2 Copy and paste the powercfg /L command into Windows Terminal, and press Enter. Make note of the GUID number (ex: 381b4222-f694-41f0-9685-ff5bb260df2e) of the power plan (ex: «Balanced») you want to apply this to. (see screenshot below)
The power plan (ex: «Balanced») with an asterisk (*) to the right of it is your current active power plan scheme.

3 Type the command below you want to use for when on battery and/or plugged in into Windows Terminal, and press Enter.
(Do nothing)
powercfg -setdcvalueindex GUID 4f971e89-eebd-4455-a8de-9e59040e7347 7648efa3-dd9c-4e3e-b566-50f929386280 0
OR
(Sleep)
powercfg -setdcvalueindex GUID 4f971e89-eebd-4455-a8de-9e59040e7347 7648efa3-dd9c-4e3e-b566-50f929386280 1
OR
powercfg -setdcvalueindex GUID 4f971e89-eebd-4455-a8de-9e59040e7347 7648efa3-dd9c-4e3e-b566-50f929386280 2
OR
(Shut down)
powercfg -setdcvalueindex GUID 4f971e89-eebd-4455-a8de-9e59040e7347 7648efa3-dd9c-4e3e-b566-50f929386280 3
OR
(Turn off the display)
powercfg -setdcvalueindex GUID 4f971e89-eebd-4455-a8de-9e59040e7347 7648efa3-dd9c-4e3e-b566-50f929386280 4
AND/OR
You would use this option for a desktop computer, since desktop computers will not have separate On battery and Plugged in options available unless it has a data connection to a UPS.
(Do nothing)
powercfg -setacvalueindex GUID 4f971e89-eebd-4455-a8de-9e59040e7347 7648efa3-dd9c-4e3e-b566-50f929386280 0
OR
(Sleep)
powercfg -setacvalueindex GUID 4f971e89-eebd-4455-a8de-9e59040e7347 7648efa3-dd9c-4e3e-b566-50f929386280 1
OR
powercfg -setacvalueindex GUID 4f971e89-eebd-4455-a8de-9e59040e7347 7648efa3-dd9c-4e3e-b566-50f929386280 2
OR
(Shut down)
powercfg -setacvalueindex GUID 4f971e89-eebd-4455-a8de-9e59040e7347 7648efa3-dd9c-4e3e-b566-50f929386280 3
OR
(Turn off the display)
powercfg -setacvalueindex GUID 4f971e89-eebd-4455-a8de-9e59040e7347 7648efa3-dd9c-4e3e-b566-50f929386280 4
Substitute GUID in the command above with the actual GUID (ex: «381b4222-f694-41f0-9685-ff5bb260df2e») from step 2 above for the power plan (ex: «Balanced») you want to apply this to.
For example:
powercfg -setacvalueindex 381b4222-f694-41f0-9685-ff5bb260df2e 4f971e89-eebd-4455-a8de-9e59040e7347 7648efa3-dd9c-4e3e-b566-50f929386280 3
4 Copy and paste the powercfg -SetActive SCHEME_CURRENT command into the Windows Terminal, and press Enter.
5 Restart the computer to apply.

Option Six
Specify Power Button Action for All Power Plans in Local Group Policy Editor
You must be signed in as an administrator to use this option.
The Local Group Policy Editor is only available in the Windows 11 Pro, Enterprise, and Education, editions.
All editions can use Option Seven below to configure the same policy.
1 Open the Local Group Policy Editor (gpedit.msc).
2 Navigate to the policy location below in the left pane of the Local Group Policy Editor. (see screenshot below)
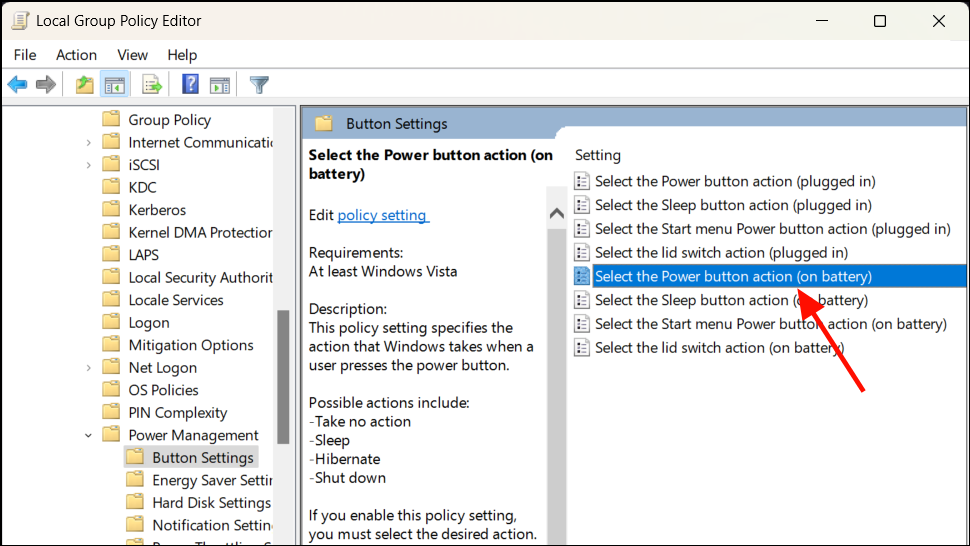
Computer Configuration > Administrative Templates > System > Power Management > Button Settings.

3 In the right pane of Button Settings, double click/tap on the Select the Power button action (plugged in) and/or Select the Power button action (on battery) policy you want to edit. (see screenshot above)
4 Do step 5 (default), step 6 (hibernate), step 7 (shut down), step 8 (sleep), or step 9 (Take no action) below for which default action you want to specify.
5 Default User Choice for Power Button Action
This will allow users to use Option One, Option Two, Option Three, Option Four, and Option Five.
A) Select (dot) Not Configured, click/tap on OK, and go to step 10 below. (see screenshot below step 9)
6 To Specify «Hibernate» for Power Button Action
This will override and gray out Option One, Option Two, Option Three, Option Four, and Option Five.
A) Select (dot) Enabled, select Hibernate in the Power Button Action drop menu under Options, click/tap on OK, and go to step 10 below. (see screenshots below step 9)
7 To Specify «Shut down» for Power Button Action
This will override and gray out Option One, Option Two, Option Three, Option Four, and Option Five.
A) Select (dot) Enabled, select Shut down in the Power Button Action drop menu under Options, click/tap on OK, and go to step 10 below. (see screenshots below step 9)
8 To Specify «Sleep» for Power Button Action
This will override and gray out Option One, Option Two, Option Three, Option Four, and Option Five.
A) Select (dot) Enabled, select Sleep in the Power Button Action drop menu under Options, click/tap on OK, and go to step 10 below. (see screenshots below step 9)
9 To Specify «Take no action» for Power Button Action
This will override and gray out Option One, Option Two, Option Three, Option Four, and Option Five.
A) Select (dot) Enabled, select Take no action in the Power Button Action drop menu under Options, click/tap on OK, and go to step 10 below. (see screenshots below)


10 When finished, you can close the Local Group Policy Editor if you like.
Option Seven
Specify Power Button Action for All Power Plans using REG file
You must be signed in as an administrator to use this option.
1 Do step 2 (default), step 3 (hibernate), step 4 (shut down), step 5 (sleep), or step 6 (Take no action) below for which default action you want to specify.
2. Default User Choice for Power Button Action
This will allow users to use Option One, Option Two, Option Three, Option Four, and Option Five.
A) Click/tap on the Download button you want below to download the plugged in AND/OR on battery file below, and go to step 7 below.
Default_user_choice_for_power_button_action-plugged-in.reg
(Contents of REG file for reference)
Code:
Windows Registry Editor Version 5.00

[HKEY_LOCAL_MACHINE\SOFTWARE\Policies\Microsoft\Power\PowerSettings\7648EFA3-DD9C-4E3E-B566-50F929386280]
"ACSettingIndex"=-AND/OR
Default_user_choice_for_power_button_action-on-battery.reg
(Contents of REG file for reference)
Code:
Windows Registry Editor Version 5.00

[HKEY_LOCAL_MACHINE\SOFTWARE\Policies\Microsoft\Power\PowerSettings\7648EFA3-DD9C-4E3E-B566-50F929386280]
"DCSettingIndex"=-
3. To Specify «Hibernate» for Power Button Action
This will override and gray out Option One, Option Two, Option Three, Option Four, and Option Five.
A) Click/tap on the Download button you want below to download the plugged in AND/OR on battery file below, and go to step 7 below.
Specify_hibernate_for_power_button_action-plugged-in.reg
(Contents of REG file for reference)
Code:
Windows Registry Editor Version 5.00

[HKEY_LOCAL_MACHINE\SOFTWARE\Policies\Microsoft\Power\PowerSettings\7648EFA3-DD9C-4E3E-B566-50F929386280]
"ACSettingIndex"=dword:00000002AND/OR
Specify_hibernate_for_power_button_action-on-battery.reg
(Contents of REG file for reference)
Code:
Windows Registry Editor Version 5.00

[HKEY_LOCAL_MACHINE\SOFTWARE\Policies\Microsoft\Power\PowerSettings\7648EFA3-DD9C-4E3E-B566-50F929386280]
"DCSettingIndex"=dword:00000002
4. To Specify «Shut down» for Power Button Action
This will override and gray out Option One, Option Two, Option Three, Option Four, and Option Five.
A) Click/tap on the Download button you want below to download the plugged in AND/OR on battery file below, and go to step 7 below.
Specify_shut_down_for_power_button_action-plugged-in.reg
(Contents of REG file for reference)
Code:
Windows Registry Editor Version 5.00

[HKEY_LOCAL_MACHINE\SOFTWARE\Policies\Microsoft\Power\PowerSettings\7648EFA3-DD9C-4E3E-B566-50F929386280]
"ACSettingIndex"=dword:00000003AND/OR
Specify_shut_down_for_power_button_action-on-battery.reg
(Contents of REG file for reference)
Code:
Windows Registry Editor Version 5.00

[HKEY_LOCAL_MACHINE\SOFTWARE\Policies\Microsoft\Power\PowerSettings\7648EFA3-DD9C-4E3E-B566-50F929386280]
"DCSettingIndex"=dword:00000003
5. To Specify «Sleep» for Power Button Action
This will override and gray out Option One, Option Two, Option Three, Option Four, and Option Five.
A) Click/tap on the Download button you want below to download the plugged in AND/OR on battery file below, and go to step 7 below.
Specify_sleep_for_power_button_action-plugged-in.reg
(Contents of REG file for reference)
Code:
Windows Registry Editor Version 5.00

[HKEY_LOCAL_MACHINE\SOFTWARE\Policies\Microsoft\Power\PowerSettings\7648EFA3-DD9C-4E3E-B566-50F929386280]
"ACSettingIndex"=dword:00000001AND/OR
Specify_sleep_for_power_button_action-on-battery.reg
(Contents of REG file for reference)
Code:
Windows Registry Editor Version 5.00

[HKEY_LOCAL_MACHINE\SOFTWARE\Policies\Microsoft\Power\PowerSettings\7648EFA3-DD9C-4E3E-B566-50F929386280]
"DCSettingIndex"=dword:00000001
6. To Specify «Take no action» for Power Button Action
This will override and gray out Option One, Option Two, Option Three, Option Four, and Option Five.
A) Click/tap on the Download button you want below to download the plugged in AND/OR on battery file below, and go to step 7 below.
Specify_do_nothing_for_power_button_action-plugged-in.reg
(Contents of REG file for reference)
Code:
Windows Registry Editor Version 5.00

[HKEY_LOCAL_MACHINE\SOFTWARE\Policies\Microsoft\Power\PowerSettings\7648EFA3-DD9C-4E3E-B566-50F929386280]
"ACSettingIndex"=dword:00000000AND/OR
Specify_do_nothing_for_power_button_action-on-battery.reg
(Contents of REG file for reference)
Code:
Windows Registry Editor Version 5.00

[HKEY_LOCAL_MACHINE\SOFTWARE\Policies\Microsoft\Power\PowerSettings\7648EFA3-DD9C-4E3E-B566-50F929386280]
"DCSettingIndex"=dword:00000000
7 Save the .reg file to your desktop.
8 Double click/tap on the downloaded .reg file to merge it.
9 When prompted, click/tap on Run, Yes (UAC), Yes, and OK to approve the merge.
10 You can now delete the downloaded .reg file if you like.
That’s it,
Shawn Brink
Related Tutorials
- Change Lid Close Action in Windows 11
- Change Lid Open Action in Windows 11
- Change Sleep Button Action in Windows 11
- Turn On or Off «Enable forced button/lid shutdown» in Windows 11
You are here:
Home » Windows 11 » Use Power Button To Shut Down Or Hibernate Windows 11 PC
There are different ways to shut down, hibernate, and sleep your Windows 11 computer. If running Windows 11 on a laptop, you can even use the physical power button to shut down, hibernate or sleep your computer.
The power button on your Windows 11 device, by default, is only used to turn on your device. However, there is an option under power settings to configure it to shut down, hibernate or sleep your computer.
This guide will show you how to change the default power button settings so that you can configure it to turn off your Windows 11 computer quickly.
Tip: 5 ways to shut down, restart and hibernate Windows 11 PC
Shut down, hibernate or sleep your Windows 11 PC with the power button
Step 1: Open the classic Control Panel. There are multiple ways to open the Control Panel. The easiest option is to type Control Panel in the search and hit the Enter key.

Step 2: Once the Control Panel is launched, change the View by to Small icons (refer to the picture below).
Step 3: Now, click on Power Options. This will open the Power Options window.

Step 4: On the left side of the window, click on the Choose what the power buttons do link.

Step 5: Here, from the drop-down next to When I press the power button, select an action that you would like Windows to do when you press the power button. The drop-down offers Sleep, Shut down, Hibernate, and Turn off the display options.
You can select an option for both On battery and Plugged in states or just for one state. Also, no need to choose the same action for both On battery and Plugged in states.

As you can see, the same window offers options to set what happens when you press the sleep button (not available on modern computers) and when you close the screen lid.
Step 6: Finally, click on the Save changes button to apply the new settings.
Tip: Irrespective of how you have configured the power button to do when you press it, pressing down the power button for about 7 to 10 seconds shuts down your computer. Use this method if your Windows 11 laptop is not responding, and you want to shut down your PC.