
автор: Джон, Обновлено: 21 августа 2024 г.
То же самое с предыдущей версией, Windows Server 2019 имеет родной Управление дисками инструмент, помогающий управлять разделами диска. Но он может выполнять только некоторые базовые операции и не так эффективен, как стороннее программное обеспечение. В этой статье рассказывается, что делает Windows Server 2019 Управление дисками и ограничения по сравнению с программным обеспечением диспетчера разделов диска сервера.
Содержание:
- Что Windows Server 2019 Управление дисками
- Как изменить размер раздела с Server 2019 Управление дисками
- Сравнение с диспетчером разделов диска сервера
Что Windows Server 2019 Управление дисками
Есть 3 распространенных способа открыть «Управление дисками» в Windows Server 2019:
- Щелкните правой кнопкой мыши Windows значок в левом нижнем углу и нажмите Управление дисками в списке.
- Press Windows и X вместе на клавиатуре, вы увидите Управление дисками в списке.
- Press Windows + R чтобы открыть Run, наберите diskmgmt.msc и нажмите Enter.
Щелкните правой кнопкой мыши раздел или передний диска, вы увидите варианты. Недоступные параметры выделены серым цветом, это означает, что тип диска/раздела текущей конфигурации не соответствует требованиям этой функции.
Для инициализированного диска параметры включают в себя:
- Новый Spanned Volume
- Новый Полосатый Объем
- Новый зеркальный том
- Новое RAID-5 Объем
- Преобразовать в динамический диск
- Конвертировать в GPT диск
- оффлайн
- НЕДВИЖИМОСТИ

Для выделенного раздела параметры включают в себя:
- Откройте корневой каталог в проводнике
- Пометить раздел как активный
- Изменить букву диска и путь
- Формат
- Расширить том
- Сжать том
- Добавить зеркало
- Удалить раздел
- НЕДВИЖИМОСТИ

Помимо базовой способности создавать, удалять и форматировать раздел, Windows Server 2019 Управление дисками имеет некоторые расширенные возможности.
Управление динамическими томами:
Server 2019 Управление дисками позволяет создавать и управлять простыми, зеркальными, чередующимися, составными и RAID 5 динамический объем.
Динамические дисковые тома потребляют много ресурсов сервера, если один диск поврежден, все данные в этом томе будут потеряны. Цена на оборудование сейчас намного ниже, поэтому большинство серверов используют оборудование RAID массивы вместо динамического тома.
Преобразование диска:
Управление дисками имеет возможность конвертировать диск между MBR и GPT, конвертировать диск между Basic и Dynamic.
Тем не менее, он может конвертировать только базовый диск в динамический без потери данных. Чтобы преобразовать динамический диск в базовый или конвертировать между MBR и GPT, необходимо удалить все разделы на диске.
Изменить размер раздела:
То же самое с предыдущей версией, Server 2019 Управление дисками имеет Сжать том и Расширить том функции, помогающие изменить размер выделенного раздела без потери данных (в большинстве случаев).
Но из-за некоторых ограничений обеих функций, Управление дисками не может расширить раздел сжимая еще один. Кроме того, только NTFS раздел может быть изменен.
Как изменить размер раздела с Server 2019 Управление дисками
Сократить раздел в Server 2019 Управление диском:
- Щелкните правой кнопкой мыши раздел NTFS в разделе «Управление дисками» и выберите Сжать том.
- Введите и количество места и нажмите Сжиматься, (Если вы не введете сумму, будет использовано максимально доступное пространство.)
Недостатки функции «Уменьшить объем»:
- Нераспределенное пространство может быть сделано только на правую пока сжимается.
- Он может уменьшить пространство только в том случае, если на этом диске есть неподвижные файлы.
Расширить раздел в Server 2019 Управление диском:
- Щелкните правой кнопкой мыши правый непрерывный раздел (D
 и выберите «Удалить том».
 - Щелкните правой кнопкой мыши раздел, который вы хотите расширить (C выберите Расширить том.
- Просто нажмите Следующая к Завершить во всплывающем окне мастера расширения тома.
 и выберите «Удалить том».
Недостатки функции «Увеличить громкость»:
- Должно быть примыкающий Нераспределенное пространство на правую раздела, который вы хотите расширить, в противном случае, Опция расширения отключена.
- Если диск D логический, ты все еще невозможно продлить диск C: даже после удаления D.
Следуйте лучшему методу, чтобы изменить размер раздела на Windows Server 2019.
Сравнение с диспетчером разделов диска сервера
Сравнивая с Windows Server 2019 встроенный инструмент управления дисками, стороннее программное обеспечение намного мощнее. Таких программ на рынке много, графический интерфейс и функции у всех одинаковые. Но лучше, чем другое программное обеспечение, NIUBI Partition Editor намного безопаснее и быстрее благодаря передовым технологиям:
- Виртуальный режим — все операции сначала отображаются как ожидающие выполнения, реальные разделы диска не будут изменены, пока вы не нажмете «Применить» для подтверждения.
- Hot-Clone — клонирование раздела диска без остановки работы сервера. Вы можете клонировать системный диск в качестве резервной копии и немедленно загрузиться с клонированного диска.
- Отменить-на-воли — если вы применили неправильные операции, вы можете отменить текущие операции в любой момент без разрушения разделов.
- 1 второй откат — если при изменении размера раздела обнаружена какая-либо известная ошибка, он автоматически мгновенно возвращает сервер к исходному состоянию.
- Фильтр алгоритм перемещения файлов — перемещать и расширять раздел на 30–300% быстрее.
Скачать NIUBI Partition Editor и вы увидите главное окно со структурой разделов диска и другой информацией справа. Доступные операции с диском или разделом перечислены слева и по щелчку правой кнопкой мыши. Недоступные операции будут скрыты, чтобы интерфейс оставался чистым.

Доступные операции для раздела:
- Изменить размер тома (уменьшить и расширить)
- Переместить расположение раздела
- Объединить два смежных тома за 1 шаг
- Скопировать том в нераспределенное пространство
- Преобразовать раздел между логическим и основным
- Конвертировать NTFS в FAT32
- Оптимизировать файловую систему
- Изменить букву диска (например, D:)
- Изменить метку (добавить или изменить имя раздела)
- Сделать активным
- Проверьте целостность файловой системы
- Дефрагментация для улучшения производительности
- Скрыть из проводника
- Удалить (файлы можно восстановить)
- Формат тома для использования в качестве нового
- Протрите (стереть данные навсегда)
- Тест поверхности (сканирование поврежденных секторов)
- Исследуйте (просмотр файлов / папок с каталогом)
- Посмотреть недвижимость

Доступные операции на весь диск:
- Инициализировать новый диск
- Изменить статус на оффлайн или онлайн
- Установить атрибут только для чтения
- Протрите диск (не может быть восстановлено)
- Тест поверхности
- Посмотреть недвижимость
- Клонировать диск для переноса данных и ОС
- Конвертировать MBR диск в GPT
- Удалите все разделы
- Очистка диска
Скачать
Учитесь как управлять разделом диска для Server 2019 с этим мощным инструментом.
Summary
If you want to better manage your hard disk partition space, you will need a partition manage tool. This page will introduce a useful partition manage program for you to extend, merge or resize partitions on Windows server 2019 without losing data.
Limits of Windows Built-in Disk Management Utility
Disk management is the default partition tool offered in the windows server 2019. There is a comparison table between the Windows built-in partition manager VS the 3rd party partition manager.
| Disk Management | Partition Resizer* | |
| Dynamic disk | NO | |
| Shrink fat32 partition | NO | |
| Extend fat32 partition | YES when unallocated space at right side | |
| Extend fat32 C drive | NO | |
| Clone disk/partition | NO | |
| Convert logical to primary | (Data loss) | (No data loss) |
| Convert basic dynamic | (Data loss) | (No data loss) |
| Convert mbr gpt | (Data loss) | (No data loss) |
| Extend ntfs C drive | YES when right unallocated space is available | |
| Move unallocated space or partition | NO | |
| Download Win 11-7 (100% Free) Download Win Server (Free Demo) |
Data Loss Risk in Windows Built-in Partition Manager Windows Server 2019
The partition manager is easy to use but it can be risky. The huge loads of files, bigger hard disk, cpu usage, and overloaded ram can cause certain difficulties while resizing the disk partition. In such cases, the data may be loss and affect the system.
- If the system parameters failed to be changes, system is unable to handle errors, and system files are damaged.
- If the partition manager drivers becomes damaged to failed system parameters
- If the system parameters failed and caused to lose the data
Extend Partition without Data Loss: IM-Magic Partition Resizer Server Edition
To overcome these solutions, it is recommended to use third-party partition manager software. Reputed partition manager software ensures complete data safety. For instance, the IM-Magic Partition Resizer Server Edition allows you to modify, extend, or shrink the disk without any kind of data loss.
Video Tutorial to Resize Partitions with Partition Tool
While the built-in partition manager software windows server 2019 is reliable and convenient for pro users, the IM-Magic Server Edition can be used by novice computer users.
IM-Magic Partition Resizer Server is a 100% safe partition manager for all Windows
Server users, with which users can extend disk partitions, shrink disk partitions etc. Here is a list of functions of this safe partition manager.
- Shrink any drive without losing data
- Extend any drive without losing data
- Move unallocated space without losing data
- Move partitions without losing data
- Copy partition
- Clone disk to backup disk
- Convert NTFS to fat32 without losing data
- Convert MBR to GPT without losing data
- Change cluster size by formatting
- Remove bad sectors for hdd/ssd/usb/sd etc.
What’s special? This
partition manager software is secure, reliable and easy-to-use, and it can protect OS and data safety even from power failure during disk management.
IM-Magic Partition Resizer Server is for all Windows Server OS.
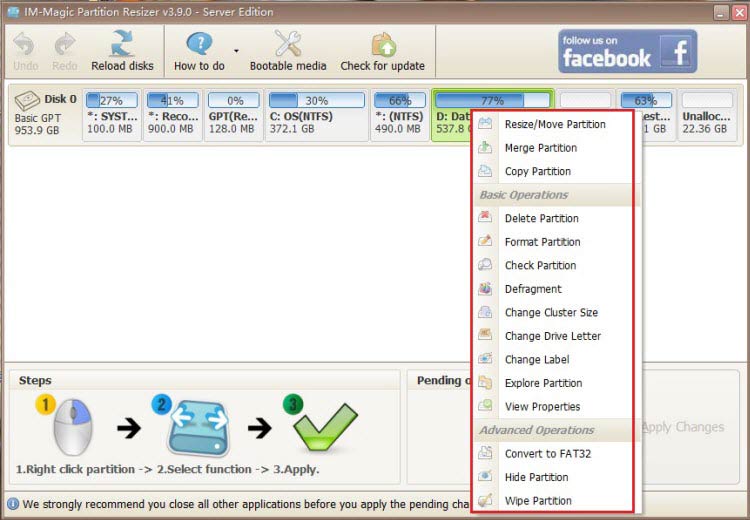
If you right-click a partition in Partition Resizer, you will see the following options. Details may vary depending on the volume properties.
[Guide] Steps to extend volume without data loss
This step by step guide will show you the right way to extend any volume using IM-Magic Partition Resizer.
Step-1 Download install, and launch the program.
Step-2 Right click the large volume to produce unallocated free space.

Steps to resize your disk partition
Step-3 Then right click c and drag the border to acquire the free space.
Steps to resize your disk partition
Step-4 Apply the changes.
Background
Windows Server 2019 has come up with quite new features and supports hyper coverage centers and hyper cloud. Storing a lot of data on the system drive can lead to low disk space problems – as the application and system programs starts to grow with updates. Partition manager Windows server 2019 is responsible to modify the allocated size to the disk partitions. The built-in shrink and extend volume functionalities offered in the Windows server’s disk management utility are awesome. However, it is recommended to take a backup of the disk before an action – built-in partition managers involve the risk of data loss.
Expanding c drive with Disk Management on Server 2019
The unallocated space created by the disk management must be next to the system partition to extend the c drive. After creating unallocated space (by deleting the c drive contiguous volume) next to the system partition that needs to be extended, follow the guide below
- Click on “start” and open the “Disk Management”
- Right click on the c-drive and click on “Extend Volume”
- Follow the setup guidelines to extend disk space
Also read: how to extend c drive server 2019

Disk Partition Manager Software For Windows Pc And Server The same with previous versions, windows server 2019 2022 has 2 native tools to help manage disk partition disk management and diskpart. disk management (diskmgmt.msc) has graphical interface, it is able to create, delete, format partition, set partition active, change drive letter and path. This page shows the ability of windows server 2019 disk management and how to shrink extend partition with it, and the comparison with partition editor.

Free Best Disk Partition Tool For Windows Server 2012 2016 Niubi partition editor server edition is safest server partition software and best disk partition manager for windows server 2025 2022 2019 2016 2012 2008 2003. Learn how to create a new partition in windows server systems with built in disk management and windows server partition manager software. method 1. create a new partition in server with disk management. method 3. create new partition with aomei partition assistant (recommend) why create new partition in windows server?. Follow this page, and you’ll get the two best disk managers for windows server 2022 2019 2016 and even older server editions for help. your trustworthy windows server disk manager. extend system drive, combine split partitions. clone disk, migrate os to hdd ssd. convert mbr to gpt, gpt to mbr, no data loss. Aomei partition assistant server edition is the best windows server disk partition manager, specially designed for optimizing windows pc and windows server operating systems, applied to small and medium sized business to take out the challenges of managing hard disks and partitions on server machines.

Free Best Disk Partition Tool For Windows Server 2019 2022 Follow this page, and you’ll get the two best disk managers for windows server 2022 2019 2016 and even older server editions for help. your trustworthy windows server disk manager. extend system drive, combine split partitions. clone disk, migrate os to hdd ssd. convert mbr to gpt, gpt to mbr, no data loss. Aomei partition assistant server edition is the best windows server disk partition manager, specially designed for optimizing windows pc and windows server operating systems, applied to small and medium sized business to take out the challenges of managing hard disks and partitions on server machines. As partition magic server alternative, aomei partition assistant server is a reliable hard disk partition manager software for windows server 2022, 2019, 2016, 2012, 2008, 2003 to maximize disk space usage and improve server performance. For windows server 2022, 2019, 2016, 2012, 2008 and server 2003. macrorit partition expert server is the newest and greatest windows server partition magic software which performs best disk partition management and keeps 100% data intact. To accomplish these tasks, you need a reliable disk partition manager to manage server storage devices. this article introduces the native free partition manager in server 2019 and the best partition software for windows server 2019 2022 2025 2003 2008 2012 2016. This page shows the ability of windows server 2019 disk management and how to shrink extend partition with it, and the comparison with partition editor.
Updated on April 22, 2024
Here’s a step-by-step guide on how to create a new partition in Windows Server 2022/2019/2016, detailing four different methods. You can choose the one that suits you best:
1. **Using Disk Management:**
— **Step 1:** Press `Win + X` and select «Disk Management» from the menu.
— **Step 2:** Right-click on the unallocated space and choose «New Simple Volume.»
— **Step 3:** Follow the New Simple Volume Wizard, assigning a drive letter, formatting options, and volume size.
— **Step 4:** Finish the wizard and click «Close.»
2. **Using PowerShell:**
— **Step 1:** Open PowerShell as an Administrator.
— **Step 2:** Run the following command to create a new partition:
«`
New-Partition -DiskNumber -Size -DriveLetter
«`
Replace «, «, and « with the appropriate values.
— **Step 3:** Format the new partition:
«`
Format-Volume -Partition -FileSystem NTFS -Confirm:$false
«`
Replace « with the number of the created partition.
3. **Using Command Prompt:**
— **Step 1:** Open Command Prompt as an Administrator.
— **Step 2:** Create a new partition with:
«`
diskpart
list disk
select disk
create partition primary
«`
Replace « with the disk’s number.
— **Step 3:** Assign a drive letter:
«`
select partition
assign letter=
«`
Replace « and « with the appropriate values.
— **Step 4:** Format the partition:
«`
format fs=ntfs quick
«`
4. **Using a Third-Party Partition Manager (e.g., tools Partition Master):**
— **Step 1:** Download and install a reliable third-party partition manager.
— **Step 2:** Launch the tool and identify the unallocated space.
— **Step 3:** Click on «Create» or «New Partition,» then set the partition size and location.
— **Step 4:** Apply the changes and follow the software’s prompts to complete the process.
Remember to back up your data before making any changes to your partitions.
Please provide the English content you would like translated, and I will promptly translate it into Chinese for you.
| Solutions That Work | Step-by-Step Troubleshooting |
|---|---|
| Solution 1: Use a Third-Party Partition Manager | Step 1: Check available space…Full Steps |
| Solution 2: Use Disk Management | Step 1: Click on «This PC» on your computer…Full Steps |
| Solution 3: Use Command Prompt (CMD) | Step 1: Press «Win+R» keys together on your keyboard…Full Steps |
| Solution 4: Use PowerShell | Step 1: Right-click the Windows icon, select Run, type Powershell, and click «OK» to open it…Full Steps |
The Need for Creating New Partitions in Windows Server
Whenever you buy a new laptop/server/computer with Windows pre-installed, the hard drive usually has a single partition by default, unless someone explicitly partitioned it. This is how every hard drive comes by default. You might not see the problem with this at first, but once you start partitioning your hard drive, you’ll realize that it solves many practical issues. For example:
- Easily back up your files
Managing files and backing up is much easier when you have your hard drive organized with multiple partitions. You could have an entire partition devoted to keeping important backup files, for example.
- Perfectionism
Partitioning your system allows you to separate files according to your choosing. This can help you avoid mixing up your files among the 100 folders you create. For example, you can set up one partition for your operating system, another for work, and a third for personal use.
- • Greater access to data for research purposes
When you partition a system, it becomes easier to recover from accidents like losing access to a file – for example, by deleting it.
- More than one operating system
Once your server has multiple partitions, you can install more than one operating system on it, each in its own partition.
4 Ways to Create New Partition on Windows Server 2019/2016 and Earlier
There are several ways to partition a drive for your server. This article will start with the easiest methods and work up to the hardest, describing each one in turn. For reference, the methods are listed in increasing order of difficulty.
- Method 1: Create New Partition with Third-party Partition Manager — Easiest
- Method 2: Create New Simple Volume with Disk Management — Moderate
- Method 3: Create New Partition with CMD — Difficult
- Method 4: Create New Volume with PowerShell — Difficult
Method 1: Create New Partition in Windows Server 2019/2016 with Third-party Software
The easiest way to create a new partition on your hard drive is by using third-party software. The best disk partition tool available online is undoubtedly tools Partition Master Enterprise. This tool is undoubtedly the best in its category because it offers:
- One of the best interfaces that make using the tool simple and user-friendly.
- Accurate and fastest execution time.
- A comprehensive disk management toolkit that lets you handle and manage hard disk drives correctly after processing.
«Partition Master is the best tool for Windows and Mac computers, and you can download it from their official website.»
Please provide the English content you wish to translate, and I’ll do my best to translate it into Chinese.
Now let’s see how to create a new partition on your Windows Server computer:
Step 1: Run AOMEI Partition Assistant, and check the free space of the disk in «Partition Management».
- • If your hard disk has unallocated space, skip to Step 3 to create a partition. • If your hard disk has no unallocated space, continue to Step 2.
Step 2. Shrink the partition to create unallocated space.
Right-click on the target disk partition with lots of free space, and select “Resize/Move.”

Then, drag the partition’s left or right side inward to shrink it by enough space to have sufficient unallocated space. You can see how much you’ve reduced the partition size visually in the “Size” area. Click “OK.”

Click “Perform XX Task” and then click “Apply” to save all changes.

Return to the “Disk Management” screen, and you should see the “Unallocated” space on the same disk. You can now proceed to create a new partition on your hard drive.
Step 3. Create a new partition on the target drive to use the unallocated space.
Right-click the unallocated space, and then select «New Partition».
Create Partition Step 1

Customize the partition size, drive letter, label, and file system (NTFS, FAT32, EXT2/3/4, exFAT) in the «Advanced Settings.» Click «OK.»

Click “Execute Task” and then “Apply” to finish creating the partition from unallocated space. Repeat these steps to partition your hard drive and create more partitions.

Method 2: Create New Simple Volume in Windows Server 2019/2016 with Disk Management
Start with the simplest option. Disk Management is a built-in Windows tool that lets you organize partitions and volumes on your server. To add to or modify your current setup, follow these steps:
Step 1: Click on «This PC» on your computer. Go to «Manage» at the top. Then, select «Disk Management.»

Step 2: Select the Unallocated space, and then click New Simple Volume.
Create new partition
Step 3: Click the «Next» button on the «New Simple Volume Wizard» window that pops up.
Step 4: Type in the size you want for your disk in the «Simple Volume Size» box.
Step 5: Type a name for the disk, such as E, F, or G.
Step 6: You can also choose the file system format for the drive, such as exFAT, NTFS, FAT, FAT32, and so on. You can also customize the allocation unit size. If you don’t want to do this, select Default, and then click Next.
Create a new partition in «Disk Management»

Done! If you’ve done everything correctly, you should now have a perfectly partitioned hard drive, and it only took a few minutes!
Method 3: Create a New Partition in Windows Server Using CMD
The last method is by using the computer’s Command Prompt. Since not everyone is familiar with the Command Prompt, it is considered the most complicated method. Hence, this should only be attempted by those who have used CMD before or have prior knowledge about it for their first try. Others should try the options above first and use this method only as a last resort if the others do not work.
Step 1 — Press the «Win+R» keys on your keyboard at the same time. This will open the «Run» option on your computer.
Step 2 — Type «CMD» in the text box and press Enter to continue.
Step 3 — After opening the Command Prompt, type in the commands listed below in the order mentioned. Make sure to type each letter correctly, and hit Enter after typing each command.
- diskpart
- list disk
- select disk n (Replace «n» with the number of the disk where you want to create the partition. If we’re partitioning the first disk, you would type select disk 1)
Step 4 — If you do not have any Unallocated space on your disk, follow the instructions from this link, and then proceed to the next step.
- List Disks
- List Volumes
- Select Volume Number
- Shrink = (*MB)
Step 5 — Next, you can proceed and type in the following command to create a new simple volume on the unallocated space and set its file system to NTFS:
- Create primary partition with size of *MB
- Assign drive letter = G (or any preferred name)
- Select volume number
- Quick format, with file system as NTFS
Step 6 — Click on “Ener”.

Done! You have partitioned the drive.
Method 4: Create a New Volume in Windows Server 2019/2016 Using PowerShell
In Windows Server 2019 or 2016, you can create a new disk volume using PowerShell. Follow these steps:
1. Open PowerShell: Press `Win + X`, then choose «Windows PowerShell» (or run it as an administrator).
2. In the PowerShell window, list all available disks by entering the following command and pressing Enter:
«`
Get-Disk
«`
3. Identify an unallocated disk. Generally, a disk with a status of «Online» and «Initialized» set to «No» is available. Note the disk’s number.
4. Initialize the unallocated disk, for example, if the disk number is 0, type:
«`
Initialize-Disk -Number 0 -PartitionStyle GPT
«`
Here, we use GPT (GUID Partition Table) as the partition style, suitable for most scenarios. If you need MBR (Master Boot Record), replace `GPT` with `MBR`.
5. Create a new partition, say you want to allocate 100 GB of space, enter:
«`
New-Partition -DiskNumber 0 -Size 100GB -DriveLetter X
«`
Replace `X` with the drive letter you wish to assign.
6. Format the new partition with:
«`
Format-Volume -DriveLetter X -FileSystem NTFS -Confirm:$false -Force
«`
This uses the NTFS file system. If you have specific requirements, choose another file system.
7. Wait for the formatting to complete. Once finished, you’ll see the newly created volume in «This PC.»
Please note that these steps might vary depending on your specific environment. Always confirm the target disk and partition information before proceeding to avoid accidental operations.
The last method mentioned is to use PowerShell to partition the drive. Use this method only if you’re familiar with PowerShell; otherwise, stick to the steps above, as they’ll get the job done most efficiently. Type the following command to begin the partitioning process:
Here we use PowerShell to format the 10GB partition and assign it the letter “G” for the new drive:
1. Right-click the Windows logo and select **Run**. Type **Powershell** and click **OK** to open it.
Step 2. Type each of the following commands into PowerShell, pressing Enter after each line:
- Create Partition — Disk Number 0 — Size 20GB — Drive Letter G
- Get Partition — Disk Number 0
- Format Volume — Drive Letter G — File System NTFS

And there you have it! If you followed the steps and commands above correctly, you should be only minutes away from a successfully partitioned drive.
Conclusions
There are several ways to create server partitions. The best is by using CMD or third-party software available in the market. However, always be cautious of fraudulent and virus-ridden software that can harm your server. Use reliable tools like the Partition Master tool that make the job easy. One significant advantage of using third-party tools is that they require minimal technical know-how.
Anyone with a little computer literacy can create partitions with third-party software.
24/7 Technical Chat
Free Consultation
In addition to these, many other tools can be used, depending on users’ choices.
Arranging them in such a way will help you choose the most suitable method for you. Resort to more complex methods only if the above ones don’t work for you or can’t be carried out. In any case, you can always use the Internet to learn more about the partitioning process. You can refer to our blog for more information on how to partition a hard drive.