
Все способы:
- Вызов «Управления дисками» в Виндовс 10
- Способ 1: Поиск по системе
- Способ 2: Окно «Выполнить»
- Способ 3: «Командная строка»
- Способ 4: PowerShell
- Способ 5: «Этот компьютер»
- Способ 6: «Управление компьютером»
- Способ 7: Контекстное меню кнопки «Пуск»
- Заключение
- Вопросы и ответы: 4
Большинству пользователей для решения базовых задач, которые могут возникнуть при работе с накопителями (создание томов, расширение, разделение, форматирование и т.д.), будет достаточно встроенного в ОС средства «Управление дисками». Расскажем, как его можно открыть на компьютере с Windows 10.
Вызов «Управления дисками» в Виндовс 10
Как и большинство стандартных компонентов операционной системы, «Управление дисками» может быть вызвано далеко не единственным способом. Рассмотрим их все, а вы просто подберете для себя наиболее подходящий.

Способ 1: Поиск по системе
В десятой версии ОС от Microsoft появилась удобная и во многих случаях весьма полезная функция поиска. Воспользовавшись ею, можно практически моментально запустить «Управление дисками».
Нажмите на кнопку вызова поиска, расположенную на панели задач, или воспользуйтесь горячими клавишами «WIN+S», и затем начните вводить не название оснастки, а указанную ниже команду:
diskmgmt.msc
Искомый компонент появится в выдаче, после чего его можно будет запустить простым нажатием левой кнопки мышки (ЛКМ).

Способ 2: Окно «Выполнить»
Обычно с помощью поиска в Windows 10 можно найти и открыть любой компонент системы по его обычному названию, но для «Управления дисками» требуется вводить обозначенный выше запрос. Ее же можно использовать и в оснастке «Выполнить», основным назначением которой как раз-таки и является быстрый запуск стандартных приложений.
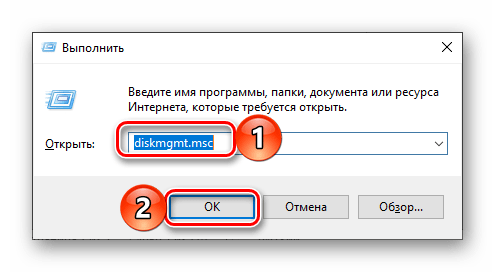
diskmgmt.msc
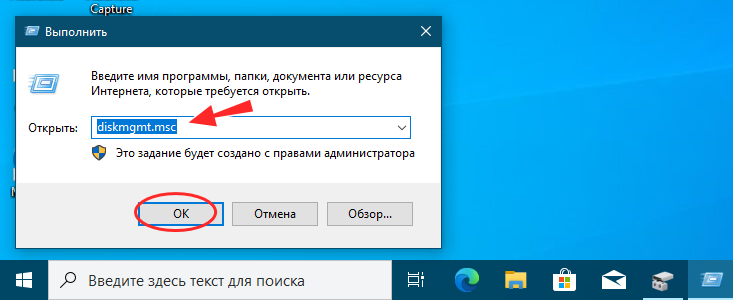
Вызовите окно «Выполнить» любым удобным способом, например, нажав клавиши «WIN+R», введите в его строку указанную выше команду и нажмите «ОК» или «ENTER» для ее выполнения.
Читайте также: Как открыть окно «Выполнить» в Виндовс 10
Способ 3: «Командная строка»
Консоль в Windows 10 можно использовать не только для продвинутой работы с операционной системой и ее тонкой настройки, но и для решения более простых задач. К числу таковых относится и интересующее нас в рамках данной статьи открытие «Управления дисками».
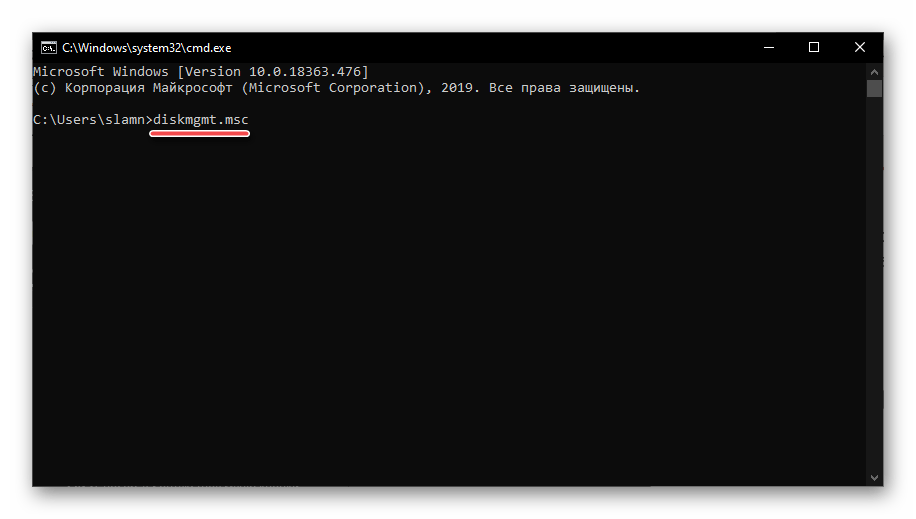
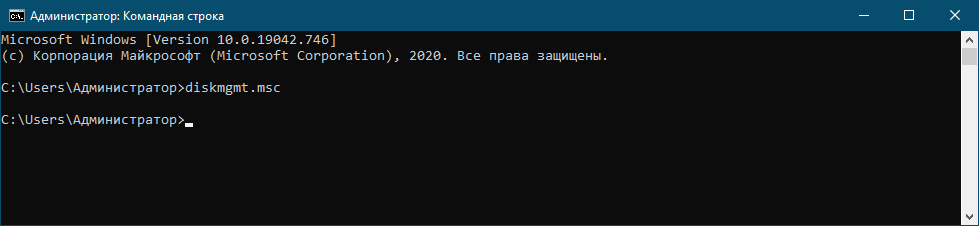
Запустите «Командную строку» (один из наиболее простых способов – ввод и выполнение команды cmd в окне «Выполнить» или использование поиска), вставьте в нее уже знакомую нам по предыдущим способам команду diskmgmt.msc и нажмите «ENTER».
Читайте также: Запуск «Командной строки» в Виндовс 10
Способ 4: PowerShell
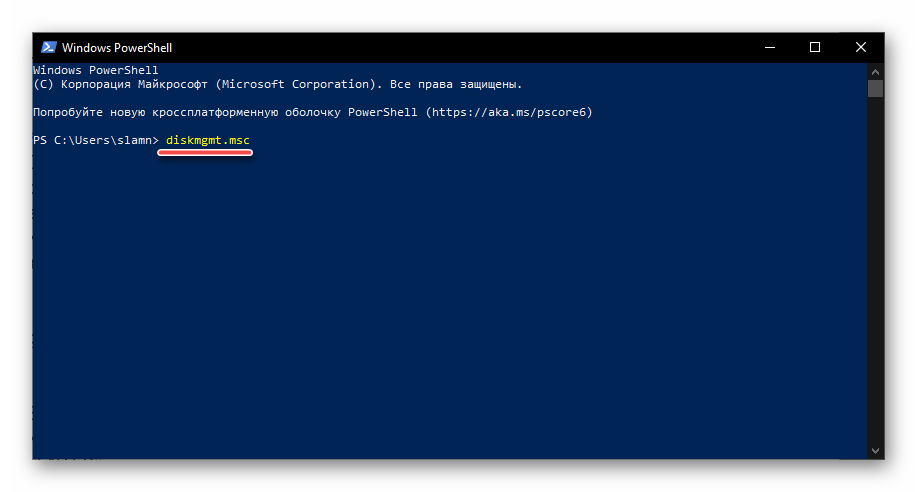
Windows PowerShell – более функциональный аналог «Командной строки», ставший одним из множества нововведений десятой версии операционной системы от Microsoft. Им поддерживается большинство команд для консоли и та, что предназначена для вызова «Управления дисками», не является исключением.
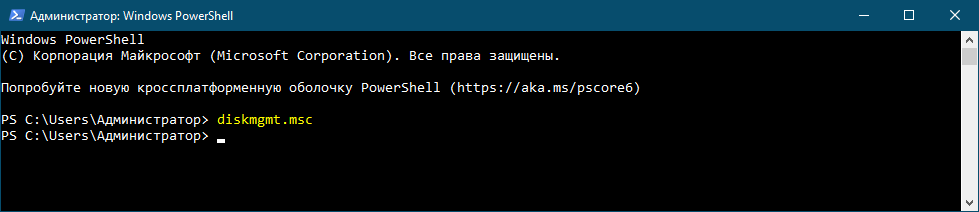
Запустите оболочку PowerShell, например, введя это наименование в поиск, после чего вставьте в открывшийся интерфейс команду diskmgmt.msc и инициируйте ее выполнение нажатием клавиши «ENTER».
Способ 5: «Этот компьютер»
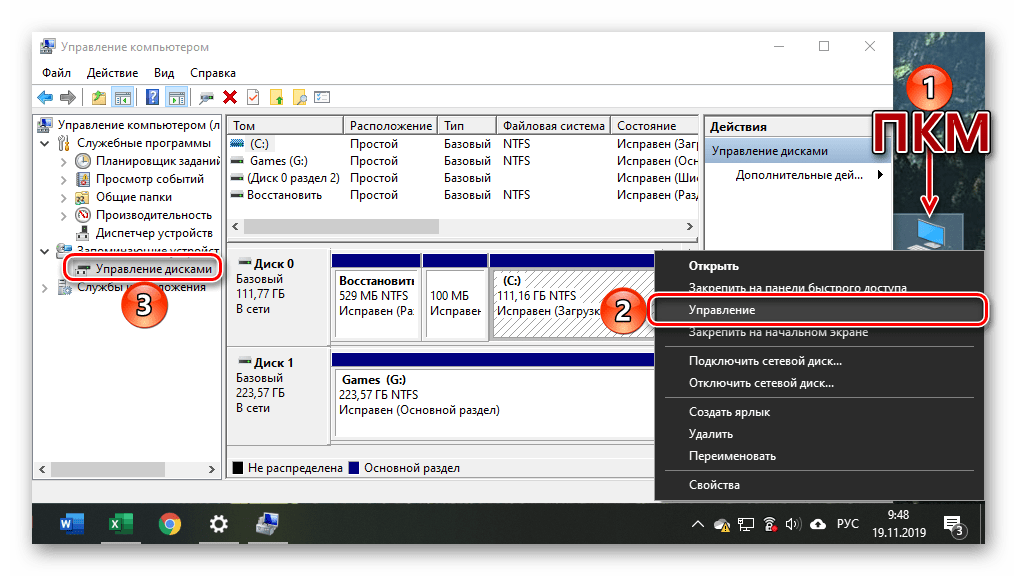
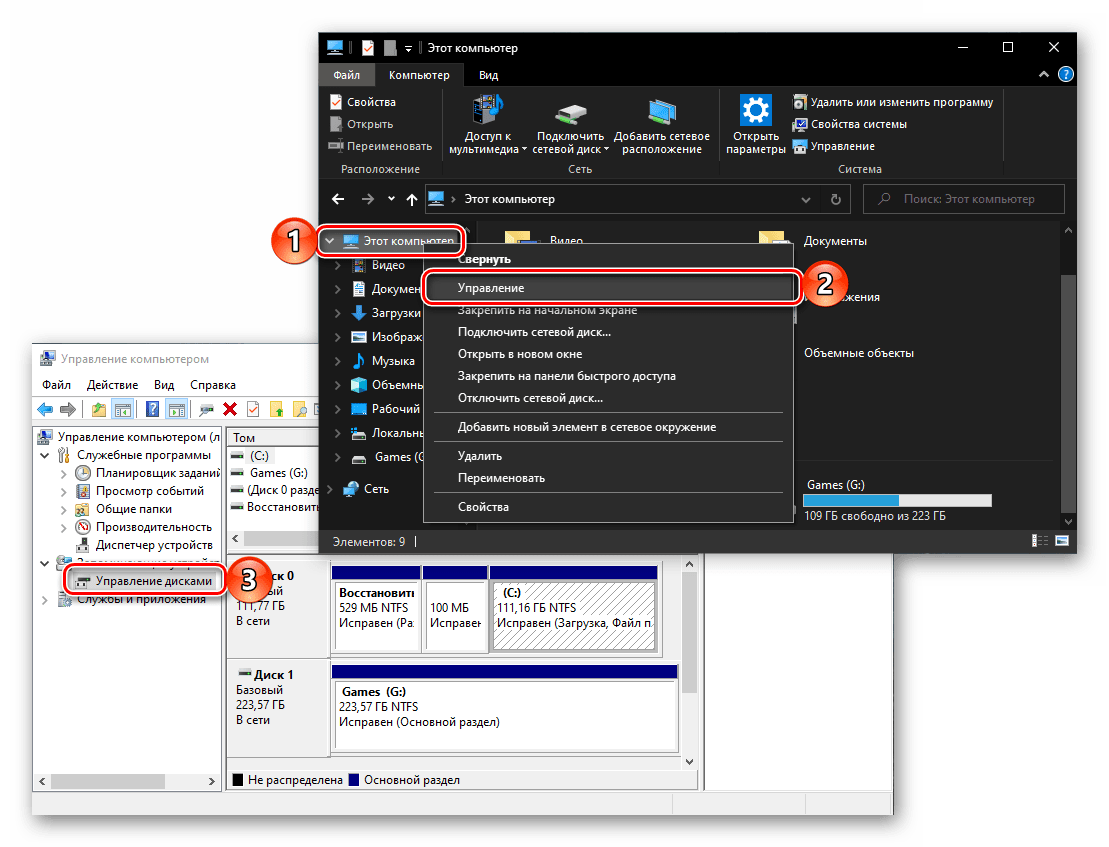
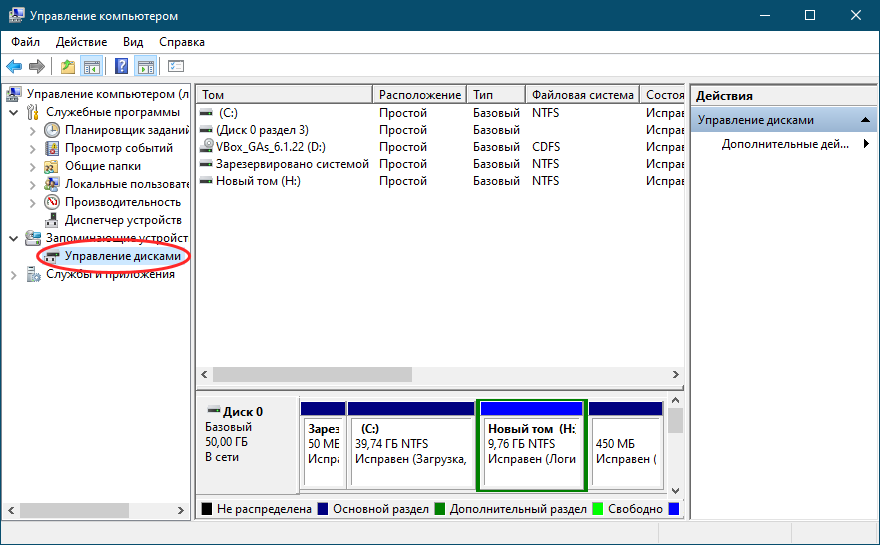
Если ярлык «Этот компьютер» у вас помещен на рабочий стол, для запуска «Управления дисками» достаточно будет воспользоваться его контекстным меню (правый клик по значку) и выбрать там пункт «Управление». Эти действия откроют оснастку «Управление компьютером», частью которого и является интересующее нас средство – просто выберите его на боковой панели.
Читайте также: Как добавить ярлык «Этот компьютер» на рабочий стол
Однако по умолчанию в Виндовс 10 отключено отображение ярлыка «Этот компьютер» на рабочем столе, а потому если вы хотите использовать именно этот способ для запуска «Управления дисками», потребуется обратиться к «Проводнику». Откройте интегрированный в ОС файловый менеджер, например, нажав «WIN+E», отыщите на его левой панели ссылку «Этот компьютер» и проделайте то же, что и со значком – правый клик и выбор соответствующего пункта меню.
Способ 6: «Управление компьютером»
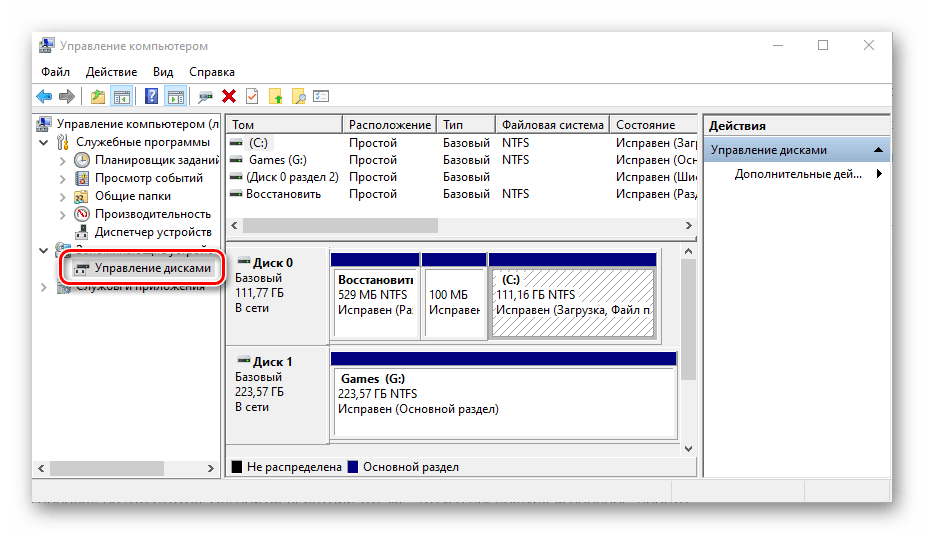
Предыдущий способ запуска «Управления дисками» можно назвать наиболее запутанным из всех рассматриваемых нами в данной статье и требующим выполнения лишних действий. И все же поставленную задачу он решает, как решает ее и прямой вызов «материнской» оснастки «Управление компьютером», в которую мы попадали через контекстное меню «Компьютера».

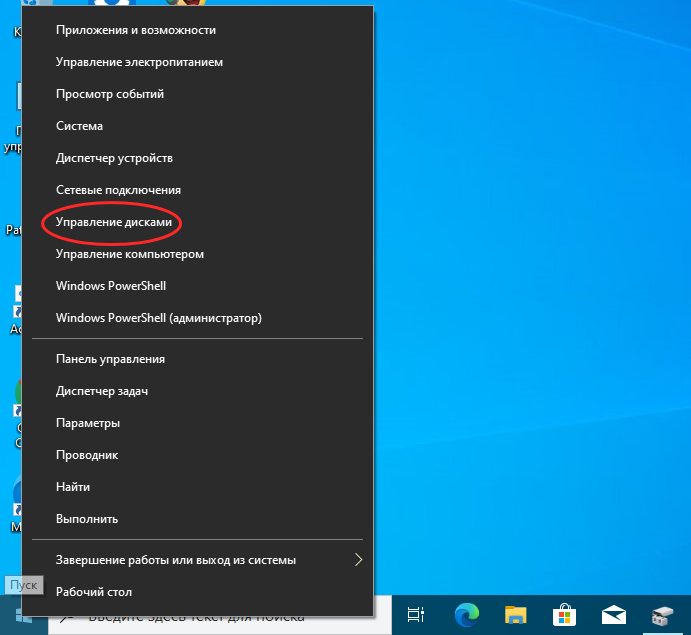
Щелкните правой кнопкой мышки (ПКМ) по кнопке «Пуск» или воспользуйтесь горячими клавишами «WIN+X». В появившемся меню выберите пункт «Управление компьютером», а из его боковой панели перейдите к «Дискам».
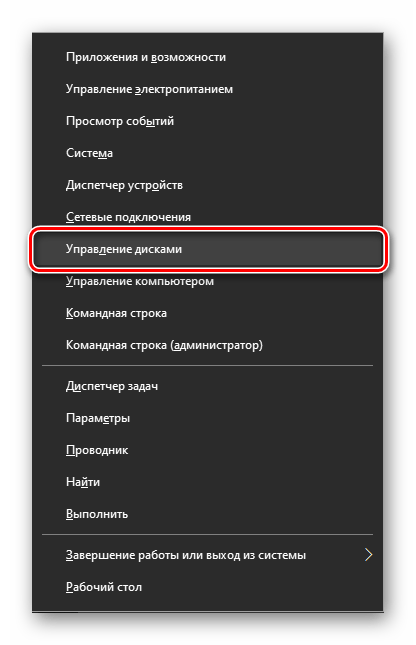
Способ 7: Контекстное меню кнопки «Пуск»
Как вы наверняка могли заметить при выполнении предыдущего способа, в контекстном меню кнопки «Пуск» есть не только основная оснастка, но и ее подраздел «Управление дисками», которому и посвящена эта статья. Алгоритм действий тот же, что и в рассмотренном выше случае, просто выбирать нужно другой пункт этого меню.
Заключение
После ознакомления с этой статьей вы больше не будете задаваться вопросом «Как открыть «Управление дисками» в Windows 10». Узнать же о том, какие возможности данная оснастка предоставляет, помогут отдельные статьи на нашем сайте.
Читайте также:
Управление дисками в Windows 10
Добавление новых дисков
Объединение дисков
Форматирование дисков
Наша группа в TelegramПолезные советы и помощь
Updated on Apr 28, 2025
| Workable Solutions | Step-by-step Troubleshooting |
|---|---|
| Disk Partition CMD | Step 1: You can use the two methods mentioned above to open the command prompt or Run window…Full steps |
| EaseUS Partition Master |
1. Disk migration and cloning…Full steps 2. Partition Recovery…Full steps |
«Unable to select a drive, as it is showing 0 MB while installing Windows 10, I tried to check-in cmd, but I don’t know its instructions. Can I get the cmd guide or other software?»
Are you confused about how to use disk partition cmd? Don’t worry. We know what you want to know. In the following, this page lists many practical tips about cmd. And we recommend a third party software — EaseUS Partition Master Professional that can replace the cmd function.
Overview of disk partition cmd
Cmd, the abbreviation for command, is a Microsoft Windows command that opens the Windows command line window.
Notes: Windows 95 & 98 users can only enter the command line by entering command; other Windows users can enter command or cmd to use.
How to open Windows cmd
Method 1: You can input cmd in the Start Menu search bar to open the Windows Command Prompt.
Method 2: You can press Win+R to open the Run box, type cmd, and press Enter.
What is Diskpart
After open cmd, you need to type ‘diskpart’ for disk partitioning. Diskpart is a command-line utility in Windows 10, which enables you to operate disk partition by using Diskpart command prompt, including create, merge, extend, shrink, format, delete, wipe disk partition, and other features.
Next, we will provide more information about how to use disk partition cmd in Windows 11/10. If you like this page, don’t hesitate to click the buttons below to share it with more people!
Steps to create a partition in Windows 11/10 using command prompt.
Warning: Do not use the Diskpart until a full backup.
Step 1: You can use the two methods mentioned above to open the command prompt or Run window.
Step 2: Enter Diskpart
Steps about essential partition functions are as follows:
- Create a partition using Diskpart
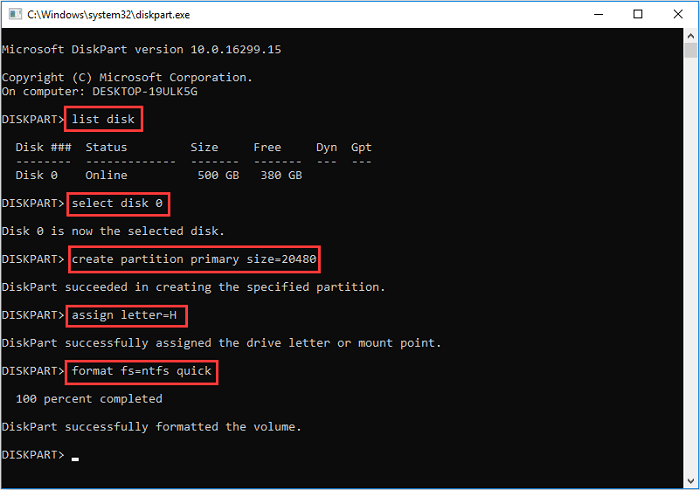
1. At the Diskpart prompt, type: List Disk
2. Input: Select Disk * (* represents the disk number)
3. Type: Create partition primary size=*(* means the partition size.)
4. Input: Assign letter=* (* represents Choose a drive letter not already being used.)
5. Type: Exit (Exit is the Esc on the top left of the keyboard.)
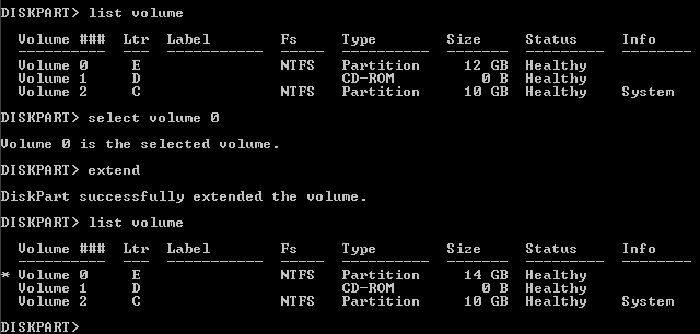
- Extending a partition using Diskpart
Note: If you try it or any other method, make sure you have a full backup.
1. Verify that contiguous free space is available on the same drive and that free space is next to the partition you intend on extending, with no partitions in between.
2. Type: Select Disk * (Selects the disk.)
3. Type: Select Volume *(Selects the volume.)
4. Type: Extend Size=*
5. Type: Exit
- Deleting a partition using Diskpart
Note: You cannot delete an active system or boot partition or a partition with a dynamic page file.
1. Input: Diskpart.exe
2. Select disk *
3. Select Partition *
4. Delete partition
5. Exit
- Wiping a disk using Diskpart
This operation deletes all data on the disk.
1. Type: Select disk *
2. Type: Clean all(The CLEAN ALL command removes all partition and volume information from the hard drive being focused on.)
3. Exit
The diskpart also has other features, such as assign drive letters, shrink partition, mark partition as active, convert MBR/GPT. If you want to learn these parts, FAQ, at the end of the article, will bring you the right answer.
After reading the above guide, I believe you have a specific understanding of how to use cmd via Diskpart in Windows 11/10. Cmd is a powerful tool, but it is not suitable for a beginner. Misoperations can easily cause partition problems. There is a better software — EaseUS Partition Master.
How to manage partitions with EaseUS Partition Master
EaseUS Partition Master is an all-in-one partition manager, which helps you create, resize, clone, move, merge, and format partitions. The following video tutorial shows you how to create, deleted, shrink, and resize a partition with this powerful disk management program.
Favored by millions of users. It contains all features Diskpart has and many other superior functions like the two demonstrated below.
1. Disk migration and cloning
Nowadays, for better performance of computer disk, you may want to migrate the operating system and clone disk to the target one. It saves the user’s time to download programs. It only takes a few steps to get remarkable results. For example, there is a guide about transfer Windows 10 to another drive.
Steps to migrate OS to HDD/SSD:
- Run EaseUS Partition Master, and select «Clone» from the left menu.
- Check «Migrate OS» and click «Next».
- Select the SSD or HDD as the destination disk and click «Next».
- Check Warning: the data and partitions on the target disk will be deleted. Make sure that you’ve backed up important data in advance. If not, do it now.
- Then click «Yes».
- Preview the layout of your target disk. Then click «Start» to start migrating your OS to a new disk.
- After this, click «Reboot Now» or «Done» to determine if you want to reboot the computer from the new disk immediately.
«Reboot Now» means to keep the changes instantly, while «Done» means you need to restart the computer later manually.

Note: The operation of migrating OS to SSD or HDD will delete and remove existing partitions and data on your target disk when there is not enough unallocated space on the target disk. If you saved important data there, back up them to an external hard drive in advance.
2. Partition Recovery
Partition Recovery is a practical feature targeting your lost partitions.
It is worth trying to scan your selected disk. The spending time of a deep scan may in line with your disk volume.
You can check the related article about «recover unallocated space in Windows 10» to get further learning.
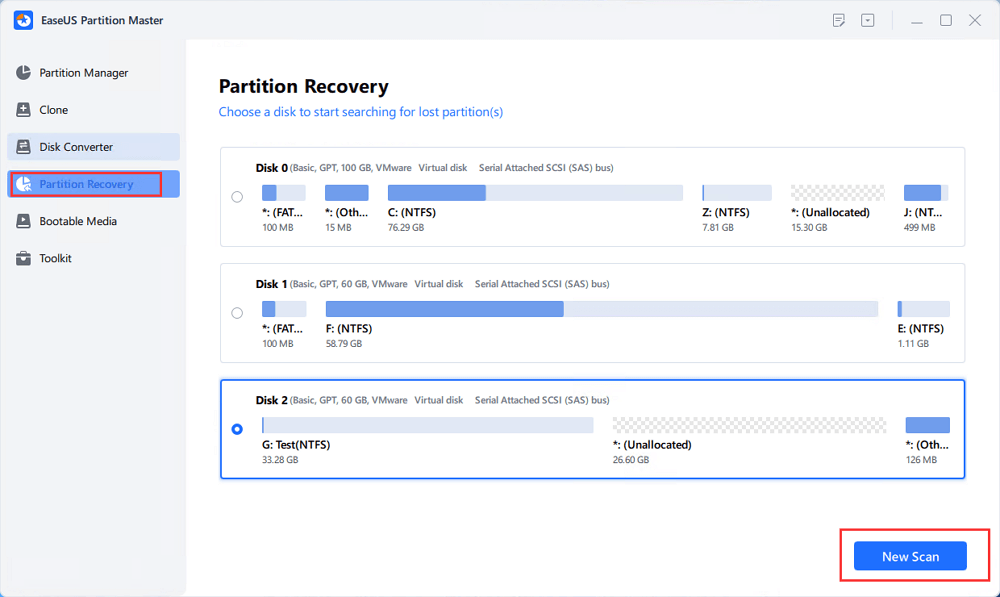
Step 1. Open EaseUS Partition Master and click «Partition Recovery». Select the target disk with your lost partition and click «New Scan».
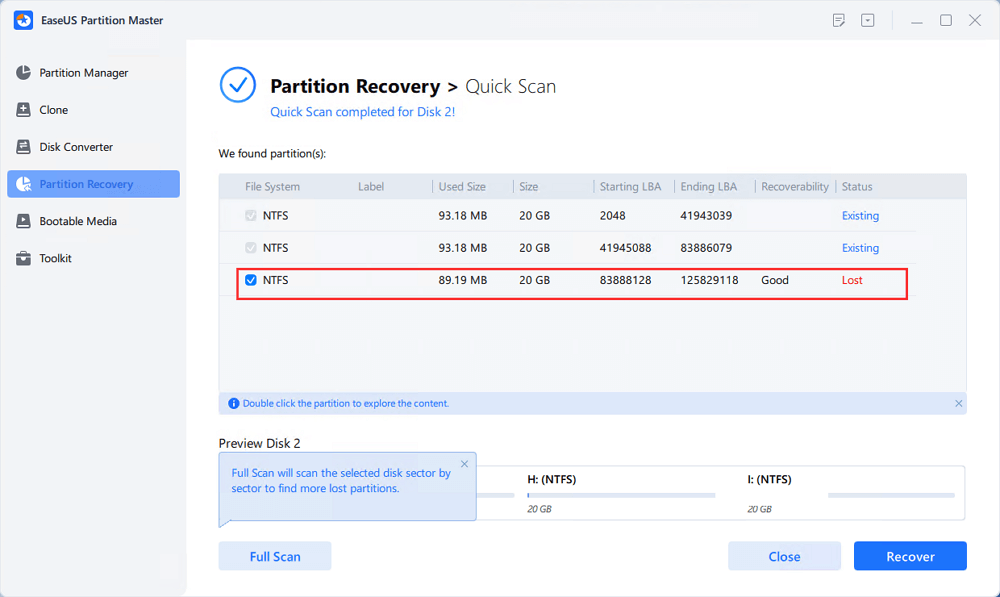
Step 2. Wait patiently to let the software execute «Quick Scan» and «Full Scan» operation. It will mark your deleted partition as «lost» as the Status section. Select the lost partition, and click «Recover».
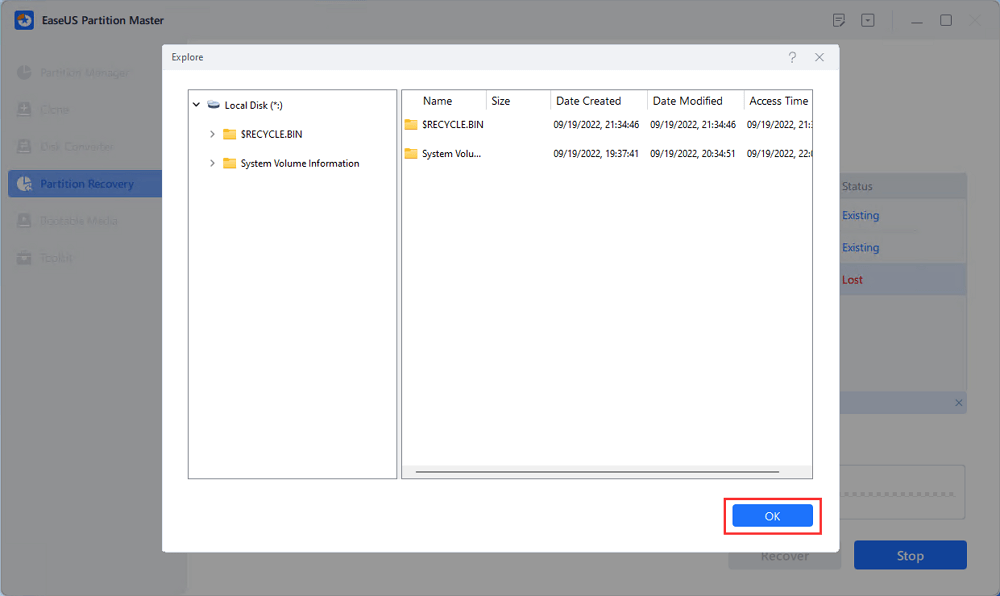
You can also double click on the partition you’re looking for to preview its content and click «OK» to confirm.
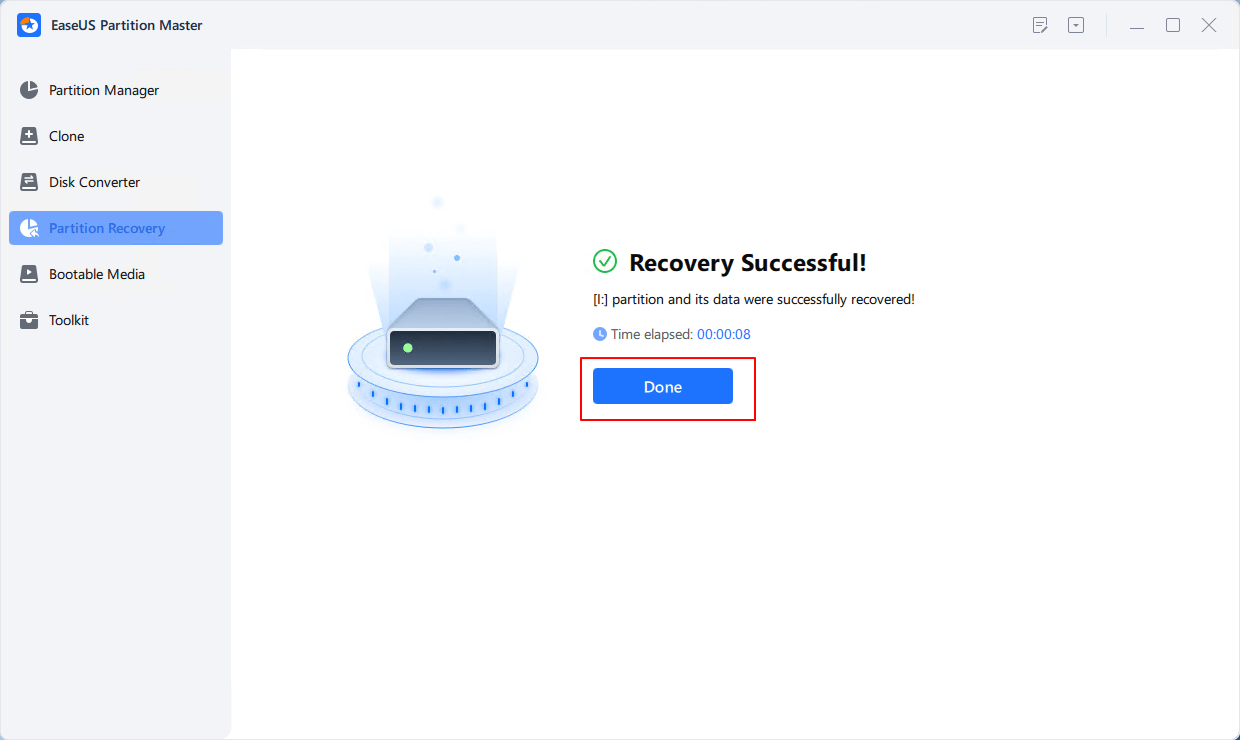
Step 3. Wait patiently and click «Done» when the partition recovery process completes.
FAQ
1. How do I use diskpart command in Windows 11/10?
-Boot into Windows 10
-Press the Windows key and C to open the charm bar.
-Type cmd
-Click Command Prompt
-When Command Prompt opens, type diskpart
-Press Enter
2. How to assign drive letter via Diskpart?
—Type «assign letter=F» (F can be replaced with another letter that has not been used yet).
—And then, you will receive a message that says: DiskPart successfully assigned the drive letter or mount point.
3. How to shrink partition via Diskpart
Type shrink directly will automatically shrink the partition by Windows, and you can also type shrink desired=*** to define your partition size.
(Such as: Type «shrink desired=10240». And then, you will receive a message that says: DiskPart successfully shrunk the volume by 10GB.)
Note: You can reduce the size of a volume only if it is formatted using the NTFS file system.
4. How to mark a partition as active via Diskpart?
—Type active.
—And then, you will receive a message that says: DiskPart marked the current separation as active.
5. How to clean Disk/convert a disk to GPT/ convert a disk to MBR?
-Type: list disk.
-Type: select disk 1.
-Type: clean.
-Type: convert gpt or convert mbr.
Для управления дисками и разделами в Windows предусмотрено два основных инструмента — консольная утилита Diskpart и графическая оснастка Disk Management, причём первая, более функциональная, ориентирована на опытных пользователей. Disk Management, или Управление дисками более проста и удобна, но имеет относительно слабый функционал, например, не умеет работать со служебными разделами. Она рассчитана на выполнение базовых операций — сжатие и изменение букв томов, создание разделов в нераспределённом пространстве, удаление разделов, инициализацию подключённых к компьютеру новых физических дисков, преобразование основных дисков в динамические.
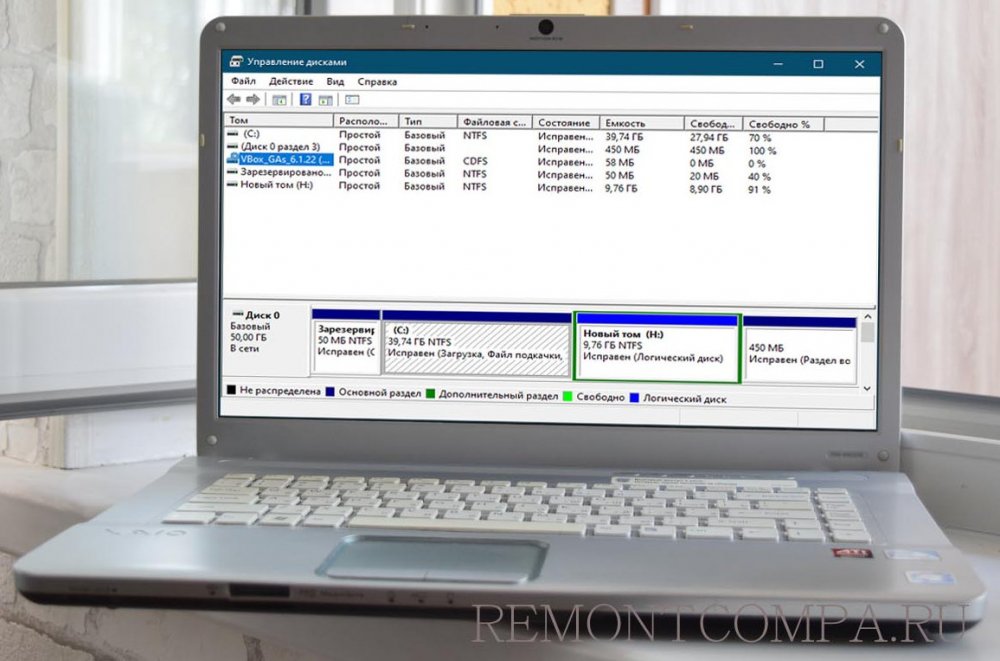
С её помощью можно даже создавать массивы RAID, но это всего лишь сравнительно небольшая часть того, что умеет Diskpart. В использовании оснастка проста, а открыть её в Windows 10 можно как минимум восьмью разными способами, к рассмотрению которых мы сейчас перейдём.
Это самый простой способ открыть «Управление дисками». Кликаем правой кнопкой мыши по кнопке Пуск и выбираем в открывшемся контекстном меню одноименную опцию. Также для вызова оного меню можно нажать комбинацию Win + X, а «Управление дисками» выбрать с помощью клавиш-стрелок вверх-вниз.
Не менее простым и удобным способом открытия оснастки управления дисками является использование хорошо знакомого многим окошка «Выполнить», вызываемого нажатием клавиш Win + R. Чтобы запустить оснастку, вводим в поле ввода команду diskmgmt.msc и жмём Enter.
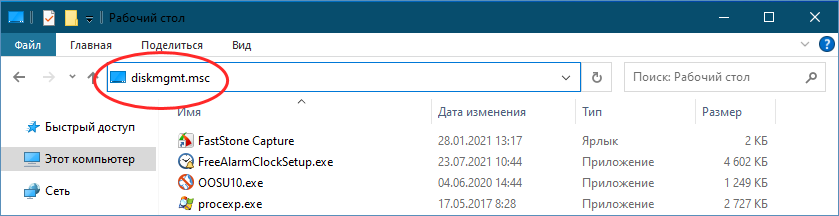
Похожий способ с использованием той же команды diskmgmt.msc, только на этот раз вместо диалогового окошка «Выполнить» используется самая обычная адресная строка Проводника. Вводим в неё diskmgmt.msc и жмём Enter. Команда тут же будет «преобразована» в полный адрес C:\Windows\System32\diskmgmt.msc, но при этом вы останетесь в том же расположении, тогда как оснастка будет благополучно запущенна.
Вместо окошка «Выполнить» для запуска оснастки управления дисками можно использовать классическую командную строку или консоль PowerShell, а в Windows 11 — терминал. Правда, использовать этот способ имеет смысл только в том случае, если упомянутые приложения уже открыты, в противном случае пришлось бы сначала открыть ту же командную строку, а затем с её помощью запустить оснастку управления дисками. Команда запуска во всех трёх вариантах используется одна и та же — уже знакомая diskmgmt.msc. Кстати, ее можно использовать в сокращённом виде — diskmgmt, тогда как в окошке «Выполнить» и адресной строке Проводника нужно обязательно добавлять .msc, иначе Windows не поймёт, что вы от неё хотите.
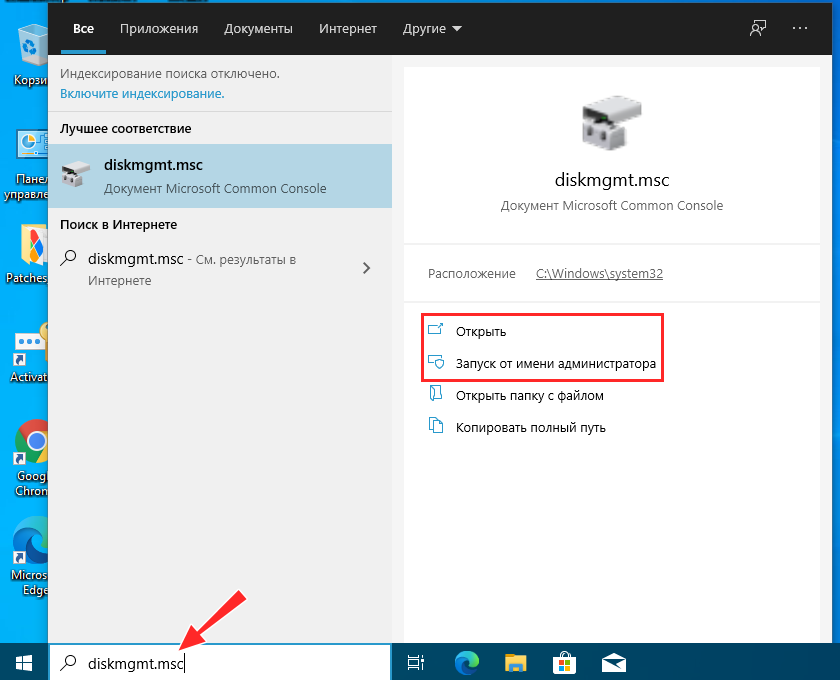
Классический способ запуска приложений — в поле поиска на панели задач Windows 10 вбиваем команду diskmgmt.msc и кликаем по ссылке «Открыть» или «Запуск от имени администратора» в правой колонке панели с результатами поиска.
Ещё один не особо удобный вариант, но мало ли чего, может кому-то понадобиться. Откройте любым удобным вам способом «Управление компьютером» (командой compmgmtlauncher, через меню ярлыка «Этот компьютер» на рабочем столе, через классическую панель управления → администрирование и т. д.) и выберите в меню слева опцию «Управление дисками». Оснастка будет открыта непосредственно в окне штатной утилиты «Управление компьютером».

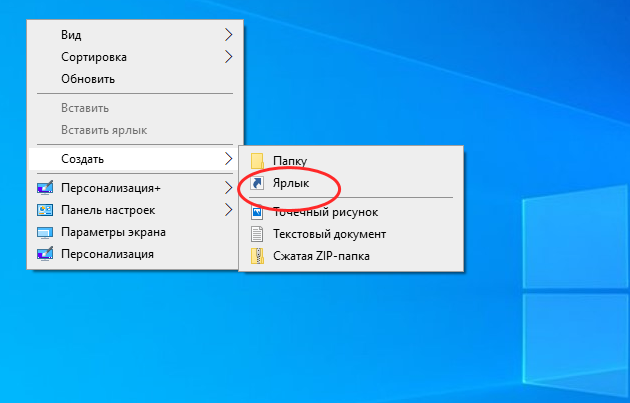
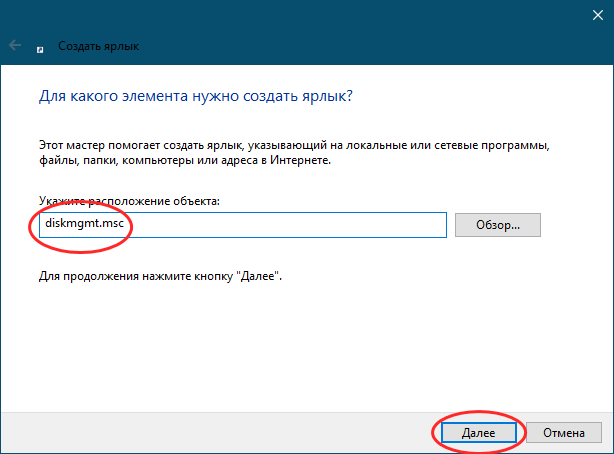
Наконец, получать доступ к оснастке управления дисками можно с помощью созданного и размещённого на рабочем столе или панели задач ярлыка. Тут всё очень просто. Создайте через контекстное меню на рабочем столе пустой ярлык и вставьте в поле расположения объекта команду diskmgmt.msc. Нажмите «Далее», дайте ярлыку приличествующее имя и сохраните ярлык нажатием «Готово».

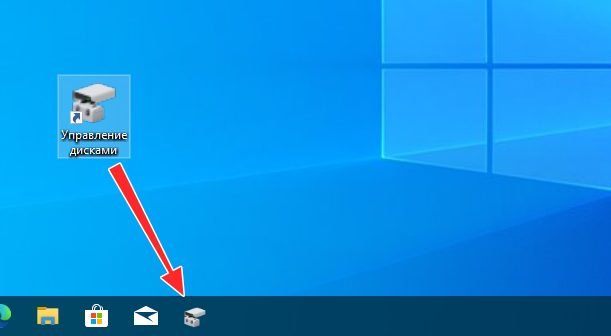
Готовый ярлык можно закрепить на панели задач, открыть его свойства и назначить ему «горячие» клавиши, сменить иконку, в общем, сделать его более удобным в использовании и приятным на вид.
Как видите, способов вызвать «Управление дисками» в Windows 10 имеется более чем достаточно. Кстати, то же самое касается и других встроенных в операционную систему инструментов администрирования, причём не только входящих в набор утилит оснастки «Управление компьютером».

19.07.2023
Windows 10: Полное руководство по управлению дисками
Содержание
- 1 Создание новых разделов
- 2 Управление дисками: через командную строку
- 3 Особенности работы с SSD и HDD дисками
- 4 Часто задаваемые вопросы от пользователей
Процедура управления дисками Windows 10 позволяет разнообразить список задач, используя все возможности хранилища. Это касается всех важных процессов, как инициализация нового диска, а также удаление, добавление отдельно взятых томов.
Чтобы разобраться в таком руководстве, изначально нужно ознакомиться с основными понятиями и базовыми терминами:
- Жесткие диски – твердотельные хранилища, обеспечивающие сохранность информации, которые называются постоянными.
- Системный раздел, том – находится на основном жестком диске и часто применяется с целью загрузки устройства.
- Форматирование диска – программная задача, во время решения которой осуществляется разметка всех ячеек хранения данных электронных информационных носителей.
- Главное меню управления дисками – полноценное меню для управления с необходимым набором инструментов и прочих возможностей.
Разбираясь с тем, как открыть управление дисками, можно выбрать один из нескольких вариантов: мышкой кликаем «Пуск» (или зажимаем «Пуск»), выбираем «Управление дисками».
Создание новых разделов
После принятия правильного решения купить лицензионную Windows 10, начинается активная работа с дисками Windows 10. Изначально потребуется подготовить новые разделы. С этой целью нужно использовать не распределенное место в «Управлении дисками» для подготовки будущего тома:
- Мышкой нажимаем на пункт «не распределен», выбирая «Создать простой том», занимающий свободное место одного диска.
- Открывается вкладка «Мастер простого тома», где кликаем «Далее».
- Выбираем размер раздела: в строке «максимальный размер» указано общее свободное количество для такого тома, в строке «минимальный размер» – минимум, который нужно использовать. Поэтому можно самостоятельно определить «золотую середину», введя размер в пустом поле (в Мб).
- Из предложенного перечня (A-Z) выбираем букву под будущее дисковое пространство.
- По завершению вышеперечисленных действий определяемся с дополнительными параметрами – файловая система, метки и размеры. Также, можно оставить все «по умолчанию», нажимая «Далее».
Появляется окошко со списком всего, что было выбрано пользователем для управления дисками Виндовс 10. Если вы со всем согласны, нужно прожать «Готово».
Управление дисками: через командную строку
Чтобы в командной строке открыть функцию управления, необходимо произвести запуск командной строки на собственном устройстве. Как только откроется окно интерпретатора, потребуется ввести команду «diskmgmt. Msc», нажимая на клавишу «Enter».
Если потребуется резервное копирование, восстановление дисков, нужно воспользоваться такой последовательностью действий:
- Из рабочей ОС заходим в меню «Пуск».
- Выбираем пункт «Параметры».
- Переходим в «Обновление и безопасность».
- Выбираем опцию «Резервное копирование» и определяемся с необходимым диском – «Добавить диск».
Для создания резервных копий пользователь может выбрать внешний диски или же сетевое расположение.
Особенности работы с SSD и HDD дисками
Выбирая диск менеджер Windows 10, каждый пользователь ПК может выполнять различные действия, направленные на настройку, управление дисками. К примеру, удастся настроить частоту оптимизации SSD. Таким образом, понадобиться открыть меню «Пуск», чтобы в поисковой строке ввести «Дефрагментация и оптимизация ваших дисков». Произойдет открытие окна утилиты, где потребуется выбрать диск, если используется сразу два SSD или больше. Выбираем опцию «Изменить параметры», настраивая частоту автоматической оптимизации.
Благодаря наличию встроенного бесплатного менеджера, удастся также произвести успешную инициализацию HDD или SSD, произвести процесс конвертирования основного диска в динамический и другое.
Часто задаваемые вопросы от пользователей
- Как увеличить размер системного раздела?
Увеличение размера происходит за счет функции «Управление дисками». С помощью мыши кликаем смежный раздел (расположен с правой стороны), выбирая «Удалить том». Следующее, что нужно сделать – мышкой кликаем соседний раздел (который находится с левой стороны), нажимая «Расширить том».
- Можно ли объединить два раздела без потери информации?
В Windows 10 возможен вариант объединения нескольких дисков, не теряя важные и полезные данные. В результате рекомендуется воспользоваться инструментом – EaseUS Partition Master, который называют менеджером разделов.
- Как быстро и безопасно произвести процедуру форматирования?
Выяснив, как добавить диск в Windows 10, возникает необходимость в его форматировании: открываем проводник, нажимаем на определенный диск, правой кнопкой мыши кликаем «Форматировать».
Sometimes the disk on your Windows 10 system may not work correctly, or the Windows fails to start because of the hard disk error. To rectify such disk errors, Windows 10 comes with an excellent tool known as DiskPart.
The DiskPart is a powerful command tool that lets you manage the Windows disks and partitions using Command Prompt or Windows PowerShell. This command interpreter allows you to delete, create, and modify partitions on any drives your PC can detect, even the external hard drives and USB storage. It is quite useful when any Pendrive or hard disks get corrupted because of logical errors and stopped working. Using DiskPart commands, you can wipe out the data and start clean.
To fix various Windows 10/11 problems, we recommend Outbyte PC Repair:
This software will repair common computer errors, protect you from file loss, malware damage, hardware failure, and optimise your computer for peak performance. In three simple steps, you can resolve PC issues and remove virus damage:
- Download Outbyte PC Repair Software
- Click Start Scan to detect Windows 10/11 issues that may be causing PC issues.
- Click Repair All to fix issues with your computer’s security and performance.
This month, Outbyte has been downloaded by 23,167 readers.
DiskPart is not a new concept. It has been the part of the Windows even before Windows 10. It is the best alternative when other disk utility such as Disk Management Tool fails to work.
In this guide, we would learn to use the common DiskPart commands to fix ‘Drive not Working’ and other disk errors.
How to open DiskPart on Windows 10?
Launching the DiskPart is not a big task. You just require to open the command terminals, either the Command Prompt or Windows PowerShell with the administrative rights.
In this guide, we would use the Command Prompt to run the DiskPart commands. The same commands can be directly used in Windows PowerShell without any changes.
-
Search Command Prompt in the Windows search bar and launch it with admin rights.

-
In the command window, type diskpart and hit enter. The DISKPART tool would be open and ready to use.

-
If you want to glance on the full list of available commands of DiskPart type help in the command window and press the enter key.

-
After using it, type Exit and hit the enter key to exit the tool.


Common DiskPart Commands
We would now explore the common DiskPart Command Prompt commands that you will mostly require.
| Command | Description |
| ACTIVE | Mark the selected partition as active. |
| ADD | Add a mirror to a simple volume. |
| ASSIGN | Assign a drive letter or mount point to the selected volume. |
| ATTRIBUTES | Manipulate volume or disk attributes. |
| ATTACH | Attaches a virtual disk file. |
| AUTOMOUNT | Enable and disable automatic mounting of basic volumes. |
| BREAK | Break a mirror set. |
| CLEAN | Clear the configuration information, or all information, off the disk. |
| COMPACT | Attempts to reduce the physical size of the file. |
| CONVERT | Convert between different disk formats. |
| CREATE | Create a volume, partition, or virtual disk. (No virtual disk management in Windows XP.) |
| DELETE | Delete an object. |
| DETAIL | Provide details about an object. |
| DETACH | Detaches a virtual disk file. |
| EXIT | Exit DiskPart. |
| EXTEND | Extend a volume. |
| EXPAND | Expands the maximum size available on a virtual disk |
| FILESYSTEMS | Display current and supported file systems on the volume. |
| FORMAT | Format the volume or partition. |
| GPT | Assign attributes to the selected GPT partition. |
| HELP | Display a list of commands. |
| IMPORT | Import a disk group. |
| INACTIVE | Mark the selected partition as inactive. |
| LIST | Display a list of objects. |
| MERGE | Merges a child disk with its parents. |
| ONLINE | Online an object that is currently marked as offline. |
| OFFLINE | Offline an object that is currently marked as online. |
| RECOVER | Refreshes the state of all disks in the selected pack. Attempts recovery on disks in the invalid pack, and resynchronizes mirrored volumes and RAID5 volumes that have stale plex or parity data |
| REM | Does nothing. This is used to comment scripts. |
| REMOVE | Remove a drive letter or mount point assignment. |
| REPAIR | Repair a RAID-5 volume with a failed member. |
| RESCAN | Rescan the computer looking for disks and volumes. |
| RETAIN | Place a retained partition under a simple volume. |
| SAN | Display or set the SAN policy for the currently booted OS. |
| SELECT | Shift the focus to an object. |
| SETID | Change the partition type. |
| SHRINK | Reduce the size of the selected volume. |
| UNIQUEID | Displays or sets the GUID partition table (GPT) identifier or master boot record (MBR) signature of a disk. |
Listing Existing Hard Drives, Volumes & Partitions using DiskPart
Before applying any destructive commands, you can first check the current internal and external hard disks and USB storage layout.
To check the available disks:
- Open the DiskPart and after “DISKPART>” prompt type list disk and hit enter. This command will list all the available and detectable storage disks, including internal and external drives and USB storage.

- To apply the DiskPart commands on the disks, you need to remember the disk number. For example, the windows disk is “Disk 0.“

To display the list of detected Volumes:
- Launch DiskPart and next to “DISKPART>” prompt type list volume.

- All volumes would be listed.

Check the list of partitions:
- To check the partition list, you must first select the hard disk with the list disk command.
- After the disk list is displayed, type select disk followed by the disk number.

- Once the disk is selected, type list partition, and hit the enter key, the selected disk’s partition list will be displayed. You can further modify the partitions using the partition number.


How to Delete Hard Drive, Volume, and Partition using DiskPart ?
If you want to delete the Volume or Partition of your system’s hard disk using Diskpart, follow these steps:
- First, select the hard drive using the select disk command, followed by the disk number.
- Now open the partition list of the chosen disk using list partition command.
- Chose the partition using select partition # command, replace # with the required partition number.
- Once the partition is selected, you can delete it using the delete partition command. The partition will be deleted.

- Similarly, you can delete the disk volume. Type list volume, check your chosen volume number, then type select volume #, replacing # with your volume number.

- Type delete volume, to delete the chosen volume.


How to Completely Wipe Out the Hard Disk using DiskPart?
If you face a problem in formatting the system hard disk, external hard drive, or the USB Pendrive, then using DiskPart, you can easily wipe them out. Obviously, you won’t be able to clean the disk on which your OS is installed.
- Similar to previous steps, on the DISKPART prompt window, type list disk.
- By typing select disk # command where # is your disk number, choose the disk that you want to format completely.
- After selecting the disk, type clean command to format it completely. Remember that it would not warn you, so make sure that you have selected the correct disk.

- After the cleanup, DiskPart would display the success message, and the disk would be ready for creating the new partitions.

How to Create and Format New Hard Drive Partitions using DiskPart?
Using the steps from the last section, you might have cleaned your hard disk. Now its time to create the new partitions and format them with Windows-friendly file systems like NTFS or FAT32.

- Open the disk list using the list disk command and select the disk using the select disk # command, where # is the disk number.
- After selecting the disk type the create partition primary command to create a partition using the entire space on that drive.
- If you want to create multiple partitions, you can assign how much space a partition could take. For that type, create partition primary size=X, where X is the size that you wish to set to the partition.
- To ensure that the new partition is listed, type list partition command.
- Use active command to activate the partition. It is required to use the partition as a bootable drive.
- To format the partition with the NTFS file system, use format FS=NTFS label=Data quick command. You can replace Data with any label you want.
- After it gets format, the DiskPart would automatically assign the letter to the partition. If it doesn’t, you can manually set it. For that type, assign letter=g, where you can replace g with any drive letter that you want.

Conclusion
These are the top used DiskPart commands that you can use to fix your hard drive problems and clean the USB drives and hard disks.
There are more commands, too, if you want to know about them, type help after launching DISKPART in the command window.
1. How to open DiskPart in Windows 10?
You can open DiskPart utility through Command Prompt or Windows PowerShell in Windows 10. After launching any of the command terminals, type diskpart to launch DiskPart.
2. How to fix hard drive problems with DiskPart?
DiskPart utility is specifically available for solving the disk issues on Windows 10. After launching the diskpart, type the help command to know about all the commands supported by diskpart. This post guides you on how to use the most common DiskPart commands.
Peter is an Electrical Engineer whose primary interest is tinkering with his computer. He is passionate about Windows 10 Platform and enjoys writing tips and tutorials about it.