
Applies ToWindows 10 Windows 11
С помощью домашней беспроводной сети можно получить доступ к Интернету в разных местах вашего дома. В этой статье описаны основные действия по настройке беспроводной сети и началу ее использования.
Приобретение необходимого оборудования
Чтобы создать собственную беспроводную сеть, необходимы указанные ниже компоненты.
Широкополосное подключение к Интернету и модем. Широкополосное подключение к Интернету — это высокоскоростное подключение. Оптоволокно и кабель являются наиболее распространенными широкополосными подключениями. Чтобы получить услуги широкополосного подключения, обратитесь к поставщику услуг Интернета. Часто поставщики услуг Интернета предлагают широкополосные модемы. Кроме того, в дополнение к модемам некоторые поставщики услуг Интернета предлагают беспроводные маршрутизаторы. Вы также можете найти это оборудование в магазинах электроники и компьютерной техники или в интернет-магазинах.
Беспроводной маршрутизатор. Маршрутизатор пересылает данные между вашей сетью и Интернетом. При использовании беспроводного маршрутизатора вы можете подключить компьютеры к своей сети, используя радиосвязь вместо проводов. Существует несколько различных типов технологий беспроводной сети, которые включают 802.11a, 802.11b, 802.11g, 802.11n, 802.11ac и 802.11ax.
Беспроводной сетевой адаптер. Адаптер беспроводной сети — это оборудование, которое подключает устройство к беспроводной сети. Чтобы подключить портативное или классическое устройство к беспроводной сети, оно должно иметь адаптер беспроводной сети. Большинство ноутбуков и планшетов и некоторые настольные компьютеры поставляются с уже установленным адаптером беспроводной сети.
Чтобы проверка, есть ли на устройстве Windows адаптер беспроводной сети, выполните указанные действия.
-
Нажмите кнопку Пуск , введите диспетчер устройств в поле поиска, а затем выберите диспетчер устройств.
-
Разверните узел Сетевые адаптеры.
-
Найдите необходимый сетевой адаптер. В его имени может встречаться слово беспроводной.
Настройка модема и подключения к Интернету
После того как у вас будет в наличии все необходимое оборудование, вам потребуется настроить модем и подключение к Интернету. Если ваш модем не был настроен для вас поставщиком услуг Интернета, следуйте инструкциям, которые поставляется с модемом, чтобы подключить его к устройству и Интернету.
-
Для оптоволоконных подключений: подключите модем к оптоволоконной розетке, как правило, с помощью соединителя SFP (Small Form-factor Pluggable).
-
Для подключения к кабелю. Подключите модем к разъему кабеля с помощью коаксиального кабеля.
-
Для подключений цифровой абонентской линии (DSL): подключите модем к разъему телефона с помощью фильтра DSL и телефонного кабеля.
Размещение беспроводного маршрутизатора
Разместите беспроводной маршрутизатор в месте, в котором уровень его сигнала будет максимальным, а уровень помех — минимальным. Для достижения наилучших результатов следуйте указанным ниже советам.
Разместите беспроводной маршрутизатор в центре дома или квартиры. Разместите маршрутизатор как можно ближе к центру дома или квартиры, чтобы его радиосигнал равномерно охватывал все уголки дома.
Разместите беспроводной маршрутизатор над полом вдали от стен и металлических объектов, например от металлических шкафов. Чем меньше физических препятствий между компьютером и беспроводным маршрутизатором, тем сильнее будет его сигнал.
Уменьшите уровень помех. Некоторое сетевое оборудование использует радиоканал с частотой 2,4 ГГц. Эту же частоту использует большая часть микроволновых печей и многие беспроводные телефоны. Если вы включите микроволновую печь или вам позвонят на беспроводный телефон, то сигнал беспроводного маршрутизатора может быть временно прерван. Вы можете избежать большей части таких проблем, используя беспроводный телефон, работающий на более высокой частоте, например на частоте 5,8 ГГц.
Совет: Дополнительные сведения о Wi-Fi диапазонах, каналах и силе сигнала см. в статье Wi-Fi и макет вашего дома.
Обеспечение безопасности беспроводной сети
Безопасность сети всегда важна. При использовании беспроводной сети этот вопрос становится еще более актуальным, так как сигнал вашей сети может выходить за пределы дома. Если вы не обезопасите свою сеть, посторонние люди с компьютерами могут получить доступ к вашим подключенным к сети компьютерам и воспользоваться вашим подключением к Интернету.
Чтобы повысить безопасность своей сети, выполните указанные ниже действия.
Измените имя пользователя и пароль по умолчанию.Это помогает защитить маршрутизатор. Большинство производителей маршрутизаторов имеют имя пользователя и пароль по умолчанию на маршрутизаторе и сетевое имя по умолчанию (также известное как SSID). Посторонние могут воспользоваться этой информацией для доступа к вашему маршрутизатору втайне от вас. Чтобы избежать этого, измените имя пользователя и пароль по умолчанию для маршрутизатора. Инструкции см. в документации по сетевому устройству.
Настройте ключ безопасности (пароль) беспроводной сети. В беспроводных сетях используются ключи безопасности сети, позволяющие защитить сети от несанкционированного доступа. Мы рекомендуем использовать безопасность Wi-Fi защищенный доступ 3 (WPA3), если маршрутизатор и компьютер поддерживают ее. Дополнительные сведения см. в документации по маршрутизатору, в том числе о том, какой тип безопасности поддерживается и как его настроить.
Использование WPS
Некоторые маршрутизаторы поддерживают протокол WPS. Если ваш маршрутизатор поддерживает протокол WPS и подключен к сети, выполните следующие действия, чтобы настроить ключ безопасности сети:
-
В зависимости от того, какая версия Windows установлена на вашем компьютере, выполните одно из следующих действий.
-
В Windows 10 нажмите кнопку Пуск, а затем выберите Параметры > Сеть & Интернет > Состояние > Центр управления сетями и общим доступом.
-
В Windows 11 нажмите кнопку Пуск, введите панель управления, а затем выберите панель управления > Сеть и Интернет > Центр управления сетями и общим доступом.
-
-
Выберите Настройка нового подключения или сети.
-
Выберите Создание и настройка новой сети, а затем нажмите кнопку Далее.
Мастер поможет вам создать имя сети и ключ безопасности. Если маршрутизатор поддерживает его, мастер по умолчанию будет обеспечивать безопасность защищенного доступа Wi-Fi (WPA2 или WPA3). Мы рекомендуем использовать WPA3, если это возможно, так как он обеспечивает лучшую безопасность, чем безопасность WPA2, WPA или WEP. При использовании WPA3, WPA2 или WPA также можно использовать парольную фразу, поэтому вам не нужно запоминать зашифрованную последовательность букв и цифр.
-
Запишите ключ безопасности и храните его в надежном месте.
-
Используйте брандмауэр. Брандмауэр — это оборудование или программное обеспечение, защищающее ваш компьютер от несанкционированного доступа и вредоносного программного обеспечения (вредоносных программ). Запуск брандмауэра на каждом компьютере в сети помогает контролировать распространение вредоносных программ в сети и защищать компьютеры при доступе к Интернету. Брандмауэр Windows входит в состав Windows.
Статьи по теме
Подключение устройства к сети Wi-Fi
Нужна дополнительная помощь?
Нужны дополнительные параметры?
Изучите преимущества подписки, просмотрите учебные курсы, узнайте, как защитить свое устройство и т. д.
Although, for the most part, setting up a wired network connection on a Windows 10 device is as easy as plugging in an Ethernet cable, connecting using a wireless adapter requires some additional steps depending on the security of the network.
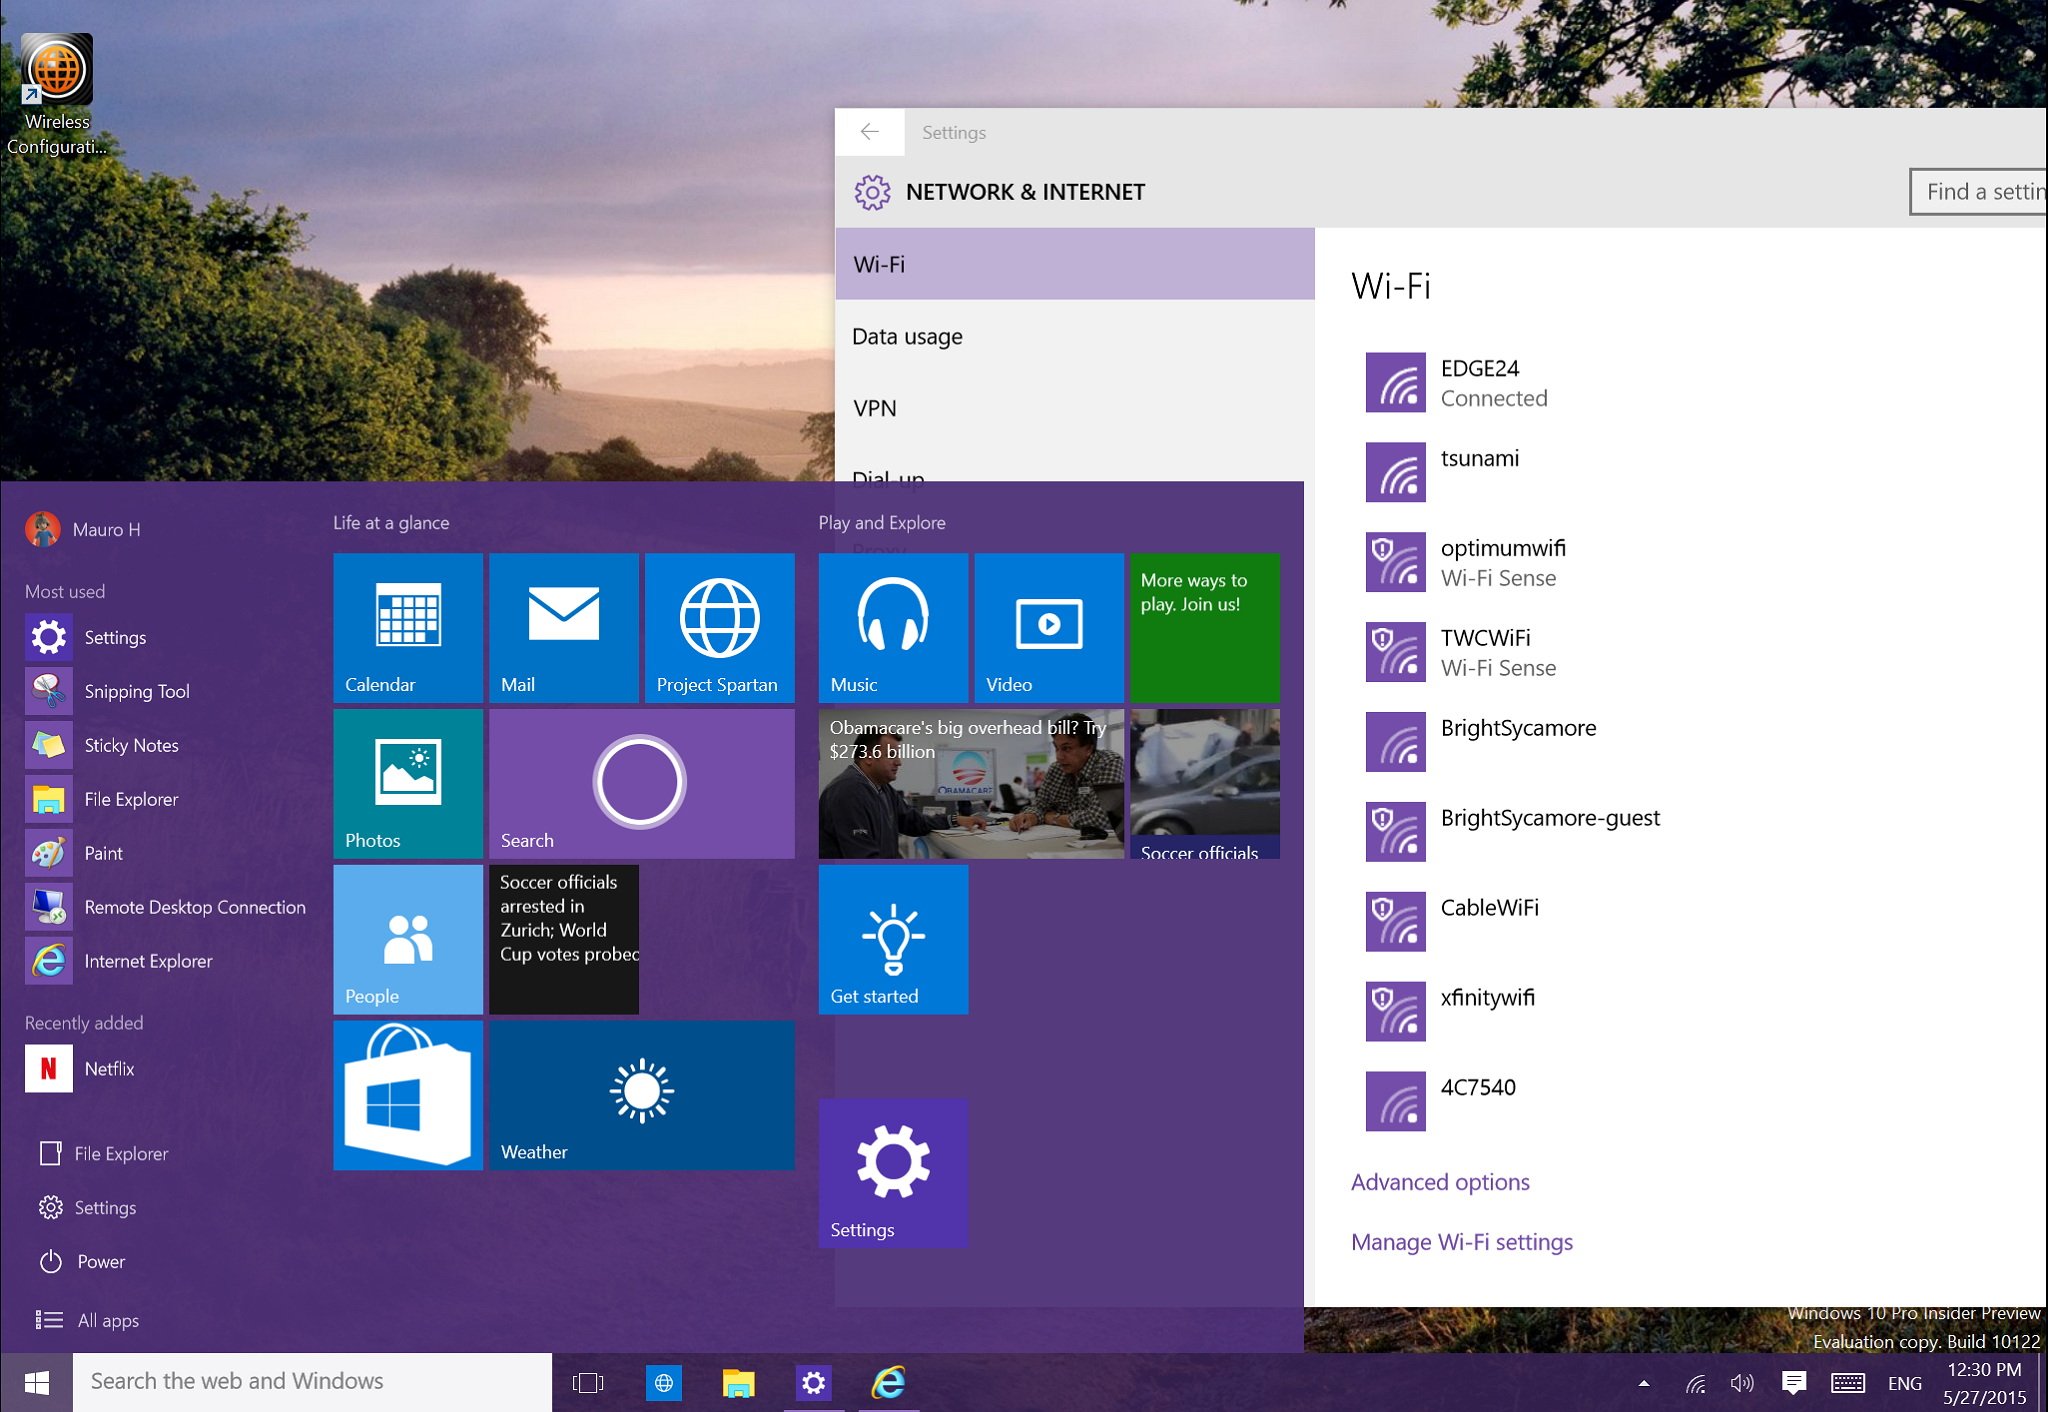
Windows 10’s Settings app that makes it super easy to manage many aspects of a Wi-Fi connection. Using the «Wi-Fi» page in the «Network & Security» section, you can connect and disconnect from a network, view configuration properties, change the network profile, manually add and remove network connections, set your connection as metered to reduce data usage on capped internet plans, and a lot more.
In this Windows 10 guide, we’ll walk you through many ways you can manage wireless network connections on your device using the Settings app.
- How to connect to a Wi-Fi network
- How to disconnect from a Wi-Fi network
- How to view a Wi-Fi connection properties
- How to connect to a Wi-Fi network on range automatically
- How to change the Wi-Fi connection network profile
- How to set a Wi-Fi connection as metered
- How to add or remove Wi-Fi connections
- How to manage wireless services
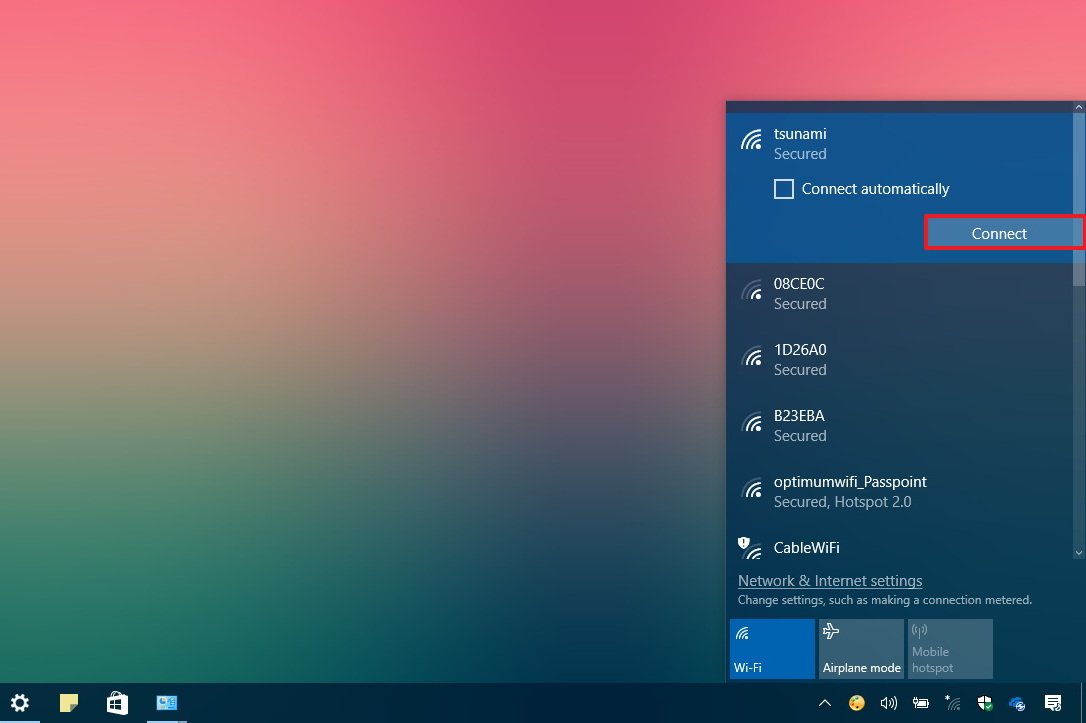
How to connect to a Wi-Fi network
Connecting to a wireless network is an easy process, you only need to know the network you want to connect and the security key to authenticate (sometimes also referred as a Wi-Fi password).
- Click the wireless icon in the notification area.
- Select the network you want to connect.
- Check the Connect automatically option.
- Click the Connect button.
- Enter the network security key.
- Click the Next button.
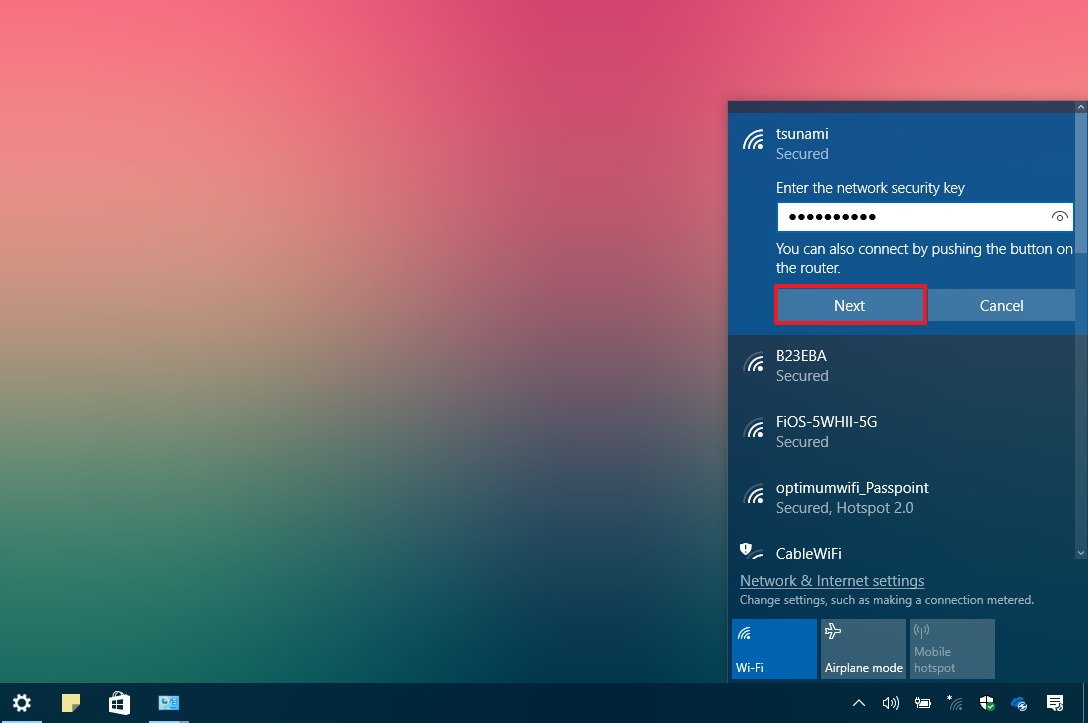
If the network flyout is not reporting any wireless network, you can try the steps shown below to turn off and on again Wi-Fi to see if that fixes the problem.
How to disconnect from a Wi-Fi network
Removing your device from a wireless network is also a straightforward process that can be done in a few different ways.
The easiest way to disconnect is using the network flyout menu.
All the latest news, reviews, and guides for Windows and Xbox diehards.
- Click the wireless icon in the notification area.
- Select the network you’re currently connected.
- Click the Disconnect button on the network connection.
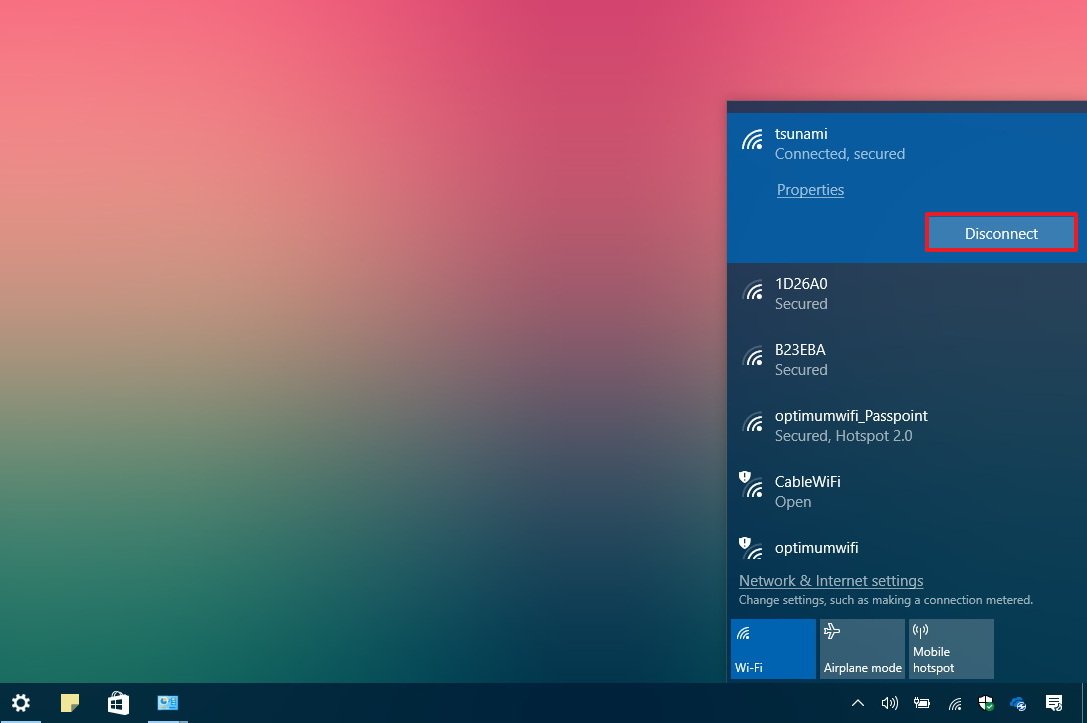
Alternatively, you can click the quick action Wi-Fi button at the bottom to turn off the adapter and disconnect from the network using flyout menu.
Quick Tip: The same Wi-Fi button can also be found in the Action Center’s Quick Actions section (Windows key + A).
If you don’t select a schedule, then you’ll need to enable the adapter manually by clicking the Wi-Fi button again from the flyout menu. Also, note that using the flygout menu, it’s possible to turn on or off Airplane mode and Mobile hotspot.
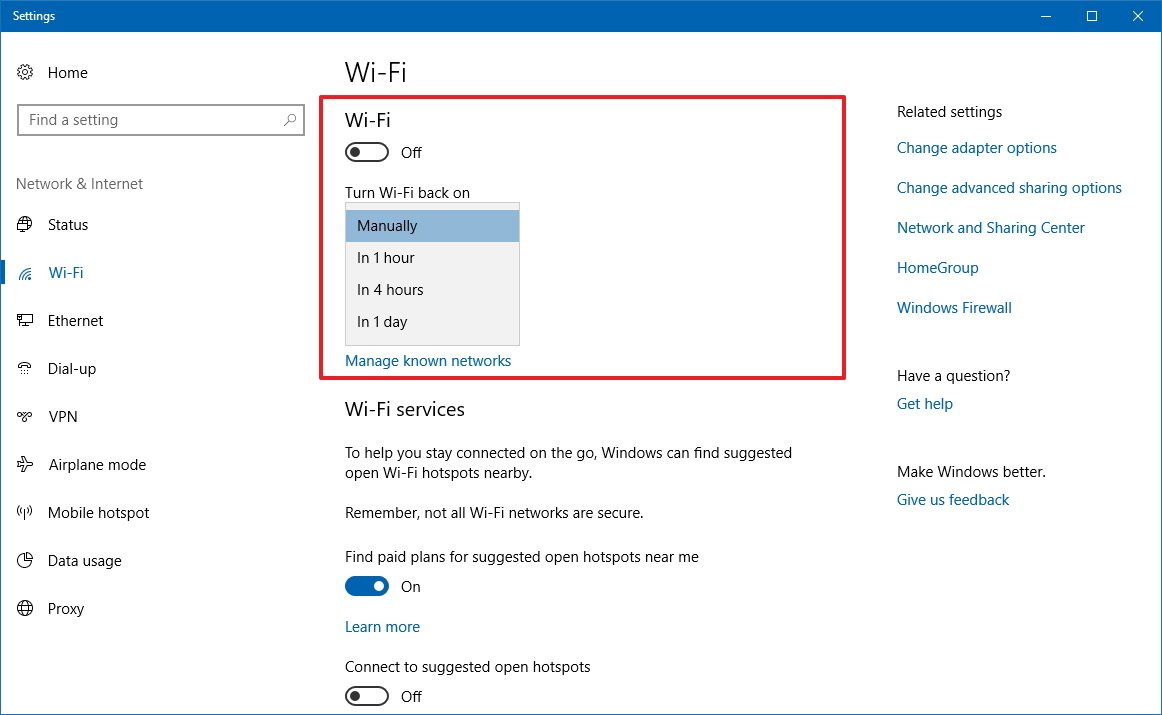
Disconnecting using the Settings app
Alternatively, you can enable or disable Wi-Fi using the Settings app.
- Open Settings.
- Click on Network & Security.
- Click on Wi-Fi.
- Turn off the toggle switch for the adapter you want to disconnect.
- Use the drop-down menu to select an option to turn on the wireless adapter on schedule.
How to view a Wi-Fi connection properties
Sometimes, in order to troubleshoot a problem or set up an application, you’ll need to know your network hardware information, such as network band, IP address, the name of the adapter and others. While there are a number of ways to find out this information, you can quickly identify these and other information about your wireless connection using the Settings app.
- Open Settings.
- Click on Network & Security.
- Click on Wi-Fi.
- Under the wireless network, click the Hardware properties link.
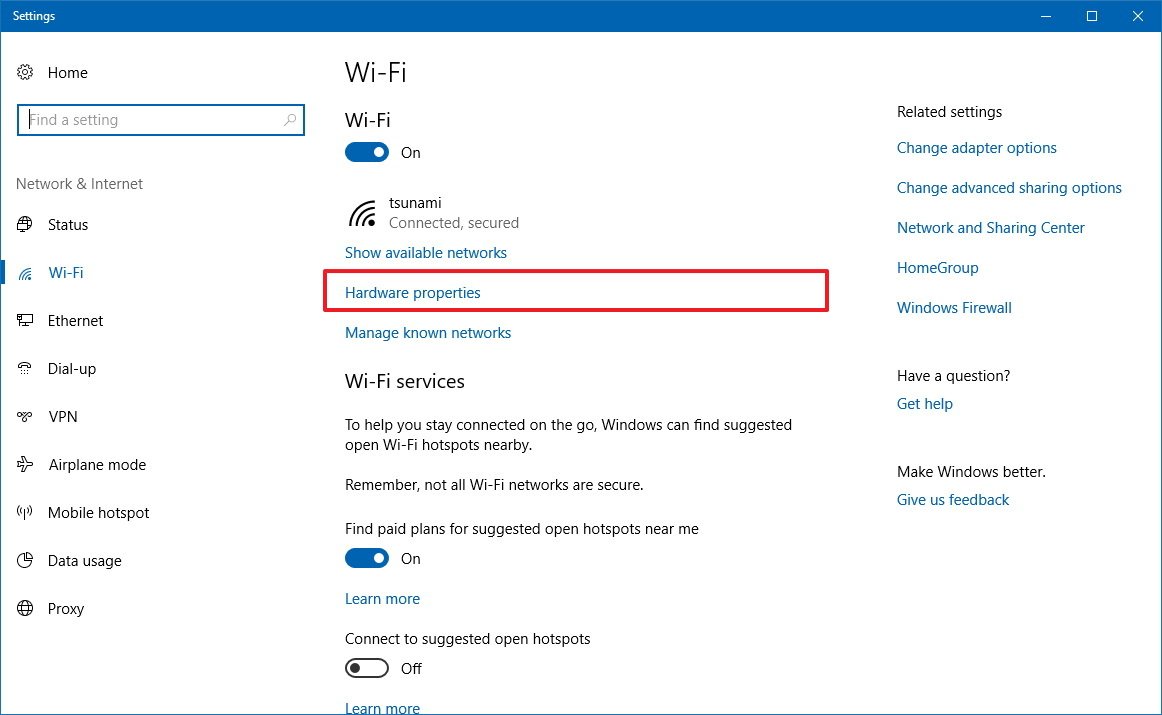

In the properties page, you’ll find information, such as SSID, protocol, security type, network band and channel, IP and MAC address.
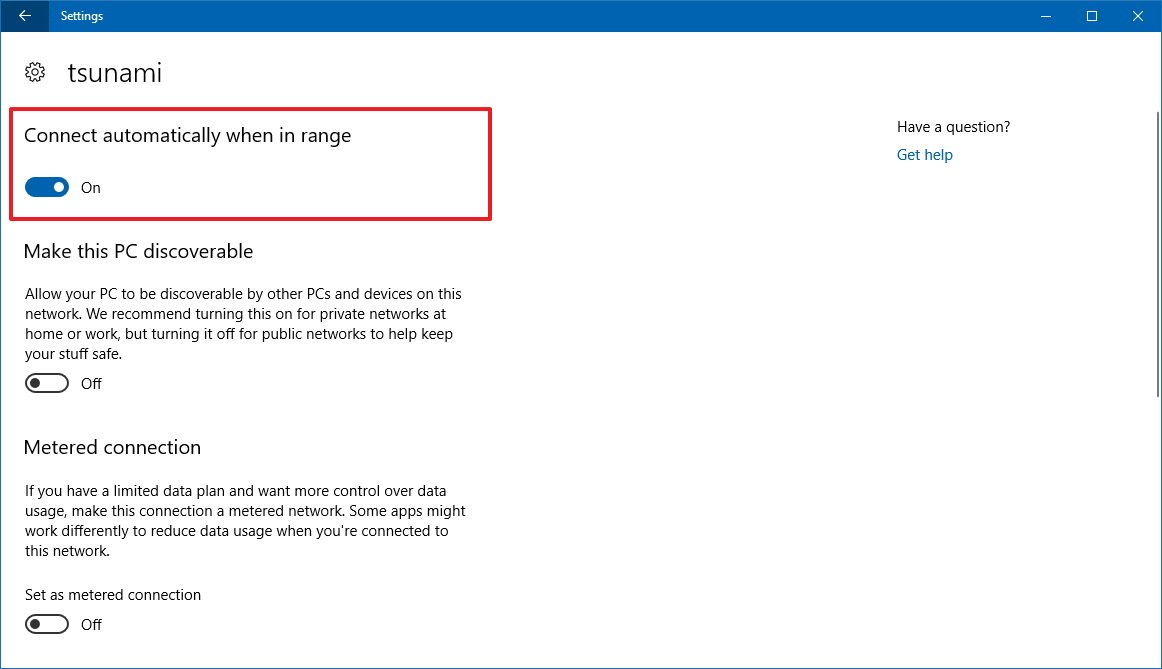
How to connect to a Wi-Fi network on range automatically
If you didn’t select the option to connect to a wireless network automatically while setting up a new connection, or you enabled the option, but you don’t need the configuration anymore, it’s possible to control this feature using the Settings app.
- Open Settings.
- Click on Network & Security.
- Click on Wi-Fi.
- Click your current Wi-Fi connection.

- Turn on or off the Connect automatically when in range option.
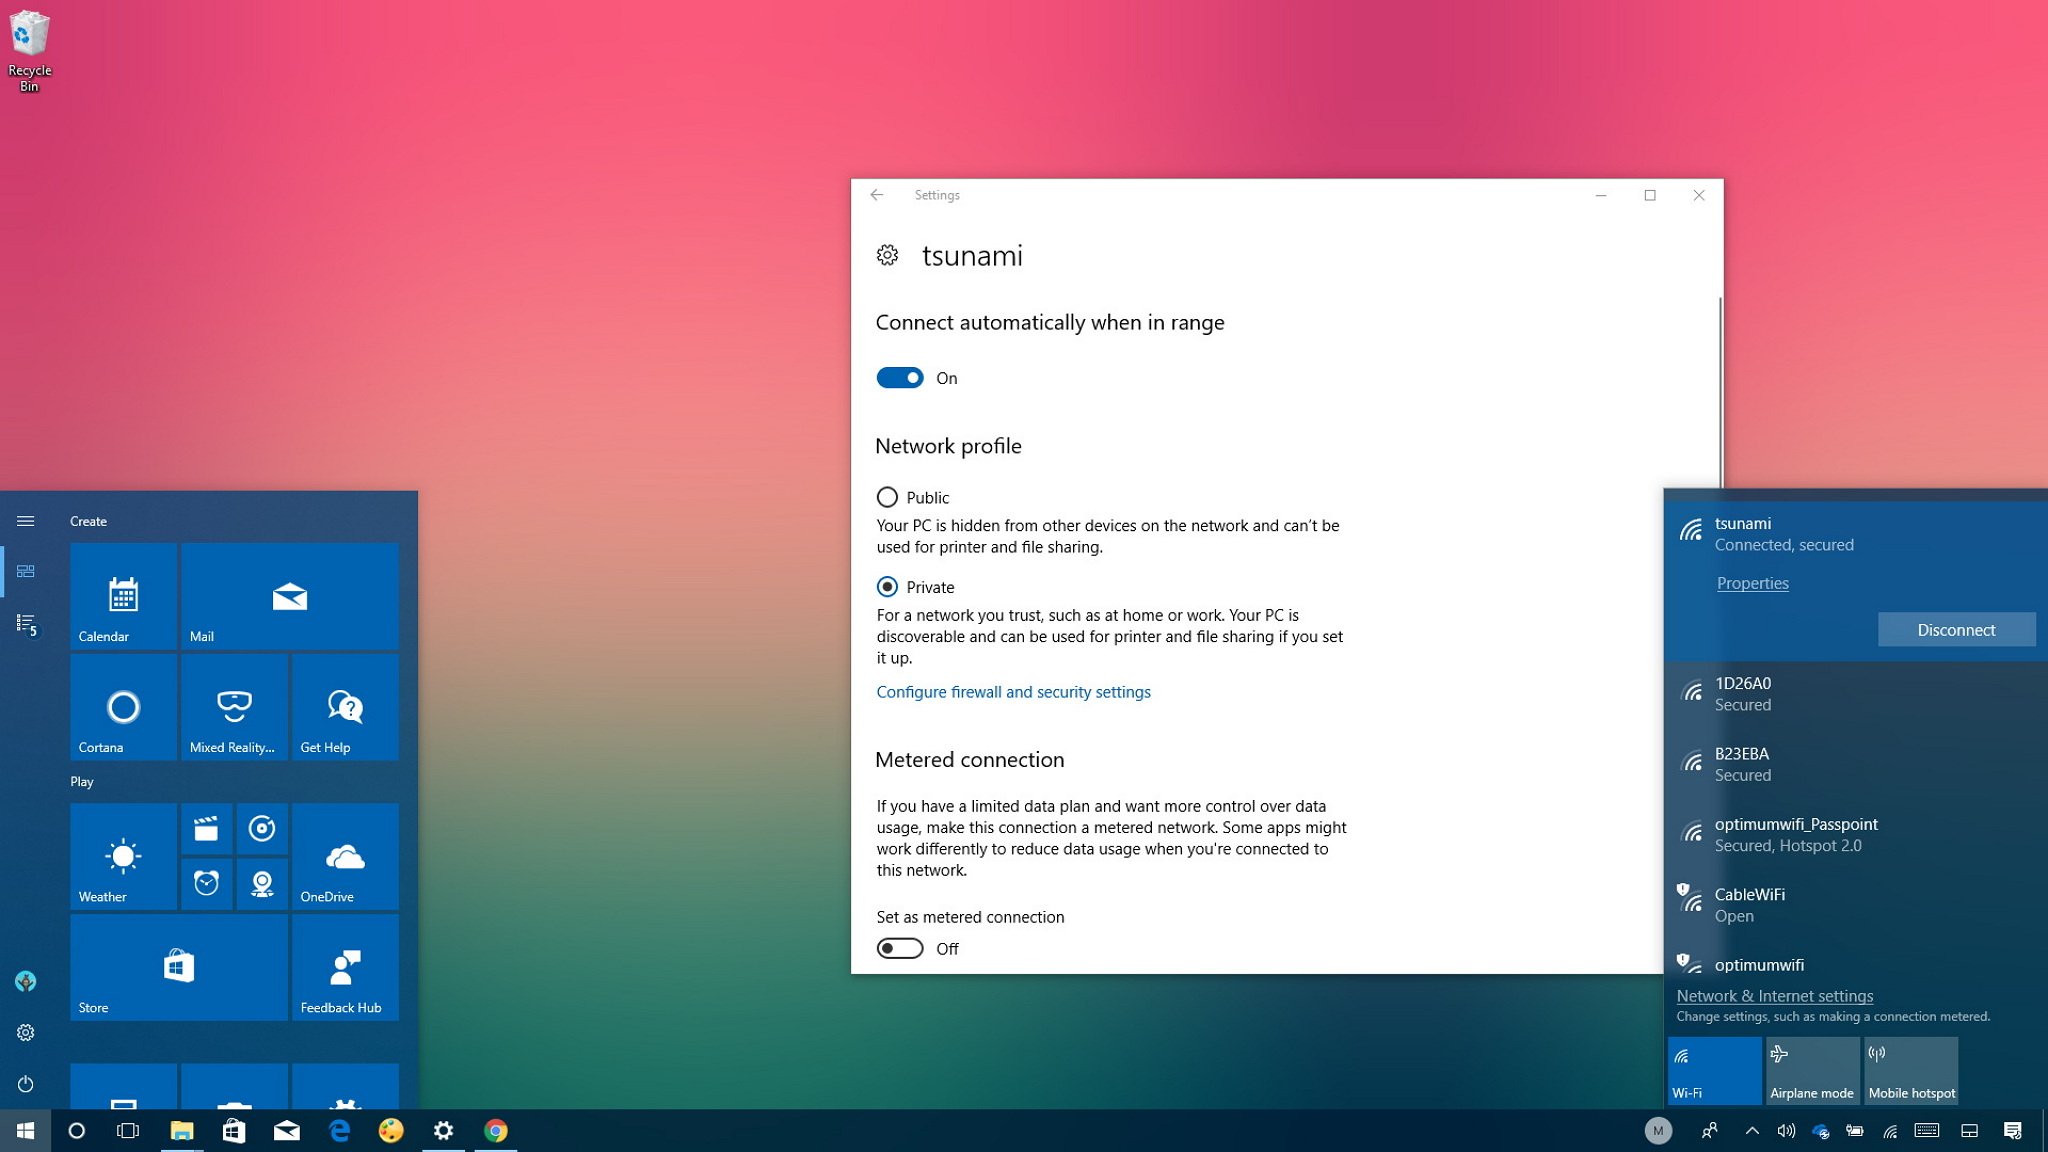
How to change the Wi-Fi connection network profile
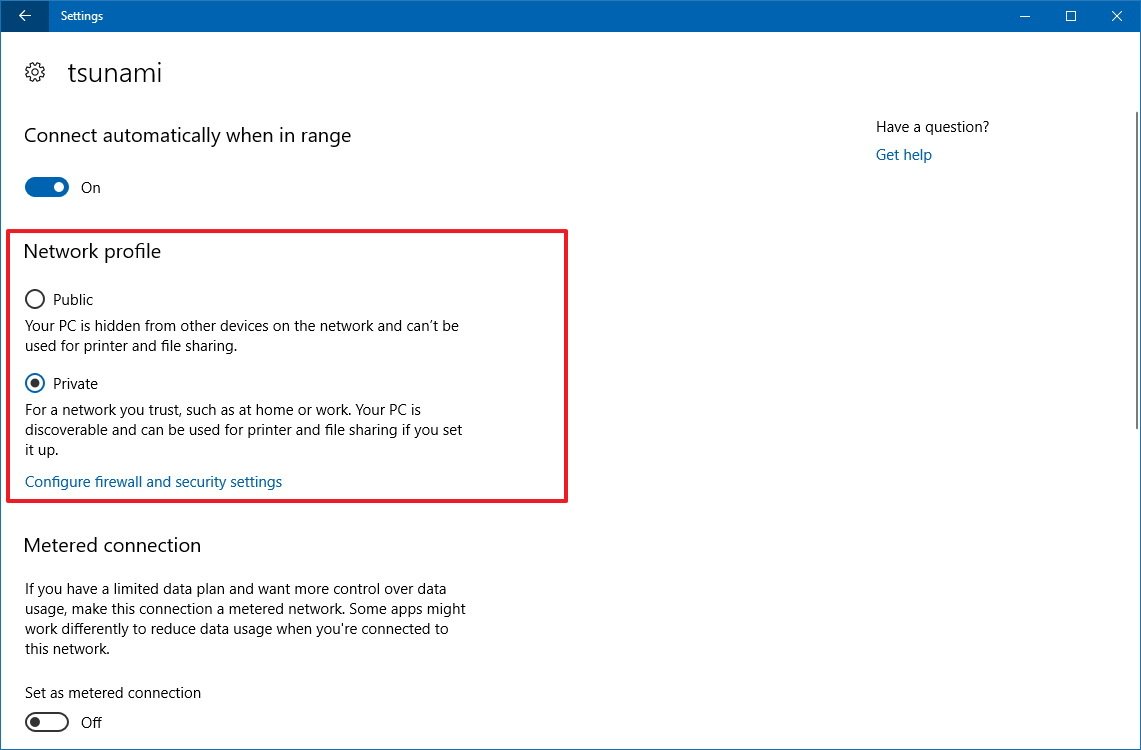
In order to increase network security, starting with the Windows 10 Fall Creators Update, you can now more easily set your wireless connection as Private on a network you trust, or Public on the network you don’t trust, such as at a coffee shop or airport.
- Open Settings.
- Click on Network & Security.
- Click on Wi-Fi.
- Click your current Wi-Fi connection.
- Under «Network profile,» select one of the two options:
- Public – makes your PC hidden from other devices on a public network and disables file and printer sharing.
- Private – makes your PC discoverable by other devices in a local network and allows them to use printer and file sharing (if it was configured).
If you’re not running the Windows 10 Fall Creators Update, you’ll see a Make this PC discoverable option, which works in the same way as the options shown in the above steps (toggle switch off means Public, and toggle switch on means Private).
How to set a Wi-Fi connection as metered
Out of the box, Windows 10 has unlimited access to the internet to download system and app updates, sync settings across your devices, connect to cloud services, and to connect you to the mighty internet.
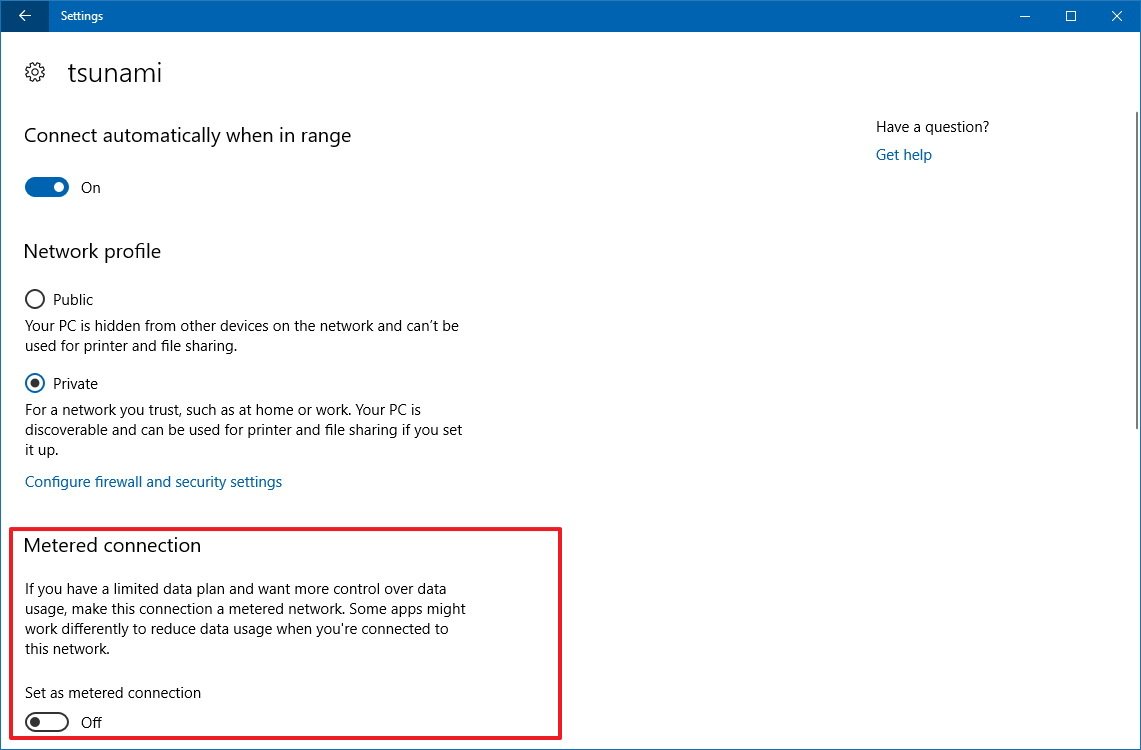
The problem is that if you’re on a limited internet connection, it’s possible to go over the data cap very quickly. A metered connection helps to reduce Windows 10’s data usage to prevent exceeding your data plan.
If you’re connected to a limited data plan, you can use the Settings app to set your wireless connection as metered.
- Open Settings.
- Click on Network & Security.
- Click on Wi-Fi.
- Click your current Wi-Fi connection.
- Under «Metered connection,» turn on the Set as metered connection toggle switch.
After completing the steps, Windows 10 will only have restricted access to an internet connection, which also prevents it from downloading updates. However, some critical updates may download over this type of connection.
In addition, using a metered connection will prevent the Start menu from downloading Live Tiles updates, and some apps will no longer receive updates automatically.
How to add or remove Wi-Fi connections
Using the Settings app is also possible to add or remove a Wi-Fi network manually in those cases when you may need to connect to a network that doesn’t broadcast its SSID (Service Set Identifier), or when you need to set up a wireless connection beforehand to save time.
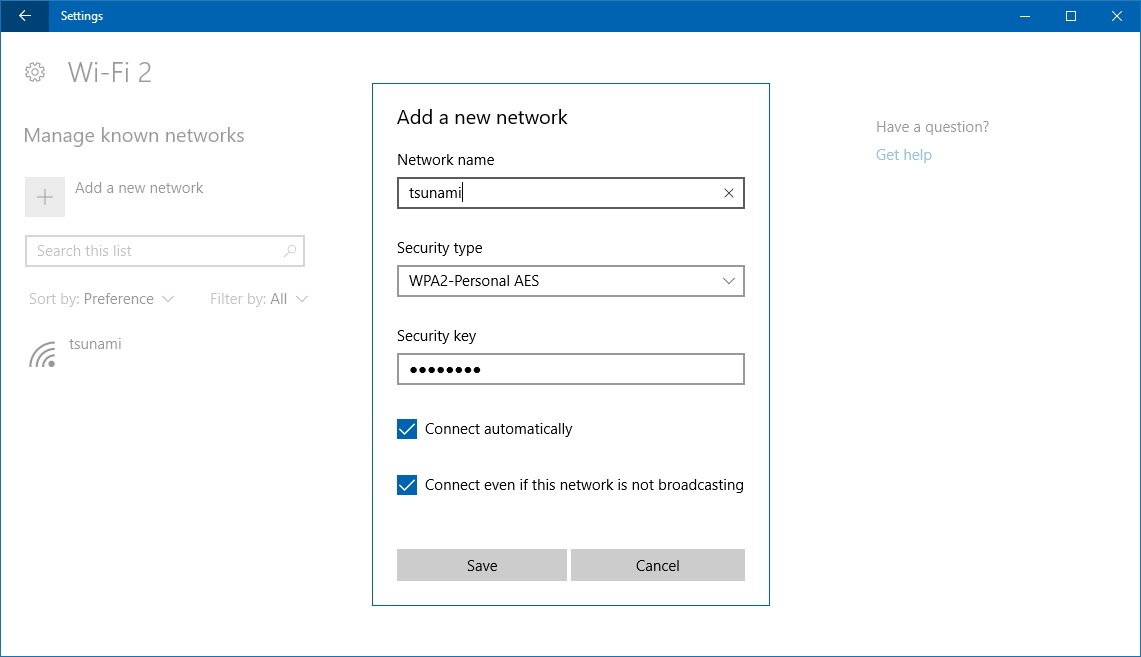
Adding a Wi-Fi network
- Open Settings.
- Click on Network & Security.
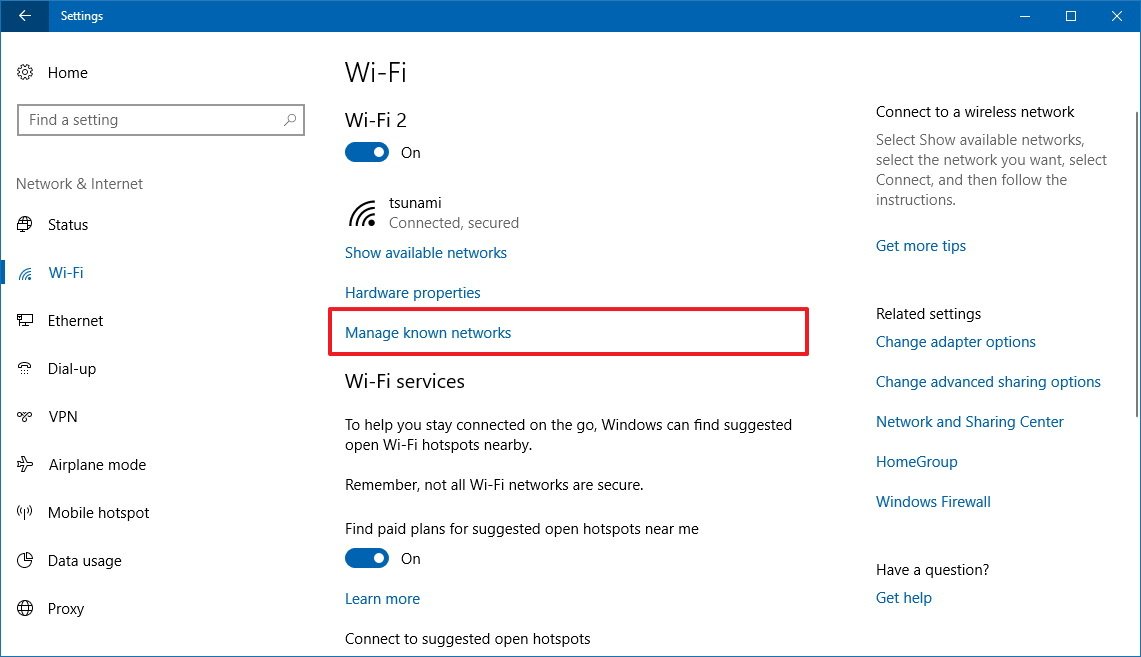
- Click on Wi-Fi.
- Click the Manage known networks link.
- Click the Add a new network button.
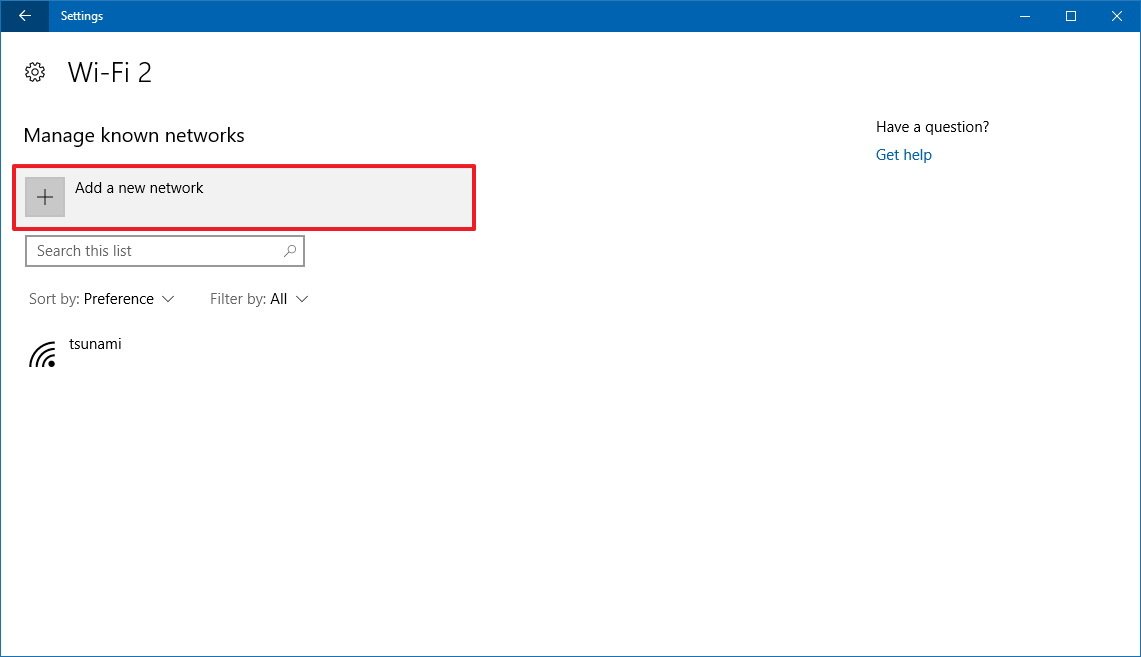
- Enter the network name.
- Using the drop-down menu, select the network security type.
- Check the Connect automatically option.
- Check the Connect even if the network is not broadcasting option.
- Click Save.
Once you’ve completed the steps, whenever your device is within range of the network, it’ll connect automatically without any further steps.
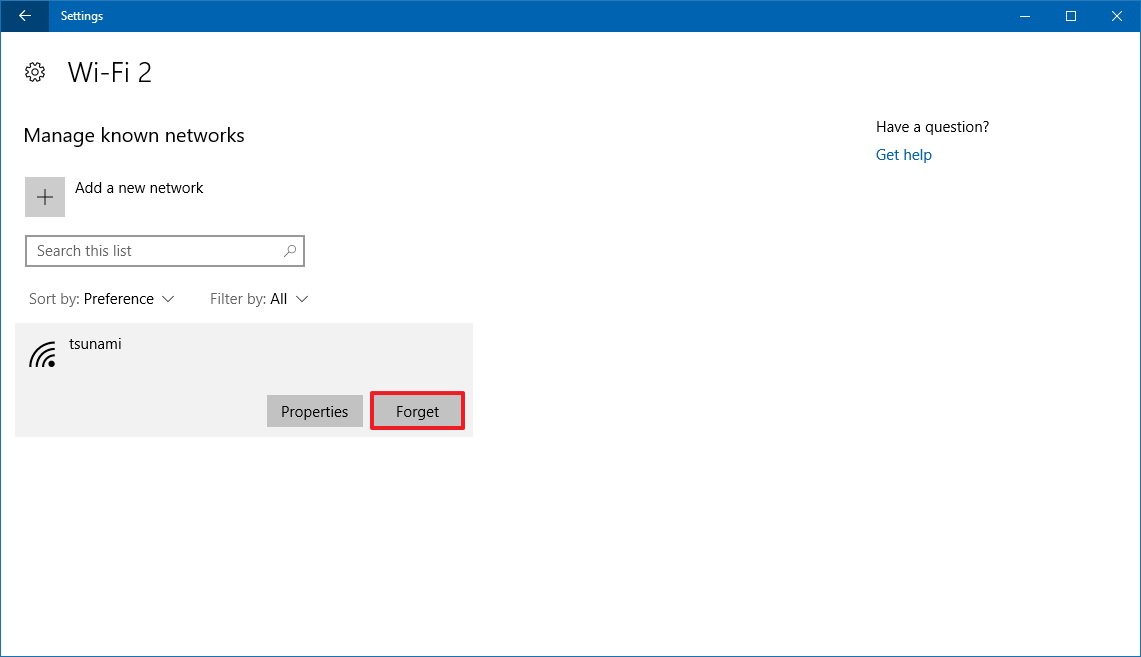
Removing a Wi-Fi network
If you must remove (forget) a Wi-Fi network, the Settings app makes it a very straightforward process.
- Open Settings.
- Click on Network & Security.
- Click on Wi-Fi.
- Click the Manage known networks link.
- Select the Wi-Fi connection you want to remove.
- Click the Forget button (there is no confirmation dialog using this button, so make sure that you really want Windows 10 to forget this connection before clicking the button).
After completing the steps, your device will no longer try to connect with the network you’ve removed.
How to manage wireless services
The Wi-Fi settings page also offers a few nifty features for users that are always on the move.
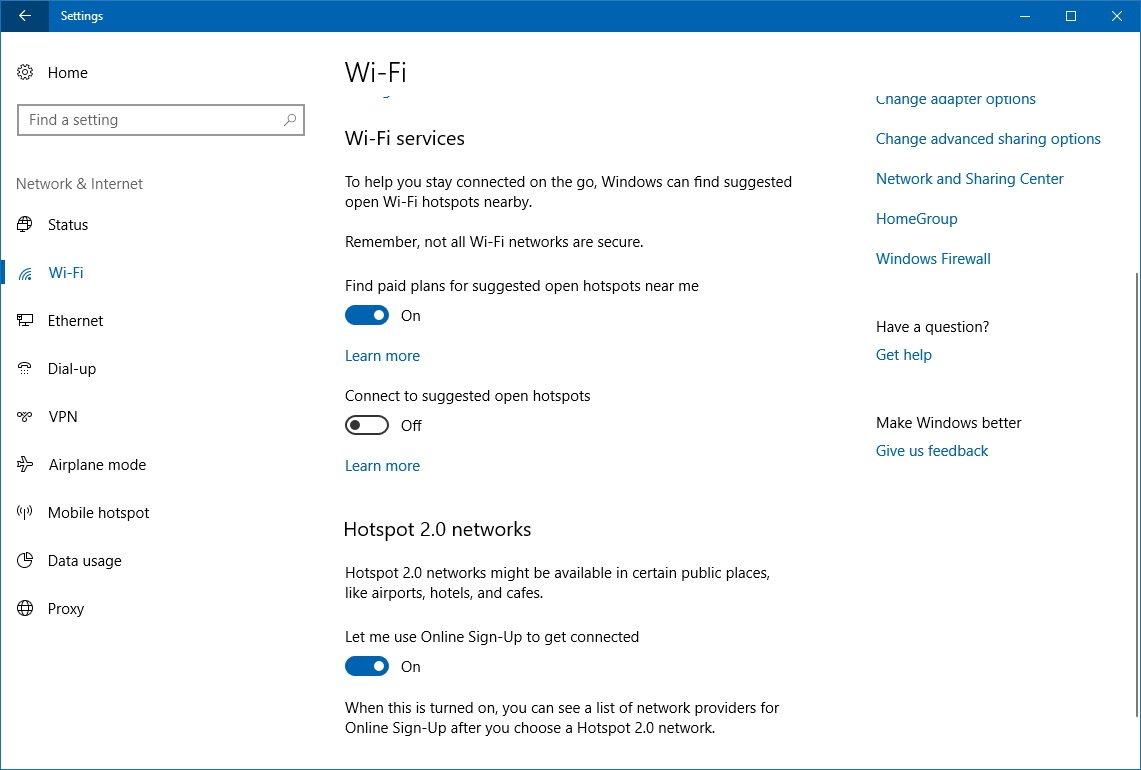
Wi-Fi services
Windows 10 offers two additional features to help you get connected no matter where you are located. If you turn on the Find paid plans for suggested open hotspots near me toggle switch, then you’ll be able to purchase data plans from the Windows Store form affiliated networks.
In addition, you can also turn on the Connect to suggested open hotspots toggle switch, which allows Windows 10 to connect automatically to open wireless networks, even connecting through landing pages thanks to a database of known networks.
While using suggested open hotspots is a good option, remember that some networks can be reliable but not secure.
Hotspot 2.0 networks
Hotspot 2.0 is a relatively new networking standard that makes connecting to public Wi-Fi networks a simple and secure process.
If you’re in a public place like at a coffee shop, airport, or hotel, Hotspot 2.0 will identify and connect to the right network automatically without having to go through a list of networks which can be fake or malicious.
Hotspot 2.0 networks is enabled by default on Windows 10, but if you’re planning to make use of this feature, you can go to Settings > Update & Security > Wi-Fi to make sure is enabled. You can also check this guide for more details.
Wrapping things up
While it’s now possible to configure many wireless options using the Settings app, Windows 10 has yet to include every networking feature in this experience. This means that to change some options, such as advanced network adapter settings, power management, and set up specific protocols, you still need to use Control Panel.
More Windows 10 resources
For more helpful articles, coverage, and answers to common questions about Windows 10, visit the following resources:
- Windows 10 on Windows Central – All you need to know
- Windows 10 help, tips, and tricks
- Windows 10 forums on Windows Central
Mauro Huculak has been a Windows How-To Expert contributor for WindowsCentral.com for nearly a decade and has over 15 years of experience writing comprehensive guides. He also has an IT background and has achieved different professional certifications from Microsoft, Cisco, VMware, and CompTIA. He has been recognized as a Microsoft MVP for many years.
У многих пользователей дома или на работе присутствует более одной точки доступа Wi-Fi — обычно, работающих на разных частотах, для которых в Windows сохранены учётные данные. При этом автоматически подключение может устанавливаться не для той сети, к которой вы хотели бы подключаться по умолчанию. Это поведение можно изменить.
В этой инструкции подробно о том, как изменить приоритет Wi-Fi сетей в Windows 11 и Windows 10 таким образом, чтобы при доступности нескольких беспроводных сетей автоматическое подключение выполнялось к выбранной вами.
Настройка приоритета беспроводных сетей в командной строке
Изменение приоритета Wi-Fi сетей в Windows 11/10 возможно с помощью команды netsh в командной строке, других способов не предусмотрено. Порядок действий будет следующим:
- Запустите командную строку от имени администратора, либо Терминал Windows от имени администратора (сделать это можно в меню по правому клику на кнопке «Пуск»).
- Введите команду
netsh wlan show profiles
и нажмите Enter. Команда отобразит список сохранённых Wi-Fi сетей на компьютере.

- Для установки приоритета сетей используйте команду
netsh wlan set profileorder name="ИМЯ_СЕТИ" interface="Беспроводная сеть" priority=ПРИОРИТЕТ
где приоритет задаётся числом, а 1 означает первую по порядку подключения сеть. Например, на скриншоте ниже команда устанавливает мою сеть, работающую на частоте 5 ГГц в качестве предпочтительной:
- Аналогичным образом можно установить приоритеты для других сохранённых сетей.


Обратите внимание, что значение для параметра «interface» в команде на первом шаге может отличаться в зависимости от языка системы, например, быть «Wi-Fi» вместо «Беспроводная сеть». Правильное значение будет отображено сразу после выполнения команды для показа списка сохранённых профилей Wi-Fi сетей как имя интерфейса.
Дополнительная информация
В завершение — некоторые дополнительные нюансы, которые могут быть полезными в контексте рассмотренной темы:
- Если зайти в (пример для Windows 11) Параметры — Сеть и Интернет — Wi-Fi — Управление известными сетями и открыть свойства какой-либо сохранённой сети, можно отключить автоматическое к ней подключение сняв отметку «Подключаться автоматически в радиусе действия». В результате автоматическое подключение к сети выполняться не будет, но её пароль всё также будет храниться в системе для подключения вручную при необходимости.

- Вы можете скрыть Wi-Fi сети соседей и просто ненужные Wi-Fi сети в списке доступных для подключения.

Если у вас остаются дополнительные вопросы, связанные с порядком подключения к Wi-Fi сетям в зоне действия, их можно задать в комментариях, я постараюсь помочь.
| ManageWirelessNetworks v1.16 Copyright (c) 2021 — 2025 Nir Sofer |
Description
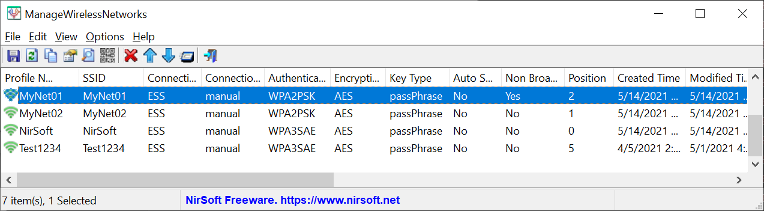
ManageWirelessNetworks is an alternative tool to the standard ‘Manage Wireless Networks’ of Windows (or ‘Manage Known Networks’ on Windows 10).
It displays extensive information about every wireless profile on your system, even if the network adapter is not active.
For every wireless profile, the following information is displayed: Profile Name, SSID, Connection Type, Connection Mode, Authentication, Encryption, Key Type,
Auto Switch (Yes/No), Non Broadcast (Yes/No), Profile Position, Created Time, Modified Time, Wireless Key, and more…
ManageWirelessNetworks also allows you to edit a single profile with the standard editor of Windows, edit the XML of the wireless profile (For advanced users only !),
quickly switch between manual and automatic mode, quickly switch between WPAPSK/WPA2PSK/AES/TKIP modes, rename the profile, rename the SSID,
move profile position up and down, copy multiple wireless profiles to another wireless card on your system, and more…
System Requirements
- This tool works on any version of Windows, starting from Windows Vista and up to Windows 11. Both 32-bit and 64-bit systems are supported.
- This tool is just a small standalone .exe file that you can run on any system without installing anything.
Version History
- Version 1.16:
- Added ‘Save All Items’ option.
- Version 1.15:
- Added ‘Black Background’ option (Under the View menu). When it’s turned on, the main table is displayed in black background and white text, instead of default system colors.
- Version 1.14:
- Added ‘Set Connection Mode’ toolbar dropdown.
- Version 1.13:
- Fixed issue: When copying data to the clipboard or exporting to tab-delimited file, every line contained an empty field in the end of the line.
- Version 1.12:
- Added ‘Sort By’ toolbar button.
- Version 1.11:
- Added ‘Copy QR Code’ option (Under the Edit menu), which allows you to copy the QR Code image to the clipboard.
- Version 1.10:
- Added ‘Connect Selected Profile’ option, which allows you to instantly connect the wireless network of the selected profile.
- Version 1.08:
- Added ‘Always On Top’ option.
- Fixed the default columns size in high DPI mode.
- Version 1.07:
- Added ‘Add Header Line To CSV/Tab-Delimited File’ option (Turned on by default).
- Version 1.06:
- Added /Columns command-line option, which allows you to set the columns to display or the columns to export from command-line, for example:
ManageWirelessNetworks.exe /Columns «Profile Name,SSID,Authentication,Encryption,Key Type,Interface Name»
- Added /Columns command-line option, which allows you to set the columns to display or the columns to export from command-line, for example:
- Version 1.05:
- Added ‘Double-Click Action’ option, which allows you to choose what to do when you double-click a wirless network item with the mouse: None, Open Properties Window, Edit Wireless Profile, Edit Profile XML, Rename SSID, Rename Profile.
- Added ‘Enter Action’ option, which allows you to choose what to do when you press the Enter key: None, Open Properties Window, Edit Wireless Profile, Edit Profile XML, Rename SSID, Rename Profile.
- Version 1.02:
- Added ‘Copy Clicked Cell’ option to the right-click context menu, which copies to the clipboard the text of cell that you right-clicked with the mouse.
- Version 1.01:
- Added option to choose another font (name and size) to display in the main window.
- Version 1.00 — First release.
Start Using ManageWirelessNetworks
ManageWirelessNetworks doesn’t require any installation process or additional DLL files. In order to start using it, simply run the executable file — ManageWirelessNetworks.exe
After you run the ManageWirelessNetworks tool, the main window displays the details of all wireless profiles on your system.
You can select one or more profiles from the list and then choose the desired action from the top menu or from the right-click context menu.
Be aware: ManageWirelessNetworks displays all wireless profiles on your system, even if the wireless adapter is not active. However, most actions (like edit profile, rename SSID, and so on…) only works for wireless profiles with active network adapter.
If you want to view only the wireless profiles that their wireless adapter is active, simply turn on the ‘Load Only Active Network Interfaces’ option.
Wireless profiles of active network adapters are displayed with green icon, while Wireless profiles of inactive network adapters are displayed with gray icon.
Export wireless profiles list
In order to export the wireless profiles list into a file, simply select one or more files in the main window (or press Ctrl+A to select all items), press Ctrl+S (Save Selected Items) and then
in the save dialog-box choose the type of file to export (Text File, Tab Delimited Text File, JSON File, HTML File — Horizontal, HTML File — Vertical, XML File, or Comma Delimited Text File),
type the filename to save, and then click the Save button.
Optionally, you can also press Ctrl+C (Copy Selected Items) to copy the wireless profiles list as tab-delimited format, and then paste the profiles list into Excel or other spreadsheet application.
Copy wireless profiles to another wireless network adapter
If you have a new wireless network adapter and you want to connect the same wireless networks that you used with another network adapter, simply
select the profiles you want to use with the new adapter, choose the ‘Copy Profiles To Another Network Interface’ option from the File menu, select your new wireless adapter, and
ManageWirelessNetworks tool will copy all previous profiles to the new adapter.
This feature works even if the previous network adapter is not active.
Rename SSID
If you changed the name of your wireless network (SSID), you can easily update the new SSID by using the ‘Rename SSID’ option.
Only the SSID of your profile will be updated. All other settings, like the network key, will remain the same as before.
Optionally, you can also update the profile name by using the ‘Rename Profile’ option.
Edit Wireless Profile
The ‘Edit Wireless Profile’ option allows you the change the settings of existing wireless profile, using the standard wireless profile editor of Windows operating system.
Be aware that this option works only for wireless profiles of active network adapter (Active Interface = Yes).
Delete wireless profiles
ManageWirelessNetworks allows you to delete one or more wireless profiles on your system, by using the ‘Delete Selected Profiles’ option (Ctrl+Delete).
If you want to delete wireless profiles of inactive wireless adapter (Active Interface = No), you have to run ManageWirelessNetworks as Administrator (Ctrl+F11).
Duplicate Profile
If you want to duplicate an existing wireless profile on the same wireless network adapter, simply select the desired profile, choose ‘Duplicate Profile’ from the menu,
type the name of the new duplicated profile and then ManageWirelessNetworks will create a new profile with exactly the same settings of the original profile.
After the duplicated profile is created, you can use the ‘Edit Wireless Profile’ and other options to change the settings of the duplicated profile.
Set connection mode for multiple profiles
ManageWirelessNetworks allows you to quickly choose the wireless profiles that Windows will try to connect automatically.
Simply select the desired wireless profiles, and then press F7 to connect the selected wireless profiles automatically (Set Connection Mode -> Automatic),
or press F8 to stop connecting the selected wireless profiles automatically (Set Connection Mode -> Manual).
View Wireless Keys
If you want the view the wireless key of your wireless profiles, go to the Options menu and turn on the ‘Show Wireless Keys’ options.
ManageWirelessNetworks displays the wireless key only for profiles of active wireless adapter (Active Interface = Yes).
Be aware that on systems prior to Windows 10 you have to run ManageWirelessNetworks as Administrator (Ctrl+F11) in order to view the wireless keys.
Command-Line Options
| /stext <Filename> | Save the wireless profiles list to a simple text file. |
| /stab <Filename> | Save the wireless profiles list to a tab-delimited text file. |
| /scomma <Filename> | Save the wireless profiles list to a comma-delimited text file (csv). |
| /shtml <Filename> | Save the wireless profiles list to HTML5 file (Horizontal). |
| /sverhtml <Filename> | Save the wireless profiles list to HTML5 file (Vertical). |
| /sxml <Filename> | Save the wireless profiles list to XML file. |
| /sjson <Filename> | Save the wireless profiles list to JSON file. |
| /sort <column> | This command-line option can be used with other save options for sorting by the desired column. The <column> parameter can specify the column index (0 for the first column, 1 for the second column, and so on) or the name of the column, like «SSID» and «Profile Name». You can specify the ‘~’ prefix character (e.g: «~Position») if you want to sort in descending order. You can put multiple /sort in the command-line if you want to sort by multiple columns. |
| /cfg <Config Filename> | Start ManageWirelessNetworks with the specified config file. |
| /Columns <Comma Delimited Columns List> |
Allows you to set the columns to display or the columns to export from command-line. You have to specify the column names, delimited by comma, for example: ManageWirelessNetworks.exe /scomma c:\temp\wireless-networks-list.csv /Columns «Profile Name,SSID,Authentication,Encryption,Key Type,Interface Name»
You can also specify the column names without space characters, for example: |
Translating ManageWirelessNetworks to other languages
In order to translate ManageWirelessNetworks to other language, follow the instructions below:
- Run ManageWirelessNetworks with /savelangfile parameter:
ManageWirelessNetworks.exe /savelangfile
A file named ManageWirelessNetworks_lng.ini will be created in the folder of ManageWirelessNetworks utility. - Open the created language file in Notepad or in any other text editor.
- Translate all string entries to the desired language.
Optionally, you can also add your name and/or a link to your Web site.
(TranslatorName and TranslatorURL values) If you add this information, it’ll be
used in the ‘About’ window. - After you finish the translation, Run ManageWirelessNetworks, and all translated
strings will be loaded from the language file.
If you want to run ManageWirelessNetworks without the translation, simply rename the language file, or move
it to another folder.
License
This utility is released as freeware.
You are allowed to freely distribute this utility via CD-ROM, DVD,
Internet, or in any other way, as long as you don’t charge anything for this and you don’t
sell it or distribute it as a part of commercial product.
If you distribute this utility, you must include all files in
the distribution package, without any modification !
Disclaimer
The software is provided «AS IS» without any warranty, either expressed or implied,
including, but not limited to, the implied warranties of merchantability and fitness
for a particular purpose. The author will not be liable for any special, incidental,
consequential or indirect damages due to loss of data or any other reason.
Feedback
If you have any problem, suggestion, comment, or you found a bug in my utility,
you can send a message to support@nirsoft.net
ManageWirelessNetworks is also available in other languages. In order to change the language of
ManageWirelessNetworks, download the appropriate language zip file, extract the ‘managewirelessnetworks_lng.ini’,
and put it in the same folder that you Installed ManageWirelessNetworks utility.
| Language | Translated By | Date | Version |
|---|---|---|---|
| Arabic | Mohamed Bajdouai | 15/07/2021 | 1.00 |
| Czech | Jakub Hejl | 27/09/2024 | 1.14 |
| Dutch | Jan Verheijen | 14/03/2025 | 1.16 |
| French | Largo | 13/02/2025 | 1.15 |
| German | «Latino» | 21/04/2025 | 1.16 |
| Greek | geogeo.gr | 31/05/2021 | 1.00 |
| Hungarian | Timinoun | 18/04/2025 | 1.16 |
| Italian | Styb | 29/03/2025 | 1.16 |
| Japanese | coolvitto | 19/03/2025 | 1.16 |
| Korean | VenusGirl (비너스걸♡) | 18/06/2024 | 1.14 |
| Lapanese | coolvitto | 18/02/2025 | 1.15 |
| Persian | ZendegiyeSabz | 01/04/2025 | 1.16 |
| Polish | Hightower | 26/03/2025 | 1.16 |
| Russian | Dmitry Yerokhin | 13/03/2025 | 1.16 |
| Simplified Chinese | DickMoore | 03/04/2024 | 1.13 |
| Simplified Chinese | DaiXQ021 | 14/04/2025 | 1.16 |
| Slovak | František Fico | 02/04/2025 | 1.16 |
| Traditional Chinese | Danfong Hsieh | 20/03/2025 | 1.16 |
| Turkish | HARUN ARI | 17/06/2024 | 1.14 |
Windows 10 стала продолжением идей Windows 8, переняв от неё хорошие качества и еще больше приспособившись к одновременной работе как с классическими контроллерами вроде мыши и клавиатуры, так и с новыми сенсорными экранами, ориентированными на управление пальцем. Однако пользователям, только что освоившимся работать с «8-кой», потребуется снова адаптироваться к измененному внешнему виду Windows. Из-за этого операции вроде настройки Wi-Fi на Windows 10 вызывают затруднения у неподготовленных людей.
Подключение к действующей сети
Для начала разберемся с подключением к уже активной транслируемой Wi-Fi сети. Сперва стоит убедиться, что кнопка активации беспроводного адаптера находится во включенном положении. После включения модуля нужно выполнить подключение к Wi-Fi сети, для чего понадобится:
- Щелкнуть или коснуться значка сети в правом нижнем углу экрана на панели задач в области уведомлений рядом с часами.
- Выбрать сеть из появившегося списка.
- Нажать на кнопку «Подключиться», поставив галочку «подключаться автоматически», если данная сеть – основная используемая точка доступа в Интернет.
- Ввести пароль, если выбранная сеть им защищена.
После проделанных манипуляций компьютер будет готов к работе с веб-страницами. Как вы заметили, подключиться к Wi-Fi на Windows 10 так же просто, как и в прошлых редакциях ОС.
Взаимодействие с сетями
Windows пользуется популярностью у пользователей потому, что дает возможности по тонкой настройке практически каждого параметра. При необходимости, потратив немного усилий, пользователь может самостоятельно настроить функции ОС так, как посчитает нужным. Это же касается и богатого функционала по настройке сетей: посмотреть IP-адрес, задать параметры безопасности и общего доступа, передать файлы на другие компьютеры в одной рабочей сети – всё это можно было сделать и в предыдущих поколениях Windows, и в новой Windows 10.
Просмотреть пароль сети
В новой ОС остались и функции, позволяющие узнать ключ от подключенной сети. Так, если пользователю нужно посмотреть пароль Wi-Fi на Windows 10 для того, чтобы сообщить его другому человеку, то необходимо:
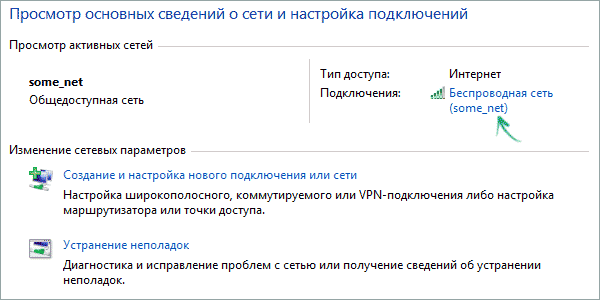
- Зайти в раздел «Центр управления сетями и общим доступом» в панели управления.
- Найти в открывшемся окне надпись: «Подключения: беспроводная сеть (имя сети)» и щелкнуть по ней.

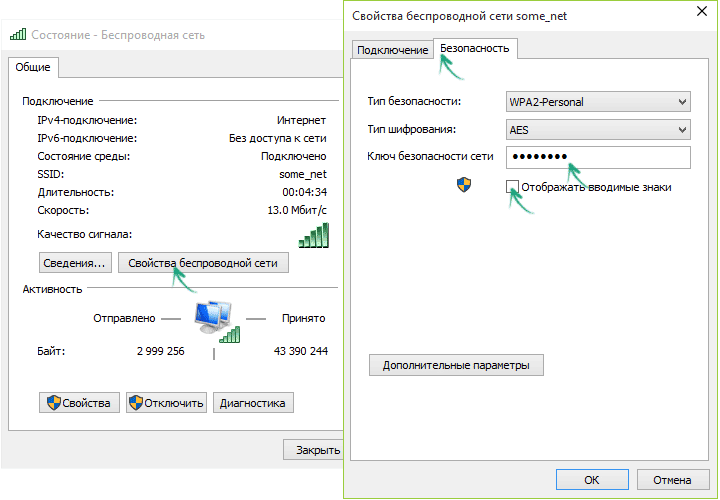
- Щелкнуть по кнопке «Свойства беспроводной сети».
- Перейти на вкладку «Безопасность».
- Поставить галочку «Отображать вводимые знаки».
Забыть сохраненную сеть
Также, можно и полностью забыть сеть Wi-Fi на Windows 10, чтобы компьютер самостоятельно не подключался к ней, когда она снова будет доступна. Чтобы это сделать, пользователю требуется:
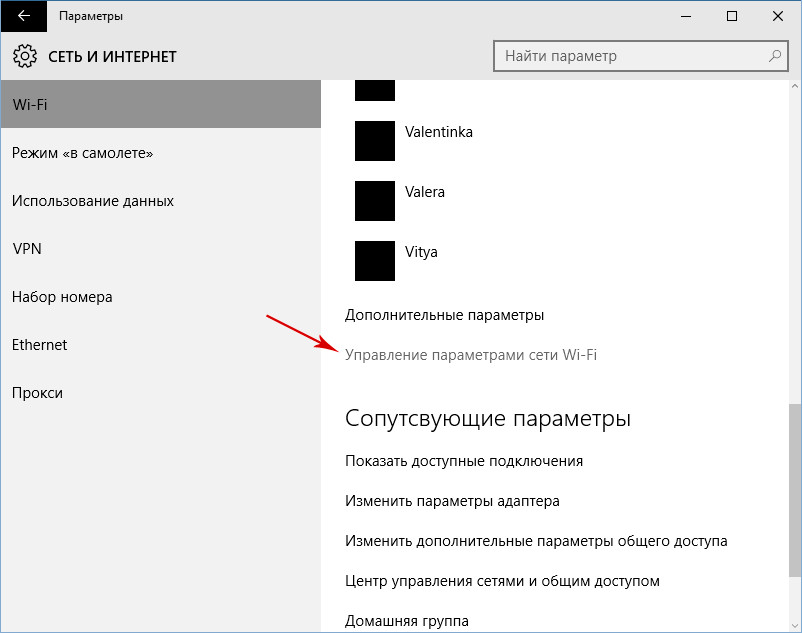
- Перейти в Параметрах системы в раздел Сеть и Интернет и выбрать подраздел Wi-Fi.
- В открывшемся окне нужно перейти по ссылке «Управление параметрами сети Wi-Fi», и пролистать появившуюся страницу вниз.

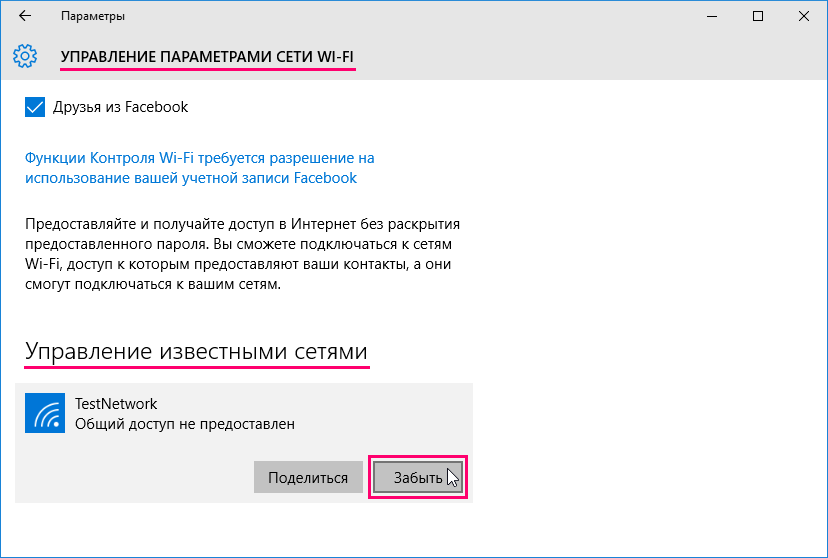
- В списке известных сетей потребуется выбрать ту, которую нужно забыть, и щелкнуть по ее названию один раз. Далее появится кнопка «Забыть», которая и исключит данную точку доступа из списка известных, и Windows не будет самостоятельно выполнять подключение к ней.
Создание новой сети с помощью роутера
В свою очередь, создать Wi-Fi сеть на Windows 10 можно таким же образом, как это делалось в предыдущих редакциях ОС. Данная операция ложится больше не на плечи системы, а зависит от используемого маршрутизатора. Инструкция по созданию и настройки сети всегда имеется в комплекте с роутером, по общим правилам она выглядит следующим образом:
- Пользователю требуется подключить сетевой кабель к роутеру, а само устройство включить в розетку и активировать.
- Дождаться загорания нужных индикаторов на корпусе устройства.
- Перейти к компьютеру и проверить список транслируемых сетей.
- Подключиться к точке доступа, название которой совпадает с наименованием используемого роутера.
- Открыть интернет-браузер и перейти на страницу веб-интерфейса роутера. В зависимости от модели устройства, это может быть адрес «192.168.0.0» или «192.168.0.1», но данный параметр индивидуален для каждого производителя, и здесь лучше воспользоваться инструкцией по эксплуатации.
- Войти в меню роутера, воспользовавшись стандартной парой логин-пароль. Данный параметр также зависит от производителя.
- Воспользоваться мастером быстрой настройки. Данная функция есть у большинства роутеров, в том числе и у бюджетных моделей. Следуя подсказкам программы, пользователь последовательно задаст все нужные параметры сети, в том числе её имя, пароль и количество устройств, которым доступно подключение к данной точке доступа одновременно.
Важно! После того, как настройка будет завершена, сохраните изменения, поскольку многие модели маршрутизаторов имеют свойство сбрасывать параметры до заводских после выключения и не сохраняют указанные данные автоматически.
Также, для доступа к интернету часто требуются действия со стороны провайдера – это также нужно узнавать у компании, предоставляющей доступ к всемирной сети.
Вывод
Итак, Windows 10 предоставляет всё те же инструменты по управлению соединением с Интернетом, что и предыдущие версии ОС. В большей мере отличия заключаются лишь в визуальном оформлении некоторых разделов меню настроек и в их адаптированности под сенсорное управление.