
Universal Plug and Play (UPnP) is a set of networking protocols that allows devices connected to a network to discover each other and establish functional network services. In simpler terms, it allows devices like printers, computers, and games to communicate with each other over a local area network (LAN) more efficiently. UPnP is particularly useful for online gaming and streaming media services, as it can significantly reduce connection issues. If you are using Windows 11 and want to enable UPnP for better network connectivity, this guide will provide detailed instructions.
Understanding UPnP
Before we dive into the enabling process, it’s essential to understand what UPnP does. UPnP works primarily on IPv4 and IPv6 networks. It automates the discovery process for devices on the network, allowing them to configure their own IP addresses and open ports for communication as needed.
Advantages of UPnP
-
Ease of Use: UPnP simplifies the process for users who might not be tech-savvy. It automates many actions required for devices to communicate over a network.
-
Instant Communication: Devices can communicate with each other almost instantly, allowing for fluid online gaming experiences, smooth streaming, and efficient use of shared resources.
-
Adaptability: UPnP also adapts to different network conditions, making it quite flexible in varying environments.
Risks of UPnP
Despite its advantages, UPnP is not without risks. It can expose your network to security vulnerabilities if not configured correctly. Some malware exploits UPnP to gain unauthorized access to networks, so it’s essential to understand how to manage its settings safely.
Pre-requisites
Before you proceed with enabling UPnP, here are a few things you need to consider and check:
-
Network Configuration: Ensure your router supports UPnP. Most modern routers do, but verify the specifications if unsure.
-
Firewall Settings: Ensure that your firewall settings on both Windows 11 and the router will not block UPnP requests.
-
Administrative Rights: You will need administrative privileges to perform some of the steps outlined in this article.
Step 1: Accessing the Router Settings
The first step in enabling UPnP in Windows 11 is to ensure it is enabled on your router. UPnP settings are typically found on the router’s web interface.
-
Find the Router’s IP Address:
- Press
Win + Rto open the Run dialog box. - Type in
cmdand hit Enter to open the Command Prompt. - In the Command Prompt, type
ipconfigand press Enter. - Look for the line that says
Default Gateway; this IP address usually looks something like192.168.1.1or192.168.0.1.
- Press
-
Log into the Router:
- Open a web browser and enter the router’s IP address in the address bar.
- This should take you to the router’s login page. Enter your username and password (common defaults are “admin”/“admin” or “admin”/“password”, but check your router’s documentation if these do not work).
-
Navigate to UPnP Settings:
- Once logged in, look for the UPnP settings. This is typically found under settings labeled as ‘Advanced’, ‘Network’, or ‘WAN Settings’.
- Look for options labeled as “UPnP” or “Universal Plug and Play”. Ensure that the option to enable it is checked.
-
Save Changes:
- After enabling UPnP, make sure to save your changes. The router may need to reboot for changes to take effect.
Step 2: Enabling UPnP in Windows 11
Once UPnP is enabled on the router, you need to check if it is enabled on your Windows 11 machine.
-
Open Settings:
- Click on the Start menu and select Settings (the gear icon), or you can press
Win + I.
- Click on the Start menu and select Settings (the gear icon), or you can press
-
Network & Internet:
- In the Settings menu, click on «Network & Internet».
-
Advanced Network Settings:
- Scroll down to locate the ‘Advanced network settings’ option at the bottom and click on it.
-
Network Adapter Options:
- Under «More Settings,» select ‘Hardware properties’ for your active network adapter (Ethernet, Wi-Fi).
-
Adapter Options:
- In the window that opens, click on ‘Change adapter options’.
-
Access Network Properties:
- Right-click on your active network connection and select ‘Properties’.
-
Internet Protocol Version 4 (TCP/IPv4):
- Scroll down to locate “Internet Protocol Version 4 (TCP/IPv4)”, highlight it and click the Properties button.
- Make sure both options to «Obtain an IP address automatically» and «Obtain DNS server address automatically» are selected.
-
Internet Protocol Version 6 (TCP/IPv6):
- If you wish to enable UPnP for IPv6 as well, follow the same process for “Internet Protocol Version 6 (TCP/IPv6)” if it is listed.
-
Restart Your Computer:
- After making these changes, restart your PC to ensure all settings take effect.
Step 3: Verifying UPnP Functionality
Now that you have enabled UPnP, verifying that it’s functioning correctly is crucial.
-
Run a UPnP Test:
- You can use various online tools to test UPnP functionality. Simple web-based UPnP testing tools will try to detect whether UPnP is enabled.
- Just type «UPnP test» in your browser’s search engine, and select one of the tools available.
-
Use a UPnP-enabled Application:
- Applications like games (e.g., Fortnite) often prompt for UPnP configurations. Launch such an application and see if it successfully communicates with the online services.
Troubleshooting UPnP
If you encounter issues after enabling UPnP, here are some troubleshooting tips:
-
Router-related Issues:
- Not all routers support UPnP fully. Check for firmware updates, since routers may have bugs or limitations with certain versions.
-
Firewall Settings:
- Ensure that neither the Windows Firewall nor any third-party firewall is blocking UPnP services. You can temporarily disable the firewall to see if that resolves your issues, but remember to enable it afterward.
-
Network Reset:
- If problems persist, consider performing a network reset. This can often resolve odd networking issues but will remove all saved Wi-Fi networks and VPN settings.
-
Contact Router Manufacturer Support:
- If none of these solutions work, you may want to reach out to your router’s customer support for assistance.
Additional Security Measures
Given the security concerns associated with UPnP, consider these precautions:
-
Regularly Update Firmware:
- Keeping your router’s firmware updated can mitigate many vulnerabilities.
-
Restrict External Access:
- If possible, restrict UPnP usage to only those applications that require it.
-
Consider Alternatives:
- If UPnP is causing security concerns, consider using manual port forwarding for specific applications.
-
Disable UPnP when not in use:
- If you’re not actively using applications that rely on UPnP, consider disabling it to secure your network.
Conclusion
Enabling UPnP on Windows 11 can significantly enhance your network experience by allowing for seamless communication between devices. With the steps outlined in this article, you should now be able to enable UPnP on both your router and your Windows 11 machine with confidence. However, always keep in mind the potential security risks and take necessary precautions to protect your network. By making informed decisions regarding UPnP configuration and security, you can enjoy the benefits of smoother connectivity while minimizing potential risks.
Universal Plug and Play (UPnP) is a protocol that enables devices on a network to discover each other and establish functional network services for data sharing, gaming, and multimedia applications. For gamers and home networking enthusiasts, enabling UPnP can significantly enhance connectivity with online services, optimize device communication, and reduce the complexities of manual port forwarding.
This guide will walk you through enabling UPnP on Windows 11, providing detailed steps, troubleshooting tips, and additional information about the UPnP protocol and its benefits.
Understanding UPnP
Before diving into the steps to enable UPnP on Windows 11, it is essential to understand what UPnP is and why you might want to use it.
What is UPnP?
UPnP is a set of networking protocols that enables networked devices to seamlessly discover and communicate with one another. Frequently used in home networks, it allows for automatic port forwarding and connections without the need for deeply technical knowledge or configurations.
Benefits of UPnP
-
Ease of Use: UPnP eliminates the need for manual port configuration, making it user-friendly for those unfamiliar with network settings.
-
Automatic Device Discovery: IP-connected devices (like printers, smart TVs, and gaming consoles) can find and connect with each other automatically.
-
Port Forwarding: For applications that require specific ports to be open, UPnP can automatically open these ports as needed, improving the performance of applications such as online games and VoIP services.
-
Enhanced Connectivity: UPnP allows devices to maintain a consistent connection, thus reducing lag and improving performance during data-intensive tasks.
Preparing to Enable UPnP on Windows 11
Though enabling UPnP is generally straightforward, it’s crucial to ensure that your system and network are ready:
-
Check Your Router: The first step is to ensure that your router supports UPnP. Most modern routers do, but you may have to enable it through the router’s settings.
-
Install Windows 11 Updates: Before proceeding, ensure your Windows 11 installation is up to date to avoid compatibility issues.
-
Network Configuration: Verify that you are connected to the correct network. If you’re using multiple connections (like Ethernet and Wi-Fi), ensure you’re on the desired network.
Steps to Enable UPnP on Windows 11
Accessing Network Settings
-
Open Settings: Click on the Start button (Windows icon) on your taskbar, or use the keyboard shortcut
Win + Ito open the Settings app. -
Navigate to Network & Internet: In the Settings window, select the «Network & Internet» option from the left sidebar.
-
Select Advanced Network Settings: Scroll down and click on «Advanced network settings.»
-
Access Network Adapter Options: Click on «Hardware properties» beneath your active network (Ethernet or Wi-Fi), or go to «Network and Sharing Center» by scrolling down and selecting it.
Enabling UPnP via Windows Features
-
Control Panel: First, you’ll need to access the Control Panel. You can search for it by typing “Control Panel” in the Windows search bar.
-
Programs and Features: In the Control Panel, navigate to “Programs” and then click on “Turn Windows features on or off.”
-
Locate Simple Service Discovery Protocol: In the Windows Features window, look for the «Simple Service Discovery Protocol (SSDP)». This service is related to UPnP.
-
Enable the Service: If the SSDP option is unchecked, check it and click «OK.» Windows will install the necessary components; this can take a few minutes.
-
Restart Your Computer: It’s advisable to restart your computer after enabling SSDP to ensure all services are properly started.
Enabling UPnP on Your Router
To fully utilize UPnP, you also need to enable it directly on your router.
-
Access Router Settings: Open a web browser and type in your router’s IP address into the address bar. Common addresses are
192.168.1.1or192.168.0.1. You can check your router’s documentation or useipconfigin the command prompt to find your gateway address. -
Log In: Enter your router’s admin username and password. If you haven’t changed these from the default, refer to the router’s manual or search online for the default credentials.
-
Find UPnP Settings: Navigate to the network settings menu. The exact location may vary by manufacturer, but look for a section labeled UPnP, Advanced Features, or similar.
-
Enable UPnP: Find the toggle or checkbox for UPnP and enable it. Save the settings and reboot your router if prompted.
-
Confirm UPnP is Active: After rebooting the router, you can access UPnP settings again to confirm that it remains enabled.
Verifying UPnP Functionality
After enabling UPnP settings on both your Windows 11 device and your router, it’s essential to verify that everything is working as expected.
Using a UPnP Tester Tool
-
Download a UPnP Tester: You can find various UPnP testing applications online. Tools like «UPnP Tester» or «Simple Port Tester» can help you assess UPnP functionality.
-
Run the Tool: Open the application and follow the prompts to test UPnP on your network. It will display information regarding open ports and connections.
-
Check Results: If the tool verifies that UPnP is enabled and functional, you’re all set! If not, double-check the router and Windows settings.
Common Troubleshooting Tips
There may be occasions when UPnP does not work as expected. Here are some common troubleshooting steps:
Verify Router Settings Again
- Double-Check UPnP: Make sure that UPnP is still enabled on your router after rebooting.
- Firmware Update: Ensure your router has the latest firmware. Outdated firmware can lead to connectivity issues.
Disable Firewall or Antivirus
Sometimes, firewalls or antivirus software can interfere with UPnP functionality.
- Temporarily Disable: Try disabling any third-party firewall or antivirus software temporarily to see if it resolves UPnP-related issues.
- Windows Firewall Settings: Ensure UPnP is allowed through the Windows Firewall by going to Control Panel > Windows Defender Firewall > Allow an app or feature through Windows Defender Firewall.
Recheck Network Connection
- Reconnect to Your Network: Disconnect and reconnect to your network. Sometimes a simple reconnection can solve connectivity issues.
- Switch Networks: If possible, switch to another network to check if the issue is with the local network or the device itself.
Use Static IP Address
If you’re experiencing persistent issues with UPnP:
- Set Static IP: Assign a static IP to your computer through the network settings.
Consult Router Manufacturer
If all else fails and UPnP remains problematic, consider contacting your router manufacturer for support or consult their online documentation.
Security Considerations
While UPnP offers great convenience, be aware of the potential security risks:
-
Network Vulnerability: An enabled UPnP can become a vector for attacks if not secured properly, especially on less secure networks.
-
Unauthorized Access: Devices on a network may inadvertently expose themselves to unauthorized access if UPnP rules are misconfigured.
Best Security Practices:
-
Keep Firmware Up to Date: Regularly update your router and device firmware to mitigate vulnerabilities.
-
Disable UPnP When Not in Use: If you don’t require UPnP for specific applications, it’s best to disable it. This reduces potential attack surfaces for hackers.
-
Use Strong Passwords: Ensure your router and devices have strong, unique passwords to prevent unauthorized access.
-
Periodically Check Connected Devices: Regularly inspect devices connected to your network and remove any that are unfamiliar or unauthorized.
Conclusion
Enabling UPnP on Windows 11 can significantly enhance your network experience by allowing devices to discover and connect with each other more efficiently. With UPnP enabled, many applications—particularly in gaming and multimedia—can run with improved performance.
By following this guide, you should be well-equipped to enable UPnP on Windows 11, configure your router settings, and troubleshoot any issues that may arise. Always remember to weigh the convenience of UPnP against the potential security risks, applying best practices to keep your network protected.
If you encounter persistent issues or have additional questions about UPnP or network configurations, don’t hesitate to reach out to community forums or professional support. Happy networking!
-
Home
-
News
- How to Enable Universal Plug and Play? Here’s A Detailed Guide!
By Aurelie | Follow |
Last Updated
You may try to enable UPnP to improve your game experience but do you know what it is and how to enable it on your device? This post on MiniTool Website will teach you how to enable UPnP step by step.
What Is UPnP?
UPnP is short for Universal Plug and Play and it is a protocol that allows applications and other devices on your network to open and close ports automatically to connect with each other. UPnP is so convenient because none of the devices on your network need configuring manually to discover a new device.
UPnP can be used in the following situations:
- Streaming content with a media server
- Streaming online games
- Remote home surveillance
- Digital home assistants
Although it has so many advantages, its shortcoming is pretty evident. UPnP can be used by a malicious application to influence the computer with malware because of the open nature of architecture. This will threaten the devices that are used on a public network while it is harmless on a home network.
After having a basic understanding of UPnP, let me walk you through how to enable it on different devices.
How to Enable UPnP on Router?
At first, you need to enable UPnP on the homepage of your router. Here’s how to enable it on different types of routers.
Tips:
If you cannot see your router brand below, don’t worry! All the instructions are similar on different devices. You can change them a bit to make them work for you.
TP-Link
Step 1. Log in as an administrator.
Step 2. Go to Advanced > NAT Forwarding >UPnP.
Step 3. Turn on UPnP.
Tips:
Some TP-Link routers don’t require you to go to the Advanced option, so you can skip this step.
D-Link
Step 1. Log in as an administrator.
Step 2. Hit ADVANCED NETWORK or UPNP SETTINGS from the left side.
Step 3. Tick Enable UPnP and hit Save Settings.
Tips:
You may also go to Tools > Misc > hit Enabled from UPnP Settings > Apply & OK.
ASUS
Step 1. Enter the router username and password.
Step 2. Go to Advanced Settings > Wan > Internet Connection > Tick Yes beside Enable UPnP > hit Apply.
Google Fiber
Step 1. Sign in to Fiber.
Step 2. Tap on Network > Advanced > Ports > toggle on Universal Plug and Play > hit Apply.
How to Enable UPnP on PC/PlayStation/Xbox?
After turning on UPnP on the router, you also need to enable it for Windows, Xbox or PlayStation. Here’s how to enable UPnP Windows 10/11/8/7, Xbox and PlayStation.
How to Enable UPnP Windows 11/10/8/7?
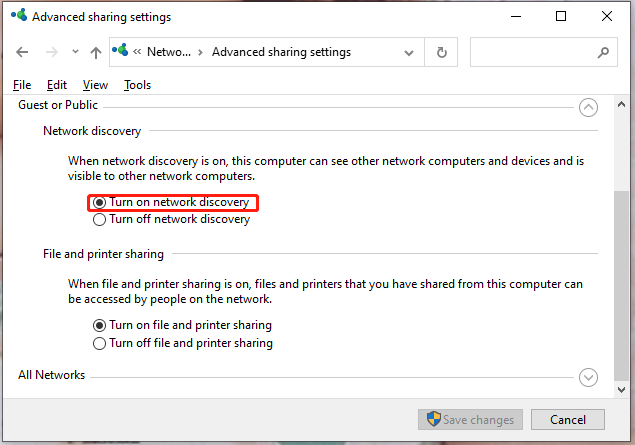
Step 1. Open your Control Panel and go to Network and Internet.
Step 2. Go to Network and Sharing Center > Change advanced sharing settings.
Step 3. Under Network discovery, tick Turn on network discovery and hit Save changes. Now, UPnP has been enabled on your device.
How to Enable UPnP on PlayStation?
Unlike any other console, PlayStation can automatically detect and apply the network configuration settings. Therefore, you only need to power cycle your console after configuring the router as indicated above.
How to Enable UPnP on Xbox?
UPnP will be automatically enabled on Xbox after you enable it from the router. If the NAT type is running in Open NAT, it means that UPnP is enabled.
Step 1. Go to Settings > Networks > Setup New Wireless Network.
Step 2. Under Troubleshooting, choose Test NAT type and it will automatically configure the device to run on an Open NAT. Then, UPnP will be enabled on your device.
You may be interested in: How to Fix UPnP Not Successful Xbox One Error [Quickest Fix]
About The Author
Position: Columnist
Aurelie is a passionate soul who always enjoys researching & writing articles and solutions to help others. Her posts mainly cover topics related to games, data backup & recovery, file sync and so on. Apart from writing, her primary interests include reading novels and poems, travelling and listening to country music.
Allows UPnP devices to be hosted on your computer. If this service is stopped, any hosted UPnP devices will stop functioning and no additional hosted devices can be added. If this service is disabled, any services that explicitly depend on it will fail to start.
This service also exists in Windows 10, 7, 8, Vista and XP.
Startup Type
| Windows 11 version | Home | Pro | Education | Enterprise |
|---|---|---|---|---|
| 21H2 | Manual | Manual | Manual | Manual |
| 22H2 | Manual | Manual | Manual | Manual |
| 23H2 | Manual | Manual | Manual | Manual |
| 24H2 | Manual | Manual | Manual | Manual |
Default Properties
| Display name: | UPnP Device Host |
| Service name: | upnphost |
| Type: | share |
| Path: | %WinDir%\system32\svchost.exe -k LocalServiceAndNoImpersonation -p |
| File: | %WinDir%\System32\upnphost.dll |
| Error control: | normal |
| Object: | NT AUTHORITY\LocalService |
| Privileges: |
|
Default Behavior
The UPnP Device Host service is running as NT AUTHORITY\LocalService in a shared process of svchost.exe. Other services might run in the same process. If UPnP Device Host fails to start, the error is logged. Windows 11 startup proceeds, but a message box is displayed informing you that the upnphost service has failed to start.
Dependencies
UPnP Device Host is unable to start, if at least one of the following services is stopped or disabled:
- HTTP Service
- SSDP Discovery
Restore Default Startup Type for UPnP Device Host
Automated Restore
1. Select your Windows 11 edition and release, and then click on the Download button below.
2. Save the RestoreUPnPDeviceHostWindows11.bat file to any folder on a local drive such as SSD or a hard disk.
3. Right-click the downloaded batch file and select Properties.
4. Check the Unblock checkbox and click OK.
5. Right-click the batch file again and select Run as administrator.
6. Restart the computer to save changes.
Note. Make sure that the upnphost.dll file exists in the %WinDir%\System32 folder. If this file is missing you can try to restore it from your Windows 11 installation media.
Yea, though I walk through the valley of the shadow of death, I will fear no evil: for thou art with me; thy rod and thy staff they comfort me.
Universal Plug and Play (UPnP) is a way for devices on a network to find each other and share resources without any action on your side. It makes connecting devices and forwarding ports much easier, but it can also open doors for many security problems. In this guide, we’ll talk about why turning off UPnP can sometimes be something you should do and show you how to disable it on Windows 11.
Also see: 30+ Windows 11 Services to Disable for Gaming Performance
The risks of having UPnP enabled all the time
UPnP makes port forwarding and communication between devices easier and automatic, but it’s not always a good practice. The following are some problems that UPnP can cause when left enabled:
- UPnP doesn’t check who’s trying to connect, so any device can hop on and mess with your devices.
- It can open up pathways in your router all by itself, which might let hackers sneak in and steal your data.
- Since every device might do UPnP differently, there could be weak spots that hackers can use to break into your network.
- Internet of Things (IoT) devices love UPnP for easy setup, but their security isn’t always strong and they are often the easy targets.
Because of these issues, turning off UPnP can, in a sense, help keep your network and personal info safe.
Recommended guide: How to Disable Proxy Settings in Windows 11/10 Permanently
Disabling UPnP in Windows 11
Method 1: Using the Services application
Here’s how to stop UPnP on your Windows 11 PC using the Services app:
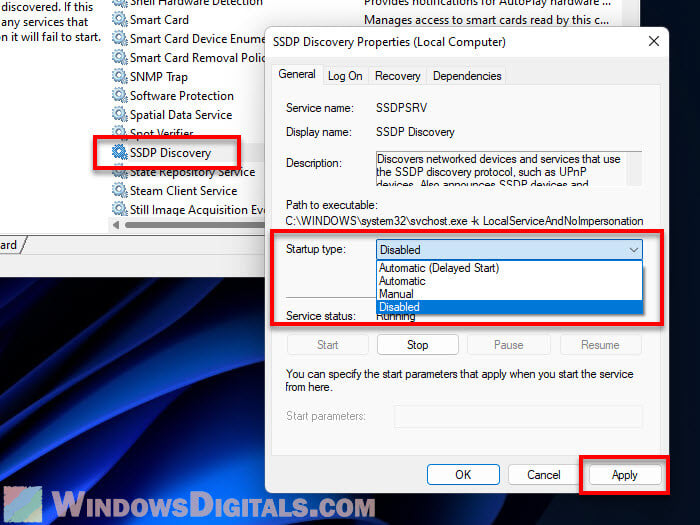
- Open the Services app: Press Win + R, type services.msc, and click OK.
- Find the SSDP Discovery Service: This service handles UPnP in Windows.
- Turn off the SSDP Discovery Service: Right-click it, choose Properties, set Startup type to Disabled, stop it if it’s running, and hit OK.

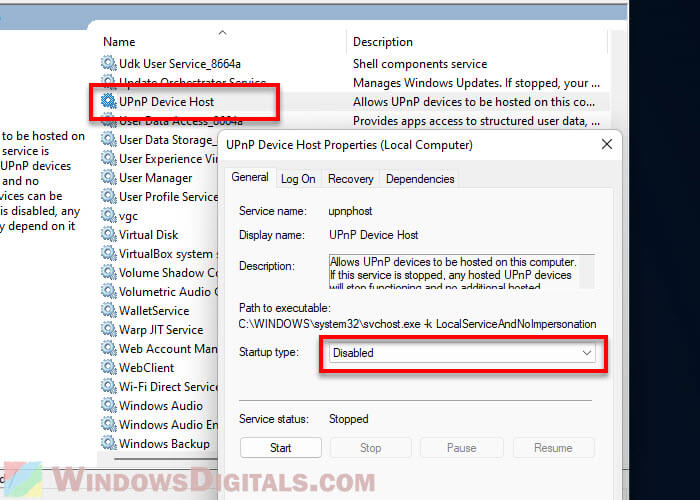
- Find the UPnP Device Host service: This service lets your PC host UPnP devices.
- Turn off the UPnP Device Host service: Right-click, go to Properties, set to Disabled, stop it if needed, and click OK.

- Close the Services window.
Related resource: How to Disable VPN in Windows 11
Method 2: Using the Registry Editor
You can also turn off UPnP using the Registry Editor, but be careful because messing up the registry can cause very serious problems. Always create a system restore point or back up your registry first.
- Open the Registry Editor: Press Win + R, type regedit, and click OK. If asked, say Yes.

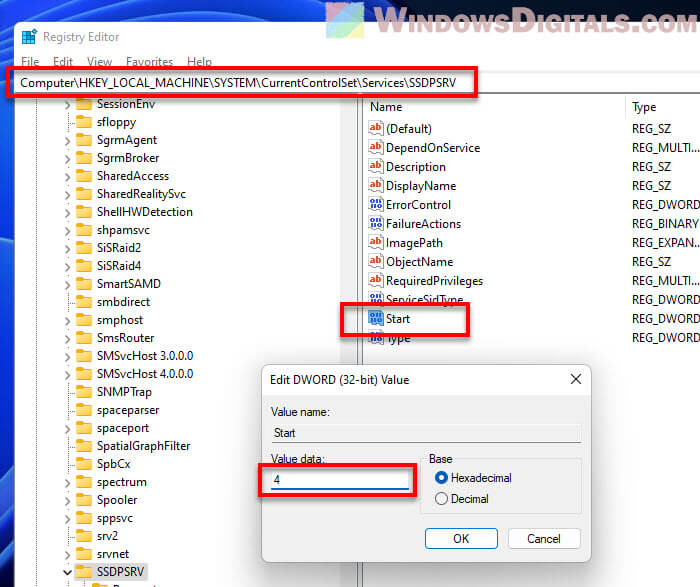
- Go to the SSDP Discovery Service key:
HKEY_LOCAL_MACHINE\SYSTEM\CurrentControlSet\Services\SSDPSRV
- Change the Start value: Double-click Start, set it to 4 (Disabled), and hit OK.

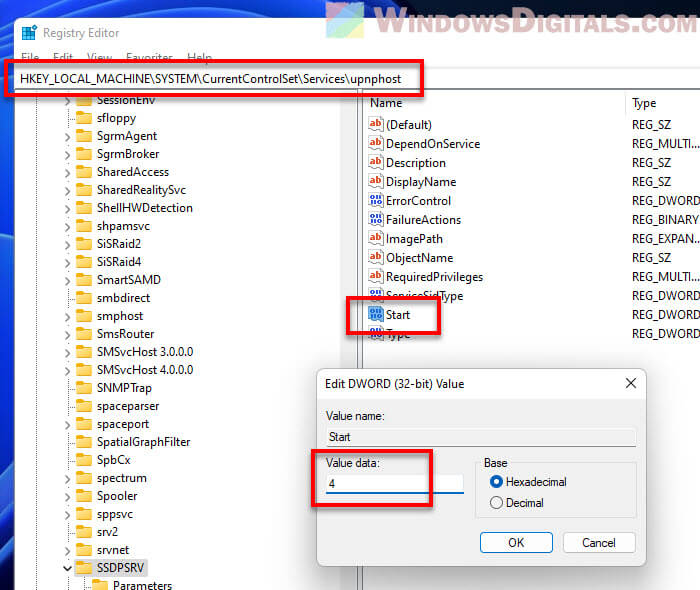
- Go to the UPnP Device Host service key:
HKEY_LOCAL_MACHINE\SYSTEM\CurrentControlSet\Services\upnphost
- Change the Start value: Double-click Start, set it to 4, and click OK.

- Close the Registry Editor.
- Restart your PC.

More ways to keep your network safe
Turning off UPnP on Windows 11 is a good start to better protect your home network. But, there’s more you can do to make it even safer. The following are things you should consider:
- Make sure your router’s software is always the latest. This helps fix security weak spots.
- Change your router’s factory-set login info to something only you know. This keeps strangers out.
- If you can, turn on WPA3 encryption for your Wi-Fi. It’s the newest and most secure. If not, WPA2 is still good.
- Turn off the option to change your router settings over the internet. This stops hackers from messing with your network from far away.
- Use a really strong Wi-Fi password. Make it something unique and tough to guess.
- Set up a separate Wi-Fi for guests. It can keep your main network safer.
- Don’t use Wi-Fi Protected Setup (WPS). It’s meant to make connecting devices easy, but it can also make it easy for hackers.
- Keep all your devices and drivers updated. This closes loopholes hackers might exploit.
- Adding a firewall to your network is like having a guard. It watches for trouble coming in or going out and stops it.
- Think about using a VPN. It scrambles your internet traffic, making it hard for hackers to spy on you.
What you might miss without UPnP
Before disabling UPnP, I think it’s important that you know what you might miss without UPnP. It’s pretty much about making things easier for you. UPnP helps your devices to find each other and communicate without any work from your end. This comes in very handy when you’re setting up things like printers, gaming consoles, and all those smart gadgets at home quickly. Without UPnP, you might end up having to manually input the settings, which is usually quite time-consuming.
However, having UPnP enabled means you might have certain security risks in your network. Though, most people actually neglect this and keep their UPnP on all the time. If you value your security more and you don’t actually use UPnP at all, you might want to just turn it off.