
Hello fellow sys admins! In the following article, we will walk through an in-place upgrade from Windows Server 2008 R2 to 2012 R2. So let us dive right in.
The first step in any upgrade is to get the Installation Media. If you are using a Virtual Machine, then it’s as simple as adding the ISO to the Virtual CD-R Drive, either using the Hyper-V machine settings or the VMware console. If you are upgrading a physical server, then just unpack the ISO and copy it to either a secondary drive or flash drive, or you can just run it from a network share.
In our scenario, I am running the installation from a network share. In both cases, the upgrade process is the same; there is no difference between the VM OS or physical server OS as we all know so well.
Therefore, as I mentioned before. I have unpacked the ISO using WinRAR.
Afterwards, I just ran the setup.exe from inside the OS. A small tip is to make sure you don’t have any other users logged into the server in any way, RDP or console, since the prerequisite check will fail and you will have to go through the setup again.
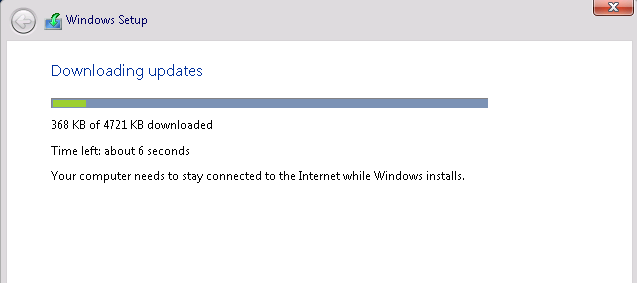
Once in the Setup Wizard, we will download the latest updates, which are required in order to bring the server to the latest compatible state for upgrading to Windows Server 2012 R2. This is a very important step, which most people choose to ignore, but it will save you a lot of hassle after you upgrade.
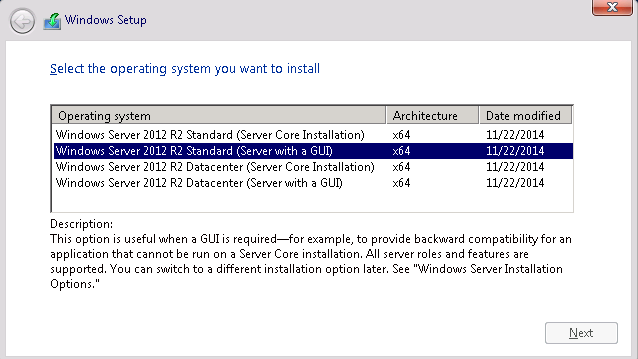
Next, we will choose the version of Windows Server 2012 R2. In our case, we are going from Windows Server 2008 R2 Standard Edition to Windows Server 2012 R2 Standard Edition.
Afterwards, we read the EULA from top to bottom, since it is very important. Hit Next and we then get to the eternal crossroad, where we have to choose whether to upgrade or to format. Since we want to upgrade, we will of course choose Upgrade!

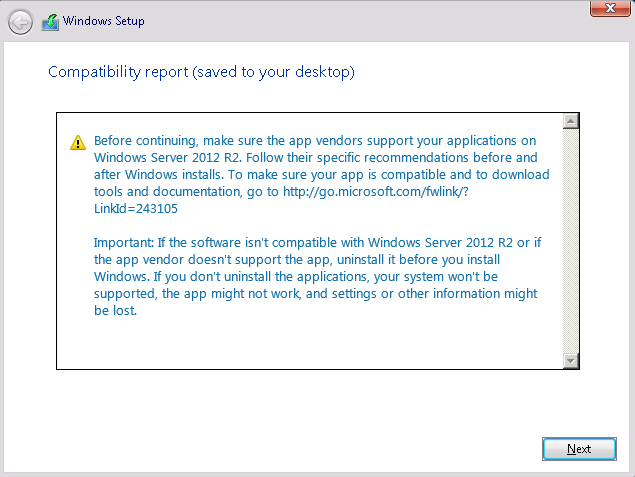
Once Upgrade is selected, there is no going back. The train has left the station. The Upgrade process has commenced. Well, not really. First, it’s going to do the compatibility check, and if all goes well, you will be greeted with the following screen.
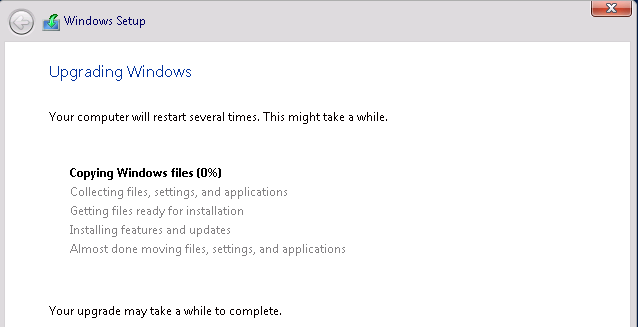
Then we hit Next, take a deep breath and watch and wait as the new version of Windows is being installed on top of our old one.
If everything goes well, we will be greeted with the Windows Server 2012 R2 loading screen and the Finalizing Settings window. This process will take a while, so even if at times it appears to be doing nothing, go take a break, come back later and then login to your new OS.
Thank you for taking this journey with me through the Upgrade of Windows Server 2008 R2 to Windows Server 2012 R2. Until next time! Enjoy!
In this post we will see how to upgrade Windows Server 2008 R2 to Windows Server 2012. It’s been an year that Microsoft has released Windows Server 2012, when Windows Sever 2012 was released the IT professionals were eager to know what’s new in Windows Server 2012 and i was one of them. Microsoft releases all of its operating systems in multiple editions, which provides consumers with varying price points and feature sets. While choosing the edition make sure you choose the edition that suits your requirements. Before we go ahead and deploy Server 2012, let’s take a look at editions of Windows Server 2012.
1) Windows Server 2012 Datacenter Edition – The Datacenter edition is designed for large and powerful servers with up to 64 processors and fault-tolerance features such as hot add processor support. This edition is available only through the Microsoft volume licensing program and from original equipment manufacturers bundled with a server.
2) Windows Server 2012 Standard Edition – This is a fully functional edition of Windows Server 2012. Frankly speaking there is no much difference between Datacenter and Standard Edition of Windows Server 2012. What differentiates these 2 editions is the number of virtual machine instances that is permitted by the license. A Standard edition license will entitle you to run up to two VMs on up to two processors. A Datacenter edition license will entitle you to run an unlimited number of VMs on up to two processors.

3) Windows Server 2012 Essentials – The Essentials edition is suited for small organizations, this edition includes all the features of Standard and Datacenter edition except the Server Core, Hyper-v and ADFS (Active Directory Federation Services).
4) Windows Server 2012 Foundation – This edition is designed for small businesses that require only basic server features such as file and print services and application support. The edition includes no virtualization rights and is limited to 15 users.

If i were to upgrade my existing windows server 2008 R2 Enterprise server to windows server 2012 i would first choose the edition and then i would check the upgrade paths. I have created a table which shows whether you can upgrade to windows server 2012 with you present operating system.

Lets take a look at hardware requirements for upgrading our server to windows server 2012. Windows Server 2012 requires minimum of 16 GB to 32 GB of disk space. When you install Windows Server 2012 it occupies 15.1 GB of space approximately but its good to allocate at least 32 GB of drive space for Windows Server 2012. You would require 1.4 GHz 64-bit processor, 512 MB of RAM, 32 GB of disk space, DVD Drive, Super VGA (800×600) or higher resolution monitor, keyboard and mouse.
The Windows Server 2012 evaluation software is available in Standard and Datacenter editions, you can download Windows Server 2012 from here :- http://technet.microsoft.com/en-in/evalcenter/hh670538.aspx.
In this post i will be showing you how to upgrade a windows server 2008 R2 Enterprise SP1 to Windows Server 2012 Datacenter. Note that the existing server is in workgroup, do not consider this post to upgrade your domain controller to windows server 2012. I will be creating a separate post to show the upgrade of domain controller running on windows server 2008 r2 to windows server 2012.

Insert the windows server 2012 DVD into the DVD-ROM and click on Run Setup.exe.

On the Windows Setup screen, click on Install now.

If you want to get security updates and latest drivers for your operating system select Go online to install updates now. We can also do a windows update once the upgrade is completed, so select No, Thanks.

Enter your product key for windows server 2012 and click on Next. In this step i have entered server 2012 Datacenter edition key. Click on Next.

Server core installation has no Server Manager or any other MMCs to manage roles and features. The management must be done either remotely from a client machine or through the command prompt or Powershell at the console. There is no Start menu, no desktop Explorer shell, no Microsoft Management Console, and virtually no graphical applications. All you see when you start the computer is a single window with a command prompt. In this step i will select the second installation mode, Windows Server 2012 Datacenter (Server with a GUI). Click on Next.

Select Upgrade: Install Windows and Keep files, settings and applications. This will keep existing files, settings and applications and upgrade our server to windows 2012.

The upgrade will take close to 20 minutes. Sit back and relax until the upgrade is complete.

The upgrade from windows server 2008 R2 Enterprise to windows server 2012 Datacenter is complete. Let’s login to the server and check for the edition.

Click on Server Manager, Click on Local Server, check the properties of server. We see that the operating system version is Microsoft Windows Server 2012 Datacenter. The upgrade process has been completed successfully.

Still Need Help?
If you need further assistance on the above article or want to discuss other technical issues, check out some of these options.
Here is smooth tutorial on how to upgrade and migrate you Windows Server 2008 or 2008 R2 to Server 2012.
A lot of people/business would like to upgrade their server system but would not want to loose all their comfigurations. So i presume here an helpful tutorial to help you Upgrade and Migrate without loosing your configurations.
NOTE: You can use this same process to;
- Upgrade/Migrate Server 2003 SP1 to Server 2008
- Upgrade/Migrate Server 2003 SP1 to Server 2008 R2
- Upgrade/Migrate Server 2003 SP1 to Server 2012
- Upgrade/Migrate Server 2008 to Server 2008 R2
- Upgrade/Migrate Server 2008 to Server 2012
- Upgrade/Migrate Server 2008 R2 to Server 2012
Following their precise Editions.
Follow the Step below gently;
Step 1 – Insert your installation disc – Window Server 20l2
Step 2 – Make sure your Forest and Domain functional level is set to Server 2003 or higher
Step 3 – Open your installation folder and switch to Support\adprep\ folder – you would see adprep.exe
Step 4 – Open the Command Prompt and Drag the adprep.exe application to it
Step 5 – Hit space and type /forestprep then hit Enter
(You should get a success message)
Step 6 – In the same command prompt, drag the adprep.exe application again, hit space and type /domainprep then hit Enter.
(You should get a success message)
Step 7 – After you’re done. Run the Window Server 20l2 from “My Computer Window” and start your upgrade.
NOTE: Don’t go for new/fresh installation. Go for Upgrade.
System Requirements for Windows Server 2012
Processor – 1.4 GHz (64-bit processor) or faster for single core
RAM – 2 GB
Hard-Disk – 160 GB hard disk with a 60 GB system partition
It should take appoximately 30mins depending on the speed of your System.
Thanks, If this worked for you. Please Comment | Share | Subscribe
If you don’t get the steps, See a video tutorial below;
Watch Video Tutorial
1. Make sure that your current hardware supports Windows server 2012 as per the MS recommendation.
Important: Make sure that the replication between all your DC are working properly, else you will fails to complete the below operations.
2. Before performing the upgrade, you must prepare your forest and domain for the changes. It can be achieved by using the command ‘ADPREP‘. ADPREP is a command line utility which will extends the Active Directory schema, and updates permissions as necessary to prepare a forest and domain for a domain controller. In order to run the commands you must locate it from your server installation CD. Insert your Windows server 2012 installation CD and locate the directory using command prompt. In my case the installation CD is located in D drive and command will be cd D:\support\adprep press ENTER or open the directory and drag and drop the tool adprep from the location(D:\support\adprep) into command prompt.
a) Now run this command in your forest root server and prepare the forest for upgrade. adprep /forestprep press ENTER. You will have warning message before this operation, type C and press ENTER to continue with the operation( You must be a member Schema Admins and Enterprise Admins groups to perform this action)
Once the operation is completed you will have the below screen.
b) Now prepare your domain for upgrade. On the same command prompt type adprep /domainprep and press ENTER. This operation will complete comparatively faster than the forest preparation.
3. Replicate these changes to your additional domain controllers as well. On command prompt type RepAdmin /SyncAll /AdePand press ENTER. Wait few seconds to complete and make sure succeeds.
4. Completing the above steps makes your server to be capable for upgrade. Now reboot your server from Windows server 2012 installation CD or open the CD drive and double click on SETUP.EXE to start with OS installation/upgrade.
5. Click on Install now and continue.
6. Here you need to specify either you want to perform a windows update before upgrade process or not. It is recommended to perform windows update before upgrade process, else you can skip this. I have my latest update installed so skipping this operation by selecting No Thanks.
7. Enter the product key and click Next to continue.
8. Select the operating system that you want to install and click Next. Note that you will not be able to upgrade from a lower edition to higher edition of OS. Means, if you have windows server 2008 R2 standard edition installed then you will not be able to upgrade to Datacenter edition of 2012. Here my existing server is datacenter edition so I will select as Windows server 2012 datacenter(Server with GUI).
9. Accept the License terms and click Next.
10. Next step actually determines whether it’s an installation or Upgrade. Click Upgrade: Install windows and keep files, settings and application.
11. Now it will perform a compatibility check and this must be passed in order to continue. If it detects any applications to be uninstalled or any other changes requires it will show and you need to exit and make the necessary changes.
Note: Upgrade process will fail if we need to make any changes before upgrade and it can be viewed on Compatibility report window. Also the report will be saved automatically on your desktop for you reference.
Assuming everything is OK and click Next to continue,
12. The upgrade process will start and we need to wait until the operation completes. The server will restart multiple times during this process.
13. Now that’s it the upgrade process. Please note that this may take few hours to complete based on the features and application that is already existing on your server. For me it has taken about 1.5 hours to complete this operation but again it depends on your hardware efficiency. Please note that during the automatic reboot of your server it will prompt with Windows boot manager, you do not want to interrupt the operation and it will continue automatically.
Have a comment or points to be reviewed? Let us grow together. Feel free to comment.
How to Upgrade an Existing Windows Server 2008 Domain to Windows Server 2012 R2 Domain
Nobody will forget the about “DCPROMO.exe” which was used by almost all the administrator to add or build a standalone server in to a domain controller. But as you know we are growing with new technologies and functions it is now the end of DCPROMO.exe and now AD and Domain is a service and so it is a role based function.
We can use the “netdom query FSMO” command to find the FSMO role of the Domain Controllers involved in the present domain environment and if required we can use “Move-ADDirectoryServerOperationMasterRole” PowerShell command, for more details: https://technet.microsoft.com/en-us/library/ee617229.aspx .
We can also use adprep.exe to prepare the schema of the domain environment. Here are the commands used for preparing the domain Schema.
1.adprep /forestprep
2.adprep /domainprep /gpprep
3.adprep /rodcprep
for more details: https://technet.microsoft.com/en-us/library/cc731728.aspx .
According to the understanding and experience it is proven that pre windows 2008 operating system, we need to manually move the FSMO role which upgrading or demoting the domain controller and also we need to manually run the adprep.exe command switches to prepare the schema.
But in Windows Server 2012 R2, the Death of DCPROMO and the Birth of Role based function to promote a standalone server to Domain Controller, the above mentioned two task like DCPROMO and adprep, will performed automatically by the Role based promotion.
Now we can follow the steps to promote a server to Domain Controller.

Click add roles and features from server manager

Click Next

Select Role based or feature based installation

Click Next

Select Active Directory Domain Services

After click the install button it will take some time to install all the necessary components for converting a normal workgroup server to become a domain controller, it is now easy for you to promote this server to a domain controller.

Click Promote this server to a domain controller

Here we have 3 options 1. Add a domain controller to an existing domain 2. Add a new domain to and existing forest 3. Add a new forest. Choose according to your environment and installation.
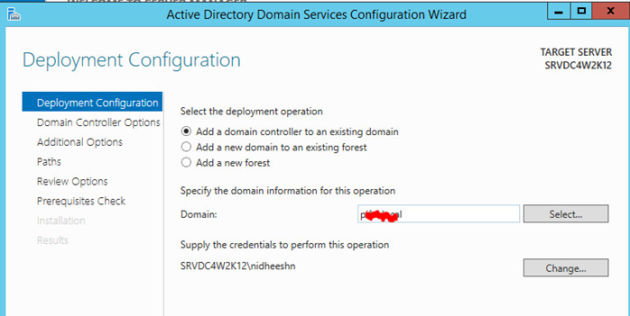
We will select option 1. Add a domain controller to an existing domain and click select button to select the existing domain in your environment


If required you can click the change button to provide the right credential for the domain controller to add this standalone server to became a domain controller.

If credential and other parameters are provided correctly then you will be prompted with the screen above and let you specify by selecting the proper capabilities of the domain controller like DNS, GC or RODC to the server you are going to build or add and here you have can also select the site if you have multiple site.

If you select RODC and you don’t have one in your environment then it will not be able to retrieve the information and if you add and click next or install then latter this domain controller will became your first RODC in your environment.

Here you can specify from where you want to replicate your new domain controller either by selecting the existing domain controller or form an installation media which means you can back up a copy of your domain controller information, which is useful if you have a reachability issue on the time of installation like branch office or other geographical location connectivity etc.

If required you can specify the location of the AD DS database, log files and SYSVOL etc.

Click Next

This is a summary of the installation based on the parameters you provided in the wizard.

You can also view script button to view the PowerShell script for the entire process.

Here it will check all the prerequisite and inform you if anything is missing and based on the errors and warning you can decided whether to correct or continue. There is an option to rerun the prerequisite check.

Upon click install from the previous screen you will be prompted the above screen.

Here you will see the progress for your new domain controller, you can close the screen here and after the replication and installation of the components the server will reboot.

After rebooting the server this will became a domain controller.

And that it, you will have new brand new Windows Server 2012 R2 Domain Controller, Please login …

And here is the new domain controller and explore the new features. Reset is history and how to use the new features and functions are beyond the scope of the article and if necessary we can discusses.