
How to Upgrade Windows 10 to Windows 11 Without Losing Data
Upgrading your operating system doesn’t have to be stressful. If you’re planning to upgrade Windows 10 to Windows 11 without losing data, this guide is here to help. By following these simple steps, you can transition seamlessly while preserving your files, apps, and settings.
Why Upgrade Windows 10 to Windows 11 Without Losing Data?
The decision to upgrade comes with exciting benefits. Windows 11 introduces a fresh interface, advanced gaming features, and enhanced security. However, ensuring a smooth process without data loss is essential. By learning how to upgrade Windows 10 to Windows 11 without losing data, you’ll avoid unnecessary hassles and keep your important files intact.
Step 1: Check System Requirements
Before you begin, it’s essential to confirm that your device meets the minimum requirements for Windows 11. Here’s what you’ll need:
- Processor: At least 1 GHz, with 2 or more cores on a 64-bit processor.
- RAM: 4 GB or more.
- Storage: A minimum of 64 GB.
- Graphics: DirectX 12 compatible.
- TPM: Trusted Platform Module (TPM) version 2.0.
To make this step easier, download and use Microsoft’s PC Health Check Tool. This tool will quickly verify your system’s compatibility.
Step 2: Backup Your Data
Even though the upgrade process typically preserves your files, it’s better to err on the side of caution. For instance, you can:
- Use File History:
- Navigate to Settings > Update & Security > Backup.
- Set up an external drive and enable the backup option.
- Rely on cloud storage:
- Services like OneDrive, Google Drive, or Dropbox are great for safeguarding important files.
- Create a system image:
- Tools like AOMEI Backupper or the built-in Backup and Restore (Windows 7) utility work well for this purpose.
By taking these precautions, you’ll ensure your data is safe in case of unexpected issues.
Step 3: Update Windows 10
To avoid potential errors during the upgrade, it’s crucial to have the latest updates installed on your current operating system.
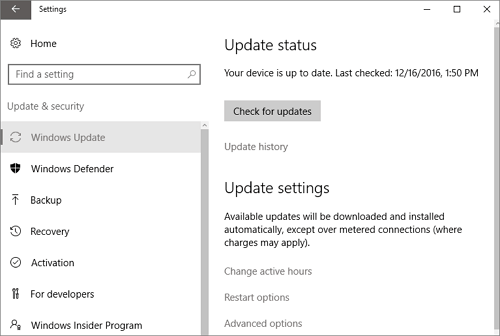
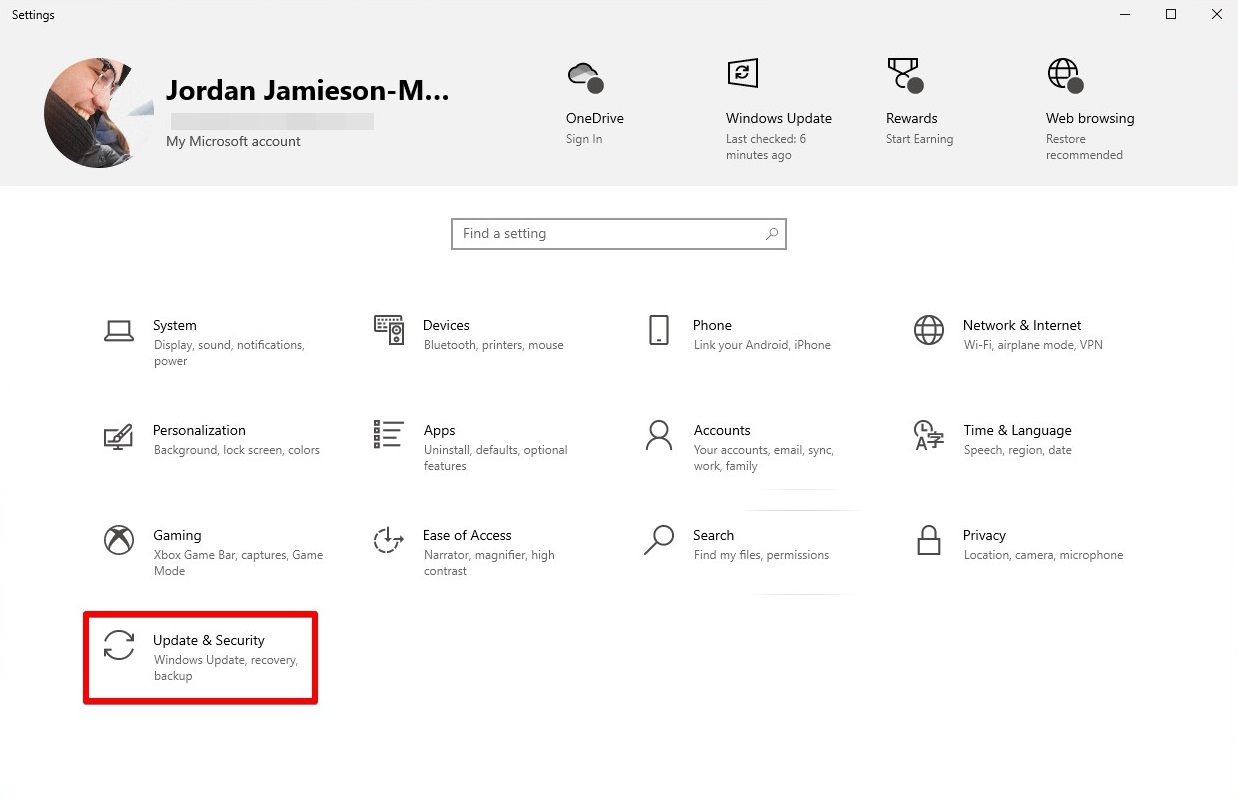
- Open Settings.
- Go to Update & Security > Windows Update.
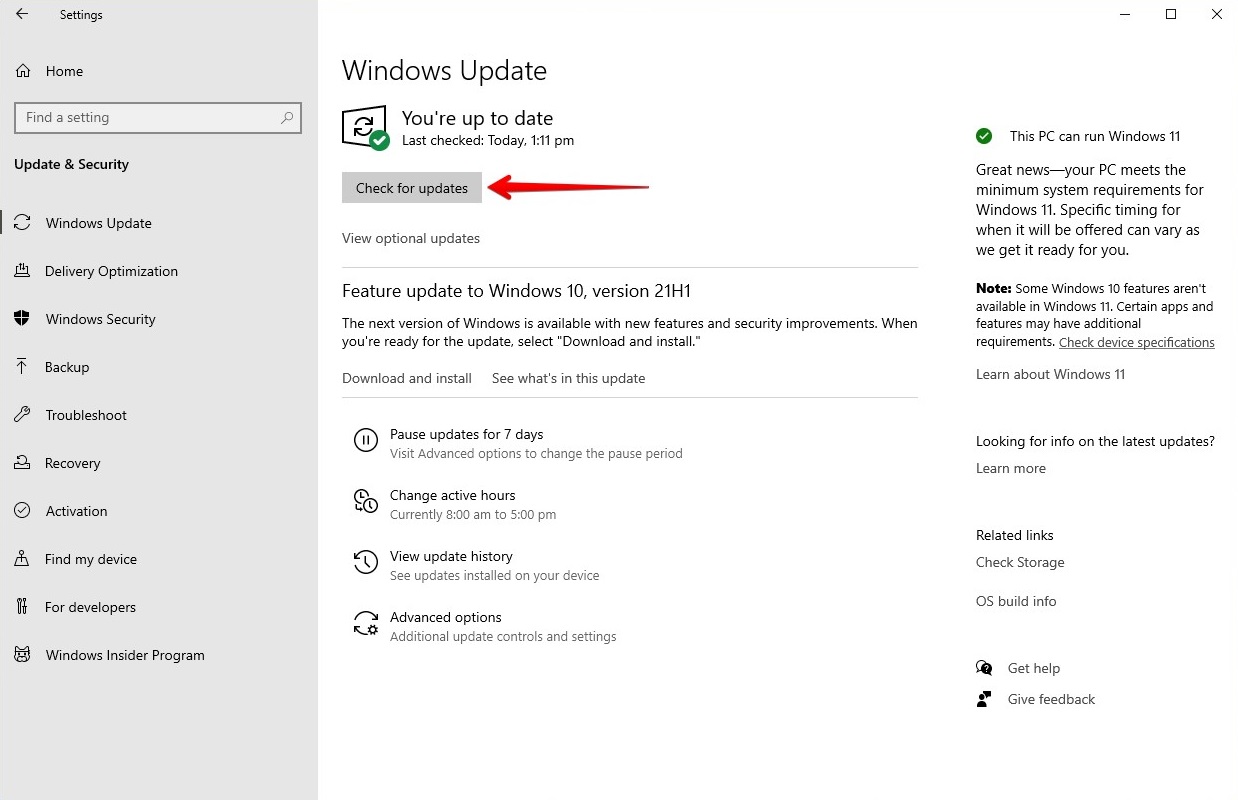
- Click Check for updates and install any pending updates.
Regular updates not only improve compatibility but also enhance overall system stability.
Step 4: Enable TPM 2.0 and Secure Boot
For the upgrade to proceed, enabling TPM 2.0 and Secure Boot is mandatory. Don’t worry—this process is simpler than it sounds.
- Restart your PC and access the BIOS/UEFI settings.
- Typically, this requires pressing keys like F2, DEL, or ESC during startup.
- Once in the BIOS, enable TPM under the Security section.
- Similarly, navigate to the Boot tab and activate Secure Boot.
These steps help ensure your system meets Windows 11’s security standards.
Step 5: Download the Windows 11 Installation Assistant
Next, you’ll need to download the Windows 11 Installation Assistant from Microsoft’s official website.
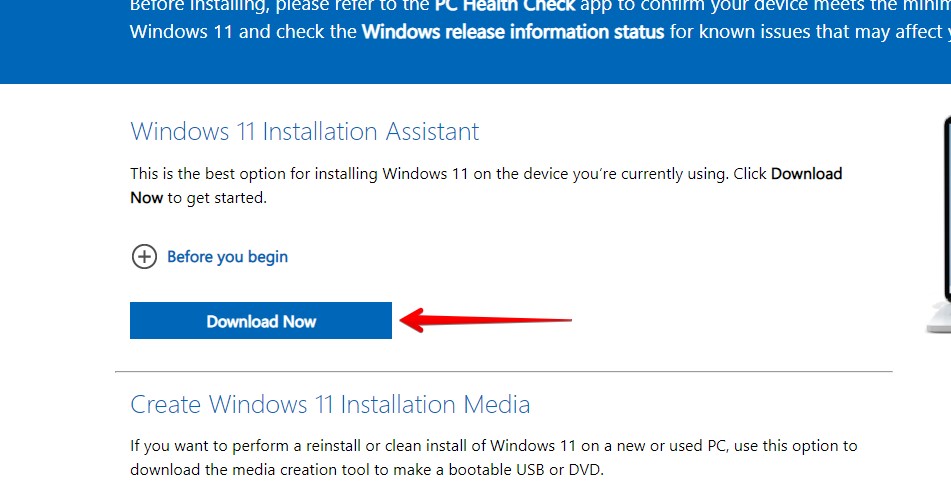
- Visit the Windows 11 download page.
- Click on Download Now under the Installation Assistant section.
- After the download is complete, run the tool and follow the instructions.
Step 6: Begin the Upgrade Process
With the Installation Assistant ready, you’re all set to start the upgrade.
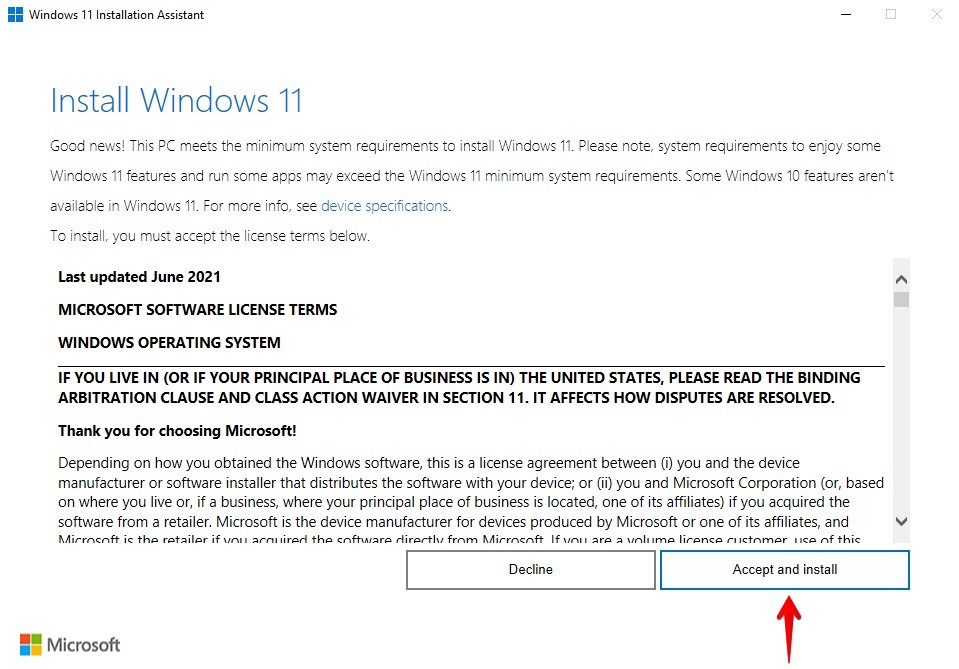
- Launch the tool and accept Microsoft’s terms and conditions.
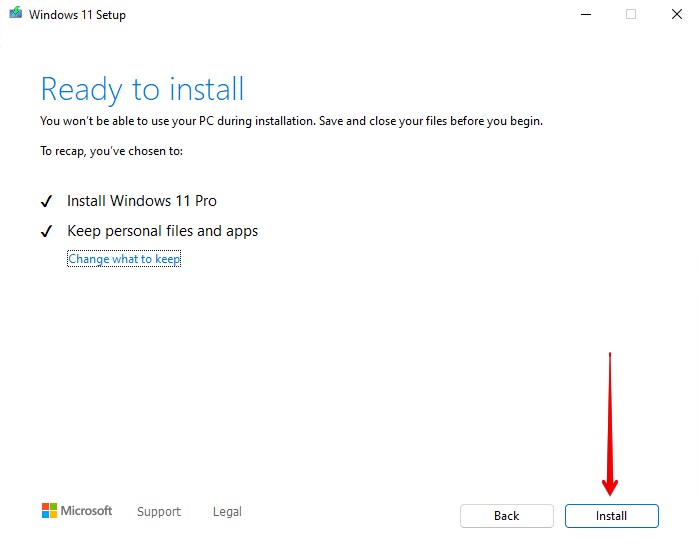
- Once your system passes the compatibility check, select the option to Keep personal files and apps.
- Click Install and let the process run its course.
It’s important to stay patient during this step, as the installation may take some time.
Step 7: Post-Upgrade Tasks
Finally, after the upgrade completes, take a few moments to ensure everything is in order.
- Check your files to confirm nothing is missing.
- Verify that all apps are functioning as expected.
- Install any remaining updates by visiting Settings > Update & Security > Windows Update.
By double-checking these details, you can enjoy a smooth transition to Windows 11.
Troubleshooting Common Issues
Occasionally, you may encounter minor hiccups during the upgrade. For instance:
- Low Storage Space: Use Disk Cleanup to free up space or connect an external drive.
- Compatibility Errors: Double-check that TPM and Secure Boot are enabled.
- Slow Installation: Disconnect unnecessary peripherals to optimize performance.
Addressing these issues promptly will save you time and frustration.
FAQs
1. Will I lose my files or applications during the upgrade?
No, as long as you choose the Keep personal files and apps option, your data will remain intact.
2. Can I revert to Windows 10 after upgrading?
Yes, within 10 days of upgrading, you can roll back via Settings > System > Recovery.
3. Is the upgrade free?
Yes, Windows 11 is free for all licensed Windows 10 users.
Conclusion
Upgrading from Windows 10 to Windows 11 is an easy process if you prepare correctly. By following this guide and ensuring proper backups, you can enjoy the latest features without any risk to your data. Upgrade today and experience a faster, more secure operating system.
Thank you for visiting our website! We hope this guide helps you achieve a smoother and faster Windows experience. Do check out our other tech tips and visit again Fyss.in for more solutions.
Post Views: 418
Discover more from Fyss | Find Your System Solutions
Subscribe to get the latest posts sent to your email.
In this short blog post, we’ll learn how to upgrade Windows 10 to Windows 11 without losing programs. As you probably know, Windows 11 offers more advanced features than Windows 10 and previous Windows versions, so many people desire to upgrade their Windows and install the latest Windows version. You can enjoy its several programs and features by installing or upgrading it.
View the Necessary Information to Upgrade Windows 10 to Windows 11:
| ⏱️Duration | 5-10 minutes |
| 🧑💻Difficulty | Medium |
| ⚒️Tool | EaseUS Todo PCTrans, Windows 11 Installation Assistant |
| 👣Steps |
1️⃣Stage 1. Check Whether Your PC Supports Windows 11 2️⃣Stage 2. Backup Programs Before Windows 10 to Windows 11 Upgrade 3️⃣Stage 3. Upgrade Windows 10 to Windows 11 without Losing Programs |
No, the upgradation process from Windows 10 to 11 won’t affect or delete anything. You can access your files that were previously stored in Windows 10 after upgrading to Windows 11. But the risk is anticipated. Although chances are rare, you should know that not every update works perfectly. Acknowledging the possibility of encountering issues where certain files could be inadvertently lost or deleted is important. So, to avoid any potential risk, you should back up your necessary data or all files or perform a full backup to preserve all your data and perform a Windows upgrade without worrying about anything. That’s our strong recommendation for you.
Now that you’re aware of all facts let’s start backup your programs and data before the upgradation of Windows 10 to Windows 11 step-by-step and enjoy the new features of Windows 11 immediately. If you think this tutorial is helpful, you can share it with others in need.
How to Upgrade Windows 10 to Windows 11 without Losing Programs?
This section will give detailed steps for the different stages of upgrading to Windows 11, so if you’re ready, start upgrading your Windows 10:
Stage 1. Check Whether Your PC Supports Windows 11
Stage 2. Backup Programs Before Windows 10 to Windows 11 Upgrade
Stage 3. Upgrade Windows 10 to Windows 11 without Losing Programs
Let’s look at the step-by-step guide:
Stage 1. Check Whether Your PC Supports Windows 11
Now, it’s necessary to check your PC before switching to Windows 11, whether it supports Windows 11 or doesn’t meet requirements. Because there are a few specifications for Windows 11, and your PC should meet those requirements, you can switch to Windows 11. Don’t worry; we’ll guide you step-by-step to easily check your PC/Laptop.
Let’s first look at the specifications for Windows 11:

You can do it through a PC health checker when checking if your PC is compatible and can support Windows 11. Sometimes, the PC health checker can be installed by default, but if you don’t find it on your PC, you have to install it to check your PC’s capability.
Here’s how:
Step 1. Download and install Microsoft’s PC health checker by visiting the official Microsoft website.
Step 2. The app’s home page displays the message, «PC health at a glance.» Positioned at the top is a box introducing Windows 11. To proceed, simply click «Check now» to see whether it’s compatible.
There is also another easy way to check it. Go to the Windows 10 settings, click «Update & Security,» and see at the top right corner if it doesn’t meet the requirements.
Stage 2. Backup Programs Before Windows 10 to Windows 11 Upgrade
Regarding potential risks, while performing the update process from Windows 10 to 11, we should back up before taking action and preserve our necessary and valuable data or files. We have an extraordinary tool that will help us from data loss.
It’s EaseUS Todo PCTrans to back up Windows programs. You can back up all your Windows 10 programs, settings, and data for free. You can restore your programs anytime once you successfully upgrade to Windows 11. So, it’s a really big deal to preserve your Windows 10 programs through EaseUS Todo PCTrans before starting the Windows 11 update process.
Follow these steps to back up your programs before Windows 10 to Windows 11 upgrade:
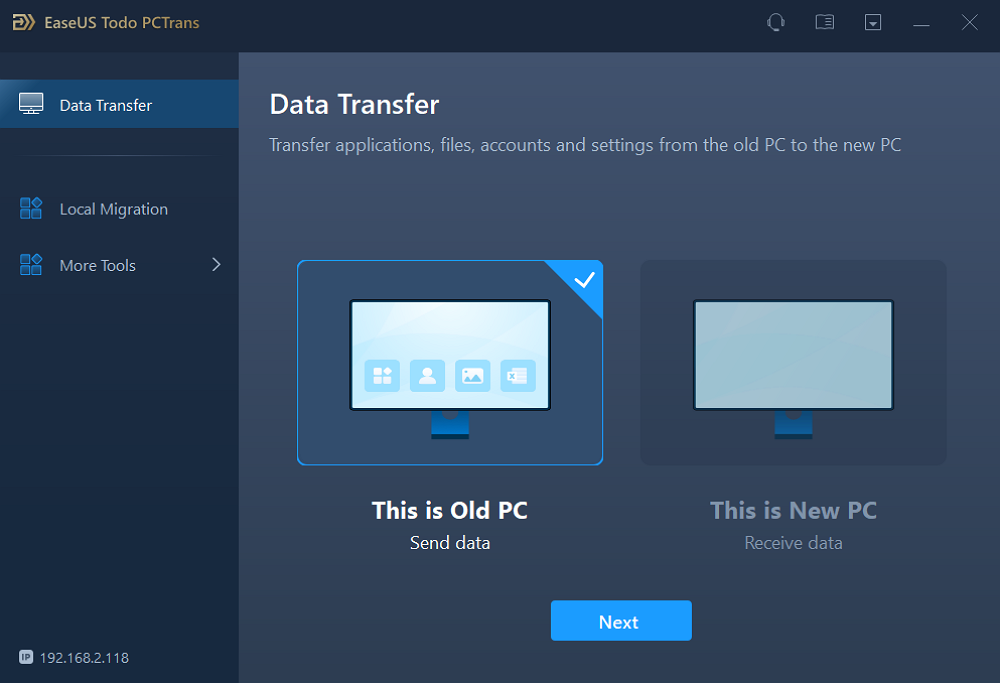
Step 1. Launch EaseUS Todo PCTrans on your computer. Click «Data Transfer» on the main screen, select «This is Old PC» and click «Next.»
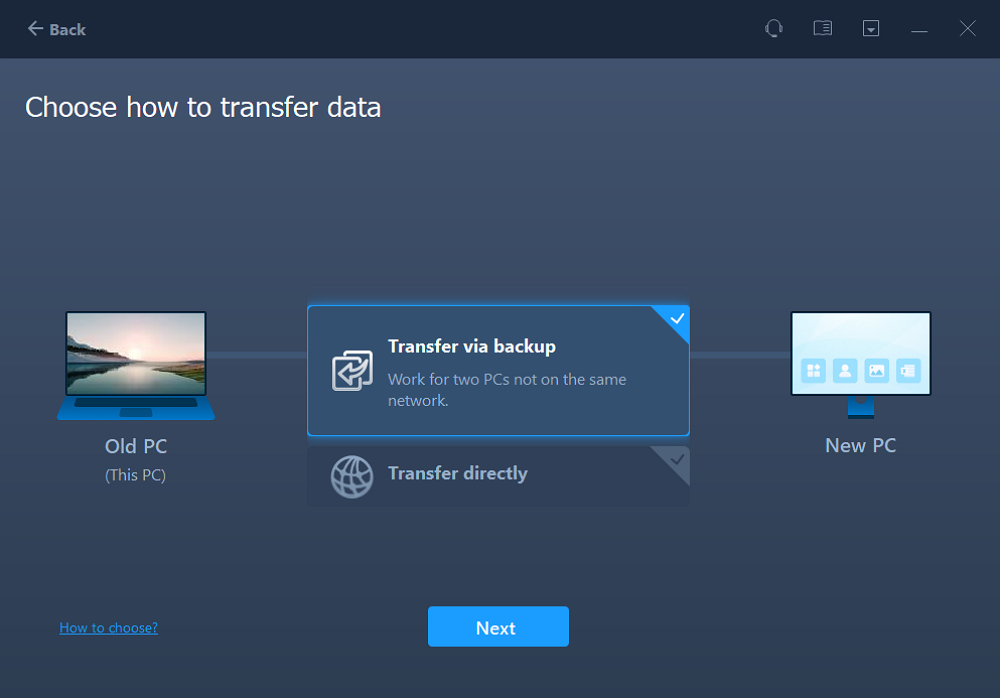
Step 2. Choose the «Transfer via backup» method and click the «Next.»
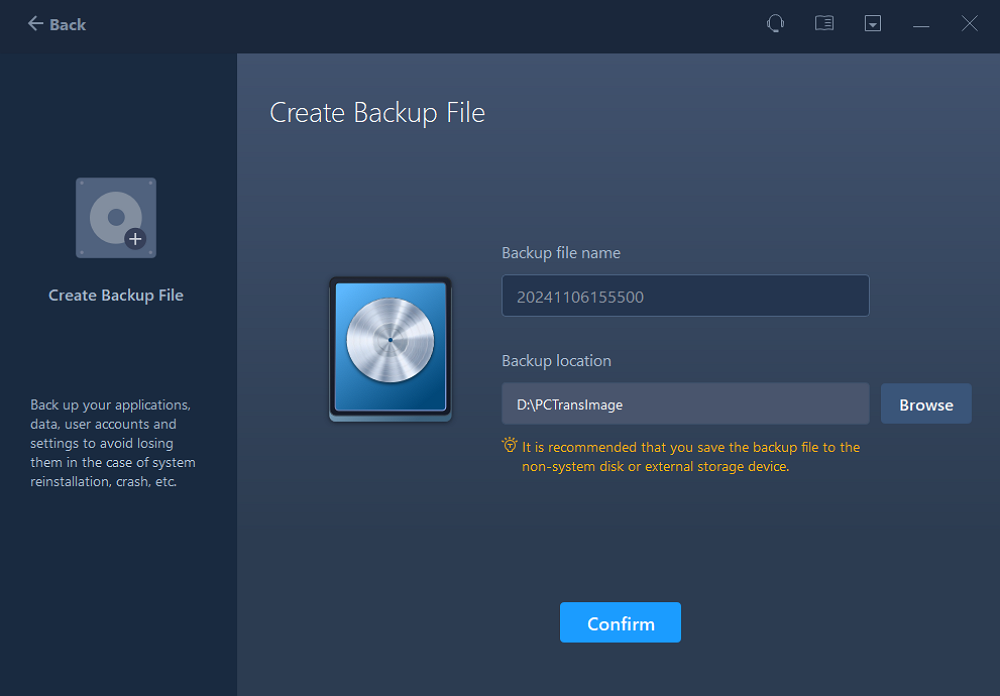
Step 3. Confirm the backup file name and backup location (Please save your files to a location where the new PC can access, like an external hard disk or shared network location.)
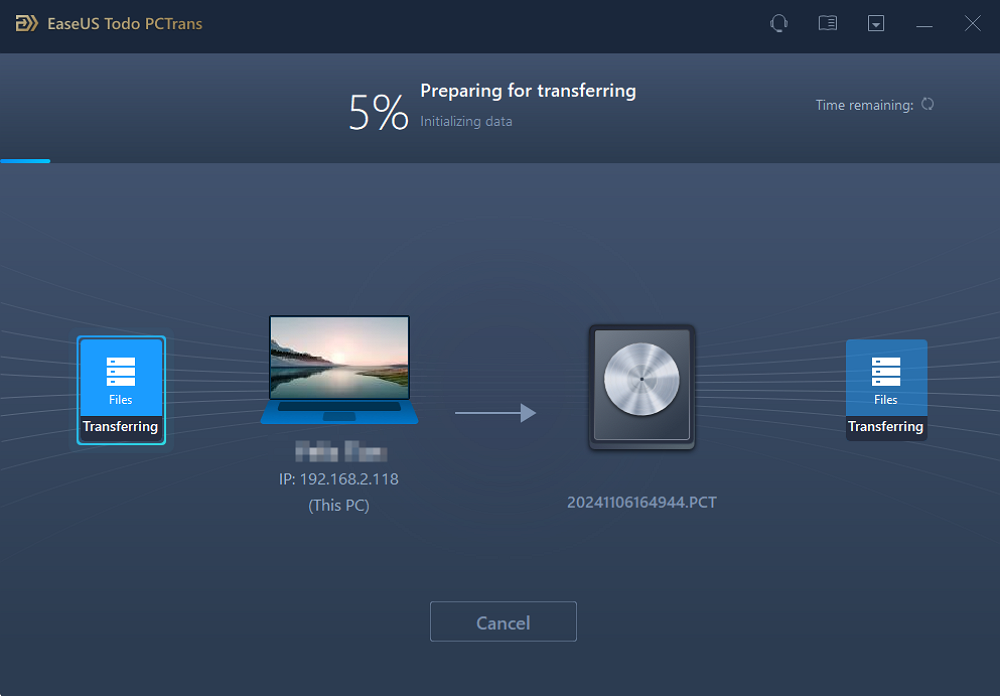
Step 4. Tick the Applications, Files, and Accounts that you wnat to backup. Click the «Backup» option to execute the process.

Step 5. Wait patiently till the backup procedure is done.
You May Also Like:
Stage 3. Upgrade Windows 10 to Windows 11 without Losing Programs
So, let’s upgrade from Windows 10 to Windows 11 without losing programs or data loss. We’ve three ways to perform this task, and we’ll present each method with complete instructional steps to make the process easier for you. We hope you have preserved your programs/data by creating a backup to avoid potential loss or disaster and are now ready to upgrade.
Here are three methods to update our Windows:
Method 1. Upgrade to Windows 11 via Windows Update
Method 2. Download Windows 11 ISO File
Method 3. Use Windows 11 Installation Assistant
Please pay attention to each method and step and understand everything because your little mistake can lead to loss. So, kindly read everything carefully and then choose any method which suits you better.
Method 1. Upgrade to Windows 11 via Windows Update
This is an easy and simple method. Follow these instructional steps from your Windows 10 to get updated Windows 11:
Step 1. Open «Settings.» Simply press the «Windows + I» buttons simultaneously to open it.
Step 2. Click «Update & Security.»
Step 3. Click «Check for updates» and wait a few moments until it completes the search.
Step 4. You’ll see all available updates and find Windows 11 updates.
Step 5. Simply click on the download and proceed with the installation. After starting downloading process, you will receive a prompt to restart your system.
Step 6. Pay close attention to the procedure; when prompted about preserving your files, you have to select the option to retain them.
Note: The installation takes time, and your PC/Laptop may reboot multiple times. Please be patient and allow Windows to complete the installation smoothly.
Method 2. Download Windows 11 ISO File
Here is another way, you can upgrade your Windows 10 to Windows 11 by downloading Windows 11 ISO files from the official Microsoft website. After downloading the Windows 11 ISO files, you must create a bootable USB and burn the ISO to USB. In this regard, the EaseUS Partition Master comes handy to create a bootable USB without extra effort. So, first of all, download the EaseUS Partition Master to create a bootable and then download the ISO file of Windows 11.
Here are the instructional steps:
Step 1. Visit Microsoft’s official website and Windows 11 download page.
Step 2. Under the «Download Windows 11 Disk Image (ISO) for x64 devices», select «Windows 11 (multi-edition ISO for x64 devices)».
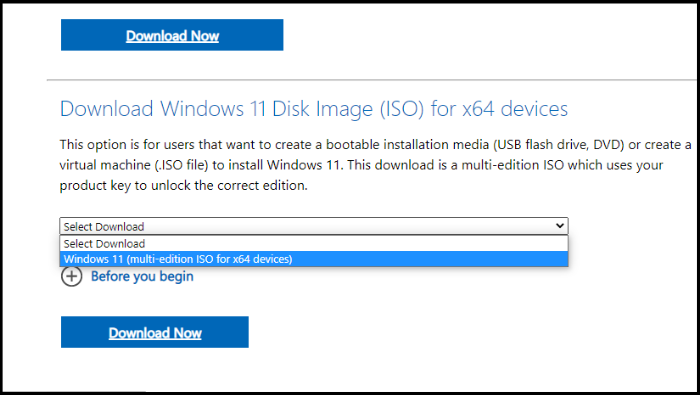
Step 3. Click «Download Now,» choose the language, and click «Confirm.»

Step 4. Upon receiving the download link, you can click on the «64-bit Download» button to obtain the Windows 11 ISO.
Step 5. Now, you need to create a bootable USB through the EaseUS Partition Master or simply locate the downloaded Windows 11 ISO file, right-click on that, select «Show more options,» click «Burn disc image,» and follow further on-screen instructions.
Step 6. After making a bootable USB, you can install Windows 11 through it.
Note: Connect your USB to your PC/Laptop to make a bootable USB. As the installation process begins for Windows 11, you will experience prompts asking whether you wish to preserve your files. Selecting the option to retain your files at this stage is crucial.
Method 3. Use Windows 11 Installation Assistant
This method utilizes the Windows 11 Installation Assistant. Whether upgrading from Windows 10 to Windows 11 or performing a clean installation, the Windows 11 Installation Assistant offers a convenient way to install the new operating system.
Step 1. Visit the Windows 11 Downloads page and click the «Download now» button beneath the Windows 11 Installation Assistant.
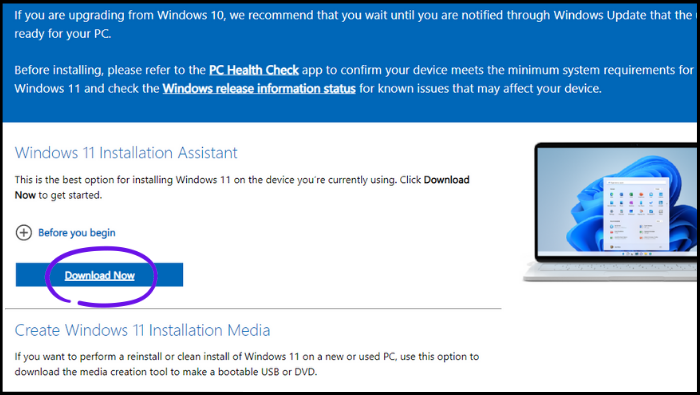
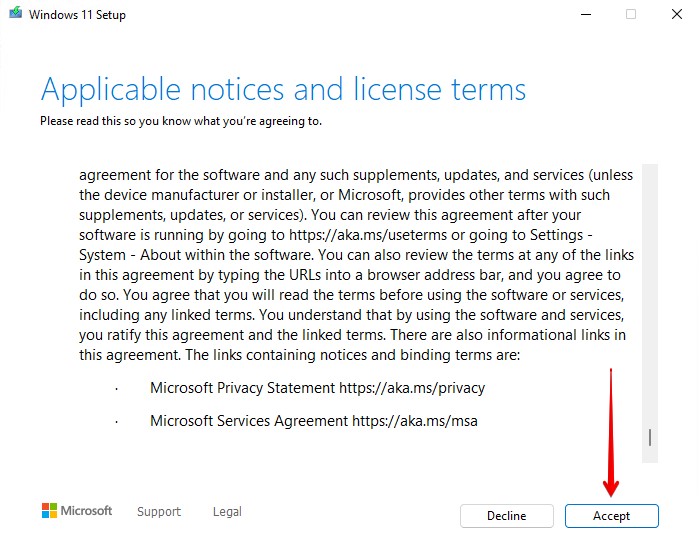
Step 2. After downloading the executable file, run it to initiate the installation process. Read the agreement, then select «Accept and install.»
Step 3. Windows 11 will begin downloading and installing. Please exercise patience until the process is complete. Follow the instructions to finalize the installation.
Why Upgrade Windows 10 to Windows 11?
Upgrading from Windows 10 to Windows 11 brings numerous benefits and exciting features. Let’s explore some compelling and exciting reasons to make the transition.
Reasons to upgrade to Windows 11:
- Game Experience: Windows 11 offers improved gaming features, including Auto HDR, DirectStorage, and compatibility with Xbox Game Pass, enhancing your gaming experience with stunning visuals and faster loading times.
- Android Apps: With Windows 11, you can access a vast library of Android apps through the Microsoft Store, allowing you to enjoy your favorite mobile applications directly on your desktop.
- Widgets: Windows 11 introduces widgets, providing personalized, glanceable information such as weather updates, calendar events, news, and more, conveniently accessible from your desktop.
- Multi Desktop: Windows 11 enables multiple virtual desktops, allowing you to organize your work and personal tasks more efficiently, improving productivity and reducing clutter.
- Microsoft Teams Integration: Windows 11 integrates Microsoft Teams directly into the taskbar, enabling seamless communication and collaboration with colleagues, friends, and family.
- Snap Layouts: Snap layouts simplify multitasking by allowing you to snap multiple windows into organized layouts, making arranging and switching between applications effortless.
These features and enhancements in Windows 11 contribute to a more immersive gaming experience, expanded app availability, improved productivity, and enhanced desktop customization options.
Conclusion
We defined three ways with complete instructional steps to make switching from Windows 10 to Windows 11 easier. Now, you can upgrade your Windows 10 to Windows 11 without losing programs or data to enjoy many incredible and advanced features of Windows 11. But to avoid any potential risk, you should proceed with caution. As we discussed above, everything, such as before starting, you have to back up your programs or data through EaseUS Todo PCTrans.
We hope you know all facts and find this article helpful and informative. Thanks for reading!
FAQs About Upgrade Windows 10 to Windows 11 without Losing Programs
Let’s check out the frequently asked questions below if you have any queries or want to learn more about upgrading Windows 10 to Windows 11 without losing programs.
1. Will I lose my Windows 10 license when I upgrade to Windows 11?
Upgrading to Windows 11 from Windows 10 will not invalidate your Windows 10 license. Microsoft offers an upgrade to Windows 11 for eligible Windows 10 devices, and your existing license will seamlessly transfer for free to the new operating system without any extra charges. Nevertheless, it’s advisable to back up your important files and data as a precautionary measure before undergoing any significant OS upgrade.
2. How to refresh Windows 11 without losing programs?
There are several methods to refresh your Windows 11 without losing programs. You can easily do it by «Reset this PC.»
Here are the simple steps:
Step 1. If your computer functions normally, access the settings by pressing Win+I, then go to System > Recovery > Reset this PC.
Step 2. If your computer cannot boot, create a recovery drive and boot from it. Choose your language and other preferences, click Next, then select «Repair your computer» > «Troubleshoot» > «Reset this PC.»
Step 3. Select «Keep my files» in the pop-up window.
3. What will I lose if I upgrade to Windows 11?
When upgrading to Windows 11, you may lose compatibility with some older software, require updated device drivers, experience changes in features and interface, and need to reconfigure customization settings. Data loss is unlikely, but backing up important files is always recommended.

On this topic, I will show you how to update windows 10 to 11 in any computer without losing data or files with free activation activation in supported and unsupported hardware.
As you know, there are 8 minimum requirements for windows 11, but the TPM and UEFI with secure boot are the most common obstacles in older computers. Other requirements in relation to Processor, RAM, and storage are nearly available in all computers or at least can be upgraded easily.
Minimum requirements for Windows 11:
- Processor: 1 gigahertz (GHz) or faster with 2 or more cores on a compatible 64-bit processor or System on a Chip (SoC)
- RAM: 4 gigabyte (GB)
- Storage: 64 GB or larger storage device
- System firmware: UEFI, Secure Boot capable
- TPM: Trusted Platform Module (TPM) version 2.0
- Graphics card: Compatible with DirectX 12 or later with WDDM 2.0 driver
- Display: High definition (720p) display that is greater than 9” diagonally, 8 bits per color channel
- Internet connection and Microsoft accounts:
- Windows 11 Home edition requires internet connectivity and a Microsoft account to complete device setup on first use.
This topic will help you to get rid of all these requirements in order to upgrade to windows 11 on any computer step by step, so you can enjoy windows 11 new features even in an old computer.
Download Windows 11 ISO file:
- Open the official Microsoft website of Windows 11 to download the ISO image
- Scroll down to Download Windows 11 Disk Image (ISO) section
- Click on Select Download and select Windows 11 Multi-edition ISO, after that Click Download
- Select the desired language and then click on Confirm
- Click on 64-bit Download to start downloading Windows 11 ISO file.
- Notice that there is no option to download windows 11 in 32-bit version, as windows 11 not officially supports this type of processor.
After downloading the ISO file of windows 11, let’s see how to upgrade windows 10 to windows 11 on supported pc in the next part.
If you have a supported computer and supported hardware, you can upgrade windows 11 from windows 10 easily as followings:
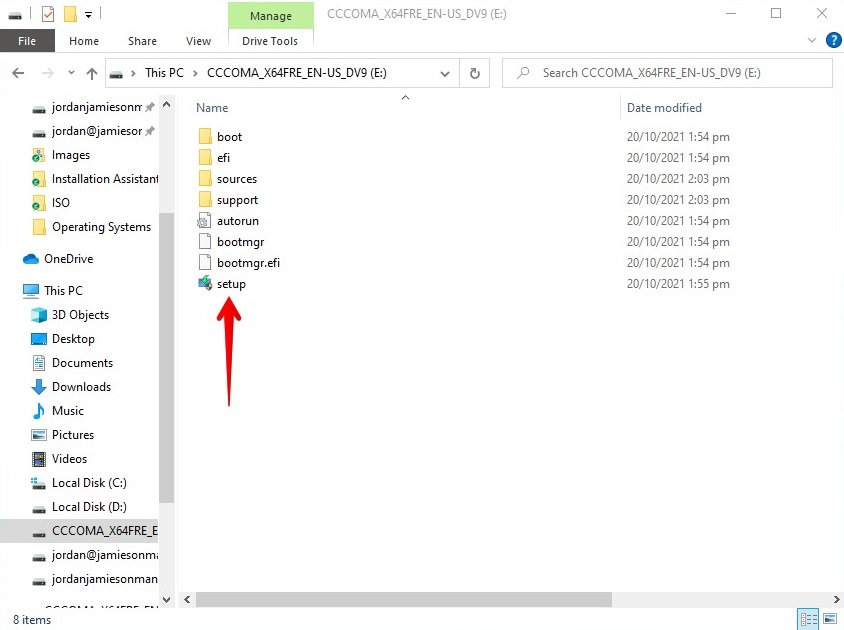
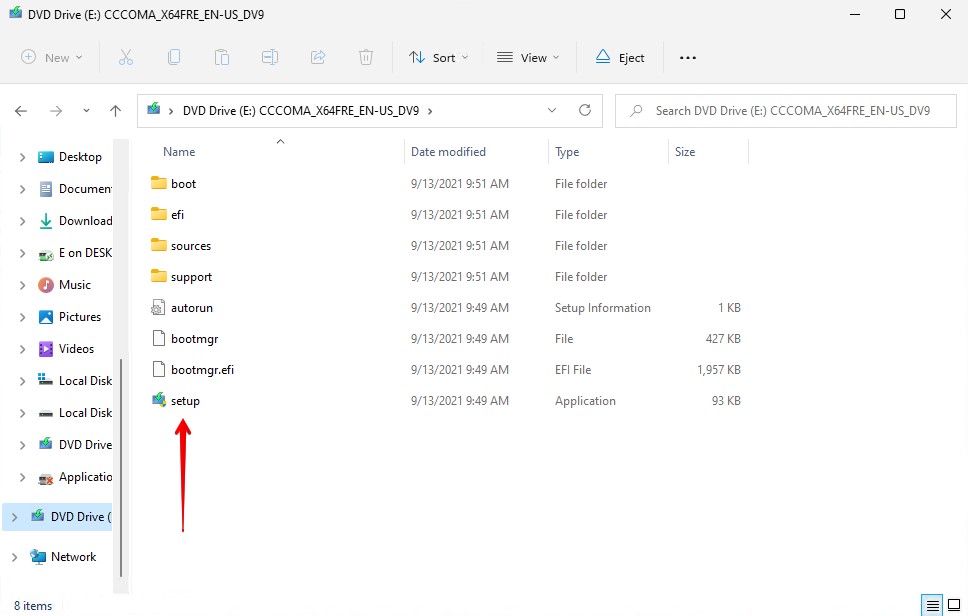
- Double click the ISO file to mount it
- Double click the Setup file to start windows 11 upgrade from windows 10
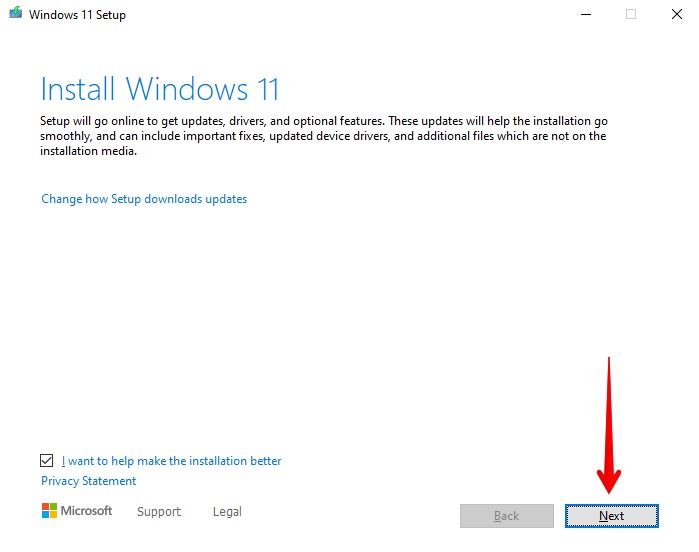
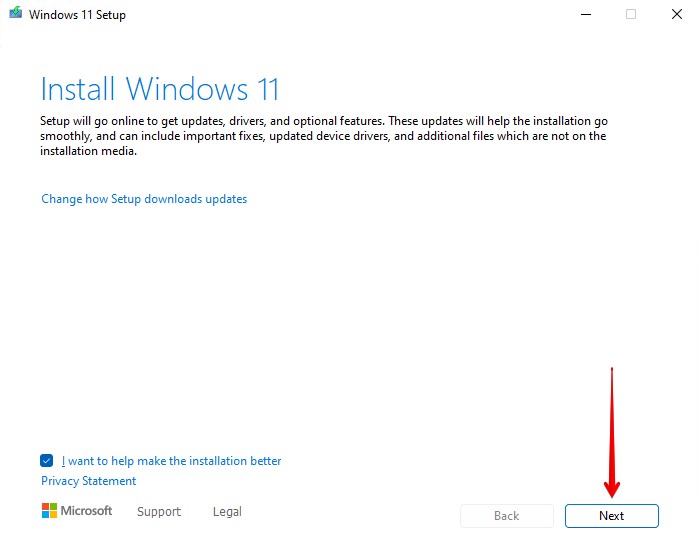
- If you want to install drivers and other windows updates while upgrading, click Next directly, otherwise, click on Change how Setup Downloads Updates and then select, Not Right Now option.
- If you have installed ISO file in a language that is different from the default UI language, you will receive a message to inform you that the language will be changed after this upgrade.
- Click Ok to continue.
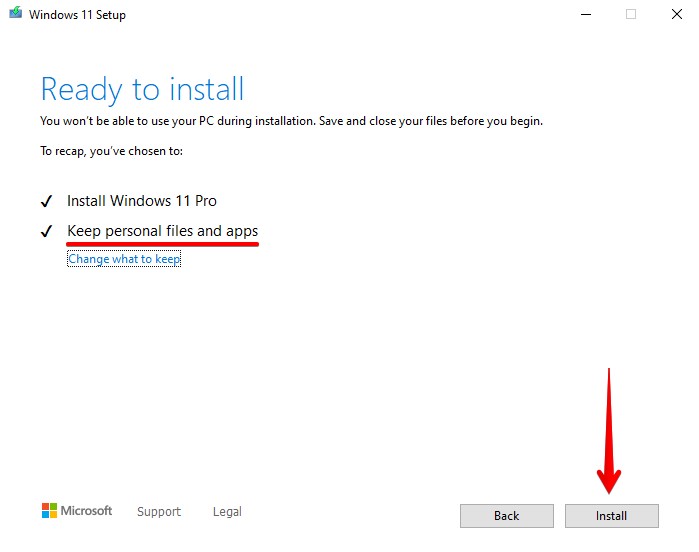
Click Change what to keep option to change whether to keep or to delete apps and or files, otherwise, click on Install to start windows 11 upgrading process, keeping Personal files and apps.
As you will see on the video below, the setup wizard automatically selected to install Windows 11 Home Single Language from available windows editions on the ISO image, as this is the activated edition of windows 10 on my computer. So don’t worry about activation too, as the setup wizard will use your windows 10 license key to activate windows 11 automatically.
how to upgrade windows 10 to windows 11 on unsupported hardware?
If your computer doesn’t meet windows 11 requirements, you will receive an error message saying that: “This PC doesn’t currently meet Windows 11 system requirements”. or “This PC Can’t Run Windows 11“
So, don’t worry, as you can fix that by replacing the appraiserres file in the Sources folder of windows 11 as followings:
- Back to the download folder and then unmount the ISO file of windows 11 if already mounted.
- Extract the ISO file using WinRAR or another app
- Download appraiserres.zip file from this direct link and then extract it
- Copy the appraiserres file into Sources folder inside windows 11 folder and replace the existing file.
- Back to the main directory of windows 11 folder (i.e. the extracted folder).
- Double-click the Setup.exe file to start installation wizard
- As you will see on the video, checking for requirements step will be passed successfully after replacing appraiserres file.
- Click Change what to keep hyperlink to change whether to keep or to delete apps and or files, otherwise, click on Install to continue.
As you will see on the video, windows 10 updated to windows 11 successfully in unsupported hardware. Microsoft recommend against upgrading to windows 11 in unsupported PCs, because you may not receive some security updates as stated on Microsoft Website. However, new windows 11 features insists users to upgrade.
New update:
- If the manual replacing the appraiserres.dll not helped to bypass TPM, Secure Boot and CPU restrictions, you can do the followings:
- Download the Rufus tool from this link and start it
- Connect an empty USB drive to your computer and make sure it is the selected one in the Rufus tool if you have more than one USB connected to your PC.
- Click on Select icon to load the ISO file of windows into the Rufus tool
- Once everything get ready, click on Start icon to start creating a bootable USB.
- Make sure that the both Remove Requirements options are checked according to your restriction.
- After that, click on Ok to continue
- Read the next warning message in the Rufus tool interface carefully, to be aware that everything inside the USB will be lost permanently after this step.
- Once the bootable USB created successfully, navigate to the USB drive and then run the Setup.exe file to start upgrading your system normally without errors.
Important notes:
- Windows 10 files are stored in folder called Windows.old inside C folder.
- This folder will persist for the next ten days, to help you go back to windows 10 if you faced any incompatibility errors or whatever, that make you decide to leave Windows 11 back to windows 10.
- On the first 10 days of your evaluation or usage for windows 11, don’t try to do a disk cleanup, defragment or another action on system files, otherwise, you will fail to revert your windows back to windows 10 if you decide to do so.
- After 10 days, Windows.old will be removed automatically. If not removed, you can remove it manually if you want.
How to remove windows.old folder of windows 10 after upgrading to windows 11?
- Type CLEANMGR into search box and open Disk Cleanup tool
- The tool will open with the C as the selected partition by default. But you may need to select the C partition or another partition that has windows logo manually then click Ok.
- Click on Cleanup System files option and reselect Windows partition again then click Ok
- Check all options then click Ok to remove junk and temporary files.
VIDEO:
To show all mentioned methods in upgrading windows 10 to 11, we have created a video with detailed illustration and step by step:
Please follow and like us:
В блоге «Эксперимент: исправит ли сброс Windows 10 к заводским настройкам накопившиеся баги и ошибки» я применил функцию «возврат компьютера в исходное состояние» к замусоренной и забагованной Windows 10. Результат оказался противоречив, с одной стороны — все баги исчезли, с другой — процесс очень долог, а все установленные программы и игры придется переустановить.
Но эксперимент удался, что дало мне еще одну идею — обновить эту же самую систему до Windows 11 и проверить, сохраняться ли установленные программы, настройки и данные пользователя.

Надо сказать, что старт операционной системы Windows 11 не стал гладким, и был омрачен как проблемами с производительностью, так и противоречивыми системными требованиями, оставляющими за бортом большинство компьютеров с процессорами Intel старее восьмого поколения и AMD Ryzen старее второго поколения.
Впоследствии Microsoft добавила в список совместимых несколько чипов Intel седьмого поколения и мой Ryzen 5 1600 AF, который, несмотря на цифровой индекс, относится к архитектуре Zen+ и является практически аналогом Ryzen 5 2600, только с более низкими частотами. Поэтому к выбору процессора, совместимого с Windows 11, нужно отнестись с внимательностью, особенно среди бюджетных моделей.

Из ассортимента недорогих процессоров в Ситилинке можно смело брать популярные Athlon 3000G и Core i3-10100F, которые полностью совместимы с Windows 11.

Я узнал это, запустив на ПК утилиту Windows 11 PC Health Check, и нажав кнопку «Проверить сейчас». Но прежде обратите внимание на огрехи перевода — «2 лет» и на то, что утилита не может работать при масштабировании экрана в 150% — текст на кнопках «ползет». Далее подобные огрехов будет еще больше и они будут прямо влиять на процесс обновления.

Windows 11 PC Health Check показала вот такой результат. Мой процессор совместим и осталось разобраться с модулем TPM 2.0.

На материнской плате MSI B450-A PRO MAX он есть и включить его можно в BIOS, в разделе Settings — Security — Trusted Computing.

После включения модуля TPM 2.0 утилита Windows 11 PC Health Check показывает полную совместимость моего ПК с Windows 11. Казалось бы, теперь должна появиться большая кнопка «Обновиться сейчас», но ее нет.

Кнопка «Показать все результаты» открывает подробности совместимости.

А вот кнопка «Характеристики устройства» почему-то перекидывает на сайт Microsoft. Там мы видим вот такое сообщение, в котором ссылка «ПРОВЕРИТЬ НАЛИЧИЕ БЕСПЛАТНОГО ОБНОВЛЕНИЯ» открывает локальную ссылку на вашем ПК — ms-settings:windowsupdate и перебросит вас в «Центр обновления Windows» расположенный в «Параметрах».

Тут надо сделать небольшое отступление. Некоторые из нас еще помнят, как происходило обновление Windows 7 и Windows 8 до Windows 10 летом 2015 года. Многие пользователи получали с обновлениями скандально известную утилиту Get Windows 10, которая предлагала обновиться «сейчас» или «сегодня вечером», а нажатие крестика означало согласие пользователя.

Это был маркетинг самого низшего уровня, до которого обычно опускаются только разработчики мелкого программного «мусора», но в этот раз мы увидели это от огромной корпорации и такой подход к пользователям шокировал. Microsoft потом извинялась за утилиту Get Windows 10 и признала, что «переборщила», но, как говорится, «репутация создается годами, а теряется одним поступком».

В случае с Windows 11 такой агрессивной политики обновления нет, да и спорные системные требования оставляют за бортом множество ПК и ноутбуков, выпущенных за последние 10 лет, но еще вполне шустро справляющихся с Windows 10. Но, тем не менее, миграция пользователей с Windows 10 на Windows 11 идет довольно шустро и по статистике компании Adduplex на ноябрь 2021 года 8.6% пользователей уже перешли на новую ОС.

Но вернемся к моему ПК и обновлению. Перейдя в «Центр обновления Windows» я увидел ссылку «Проверка требований к оборудованию» и никаких кнопок «Обновиться».

Ссылка опять перебрасывала на сайт Microsoft, но уже с сообщением «Мы работаем над этим».

Попробовав сделать этот цикл действий еще раз, я понял что обновиться до Windows 11 самым простым и логичным способом не получится. К счастью, есть второй способ обновиться до Windows 11, для этого надо перейти на страницу загрузки Windows 11 на сайте Microsoft и скачать приложение «Помощник по установке Windows 11».

Но прежде чем запускать его, я установил на ПК несколько программ, чтобы убедиться, что обновление не затронет не только данные пользователи и настройки, но и программы и игры. Утилиты freeshooter и HWiNFO, прописывающиеся в автозагрузку, отлично для этого подойдут.
Запускаем «Помощник по установке Windows 11» и следуем указаниям.

Начинается загрузка новой ОС.

Установка происходит в фоновом режиме и довольно быстро, гораздо быстрее, чем сброс Windows 10 к заводским настройкам. При этом можно пользоваться ПК.

Окно завершения установки.

После перезагрузки ПК еще несколько минут идет процесс обновления.

Этот процесс гораздо быстрее обычной установки и через несколько минут мы получаем обновленную систему. Сразу заметно, что обои Рабочего стола «слетели», но все ярлыки на месте.

Сведения о системе рапортуют о том, что у нас установлена самая свежая версия Windows 11.

Установленные еще в Windows 10 программы корректно запускаются.

Есть они и в «Приложениях и возможностях».

Все файлы пользователя на месте, как и настройки проводника.

В обновленном меню «Пуск» остались не только старые ярлыки, но и список документов с недавним доступом.


Специфические настройки Windows 10, реализуемые в реестре, сохранились и работают. Например, старое средство просмотра фотографий Windows.

Сохранились и настройки Microsoft Defender с исключениями файлов и папок.

Итоги
Несмотря на неразбериху с обновлением через «Центр обновления Windows» в моем случае и откровенно недоработанное средство Windows 11 PC Health Check процесс обновления Windows 10 до Windows 11 довольно быстр и безболезнен. Все настройки и программы пользователя остаются на месте, а слетевшие обои — не критичная проблема.
С другой стороны, быстрый процесс обновления и то, что от старой ОС остаются в рабочем состоянии даже настройки, сделанные через реестр, показывают, что под капотом у Windows 11 старая добрая Windows 10, которой скоро исполнится уже семь лет, и у которой просто поменяли интерфейс. Но ведь Microsoft заявляли, что Windows 10 станет последней Windows и других не будет, так что придраться не к чему.
Пишите в комментарии, а вы будете обновляться до Windows 11?
Telegram-канал @overclockers_news — теперь в новом формате. Подписывайся, чтобы быть в курсе всех новостей!
The all-new Windows 11 is finally available to the public. Microsoft has given users a few options to choose from when it comes to installing Windows 11, and for the most part, it’s quite straightforward.
However, the worry of losing your data still remains. Rightfully so, as upgrading your operating system can be quite scary if you haven’t done it before. In this article, we’ll cover the required specifications and how to install Windows 11 without losing data.
System Requirements for Windows 11
As you might expect, Windows 11’s system requirements are a slight step up from Windows 10’s. While most modern computer systems will be able to install it with no issues, older machines may struggle with some of the new requirements.
Here are the minimum system requirements needed to install and run Windows 11:
- Processor: 1GHz, 2 Cores, 64-bit
- RAM: 4GB
- Storage: 64GB
- Firmware: UEFI with Secure Boot
- TPM: Version 2.0
As you’ll notice, Secure Boot and TPM 2.0 are required. These are two features that weren’t necessarily required in previous operating systems, but Windows has decided to enforce them with the new Windows 11 to help better protect users and their data.
You can download and run the PC Health Check App by Microsoft to see if your machine is compatible.
Windows 11 requires that Secure boot be enabled before it can be installed. Secure boot is a security feature that only allows your PC to boot if it can verify the signature of your operating system, as well as the UEFI firmware drivers and EFI applications. This is to prevent malicious software from taking over the boot sequence of your computer.
TPM (Trusted Platform Module) is another security requirement to install Windows 11. A TPM is a small chip on your motherboard that serves many functions, but for Windows 11 specifically, it’s used for Windows Hello identity protection and BitLocker encryption.
Common Reasons for Data Loss
Data loss isn’t uncommon when upgrading to a new operating system. During the upgrade, your computer is in a very vulnerable state. Any disruption to the upgrade process can be detrimental to your data. Here are some common causes for data loss to be aware of.
- ❌ Interrupted upgrade/install – If the Windows 11 installation process is interrupted by sudden power loss, this can corrupt your data and potentially your hard drive. If your system files have become corrupted, this could render your computer unusable.
- 😮 Incorrect install type – When you’re installing a new operating system, you will often have the choice between two install types: Upgrade or Custom. If you choose Custom and you’re unfamiliar with what steps to take, it’s very easy to wipe everything from your computer by making a mistake.
- 💻 Failing hard drive – A failing hard drive or solid-state drive can crash during the Windows 11 installation. If incomplete, system files can become corrupted and result in the loss of your data.
- 🙅♂️ Human error – Everyone makes mistakes. It could be as simple as deleting the wrong folder, or as complex as using the wrong parameters while using DiskPart. Regardless, data loss as a result of human error is very common.
- 🦠 Virus attacks – There are unfathomable numbers of viruses lurking on the internet. Hackers with malicious intent are just waiting to prey on unsuspecting internet users. Viruses are a leading cause of data loss, so protect yourself with an antivirus application.
Keep these reasons in mind going forward to ensure you install Windows 11 without a hitch. After all, you wouldn’t want to be in a position where you accidentally format your main drive or get stuck on an infinite loading screen because you installed an unstable version.
You may be excited to try out the new Windows 11 operating system. Why wouldn’t you be? There’s a whole new user interface, as well as cool new features like the ability to run Android applications natively within Windows.
Before we begin, it’s imperative that you make a backup of all your important data. Even though these methods work, something could happen to interrupt the process like sudden power or hardware failure. Creating a backup of your files now ensures you can easily restore them in case the worst-case scenario becomes a reality.
Let’s get you set up. Use the below methods to install Windows 11 without losing your data. Bear in mind that upgrading to a new operating system can take time, so ensure you do not shut down your computer during the process.
Method #1: Upgrade from Windows 10 to Windows 11
If you have a valid version of Windows 10 installed already, you can upgrade to Windows 11 through the Windows Update section. This is probably the easiest and most popular way of installing Windows 11.
Not all Windows 10 computers will have the ability to upgrade to Windows 11 straight away. Microsoft is gradually rolling out this update to all compatible computers and plans to be finished by mid-2022, prioritizing new eligible devices first.
If you notice that your computer is eligible for the upgrade but there’s no option yet, proceed to one of the following methods to upgrade.
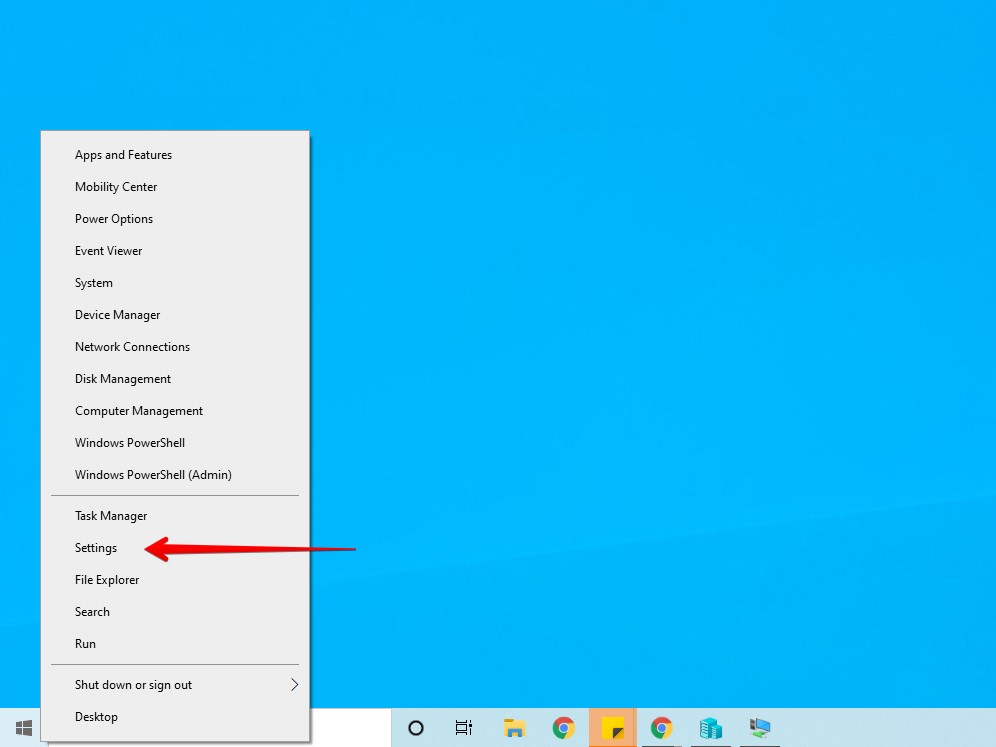
- Right-click Start and click Settings.

- Click Update & Security.

- Click Check for updates.
- Click Download and install in the Upgrade to Windows 11 section.
Method #2: Windows 11 Installation Assistant
Microsoft allows you to upgrade using the Windows 11 Installation Assistant if the update isn’t available just yet through Windows Update. The tool will download the updated operating system and install it for you. In terms of effort, this method is one of the easiest as it doesn’t require the creation of any bootable media.
- Download the Windows 11 Installation Assistant and open it. If prompted by UAC to allow permission, click Yes.

- Read and accept the license terms.

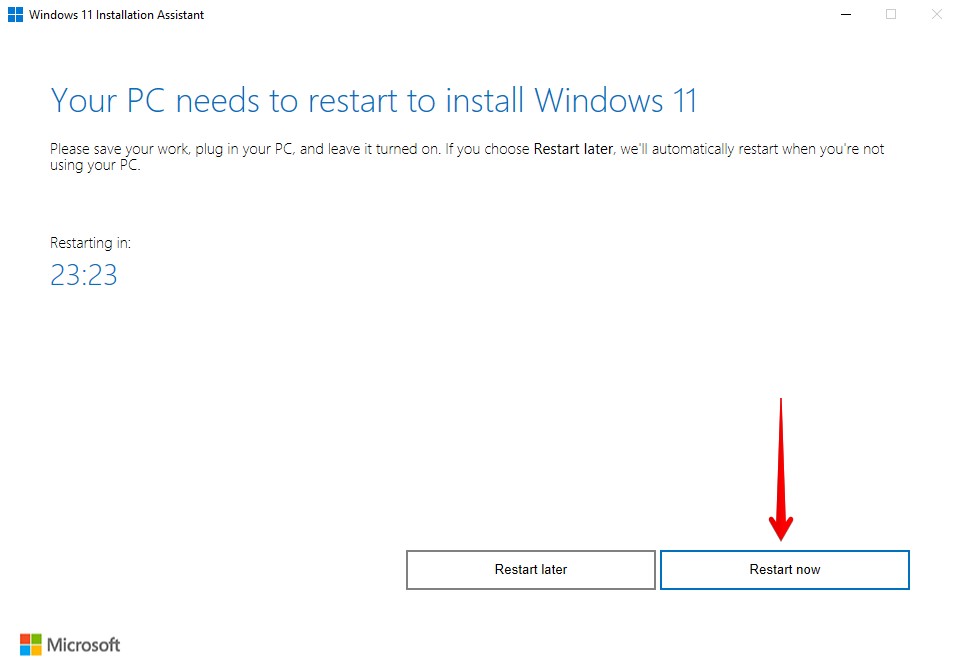
- When Windows 11 has been downloaded and prepared for install, click Restart now.
- Windows 11 will install in the background. Eventually, you’ll be met with a login screen where you can log in to your new Windows 11 desktop.
Method #3: Download the Windows 11 ISO
ISO files are disk images that are used to install operating systems. You can download the Windows 11 ISO from the Microsoft website and use it to perform an in-place upgrade. To do so, you’re going to need a USB to create a bootable USB installation drive. Alternatively, if you don’t have a usable USB, you can virtually mount the ISO using a tool like DAEMON Tools Lite.
This process will wipe the USB of all its contents. Before proceeding, make sure there is nothing on the USB that you need. If there is, back it up now.
Before starting this process, you will need to download the following:
- Windows 11 ISO – The ISO file contains Windows 11 and all files necessary for installation. Download it in the Download Windows 11 Disk Image (ISO) section.
- Rufus – Utility tool used to create bootable USB drives.
Once ready, follow the below instructions to create a bootable USB and install Windows 11.
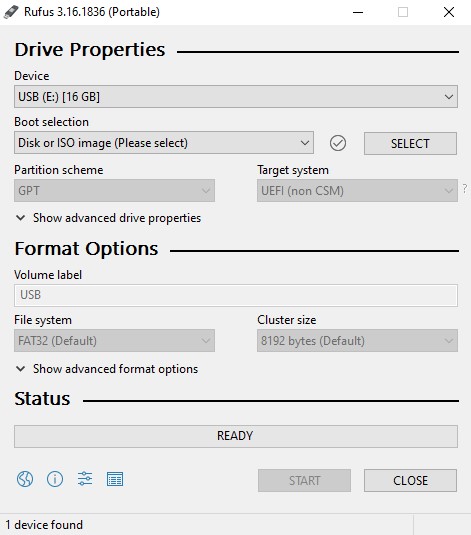
- Open Rufus.

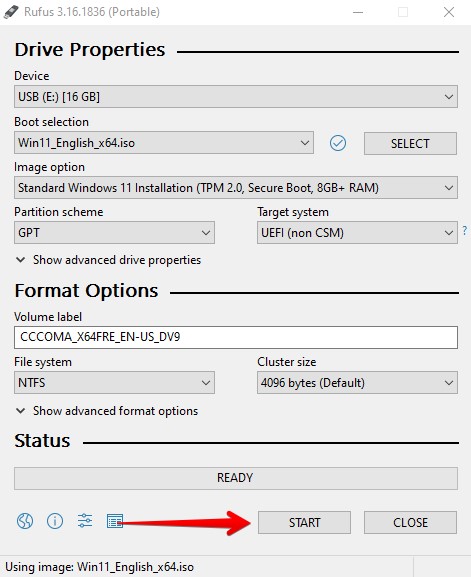
- Click Select and choose the Windows 11 ISO file.

- Click Start.

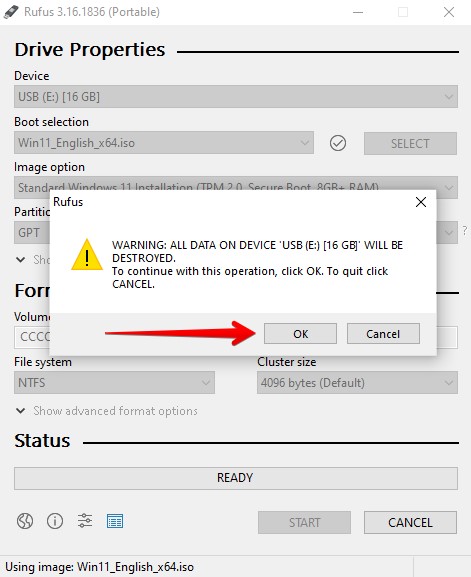
- It will ask you to confirm your decision. Click OK.
-
When finished, click Close. Open Windows Explorer and open your USB. Open Setup. Click Yes if prompted by UAC.

- Click Next. It will begin to check for updates and ensure your computer is ready for the upgrade.

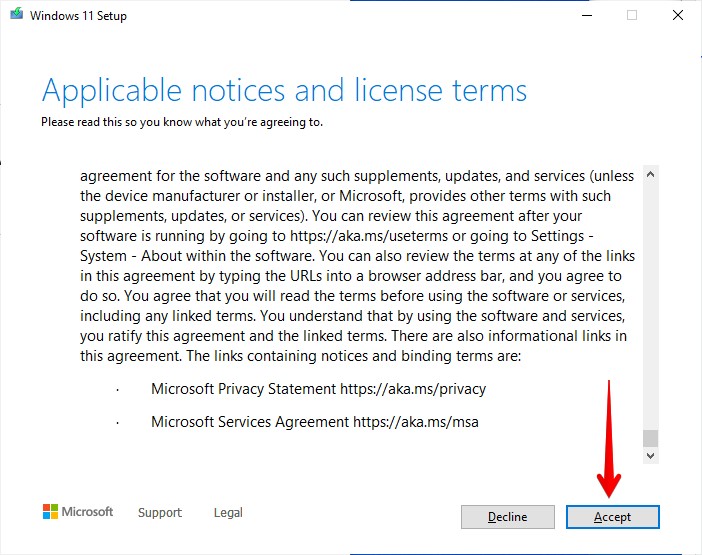
- Read the license terms and click Accept.

- Ensure that Keep personal files and apps is selected. If it’s not, you can choose this option by clicking Change what to keep. When ready, click Install.

After a few restarts, your computer will boot into Windows 11. You can sign-in using your regular Microsoft or local account and begin using your PC.
How to Reset Windows 11 Without Data Loss
If you’ve already installed Windows 11 but need to reset it again, Windows gives you several options to do so without losing your data or apps. Again, before actioning any of the below methods, ensure you’ve backed up your data.
Method #1: Reset Windows 11 PC
This method of resetting your Windows 11 computer without losing your data is the easiest. It allows you to choose whether you want to reset from local files or by downloading the necessary files online.
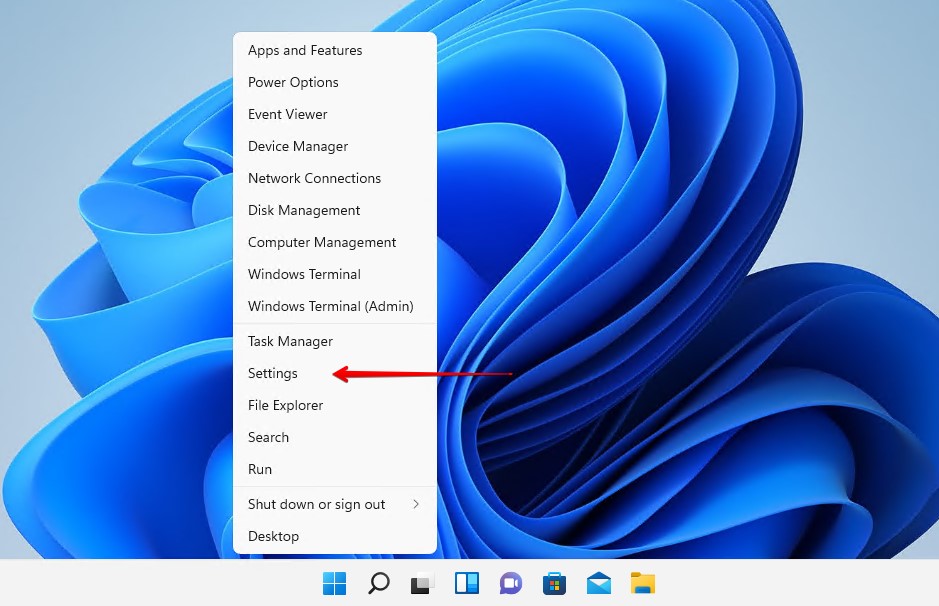
- Right-click Start and click Settings.

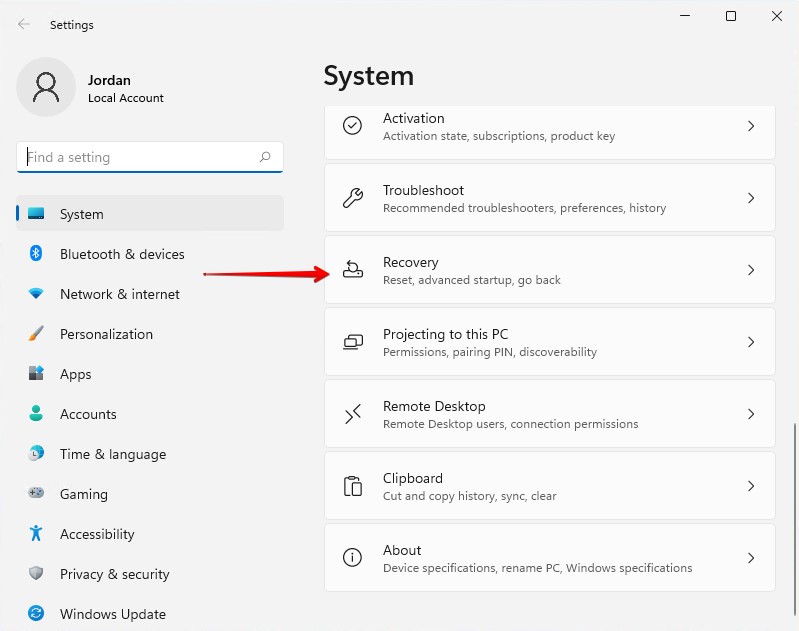
- Click Recovery.

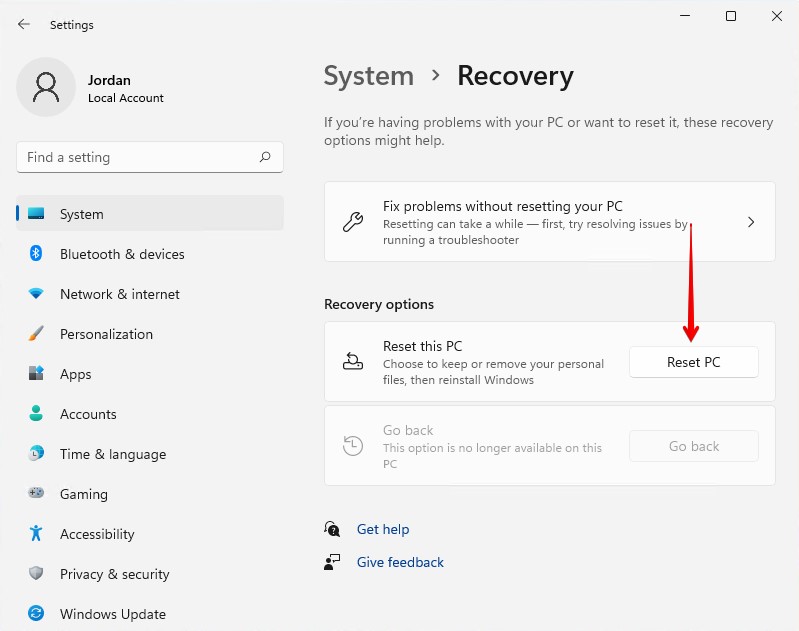
- Click Reset PC.
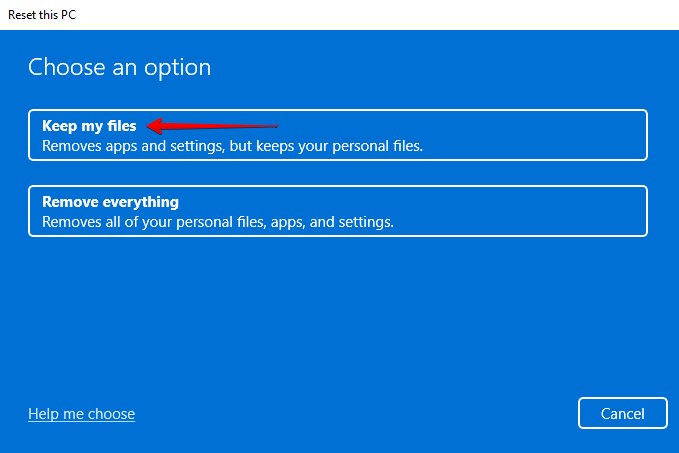
- Click Keep my files.

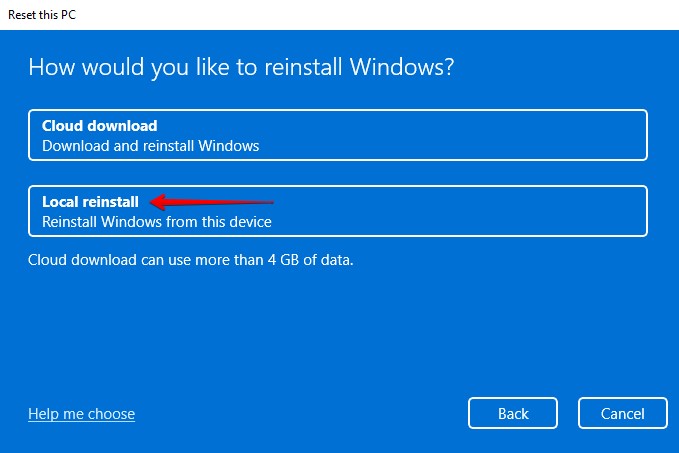
- Click Local reinstall.
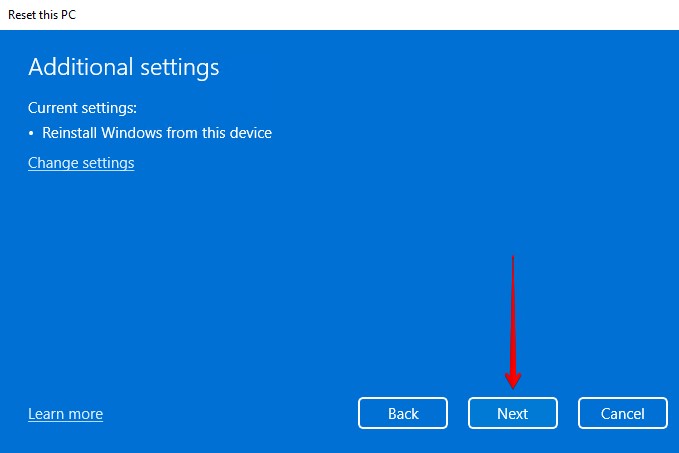
- Click Next.
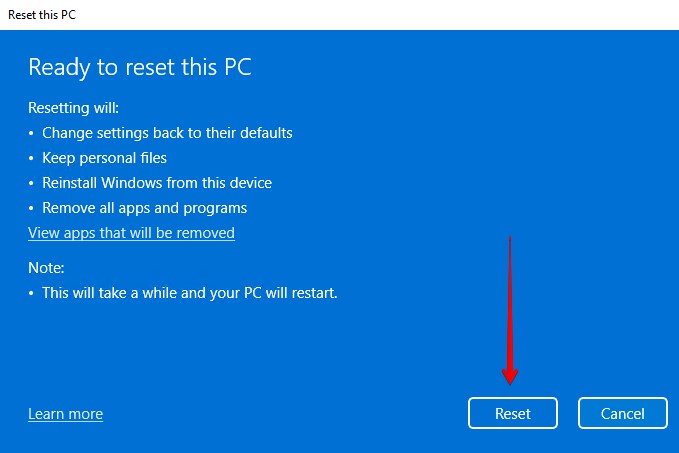
- Click Reset.
Method #2: Perform a Repair Install
Using the bootable USB we created earlier, you can perform a repair install of Windows 11 using an in-place upgrade. This uses the Windows 11 ISO to repair any corrupted or missing system files.
- Plug the bootable USB into your computer.
- Open the USB in File Explorer and run Setup. If prompted to confirm by UAC, click Yes.

- Click Next.
- Read the license terms and click Accept.
-

Ensure Keep personal files and apps is the selected option and click Install.
How to Prevent Losing Data in Windows 11
Upgrading to a new operating system can be intimidating, especially if you haven’t done it before. While Microsoft have done a great job at making it as easy as possible for the user, hiccups are always a possibility along the way.
- 💾 Make backups – By far the most effective way of preventing data loss is by making backups. Backing up your data ensures you have a full copy of your files that can be restored if the originals are lost.
- 👀 Monitor your drive – Monitoring your hard drive’s S.M.A.R.T. data can alert you to problems that arise before they become a major issue. You can use Disk Drill’s disk monitoring feature to stay updated on any problems that arise instead of manually checking it often.
- 💂♂️ Use antivirus software – Protect your data from virus attacks by using a reliable antivirus application that can prevent and contain malicious attacks.
- 👌 Eject devices safely – Removing storage devices in the middle of write processes can corrupt your data. Instead of just physically disconnecting it, be sure to eject the device safely. This will make sure all important processes are stopped safely.
- 👍 Use official ISO files – Before Windows 11 launched, it was leaked to the public. The problem with unofficial ISO files is that they’re unstable and potentially compromised by hackers. Always download ISO files from the official Microsoft website.
The above tips can help keep your data safe. Of course, data loss is always a possibility due to circumstances outside of our control. For that reason, keeping a backup on hand is the most effective data protection method.
Conclusion
By using the methods outlined in this article, you can install Windows 11 without losing any of your precious data. But, even though these methods work, there’s always a chance that something can go wrong.
Recovering your data from a backup is much easier than recovering it from a failed Windows installation. For that reason, we recommend making a backup of your data before attempting anything.
FAQ
No, your data won’t be lost if you install Windows 11 correctly. Of course, if you perform a custom install and format your drive, then your data will be lost. When upgrading to Windows 11, always ensure you choose the option to keep your data.
Regardless, you should back up your data any time you change operating systems.
You can easily upgrade to Windows 11 using the Windows 11 Installation Assistant. Before doing so, create a backup of your important data.
- Download and install the Windows 11 Installation Assistant. Open it.
- Read and accept the license terms.
- Click Restart now.
When completed, you you will be prompted to log into your new Windows 11 desktop using either your Microsoft or local credentials.
If your computer can support it, the Windows 11 update will appear in the Windows Update section of your settings when it’s ready. This is happening gradually by Microsoft. If you don’t want to wait, you can try installing it using the Windows Installation Assistant or ISO found on the Download Windows 11 page by Microsoft.
If you use the Reset PC option to reinstall Windows 11, you will be provided with two options:
- Keep my files: Removes apps and settings, but keeps your personal files.
- Remove everything: Removes all of your personal files, apps, and settings.
Yes, you can reinstall Windows without losing your personal files by using the Keep my files option after clicking the Reset PC button in the Settings app. That said, you should still backup your personal files to a secure location just to be extra safe.
If Windows 11 is taking a long time to install on your computer, it could be because your system hard drive or internet connection is too slow. It’s also possible that your system hard drive is nearing the end of its life and Windows is encountering a lot of bad sectors.
It typically takes around 45 minutes to perform a clean installation of Windows 11, but the time depends on the performance of your computer and the speed of your internet connection, so it may vary a lot.
Jordan Jamieson-Mane
Jordan Jamieson-Mane is a technology content writer with a passionate interest in technology. Starting from a young age, this interest gradually turned into a career, with Jordan studying in the field of IT and moving int…
Read full bio
Jordan Jamieson-Mane is a technology content writer with a passionate interest in technology. Starting from a young age, this interest gradually turned into a career, with Jordan studying in the field of IT and moving int…
Read full bio
Approved by
Brett Johnson
This article has been approved by Brett Johnson, Data Recovery Engineer at ACE Data Recovery. Brett has a Bachelor’s Degree in Computer Systems and Network, 12 years of experience.
This article has been approved by Brett Johnson, Data Recovery Engineer at ACE Data Recovery. Brett has a Bachelor’s Degree in Computer Systems and Network, 12 years of experience.