In this post we will see how to upgrade Windows Server 2008 R2 to Windows Server 2012. It’s been an year that Microsoft has released Windows Server 2012, when Windows Sever 2012 was released the IT professionals were eager to know what’s new in Windows Server 2012 and i was one of them. Microsoft releases all of its operating systems in multiple editions, which provides consumers with varying price points and feature sets. While choosing the edition make sure you choose the edition that suits your requirements. Before we go ahead and deploy Server 2012, let’s take a look at editions of Windows Server 2012.
1) Windows Server 2012 Datacenter Edition – The Datacenter edition is designed for large and powerful servers with up to 64 processors and fault-tolerance features such as hot add processor support. This edition is available only through the Microsoft volume licensing program and from original equipment manufacturers bundled with a server.
2) Windows Server 2012 Standard Edition – This is a fully functional edition of Windows Server 2012. Frankly speaking there is no much difference between Datacenter and Standard Edition of Windows Server 2012. What differentiates these 2 editions is the number of virtual machine instances that is permitted by the license. A Standard edition license will entitle you to run up to two VMs on up to two processors. A Datacenter edition license will entitle you to run an unlimited number of VMs on up to two processors.

3) Windows Server 2012 Essentials – The Essentials edition is suited for small organizations, this edition includes all the features of Standard and Datacenter edition except the Server Core, Hyper-v and ADFS (Active Directory Federation Services).
4) Windows Server 2012 Foundation – This edition is designed for small businesses that require only basic server features such as file and print services and application support. The edition includes no virtualization rights and is limited to 15 users.

If i were to upgrade my existing windows server 2008 R2 Enterprise server to windows server 2012 i would first choose the edition and then i would check the upgrade paths. I have created a table which shows whether you can upgrade to windows server 2012 with you present operating system.
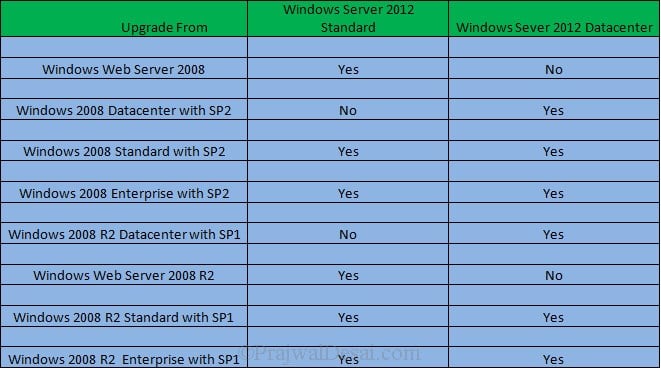
Lets take a look at hardware requirements for upgrading our server to windows server 2012. Windows Server 2012 requires minimum of 16 GB to 32 GB of disk space. When you install Windows Server 2012 it occupies 15.1 GB of space approximately but its good to allocate at least 32 GB of drive space for Windows Server 2012. You would require 1.4 GHz 64-bit processor, 512 MB of RAM, 32 GB of disk space, DVD Drive, Super VGA (800×600) or higher resolution monitor, keyboard and mouse.
The Windows Server 2012 evaluation software is available in Standard and Datacenter editions, you can download Windows Server 2012 from here :- http://technet.microsoft.com/en-in/evalcenter/hh670538.aspx.
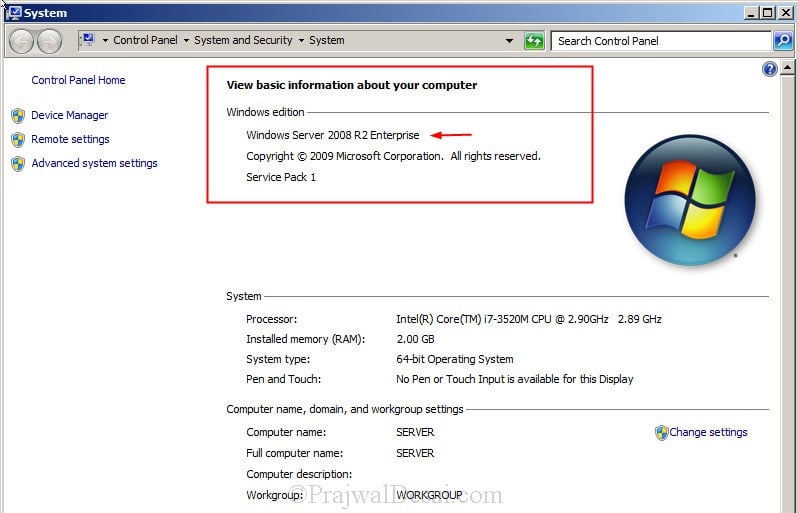
In this post i will be showing you how to upgrade a windows server 2008 R2 Enterprise SP1 to Windows Server 2012 Datacenter. Note that the existing server is in workgroup, do not consider this post to upgrade your domain controller to windows server 2012. I will be creating a separate post to show the upgrade of domain controller running on windows server 2008 r2 to windows server 2012.
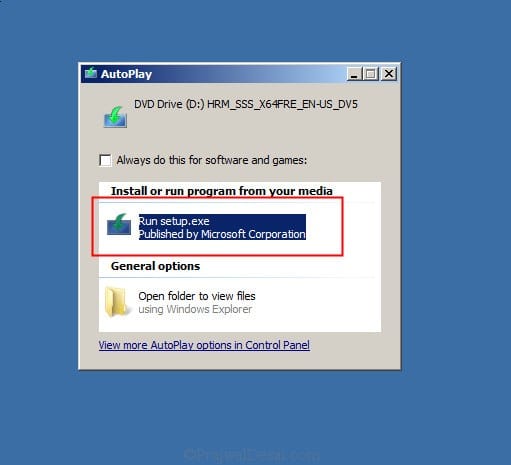
Insert the windows server 2012 DVD into the DVD-ROM and click on Run Setup.exe.
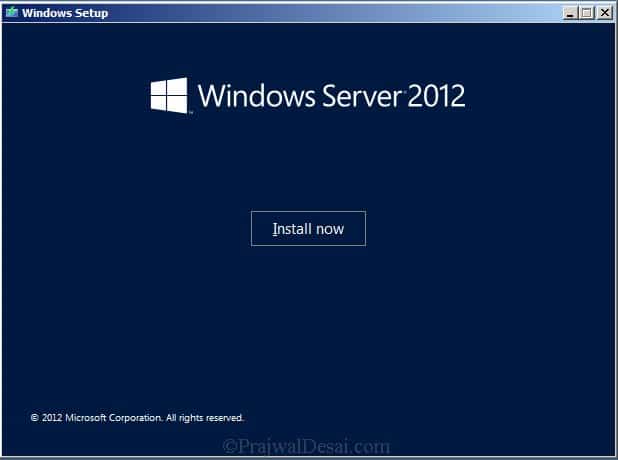
On the Windows Setup screen, click on Install now.
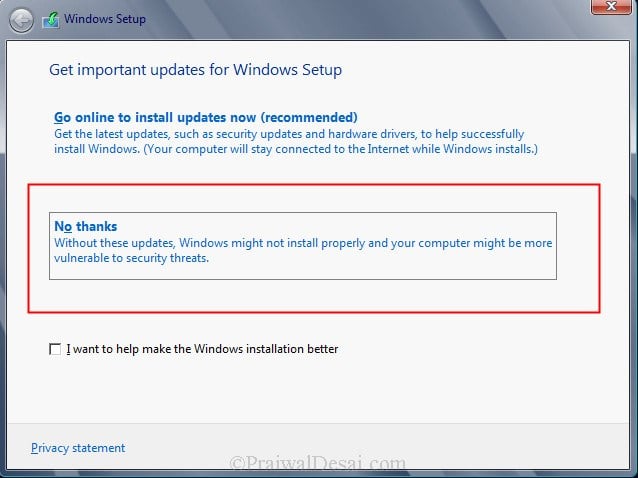
If you want to get security updates and latest drivers for your operating system select Go online to install updates now. We can also do a windows update once the upgrade is completed, so select No, Thanks.
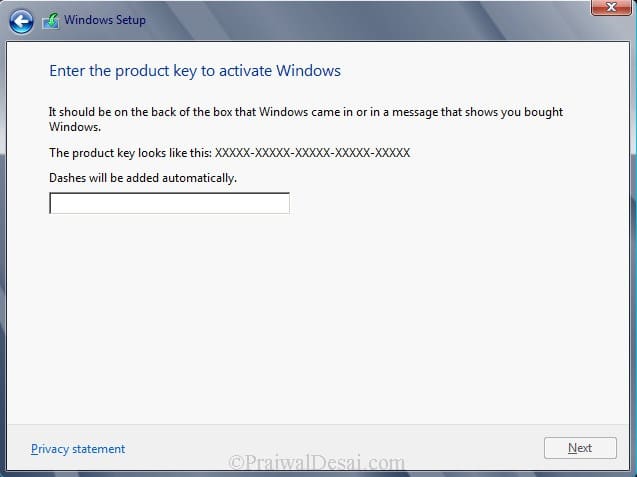
Enter your product key for windows server 2012 and click on Next. In this step i have entered server 2012 Datacenter edition key. Click on Next.
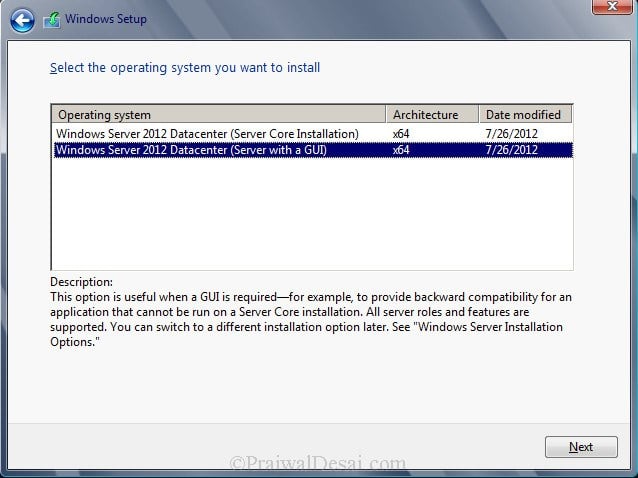
Server core installation has no Server Manager or any other MMCs to manage roles and features. The management must be done either remotely from a client machine or through the command prompt or Powershell at the console. There is no Start menu, no desktop Explorer shell, no Microsoft Management Console, and virtually no graphical applications. All you see when you start the computer is a single window with a command prompt. In this step i will select the second installation mode, Windows Server 2012 Datacenter (Server with a GUI). Click on Next.
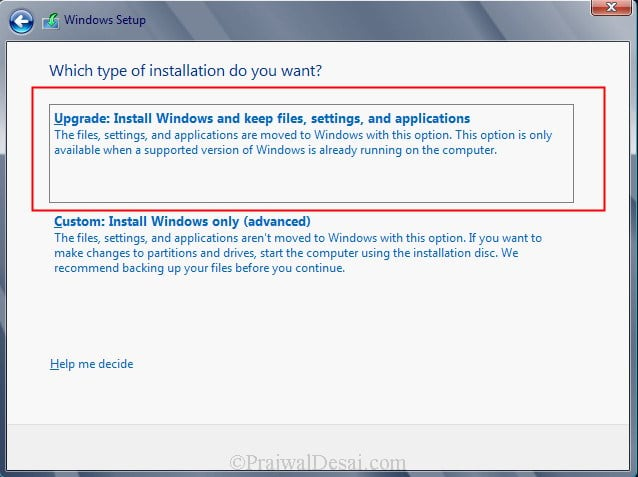
Select Upgrade: Install Windows and Keep files, settings and applications. This will keep existing files, settings and applications and upgrade our server to windows 2012.
The upgrade will take close to 20 minutes. Sit back and relax until the upgrade is complete.

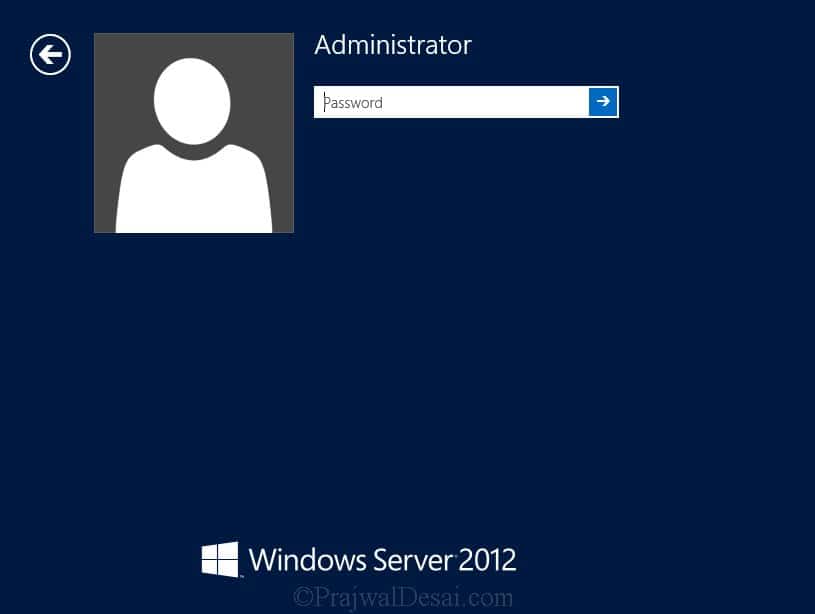
The upgrade from windows server 2008 R2 Enterprise to windows server 2012 Datacenter is complete. Let’s login to the server and check for the edition.
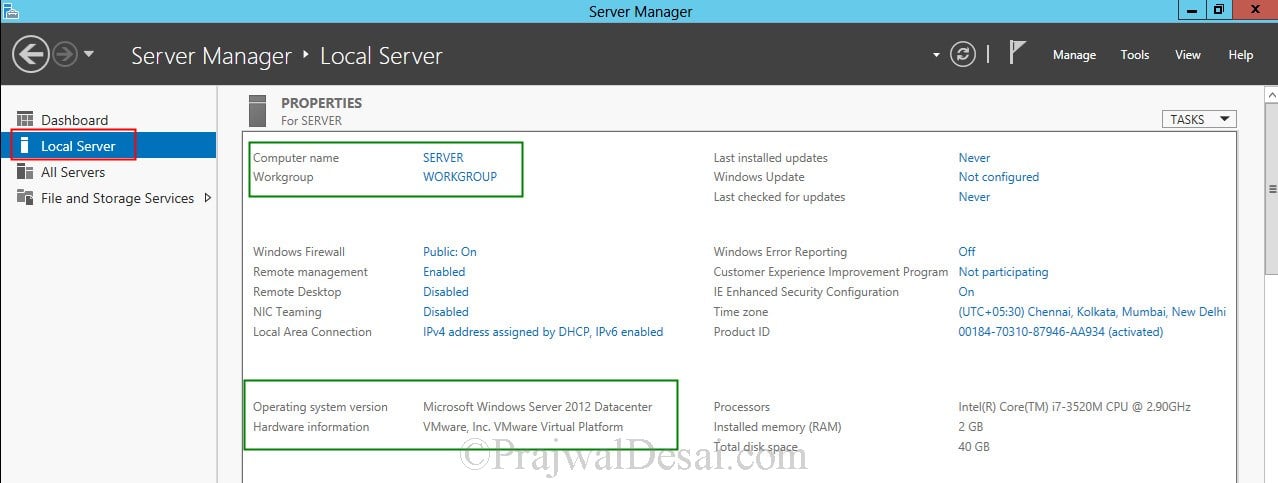
Click on Server Manager, Click on Local Server, check the properties of server. We see that the operating system version is Microsoft Windows Server 2012 Datacenter. The upgrade process has been completed successfully.
Still Need Help?
If you need further assistance on the above article or want to discuss other technical issues, check out some of these options.
Windows Server 2008 R2 will reach to end of life on January 14, 2020. It is essential that all users who are using Windows Server 2008 R2 upgrade their server to Windows Server 2012 R2 or migrate to other higher operating system (i.e. Windows Server 2016).
In this knowledgebase article, we will illustrate how can you perform in-place upgrade Windows Server 2008 R2 to Windows Server 2012 R2. Since this is major version upgrade, you have to read and understand the upgrade instructions properly.
Before you start upgrading your server, please ensure that you have necessary license for Windows Server 2012 R2. For more information about license upgrade, you can refer the following URL:
https://docs.microsoft.com/en-us/previous-versions/windows/it-pro/windows-server-2012-R2-and-2012/dn303416(v=ws.11)
It is essential that you have secured full backup of your data and you should be able to perform bare metal restore in case if the upgrade is failed. If upgrade is failed, you will have to restore the server from backup to boot from the old Windows Server 2008 R2. Also, if you have installed third party software or applications, please ensure that they are compatible with Windows Server 2012 R2.
Important Note: We are considering that you do not have any additional server role (i.e. IIS, FTP, DNS, Active Directory etc.) on the server. If you have additional server role, kindly refer their compatibility to perform in-place upgrade.
Upgrade Windows Server 2008 R2 to Windows Server 2012 R2
Before starting upgrade, please ensure that you have installed all pending updates for Windows Server 2008 R2. If there is any pending update, kindly install it first. Once all updates are installed, we are ready to perform this upgrade.
[1] Insert Windows Server 2012 R2 ISO in your server and start the installation. It will ask you to accept license terms. Select “I accept the license terms” and click on Next button as shown in the following image:

[2] On next step, it will ask you which type of installation do you want. You need to select “Upgrade: Install Windows and keep files, settings and applications” option to upgrade the existing operating system as shown in the following image:

[3] Next step will check the compatibility and it will provide you report. Kindly the compatibility report. If it does not report any issue, you can click on Next button as shown in the following image:

If this is Hyper-V virtual machine, you may see the following warning:
Installing Windows will affect these devices:
These devices might not work properly in Windows. We recommend updating the drivers for these devices before you continue. ? System devices: Microsoft Hyper-V S3 Cap
You can ignore this message and continue with upgrade. This will not cause any issue.
[4] Now it will start copying Windows files to upgrade the server’s operating system. During this process your system may restart several times. Please do not interrupt this process.


[5] On last step, you will see a screen with “Finalizing your settings” after reboot. Once again, do no interrupt or reboot your server while it is performing this. It may take some time. Once this step is complete, you should see that login screen.

After login, you should verify your installed software and data to ensure that they are available after upgrade.
В этой статье мы поговорим о процедуре обновления домена с версии Windows Server 2008 R2 до Windows Server 2012 с последующим понижением роли старого контроллера домена до рядового сервера AD.
Итак, что имеется:
- Домен Active Directory как минимум с одним контроллером домена на Windows Server 2008 R2
- Уровень леса и домена AD должен быть как минимум Windows Server 2003
- Дополнительный рядовой сервер домена с Windows Server 2012 , который в дальнейшем станет контроллером домена (как включить сервер в домен подробно описано в статье Как включить Windows в домен).
- Учетная запись с правами администратора домена, схемы и леса.
Прежде чем добавлять новый контроллер домена на Windows 2012 необходимо обновить схему домена и леса. Классически подготовка и повышение уровня домена осуществлялась вручную с помощью утилиты Adprep.exe. В документации новой серверной платформы от Microsoft указано, что при повышении первого сервера с Windows Server 2012 до уровня контроллера домена, повышение уровня домена происходит автоматически при установке роли AD DS на первый сервер Windows 2012 в домене. Так что, теоретически, для подготовки домена ничего делать не нужно.
Однако, предпочтительнее контролировать результат такого ответственного процесса, как обновление схемы. Выполним процедуру обновления схемы вручную.
Обновление схемы AD до Windows Server 2012 с помощью adprep
Для обновления схемы нам понадобится утилита adprep.exe, взять которую можно в каталоге \support\adprep\ на диске с дистрибутивом Windows Server 2012. Данная утилита бывает только 64-разрадной (утилиты adprep32.exe больше не существует), соответственно, запустить ее можно будет только на 64 разрядном контроллере домена.
Необходимо скопировать утилиту на текущий DC с ролью Schema Master (Хозяин схемы) и в командной строке с правами администратора выполнить команду подготовки леса к установке нового DC на Windows Server 2012:
adprep /forestprep
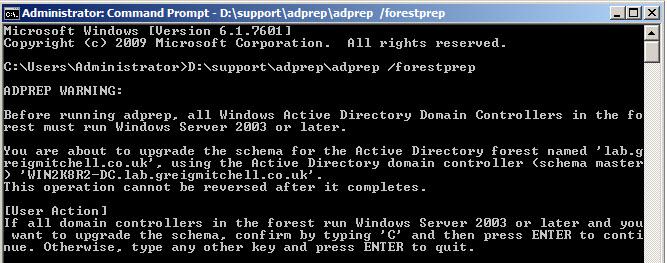
Версия схемы Active Directory в Windows Server 2012 — 56.
Далее обновим схему домена:
adprep /domainprep
Далее осталось дожидаться окончания репликации изменений в схеме по всему лесу и проверить существующие контроллеры домена на наличие ошибок. Если все прошло хорошо – продолжаем. Пришла пора развернуть контроллер домена на Windows Server 2012.
Установка контроллер домена на Windows Server 2012
Первой интересной новостью является тот факт, что знакомой администраторам утилиты DCPROMO, позволяющей добавить или удалить контроллер домена в AD больше не существует. При ее запуске появляется окно, в котором сообщается, что мастер установки Active Directory Domain Services перемещен в консоль Server Manager.
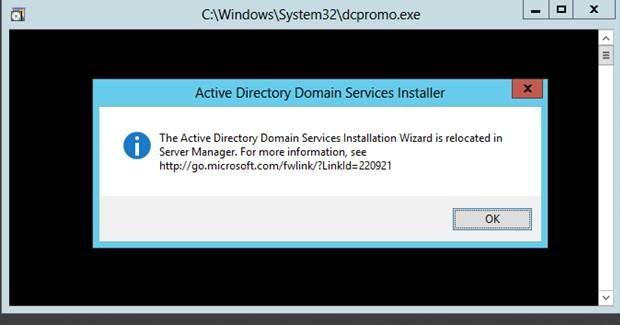
Что ж, откроем консоль Server Manager и установим роль Active Directory Domain Services (Внимание! Установка роли автоматически не означает тот факт, что сервер стал контроллером домена, роль нужно сначала настроить)
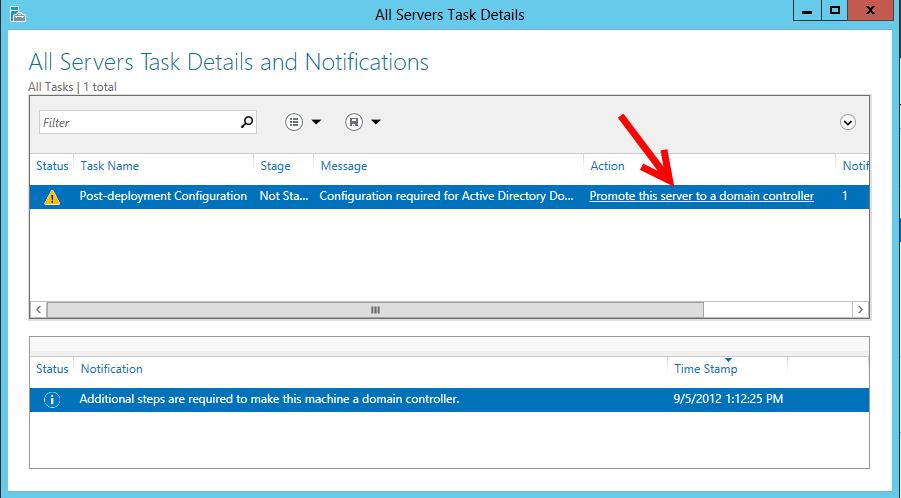
После окончания установки роли появится окно, в котором сообщается, что сервер готов стать контроллером домена, для чего нужно нажать на ссылку “Promote this server to domain controller” (далее мы рассмотрим только значимые шаги мастера создания нового контроллера домена).
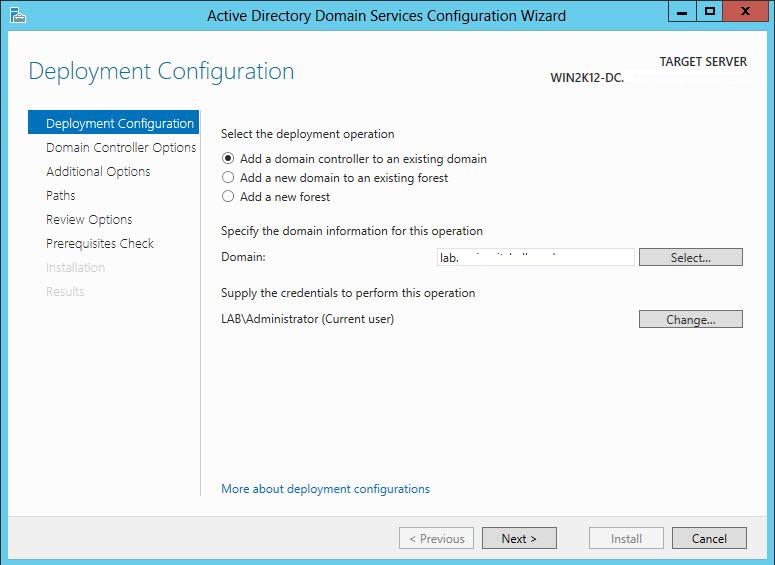
Затем нужно указать, что данный контроллер домена будет добавлен в уже существующий домен (Add a domain controller to an existing domain), указать имя домен и учетную запись из-под которой будет проводится операция.
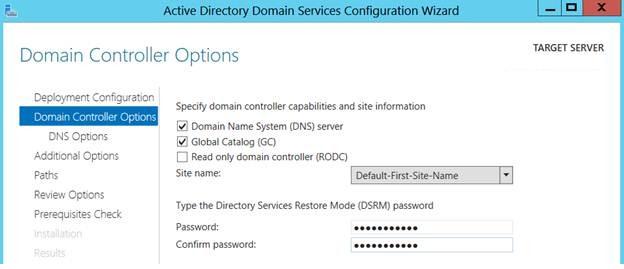
Затем укажите, что данный контроллер домена будет содержать роли GC (Global Catalog) и DNS сервера. Также укажите пароль восстановления DSRM (Directory Services Restore Mode) и, если необходимо имя сайта, к которому будет относиться данный контроллер домена.
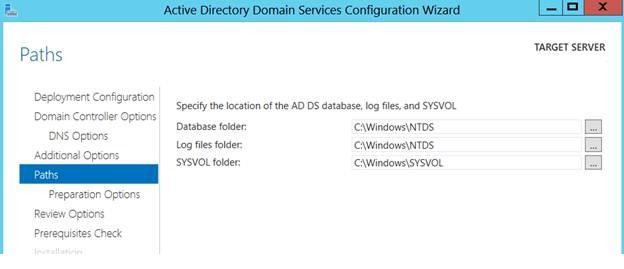
В разделе “Paths” указываются пути к базе Active Directory (NTDS), файлам логов и каталогу SYSVOL. Учтите, что данные каталоги должны находиться на разделе с файловой системой NTFS, тома с новой файловой системой Windows Server 2012 — Resilient File System (ReFS) – использовать для этих целей нельзя!
По окончании работы мастера установки роли AD DS, сервер нужно перезагрузить. После перезагрузки вы получаете новый контроллер домена с ОС Windows Server 2012.
Удаление старого контроллера домена на Windows Server 2008 R2
Прежде, чем понизить роль старого контроллера домена с Windows Server 2008 R2 до рядового сервера, нужно перенести все FSMO роли на новый контроллер домена .
Процедура переноса ролей FSMO с одного контролера домена на другой нами уже рассматривалась, подробнее с ней можно познакомится в статье Передача ролей FSMO в Active Directory. Процедуру можно осуществить через графический GUI (проще) или из командной строки с помощью утилиты ntdsutil
После передачи роли FSMO PDC Emulator, необходимо настроить синхронизацию времени на новом контроллере домена с внешним сервером (с которым время синхронизировалось ранее). Подробно процедура настройки синхронизации времени на PDC описана в статье: Синхронизация времени с внешним NTP сервером в Windows 2008 R2 . Формат команды примерно такой (ntp_server_adress – адрес NTP сервера):
w32tm /config /manualpeerlist:ntp_server_adress /syncfromflags:manual /reliable:yes /update
После того, как все роли FSMO перенесены на новый DC Windows Server 2012, убедитесь, что домен работает корректно: проверьте прохождение репликации AD, журналы DNS и AD на наличие ошибки. Не забудьте в настройках сетевой карты на новом сервере в качестве предпочтительного DNS сервера указать собственный адрес.
Если все прошло корректно, можно понизить роль старого контроллера домена 2008 R2 до рядового сервера домена. Это можно сделать, запустив на нем мастер DCPROMO, и указать, что данный сервер более не является контроллером домена. После того, как данный сервер станет рядовым сервером, его можно полностью отключить.
Here is smooth tutorial on how to upgrade and migrate you Windows Server 2008 or 2008 R2 to Server 2012.
A lot of people/business would like to upgrade their server system but would not want to loose all their comfigurations. So i presume here an helpful tutorial to help you Upgrade and Migrate without loosing your configurations.
NOTE: You can use this same process to;
- Upgrade/Migrate Server 2003 SP1 to Server 2008
- Upgrade/Migrate Server 2003 SP1 to Server 2008 R2
- Upgrade/Migrate Server 2003 SP1 to Server 2012
- Upgrade/Migrate Server 2008 to Server 2008 R2
- Upgrade/Migrate Server 2008 to Server 2012
- Upgrade/Migrate Server 2008 R2 to Server 2012
Following their precise Editions.
Follow the Step below gently;
Step 1 – Insert your installation disc – Window Server 20l2
Step 2 – Make sure your Forest and Domain functional level is set to Server 2003 or higher
Step 3 – Open your installation folder and switch to Support\adprep\ folder – you would see adprep.exe
Step 4 – Open the Command Prompt and Drag the adprep.exe application to it
Step 5 – Hit space and type /forestprep then hit Enter
(You should get a success message)
Step 6 – In the same command prompt, drag the adprep.exe application again, hit space and type /domainprep then hit Enter.
(You should get a success message)
Step 7 – After you’re done. Run the Window Server 20l2 from “My Computer Window” and start your upgrade.
NOTE: Don’t go for new/fresh installation. Go for Upgrade.
System Requirements for Windows Server 2012
Processor – 1.4 GHz (64-bit processor) or faster for single core
RAM – 2 GB
Hard-Disk – 160 GB hard disk with a 60 GB system partition
It should take appoximately 30mins depending on the speed of your System.
Thanks, If this worked for you. Please Comment | Share | Subscribe
If you don’t get the steps, See a video tutorial below;
Watch Video Tutorial
I would never recommend an in place upgrade of any Windows version, but
sometimes it may be required in certain situations. Should this be necessary
I figured we could take a few minutes to walk through it. Note that doing
this on a Domain Controller presents additional challenges listed at the end
of this article. (TLDR: Don’t do an in-place upgrade of a core 2k8r2 DC to
2012)
Let’s do a core upgrade from 2008r2 to 2012:
Assumptions
- Your 2008r2 Filesystem is healthy and you don’t have any major issues
with the services on the node. - Local Admin Access
- A valid license
Upgrade
- Insert the 2012 disk in the physical machine or VM you intend to
upgrade. - Change directory to the disk and execute setup.exe, i.e. «j:»
(ENTER) «setup.exe« - When prompted, choose «go online and install updates now» if
you’ve got internet access on this machine. If not, more forward without
updating. - Enter your product key for this install. Most enterprise customers
will either use a volume license key or datacenter key. - Here you can select to either stick with the core install or install
the GUI as part of the upgrade. I’m assuming that because you are
upgrading the core version you’ll want to stick with core. - Accept the license terms.
- Select «Upgrade» unless you want to do a custom install. I
won’t cover that here since the options would be specific to your
implementation. - At the next screen you will be warned if there are any compatibility
issues; often times virtualization components will be flagged. Oft times
you can ignore this warning, but be sure you read it in full and
consider how easy it would be to double back now and correct the
issue. - The upgrade process will now proceed; there will be a few
reboots. - After the upgrade is complete, ensure you update virtualization
components if applicable and run Windows Update.


Upgrading a domain controller on a core installation of 2008r2 to 2012
doesn’t really work without relatively major workarounds. See this Microsoft support article for more information.
This fix took quite awhile to be developed, and leaves a bit to be desired.
It’s probably easier to do the right thing anyhow; stand up new 2012 DCs and
decommission the old 2008r2 servers. After you decommission the old ones, make sure you
ensure the AD sites as well as the _msdcs and primary DNS zones are cleaned
up correctly. (that’s an article in and of itself) There is a long
discussion thread regarding this workaround on the Technet
forums.

|
| The Dreaded Black Screen of Life! |
It should also be noted that the Win2012 certification exams (70-41x) are
not aware of this issue. Until next time!
