
Здравствуйте
У Вас повреждена система, не обновлена, либо установлена пиратская «сборка» Windows.
Удалите стороннее антивирусное ПО (Kaspersky, Avast, Iobit, Eset, Malvarebytes, 360 Security и т.п), сторонние файрволы, Adguard, Wallpaper engine, MSI Afterburner, MSI Mystic light и аналогичные, для управления подсветкой и блокировки рекламы. Добавьте папки с GTAV и RAGEMP в исключения защитника Windows. Отключите защиту в реальном времени. Отключите, либо удалите ПО от Razer если установлено. Также Process Lasso и Park Control, Memreduct, Advanced system care и подобные. Также отключите Xbox game bar и его оверлей, повтор xbox, оверлей дискорд, удалите betterdiscord, отключите оверлей стим и прочие оверлеи, кроме geforce experience/AMD Relive
Обновите Вашу Windows 10 до актуальной версии — 21Н1 и выше, либо Windows 11
Установите VC++ всех годов и версий(x64/x86), и .Net 4.6, DirectX, которые позволит установить система
Выполните восстановление целостности Вашей Windows 10 (Для Windows 11 аналогично), с помощью DISM — DISM /Online /Cleanup-Image /RestoreHealth, как указано в данной теме — https://forum.gta5rp.com/threads/faq-proverka-celostnosti-windows-10.248742/
Если пользовались «Драйвер паками» удалите их, установите драйверы адекватно, с сайта производителя.
Переустановите драйверы видеокарты начисто, удалив их через утилиту DDU в безопасном режиме — Display Driver Uninstaller guru3d.com
Далее установите с сайта Nvidia, либо AMD, Driver booster и подобное ПО использовать нельзя.
Как сама система, так и драйверы видеокарты, должны быть обновлены до последней версии.Проверьте настройки системы — Параметры-Система-Дисплей-Масштаб, выберите 100%
Также проверьте, чтобы в панели видеокарты, не был выбран нестандартный масштаб
Задайте приоритет для gta5.exe, который находится в папке RAGEMP как в системе, так и в панели nvidia/AMD
Параметры -> Система -> Дисплей -> Настройки графики (в самом низу) -> Обзор (зайти в папку RAGEMP выбрать файл gta5.exe) -> для этого приложения выбрать параметр «Высокая производительность»
Убедитесь, что у Вас установлена только одна копия мультиплеера RAGE. Введите в поиске проводника Windows gta5.exe Приоритет должен быть задан именно для той копии мультиплеера, из папке с которой Вы запускаете updater (не для папки GTA V)
Не забудьте перезагрузить ПК. Проверьте обновления системы, актуальная версия — 21Н1 и выше.
Выполните восстановление целостности Вашей Windows 10 (Для Windows 11 аналогично), с помощью DISM — DISM /Online /Cleanup-Image /RestoreHealth, как указано в данной теме — https://forum.gta5rp.com/threads/faq-proverka-celostnosti-windows-10.248742/
Если результата нет, остается радикальный метод — переустановка Windows, используя образ с сайта Microsoft. Использовать пиратские сборки, корпоративную версию Windows не следует.
Во время пуска различных игр может появиться критическая ошибка, при которой окно сразу закрывается. Крит сопровождается уведомлением «Untrusted system file (C:\Windows\System32\…)». В подавляющем большинстве случаев причиной является сбой или неправильная работа анти-чит приложения – EasyAntiCheat. Ещё проблему может вызывать нарушение целостности системных файлов Windows. Сейчас обо всём поподробнее.
Причины сбоя
На суть проблемы не двояко намекает само сообщение. В переводе оно говорит: «Подозрительный системный файл». После данной записи обычно указывается ссылка на расположение файла по пути C:\Windows\System32. Естественно, в сообщении передаётся и наименование сомнительного файла.
Чаще всего у пользователей появляются проблемы со следующими dll-файлами:
- apphelp;
- aticfx64;
- avifil32;
- dwmapi;
- normalize;
- safeips64;
- vcruntime140;
- wldap32 и прочие.
Чтобы описать проблему понятнее, лучше сказать так – EasyAntiCheat выявил повреждение системного файла (не обязательно одного из вышеперечисленных). Приложение для защиты от читов, производимое Valve, выявляет какие-то нарушения целостности файлов, от чего его подвергает сомнению. Программа утрачивает доверие к конкретному файлу, из-за чего и появляется ошибка «Untrusted system file…».
Основные причины сбоя:
- Повреждение системных файлов из-за работы антивируса, вируса или повреждения секторов на диске;
- Неправильная работа приложения EasyAntiCheat;
- Заблокирована или выключена служба EasyAntiCheat.
Исправление перечисленных причин ошибки поможет исправить и последствие – вылет из игры.
Проверка целостности системы
В Windows есть предустановленная утилита под названием sfc, которая автоматически проверяет целостность системных файлов. Если она найдёт какие-то сбои или повреждения, автоматически исправит их. Для запуска функции нужно воспользоваться консолью (ПКМ по Пуску и клик на «Командная строка»). Внутрь появившегося окна нужно вставить sfc /scannow и нажать кнопку Enter.
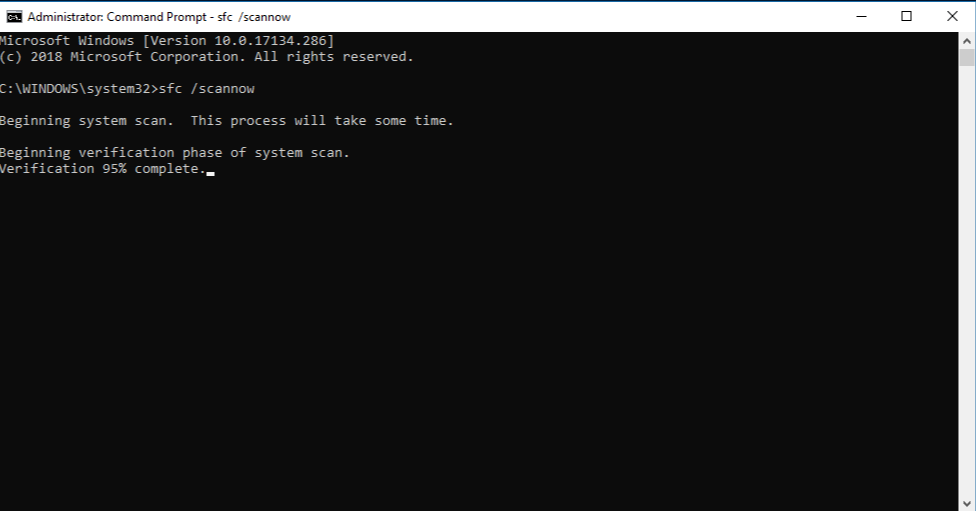
Больше от пользователя ничего не нужно, лишь дождаться завершения процедуры, и перезагрузить компьютер. В качестве альтернативы функции sfc есть DISM. Её имеет смысл использовать, если во время сканирования через sfc появились сбои. Команда в консоль – DISM.exe /online /cleanup-image /restorehealth.
Проверка состояния службы EasyAntiCheat
Задача пользователя – удостовериться, что служба активна.
Пошаговое руководство:
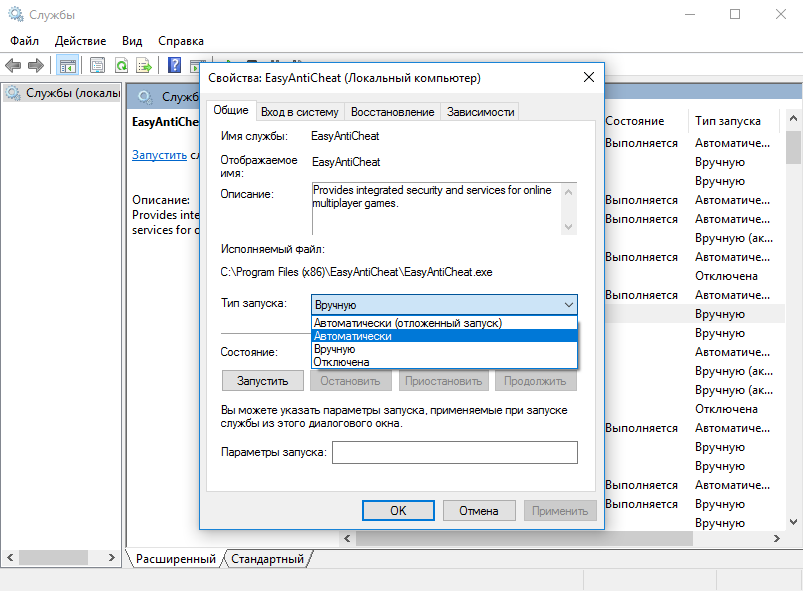
- Нажать Win + R, вставить services.msc и щёлкнуть Ввод.
- Среди списка доступных служб нужно найти EasyAntiCheat.
- Сделать двойной клик по службе и заменить «Тип запуска» на «Автоматически».

- Перезагрузить службу.
Временное выключение средств защиты
Следует удостовериться, что антивирусное ПО и брандмауэр не блокирует нормальную работу приложения EasyAntiCheat. Для этого стоит временно выключить антивирус с брандмауэром и проверить, работает ли игра.
Удаление файлов EasyAntiCheat
Суть способа в том, чтобы перейти в каталог с игрой и удалить внутри него директорию с названием «EasyAntiCheat». Сразу после удаления папки нужно попробовать запустить игру.
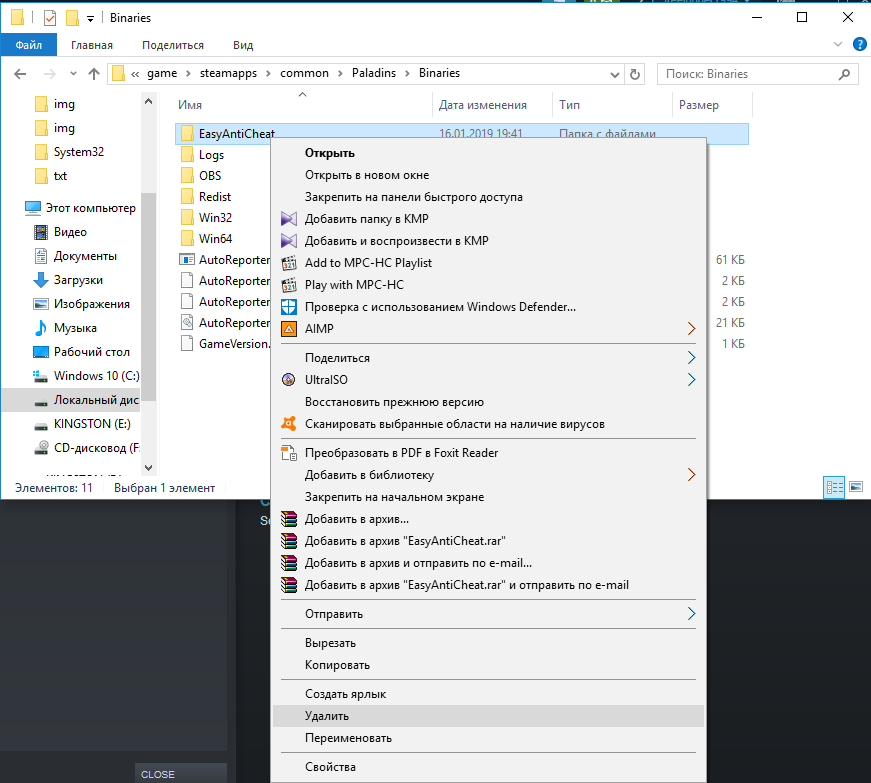
Важно! Удаление может не получиться, вместо него часто появляется сообщение – папка используется. Чтобы исключить её из работы, стоит перезагрузить компьютер и не запускать игру до удаления каталога.
Переустановка EasyAntiCheat
Довольно часто помогает переустановка анти-чит утилиты EasyAntiCheat.
Что нужно делать:
- Открыть каталог с игрой и перейти в раздел bin.
- Найти и открыть здесь папку EasyAntiCheat.
- Запустить установочный файл EasyAntiCheat_Setup.exe.
Сброс сетевых протоколов
Всё предельно просто:
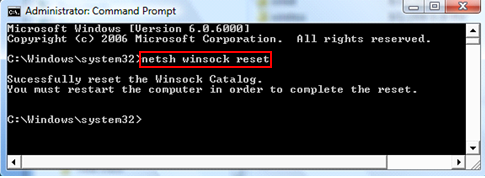
- Сделать ПКМ по Пуску и выбрать «Командная строка (Администратор)».
- Вставить запись netsh winsock reset.

- Нажать на клавишу Enter и ожидать завершения процедуры.
Сканирование системы на наличие вирусов
Повреждение важных для системы файлов может произойти из-за наличия в Windows вредоносного кода. Зловреды могут изменять файлы, от чего они теряют работоспособность. Чтобы удалить вирусы, стоит использовать сканеры AdwCleaner или Dr.Web.
Уже сейчас ошибку «Untrusted system file (C:\Windows\System32\…)» можно считать поверженной. Один из прошлых способов должен был исправить проблему с некорректной работой анти-чита или повреждением файлов. Теперь игра должна работать исправно и стабильно.
Readers help support Windows Report. We may get a commission if you buy through our links.
Read our disclosure page to find out how can you help Windows Report sustain the editorial team. Read more
You might have been encountering issues related to nvapi64.dll, and you are wondering what the file does on your PC. Rest assured that this file is pretty safe and poses no threat to your PC.
In this guide, we have provided detailed information on this DLL file and what to do when you encounter issues with it.
What is nvapi64.dll?
The nvapi64.dll is a 64-bit file that is an essential module of the NVIDIA Windows drivers. This DLL file plays an important role in the smooth running of your graphics driver, which many apps depend on to work properly.
The good thing about this DLL file is that it is completely safe. However, it must be noted that viruses can make these files malfunction, leading to DLL files missing error messages. Usually, a full virus scan should fix this.
How can I fix nvapi64.dll errors?
1. Use a dedicated DLL fixer
Nvapi64.dll is one of the third-party DLL files that come with the needed software. The importance of this file cannot be downplayed, as many apps depend on it to run successfully.
Fortunately, you can fix this DLL file with one of the best DLL repair tools. Such software is known to fix compatibility issues which are the major problem that plagues third-party DLL files and Windows PCs.
2. Download from a third-party website
- Go to a top third-party website like DLL files.com and click the Download link.

- Now, extract the content of the downloaded file and move the nvapi64.dll file to the path below on a 32-bit PC:
C:\Windows\System32 - Move it to the path below instead on a 64-bit PC:
C:\Windows\SysWOW64 - Finally, restart your PC.

If you are facing issues related to the nvapi64.dll file on a PC you built, you need to download it from a third-party website. Moving it to your system files should help you fix this issue.
Note that you need to scan the downloaded file to ensure its safety.
- D3dx11_42.dll Not Found: How to Fix it
- Windows 11 Shutdown After Inactivity: 4 Ways to Stop it
- Windows Shuts Down Instead of Restarting: 4 Ways to Fix it
3. Update your PC
- Press the Windows key + I and select the Windows Update option in the left pane.
- Click Check for updates in the right pane.

- Finally, download and install all available updates, including the optional ones.

Windows update is important for fixing many issues on your PC. So, if you are dealing with errors related to nvapi64.dll, you need to update your system and restart it after.
4. Update your graphics driver
- Press the Windows key + R, type devmgmt.msc, and click OK.
dev
- Click the arrow next to Display adapters to expand it and right-click the device under it.
- Now, choose the Update driver option.

- Click the Search automatically for drivers option and install any available updates.
- If updating the driver does not fix the issue, repeat Steps 1 to 3 and select Uninstall device instead.
- Finally, click the Uninstall button and restart your PC.


The activity of the nvapi64.dll file is related to your graphics driver. So, when your display driver is outdated or broken, you will likely get different errors. This is also the reason behind amfrt64.dll errors.
An alternate method of restoring your driver to top condition is to use an automatic driver updater in Outbyte Driver Updater. With this tool, you can take out the guessing, as it will scan and repair any faulty driver with just a few clicks.
5. Repair system files
- Press the Windows key, type cmd, and select Run as administrator under Command Prompt.

- Type the command below and hit Enter to run it:
DISM /online /cleanup-image /restorehealth
- Wait for the command to finish running. Now, run the command below:
sfc /scannow
- Finally, wait for the command to finish running and restart your PC.


Sometimes, you might face problems with nvapi64.dll because of faulty system files. The fastest way around this is to run the DISM and SFC scans.
6. Perform a system restore
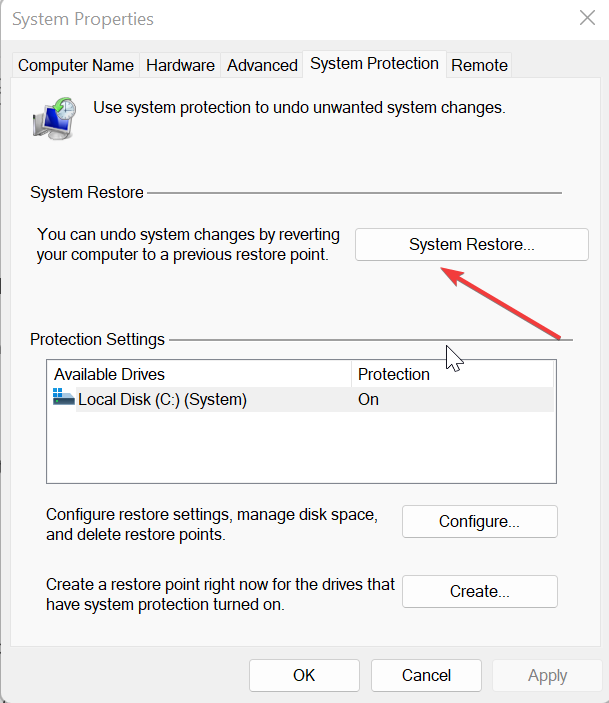
- Press the Windows key, type restore, and select Create a restore point.

- Click the System restore button on the next page.

- Now, click the Next button on the page that pops up.

- Select your preferred restore point and click the Next button.
- Finally, click the Finish button and follow the onscreen instructions to complete the process.


Sometimes, it might be hard to trace the cause of the nvapi64.dll issue. What you need to do here is to perform a system restore to a point before the problem.
There you have it: everything you need to know about the nvapi64.dll file. You should now know the importance of the file and how to fix its occasional errors.
If you are missing some DLL files on Windows 10, check our detailed guide to get them back.
We also have a guide on what to do if cudart64_90.dll is missing, so don’t miss it. This isn’t the only issue, and we covered libgcc_s_dw2-1.dll was not found earlier, so check it out.
We also wrote about Gwrks64.dll in our latest article, so don’t hesitate to visit it for more information.
Do you have any experience to share about this file? Feel free to use the comments below.
Ola-Hassan Bolaji
Windows Hardware Expert
A Computer Engineering graduate, he has spent most of his life reading and writing about computers.
He finds joy in simplifying complex topics into simple solutions for PC users. The quality of his work and providing step-wise tested and proven solutions to PC issues are all that matter to him.
Away from computers, he is either reading or watching football!
Are you looking for effective methods for the “Easy Anti-Cheat untrusted system file” error? In this post, MiniTool Partition Wizard introduces a couple of feasible solutions to this error. You can have a try.
The “Easy Anti-Cheat untrusted system file” error always occurs when you are launching games on Steam, including Apex Legends, Elden Ring, Fortnite, New World, etc. This error is annoying and can be caused by various factors. To resolve the error better, some main reasons for it are listed below:
- You don’t have administrative privileges to run Easy Anti-Cheat
- Easy Anti-Cheat is installed improperly
- There are some corrupted game files of the specific game
- Something wrong occurs while installing the specific game
- …
If you have no clue how to fix the “Easy Anti-Cheat untrusted system file Steam” issue, you can have a look at the following content.
Solution 1: Run Easy Anti-Cheat as an Administrator
If you run Easy Anti-Cheat without administrative rights, you may encounter the “Easy Anti-Cheat untrusted system file” issue. Therefore, when the issue comes out, the first thing you can do is to run Easy Anti-Cheat as an administrator.
Step 1: Launch the Steam client and then go to LIBRARY.
Step 2: Right-click the problematic game from the game list and select Properties.
Step 3: Go to LOCAL FILES and then click Browse to open the root directory of the specific game.
Step 4: Find and right-click the EasyAntiCheat_launcher file and select Properties.
Step 5: After that, go to Compatibility. Then tick the checkbox next to Run this program as an administrator.
Step 6: Finally, click Apply and OK to save the changes.
Once done, go to Steam and check if the issue is fixed.
Solution 2: Repair Easy Anti-Cheat
Another way you can try to fix the “Easy Anti-Cheat untrusted system file Steam” error is to repair Easy Anti-Cheat. To do this, follow the steps below.
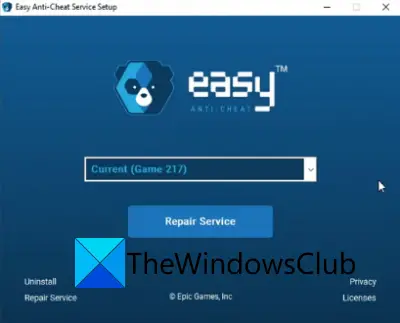
Step 1: Locate the EasyAntiCheat_Setup.exe file in File Explorer. Then right-click this file and select Run as administrator.
Step 2: After you open this program, select the game you want to launch in the blank box and then click Repair Service.
Step 3: After the process is completed, click Finish and try launching the game again to see if the error is removed.
Solution 3: Reinstall Easy Anti-Cheat
The “Steam game untrusted system file” error may also appear due to improper installation of Easy Anti-Cheat. In this case, you need to reinstall this program to fix the error.
Step 1: Run the EasyAntiCheat_Setup.exe file as an administrator again.
Step 2: Select the problematic game from the drop-down menu. Then select Uninstall.
Step 3: Once the process is finished, open the file once more. Then click Install Easy Anti-Cheat. You should follow the on-screen instructions to finish the installation.
After that, restart your computer and launch the specific game again to check if the “Easy Anti-Cheat untrusted system file Steam client” issue is repaired.
Solution 4: Verify the Integrity of the Specific Game
Corrupted game files may lead to the “Easy Anti-Cheat untrusted system file Steam” error as well. On this occasion, you can fix the error by verifying the integrity of the problematic game.
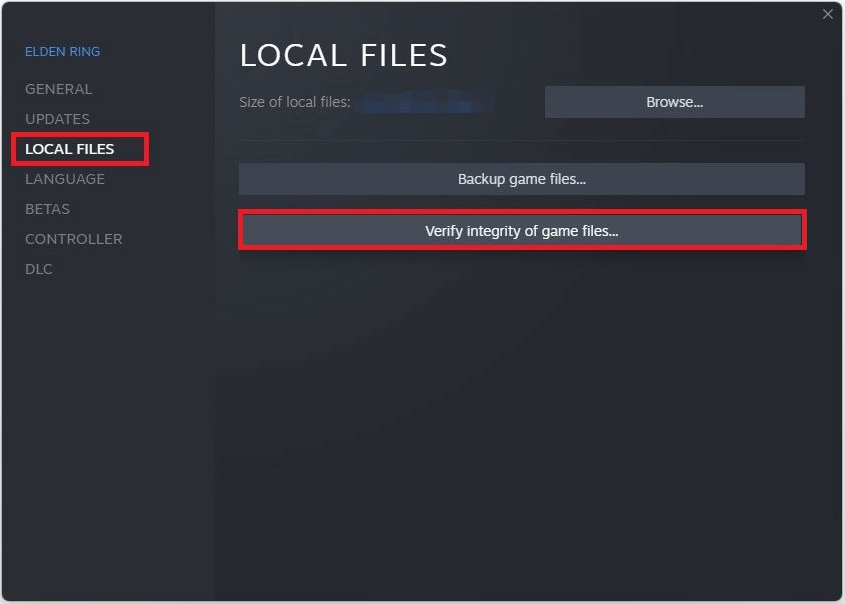
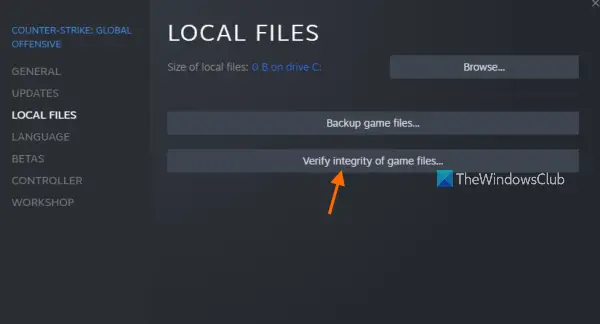
Step 1: Navigate to Steam > LIBRARY. Then right-click the specific game and select Properties.
Step 2: Go to the LOCAL FILES tab and click Verify integrity of game files.
Solution 5: Run the SFC Scan
The SFC (System File Checker) utility on your PC may also help when you are facing the “Easy Anti-Cheat untrusted system file Steam client” error.
Step 1: Open the elevated Command Prompt on your computer.
Step 2: Type sfc /scannow in the panel and press Enter to execute this command.
Step 3: After the scan completes, restart your computer, and the “Steam game untrusted system file” might be resolved this time.
Solution 6: Reinstall the Problematic Game
If all the above solutions don’t work, it may indicate there is something wrong with the installation of the specific game. If so, we recommend you uninstall the game and install it back to get rid of the “Easy Anti-Cheat untrusted system file” error.
If you get stuck in the “Easy Anti-Cheat untrusted system file” error, you can try these solutions offered in this post to fix it. If you have any problems with this error, you can leave a message in our comment zone.
Do you want to manage your partitions and disks more effectively? Well, we highly recommend you try MiniTool Partition Wizard. It is a comprehensive partition manager with various features. If you want to know more, you can visit its official website.
Are you experiencing an Easy Anti-Cheat error that says Untrusted system file when launching games like Apex Legends, Elden Ring, Lost Ark, New World, Jump Force, Watch Dog, etc. on Steam? Apex Legends is a popular free-to-play battle royale-hero shooter game with millions of users. Many Apex Legends players have reported getting the Untrusted system file error while opening the game on Steam. The error occurs when playing the game via the Steam desktop client.
When this error is triggered, you are likely to get a similar error message as the below one:
Easy Anti-Cheat
Untrusted system file (D:\Program Files\Steam\steamclient64.dll)

Now, what exactly does this error mean? Let us check out below.
What does Untrusted System File mean on Steam?
The Untrusted system file error on Steam means that Easy Anti-Cheat (EAC) is flagging specific game files as untrusted. While EAC prevents hacks and cheats in online gaming, it can also incorrectly flag normal files sometimes. You are likely to encounter this error after installing a Steam update that modifies the DLL file. Due to this, the game might consider the file as an untrusted system file. As a result, it prevents the game from launching. Hence, it becomes crucial to fix the error.
This error could be triggered due to different reasons. Here are the potential causes:
- You might experience this error due to a lack of admin rights to run EAC. If the scenario is applicable, you can try running Easy Anti-Cheat software as an administrator to fix the error.
- It could also occur because of the corrupted or faulty installation of Easy Anti-Cheat. Hence, if the scenario applies, repairing or reinstalling Easy Anti-Cheat should help you resolve the error.
- The corrupted and infected game files of Apex Legends can be another reason causing the error at hand. So, you can try verifying the integrity of game files to fix the error.
- The error might also be triggered due to the corrupted installation of the game itself. Hence, you can try reinstalling the game to fix the error.
Now, if you are one of the affected users getting the same error, you can try the fixes we have mentioned in this post. But before that, try rebooting your PC and then launch the game to check if the error is fixed. If not, you can use the below-mentioned solutions to resolve the error.
If you are receiving the Easy Anti-Cheat – Untrusted system file error when launching Apex Legends, Elden Ring, Lost Ark, New World, Jump Force, Watch Dog, etc. on Steam, you can try the below fixes:
- Run Easy Anti-Cheat (EAC) as an administrator.
- Repair Easy Anti-Cheat (EAC).
- Reinstall Easy Anti-Cheat (EAC).
- Verify the integrity of game files.
- Reinstall the game.
1] Run Easy Anti-Cheat (EAC) as an administrator
The first thing you should try doing is running the Easy Anti-Cheat (EAC) software with administrator rights. You might be receiving the error due to a lack of admin privileges. Hence, opening EAC as an administrator to fix the error. Here are the steps you can follow to do so:
- Firstly, open the Steam desktop client and navigate to its LIBRARY section.
- Now, right-click on Apex Legends, and from the right-click context menu, select the Properties option.
- In the Properties window, go to the Local Files tab and press the Browse Local Files button to open up the game installation directory.
- Next, double-click the EasyAntiCheat folder to open it and press the right-click on the EasyAntiCheat_Setup.exe file.
- From the opened context menu, click on the Properties option.
- Now, go to the Compatibility tab and simply tick the Run this program as an administrator option.
- Finally, press the Apply > OK button to save changes. You can now try relaunching Apex Legends and see if the error is fixed.
If you still receive the same even after running EAC with admin rights, you can try the next potential fix to resolve the error.
See: Fix Apex Legends won’t open on Windows PC.
2] Repair Easy Anti-Cheat (EAC)
The error might be triggered due to corrupted Easy Anti-Cheat (EAC) software. If the scenario is applicable, you can try repairing EAC to fix the error. Here are the steps to repair EAC:
- Firstly, go to Steam and navigate to LIBRARY to open your games list.
- Now, right-click on the Apex Legends game, press the Properties option, go to the Local Files tab, and press the Browse Local Files option.
- In the opened location, open the EasyAntiCheat folder by double-clicking on it.
- Next, press the right-click on the EasyAntiCheat_Setup.exe file and select the Run as Administrator option.
- After that, select the Apex Legends game on the setup screen and then choose the Repair Service option to repair EAC.
- Next, follow the prompted instructions and complete the repair process.
- When the process is finished, restart your PC and then launch the game to see if the error is fixed.
If repairing EAC doesn’t fix the error for you, you can go ahead and try the next potential fix to resolve the Untrusted system file error.
Read: Fix Apex Legends Engine Error Code 0X887a0006, 0x8887a0005.
3] Reinstall Easy Anti-Cheat (EAC)
If repairing EAC doesn’t work for you, try reinstalling the EAC software. There might be some corrupted files associated with EAC that can only be fixed by reinstallation of the software. Hence, uninstall EAC and then reinstall to fix the error. Here’s how you can do that:
- Firstly, press the Windows + E hotkey to open File Explorer.
- Now, navigate to the Apex Legends installation directory. You are likely to find it at the following location:
C:\Program Files (x86) \Steam\steamapps\common\Apex Legends
- Next, open the EasyAntiCheat folder and locate the file named EasyAntiCheat_Setup.exe.
- Next, press the right-click on the file and click on the Run as Administrator option.
- On the appeared setup screen appears, select the Apex Legends game from the dropdown option and click on the Uninstall button.
- Follow the prompted instructions to complete the uninstallation.
- Once done, again right-click on the EasyAntiCheat_Setup.exe file and select the Run as Administrator option.
- Now, press the ‘Install Easy Anti-Cheat’ option and follow the onscreen instruction to complete the process.
- Finally, reboot your PC and try launching Apex Legends to check if the Untrusted system file error is stopped now.
If the error is still the same, you can try the next potential fix to resolve it.
Read: Apex Legends Error 0x00000017, Error reading pak file on PC.
4] Verify the integrity of game files
The error might be caused due to infected game files of Apex Legends. Hence, you can try verifying the integrity of game files and repair and replace the bad ones. Here’s how you can do that:
- Firstly, open the Steam client and navigate to the LIBRARY section to access your installed games.
- After that, press the right-click on the Apex Legends game.
- Next, choose the Properties option from the opened context menu.
- Now, move to the Local Files tab and click on the Verify integrity of game files button. Steam will verify and fix the corrupted and damaged game files in some time.
- Once the process is finished, try launching the game and see if the error is fixed or not.
If you still get the Untrusted system file error when running the Apex Legends game on Steam, you can move on to the next potential fix.
Read: Connection rejected Invalid token error in Apex Legends on Xbox and PC.
5] Reinstall the game
If nothing else worked, you can try reinstalling the the game to fix the Untrusted system file error. The error might be triggered due to the corrupted installation of the game. Hence, you can try installing the game and then reinstalling it to fix the error. Here’s how you can do that:
- Firstly, open the Steam client and navigate to LIBRARY.
- Now, right-click on the game and then go to the Manage option.
- Next, select the Uninstall option and follow the prompted instruction to complete the uninstallation process.
- Once the game is uninstalled, reopen Steam and reinstall the game.
- Finally, try launching the game and see if the Untrusted System File error is resolved.
Hopefully, you won’t get the same error now.
See: Apex Legends voice chat not working on Xbox or PC.
How do I fix Untrusted system error?
To fix the Untrusted system file error, you can try running Easy Anti-Cheat as an administrator. Other than that, you can also try repairing Easy Anti-Cheat or reinstalling it, or verifying the integrity of game files. If nothing helps, you can try uninstalling and then reinstalling the Apex Legends game to fix the error.
Is Easy Anti-Cheat safe?
Easy Anti-Cheat is safe and legitimate. It primarily helps in preventing or reducing cheating in online gaming. During the installation of new EAC-based games, you will be prompted to install Easy Anti-Cheat.
Should I uninstall Easy Anti-Cheat?
Easy Anti-Cheat runs in the background when playing a game that supports it. It doesn’t consume much of your system resources, so running it shouldn’t be a problem. So, having it installed on your system shouldn’t bother you.
Now read:
- Fix NO SERVERS FOUND Error in Apex Legends.
- Fix Apex Legends won’t open on Windows PC.