
Все способы:
- Вариант 1: Заблокирован файл из интернета
- Способ 1: Редактирование свойств файла
- Способ 2: «PowerShell»
- Способ 3: Настройки антивируса
- Вариант 2: Файл удерживается процессом
- Способ 1: Перезагрузка или «Безопасный режим»
- Способ 2: Process Explorer
- Вопросы и ответы: 0
Вариант 1: Заблокирован файл из интернета
Под блокировкой файлов следует понимать невозможность совершения с ними определенных действий: запуска, редактирования, перемещения или удаления. В первом случае речь идет в основном об исполняемых файлах, блокируемых системой безопасности, во втором – о файлах, удерживаемых другими процессами. Способы разблокировки будут отличаться в зависимости от того, как именно блокируется файл.
Способ 1: Редактирование свойств файла
Если при открытии скачанного из интернета файла Windows 10 выдает сообщение «Не удается проверить издателя» или «Система защитила ваш компьютер», сделайте следующее:
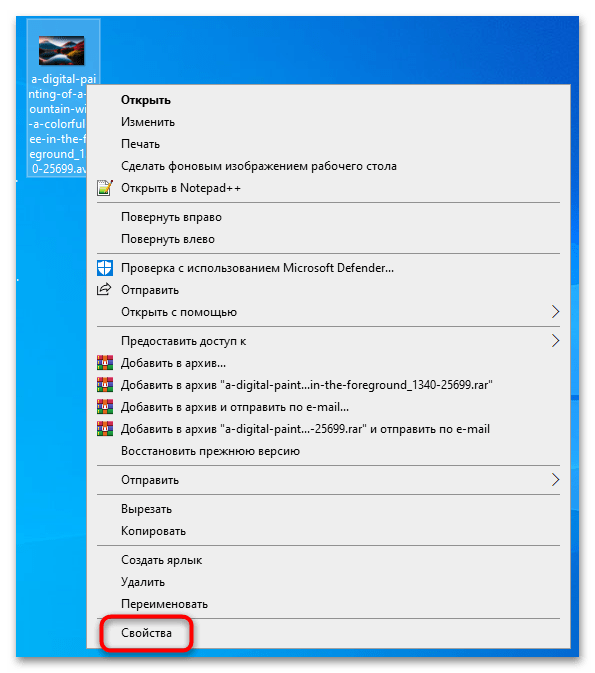
- Кликните по файлу правой кнопкой мыши и выберите из контекстного меню опцию «Свойства».
- Окно свойств откроется на вкладке «Общие». Посмотрите, имеется в нижней области окна уведомление «Этот файл получен с другого компьютера…». Если да, снимите флажок с чекбокса «Разблокировать» и нажмите «ОК».
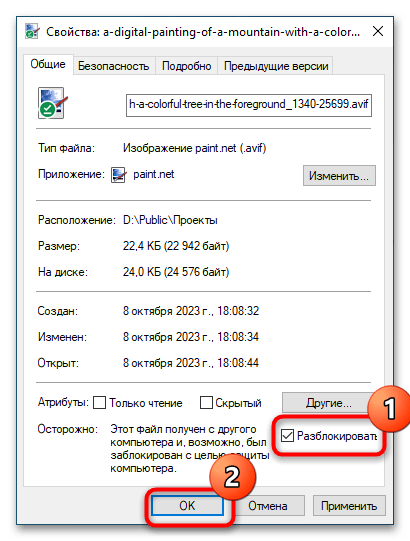
Файл будет разблокирован, после чего его можно будет использовать без ограничений.
Способ 2: «PowerShell»
Для разблокировки скачанных из интернета файлов также можно использовать консоль «PowerShell». Это удобно, когда нужно снять блокировку с группы файлов.
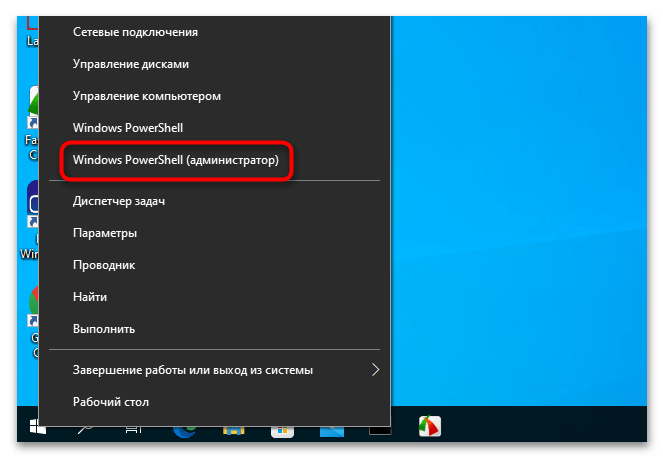
- Откройте от имени администратора «PowerShell» из контекстного меню кнопки «Пуск».
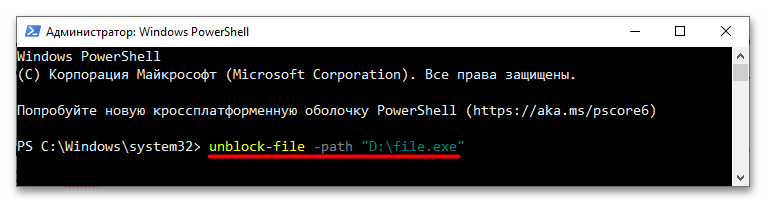
- Выполните команду
unblock-file -path "D:\file.exe"илиget-childitem "D:\folder" | unblock-file, если нужно разблокировать файлы в папке, где составляющие команды «file.exe» и «D:\folder» замените своими. Если нужно, подтвердите действие вводом Y.
Способ 3: Настройки антивируса
Возможно, открытие файла блокируется встроенным или сторонним антивирусом. Чтобы исключить этот сценарий, добавьте файл в исключения антивирусной программы или временно отключите защиту. О том, как исключить файл из проверки в разных антивирусах, читайте по ссылке ниже.
Подробнее: Добавление файла в исключения антивируса
Вариант 2: Файл удерживается процессом
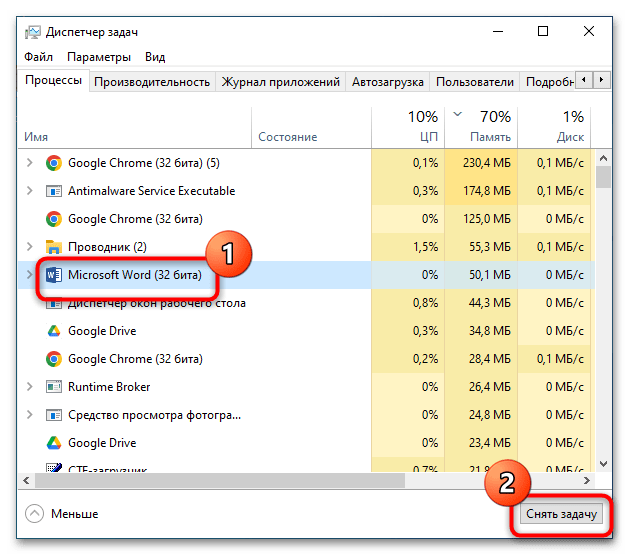
Если при попытке удалить, отредактировать или переместить файл Windows выдает сообщение, что файл занят, заблокирован или используется, снятие блокировки будет означать завершение того процесса, который удерживает этот файл. В ряде случаев блокирующий процесс указывается в окошке с сообщением. Это самый простой случай, так как зная название процесса (программы), можно легко его найти и завершить. В том числе через «Диспетчер задач» или консоль.
Подробнее: Завершение процессов в Windows 10
Но нередко встречаются ситуации, когда какой-то файл используется неизвестным или системным процессом. В этом случае снять блокировку будет немного сложнее.
Способ 1: Перезагрузка или «Безопасный режим»
Отвязать файл от блокирующего его процесса можно простой перезагрузкой компьютера, если же это не даст положительного результата, загрузите компьютер в «Безопасном режиме» и попробуйте выполнить с файлом нужное действие.
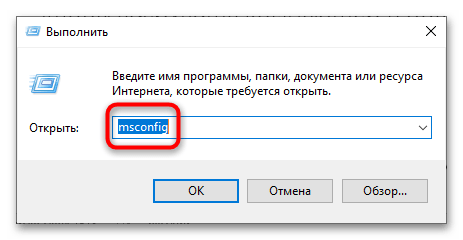
- Запустите штатную утилиту «Конфигурация системы», выполнив в вызванном нажатием клавиш Win + R окне команду
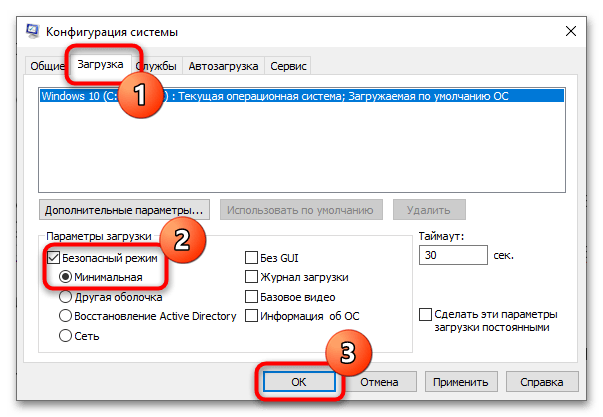
msconfig. - Переключитесь на вкладку «Загрузка», отметьте флажком чекбокс «Безопасный режим» и нажмите «ОК» и подтвердите перезагрузку.
- Проверьте, блокируется ли файл.
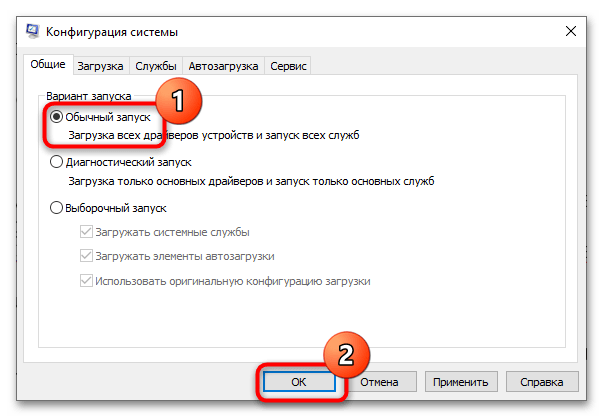
Чтобы загрузить компьютер в обычном режиме, вновь запустите утилиту и на этот раз на вкладке «Общие» активируйте радиокнопку «Обычный запуск».
Способ 2: Process Explorer
Для определения и снятия блокирующего процесса можно использовать профессиональную утилиту Process Explorer.
Скачать Process Explorer с официального сайта
- Скачайте инструмент со страницы разработчика и запустите с правами администратора.
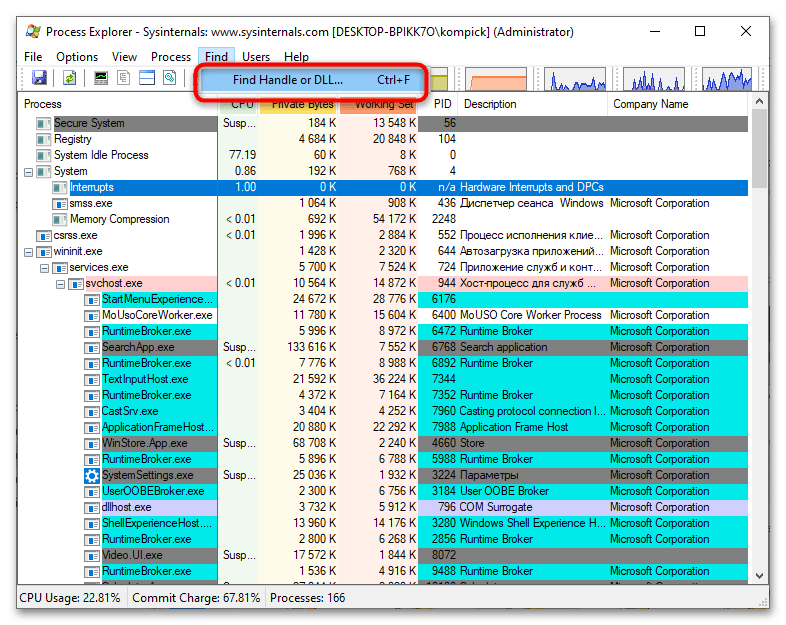
- В главном меню выберите опцию «Find» → «Find Handle or DLL».
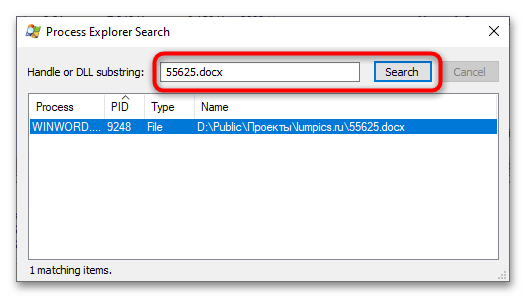
- В поле «Handle or DLL substring» открывшегося окошка вставьте название (с расширением) заблокированного файла и нажмите «Search».
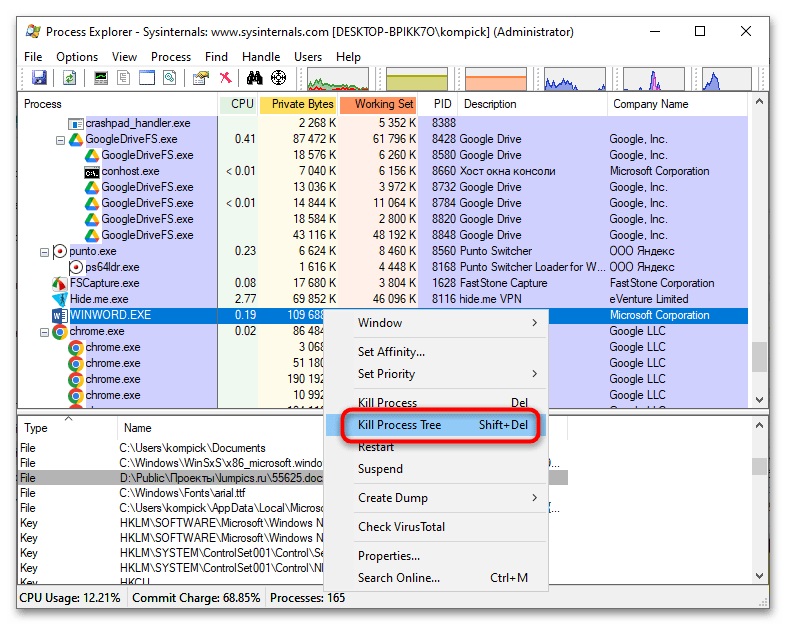
- В результате Process Explorer выдаст список блокирующих процессов с указанием их названий и идентификаторов (PID).
- Если это пользовательский процесс, найдите его по имени или PID в окне Process Explorer и завершите принудительно. Для этого нажмите по процессу правой кнопкой мыши и выберите из контекстного меню опцию «Kill Process Tree».
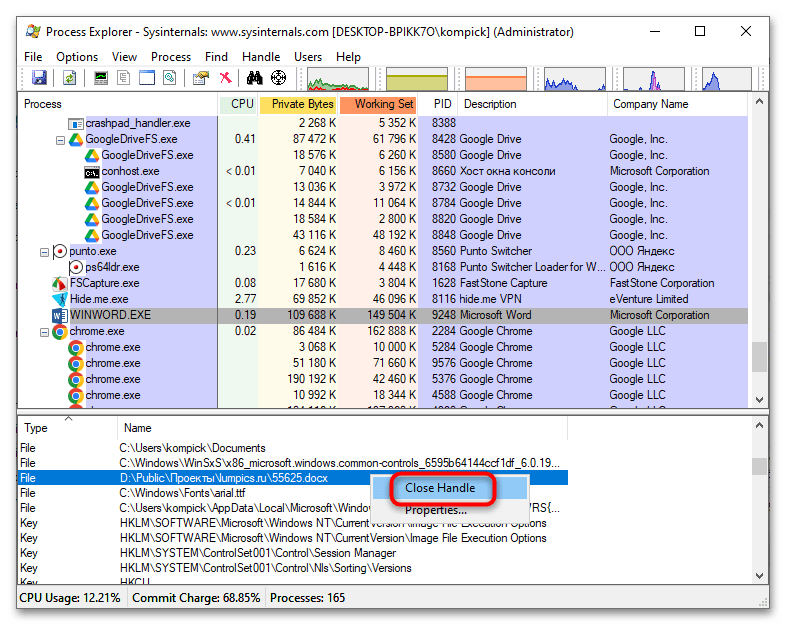
- Если блокирующим оказался системный процесс, можно попробовать закрыть только дескриптор файла. Последний автоматически выделяется в нижней панели Process Explorer. Кликните по нему правой кнопкой, выберите опцию «Close handle» и подтвердите действие.

Если нижняя панель Process Explorer скрыта, включите ее показ, выбрав из главного меню опцию «View» → «Lower Pane View» → «Handles».
Помимо Process Explorer, существуют также и другие сторонние инструменты для разблокирования файлов, но они не столь эффективны и функциональны. Многие из них не позволяют получать сведения о дереве процессов и нередко требуют перезагрузки компьютера.
Наша группа в TelegramПолезные советы и помощь
Readers help support Windows Report. We may get a commission if you buy through our links.
Read our disclosure page to find out how can you help Windows Report sustain the editorial team. Read more
Sometimes users can’t modify files in Windows 10 & 11 because they are locked. Windows displays variable error messages whenever users try to modify locked files along the lines of: The source or destination file may be in use, The file is in use by another program, The action can’t be completed because the file is open in.
All such file-locking errors prevent users from renaming, copying, deleting, and moving files when needed. Fortunately, it’s usually relatively straightforward to unlock a file with the methods below.
What is a locked file?
A locked file is one that Windows has temporarily restricted access to with its file-locking mechanism. The OS locks files in use by other programs or processes to ensure they can’t be simultaneously modified.
So, a locked file error means another program (process) is using the same file you’re trying to modify. Such an issue can also arise for shared files that can be edited by other users in a network environment.
Users can usually unlock files by ending the program processes utilizing them, as outlined in this guide’s resolutions. Terminating those processes will lift the applied file locking.
How do I unlock a locked file in Windows 10?
Before applying the resolutions below, check a few things first:
- If the locked file is shared with other users via the internet or an organization-based network, check that nobody else is editing it.
- Restarting your PC can often be a simple way to unlock a locked file. So, try restarting your PC to see if that unlocks the file.
If you still have problems with locked files in Windows, use the solutions below.
1. End background processes in Task Manager
- Press Ctrl + Shift + Esc to access Task Manager.
- Click Task Manager’s Processes tab if it’s not selected, then select the End task option for all open programs listed in the apps section.

- Disable non-essential third-party programs and services included within the background processes section by right-clicking them and selecting End task.
- Try modifying whatever file is locked again.

NOTE
Don’t disable anything within the Windows processes section. Disabling those more essential system processes will likely cause OS issues.
2. Restart Windows by Clean Booting
- Use the Windows + R keyboard key combination to start the Run command box.
- To access the MSConfig utility, type this text in Run and press Return:
msconfig
- Check the Selective startup option on the General tab.

- Click System Configuration’s Services tab to view it.
- Select Hide all Microsoft services to exclude more important services then click the Service’s tabs Disable all button.

- Select Apply and OK, and select Restart in the dialog box.
- Try to edit the locked file after clean booting.


- How to Delete Windows 11 Saved Passwords
- How to Download DirectX 12 Agility SDK [Installation Guide]
- How to Open PPTX File in Windows 11? Use These 4 Ways
- How to Install Windows 7 Icons on Windows 11
3. Use a dedicated tool
- Open the IObit Unlocker page, and select Free Download there.
- Browse to the folder the IObit Unlocker installer downloaded to within File Explorer.

- Double-click the unlocker-setup.exe file for IObit Unlocker.
- Install IObit Uninstaller with its setup wizard.
- Open the IObit Uninstaller window with the desktop shortcut for that software.
- Click the Add button.

- Select the locked file you need to unlock and click the OK option in the Browse window.

- Press the Unlock button if the file’s status is indeed locked. The box at the bottom of the IObit Unlocker window shows the processes causing the lock.

- Or you can click the small arrow button to select options for unlocking and modifying (renaming, moving, deleting, or copying) the file.


4. Unlock files with PowerToys’ File Locksmith Tool
File Locksmith is another utility you can unlock files with, which is included within the Microsoft PowerToys software. That tool detects processes using a locked file and enables you to end tasks.
To utilize File Locksmith, install the latest Microsoft PowerToys version. Windows Report’s File Locksmith post includes instructions for using that tool and installing PowerToys via PowerShell.
How to unlock a file in Windows 11?
We outlined solutions on how to unlock a file in Windows 10, but all the methods above can be performed identically on Windows 11 as well.
Those methods will almost certainly enable you to unlock all your locked files in Windows 10/11. Then you’ll be able to modify the files however you need to again.
Closing background processes with Task Manager or clean booting will often work for unlocking files. However, It’s worth installing a third-party tool like IObit Unlocker or PowerToys since they make it easier to identify background processes locking files.
Matthew Adams
Windows Hardware Expert
Matthew is a freelancer who has produced a variety of articles on various topics related to technology. His main focus is the Windows OS and all the things surrounding it.
He is passionate about the tech world, always staying up-to-date with the latest and greatest. With an analytical view, he likes problem-solving, focusing on errors and their causes.
In his free time, he likes to read and write about history and tries to always develop new skills.
If you’ve ever encountered a locked file on your Windows 10 computer, you know how frustrating it can be. Whether it’s a file that’s being used by another program or a file that you don’t have the necessary permissions to access, unlocking it may seem like a daunting task. However, fear not! In this article, we will explore some simple methods and solutions that will help you unlock those pesky locked files on your Windows 10 system.
Understanding File Locking In Windows 10: An Overview
Understanding file locking in Windows 10 is crucial for efficiently managing your files and resolving any locked file issues that may arise. File locking refers to a safeguard that prevents multiple users or programs from simultaneously accessing or modifying a file. It ensures data integrity and prevents conflicts that can arise from concurrent modifications.
File locking can occur due to various reasons, such as:
1. Exclusive lock: When a file is opened in an exclusive mode, it cannot be accessed by other programs or users.
2. Read-only lock: When a file is opened with read-only permissions, it cannot be modified by other programs or users.
3. File in use: When a file is actively being accessed or modified by a program, it gets locked to prevent conflicts.
In this article, we will explore different methods to unlock locked files in Windows 10. These methods include using the Task Manager, accessing Windows Safe Mode, utilizing the Command Prompt, and using third-party software. By following these methods, you can effectively unlock locked files and regain control over your data in no time.
Method 1: Using Task Manager To Unlock A Locked File
Task Manager is a powerful built-in tool in Windows 10 that can help you unlock a locked file swiftly. Follow these steps to unlock a locked file using Task Manager:
1. Press Ctrl + Shift + Esc to open Task Manager.
2. In the “Processes” tab, find the process that is using the locked file. Look for the name of the program or service associated with the file.
3. Right-click on the process and select “End Task” or “End Process.” This will terminate the process and release the file lock.
4. Close Task Manager and try accessing the file again. It should now be unlocked.
However, exercise caution while terminating processes in Task Manager, as ending critical system processes may cause stability issues. Make sure to identify the correct process associated with the locked file before proceeding.
Using Task Manager is an effective method to unlock a locked file in Windows 10 without the need for additional software. If this method doesn’t work, continue reading the article for alternative solutions.
Method 2: Unlocking A Locked File Using Windows Safe Mode
In certain cases, a file may be locked in such a way that it cannot be accessed or modified even with administrative privileges. Windows Safe Mode can be a useful tool to bypass these restrictions and unlock the file.
To unlock a locked file using Windows Safe Mode, follow these steps:
1. Restart your computer and continuously press the F8 key until the Advanced Boot Options menu appears.
2. Select “Safe Mode” from the list and press Enter to boot into Safe Mode.
3. Once you’re in Safe Mode, navigate to the folder containing the locked file.
4. Right-click on the file and select “Properties.”
5. In the “Properties” window, navigate to the “Security” tab.
6. Click on “Edit” to modify the permissions for the file.
7. Select your user account from the list and check the box for “Full Control.”
8. Click “Apply” and then “OK” to save the changes.
9. Restart your computer to exit Safe Mode.
By accessing the file in Safe Mode and modifying the permissions, you should now be able to unlock and access the previously locked file. Remember to exercise caution when modifying file permissions, as incorrect changes can potentially lead to system instability or security vulnerabilities.
#
Method 3: Using the Command Prompt to release file locks
The Command Prompt is a powerful tool in Windows 10 that allows users to execute a variety of commands. It can also be used to release file locks, providing a simple and effective method to unlock locked files.
To begin, open the Command Prompt by searching for it in the Windows Start menu. Once open, navigate to the folder containing the locked file by using the “cd” command followed by the file path.
Next, use the “handle” command followed by the file name to determine which process is locking the file. Identify the process and note down the corresponding process ID (PID).
With the PID in hand, use the “taskkill” command followed by “/PID” and the PID to terminate the process locking the file. For example, the command may look like this: “taskkill /PID 1234”.
Once the process is terminated, the file lock will be released, and the file can be accessed and modified as desired.
Using the Command Prompt to release file locks provides a quick and efficient solution for unlocking locked files in Windows 10.
Method 4: Unlocking A Locked File Through Third-party Software
Third-party software can come to your rescue when you encounter a locked file in Windows 10 that you can’t unlock using the built-in methods. These tools offer additional functionalities and advanced features that can help you overcome file locking issues effectively.
One popular software for unlocking locked files is “Unlocker.” It is a free tool that enables you to release file locks and delete or move locked files with ease. To use Unlocker, simply right-click on the locked file and select the “Unlocker” option from the context menu. A window will appear listing the process or application that has locked the file. From there, you can choose to unlock the file and perform the desired action.
Another reliable option is “IObit Unlocker,” which provides similar functionality. It allows you to unlock files and folders that are being used by other programs, making it easy to manage and manipulate locked files.
When using third-party software, it’s important to download them from trusted sources to avoid malware or other security risks. It’s also recommended to have an updated antivirus program installed on your system for an added layer of protection.
By utilizing third-party software, you can effectively unlock and manage locked files in Windows 10, expanding your options beyond the built-in methods.
Common Errors And Troubleshooting Tips When Unlocking Files In Windows 10
When trying to unlock a locked file in Windows 10, you may encounter a few common errors and issues that can hinder the unlocking process. Here are some troubleshooting tips to help you overcome these obstacles:
1. “Access Denied” error: This error occurs when you don’t have the necessary permissions to unlock the file. To resolve this, try running the unlock process as an administrator or modifying the file’s permissions.
2. “File in use” error: This error indicates that another application or process currently has the file open and is using it. To fix this, you can try closing the application or process that is using the file, or use the Task Manager to force close it.
3. File permissions issues: If you are unable to modify or delete a locked file, it’s possible that the file’s permissions are restricted. To fix this, right-click on the file, go to Properties, navigate to the Security tab, and adjust the permissions accordingly.
4. System resource limitations: Sometimes, excessive resource usage or high system load can prevent file unlocking. Restarting your computer and trying again can help resolve this.
Remember to always exercise caution when unlocking files, as modifying system files or files in use by essential programs can cause system instability. If all else fails, seeking assistance from a professional or Microsoft support can help you safely unlock the locked file.
Best Practices To Prevent File Locking Issues In Windows 10:
To avoid file locking issues in Windows 10 and ensure smooth access to your files, it is essential to follow some best practices. Here are a few strategies that can help prevent file locking problems:
1. Close files properly: Always close files and applications correctly before shutting down or switching users. This ensures that the files are saved and released, preventing them from being locked.
2. Avoid opening files from network locations: Opening files directly from network drives or shared folders can lead to file locking issues. Instead, copy the required files to your computer and work on them locally.
3. Use file sharing and collaboration tools: If multiple users need access to the same file simultaneously, consider using file sharing and collaboration tools such as Microsoft OneDrive, Google Drive, or Dropbox. These tools facilitate real-time collaboration without causing file locking conflicts.
4. Update software and drivers regularly: Keeping your operating system, applications, and device drivers up to date can help prevent compatibility issues that may lead to file locking problems.
5. Avoid excessive file permissions: Granting unnecessary file permissions can increase the chances of file locking conflicts. Only provide the necessary access rights to users or groups.
By following these best practices, you can minimize the occurrence of file locking issues in Windows 10, ensuring efficient and uninterrupted access to your files.
Frequently Asked Questions
FAQ 1: Can I unlock a locked file in Windows 10 without any third-party software?
Yes, it is possible to unlock a locked file in Windows 10 without using any third-party software. There are built-in methods and solutions available that can help you unlock the file.
FAQ 2: How do I unlock a file using the Command Prompt in Windows 10?
To unlock a file using the Command Prompt, follow these steps:
- Open the Command Prompt as an administrator.
- Use the “cd” command to navigate to the folder where the locked file is located.
- Once in the correct directory, enter the command “icacls filename /reset” (replace “filename” with the name of the locked file).
- Press Enter to execute the command and unlock the file.
FAQ 3: Are there any other built-in methods to unlock a locked file in Windows 10?
Yes, apart from using the Command Prompt, you can also try unlocking a locked file by using the “Unlocker” tool in Windows 10. This tool provides a graphical interface and allows you to unlock and delete locked files conveniently.
FAQ 4: What should I do if I am unable to unlock a locked file using the built-in methods?
If you are unable to unlock a locked file using the built-in methods, you can try using third-party software specifically designed for unlocking files in Windows 10. Some popular options include “IObit Unlocker,” “LockHunter,” and “UnlockIT.”
Wrapping Up
In conclusion, unlocking a locked file in Windows 10 can be achieved using simple methods and solutions. Whether it is through the use of third-party software, the command prompt, or by changing file permissions, users have several options to regain access to their locked files. It is important to choose the method that best suits the situation and follow the provided steps carefully to ensure a successful outcome. With a little bit of patience and technical knowledge, anyone can unlock a locked file and resume their work without any interruptions.
Unlocking files in Windows 10 can be a straightforward process. Essentially, you’ll need to adjust the file properties or permissions to regain access. We’re going to walk through each step so you can easily unlock files and get back to work.
Unlocking files in Windows 10 involves changing file properties and permissions. Follow these steps to regain access to your locked files.
Step 1: Right-click on the File
Right-click on the file you want to unlock.
When you right-click, a context menu will appear. This menu gives you several options related to the file you selected.
Step 2: Select Properties
Select «Properties» from the context menu.
The Properties window gives detailed information about the file and will have the settings we need to change.
Step 3: Go to the Security Tab
In the Properties window, go to the «Security» tab.
The Security tab shows you the permissions currently set for the file and who has access to it.
Step 4: Click on Edit
Click on the «Edit» button to change permissions.
The Edit option allows you to modify who can access or modify the file.
Step 5: Adjust Permissions
Adjust the permissions to give yourself full control.
Use the checkboxes to modify permissions and make sure you have full control over the file.
Step 6: Apply and OK
Click «Apply» and then «OK» to save the changes.
These buttons will save the new permissions and close the Properties window, applying your changes immediately.
After following these steps, your file should be unlocked, and you’ll be able to access or modify it as needed.
Tips for Unlocking Files in Windows 10
- Check for Read-Only Attribute: Sometimes files are locked because they are read-only. Uncheck this box in the Properties window to unlock.
- Use Command Prompt: If you’re comfortable with commands, you can use Command Prompt to change file attributes.
- Disable Encryption: Files can be locked if they are encrypted. Check the Advanced settings in Properties to decrypt them.
- Ownership: Ensure you are the owner of the file by clicking the «Advanced» button in the Security tab and changing the owner.
- Third-Party Tools: There are various software tools available that can help you unlock files quickly and easily.
Frequently Asked Questions
Why can’t I modify a file even after unlocking it?
You might not have the necessary permissions. Ensure that you have full control set in the file’s properties.
What if I still can’t unlock the file?
Check if the file is in use by another application. Try closing other programs or restarting your computer.
Can I unlock multiple files at once?
Yes, you can select multiple files, right-click, and follow the same steps to unlock them all at once.
Is it safe to use third-party tools to unlock files?
Generally, yes, but make sure to download reputable software to avoid security risks.
What is the read-only attribute?
The read-only attribute prevents files from being modified. Unchecking it in the file’s properties can help unlock it.
Summary
- Step 1: Right-click on the file.
- Step 2: Select Properties.
- Step 3: Go to the Security tab.
- Step 4: Click on Edit.
- Step 5: Adjust permissions.
- Step 6: Apply and OK.
Conclusion
Unlocking files in Windows 10 might seem like a daunting task, but with the right steps, it’s pretty straightforward. By adjusting the file properties and permissions, you can regain access to your locked files without much hassle. Remember to double-check for read-only attributes and consider using command prompts if you’re comfortable with them. Taking ownership of the file and making sure it’s not encrypted can also solve a lot of common issues.
If you still face difficulties, there are reputable third-party tools available that can simplify the process. So next time you encounter a locked file, don’t panic! Just follow these steps, and you’ll be back on track in no time. For more in-depth guides on Windows 10, stay tuned to our blog. Happy computing!
Kermit Matthews is a freelance writer based in Philadelphia, Pennsylvania with more than a decade of experience writing technology guides. He has a Bachelor’s and Master’s degree in Computer Science and has spent much of his professional career in IT management.
He specializes in writing content about iPhones, Android devices, Microsoft Office, and many other popular applications and devices.
Read his full bio here.
The most common reason for Shared Files getting locked is due to the Shared File being left open by one of the users. Hence, the easiest way to unlock locked files in such cases is to locate the computer on which the file has been left open and close the file.
However, even if you locate the computer where the shared file has been left open, you may not find the person that has left the file open has locked the computer and is not available.
In such cases, you should be able to unlock the locked file on any Windows 11/10 computer using steps as provided below in this guide.
1. Unlock File Locked by Another User
If you have Admin access to the network, you should be able to Unlock the Locked File using the following steps.
Advertisement
1. Right-click on the Start button and click on RUN.
2. In the Run Command window, type mmc and click on OK to bring up Microsoft Management Console.
3. On the next screen, click on File > Add/Remove Snap-in.

4. On “Add or Remove Snap-ins” screen, select Shared Folders and click on the Add button.

5. On the next screen, select Local Computer if you are logged into the computer or network where the file resides. If not, select Another computer and click on Browse.

Once the other computer is located, select Open Files option and click on the Finish button.
6. Back on “Add or Remove Snap-ins” screen, click on OK to Add the selected Snap-in.

Advertisement
7. On the next screen, expand the list of Open Files > right-click on the Locked File and click on Close Open File option.

Once the open file is closed, the blocking user will be removed from the File and the File will become unlocked.
2. Unlock Locked Files on Your Own Computer
As mentioned above, Excel, Word and other Microsoft Office files can get locked, even if they are not being shared with other users.
This happens due to the way Microsoft Office creates a temporary ownership file whenever a Microsoft Office File is opened and automatically deletes the temporary ownership file as soon as the File is closed.
If the file does not close properly, the temporary ownership file remains open in the memory, leading to “File is Locked for Editing by another user” error.
The only way to fix this issue is to locate the temporary ownership file on your computer and delete the ownership file.
1. Right-click on the Start button and click on File Explorer.
2. On File Explorer screen, navigate to the Location of the temporary ownership file ~$<filename> and delete this file.
For example, if the file is example.xls, the temporary ownership file will be named as ~$example.com.
Once the temporary ownership file is deleted, you will be able to open/edit your Excel File, without encountering “File is Locked for editing by another user” message.