
Cygwin — это Linux-подобная среда для систем на базе Windows. Он состоит из эмулятора и набора инструментов, которые обеспечивают возможность работы на Linux в среде Windows.
Cygwin состоит из DLL cygwin1.dll, которая действует как уровень эмуляции, обеспечивающий функциональность системного вызова POSIX через Windows. С Cygwin пользователи имеют доступ к стандартным утилитам UNIX, которые могут использоваться либо из предоставленной bash-оболочки, либо через командную строку Windows.
Кроме того, она предоставляет программистам поддержку в использовании Win32 API вместе с Cygwin API, позволяя переносить утилиты UNIX в Windows без особых изменений исходного кода.
Преимущества Cygwin по сравнению с командной строкой/WSL
Существует ряд преимуществ использования оболочки Cygwin по сравнению с командной строкой Windows. Ниже перечислены некоторые из основных:
- Предоставляет оболочку UNIX для Windows, обеспечивая доступ к целому ряду утилит от UNIX/Linux до Windows.
- Нет необходимости устанавливать полноценную ОС Linux или настраивать виртуальную машину, когда ресурсов, доступных через Cygwin, может быть достаточно.
- Оптимальное использование ресурсов и системные требования для работы в Windows, поскольку среда эмулируется и работает поверх Windows.
- Идеально подходит для тестирования/разработки, когда требуется использовать утилиты UNIX/Linux в Windows.
- Совместим со старыми ОС Windows, такими как Windows 7 и т.д., тогда как среда WSL, предлагаемая Windows, поддерживается только в более новых версиях.
Как скачать
Чтобы загрузить последнюю версию Cygwin, перейдите по этой ссылке на ее официальный сайт. Можно загрузить версию, под установленную версию Windows и архитектуры системы. 32-разрядную версию можно скачать тут, а 64-разрядную — тут.
Установка
Запустите скачанный файл с предыдущего шага. Подтвердите все запросы и предупреждения, отображаемые на экране компонентом UAC Windows. После прохождения этого квеста, будет запущена программа установки, как показано ниже.

Нажмите далее.

Появится запрос на выбор источника загрузки. В большинстве случаев параметр по умолчанию «Install from Internet» (Установить из Интернета) подходит и ничего изменять не приходится. Если у вас есть локальный загруженный репозиторий или вы просто хотите загрузить и установить Cygwin позже, выберите один из других доступных вариантов. Для продолжения нажмите «Далее».

В следующем окне предлагается указать «Root Directory» для установки, а также указать, будет ли она установлена для всех пользователей «All Users» или только для вас «Just Me». Если довольны значениями по умолчанию, то нажмите кнопку «Далее», чтобы продолжить установку.

Чтобы загрузить файлы пакета, программа установки попросит вас указать «Локальный каталог пакетов». По умолчанию указывается папка «Загрузки». Если требуется указать другое расположение, укажите путь к нему и нажмите кнопку «Далее», чтобы продолжить настройку.

В большинстве случаев для загрузки пакетов следует использовать параметр «Using System Proxy Settings». Если вы не хотите использовать прокси-сервер и использовать прямое подключение к Интернету, выберите параметр «Direct Connection», также есть возможность указать пользовательские параметры прокси-сервера, если таковые существуют. Для продолжения установки нажмите «Далее».

Затем программа предложит выбрать зеркало, откуда Cygwin загрузит файлы пакета. Чтобы обеспечить более высокую скорость загрузки, лучше выбрать зеркало, которое географически расположено ближе. Если вы не знаете что выбрать, выберите любое зеркало из списка и нажмите «Далее», чтобы продолжить.

Cygwin предоставляет множество утилит на базе UNIX/Linux, работающих под управлением Windows. Не все пакеты устанавливаются по умолчанию. Устанавливается только минимальный набор важных пакетов. На этом шаге можно настроить Cygwin, выбрав/убрав различные категорий пакетов. Помните, что добавить или удалить пакеты в Cygwin можно и позже. Если у вас есть конкретный список важных пакетов для вашей работы, вы можете выбрать их сейчас и продолжить, нажав «Далее».

На следующем экране отображается список выбранных пакетов с запросом на просмотр и подтверждение. Нажмите «Далее» для подтверждения и продолжения.

Выбранные пакеты начнут загружаться, и это может занять некоторое время в зависимости от скорости выбранного зеркала загрузки и количества выбранных пакетов.

После загрузки всех пакетов программа продолжит установку пакетов.

После завершения установки появится возможность создания значков на рабочем столе и в меню «Пуск» для упрощения доступа. По завершении нажмите кнопку «Готово», чтобы закончить работу мастера установки.

Теперь можно запустить Cygwin, через поиск в меню «Пуск», как показано выше, или дважды щелкнув значок на рабочем столе (если он был создан во время установки).

Оболочка Cygwin поддерживает обычно используемые команды UNIX/Linux. Если какая-либо команда не работает, можно повторно запустить программу установки и выбрать отсутствующий пакет, если он доступен в репозитории Cygwin (пример — Ansible), и установить его. Установленная команда теперь должна стать доступной как обычная команда в CLI оболочки Cygwin.
Заключение
Cygwin — полезная утилита, обеспечивающая оболочку UNIX/Linux, эмулированную в среде Windows. Он облегчает перенос определенных приложений в Windows и позволяет разрабатывать и использовать скрипты на основе Linux в Windows для различных задач. Его установка так же проста, как и любая программа на базе Windows с настройкой на основе графического интерфейса пользователя.
Дополнительную информацию о Cygwin можно найти здесь. Подробные инструкции по использованию можно найти в разделе часто задаваемых вопросов и руководстве пользователя.
In today’s computing landscape, the UNIX shell has paved the way for various applications and tools that enhance user capabilities across different platforms, including Windows. While Windows has long been associated with its own command-line interface, the integration of a UNIX-like environment is gaining traction among developers and system administrators alike. In this article, we will explore the exciting world of UNIX shell for Windows, its benefits, and how you can leverage its power to enhance your productivity.
What is a UNIX Shell?
A UNIX shell is a command-line interpreter that provides a user interface for interacting with the operating system. Unlike the graphical user interfaces (GUIs) prevalent in many operating systems, a shell allows for more efficient operations through textual commands. Users can execute programs, manage files, and perform various tasks directly from the command line.
Why Use a UNIX Shell on Windows?
Many would ask, “Why would I need a UNIX shell on my Windows system?” Here are some compelling reasons:
- Enhanced Productivity: The command-line interface allows for quick navigation and manipulation of files and directories, which can significantly speed up workflows.
- Familiarity for Developers: Many developers come from UNIX/Linux backgrounds. Providing a compatible environment helps them transition their skills seamlessly.
- Powerful Scripting Capabilities: UNIX shells support powerful scripting languages that are incredibly useful for automating tasks.
- Access to UNIX Utilities: Numerous command-line utilities that are native to UNIX systems can enhance functionality in your Windows setup.
Setting Up a UNIX Shell on Windows
To harness the benefits of a UNIX shell for Windows, users have several options. Let’s delve into the popular methods:
1. Windows Subsystem for Linux (WSL)
The most prominent way to use a UNIX shell on Windows is through the Windows Subsystem for Linux (WSL). WSL allows you to run native Linux command-line tools directly on your Windows operating system without the need for a virtual machine or dual boot. Here’s how to set it up:
- Enable WSL: Open PowerShell as an administrator and run the command:
wsl --install
. This command installs WSL along with the default Linux distribution.
- Choose a Linux distribution: After enabling WSL, you can install various distributions such as Ubuntu, Debian, or Kali Linux from the Microsoft Store.
- Launch the UNIX shell: Simply go to the Start Menu, type the distribution name (e.g., Ubuntu), and you’ll have access to a full UNIX shell experience on your Windows machine.
2. Cygwin
Another popular choice is Cygwin, a large collection of GNU and Open Source tools that provide functionality similar to a UNIX system on Windows. Setting up Cygwin is straightforward:
- Download and Install: Go to the official Cygwin website and download the installer. Follow the installation steps, selecting the desired packages you want to include.
- Launch Cygwin Terminal: Once installed, you can run the Cygwin terminal, which provides a familiar UNIX shell environment.
3. Git Bash
If you are a developer who uses Git, then Git Bash might be the ideal choice. It offers a minimal UNIX shell experience, especially for those who work on version control:
- Install Git: Download and install Git for Windows from Git for Windows.
- Access Git Bash: Once installed, you can access Git Bash from your Start Menu, providing a basic shell interface.
Common UNIX Shell Commands
Once you are set up with a UNIX shell environment on Windows, you can begin executing various commands to manage files, directories, and processes. Here’s a list of commonly used commands:
- ls: Lists files and directories in the current directory.
- cd: Changes the current directory.
- mkdir: Creates a new directory.
- rm: Removes files or directories. Use with caution!
- cp: Copies files or directories.
- mv: Moves or renames files or directories.
- echo: Displays a line of text or variable values.
- grep: Searches for specific patterns within files.
Benefits of Using UNIX Shell Scripts
The real power of the UNIX shell comes into play when you start writing scripts. Shell scripting allows you to automate repetitive tasks, manage system processes, and even create complex programs. Here are some of the key benefits:
- Automation: Automate tedious tasks such as backups, system updates, and data processing.
- Custom Tools: Create custom scripts tailored to your specific requirements, saving time in the long run.
- Batch Processing: Execute a series of commands or scripts in one go, making it easier to manage large datasets and repetitive tasks.
- System Management: Monitor system performance, configure system settings, and manage user accounts.
Tips for Leveraging UNIX Shell in Windows
To truly maximize your experience with a UNIX shell for Windows, consider the following tips:
- Learn the Basics: Familiarize yourself with basic command-line operations and scripting to make the most out of your environment.
- Utilize Online Resources: Numerous tutorials, guides, and forums are available online, making it easier to troubleshoot and learn.
- Experiment! Try different commands and scripts in a test environment to build confidence in using the shell.
- Backup Regularly: If you are executing scripts that manipulate files, always ensure you have backups to prevent data loss.
Conclusion
The UNIX shell provides an incredibly powerful tool for users seeking to elevate their computing experience on Windows. With options like WSL, Cygwin, and Git Bash, users can embrace the UNIX philosophy and unlock productivity in ways previously thought impossible on Windows. By learning the basics and utilizing powerful scripting capabilities, you can automate tasks, manage files, and become more efficient at your daily operations.
As more users turn to a UNIX shell for Windows, the future looks bright for cross-platform collaboration and innovation. Embrace the change and explore the vast possibilities that a UNIX shell has to offer!
Don’t forget to share this article with your friends and follow us for more updates on technology! #UnixShell #Windows #CommandLine #Productivity #Scripting #Automation #WSL #Cygwin #GitBash #TechTips #Programming
Эта статья будет полезна начинающим пользователям Cygwin. Начнем с того, что нам для начала нужно ответить на простой вопрос. Что же такое Cygwin? Cygwin — это UNIX-подобная среда и интерфейс командной строки для Microsoft Windows. В системе Microsoft Windows уже существует подобный интерфейс cmd. Вызвать командную строку можно сочетанием клавиш Win+R. Но зачастую большую часть работы Windows пользователям приходится делать вручную. По другую сторону Linux пользователь уже давно написал bash-скрипт и сидит пьет пиво в сторонке от автоматизированного рабочего процесса.
Так что же мешает сделать это и в ОС Windows? Правильно, абсолютно ничего не мешает. Но для этого нужны дополнительные программы и библиотеки. Программа Cygwin расширяет возможности стандартной командной строки Windows, позволяя автоматизировать некоторые процессы и разрабатывать программы для Linux и других систем.
Программу Cygwin можно качать с официального сайта: Ссылка на 32 битную версию программы и Ссылка на 64 битную версию программы.
Выбираем нужную версию, скачиваем и запускаем исполнительный файл setup-x86.exe и setup-x86_64.exe соответственно.

Окно установки 64 битной версии программы

Окно выбор способа установки

Окно выбора пакетов
Окно установки 32 битной версии программы выглядит точно так же как и 64 битной. Следующим шагом будет окно выбора. Откуда устанавливать или скачивать программу. Всего есть три варианта. Первый вариант Install from Internet (downloaded files will be kept for future re-use) установка из интернета причем загруженные файлы будут храниться до следующего повторного использования. Второй вариант Download Without Installing скачать без установки. Третий вариант Install from Local Directory установка из локального каталога. Т.к. у нас нет локальной копии и нам нужно установить то выбираем первый вариант. Следующее окно будет выбор пути установки. Рекомендую выбрать системный диск, к примеру у меня путь установки Cygwin это C:\cygwin64. Следующее окно это выбор пути где будут храниться временный файлы которые будут скачиваться в процессе установки. У меня это C:\cygwin64\package. Потом нужно выбрать как скачивать через прокси или напрямую. Следующим шагом будет выбор репозитория скачки выбираем любой попавшийся или тот что по умолчанию и жмем Далее. После нажатия кнопки далее начнется процесс скачивания основных конфигов. Следом вы сможете выбрать что устанавливать. Чтобы выбрать пакет нужно нажать Skip около названия пакета. Список пакетов которые вам пригодятся:
- gcc-core (в разделе Devel)
- gcc-g++ (в разделе Devel)
- make (в разделе Devel)
- cmake (в разделе Devel)
- automake (в разделе Devel)
- wget (в разделе Web)
- libiconv (в разделах Devel и Libs)
- openssh (в разделе Net)
- nano (в разделе Editors)
- bash (из раздела Base)
- base-cygwin (из раздела Base)
- base-files (из раздела Base)
- cygwin (из раздела Base)
- file (из раздела Base)
- gzip (из раздела Base)
- login (из раздела Base)
- mintty (из раздела Base)
- openssl (из раздела Base)
- run (из раздела Base)
- tar (из раздела Base)
- vim-minimal (из раздела Base)
- cron (из раздела Admin)
- shutdown (из раздела Admin)
- git (все пакеты из раздела Devel)
Также рекомендую полностью установить раздел Perl и Python. После этого жмем далее и произойдет установка нужных пакетов и их зависимостей. После конца установки можно будет запустить сам Cygwin и начать работу.

Мне не симпатизировал ни цвет фона, ни встроенный шрифт и цвет текста поэтому я кастомизировал его. На этих словах я закончу эту статью.

When Microsoft’s CEO announced that the Bash shell was coming to Windows, several people couldn’t believe it. #BashOnWindows trended on Twitter for days; such was the impact of this news.
Initially referred as Bash on Windows, it is actually called Windows Subsystem for Linux, popularly known as WSL.
With WSL, you can install one of the supported Linux distribution inside Windows and use the Windows terminal to access the Linux systems and run Linux commands.
In this tutorial, you’ll learn how to enable WSL on Windows and then install a Linux distribution of your choice.
📋
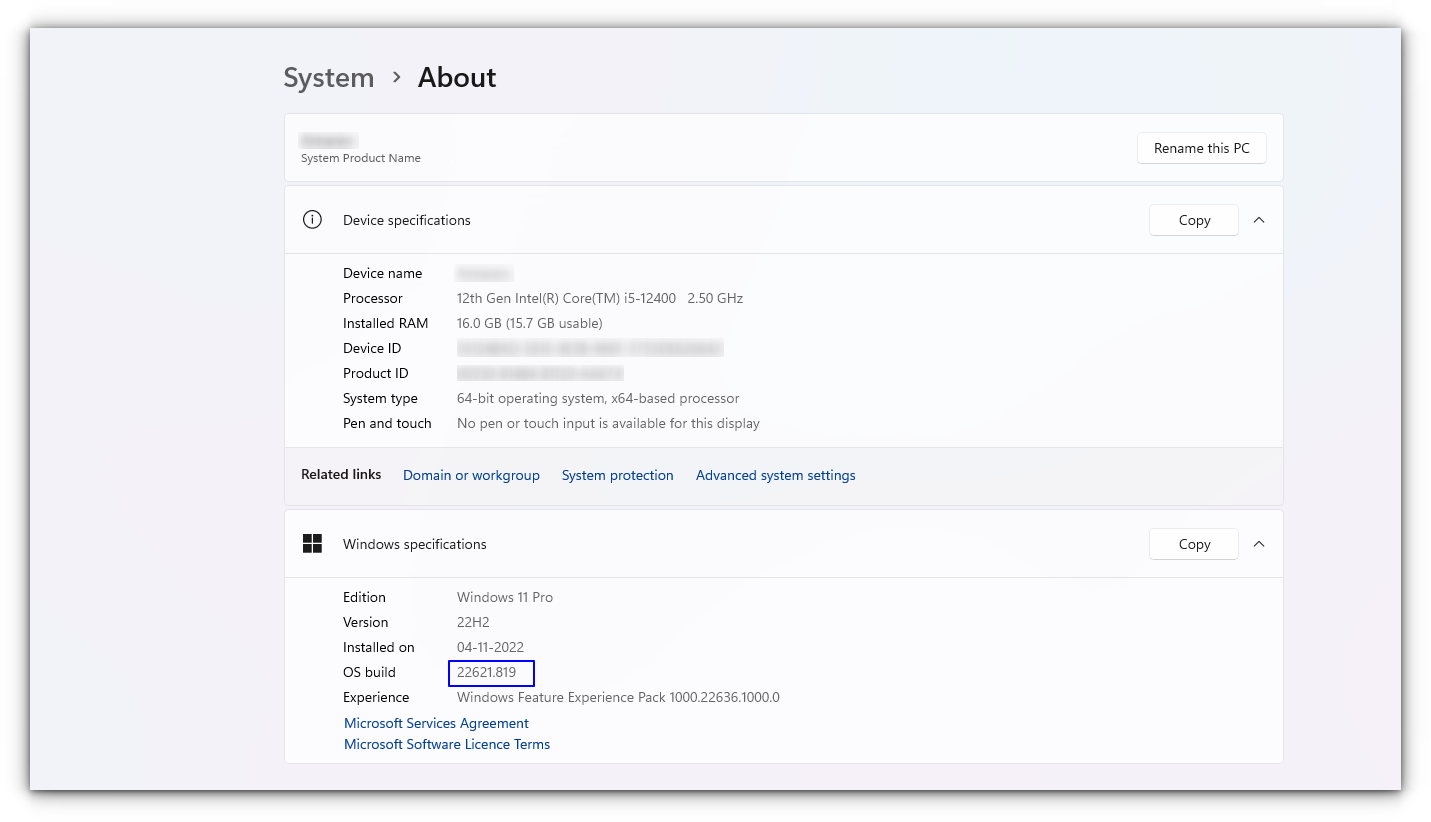
This tutorial was tested with the latest Windows 11 version 22H2, and build 22621.819. You might need to update your Windows installation if you have an older build to follow everything in this tutorial.
What is WSL?
WSL (formerly Bash on Windows) provides a Windows subsystem, and Linux runs atop it. It is not a virtual machine or an application like Cygwin. It is a complete Linux system inside Windows 10/11. It allows you to run the same Bash shell you find on Linux. You can run Linux commands inside Windows without installing a virtual machine or dual-boot Linux and Windows.
You install Linux inside Windows like a regular application. This is a good option if your main aim is to learn Linux/UNIX commands.
Check for System Compatibility
You must be running specific versions of Windows for the different features described in this article. Requirements necessary for a particular feature to work are described under its titles. To check your Windows version, search for about in the start menu.
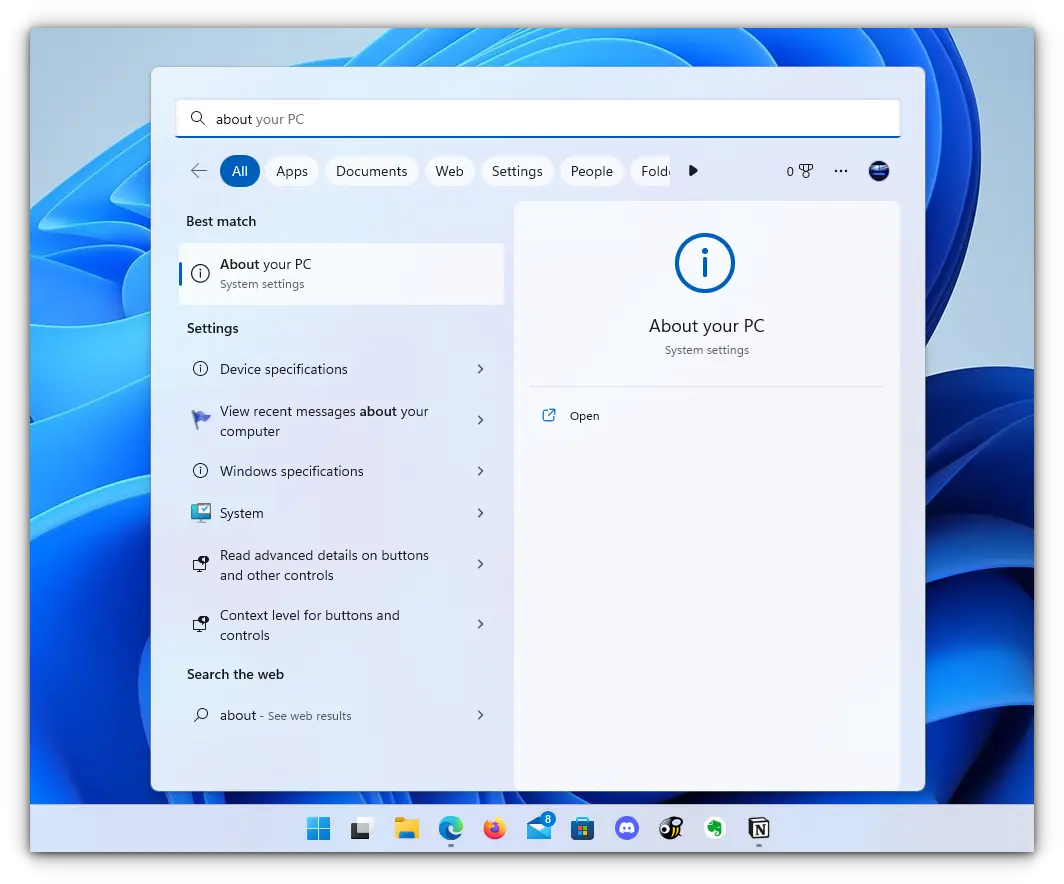
Here, you can see the build of your PC, as shown in the screenshot below. Make sure it is matching with the respective requirements described under various sub-headings here in this article.
- You must be running Windows 10 version 1607 (the Anniversary update) or above.
- WSL only runs on 64-bit versions 32-bit versions are not supported.
Install Bash in Newer Windows 10 and 11
The good thing is that the latest set of upgrades, including the stable release of WSL v1.0 released from Windows, makes it easier to install Bash on Windows.
There are two ways you can go about it:
- You can get it in one click from Windows Store.
- Choose to use the command-line.
1. Install WSL Using the Microsoft Store
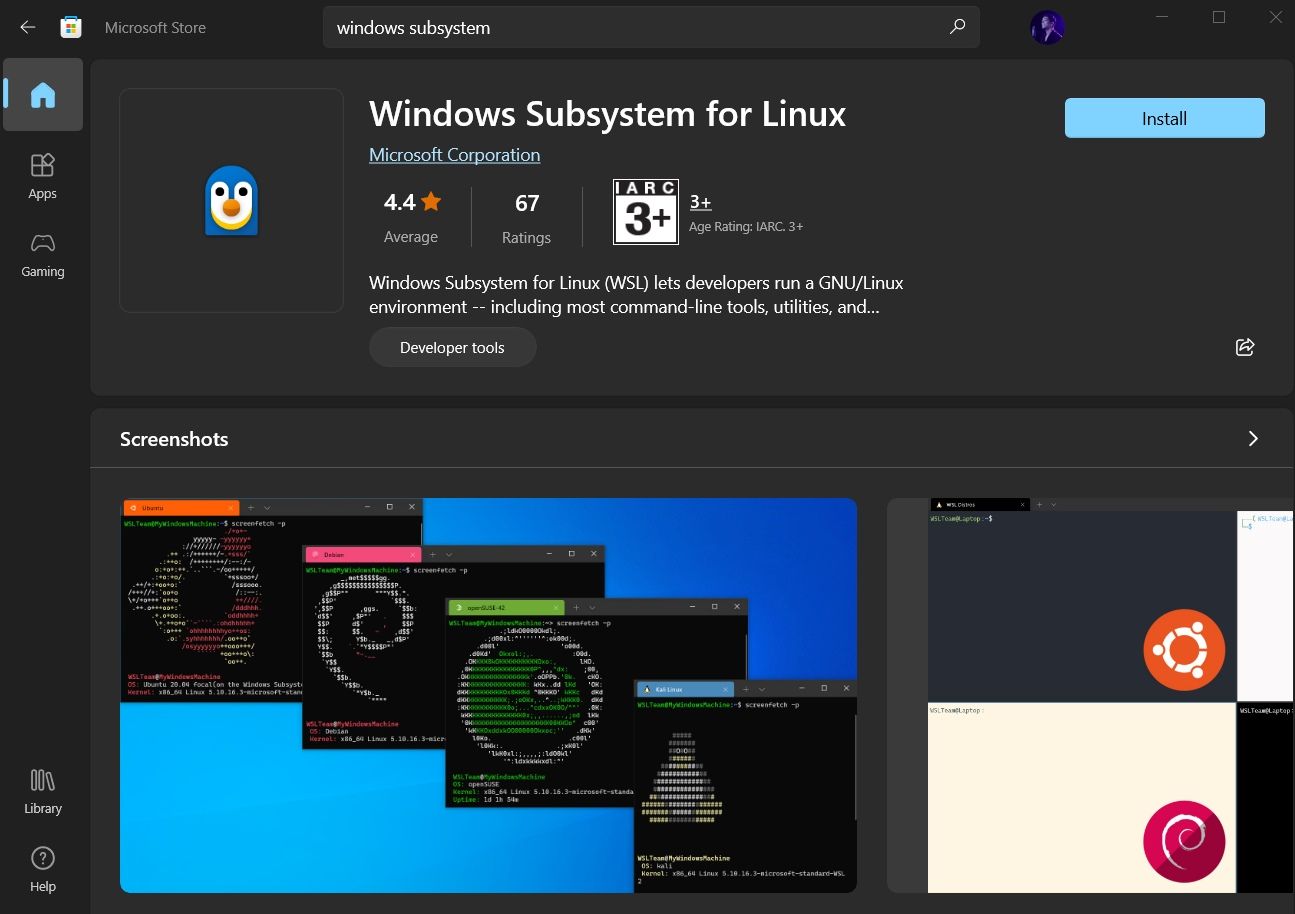
Launch the Microsoft Store and search for «Windows subsystem«.
Install it, and you’re done with the first step. Next, you have to install a Linux distribution.
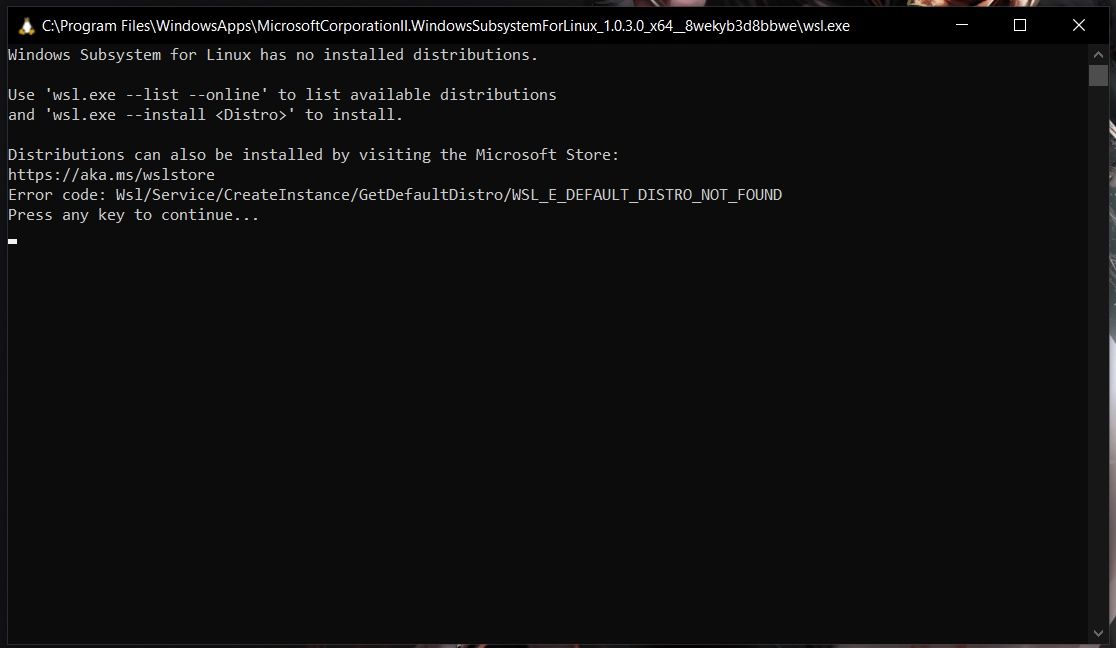
So, if you try to open WSL, you will get to see a window informing you that no distribution is installed.
Similar to WSL, search for the distribution on Microsoft Store, and then install it.
For instance, I installed Ubuntu from the store as shown in the image below:
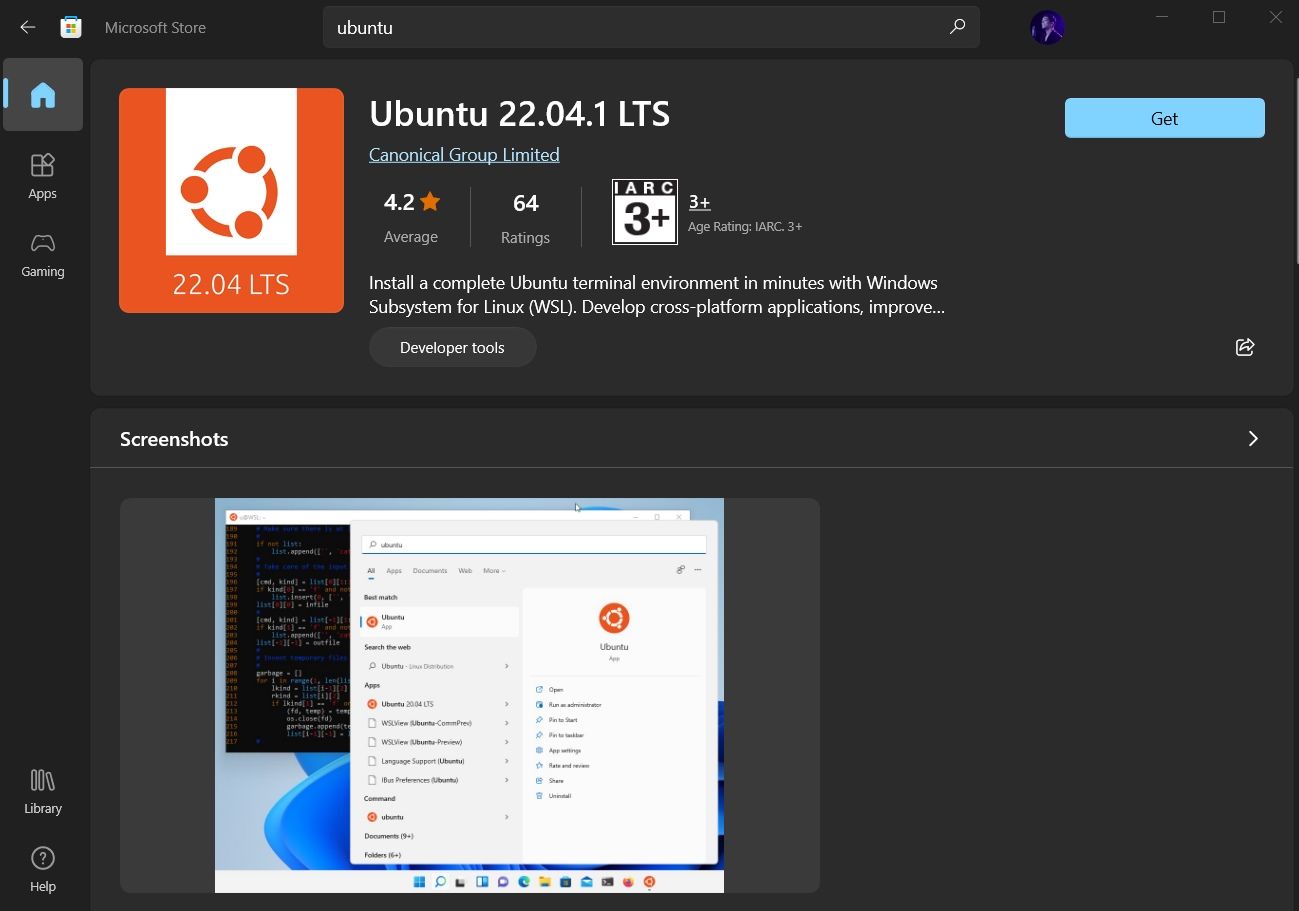
And, then proceed to «Open» it and it will automatically start installing. The procedure is same for any distribution you choose.
We then have to configure it, which is discussed right after installing it through the command line.
2. Install WSL and the default distribution using the command-line
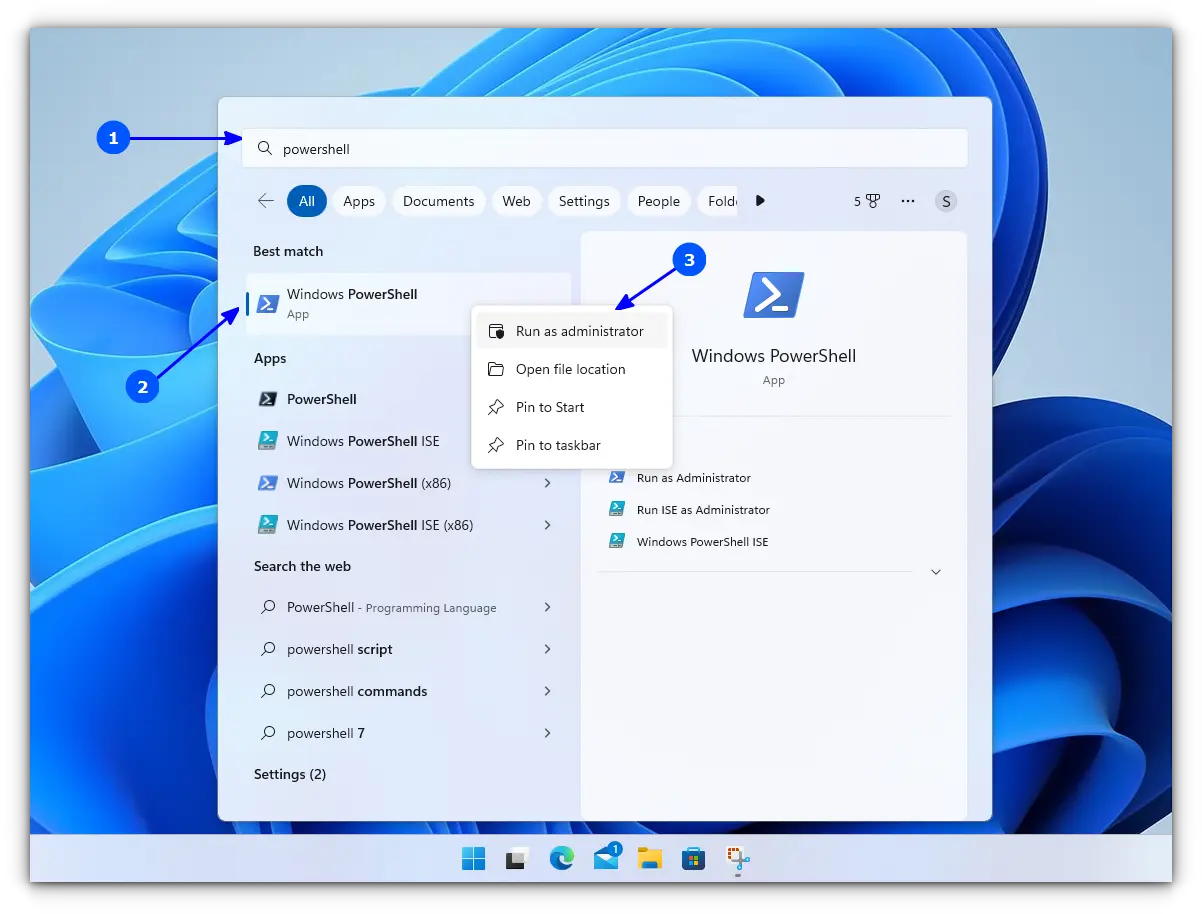
In WSL, the default distribution is Ubuntu (which can be changed). To install, open Powershell as an administrator.
For this, search for Powershell in the start menu, right-click on Powershell and select Run as Administrator.
Inside Powershell, enter the following command to install WSL, along with all necessary features and the default distribution, that is, Ubuntu.
wsl --installOnce finished downloading and installing, you need to reboot to apply the changes.
Whether you installed WSL and Ubuntu using the Microsoft Store or the command line, you need to configure it.
Here’s how it is done:
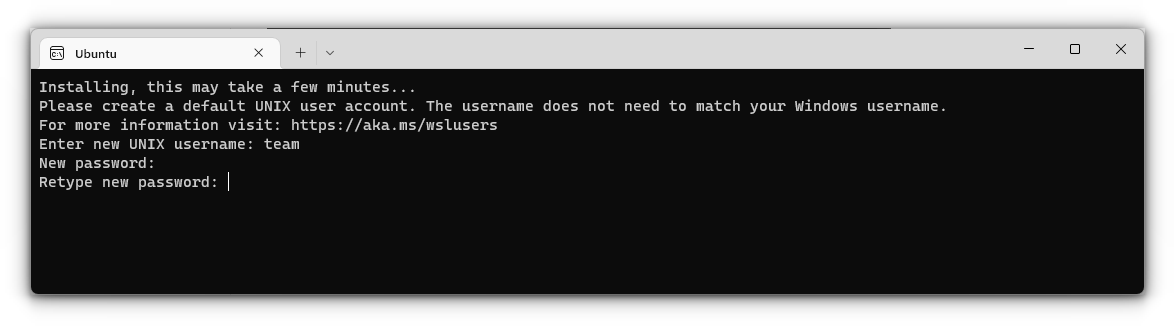
🛠️ Configure the newly installed Ubuntu
After rebooting, search for Ubuntu in Start Menu and open it.

It will ask you to enter a UNIX Username and Password. Enter these details and press enter key.
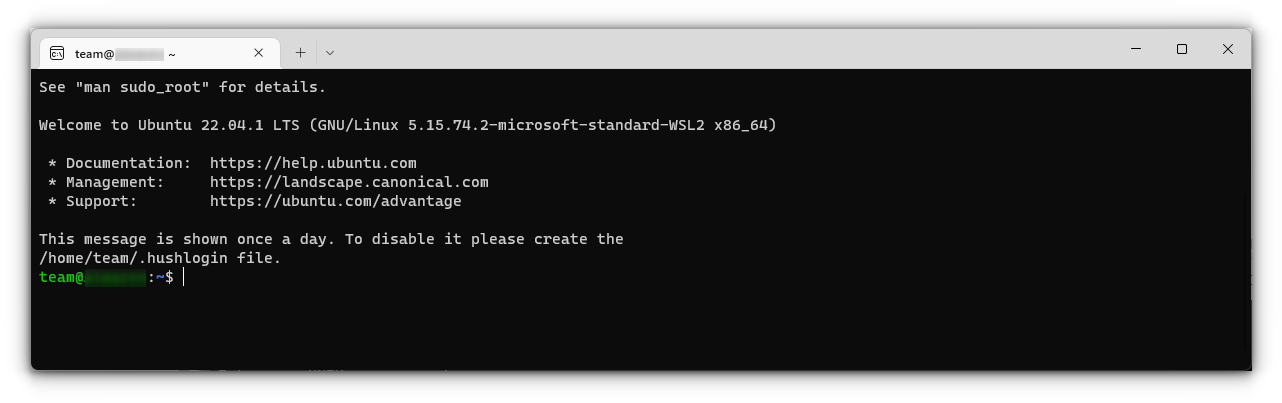
You will now be inside the terminal window of Ubuntu.
Once logged in, you need to update the installed Ubuntu. For this, enter the following commands one by one:
sudo apt update
sudo apt full-upgrade
After completing the update, you are good to go with Ubuntu in WSL.
Install Bash on Older Windows
If you have the minimum requirements mentioned in the beginning but are running an older Windows build, the previous method may not be supported. So there is a manual installation method.
Also, there are both WSL1 and WSL2 available. WSL2 offers some upgraded functionalities but has some minimum requirements to run:
- For x64 systems: Version 1903 or later, with Build 18362 or later.
- For ARM64 systems: Version 2004 or later, with Build 19041 or later.
So this brings us to two possibilities to install:
- Install Ubuntu with WSL1
- Install Ubuntu with WSL2
1. Install Ubuntu with WSL 1
This is a relatively simple procedure for those with a system incompatible with WSL2. First, you need to enable the Windows Subsystem for the Linux feature. This can be done through the command line. Open Powershell as an administrator and enter the following command:
dism.exe /online /enable-feature /featurename:Microsoft-Windows-Subsystem-Linux /all /norestartOr, to do this via GUI, follow the steps below:
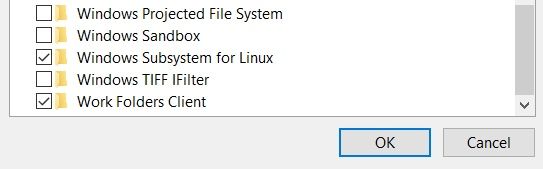
- Search for Windows Features in Start Menu.
- Turn on Windows Subsystem for the Linux feature.
- Reboot your system.
- Open the Windows store and search for the distribution of your choice to install.
Once installation is completed, open the Ubuntu app from the start menu. It will take a couple of seconds to install. You will be prompted to enter a username and password. Provide those credentials, and you are good to go with Ubuntu in WSL1.
2. Install Ubuntu with WSL 2
It is recommended to use WSL2 instead of WSL1 if you have support. To install Ubuntu with WSL2, you need to make sure that the Windows Subsystem for Linux feature is turned on. For this, as in the above case, execute the following command in an elevated Powershell:
dism.exe /online /enable-feature /featurename:Microsoft-Windows-Subsystem-Linux /all /norestartReboot the device once the command is completed.
After this, you need to enable the Virtual Machine Platform feature. Open the Powershell with admin privileges and enter the following command:
dism.exe /online /enable-feature /featurename:VirtualMachinePlatform /all /norestartOnce again, restart the device to complete the WSL install and update to WSL 2.
Now, download the Linux Kernel Update Package for x64 machines from the official website. If you are using ARM64 devices, use this link to download the latest kernel update package.
If you are not sure about the device architecture, enter the command below in Powershell to get the type:
systeminfo | find "System Type"When the file is downloaded, double-click on it and finish the installation of the Kernel update package.
Now, open PowerShell and run this command to set WSL 2 as the default version when installing a new Linux distribution:
wsl --set-default-version 2Once WSL2 is set as the default version, you can now install the Linux distribution of your choice.
Go to Windows Store and install Ubuntu, as described in the earlier steps. and the rest of the procedure is already described above.
Enjoy Linux inside Windows.
🔧 Troubleshooting Tip 1
«The WSL optional component is not enabled. Please enable it and try again.»
You may see an error like this when you try to run Linux inside Windows 10:
The WSL optional component is not enabled. Please enable it and try again.
See https://aka.ms/wslinstall for details.
Error: 0x8007007e
Press any key to continue...
And when you press any key, the application closes immediately.
The reason here is that the Windows Subsystem for Linux is not enabled in your case. You should enable it as explained in this guide. You can do that even after you have installed Linux.
🔧 Troubleshooting Tip 2
Installation failed with error 0x80070003
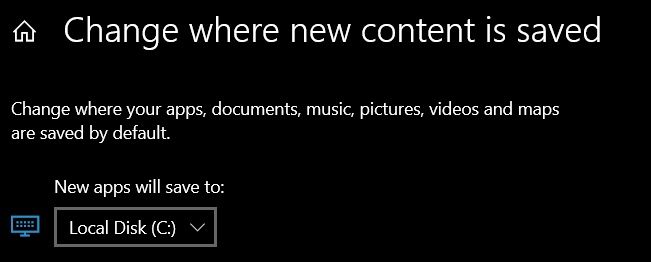
This is because Windows Subsystem for Linux only runs on the system drive i.e. the C drive. You should ensure that when you download Linux from the Windows Store, it is stored and installed in the C Drive.
On Windows 10, go to Settings -> Storage -> More Storage Settings -> Where new content is saved: Change where new content is saved and select C Drive here.
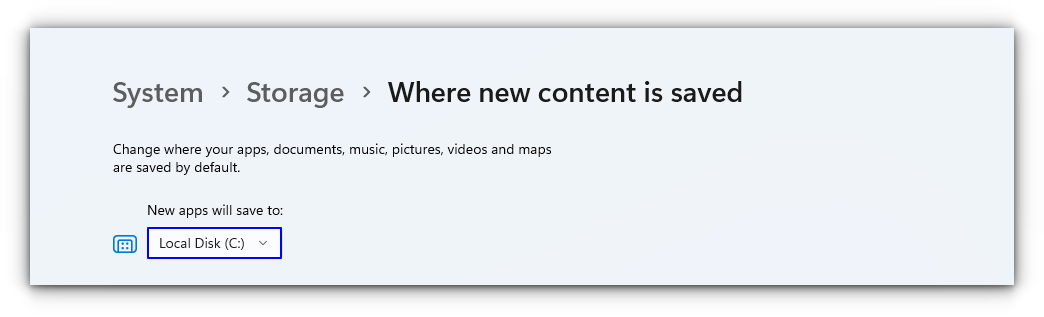
On Windows 11, go to Settings -> System -> Storage -> Advanced storage settings -> Where new content is saved and select C Drive here.
🔧 Troubleshooting Tip 3
«Failed to attach disk Error»
Sometimes, this error will appear when we reinstall the Ubuntu in WSL.
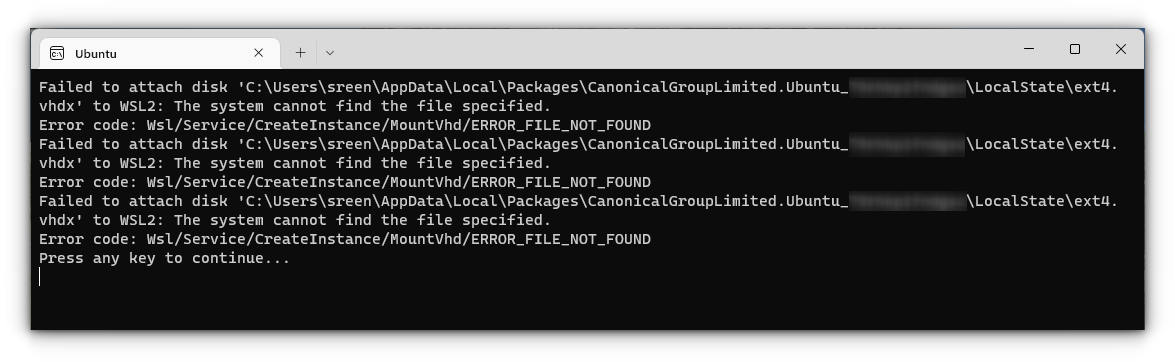
In this case, open Powershell and run the following command:
wsl -l -vThis will list the installed Linux systems. Find the name of the system, that is throwing the error, in my case Ubuntu. Now run the following command:
wsl --unregister UbuntuYou can restart the ubuntu app and it will run without any issues.
You can refer to more common troubleshooting methods from the official website.
Run GUI Apps On Windows Subsystem for Linux
The ability to run GUI apps on Windows Subsystem for Linux was introduced with the WSL 2 release in May 2020.
Windows Subsystem for Linux (WSL) with WSL2 now supports running Linux GUI applications (X11 and Wayland) on Windows in a fully integrated desktop experience. This allows you to install Linux applications and seamlessly integrate them into Windows desktop, including features like “pin to taskbar”.
📋
One crucial point is that you must be on Windows 10 Build 19044+ or Windows 11 to access this feature.
Step 1: Enable/Update WSL 2
This procedure has been explained in the above section and you can refer to it.
Step 2: Download and Install Graphics drivers
To run GUI apps, you need to install appropriate graphics drivers. You can use the following link to download the drivers according to your provider.
- Intel GPU Driver for WSL
- AMD GPU Driver for WSL
- NVIDIA GPU Driver for WSL
Once installed, you are all done.
Step 3: Install some GUI Apps
Now, go to your Ubuntu app and install any GUI app using the APT package manager. You should note that running apps from other sources like flatpak are problematic within WSL.
For this article, I installed the Gedit text editor using the following command:
sudo apt install gedit -yThis will install several MB of packages including required libraries. Once completed, you can run the following command to start the GUI Gedit app in Windows.:
gedit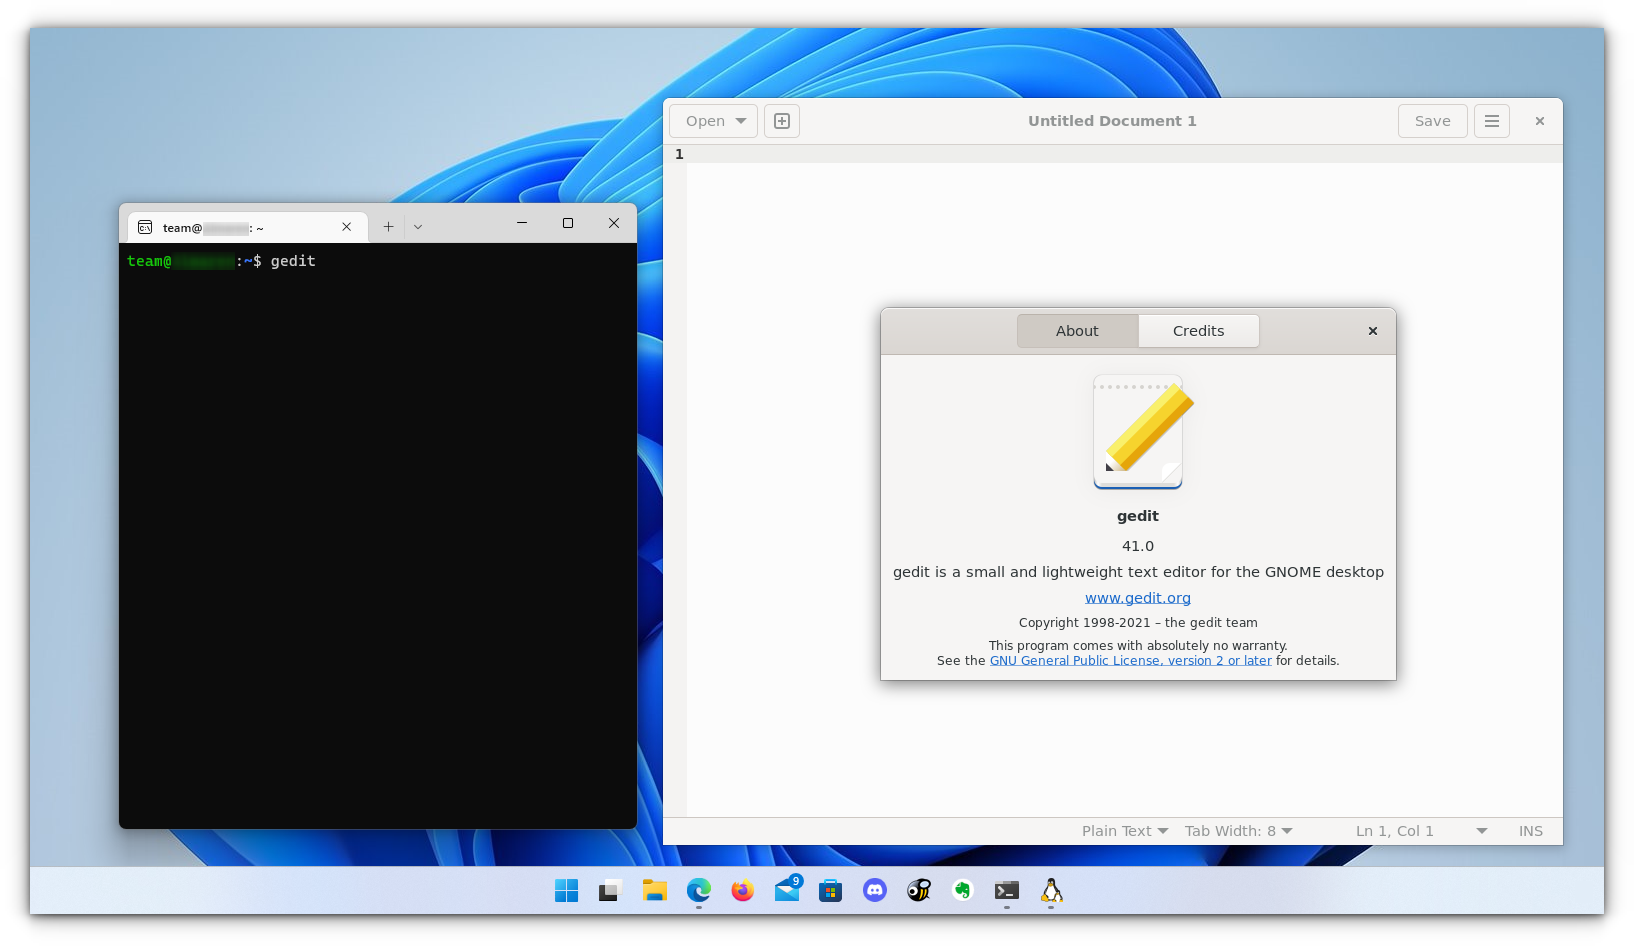
Similarly, you can install all the popular applications available to Linux, including Nautilus file manager, GIMP, etc. For more about running GUI applications in WSL, you can refer to the official documentation.
Install Linux Bash Shell on other older Windows 10
If you cannot get the Fall Creator’s update on Windows 10 for some reason, you can still install it if you have the Anniversary update of Windows 10. But here, you’ll have to enable developer mode. I still recommend upgrading to the Fall Creator’s update or the latest Windows 10 2004 version update though.
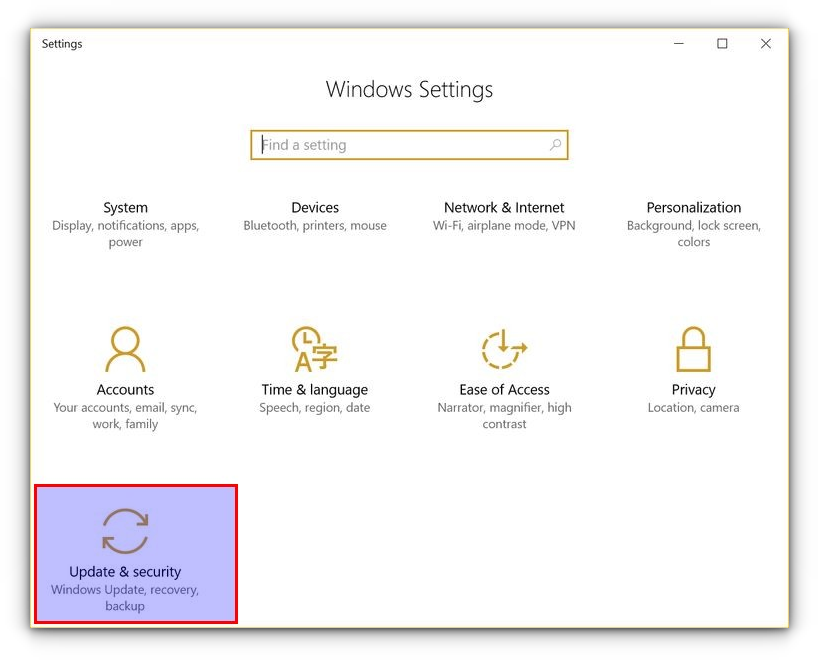
Press Windows Key + I to access Windows system settings. Here, go to Update & Security:
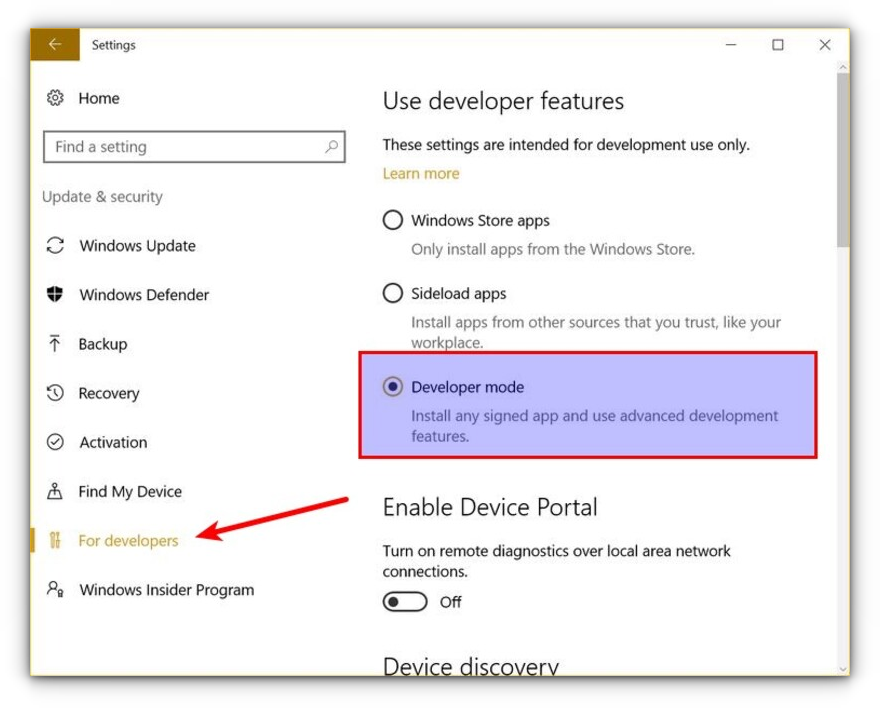
From the left side pane, choose “For developers.” You’ll see an option for “Developer mode.” Enable it.
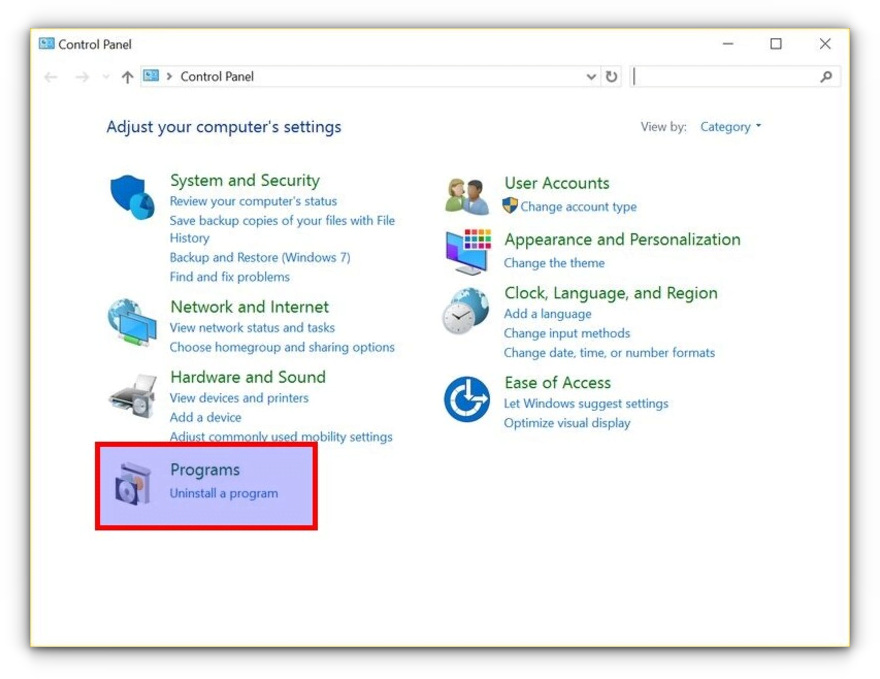
Now search for Control Panel and in Control Panel, click on “Programs”:
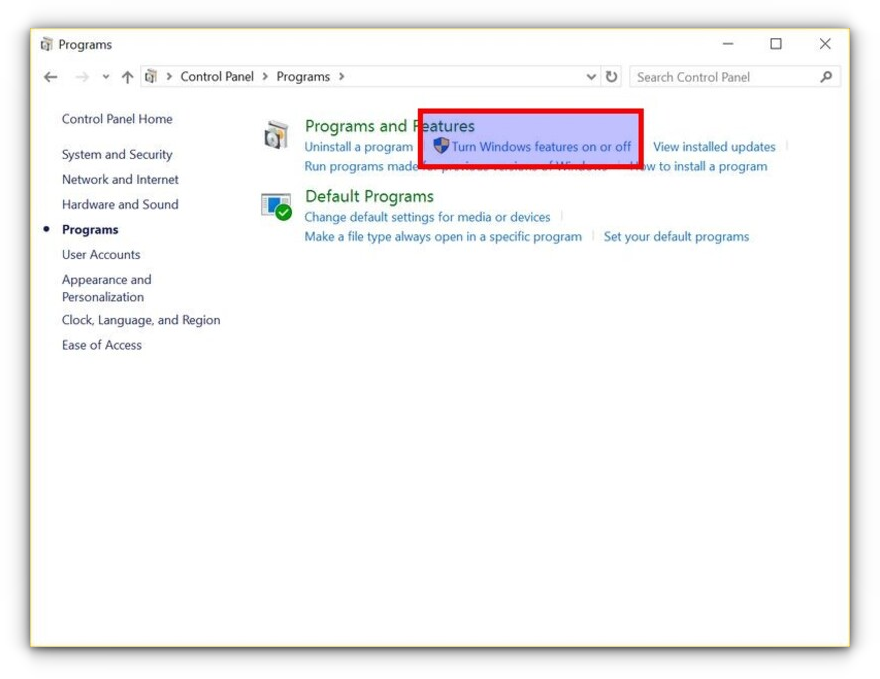
In Programs, click “Turn Windows features on or off”:
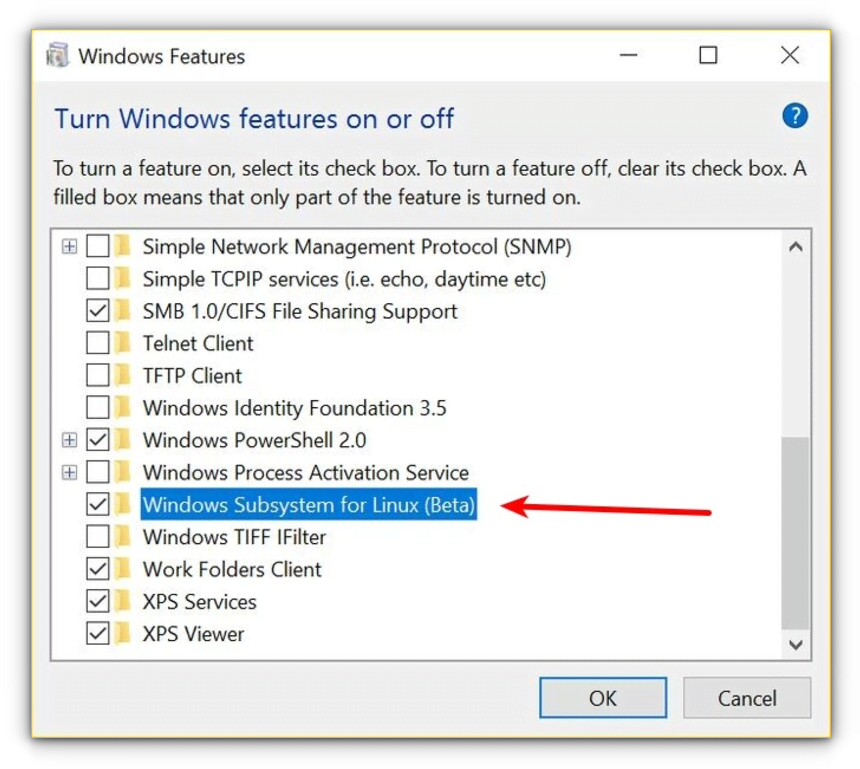
When you do this, you’ll see several Windows features. Look for “Windows Subsystem for Linux” and enable it.
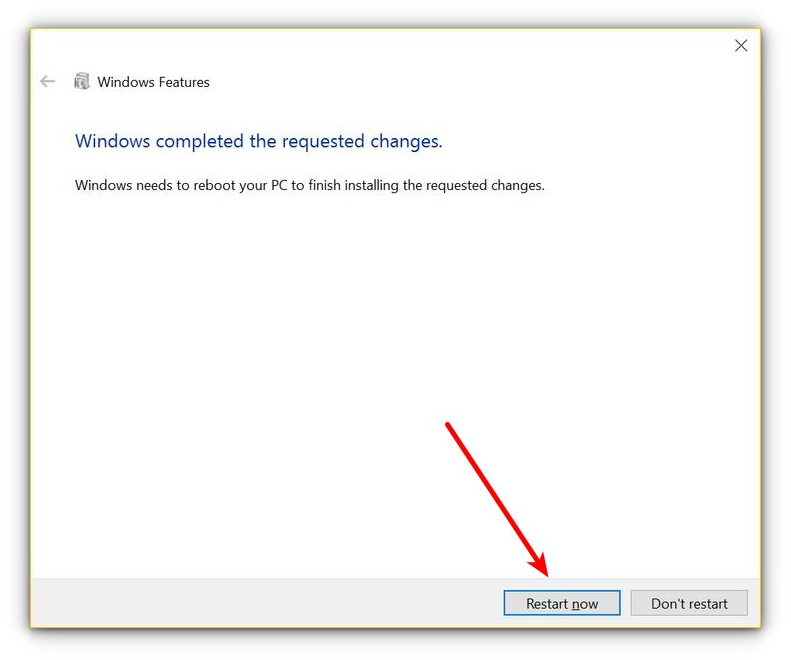
You’ll need to restart the system after doing this.
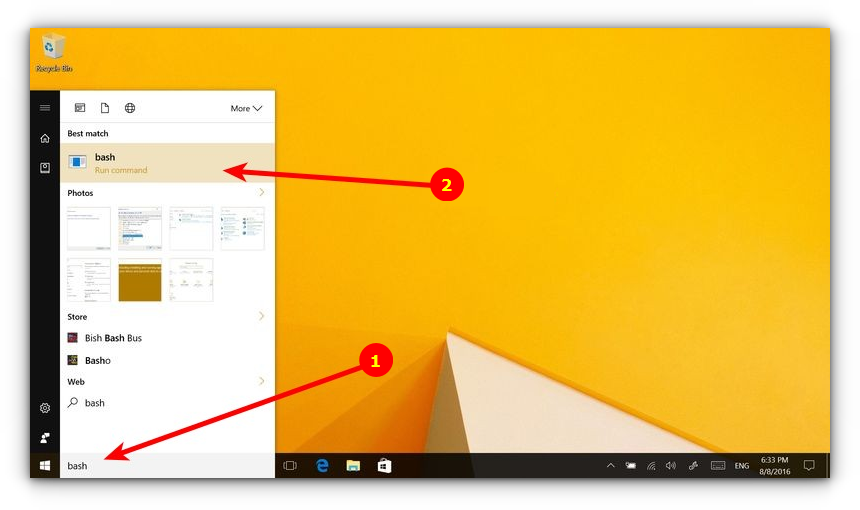
After restarting the computer, click the start button and search for “bash”.
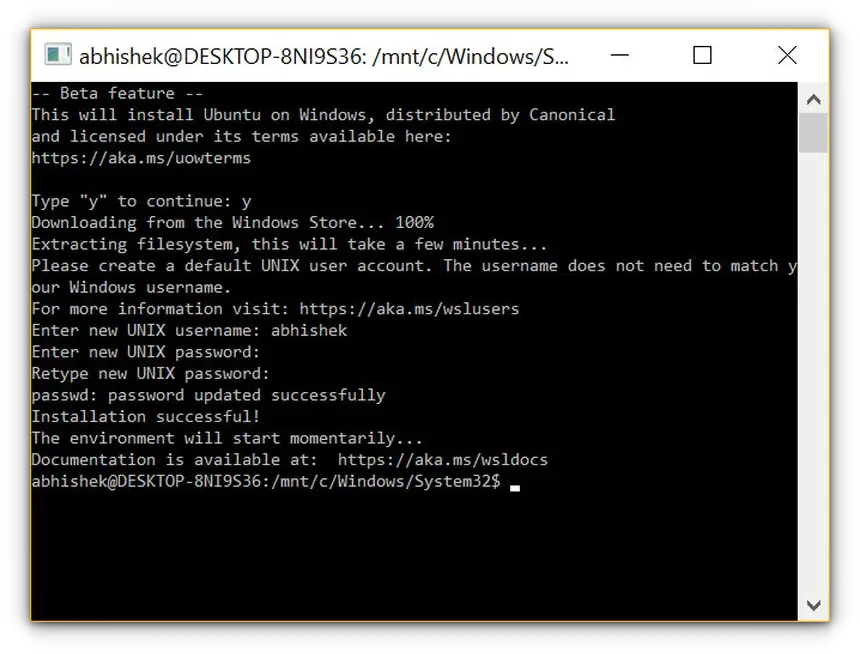
When you run it for the first time, you’ll be given the option to download and install Ubuntu. You’ll be asked to create a username and password during this process. It will install an entire Ubuntu Linux system, so have patience as it will take some time in downloading and installing Linux on Windows.
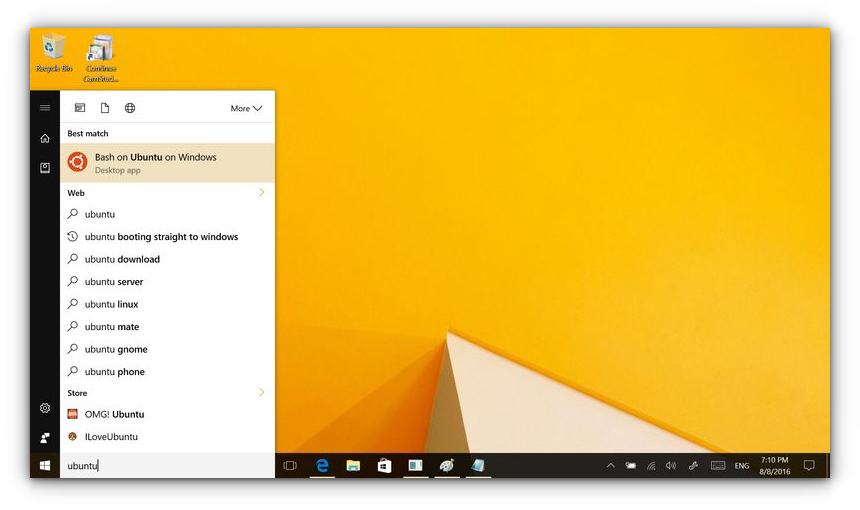
Once this is done, go back to the Start menu and search for Ubuntu or Bash.
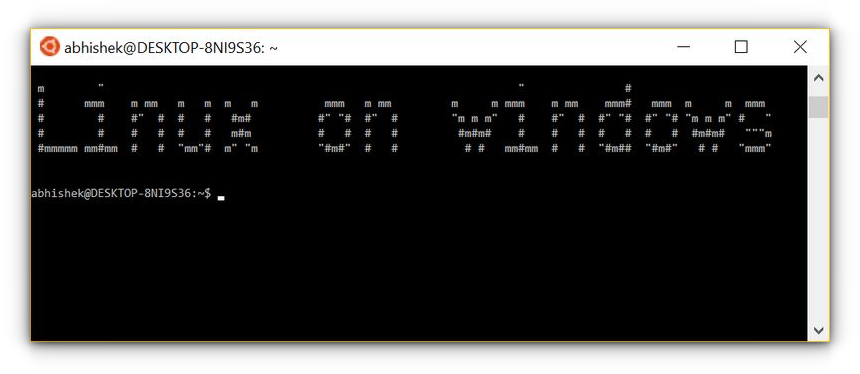
Now you have a command line version of Ubuntu Linux. You can use apt to install various command line tools in it.
💬 I hope you find this tutorial helpful for installing bash on Windows and experimenting with Linux GUI apps on Windows. No wonder WSL lets you play with Linux inside of Windows. If you have questions or suggestions, feel free to ask.
From Wikipedia, the free encyclopedia
Cygwin
|
Running Cygwin, including Cygwin/X, under Windows XP |
|
| Original author(s) | Steve Chamberlain, Cygnus Solutions |
|---|---|
| Developer(s) | Cygnus Solutions, Red Hat, Cygwin project volunteers |
| Initial release | October 18, 1995; 29 years ago |
| Stable release |
3.6.1-1[1] |
| Repository |
|
| Written in | C/C++ |
| Operating system | Microsoft Windows |
| Type | POSIX standard utilities, POSIX standard library, C standard library, compatibility layer |
| License | GPLv3, LGPLv3[2] |
| Website | cygwin |
Cygwin ( SIG-win)[3] is a free and open-source Unix-like environment and command-line interface (CLI) for Microsoft Windows. The project also provides a software repository containing open-source packages. Cygwin allows source code for Unix-like operating systems to be compiled and run on Windows. Cygwin provides native integration of Windows-based applications.
The terminal emulator mintty is the default command-line interface provided to interact with the environment. The Cygwin installation directory layout mimics the root file system of Unix-like systems, with directories such as /bin, /home, /etc, /usr, and /var.
Cygwin is released under the GNU Lesser General Public License version 3.[4] It was originally developed by Cygnus Solutions,[5][6] which was later acquired by Red Hat (now part of IBM), to port the GNU toolchain to Win32, including the GNU Compiler Suite. Rather than rewrite the tools to use the Win32 runtime environment, Cygwin implemented a POSIX-compatible environment in the form of a DLL.[7]
The brand motto is «Get that Linux feeling – on Windows«, although Cygwin doesn’t have Linux in it.[8]
Cygwin began in 1995 as a project of Steve Chamberlain, a Cygnus engineer who observed that Windows NT and 95 used COFF as their object file format, and that GNU already included support for x86 and COFF, and the C library newlib. He thought that it would be possible to retarget GCC and produce a cross compiler generating executables that could run on Windows. A prototype was later developed. Chamberlain bootstrapped the compiler on a Windows system, to emulate Unix to let the GNU configure shell script run.
Initially, Cygwin was called Cygwin32.[6][note 1] When Microsoft registered the trademark Win32, the «32» was dropped to simply become Cygwin.
In 1999, Cygnus offered Cygwin 1.0 as a commercial product.[9] Subsequent versions have not been released, instead relying on continued open source releases.
Geoffrey Noer was the project lead from 1996 to 1999.[10][11] Christopher Faylor was lead from 1999 to 2004; he left Red Hat and became co-lead with Corinna Vinschen.[12][13] Corinna Vinschen has been the project lead from mid-2014 to date (as of September, 2024).[14]
From June 23, 2016, the Cygwin library version 2.5.2 was licensed under the GNU Lesser General Public License (LGPL) version 3.[15]
Cygwin is provided in two versions: the full 64-bit version and a stripped-down 32-bit version, whose final version was released in 2022.[16] Cygwin consists of a library that implements the POSIX system call API in terms of Windows system calls to enable the running of a large number of application programs equivalent to those on Unix systems, and a GNU development toolchain (including GCC and GDB). Programmers have ported the X Window System, K Desktop Environment 3, GNOME,[17] Apache, and TeX. Cygwin permits installing inetd, syslogd, sshd, Apache, and other daemons as standard Windows services. Cygwin programs have full access to the Windows API and other Windows libraries.
Cygwin programs are installed by running Cygwin’s «setup»[18] program, which downloads them from repositories on the Internet.
The Cygwin API library is licensed under the GNU Lesser General Public License version 3 (or later), with an exception to allow linking to any free and open-source software whose license conforms to the Open Source Definition.[19]
Cygwin consists of two parts:
- A dynamic-link library in the form of a C standard library that acts as a compatibility layer for the POSIX API and
- A collection of software tools and applications that provide a Unix-like look and feel.[20]
Cygwin supports POSIX symbolic links, representing them as plain-text files with the system attribute set. Cygwin 1.5 represented them as Windows Explorer shortcuts, but this was changed for reasons of performance and POSIX correctness. Cygwin also recognises NTFS junction points and symbolic links and treats them as POSIX symbolic links, but it does not create them. The POSIX API for handling access control lists (ACLs) is supported.[21]
A Cygwin-specific version of the Unix mount command allows mounting Windows paths as «filesystems» in the Unix file space. Initial mount points can be configured in /etc/fstab, which has a format very similar to Unix systems, except that Windows paths appear in place of devices. Filesystems can be mounted in binary mode (by default), or in text mode, which enables automatic conversion between LF and CRLF endings (which only affects programs that open files without explicitly specifying text or binary mode).
Cygwin 1.7 introduced comprehensive support for POSIX locales, and the UTF-8 Unicode encoding became the default.
The fork system call for duplicating a process is fully implemented, but the copy-on-write optimization strategy could not be used.[22][23][24]
Cygwin’s default user interface is the bash shell running in the mintty terminal emulator.[25] The DLL also implements pseudo terminal (pty) devices, and Cygwin ships with a number of terminal emulators that are based on them, including rxvt/urxvt and xterm. The version of GCC that comes with Cygwin has various extensions for creating Windows DLLs, such as specifying whether a program is a windowing or console-mode program. Support for compiling programs that do not require the POSIX compatibility layer provided by the Cygwin DLL used to be included in the default GCC, but as of 2014, it is provided by cross-compilers contributed by the MinGW-w64 project.
Cygwin’s base package selection is approximately 100MB,[26] containing the bash (interactive user) and dash (installation) shells and the core file and text manipulation utilities. Additional packages are available as optional installs from within the Cygwin «setup» program and package manager («setup-x86_64.exe» – 64 bit).[27] The Cygwin Ports project provided[when?] additional packages that were not available in the Cygwin distribution itself. Examples included GNOME, K Desktop Environment 3, MySQL database, and the PHP scripting language. Most ports have been adopted by volunteer maintainers as Cygwin packages, and Cygwin Ports are no longer maintained. Cygwin ships with GTK+ and Qt.
The Cygwin/X project allows graphical Unix programs to display their user interfaces on the Windows desktop for both local and remote programs.
- Windows Subsystem for Linux – Feature for a Linux environment in Windows
- ^ Not to be confused with the current GnuWin32 project.
- ^ «cygwin 3.6.1-1». April 9, 2025. Retrieved April 15, 2025.
- ^ «Cygwin Licensing Terms». Archived from the original on July 28, 2012. Retrieved December 15, 2022.
- ^ Hall, Larry (September 14, 2004). «Re: How do you pronounce it?». Cygwin (Mailing list). Archived from the original on August 30, 2011. Retrieved October 10, 2007.
- ^ «Cygwin library now available under GNU Lesser General Public License». Red Hat. Archived from the original on June 24, 2016. Retrieved June 23, 2016.
- ^ «A brief history of the Cygwin project». Cygwin. February 2, 2018. Archived from the original on January 8, 2020. Retrieved January 10, 2020.
- ^ a b «Cygwin32: A Free Win32 Porting Layer for UNIX Applications». USENIX. August 3, 1998. Archived from the original on January 11, 2020. Retrieved January 10, 2020.
- ^ «(Solved) Linux Subsystem vs Cygwin vs MobaXterm». Tech Help Forum by How-To Geek. January 24, 2017. Archived from the original on February 20, 2023. Retrieved March 15, 2019.
- ^ «Cygwin». www.cygwin.com. Retrieved March 11, 2024.
- ^ «Cygwin Unites Unix and Windows Apps». Google Books. November 15, 1999. Archived from the original on February 20, 2023. Retrieved January 13, 2020.
- ^ Delorie, DJ (February 17, 1999). «fyi: who does what». Cygwin (Mailing list). Archived from the original on February 14, 2004. Retrieved January 13, 2020.
- ^ Noer, Geoffrey (February 19, 1999). «A partial goodbye…» Cygwin (Mailing list). Archived from the original on February 2, 2004. Retrieved January 13, 2020.
- ^ Faylor, Christopher (March 31, 2004). «Changing jobs». Cygwin (Mailing list). Archived from the original on September 6, 2015. Retrieved January 13, 2020.
- ^ Faylor, Christopher (July 31, 2014). «Christopher Faylor – Withdrawing from the project». Cygwin (Mailing list). Archived from the original on December 17, 2014. Retrieved May 2, 2015.
- ^ «Cygwin Notables». www.cygwin.com. Retrieved September 10, 2024.
- ^ «Cygwin library now available under GNU Lesser General Public License». www.redhat.com. Archived from the original on June 16, 2021. Retrieved May 27, 2021.
- ^ Turney, Jon (November 25, 2022). «Cygwin x86 end-of-life». Retrieved September 14, 2023.
- ^ «Cygwin Ports». Archived from the original on May 11, 2015. Retrieved May 2, 2015.
- ^ Delorie, DJ (April 17, 2000). «New Cygwin Net Release». Cygwin (Mailing list). Archived from the original on December 20, 2014. Retrieved January 10, 2020.
- ^ «What are the licensing terms?». Cygwin. Archived from the original on July 28, 2012.
- ^ «Cygwin FAQ». cygwin.com. Archived from the original on May 7, 2021. Retrieved January 7, 2021.
- ^ Vinschen, Corinna (January 16, 2016). «Updated: Cygwin 2.4.0-1». Cygwin Announcements (Mailing list). Archived from the original on January 11, 2020. Retrieved January 11, 2020.
- ^ «Cygwin FAQ: How is fork() implemented?». cygwin.com. Archived from the original on October 20, 2010. Retrieved October 10, 2010.
- ^ «Highlights of Cygwin Functionality: Process Creation». Archived from the original on December 30, 2014. Retrieved December 24, 2014.
- ^ Blake, Eric (January 15, 2009). «Bash doesn’t launch the applications directly». Cygwin (Mailing list). Archived from the original on June 13, 2011. Retrieved October 10, 2010.
- ^ «Chapter 2: Setting Up Cygwin». cygwin.com. Retrieved March 17, 2025.
- ^ «Installing and Updating Cygwin Packages». Cygwin. Archived from the original on January 10, 2020. Retrieved January 11, 2020.
- ^ «Cygwin Package List». Cygwin. Archived from the original on February 5, 2016. Retrieved January 11, 2020.
Wikibooks has more on the topic of: Cygwin
- Official website