
В случае, если вам потребовался доступ из Windows к данным на разделе диска с файловой системой Linux — ext4/ext3/ext2, встроенными средствами системы сделать это не получится. Однако, возможности есть, причем реализовать это можно встроенными средствами системы или с помощью сторонних инструментов.
В этой инструкции подробно о способах подключить раздел диска в файловой системе Linux в Windows 11 и Windows 10 для доступа к данным на этом разделе как для чтения, так и для записи.
Ext2 File System Driver (Ext2Fsd) — самый простой способ открыть раздел ext4/ext3/ext2 в Windows
Ext2 File System Driver или Ext2Fsd — сторонний и полностью бесплатный драйвер для подключения разделов Linux во всех версиях Windows начиная с XP. Несмотря на название, поддерживаются не только разделы не только с файловой системой ext2, но и более новые ext4 и ext3.
Порядок использования Ext2 File System Driver для доступа к дискам Linux будет следующим:
- Загрузите установщик Ext2Fsd с сайта https://sourceforge.net/projects/ext2fsd/
- Установите драйвер, в параметрах установки как правило не требуется ничего изменять.
- По завершении установки вам будет предложено запустить Ext2 Volume Manager (менеджер томов), запустите его.
- Нажмите правой кнопкой мыши по разделу Linux ext4, ext3, ext2 и выберите пункт «Assign Drive Letter» — назначить букву диска.

- Для раздела будет автоматически назначена буква диска, и вы увидите раздел в Проводнике Windows с возможностью чтения и записи файлов на нём.


В дальнейшем вы тем же способом сможете удалить букву диска с раздела (опция «Change letter» — «Remove»).
Доступ к разделам Linux средствами Подсистемы Windows для Linux (WSL)
Подсистема Windows для Linux (WSL) также может быть использована для подключения дисков Linux в Windows таким образом, чтобы доступ к ним был возможен из проводника. Шаги будут следующими:
- Запустите командную строку, Терминал или PowerShell от имени администратора и по порядку введите команды
wsl --install
wsl --set-default-version 2
dism.exe /online /enable-feature /featurename:VirtualMachinePlatform /all /norestart
wsl --install -d Ubuntu

- После выполнения последней команды откроется окно консоли Linux (командную строку при этом не закрывайте, она еще пригодится) с предложением настроить имя пользователя и пароль, сделайте это. Если в окне консоли вы увидите сообщение об ошибке, скачайте и установите обновление WSL, перезагрузите компьютер и запустите Ubuntu из меню «Пуск».
- В консоли Ubuntu введите команду
sudo mkdir -p /mnt/ext-drives/
для создания папки, к которой будут монтироваться диски.

- В консоли Windows (командная строка, терминал, Powershell) введите команду
wmic diskdrive list brief
- Обратите внимание на DeviceID диска, который нужно подключить и введите команду (так же в консоли Windows) указав соответствующий номер в имени PHYSICALDRIVE
wsl --mount \\.\PHYSICALDRIVE

- В консоли Ubuntu введите команду lsblk — это отобразит список подключенных дисков, разделов на них и их размер. В следующей команде используем имя нужного раздела для монтирования:
sudo mount /dev/sdИМЯ /mnt/ext-drives/
- После успешного выполнения всех указанных шагов вы можете зайти в Проводник Windows, выбрать пункт «Linux» в панели быстрого доступа, перейти в папку mnt\ext-drives и получить доступ к файлам на подключенном разделе Linux с возможностью записи и чтения.


В дальнейшем для отключения диска от WSL можно использовать ту же команду, которая использовалась на 5-м шаге, заменив mount на unmount.
Есть и другие программы (драйверы) для доступа к разделам Linux из Windows, но не полностью бесплатные. Среди них:
- DiskInternals Linux Reader — в бесплатной версии доступно только чтение данных с разделов.
- Paragon Linux File Systems for Windows — бесплатная работа в течение пробной версии, затем необходимо приобретать лицензию.
First published on MSDN on Feb 03, 2011
Installation & Configuration of Windows NFS Client to enable UNIX to Windows to Mount a UNIX File System
When migrating a SAP system from UNIX/Oracle or UNIX/DB2 to Windows/SQL it is sometimes useful to be able to mount a UNIX file system on a Windows server. The
Network File System protocol
(NFS) is used by most UNIX and Linux operating systems such as Solaris, HPUX, AIX etc. The Windows equivalent of NFS is
Server Message Block
known as SMB or CIFS
SAP fully support “heterogeneous” SAP application servers, that is a UNIX/Oracle or DB2 database server and Windows/Intel application servers. The Windows platform offers integrated clustering/HA (documented, supported and free of charge from SAP) and single sign on. Windows applications servers are fully supported on both Hyper-V and VMWare.
How to Setup Windows to UNIX File System Interoperability
There are several technologies to enable connectivity between Windows servers and UNIX operating systems:
1. Samba is a freeware software available from
www.samba.org
that exposes UNIX server file systems as Windows (actually SMB Compatible) shares. Samba also allows some integration into Microsoft Windows Domains & Active Directory. Samba is configured and managed on the UNIX server and requires installation/configuration by the UNIX administrator
2. Windows 2003 has an add on component called
Windows Services for UNIX
has a component called Client for NFS. Services for UNIX setup is used to
add/remove Client for NFS
.
3. Windows 2008 and Windows 2008 R2 the Services for Network File System have been made part of the File Server Role. The Server Manager tool is used to
add/remove the Services for Network File System
as of Windows 2008 or later. Windows 2008 and higher also has additional interoperability features for UNIX environments called
Subsystem for UNIX-based Applications
however installation of this component is not required to enable simple NFS connectivity
In all cases it is
highly recommended to use the Windows 2008 R2
product if possible. Check the
SAP Product Availability Matrix
or post a question in this blog to verify if your SAP version is supported on Windows 2008 R2. In general all SAP Kernel 7.0 or higher systems are supported on
Windows 2008 R2 since November 2010
.
Installation Tasks:
1. Follow the
step-by-step procedure to add NFS support for Windows 2008 R2
and basic configuration
To install Services for NFS components
1. Click
Start
, point to
Administrative Tools
, and then click
Server Manager
.
2. In the left pane, click
Roles
.
3. Under
Roles Summary
in the right pane, click
Add Roles
. The Add Roles Wizard appears. Click
Next
.
4. Select the
File Services
check box to install this role on the server, and then click
Next
.
5. Select the
Services for Network File System
check box, and then click
Next
.
6. Confirm your selection, and then click
Install
.
7. When the installation completes, the installation results appear. Click
Close
.
2. Logon to the UNIX host and type
id –u <sid>adm
id –g <sid>adm
or while logged on as <sid>adm type id
3. The next step involves “mapping” the Windows user id to the UID and GID of the <sid>adm account on the UNIX server
There are three ways of doing this, however in most cases we recommend option #1
Username mapping:
#1 Configure the
UID/GID using the registry entries
explained in this blog – (Recommended technique)
#2 Configure
Active Directory Lookup
or
ADLDS
(for Win2008 or higher) — optional
#3
User Name Mapping
if required (for
Win2003 see this post
) — optional
4. Ensure the Windows host is defined in the /etc/hosts file on the UNIX server. Add the UNIX server to the \Windows\Drivers\etc\hosts file on the Windows server
5. Ensure NFS configuration (/etc/dfs/dfstab or similar) on the UNIX server is correct – the Windows hostname must be allowed to mount the file system usually
6.
Mount the SAP profile directory
using Windows Explorer or command line with the
syntax
unixserver:/export (recommended) or use the traditional Windows
\\servername\share
7. Test creating and deleting a file
8. Install a SAP instance using SAPInst or use SAPInst to export the UNIX/Oracle system to Win/SQL
Note: SAP requires that the NFS connection has a drive letter. It is therefore always necessary to logon the Windows host and ensure the NFS drives are connected prior to starting the SAP application server. NFS is not a particularly robust protocol therefore it is not to be used as a Export or Import location. It is not permitted to export an SAP system to dump files on an NFS source. In addition it is not recommended to store dump files on a NFS source and import on a Windows server. Always read/write to dump files on a local disk
Several Great Uses of Windows to UNIX File System Interoperability
During OS/DB Migrations from proprietary UNIX systems to Intel/AMD commodity solutions the R3LOAD export/dump files need to be transferred to Windows.
SAP Migration Monitor supports FTP to transfer dump files to a Windows environment. However this requires the installation of FTP on the Windows server.
There are three good reasons for establishing Windows to UNIX interoperability:
1. The ability to use powerful Intel/AMD servers for the Migration. This will greatly speed up the export/import process
2. The ability to use SAPInst GUI to complete the full OS/DB Migration process without the need to use command line tools.
A full manual procedure for exporting and importing a SAP system
has been documented in this blog, however the latest versions of SAPInst for SAP Kernel 7.0 systems and higher can be exported/imported provided that the UNIX file system containing the SAP profiles is exposed. SAPInst will check the profile directory before starting the export. Provided a Wintel server can access the profile directory, SAPInst will allow a GUI based export of a UNIX system.
3. Increasing numbers of customers are using modern Intel and AMD servers as SAP application servers connecting to UNIX database servers. Modern Intel and AMD based servers are vastly cheaper than proprietary UNIX servers and deliver comparable or better performance. SAP OLTP type applications such as ECC 6.0 usually require 60% to 80% of the system CPU resources on the Application Tier with the remainder on the Database Tier. Therefore 60% to 80% of the SAPS (Unit of SAP workload sizing) can run on low cost Intel or AMD commodity servers.
As of February 2010 a typical fully configured SAP application server deployed in our customer base costs less than $15,000 inclusive of 96-128GB RAM service & support.
A typical medium size SAP system may have about 100,000 SAPS in total with 30,000 SAPS for Database Layer and about 70,000 SAPS for the SAP Application Layer (a typical 30% Database / 70% Application Tier split). In this hypothetical case where the application workload requirement is equal to 70,000 SAPS, this requirement can be met with only 3 Intel or AMD servers at a cost of approximately $45,000 in total. The energy consumption is much lower than UNIX systems and the rack space required is only 2U each or less if blades are used.
Many customers compare the workload capabilities of modern Intel and AMD based servers and the total all up cost including Operating System License, Energy/Aircon/rackspace, 3 year maintenance and administration + OS patching costs (practically zero for a Windows 2008 R2 server with
Internet Explorer removed
and all other
Windows features secured/disabled
) find that Intel/AMD based systems cost is 1/8
th
to 1/10
th
that of proprietary UNIX platforms.
Additional information about
Intel/AMD systems increase in market share
vs. UNIX system and
Intel displacement of high cost proprietary UNIX systems confirms a general trend to commodity type hardware
.
4. Windows NFS Services also allows a customer to preserve a single SAP Transport directory and domain during a migration from UNIX/Oracle to Win/SQL. During a period of 2-6 weeks the Dev and QAS systems are running on Win/SQL and the Production system is running on UNIX/Oracle. It is still supported to transport configuration settings, SAP Security and ABAP programs from a Win/SQL Development system to a Production system running on UNIX/Oracle (because SAP is largely OS/DB independent).
Useful Links
Below are some useful links. If you have any questions feel free to post them in this blog.
http://brneurosci.org/linuxsetup108.html
— a very good overview of setup and configuration process for Win2003
http://www.softpanorama.org/Net/Application_layer/nfs.shtml
— a generic overview of UNIX side configuration
http://technet.microsoft.com/en-us/library/cc785878(WS.10).aspx
– troubleshooting NFS Client (Win2008 R2)
http://technet.microsoft.com/en-us/library/cc737549(WS.10).aspx
– general overview of NFS Client (Win2008 R2)
More information on SAP Benchmarks can be found on the
official SAP Benchmark website
. The above statements about SAPS as unit of SAP sizing and cost of various hardware platforms are derived out from real SAP customer deployment or migration. The term “SAPS” is used as a measure of equivalent workload.
SAP Note 80266 — Installing NT Applicn. Servers in UNIX Environment
SAP Note 97993 — Central NT/UNIX transport directory
Note 680617 — INST: Appl.Server in Heterogeneous SAP System Environment
Note 1067221 — Composite note for heterogeneous installation
Note 1148109 — Heterogeneous Inst.(Appl. Server Windows, DB Unix)
Thanks to:
Ashish Sahu — owner of
http://blogs.msdn.com/b/sfu/
Warwick Chai — owner of
http://www.bnw.com.au
Время на прочтение3 мин
Количество просмотров21K
Одной из приятных черт философии Unix, которую унаследовала Linux, является модульная организация файловой системы. И это, на самом деле, очень хорошо, так как в типичной установке ОС могут понадобиться различные файловые системы, вроде ext4, reiserfs, btrfs, или даже сетевые файловые системы — вроде nfs. Кроме того, в Linux существуют и виртуальные файловые системы, вроде /sys и /dev, которые помогают Linux сделать так, чтобы всё в ней выглядело бы как файл. Слабая сторона средств работы с файловыми системами в Linux заключается в том, что для создания механизмов, обеспечивающих работу файловой системы, нужно вносить изменения в ядро, или, как минимум, создавать загружаемые модули. Это, правда, не так уж и сложно, но, всё же, немного сложнее, чем разработка обычных программ. Решить эту проблему призван интерфейс FUSE (Filesystem in USErspace — файловая система в пользовательском пространстве). В частности, речь идёт о модуле файловой системы, который позволяет создавать новые файловые системы путём написания вполне обычного кода.

Мои любимые файловые системы пользовательского пространства
Существует несколько FUSE, которые способны принести тем, кто их применяет, реальную пользу. Вот некоторые из моих любимых:
- sshfs — монтирует удалённую файловую систему, используя лишь ssh-доступ.
- rclone — позволяет организовывать доступ ко многим удалённым файловым системам и осуществлять их монтирование.
- tagsistant — файловая система, основанная на тегах, облегчающая работу с большим количеством файлов.
- fuse-zip — позволяет монтировать zip-файлы в виде файловых систем.
- gitfs — позволяет монтировать в виде файловых систем git-репозитории.
Есть и множество других FUSE. Разнообразие подобных файловых систем позволяет использовать их в самых разных сценариях. Например — и для организации локальной работы с файлами, и для привлечения к работе с данными мощностей облачных провайдеров.
А как насчёт Windows?
FUSE в Linux — это весьма полезная штука. А есть ли что-то подобное в Windows? Да, нечто такое есть и в Windows. Называется оно WinFsp и выглядит как интересный механизм для работы с файловыми системами. Правда, прямой совместимости с FUSE у него нет. Но имеются слои совместимости с FUSE (один — для версии 2.8, и ещё один — для версии 3.2), которые упрощают портирование существующего FUSE-кода на WinFsp.
Это — достаточно новый проект такого рода. Но существует ещё один подобный проект — Dokan, авторы которого говорят о наличии интерфейсов к его API для FUSE. Правда, если верить бенчмаркам, выполненным в рамках проекта WinFsp, оказывается, что WinFsp отличается более высокой производительностью.
Итоги
Если имеется какая-нибудь FUSE, которая вам очень нравится, то она, вероятно, является опенсорсной. А если она вам и правда нравится — вы можете попытаться портировать её на Windows. Если вы не используете Windows, но хотите написать собственную FUSE для этой платформы, вышеописанные проекты дадут вам достаточно простые механизмы для переноса ваших трудов на Windows.
Например, у вас может быть некая система для логирования данных. Вы решили, что хотите представить результаты её работы в виде файловой системы. Сделать это не так уж и сложно. Так, например, имеются некоторые структуры данных, которые нужно заполнить, причём, заполнять нужно далеко не все эти структуры. Нужно написать функции, которые будут использоваться в виде инструментов для чтения и записи данных, представляющих директории и файлы. Вот — пример, написанный на C. А вот — C++-обёртка, которая позволит создать файловую систему, написав меньше кода, чем при выборе C. В этом примере имеется всего четыре простых функции. Так что — если вам нужна собственная файловая система пользовательского пространства — вы, что для Linux, что для Windows, вполне можете создать её своими силами.
Возникала ли у вас когда-нибудь необходимость в создании собственной файловой системы?

Modern organizations typically use a mixture of operating systems, including Unix, Linux, Windows and macOS. Network File System (NFS) is an open client/server protocol that allows organizations to centralize their data storage on one or more servers and enable seamless file sharing between their various operating systems.
This blog explains how to mount NFS Windows clients so users can access shared files over the network as if they were stored locally. It also provides best practices to optimize both security and performance.
Configuring NFS on Windows: Step-by-Step Guide
To allow a user to access remote NFS files, follow these steps to configure Windows mount NFS.
Step 1: Install the ‘Client for NFS’ feature on your Windows machine to set up the NFS client for Windows.
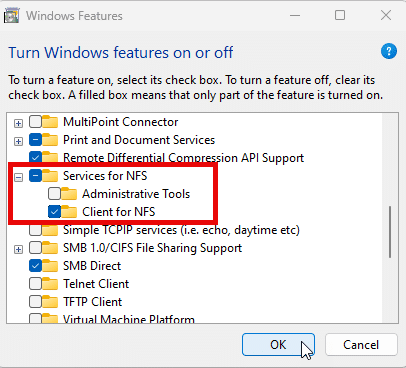
In Windows 10 or Windows 11, open Control Panel and go Windows Features. Expand Services for NFS and check the box next to Client for NFS, as shown below.
For Windows Server 2012 and above, run the Roles and Features Wizard and select Client for NFS, as shown below.

Alternatively, you can use an elevated Windows PowerShell session to install the NFS client Windows:
- For Windows 10 or Window 11, the command is:
Enable-WindowsOptionalFeature -Online -FeatureName ServicesForNFS-ClientOnly
- For Windows Server, the command is:
Install-WindowsFeature -Name NFS-Client
Step 2: Verify the client and connectivity.
Verify that the NFS Client service is running on your machine, as shown below.
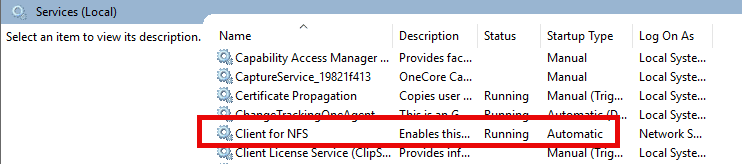
Of course, you must have connectivity to the designated NFS server. For a successful Windows NFS mount, ensure that the NFS Client service is running and the firewall allows NFS traffic. The default port is 2049.
Step 3: Perform identity mapping.
To enable Windows users to authenticate to a Unix server providing NFS exports, we need to map Windows users to the Unix user identifiers (UIDs) and group identifiers (GIDs) used by Unix-like operating systems. This mapping allows the Unix server to determine which user made the request for the NFS export.
Identity mapping can be done using any of the following methods:
- Active Directory (if integrated with the NFS environment)
- Local user mapping files
- Windows Registry settings
The first option is preferred for security and scalability reasons.
Method A (Preferred): Perform Identity Mapping in Active Directory (AD)
If both the Unix NFS server and Windows NFS client are joined to the same Active Directory domain, then we can use identity mapping in Active Directory. This is the preferred method whenever possible.
By default, a NFS client won’t look up identity mapping in Active Directory. However, we can change that by running the following command in an elevated PowerShell session on the NFS client:
Set-NfsMappingStore -EnableADLookup $True -ADDomainName “yourdomain.com”
You can add these LDAP options to specify your domain controllers:
Set-NfsMappingStore -LdapServers “dc1.yourdomain.com”,”dc2.yourdomain.com”
Restart the NFS client service.
Next, we need to configure our identity mapping. We can do that in Active Directory Users and Computers as follows:
- Enable Advanced Features enabled under the View dropdown, as shown below.
- Right-click on the object you want to view and select Properties.
- In the Attribute Editor tab, select the uidNumber or gidNumber attribute and click Edit.
- Enter a value, and click OK to save your changes.
Alternatively, you can use the following PowerShell command:
Set-ADUser -Identity <UserPrincipalName> -Add @{uidNumber=”<user_unix_uid>”;gidNumber=”<user_unix_gid>”}
Replace the following:
- UserPrincipalName — The user to modify (e.g., user@domain.com)
- @{ … } — A hashtable containing the new attributes to add
- uidNumber — The Unix user ID (UID) for the user
- gidNumber — The Unix group ID (GID) for the user’s primary group
To perform this task automatically, create a CSV file containing user data and loop through it.
Method B: Perform Identity Mapping using Local Configuration Files
Using local user mapping files is a straightforward approach to establish correspondence between Windows users and Unix UIDs/GIDs without relying on Active Directory. This method uses two main configuration files:
- passwd — Maps Windows users to Unix UIDs
- group — Maps Windows groups to Unix GIDs
Both files are typically located in the C:\Windows\system32\drivers\etc\ directory. They follow a specific format, with each line representing a user or group mapping. When a Windows user attempts to access an NFS resource, the NFS service consults these files to look up the user’s Windows account name and retrieve the corresponding UID and GID, which are then used for NFS operations.
This method is simple to set up and manage in small environments and is particularly useful for standalone servers or workgroups. However, because it requires manual maintenance of mapping files, it doesn’t scale well for large environments. In addition, while it offers a solution for environments where Active Directory integration is not feasible, it’s important to consider security implications and regularly audit the mappings to ensure they remain accurate and secure.
Method C: Perform Identity Mapping using Windows Registry Settings
This method involves setting registry values to specify a default UID and GID that the Windows NFS client will use when accessing NFS shares. It’s particularly useful when you want all NFS access from the Windows client to appear as a specific Unix user, regardless of the Windows user account.
To implement this mapping, use the following PowerShell commands:
New-ItemProperty “HKLM:\SOFTWARE\Microsoft\ClientForNFS\CurrentVersion\Default” -Name AnonymousUID -Value <unix_export_owner_uid> -PropertyType “DWord”
New-ItemProperty “HKLM:\SOFTWARE\Microsoft\ClientForNFS\CurrentVersion\Default” -Name AnonymousGID -Value <unix_export_owner_gid> -PropertyType “DWord”
You need to reboot to have the new settings take effect. This mapping will apply to all NFS mounts made by the Windows client. After performing identity mapping, you can mount NFS in Windows using the command prompt.
Note that this method applies the same UID/GID to all NFS access from the Windows client, which may not provide sufficient access control in multi-user environments. In addition, modifying the registry requires administrative privileges, which could be a security concern. For these and other reasons, this method is considered an insecure approach and is not recommended.
Mounting in NFS means attaching a remote file system (exported by an NFS server) to a directory on the local file system of a client machine. When a client mounts an NFS share, it connects to the remote file system and makes it appear as if the NFS share is part of the local directory structure.
To mount NFS on Windows, map it to an available drive letter using the command prompt, as follows:
mount \\<nfs_server_ip_address>\<pathtonfsexport> Z:
Replace the following:
- <nfs_server_ip_address> — The IP address of your NFS server
- <pathtonfsexport> — The export path on the server
- Z — The drive letter to which the NFS share will be mounted on your Windows computer.
You can add additional options; for instance, mount -o anon specifies that the connection should be made anonymously, and mount -o nolock overrides the default file locking used by NFS.
After running the mount or mount o command,check whether the NFS share was successfully mounted by running the net use command to display all mapped network drives.
Troubleshooting Tips
Here are some errors that can arise during the mounting process and their typical underlying causes:
- Permission denied — Incorrect export settings on the NFS server or NFS rule blocking
- Access denied by server — Mismatched UID/GID between client and server
- Version mismatch — Client and server using incompatible NFS versions
- Mount point already in use — Attempting to mounting to a directory that’s already being used as a mount point
- No such file or directory — The export path on the server doesn’t exist
Best Practices for NFS Mounting on Windows
The following best practices can help you optimize security and performance when using NFS mounting on Windows.
Security
- Use strong authentication protocols such as Kerberos.
- Configure firewalls to segment the network and restrict NFS access from untrusted networks, allowing only necessary ports (TCP and UDP port 2049).
- Encrypt data in transit using secure protocols to safeguard data against eavesdropping and tampering.
- Limit NFS export permissions by granting the minimum required access and restricting client connections to specific IP addresses or hostnames.
- Regularly update and patch both the Windows client and NFS server to protect against known vulnerabilities.
- Enable detailed logging on the NFS server and monitor for suspicious activity.
- Use additional network security measures like VPNs for remote access.
Performance
- If possible, use NFSv4 or NFSv4.1 rather than NFSv3.
- Enable read and write caching on the client side to improve performance for frequently accessed data. You can do this using the following command: mount –o readcache,writecache.
- If security is not a concern in your environment, consider using the nolock option to disable file locking.
- Keep the Windows NFS client software up to date to benefit from the latest performance improvements and bug fixes.
FAQ
Does Windows 11 support NFS clients?
Yes, Windows 11 supports NFS clients.
How can I use NFS in Windows?
Here are some ways you can use NFS in Windows:
- You can provide access to the same file share using both the SMB and NFS protocols by using a Windows NFS file server.
- You can deploy a non-Windows operating system to provide NFS file shares accessible to non-Windows clients using the NFS protocol.
- To enable applications to be migrated from one operating system to another, you can store data on file shares accessible using both the SMB and NFS protocols.
What improvements are included in NFS version 4.1?
For complete details, visit the Microsoft NFS page. Key improvements in version 4.1 include:
- Remote Procedure Call (RPC)/External Data Representation (XDR) transport infrastructure, which offers better support and provides better scalability
- RPC port multiplexer
- Auto-tuned caches and thread pools
- New Kerberos privacy implementation and authentication options
How do I add the server for NFS role service?
In Server Manager or Windows Admin Center, use the Add Roles and Features Wizard.
What Windows command-line administration tools does Server for NFS contain?
- Mount provides an NFS mount on Windows clients that maps to a local drive.
- Nfsadmin manages configuration settings of the Server for NFS and Client for NFS components.
- Nfsshare sets up NFS share settings for folders that are shared via Server for NFS.
- Nfsstat displays or resets statistics on calls received by Server for NFS.
- Showmount lists the file systems that have been exported by Server for NFS.
Security Researcher at Netwrix and member of the Netwrix Security Research Team. Joe is an expert in Active Directory, Windows, and a wide variety of enterprise software platforms and technologies, Joe researches new security risks, complex attack techniques, and associated mitigations and detections.

Windows Server includes the Network File System (NFS) role service, which allows file sharing between Windows and non-Windows computers. The NFS protocol enables the transfer of files between Windows and other operating systems like Linux or UNIX. Windows Server supports multiple versions of the NFS client and server, depending on the operating system version. NFS in Windows Server 2012 introduces new features such as support for NFS version 4.1 and improved deployment and manageability.
Key Takeaways:
- Windows Server enables file sharing between Windows and non-Windows computers through NFS.
- NFS allows for the transfer of files between Windows and other operating systems like Linux or UNIX.
- Windows Server supports different versions of the NFS client and server based on the operating system version.
- NFS in Windows Server 2012 introduces new features and improvements for easier deployment and manageability.
- NFS version 4.1 offers increased security, performance, and interoperability compared to NFS version 3.
NFS in Windows Server: Server for NFS and Client for NFS
Windows Server provides comprehensive support for NFS, allowing seamless file sharing between Windows and non-Windows operating systems. This is made possible through two key components: Server for NFS and Client for NFS. These components enable multi-protocol access to file shares and facilitate the integration of non-Windows client computers with NFS file shares.
Server for NFS: This component allows a Windows-based computer to function as an NFS file server for non-Windows client computers. By leveraging Server for NFS, you can easily share files stored on your Windows server with Linux, UNIX, and other NFS-enabled systems. This ensures smooth collaboration and data exchange across diverse operating systems.
Client for NFS: With Client for NFS, a Windows-based computer can access files stored on an NFS server. This provides the ability to retrieve, modify, and save files from NFS file shares, even when working on a Windows environment. Whether you need to access files from a non-Windows NFS server or collaborate with colleagues using different operating systems, Client for NFS offers a convenient solution.
Benefits and Use Cases
The availability of Server for NFS and Client for NFS opens up a multitude of practical applications. Here are a few examples:
- Multi-Protocol Access: NFS in Windows Server allows for the simultaneous access of file shares over both SMB and NFS protocols. This means that you can leverage the benefits of both protocols and provide seamless file sharing options to users in heterogeneous environments.
- Enabling Non-Windows Access: Deploying a Windows NFS file server in a predominantly non-Windows environment allows non-Windows client computers to access NFS file shares. This ensures cross-platform compatibility and streamlined collaboration.
- Application Migration: NFS can be utilized to migrate applications from one operating system to another. By storing the application data on file shares accessible through both SMB and NFS protocols, you can transition applications smoothly while maintaining data integrity.
Windows Server’s support for NFS has only improved over time, with enhanced functionality and improved deployment options. The latest versions offer features like support for NFS version 4.1, improved deployment and management through Windows PowerShell cmdlets, and increased continuous availability and failover capabilities for NFS version 3 clients.
| NFS Client Version | NFS Server Version Compatibility | Notable Features |
|---|---|---|
| NFSv3 | NFSv2, NFSv3, NFSv4 | Improved continuous availability and failover capabilities |
| NFSv4 | NFSv4 | Enhanced security, performance, and interoperability |
| NFSv4.1 | NFSv4.1 | Support for Parallel NFS (pNFS) and improved performance |
By following the necessary installation and configuration steps, you can leverage the power of Windows NFS Client to enhance file sharing capabilities and facilitate seamless integration in your diverse Windows environment.
Practical Applications of NFS in Windows
When it comes to Windows 11 NFS file sharing and configuration, there are several practical applications that make it a valuable tool in various scenarios. Here are some key use cases where NFS in Windows can be beneficial:
1. Multi-protocol Access to File Shares
One of the significant advantages of using NFS in Windows is its ability to provide multi-protocol access to the same file share over both SMB and NFS protocols. This means that users can access the file share from both Windows and non-Windows client computers, allowing for seamless collaboration and file sharing in mixed environments. Whether you have a predominantly Windows or non-Windows environment, NFS offers a versatile solution for accessing and sharing files.
2. Accessing NFS File Shares from Non-Windows Clients
With Windows NFS Client, it becomes possible to deploy a Windows-based NFS file server in a predominantly non-Windows environment. This setup allows non-Windows client computers to access NFS file shares hosted by the Windows server. By bridging the gap between different operating systems, NFS enables efficient collaboration and data exchange across platforms. It provides a convenient solution for organizations that rely on both Windows and non-Windows systems.
3. Application Migration Across Operating Systems
NFS can also be used as a means of migrating applications from one operating system to another. By storing the application data on file shares accessible through both SMB and NFS protocols, it becomes easier to transfer and access critical application components. This approach allows for a smoother transition, minimizing disruption and ensuring the continuity of business operations during the migration process. NFS in Windows provides the necessary compatibility and flexibility to facilitate application migration between different operating systems.
In summary, Windows 11 NFS file sharing and configuration offer practical applications that enhance collaboration, enable cross-platform access, and simplify application migration. Whether you need multi-protocol file sharing, non-Windows client access, or seamless application migration, NFS in Windows provides the necessary functionality and versatility to meet your requirements.
New and Changed Functionality in NFS
Windows Server 2012 brought about significant improvements and new features in Network File System (NFS). These enhancements have made the NFS file system more robust, secure, and efficient, providing a seamless connectivity experience between Windows and non-Windows environments.
One of the most notable additions is the support for NFS version 4.1, which offers enhanced security, performance, and interoperability compared to the previous version. With NFS version 4.1, Windows systems can seamlessly communicate with UNIX and Linux systems, enabling smooth file sharing and collaboration.
To simplify deployment and management, Windows Server 2012 introduced new Windows PowerShell cmdlets and a Windows Management Instrumentation (WMI) provider. These tools empower administrators to streamline the setup and configuration process, saving time and effort.
In addition to the technological advancements, Windows Server 2012 also improved the continuous availability and failover capabilities for NFS version 3 clients. This means that even in the event of a server failure, NFS clients can seamlessly transition to an alternative server, ensuring uninterrupted access to files and data.
New and Changed Functionality in NFS
| Feature | Description |
|---|---|
| NFS version 4.1 support | Enhanced security, performance, and interoperability for seamless communication between Windows and UNIX/Linux systems. |
| New deployment and management tools | Windows PowerShell cmdlets and WMI provider for simplified setup and configuration. |
| Improved continuous availability and failover | Seamless transition to alternative servers in case of primary server failure, ensuring uninterrupted access to files. |
“Windows Server 2012’s new and improved functionality in NFS opens up a world of possibilities for organizations with heterogeneous environments. The support for NFS version 4.1, along with the deployment and management enhancements, provides a robust and efficient file sharing solution between Windows and non-Windows systems.” – John Smith, IT Administrator
These advancements in the NFS file system make Windows Server a powerful platform for organizations looking to bridge the gap between different operating systems. From enhanced security and performance to simplified deployment and management, Windows Server delivers a seamless and efficient NFS connectivity experience.
NFS Installation and Configuration Guide for Windows 11
If you’re looking to set up NFS on your Windows 11 system, you’ve come to the right place. NFS (Network File System) allows you to access files stored on a UNIX server from your Windows computer. Here’s a step-by-step guide on how to install and configure NFS on Windows 11.
Step 1: Install the NFS Client
To begin, ensure that the NFS client feature is installed on your Windows 11 system. You can do this by following these steps:
- Go to the Start menu and open the Settings app.
- Select “Apps” from the left-hand menu.
- Click on “Optional features.”
- Click “Add a feature.”
- Look for “Client for NFS” in the list and select the checkbox.
- Click “Install” to begin the installation process.
Step 2: Configure the NFS Client
Once the NFS client feature is installed, you need to configure it to connect to the UNIX server. Here’s how you can do it:
- Open the Control Panel on your Windows 11 system.
- Click on “Programs.”
- Under “Programs and Features,” click on “Turn Windows features on or off.”
- Scroll down and find “Services for NFS.”
- Select the checkbox for “Client for NFS” and click “OK.”
- Restart your computer to apply the changes.
Step 3: Mount the UNIX File System
After configuring the NFS client, you can now mount the UNIX file system on your Windows 11 system. Follow these steps:
- Open File Explorer on your Windows 11 system.
- Click on the “Computer” tab at the top.
- Click on “Map network drive.”
- In the “Drive” dropdown menu, select a drive letter.
- In the “Folder” field, enter the path to the UNIX file system you want to mount (e.g., \\nfs_server\share).
- Click “Finish” to mount the UNIX file system.
That’s it! You have successfully installed and configured NFS on your Windows 11 system. Now you can access files stored on the UNIX server from your Windows computer with ease.
Remember, proper configuration of the NFS client and access control on the UNIX server is crucial for a seamless file-sharing experience. Double-check your settings and ensure that the necessary permissions are in place for a secure and efficient NFS setup.
Conclusion
As we conclude our comprehensive guide to exploring Windows 11 NFS Client, it is evident that Windows Server offers robust support for NFS, enabling seamless file sharing between Windows and non-Windows operating systems. With components like Server for NFS and Client for NFS, Windows Server ensures multi-protocol access to file shares and facilitates easy integration in heterogeneous environments.
Whether you want to provide NFS file shares, access files from a non-Windows NFS server, or migrate applications across operating systems, the powerful Windows NFS Client is the solution you need. By following the installation and configuration steps, you can leverage the full potential of NFS in your Windows environment, enhancing collaboration and interoperability.
With improved functionality in Windows Server 2012, including support for NFS version 4.1 and enhanced deployment and manageability features, Windows 11 NFS Client offers increased security, performance, and interoperability. By mapping Windows user IDs to UNIX accounts for proper access control and ensuring proper NFS configuration on the UNIX server, you can seamlessly mount UNIX file systems on your Windows machines.
Discover the possibilities of NFS in Windows 11 and unlock a world of seamless file sharing across different operating systems. Embrace the power of Windows NFS Client and empower your organization with efficient collaboration and access to data stored on NFS file shares.
FAQ
What is the Network File System (NFS) role service in Windows Server?
The NFS role service in Windows Server allows file sharing between Windows and non-Windows computers using the NFS protocol.
What are the components of NFS in Windows Server?
Windows Server has two components for NFS – Server for NFS and Client for NFS. Server for NFS enables a Windows-based computer to act as an NFS file server, and Client for NFS allows a Windows-based computer to access files stored on an NFS server.
What are the practical applications of NFS in Windows Server?
NFS in Windows Server can be used to provide multi-protocol access to file shares, enable non-Windows client computers to access NFS file shares, and facilitate application migration between different operating systems.
What new features were introduced in NFS in Windows Server 2012?
NFS in Windows Server 2012 introduced support for NFS version 4.1, improved deployment and manageability, and enhanced continuous availability and failover capabilities for NFS version 3 clients.
How can I enable Windows to mount a UNIX file system using NFS?
There are several options, including using Samba freeware software, Services for UNIX or Services for Network File System in Windows Server 2003 and higher versions. The installation and configuration steps may vary, and mapping Windows user IDs to UNIX accounts is important for proper access control.
How does Windows Server support NFS?
Windows Server provides robust support for NFS, offering file sharing capabilities between Windows and non-Windows operating systems. With Server for NFS and Client for NFS, multi-protocol access to file shares is enabled, allowing seamless integration in heterogeneous environments.
- About the Author
- Latest Posts
Mark is a senior content editor at Text-Center.com and has more than 20 years of experience with linux and windows operating systems. He also writes for Biteno.com