
,
The Generic PNP Monitor problem in Windows 10 occurs because the connected monitor is not properly recognized by the system. The «Generic PNP Monitor» problem appears on desktops computers or when you ‘re using an external monitor with your laptop, and is caused for one of the following three (3) reasons:
-
-
The driver for the display adapter (VGA) is incorrect or not installed.
-
The driver for the Monitor is not properly installed.
-
The Video Cable has problem.
-

This tutorial contains step-by-step instructions on how to resolve the ‘Generic PNP Monitor’ problem on Windows 10.
How to FIX: Generic PNP Monitor in Windows 10.
Method 1. Install all available Windows 10 Updates.
If the Generic PNP monitor problem, appears after installing or after updating Windows 10, proceed and install all the available updates. To do that,
1. Go to Start -> Settings -> Update and Security -> and click Check for Updates.

2. Download and install all Windows updates and then restart your PC.
Method 2. Install or Rollback the Display Adapter’s Drivers.
The second step to fix the Generic PNP Monitor problem, is to install (or to roll back), the graphic adapter’s drivers. To do that:
1. Open Device Manager. To do that:
-
- Press Windows + R keys to open the run command box.
- In the «Open» box, type: devmgmt.msc & click OK.
2. In Device Manager expand the Display Adapters.
3. Now perform the corresponding action, according your case:
Case A. If the installed display adapter is listed as «Microsoft Basic Display Adapter» (like in the screenshot below), this means that the drivers for your graphics card are not installed.

At this case, to fix the ‘Generic PNP Monitor’ problem:
a. Right-click on the Microsoft Basic Display Adapter and select Update Driver.

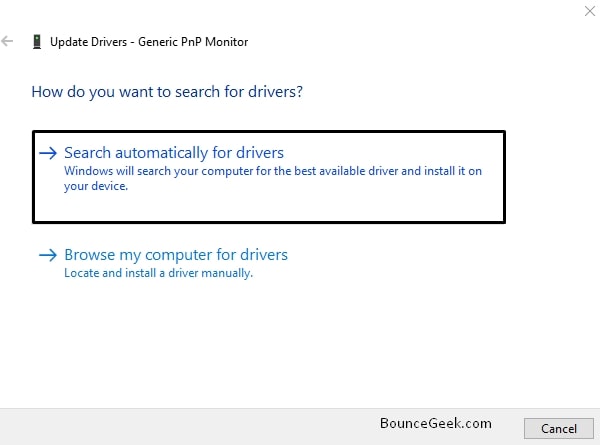
b. At the next screen, click Search automatically for drivers and let Windows to download and install the drivers for the display device. *

* Note: If Windows cannot find a different driver for your graphics adapter, then navigate to your computer (or graphics card) manufacturer’s support site, and download and install the latest drivers for your graphics card.
-
- For NVIDIA based GPU’s, navigate to NVIDIA Advanced Driver Search page.
- For AMD based GPU’s, navigate to AMD (ATI) Driver Download Center.
- For Intel based GPU’s, navigate to Intel Graphics Download center.
Case B. If you see that your graphics adapter is properly recognized from Windows 10, then probably the installed graphic driver is incorrect.
At this case, proceed and install the latest drivers for your graphics card from the manufacturer’s support site, or, if the «Generic PNP Monitor» problem, appears after a Windows 10 update, proceed and rollback the video drivers.
To Rollback the Graphics drivers:
a. Right-click on the installed display adapter, and click Properties.

b. Select the Driver tab and then click Roll Back Driver.

c. Select a reason for the driver package rollback and click Yes.

d. When the driver rollback is completed, restart your computer.
Method 3. Uninstall the Generic PNP Monitor device & Reconnect the Monitor.
1. Navigate to Device Manager.
2. Expand Monitors.
3. Right-click at Generic PnP Monitor and select Uninstall device.

4. Click Uninstall to confirm your decision.
5. Shutdown your computer.
6. Turn off your monitor and remove its power cord from the plug.
7. Disconnect the video cable from the computer.
8. Leave the cords unplugged for 2-3 minutes and then reconnect all the cables.
9. Power on your PC, and check if the problem is solved.
Method 4. Install the Generic Non-PNP Monitor Driver.
1. Navigate to Device Manager.
2. Expand Monitors.
3. Right-click on Generic PNP Monitor and select Update driver.

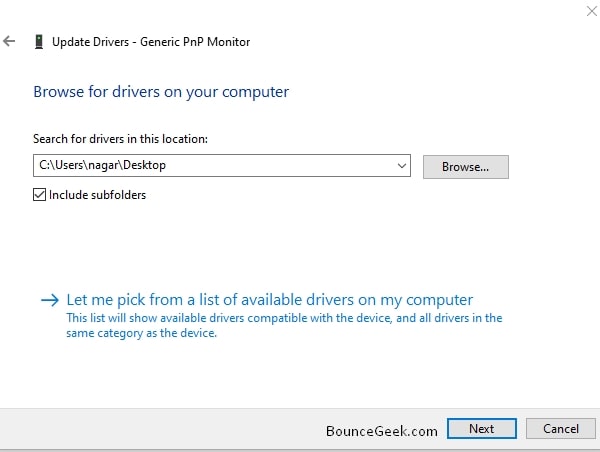
3. Click Browse my computer for drivers.

4. Select Let me pick from a list of available drivers on my computer.

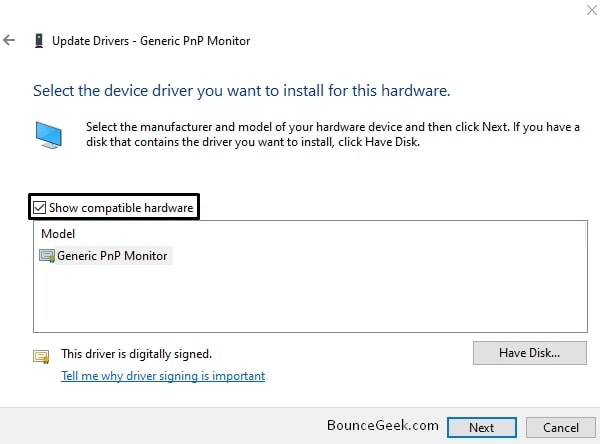
5. Check the Show compatible hardware checkbox, and select and install one of the other compatible drivers, or the ‘Generic Non-PNP Monitor’ driver.

Method 5. Try with Another Video Cable.
The final method to resolve the ‘Generic PNP Monitor’ issue in Windows 10, is to connect your PC with your monitor with a different cable. To do that:
* Note: This method applies only to desktops, or when you use an external monitor with your laptop.
1. Shutdown your PC.
2. Replace the video cable with a similar one, but from a different manufacturer.
3. Power On your PC.
That’s all folks! Did it work for you?
Please leave a comment in the comment section below or even better: like and share this blog post in the social networks to help spread the word about this solution.
If this article was useful for you, please consider supporting us by making a donation. Even $1 can a make a huge difference for us.
- Author
- Recent Posts
Konstantinos is the founder and administrator of Repairwin.com. Since 1995 he works and provides IT support as a computer and network expert to individuals and large companies. He is specialized in solving problems related to Windows or other Microsoft products (Windows Server, Office, Microsoft 365, etc.).
Windows updates do not always go as planned and many unexpected problems crop up. One of the problems that many users have encountered is display driver goes missing and the Device Manager shows a generic PnP monitor. Let’s see more about this problem in detail.
What is Generic PnP and why does it matter?
Generic PnP monitor means your computer is using generic drivers for the display attached. Though it may not seem a problem, it does have some drawbacks.
If you are accessing video streaming websites like Netflix, watching HD movies or playing games, you might see the screen freeze with a constant tone. Also, Generic Plug n Play monitor supports a maximum resolution of 1024 x 768 even when the native resolution supported by your monitor may be higher (1080 p or higher).
The reason for this problem is your computer is not using monitor drivers (particular to the model) that you had installed. Instead, it is using generic drivers and your display is categorized as Plug n Play monitor with no access to additional settings. That means you would not be able to set the resolution of the screen nor the refresh rate, which is important for gaming or video streaming.
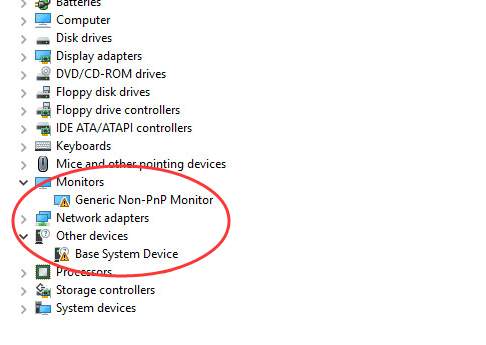
If you check the Device Manager, you would see a yellow exclamation mark beside the generic PnP monitor entry indicating the right driver for the monitor is not installed.
Now let’s look at the solutions to resolve this issue.
We have provided you with two solutions that could fix the generic PnP monitor issue. You don’t need to try both solutions.
The best way to start is to perform the troubleshooting steps in Solution One. If it does not resolve the issue, only then move to Solution two.
Solution One- Update Driver through Device Manager
- Press Windows logo key and R simultaneously on the keyboard to bring up the Run command console
- In Run command box, type devmgmt.msc and click OK
- In the Device Manager window, go to Monitors category and expand it
- right-click Generic PnP monitor and choose Update Driver Software
- In the next window, click Search automatically for updated driver software
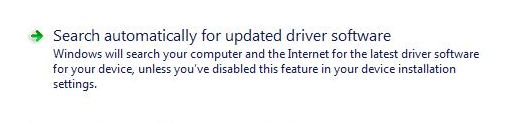
Windows will now search for drive online. In most cases, Windows fails to find the right driver. In that case, you need to try another way to update display drivers.
- Go to Monitors category again and right-click Generic PnP monitor
- Click Update Driver Software
- In the next window, click Browse my computer for driver software

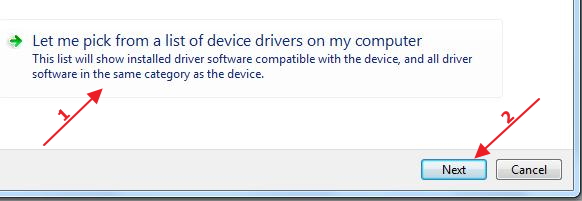
- Click Let me pick from the list of device drivers on my computer
- See whether Show compatible hardware option is checked. If there is check in the box, click the box to uncheck
- Now you can see a list of manufacturers in left pane and Models in the left pane
- Select the display manufacturer and then select the right native resolution supported by the display
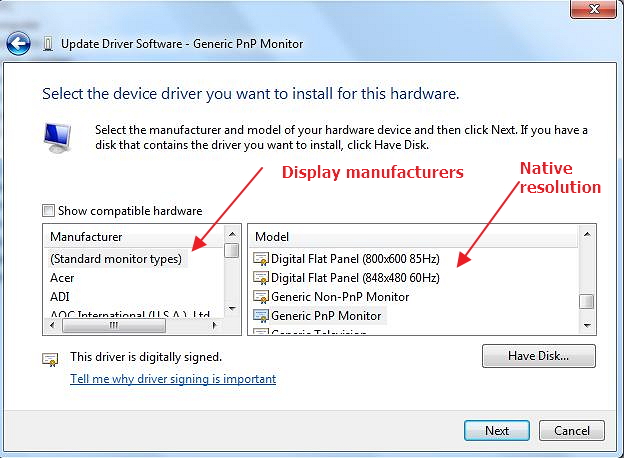
- Click Next and follow on-screen instructions to install display drivers
- Close all windows
If this method of updating driver does not work for you, move to the next solution.
Automatic driver update tools offer many benefits, the most important ones being:
- You can update device drivers automatically
- The software scans and updates all outdated or missing drivers at one go
- The tool picks the right drivers for your device and operating system, so you won’t have to worry about installing an incorrect driver by mistake
- Automatic driver updates are 100% safe
Driver Updater is one of the best driver update tools out there. Outbyte Driver Updater will give you access to a database of over 1 million drivers. It will regularly scan your PC, suggesting new driver versions to install. Driver Updater contains drivers for a variety of Windows devices. With just one click, you can update drivers in your system.
Step 1
Click here to Install and launch the app
Step 2
Scan all devices
Step 3
Install or update drivers automatically
Start Download
Device Drivers are the most important part of a Computer System. It does control a particular type of device that is attached to a Computer. An operating system also comes with many Generic Device Drivers. This means if you don’t install a required driver for connected hardware. Then, Windows automatically does install a generic driver for it. It helps devices to get work basic functionality. But, recently after Windows 10 update, many users are reporting the Generic PnP Monitor issue. This means, their monitor isn’t being recognized by Windows. Even, many Windows 11 users also experience the same after upgrading to Windows.
Undoubtedly, It is a monitor driver issue. But, we also can’t deny that it could be a hardware or cable-related issue. For some users, the device manager is showing Generic Non-PnP Monitor. Well, no need to worry. This problem can be fixed by trying out certain methods. Simply, do follow each solution mentioned in this article, one by one, until this monitor driver issue gets fixed.
What is a Generic PnP Monitor?
In Windows, PnP stands for Plug and Play. When you plug a PnP monitor into Windows, it starts working without having to install a specific driver. And, when the device manager shows Generic PnP Monitor, that means: Windows has installed a basic monitor driver, in the absence of the required monitor driver. A generic monitor driver provides basic functionality to the monitor.
But, with the generic monitor driver, you cannot customize display settings. You cannot set the best resolution and highest possible refresh rate. For that, you have to install the required monitor driver.
How to Fix Generic PnP Monitor Issue
Note: If you have already tried to install a monitor driver using the device manager. Then, check solution 4. I have mentioned in it how you can generate a monitor driver file and install it.
Solution 1: Reconnect Monitor, and Change Monitor Display Cable
Before moving towards some advanced solutions, let’s try some basic solutions. If you’re a desktop user or using an external display on your laptop, then this method might help you. Also, this solution will work for those, who’re facing this issue after a Windows update.
Step 1. Do completely turn off your computer. Even, remove the power cord.
Step 2. Now, unplug the video cable from the CPU. (HDMI/VGA/DVI Cable.)
Tip: If you’re using VGA Cable connect the Monitor to the CPU. Then, do use a “VGA to HDMI Converter“. And, connect the HDMI cable to the HDMI port. And, if you’re using a dedicated graphics card on your PC. Then, connect the video cable to the graphics card port, not to the motherboard display port.
Step 3. After 10 minutes, plug the video cable back in. And, turn on your PC.
Open Device Manager and find out connected monitor name is appearing in the monitor’s section or not.
Solution 2: Install Monitor Driver from Windows Optional Updates
Install Monitor Driver from Windows Optional Updates.
If you’ve recently built a PC, and using the latest Monitor with it. Then, you can easily get driver updates for it from Windows Updates. Yes, Windows has a hidden section to update monitor and chipset drivers. Windows 10/11 comes with an optional updates section in the settings app. From there, you can find a driver for your monitor. And, this will replace Generic PnP Monitor with your Monitor name.
1. Press Windows + I key in Windows 11 to open the Settings App.
2. Click on Windows Updates from the left pane.
3. Now, click on Advanced Options. Now, in Additional Options, you will see “Optional Updates”.
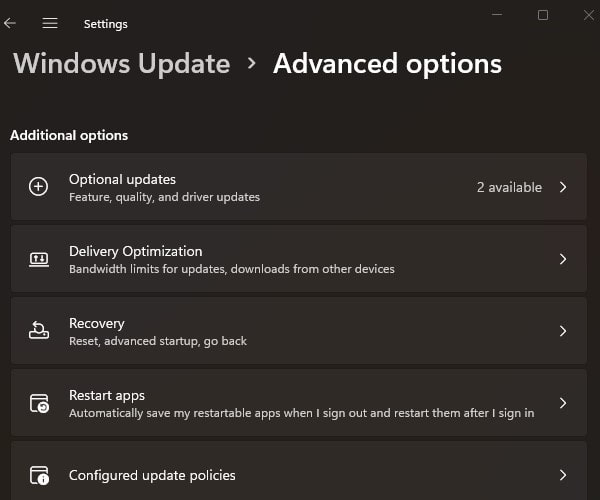
4. Click on Driver Update. Here, you will find your monitor driver. Select the driver from the list, and click on “Download & Install”.
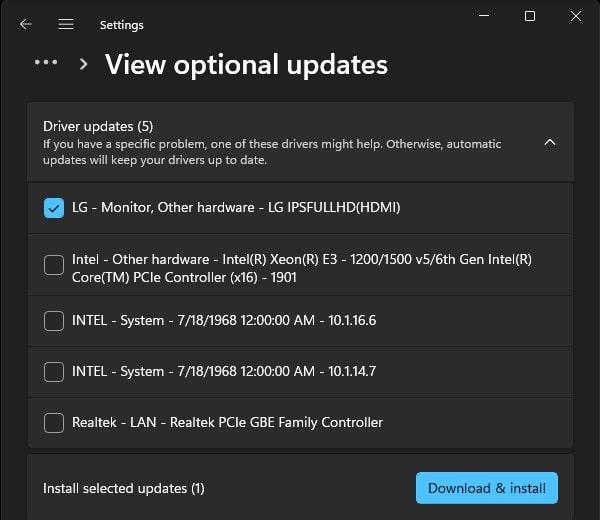
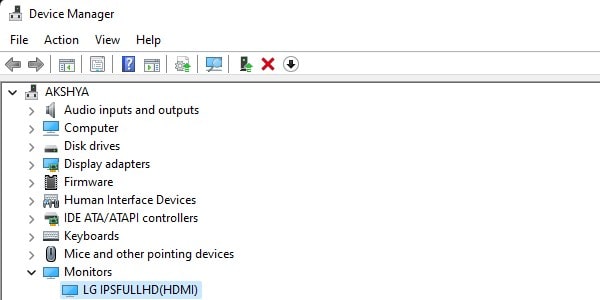
5. Once, the driver gets installed, open the device manager, and you will see your monitor name.
Solution 3: Uninstall Generic Monitor Driver
If after reconnecting the monitor or changing the display cable, if still issue not resolved. Then, you can try uninstalling the Generic Monitor Driver.
Is it safe to uninstall the generic PnP monitor driver?
You must be thinking if I uninstall the generic driver, will I lose the monitor display? The answer is no, your monitor display will not stop working. Windows will revert to either a standard driver or the same default driver that was used during the original installation of the OS. In other words, Windows will recognize it as new connected hardware and it will install the drivers automatically. Do follow the following steps:
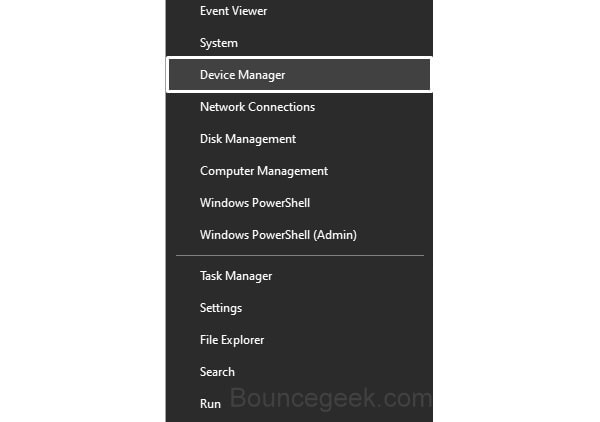
Step 1. Right-Click on the start button, and from the WinX Menu, click on Device Manager to open.
Step 2. Expand Monitors in Device Manager. Now, do right-click on Generic PnP Monitor, and then click on Uninstall device.
A warning now will appear, click on Uninstall.
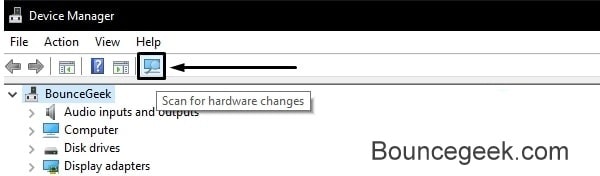
Step 3. Now, click on the “Scan for hardware changes” option.
Hopefully, now Windows will now recognize the monitor and will install the real monitor driver, instead of Generic. Though, If it doesn’t work for you, then try the next method.
Solution 4: Update Monitor Driver
If the computer is not able to identify the monitor. And, if it keeps installing Generic PnP Driver, even after uninstalling. Then, the best thing you can do is, install Monitor Driver. There are two ways to update or install Monitor Driver in Windows 10/Windows 11. Either you can update using Device Manager. But, that method does not work in most cases. So, you can download Monitor Driver from the Manufacturer’s site. And, can install it manually.
Though, If you have already installed Monitor Driver manually. But still, the device manager is showing Generic Driver. Then, check our next solution, in which we have used Monitor Asset Manager. Because even I resolved this issue by using that method.
Find and Download Monitor Driver
Most Monitor manufacturer companies provide a driver CD with their product. But, If your monitor is Plug and Play compatible, then there won’t be any driver CD. Even, you don’t need to install any separate driver. You can just install the latest graphics driver.
Step 1. To find out if there is a monitor driver available or not. Go to your manufacturer’s website’s software, firmware, or driver download webpage. And, search for your Monitor model number. And, hopefully, you will get the driver download link.
Important: If the problem is with a laptop, then you can go to the laptop manufacturer site and from your laptop support page. You will get all the required driver’s download links. To install all display-related drivers.
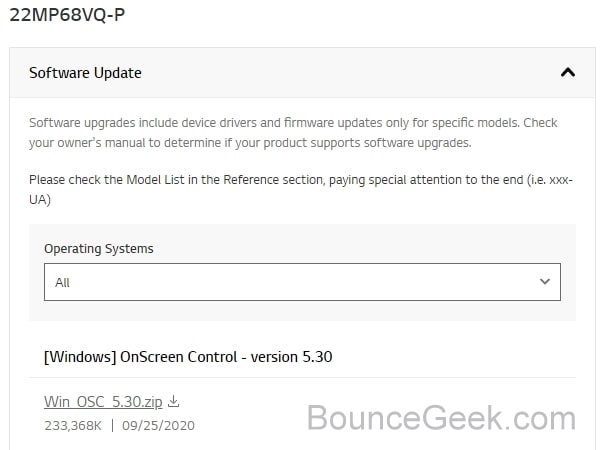
In my case, I am using LG 22MP68VQ Monitor. And, LG provides an OnScreen Control software for it. That helps to manage the Monitor refresh rate, brightness, and everything else.
Step 2. If the monitor driver file is in .exe format. Then, you can directly run it and install it on your PC or laptop. But, if it is an INF file, then you can use the device manager to update it.
Update Monitors Driver using Device Manager
Step 1. Open Device Manager.
Press Windows + X keyboard shortcut.
Click on Device Manager.
Step 2. In Device Manager, click on monitors to expand.
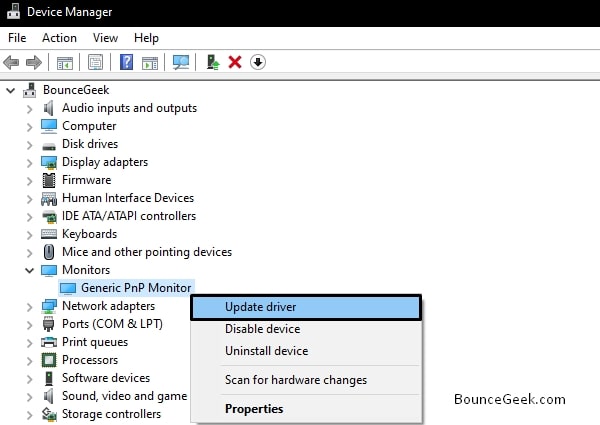
Step 3. Right-click on Generic PnP Monitor driver and then click on Update driver.
Next, click on “Search automatically for drivers”.
Windows will now find the latest driver for your monitor and install it on your system.
Though, If Windows says “The best drivers for your device are already installed”. In that case, follow this: (Though, this will only work, if your monitor name was appearing before. But, after the Windows update, the Generic driver got installed.)
Step 1. Again open the Driver Update window of the Generic Monitor Driver. And, this time, click on Browse my computer for drivers.
Step 2. Click on Let me pick from a list of device drivers on my computer.
Note: If you have a driver file, then select by clicking on the “Have Disk” option and then click on Next to install.
Step 3. Mark the “Show compatible hardware” option. And, If your monitor driver appears in the list, then select it and install it.
Well, If this doesn’t work, then you can try our next method. That will definitely work.
Solution 5: Create a Driver File using Monitor Asset Manager
Change the Startup Settings in Windows
Before installing the monitor driver, first, you need to disable driver signature enforcement from Startup Settings. Else, during installation, you will get an error “Windows encountered a problem installing the drivers for your device. The third-party INF does not contain digital signature information”. Because, we are going to create a driver file for the monitor, which will not digitally be signed.
Disable driver signature enforcement
Step 1. In Windows, Click on the start, then click on the power. Now, press and hold the Shift key and click the Restart button.
Step 2. Wait for a few seconds, a new window will appear to ask you to select an option.
Click on Troubleshoot.
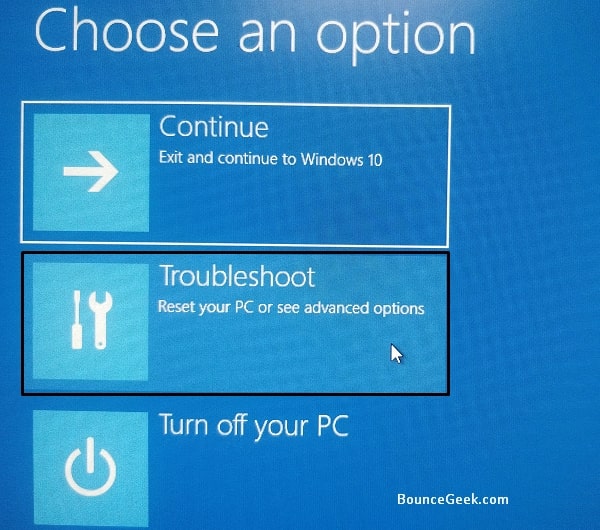
Step 3. Now, click on Advanced options > Startup Settings.
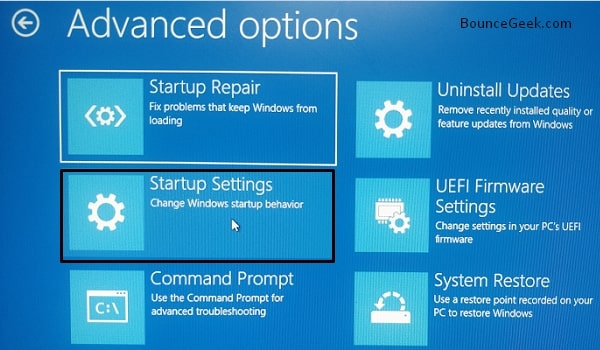
Click on “Restart”.
Step 4. Now, Windows’s Startup Settings will appear, now, to disable driver signature enforcement. Do press the F7 key.
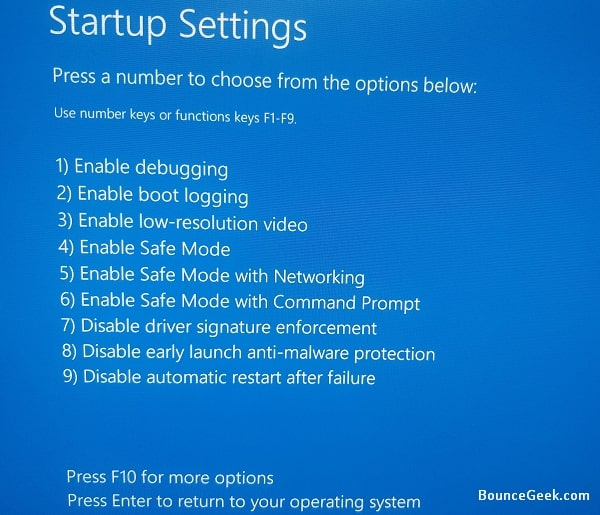
That’s it, Computer will now restart. And, now you can install any unsigned drivers.
Create INF File
INF File or as known as a setup information file is a plain-text file used by Microsoft Windows. It is most commonly used for installing device drivers for hardware components. So, we are going to create a monitor INF file. And, after that, we will install it from the device manager. And, that will fix the Generic PnP monitor problem.
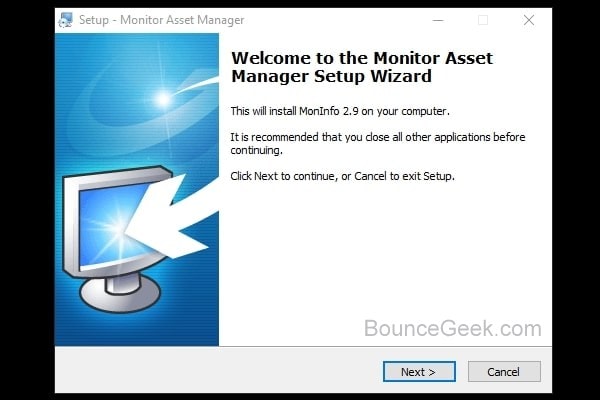
Download: Monitor Asset Manager.
Monitor Asset Manager is a PnP monitor information utility. It shows detailed technical information about the target display device and its capabilities. And, with that, you can create a Monitor Driver (INF) File.
Step 1. First, download and install Monitor Asset Manager on your Windows PC.
Step 2. Open the MAM utility, and it will show you complete display information.
If it doesn’t click on view > refresh.
As you can see in the screenshot, it is showing the correct information about my monitor, instead of the Generic PnP Monitor. So, I can continue this process.
Step 3. You will notice a Display ID section. Here, you will notice multiple display ID entries. On my PC, it is showing Real-time information about my connected monitor. So, I am selecting it to create an INF file. Though, you can create an INF file from the Registry Active display ID also.
Click on File > Create INF.
Select Desktop and Click on Save.
Install Monitor Driver
Step 1. Right-Click on the Start button and then click on “Device Manager”.
Step 2. Expand Monitors Section, now, right-click on Generic PnP monitor. And, then click on Update driver.
Click on Browse my computers for Drivers.
Step 3. Next, click on Let me pick from available drivers on my computer.
Step 4. Now, Click on Have Disk.
From the “Install from Disk” window, click on Browse. And, do select monitor.inf file from the desktop. Which you have created using Monitor Asset Manager. And, after that, click on ok.
Click on Next.
Step 5. A Windows Security Warning will now appear. Click on “Install the driver software anyway”.
That’s it, you will now get a message, that “Windows has successfully updated your drivers”.
And, now instead of Generic PnP or Non-PnP Monitor, the name of your Monitor will appear. So this was the way to update Monitor Driver.
Solution 6: Update Display Adapter Driver
If you’re using a dedicated NVIDIA Graphics Card on your PC. And, your monitor is also connected to it. Then, you can update the Graphics Card Driver instead of the Monitor. Graphics Card software will help you to manage your monitor settings. For instance, I can change resolution, set up multiple displays, and change the refresh rate, all is possible with the NVIDIA Control Panel. So, do the open device manager, and find out your Graphics Card information. And, download and install its driver from the manufacturer’s site. If you’re using a laptop then you might have to update both integrated and dedicated graphics card drivers.
Solution 7: Run SFC Scan
If you think driver files got corrupted due to some reason. Then, you can run the system file checker tool in Windows. It will work as an automatic troubleshooter. SFC Scan is designed to scan for corrupted system files. As you know drivers are also part of the system. System File Checker utility also repairs files automatically. So, if nothing works, you can give it a try.
Step 1. Click on the start button, and search for CMD. And, then click on “Run as administrator”. You can also use Windows PowerShell
Step 2. In Command Prompt, type the following command to run SFC Scan.
sfc /scannow
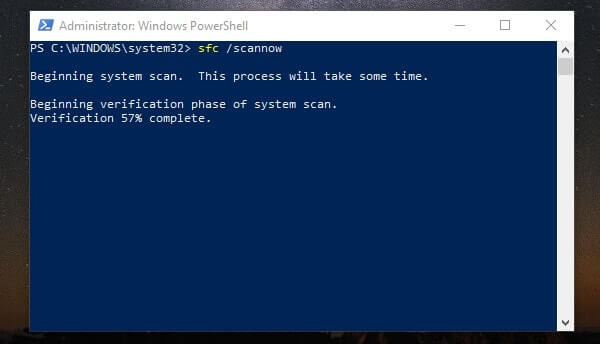
Wait for the SFC scan to get complete, don’t interrupt the process.
I hope you’re able to fix the Generic PnP Monitor issue on your PC or Laptop. If you have any queries related to this Windows 10/Windows 11 problem, you can leave a comment. Moreover, you can also overclock monitor refresh rate.
Универсальный монитор PnP драйвер Windows 10 — что это

Устройства, подключенные к компьютеру, часто требуют драйвера для правильной работы. Один из таких драйверов — универсальный монитор PnP драйвер, который используется в Windows 10.
Что такое PnP
PnP (Plug and Play) — это технология, которая позволяет компьютеру автоматически обнаруживать и конфигурировать новые устройства. Это означает, что установка и настройка нового устройства стала проще и быстрее. Вместо того, чтобы искать и устанавливать драйверы вручную, PnP обрабатывает этот процесс автоматически.
Зачем нужен PnP драйвер для монитора

При подключении нового монитора к компьютеру, Windows 10 должна использовать драйвер, чтобы правильно определить и настроить монитор. Мониторы требуют специальных настроек, таких как разрешение, частота обновления и цветовая гамма. Без драйвера PnP, Windows может не распознать устройство и не настроить его правильно. Это может привести к неправильному отображению цветов и изображений, а также к проблемам с разрешением и обновлением экрана.
Как найти универсальный монитор PnP драйвер в Windows 10
Универсальный монитор PnP драйвер поставляется вместе с Windows 10, и обычно устанавливается автоматически при первом подключении монитора к компьютеру. Если драйвер не установлен автоматически, можно попытаться его найти и установить вручную.
- Шаг 1: Откройте «Панель управления» и выберите «Оборудование и звук».
- Шаг 2: Выберите «Устройства и принтеры».
- Шаг 3: Найдите свой монитор в списке устройств, нажмите правой кнопкой мыши и выберите «Свойства».
- Шаг 4: В окне «Свойства» выберите вкладку «Драйвер» и нажмите кнопку «Обновить драйвер».
- Шаг 5: Выберите «Автоматический поиск обновленного драйвера», и Windows начнет поиск обновленной версии драйвера.
Возможные проблемы с универсальным монитором PnP драйвером
Хотя универсальный монитор PnP драйвер обычно работает без проблем, могут возникнуть некоторые проблемы.
Проблема №1: Не устанавливается драйвер автоматически.
Если драйвер не устанавливается автоматически, то можно попытаться установить его вручную, следуя вышеописанным шагам.
Проблема №2: Неверное разрешение экрана или обновления.
Если монитор отображает изображения в низком разрешении или слишком высокой частотой обновления, то возможно, Windows неверно определила настройки монитора. Попробуйте открыть «Панель управления» и выберите «Экран». Выберите «Разрешение экрана» и «Частота обновления экрана». Проверьте, что настройки соответствуют вашему монитору.
Выводы
Универсальный монитор PnP драйвер является важным компонентом Windows 10 для корректной настройки мониторов. Как правило, он устанавливается автоматически при подключении нового монитора, но может быть установлен вручную, если возникнет проблема. В случае проблем с монитором проверьте настройки разрешения и частоты обновления на окне «Экрана» в «Панели управления».
Универсальный монитор PNP драйвер для Windows 10: что это и зачем нужен?
Для корректной работы компьютера необходимо установить драйверы на все устройства, подключенные к нему. Когда речь заходит о мониторах, PNP (Plug and Play) драйверы являются наиболее распространенным способом подключения.
Что такое PNP драйвер?
PNP драйвер (Plug and Play) — это универсальный драйвер, который автоматически подключает устройство к компьютеру после подключения. Таким образом, не требуется дополнительной установки драйверов или настройки системы вручную.

Windows 10 использует эту технологию в большинстве случаев, чтобы обеспечить быстрое, легкое и автоматическое подключение вашего монитора к компьютеру. Это позволяет избежать необходимости устанавливать драйверы вручную и сокращает время, необходимое для настройки вашего оборудования.
Преимущества универсального монитора PNP драйвера для Windows 10
Универсальный PNP драйвер для монитора имеет несколько преимуществ:
- Легкость использования и установки;
- Не требуется дополнительной настройки системы;
- Сокращение времени, необходимого для подключения монитора к компьютеру;
- Высокая совместимость с большинством мониторов.
Это означает, что при использовании универсального PNP драйвера для монитора на Windows 10 не нужно заботиться о том, подойдет ли драйвер для вашего монитора или нет. Данный драйвер подходит для большинства моделей мониторов и обеспечивает быстрое подключение.
Как установить универсальный PNP драйвер на Windows 10?

Один из главных плюсов универсального PNP драйвера — необходимость создавать новые драйверы для каждого оборудования отпадает. Windows 10 уже имеет встроенный универсальный монитор PNP драйвер.
Для установки универсального монитора PNP драйвера в Windows 10 нужно просто подключить монитор в компьютер и запустить установку драйвера в автоматическом режиме.
Если устройство отказывается подключаться автоматически, вы можете выполнить следующие действия:
- Откройте «Управление устройствами»;
- Выберите раздел «Мониторы»;
- Выберите «Обновить драйвер»;
- Выберите «Автоматический поиск драйвера обновлений»;
- Дождитесь завершения процесса инсталляции и перезагрузите компьютер.
После выполнения этих действий устройство должно корректно работать.
Итог
Универсальный монитор PNP драйвер для Windows 10 — это удобный и простой способ подключения вашего монитора к компьютеру, который сокращает время и усилия, необходимые для установки драйверов. Для большинства пользователей он обеспечивает быстрое и надежное подключение, не требуя дополнительных усилий по настройке.
Универсальный монитор pnp драйвер Windows 10: что это?

Каждое обновление операционной системы Windows порой сопровождается новыми элементами и внешними компонентами. В Windows 10 появился новый драйвер, именуемый универсальный монитор pnp драйвер Windows 10. В данной статье мы осветим это понятие, а также дадим полезную информацию о том, как он работает и как использовать его.
Что такое драйвер убиверсального монитора pnp в Windows 10?
Универсальный монитор pnp драйвер Windows 10 (Plug and Play) — это драйвер устройства, предназначенный для упрощения процесса установки и работы мониторов на ПК. Также этот драйвер может свободно конфигурировать условия работы вашей графической карты и монитора.
Кроме того, данный драйвер устанавливается автоматически без каких-либо дополнительных действий со стороны пользователя. Драйвер не требует дополнительной установки дополнительных программ и настроек. Все происходит автоматически и позволяет сэкономить время при установке монитора.
Как работает драйвер монитора pnp в Windows 10?
При подключении нового монитора, драйвер монитора pnp Windows 10 автоматически начинает процесс установки. Драйвер определит тип и модель монитора, а затем выберет наиболее подходящие настройки. Монитор будет сразу готов к работе, без дополнительных действий или установки драйвера вручную.
Если пользователь решит изменить настройки монитора в Windows 10, то монитор pnp работает в партнерстве с операционной системой Windows 10, которая позволит автоматически изменить настройки монитора под определенные условия.
Как использовать драйвер монитора pnp в Windows 10?
Установка и использование драйвера монитора pnp Windows 10 очень просты. Монитор автоматически установится при его подключении к компьютеру. Если вы решите изменить настройки монитора, то следуйте следующим шагам:
- Щелкните правой кнопкой мыши по пустому месту на главном экране
- Выберите «Параметры дисплея»
- Выберите нужный вариант настройки в разделе «Параметры дисплея»
Выберите необходимые параметры и приложите их. Драйвер монитора pnp Windows 10 перейдет на новые настройки без оптимизации и дополнительных действий.
Общий итог:

В Windows 10 появился новый драйвер монитора, универсальный монитор pnp драйвер Windows 10, обычно используемый для упрощения установки и работы мониторов на ПК. Драйвер позволяет конфигурировать условия работы вашей графической карты и монитора. Драйвер устанавливается автоматически, а также не требует программного обеспечения и настройки со стороны пользователя. Это позволяет сократить время установки и настройки монитора в Windows 10, а также обеспечивает более легкий доступ к настройкам системы.