Все способы:
- Способ 1: Меню Свойства системы
- Способ 2: Командная строка
- Способ 3: Автоматизация теневого копирования
- Вопросы и ответы: 5
Служба теневого копирования — встроенная в Windows опция, позволяющая в автоматическом режиме копировать файлы, с которыми на текущий момент времени ведется работа. Это позволяет восстанавливать их предыдущие версии при необходимости. Однако изначально этот параметр отключен и пользователю придется вручную не только активировать его, но и каждый раз создавать новые копии, чтобы всегда иметь доступ к актуальным резервным копиям. Сегодня мы продемонстрируем два метода реализации этой задачи, а в качестве третьего рассмотрим автоматизацию копирования.
Способ 1: Меню Свойства системы
Способ с использованием графического меню не самый простой, поскольку придется переходить в разные окна и искать соответствующие пункты. Если вы желаете ускорить процесс создания теневой копии и не боитесь использовать для этого командную строку, сразу переходите к следующей инструкции, однако учитывайте, что отведенное под резервные копии пространство при этом будет выбрано автоматически. Ручная настройка позволяет гибко задать подходящие значения, что осуществляется так:
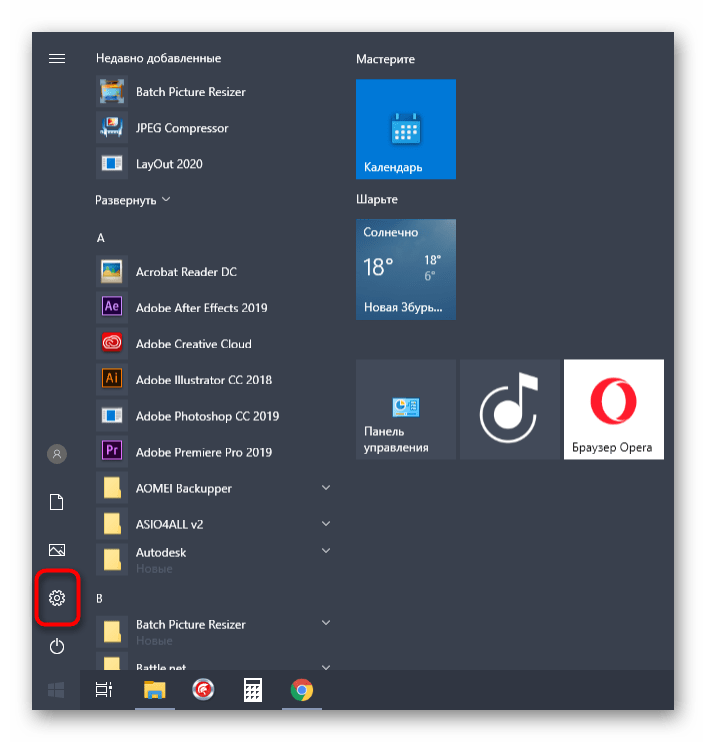
- Откройте «Пуск» и перейдите в «Параметры», кликнув по специальной кнопке в виде шестеренки.
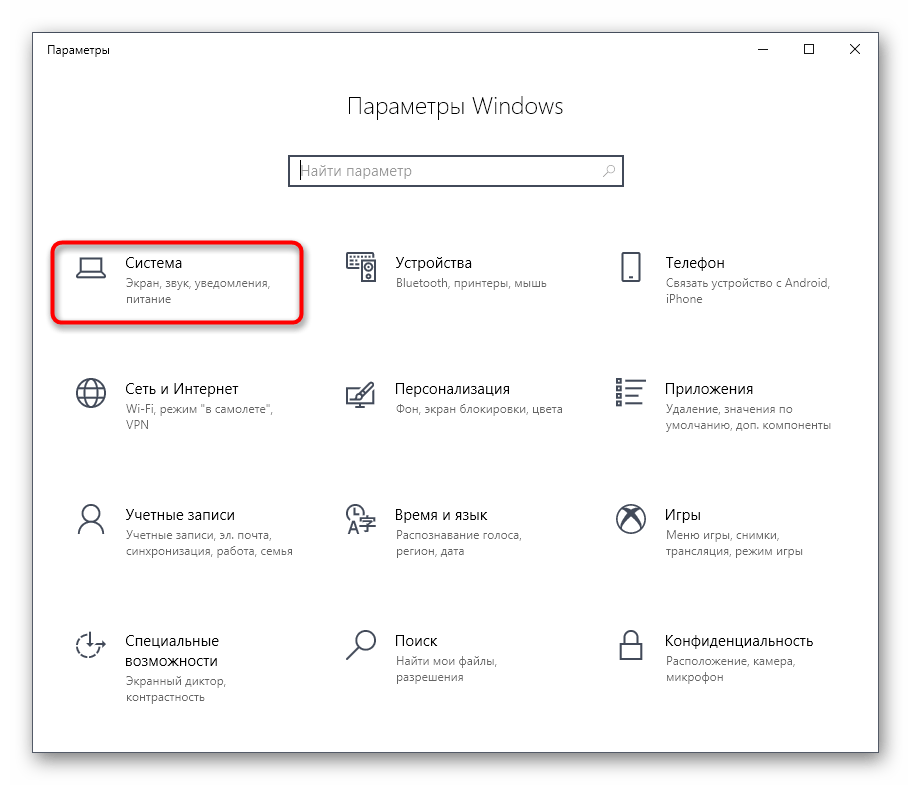
- В появившемся меню выберите первый же раздел под названием «Система».
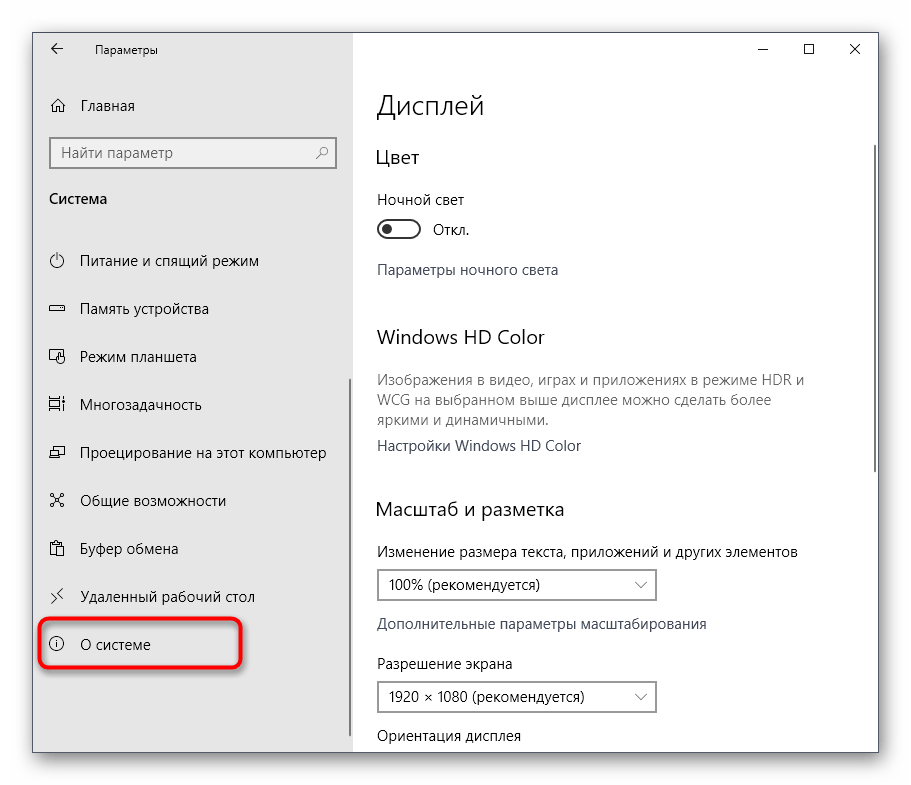
- Через левую панель переместитесь к категории «О системе».
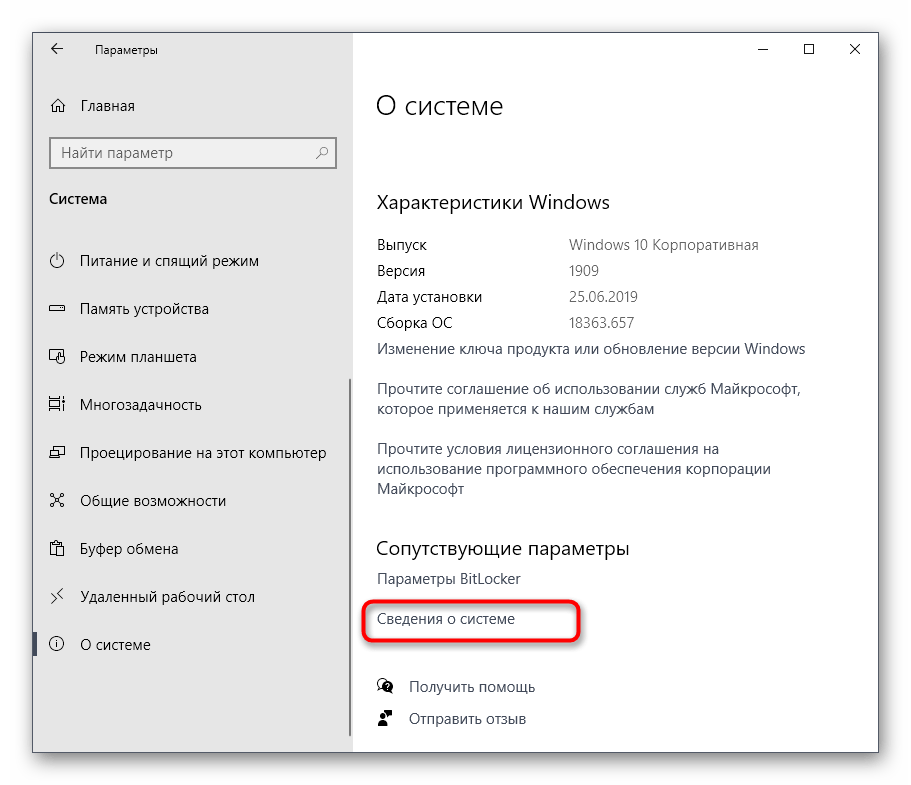
- Опуститесь вниз, где отыщите строку «Сведения о системе».
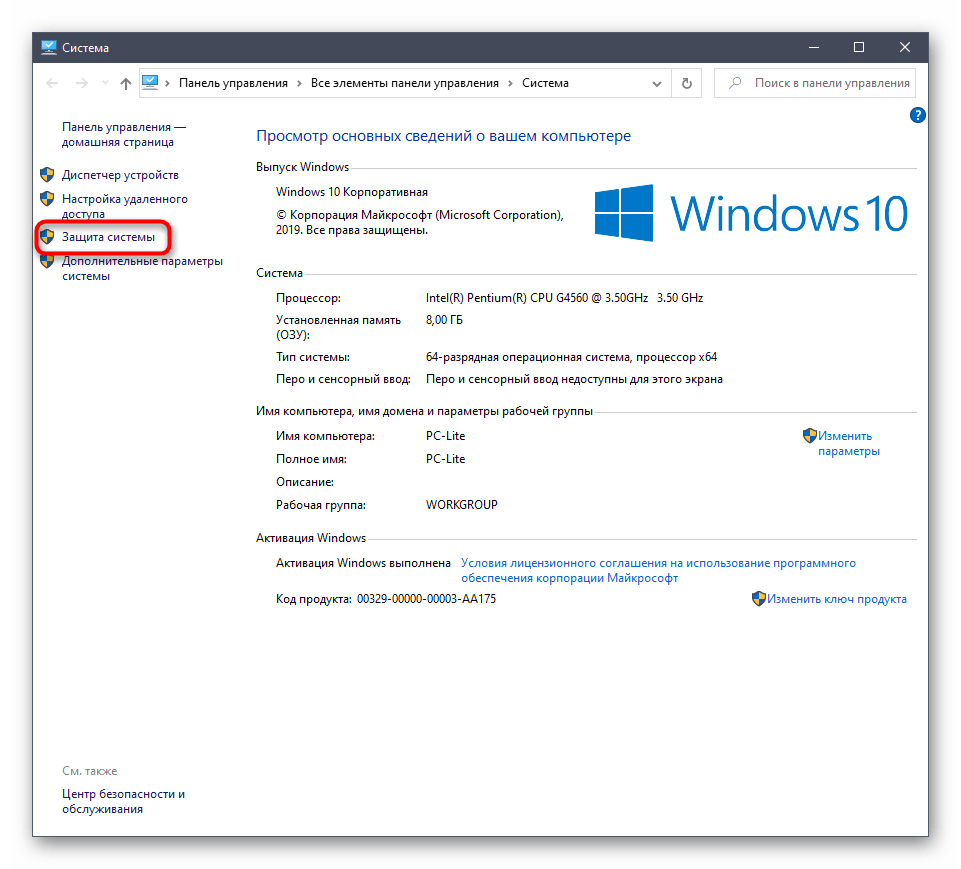
- Произойдет переход в раздел «Система», который находится в Панели управления. Здесь вас интересует надпись «Защита системы».
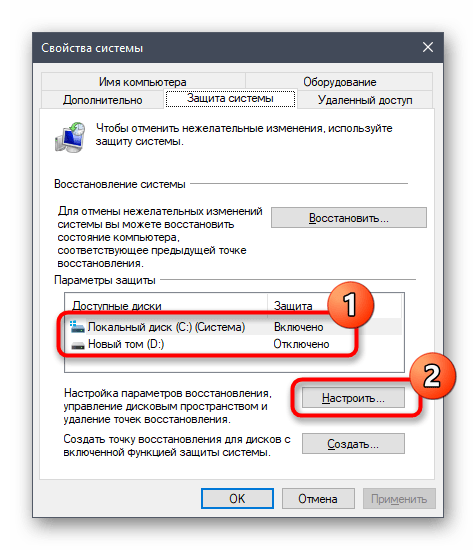
- В окне свойств выберите логический том диска, с которым хотите работать, и перейдите в «Настроить».
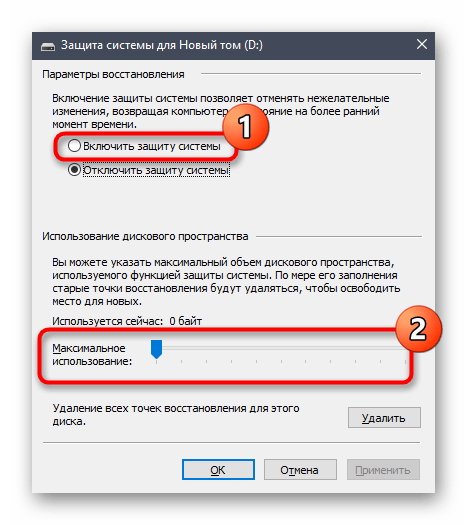
- Отметьте маркером пункт «Включить защиту системы» и задайте максимальное пространство, которое может быть выделено под резервные копии. Объем информации выбирается пользователем самостоятельно, отталкиваясь от личных предпочтений и имеющихся носителей.
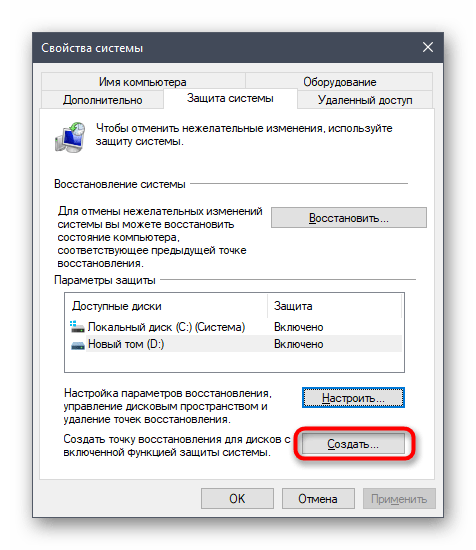
- После применения изменений вернитесь в предыдущее меню, где нажмите по кнопке «Создать».
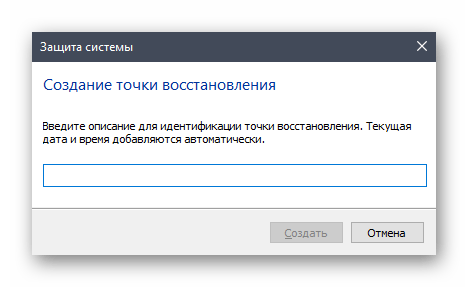
- Введите название точки восстановления и подтвердите создание.
- Ожидайте завершения процесса. Он займет буквально несколько минут, что напрямую зависит от объема информации на диске.
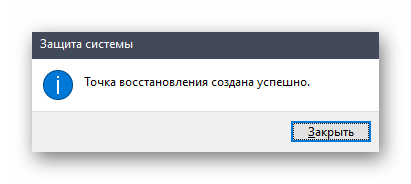
- Вы получите уведомление об успешном создании точки восстановления.
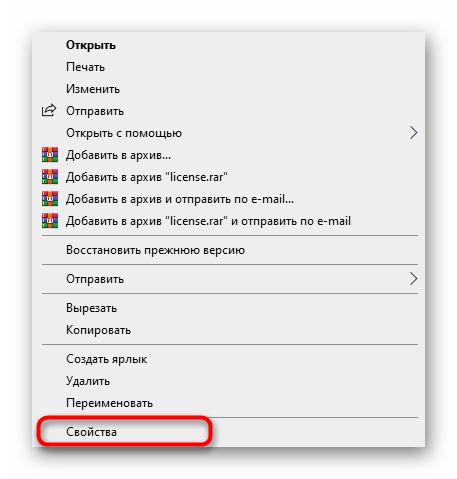
- Для проверки измените какой-либо файл, находящийся на выбранном диске, а затем щелкните по нему ПКМ и выберите пункт «Свойства».
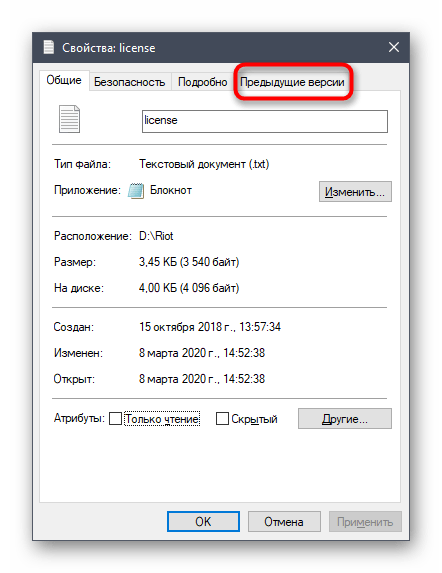
- Переключитесь на вкладку «Предыдущие версии».
- Теперь вы видите, что здесь находится старая версия файла, которую можно при желании восстановить.
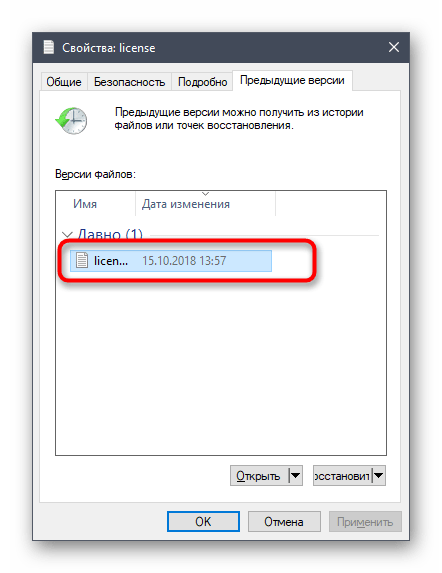
Как вы уже поняли, прошлая версия файла будет создаваться только после внесения изменений, что и характеризует технологию теневого копирования. Уточним, что при выполнении предыдущих действий вы создали только одну точку восстановления, от которой и нужно будет отталкиваться при необходимости вернуть объекты. Мы же советуем регулярно создавать новые записи так, как это было показано выше, чтобы поддерживать операционную систему в актуальном состоянии и случайно не потерять важные объекты.
Способ 2: Командная строка
Более простой вариант создания резервной теневой копии выбранного носителя — использование консольной команды. Однако в этом случае у вас не будет возможности самостоятельно выбрать отведенное под предшествующие версии файлов дисковое пространство. Если вас устраивает такое положение вещей, выполните следующие действия:
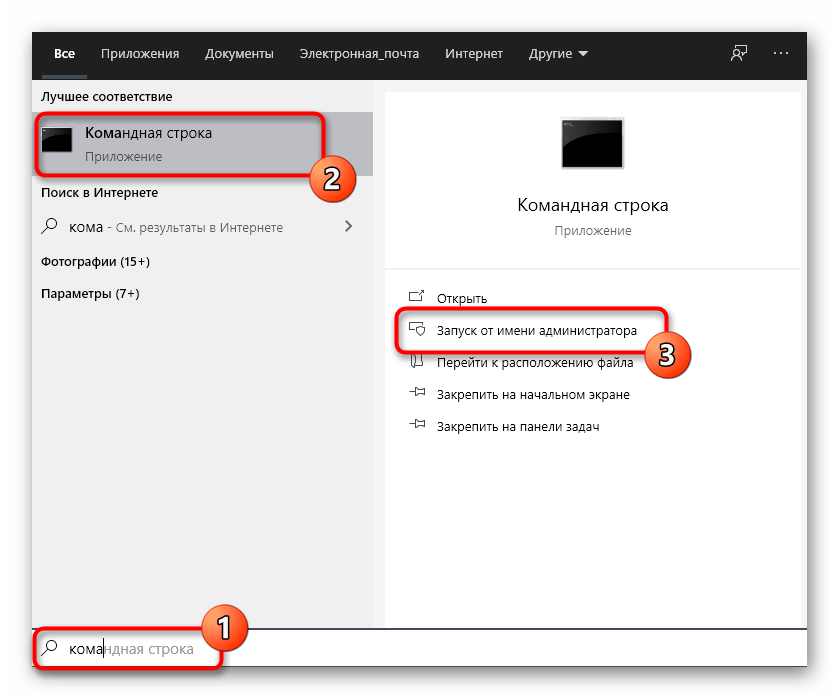
- Запустите Командную строку от имени администратора любым удобным образом, например, отыскав само приложение через поиск в меню «Пуск».
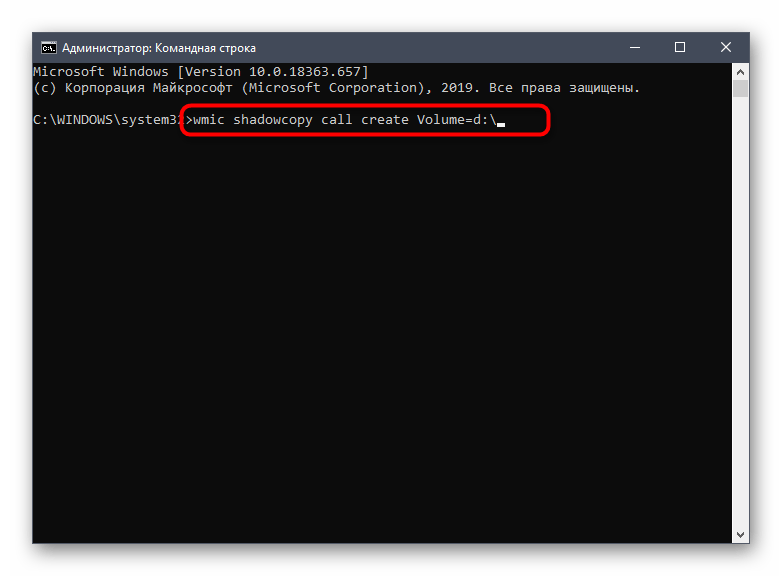
- Введите там команду
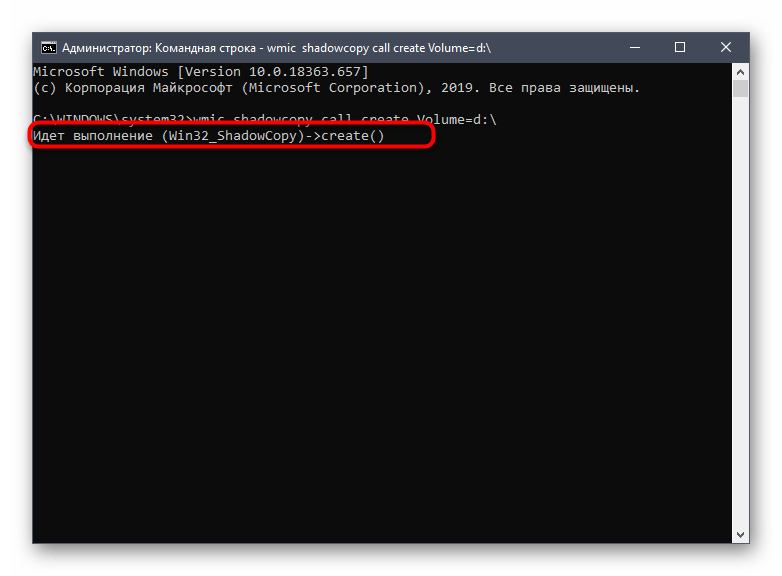
wmic shadowcopy call create Volume=D:\и нажмите на Enter. Литеру D замените на метку тома, для которого создается копия. - Начнется выполнение операции, о чем уведомит соответствующее консольное сообщение.
- В конце вы получите строку с выводом «Метод успешно вызван».
- Переходите к свойствам диска и на вкладке «Предыдущие версии» просмотрите, создалась ли новая версия директории.
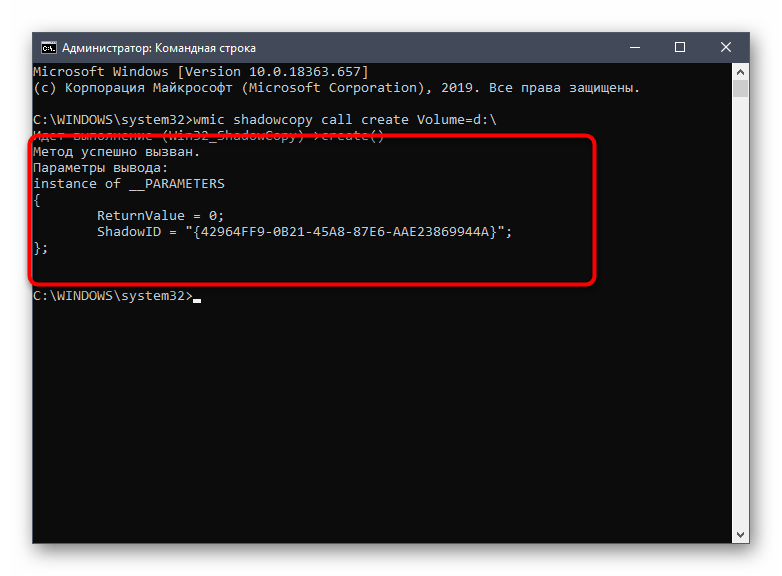
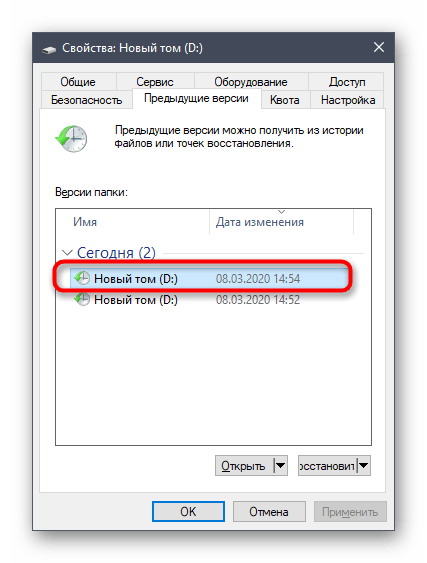
При необходимости повторного создания теневой копии вызовите эту же команду и дождитесь завершения операции. Не забывайте менять буквы дисков, если этот процесс производится для разных логических разделов.
Способ 3: Автоматизация теневого копирования
В начале статьи мы обещали, что расскажем о методе автоматизации теневого копирования. Делается это путем добавления новой задачи через «Планировщик заданий». Тогда в определенный период времени будет вызываться рассмотренная выше команда и выполняться создание новой точки восстановления.
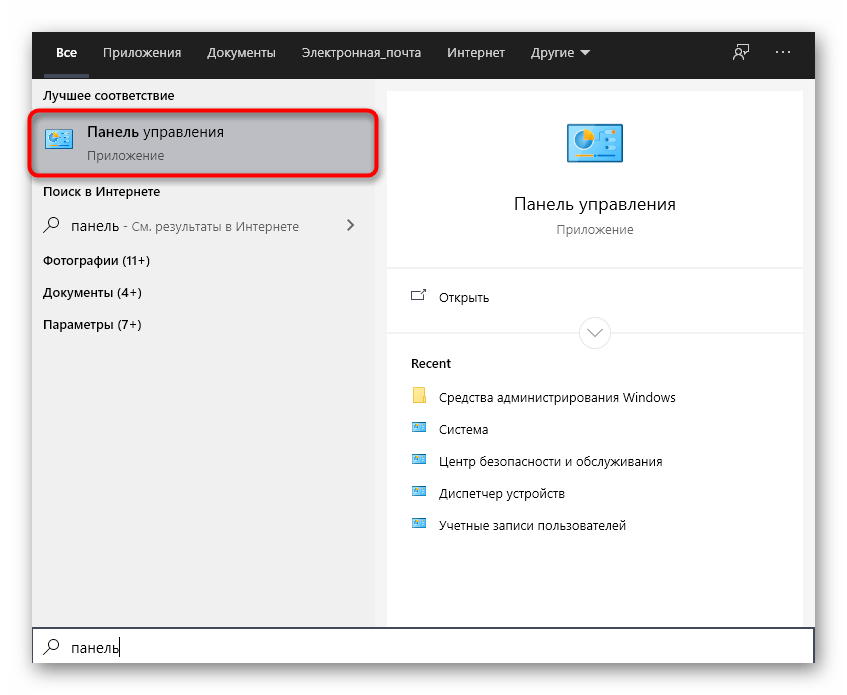
- Откройте «Пуск» и через поиск отыщите приложение «Панель управления».
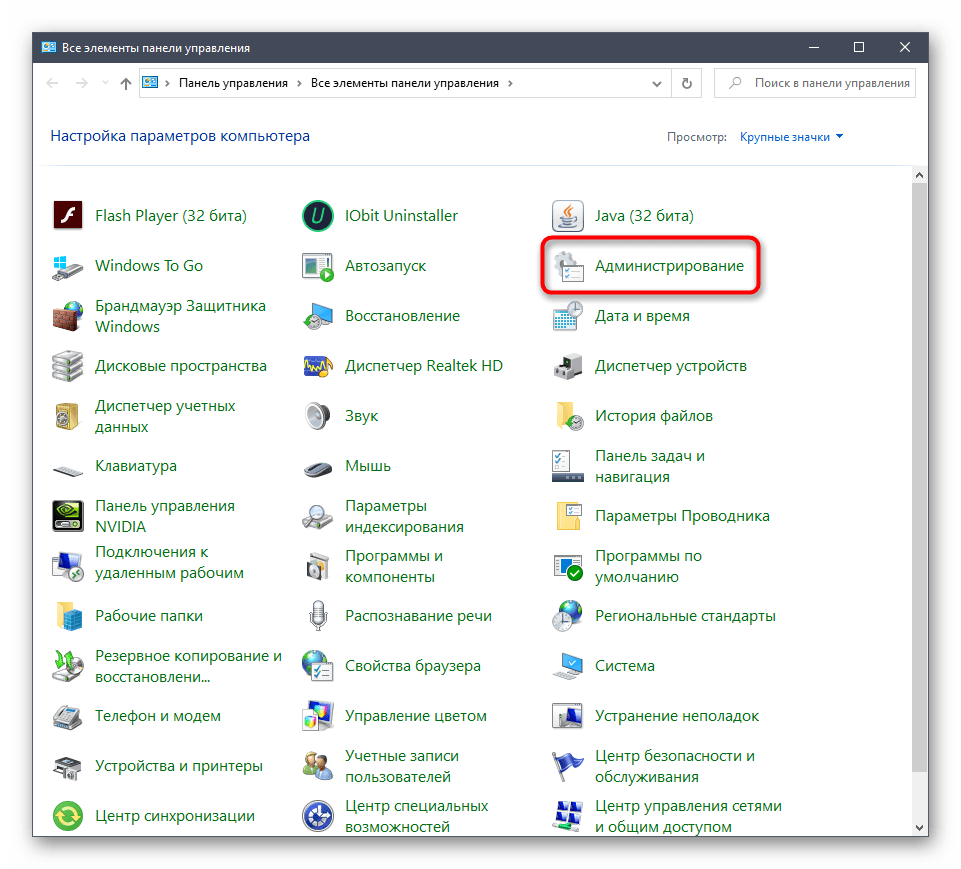
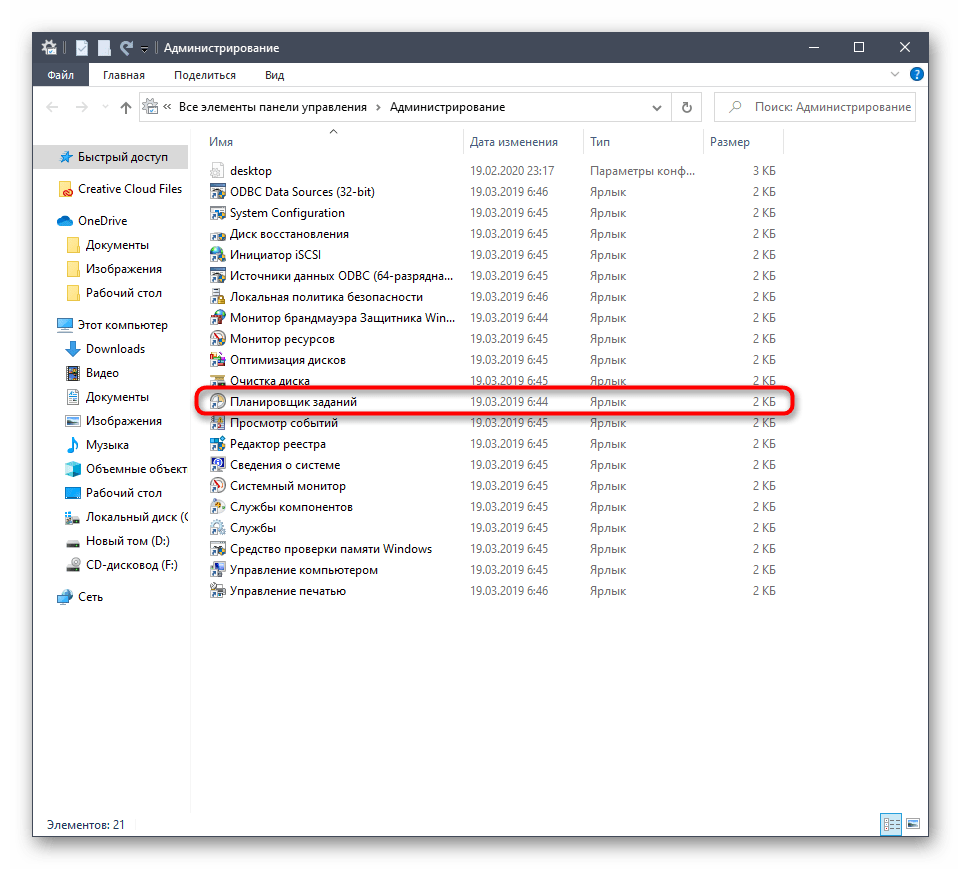
- Там выберите раздел «Администрирование».
- Запустите модуль «Планировщик заданий».
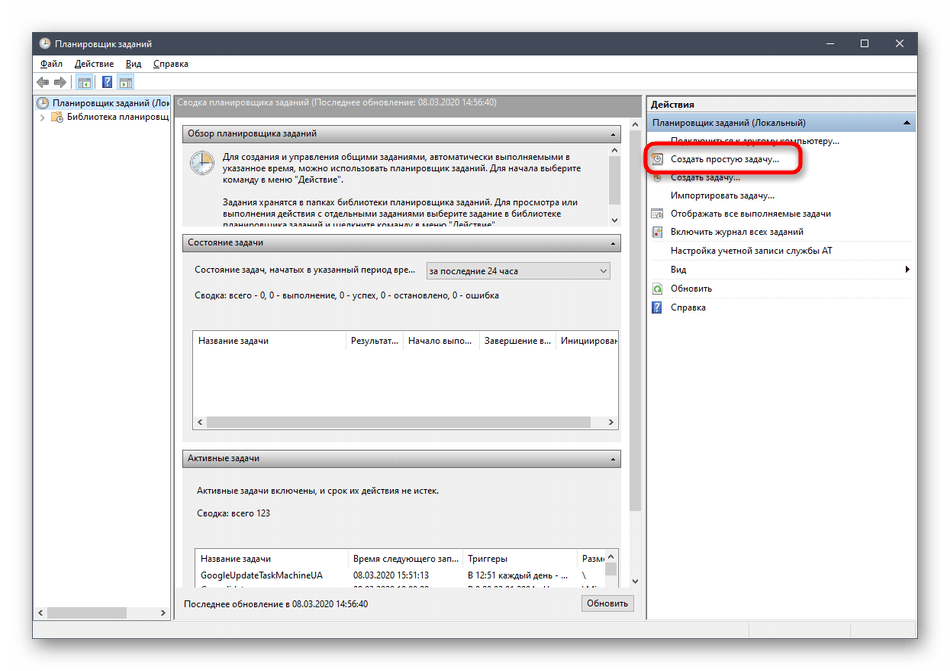
- В блоке «Действия», который находится справа, нажмите по строке «Создать простую задачу».
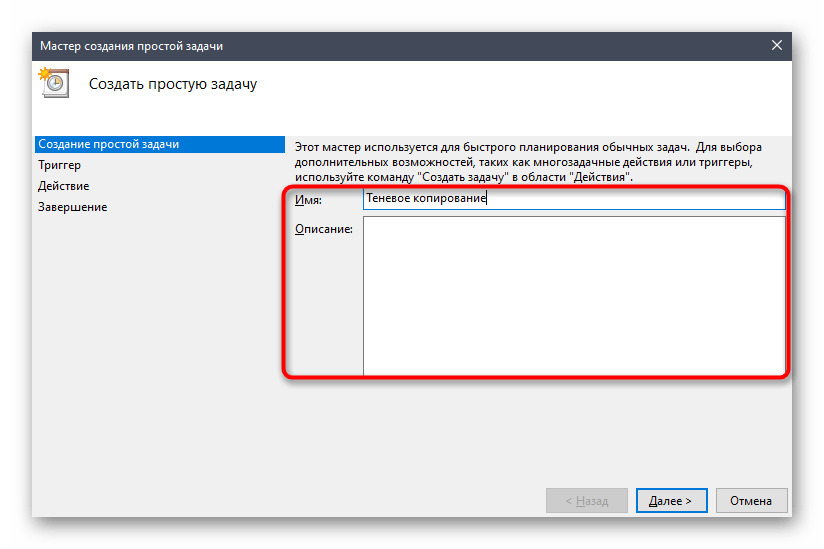
- Введите произвольное имя, чтобы отличить эту задачу от других в списке, а затем переходите к следующему шагу.
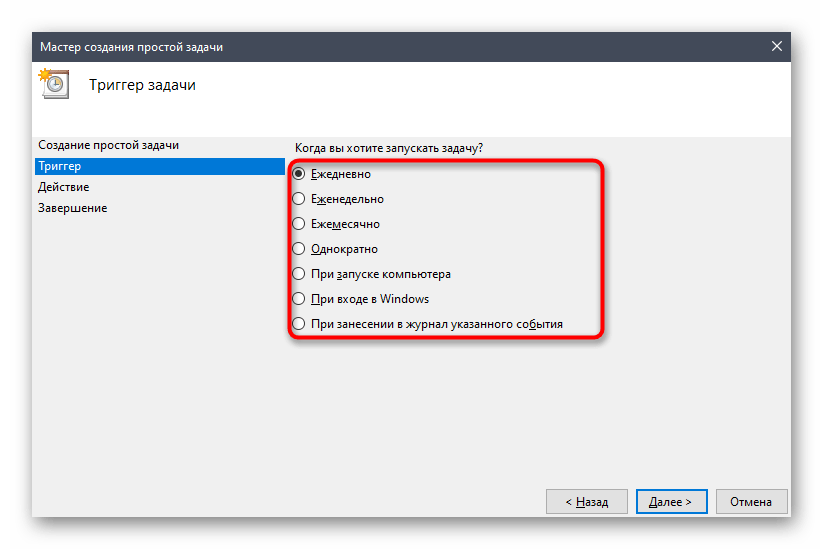
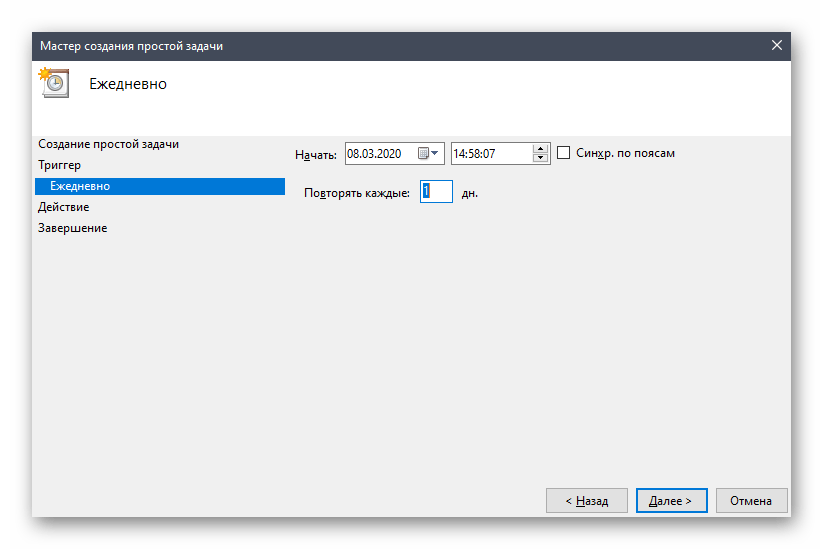
- Установите триггер для запуска задачи, поставив маркер возле подходящего пункта. Например, можно выполнять новое теневое копирование каждый день или только один раз в неделю.
- После этого задайте промежуток для задачи и установите повторение, если это требуется.
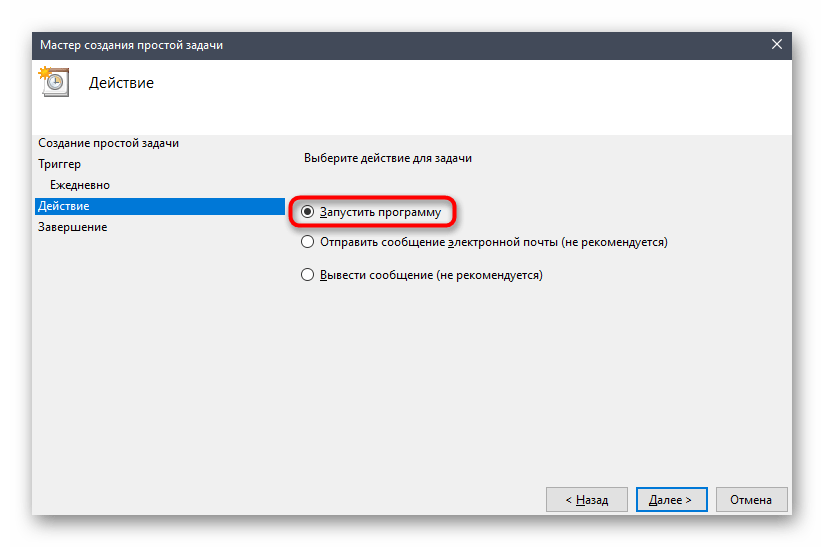
- В качестве действия отметьте «Запустить программу».
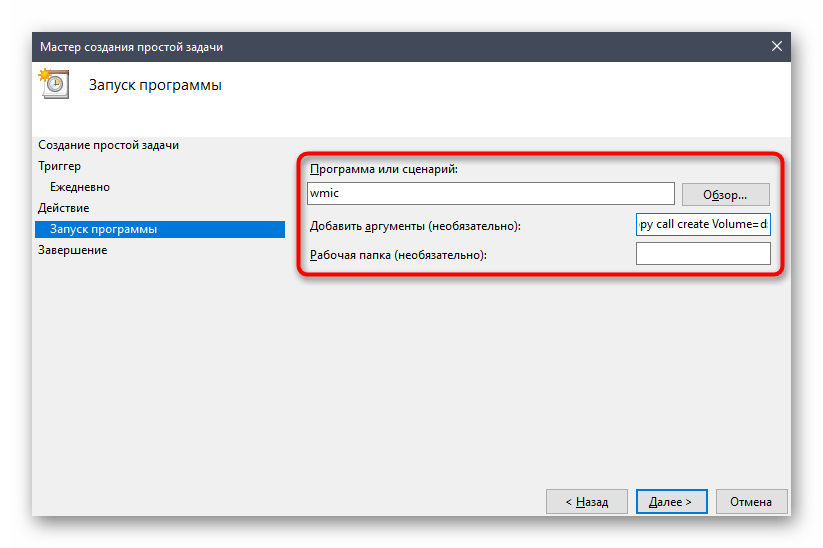
- В поле «Программа или сценарий» введите
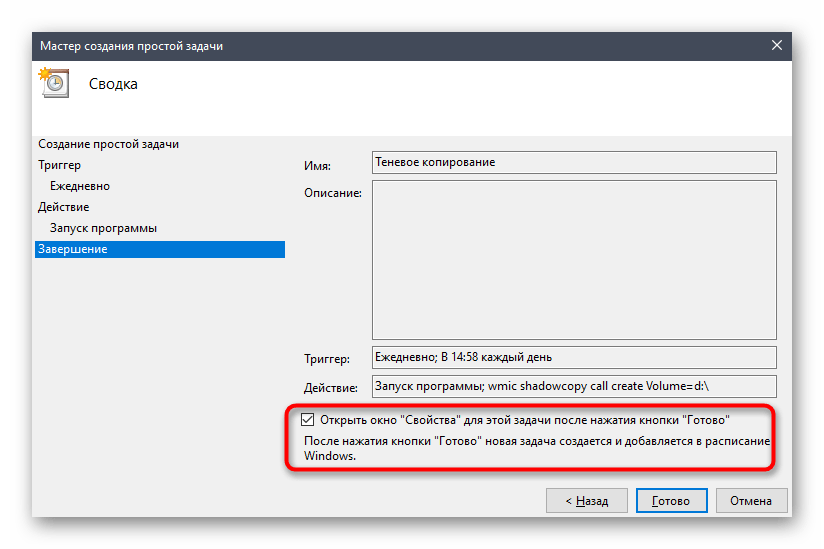
wmic, а для «Добавить аргументы (необязательно)» присвойтеshadowcopy call create Volume=c:\, заменив букву диска на нужную. - При завершающем этапе отметьте галочкой пункт «Открыть окно «Свойства» для этой задачи после нажатия кнопки «Готово»».
- После открытия свойств назначьте статус «Выполнить с наивысшими правами» и завершите работу над заданием.
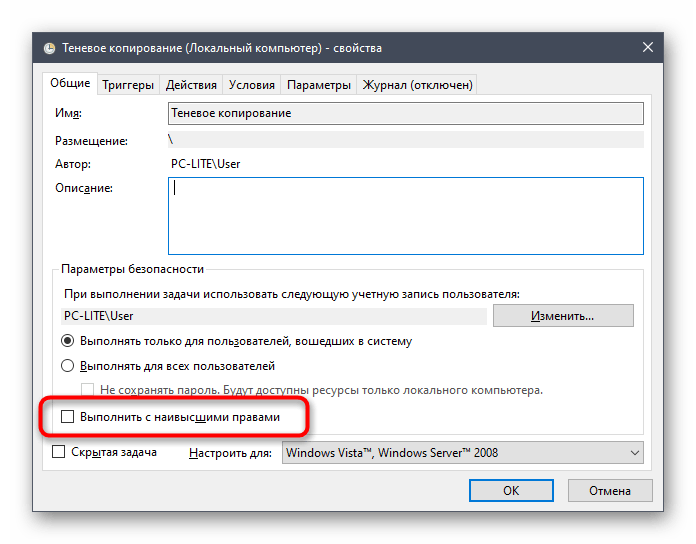
Теперь вы можете быть уверены в том, что задача выполнится в назначенный период времени и теневые копии файлов автоматически обновятся. В окне просмотра предыдущих версий можно удалить все точки восстановления. Учитывайте это и периодически осуществляйте данную задачу, чтобы не копить на компьютере ненужные файлы.
Это была вся информация о теневом копировании в Windows 10, которую мы хотели представить в сегодняшнем руководстве. Если вас интересует тема прямого резервного копирования операционной системы, ознакомьтесь с соответствующими сторонними тематическими программами и штатными средствами в статье по ссылке далее.
Подробнее: Инструкция по созданию резервной копии Windows 10
Наша группа в TelegramПолезные советы и помощь
Shadow Copy Windows 10/11 can help you back up your data and protect it from loss. You must be curious about what it is and how to enable/disable Shadow Copy in Windows 10/11. Read this stepwise article from MiniTool to follow a comprehensive tutorial on how this tool works and an all-around way for backup.
Shadow Copy is a technology available in Windows 11/10/8/7 that can create backup copies or snapshots of computer volumes/files on a local disk, external hard drive, or network drive, whether you are in use or not. It is implemented as a Windows service called the Volume Shadow Copy service, also known as Volume Snapshots Service or VSS.
Shadow Copy requires the NTFS or ReFS file system to create and restore shadow copies. Any Windows component using this technology can create Shadow Copies on local or external volumes (creating a Windows backup or system restore point, for example).
In addition, you can use the Shadow Copy feature to restore lost files. In Windows 10/11, you can choose to use Windows Previous Versions, which are copies of files and folders and sometimes serve as Shadow Copies. With it, you can first look through your old Shadow Copies and restore your lost files.
At the same time, Shadow Copy can also be able to restore the system. As long as a system point is created, you will have a valid Shadow Copy. When the Windows 10/11 system does not work normally, you can restore Windows 10/11 to the previous normal state with a system restore point.
To learn more information about Shadow Copy, you can click on Shadow Copy from Wiki.
From the above information, now you may understand Shadow Copy is such a handy tool. Therefore, it’s necessary for you to know how to use it. Follow the next part to learn more details.
How to Configure a Shadow Copy in Windows 10/11
If you want to set up a Shadow Copy, first you should enable Shadow Copy in Windows 10/11. This process is very easy. Meanwhile, if you need to delete Shadow Copies, all these operations are straightforward with several simple steps as well. The Shadow Copy feature ensures the continuity of data backup and restorability. Read this part carefully, it will show you how to enable Shadow Copy in Windows 10/11 with the following methods.
1. Enable Volume Shadow Copy Service Using System Restore Points
Setting restore points is an optional way to enable Shadow Copy in Windows 10/11. Here’s how to do it.
Step 1: Input Create a restore point into the search box of Windows and choose it.
Step 2: Choose a drive from the Available Drives menu and then click on the Configure button.
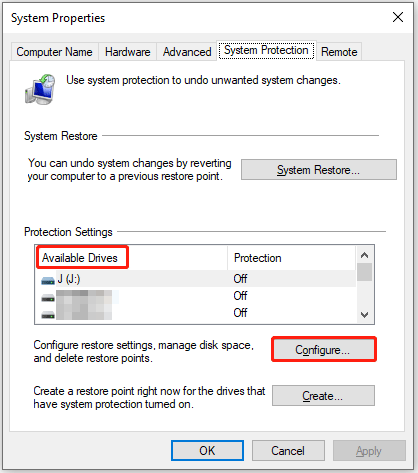
Step 3: Check the option for Turn on system protection, click the Apply button to enable the setting, and then click OK.
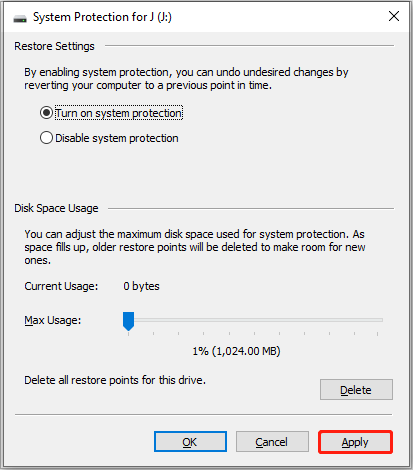
Step 4: Click the Create option to create a restore point to turn on the volume Shadow Copy service. Then you can type a description to help you identify the restore point in the pop-up window.
2. Use Task Scheduler to Turn on Shadow Copy Windows 10/11
Utilizing Task Scheduler is a more accurate way to turn on Shadow Copy Windows 10/11. With it, you can set up a specific time to create a Shadow Copy.
Here’s how to enable Shadow Copy in Windows 10/11 using Task Scheduler.
Step 1: Locate the search bar, go ahead by typing Task Scheduler, and click on it to enter its interface.
Step 2: Choose Create Task… from the right panel and name this task under the General section.
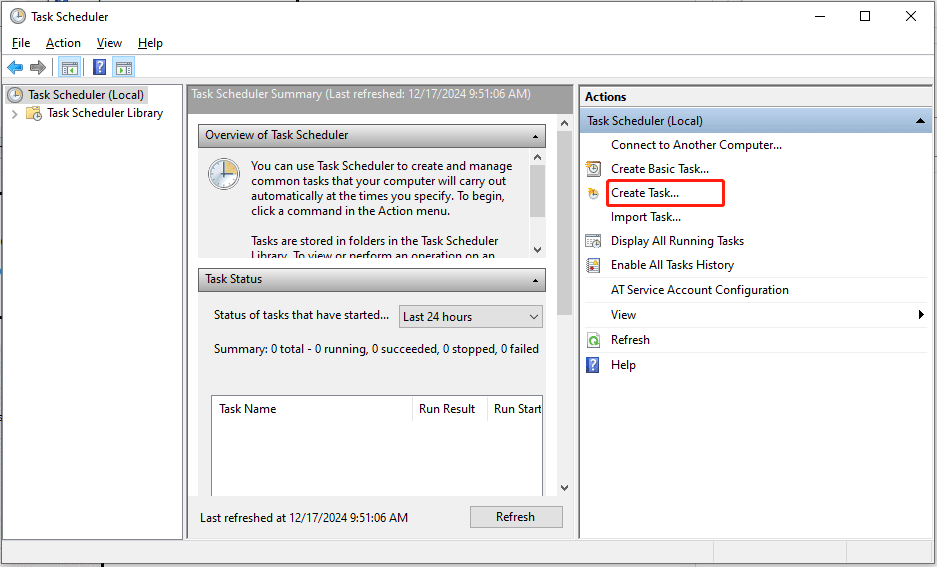
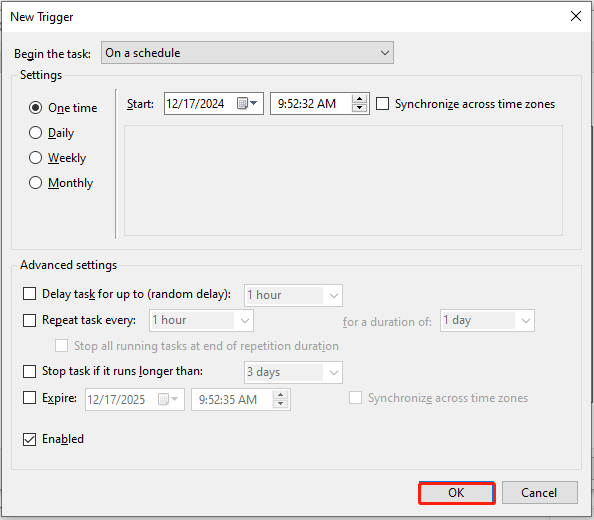
Step 3: Click Trigger and then click the New… button to create a new trigger. Now in the popup window, you can make settings as per your needs. When done, click OK to go on.
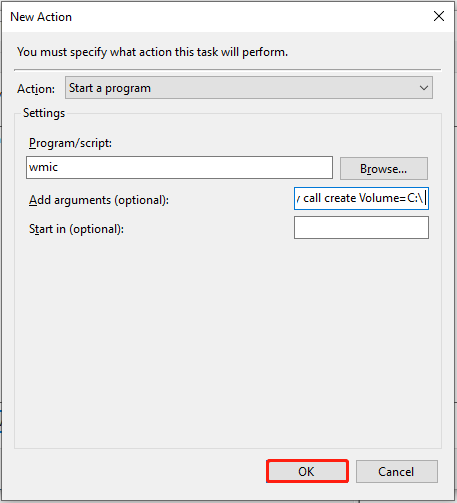
Step 4: Click the Actions button and choose New… to specify what actions this task will perform.
Step 5: Next type wmic under the Program/script: section and then input shadowcopy call create Volume=C:\ at the right side of the Add arguments (optional): section. Click OK to back to the Actions interface and then click OK to finish the settings.
Disable Shadow Copy in Windows 10/11 for System Restore
In case you would not like to use Shadow Copy Windows 10/11, you can follow the introductions below to turn off it. Here’s how to do it.
Step 1: Type Control Panel in the search bar of Windows and click it to enter its interface.
Step 2: Select System and Security, locate the System option, and click it. Alternatively, you can select System with the way View by Small icons.
Step 3: Choose Advanced system settings to continue.
Step 4: Enter the System Properties section and select System Protection.
Step 5: Choose the drive that you have turned on system protection and click Configure… to go on.
Step 6: Check the option of Disable system protection and click on Apply.
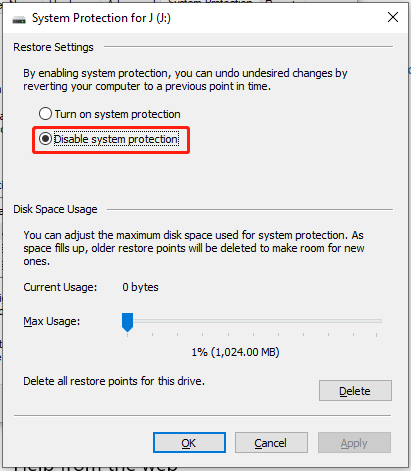
Step 7: You will receive a warning message. Read it carefully and click Yes. After that, click the OK button to exit this window.
Now you have disabled Shadow Copy in Windows 10/11 successfully. Besides, if you encounter some issues when using the Volume Shadow Copy Service, refer to this post for solutions: Quick Fix Volume Shadow Copy Service Errors (for Windows 10/8/7).
Tips:
Although Volume Shadow Copy Service enables you to create a snapshot of a computer file or volume, it cannot replace backup. So, you can create a backup using Backup and Restore (Windows 7) which can help you ensure your system and data are safe.
Backup Files Using Volume Shadow Copy Windows 10/11
After enabling Volume Shadow Copy, run the built-in tools such as Backup and Restore to backup files. But if you want to know more details about it, you can follow the steps below to check.
Step 1: Type Control Panel in the search box on Windows 10/11 and click it. View all the items by Category, choose the System and Security option, and click Backup and Restore (Window 7).
Step 2: Locate Set up backup and tap on it.
Step 3: Select where you want to have your backup saved and click Next.
Step 4: Select Let Windows choose. Orcheck Let me choose tochoosethe items that you want to include in the backup. Check the checkbox – Include a system image of drives if necessary and click Next to continue.
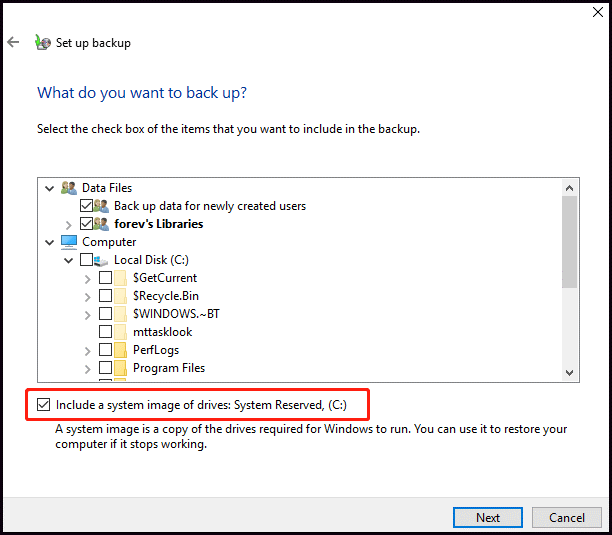
Step 5: Review your backup settings and confirm the same. Finally, click Save settings and run backup.
How to Use Shadow Copies to Restore Files
Under the condition of having shadow copies available on the drive, you can easily use the Previous Versions feature to restore deleted files and earlier specific copies from the snapshot of Shadow Copy. Take certain files that were saved on the Desktop as an example. Here’s how to restore shadow copies.
Step 1: Locate the Desktop folder in the File Explorer. Right-click it and choose Properties.
Step 2: Select the Previous Versions tab, click the right version you want to restore, and click the Restore option.
Tips:
If the files are not listed in the folder menu, you can look for their parent folder and restore it to the previous version. Or perhaps you forgot the location of the lost files, you can also download and install the Shadow Explorer for free. It can help find your shadow copies conveniently.
Versatile Backup Software for Windows 10/11
When it comes to data backup, MiniTool ShadowMaker cannot be ignored. MiniTool ShadowMaker is a professional backup software that helps you do this work to protect your system and data. With this tool, you are allowed to back up files, folders, partitions, and disks as well as the operating system.
The copy of the backup enables you to restore data if a disaster occurs, while also providing the capability to create bootable media. When your computer fails to boot correctly, you can restore your system to the previous state via the created media.
MiniTool ShadowMaker TrialClick to Download100%Clean & Safe
Take backing up Windows 10/11 system as an example.
Step 1: Launch MiniTool Shadowmaker and choose the Backup section.
Step 2: Choose the SOURCE module. There are two source types you can select including Disk and Partition and Folders and Files. Select one you need to back up and click OK to continue.
Step 3: Click the DESTINATION module and choose the destination path where you want to save the image files. Click the OK button.
MiniTool ShadowMaker lets you back up your items to multiple places (User, Computer, Libraries, Shared). Among these places, Shared allows you to back up your files to the shared folder via a network path. You need to:
Turn on the network discovery and file sharing.
- Go to Control Panel > Network and Sharing Center > Change advanced sharing settings.
- Turn on network discovery and file sharing under Private, Guest or Public, and All Networks.
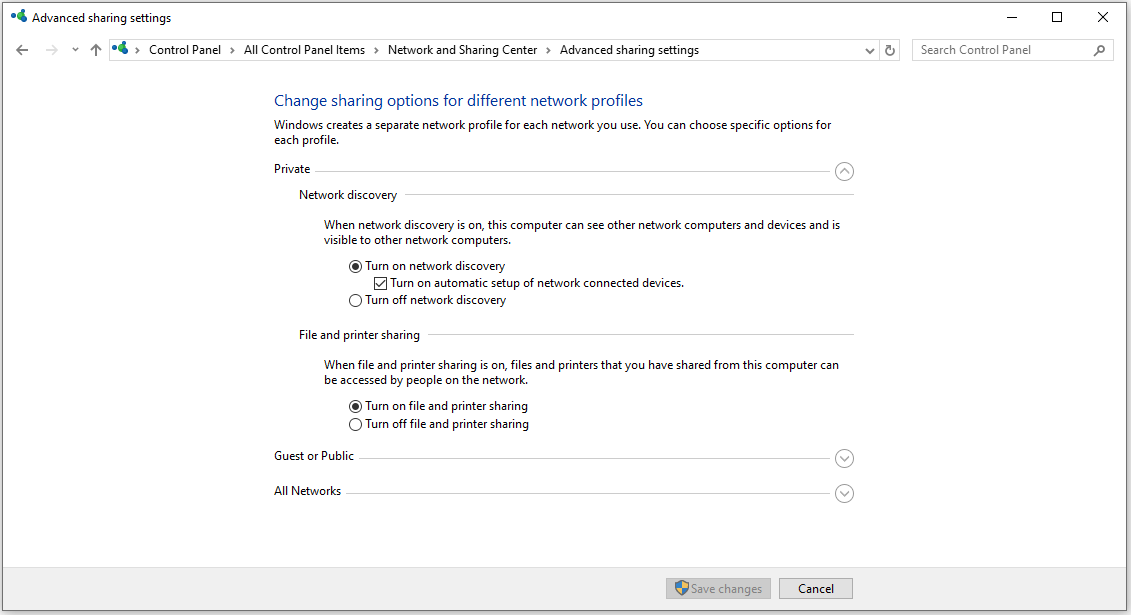
Create the shared folder
- Create a shared folder called smelly cat, and create a subfolder called cats (examples).
- Right-click the shared folder and click Properties.
- Choose Sharing and click Share. Then, choose Everyone from the pull-down menu and click Add, choose Read/Write under Permission Level, and click Share.
- Return to the Sharing tab. Click Advanced Sharing… and check the Share this folder in the same window, tap on the Permission button, and check the Allow box next to the Full Control option.
- After creation, go back to the Sharing section and note down the network path.
Choose a network path
Go to the Shared tab and click the Add button.
Type the network path, user name, and password, and click OK.
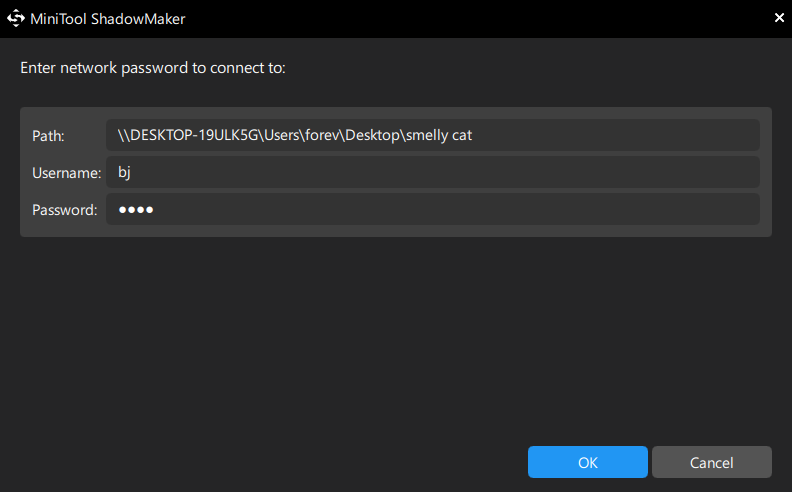
Open the shared folder (smelly cat) and choose the subfolder (cats) as the destination.
Step 4: Before backing up, you can go to Options > Backup options to customize some specific settings according to your needs. Go to the Backup Scheme section to set up the backup type or manage disk space occupied by the backup image files. Make a schedule to automatically back up the item in Schedule Settings.
Tips:
If you need more clarification on it, you can refer to Backup Settings.
Step 5: Click Back Up Now to perform the backup process immediately. Or you can choose Back Up Later to delay the operation. It will finish based on your schedule or restart in the Manage window.
Bottom Line
In conclusion, this article does not just show you much introduction about what Shadow Copy Windows 10/11 is but also shares the methods on how to create a Shadow Copy in Windows 10/11. Meanwhile, it also introduces you to how to perform backups to keep your system and data safe with MiniTool ShadowMaker.
If you have any questions about MiniTool ShadowMaker, please contact us via the email [email protected].
Shadow Copy Windows 10/11 FAQ
Where are shadow copies stored?
Shadow copies are stored locally and found in the System Volume Information folder which is hidden so you need to make it visible.
Is it OK to delete shadow copies?
Yes, it’s safe. This is because your system is working properly and there is no need to retain those specific snapshots that have been created.
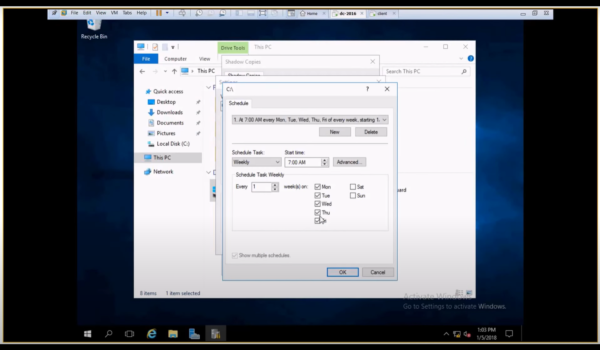
Are you worried about losing your important files and data in Windows 10? Fear not, as we have the perfect solution for you. In this guide, we will walk you through the process of configuring Shadow Copy in Windows 10, ensuring your data remains safe and easily recoverable. Whether you’re a tech novice or an experienced user, this step-by-step tutorial has got you covered.
Getting Started with Shadow Copy
Understanding Shadow Copy
Shadow Copy, also known as Volume Snapshot Service (VSS), is a built-in Windows feature that allows you to create snapshots or backups of your files and volumes. These snapshots capture your files at specific points in time, making it easy to recover previous versions or restore files that may have been accidentally deleted.
Checking Compatibility
Before we dive into configuring Shadow Copy, it’s essential to ensure your version of Windows 10 supports this feature. Typically, all Windows 10 editions come with Shadow Copy, so compatibility won’t be an issue.
Enabling Shadow Copy
To enable Shadow Copy, follow these steps:
- Step 1: Open Services
Press Win + R, type services.msc, and press Enter. This opens the Services window.
- Step 2: Locate Volume Shadow Copy
Scroll through the list of services and find “Volume Shadow Copy.” Double-click on it to open its properties.
- Step 3: Set Startup Type
In the Properties window, under the “General” tab, locate the “Startup type” dropdown menu. Choose “Automatic” and click “Apply.”
- Step 4: Start the Service
After setting the startup type, click the “Start” button to initiate the service. Click “OK” to save your changes.
Creating Shadow Copies
Scheduling Shadow Copies
Now that Shadow Copy is enabled, let’s set up scheduled snapshots:
- Step 1: Open Control Panel;
Press Win + X and select “Control Panel”.
- Step 2: Open File History;
In the Control Panel, search for “File History” and click on it.
- Step 3: Configure File History;
Click “Configure File History settings” on the left side of the window. Here, you can set the frequency and duration for your shadow copies.
Manually Creating Shadow Copies
Sometimes, you may want to create a shadow copy on-demand:
- Step 1: Open File Explorer;
Launch File Explorer by pressing Win + E.
- Step 2: Right-Click on a Folder or Drive;
Right-click on the folder or drive you want to create a shadow copy for.
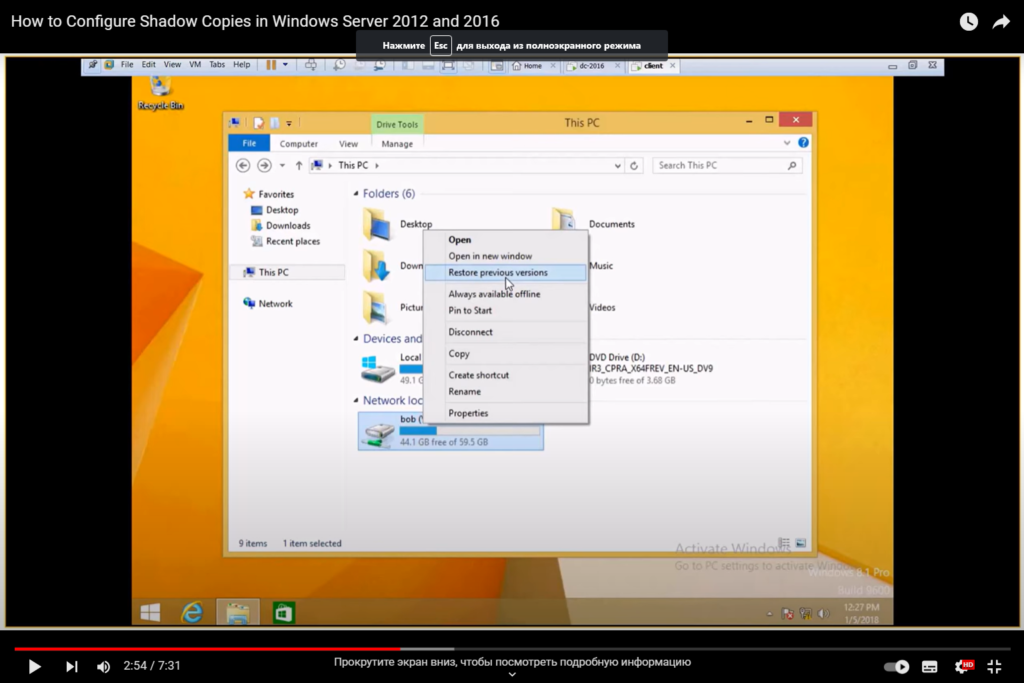
- Step 3: Access “Restore Previous Versions”;
From the context menu, select “Restore previous versions.” This will display a list of available shadow copies for that folder or drive.
- Step 4: Choose a Version to Restore;
Select the version you want to restore and click “Restore” to recover your files.
Shadow Copy Best Practices
Configuring Storage Space
Managing storage space for shadow copies is crucial to ensure efficient backup management. Here are some tips:
- Allocate an appropriate amount of disk space for shadow copies;
- Regularly monitor and adjust storage allocations based on your backup needs;
- Consider using an external drive or network storage for shadow copy storage to free up space on your system drive.
Backup Frequency
The frequency of shadow copies depends on your needs. Consider the following:
- Critical files may require more frequent snapshots;
- For less critical data, less frequent backups may suffice.
Conclusion
Configuring Shadow Copy in Windows 10 is a proactive step towards safeguarding your valuable data. With the ability to create snapshots and restore previous versions effortlessly, you’ll never have to worry about data loss again. Follow our comprehensive guide to ensure your data’s safety and enjoy peace of mind.
FAQs
What is the purpose of Shadow Copy in Windows 10?
Shadow Copy allows you to create backups or snapshots of your files and volumes, making it easy to recover previous versions or restore deleted files.
Is Shadow Copy available in all editions of Windows 10?
Yes, Shadow Copy is included in all editions of Windows 10, so you can configure it regardless of which version you have.
Can I schedule automatic shadow copies in Windows 10?
Absolutely! You can schedule regular snapshots of your files and volumes to ensure data protection.
What is the recommended storage space allocation for shadow copies?
The recommended storage space allocation depends on your backup needs. Allocate more space for critical data and adjust as necessary.
Can I use an external drive for storing shadow copies?
Yes, you can use an external drive or network storage for shadow copy storage, which can help free up space on your system drive.
Прочитано: 9 130
Порой сталкиваешься на рабочем месте, что к тебе как к системному администратору обращается пользователь с просьбой восстановить файл который он редактировал весь день, а потом вернулся к рабочему месту, но весь его труд утерян. Да, на его совести тот момент если он отошел от своего компьютера и не заблокировал вручную экран (приучаю нажимать сочетание клавиш: Win + L), а таймаут выставленный групповой политикой еще не активировался. Использовать такую отговорку, что можно восстановить файл(ы) только из вчерашнего бекапа — ну это не профессионализм. Вот в этом случае каждый системный администратор должен совершенствоваться и знать, что система Windows имеет такую важную настройку как использование «Теневых копий».
За основу функции/настройки теневого копирования отвечает служба теневого копирования (Volume Shadow Copies, VSS). Служба VSS применяется ко всему логическому диску и создаем снимок всех находящихся на нем файлов. После через запланированные промежутки времени отслеживает изменения и снова создает снимок.
Покажу на примере, как такая настройка «Теневые копии» включается и что она дает обычному пользователю.
Есть файловый сервер под управлением Windows Server 2016 Standard (на заметку: настройка «Теневые копии» работает и на Server 2008 R2,Server 2012/R2).
На заметку: логический диск с общими папками должен располагаться не на системном диске и не на диске с бекапами — это мое мнение.
На заметку: при использовании настройки «Теневые копии» следует под общие папки (файловый ресурс) заложить большой логический диск для хранения снимков. Если используется система виртуализации Hyper-V или ESXi то проблем с его расширением быть не должно и отрепетирована процедура его расширения.
На логическом диске D: создана папка с именем fileserver и настроена как общая с отключенным наследованием.
Запускаю оснастку «Управление компьютером»:
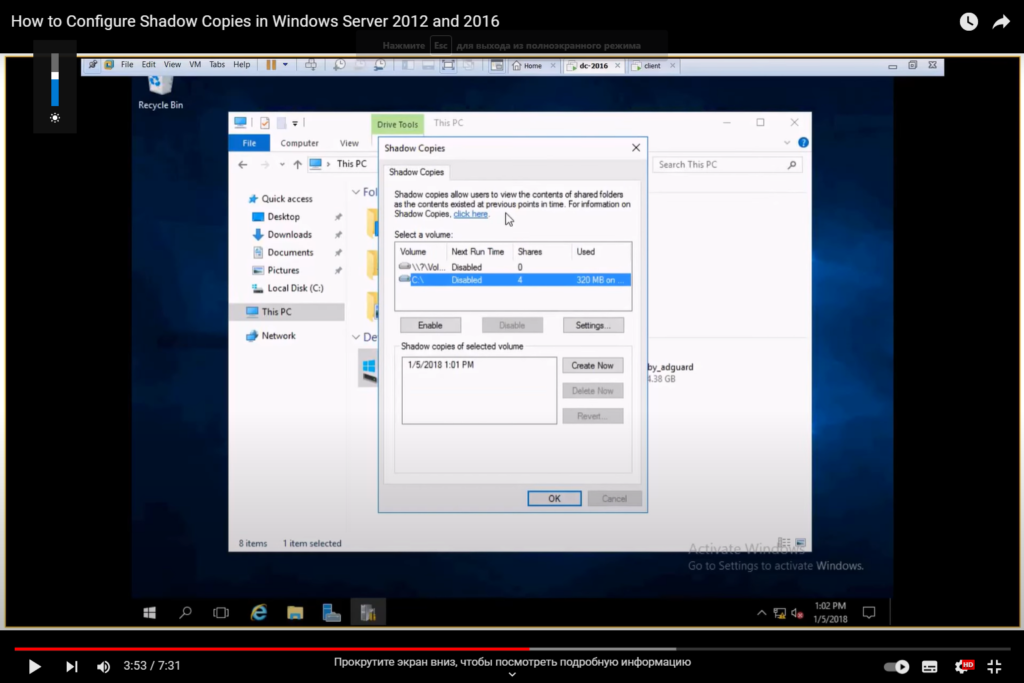
Win + R → control.exe — Просмотр: Категория — Мелкие значки — «Администрирование» – «Управление компьютером» – «Служебные программы» – и на «Общие папки» через правый клик мышью выбираю «Все задачи» – «Настроить теневые копии», выделяю том, в моем случае том D:\ и нажимаю «Настроить».
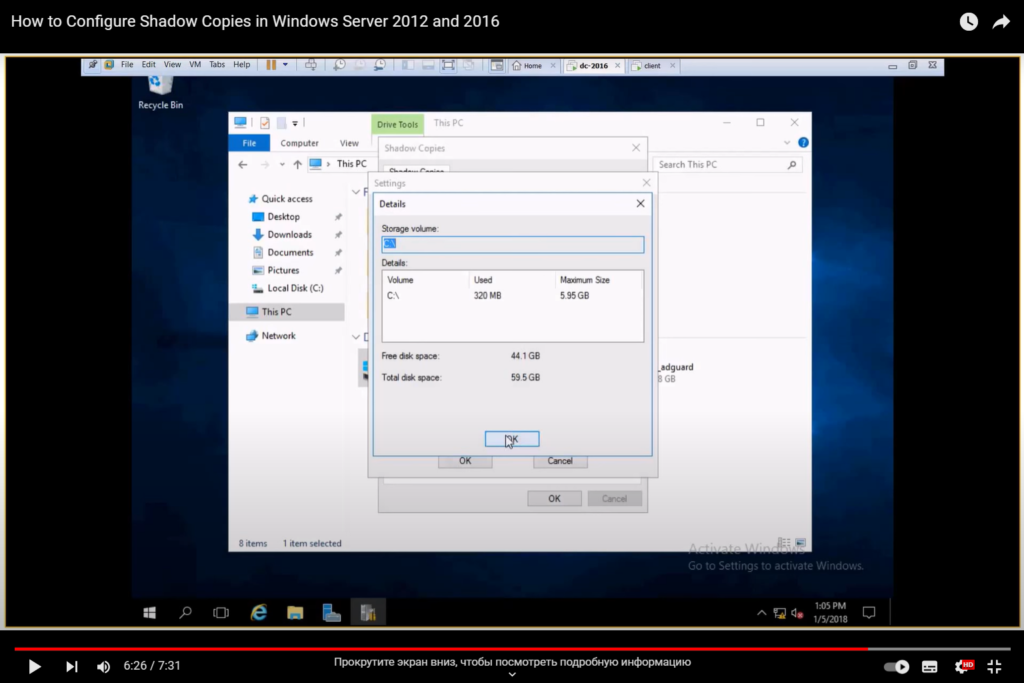
В данных настройках задается максимальный размер использования теневой копии, но не менее 300 МБ. По умолчанию хранилище теневых копий занимает 10 % от размера диска, а в снимках хранятся только изменения, а не сами изменившиеся файлы. Если места не достаточно, то при создании нового снимка старые снимки удаляют.
Как выбрать какой размер задать, прикинем, всего файлов под файловый ресурс 50 Gb, то я бы выбрал 50% от размера диска или: Максимальный размер: => не ограничен.
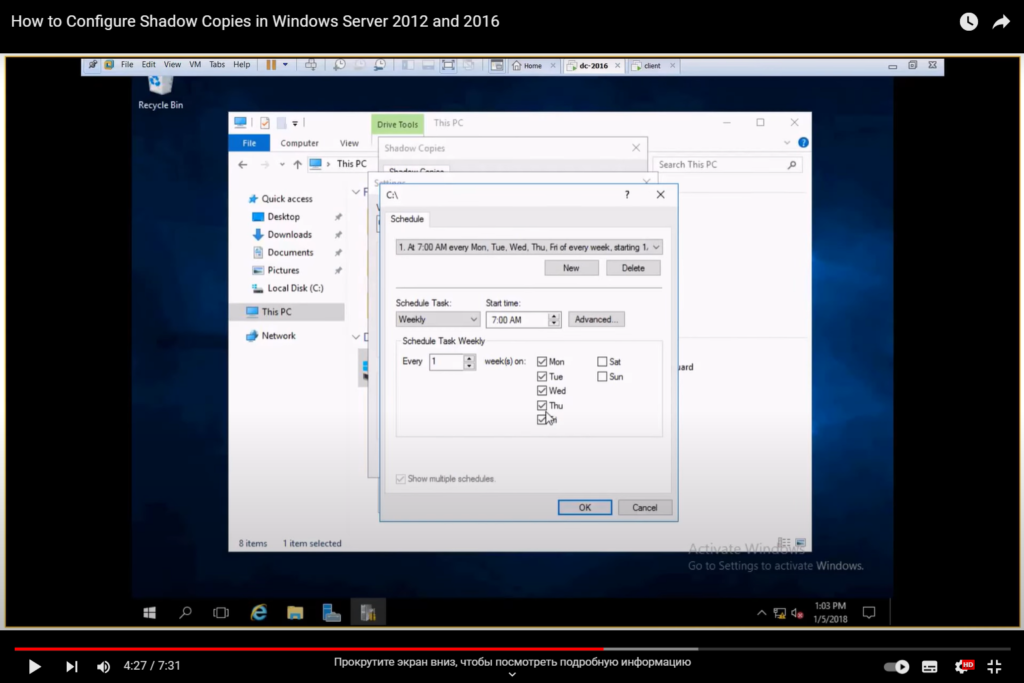
После нажимаю «Расписание» чтобы указать как часто будут делаться теневые копии. Если обратить внимание на рекомендацию, то не следует указывать создание одной теневой копии в час, вот только здесь уже каждый системный администратор должен все правильно взвесить как отразится потеря данных на продуктивной работе организации. Т.к. у меня жесткий диск под 2Tb, а данных всего 500Gb, то я делаю под себя следующее расписание:
Нажимаю «Дополнительно…»
- Дата начала: текущая дата
- Повторять задание: отмечаю галочкой
- Каждые: 2 часа
- Выполнять: в течение: 10 час
и получается расписание: Каждые 2 часа с 09.00 по 10 час начиная с текущей даты и каждый день.
В процессе эксплуатации я подкорректирую данное расписание.
и нажимаю кнопку Ok окна настройки расписания для тома D:\ – кнопку OK окна «Параметры» и выделив том D:\ нажимаю «Создать» тем самым создаю теневую копию текущего диска.
Из представленного выше скриншота видно, что текущий снимок занимаем целых 2.5G, так что об выделяемом размере под теневые копии каждый должен смотреть самостоятельно.
Также функцию теневые копии можно включить если перейти из оснастки «Управление компьютером» – «Запоминающие устройства» – «Управление дисками» – через правый клик по тому D: вызвать «Свойства» и перейдя во вкладку «Теневые копии».
Если сымитировать добавление файлов и последующее нажатие создания снимка можно будет видеть как изменяется размер и количество теневые копий в оснастке тома:
Итак копии имеются, объясняю пользователю что он может сделать сам на своем рабочем месте если что-то у него пропало.
Под Windows 10 Pro:
Шаг №1: Перейти на файловый ресурс
Шаг №2: По каталогу (или по файлу) внутри которого располагаются его файлы нажать на нем через правый клик мышью перейти на меню «Восстановить прежнюю версию» после чего на вкладку «Предыдущие версии».
Шаг №3: Тут он увидит сделанные снимки и открывая последний ориентируясь на дату и время будут открываться экраны с файлами/или файл за указанный временной промежуток при нажатии на кнопку «Открыть» или через правый клик мышью по нему «Изменить» ту версию где результаты его работы самые последние.
Шаг №4: После чтобы его восстановить нужно либо когда файл найден и открыт сделать «Файл» – «Сохранить как» и сохранить в ту директорию где он был затерев не актуальный или же нажать кнопку «Восстановить» и воспользоваться мастером восстановления:
Нажимаю «Восстановить» и получаю сообщение «Файл был успешно переведен в предыдущее состояние».
Шаг №5: Пользователь возвращается к редактированию на том месте файл(ы) которого были восстановлены.
Шаг №6: После этого момента пользователь становится чуть счастливее от того что теперь он сам может это делать и ему не надо писать заявку на helpdesk или подходить к Вам лично.
На заметку: Не советую включать теневые копии на системном диске, т. к. обновления, логирование и многое другое будет все заполоняется никому не нужными снимками и расходуемым местом. Возьмите за правило, один логический диск под систему, другой под данные.
На заметку: если выключить «Теневое копирование тома» в свойства диска, то все снимки будут удалены, а файлы будут оставлены как есть.
На заметку: Теневые копии — это не то же самое что и резервная копия, так что не советую полностью на них надеяться, ведь это всего лишь дельта изменения от первого и последующих снимков, а бекап — это наше все.
Итого, я для себя оформил те моменты с которыми сталкиваешься когда задействуешь «Теневые копии» для тома и что пользователь может сам сделать в случае проблемы с потерей файла(ов).
На этом я прощаюсь, если что будет интересного я дополню данную заметку, а пока собственно и всё, с уважением автор блога Олло Александр aka ekzorchik.
Shadow copies are a practical solution for quickly recovering previous versions of files without significant downtime. They are particularly beneficial in enterprise IT environments, where data integrity and availability are crucial, and downtime for backups can be disruptive.
Windows Shadow Copy is a simple tool you can use to set up, manage, and configure your shadow copies using Volume Shadow Copy Service (VSS). This blog explains how to use this feature, manage your storage space, and execute advanced configurations.
Shadow copies and terminology explained
Let’s look at some of the basic terminology and concepts you’ll want to understand before jumping into Windows Shadow Copy.
What is a shadow copy?
A shadow copy is a snapshot of your data at a specific moment in time. Imagine you’re working on a document and you want to revert to a version from two hours ago because of a mistake or a change in direction. Creating a shadow copy enables you to do that without losing any work. It’s a safety net that captures and preserves the state of your files at various points so you can access previous versions easily.
What is the difference between shadow copy and backup?
While both shadow copies and backups aim to protect your data, they operate differently. A backup is a comprehensive archive of your data stored in a separate location, which can be used for recovery in case of significant data loss.
Shadow copies, on the other hand, allow for quick recovery of files to earlier versions without the need to restore from a backup. Essentially, backups are your long-term safety net, while shadow copies provide short-term, convenient snapshots.
What is VSS?
Volume Shadow Copy Service (VSS) is a technology that Windows uses to create shadow copies. It’s what allows your system to take these snapshots of your files or even entire volumes of data without interrupting your work. VSS is especially useful in environments where your files are constantly being accessed and changed, as it ensures that backups can be performed without closing files or taking systems offline.
Setting up Windows Shadow Copy
Windows Shadow Copy is a feature included in the Microsoft Windows operating system that allows you to easily create shadow copies even while your files are in use — enabling quick rollbacks to earlier states without the downtime associated with traditional backups. The service monitors changes to files on a volume and automatically creates copies of these files in a shadow copy storage area.
There are a few steps you must follow to enable shadow copies and get Windows Shadow Copy up and running on your device:
- Right-click on ”This PC” on your desktop or in File Explorer, then select ”Properties.”
- Click on ”System protection” on the left sidebar.
- In the “System Properties” window, under the “System Protection” tab, you’ll see a list of drives. Select the drive where Windows is installed (usually C:) and click “Configure.”
- In the next window, select ”Turn on system protection.”
- Adjust the “Max Usage” slider to allocate disk space for shadow copies.
- Click ”Apply” then ”OK.”
You’ve now enabled Shadow Copy, setting up a crucial safeguard for your data.
Disabling Shadow Copy in Windows
If you need to turn off Shadow Copy, perhaps to free up disk space temporarily, follow these steps:
- Right-click on ”This PC”, choose ”Properties”, then “System protection.”
- Select the ‘System Protection’ tab, choose your Windows drive and click “Configure.”
- Select ”Disable system protection.”
- Click ”Apply” and then “OK.”
Remember, this action stops the creation of new shadow copies and might delete existing ones, so use it judiciously.
Managing Windows Shadow Copy storage space
Given the convenience of shadow copies, it’s easy to overlook the disk space they consume. Over time, as snapshots accumulate, they can significantly eat into your storage capacity, which might be a concern, especially on drives with limited space.
Here’s how to manage it without compromising overall system performance:
- Right-click “This PC,” select “Properties” then “System protection”.
- Under the “System Protection” tab, choose your drive and click “Configure.”
- Use the slider under “Max Usage” to set a limit on the space shadow copies can use.
- After adjusting, click “Apply” and “OK”.
Advanced Windows Shadow Copy options
Beyond the basics, Windows Shadow Copy offers a suite of advanced options for those needing finer control over how snapshots are managed. Here’s how to access and adjust them:
Adjusting advanced options via Group Policy Editor
- Press Windows + R, type gpedit.msc, and press “Enter.”
- Navigate to Computer Configuration > Administrative Templates > System > System Restore.
- Adjust settings like the creation frequency and storage locations of shadow copies.
- Make your changes, then apply them.
Adjusting advanced options via Command Line tools
- Open Command Prompt as an administrator.
- Use vssadmin to adjust shadow copy settings directly.
- For example, vssadmin list shadows shows existing shadow copies, while vssadmin resize shadowstorage can change storage allocation.
Advanced configurations and troubleshooting
Even with a well-configured Shadow Copy setup, issues can arise. For troubleshooting or further customizations, these steps can help:
Use Event Viewer
The Event Viewer provides logs that can help identify and resolve issues with Shadow Copy, offering insights into failed snapshot attempts and other anomalies.
- Press Windows + R, type eventvwr.msc and press “Enter.”
- Look under Windows Logs > Application for VSS or System Restore-related messages that can guide troubleshooting.
Leverage vssadmin for diagnostics
This tool can diagnose problems, offering commands to list, create and delete snapshots, giving you hands-on control over troubleshooting processes.
- Open Command Prompt as an administrator.
- Commands like vssadmin list writers and vssadmin list providers can help identify and solve issues with shadow copies.
Restoring data from a Windows shadow copy
Restoring your data using Windows Shadow Copy is straightforward and allows you to retrieve previous versions of files or folders directly from within Windows. Here’s how you can do it:
- Navigate to the file or folder where you want to restore a previous version.
- Right-click on the file or folder and select “Properties” from the context menu. This will open the Properties dialog for the selected item.
- In the Properties dialog, look for a tab labeled “Previous Versions.” Click on this tab to view a list of available shadow copies and previous versions of the file or folder.
- The “Previous Versions” tab will display a list of available versions, along with the dates and times they were created.
- Browse through this list and identify the version you wish to restore. If you’re not sure which version is the right one, you can select a version and click “Open” to view its contents without affecting your current version.
Once you’ve identified the correct version, you have a couple of options:
Restore: To replace the current version of the file or folder with the selected previous version, click “Restore.” Be cautious with this option, as it will overwrite the current version.
Copy: If you prefer not to overwrite the current version, you can click “Copy” to copy the selected version to another location on your system. You can then access both versions of the file or folder.
After selecting “Restore” or “Copy,” follow any additional prompts to complete the process. If you restored the item, check to ensure that the previous version now exists where the current version used to be. If you chose to copy your previous version, navigate to the location where you saved the copy to access it.
[in-context
Monitoring shadow copies
Did you know you can create automated alerts that will monitor your shadow copies or Volume Shadow Copy Service (VSS)? This can help you mitigate the potential risks associated with insufficient backup points. Just follow this PowerShell script to learn how.
- Can you create a shadow copy manually?
Windows automatically creates shadow copies based on your system configurations. Meanwhile, it’s also possible to trigger the creation of shadow copy manually using the vssadmin command-line tool. However, this may require advanced technical knowledge to perform, so caution is needed.
- How to delete old shadow copies to free up disk space?
There are tools that you can use to delete old shadow copies, such as the Disk Cleanup tool and the vssadmin command-line tool. However, be cautious when deleting shadow copies, as you may lose the ability to restore previous versions of your files.
- Can shadow copies recover deleted files?
While shadow copies can help restore previous versions of existing files, they typically don’t capture deleted files. You may need to use data recovery software or explore other methods to recover deleted files. In some cases, you may be able to use shadow copies to recover data from a failed hard drive, but it’s not guaranteed. You may need specialized data recovery services if the hard drive is physically damaged.
- What is the impact of shadow copies on system performance?
Creating and storing shadow copies can consume minimal system resources, especially disk space and CPU cycles. To minimize any performance impact, you can adjust the shadow copy storage settings to limit the amount of disk space used.
- Is it safe to delete shadow copies?
Yes, it is safe to delete shadow copies if you no longer need them. Deleting shadow copies will free up disk space but also remove the ability to restore previous versions of files from those copies. However, as a precaution, always utilize an efficient backup and restore platform.
