
Skip to main content
Microsoft
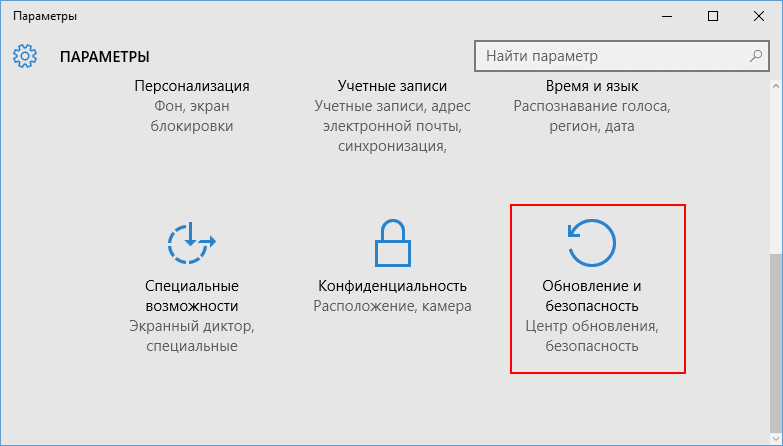
Что такое Universal Windows Platform
Последнее обновление: 12.04.2017
UWP (Universal Windows Platform) представляет собой унифицированную платформу для создания и запуска приложений в Windows 10 и Windows 10 Mobile.
UWP стала результатом эволюции более ранних технологий. Так, с выходом Windows 8 была внедрена новая архитектурная платформа для приложений — Windows Runtime (WinRT), которая позволяла запускать приложения в так называемом режиме Modern (Metro) на десктопах, планшетах.
Затем с выходом Windows 8.1 и Windows Phone 8.1 эта технология получила развитие — появились «универсальные приложения», которые можно было запускать сразу Windows 8.1 и WP8.1.
И в июле 2015 года официально вышла новая ОС Windows 10. Она использует платформу UWP, которая представляет собой развитие Windows Runtime.
Как подсказывает название платформы, она является универсальной — универсальной для всех устройств экосистемы Windows 10. А это обычные дестопы, планшеты,
мобильные устройства, устройства IoT (интернет вещей), Xbox, устройства Surface Hub. И приложение UWP может одинаково работать на всех этих платформах, если на них установлена Windows 10.
Почему UWP?
Программирование под UWP несет ряд преимуществ:
-
Широта распространения. На текущий момент (апрель 2017) Windows 10 установлена уже более чем на 400 миллионах устройств.
На десктопах Windows 10 уже опередила Windows 8/8.1. -
Поддержка широкого круга устройств. Десктопы, планшеты, смартфоны, большие планшеты Surface Hub, различные IoT-устройства, в перспективе устройства виртуальной реальности
HoloLens — круг устрйоств, на которых может работать Windows 10 действительно широк. -
Поддержка разных языков и технологий программирования. UWP-приложения можно создавать с помощью таких языков, как
Visual C++, C#, Visual Basic, JavaScript. В качестве технологии для создания графического интерфейса Visual C++, C# и Visual Basic используют XAML,
JavaScript применяет HTML. Кроме того, С++ может вместо XAML использовать DirectX. То есть достаточно распространенные и и знакомые многим технологии. -
Магазин приложений и удобство распространения. Windows Store представляет собой прекрасное место для распространения
UWP-приложений, как платных, так и бесплатных. Сами возможности платформы и магазина Windows Store позволяют использовать разные способы монетизации.
Например, можно интегрировать в приложения блоки для показа рекламы через различные SDK. Можно распространять за определенную плату, причем оплату можно гибко настраивать.
При необходимости можно встроить предоставление ознакомительной версии, после использования которой пользователь может решить, покупать приложение или нет.
И также можно монетизировать по модели freemium, при которой приложение условно бесплатное, а отдельные услуги внутри приложения предоставляются за определенную плату.
Причем все эти возможности монетизации обесечиваются встроенными инструментами SDK. -
Богатые возможности платформы. UWP многое наследует от Windows Runtime из Windows 8.1 и в то же время предоставляет много новых функцональностей, как,
более богатые возможности по интеграции с облаком, использование Cortana, системы уведомлений в Win10 и многое другое.
Что необходимо для разработки под UWP
Для программирования под UWP необходима ОС Windows 10. Все другие операционные системы, как Windows 8.1/8/7, не говоря уже о Windows XP, не подходят!
Также потребуется среда разработки Visual Studio 2017 Community. Это полнофункциональная бесплатная среда разработки, которую можно загрузить с официального сайта
по адресу https://www.visualstudio.com/downloads/download-visual-studio-vs.
Также можно использовать версию VS 2015, а все остальные предыдущие версии Visual Studio — 2013, 2012, 2010 и т.д. с UWP не работают.
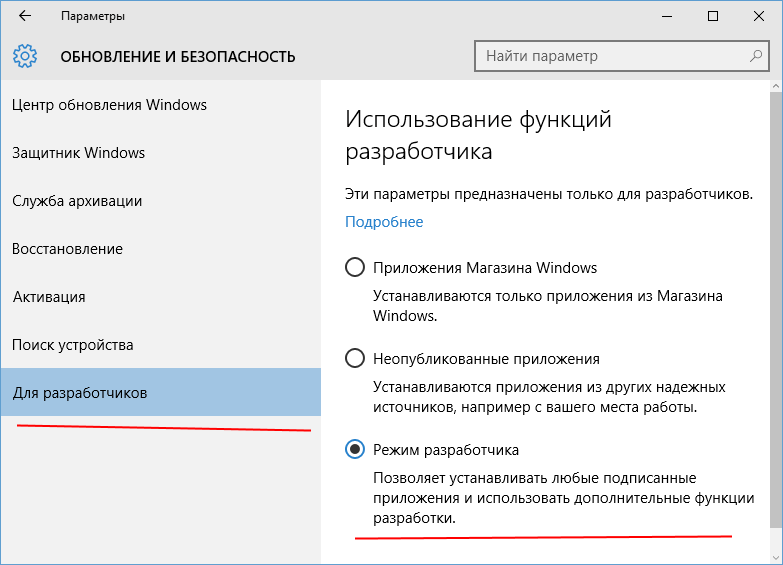
При установке Visual Studio 2017 в программе установщика необходимо отметить соответствующий пункт:

Перед чем как начать создание приложений, убедитесь, что в центре обновления в Windows 10 установлена соответствующая опция для разработчиков:
И имея Windows 10 и установленную Visual Studio 2017, можно приступать к разработке приложений.
July 22, 2023
1 min read
views 5700
Arthur C. Codex
chats: 3
Engineering
.Net
The Universal Windows Platform (UWP) allows you to build apps for any Windows device—PCs, Xbox One, HoloLens, and more. In this tutorial, we will guide you step-by-step on creating a UWP app using .NET and C#. If you need additional help or prefer to hire .NET remote developers, feel free to explore the link.

Prerequisites:
- Windows 10
- Visual Studio 2019 or later with the ‘Universal Windows Platform development’ workload installed
Step 1: Create a new project
Open Visual Studio and select ‘Create a new project’. In the ‘Create a new project’ dialog box, select ‘Blank App (Universal Windows)’ and then select ‘Next’.
Step 2: Configure your project
Provide a name for the project, choose a location, and then select ‘Create’. In the ‘New Universal Windows Platform Project’ dialog, ensure that the ‘Target Version’ and ‘Minimum Version’ are both set to ‘Windows 10, version 1903’ or later, and then select ‘Create’.
Step 3: Review the project files
Visual Studio creates a UWP project that’s set up using default configurations. The ‘Solution Explorer’ pane lists the files Visual Studio created.
Step 4: Run the app
To run the app, select ‘Start Debugging’ or press F5. Congratulations, you’ve just run your first UWP app!
Step 5: Add code to the app
Let’s add code to display «Hello, World!» on the screen.
  TextBlock textBlock = new TextBlock();
  textBlock.Text = "Hello, world!";
  MainPage = new MainPage();
  MainPage.Content = textBlock;
That’s it! You’ve created your first UWP application. You can now start building your application, adding more features, and tailoring it to your needs.
Conclusion
Creating a UWP app can be simple with the right tools and knowledge. I hope this tutorial has been helpful. Remember, if you need to hire .NET remote developers, Reintech is there to help.
Universal Windows Platform App Development Using Visual Studio 2017
Microsoft launched Visual Studio 2017 last week. Today, in this article, I am going to talk about how to download Visual Studio 2017, how to install VS17, how to create new Universal Windows Platform (UWP) app using Visual Studio 2017; and will also talk about some basic features of Visual Studio, app deployment, Universal Windows Emulator and some common controls of UWP apps, available on Visual Studio 2017.
You can download Visual Studio 2017 from here.
For this article, I am using Visual Studio 2017 Professional Version.
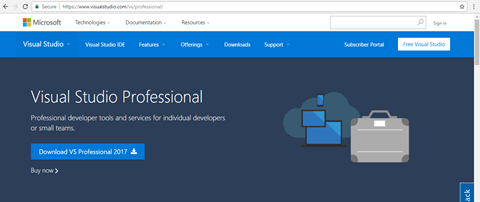
Figure 1: Visual Studio 2017 Professional version download page
Download and save web installer of Visual Studio 2017. If you download VS 2017 now, you can claim for a 60-day free trial license of Xamarin University.
Figure 2: Xamarin University trial license offer
Once you download and click on the web installer, you will see the VS privacy settings page like below.
Figure 3: Visual Studio installation file loading
Click «Continue» on the above page to start the installation process of VS 2017.
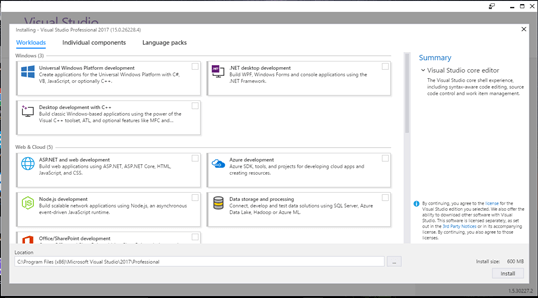
Figure 4: Visual Studio 2017 installation process
No Visual Studio installation process will start. You need to select from the Workloads the one you want to install.
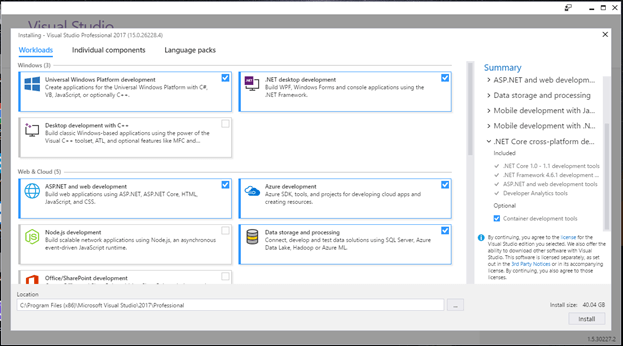
Figure 5: Visual Studio 2017 installation process
Here, for UWP app development, I have selected Universal Windows Platform development from the Windows workload.
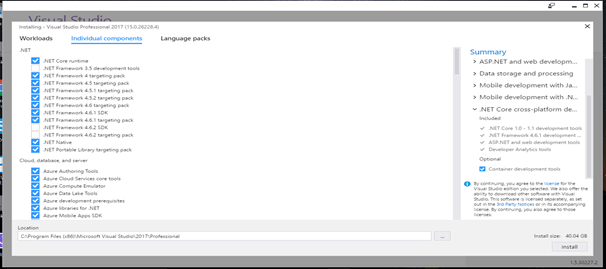
Figure 6: Visual Studio 2017 individual component selection
Here, I have added a few more components. My installation is almost full installation of VS17 with all the features, that’s why the size is bigger — more than 46 GB.
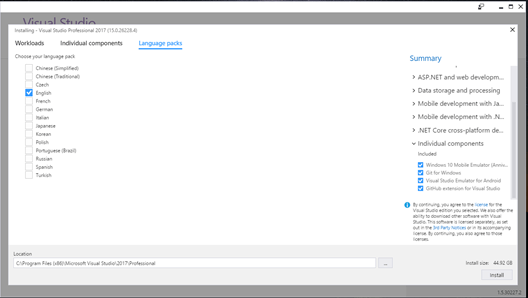
Figure 7: Visual Studio 2017 language packs selection
You can select your own language from the language packs selection option. Once you click on the «Install» button, the installation will begin.
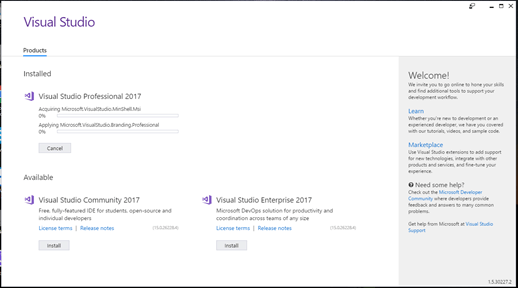
Figure 8: Visual Studio installation
As the installation begins, you can see the above screen.
Figure 9: Starting Visual Studio
Once the installation is done, you need to restart your computer and launch Visual Studio. For the first time, the above screen will show. It will take a few minutes to launch Visual Studio for the first time.
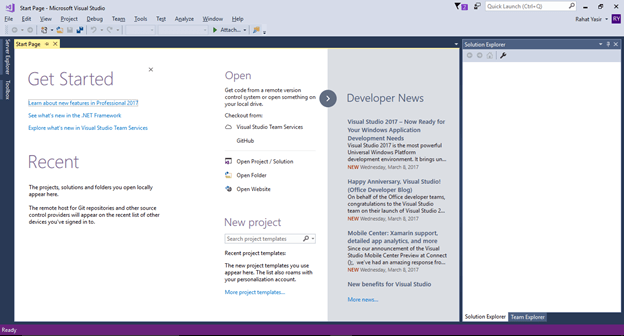
Figure 10: Initial page of Visual Studio 2017
The above screen is the initial page of Visual Studio 2017. If developer mode is off, then the below screen will appear on your pc and prompt you to toggle the developer mode ON.
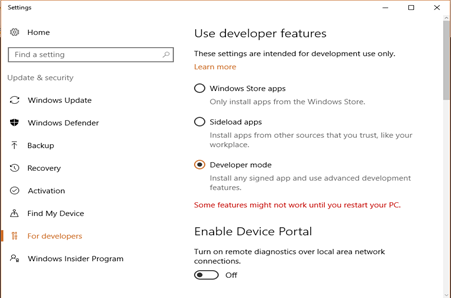
Figure 11: Settings page to on Developer mode
Once you turn on the developer mode, now you can use visual studio 2017 to develop the UWP app.
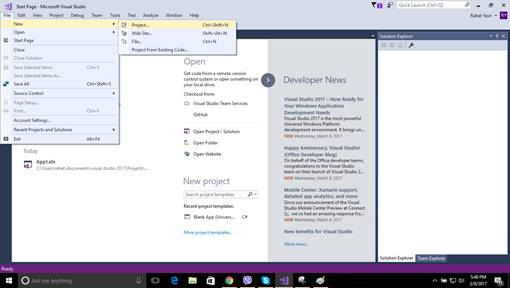
Figure 12: Visual Studio 2017 to create new project
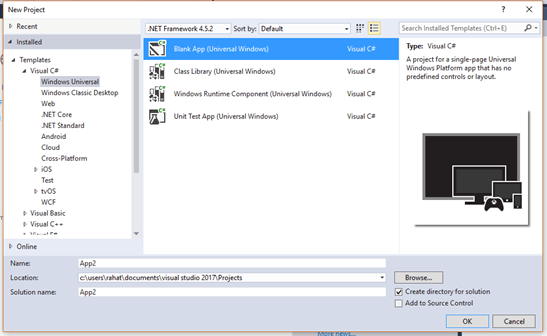
Figure 13: VS 17 project template for UWP
Now, you need to select your project type. Here, I have selected a Blank App – Universal Windows. You need to select the target version and minimum supported version now.
I have selected Windows 10 Anniversary Edition as a target version and Windows 10 as the minimum version.
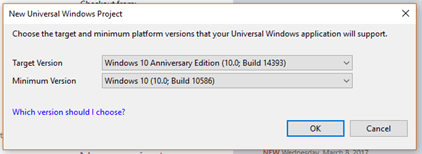
Figure 14: Target and minimum version selection
A new Universal Windows Platform project is created, and now, you can develop the UWP app in Visual Studio 2017.
Now, click on the mainpage.xaml from Solution Explorer to see the designer section on VS17.
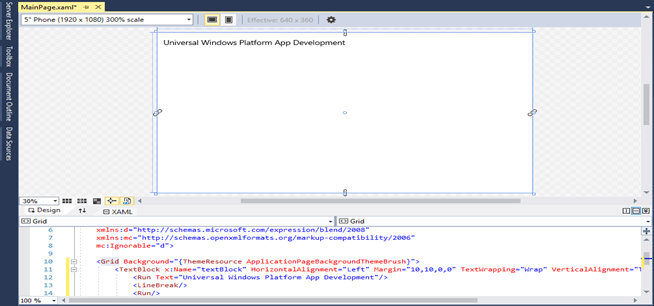
Figure 14: Designer Section
From the toolbox, drag and drop text block control in the designer section and modify the text to “Universal Windows Platform App Development”. Your design should look like the above figure.
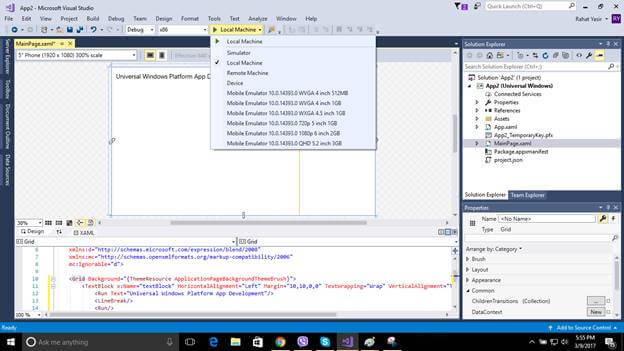
Figure 15: Running Universal Windows app on VS17
There are a lot of options for us to run our UWP app. We can run our app on,
- Local machine
- Remote machine
- Device
- And different Windows phone mobile emulators
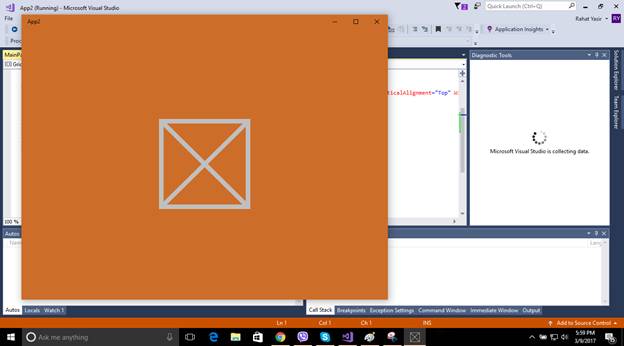
Figure 16: Splash screen after running the Universal Windows app
You can select any option from figure 15 to run the app. Here, I have selected a local machine to run my first app. At first, it will take some time to run the app. It will build the app first and then run.
Figure 17: Universal Windows Platform app on a local machine
In the running app, we can see a black bar at the top. This bar is to see UI layout properly and its contents. We can see display layout adcorners and positions of each controls on the app.
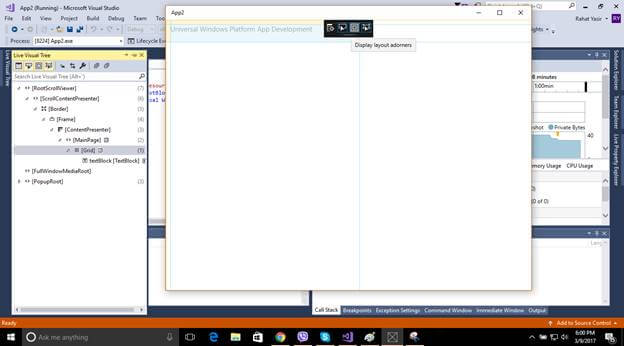
Figure 18: Display layout adcorners on local machine simulator
Now, close the local machine simulator and you will notice Live Visual Tree from the left section of Visual Studio 2017. You can see the hierarchy of the UI on the Live Visual Tree section.
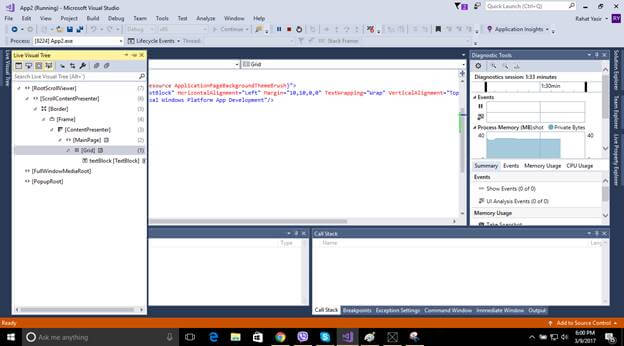
Figure 19: Live Visual Tree of Visual Studio 2017
You can run the app on the Windows Phone emulator as well. Here, I have selected a Windows phone emulator with 2 GB RAM. It will take some time to load the emulator and run it. Once you run the app, it will look like this.
Figure 20: UWP app on Windows Phone emulator
Now, we will work with different controls of the Universal Windows Platform.
HyperlinkButton
Now, we’ll work with another Button like control called “HeyperLinkButton”. It’s used to link a URL or some other things you like.
To do that, you can see Toolbox on the left side of Visual Studio and you can find it in the “All XAML Controls” section. Click on this control and drag it to your design. Like this,
Figure 21
Now, to make sure it works, we need another TextBlock control. To do so, drag it from the Toolbox and put it below the Hyperlink button. The designing code is given below.
- <HyperlinkButton x:Name=«HyperlinkButton_1»
- Content=«HyperlinkButton»
- HorizontalAlignment=«Left»
- VerticalAlignment=«Top»
- Margin=«10,10,0,0»
- Click=«HyperlinkButton_1_Click»
- Grid.Column=«0»
- Grid.Row=«0»
- Width=«114»
- Height=«50»/>
- <TextBlock x:Name=«HB_TextBlock»
- HorizontalAlignment=«Left»
- VerticalAlignment=«Top»
- TextWrapping=«Wrap»
- Height=«50»
- Width=«124»
- FontSize=«24»
- Grid.Column=«1»
- Grid.Row=«0»
- Margin=«10»/>
Listing: 1
Here, in HyperlinkButton, we have an event controller named HyperlinkButton_1_Click. It creates a code block that will handle the background task when you will click on the hyperlink button and we will be shown a confirmation message in the TextBlock named HB_TextBlock.
Making Grid
We have made some Grids in our main Grid to arrange the controls in these Grids, like Grid 1, 2 and so on. You can make Grids wherever you want and customize the Grid as your need.
- <Grid Background=«{ThemeResource ApplicationPageBackgroundThemeBrush}»>
- <Grid.RowDefinitions>
- <RowDefinition Height=«70*»/>
- <RowDefinition Height=«80*»/>
- <RowDefinition Height=«68*»/>
- <RowDefinition Height=«93*»/>
- <RowDefinition Height=«145*»/>
- <RowDefinition Height=«124*»/>
- <RowDefinition Height=«60*»/>
- </Grid.RowDefinitions>
- <Grid.ColumnDefinitions>
- <ColumnDefinition Width=«60*»/>
- <ColumnDefinition Width=«40*»/>
- </Grid.ColumnDefinitions>
- </Grid>
Listing: 2
Now, the main Grid will look like this.
Figure 22
You can define Row Definitions, a number of rows along with their width and Column Definitions according to their width. We have seven rows and two columns here.
Now, open MainPage.xaml.cs and put the code below the constructor.
- private void HyperlinkButton_1_Click(object sender, RoutedEventArgs e)
- {
- HB_TextBlock.Text = «OK»;
- }
Listing 2
Now, run the application and it will look like the picture below once you click on the hyperlink button.
Figure 23
Working with RadioButton
Well if you can do that, then you are on move. Now, we take another control name RadioButton, and drag it from TextBlock and put it in another Grid and also a TextBlock in Row 1. The customized code will look like this, or you can simply drag a control and test separately; it’s up to you. I suggest you to do as I did.
So, our design will look like this.
Figure 24
and the designing code is below.
- <RadioButton x:Name=«RadioButton_1»
- Content=«RadioButton»
- HorizontalAlignment=«Left»
- Margin=«10,4,0,0»
- Grid.Row=«1»
- Grid.Column=«0»
- VerticalAlignment=«Top»
- Checked=«RadioButton_1_Checked» Height=«66» Width=«114»/>
- <TextBlock x:Name=«RB_TextBlock»
- HorizontalAlignment=«Left»
- VerticalAlignment=«Top»
- Margin=«10,10,0,0»
- TextWrapping=«Wrap»
- Height=«60»
- Width=«124»
- FontSize=«24»
- Grid.Column=«1»
- Grid.Row=«1»/>
Listing 3
Here, like HyperlinkButton, in our RadioButton, we have also an event handler named RadioButton_1_Checked, and in our event handler, we will show the confirmation message whether checked or unchecked.
- private void RadioButton_1_Checked(object sender, RoutedEventArgs e)
- {
- if (RadioButton_1.IsChecked == true)
- {
- RB_TextBlock.Text = «Checked»;
- }
- else
- {
- RB_TextBlock.Text = «Not checked»;
- }
- }
Listing 4
Here, we’re checking whether our RadioButton is checked or not. If it’s checked (true), the TextBlock will show “Checked”; and if it’s unchecked (false), the TextBox will show “Not checked”.
After you run your application, it’ll look exactly like this.
Figure 25
Working with TextBlock
Another control we rapidly use in our every application is TextBlock. We’ve used it in our previous controls also. We will show static data in our TextBlocke.x., “Hello world”.
The design will look like this.
Figure 26
Designing code is below.
- <TextBlock Text=«Hello world»
- HorizontalAlignment=«Left»
- Margin=«10,10,0,0»
- Grid.Row=«2»
- TextWrapping=«Wrap»
- VerticalAlignment=«Top»
- Height=«40»
- Width=«380»
- FontSize=«24» Grid.ColumnSpan=«2»/>
Listing 5
We don’t need any Button or event handler in this case, cause the text is given statically in the design (Text=”Hello world”).
After you run your application, it’ll look exactly like this.
Figure 27
Working with ToggleSwitch
Another control we’ll talk about is ToggleSwitch. It’s really a beautiful control that will make your application cooler than before. I think you know, how to use control now, we have done it before. So, just take this control and take another TextBlock, and the design will look like this.
Figure 28
The designing code is below,
- <ToggleSwitch x:Name=«ToggleSwitch_1»
- Header=«ToggleSwitch»
- Margin=«10,10,0,0»
- Grid.Row=«3»
- VerticalAlignment=«Top»
- Toggled=«ToggleSwitch_1_Toggled»
- Width=«196»
- Height=«73»/>
- <TextBlock x:Name=«TS_TextBlock»
- HorizontalAlignment=«Left»
- VerticalAlignment=«Top»
- Margin=«10,10,0,0»
- TextWrapping=«Wrap»
- Height=«73»
- Width=«124»
- FontSize=«24»
- Grid.Column=«1»
- Grid.Row=«3»/>
Listing 6
We have an event handler here, so the C# code is given below.
- private void ToggleSwitch_1_Toggled(object sender, RoutedEventArgs e)
- {
- if (ToggleSwitch_1.IsOn == true)
- {
- TS_TextBlock.Text = «This is On»;
- }
- else
- {
- TS_TextBlock.Text = «This is Off»;
- }
- }
Listing 7
We did the same logic here as the RadioButton.
After you run your application, it’ll look exactly like this.
Figure 29
Working with ListBox
Our fifth control will be ListBox, its data binding control. It’s an important control which has some complicated structure. So let’s see how we can use it in our application.
Like other controls drag it from Toolbox and put in the Grid. Here, we need a Button and TextBlock controls.
The design will look like this,
Figure 30
The designing code is given below,
- <ListBox x:Name=«ListBox_1»
- HorizontalAlignment=«Left»
- Height=«120»
- Margin=«10,10,0,0»
- Grid.Row=«4»
- VerticalAlignment=«Top»
- Width=«196»
- ScrollViewer.VerticalScrollBarVisibility=«Visible»>
- <ListBoxItem Content=«January»/>
- <ListBoxItem Content=«February»/>
- <ListBoxItem Content=«March»/>
- <ListBoxItem Content=«April»/>
- <ListBoxItem Content=«May»/>
- <ListBoxItem Content=«June»/>
- <ListBoxItem Content=«July»/>
- <ListBoxItem Content=«August»/>
- <ListBoxItem Content=«September»/>
- <ListBoxItem Content=«October»/>
- <ListBoxItem Content=«November»/>
- <ListBoxItem Content=«December»/>
- </ListBox>
- <Button Content=«Ok»
- x:Name=«Ok»
- Grid.Column=«1»
- HorizontalAlignment=«Left»
- Margin=«10,10,0,0»
- Grid.Row=«4»
- VerticalAlignment=«Top»
- Width=«110»
- Click=«Ok_Click»/>
- <TextBlock x:Name=«LB_TextBlock»
- HorizontalAlignment=«Left»
- VerticalAlignment=«Top»
- Margin=«10,53,0,0»
- TextWrapping=«Wrap»
- Height=«82»
- Width=«124»
- FontSize=«24»
- Grid.Column=«1»
- Grid.Row=«4»/>
Listing 8
Here, we have an event handler named “Ok_Click”, and we have binded some month’s name inside the ListBox’s starting and closing tags. TextBlock’s name is LB_TextBlock.
So, the C# code will look like this.
- private void Ok_Click(object sender, RoutedEventArgs e) {
- string[] month = {
- «January»,
- «February»,
- «March»,
- «April»,
- «May»,
- «June»,
- «July»,
- «August»,
- «September»,
- «October»,
- «November»,
- «December»
- };
- if (ListBox_1.SelectedValue != null) {
- LB_TextBlock.Text = month[ListBox_1.SelectedIndex];
- } else {
- LB_TextBlock.Text = «Select a item from list.»;
- }
- }
Listing 9
Here, we have created a string Array named month, and the array index’s values are the month’s name. In If decision statement, first we’re checking if the ListBlock is selected or not, if an item is selected we’re matching the SelectedIndex’s value with our array Index’s value, and if no item’s selected then an alert message will be shown in the TextBlock.
If we run the application, it will look exactly like this,
Figure 31
Working with ComboBox
Now, we’ll talk about a similar control and it’s really more awesome than ListBox; it works exactly the same as ListBox, but it depends on your application which will be more appropriate in case of your needs. It’s called a ComboBox. Take it from ToolBox or you can just write XAML on your own, like or something like that. So, the design will look like this,
Figure 32
The designing code is given below,
- <ComboBox x:Name=«ComboBox_1»
- HorizontalAlignment=«Left»
- Margin=«10,0.167,0,0»
- Grid.Row=«5»
- VerticalAlignment=«Top»
- Width=«220»>
- <ComboBoxItem Content=«January»/>
- <ComboBoxItem Content=«February»/>
- <ComboBoxItem Content=«March»/>
- <ComboBoxItem Content=«April»/>
- <ComboBoxItem Content=«May»/>
- <ComboBoxItem Content=«June»/>
- <ComboBoxItem Content=«July»/>
- <ComboBoxItem Content=«August»/>
- <ComboBoxItem Content=«September»/>
- <ComboBoxItem Content=«October»/>
- <ComboBoxItem Content=«November»/>
- <ComboBoxItem Content=«December»/>
- </ComboBox>
- <TextBlock x:Name=«CB_TextBlock»
- HorizontalAlignment=«Left»
- VerticalAlignment=«Top»
- Margin=«10,65.167,0,0»
- TextWrapping=«Wrap»
- Height=«40»
- Width=«380»
- FontSize=«24»
- Grid.Row=«5» Grid.ColumnSpan=«2»/>
Listing 10
And the C# code is here.
- private void Ok_1_Click(object sender, RoutedEventArgs e) {
- string[] month = {
- «January»,
- «February»,
- «March»,
- «April»,
- «May»,
- «June»,
- «July»,
- «August»,
- «September»,
- «October»,
- «November»,
- «December»
- };
- if (ComboBox_1.SelectedValue != null) {
- CB_TextBlock.Text = month[ComboBox_1.SelectedIndex];
- } else {
- CB_TextBlock.Text = «Select a item from list.»;
- }
- }
Listing 11
If we run the application, it’ll look exactly like this.
Figure 33
Adding a User Control
And lastly, we’ll talk about Popup Box with a Button control, and it will show some messages. For this, we need a User Control. Go to the Solution Explorer, and Add >> New Item.
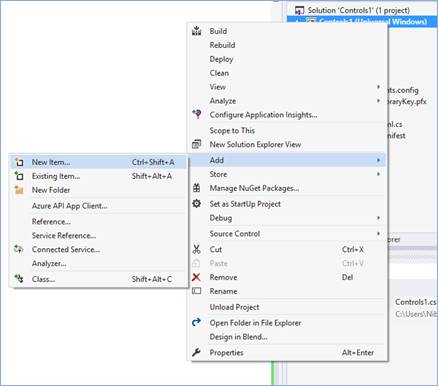
Figure 34
Now you’ve to select User Control and give it a name called “PopupPanel”.

Figure 35
Customize the XAML code, mainly the Grid section.
- <Grid>
- <Border BorderBrush=«{StaticResource ApplicationForegroundThemeBrush}» BorderThickness=«1» Background=«{StaticResource ApplicationPageBackgroundThemeBrush}»>
- <StackPanel Orientation=«Vertical» Height=«200» Width=«200» VerticalAlignment=«Center»>
- <TextBlock Text=«This is a Popup!» VerticalAlignment=«Center» HorizontalAlignment=«Center» Margin=«0,60,0,0»/>
- <TextBlock Text=«Hit the button again to hide me» VerticalAlignment=«Center» HorizontalAlignment=«Center» Margin=«0,10,0,0» TextWrapping=«Wrap» TextAlignment=«Center»/>
- <Button HorizontalAlignment=«Center» Content=«Close Popup» Click=«ClosePopup» />
- </StackPanel>
- </Border>
- </Grid>
Listing 12
Here, we’ve Border brush, StacPanel which will bound the TextBlocks and a Button. The design will look like this,
Figure 36
The C# code of PopupPanel.xaml.cs is given below. It’s mainly the Button’s event handler.
- private void ClosePopup(object sender, RoutedEventArgs e) {
- Popup hostPopup = this.Parent as Popup;
- hostPopup.IsOpen = false;
- }
Listing 13
We’ll just make our first User Control. It’s really helpful when you need a custom control in your application.
Working with Popup Window
Now, in our MainPage.xaml, we have to take a TextBlock which will have a header message called “Popup Window” and a Button which content is “Show Popup”. The design will look like this,
Figure 37
The designing code is given below,
- <TextBlock HorizontalAlignment=«Left»
- Text=«Popup Winodow»
- VerticalAlignment=«Top»
- Margin=«10,10,0,0»
- TextWrapping=«Wrap»
- Height=«40»
- Width=«220»
- FontSize=«24»
- Grid.Row=«6»/>
- <Button Content=«Show Popup»
- x:Name=«PopupButton»
- Grid.Column=«1»
- HorizontalAlignment=«Left»
- Margin=«10,0,0,0»
- Grid.Row=«6»
- VerticalAlignment=«Top»
- Width=«140»
- Click=«PopupButton_Click»/>
Listing 14
Our event handler C# code behind is also given here,
- private void PopupButton_Click(object sender, RoutedEventArgs e) {
- if (!popup.IsOpen) {
- popup.Child = new PopupPanel();
- popup.VerticalOffset = 250.0;
- popup.HorizontalOffset = 100.0;
- popup.IsOpen = true;
- }
- }
- Popuppopup = newPopup();
Listing 15
Here, we have created a new object of Popup window and checked it in our event handler code block by If decision statement. We have created a Popup Child object and set its position and make IsOpen equal to true so that it shows up when it’s called.
If we run the application, it’ll look exactly like this.
Figure 38
Finalizing and running our Control Application
In the end, our full design will look like the picture below,
Figure 39
And if we run the complete application, it’ll look exactly like this.
Figure 40
Working with TextBox Control
Take two TextBlocks, and change the Text content to “First Name” & “Last Name”. Then take two TextBoxs, named it “firstNameTextBox” & “lastNameTextBox”, and take another two TextBlock and named it “welcomeTextBlock” & “nameTextBlock”. Arrange them like the picture below.
Figure 41
Designing code is also given here.
- <TextBlock Text=»First Name: «FontSize=»24″/>
- <TextBoxx:NameTextBoxx:Name=»firstNameTextBox»Grid.Column=«1» />
- <TextBlock Text=»Last Name: «Grid.Row=»1″FontSize=»24″/>
- <TextBoxx:NameTextBoxx:Name=»lastNameTextBox»Grid.Row=»1″Grid.Column=«1» />
- <Buttonx:NameButtonx:Name=»GoButton»Grid.Column=»1″Grid.Row=«2» Content=»Go»VerticalAlignment=»Bottom» Width=«110» Click=«GoButton_Click» />
- <TextBlockx:NameTextBlockx:Name=»welcomeTextBlock»HorizontalAlignment=»Left» Margin=»10,5,0,0″Grid.Row=»3″TextWrapping=»Wrap»VerticalAlignment=«Top» Height=«40» Width=»320″FontSize=»20″Grid.ColumnSpan=«2»/>
- <TextBlockx:NameTextBlockx:Name=»nameTextBlock»HorizontalAlignment=»Left» Margin=»10,50,0,0″Grid.Row=»3″TextWrapping=»Wrap» Width=»320″FontSize=»20″Grid.ColumnSpan=«2» Height=»40″VerticalAlignment=»Top»/>
Listing 16
As we have to handle the Input operation, we used a Button control in the code above and have a click event “GoButton_Click”. So our C# code will look like this.
- private void GoButton_Click(object sender, RoutedEventArgs e) {
- if (lastNameTextBox.Text != string.Empty) {
- if (firstNameTextBox.Text != string.Empty) {
- welcomeTextBlock.Text = «Hello,»;
- nameTextBlock.Text = firstNameTextBox.Text + » « + lastNameTextBox.Text;
- } else {
- welcomeTextBlock.Text = «Hello,»;
- nameTextBlock.Text = lastNameTextBox.Text;
- }
- } else {
- welcomeTextBlock.Text = «Sorry,»;
- nameTextBlock.Text = «Last name can’t be empty!»;
- }
- }
Listing 17
Now, what I actually did, is check whether the text of “lastNameTextBox” is empty or not. If it’s not empty, it’s good to go. Then we’re checking the text of “firstNameTextBox”, and if it’s not empty we’ll do the operation below the second if decision statement. So, in this case, we make a welcome text “Hello” and put the first and last name in the “nameTextBlock” or we’ll just put the last name in this field.
Otherwise, we’ll give an error message if the last name field is empty because last name can’t be empty.
Working with Date & Time Picker Control
Now, we’ll talk about Date and Time Picker controls. Drag and drop or just write your own customized XAML. I like to write my preferable customized XAML. I’ve taken, one Textblock as header to show some text, one DatePicker, and one TimePicker and a Button. On the right side, I’ve also taken a TextBlock as a header field and two other TextBlcok to show the date and time you’ll pick. The design is given here.
Figure 42
Designing code is given below.
- <TextBlockHorizontalAlignmentTextBlockHorizontalAlignment=«Left» Margin=»10,10.333,0,0″Grid.Row=»4″TextWrapping=»Wrap» Text=»Pick a Date and Time»FontSize=»20″VerticalAlignment=«Top» Height=«40» Width=»320″Grid.ColumnSpan=«2»/>
- <DatePickerx:NameDatePickerx:Name=»datePicker»HorizontalAlignment=»Left» Margin=»10,54,0,0″Grid.Row=»4″VerticalAlignment=»Top» Width=»100″Grid.ColumnSpan=«2»/>
- <TimePickerx:NameTimePickerx:Name=»timePicker»HorizontalAlignment=»Left» Margin=»10,93,0,0″Grid.Row=»4″VerticalAlignment=»Top» Width=»100″Grid.ColumnSpan=«2»/>
- <Buttonx:NameButtonx:Name=»submitButton»Grid.Row=«4» Content=«Submit» Width=«110» Click=«submitButton_Click» Margin=«10,131,0,202.333»/>
- <TextBlockHorizontalAlignmentTextBlockHorizontalAlignment=«Left» Margin=»10,172,0,0″Grid.Row=»4″TextWrapping=»Wrap» Text=»You have selected»FontSize=»20″VerticalAlignment=«Top» Height=«47» Width=»320″Grid.ColumnSpan=«2»/>
- <TextBlockx:NameTextBlockx:Name=»dateTextBlock»HorizontalAlignment=»Left» Margin=»10,208,0,0″Grid.Row=»4″TextWrapping=»Wrap»FontSize=»20″VerticalAlignment=»Top» Height=«40» Width=»320″Grid.ColumnSpan=«2»/>
- <TextBlockx:NameTextBlockx:Name=»timeTextBlock»HorizontalAlignment=»Left» Margin=»10,253,0,0″Grid.Row=»4″TextWrapping=»Wrap»FontSize=»20″VerticalAlignment=»Top» Height=«40» Width=»320″Grid.ColumnSpan=«2»/>
Listing 18
And in the code behind, the C# code will be like this.
- private void submitButton_Click(object sender, RoutedEventArgs e) {
- dateTextBlock.Text = datePicker.Date.ToString(«D»);
- timeTextBlock.Text = timePicker.Time.ToString(«T»);
- }
Listing 19
Here, in the Button event handler, we’ve used some methods to show date and time. The best and easiest option is given here for both date and time. Others are commented out, you can try these if you want.
After you’ve set all these, your design will look like this,
Figure 43
and if you run the application, it’ll work just like this.
Figure 44
Working with Image Control
You can take an Image control from Toolbox or just write a simple code like that, and you have to take four RadioButtons. We’ve talk about RadioButton in our first part of this section Universal Windows Platform Part — 1. If you don’t familiar with RadioButton feel free to take a look of it. So, our design looks like this picture below.
Figure 45
Adding an Image to Our Project
Now we’ve to do a little bit of work before to go. We need to add an image to our project. Just right-click on the Solution Explorer and go to Add >> New Folder. Give it the name “Images”.
Now, right-click on the “Images” folder and go to Add >> Existing Item. Go to your destination directory to select your desired image. Select and add it.
Designing UI and Code Behind
Now, in the XAML code show the path of the image you’ve added in the Source property of Image control. The XAML code is given below.
- <Grid>
- <Image x:Name=«Image1»
- HorizontalAlignment=«Left»
- Height=«473»
- VerticalAlignment=«Top»
- Width=«380»
- Source=«Images/sample.jpg»
- Stretch=«None»
- Margin=«10,10,0,0»/>
- <RadioButton x:Name=«NoneButton»
- Content=«None»
- HorizontalAlignment=«Left»
- VerticalAlignment=«Top»
- Checked=«StretchModeButton_Checked»
- Margin=«10,488,0,0»/>
- <RadioButton x:Name=«FillButton»
- Content=«Fill»
- HorizontalAlignment=«Left»
- VerticalAlignment=«Top»
- Checked=«StretchModeButton_Checked»
- Margin=«222,488,0,0»/>
- <RadioButton x:Name=«UniformButton» Content=«Uniform»
- HorizontalAlignment=«Left»
- VerticalAlignment=«Top»
- Checked=«StretchModeButton_Checked»
- Margin=«10,555,0,0»/>
- <RadioButton x:Name=«UniformToFillButton»
- Content=«UniformToFill»
- HorizontalAlignment=«Left»
- VerticalAlignment=«Top»
- Checked=«StretchModeButton_Checked»
- Margin=«222,555,0,0»/>
- </Grid>
Listing 20
Here, we’ve shown the path full path of our image in line number seven. We will mainly show the four image Zooming property e.g., Fill, Uniform, Uniform to Fill and Normal (None). Our four RadioButton will handle this operation. C# code is given here.
- private void StretchModeButton_Checked(object sender, RoutedEventArgs e) {
- RadioButton button = sender as RadioButton;
- if (Image1 != null) {
- switch (button.Name) {
- case «FillButton»:
- Image1.Stretch = Windows.UI.Xaml.Media.Stretch.Fill;
- break;
- case «NoneButton»:
- Image1.Stretch = Windows.UI.Xaml.Media.Stretch.None;
- break;
- case «UniformButton»:
- Image1.Stretch = Windows.UI.Xaml.Media.Stretch.Uniform;
- break;
- case «UniformToFillButton»:
- Image1.Stretch = Windows.UI.Xaml.Media.Stretch.UniformToFill;
- break;
- default:
- break;
- }
- }
- }
Listing 21
Here, we’ve applied a very simple logic, like Switch Case operation. We just call every RadioButton by their name like inline number eight, eleven, fourteen and seventeen, and call Windows Media Class. Image1 is our Image control’s name. It’s really small lines of codes but really helpful.
Running the Application
If you run the application, it’ll look exactly like this.
Figure: 46 Windows Phone
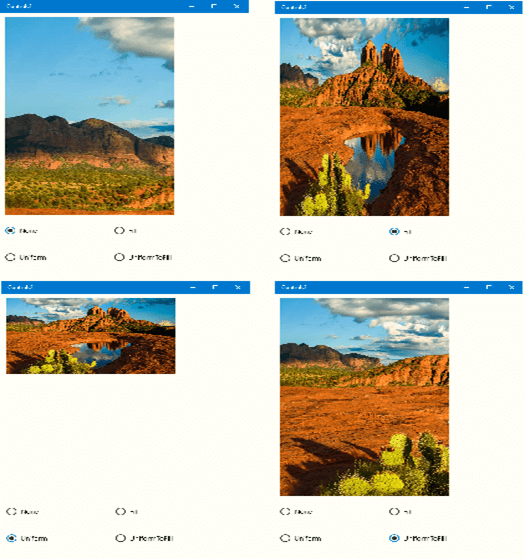
Figure: 47 Windows Platform.
Conclusion
In this article, we talked about how we download and install Visual Studio 2017, create our first application on UWP, run our app on Windows phone and local machine; we have talked about different Universal Windows Platform Controls as well.
Universal Windows Platform (UWP) — это платформа разработки
приложений для операционных систем Windows, охватывающая широкий спектр
устройств, включая ПК, планшеты, смартфоны, Xbox, HoloLens и другие
устройства. UWP позволяет создавать приложения с единым кодом, которые
могут работать на всех этих устройствах, адаптируя интерфейс и
функциональность в зависимости от специфики устройства.
В этой главе мы рассмотрим, как создавать UWP-приложения с
использованием Visual Basic, основные принципы и возможности, которые
предоставляет эта платформа, а также как интегрировать UWP с другими
компонентами Windows.
Основы работы с UWP
UWP-приложения могут быть разработаны с помощью Microsoft Visual
Studio, который предоставляет все необходимые инструменты для
разработки, от написания кода до тестирования и отладки. Приложения
могут быть написаны на различных языках, включая Visual Basic.
Для создания простого UWP-приложения откройте Visual Studio, создайте
новый проект и выберите тип “Blank App (Universal Windows)” с языком
программирования Visual Basic.
Пример
простого приложения на Visual Basic для UWP
Imports Windows.UI.Xaml
Imports Windows.UI.Xaml.Controls

Public NotInheritable Class MainPage
    Inherits Page

    Public Sub New()
        This.InitializeComponent()
    End Sub

    Private Sub Button_Click(sender As Object, e As RoutedEventArgs)
        Dim message As String = "Hello, UWP!"
        MessageBox.Show(message)
    End Sub
End Class
В этом примере создается простая страница приложения с одной кнопкой,
при нажатии на которую появляется всплывающее сообщение с текстом
“Hello, UWP!”.
Работа с пользовательским
интерфейсом
Одной из особенностей UWP является использование языка разметки XAML
для создания пользовательских интерфейсов. XAML предоставляет
декларативный способ описания интерфейсов, который легко комбинируется с
кодом на Visual Basic.
Пример XAML-разметки для
кнопки
<Page x:Class="UWPApp.MainPage"
      xmlns="http://schemas.microsoft.com/winfx/2006/xaml/presentation"
      xmlns:x="http://schemas.microsoft.com/winfx/2006/xaml"
      xmlns:local="using:UWPApp"
      Background="{ThemeResource ApplicationPageBackgroundThemeBrush}">

    <Grid>
        <Button Content="Click Me" HorizontalAlignment="Center" VerticalAlignment="Center" Click="Button_Click"/>
    </Grid>
</Page>
В этом примере создается страница с кнопкой, расположенной по центру.
Атрибут Click указывает на обработчик события, который
будет вызываться при нажатии на кнопку.
Основные принципы работы с
UWP
Платформонезависимость
Одна из основных особенностей UWP — это принцип “один код для всех
устройств”. Разработчик пишет приложение с использованием UWP API, и оно
автоматически адаптируется под различные устройства. Например,
приложение может быть оптимизировано для работы на экране ПК, а также
автоматически масштабироваться для смартфонов или адаптироваться для
управления с помощью жестов на устройствах с сенсорным экраном.
Адаптивность интерфейса
UWP предоставляет мощные средства для адаптации интерфейса под
различные экраны и разрешения. Использование стандартных контейнеров,
таких как Grid, StackPanel,
RelativePanel, позволяет создавать гибкие интерфейсы,
которые автоматически изменяют свое расположение в зависимости от
размера экрана.
Работа с файлами и
хранилищем данных
UWP предоставляет доступ к различным видам хранилища данных, включая
локальные файлы, библиотеку изображений, данные пользователя и облачное
хранилище через API Windows.Storage.
Пример работы с файлами
Imports Windows.Storage

Private Async Sub SaveTextToFileAsync()
    Dim folder As StorageFolder = KnownFolders.DocumentsLibrary
    Dim file As StorageFile = Await folder.CreateFileAsync("example.txt", CreationCollisionOption.ReplaceExisting)
    Await FileIO.WriteTextAsync(file, "This is a sample text.")
End Sub
В этом примере создается файл в библиотеке документов и записывается
текст. Обратите внимание на использование асинхронных операций, которые
являются стандартом для работы с файловой системой в UWP.
Асинхронное программирование
в UWP
Асинхронное программирование — это важная часть разработки для UWP,
особенно для обработки операций ввода-вывода (например, чтение и запись
файлов, работа с сетью). В UWP используется ключевое слово
Async и операторы Await для асинхронных
операций.
Пример асинхронного метода
Private Async Sub DownloadData()
    Dim uri As New Uri("https://example.com/data")
    Dim client As New Windows.Web.Http.HttpClient()
    Dim result As String = Await client.GetStringAsync(uri)
    MessageBox.Show(result)
End Sub
Этот пример демонстрирует использование асинхронной операции для
загрузки данных с веб-ресурса. Метод GetStringAsync
позволяет получить строку из интернет-ресурса, не блокируя основной
поток пользовательского интерфейса.
Взаимодействие с сетью
UWP предоставляет возможность работы с интернет-ресурсами с помощью
класса HttpClient, который поддерживает HTTP-запросы. Важно
помнить, что работа с сетью в UWP всегда выполняется асинхронно, чтобы
избежать блокировки интерфейса.
Пример загрузки данных с
веб-сервиса
Private Async Sub FetchWeatherData()
    Dim uri As New Uri("https://api.openweathermap.org/data/2.5/weather?q=London&appid=your_api_key")
    Dim client As New Windows.Web.Http.HttpClient()
    Dim response As String = Await client.GetStringAsync(uri)
    ' Обработка данных ответа
    MessageBox.Show(response)
End Sub
В этом примере отправляется HTTP-запрос к API погоды, и результат
выводится в сообщении.
Работа с сенсорными
событиями
UWP поддерживает разнообразные сенсорные устройства, такие как
тачскрины и устройства с поддержкой жестов. Для обработки событий
сенсорного ввода можно использовать классы, такие как
Pointer, GestureRecognizer и другие.
Пример обработки сенсорных
событий
Private Sub OnPointerPressed(sender As Object, e As Windows.UI.Xaml.Input.PointerRoutedEventArgs)
    Dim pointer As Windows.UI.Input.Pointer = e.Pointer
    If pointer.PointerDeviceType = Windows.Devices.Input.PointerDeviceType.Touch Then
        MessageBox.Show("Touch event detected")
    End If
End Sub
Здесь показан простой пример обработки касания экрана и вывода
сообщения при детектировании события касания.
Заключение
UWP предоставляет мощные возможности для создания универсальных
приложений для различных устройств на платформе Windows. Используя
Visual Basic, разработчики могут легко создавать адаптивные интерфейсы,
работать с асинхронными операциями, взаимодействовать с файловой
системой и использовать сенсорные устройства. Платформа UWP позволяет
создавать приложения, которые работают на разных устройствах с
минимальными изменениями в коде, что делает её отличным выбором для
разработки современных приложений на Windows.