
Applies ToExcel for Microsoft 365 Word for Microsoft 365 Outlook for Microsoft 365 PowerPoint for Microsoft 365 Project Online Desktop Client Excel for Microsoft 365 for Mac Word for Microsoft 365 for Mac PowerPoint for Microsoft 365 for Mac Excel 2024 Outlook 2024 PowerPoint 2024 Project Professional 2024 Project Standard 2024 Excel 2024 for Mac Word 2024 for Mac PowerPoint 2024 for Mac Excel 2021 Word 2021 Outlook 2021 PowerPoint 2021 Project Professional 2021 Project Standard 2021 Excel 2021 for Mac Word 2021 for Mac PowerPoint 2021 for Mac Excel 2019 Word 2019 Outlook 2019 PowerPoint 2019 Project Professional 2019 Project Standard 2019 Excel 2016 Word 2016 Outlook 2016 PowerPoint 2016 Project Professional 2016 Project Standard 2016
You can reduce the file size and save disk space by compressing pictures in your document. The compression options reduce both the file size and picture dimensions based on how you intend to use the picture, such as viewing on screen or in an email message. You can compress all pictures in the file or just the ones that you select.
These features aren’t available in Microsoft 365 for the web, but only the desktop versions of the Office apps.
You can send files with high-quality images easily, and without file limits, by saving to the cloud and then sharing files from OneDrive.
Compress individual pictures
When you don’t need every single pixel in an image to get an acceptable version of it, you can compress pictures to make the file size smaller.
-
With your file open in your Microsoft Office application, select the picture or pictures that you want to compress.
-
Under Picture Tools, on the Format tab, in the Adjust group, select Compress Pictures.

If you do not see the Picture Tools — Format tab, make sure that you selected a picture. You may have to double-click the picture to select it and open the Format tab.
Also, depending on your screen size, you might only see the icons for the Adjust group. The Compress Pictures button appears without a label.
-
To compress the selected pictures only and not all of the pictures in the document, select the Apply only to this picture check box.
Clearing the Apply only to this picture checkbox will override any previous changes you have made for other individual pictures in this document.
-
Under Resolution, click the resolution that you want, then click OK.
Notes:
-
The default picture resolution in Office is 220 ppi. You can Change the default picture resolution or Turn off picture compression.
-
Compression changes are made when you close this dialog box. If you aren’t satisfied with the results, you can undo the changes.
-
Compressing a picture may make the image look different because of loss of detail. Because of this, you should compress the picture and save the file before applying an artistic effect.
Click the headings below for more information
-

Important: This setting applies only to pictures in the current document or the document selected in the list next to Image Size and Quality. To make it the default for all new documents change the drop down.
-
Click the File tab.
-
Click Options and then click Advanced.
-
Under Image Size and Quality, use the drop down to select whether you want the change to apply to a specific document or all new (and future) documents.
-
Set the resolution that you want to default to, then click OK
Any info on the changes you’ve made to your picture are stored in your file. You can reduce the size of your file by deleting this editing data, but if you want to undo your edits you will need to reinsert the picture.
Note: This feature is not available in Microsoft Project 2016.
-
Click the File tab.
-
Click Options and then click Advanced.
-
Under Image Size and Quality, click the document that you want to remove picture editing data from.
-
Under Image Size and Quality, select the Discard editing data checkbox.
Note: This setting applies only to pictures in the current document, or the document selected in the list next to Image Size and Quality.
See Also
Change the default resolution for inserting pictures in Office
Editing photos without Picture Manager
Compress the media files in your presentation
Crop a picture
Turn off picture compression
Need more help?
Want more options?
Explore subscription benefits, browse training courses, learn how to secure your device, and more.
You can resize an image in two ways: By making it larger or by making it smaller.
Here’s a question for you: What are you planning to accomplish today?
Looking to enlarge your blog post image size from 500px to 1000px? It’s quite easy to pull off in MS Paint or Photos. But if it’s a pixel-based (also called raster-type) image like PNG or JPG, you may end up with a pixelated image that doesn’t look all that great.
But with a neat feature like resampling — on Windows, the feature is available in Adobe Photoshop and Bulk Image Resize (from the MS Store) — you can still end up with a good-quality image.
Reducing the image dimensions means that you end up with a small photo. The perceivable quality will remain the same if the image occupies a smaller area on the screen. However, there is an irreparable loss of information as the pixels are shrunk.
During resizing, there are consequences! So a tip to remember is to always retain the original image before resizing, particularly when going smaller.
What if resizing was without consequences and quality issues? That’s a reality when dealing with a vector-file format such as SVG, where the image is not made of tiny color pixels but constructed from vectors and lines. You can catch up on the differences between SVG and PNG.
Moving on. Let’s examine techniques for resizing images on Windows.
In case you also own Apple devices, you may check our articles about how to resize images on your iPhone or how to reduce an image size on MacOS.
If you’d like to get a quick overview of top Windows methods and see which one is best for you, jump to the Conclusion section to view our comparison table.
Method 1: Use Windows Photo Editing Apps to Resize Your Photos
MS Paint is a raster (i..e pixel-based) image editor included in all Windows ve
rsions since Windows 1.0, which was released in November 1985. You’ve probably used it a couple of times to draw stickman figures, with varying success levels.
Now, Paint can work with the following file formats: Windows Bitmap, JPEG, GIF, PNG, and TIFF.
Follow these steps to resize images with MS Paint:
Step 1: Open Paint. Go to File > Open > Choose the file path.
Step 2: Go File > Image Properties.
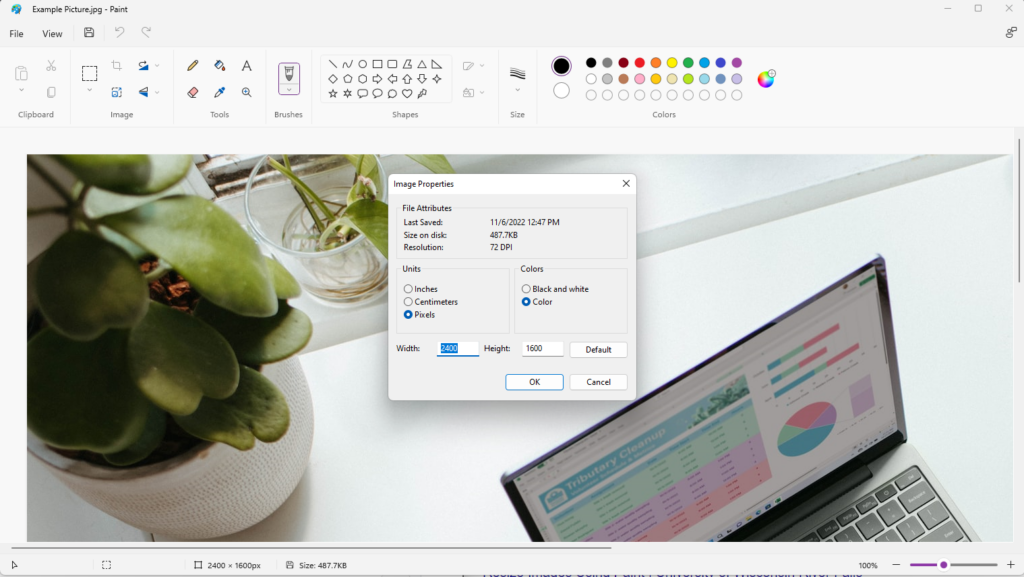
Step 3: In Image Properties, you can change the Width and the Height, for instance, from 2400 x 1600 to 1152 x 648.
Step 4: Save a copy of the image with the new dimensions. Go to File > Save As > Choose the file format (PNG, JPEG, BMP, GIF, or other formats).
That’s all. You’ll have the new file with different dimensions and file size.
One of the main drawbacks of this method is that it doesn’t offer any resampling. In case you’re wondering, we explained what resampling is when we described how to resize images on Mac. The fact that Microsoft Paint doesn’t offer resampling means that if you decrease the size of a large image from 1000px to 500px, its file size won’t be reduced.
| Pros of MS Paint | Cons of MS Paint |
| Free and no download | Doesn’t offer resampling |
| Simple three-step process | May not support as many formats as other image convertors |
| Supports other functions, drawing shapes, flipping, etc. |
How to resize an image on Windows using the Photos app?
MS Photos is a raster graphics editor that comes with many other functions, including image viewing, organizing, and sharing. It can even edit video clips.
The app has been made available since 2012 with the release of Windows 8. When trying to open very large images, Photos may automatically resize them. But it’s similarly possible to resize other images with these steps:
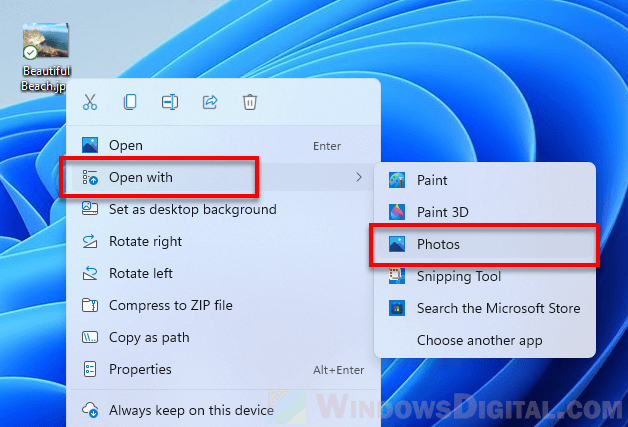
Step 1: Open your image with Photos. If Photos is the default photo viewing app, just double-click to open the image. Or, right-click on the image, and choose Open With Photos.

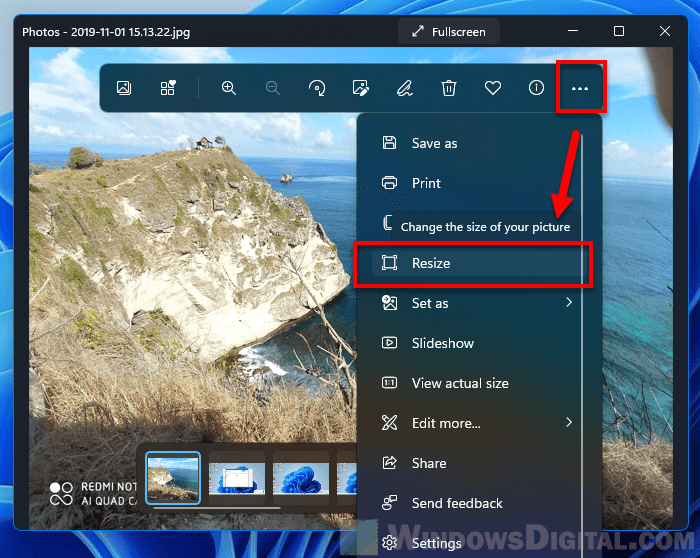
Step 2: Click on the more icon (three dots) and select Resize.
Step 3: Photos recommends some resizing options, for instance, Best for Thumbnails. You can choose the default options, or set custom dimensions.
Step 4: Choose the location to save your new resized file.
Step 5: You can edit the File name and Save as Type to export the image to different image formats.
Like MS Paint, the Photos app doesn’t allow you to resample the pixels of your photos.
| Pros of using Photos | Cons of using Photos |
| Quick and easy | Doesn’t come with a resampling feature |
| Export image to up to 8 formats | No support for next-gen formats such as WEBP |
| Free and no need for third-party downloads | |
| Recommends appropriate sizes for different uses |
How to resize an image on Windows with Paint 3D
If you’re running on Windows 10, you’ll find that Paint 3D comes installed as part of provisioned programs.
Paint 3D is essentially an improved version of Paint with support for creating 3D objects and pictures. In Windows 11, the app may be installed for free from the Microsoft Store.
It provides a great resizing feature that allows you to lock in the aspect ratio or choose from preconfigured sizes. Use it to make sure your blog images follow a constant image ratio.
Step 1: Launch Paint 3D. Select Open > Open Files.
Step 2: Choose the file path in File Explorer.
Step 3: From the top menu, choose Canvas.
Step 4: Resize the Canvas from the left-hand panel. Tip: You should lock the aspect ratio and resize the image with canvas.
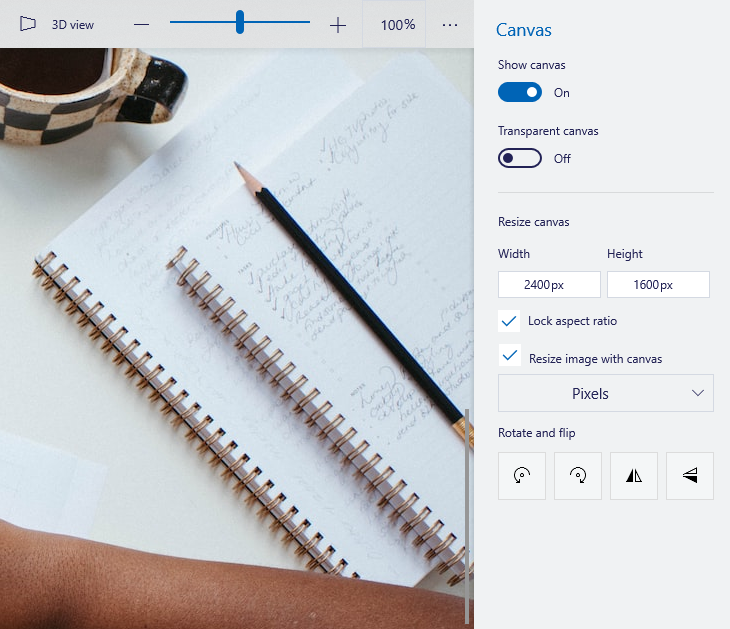
Step 5: Change the width or height, for instance, from 2400px to 1200px, and the changes will be dynamically applied.
Step 6: Save a copy of the resized image. Go to Menu > Save As > Choose the file format and specify a name.
| Pros of using Paint 3D | Cons of Paint 3D |
| Allows you to lock the aspect ratio | Doesn’t provide a resampling feature |
| Resize the image independently of the canvas | No support for next-gen or vector formats |
| Easy to use and no downloads. | |
| Supports more image formats than Paint and Photos |
How to resize an image on Windows using PowerToys
Microsoft PowerToys are a collection of utilities that expand your Windows functions so that you can get the experience you want and obtain more productivity. Most features are designed for developers and power users, but you’ll find an image resizer.
You may have to install Powertoys, and there are two main ways you can do this:
- Get it from the Microsoft Store App, or
- Install it from Github which the most techies of you will enjoy
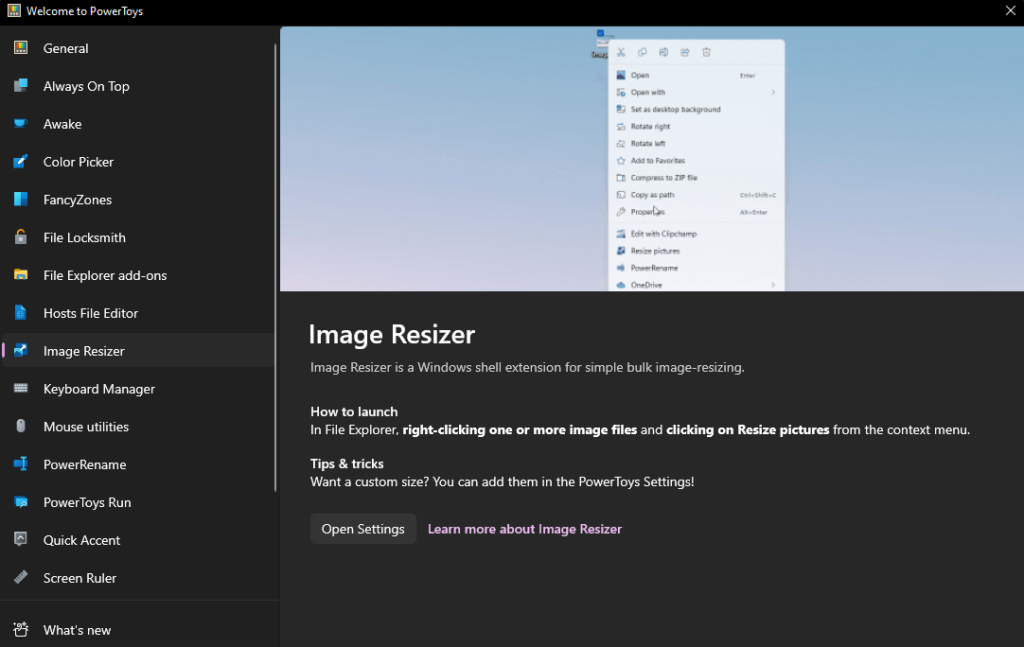
After installing Microsoft PowerToys, just launch it, and select Image Resizer. You can learn how to use it from the quick tutorial. By clicking “Open Settings” you can specify custom sizes.
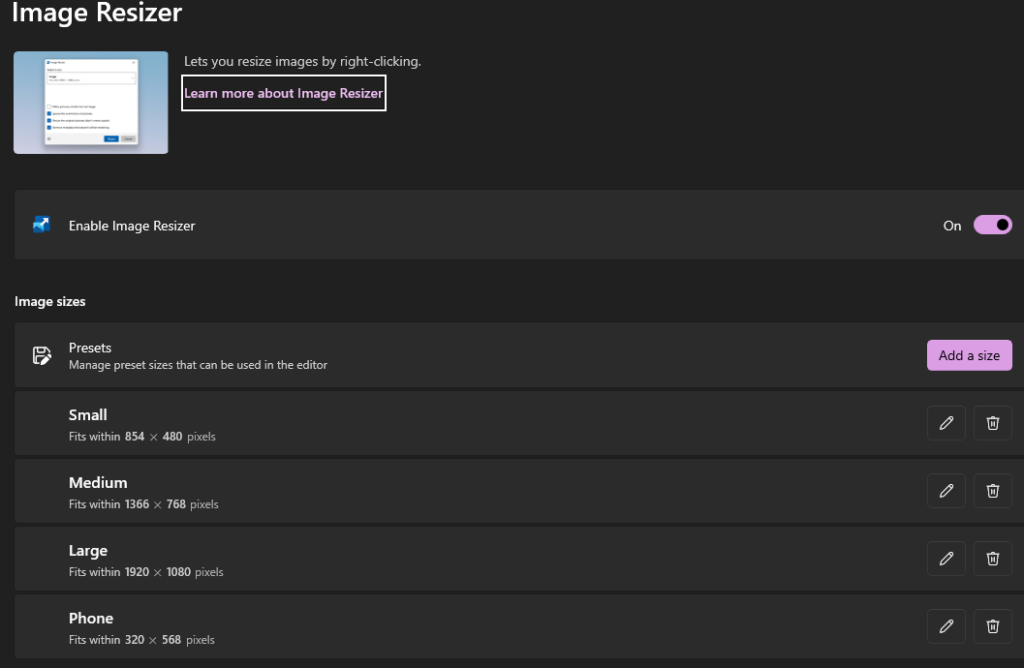
Using the tool is quite straightforward and unlike other native methods, it supports bulk resizing.
Step 1: Right-click on one or several images, and choose Resize Pictures.
Step 2: Choose the resizing options you want.
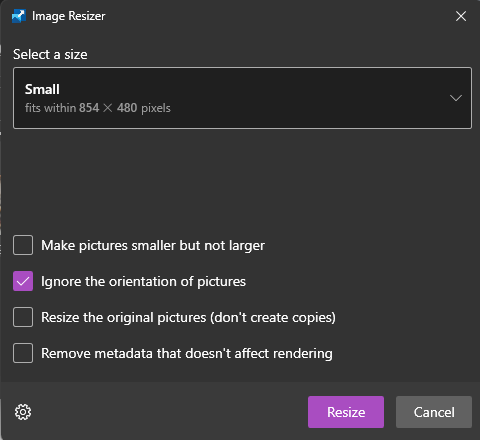
Step 3: Finish by selecting Resize.
Method 2: Resize Images on Windows With Chrome Extensions
You can use a couple of extensions on Chrome to resize images to your desired dimensions. Note that you can add extensions from the Chrome Webstore to Microsoft Edge. This is possible because Microsoft Edge is built on Chromium, the same technology used by Chrome.
The featured extensions are free and straightforward to use. So, here are the top three extensions to use::
Extension 1: Resizing App
The Resizing App is a handy Chrome plugin that you can use to quickly resize images.
It provides quick functions, for instance, resizing images by Width, Height, Largest Side, Percentage, or custom size settings.
Using the extension is quite intuitive. Click on the Extension icon, and upload your image.
You can optimize the images as well while preserving the image dimensions.
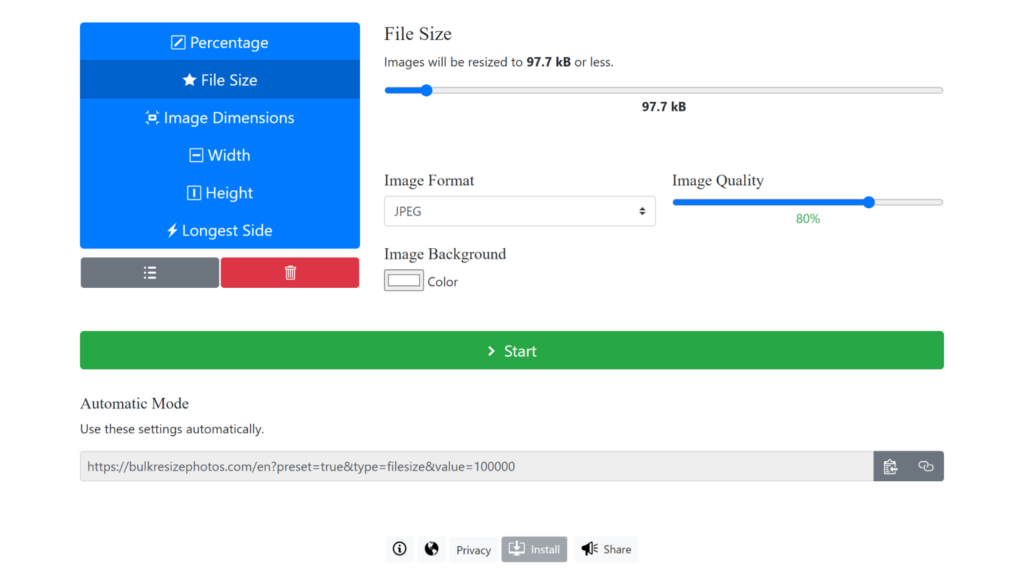
Extension 2: Bulk Resize
The Bulk Resize plugin offers intuitive features to resize many images at once. You can specify custom image dimensions, define values for the width, height, or longest side, or reduce the image sizes by a certain percentage.

It’s a handy tool to use for reducing the file size too, as you can vary the image quality or even specify a file size that images should be reduced to. For instance, you can state that the image file should be 97.7kb or less.
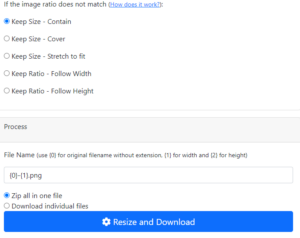
Extension 3: Bulk Image Resize
The Bulk Image Resize plugin supports popular image formats such as GIF, TIF, JPEG, PNG, and more. It has two output options: download multiple images in one zip file or get each image individually.
Download and pin the Extension to the toolbar for easier access. To start resizing, open the plugin by clicking on the icon.
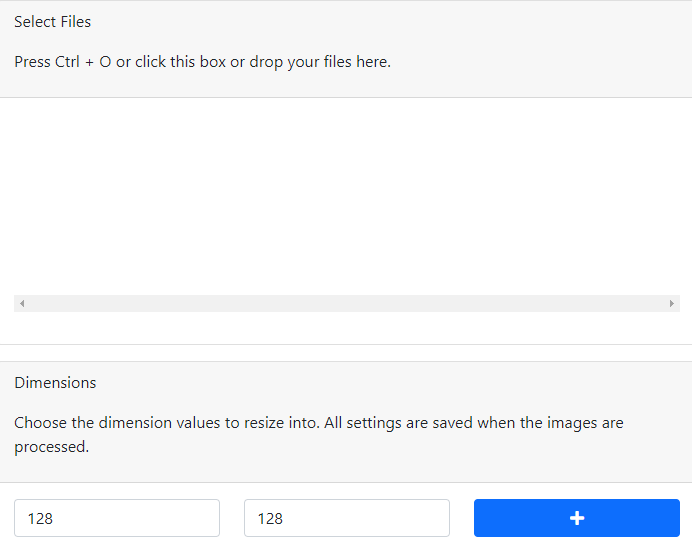
You can choose the dimensions values to resize images into. If you scroll down, there are more settings, for instance, what to do if the image ratio doesn’t match.
Method 3: Resize Images on Windows Using Third-Party Software
The significance of using third-party software is that there is no need to be online to resize photos. Similarly, the tool can process hundreds or even thousands of photos quickly and without a tedious download process.
The following tools can help with resizing images after you download and install them:
Software 1: Batch Photo
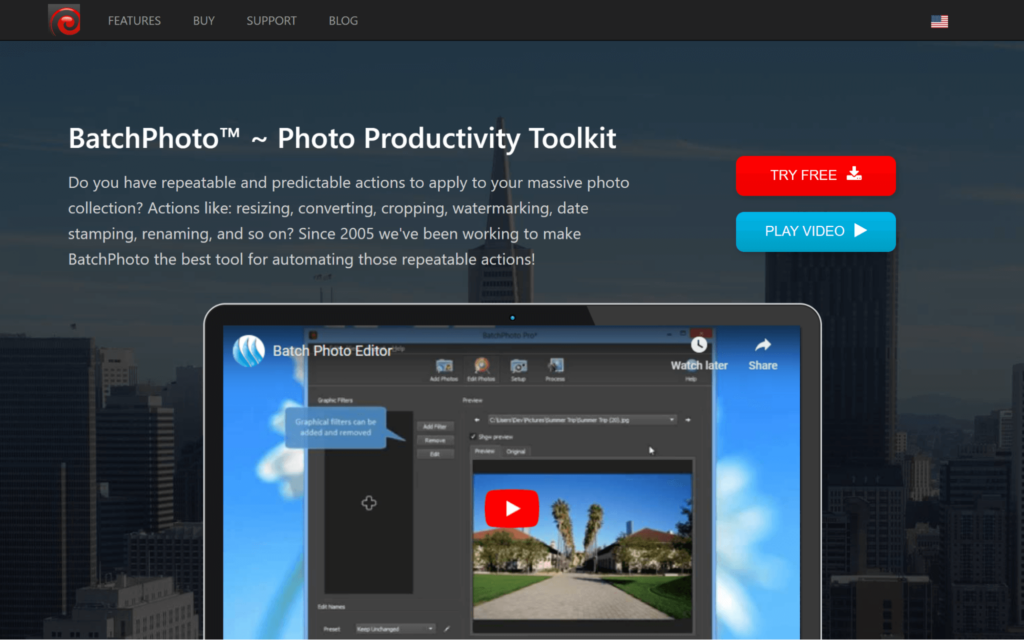
BatchPhoto™ is a professional image manipulation program for Windows and Mac. It allows users to perform a wide range of edits on multiple photos with one process, including adding watermarks, applying special effects, renaming photos, adding time stamps, etc.
You’ll even find intuitive time-saving features such as Folder Watch that monitors for new photos and adds predefined edits. The tool can convert images from 170 formats. So, it’s quite reliable for professional users.
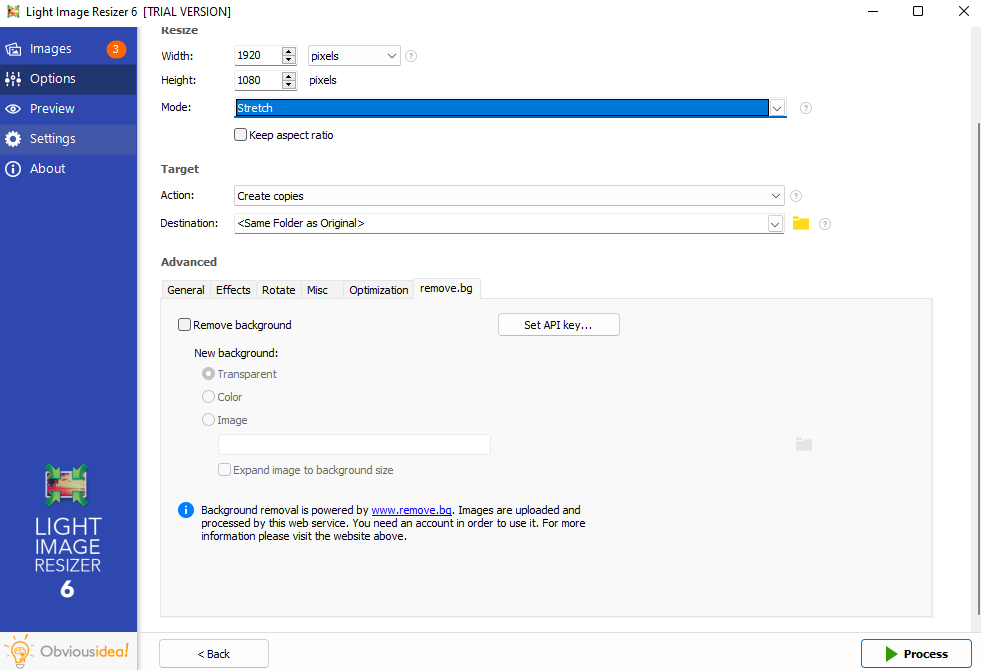
Software 2: Light Image Resizer
The Light Image Resizer offers an advanced resizing feature with the crucial ability to retain the aspect ratio during resizing. You can select from pre-configured resizing profiles even for mobile phone screen sizes.
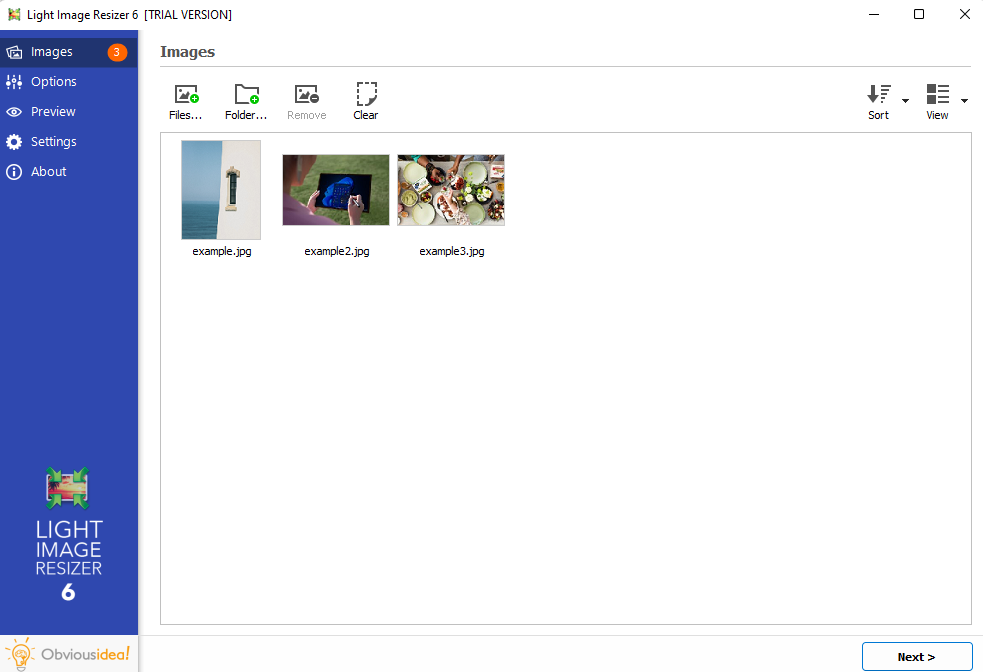
The tool can even remove the background of images as well, but the feature is powered by remove.bg and the images have to be uploaded first.
The free version allows users to process up to 100 images.
Software 3: Fotosizer
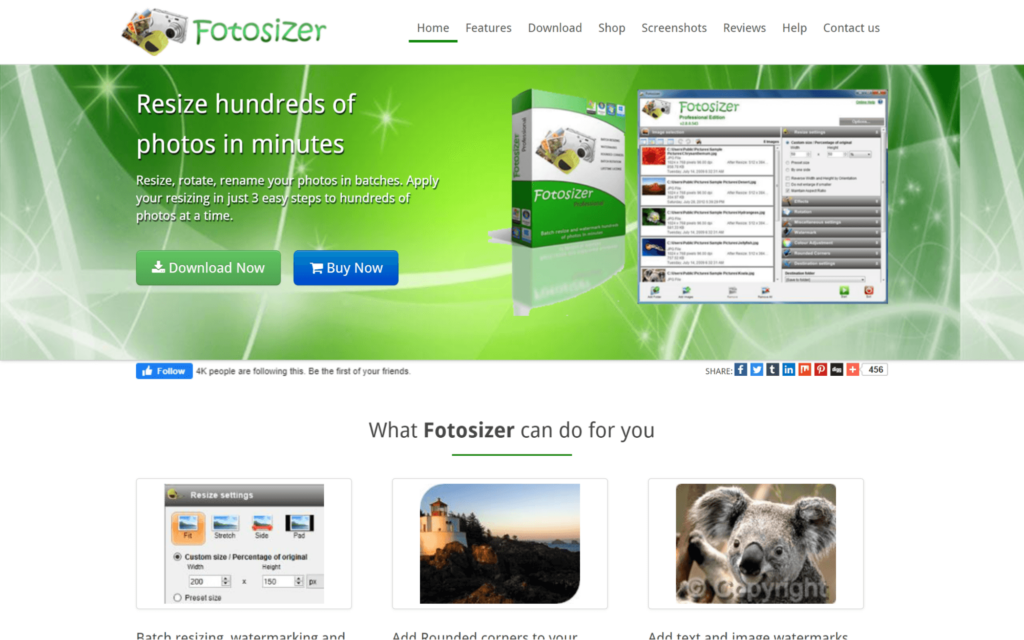
Fotosizer is available in editions. In the Standard Edition, you access basic batch editing features such as resizing, rotation, and changing image formats. The Professional Edition comes with a broader spectrum of features including
- Applying watermarks;
- Adding rounded corners;
- Adjusting image colors with contrast, saturation, hue, shadows, and other settings;
- Applying text on images;
- And more.
Method 4: Resize Images Without Loosing Quality with AI Image Resizers
AI tools are revolutionizing the way we resize images on Windows. They maintain high quality without the loss typically associated with image enlargement. These tools leverage Machine Learning algorithms, where self-taught neural networks, exposed to millions of images, learn to adaptively compress images and enlarge by assigning different bitrates to various parts.
Popular AI image resizers include:
- ON1 Resize AI 2023.5: Functions as a standalone application or as a plug-in for Adobe Photoshop
- Overscale AI: Excels at upscaling low-resolution images.
- Pixelhunter: offers a free solution tailored for social media.
- AI Image Enlarger: Can enlarge images up to 8k resolution, remove faces & backgrounds, and even clarify blurry sections.
Other notable AI resizers are Uploadcare Smart Resize and Spyne.ai, expanding the possibilities for photographers and designers alike.
Now, using AI Image resizers is quite intuitive. For instance, with AI. Image Enlarger, you only need to upload your image, and choose the scaling option from 200% to 800%.

For detailed instructions on how to resize images specifically for passport photos, check out our comprehensive guide on how to convert a picture to passport size.
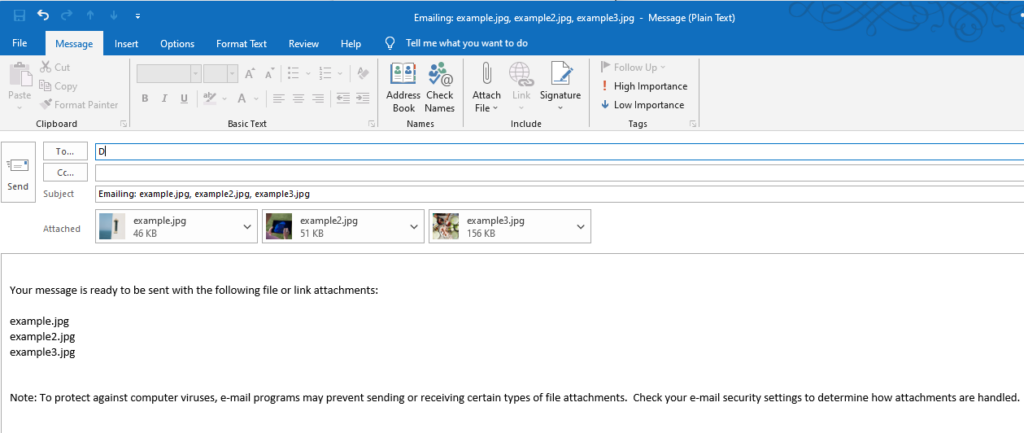
Method 5: Using Send to Mail Recipient Function to Resize Images
Another handy and quick way to resize multiple images in Windows without installing any app is to use the Send to Mail Recipient function. This method is ideal if you plan on sending the images via email.
To use it:
Step 1: Select multiple photos
Step 2: Right-click and select Send to > Mail Recipient (P.S If you can’t see Send to after right-clicking, choose “Show More Options.”
Step 3: Choose the image dimensions in the Attach Files wizard.
Step 4: This will launch Outlook if it’s the default email client. You can proceed to personalize the email as you like.
Method 6: Using Microsoft Store Apps to Resize Images
If you have access to the Microsoft store from your PC or tablet, you can quickly find suitable tools for resizing images. Here are some of the most highly rated apps:
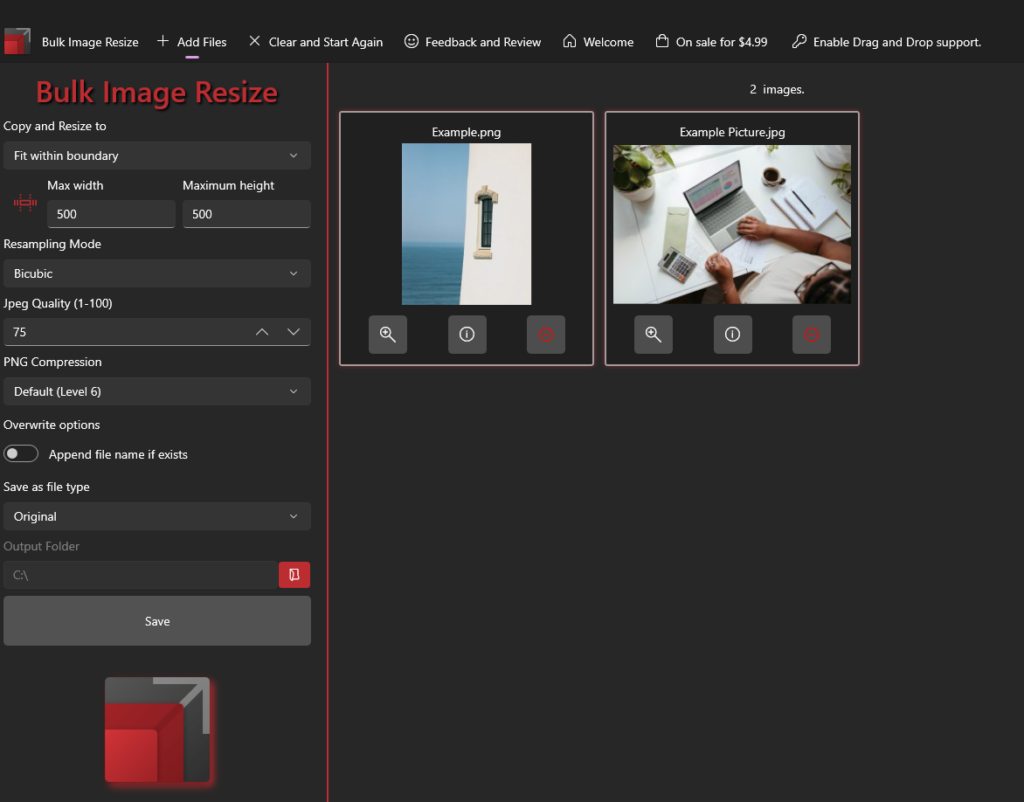
App 1: Bulk Image Resize by Valley Software
One of the best features of Bulk Image Resize is resampling. It provides up to different modes:
- Average
- Bicubic
- Nearest Neighbour
The methods add new information to the image when enlarging, so you can end up with a better quality image.
Bulk Image Resize offers other standard resizing functions. You can add photos from multiple locations, and in different sizes, and aspect ratios. Images may be resized by percentage or with predefined boundaries.
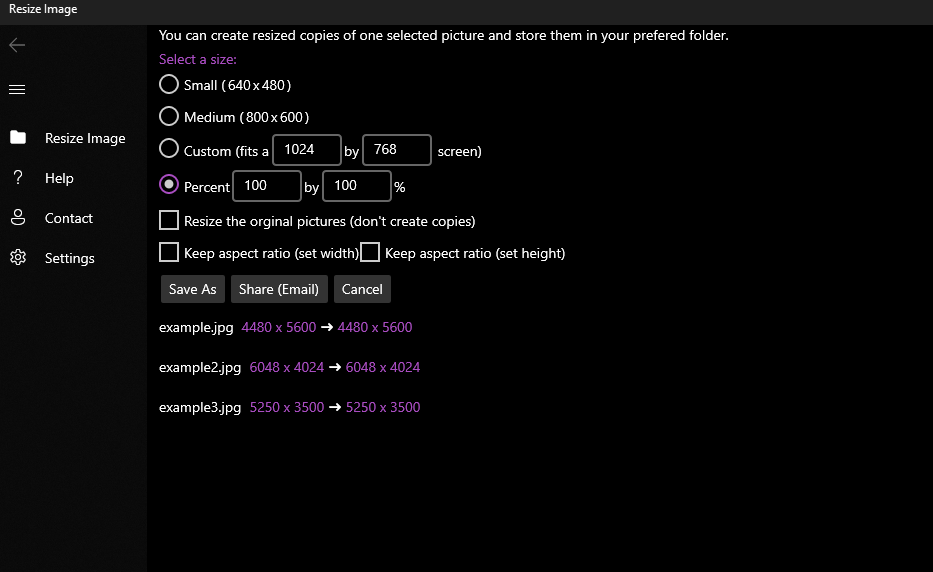
App 2: Resize Image by Get-the-solution
Many users have positively reviewed this app as it performs its core function really well, and that is resizing photos. It includes support for next-gen image formats, including WebP. You can preserve the aspect ratio too.
App 3: Pixillion Image Converter by NCH Software
You can get Pixillion directly from the Store for free. And while it mainly helps with converting image formats, it can resize images as well.
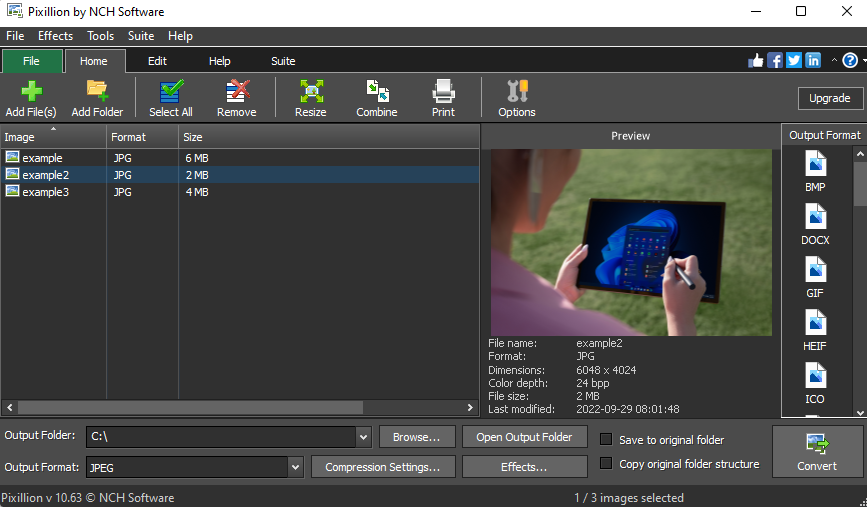
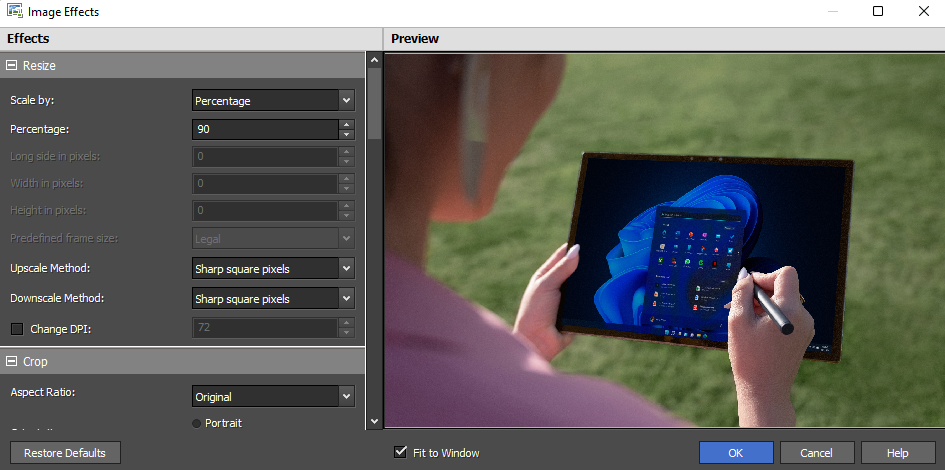
The resizing feature can scale images by percentage, predefined frame size, or with the longest side. It can preserve the original aspect ratio. You also get better control of the final image quality during upscaling or downscaling by choosing from sharp square or smooth blurry pixels:
What’s the Best Way to Resize Images in Bulk on Windows?
You can resize images multiple images at once in Windows in five different ways:
- With a Google Chrome extension such as Bulk Resize
- With Third-party tools such as Batch Photo: Best app (Batch Photo):
- With an app from the Microsoft Store such as Bulk Image Resize
- Using a Windows native app. For bulk resizing, you can use PowerToys.
- Utilizing the Send to > Mail Recipient function that you can access by right-clicking on one or several images from File Explorer.
Wrapping-It Up: The Best Image Resizing Methods Depending on Your Goals
Here is a summary of the top tools you can use to resize an image on Windows:
| Method | Tools | Biggest pros | Biggest cons |
| Native |
Paint Photos Paint 3D PowerToys |
Quick edits No downloads Single edits |
No support for resampling Limited support for bulk resizing (PowerToys) |
| Web browser plugins |
Resizing app Bulk Resize Bulk Image Resize |
Bulk edits Resizing photos on the web Free usage |
Some may need internet access May require uploading photos Depends on browser support |
| Desktop third-party apps |
BatchPhoto™ Light Image Resizer Fotosizer |
Advanced photo manipulations Bulk resizing Offline access |
Many tools may require paid version for full access Few tools offering resampling |
| Send to > Mail Recipient function |
Sending resized image via email No downloads Native method |
Preconfigured image sizes Lack of other photo manipulations |
|
| Windows store apps |
Bulk Image Resize Resize Image Pixillion |
Resampling support on some tools (Bulk Image Resize) Plenty of free options Offline access Advanced photo manipulations Bulk resizing |
Need to purchase ad-free versions Limited to newer versions of Windows with Store App |
Frequently Asked Questions
What is a raster file?
It is a type of image format where the image is defined by pixels. The pixel’s location in the grid, their size, and colors are defined with numbers.
What is image resizing?
Image resizing refers to making an image smaller or larger. During resizing, you can change the image dimensions, quality, and file size.
What is batch resizing?
Batch resizing refers to altering the image dimensions of multiple images at the same time. It’s a good strategy to save time when dealing with many files.
Does resizing affect image quality?
Resizing may not really affect the perceivable image quality as the image will now occupy a small size of the screen. The quality is affected if the photo is magnified.
Does resizing an image change the file size?
Yes. Resizing an image will change the file size. That’s because there will be a loss of information unless the method you’re using allows you to disable resampling.
Why does my image get blurry when I make it smaller?
It’s not typical for an image to get blurry if it’s made smaller. There could be an issue with the resolution settings, or the image resizing tool may be producing smaller and blurry pixels instead of square and sharp pixels.
How can you resize images on Windows without losing quality?
If you need a way to resize images without a loss of quality, use a tool with a resampling feature. Professional users tend to use Adobe Photoshop. However, it’s not suitable for performing bulk functions. A better tool to use is the Bulk Image Resize which you can download from the chrome plugin store for free. It even allows you to choose the resampling mode so you can get the best quality.
Can you reduce file size without losing quality?
You can reduce the file size of an image by using a lossless compression tool. It’s advisable to save the file in a lossless format such as PNG. But if the file size ends up too big, you can use a next-gen format such as Webp.
Conclusion
There are plenty of methods to resize images on Windows. Natively, you can use Photos, Paint, Paint 3D. But apart from PowerToys, they don’t support bulk resizing. You can get this feature by using a third-party tool, online converter, or Microsoft Store App.
Another important thing to remember is that, unless you’re resizing an SVG file, there will be a loss of information during resizing. That’s why it’s important to retain the original file.
Finally, when trying to enlarge a smaller image, you can improve the final image quality by using a tool that supports resampling.
Do you have a photo you want to send to a friend but the app you use to send the photo tells you that the file size of the photo is too large that it cannot be sent? This tutorial will show you how to reduce the file size of a photo or an image in Windows 11 – by resizing the photo and/or compressing it without resizing it.
There are generally two ways to reduce the file size of a photo in Windows:
- You can resize the photo to a smaller resolution which will significantly reduce its file size if it originally has an enormous resolution, especially for photos taken by a high megapixel camera.
- You can compress a photo without resizing it using an image compression tool which will sacrifice a tiny bit of image quality for significant file size reduction. The reduce in image quality using an image compression method is usually unnoticeable.
- Or, you can combine both ways by first resizing a photo to an acceptable smaller dimensions, and then compress it with an image compression tool.
Reduce photo file size by resizing it using Photos app in Windows 11
To resize a photo or an image, you need to use an image editing software or any photo viewer with the resize function. In Windows 11, you can use a Windows built-in photo editing tool called Photos app to resize your photos. See below for step-by-step instruction on how to use Photos app to resize a photo in Windows 11.
First, open the photo you want to resize with Photos app. To do so, right-click on the photo, select Open with > Photos.
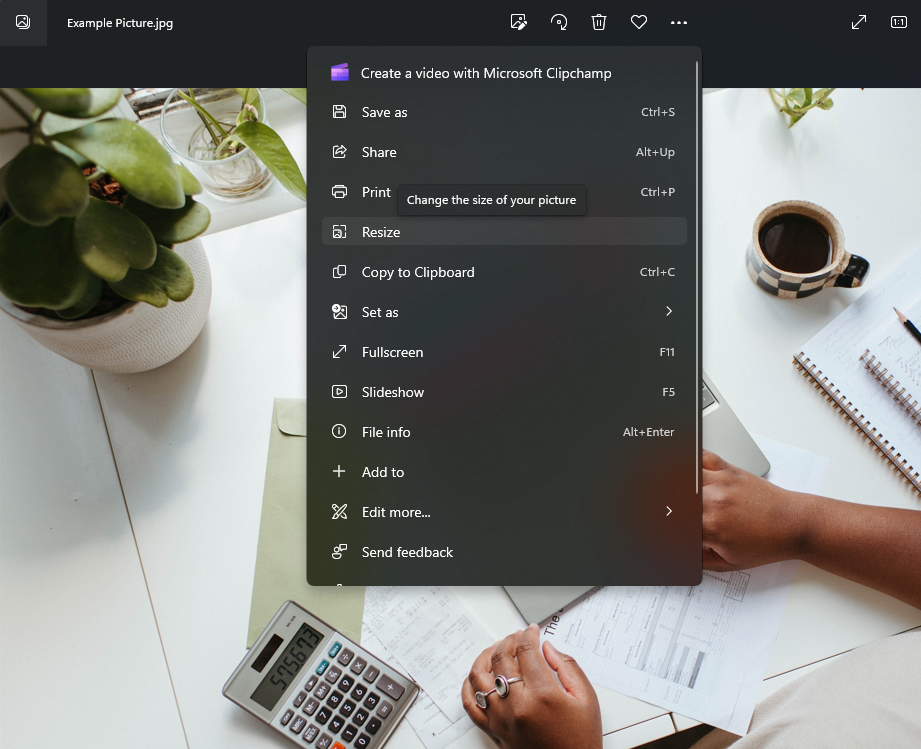
In the Photos app where your photo is open, click on the See more button (triple horizontal dotted icon), and select Resize.
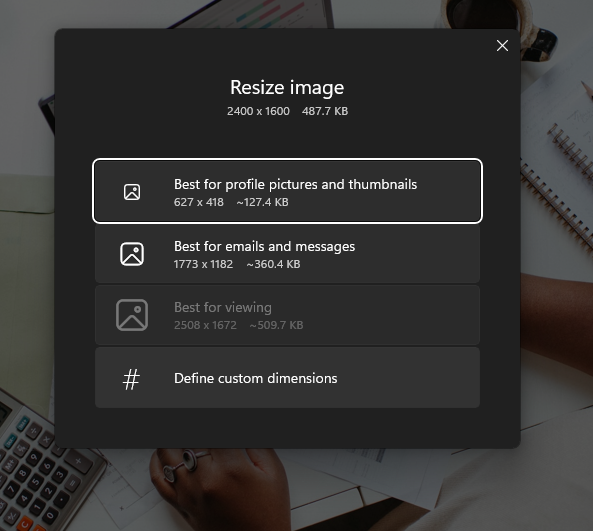
In the Resize image window, select a size that best describes what you want to do with the photo. It will show the outcome resolution and predicted file size after resize for each option. For example, if you want to send the photo via email or messages, you may want to select “Best for emails and messages“.
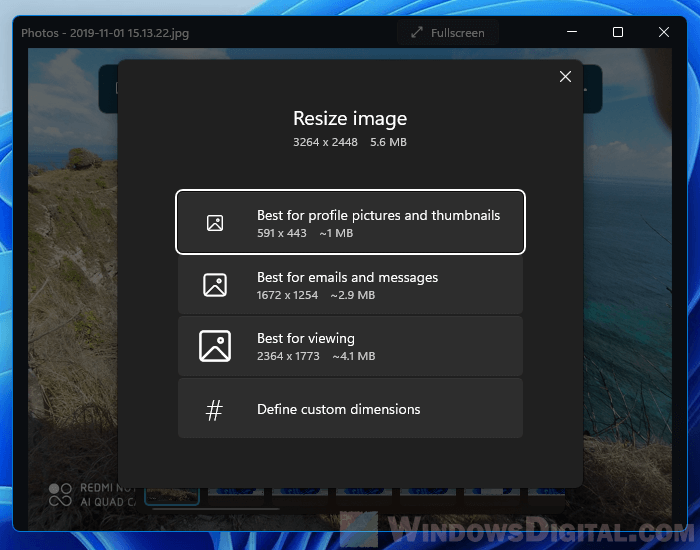
Optionally, if you prefer to manually enter a custom dimensions, select “Define custom dimensions” instead. You can then enter a custom dimensions that you want to resize the photo to. Make sure Maintain aspect ratio is enabled to keep the image proportions so that it doesn’t forcefully stretch your photo while resizing it.
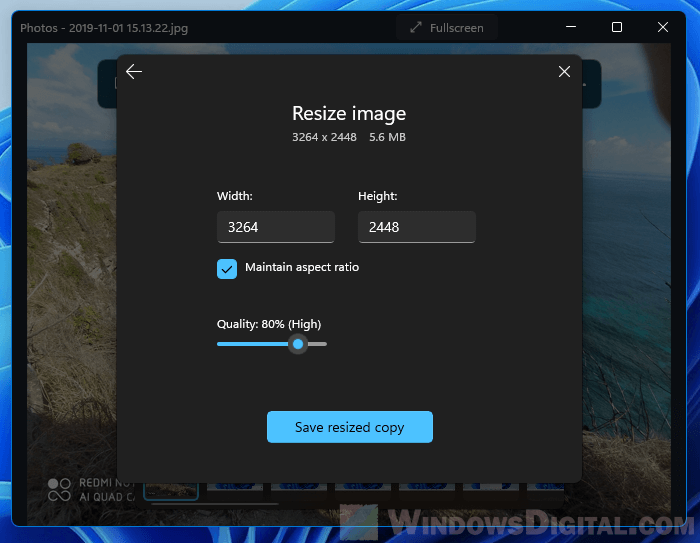
You can also manually set the Quality to tell the app how much quality it should keep while resizing the photo. The lesser the quality, the smaller the file size of the resized outcome. You should try to use as low quality as you feel acceptable if you want to reduce the file size as much as possible. The quality loss is often less noticeable to the human eye.
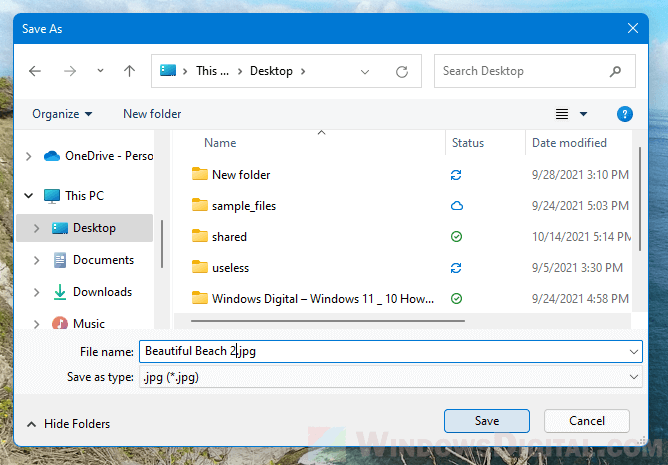
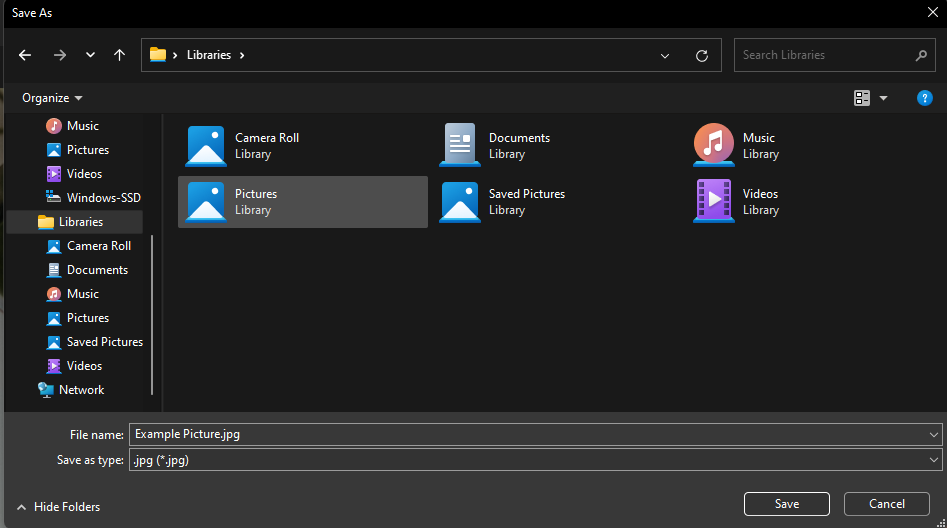
After choosing a resize option, you will be prompted to select a location where you want to save the resized photo. Make sure to give it a different name so that you don’t overwrite the original copy of the photo if you are to save the resized photo in the same folder.
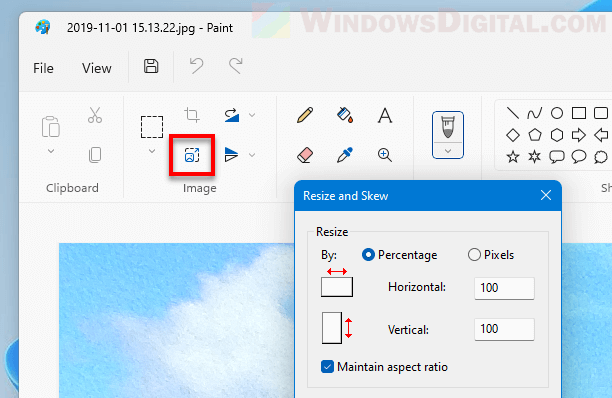
Resize an image using Paint
In addition to Photos app, you can use the classic Paint to resize an image in Windows 11. Simply open the photo you want to resize with Paint. Then, select Resize from the toolbar.
Compress a photo using an online image compression tool
Another method to reduce the file size of a photo is by compressing it using an image compression method (which doesn’t resize the image). There are many websites that provide online image compression tool where you can upload your photo for compression, and then download it after it is compressed. These tools are usually able to compress photos or images and reduce their file size significantly without losing too much quality.
It is recommended that you resize your photo to a size you feel comfortable first, only then you should compress it using an image compression tool.
We recommend tinypng.com or tinyjpg.com to compress PNG or JPG file type images. Simply drag and drop your WebP, PNG or JPEG file type photos on the said webpage, and then download your compressed image when the compression is done and ready to be downloaded.
However, tinypng.com and tinyjpg.com only offer free compression for image up to 5 MB of file size. If your photo is larger than 5 MB, you may want to resize it first using the Photos app in Windows 11 as mentioned above.
Все способы:
- Вариант 1: Специальные программы
- Способ 1: Paint
- Способ 2: XnView
- Способ 3: Caesium
- Способ 4: Photoshop
- Вариант 2: Онлайн-сервисы
- Способ 1: Compressor.io
- Способ 2: PicResize
- Вопросы и ответы: 0
Вариант 1: Специальные программы
Для уменьшения размера фотографии на компьютере можно воспользоваться специализированными программами, причем некоторые из них позволяют изменять снимки целыми пакетами. По умолчанию в операционной системе Windows предустановлен редактор для работы с графическими файлами, также можно установить сторонний софт.
Способ 1: Paint
Приложение Paint – бесплатный графический редактор от компании Microsoft, который встроен во все Windows. Он не отличается многофункциональностью, но базовых возможностей хватает для изменения размера снимков, работы с форматами файлов, а также простого редактирования с использованием встроенных инструментов: кисти, заливки, добавления фигур и других элементов.
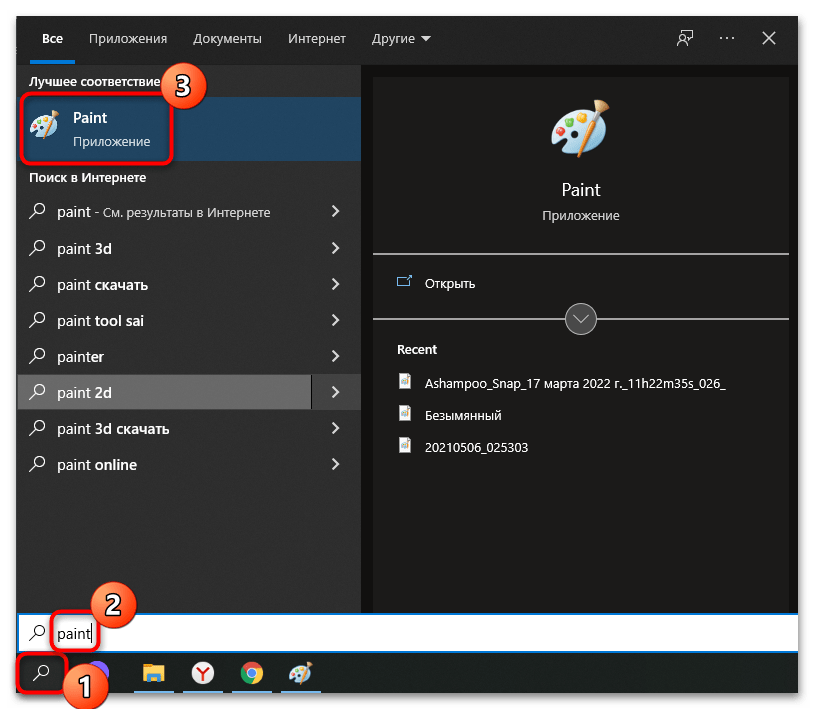
- Чтобы уменьшить размер фотографии на компьютере через Paint с помощью встроенной функции, запустите редактор от Microsoft. Он находится в списке предустановленного софта меню «Пуск». Также можно воспользоваться системной поисковой строкой.
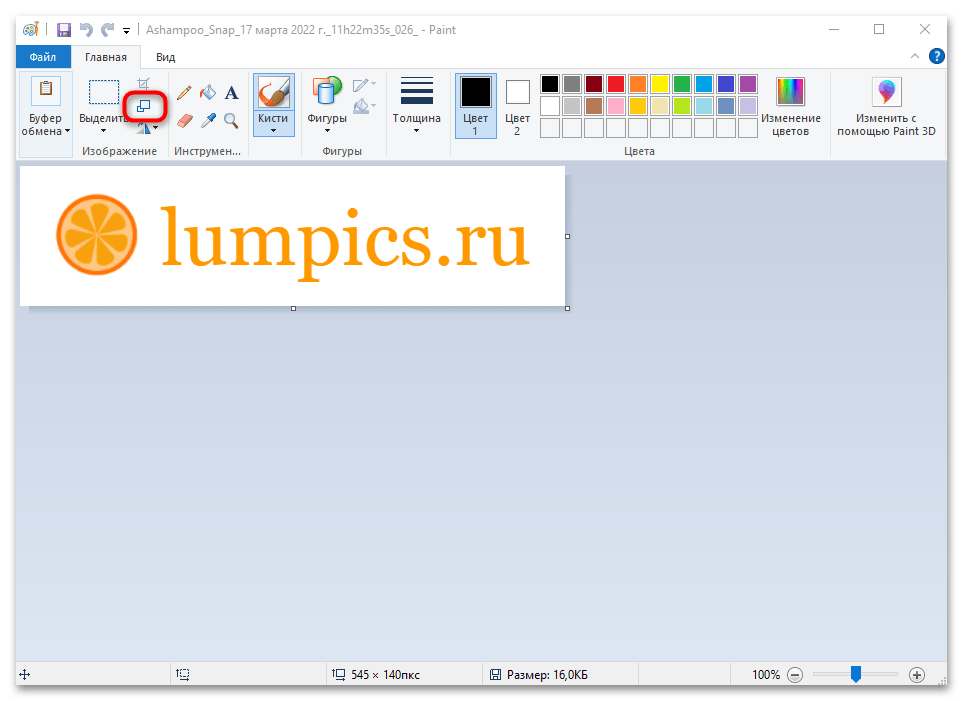
- Откройте фотографию через раздел «Файл» и системный «Проводник». После этого на вкладке «Главная» в блоке «Изображение» кликните по кнопке «Изменить размер».
- Откроется новое окно, где выставьте размер изображения в пикселях или процентах от исходных данных. Также предусмотрена опция, позволяющая сохранять пропорции картинки для корректного масштабирования. При необходимости можно изменить наклон снимка в градусах.
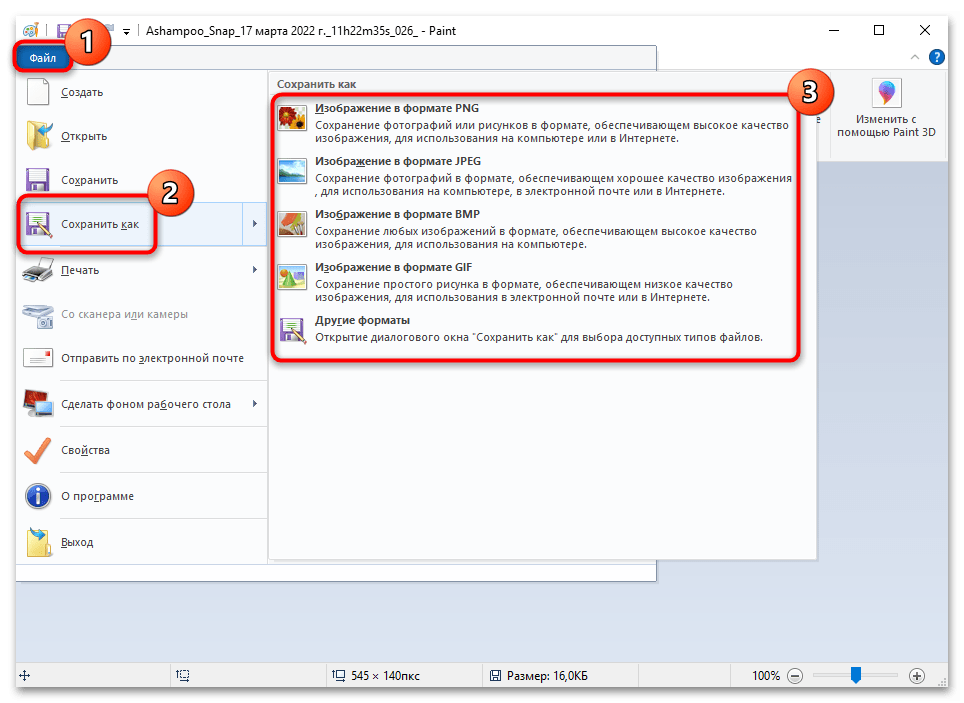
- На верхней рабочей панели располагаются основные инструменты и функции для работы с графикой — воспользуйтесь ими, если есть дополнительная необходимость в редактировании файла. В конце результат можно сохранить в одном из самых распространенных форматов: JPEG, PNG, GIF, BMP и др.

Способ 2: XnView
Программа XnView – это бесплатный и мощный инструмент для просмотра и редактирования графических файлов. Он не требует много места на компьютере, но при этом отличается полезными функциями и возможностью пакетного изменения размера фотографий. Так, можно обрезать снимок, наложить различные фильтры и эффекты, откорректировать цвет, насыщенность или контрастность. Поддерживается работа со сканером и создание скриншотов экрана. Программа полезна для разработчиков сайтов, поскольку позволяет самостоятельно делать HTML-галерею для последующего размещения на различных ресурсах в интернете.
Скачать XnView
- Для уменьшения фотографии на компьютере через программу XnView найдите нужную папку со снимками в каталоге слева. Выделите один или несколько файлов, затем кликните по кнопке в виде двух фотографий со стрелкой – «Преобразование».
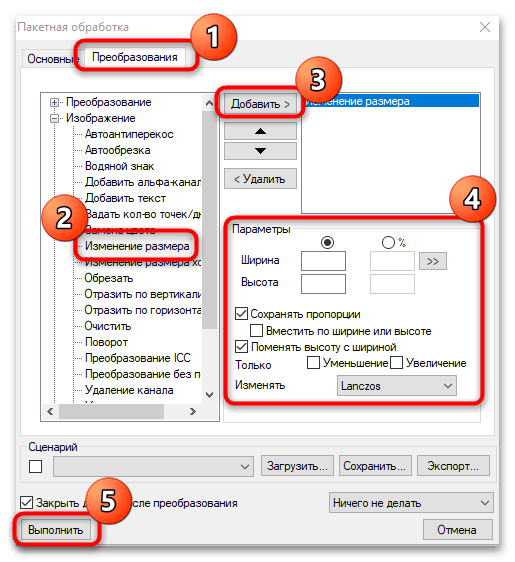
- Откроется новое окно с параметрами изменения. Перейдите на вкладку «Преобразования» и в меню «Изображение» найдите пункт «Изменение размера». Щелкните по кнопке «Добавить», которая находится посредине. В блоке «Параметры» пропишите значение уменьшения, выбрав пиксели или проценты. Для сохранения результата кликните по «Выполнить» внизу слева.

Перед уменьшением фотографии можно настроить дополнительные параметры, и в этом является преимущество редактора. Например, сохранять пропорции снимка или сжать формат JPEG без снижения качества (эта функция есть в «Настройках» XnView).
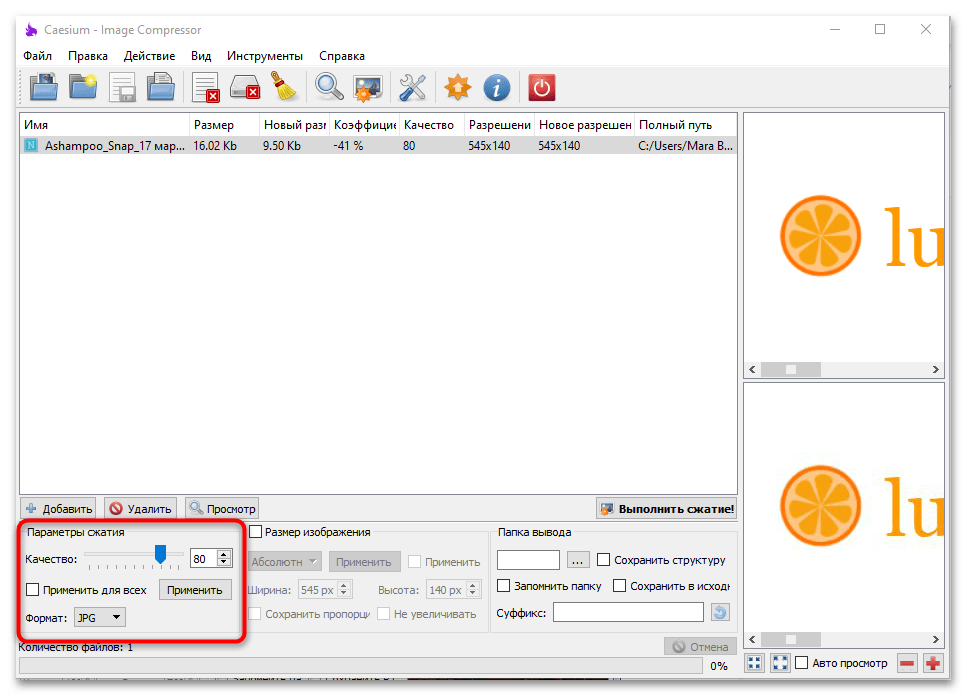
Способ 3: Caesium
Caesium – специализированный софт для пакетной компрессии графических файлов. Он не занимает много места в операционной системе, нетребователен к ресурсам ПК и предназначен для бесплатного использования. Кроме сжатия инструмент располагает средствами для значительного уменьшения размера изображений. Поддерживаются самые распространенные форматы – JPEG, PNG и BMP.
В отличие от большинства аналогичных продуктов, графический интерфейс полностью на русском языке, а поскольку программа не нагружена ненужными возможностями, сжатие снимков происходит в несколько кликов. При этом доступны дополнительные функции для применения сжатия фотографий.
Способ 4: Photoshop
Мощный графический редактор от компании Adobe оснащен обширным набором инструментов для редактирования и создания изображений. Среди функций предусматриваются профессиональные средства для корректировки и ретуширования, возможность накладывания фильтров, слоев. Полученный результат оптимизируется и сохраняется в одном из популярных форматов или в виде проекта для последующей обработки.
Изменить размер снимка можно различными способами, включая кадрирование или специальные функции, определяющие размер холста. Конечно же, программой имеет смысл пользоваться только тем, у кого она уже есть или кто обучается работать в ней, поскольку чего-то уникального она не предлагает, а использовать профессиональный графический редактор только для уменьшения фото — нецелесообразно. На нашем сайте есть подробная инструкция по уменьшению фотографии через Photoshop.
Подробнее: Как уменьшить изображение в Фотошопе
Вариант 2: Онлайн-сервисы
Сервисы в интернете удобнее тем, что не требуется устанавливать на ПК дополнительный софт: достаточно запустить любой браузер и перейти на страницу сайта. Принцип работы таких ресурсов в большинстве случаев аналогичен: нужно загрузить картинку, затем дождаться, пока закончится ее обработка, и скачать получившийся результат. Рассмотрим самые распространенные и эффективные варианты, которые позволяют обработать фотографию бесплатно.
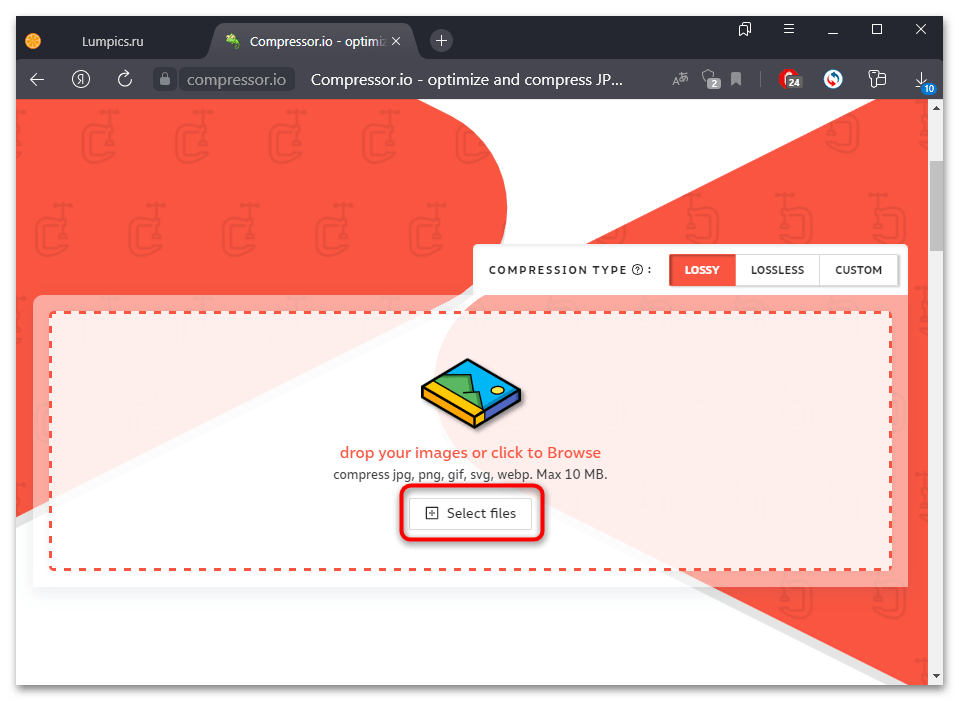
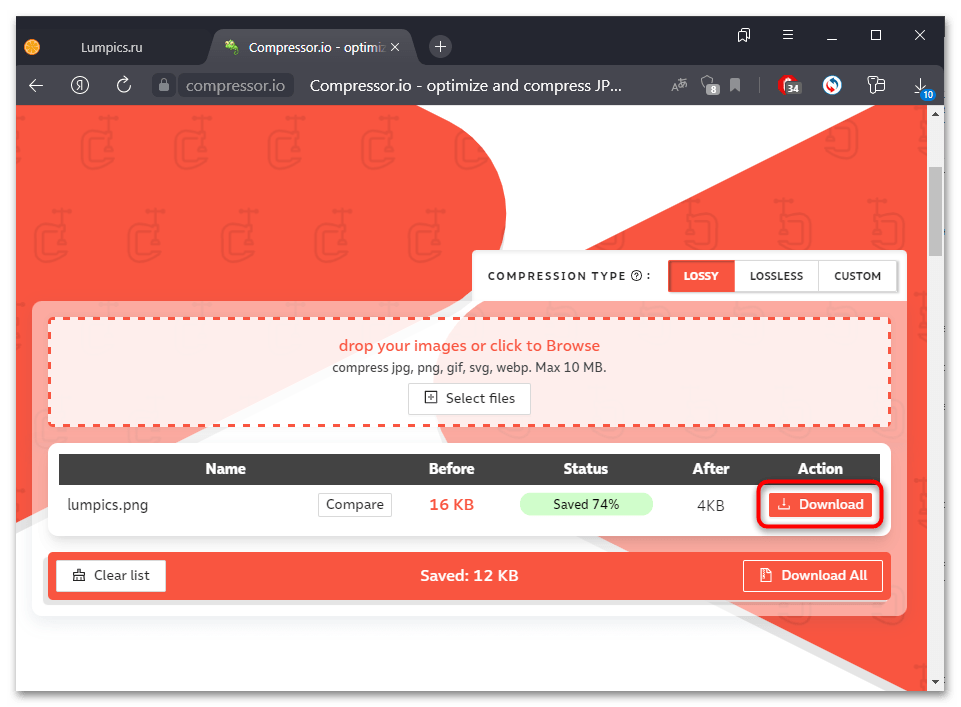
Способ 1: Compressor.io
Рассматриваемый сервис предназначен только для уменьшения размера изображений, поэтому у него довольно простой интерфейс, несмотря на англоязычную локализацию. При сжатии отображается, какой размер у изображения будет после процедуры. Также можно самостоятельно настроить параметры редактирования. В интерфейсе доступен выбор типа сжатия: максимальная компрессия с потерями качества или без потерь, но при минимальном уменьшении.
Перейти к онлайн-сервису Compressor.io
- Чтобы изменить размер фотографий, перейдите по ссылке и перетащите их на страницу сайта. Также можно нажать на кнопку «Select files» и отыскать снимок через «Проводник». Сервис поддерживает пакетное редактирование.
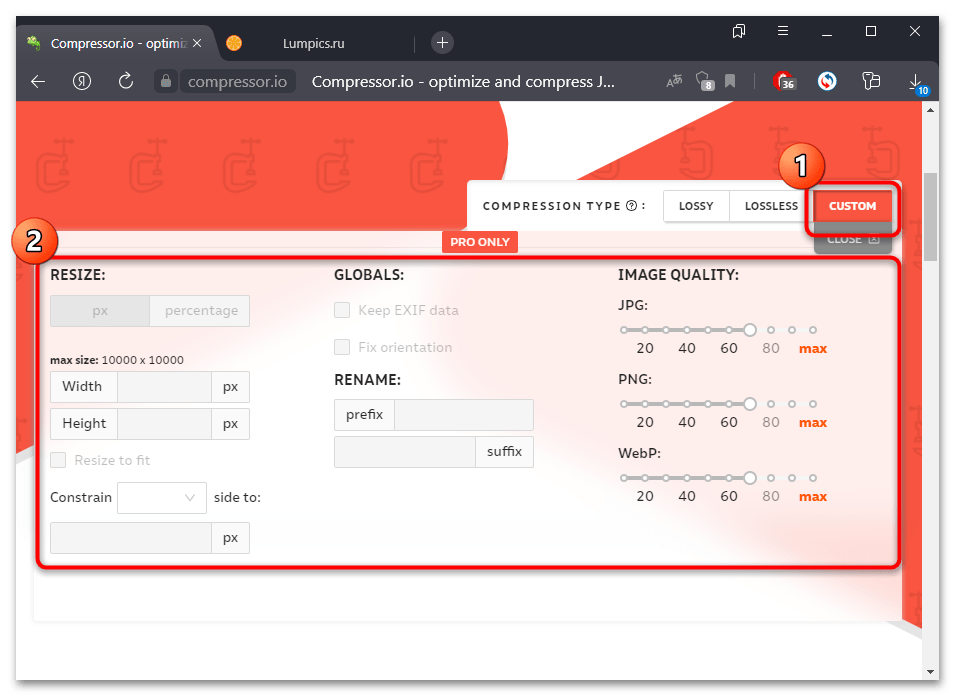
- На сайте также доступны пользовательские настройки. Для выбора параметров после загрузки фото перейдите на вкладку «Custom». Здесь можно прописать размер файла по пикселям или процентам от исходных данных. Кроме того, есть функция выбора качества снимка в разных форматах, а также автоматическая смена названия.

- Сжатие произойдет автоматически после закачки файла на сервер. Вам достаточно нажать на кнопку загрузки — «Download». Если было отредактировано несколько изображений, кликните по «Download All». Все данные поместятся в архив и будут сохранены на диск компьютера.
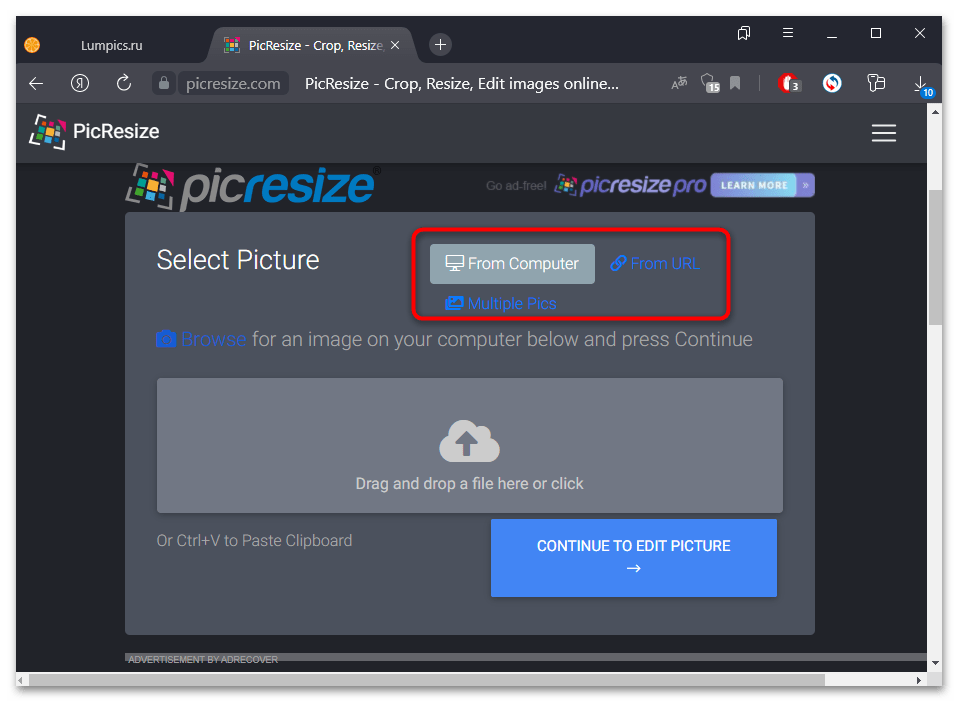
Способ 2: PicResize
Сервис PicResize позволяет изменить размер фотографии на компьютере онлайн, без установки дополнительного софта. Помимо компрессии предусматриваются и другие функции: например, доступна возможность повернуть изображение, обрезать его или сохранить в другом формате, то есть конвертировать онлайн. Ко всему прочему, поддерживается пакетное редактирование — сервис способен обработать до 100 изображений сразу.
Перейти к онлайн-сервису PicResize
- Перейдите на главную страницу сайта и добавьте фотоснимки удобным способом. Достаточно загрузить снимок на главную страницу сайта, причем сделать это можно несколькими способами: перетаскиванием, поиском на устройстве через «Проводник», с использованием URL-адреса картинки или сочетания клавиш «Ctrl + V», чтобы добавить ранее скопированный в буфер обмена файл. Для загрузки сразу нескольких картинок нужно кликнуть по кнопке «Multiple Pics», затем по иконке в виде плюса и выбрать несколько файлов в «Проводнике».
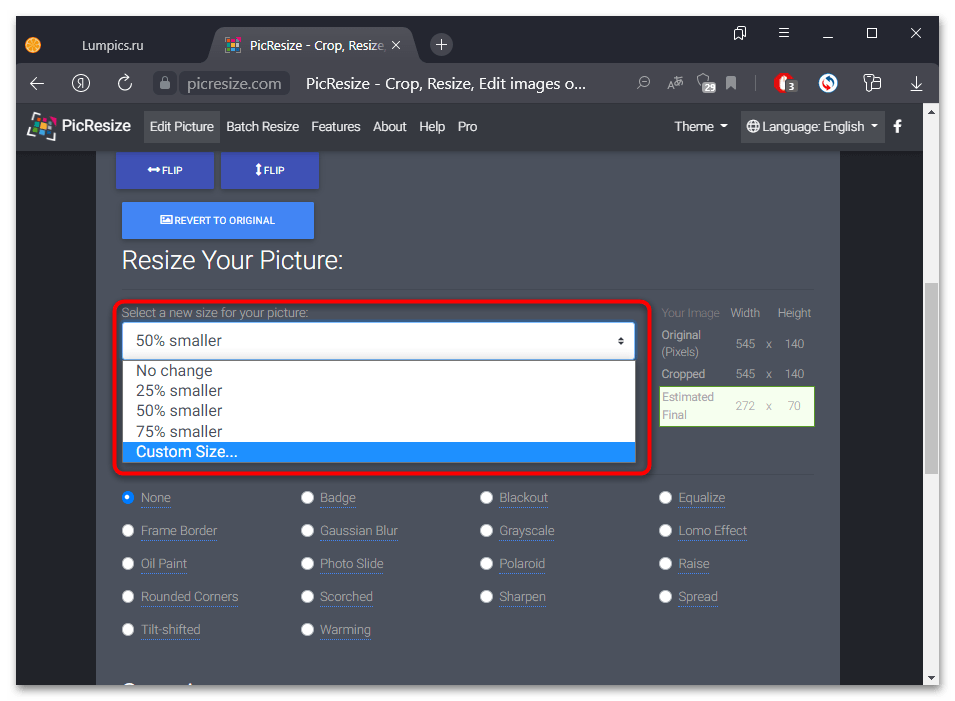
- В новом окне откроется встроенный редактор, с помощью которого задайте параметры сжатия. Чтобы уменьшить картинку, вызовите меню выбора нового размера изображения, которое располагается ниже. Здесь доступно несколько вариантов: 25, 50 и 75% от оригинала. При выборе пункта «Custom Size» откроется дополнительное окно, где можно вручную прописать размеры ширины и высоты снимка в пикселях или процентах.
- Выше слева отображаются кнопки для поворота и кадрирования.
- При необходимости можно сразу наложить эффект на изображение. Если это не требуется, то оставьте значение «None» в блоке «Choose Special Effects». Внизу предложены варианты для сохранения измененного снимка: выбор формата, качества и желаемого размера файла. После завершения настройки нажмите на «I’m done, resize my picture!».
- После обработки доступен предпросмотр («View Image») или продолжение редактирования («Resume Edit»). Если результат устраивает, то его можно скачать на компьютер, выбрав соответствующую иконку.


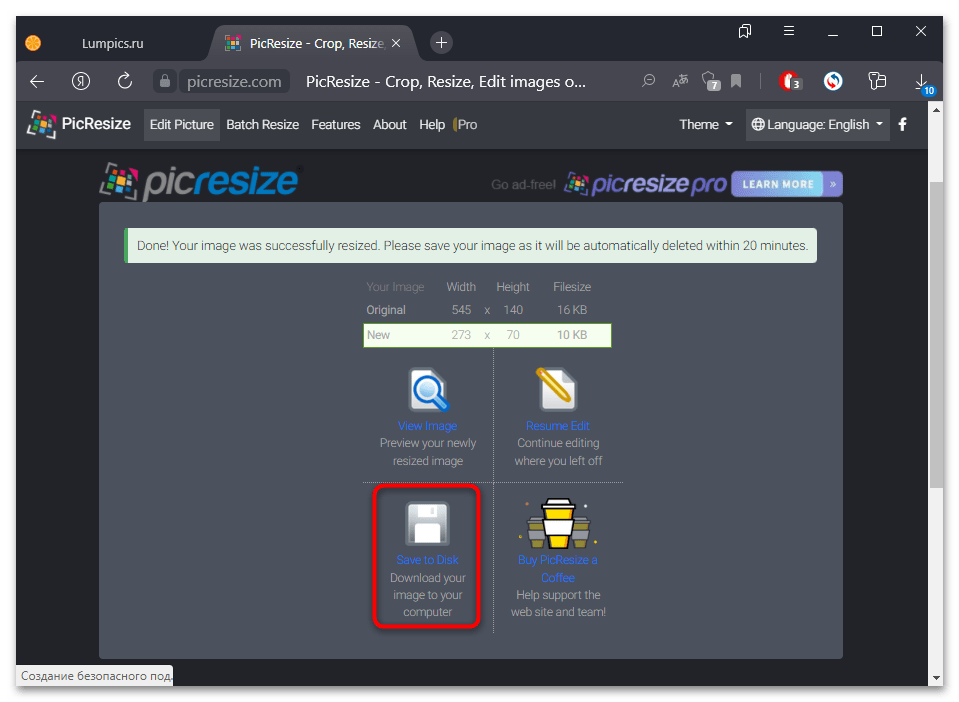
Для поддержки разработчиков ресурса предлагается купить измененную фотографию за символическую сумму.
Наша группа в TelegramПолезные советы и помощь