
В Unix-подобных операционных системах подключить каталога NFS (Network File System) довольно просто, однако если вам понадобится использовать NFS шару в Windows, придется выполнить ряд дополнительных действий. В этой статье мы покажем, как в Windows 10 подключить NFS каталог, который находинся на UNIX системе. Все описанные инструкции будут работать в Windows 10 Pro (версия 10.0.14393 и выше).
- Установка клиента NFS (службы для NFS)
- Как разрешить запись в NFS каталог анонимному пользователю
- Как подключить NFS каталог в Windows 10
Содержание:
Установка клиента NFS (службы для NFS)
В первую очередь в Windows 10 нужно установить клиент NFS. Для установки необходимо выполнить следующие шаги:
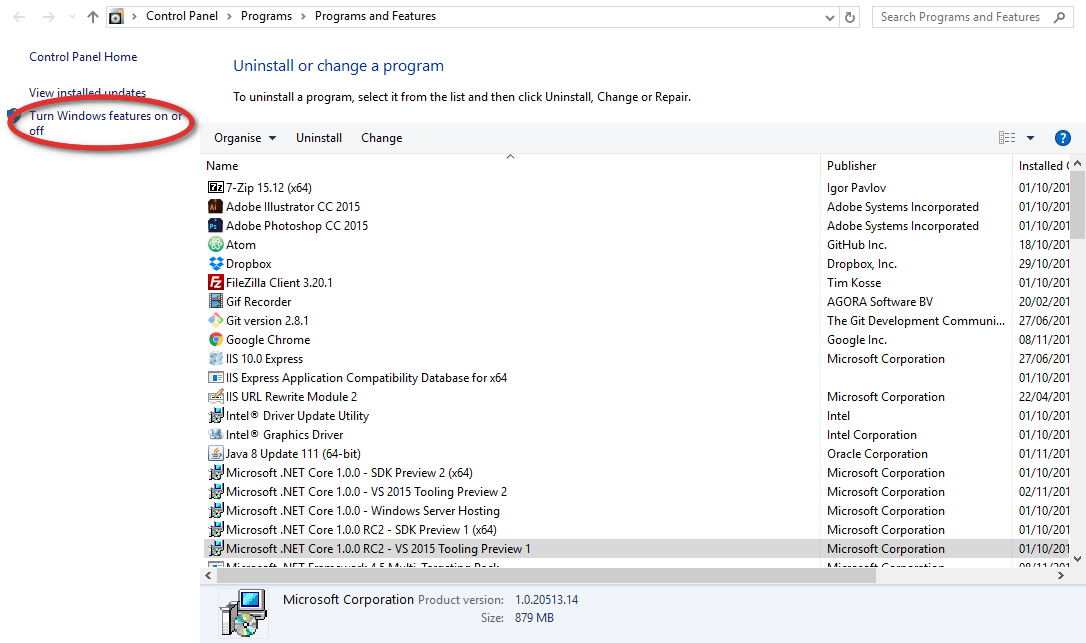
- Откройте раздел «Programs and Features».

- Щелкните по пункту «Turn Windows features on or off».

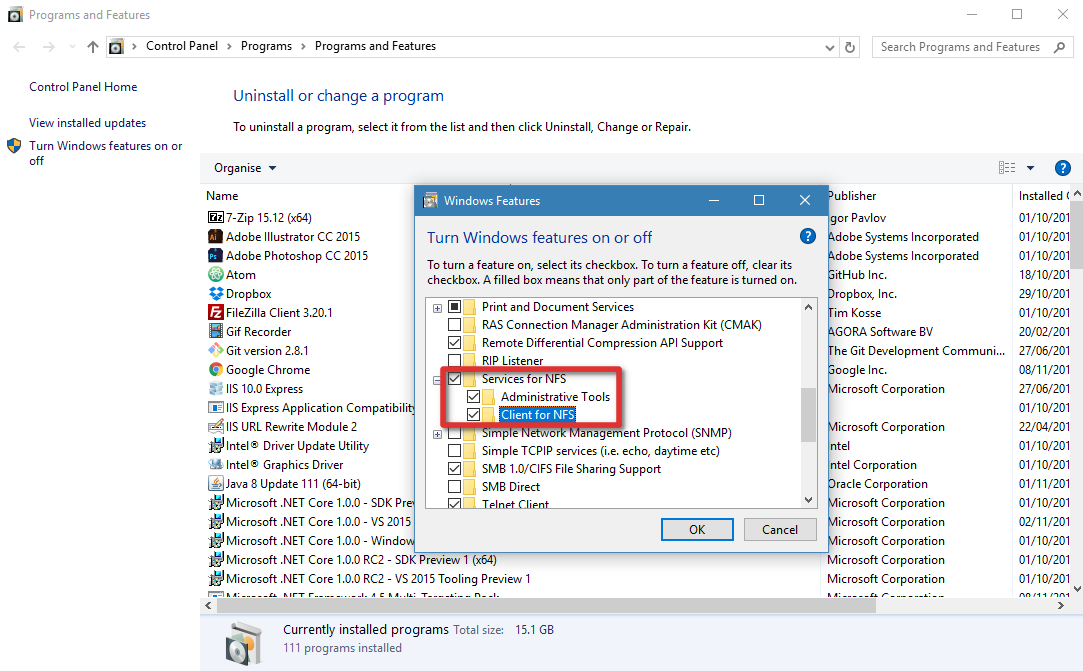
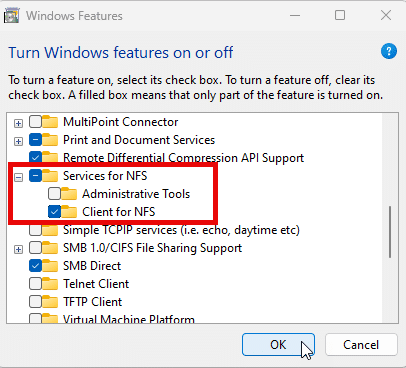
- В появившемся списке в разделе Services for NFS включите NFS клиента (Client for NFS), а затем нажмите «ОК».

- После установки нажмите кнопку «Close» и вернитесь на рабочий стол.

Как разрешить запись в NFS каталог анонимному пользователю
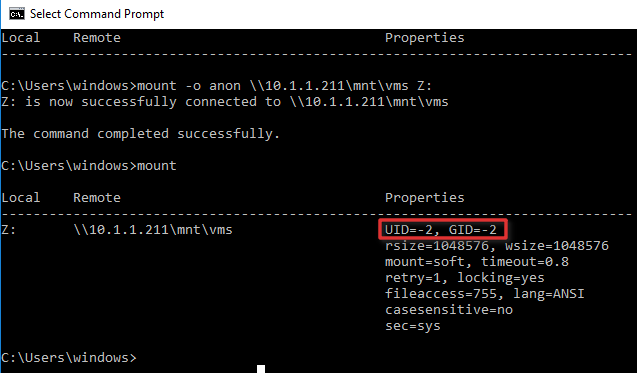
По умолчанию при подключении NFS каталога с UNIX системы, анонимному пользователю (anonymous) предоставляются права только на чтение. Чтобы предоставить анонимным пользователям право записи, необходимо изменить значения UID и GID, которые используются для монтирования NFS каталога в Windows. Пример стандартных настроек представлен на рисунке ниже.
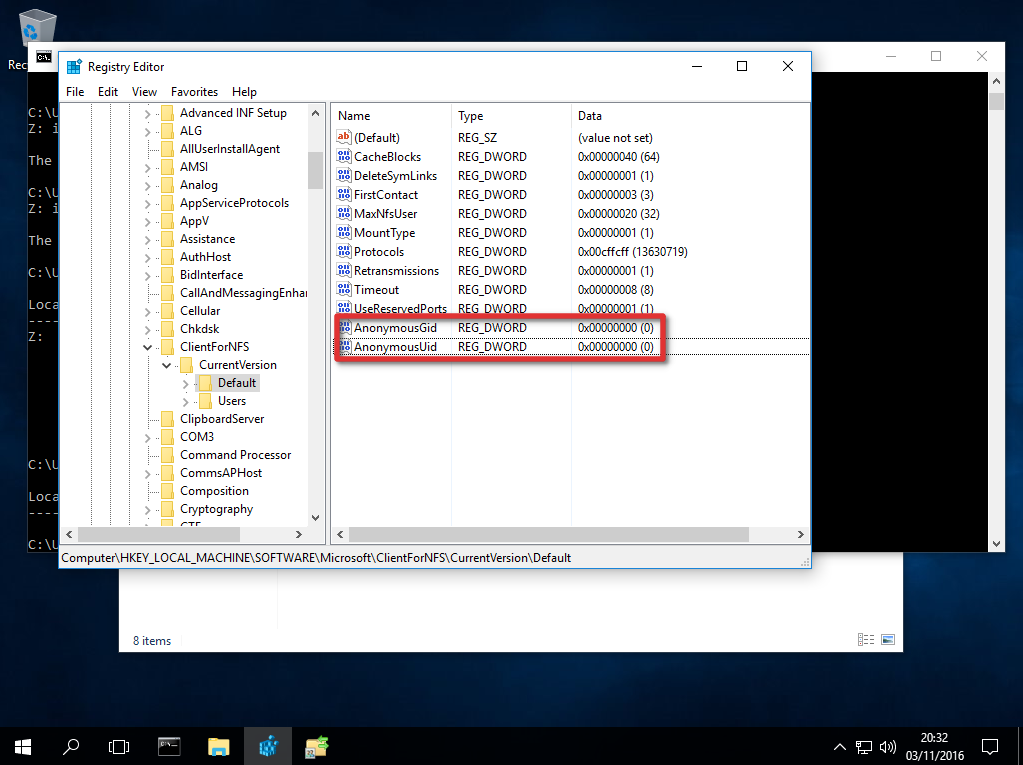
Чтобы изменить значение полей UID и GID, нам потребуется внести изменения в реестр Windows.
- Откройте редактор реестра regedit.
- Перейдите в ветку реестра — HKEY_LOCAL_MACHINE\SOFTWARE\Microsoft\ClientForNFS\CurrentVersion\Default.
- В каталоге «Default» создайте новый параметр типа DWORD (32бит) с именем AnonymousUid и назначьте UID, назначенный на каталог в UNIX, к которому открыт доступ через NFS.
- В ветке Default создайте ещё один параметр DWORD (32-бит) с именем AnonymousGid и назначьте GID, назначенный данному каталогу в UNIX.

- Для того, чтобы изменения вступили в силу вам необходимо перезапустить клиент NFS или перезагрузить компьютер.
Список подключенных NFS каталогов и параметры монтирования можно вывести с помощью команды Mount без параметров.
Результат работы команды mount теперь должен выглядеть следующим образом:
Local Remote Properties
-------------------------------------------------------------------------------
Z: \\10.1.1.211\mnt\vms UID=0, GID=0
rsize=1078756, wsize=1078756
mount=soft, timeout=1.6
retry=1, locking=yes
fileaccess=755, lang=ANSI
casesensitive=no
sec=sys
Обратите внимание на значение полей UID и GID, которое равно 0. UID=0, GID=0 — означает, что общий ресурс монтируется под пользователем root.
Как подключить NFS каталог в Windows 10
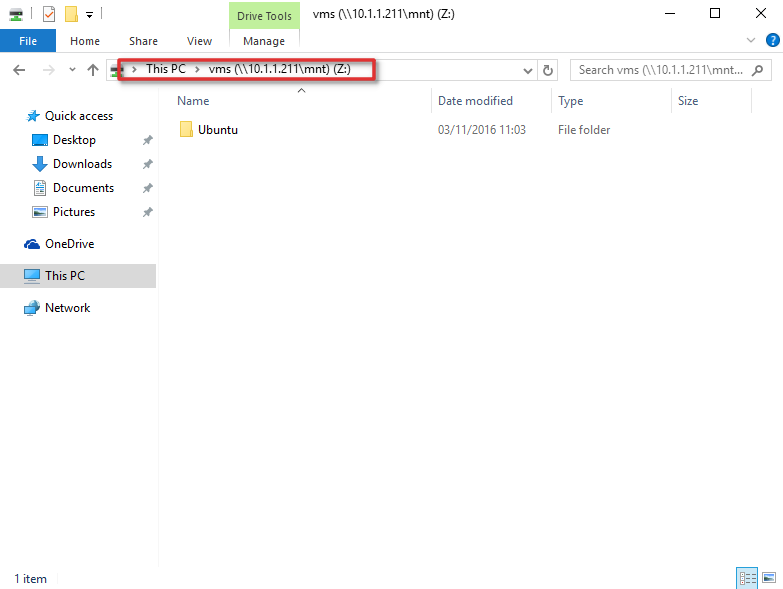
Смонтировать NFS каталог в Windows 10 можно с помощью команды mount. Например, смонтируем NFS каталог и назначим ему букву диска Z:. Предположим, что ваше NAS устройство находится в той же сети, что и ваш компьютер с установленной операционной системы Windows, а IP-адрес устройства — 10.1.1.211. С помощью следующей команды можно смонтировать общий ресурс NFS в /mnt/vms.
Mount –o anon \\10.1.1.211\mnt\vms Z:
Z: is now successfully connected to \\10.1.1.211\mnt\vms.
The command completed successfully
Теперь общий ресурс создан, и мы можем получить доступ к данным. В нашем примере сетевой ресурс (диск) обозначается буквой «Z».
На этом настройка NFS завершена и вы сможете сохранять данные на свое NAS устройство через смонтированный NFS каталог. Обратите внимание, что при в первый раз открытие этого каталога выполняется довольно долго.
Сетевая файловая система NFS является родным для мира Linux способом организации общего доступа к файлам по сети и ее взаимоотношения с Windows долгое время оставались напряженными. Однако последнее время ситуация начала меняться и Windows перешел от конфронтации к сотрудничеству с открытым ПО. Начиная с Windows 10 1607 (14393) в системе появился штатный NFS-клиент, который позволяет прозрачно подключать и использовать NFS-ресурсы. В данной статье мы расскажем, как его установить и использовать, а также разберем некоторые особенности эксплуатации.
Онлайн-курс по устройству компьютерных сетей
На углубленном курсе «Архитектура современных компьютерных сетей» вы с нуля научитесь работать с Wireshark и «под микроскопом» изучите работу сетевых протоколов. На протяжении курса надо будет выполнить более пятидесяти лабораторных работ в Wireshark.
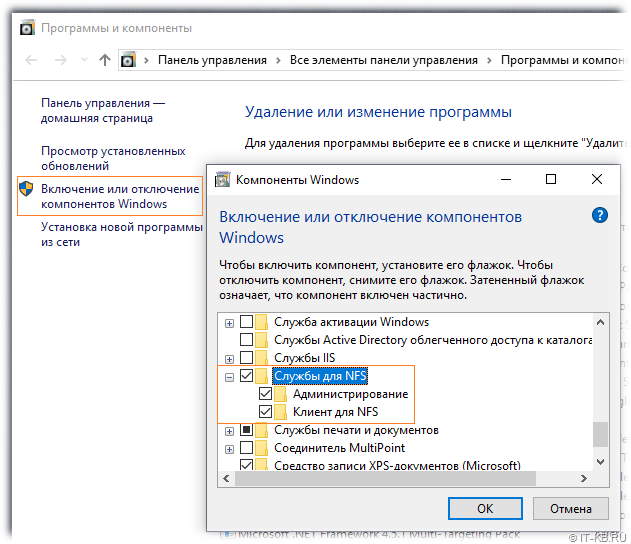
Для установки NFS-клиента откройте оснастку Программы и компоненты и перейдите по ссылке Включение или отключение компонентов Windows, найдите там раздел Службы для NFS и включите его содержимое.

Также можно быстро выполнить установку при помощи PowerShell, для выполнения команды нужно запустить терминал с повышенными правами:
Enable-WindowsOptionalFeature -FeatureName ServicesForNFS-ClientOnly, ClientForNFS-Infrastructure -Online -NoRestartГрафических инструментов для подключения NFS-ресурсов нет, поэтому снова воспользуемся терминалом, только теперь запустим его без повышения прав:
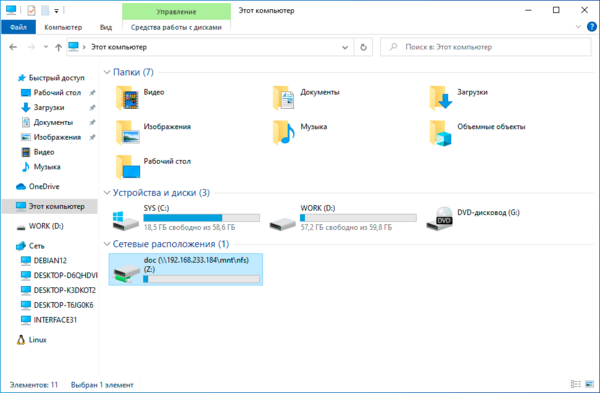
mount -o anon \\192.168.233.184\mnt\nfs\doc Z:Команда mount поддерживает ряд опций, которые указываются после ключа -o, в данном случае опция одна — anon, что означает подключение анонимным пользователем. Затем указываем сетевой путь к экспортируемому ресурсу, обратите внимание, что NFS-клиент для Windows поддерживает только NFS v3 и поэтому путь нужно указывать не от корня NFS, а от корня файловой системы. И наконец буква диска куда будет примонтирован ресурс. Адрес NFS-сервера в нашем случае 192.168.233.184.
Если нигде не было допущено ошибок, то в проводнике появится новый сетевой диск с указанной буквой.
Для отключение используйте команду:
umount Z:У команды mount есть один существенный недостаток, сетевые диски, подключенные таким образом, не восстанавливаются при загрузке системы. Можно, конечно, пойти наиболее простым путем и добавить в автозагрузку пакетный файл с нужными командами, но лучше снова позвать на помощь PowerShell. Данную команду также нужно выполнять без повышения прав:
New-PSdrive -PSProvider FileSystem -Name Z -Root \\192.168.233.184\mnt\nfs\doc -PersistОбратите внимание, что букву диска для монтирования указываем без двоеточия, а опция -Persist предписывает подключить ресурс на постоянной основе.
Для отключения ресурса воспользуйтесь командой:
Remove-PSdrive -Name ZДля просмотра всех смонтированных NFS-ресурсов, неважно как они были подключены, используйте команду:
mount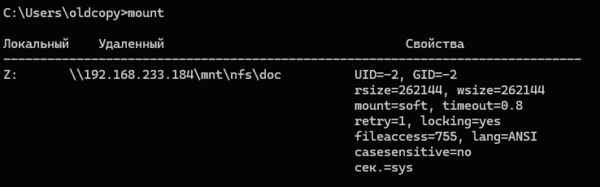
Как можем увидеть, при анонимном подключении Windows использует UID/GID = -2, если мы используем all_squash со стороны NFS-сервера, то это не имеет особого значения, в иных случаях нам может потребоваться указать иные идентификаторы. Это можно сделать через системный реестр, откройте ветвь:
HKEY_LOCAL_MACHINE\SOFTWARE\Microsoft\ClientForNFS\CurrentVersion\DefaultИ добавьте туда два параметра DWORD (32бит) с именами AnonymousUid и AnonymousGid и укажите в них нужные идентификаторы в десятичном виде. После чего перезагрузите компьютер.
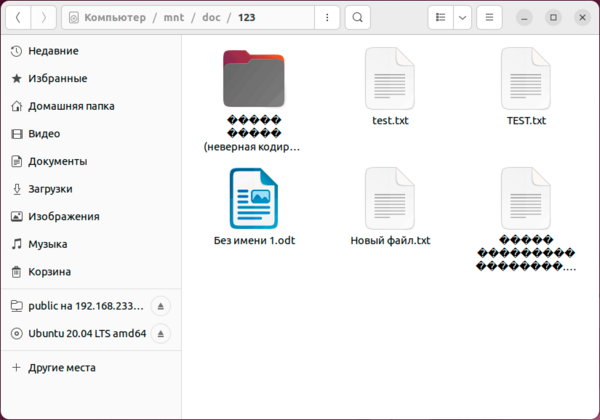
А теперь о проблемах. Для их понимания достаточно посмотреть на следующий скриншот:

Начнем с самого безобидного, регистра в именах файлов. Как мы помним — Linux система чувствительная к регистру, поэтому там TEST.txt и test.txt разные файлы. И если вы будете работать с ними в пределах NFS-ресурса, то проблем не возникнет, вы можете даже открыть оба файла одновременно, внести изменения и сохранить. Все это возможно потому, что NFS — это не протокол удаленного доступа, а именно сетевая файловая система.
Проблемы начнутся, если вы захотите скопировать их в свою систему. Неопытный пользователь вполне может допустить ошибку и перезаписать важный локальный файл.
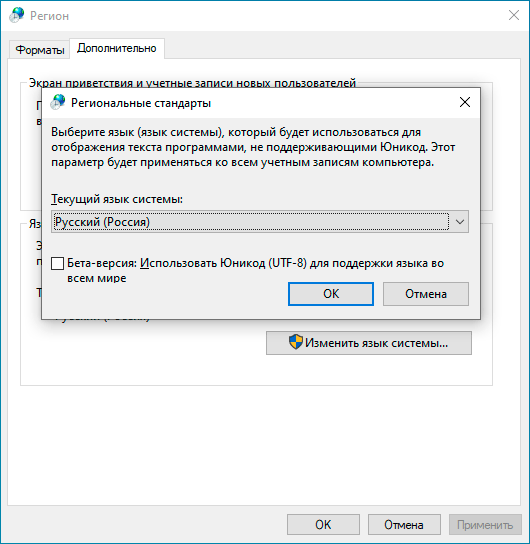
А вот следующая проблема куда серьезней и не имеет приемлемого решения на сегодняшний день. Современные Linux системы давно работают с UTF-8, в то время как Windows продолжает использовать региональные кодовые страницы, например, CP-1251 для русского языка. Это приводит к тому, что имена файлов, набранные кириллицей (или любыми иными национальными символами) отображаются «крякозябликами». Сами файлы при этом доступны и могут быть отредактированы.
Если же мы со стороны Windows поместим на NFS-ресурс файл с кириллицей в имени, то со стороны Linux мы увидим веселые ромбики.
В качестве решения можно найти совет включить поддержку UTF-8 в Windows, которая пока находится в состоянии бета. Эта возможность доступа в языковых настройках панели управления.
Но это решение из разряда «одно лечим — другое калечим» и покалечено будет гораздо больше, чем вылечено. Дело в том, что достаточно большое количество вполне современных программ ничего не знают об UTF-8 и не умеют с ним работать, в итоге веселые ромбики начнут попадаться вам в самых неожиданных местах вашей системы.
Поэтому, используя NFS-клиент для Windows следует четко понимать все плюсы, минусы и имеющиеся недостатки. Но в целом появление поддержки NFS в Windows — хорошо, так как делает поддержку гетерогенных сред проще.
Онлайн-курс по устройству компьютерных сетей
На углубленном курсе «Архитектура современных компьютерных сетей» вы с нуля научитесь работать с Wireshark и «под микроскопом» изучите работу сетевых протоколов. На протяжении курса надо будет выполнить более пятидесяти лабораторных работ в Wireshark.
Modern organizations typically use a mixture of operating systems, including Unix, Linux, Windows and macOS. Network File System (NFS) is an open client/server protocol that allows organizations to centralize their data storage on one or more servers and enable seamless file sharing between their various operating systems.
This blog explains how to mount NFS Windows clients so users can access shared files over the network as if they were stored locally. It also provides best practices to optimize both security and performance.
Configuring NFS on Windows: Step-by-Step Guide
To allow a user to access remote NFS files, follow these steps to configure Windows mount NFS.
Step 1: Install the ‘Client for NFS’ feature on your Windows machine to set up the NFS client for Windows.
In Windows 10 or Windows 11, open Control Panel and go Windows Features. Expand Services for NFS and check the box next to Client for NFS, as shown below.
For Windows Server 2012 and above, run the Roles and Features Wizard and select Client for NFS, as shown below.

Alternatively, you can use an elevated Windows PowerShell session to install the NFS client Windows:
- For Windows 10 or Window 11, the command is:
Enable-WindowsOptionalFeature -Online -FeatureName ServicesForNFS-ClientOnly
- For Windows Server, the command is:
Install-WindowsFeature -Name NFS-Client
Step 2: Verify the client and connectivity.
Verify that the NFS Client service is running on your machine, as shown below.
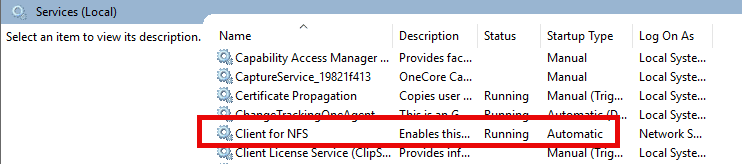
Of course, you must have connectivity to the designated NFS server. For a successful Windows NFS mount, ensure that the NFS Client service is running and the firewall allows NFS traffic. The default port is 2049.
Step 3: Perform identity mapping.
To enable Windows users to authenticate to a Unix server providing NFS exports, we need to map Windows users to the Unix user identifiers (UIDs) and group identifiers (GIDs) used by Unix-like operating systems. This mapping allows the Unix server to determine which user made the request for the NFS export.
Identity mapping can be done using any of the following methods:
- Active Directory (if integrated with the NFS environment)
- Local user mapping files
- Windows Registry settings
The first option is preferred for security and scalability reasons.
Method A (Preferred): Perform Identity Mapping in Active Directory (AD)
If both the Unix NFS server and Windows NFS client are joined to the same Active Directory domain, then we can use identity mapping in Active Directory. This is the preferred method whenever possible.
By default, a NFS client won’t look up identity mapping in Active Directory. However, we can change that by running the following command in an elevated PowerShell session on the NFS client:
Set-NfsMappingStore -EnableADLookup $True -ADDomainName “yourdomain.com”
You can add these LDAP options to specify your domain controllers:
Set-NfsMappingStore -LdapServers “dc1.yourdomain.com”,”dc2.yourdomain.com”
Restart the NFS client service.
Next, we need to configure our identity mapping. We can do that in Active Directory Users and Computers as follows:
- Enable Advanced Features enabled under the View dropdown, as shown below.
- Right-click on the object you want to view and select Properties.
- In the Attribute Editor tab, select the uidNumber or gidNumber attribute and click Edit.
- Enter a value, and click OK to save your changes.
Alternatively, you can use the following PowerShell command:
Set-ADUser -Identity <UserPrincipalName> -Add @{uidNumber=”<user_unix_uid>”;gidNumber=”<user_unix_gid>”}
Replace the following:
- UserPrincipalName — The user to modify (e.g., user@domain.com)
- @{ … } — A hashtable containing the new attributes to add
- uidNumber — The Unix user ID (UID) for the user
- gidNumber — The Unix group ID (GID) for the user’s primary group
To perform this task automatically, create a CSV file containing user data and loop through it.
Method B: Perform Identity Mapping using Local Configuration Files
Using local user mapping files is a straightforward approach to establish correspondence between Windows users and Unix UIDs/GIDs without relying on Active Directory. This method uses two main configuration files:
- passwd — Maps Windows users to Unix UIDs
- group — Maps Windows groups to Unix GIDs
Both files are typically located in the C:\Windows\system32\drivers\etc\ directory. They follow a specific format, with each line representing a user or group mapping. When a Windows user attempts to access an NFS resource, the NFS service consults these files to look up the user’s Windows account name and retrieve the corresponding UID and GID, which are then used for NFS operations.
This method is simple to set up and manage in small environments and is particularly useful for standalone servers or workgroups. However, because it requires manual maintenance of mapping files, it doesn’t scale well for large environments. In addition, while it offers a solution for environments where Active Directory integration is not feasible, it’s important to consider security implications and regularly audit the mappings to ensure they remain accurate and secure.
Method C: Perform Identity Mapping using Windows Registry Settings
This method involves setting registry values to specify a default UID and GID that the Windows NFS client will use when accessing NFS shares. It’s particularly useful when you want all NFS access from the Windows client to appear as a specific Unix user, regardless of the Windows user account.
To implement this mapping, use the following PowerShell commands:
New-ItemProperty “HKLM:\SOFTWARE\Microsoft\ClientForNFS\CurrentVersion\Default” -Name AnonymousUID -Value <unix_export_owner_uid> -PropertyType “DWord”
New-ItemProperty “HKLM:\SOFTWARE\Microsoft\ClientForNFS\CurrentVersion\Default” -Name AnonymousGID -Value <unix_export_owner_gid> -PropertyType “DWord”
You need to reboot to have the new settings take effect. This mapping will apply to all NFS mounts made by the Windows client. After performing identity mapping, you can mount NFS in Windows using the command prompt.
Note that this method applies the same UID/GID to all NFS access from the Windows client, which may not provide sufficient access control in multi-user environments. In addition, modifying the registry requires administrative privileges, which could be a security concern. For these and other reasons, this method is considered an insecure approach and is not recommended.
Mounting in NFS means attaching a remote file system (exported by an NFS server) to a directory on the local file system of a client machine. When a client mounts an NFS share, it connects to the remote file system and makes it appear as if the NFS share is part of the local directory structure.
To mount NFS on Windows, map it to an available drive letter using the command prompt, as follows:
mount \\<nfs_server_ip_address>\<pathtonfsexport> Z:
Replace the following:
- <nfs_server_ip_address> — The IP address of your NFS server
- <pathtonfsexport> — The export path on the server
- Z — The drive letter to which the NFS share will be mounted on your Windows computer.
You can add additional options; for instance, mount -o anon specifies that the connection should be made anonymously, and mount -o nolock overrides the default file locking used by NFS.
After running the mount or mount o command,check whether the NFS share was successfully mounted by running the net use command to display all mapped network drives.
Troubleshooting Tips
Here are some errors that can arise during the mounting process and their typical underlying causes:
- Permission denied — Incorrect export settings on the NFS server or NFS rule blocking
- Access denied by server — Mismatched UID/GID between client and server
- Version mismatch — Client and server using incompatible NFS versions
- Mount point already in use — Attempting to mounting to a directory that’s already being used as a mount point
- No such file or directory — The export path on the server doesn’t exist
Best Practices for NFS Mounting on Windows
The following best practices can help you optimize security and performance when using NFS mounting on Windows.
Security
- Use strong authentication protocols such as Kerberos.
- Configure firewalls to segment the network and restrict NFS access from untrusted networks, allowing only necessary ports (TCP and UDP port 2049).
- Encrypt data in transit using secure protocols to safeguard data against eavesdropping and tampering.
- Limit NFS export permissions by granting the minimum required access and restricting client connections to specific IP addresses or hostnames.
- Regularly update and patch both the Windows client and NFS server to protect against known vulnerabilities.
- Enable detailed logging on the NFS server and monitor for suspicious activity.
- Use additional network security measures like VPNs for remote access.
Performance
- If possible, use NFSv4 or NFSv4.1 rather than NFSv3.
- Enable read and write caching on the client side to improve performance for frequently accessed data. You can do this using the following command: mount –o readcache,writecache.
- If security is not a concern in your environment, consider using the nolock option to disable file locking.
- Keep the Windows NFS client software up to date to benefit from the latest performance improvements and bug fixes.
FAQ
Does Windows 11 support NFS clients?
Yes, Windows 11 supports NFS clients.
How can I use NFS in Windows?
Here are some ways you can use NFS in Windows:
- You can provide access to the same file share using both the SMB and NFS protocols by using a Windows NFS file server.
- You can deploy a non-Windows operating system to provide NFS file shares accessible to non-Windows clients using the NFS protocol.
- To enable applications to be migrated from one operating system to another, you can store data on file shares accessible using both the SMB and NFS protocols.
What improvements are included in NFS version 4.1?
For complete details, visit the Microsoft NFS page. Key improvements in version 4.1 include:
- Remote Procedure Call (RPC)/External Data Representation (XDR) transport infrastructure, which offers better support and provides better scalability
- RPC port multiplexer
- Auto-tuned caches and thread pools
- New Kerberos privacy implementation and authentication options
How do I add the server for NFS role service?
In Server Manager or Windows Admin Center, use the Add Roles and Features Wizard.
What Windows command-line administration tools does Server for NFS contain?
- Mount provides an NFS mount on Windows clients that maps to a local drive.
- Nfsadmin manages configuration settings of the Server for NFS and Client for NFS components.
- Nfsshare sets up NFS share settings for folders that are shared via Server for NFS.
- Nfsstat displays or resets statistics on calls received by Server for NFS.
- Showmount lists the file systems that have been exported by Server for NFS.
Security Researcher at Netwrix and member of the Netwrix Security Research Team. Joe is an expert in Active Directory, Windows, and a wide variety of enterprise software platforms and technologies, Joe researches new security risks, complex attack techniques, and associated mitigations and detections.
Администрируя серверы на базе ОС Linux в среде, где в качестве основной клиентской ОС используется Windows, время от времени приходится сталкиваться с необходимостью что-либо скопировать с клиентской Windows на Linux-систему или наоборот, с Linux-системы на Windows. Чаще всего для этого используются возможности протоколов SSH/SCP с помощью таких инструментов, как например, утилита pscp.exe. Но когда приходится сталкиваться с файловыми Linux-серверами, позволяющими использовать возможности протокола NFS, мы можем задаться вопросами типа «может ли клиентская ОС Windows выступать в качестве NFS-клиента?», «есть ли в клиентской ОС Windows какая-то встроенная реализация клиента NFS?». Именно такие вопросы у меня возникли в период времени, который совпал с периодом, когда мы перебирались с Windows 8.1 на первый релиз Windows 10. Информация, которую в тот момент удалось найти по этому вопросу, заключалась в том, что функциональность NFS-клиента имеют только «старшие» редакции клиентских ОС Windows, такие как Windows 7 Ultimate/Enterprise, Windows 8/8.1 Enterprise и Windows 10 Enterprise. Однако в нашем случае использовалась ОС Windows 10 редакции Professional, поэтому пришлось отбросить эти мысли.
Недавно, читая обсуждения на форумах TechNet, я столкнулся с информацией о том, что с какого-то момента времени в ОС Windows 10 редакции Professional появилась возможность использовать функционал NFS-клиента. По информации из некоторых источников такая возможность появилась в Windows 10 версии 1607 (10.0.14393 / Anniversary Update).
Решив проверить эту информацию на имеющейся у меня под руками Windows 10 1803 (10.0.17134 / April 2018 Update) редакции Professional, я обнаружил, что теперь у нас действительно имеется возможность использования этого функционала.
Чтобы включить NFS-клиента, можем воспользоваться оснасткой управления программами и компонентами appwiz.cpl. Здесь в перечне «компонентов Windows» можно найти доступные к включению «Службы для NFS«.
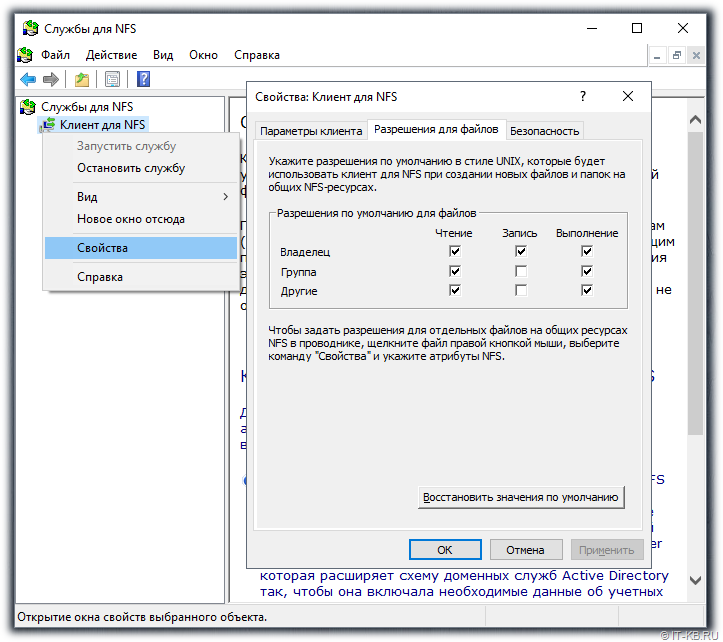
После завершения установки компонент в Панели управления в разделе «Администрирование» появится оснастка «Службы для NFS» (nfsmgmt.msc), в которой мы сможем управлять некоторым параметрами работы NFS-клиента.
Предполагаем, что на стороне NFS сервера уже настроены разрешения для доступа с клиентской системы, например, явно разрешён доступ по IP адресу клиента. Простейший пример установки и настройки NFS-сервера на стороне CentOS Linux можно найти в статье Вики «Установка и настройка сервера и клиента NFS в CentOS Linux 7.2».
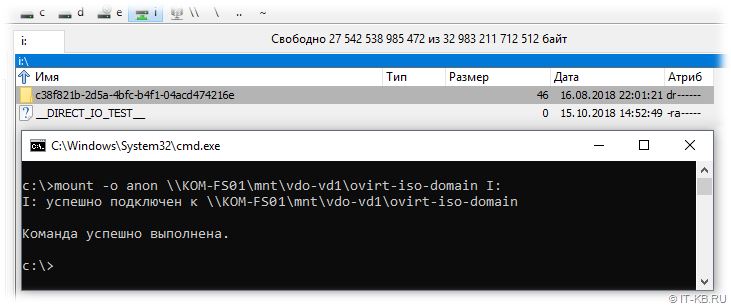
После настройки прав доступа на стороне NFS-сервера переходим на Windows 10 и выполняем подключение сетевого каталога с помощью утилиты «mount«. Простейший пример анонимного подключения к сетевому каталогу выглядит так:
mount -o anon \\KOM-FS01\mnt\vdo-vd1\ovirt-iso-domain I:
где:
- «-o anon» — подключаться с правами анонимного пользователя;
- «KOM-FS01» — имя NFS-сервера;
- «mnt\vdo-vd1\ovirt-iso-domain» — локальный путь к каталогу на NFS-сервере;
- «I» — буква диска Windows
Другие доступные параметры и ключи утилиты, можно посмотреть командой «mount /?«. Например, при подключении мы явно можем указать имя пользователь и пароль на NFS-сервере.
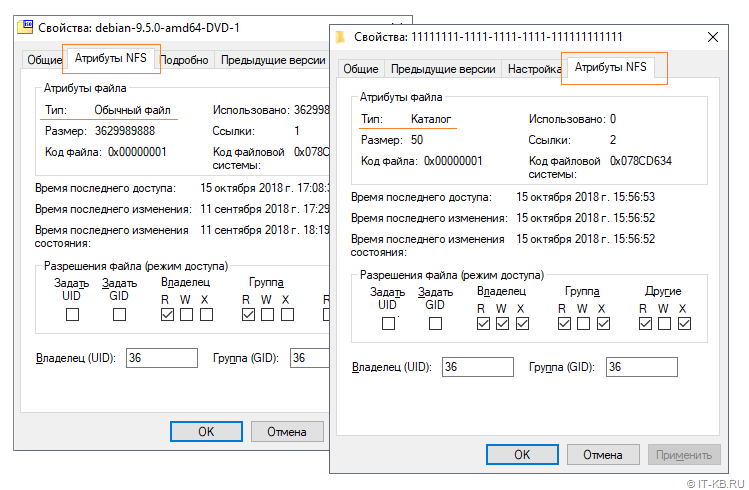
При открытии свойств каталогов и файлов в подключённом NFS-каталоге мы увидим специальную вкладку «Атрибуты NFS» с соответствующими атрибутами, в том числе и информацию о текущих разрешениях на каталог/файл, которыми, в случае достаточных прав, мы можем управлять.
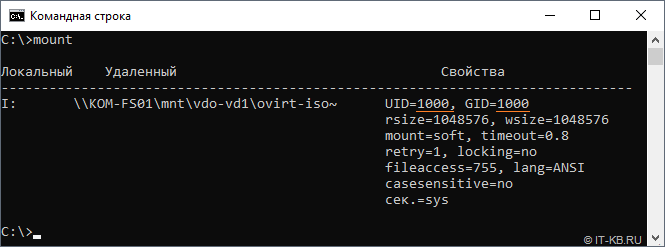
При повторном выполнении команды mount без указания параметров, мы получим сведения о текущий подключениях NFS-клиента и свойствах этих подключений:
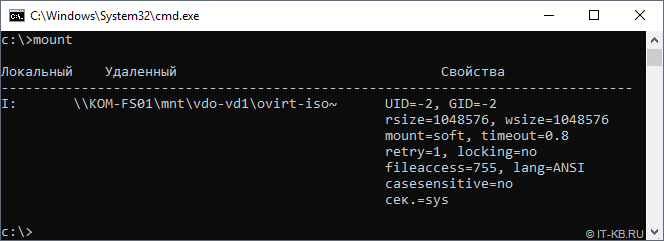
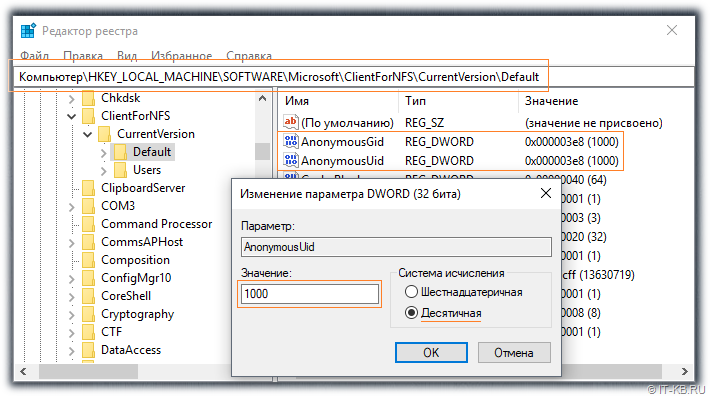
Здесь мы сможем увидеть то, с какими UID и GUID, выполнено подключение. Для анонимных подключений это по умолчанию -2/-2. Если по какой-то причине у нас возникнет необходимость изменить эти идентификаторы для всех анонимных клиентских подключений, то мы можем добавить пару отсутствующих по умолчанию параметров реестра типа DWORD (32-бита):
- AnonymousUid
- AnonymousGid
в ключ реестра:
HKEY_LOCAL_MACHINE\SOFTWARE\Microsoft\ClientForNFS\CurrentVersion\Default
В значениях созданных параметров можно записать нужные UID и GUID, которые будут использоваться при всех анонимных подключениях. На скриншоте ниже используется пример со значениями 1000:1000 (десятичное).
Если мы хотим, чтобы все анонимные подключения использовали root-овые идентификаторы, то в соответствующих параметрах реестра нужно указать AnonymousUid = 0 и AnonymousGid = 0. Указание root-овых идентификаторов может быть полезно в случае, если, например, нам требуется не только чтение, но запись в подключенном NFS-каталоге, а удалённый NFS-сервер разрешает запись только root-пользователю и/или членам группы root.
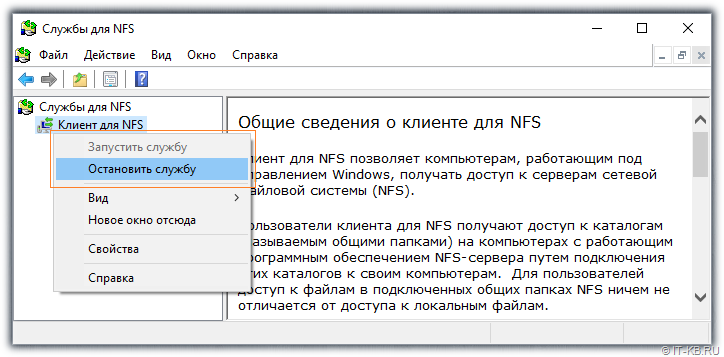
Для вступления изменений в силу потребуется выполнить остановку и повторный запуск службы клиента NFS из ранее упомянутой оснастки «Службы для NFS» (nfsmgmt.msc).
Либо, если перезапуск компьютера не составляет проблемы, то для вступления изменений в силу можно выполнить и перезагрузку клиентского компьютера.
Здесь хочу сделать маленькое отступление относительно перезапуска службы клиента NFS и поделиться своими наблюдениями.
Мои попытки перезапускать системную службу «Клиент для NFS» (NfsClnt) через стандартные механизмы, такие как оснастку управления службами services.msc или утилиту «net«, показали, что это по какой-то причине приводит к невозможности запуска службы после её остановки. Поэтому для перезапуска NFS-клиента лучше использовать именно «родную» оснастку. Хотя, опять же, замечено, что многократные остановки/запуски службы в оснастке «Службы для NFS» также могут привести к неадекватной работе NFS-клиента. В результате чего, например, утилита «mount» может перестать подключать NFS-каталоги, выдавая ошибку сети:
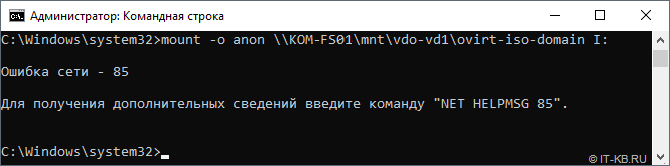
В таких случаях помогает только перезагрузка клиентского компьютера, после которой всё снова начинает работать.
После того, как нужные нам изменения внесены в реестр и служба клиента NFS успешно перезапущена, снова попытаемся подключить NFS-каталог и посмотрим командой «mount» сведения о подключениях.
Как видим, теперь в качестве идентификаторов безопасности выступают именно те, что были ранее нами указаны в реестре.
Отключение подключенных по протоколу NFS сетевых ресурсов выполняется также просто, как и подключение, только с помощью другой утилиты – «umount«
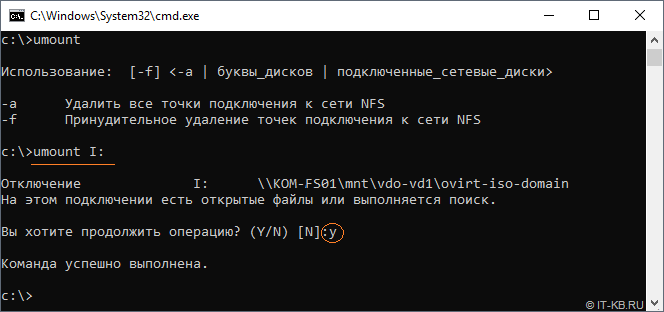
В общем это хорошо, что теперь у пользователей ОС Windows 10 редакции Professional есть штатная возможность работать с сетевыми файловыми ресурсами по протоколу NFS. Будем использовать это в работе.
First published on TECHNET on Oct 09, 2012
This document describes the selection, configuration and usage of the user and group identity mapping options available to Client for NFS available in selected versions of Windows 8 and to Server for NFS and Client for NFS available in selected versions of in Windows Server 2012 to assist an systems administrator when installing and configuring the NFS components within Windows 8 and Windows Server 2012. It describes the available mapping mechanisms and provides guidance on which of those mechanisms to use in common scenarios. Here’s a summary of the items on this post:
- ID & ID Mapping
- ID Mapping with RPCSEC_GSS
- ID Mapping Mechanisms
- Setting a Mapping for an Identity
- How to Select a Mapping Method
- Troubleshooting
The methods Windows and NFS use to represent user and group identities are different and are not necessarily directly interchangeable. Identity Mapping is the process of converting from an NFS identity representation to a Windows representation and vice-versa. The following sections briefly describe some representations of identity and then how they are used by the NFS authentication methods.
Windows uses a Security Identifier (SID) to represent an account. This applies to both user and group accounts. A SID can be converted to an account name and vice-versa directly.
The representation used by NFS can take many forms depending upon the authentication method and the protocol version.
The most widely used method is to represent an identity using a 32bit unsigned integer, for both users (UID) and groups (GID). This method can be used both by NFS V3 and NFS V4.1. Client for NFS and Server for NFS can convert to or from these identities and a Windows account using a mapping store which is populated with suitable mapping information.
For NFS version V4.1, user and group identities can take the form of “account@dns_domain” or “numeric_id” where the numeric id is a string form of a UID or GID 32bit unsigned integer expressed as a decimal number (See RFC 5661 —
http://tools.ietf.org/html/rfc5661
, section 5.9). For the “account@dns_domain” format, Server for NFS can use this form of identity directly without any mapping. For the “numeric_id” format, Server for NFS uses the configured mapping store to convert this to a Windows account. Client for NFS does not support NFS V4.1 in Windows 8 or Windows Server 2012.
For both NFS V3 and V4.1, identities can also be encoded in a Kerberos ticket. Although the accessing account can be accurately represented and retrieved from the ticket, this form of identity is only used for authentication of requests and not as a general representation of an identity. So for example, for a READDIR request, the identity of the account making the request may well be encoded as part of the Kerberos mechanism to authenticate the request. However, the ownership of the objects in the reply will make use of UID, GID or “account@dns_domain” depending on the protocol and mapping information.
NFS protocols allow for several different authentication mechanisms. The most commonly encountered, and those supported by the Windows Server 2012 Server for NFS are
- AUTH_NONE
- AUTH_SYS (also known as AUTH_UNIX)
- RPCSEC_GSS
The AUTH_NONE mechanism is an anonymous method of authentication and has no means of identifying either user or group. Server for NFS will treat all accesses using AUTH_NONE as anonymous access attempts which may or may not succeed depending upon whether the export is configured to allow them.
The AUTH_SYS mechanism is the most commonly used method and involves identifying both the user and the group by means of a 32bit unsigned integers known as UID and GID respectively. Special meaning is attached to a UID value of ‘0’ (zero) and is used to indicate the “root” superuser.
The RPCSEC_GSS mechanism is a Kerberos V5 based protocol which uses Kerberos credentials to identify the user. It provides several levels of protection to the connection between an NFS client and an NFS server, namely
- RPC_GSS_SVC_NONE where the request identifies the user, and sessions between the client and server are mutually authenticated. This identification is not based on UIDs and GIDs as provided by AUTH_SYS.
- RPC_GSS_SVC_INTEGRITY where not only the client and server mutually authenticated, but the messages have their integrity validated.
- RPC_GSS_SVC_PRIVACY where not only are the client and server mutually authenticated, but the message integrity is enforced and the message payloads are encrypted.
This paper is only concerned with identity and identity mapping. For further details on how to use RPCSEC_GSS with the Windows Server 2012 Server for NFS see “NFS Kerberos Configuration with Linux Client”.
When using RPCSEC_GSS to provide authentication, the Windows form of the identity of the user making the request can be obtained directly from the information in the request itself. And for some NFS operations that is sufficient. However for NFS V3 based accesses, the NFS protocol itself along with the companion NLM and NSM protocols makes explicit use of UID and GID values in requests (SETATTR), the explicit body of the replies (e.g. READDIR) and in the post-op attributes in replies to many requests. For example, when processing a GETATTR request, the reply contains the UID and GID for the object, so the Windows Server for NFS needs to convert the Windows style identity associated with the file from the file system and convert it to a UID/GID pair to send back to the client. Similarly, for NFS V4.1 based access, the protocol uses “account@dns_domain” or “numeric_id” strings as account identifiers. So although the use of RPCSEC_GSS provides for better security on the connection between the NFS client and server, it does not replace the need for identity mapping.
In order to use the UID and GID values used in NFS requests, they need to be converted, or mapped, to identities that the underlying Windows platform can use. The Microsoft Server for NFS and Client for NFS provide several options to map identities from NFS requests each of which have a set of advantages and disadvantages
-
Active Directory
Best used where established procedures are in use to manage user accounts, where there are many machines using a common set of users and groups and/or configurations where common files are shared using both NFS and SMB protocols (SMB is the standard Windows file sharing protocol)
-
Active Directory Lightweight Directory Services (AD LDS)
or other RFC 2307 compliant identity store
Best used where centralized management of machine local accounts is being used and identity mapping for multiple non-domain joined machines is required.
-
Username Mapping Protocol store (MS-UNMP
)
Legacy (deprecated) mapping solution available as a feature within Windows Server 2003 R2 and the Services for UNIX product. The mapping server itself is no longer supplied but Client for NFS and Server for NFS can be configured to use an existing mapping server. Information on the configuration and use of UNMP based mapping solutions can be found in the Microsoft TechNet article “User Name Mapping and Services for UNIX NFS Support” at
http://technet.microsoft.com/en-us/library/bb463218.aspx
.
-
Local passwd and group files
Best used for standalone Client for NFS or standalone Server for NFS configurations where file sharing is performed using both NFS and SMB, and Windows domains are not readily available. Can be used for domain joined machines if required.
-
Unmapped UNIX Username Access (UUUA)
(applies to Server for NFS using AUTH_SYS only).
Best used for standalone Server for NFS configurations where there are no files being shared by both NFS and SMB and where little to no management of Windows identities is required. Can also be used for domain joined servers if files made available via an NFS export are only going to be accessed by Server for NFS.
There are a number of tools which are involved in managing this mapping information. They include
- Server Manager UI.
- Services for Network File System (NFS).
- Server for NFS PowerShell cmdlets.
- Command line utility nfsadmin (superseded by Server for NFS PowerShell cmdlets).
- Standard Windows domain account management and scripting tools.
As part of Windows Server 2012, the Server for NFS sub-role has introduced a collection of cmdlets, several of which are used to manage the identity mapping information used by NFS. The cmdlets used to manage identity mapping include
- Set-NfsMappingStore
- Get-NfsMappingStore
- Install-NfsMappingStore
- Test-NfsMappingStore
- Set-NfsMappedIdentity
- Get-NfsMappedIdentity
- New-NfsMappedIdentity
- Remove-NfsMappedIdentity
- Resolve-NfsMappedIdentity
- Test-NfsMappedIdentity
This mechanism is only available to domain joined machines, both clients and servers and provides for common identities across a large number of machines and where files can be accessed by both NFS and SMB file sharing protocols.
The mechanism makes use of the Active Directory schema updates to include the “uidNumber” and “gidNumber” attributes to user and group accounts for domains running at a functional level of Windows Server 2003 R2 or higher.
Since these are standard fields in the account records any standard management tools and scripting methods can be used to manipulate these fields.
The schema for account records in domains running at a functional level of Windows Server 2003 R2 or higher includes the fields “uidNumber” and “gidNumber” for user accounts and “gidNumber” for group accounts. If these fields are defined then the NFS client and server will automatically use the values as the UID and GID fields in NFS request operations and map those values to the associated Windows user and group accounts. Note that in user records, the assigned UID number must be unique for each user account, and similarly, for group account, the assigned gidNumber must be unique across all group accounts. Multiple user records can have the same value for gidNumber. If the PowerShell cmdlets are used to set mapping information for an account then the cmdlets will ensure there are no duplicate UIDs or GIDs. If other methods are used then the administrator should take care to ensure there is no improper duplication.
Managing the mapping information will require domain level administrator privileges, namely those required to manage account attributes.
To set the machine to use domain based mapping a PowerShell command can be used
Set-NfsMappingStore -EnableADLookup $true
or the Server Manager can be used. This starts the “Services for Network File System” window, and right-clicking on the “Services for NFS” node the properties dialog can be activated.
To enable Active Directory based mapping, activate the Active Directory mapping source.
This mechanism can be used with both domain and non-domain joined machines where the source of identity maps is stored in an RFC 2307 compliant store accessed via LDAP requests. This provides for a method of managing user identities and mapping information where access to files is going to be shared by non-NFS applications or file sharing methods, and either centralized management is required or preferred and there are too many machines to manage individually using local passwd and group files.
A typical configuration would be where a number of Windows machines running Client for NFS and/or Server for NFS are arranged as a group of machines which share a set of common non-domain based identities. Using AD LDS these can be managed as a single set of identities, much like Active Directory, but without the need for a domain. This makes it simpler to manage identities than using local passwd and group files for any changes to identities and their mappings, since there is just a single location to manage rather than multiple sets of passwd and group files to maintain.
The mechanism makes use of the RFC2307 schema for accounts where the uidNumber and gidNumber attributes are used to manage the user and group identity maps respectively.
Managing the mapping information will require the privileges required to manage user and group accounts and their attributes. The specific privileges required will depend on the solution used.
Note that although AD LDS can be used in a domain environment, there is little advantage in doing so and using the normal Active Directory mapping mechanism will probably prove to be easier to manage. However, using an AD LDS mapping store for domain joined machines can be useful in configurations where the central domain cannot be used as a mapping store for some reason. For example only a limited number of domain accounts require a mapping to be set and the central domain would require elevated permissions to modify the domain accounts directly (i.e. the administrator managing the NFS identity mappings is not the same as the domain administrator). Also, the account name cannot have a “domain\” prefix and so the name must make sense on the machine using the mapping. In practical terms this means that a non-domain joined machine must have a matching machine local account and a domain joined machine must have a matching domain account.
To install Active Directory Lightweight Directory Services, a PowerShell command can be used
Install-NfsMappingStore -InstanceName NfsAdLdsInstance
This command will install and configure an AD LDS instance for use by NFS. This can be located on any Windows Server 2012 machine and need not be co-located with any Windows NFS client or server. When the command completes, if successful it will display output similar to the following
Successfully created ADLDS instance named NfsAdLdsInstance
on server NFS-SERVER, the instance is running on port 389 and the partition is
CN=nfs,DC=nfs.
To set the NFS client or server to use AD LDS based mapping, the following PowerShell command can be used
Set-NfsMappingStore -EnableLdapLookup
$true -LdapNamingContext «CN=nfs,DC=nfs» -LdapServer localhost:389
Note that the “LdapNamingContext” should be set to the value returned as the partition when the AD LDS instance was created. The “LdapServer” should be set to the machine name and port which to be used to contact the AD LDS instance.
Alternatively the Server Manager can be used to set the NFS client or server to use AD LDS based mapping.
This is a deprecated method of obtaining mapping information but may still be in use in existing environments. The UNMP Server was a feature in the separately installed Services for UNIX product, and in the Services for NFS feature of Windows Server 2003 R2 release.
The UNMP server provided a source of UID/GID to Windows account mappings which could be used by domain joined machines running Client for NFS and/or Server for NFS. This feature has been largely superseded by the use of Active Directory which provides for better management and scaling.
In simple configurations where mapping between UID/GID and Windows accounts is still required, the mapping information can be provided in UNIX style passwd and group files. These have the same fields and format as conventional UNIX passwd and group files with the exception that the account name can optionally make use of the standard Windows account names <domain>\<name>, where the «<domain>\» portion is optional and if absent, the “name” portion indicates a domain account for domain joined machines, or a machine local account for non-domain joined machines. If the machine is domain joined and the account to be mapped is a machine local account, the “domain” portion should be set to either “localhost” or to the name of the machine.
The use of local passwd and group files is enabled by placing both files in the %SystemRoot%\system32\drivers\etc directory. That is, the local files mapping feature is enabled if both the following files exist
- %SystemRoot%\system32\drivers\etc\passwd
- %SystemRoot%\system32\drivers\etc\group
This mapping method creates an independent mapping store for each machine and is typically used for
- domain joined machines where a limited number of machines are making use of NFS
- for standalone machines where a simple identity mapping mechanism is preferred, for example a single workstation accessing existing UNIX NFS servers
- a set of UNIX workstations accessing a standalone Windows Server for NFS.
Managing the mapping information will require the privileges needed to create and modify the passwd and group files in the %SystemRoot%\system32\drivers\etc directory. By default the members of the “BUILTIN\Administrators” group have sufficient privileges. It is recommended that these privilege requirements are not changed without a clear understanding of the consequences.
Note that by default, files created in the %SystemRoot%\system32\drivers\etc directory will be readable by all members of the “BUILTIN\Users” group for the computer. If this is considered to be too great a degree of information disclosure then access can be restricted by adding read access permissions for the virtual accounts for the NFS services “NT Service\NfsService” and “NT Service\NfsClnt” to both the passwd and group files and then removing access permissions for the “BUILTIN\Users” group. This can be achieved as follows
From a CMD or PowerShell prompt
icacls group /inheritance:d /grant «NT
SERVICE\NfsService:RX» /grant «NT SERVICE\NfsClnt:RX»
icacls group /remove BUILTIN\Users
icacls passwd /inheritance:d /grant «NT SERVICE\NfsService:RX» /grant «NT SERVICE\NfsClnt:RX»
icacls passwd /remove BUILTIN\Users
Or, via the Properties dialog Security tab for both the passwd and group files.
To verify that the server is using file based mapping, the “Event Viewer” utility can be used to examine the ServicesForNfs-Server\IdentityMapping channel where the server will write messages to indicate the status of the mapping files.
The UUUA identity mapping mechanism is only available to Server for NFS and can only be used when the AUTH_SYS authentication method is being used.
In situations where there is no requirement to share files accessed by NFS with any other sharing mechanism (e.g. SMB) or local application, then Server for NFS can be configured to directly use the supplied UID/GID identifiers and attach them to files in such a way that the identity information is preserved and is available to an NFS client, but no mapping to any Windows account is required. This is particularly useful for turn-key installations where very little administration is required to set up Server for NFS.
Server for NFS does this by recording the UNIX style UID, GID and mode information in the Windows file system security fields directly
[1]
. However, a consequence of this is that access to those files by other Windows applications can be problematic since the security information does not identify any Windows account and so standard Windows access mechanisms are not available.
As the methods used by Server for NFS to capture the UID, GID and mode information result in the generation of valid security descriptor, there should be no impact for backup applications provided those applications just copy the data and do not try to interpret or manipulate it in any way.
This method is typically used for standalone Windows Server for NFS installations where little to no configuration is required, such as a turnkey Windows Server 2012 Server for NFS where the only administration required is the creation of the NFS exports. It should be considered a convenience mechanism only as it provides no security (a consequence of the AUTH_SYS authentication method) and is effectively equivalent to access by an anonymous Windows user. The behavior is similar to many standard UNIX NFS server implementations.
No privileges are required as there are no mappings to administer.
As account objects are standard Windows Active Directory objects, any of the standard tools or scripting methods can be used. The account attributes used are “uidNumber” and “gidNumber” for user account type and “gidNumber” for group account types.
These fields can be manipulated several utilities shipped with Windows Server 2012.
The recommended method is to use the Server for NFS PowerShell cmdlets. These cmdlets can be used to query mappings for one or more existing accounts, modify mappings, test mappings and even create new accounts with mappings as a single operation. One of the advantages of using the PowerShell cmdlets to set mapping information is that they help ensure there are no duplicate UIDs or GIDs. Note that the following examples assume that an Active Directory or AD LDS mapping store has already been configured.
To query the mapping for an existing account
Get-NfsMappedIdentity
-AccountName root -AccountType User
Or to bulk query all the group accounts
Get-NfsMappedIdentity -AccountType Group
A bulk query for all the user accounts is performed in a similar manner, except that the AccountType is set to User. Simple wildcarding of account names can also be used, for example the following will return all the user accounts with names beginning with the prefix “nfs”.
Get-NfsMappedIdentity -AccountType Group –AccountName nfs*
To set a mapping for an existing user account
Set-NfsMappedIdentity -UserName nfsuser14 -UserIdentifier 5014 -GroupIdentifier 4000
Or to set the mapping for an existing group account
Set-NfsMappedIdentity -GroupName specgroup -GroupIdentifier 500
To create a set of new accounts and with their AUTH_SYS UID/GID mappings
$secureString = ConvertTo-SecureString «password»
-AsPlainText –Force
New-NfsMappedIdentity -GroupIdentifier 0 -GroupName rootgroup
New-NfsMappedIdentity -GroupIdentifier 4000
-GroupName nfsusers
New-NfsMappedIdentity -GroupIdentifier 0 -UserName root -UserIdentifier 0 -Password $secureString
New-NfsMappedIdentity -GroupIdentifier 4000
-UserName nfsuser1 -UserIdentifier 5001 -Password $secureString
New-NfsMappedIdentity -GroupIdentifier 4000 -UserName
nfsuser2 -UserIdentifier 5002 -Password $secureString
New-NfsMappedIdentity -GroupIdentifier 4000
-UserName nfsuser3 -UserIdentifier 5003 -Password $secureString
New-NfsMappedIdentity -GroupIdentifier 4000
-UserName nfsuser4 -UserIdentifier 5004 -Password $secureString
An alternative and more basic method is to use “adsiedit.msc” to manipulate the Active Directory objects directly. However there are few if any safeguards and extreme caution should be used for this method. This is not the preferred method of setting a mapping.
Refer to the Windows Server 2003 R2 documentation ([NFSAUTH] Russel, C., «NFS Authentication»,
http://www.microsoft.com/technet/interopmigration/unix/sfu/nfsauth.mspx
) for configuring mapping information for the identities being used.
As these are standard ANSI text files, any ANSI text editor can be used. The file format is the standard UNIX equivalents and the only active fields are the username, uid, and gid for the passwd file and the group name, gid and group list for the group file.
Note that some of the PowerShell cmdlets can get used to query and test identity mappings set this way, but attempts to set or modify local file based mappings with the PowerShell cmdlets will fail. Note the following example assume that the local file-based mapping store has already been configured.
For examples, to query the current mapping for a user account “root”
Get-NfsMappedIdentity -AccountName root -AccountType User
Or to query for the account name with the UID value of 500
Get-NfsMappedIdentity -AccountType User -UserIdentifier 500
Bulk queries to fetch all the mappings in a single command can also be used but the wildcarding options available with the LDAP based mapping stores cannot be used directly but any standard PowerShell pipe based filters can be used as an alternative.
Generally there is no single mapping solution that is “correct” for any set of circumstances. Instead, many of the mechanism can be used based on a set of tradeoffs leading to a prioritized list drawn up from the available methods.
- Is the machine Windows domain joined?
- For servers, is file access going to be shared by both NFS and non-NFS methods (e.g. files also accessed via SMB shares, or other local applications)?
- How many Windows machines are making use of NFS services (both client and server)?
- How many individual users and groups are involved on the Windows machines making use of NFS services?
-
Security
- Access control – Which NFS authentication protocol is in use? For example, RPCSEC_GSS implies a centrally managed account store and so an identity mapping store would be need to map the same accounts. Using the same store would remove the need for synchronization between the stores that would exist if an alternate mapping method were used.
- Auditing – is an account identity required to monitor access?
- NFS authentication method(s) used (e.g. AUTH_SYS etc)?
- Organizational issues such as availability of the privileges needed to manage identities?
- Network architecture and user environment? For example, are the connections between NFS clients and NFS server machines placed within a controlled environment (machine room, ipsec etc.)? Are NFS servers visible to machines on which users can run applications?
To determine which solution is appropriate for a given situation requires the administrator to select from the available mechanisms according to the tradeoffs applicable to the expected environment. Typically, solutions should be considered in the following order:
- Active Directory
- Active Directory Lightweight Directory Services (AD LDS)
- Local passwd and group mapping files
- Unmapped UNIX User Access (UUUA)
Using AUTH_NONE as the authentication method has no security whatsoever and is equivalent to using anonymous access with AUTH_SYS.
Using AUTH_SYS as the authentication method places no particular restrictions on the mapping method, consideration should be given to the ease with which this method can be spoofed and as such it provides no real security.
If the environment requires that NFS be authenticated by RPCSEC_GSS then standard Windows accounts will be required. This excludes the use of Unmapped UNIX User Access. Although using RPCSEC_GSS directly provides the necessary rights to access files, a mapping solution is generally required since many NFS procedures identify users and groups via their UID and GID values even though access to those files is authenticated by RPCSEC_GSS. For example, using a Windows Server 2012 Server for NFS processing a READDIR request, the ability to read the directory is determined by the user identified through RPCSEC_GSS, but the ownership of the items in that directory are described by UID and GID values. Without a mapping solution, the server is unable to determine the proper UID and GID values and so will indicate the files are all owned by the configured anonymous user account, typically with UID and GID values of 0xfffffffe (or -2).
Generally the most convenient solution for domain joined machines is to use Active Directory as the mapping store. This is particularly the case if a large fraction of the domain joined machines and / or users will be making use of either or both of the NFS client and server. Using Active Directory helps ensure that there are none of the synchronization issues that occur if there are separate account stores and identity mapping stores.
A possible problem is that if NFS is used by a small fraction of the accounts or machines, then in large organizations it may be organizationally difficult to manage the identities if for example a single department uses NFS and the departmental level administrators do not have the domain level privileges required to modify the centrally managed user accounts.
If using Active Directory for mapping information is problematic but domain based identities are still desired then alternative solutions are either Active Directory Lightweight Directory Services (AD LDS) or local mapping files.
Using AD LDS has the advantage of a centrally managed mapping store which is particularly useful if there are many user and/or group accounts, or if the valid accounts change frequently. The accounts being mapped must be domain accounts. However, there needs to be a machine available which can host the AD LDS services. This can be a machine hosting the Windows NFS services.
Using local mapping files requires only machine local administrator level privileges rather than domain level privileges and provides all the functionality available for a single machine as that available through Active Directory. In addition, they can also allow machine local accounts to be successfully mapped. However, consideration should be given to the number of machines to be managed.
Both AD LDS and local mapping files suffer from the need to maintain synchronization between the primary account store (Active Directory) and the mapping store (AD LDS or local files). For example, if a new NFS user account is added or deleted, then a change will need to be made to the mapping store. The AD LDS mapping store only needs changes to be applied in the one location for all machines using that mapping store to see the updates. However, if local mapping files are in use, then a change will need to be made in all of the copies of the local mapping files that contain a mapping for that account.
For machines with Server for NFS, if no domain or machine local identities are required and there will be no sharing of the files exported by NFS with any other application or file sharing protocol, and access is via the NFS AUTH_SYS authentication mechanism, then UUUA based access might be a good solution. This method has the advantage of minimal administration load, and there is no co-ordination with any other machine however it has the potentially significant disadvantage of providing essentially no security.
The choices for non-domain joined machines are similar to those for domain joined machine with the exception that Active Directory is no longer available.
Using Active Directory Lightweight Directory Services (AD LDS) provides a single centrally managed mapping store which is particularly useful if there are many user and/or group accounts, or if the valid accounts change frequently. The accounts being mapped must be machine local accounts and if care is taken over the naming of the account, the same mapping can be used by several machines. However, there needs to be a machine available which can host the AD LDS services but this can be a machine hosting the Windows NFS services.
Using local mapping files requires only machine local administrator level privileges and provides all the functionality available for a single machine as that available through AD LDS. As long as all the account names do not have a domain prefix, then machine local accounts are assumed so the same passwd/group file pair can be used on each machine. Consideration should be given to the number of machines to be managed and the amount of changes to the accounts being mapped to determine if the administrative costs are acceptable.
Both AD LDS and local mapping files suffer from the need to maintain synchronization between the primary account store (machine local accounts) and the mapping store (AD LDS or local files). For example, if a new NFS user account is added or deleted, then a change will need to be made to the mapping store. The AD LDS mapping store only needs changes to be applied in the one location for all machines using that mapping store to see the updates. However, if local mapping files are in use, then a change will need to be made in all of the copies of the local mapping files that might be used by that account. Alternatively with local mapping files each machine can have individual passwd and group files with accounts specific to that machine; however this is likely to present administrative problems in terms of ensuring the appropriate uniqueness amongst the UID and GID values being used.
For machines with configured with Server for NFS, if there is no sharing of the files exported by Server for NFS with any other application or file sharing protocol, and access is via the NFS AUTH_SYS authentication mechanism, then UUUA based access might be a good solution. This method has the advantage of minimal administration load, and there is no requirement for co-ordination with any other machine, however as with all AUTH_SYS based mechanisms, it has the potentially significant disadvantage of providing essentially no security.
To locate all the NFS related PowerShell commands, start a PowerShell session and use the command
The alias “help” can be used in place of “Get-Help”.
Get-help can then be used on individual items to get additional details on that item.
- Get-NfsMappingStore will return the currently configured mapping solution for the machine.
- Test-NfsMappingStore will test the mapping store to confirm that the machine can access the mapping store
- Get-NfsMappedIdentity is used to retrieve one or more mapped identity records from the configured mapping store.
- Test-NfsMappedIdentity is used to verify the configured mapping store can be reached from the machine on which the query is run and that the queried mapping is present in that store.
- Resolve-NfsMappedIdentity is used to determine the mapping being used by Server for NFS. If the mapping is cached then the cached values are used, otherwise Server for NFS will make a request to the configured mapping store to retrieve the mapping.
Although the identity mapping can be set in an identity mapping store, there is no guarantee that machines with either Client for NFS and\or Server for NFS can make queries of that store. To determine if the store is accessible from the machine of interest, log on to the machine in question and using the PowerShell cmdlet “Test-NfsMappedIdentity”, the cmdlet will make a request to the store for the mapping information needed to satisfy the request. For example, to test the account mapping for UID value 0
Test-NfsMappedIdentity -UserIdentifier 0
Or to test the mapping for the group “specgroup”
Test-NfsMappedIdentity -AccountName specgroup -AccountType Group
There will only be output from the command if the test operation fails.
Using the “Test-NfsMappedIdentity” cmdlet will also verify that the mapping information for the account in question does not use any improper duplicate values. That is, the UID value for a user account is unique and the GID value for a group account is unique.
The Server for NFS also keeps a cache of recently used identity mappings. To determine the mapping as currently being used by, or failing that is available to Server for NFS, the Resolve-NfsMappedIdentity cmdlet can be used. This causes the Server for NFS to search the locally cached mapping information, or if there is no local value, to query the configured mapping store for the mapping. In both cases the currently active mapping as known to Server for NFS is returned.
For example, to query for the account mapped to the UID 500
Resolve-NfsMappedIdentity -Id 500 -AccountType User
Or to query for the UID mapped to the user account “root”
Resolve-NfsMappedIdentity -AccountName root -AccountType User
The NFS services write messages to the ServicesForNfs-Server\IdentityMapping channel to indicate whether or not the local files have been found and if the format is correct. These messages can be examined using the “Event Viewer” utility. If both group and passwd files have been found and are being used there are two messages, one for each file
For the group file
and for the passwd file.
If there are any issues with either file an appropriate message will indicate which file contains the problem.
The Services for NFS Administration Tools feature contains a command line utility, nfsfile.exe, which can be used to correct a number of NFS related identity and access permission related issues for both files and directories. It can also be used to convert files between the UUUA style mapping and Windows style mappings.
For example, to set all the directories and files stored at v:\Shares to be owned by the user account “root” and group account “rootgroup” with UNIX style permissions 755 (rwxr-xr-x) use the command
nfsfile /v /rwu=root /rwg=rootgroup /rm=755 v:\Shares\*
or if all the files under an export were originally created using UUUA mapping, but there is now a domain based mapping solution available, all the file mappings can be converted using the command
nfsfile /v /s /cw v:\Shares\share-v
which converts the export and all the files and directories to a Windows style mapping based on standard Windows accounts.
See the MSDN article at
http://technet.microsoft.com/en-us/library/hh509022(v=WS.10).aspx
and in particular the section titled “Using Nfsfile.exe to Manage User and Group Access”.
Note that currently the nfsfile.exe cannot obtain mapping information from local file based mappings. This means it cannot do the automatic identity conversion between Windows style mapped files and UUUA style mapped files where the utility obtains the mapping information appropriate to the files being processed. Instead the account information must be supplied via the “/r” option, whether that is a UID/GID pair or a Windows user and group accounts on a file by file or single directory sub-tree basis. That is, all the files in a single directory sub-tree can be converted to a single identity in one command, but different users will require multiple commands to be used.
Note also that the utility can also be used to manipulate non-NFS related file permissions. This is not recommended as there are several features of Windows file security and access control that the utility is not designed to process. Instead, the standard Windows file system permission management tools and utilities should be used (e.g. the “icacls.exe” utility).
Please send feedback you might have to
nfsfeed@microsoft.com