Безопасный режим Windows 10 может быть полезен при решении самых различных проблем с компьютером: для удаления вирусов, исправления ошибок драйверов, в том числе вызывающих синий экран смерти, сброса пароля Windows 10 или активации учетной записи администратора, запуска восстановления системы из точки восстановления. Отдельная инструкция: Как зайти в безопасный режим Windows 11.
В этой инструкции — несколько способов зайти в безопасный режим Windows 10 в тех случаях, когда система запускается и вы можете в нее зайти, а также когда запуск или вход в ОС по тем или иным причинам невозможен. К сожалению, знакомый многим путь запуска безопасного режима через F8 больше не работает (но вы можете сделать, чтобы работала: Как включить вход в безопасный режим клавишей F8 в Windows 10), а потому придется пользоваться иными методами. В конце руководства имеется видео, в котором наглядно показаны способы входа в безопасный режим.
- Как запустить безопасный режим Windows 10 через msconfig
- Вход в безопасный режим через особые варианты загрузки
- Добавление пункта «Безопасный режим» в меню загрузки
- Как зайти в безопасный режим Windows 10 с использованием загрузочной флешки
- Другие способы запуска безопасного режима
- Видео инструкция
Вход в безопасный режим через конфигурацию системы msconfig
Первый, и, наверное, многим знакомый способ запустить безопасный режим Windows 10 (он работает и в предыдущих версиях ОС) — использовать встроенную утилиту конфигурации системы. Минус метода — невозможность попасть в безопасный режим, если система не запускается. Необходимые шаги:
- Нажмите клавиши Win+R на клавиатуре (Win — клавиша с эмблемой Windows), введите msconfig в окно «Выполнить» и нажмите Enter.
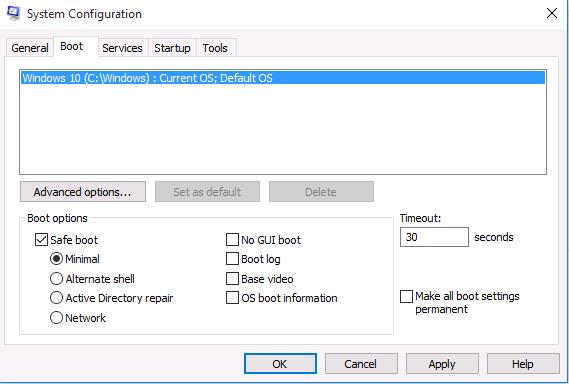
- В открывавшемся окне «Конфигурация системы» перейдите на вкладку «Загрузка», выберите ту ОС (обычно присутствует лишь один пункт меню и выбирать не требуется), которая должна запускаться в безопасном режиме и отметьте пункт «Безопасный режим».
- При этом, для него существуют несколько вариантов безопасного режима загрузки: минимальная — запуск «обычного» безопасного режима, с рабочим столом и минимальным набором драйверов и служб; другая оболочка — безопасный режим с поддержкой командной строки; сеть — запуск с поддержкой сети.

По завершении, нажмите «Ок» и перезагрузите компьютер, Windows 10 запустится в безопасном режиме.
Затем, чтобы вернуть обычный режим запуска, тем же методом снова используйте msconfig, но в этот раз снимите установленную ранее отметку запуска безопасного режима, примените настройки и перезагрузите ПК или ноутбук.
Запуск безопасного режима через особые варианты загрузки
Данный способ запуска безопасного режима Windows 10 в общем случае также требует, чтобы ОС на компьютере запускалась. Однако, есть две вариации этого способа, позволяющие зайти в безопасный режим, даже если вход в систему или ее запуск невозможен, которые я также опишу.
В общем случае способ подразумевает выполнение следующих простых шагов:
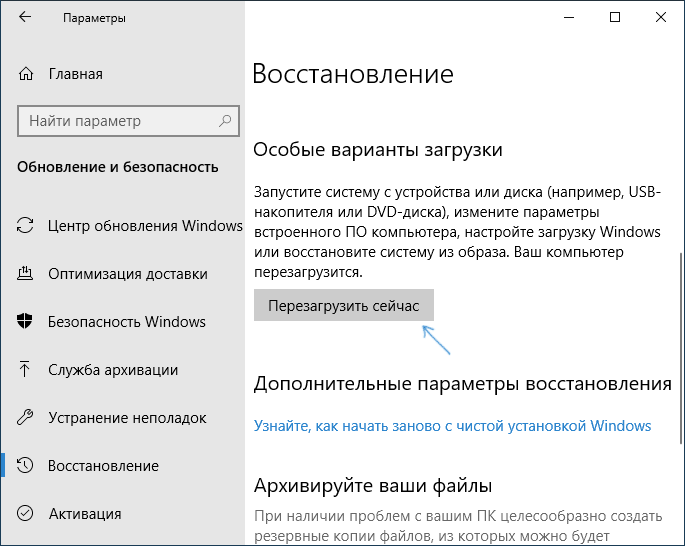
- Открыть Параметры (значок шестеренки в меню Пуск или клавиши Win+I), зайти в пункт «Обновление и безопасность», выбрать «Восстановление» и в пункте «Особые варианты загрузки» нажать «Перезагрузить сейчас». (В некоторых системах данный пункт может отсутствовать. В этом случае, для входа в безопасный режим используйте следующий способ).
- На экране особых вариантов загрузки выбрать «Поиск и устранение неисправностей» — «Дополнительные параметры» — «Параметры загрузки». Если пункт «Параметры загрузки» отсутствует, нажмите «Дополнительные параметры восстановления». На более ранних версиях Windows 10 путь такой: «Диагностика» — «Дополнительные параметры» — «Параметры загрузки». И нажать кнопку «Перезагрузить».
- На экране параметров загрузки, которые появятся после перезапуска системы, нажать клавиши от 4 (или F4) до 6 (или F6) для запуска соответствующего варианта безопасного режима.
Как добавить пункт «Безопасный режим» в меню загрузки Windows 10
При необходимости обезопасить себя от возможных проблем или если вы часто используете безопасный режим Windows 10, вы можете добавить его в меню загрузки вашего компьютера или ноутбука:
- Запустите командную строку от имени администратора и используйте следующие команды, нажимая Enter после каждой из них. После выполнения первой команды отобразится идентификатор GUID, который нужно будет использовать во второй команде.
-
bcdedit /copy {default} /d "Безопасный режим" bcdedit /set {отобразившийся_GUID} safeboot minimal - Готово, теперь при включении компьютера у вас будет отображаться меню, в котором, помимо простого запуска Windows 10 можно будет запустить и безопасный режим.
При необходимости, вы можете изменить время ожидания в меню загрузки (то есть то время, по истечении которого произойдет автоматическая загрузка Windows 10 в обычном режиме). Для этого используйте команду
bcdedit /timeout Время_в_секундах
Как зайти в безопасный режим Windows 10 с помощью загрузочной флешки или диска восстановления
И, наконец, если не удается попасть даже на экран входа в систему, то есть и еще один способ, но вам потребуется загрузочная флешка или диск с Windows 10 (которые можно легко создать на другом компьютере). Загрузитесь с такого накопителя, а затем либо нажмите клавиши Shift + F10 (это откроет командную строку), либо после выбора языка, в окне с кнопкой «Установить» нажмите «Восстановление системы», затем Диагностика — Дополнительные параметры — Командная строка. Также для этих целей можно использовать не дистрибутив, а диск восстановления Windows 10, который легко делается через панель управления в пункте «Восстановление».

В командной строке введите (безопасный режим будет применен к ОС, загружаемой на вашем компьютере по умолчанию, на случай, если таких систем несколько):
- bcdedit /set {default} safeboot minimal — для следующей загрузки в безопасном режиме.
- bcdedit /set {default} safeboot network — для безопасного режима с поддержкой сети.
Если требуется запуск безопасного режима с поддержкой командной строки, используйте сначала первую из перечисленных выше команд, а затем: bcdedit /set {default} safebootalternateshell yes

После выполнения команд, закройте командную строку и перезагрузите компьютер, он автоматически загрузится в безопасном режиме.
В дальнейшем, чтобы включить обычный запуск компьютера, используйте в командной строке, запущенной от имени администратора (или же способом, описанным выше) команду:
bcdedit /deletevalue {default} safeboot
Еще один вариант почти же способа, но запускающий не сразу безопасный режим, а различные варианты загрузки, из которых можно выбрать, при этом применяет это ко всем совместимым ОС, установленным на компьютере. Запустите командную строку с диска восстановления или загрузочной флешки Windows 10, как это уже было описано, затем введите команду:
bcdedit /set {globalsettings} advancedoptions true
И после успешного ее выполнения, закройте командную строку и перезагрузите систему (можно нажать «Продолжить. Выход и использование Windows 10». Система загрузится с предложением нескольких вариантов загрузки, как и в способе, описанном выше, и вы сможете войти в безопасный режим.
В дальнейшем, чтобы отключить особые варианты загрузки, используйте команду (можно из самой системы, используя командную строку от имени администратора):
bcdedit /deletevalue {globalsettings} advancedoptions
Дополнительные способы запустить безопасный режим
В дополнение к вышеизложенным методам, ещё два способа, позволяющих запустить Windows 10 в безопасном режиме, оба также показаны в видео ниже:
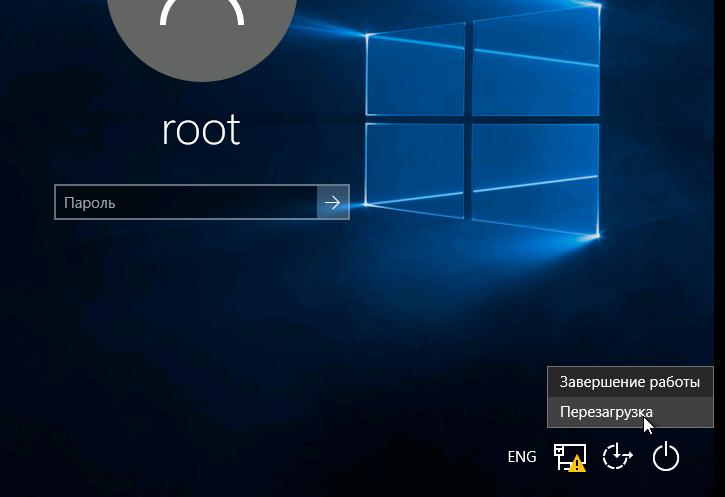
- Если вы можете попасть на экран блокировки, но не можете зайти в систему, нажмите по изображению кнопки питания справа внизу экрана блокировки, а затем, удерживая Shift, нажмите «Перезагрузка». Компьютер выполнит перезагрузку в среде восстановления, где как и в способе с особыми вариантами загрузки вы сможете попасть в безопасный режим.
- Этот метод я не могу рекомендовать, так как он потенциально может привести к проблемам с накопителями, но: если при начале загрузки Windows 10 дважды неправильно выключить компьютер или ноутбук (долгим удержанием кнопки питания), то вы попадете в окно «Автоматическое восстановление», где, нажав кнопку «Дополнительные параметры» и перейдя к пункту «Параметры загрузки» вы также сможете зайти в безопасный режим.
Безопасный режим Windows 10 — видео
И в завершение видео руководство, в котором наглядно показаны способы зайти в безопасный режим различными способами.
Думаю, какой-то из описанных способов вам непременно подойдет. Также в данном контексте может оказаться полезным руководство Восстановление Windows 10.
Способы включения
Их шесть, они различаются по степени сложности. Рассмотрим их, начиная с самого простого и заканчивая самым сложным. Каждый из методов будет полезен для разных сценариев, а выбор зависит от того, на каком этапе загрузки возникает ошибка и есть ли у вас в целом доступ к Windows.
Способ первый: через параметры Windows
Когда полезен: этот метод требует, чтобы Windows запускалась хотя бы до рабочего стола. Подходит для диагностики, если система работает, но есть сбои.
Откройте меню «Пуск», перейдите в «Параметры», затем выберите раздел «Обновление и безопасность» (для Windows 10) или «Система» и затем «Восстановление» (для Windows 11).
Так это будет выглядеть в в Windows 10
В боковом меню найдите пункт «Восстановление» и в разделе «Особые варианты загрузки» нажмите «Перезагрузить сейчас»:
А так — Windows 11
После перезагрузки компьютер предложит выбор действия. Пройдите по пути: «Диагностика» → «Дополнительные параметры» → «Параметры загрузки» и нажмите «Перезагрузить»:
Когда система перезапустится, нажмите клавишу 4 или F4 для входа в безопасный режим.
Windows 10 унаследовала все особенности системы загрузки у Windows 8, предоставляя такую же графическую среду для выполнения задач восстановления системы. Предполагается, что операции восстановления системы после сбоев будут преимущественно выполняться системой автоматического восстановления. В том случае, если Windows 10 не загружается корректно, запускается система автоматического восстановления, которая без участия пользователя пытается найти и исправить проблемы, мешающие нормальной загрузке системы. Однако это не означает, что в Windows 10 отсутствует безопасный режим (Safe mode), просто по умолчанию этот режим загрузки скрыт от пользователей.
В некоторых случаях необходимо запустить систему в безопасном режиме, например чтобы отладить или удалить службу, драйвер или приложение. Посмотрим как включить безопасный режим в Windows 10.
Windows 10 можно загрузить в безопасном режиме несколькими разными способами.
Содержание:
- Утилита MSConfig (Конфигурация системы)
- Сочетание Shift + Restart
- Запуск режим диагностики из интерфейса новой Панели управления
- Запуск безопасного режима из командой строки
- Возвращаем старое текстовое меню загрузки
- Запуск Safe Mode из режима восстановления
Утилита MSConfig (Конфигурация системы)
Самый простой способ загрузить Windows 10 в безопасном режиме, как и в предыдущих версиях Windows, воспользоваться утилитой msconfig.exe. Для этого:
- Нажмите сочетание клавиш Win+R и наберите msconfig
- В открывшемся окне перейдите на вкладку Boot
- В разделе Boot options поставьте флажок у пункта Safe boot
- Сохраните изменения (OK), согласитесь с предложением перезагрузить систему (Restart)
- После перезагрузки системы, Windows 10 загрузится в безопасном режиме (о чем свидетельствует надпись Safe Mode во всех углах экрана)

Совет. Отключить загрузку в безопасном режиме нужно также с помощью msconfig, сняв флажок у пункта Safe boot.
Сочетание Shift + Restart
В стартовом меню нажмите кнопку Power и, зажав Shift на клавиатуре, выберите пункт перезагрузки системы (Restart)

Примечание. Эту же комбинацию Shift+Перезагрузка можно использовать на экране входа в систему.
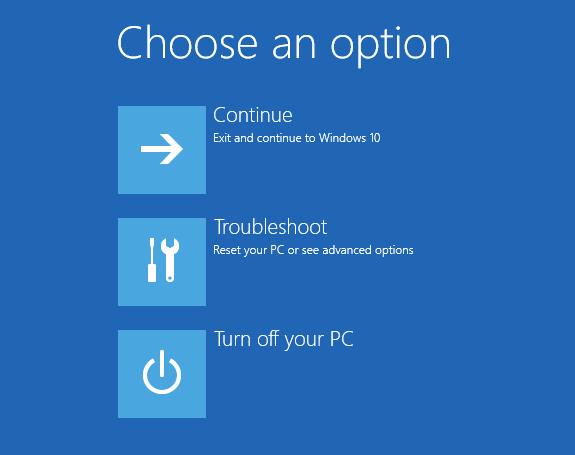
В появившемся диалоге последовательно выберите пункты Troubleshoot (Диагностика) -> Advanced options (Дополнительные параметры)-> Startup Settings (Параметры загрузки).
Перезагружаем компьютер, нажав кнопку Restart.
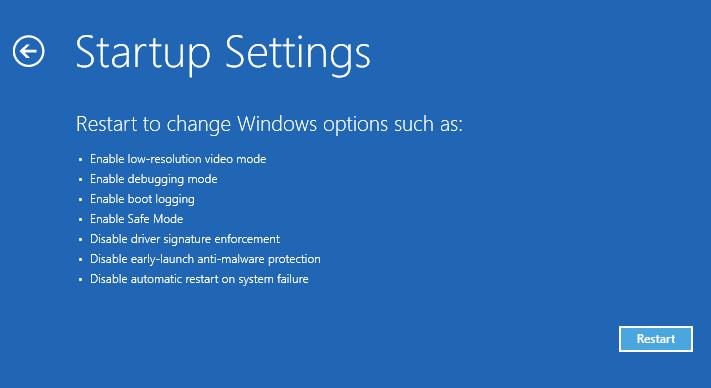
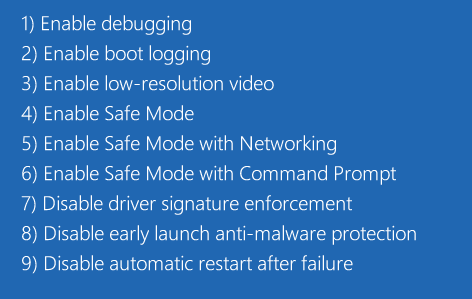
После перезагрузки появится окно с доступными опциями загрузки системы ( 9 вариантов, включая три вида безопасного режима). Для загрузки в безопасном режиме, нажмите клавишу F4 или 4 (или F5/F6 для загрузки в безопасном режиме с поддержкой сети или командной строки соответственно).
Запуск режим диагностики из интерфейса новой Панели управления
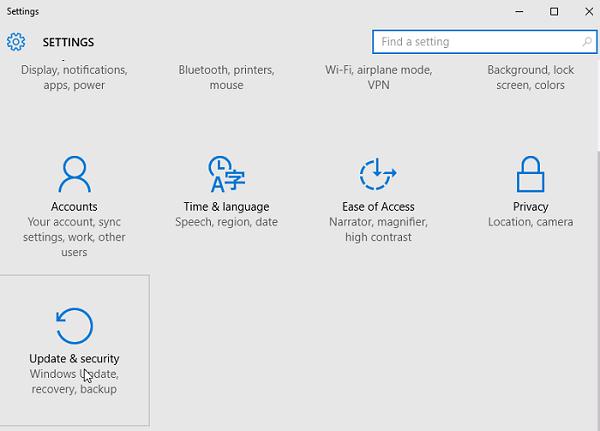
Для запуска новой современной Панели управления Windows 10, нажмите кнопку Start и выберите меню Settings. Затем перейдите в раздел Update & security.
Перейдите в раздел Recovery и в секции Advanced Startup нажмите Restart now.
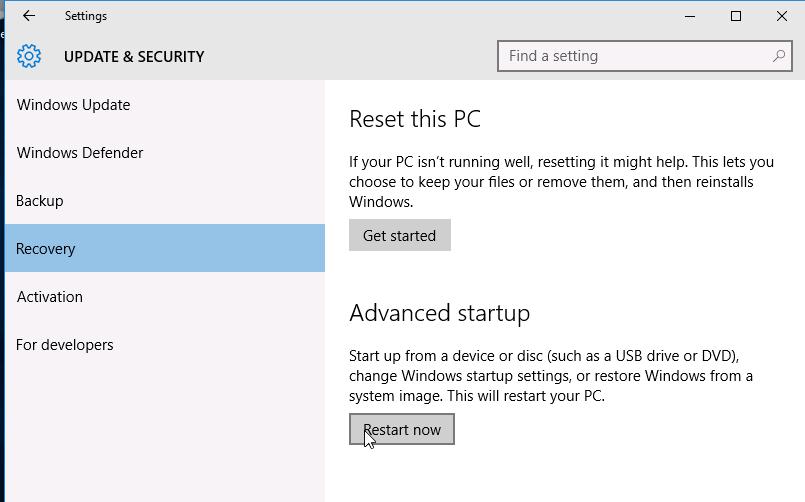
Далее все аналогично предыдущему способу.
Запуск безопасного режима из командой строки
Возможно также настроить запуск Windows 10 в безопасном режиме и из командной строки. Для этого откройте командную строку (cmd) с правами администратора и выполните команду:
bcdedit /set {current} safeboot minimal

Затем перезагрузите компьютер командой:
Shutdown –f –r –t 0
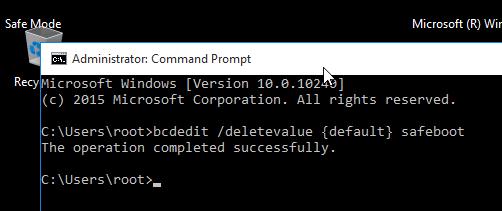
Теперь Windows 10 всегда будет загружаться в безопасном режиме. Чтобы вернуть обычный режим загрузки:
bcdedit /deletevalue {default} safeboot
Возвращаем старое текстовое меню загрузки
В Windows 10/8 возможно вернуться к старому текстовому загрузчику Windows, поддерживающего клавишу F8 (Shift+F8) и возможность выбора параметров запуска системы.
Примечание. Скорость загрузки системы с таким загрузчиком будет ниже.
Чтобы вернуть тестовый загрузчик, выполните в командной строке с правами администратора:
bcdedit /set {default} bootmenupolicy legacy
Теперь при загрузке компьютера после стадии самотестирования (POST) , нужно несколько раз нажать клавишу F8. Должно появится старое-доброе текстовое меню с параметрами загрузки системы.
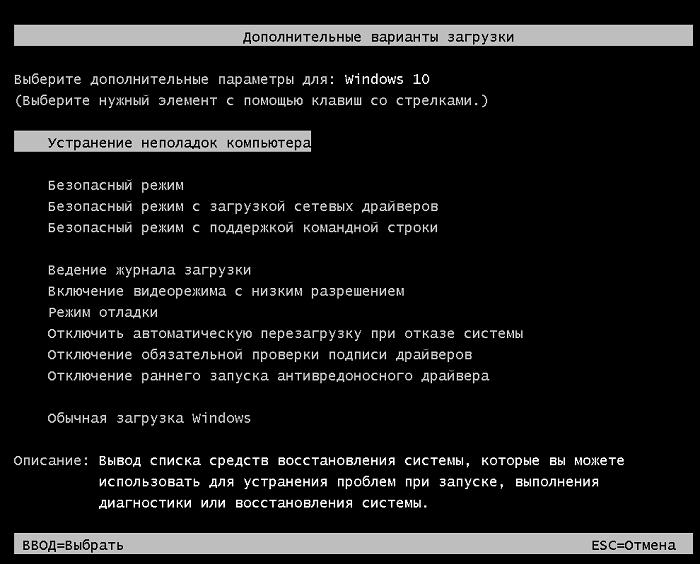
Чтобы отключить текстовый режим загрузчика, и вернуться к быстрой загрузке, выполните:
bcdedit /set {default} bootmenupolicy standard

Запуск Safe Mode из режима восстановления
Мало кто знает, что, чтобы включить безопасный режим и прочие параметры восстановления в Windows 10, достаточно 3 раза подряд прервать загрузку системы кнопкой отключения питания.
На 4 раз запустится среда восстановления системы (Recovery mode), из которой можно выбрать загрузку в безопасном режиме или другие варианты загрузки системы.

Выберите пункт See advanced repair options и следуйте инструкциям из второго пункта нашей статьи.
Booting into Windows 10 Safe Mode is an essential diagnostic method to help you identify and fix Windows 10 PC issues. This MiniTool post provides you with a step-by-step guide on how to start Windows 10 in Safe Mode (while booting) to troubleshoot the problems you are having with your Windows 10 PC.
Once your computer is installed with improper drivers or inappropriate software, the PC may freeze or crash occasionally. Utilizing Windows 10 Safe Mode can assist in diagnosing and resolving these issues. Let’s see what Safe Mode is and how to boot in Safe Mode Windows 10.
About Windows 10 Safe Mode
What Is Safe Mode?
Safe Mode is a built-in diagnostic mode of Windows 10 (7, 8, 11, etc.) computer operating system.
In Windows 10 Safe Mode, the OS will be started with only core components and many other non-necessary drivers or services such as video drivers will be disabled. Third-party startup programs are also prevented from loading. This simplifies the process of identifying the root causes of operating system issues.
For instance, you can start Windows 10 in Safe Mode to identify whether the default settings and drivers in Windows 10 are causing the misbehaving of Windows 10 PC. Or, you can diagnose if it’s the installation of poorly configured software/programs that are preventing Windows 10 PCs from booting into a normal state.
Besides, sometimes though you can’t start a Windows 10 PC normally, you can still boot it into Safe Mode. This makes it a good option to access your files and troubleshoot problems such as a blue screen or black screen. Windows 10 Safe Mode allows you to safely uninstall problematic programs, solve driver issues, diagnose hardware conflicts, and more.
Three Types of Windows 10 Safe Mode
Windows 10 offers three types of Safe Mode. You can choose to boot Windows 10 in any type of Safe Mode based on your own needs.
- Enable Safe Mode: This is the most basic type of Safe Mode. It starts Windows 10 by loading the most essential settings and services of the system. Any other unnecessary programs, drivers, or services won’t be loaded. This puts the PC in a safer status by cutting off the possible malware or virus that may move through third-party software, drivers, or local networks.
- Enable Safe Mode with Networking: If you choose to start Windows 10 in Safe Mode with networking, then it will add other necessary drivers and services that are required to access the networks while keeping the same set of drivers and services of Safe Mode. This is not as safe as Safe Mode, but it’s useful when you need to access the Internet.
- Enable Safe Mode with Command Prompt: If you boot Windows 10 in Safe Mode with Command Prompt, your computer will display a big Command Prompt window. You can address Windows 10 PC-related issues easily using command lines. However, if you don’t know much about CMD, it’s not advised to choose this option. Both Safe Mode and Safe Mode with Command Prompt are not connected to a network.
How to start Windows 10 in Safe Mode (while booting)? See detailed below.
If you prefer a quick video guide, you can watch this tutorial:
1. Start Windows 10 in Safe Mode From Settings
If you’ve already logged into Windows 10, then you can boot into Safe Mode in Windows 10 from Settings.
Step 1. Click the Start button on your taskbar and click Settings. Or you can press the Windows + I key combination to open Windows 10 Settings.
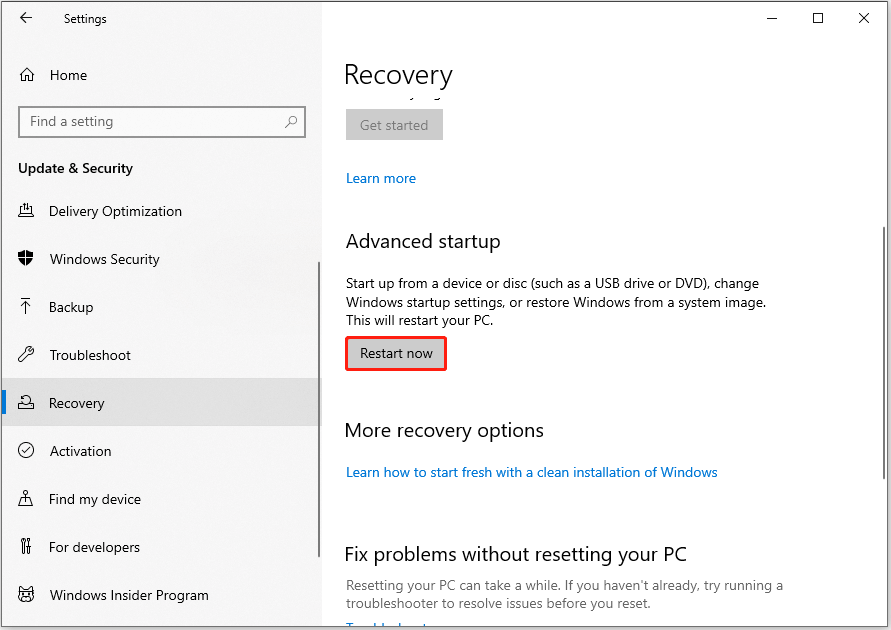
Step 2. Click Update & Security, choose the Recovery option from the left panel, and click Restart now under Advanced startup to enter Windows RE (Recovery Environment).
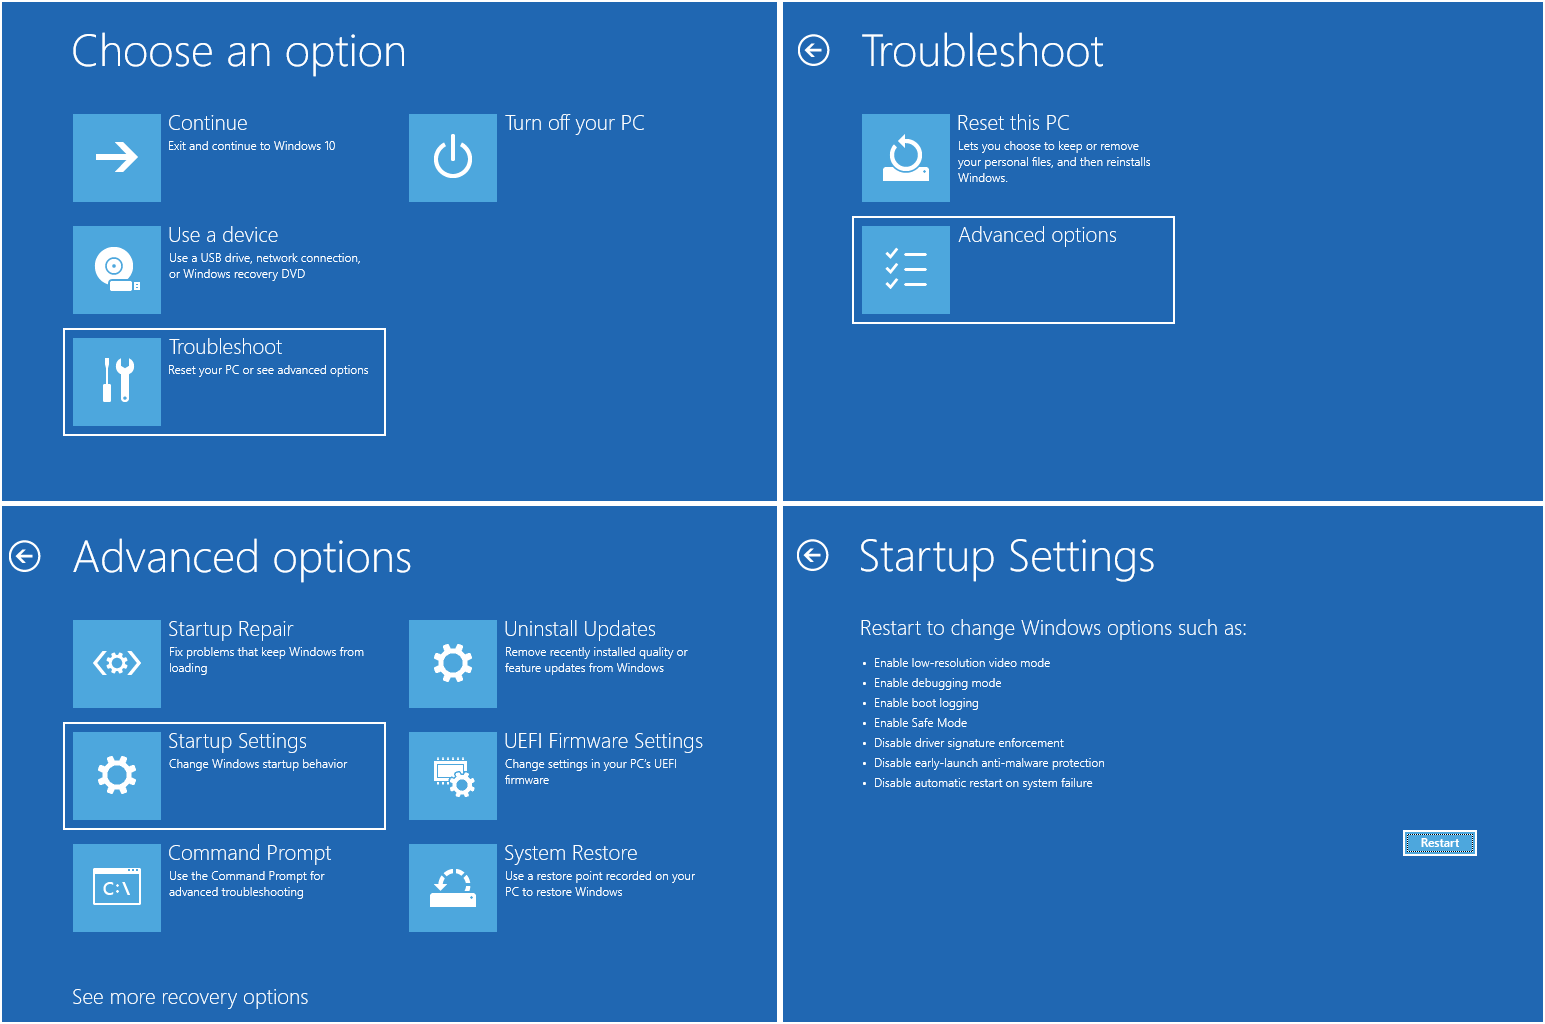
Step 3. Next, click Troubleshoot -> Advanced options -> Startup Settings -> Restart.
Step 4. Wait until the computer restarts, then choose a preferred Safe Mode option.
Press 4 or F4 on the keyboard to start Windows 10 PC in Safe Mode; Press 5 or F5 to boot Windows 10 in Safe Mode with Networking; Press 6 or F6 to access Windows 10 in Safe Mode with Command Prompt.
2. Boot Windows 10 in Safe Mode Through MSConfig
Alternatively, you can boot into Safe Mode in Windows 10 using the Windows System Configuration (msconfig.exe) tool.
Step 1. Press the Windows + R key combination, then input msconfig in the input box and hit Enter to open the System Configuration utility.
Step 2. In the new window, move onto the Boot tab. Under Boot options, choose a preferred Safe boot option based on your own needs.
- Minimal equals to Safe Mode.
- Alternate shell refers to Safe Mode with Command Prompt.
- Network refers to Safe Mode with Networking.
- Active Directory repair option is used to repair the Active Directory server.
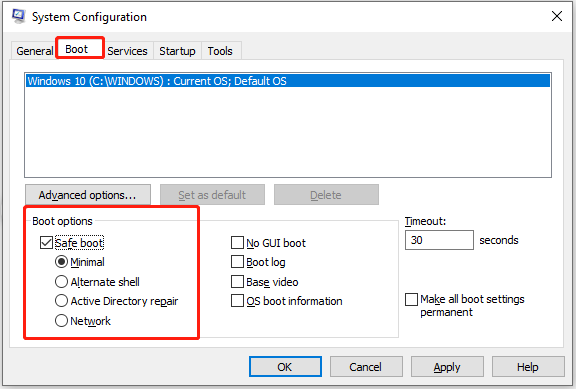
Step 3. Click OK to boot into the selected Safe Mode.
Tips:
Booting Windows 10 in Safe Mode through MSConfig, your computer will start in Safe Mode each time you start your Windows 10 PC. To exit Safe Mode, you can check “How to get out of Safe Mode Windows 10”.
3. Enter Windows 10 in Safe Mode With Shift + Restart
Furthermore, you can start Windows in Safe Mode by using the Shift + Restart feature. This way also enables you to boot into Safe Mode Windows 10 without login.
If you have logged in:
Press and hold the Shift key on the keyboard, and click the Start button on the taskbar. Then click Power -> Restart. After you get into the Choose an option screen, click Troubleshoot -> Advanced options -> Startup Settings -> Restart.
Next, press F4, F5, or F6 to choose a desired Safe Mode option.
If you haven’t logged in:
If you’re unable to log in to Windows 10 but can access the Sign-in screen, you can initiate Safe Mode in Windows 10 by using Shift + Restart from the login screen.
On the sign-in screen, press and hold the Shift key, click the Power icon at the bottom-right, and choose Restart.

Once you enter the WinRE screen, you need to click Troubleshoot -> Advanced options -> Startup Settings -> Restart. Then press F4, F5, or F6 to select a Safe Mode option that suits your needs.
4. Start Windows 10 in Safe Mode While Booting Through the F8 Key
In Windows 7, accessing the Advanced options window before logging in could be achieved by continuously pressing the F8 key. However, this approach doesn’t function in Windows 10 due to its significantly faster booting speed.
Nevertheless, you can re-enable the F8 functionality in Windows 10 by using the BCD (Boot Configuration Data) edit command.
Tips:
If your computer has UEFI and SSD drives, you may not be able to use the F8 key to enter Windows 10 Safe Mode.
Step 1. Open Administrator Command Prompt Window.
Press the Windows + R key combination to open the Run window. Then type cmd in the box and press Ctrl + Shift + Enter key to go to the Administrator Command Prompt window.
Step 2. Reactivate F8 Key Function
Then you can type this command line: bcdedit /set {default} bootmenupolicy legacy. After that, hit the Enter key.
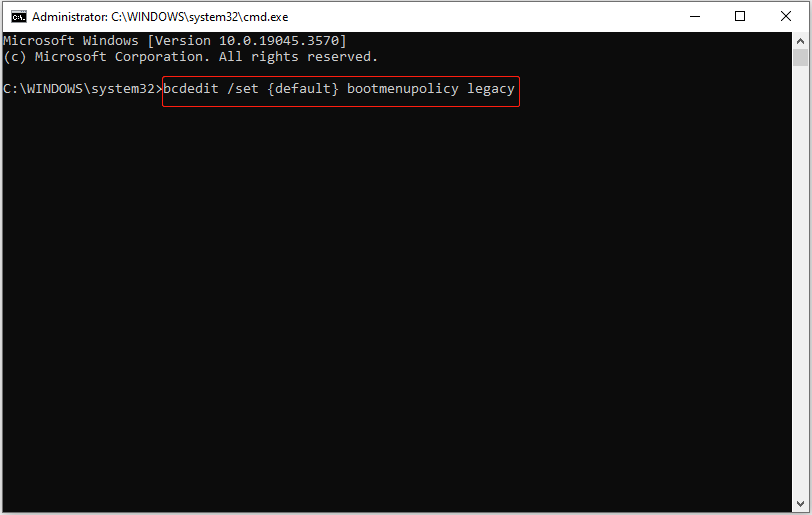
Step 3. Reboot Windows 10 PC in Safe Mode
Next, you can close the Command Prompt window and restart your PC. Before the Windows logo appears, you can constantly press F8 to enter into the Advanced Boot Options screen.
You can use the arrow keys on the keyboard to choose to start Windows 10 in Safe Mode, Safe Mode with Networking, or Safe Mode with Command Prompt.
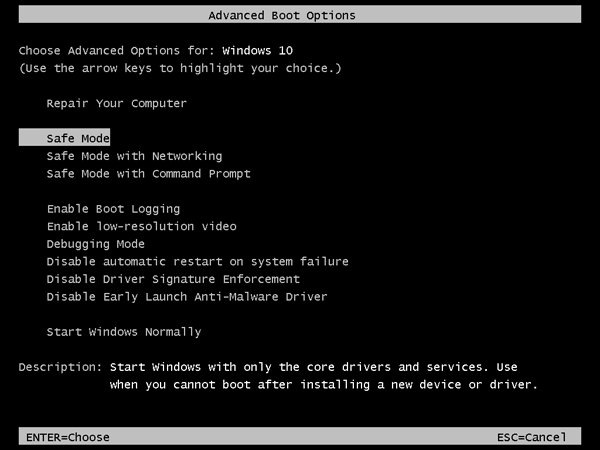
To get rid of the F8 key function in Windows 10, you can follow the same operation to get into the Administrator Command Prompt window. Then input this command line: bcdedit /set {default} bootmenupolicy standard and hit Enter. After that, restart your computer again.
Tips:
Please note that you can only reactivate the F8 function in Windows 10 on condition that the Windows PC can start normally. If you can’t access a Windows 10 PC, you should try the next way to boot in Safe Mode Windows 10.
Related article: Function Keys Not Working in Windows 10? Try These Fixes
5. Initiate Windows 10 in Safe Mode From a Black/Blank Screen
If your Windows 10 PC can’t start normally, you can also choose to boot Windows 10 in Safe Mode to troubleshoot problems.
To boot your Windows 10 PC in Safe Mode from a black or blank screen, you need to enter into the Windows Recovery Environment (WinRE) first by turning off and on the PC 3 times.
Step 1. Enter Into WinRE.
Press and hold the Power button on your PC for 10 seconds to turn off the computer, then turn on the computer by pressing the Power button again. When the computer is going to boot the operating system (e.g., the computer manufacturer’s logo appears when restarting), press the Power button again for about 10 seconds to turn off the device.
Duplicate the same process to turn off and on your Windows 10 PC 3 times. When the PC is turned on for the third time, the computer should enter into the Automatic Repair window. If not, follow the same steps until the WinRE screen is displayed.
When you see “Automatic Repair couldn’t repair your PC”, click Advanced options to enter into the Windows Recovery Environment screen.
Step 2. Enter Into Startup Settings.
In the WinRE window, you can then enter the Startup Settings window by clicking Troubleshoot -> Advanced options -> Startup Settings -> Restart.
Step 3. Start Windows 10 in Safe Mode With Networking.
Then you can press F5 to start Windows 10 PC in Safe Mode with Networking, which is a suggested option when you need to troubleshoot a black screen.
Click to Tweet
How to Use Safe Mode to Fix Windows 10 PC Issues
As mentioned before, starting Windows 10 PC in Safe Mode can help you fix some problems with your computer.
1. Recover Lost/Deleted Files on PC
If your computer has a system crash or hard drive error, you may lose some important files, and can’t start Windows 10 normally.
Upon entering the Safe Mode in Windows 10, you can use the best data recovery software – MiniTool Power Data Recovery to easily recover deleted files or lost data in 3 simple steps.
MiniTool Power Data Recovery is a 100% clean data recovery tool that is fully compatible with Windows 11/10/8/7.
You can use this software to recover lost or mistakenly deleted files from a PC hard drive, external hard drive, SSD, USB flash drive, pen drive, SD card (from Android, cameras, etc.), and more, under various kinds of data loss situations.
Tips:
If your Windows 10 PC can’t boot normally and lacks the installation of MiniTool Power Data Recovery Free, it’s advised to start Windows 10 in Safe Mode with Networking. Thus, you can download and install the software in Safe Mode.
Download and install MiniTool Power Data Recovery, and follow the detailed guide below to recover lost data and files with ease.
MiniTool Power Data Recovery FreeClick to Download100%Clean & Safe
Step 1 – Run MiniTool Power Data Recovery.
Launch MiniTool Power Data Recovery Free to enter into its main UI. All the detected drives and devices on your PC are displayed.
Step 2 – Scan for Lost Data.
Under Logical Drives, choose the partition from which data is lost and click the Scan button. Then this file recovery service will automatically scan for all lost, deleted, and existing files on the selected partition.
If you don’t know which partition contains the deleted/lost files, you can switch to the Devices tab and choose the whole disk to scan.
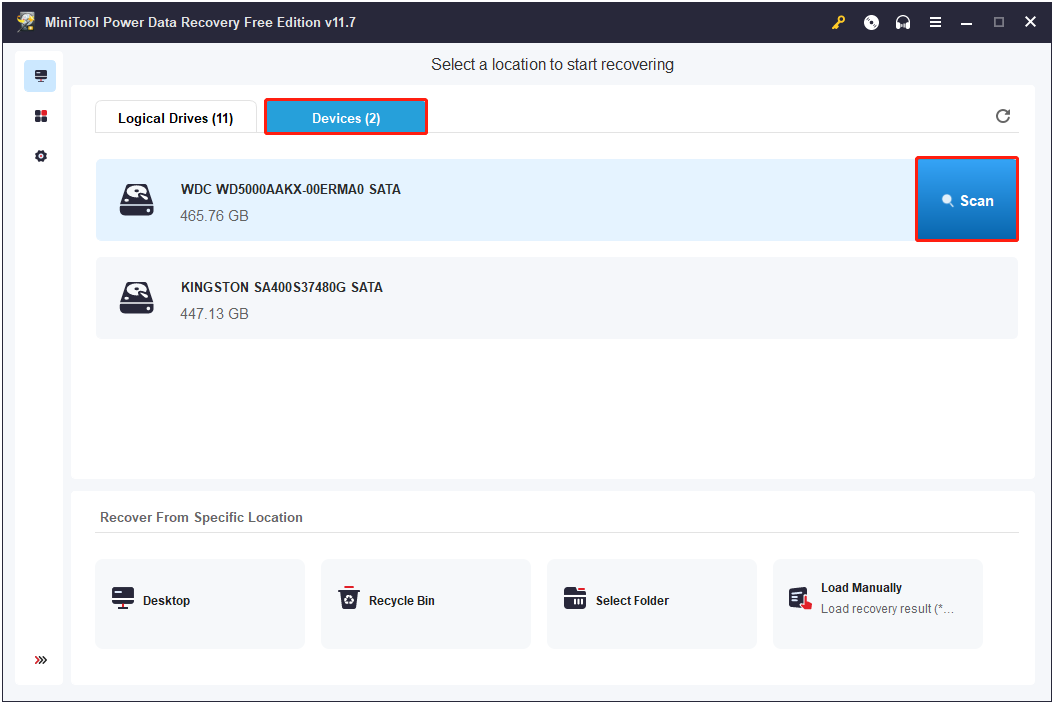
Step 3 – Preview and Save Lost Files.
Once the scanning is finished, you can browse from the scan results to find the needed files. The Filter and Search features are available to help you quickly find the wanted files.
- Filter: If you click the Filter button, you will have the option to filter out unwanted files by file type, file size, file modification date, and file category.
- Search: If you remember the file/folder name, you can locate a certain file/folder by typing the file/folder name in the search box and pressing Enter.

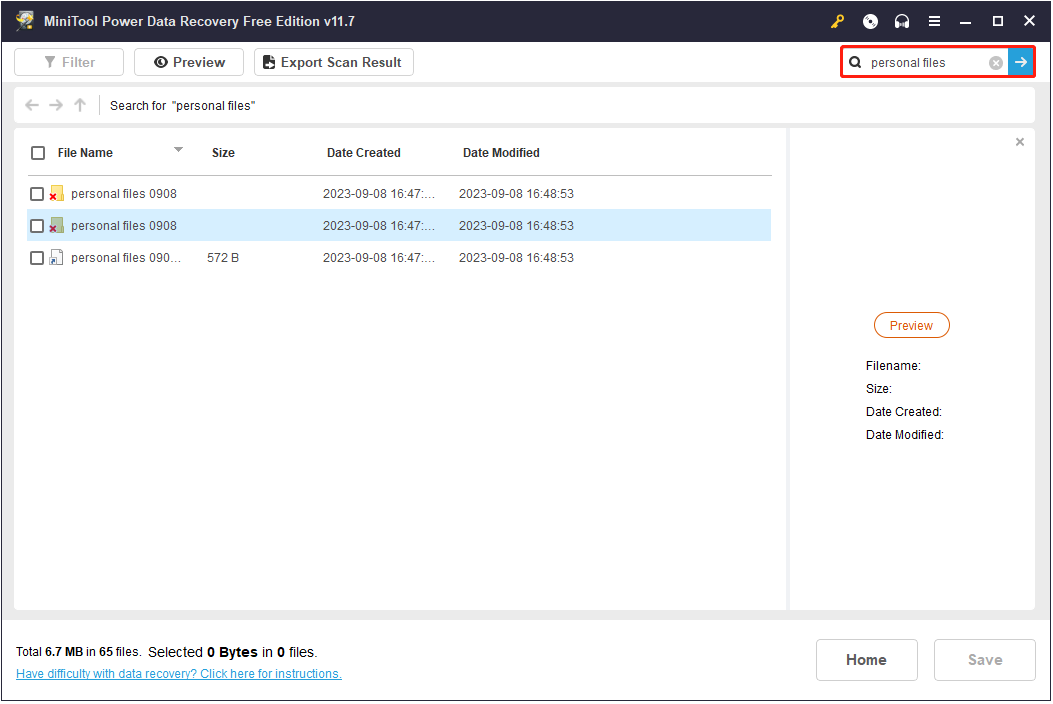
Moreover, it is crucial to preview the recovered files to ensure they are the ones you need. This hard drive data recovery service allows you to preview various types of files, such as Word documents, Excel files, pictures, videos, audio, slides, emails, etc.

Finally, click the Save button to store the wanted files to another drive.
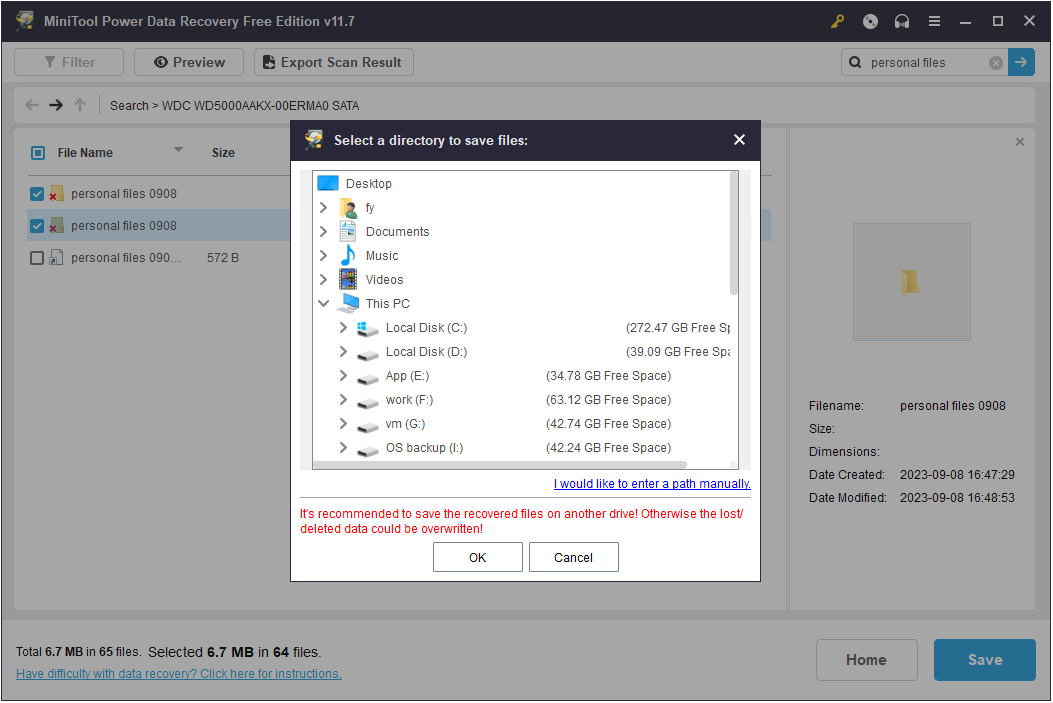
Tips:
If your computer can’t boot or even can’t start in Safe Mode, you can still recover your files with MiniTool Power Data Recovery. Related guide: How to Recover Data When PC Won’t Boot.
2. Uninstall Inappropriate Software
If your Windows 10 computer can’t work because of some recently installed programs that may have conflicting drivers, you can uninstall the suspicious software from the Control Panel in Windows 10 Safe Mode. Then restart your computer to see if the problem is fixed.
3. Perform System Restore
Performing a System Restore is a great option to restore the unstable Windows operating system to a previous state in good condition. But what if Windows System Restore is stuck or hangs up? In this case, you can try to start Windows 10 in Safe Mode to run a successful System Restore without crashing.
You can also boot Windows 10 in Safe Mode to fix Windows 10 black screen, and blue screen issues like the Kernel Data Inpage Error, etc.
Click to Tweet
Bottom Line
This post illustrates several ways to start Windows 10 in Safe Mode. If your computer doesn’t function optimally, you may want to address related issues, as well as recover deleted or lost data with MiniTool Power Data Recovery Free in Safe Mode.
If you have any concerns about MiniTool software, please feel free to contact [email protected].
Windows 10 Safe Mode FAQ
What does Safe Mode do?
Safe Mode starts Windows in a basic state using a limited set of files and drivers. It is mainly used for Windows troubleshooting. If your device functions without issues in Safe Mode, it indicates that the problem is not attributed to the computer’s default settings and basic device drivers.
How to start Windows 10 in Safe Mode?
You can boot into Safe Mode on Windows 10 via Settings, MSConfig, Shift + Restart, the F8 key, etc. Detailed instructions are included in this tutorial.
Can I boot in Safe Mode from BIOS?
You can press the F8 key during booting to enter the Advanced Boot Options screen and choose a Safe Mode option to boot Windows 10 into Safe Mode.
How do I start my computer in Safe Mode when F8 does not work?
If F8 is not working, you can try to run Command Prompt as administrator and execute this command line: bcdedit /set {default} bootmenupolicy legacy to activate the F8 key. Or, you can choose to enter into Safe Mode by using Shift + Restart or MSConfig.
Quick Access — How to Boot to Safe Mode in Windows 10
- At the sign-in screen, select «Power > Restart» and hold the Shift key down.
- After your PC restarts to the «Choose an Option» screen, select «Troubleshoot > Advanced options > Startup Settings > Restart».
- After your PC restarts, a list of options should appear. Select «4» or «F4» to start your PC in Safe Mode.
What Is Windows 10 Safe Mode and Why You Use It
Although Windows 10 is very versatile and powerful, it gets problems sometimes. Thus, starting your computer in Safe Mode is a handy way to diagnose and fix common issues with your PC. (Windows 10 stuck on the loading screen)
Safe Mode is a built-in diagnostic mode of Windows 10 (8, 7, etc.). It starts Windows in a basic state with a limited set of files and drivers. If a problem doesn’t happen in Safe Mode, this means that default settings and basic device drivers aren’t causing the issue. Checking Windows in Safe Mode enables you to narrow down the source of a problem, and can help you troubleshoot problems on your PC.

Windows 10 offers three types of Safe Mode. You can choose to boot Windows 10 in any type of Safe Mode according to your needs.
Enable Safe Mode
In this mode, the operating system is started with the bare minimum of installed drivers, and only the main Windows functions are used.
Enable Safe Mode with Networking
In this mode, the network drivers are also started.
Enable Safe Mode with Command Prompt
In this mode, the operating system is started in text mode. This mode requires knowledge of computer commands and is, therefore, more suitable for professional users.
If you want to know more details about Safe Mode, you can go to Wikipedia to get additional information.
How Do I Start Windows 10 in Safe Mode (Official Tips)
If you are familiar with Windows 10, you may have noticed that pressing the F8 or the Shift + F8 keys on your keyboard to enter Safe Mode no longer works. The process to enter Safe Mode has changed. How to start Windows 10 in Safe Mode, including when your PC doesn’t boot correctly, or when you can’t log into Windows 10? Here are six ways to start Windows 10 in Safe Mode (the full guide):
- 1. Start Safe Mode Directly from Windows 10
- 2. Enter Safe Mode from the Sign-in Screen
- 3. Restart Windows 10 in Safe Mode by Msconfig
- 4. Enter Safe Mode from the Settings App
- 5. Start Windows 10 in Safe Mode from a Black Screen
Solution 1. Start Safe Mode Directly from Windows 10
If you can log in to Windows 10, you can boot into Safe Mode in Windows 10 directly from your Start menu. Here are the detailed steps in booting into Windows 10 Safe Mode.
Step 1. Click the Windows button and select «Power».

Step 2. Hold the «shift» key on the keyboard and click «Restart».

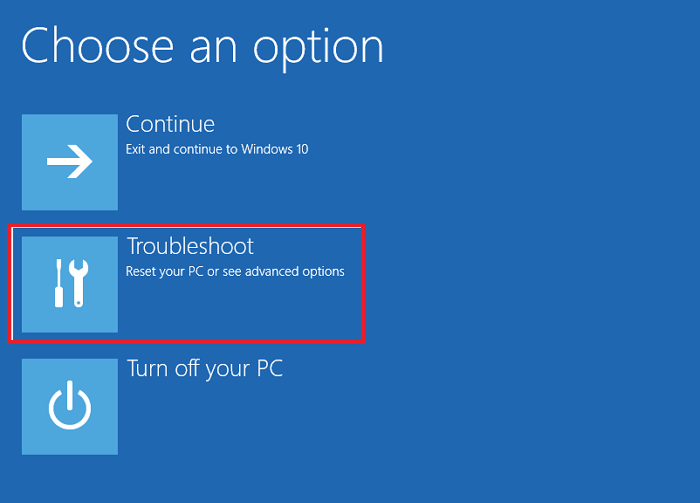
Step 3. Click the «Troubleshoot» option.
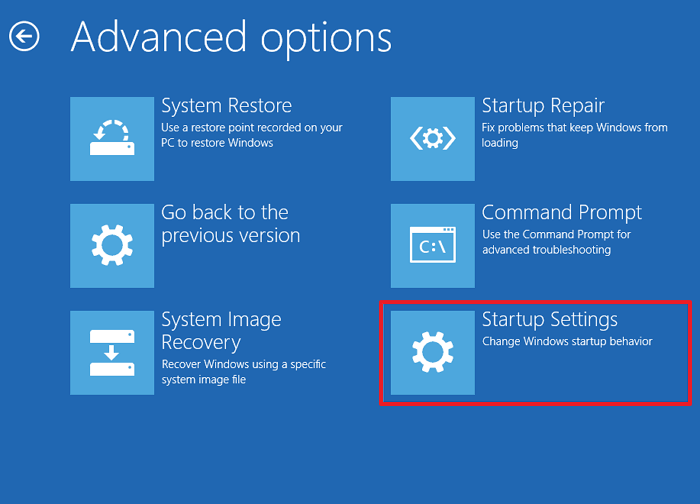
Step 4. Then, select the «Advanced options».
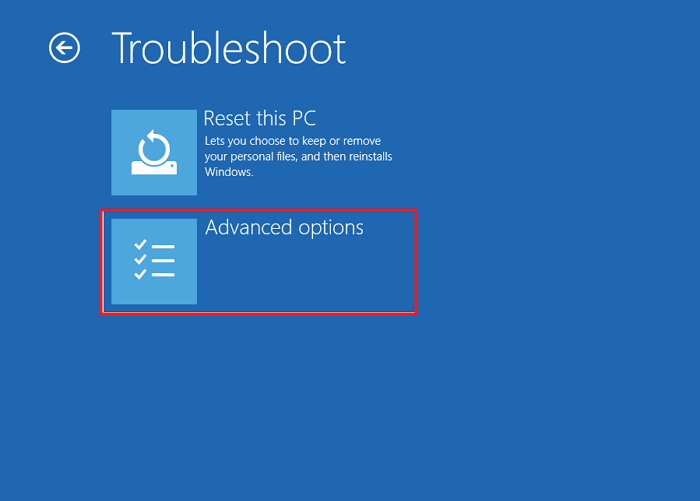
Step 5. Go to «Advanced options» and click «Start-up Settings».
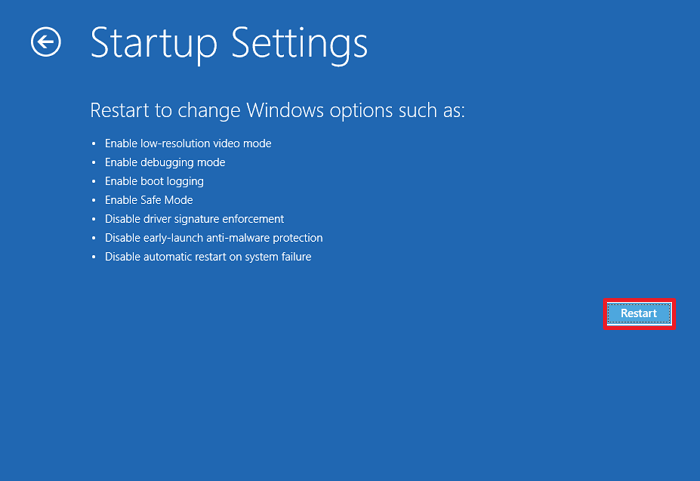
Step 5. Under «Start-up Settings» click «Restart».
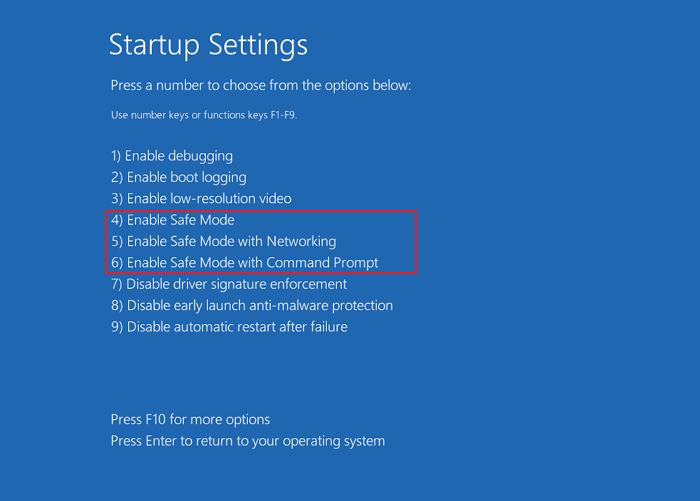
Step 6. Various boot options are displayed.
- The relevant options for booting in Safe Mode are numbers, 4,5, or 6.
- Select an option by pressing one of the numbers or function keys F4, F5 or F6
Then, Windows 10 starts in Safe Mode. You can solve your problems in Safe Mode.
Solution 2. Enter Safe Mode in Windows 10 from the Sign-in Screen
If you cannot log into Windows 10, but you can get to the sign-in screen, you can enter Safe Mode by using Shift + Restart.
Step 1. Restart the Windows 10 PC. When you see the Sign-in screen, press the «Shift» key and don’t release, and click the Power icon at the bottom-right and choose «Restart».

Step 2. Windows 10 restarts and asks you to select an option.
- Choose «Troubleshoot» > Advanced options» > «Startup Settings» > «Restart».
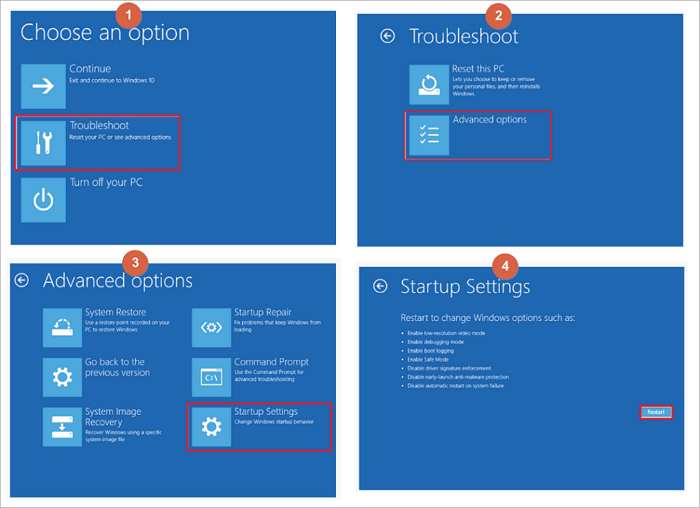
After the Windows 10 PC restarts, you can see a list of Windows startup options. Press F4 to boot Windows 10 in Safe Mode, or press F5 to start in Safe Mode in Windows 10 with Networking.
Solution 3. Restart Windows 10 in Safe Mode by Windows System Configuration
You can also try another way to boot into Safe Mode in Windows 10 if you can enter Windows 10 system normally.
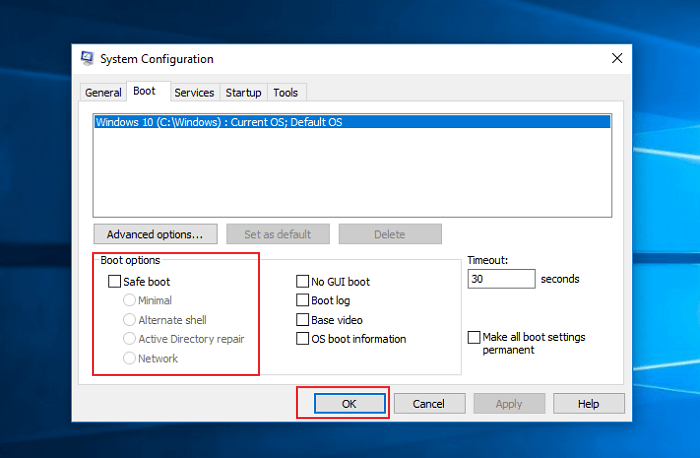
Step 1. Press Windows + R key, input msconfig, and hit «Enter» to open the System Configuration utility.

Step 2. Click the «Boot» tab. Under Boot options, you can choose a «Safe boot» option based on your own need.
- Minimal equals Safe Mode.
- Alternate shell refers to Safe Mode with Command Prompt.
- Network refers to Safe Mode with Networking.
- Active Directory repair option is used to repair the Active Directory server.
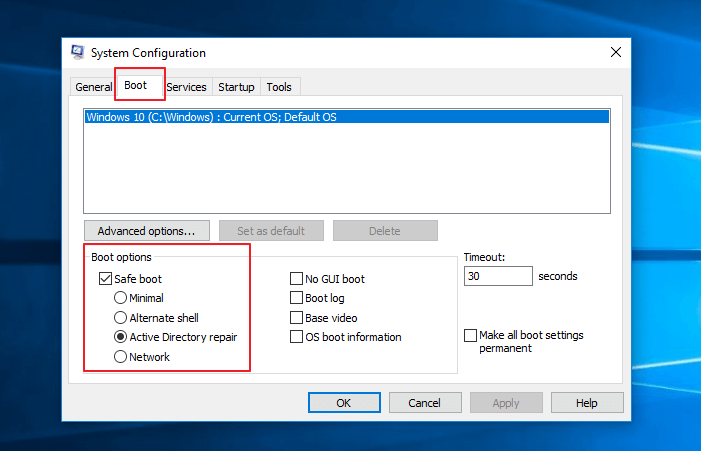
Usually, you can choose either the Minimal or Network option to start Windows 10 in Safe Mode to troubleshoot problems in Windows 10 system.
Solution 4. Enter Windows 10 Safe Mode from the Settings App
If you can log in to Windows 10, this way also enables you to boot into Safe Mode.
Step 1. Press Windows + I and head to the «Update & security» section.
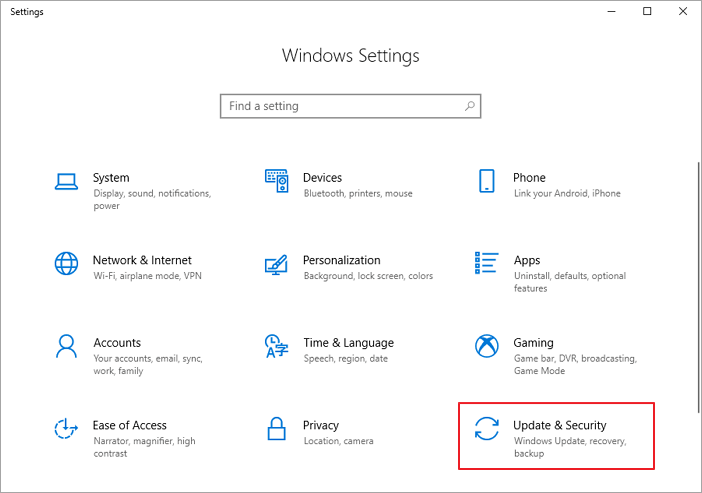
Step 2. On the left panel, press «Recovery». On the right side of the app, click or tap the «Restart now» button.
Step 3. After Windows 10 restarts, choose «Troubleshoot» > Advanced options» > «Startup Settings» > «Restart». Follow the same steps as those shown in Solution 1 from this guide.
Solution 5. How to Start Windows 10 in Safe Mode from a Black/Blank Screen
If your computer cannot boot the system successfully, you will need to directly enter Windows Recovery Environment (WinRE).
Step 1. To do this, you will repeatedly turn your device off, then on:
- Hold down the power button for 10 seconds to turn off your device.
- Press the power button again to turn on your device.
- On the first sign that Windows has started (for example, some devices show the manufacturer’s logo when restarting) hold down the power button for 10 seconds to turn off your device.
- Press the power button again to turn on your device.
- When Windows restarts, hold down the power button for 10 seconds to turn off your device.
- Press the power button again to turn on your device.
- Allow your device to fully restart. You will enter winRE.
Now that you are in winRE, you will follow these steps to take you to safe mode:
Step 2. On the Choose an option screen, select «Troubleshoot > Advanced options > Startup Settings > Restart». Follow the same steps as those shown in Solution 1 from this guide.

After your device restarts, you’ll see a list of options. Select option 5 from the list or press F5 for Safe Mode with Networking.
Solution 6. How to Boot in Safe Mode Windows 10 While Booting through F8 Key
Note: This method doesn’t work for UEFI legacy and SSD drives.
In Windows 7, you were able to press F8 just before Windows got loaded, to open the «Advanced Boot Options» window, where you could choose to start Windows 7 into Safe Mode. But in Windows 10, you can’t do that. Some people advise you to press Shift + F8 just before Windows 10 starts loading so that you make it launch the recovery mode, from where you can boot into Safe Mode.
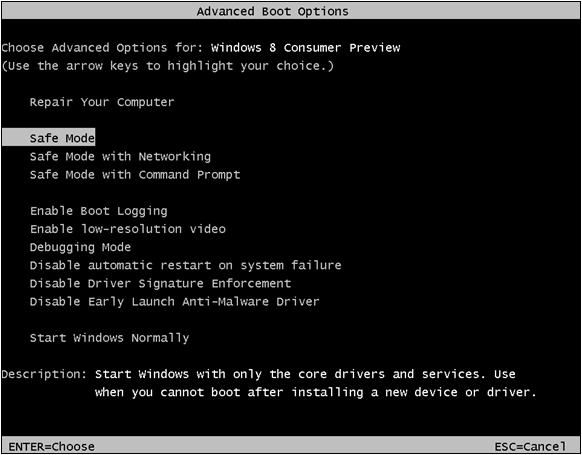
The truth is that Shift + F8 and F8 do not work in Windows 10. If you have a modern PC with a UEFI legacy and a fast SSD drive, there is no way you can interrupt the boot procedure with your keypresses. Only Windows 7 and Windows 8 users can enter Safe Mode using F8.
How to Tell If You’re in Safe Mode
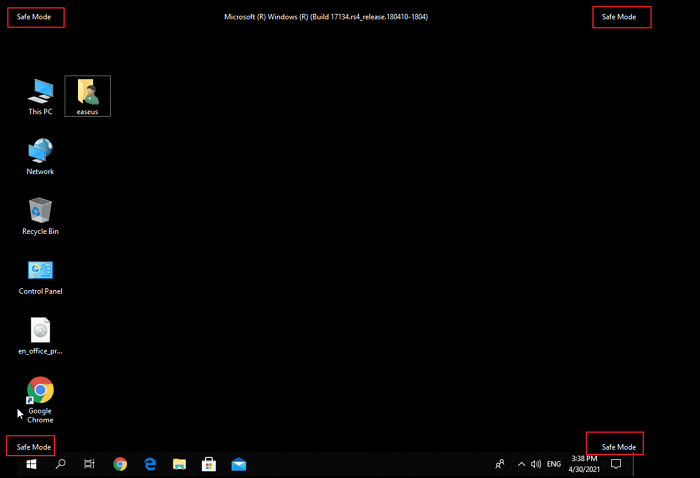
How do you know that you have entered Windows 10 Safe Mode? While in Safe Mode, the Desktop background is replaced with black. There are the words Safe Mode at all four corners. The top of the screen also shows the current Windows build and service pack level.
How to Exit Windows 10 Safe Mode Easily
If you Want to exit safe mode, you can follow these steps.
- Press the Windows logo key + R.
- Type msconfig in the Open box and then select «OK».
- Select the «Boot» tab.
- Under Boot options, clear the «Safe boot» checkbox.
How to Troubleshoot Windows 10 Computer Issues in Safe Mode
Starting your Windows 10 PC in Safe Mode can help you fix some problems with your computer. If your computer or laptop gets infected by a virus, data recovery software is highly recommended. EaseUS Data Recovery Wizard makes data recovery easy even your computer can’t boot or even can’t start in Safe Mode.
Step 1. Launch EaseUS Data Recovery Wizard in Windows 11/10/8/7 and choose the place where you lost data. Then, click «Search for Lost Data» to find lost data.

Step 2. After the scan, use the file format filter on the left or upper right corner to find the files you need. You can also search in the search box, which is the fastest way to find the target file. Then, you can click the «Preview» button or double-click a file to preview its content.

Step 3. Click the checkbox next to the file and click «Recover» to get back the lost data to your local storage or Cloud drive.

Then, you can troubleshoot Windows computer problems when certain parts of the OS may not function or may not work as quickly as you’re used to. In Safe Mode, you can:
- Remove Malware or Virus
- Uninstall Improper Software
- Roll Back a Driver
- Update a Driver
- Perform a System Restore
Conclusion
As a diagnostic tool, you only need to boot into Safe Mode when you want to troubleshoot a problem with your device or computer. If your computer can boot normally, Solution 3 is the easiest and fastest one. If you cannot boot into Windows 10, Solution 5 is my recommendation.

