
Основные отличия UEFI и Legacy
Для начала определим, что такое UEFI и Legacy. UEFI (Unified Extensible Firmware Interface — объединённый интерфейс расширяемой прошивки) представляет собой набор микропрограмм материнской платы, которые отвечают за её запуск и взаимодействие с установленным аппаратным обеспечением. Под Legacy же подразумевается старый набор служебного ПО, более известный как BIOS (Basic Input-Output System). Несмотря на общее предназначение, оба варианта значительно отличаются. Главным различием является графический интерфейс в UEFI, который, ко всему прочему, поддерживает управление мышью. В BIOS же используется исключительно клавиатура.
Менее очевидным пользователям, но не менее важным отличием является поддержка загрузочных разделов объёмом больше 2,1 Тб и формата GPT. Последний представляет собой почти что обязательное условие для установки Windows 10. Соответственно, если на этот компьютер попробовать инсталлировать Windows 7, ничего не получится – загрузочный раздел необходимо либо форматировать, либо конвертировать в поддерживаемый тип.
Читайте также: Как узнать типа разделов накопителя
UEFI поддерживает такую опцию, как Secure Boot, которая она позволяет проверять целостность загрузчика при запуске системы и отменять его, если будут обнаружены неавторизованные изменения. Последняя важная особенность, которую нужно иметь в виду – улучшенная поддержка вариантов сетевой загрузки, что позволяет устанавливать операционные системы через подключение к локальной или общей сети. Такая возможность была и в старых версиях служебного ПО материнской платы, однако в новом типе она поддерживает практически все доступные на сегодня протоколы соединения.
Читайте также: Отключаем UEFI Secure Boot в BIOS
В то же время следует иметь в виду важную особенность: UEFI рассчитан на современные операционные системы, то есть Windows 8, 8.1, 10 и 11. Семёрку на компьютер с этим вариантом программного обеспечения платы так просто не установить. Впрочем, производители учитывают подобное, поэтому, как правило, имеется возможность переключить режим загрузки в Legacy, тот самый старый добрый BIOS.
Читайте также: Узнаём, BIOS или UEFI используется на компьютере
Таким образом, резюмируя всё обозначенное в настоящей статье, можем сделать вывод – для Windows 10 режим UEFI является не просто предпочтительным, а необходимым в большинстве случаев.
Наша группа в TelegramПолезные советы и помощь
You might be here because you stumbled upon the “Boot Mode” configuration in your BIOS with two options: “UEFI” and “Legacy”. In the article below, I compare UEFI vs Legacy and figure out the best option for Windows 10 & 11, especially if you have a new one..
But before discussing the differences between the Legacy & UEFI mode of BIOS and their features, let’s understand what BIOS is and its purpose.
BIOS Purpose in Computer
BIOS (Basic Input/Output System) is a program stored on a chip on the computer’s motherboard. It is needed most when you start up your desktop when no power is there and so no instructions loaded into the memory.
This BIOS checks components such as the hard drive, CPU, memory, and video card to ensure they function correctly. After passing the POST (Power On Self Test), the BIOS assist you with running Windows.
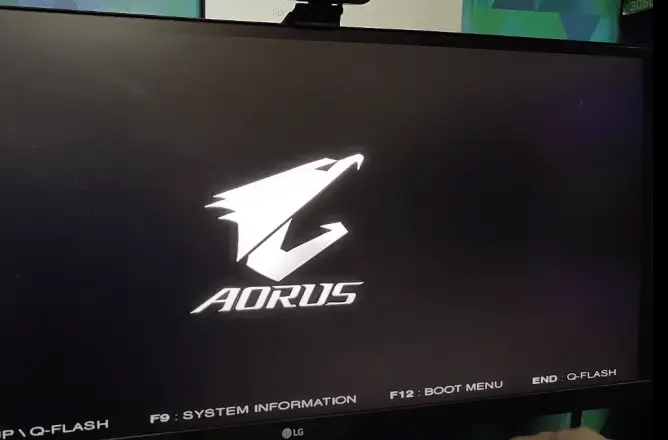
It acts as an interface between you and the hardware components of your PC. Whenever you turn on the computer, the BIOS loads and starts first (shows up your motherboard name like Aorus below), and only then does the operating system load.
Apart from this, BIOS also helps in configuring various settings like memory, voltage, diagnosing peripherals, disk settings, time & date, monitor resolution, etc. That’ why BIOS solves many PC related issues like lines on screen, slow RAM speed, turning OFF fan, etc.
Now let’s know which offers you more configuring options, a UEFI vs Legacy BIOS.
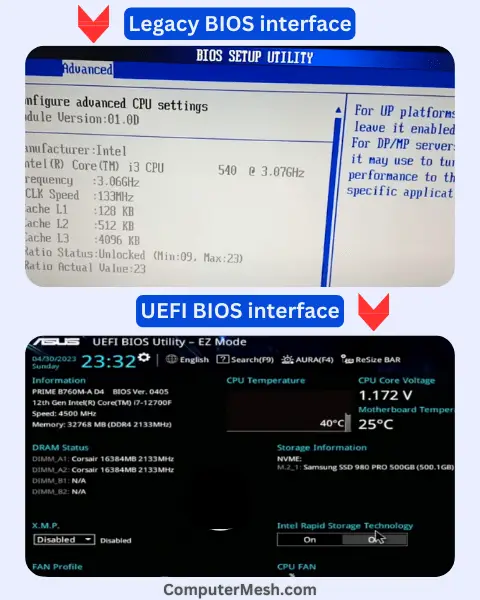
1. Legacy BIOS Mode
Legacy BIOS mode is the traditional type of booting up a computer introduced long before UEFI in 1984 when IBM released the first Personal Computer. It was more common to boot earlier versions of Windows OS like 95, 98, XP, Vista, 7, and 8, and it is still accessible in recent Windows 10 & 11.
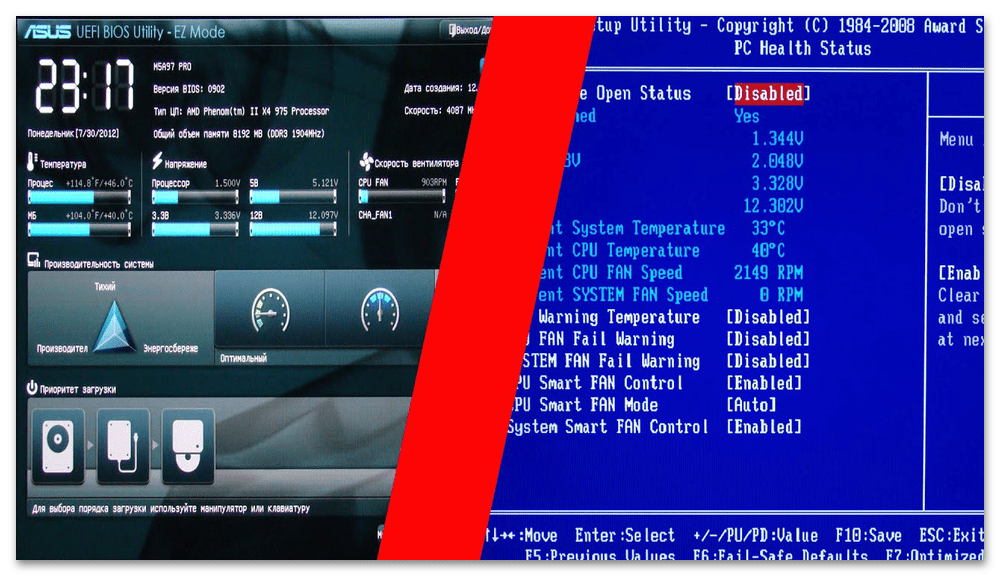
The look of BIOS legacy mode is straightforward, with a blue/gray background and text-only interface.
2. UEFI BIOS Mode
Unified Extensible Firmware Interface (UEFI) is a more modern BIOS utility introduced in 2011, replacing the Legacy mode.
UEFI BIOS looks modern and has a colorful interface with multiple configuring settings and advanced features for security and performance available to set up your system.
UEFI is designed for modern operating systems like Windows 8, 8.1, 10 and 11, and it is not much compatible with old OS like Windows 7, Vista and older OS. However, in the case of the latest OS, switching the boot mode to Legacy, the same old BIOS is possible.
What makes UEFI better than Legacy? 10 Advantages
Let’s briefly talk about the 10 advantages of UEFI and the disadvantages of Legacy:
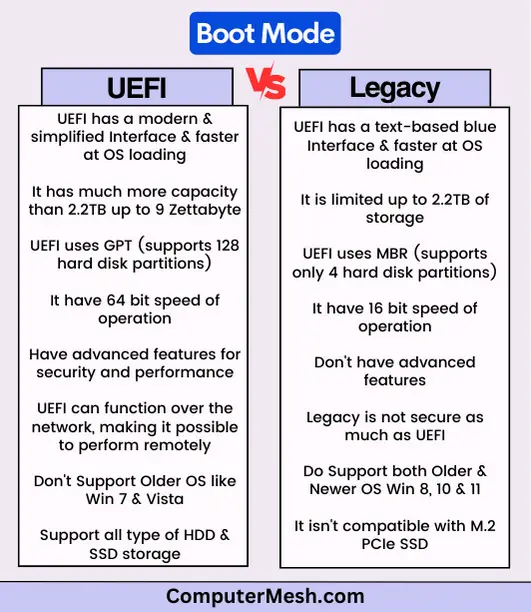
- UEFI has a modern, simplified version of the interface suitable for novice users to operate, while BIOS uses blue/gray background text-based interface.
- UEFI is faster at OS loading than Legacy BIOS, allowing for better system performance because UEFI uses GPT (GUID Partition Table), which supports larger drives for a quicker boot process as well as stores the boot data in a .efi file rather than the firmware.
- The Legacy support up to 2 TB of hard disk storage while UEFI has much more capacity, up to 9 Zettabyte, enough for a server sized hard disk with SAS or SATA interface.
- The Legacy uses MBR (supports four partitions of a disk), while UEFI uses GPT (supports 128 hard disk partitions).
- The presence of a network driver, which allows UEFI to be updated without the need to start the operating system.
- Legacy uses 16 bit speed while UEFI has 4X 64 bit speed for operation.
- UEFI supports gaming features like temperature and power monitoring and processor enhancements such as virtualization and Turbo Boost.
- UEFI supports new technologies such as Secure Boot and TPM (Trusted Platform Module).
- UEFI is functioning over the network, making it possible to perform configuration or debugging remotely.
- UEFI uses C-language – a form of coding that is much more simplistic than assembler, which is the type of language that legacy systems require.
Although UEFI firmware keeps all possibilities of future options, it has some cons where Legacy become suitable.
Cons of the UEFI Mode:
- Using UEFI may hinder the dual booting process, and you may need to switch to Legacy mode to access certain features.
- HDDs with MBR layout are not supported on UEFI.
- Sometimes PC does not start with UEFI. Disabling UEFI and enabling the Legacy option can fix startup issues.
What Is Better, Legacy BIOS Or UEFI?
Over the years, many improvements have been made to the Legacy BIOS interface, but it still lacks advanced features and security.
On the other hand, UEFI is a more modern firmware interface that offers many advantages, of an improved graphical menu, support for larger hard drives like NAS and partitions, Secure Boot, better power management, and more. Thus, UEFI mode with newer PCs, and latest versions of hardware & programs is recommended.
In contrast with older operating systems, Legacy BIOS might be the better option for you as it is more compatible with older models and software because some OS, such as Windows XP, hasn’t worked properly with UEFI. In these cases, it is necessary to use the legacy compatibility mode.
What Happens If I Switch From UEFI To Legacy?
Switching from UEFI to Legacy brings a change in the way the PC boots. With UEFI, the .efi file is loaded, and then the operating system boots. With Legacy, the hard drive’s first sector (Master Boot Record) is loaded, and then the operating system boots.
Switching from UEFI to Legacy may be necessary to install an older operating system on a PC. It is also required to install a new operating system on an older motherboard & PC.
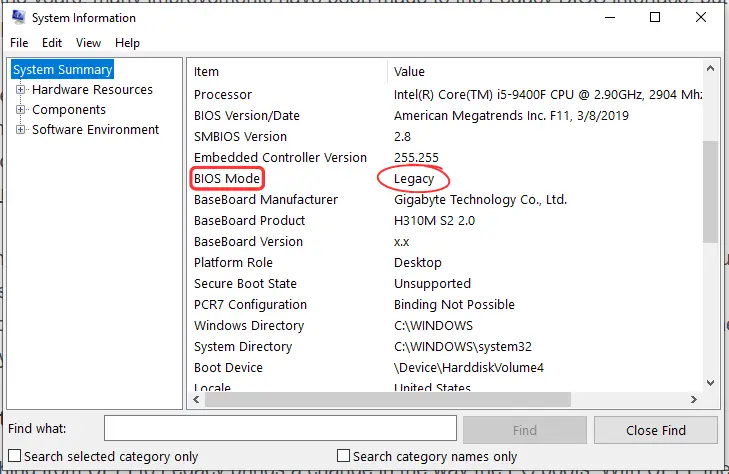
Check Legacy BIOS and UEFI Mode Currently on your PC
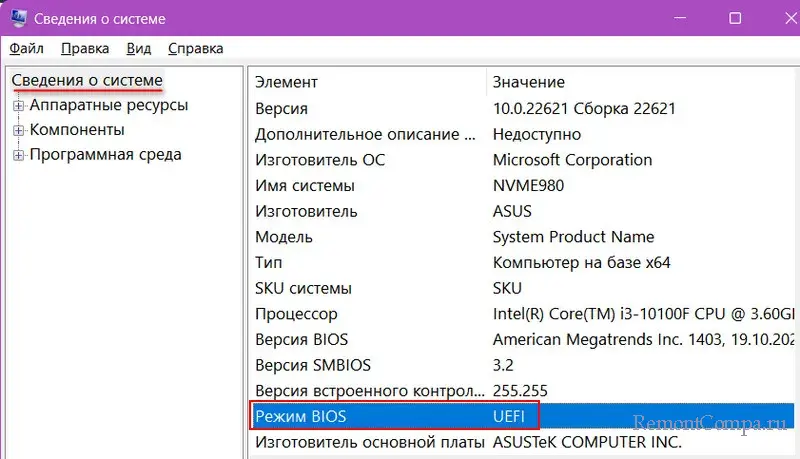
To know your current BIOS mode on your Windows, first open Run app by pressing Win+R, second paste this: msinfo32 and click OK. Here you will find the BIOS mode, either Legacy or UEFI.
- Related: DWM.exe in task Manager – Is it ok end this process?
FAQs on UEFI vs Legacy
Should I choose legacy BIOS or UEFI on my new PC?
Some modern motherboards offer both legacy BIOS and UEFI boot modes. You can choose either one, but UEFI is better as UEFI will become the standard in the future as it offers more advanced features.
Is UEFI more secure than Legacy BIOS?
Yes, UEFI has more security features like “device guard”, “credential guard”, “biometric authentication” and, more importantly, “secure boot” (avoids loading any drivers that aren’t digitally signed to protect against the installation of any harmful software)
Does Legacy BIOS support M.2 PCIE SSD drive?
M.2 PCIE SSD drive does not work on Legacy BIOS, while UEFI supports all M.2 card that installs on M.2 slot heatsink.
Will there be data loss after switching Legacy BIOS to UEFI?
There will be no data loss while converting Legacy BIOS to UEFI. However, as a precaution, take back up your system.
How do I know if my motherboard supports UEFI or BIOS?
The best way to know if your CPU & motherboard supports UEFI or BIOS is to check your user manual or visit the manufacturer’s website. You can also tell by looking at the boot menu and seeing if there’s an option for “UEFI Boot”, or something similar. For this, press a key (Del, F2, F10, or F12) during boot to enter the BIOS utility.
Is BIOS Legacy bad for SSD?
For Windows 10 and 11 on an SSD, the Legacy mode is not the best option, using UEFI is the best choice. Generally, you want to optimize SSD get the best performance from your system and don’t want to put limits on the amount of disk space.
В этой публикации, друзья, рассмотрим такой вопрос: UEFI и Legacy — в чём разница. UEFI и Legacy — это два разных режима загрузки и работы компьютера. При загрузке они определяют, как операционная система взаимодействует с аппаратным обеспечением компьютера. В процессе работы компьютера они определяют, какие программные и аппаратные возможности могут быть задействованы. И давайте детально об этом.
Итак, друзья, UEFI и Legacy – это два разных режима компьютера. Точнее, два разных режима низкоуровневого ПО (прошивки) материнской платы — BIOS. Есть BIOS UEFI, и есть BIOS Legacy. Это упрощённое понимание, дабы мы, пользователи не путались в технических тонкостях. На самом деле UEFI – это не совсем BIOS, это эволюционировавшая, преодолевшая многие ограничения BIOS. UEFI – это нечто простейшей операционной системы, работающей поверх BIOS. До появления UEFI была просто BIOS. Начиная с 2007 года на компьютеры стал массово внедряться UEFI, и обычную прошивку BIOS, которая без UEFI, стали называть Legacy, т.е. устаревшей или классической.
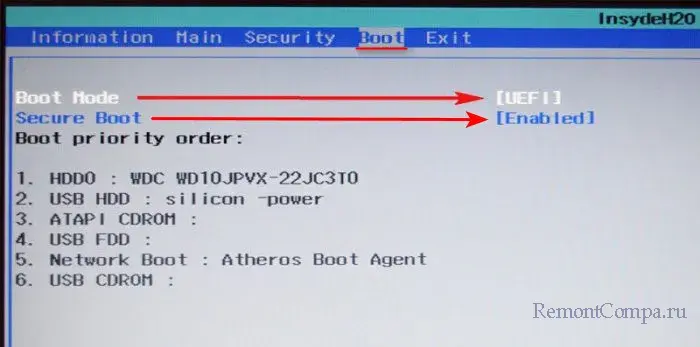
Режим UEFI или Legacy устанавливается в BIOS компьютера, обычно в разделе загрузки — «Загрузка», «Boot» и т.п. На ноутбуках UEFI часто реализован упрощённо в консольном формате, и режим BIOS меняется выставлением значения UEFI/Legacy для настройки нечто «Boot Mode». Иногда для включения Legacy необходимо отключение настройки Secure Boot.
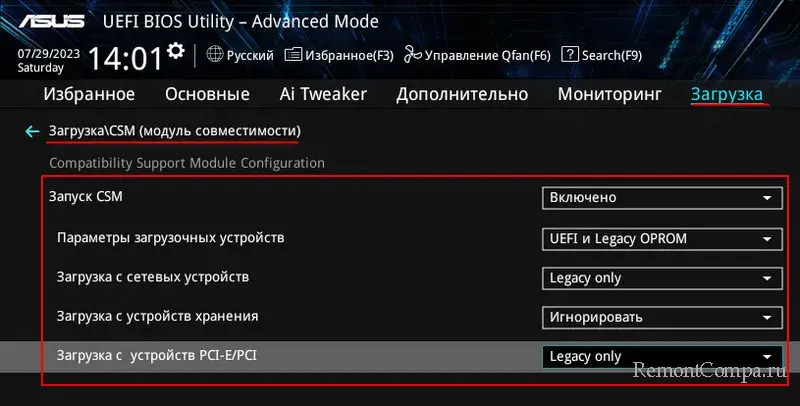
На ПК обычно UEFI расширенный с графическим интерфейсом. Предусматривает гибкие настройки UEFI и Legacy для разных задач в рамках функции CSM – режима совместимости UEFI и Legacy.
UEFI и Legacy по-разному ведут себя при загрузке компьютера. Когда мы включаем ПК или ноутбук, первым включается процессор, он обрабатывает определённые команды и переключается на BIOS. В BIOS содержится информация, с какого устройства информации должен быть загружен компьютер. Далее BIOS Legacy на нужном устройстве информации ищет загрузочный сектор Master Boot Record (MBR) — первый сектор устройства информации, содержащий код для загрузки операционной системы. UEFI использует иной механизм загрузки — Unified Extensible Firmware Interface (UEFI) Boot Manager. Он обращается к техническому разделу диска EFI System Partition (ESP), находит там и запускает файлы с расширением «.efi», содержащие информацию о загрузке операционной системы. И после уже управление передаётся загрузчику операционной системы, который загружает её саму. Подробности смотрим в статье «БИОС UEFI».
Но это только разные механизмы загрузки компьютера, определяющие базовое отличие UEFI и Legacy. Нам, обычным пользователям куда более важно понимать функциональную разницу между этими типами BIOS. UEFI был разработан с целью преодоления многих ограничений старого BIOS. Современный UEFI предусматривает все возможности BIOS Legacy, но имеет перед ней ряд преимуществ:
- В режиме UEFI более быстрый запуск компьютера. Это обеспечивается тем, что драйверы устройств компьютера загружаются в UEFI и передаются операционной системе. Тогда как в режиме Legacy драйверы загружаются при запуске операционной системы. Плюс к этому, в режиме UEFI компьютеры более устойчивы к ошибкам, связанным с драйверами. Legacy испытывает сложности при параллельной инициализации нескольких устройств, что замедляет загрузку компьютера. UEFI не испытывает таких сложностей: у этой прошивки более современная и гибкая архитектура, оптимизирующая время и ресурсы для загрузки компьютера;
- UEFI имеет функцию безопасной загрузки Secure Boot, предотвращающую запуск нежелательного или вредоносного кода. Тогда как в Legacy такой функции, и компьютер может быть подвержен атакам вредоносного ПО;
- UEFI использует современный стиль разметки диска GPT, поддерживающий диски объёмом до 9.4 Збайт (зеттабайт) и позволяет создавать разделы с объёмом до 18 Эбайт (эксабайт). Тогда как стиль разметки диска MBR, используемый Legacy, поддерживает диски только до 2.2 Тб, а максимальный размер раздела может быть не более 2 Тб;
- UEFI поддерживает программную технологию реализации (эмуляцию) TPM 2.0, которая при отсутствии аппаратного модуля TPM 2.0, является проходным билетом для официальной установки Windows 11. Тогда как Legacy не поддерживает эмуляцию TPM 2.0;
- В режиме UEFI можно официально установить Windows 11, в режиме Legacy – только неофициально;
- UEFI на ПК и некоторых ноутбуках предусматривает графический пользовательский интерфейс с возможностью использования мыши. Но главное — с возможностью переключения на русский язык, что значительно упрощает понимание настроек. Тогда как Legacy имеет только текстовый интерфейс с ограниченными настройками;
- UEFI проще обновляется, чем Legacy, так как хранит свой код в отдельном разделе диска или на съёмном носителе, а не в прошивке материнской платы;
- В UEFI можно попасть из Windows или её среды восстановления, что может быть значимо, если на компьютере не работают клавиши входа в BIOS;
- Только в режиме UEFI, а никак не в Legacy, могут быть использованы некоторые современные возможности чипсетов материнских плат. К примеру, создание RAID из SSD NVMe.
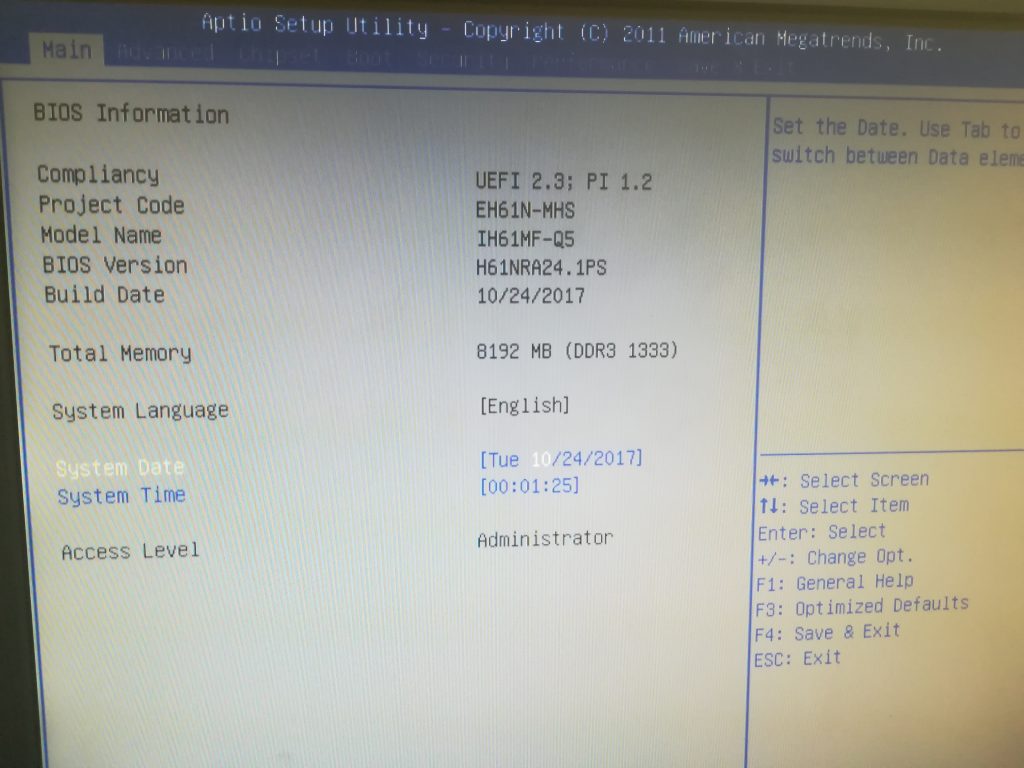
Друзья, выбор в пользу UEFI очевиден. Но в большинстве случаев выбирать ничего не нужно: режим UEFI, как правило, предустановлен в BIOS на материнских платах ПК и ноутбуков. Вы можете проверить, работает ли ваш компьютер в режиме UEFI. Это можно сделать прямо в Windows. Жмём клавиши Win+R, вписываем:
msinfo32
Смотрим графу «Режим BIOS», в ней будет указан, соответственно, режим BIOS – UEFI
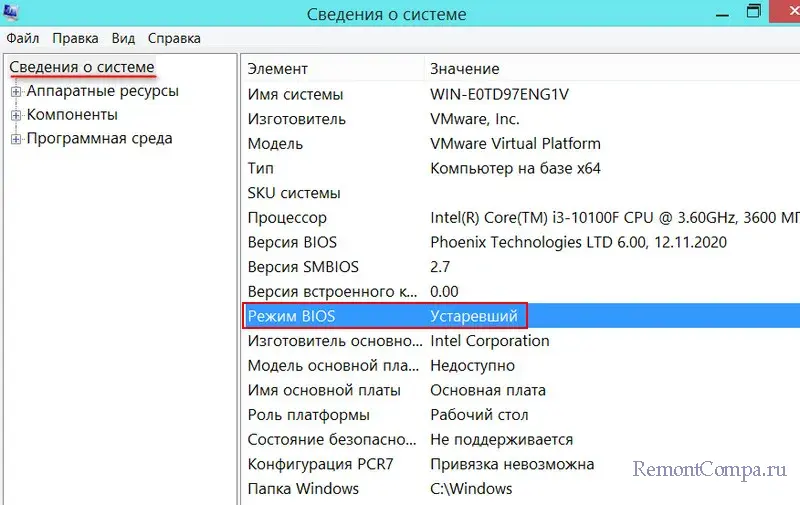
или «Устаревший», т.е. Legacy.
Если ваш компьютер работает в режиме Legacy, и он не старше 2007 года выпуска, возможно, он поддерживает UEFI, и его можно переключить в этот режим. Но в таком случае придётся конвертировать стиль разметки диска MBR в GPT. Это можно сделать с переустановкой Windows и потерей всех данных на диске. Или без переустановки Windows и потери данных на диске.
Выбирать BIOS Legacy необходимо в исключительных случаях, когда вам нужно поработать с загрузочного носителя с Legacy-ПО, либо установить устаревшую операционную систему, работающую только в режиме Legacy. Но даже в таких случаях на ПК не всегда нужно включать в BIOS режим Legacy, ведь на ПК есть упомянутая функция CSM. Подробнее об этом – в статье «Как поменять в БИОСе UEFI на Legacy».
Итак, вы решили установить Windows c загрузочной флешки, но вот незадача – BIOS (UEFI) почему-то не видит носитель. Ничего страшного – нужно лишь немного изменить дефолтные настройки.
О том, что нужно сделать, чтобы загрузочный носитель отобразился в Boot Menu, вы и узнаете в сегодняшней статье.
UEFI и Legacy — это два режима BIOS для загрузки дисков, которые отличаются методом запуска операционной системы и типом интерфейса.
Отличия UEFI и Legacy
| UEFI | Legacy | |
| Оформление | Графический интерфейс | Классический BIOS |
| Формат загрузки дисков | GPT | MBR |
| Загрузка драйверов | Есть | Нет |
| Наличие Secure Boot | Да | Нет |
| Сколько разделов можно создать | Нет лимита | 4 раздела по 2 Тб |
| Режим загрузки | EFI и Legacy | Legacy |
Почему UEFI не видит флешку?
Основная причина такой проблемы – режим загрузки флешки не соответствует режиму загрузки UEFI. Современные компьютеры поддерживают два режима загрузки – Legacy и EFI. Но по умолчанию включен только один из них, и, как правило, это EFI. А вот вашей загрузочной флешке как раз нужен именно Legacy.
Все, что нам нужно сделать в этом случае – выставить оба режима загрузки, чтобы BIOS увидел флешку и сумел ее прочитать.
Настройка запуска с флешки (UEFI/LEGACY)
Для этого нам потребуется:
- подключенная к монитору материнская плата,
- клавиатура.
Порядок действий
- Включаем плату и, пока не началась загрузка ОС, успеваем нажать F2 или DEL (комбинация может быть и другой – например, у НР это F10) для выхода в BIOS.

Стартовое окно
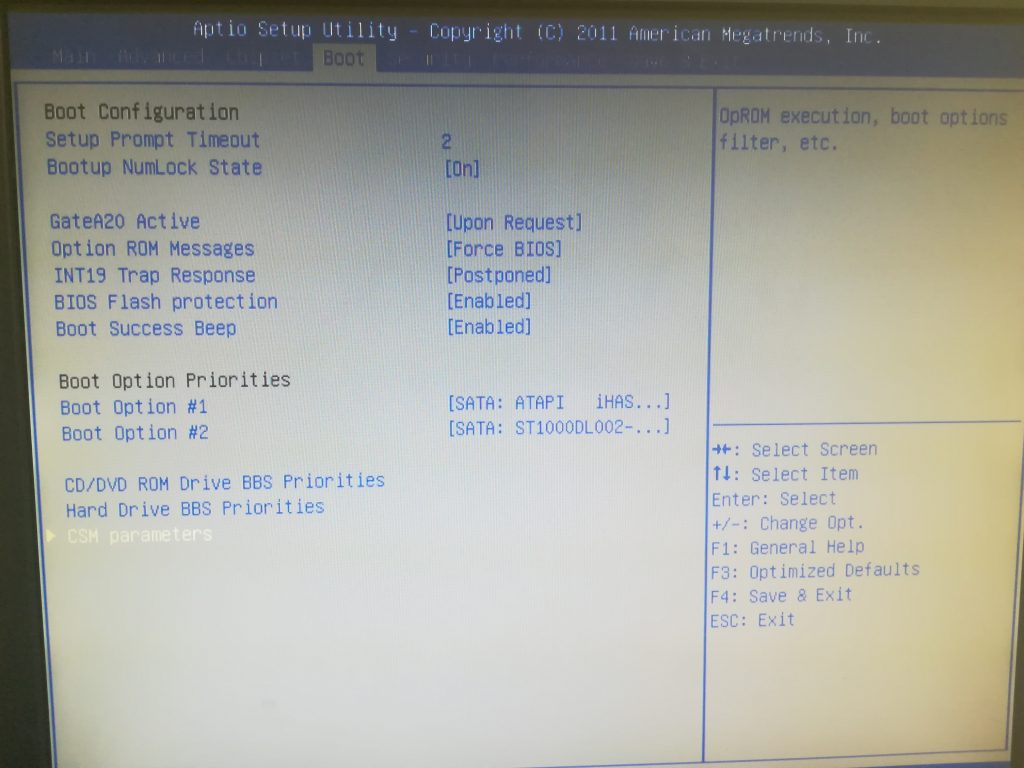
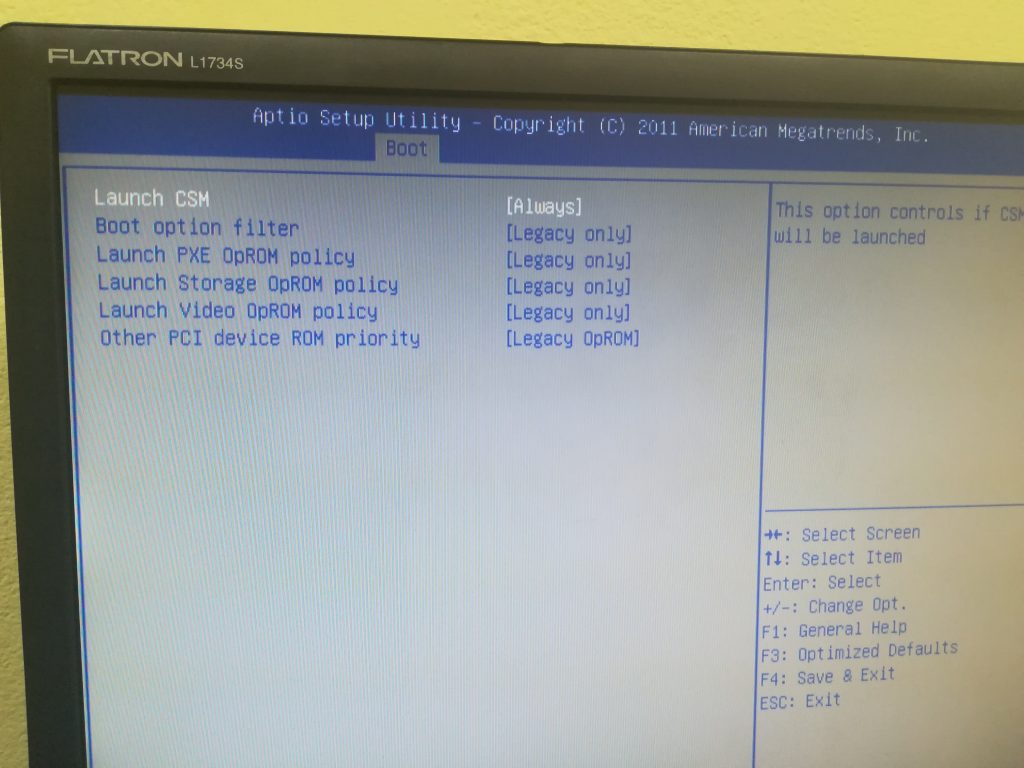
- Переходим на вкладку BOOT, в которой находим пункт CSM Parametres.
В самом низу
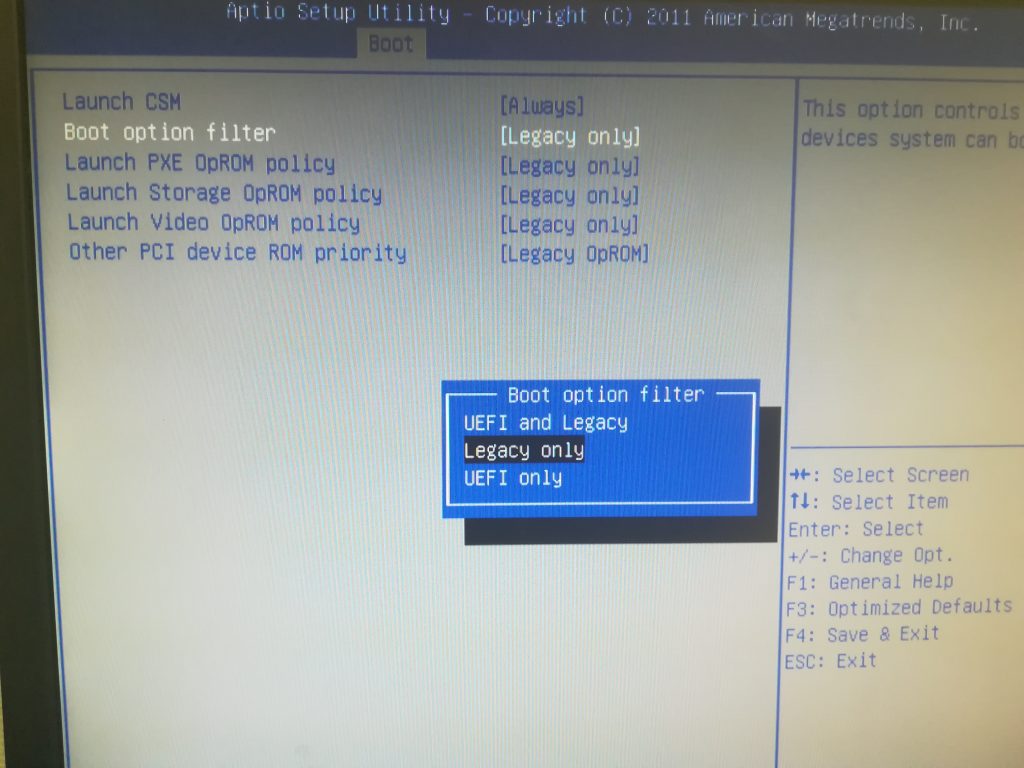
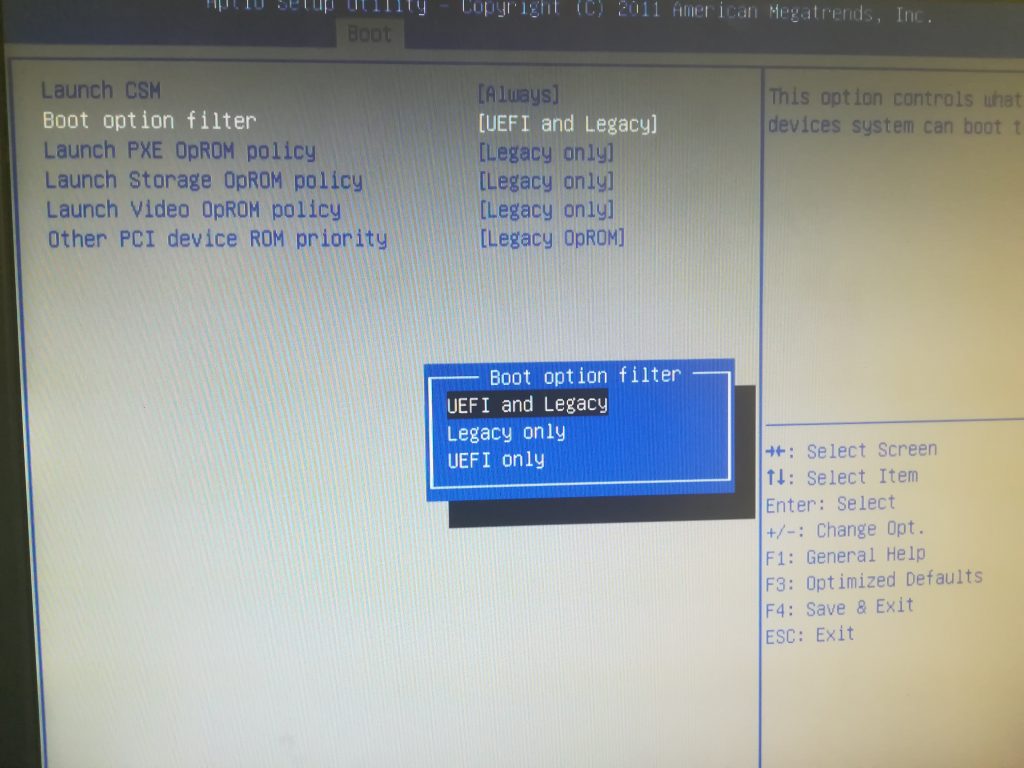
- В меню CSM Parameters находим Boot Option Filter.
Нам нужна вторая строчка
- Нажав Enter, выбираем Legacy Only, если хотим запустить флешку в режиме Legacy.
Доступно три варианта
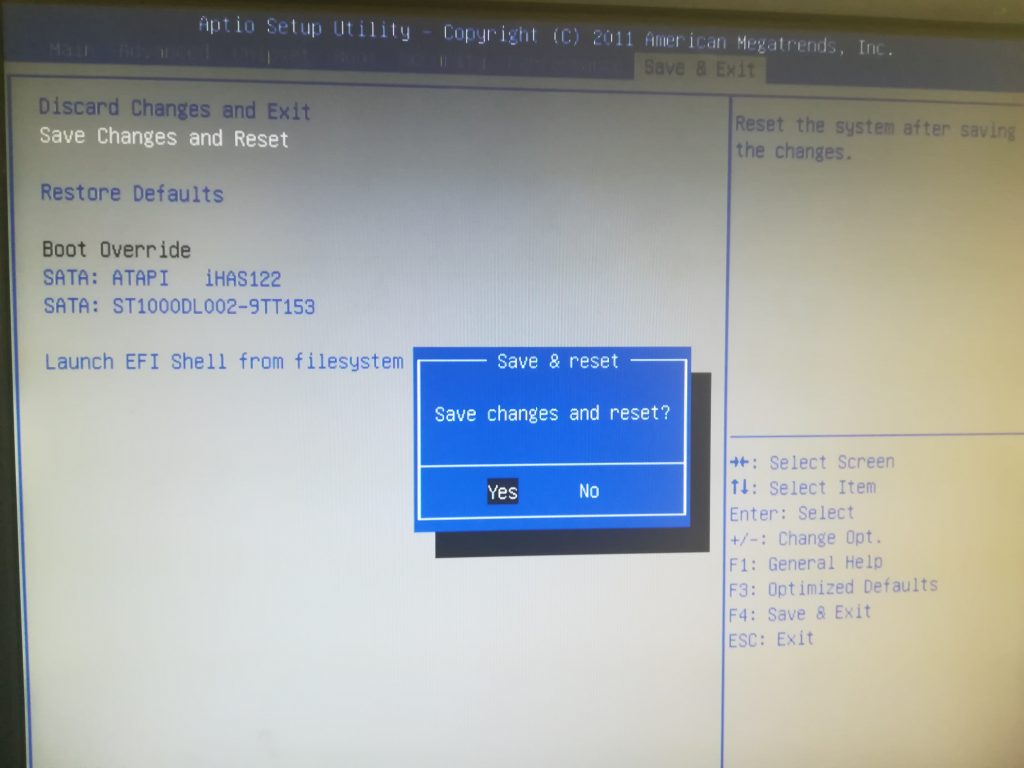
- После внесения изменений переходим на вкладку Save&Exit, где выбираем пункт Save Changes and Reset, а затем жмем Enter для сохранения изменений и перезагрузки.
То же самое можно сделать, нажав клавишу F10.
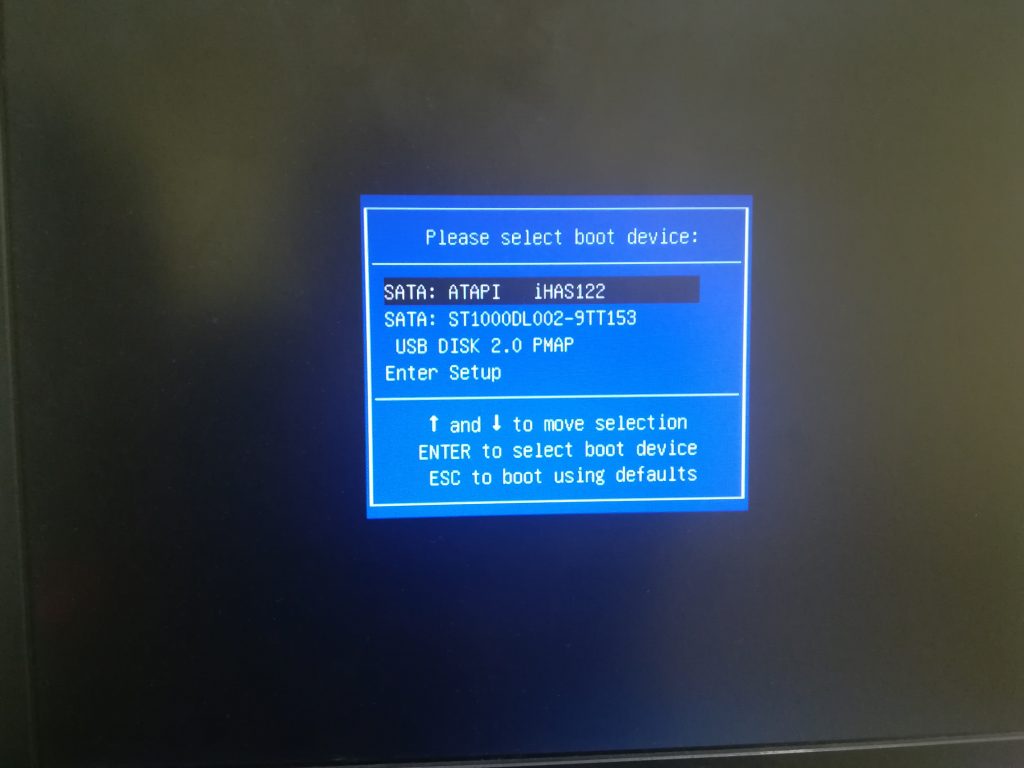
- Теперь до запуска операционной системы нажимаем F9 (клавиша может отличаться — у других плат это может быть ESC, F8, F10, F11, F12) для выхода в Boot Menu, в котором можно выбрать наш флеш-носитель и подтвердить загрузку с него нажатием на Enter.
Теперь флешка должна отображаться в Legacy.
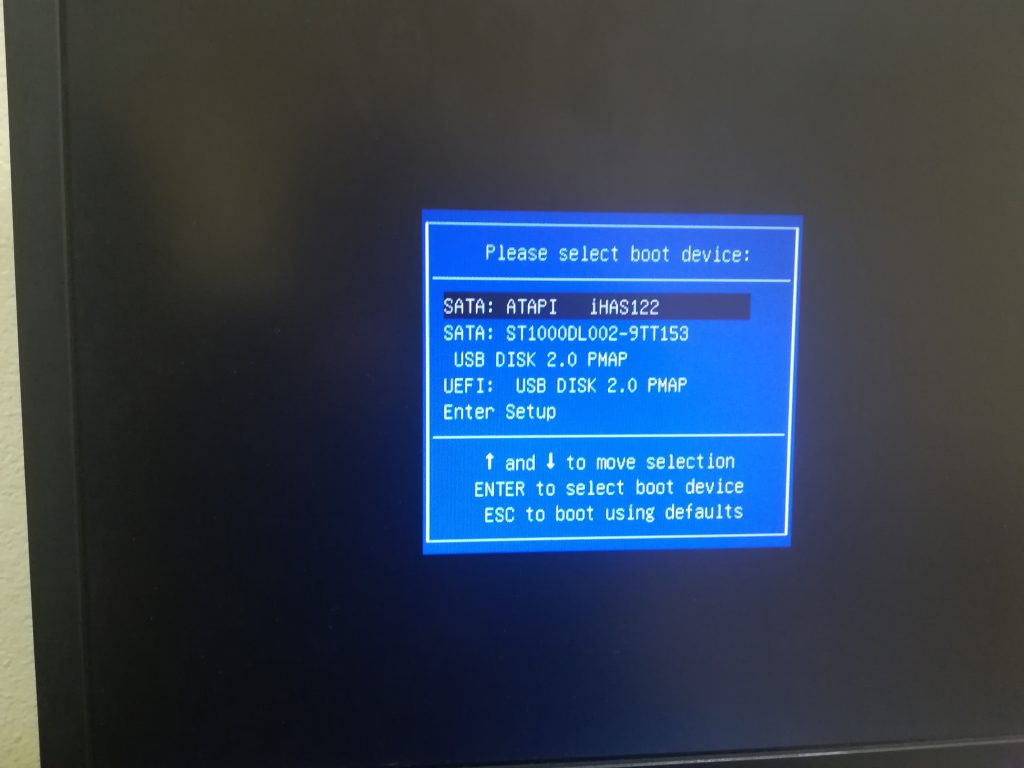
- Если нужна возможность запускать накопитель как в Legacy, так и в UEFI, то выполняем действия 1-3, но затем в пункте Boot Option Filter выбираем UEFI and Legacy и, конечно же, сохраняем изменения.
Для загрузки с обоих режимов
Да, сохранить и выйти
- После этого в Boot Menu мы увидим возможность выбора типа загрузчика в Legacy и UEFI.
Проблем быть не должно
- Выбираем необходимый нам тип загрузки клавишами «вверх» или «вниз» и подтверждаем выбор нажатием Enter. После этого ваша флешка запустится.
На этом все!
Post Views: 20 116
How to Change BIOS Mode from Legacy to UEFI Without Reinstalling Windows 10
Changing the BIOS mode from Legacy to UEFI can seem like a daunting task, especially if you have critical data on your system that you do not want to lose during the transition. However, with careful planning and the right approach, it is possible to make this switch without needing to reinstall Windows 10. In this article, we will discuss UEFI and Legacy BIOS modes, why switching to UEFI is beneficial, and provide a comprehensive step-by-step guide on how to complete the conversion safely.
Understanding BIOS and UEFI
Before we jump into the steps, it is essential to have a clear understanding of what BIOS and UEFI are and how they differ.
BIOS (Basic Input/Output System) is the firmware that initializes the hardware when you turn on your computer. It has been the standard for hard disk and peripheral initialization for decades. However, BIOS has limitations, such as:
- Limited boot options
- Restrictions on the maximum disk size (2.2TB maximum)
- Slower boot-up times
- Lack of graphics interface
- Inability to support modern security features
UEFI (Unified Extensible Firmware Interface) is a more modern counterpart to BIOS that addresses many of these limitations. UEFI supports larger hard drives, faster boot times, and a graphical user interface. It also includes features such as secure boot, which can help protect your system from malware during the boot process. Switching from Legacy BIOS to UEFI offers improved performance and security, especially for newer hardware.
Benefits of UEFI Over Legacy BIOS
Switching to UEFI mode can provide various advantages:
-
Faster Boot Times: UEFI is typically faster than Legacy BIOS, leading to quicker boot times.
-
Support for Larger Drives: UEFI can handle drives larger than 2TB, drawing on the GUID Partition Table (GPT) instead of the Master Boot Record (MBR).
-
Improved Security Features: UEFI comes with security features like Secure Boot, which can help protect against rootkits and bootkits.
-
Graphical User Interface: Many UEFI firmware implementations offer a user-friendly graphical interface, making configuration easier.
-
Advanced Networking Support: UEFI supports networking features that are not available in traditional BIOS.
Preparing for the Switch
Before changing the BIOS mode, certain preparations need to be made to ensure a smooth transition.
1. Backup Your Data
The most crucial step before making any changes to system settings is to back up your data. Use an external drive, cloud storage, or a specialized backup tool to ensure that your important files and settings are saved.
2. Check Your System Compatibility
Before proceeding with the switch, ensure that your motherboard supports UEFI. Most modern motherboards do, but if your system is older, you may need to check the manufacturer’s documentation. You can usually find this information in your BIOS setup screen or the manufacturer’s website.
3. Verify the Current BIOS Mode
To determine your current BIOS mode:
- Press
Windows + R, typemsinfo32, and hit Enter. - In the System Information window, look for «BIOS Mode.» This will indicate whether you are currently using UEFI or Legacy (BIOS).
4. Install Necessary Updates
Make sure your Windows 10 system is updated to the latest version to ensure compatibility with UEFI features. Check for Windows updates through Settings > Update & Security, and install any pending updates.
Changing the BIOS Mode from Legacy to UEFI
Now that you’re prepared, let’s outline the steps to change your BIOS mode:
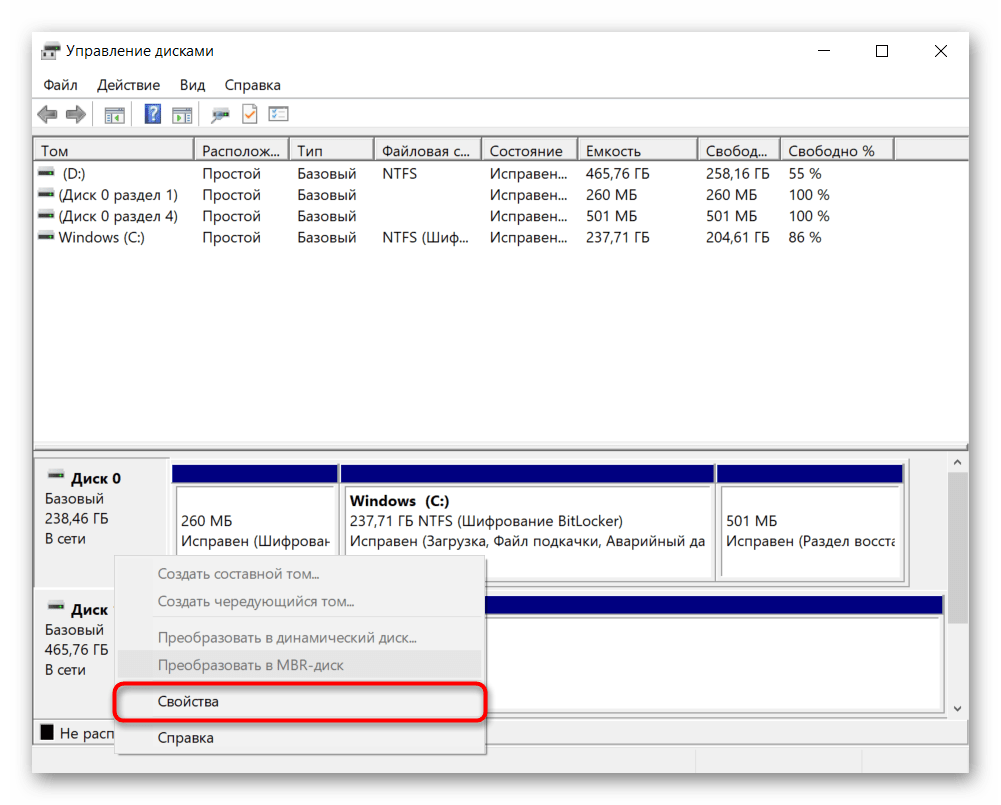
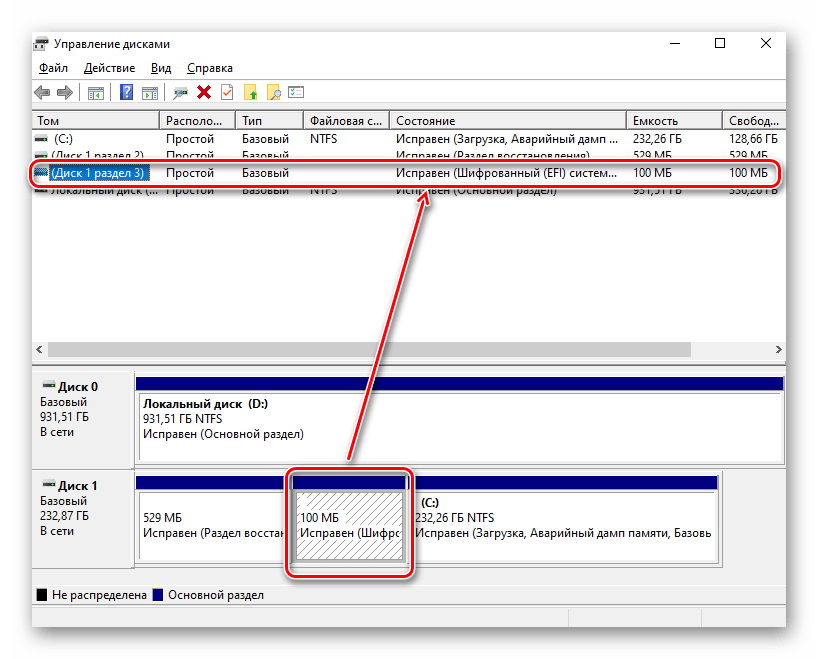
Step 1: Convert the Hard Drive from MBR to GPT
Switching from Legacy mode (which uses MBR) to UEFI mode requires the disk to be formatted using GPT. Fortunately, you can convert the disk without data loss using Windows built-in tools.
-
Open Command Prompt as Administrator:
- Press
Windows + Xand select «Windows Terminal (Admin)» or «Command Prompt (Admin).»
- Press
-
Run Disk Part:
- Type
diskpartand hit Enter to open the Diskpart utility.
- Type
-
List Disks:
- Type
list diskand press Enter. This will display all disks connected to your system.
- Type
-
Select Your Drive:
- Identify the disk you want to convert (typically Disk 0 if it is your primary drive) and type
select disk 0(replace «0» with your actual disk number).
- Identify the disk you want to convert (typically Disk 0 if it is your primary drive) and type
-
Verify Partition Style:
- Type
detail diskto view information about your selected disk. It will tell you if it’s currently using MBR.
- Type
-
Convert Disk to GPT:
- If it’s confirmed as MBR, type
convert gptto convert the disk to GPT format. Note that this command will erase all partitions on the drive, so ensure that data is backed up before proceeding.
- If it’s confirmed as MBR, type
-
Rebuild Your Partition:
- After the conversion, you will need to create new partitions for your OS and data. Remount your backups accordingly. You can do this in Disk Management.
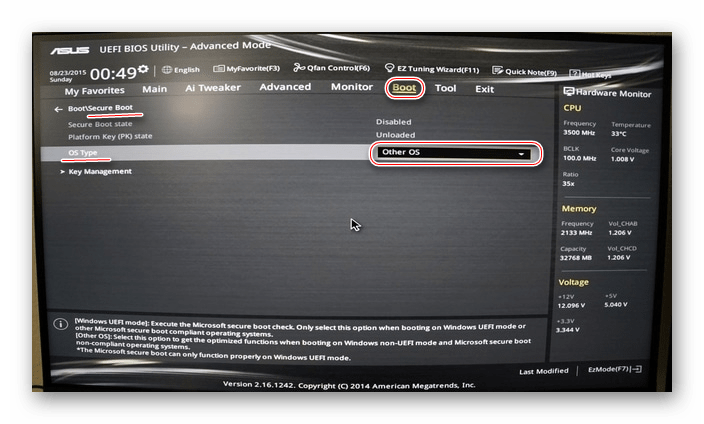
Step 2: Enable UEFI Mode in BIOS
-
Access BIOS/UEFI Settings:
- Restart your computer and press the designated key to enter BIOS/UEFI setup (commonly F2, DEL, or F10, depending on your motherboard).
-
Locate Boot Configuration:
- Navigate to the Boot tab. The layout may differ depending on the manufacturer, so follow your UEFI’s interface to find the Boot Configuration settings.
-
Switch to UEFI:
- Look for an option to switch from Legacy to UEFI. Enable UEFI mode and save the changes. Be careful not to enable Secure Boot just yet, as this may cause issues with some non-Windows operating systems.
-
Exit BIOS:
- Save and exit the BIOS settings, allowing your system to restart.
Step 3: Configure Windows Boot Manager
Once you have enabled UEFI mode, the next step is to ensure that Windows Boot Manager is set up correctly.
-
Access ‘Repair Your Computer’:
- If Windows does not boot after the switch, restart your computer and boot from a Windows installation media (USB or DVD).
-
Select Repair Options:
- Once the Windows setup screen appears, select «Repair your computer.»
-
Navigate to Troubleshoot:
- Click «Troubleshoot,» then «Advanced Options,» followed by «Command Prompt.»
-
Rebuild Boot Configuration Data:
- In Command Prompt, type the following commands one by one to rebuild the BCD:
bootrec /fixmbr
bootrec /fixboot
bootrec /scanos
bootrec /rebuildbcd
- In Command Prompt, type the following commands one by one to rebuild the BCD:
-
Exit Command Prompt:
- Once you have rebuilt the BCD successfully, type
exitand hit Enter.
- Once you have rebuilt the BCD successfully, type
Step 4: Boot into Windows
Restart your computer again. If everything has been configured correctly, you should boot into Windows 10 normally without any issues.
Step 5: Enable Secure Boot (Optional)
If you desire the additional security, you may enable Secure Boot after confirming that your operating system runs smoothly.
-
Boot into BIOS/UEFI:
- Restart and access BIOS/UEFI settings as before.
-
Secure Boot Option:
- Navigate to the Security tab or wherever Secure Boot options are located.
-
Enable Secure Boot:
- Change the option from Disabled to Enabled and save changes.
-
Exit BIOS:
- Save changes and exit BIOS. Restart your system.
Troubleshooting
Occasionally, users may face issues after changing the BIOS mode or converting the hard drive. Here are some common troubleshooting steps:
-
Windows Does Not Boot: If Windows does not start, ensure that all steps were properly followed, especially in converting the hard drive and configuring the boot settings. Revisit the repair options if necessary.
-
Reinstall Drivers: Sometimes, hardware drivers can cause issues after significant changes. Consider reinstalling device drivers using Device Manager.
-
Check Disk for Errors: Use built-in tools to check your disk for errors. Run
chkdskfrom Command Prompt to ensure your hard drive is functioning correctly. -
BIOS Settings Revert: If BIOS settings revert or do not save changes, ensure your motherboard firmware is updated to the latest version.
Conclusion
Switching from Legacy BIOS to UEFI mode can significantly improve your system’s performance, security, and compatibility with modern hardware. By carefully preparing your system, backing up your data, and following the outlined steps, you can successfully change the BIOS mode without needing to reinstall Windows 10. As always, handle your system settings with care to avoid potential issues during the transition. With this approach, you’re well on your way to enjoying the benefits of a more modern firmware experience.