

Changing the boot order, booting from USB or fixing possible boot issues. There could be a number of reasons why you would want to access the UEFI settings.
In this tutorial, I’ll show you three ways to access the UEFI settings in Windows 10:
- Using the designated key at boot time
- Using the UEFI settings from within Windows 10 (requires reboot as well)
Before you see the steps, please verify if your system is using UEFI or BIOS.
Method 1: Use F2/F10 or F12 keys at boot time to access UEFi settings
This is the classic method of accessing UEFI or the BIOS system.
Turn on your system. At the screen that shows the logo of your system manufacturer, press the F2 or F10 or F12 key. You may try pressing all of them one by one if you are not sure. But be quick when you do that otherwise it will boot into the operating system.
This key is different for different brand of computers. Some may even use Esc or Del keys for this purpose.

If it works, you should see the familiar BIOS screen. UEFI is underlying mechanism and it adds a few options in the boot settings. But the boot settings interface looks the same as the legacy BIOS system in many computers.

I have seen some newer computers have a totally different boot settings interface. This could differ from system to system.
This should work on your system but if it keeps on booting to Windows, no need to be disappointed. You may access the UEFI settings from within Windows as well. The next method shows the steps.
Method 2: Access UEFI firmware settings from within Windows 10
Windows 10 provides a way to access the UEFI settings from within Windows itself. Please bear in mind that while you may opt to access UEFI this way, your system will be restarted and boots into the BIOS/UEFI.
Follow the steps below for accessing UEFI settings in Windows 10.
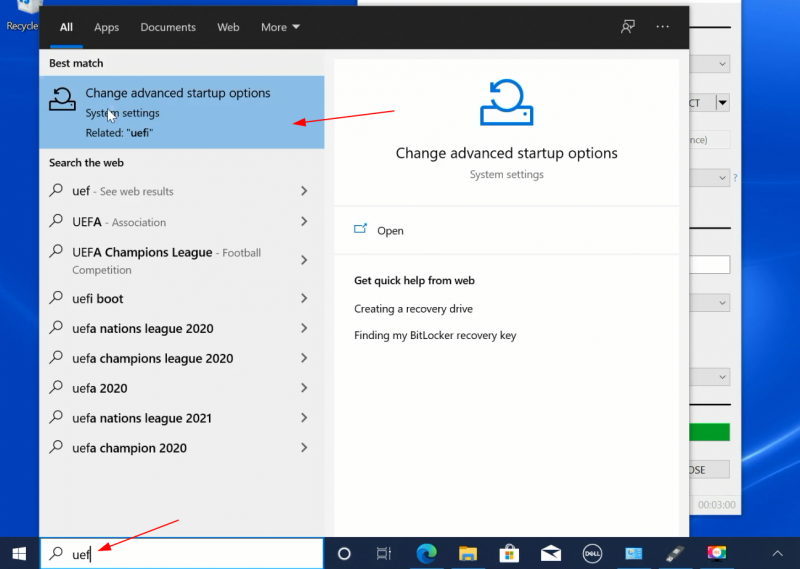
Step 1: Login to Windows and click on Menu. Search for UEFI and go to Change advanced startup options:
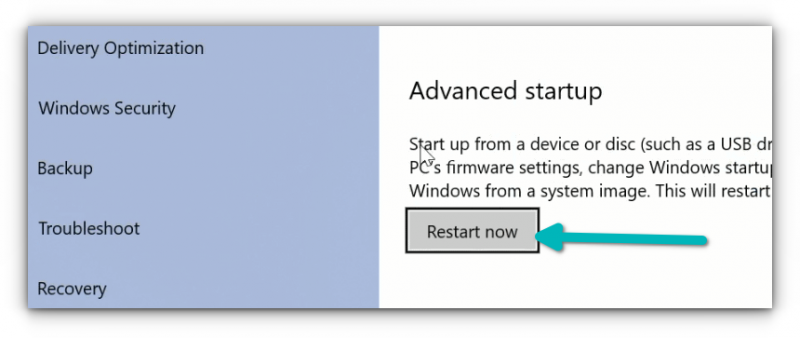
Step 2: In here, click on the Restart now button under Advanced startup option.
📋
Alternative shortcut: What you did just above can be achieved with an alternative way. You may click on the Windows menu, hit the power icon to display Shutdown, Restart and Sleep option. Press and hold the shift key and click restart at the same time. This will have the same effect as going to the ‘advanced startup option’ and clicking the ‘restart now’ button.
It will not restart your system immediately. Instead, you should see a blue screen with ‘Please wait’ displayed.

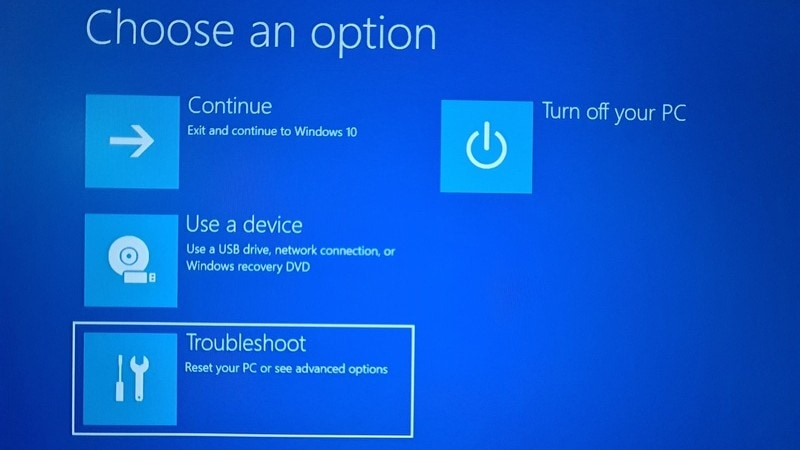
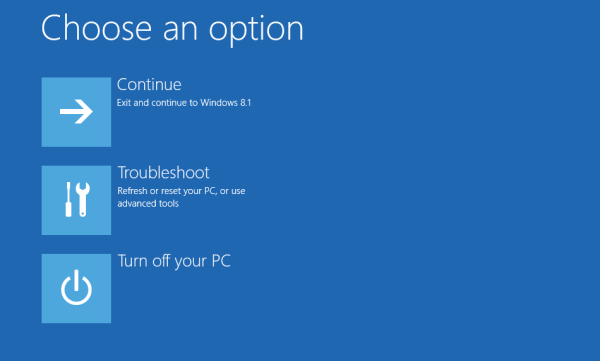
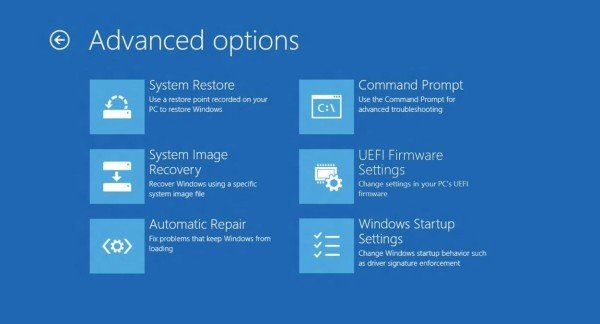
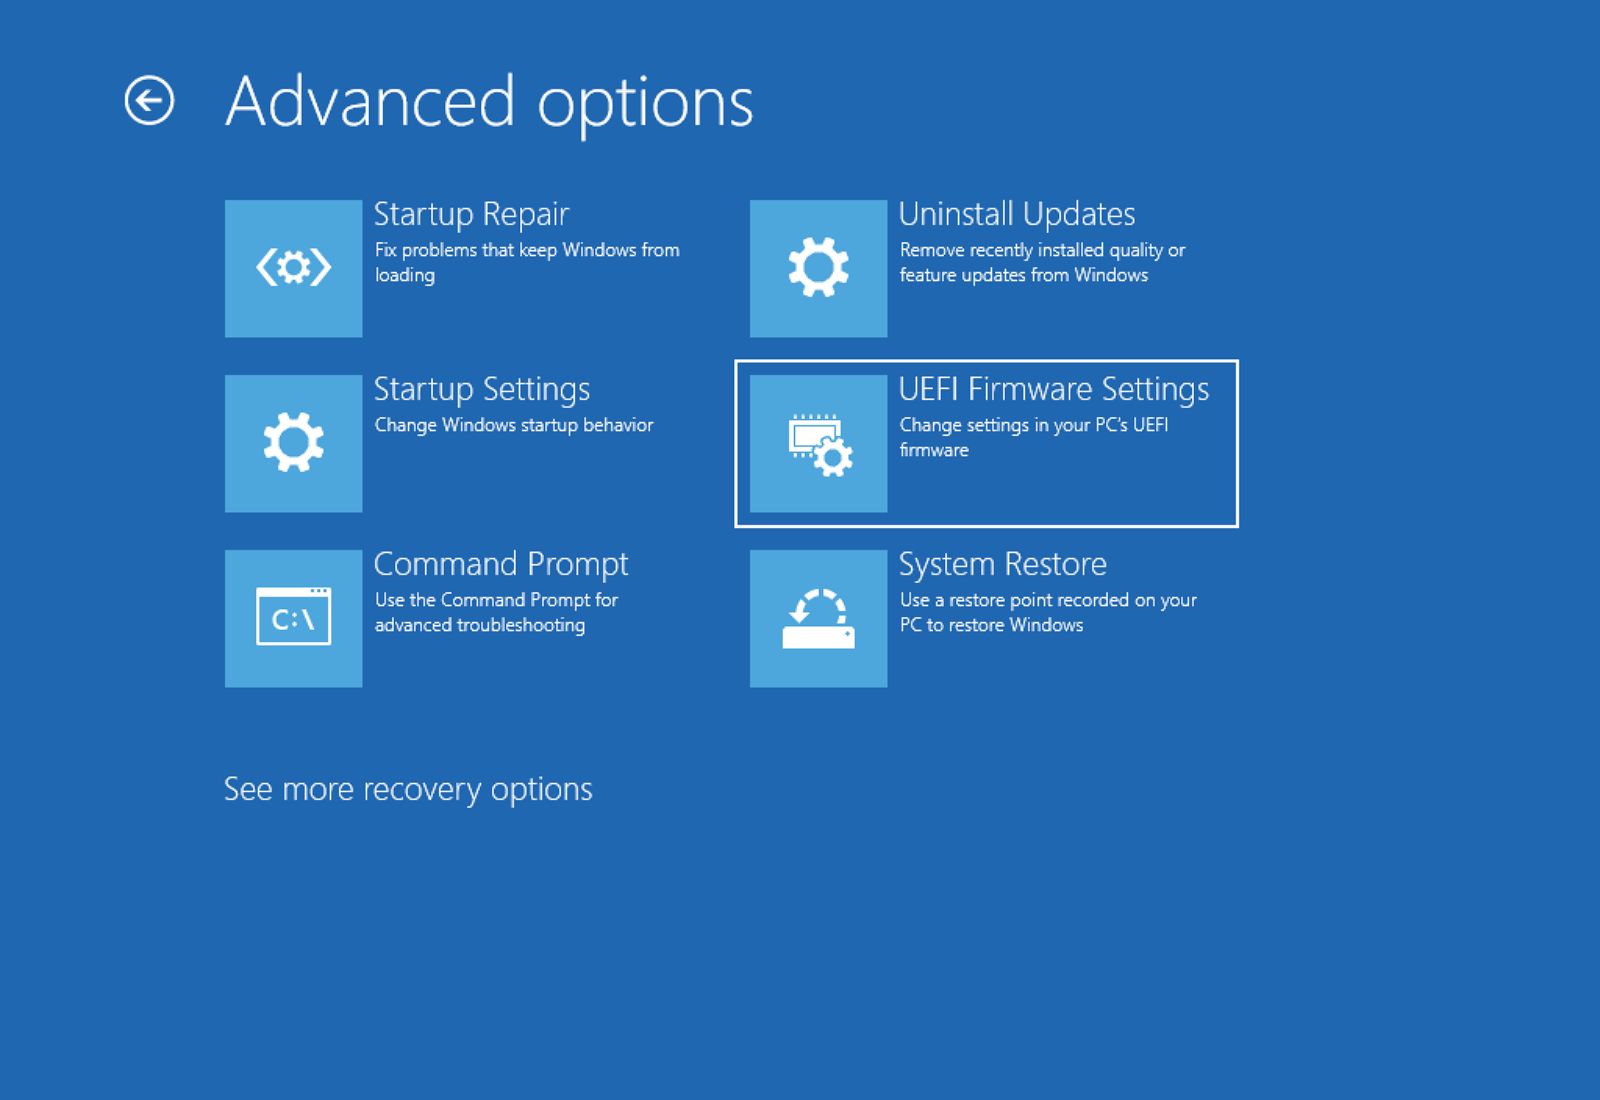
After a few seconds, you should see a blue screen with a few options to choose from. At this screen, you can choose to:
- Exit and continue using Windows 10 without restarting your system
- Turn off your system
- Boot into a USB device
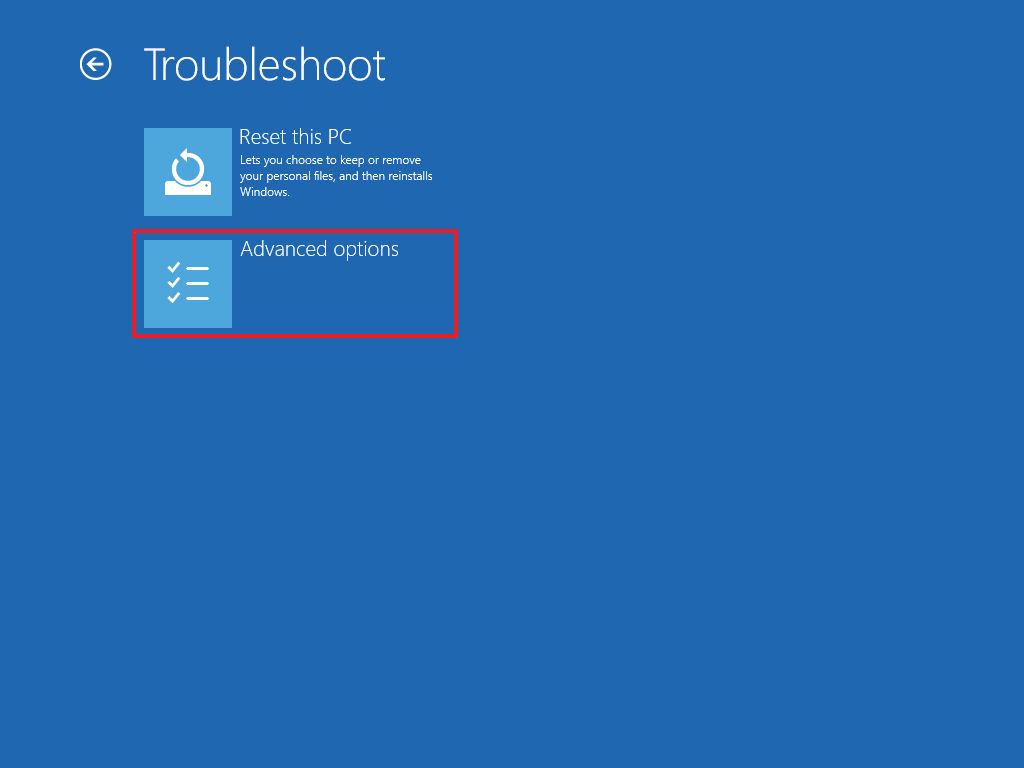
- Access the Troubleshoot option for more advanced settings
You have to click on Troubleshoot option.
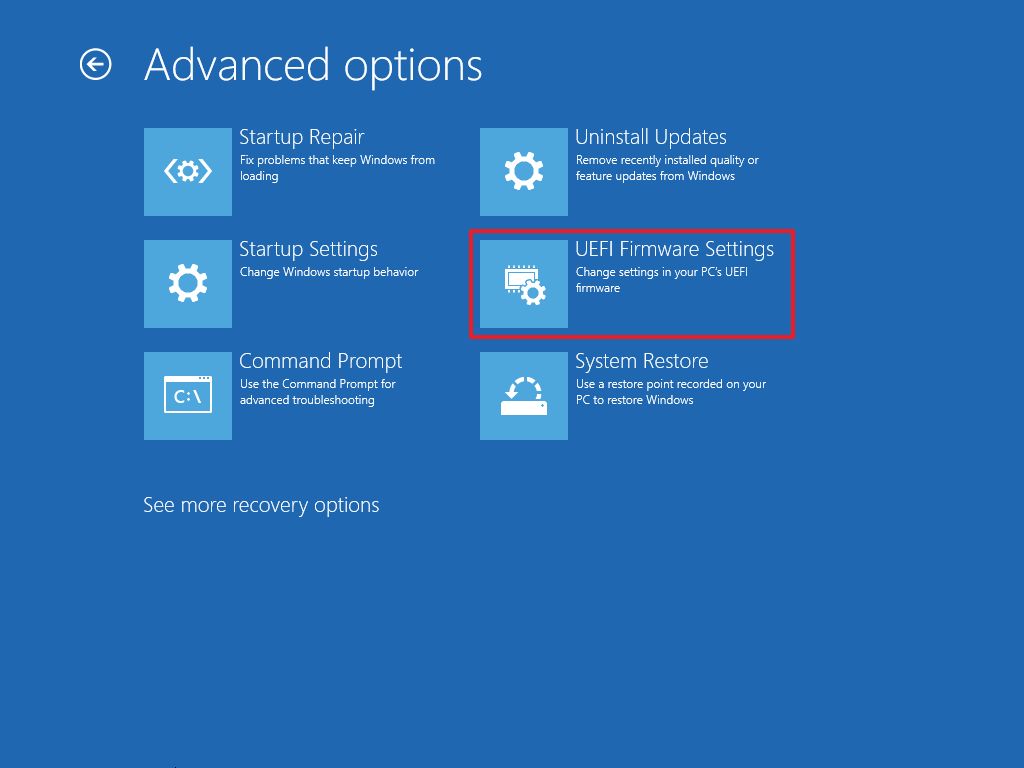
Now, some systems will give you the UEFI Firmware Settings on this screen. Some system may require you to choose an Advanced options.
If you see the UEFI Firmware Settings option, well, click on it. Otherwise, click the Advanced options.
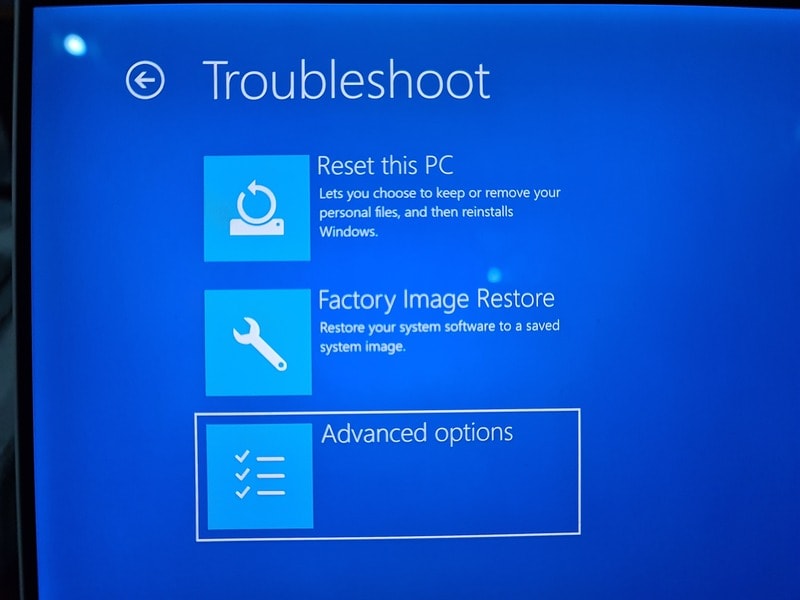
When you see the UEFI Firmware Settings, click on it.

It will notify that you’ll have to restart in order to change any UEFI firmware settings (or UEFI settings in short). Click on the Restart button.

Your system will restart now and when it boots again, you’ll find yourself in the BIOS/UEFI settings interface.
That’s it. This is what you need to do to access UEFI firmware settings in Windows 10. Whenever I dual boot Linux and Windows, I use this method for using the live USB of Linux.
There is also a tutorial for accessing UEFI settings from Linux.
How to Access UEFI Settings From Linux
A simple beginner’s tutorial discussing various ways of accessing UEFI firmware settings in a Linux computer.
It’s FOSSSagar Sharma

I hope you find this tutorial helpful. Any questions or suggestions? Please feel free to leave a comment below.
About the author
Abhishek Prakash
Created It’s FOSS 11 years ago to share my Linux adventures. Have a Master’s degree in Engineering and years of IT industry experience. Huge fan of Agatha Christie detective mysteries 🕵️♂️
When you have a Windows 10 computer, there are a wide range of features that you are unaware of, though they are significant. One of such features is the UEFI firmware settings. This facility on your Windows 10 system has taken over the age old BIOS you were used to. In an old computer, you won’t be able to switch from BIOS to UEFI. Latest UEFI implementations are compatible with BIOS, due to BIOS emulation. UEFI can run in 32-bit or 64-bit mode, can boot from larger drives, offers secure boot, and acts like a micro operating system that runs over the computer’s firmware for enhanced performance.
When you are upgrading to a higher version of Windows and adding latest hardware and firmware, it is recommended to upgrade to UEFI firmware settings. In this article, we are about to talk about how to access and change UEFI firmware settings in Windows 10.
- Part 1. How to Access UEFI Firmware Setting on Windows 10
- Part 2. How to Change UEFI Firmware Setting on Windows 10
- Part 3. Getting Know More About UEFI BIOS
Part 1. How to Access UEFI Firmware Setting on Windows 10
As most computers having UEFI firmware also offers you to activate the legacy BIOS compatibility mode, this legacy BIOS mode turns the UEFI firmware to function as a basic BIOS. It helps older OS like Windows 7 systems compatibility to run with enhanced settings. You can change the UEFI settings, only if yourcomputer has the option to enable it.
In order to access UEFI firmware setting on Windows 10, first you need to know the basics about UEFI and BIOS. In a BIOS setup, it’s easy to enter the boot menu by hitting «F12» right away. But, for UEFI setting entry in Windows 10, you got to follow the under mentioned process:
Step 1. Login to your Windows 10 system and tap «Start Menu».
Step 2. Browse «Settings» and go to «Update & Security».
Step 3. Within the «Update & Security» go to the left-panel and tap «Recovery». Press the «Restart Now» button.
Step 4. Click, «Troubleshoot» option from the upcoming screen and then opt for «Advanced Options».
Step 5. Press «UEFI Firmware Settings» > «Restart». When your system restarts, you will be taken to the UEFI firmware settings.
Also Read: How to Install Windows 10 from USB with UEFI Support
Part 2. How to Change UEFI Firmware Setting on Windows 10
So you’ve successfully gained access to UEFI Firmware Settings on Windows 10. Let’s now understand the step by step tutorial on how to change the UEFI Firmware settings, more particularly to disable Secure boot setting so that we can boot our system in Dual Boot mode.
Step 1. First, reboot your PC and hit the default F12 or Esc button to boot into the «Setup» menu.
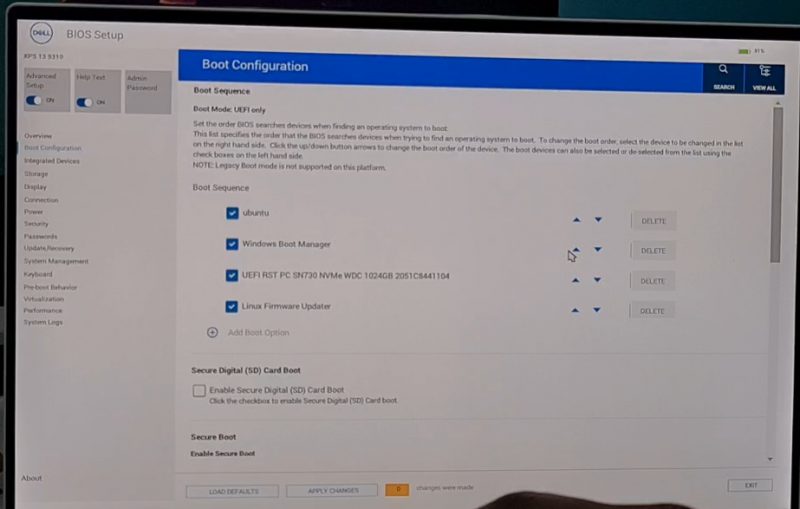
Step 2. Get under the «Boot» section and then look for «Secure Boot» option, hit Enter. Then disable the Secure Boot settings from here.
Step 3. Next, you can change other UEFI firmware settings like the «UEFI Boot Order» depending upon your requirements.
Part 3. Getting Know More About UEFI BIOS
Before going deeper in UEFI firmware settings, you need to understand the difference between BIOS and UEFI.
What are the Difference Between UEFI and BIOS?
It is a low level software located on your computer motherboard. It starts up the entire system and makes sure to run the bootloader to boot the operating system. Whereas UEFI is an advanced program, which surpasses BIOS as it can boot larger drives with more efficiency.
Here is the comparison:
| Features |
UEFI |
BIOS |
|
Secure boot and remote troubleshooting |
You can configure it remotely |
Manually set sitting in front of a computer |
|
Flash Memory |
EEPROM is here to take the pain out with Flash memory. |
It depends of CMOS to store things not Flash memory. |
|
Booting capacity |
GPT partitioning allows around three times more speed than BIOS. |
Not so great due to M/p. |
|
Code running |
Uses EFI executables to boot system |
Uses M/p for launching bootloader. |
Why Choose UEFI?
- A UEFI firmware setting is capable of running in 32-bit or 64-bit mode.
- With more addressable space compared to BIOS, the boot process becomes faster than that of a BIOS.
- You get a sleeker and smarter setup screen with UEFI that has mouse cursor and graphics support as well.
- BIOS boots after undergoing POST (Power-On Self Test).
- Ensures that the hardware works in sync with your software.
- UEFI functions faster and smoother. To overcome the restrictions of BIOS you need to move to UEFI.
- A BIOS is unable to boot beyond 2.1 TB due to M/p’s way of work and runs in 16-bit mode with 1 MB executable space.
- Initializing multiple hardware is troublesome with BIOS.
What You Should Know Before Using UEFI Instead of BIOS?
On your Windows 10 system, go to «Start» menu and then hit «Shift» + «Restart» to enter power options menu.
- Secure Boot – UEFI allows you to boot your device securely. You can enable or disable it.
- Booting from removable media – It allows you to boot your system from CD/DVD drive, USB drive, and network booting.
- You can enable a legacy BIOS mode even if you have UEFI firmware settings in your computer.
Conclusion
That was all about accessing and changing UEFI firmware settings. We now hope that you have in depth understanding about the differences in the UEFI firmware and BIOS settings. Well, apart from it, if your Windows 10 computer undergoes other issues such as forgotten or lost password. You can always look for PassFab 4WinKey to recover, remove, change or create a Windows password, be it a local, domain, admin password or a Microsoft account. Due to its high recovery rate and 100% secure features, you don’t need to bother about any data loss while unlocking a password forgotten system.
Home
Motherboards
By
Deep Shrestha
UEFI is a firmware that controls every component connected to your computer. You can enable/disable the entire hardware components and even overclock a few of them through UEFI.
However, accessing and using the UEFI firmware can be a little tricky—especially if you have just gotten into tweaking hardware settings. In fact, not every motherboard has UEFI firmware settings enabled as default—old motherboards run in classic BIOS mode or Legacy mode.
Below, we have discussed a few ways you can access and use the UEFI settings.
How to Access UEFI Firmware Settings?
Your motherboard’s BIOS operates in two different modes, UEFI and Legacy or CSM (Compatibility Support Module). If the BIOS is in Legacy or CSM mode, you cannot access the settings and configuration available in UEFI.
Here’s how you can use the system information to check your current BIOS mode.
- Simultaneously press the Windows + R key to open Run.
- Type
msinfo32and press Enter. - On the left panel, click on System Summary.
- Now, check the Item column on the right panel for BIOS Mode. Check its corresponding value.


After you have confirmed the BIOS mode on your system, you can access UEFI firmware settings either through the advanced startup menu or by pressing the BIOS key.
Using BIOS Key
Using the BIOS to enter UEFI mode is probably the easiest compared to the advanced startup method. Turn on your PC and repeatedly press the BIOS key on your keyboard to enter the BIOS.
| Motherboard/Laptop Manufacturer | BIOS key |
| HP | Esc |
| Dell | F1, F2, F3 or Delete |
| Lenovo | F1 |
| MSI | Delete |
| Razer | F1 or Delete |
| ASUS | F1, F2, F10, F12, or Delete |
| Acer | F2 |
| Gigabyte | Delete |
If you do not know the BIOS key for your system, you can check the motherboard or laptop user manual.
Advanced Startup
Windows users can easily enter the UEFI firmware settings using the Advanced Startup menu. The advanced startup menu allows you to access all the startup settings and UEFI firmware settings, uninstall updates, perform a startup repair and even restore the system.
- Press the Windows icon and I key simultaneously on your keyboard to open Windows Settings.
- On the left panel, click on System.
- Now, on the right panel, scroll down and select Recovery.

- Under Recovery options, on Advanced startup, click on Restart Now to boot the system into Advanced Startup.

- Once the system restarts and you are in Choose an option screen, click on Troubleshoot.
- Select Advanced options.

- Among the list of items, select UEFI firmware settings.

- Now, click on Restart.


Once the system restarts, it will directly load into the UEFI firmware settings.
Can’t Access UEFI Settings?
Most of the time, repeatedly pressing the BIOS key during boot or using advanced startup will most likely boot you into UEFI BIOS. However, if that does not work, settings in the BIOS itself could be causing the system from accessing UEFI settings.
For instance, if you have fast boot enabled, you may not be able to access the UEFI even when you repeatedly press the Delete key. In such a case, you need to disable fast boot.
Besides, you can try resetting the BIOS and check if you can access the UEFI settings. Resetting the BIOS will revert any changes made to the system, and set all its settings to the default state. There are several ways you can reset the BIOS. Since you cannot enter the BIOS, we recommend removing the CMOS battery to reset the BIOS.
You can also refer to this comprehensive guide if your PC won’t boot into BIOS.
How to Use UEFI Settings?
Once you have access to UEFI settings, you can change settings related to every hardware component connected to your computer. If your motherboard and CPU support it, you can even boost your system performance by adjusting the right configurations. However, in this article, we have only discussed a few basic UEFI settings.
Set Motherboard Date and Time
Your motherboard keeps track of the current date and time so that the system has access to the correct time. Incorrect system time may stop some components from functioning.
Incorrect date and time mean the PC will run into problems when performing scheduled tasks, it will add an incorrect date and time stamp to a file, and some applications that require internet access may even run into authorization issues.
- Enter the BIOS by repeatedly pressing the BIOS key during startup.
- Search for settings named Date and Time in System.
- Once you find the Date and Time settings, you can adjust them using a mouse or the keyboard.


Note: Depending on the motherboard manufacturer, the setting name might be different. So you might need to navigate the BIOS to find the Date and Time settings.
Set Boot Order
Another crucial UEFI setting is the Boot order. The boot order sets a list of storage devices that the UEFI BIOS searches for when loading the Operating system. If the BIOS cannot find the OS in any of the storage devices, you will run into a “Boot device not found” error.
Furthermore, if you are installing the OS using a USB flash drive, you need to set said USB drive to the top of the list.
- Enter the BIOS.
- Search for settings named Boot order or Boot sequence.
- Set the storage device containing the OS to the top of the list.


Change BIOS Mode
If the BIOS is in CMS or Legacy mode, you cannot access some of the settings available on UEFI firmware. A particular setting that’s not available in Legacy BIOS is the option to access Secure Boot.
To change the BIOS mode to UEFI,
- Turn on your system and repeatedly press the BIOS key to enter your motherboard’s BIOS.
- Once in, search for settings named, Boot mode, UEFI/Legacy Boot, BIOS, Boot mode select, or CSM support.
- Enable UEFI or disable CSM support depending on your system.

- Now, go to the Save and exit tab and select Save changes.

- Exit the BIOS.
- Once the PC boots into OS, check the current BIOS mode to see if the OS detects changes made to the system.


TPM and Secure Boot
TPM or the Trusted Platform Module adds a layer of hardware security to your system. It stores hardware encryption keys and digital certificates. Some Operating system also requires you to enable TPM first before installing them.
- Enter the motherboard BIOS.
- Search for settings named TPM for Intel motherboards and fTPM for AMD motherboards.

- Save and exit the BIOS.

Besides TPM, Secure Boot is also another security feature that you can find on your motherboard’s UEFI which prevents malware from loading when the system boots. Like TPM, some OS also requires you to enable Secure Boot before installing it.
- In BIOS, search for settings named Secure Boot in Windows OS configuration, System Configuration, BIOS, or Boot Security.
- Set Secure Boot to enabled.


Control Fan Speed
UEFI also allows you to check your current fan speed. Besides this, you can even control the CPU and system fan speed so that it does not reach extreme temperature.
The UEFI may also have a temperature-RPM graph that automatically changes the fan’s RPM (Rotations Per Minute) depending on the temperature.

In your motherboard’s UEFI, search for settings named Cooling, Hardware Monitor, Fan Info, Fan control, or Smart Fan.
Check PC Health
PC Health displays the current system status like CPU voltage. DRAM voltage, CPU temp, CPU fan speed, system temperature, supplied voltage, and optimal voltage. Using these readings, you can determine the PC is in good condition.

You can check your PC’s health inside settings named PC health, System Health, or PC Health Status.
Overclock Settings

Not all motherboards support overclocking. But if both your motherboard and CPU support overclocking, you can use the UEFI firmware settings to overclock your system.
When overclocking, you increase the clock speed and simultaneously increase its voltage. But when done to the extreme, it puts a lot of strain on the hardware. This might result in permanent damage to the overclocked component.
You can refer to this guide to get more information on safely overclocking your CPU.
Download Windows Speedup Tool to fix errors and make PC run faster
In this article, we’ll discuss how to reboot the system into BIOS or UEFI Firmware Settings. Windows 11/10 is designed to have a really fast boot time. In fact, it’s too fast to interrupt. Most of the decisions happen during the boot and are over in the first 2-3 seconds itself. These 2-3 seconds include the time allowed for firmware initialization and POST (< 2 seconds). In SSD-based UEFI systems, the “F8 window” is always visible for less than 200 milliseconds. Because of this Microsoft had to find out alternative ways to boot into BIOS or UEFI Firmware Settings.
In Steven Sinofsky’s article at MSDN, he addressed this problem and how they came up with a fix for this problem.
We ultimately solved these problems with a combination of three different solutions. Together they create a unified experience and solve the scenarios without needing to interrupt boot with a keystroke:
- We pulled together all the options into a single menu – the boot options menu – that has all the troubleshooting tools, the developer-focused options for Windows startup, methods for accessing the firmware’s BIOS setup, and a straightforward method for booting to alternate devices such as USB drives.
- We created failover behaviors that automatically bring up the boot options menu (in a highly robust and validated environment) whenever there is a problem that would keep the PC from booting successfully into Windows.
- Finally, we created several straightforward methods to easily reach the boot options menu, even when nothing is wrong with Windows or boot. Instead of these menus and options being “interrupt-driven,” they are triggered in an intentional way that is much easier to accomplish successfully.
Each of these solutions addresses a different aspect of the core problem, and together they create a single, cohesive end-to-end experience.
In this article, I’ll show how to access that menu.
- In Windows 11, open Windows Settings > System > Recovery.
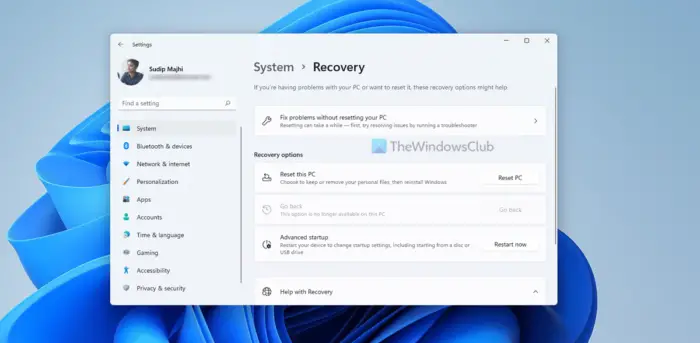
- In Windows 10, open Settings > Update & Security > Recovery > Advanced startup. It looks as follows:

- While rebooting it will take you to Advanced Start-up screen, there click on Troubleshoot.
- Under Advanced options select UEFI Firmware settings.
Now it should take you to the BIOS you need.
Sometimes I wonder why we need to go through these processes to get to the BIOS, it’s a little too much. Well, we asked for a fast boot time, and we got it. So it’s a small price to pay for a great performance.
How do I enter UEFI BIOS in Windows?
To enter the UEFI BIOS in Windows 11, you need to use the Windows Settings. Press Win+I to open the Windows Settings panel and go to System > Recovery. Then, head to the Advanced startup section and click on the Restart now button. Your computer will restart into the UEFI BIOS automatically.
Why are there no UEFI firmware settings?
If your motherboard doesn’t support UEFI, you cannot find anything related to this functionality. Although it is present on almost all the latest motherboards, you may not find the same if you have an old motherboard. However, you can try to boot your PC into UEFI BIOS using the aforementioned method to be confirmed.
Well, if you know any other alternative options do let us know.
Shyam aka “Captain Jack” is a Microsoft MVP alumnus and a Windows Enthusiast with an interest in Advanced Windows troubleshooting. Suggestions made and opinions expressed by him here are his personal ones and not of his current employers.
(Image credit: Mauro Huculak)
The Basic Input Output System (BIOS) is essential low-level software on one of the motherboard chips. It’s responsible for basic operations, such as booting and configuring hardware (mouse, keyboard, memory, processor, and other components).
On the other hand, the Unified Extensible Firmware Interface (UEFI) is modern software designed to replace the legacy BIOS and provide additional benefits, such as improved security, faster boot times, large-capacity hard drive support, and more.
Although these are different technologies, modern devices now use UEFI, but sometimes, the term «BIOS» is still used to refer to both types of firmware.
The firmware usually works without user interaction if you use a Windows 10 device. However, sometimes, you may still need to enter the motherboard BIOS to troubleshoot problems, enable or disable features (such as virtualization, RAID array, and secure boot), adjust memory and processor advanced settings, and more.
The only caveat is that the BIOS is a startup environment, meaning you can’t access it when Windows 10 is running. However, if you have to change some system settings, there are multiple methods to access the motherboard firmware.
In this how-to guide, I’ll explain how to enter your computer’s BIOS/UEFI to change advanced system settings. (These are the instructions for accessing the UEFI on Windows 11.)
Warning: Changing the wrong firmware settings can prevent your computer from starting correctly. You should only access the motherboard firmware when you have a good reason. It’s assumed that you know what you’re doing.
All the latest news, reviews, and guides for Windows and Xbox diehards.
How to access UEFI (BIOS) from Settings
- Open Settings.
- Click on Update & Security.
- Click on Recovery.
- Click the Restart now button under the «Advanced startup» section.
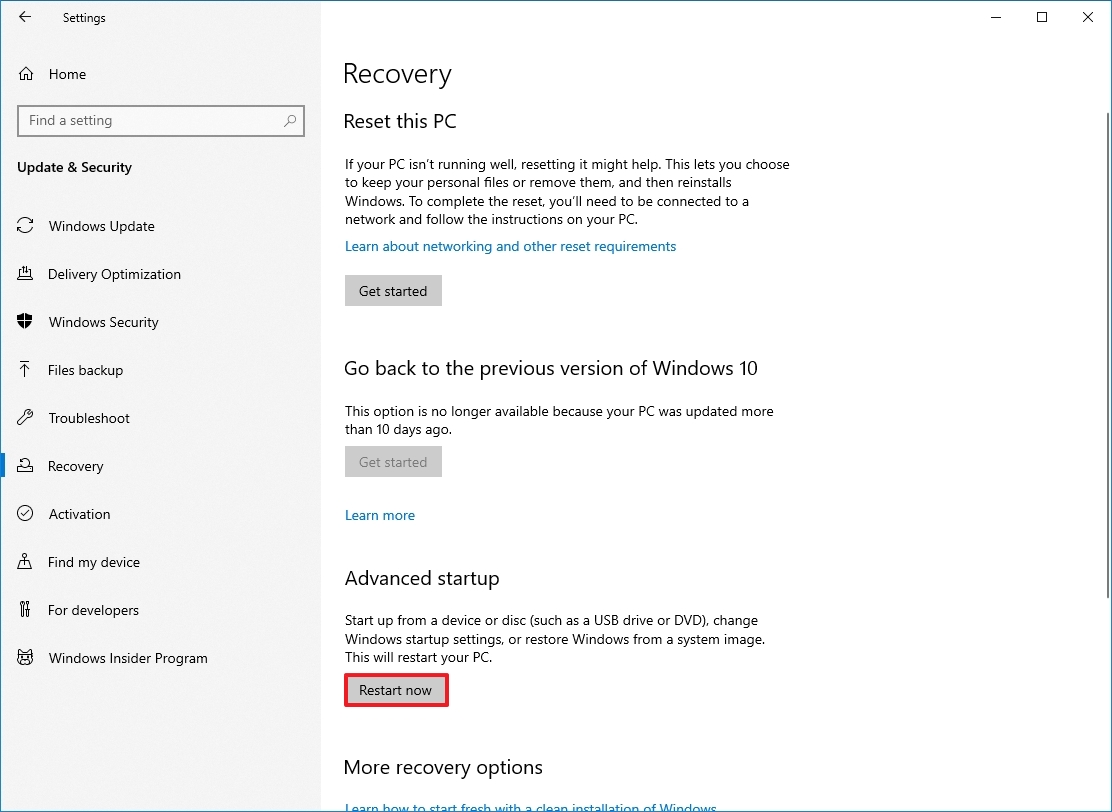
- Click on Troubleshoot.
- Click on Advanced options.
- Click the «UEFI Firmware settings» option.
- Click the Restart button.
Once you complete the steps, the computer will restart and boot into the UEFI firmware, allowing you to change advanced settings, such as disabling or enabling secure boot, changing the boot order, setting up a hardware RAID array, enabling virtualization, and other settings depending on the motherboard features. However, checking the manufacturer’s documentation is important to understand the features the motherboard supports and those you can configure.
How to access UEFI (BIOS) from boot
If you don’t have access to the desktop environment or are using a device with a legacy BIOS, you can still access the firmware during boot.
To enter legacy BIOS (or the modern UEFI) during boot, use these steps:
- Press the Power button.
- Check the screen startup splash to identify the key you must press to enter the firmware (if applicable).
- Press the required key repeatedly until you enter the setup mode. Usually, you need to press the ESC, Delete, or one of the Function keys (F1, F2, F10, etc.).
After you complete the steps, the device will access the BIOS or UEFI firmware, depending on the motherboard support. If you don’t see the information on the startup screen or the computer boots quickly, restart the device again, and as soon as the boot starts, press the required key multiple times quickly.
If you can’t get the computer to access the firmware using the keyboard, you may need to check your device manufacturer to find out which key you need to press during boot.
Here are some computer brands and their respective keys to access the motherboard firmware:
- Dell: F2 or F12.
- HP: ESC or F10.
- Acer: F2 or Delete.
- ASUS: F2 or Delete.
- Lenovo: F1 or F2.
- MSI: Delete.
- Toshiba: F2.
- Samsung: F2.
- Surface: Press and hold volume up button.
If your device is using UEFI firmware and can’t access it during startup, it’s recommended to use the Settings option (see previous steps) from within Windows 10.
More resources
For more helpful articles, coverage, and answers to common questions about Windows 10 and Windows 11, visit the following resources:
- Windows 11 on Windows Central — All you need to know
- Windows 10 on Windows Central — All you need to know
Mauro Huculak has been a Windows How-To Expert contributor for WindowsCentral.com for nearly a decade and has over 15 years of experience writing comprehensive guides. He also has an IT background and has achieved different professional certifications from Microsoft, Cisco, VMware, and CompTIA. He has been recognized as a Microsoft MVP for many years.