
Для удаления Microsoft SQL Server перейдите в Панель управления и выберите Программы и компоненты (Установка и удаление программ).
Windows 7: Пуск → Панель управления → Программы и компоненты (Установка удаление программ).
Windows 10: Пуск → Служебные — Windows → Панель управления → Программы и компоненты.
В списке программ найдите Microsoft SQL Server. Выберите его и нажмите кнопку Удалить/Изменить:

Выберите пункт Удаление:
Начнется проверка возможности удаления. По её завершении нажмите кнопку Ок:

Появится окно выбора экземпляра. Нажмите кнопку Далее:

На шаге Выбор компонентов нажмите Выделить все (1), затем Далее (2):

На шаге Готовность к удалению нажмите кнопку Удалить:

Дождитесь окончания удаления. После успешного удаления нажмите кнопку Закрыть:

Далее необходимо удалить все компоненты SQL. Выберите компонент и нажмите Удалить:

После удаления компонентов SQL закройте окно Программы и компоненты.
Далее необходимо удалить папки SQL из директории Program Files. Зайдите в раздел C:\Program Files и удалите папку Microsoft SQL Server.
Если у вас 64-разрядная система, то папку необходимо также удалить из директории C:\Program Files (x86):

В этой статье описывается процесс, обеспечивающий удаление SQL Server в Windows. Перечисленные шаги подготовят операционную систему к повторной установке и избавят от возможных проблем, связанных с неполным удалением предыдущей версии.
SQL Server от корпорации Microsoft (MSSQL) служит для управления реляционными базами данных и основана на языке запросов T-SQL. Это популярная СУБД, используемая для работы с базами разных размеров: как персональных, так и крупных масштаба предприятия.
Необходимость в удалении возникает у пользователя в разных ситуациях:
1) иногда продукт, установленный на компьютер, активно не используется. Тогда его лучше удалить, заодно и очистив реестр от остаточных файлов. В обратном случае можно столкнуться с нарушением безопасности и ухудшением производительности (существуют специальные троянские программы, способные передавать запросы в командный центр Microsoft SQL). Удалять неиспользуемые программы — это в любом случае хорошая практика;
2) СУБД, установленная на компьютер, не соответствует требованиям пользователя (устарела и т. д). Перед установкой другой версии важно почистить операционную систему от остаточных компонентов. В результате удалённая MS SQL не станет оказывать влияния на новую СУБД, что обеспечит её корректную работу.
Рекомендации и примечания
Для удаления используются средства, встроенные в программу установки. Стоит отметить следующее:
• удаление должен выполнять администратор, который имеет разрешение на вход в операционную систему;
• когда на компьютере установлен минимальный объём физической памяти из требуемого, нужно увеличить размер файла подкачки в два раза. Это важный момент, ведь в случае нехватки физической памяти, удаление SQL Server будет неполным со всеми вытекающими отсюда последствиями;
• если в системе есть несколько экземпляров SQL Server, то служба браузера удалится лишь после удаления последнего из них. Однако службу браузера можно деинсталлировать вручную самому, используя панель управления Windows (раздел «Программы и компоненты»);
• в процессе деинсталляции также удаляются и файлы данных tempdb (они добавляются при установке). Файлы с именем, которое удовлетворяет шаблону tempdb_mssql_*.ndf, удаляются лишь при их наличии в каталоге системной БД.
Подготовка к деинсталляции
Перед тем, как запустить процесс Delete, рекомендуется:
1.Выполнить резервное копирование данных. Можно создать полные копии всех БД или вручную скопировать файлы MDF и LDF, перенеся их в нужную директорию. Следует учитывать, что БД master содержит всю информацию на уровне системы для сервера, а msdb включает сведения о заданиях агента SQL Server, а также планы обслуживания и журнал резервного копирования.
Какие файлы SQL Server нужно сохранить:
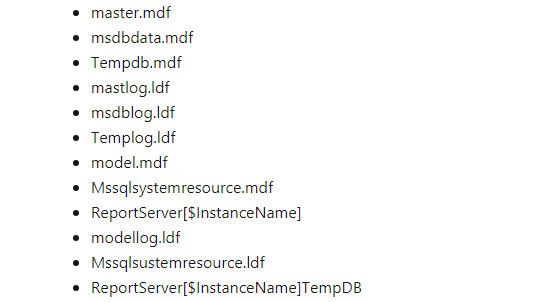
БД ReportServer являются частью службы SQL Server Reporting Services.
2.Остановить все службы SQL Server. Это нужно сделать до начала деинсталляции. Если будут присутствовать активные соединения, это может помешать деинсталляции некоторых компонентов.
3.Выбрать учётную запись с соответствующими разрешениями. Можно выполнить вход на сервер под учётной записью, которая входит в группу администраторов.
Удаление SQL Server в Windows 10 и 2016+
Чтобы деинсталлировать SQL Server из операционной системы Windows 10, а также Windows Server 2016/2019 и далее, нужно выполнить ряд действий:
1. Для начала процесса следует перейти в «Параметры» (меню «Пуск»), после чего выбрать «Приложения».
2. В поле поиска вводится sql.
3. Выбирается Microsoft SQL Server нужной версии и разрядности. Это может выглядеть так: Microsoft SQL Server 2014 (32-bit).
4. Выбирается «Удалить».
5. Теперь следует нажать на кнопку «Remove», которая находится в диалоговом всплывающем окне SQL Server. Произойдёт запуск мастера установки SQL Server.
6. На странице «Выбор экземпляра» следует воспользоваться раскрывающимся перечнем, что позволит указать удаляемый экземпляр SQL Server либо указать параметр для удаления средств управления SQL Server и общих компонентов. Для продолжения администратору надо нажать кнопку «Далее».
7. Появится страница «Выбор компонентов», где следует указать те компоненты, которые следует деинсталлировать из ранее указанной версии.
8. Когда появится страница «Все готово», надо просмотреть список функций и компонентов, которые подлежат деинсталляции, а потом нажать кнопку «Удалить» для запуска процесса.
9. Останется обновить окно «Приложения и компоненты». Удалённая версия MS SQL Server будет отсутствовать. Если какие-то компоненты SQL Server всё еще отображаются, их можно удалить из этого окна вручную.
Если что-то пойдёт не так
Несмотря на правильное выполнение вышеописанных шагов, что-то может пойдёт не так. Для установления причины сбоя рекомендуется изучить:
— файлы журнала установки SQL Server;
— статью из соответствующей базы знаний. Статья посвящена SQL Server 2008, однако описываемая методология подходит и для других версий SQL Server.
Источник — официальная инструкция по удалению от Microsoft: https://docs.microsoft.com/ru-ru/sql/sql-server/install/uninstall-an-existing-instance-of-sql-server-setup.
Интересует работа системы управления базами данных Microsoft SQL Server? Хотите освоить эту систему управления на продвинутом уровне? Добро пожаловать на специализированный курс в OTUS!
By Cristian G. Guasch • Updated: 06/28/23 • 18 min read
Occasionally, there might be a need to uninstall SQL Server from a system. This can happen when there’s a necessity to upgrade, downgrade, or deal with installation issues. The process of uninstalling SQL Server, however, isn’t as complicated as one might think.
Get Exclusive SQL Tips Right In Your Email Inbox
Plus SQL Cheat Sheets and more bonuses, all for FREE!
Although it’s important to double-check all configurations and dependencies before moving forward, understanding how to uninstall SQL Server properly ensures a smoother experience. There are multiple methods available, including using the Control Panel, command line, or specialized removal tools, to suit different situations and user preferences.
By following the correct guidelines, users can safely uninstall SQL Server and prepare their systems for the next steps, whether it’s installing a new version, troubleshooting issues, or simply freeing up valuable system resources.
Understanding SQL Server Components
Before diving into how to uninstall SQL Server, it’s essential to understand its components. SQL Server is a comprehensive database management system comprised of various parts that work together to store, manipulate, and analyze data. These components include the following:
- Database Engine: This core component handles data storage and processing. It’s responsible for managing data within SQL Server databases, executing queries, and ensuring data integrity.
- SQL Server Reporting Services (SSRS): SSRS serves as a flexible reporting platform, allowing users to create reports from multiple data sources. It manages and delivers reports, offering various report formats, including HTML5, Excel, and PDF.
- SQL Server Analysis Services (SSAS): SSAS focuses on business intelligence and data analysis. It allows users to create multidimensional data models, perform analytics, and create reports that visualize complex data.
- SQL Server Integration Services (SSIS): SSIS is a platform for data integration and workflow solutions. It provides tools and services for extracting, transforming, and loading data between various sources and destinations.
- SQL Server Management Tools: These are a collection of utilities that simplify database administration, including SQL Server Management Studio (SSMS), SQL Server Configuration Manager, and the sqlcmd command line tool.
Removing SQL Server entirely from your system entails uninstalling each of these components. It’s important to note that uninstalling SQL Server does not automatically remove all its components. Each part must be uninstalled separately.
Before attempting to uninstall SQL Server, consider the following prerequisites:
- Disable any applications dependent on SQL Server: Ensure no applications are relying on your SQL Server instance. Failing to do so might result in data loss or application errors.
- Backup your data: Before uninstalling SQL Server, it’s essential to back up any critical data, as the uninstallation process will remove all data stored on the server.
- Admin privileges: Ensure you have administrator privileges to perform the uninstallation process. Without these rights, specific components may not be entirely removed.
After completing this checklist, you’ll be prepared to uninstall SQL Server from your system.
Preparing Your System for Uninstallation
Before diving into the process of uninstalling SQL Server, it’s crucial to prepare your system appropriately. This preparation stage allows for a smoother and error-free uninstallation process. Here, we discuss some key steps to consider when getting ready to uninstall SQL Server.
One of the primary tasks during system preparation is creating a backup of your data. Since uninstalling SQL Server will remove all its related data and databases, it’s essential to safeguard important information. To back up the necessary data, follow these simple procedures:
- Identify the databases you wish to back up
- Use SQL Server Management Studio (SSMS) or T-SQL scripts
- Save your backups on an external or secured storage location
Another critical step is verifying whether SQL Server Reporting Services (SSRS) have been installed on your system. SSRS may interfere with the uninstallation process, resulting in problems down the line. To steer clear of such issues, either consider assistance from a Database Administrator (DBA) or disable SSRS before removing SQL Server.
Once you’ve backed up your data and determined whether SSRS is installed, be sure to review and document current SQL Server configurations. These configurations may be required during future upgrades or reinstallation. Documenting the system setup can prevent additional hassles and ensure a quicker configuration process when reinstalling SQL Server.
Moreover, since SQL Server’s uninstallation process will require administrative access, it’s vital to verify that you have the necessary privileges. To confirm your access rights, log in using an account with administrative privileges.
Finally, check for any applications or services that rely on SQL Server and might be affected during the uninstallation. Affected applications or services will need to be shut down temporarily until SQL Server is reinstalled or a suitable alternative is put in place. Identifying these dependencies in advance minimizes downtime and any potential negative impact on your organization’s operation.
By carefully preparing your system and taking the above steps, you’ll be well-equipped for a smooth and effective uninstallation of SQL Server. Keep in mind that proper planning and awareness of system requirements can save you time and prevent unwanted issues during the uninstallation process.
Get Exclusive SQL Tips Right In Your Email Inbox
Plus SQL Cheat Sheets and more bonuses, all for FREE!
Method 1: Uninstalling SQL Server via Control Panel
Uninstalling SQL Server may seem intimidating to some users, but it’s actually a straightforward process. In this section, we’ll discuss a common method to uninstall SQL Server through the Control Panel.
First and foremost, ensure that you’ve backed up all valuable data stored within the SQL Server, as uninstalling the server will remove all related information as well. Once this step is complete, the user can proceed with the uninstallation process, which we’ve broken down into simple steps:
- Accessing the Control Panel
To access the Control Panel, click on the “Start” button, which is typically located at the bottom-left corner of the screen, and type “Control Panel” in the search bar. Then, click on the Control Panel icon to open it. - Entering the Programs and Features
Once inside the Control Panel, select the “Programs” option, followed by “Programs and Features.” This step will display a list of all installed software on the computer. - Finding SQL Server
From the Programs and Features list, locate the SQL Server instance that needs uninstalling. Users typically have different versions or instances of SQL Server installed on their computer—it’s crucial to choose the correct one. - Initiating the Uninstallation
To uninstall SQL Server, right-click on the target instance and select “Uninstall/Change.” This action will open a new window, which is the SQL Server Installation Center. - Navigating the SQL Server Installation Center
In the left panel of the SQL Server Installation Center, click on the “Maintenance” tab. From there, select the “Remove” option in the main window. This step will launch the SQL Server Setup Wizard. - Running the SQL Server Setup Wizard
The Setup Wizard will guide the user through the uninstallation process. Carefully follow the on-screen instructions, inputting any required information as needed. The user will have to select the correct instance and components for removal, so pay close attention to the details. - Confirming the Uninstallation
Finally, review the selections made and ensure that the correct SQL Server instance and components will be uninstalled. Click on the “Remove” button to start the uninstallation process. Once it’s completed, the SQL Server instance will have been successfully uninstalled from the computer.
By following the steps outlined above, users can remove SQL Server from their computer with ease. Remember, always back up important data before proceeding with the uninstallation process to prevent losing important information.
Method 2: Using the Command Prompt
Uninstalling SQL Server using the command prompt requires several steps, but it’s an efficient method for removing one or more instances of the software. Follow the instructions below to successfully uninstall SQL Server using the command prompt:
- Identify the instance to uninstall: First, it’s essential to determine the SQL Server instance’s name before proceeding with the uninstallation. Open the command prompt and type the following command:
Get-WmiObject -Class win32_product | Where-Object {$_.Name -like "*SQL Server*"}
This command helps locate SQL Server instances with their respective identification numbers, names, and versions.
- Prepare the configuration file: Next, it’s crucial to create a configuration file to specify which SQL Server instance is to be removed. Open a text editor such as Notepad and create a file named ConfigurationFile.ini. Add the following content to this file:
[OPTIONS]
ACTION="Uninstall"
INSTANCENAME=InstanceNameToRemove
FEATURES=SQL,AS,RS,IS,Tools
QUIETSIMPLE="True"
Replace InstanceNameToRemove with the instance name identified in the first step. Save and close the file.
- Run the command to uninstall SQL Server: In the command prompt, navigate to the SQL Server Setup.exe file location of the instance you are uninstalling, and type the following command:
Setup.exe /ConfigurationFile=Path\To\ConfigurationFile.ini
Replace Path\To with the actual path to your configuration file. Press Enter to execute the command.
- The SQL Server installer will now use the information provided in the configuration file for uninstalling the specific instance.
- Wait for the process to complete. It takes a few minutes to uninstall SQL Server via command prompt.
During this process, feel free to check the progress of the uninstallation by referring to the installation log file located at %programfiles%\Microsoft SQL Server\130\Setup Bootstrap\Logs.
Note: PowerShell might need to be run as an administrator for some tasks. To do this, right-click on the PowerShell icon, and select Run as administrator. By following the steps above, users can effectively uninstall SQL server instances using the command prompt.
Uninstalling Specific SQL Server Features
Sometimes, one may need to uninstall SQL Server features instead of removing the whole instance. It’s essential to know which components to remove and the correct order of removal for a successful uninstallation. This section will provide you with detailed guidance on uninstalling specific SQL Server features.
To get started, it’s necessary to open the Programs and Features window, which can be accessed by:
- Navigating to the Control Panel.
- Clicking on Programs.
- Selecting Programs and Features.
Once the Programs and Features window is open, locate the SQL Server instance and the related features that need to be uninstalled. They will generally follow a naming pattern, such as Microsoft SQL Server, followed by the version (e.g., 2019) and the feature name.
To uninstall a specific feature, follow these steps:
- Right-click on the component you want to remove.
- Select Uninstall from the context menu.
- Follow the prompts in the uninstall wizard.
Before proceeding to remove any SQL Server features, it’s critical to ensure that all dependencies are removed first. Here’s a general sequence for feature removal:
- SQL Server Reporting Services (if installed)
- SQL Server Analysis Services (if installed)
- SQL Server Integration Services (if installed)
- SQL Server Database Engine Services (if installed)
- SQL Server Management Tools and other SQL Server-related features.
It’s crucial to verify all the individual components are removed correctly after uninstalling the specified features. To do this, you can refer back to the Programs and Features window and confirm that the components are no longer listed.
In some cases, you may encounter issues when attempting to uninstall certain SQL Server features. One common problem is that the Server Browser service might still be running. Ensure that the service is stopped before beginning the removal process. Furthermore, it’s a good practice to restart the computer after uninstalling a SQL Server feature. Restarting ensures that there are no residual services or configurations remaining, which might interfere with future installations or system performance.
To conclude, uninstalling SQL Server and its specific features requires a thorough understanding of the component dependencies and their removal order. By following the steps mentioned above, you can ensure a smooth and successful uninstallation process.
Cleaning Up Leftover Files and Registry Entries
After successfully uninstalling SQL Server, it’s necessary to clean up leftover files and registry entries to ensure a smooth reinstallation or to free up space on your system. In this section, we’ll guide you through the steps to clean up those remnants.
Start by deleting leftover files from the SQL Server installation folders. Typically, these folders reside in the following locations:
C:\Program Files\Microsoft SQL ServerC:\Program Files (x86)\Microsoft SQL Server
To remove the folders, simply follow these steps:
- Open Windows File Explorer by pressing
Win+E. - Navigate to the respective folder paths mentioned above.
- Delete the Microsoft SQL Server folder in each location.
With the files removed, it’s time to clean up registry entries. This task should be done with caution, as incorrect changes to the registry can harm your system. It’s highly recommended to create a backup of the registry before proceeding.
To create a registry backup, follow these steps:
- Press
Win+Rand type regedit to open the Registry Editor. - In the Registry Editor, click File > Export.
- Choose a safe location, provide a file name, and click Save.
Now that the backup is created, it’s safe to proceed with the cleanup of SQL Server registry entries. Remove the entries from the following locations:
HKEY_LOCAL_MACHINE\SOFTWARE\Microsoft\Microsoft SQL ServerHKEY_LOCAL_MACHINE\SOFTWARE\Wow6432Node\Microsoft\Microsoft SQL Server
To do so, follow these steps:
- In the Registry Editor, navigate to the mentioned registry key locations.
- Delete the Microsoft SQL Server folder in each path.
Additionally, it’s essential to remove services-related registry entries since uninstalling SQL Server may leave behind unnecessary service references. To do this, navigate to the following registry location:
HKEY_LOCAL_MACHINE\SYSTEM\CurrentControlSet\Services
Then, look for any entries that relate to the SQL Server services and delete the appropriate folders. Common examples include:
- SQLWriter
- SQLBrowser
- MSSQLServerADHelper100
Once these steps are completed, you’ve successfully cleaned up leftover files and registry entries post uninstalling SQL Server. This helps ensure a clean slate for future installations or to free up valuable system resources.
Verifying Complete Removal of SQL Server
After following the steps to uninstall SQL Server, it’s crucial to verify that the process has been completed successfully. This ensures that all components have been removed, and no trace of the SQL Server software is left on the system.
To begin the verification process, one should check the Windows Control Panel. By navigating to the Programs and Features section, they can confirm that SQL Server is no longer listed. If it’s still visible, additional steps might be required to completely remove the software.
Next, it’s worth examining the Windows Services on the system. To do this, users can:
- Press the Windows key + R to open the Run dialog box.
- Type services.msc and press Enter.
In the Services window, be sure to verify that there are no remaining SQL Server services. If any services persist, consider removing them manually.
Two essential system folders must also be checked to ensure complete removal:
- Program Files: Typically located at
C:\Program Files, this folder may still contain an SQL Server directory. If it’s present, delete the folder to remove any lingering files. - Program Files (x86): Located at
C:\Program Files (x86), this folder is specific to 32-bit software on 64-bit systems. Investigate this directory to ensure that no SQL Server folder remains.
Moreover, the Windows Registry should not retain any SQL Server entries. Examine the registry by following these steps:
- Open the Run dialog box by pressing the Windows key + R.
- Type regedit and press Enter.
Within the Registry Editor, check for the SQL Server keys under the following paths:
HKEY_LOCAL_MACHINE\SOFTWARE\Microsoft\Microsoft SQL ServerHKEY_LOCAL_MACHINE\SOFTWARE\WOW6432NODE\Microsoft\Microsoft SQL Server(for 64-bit systems)
If keys are still present, it’s recommended to export the keys as a backup and then delete them to ensure thorough removal.
Lastly, consider scanning the system for any leftover files or folders associated with SQL Server. Users can take advantage of third-party software to conduct a deep scan, or they can search the system manually.
Taking the time to verify the complete removal of SQL Server will help prevent potential conflicts with future software installations and maintain a clean system environment.
Troubleshooting Common Uninstallation Issues
Uninstalling SQL Server might occasionally present challenges to users. This section aims to address some common issues that may arise during the uninstallation process, providing helpful tips and solutions. By understanding these issues, it becomes easier to navigate the process and ensure a successful uninstall SQL Server outcome.
Issue 1: Uninstallation failed or incomplete
Sometimes, users may encounter failed uninstallations or incomplete removal of SQL Server components. To address this problem, they can:
- Double-check the uninstallation steps and retry the process.
- Use the “Fix it” tool provided by Microsoft Support to automatically remove remnants of the installation.
- Manually delete remaining files, folders, and registry entries, with caution, to avoid accidentally removing essential system files.
Issue 2: SQL Server services still running
If SQL Server services continue running after uninstallation, users should:
- Access the Services window by typing “services.msc” into the Run dialog (Windows key + R).
- Locate and stop any remaining SQL Server services.
- Double-check to ensure no additional SQL Server components remain installed.
Issue 3: Uninstall error messages and codes
Unexpected errors and codes can occasionally appear during the uninstallation process. In such cases:
- Note down the error code and/or message.
- Search for the issue on Microsoft’s official support website or online forums.
- Follow the suggested solutions, being cautious to avoid causing further issues.
Issue 4: Missing required permissions
Not having the necessary permissions may hinder SQL Server uninstallation. To resolve this, users should:
- Make sure they’re logged in as an administrator or have sufficient permissions before initiating the uninstallation process.
- Consider using an elevated command prompt (running as an administrator) when manually performing the uninstallation.
When uninstalling SQL Server, being mindful of these common issues will increase the likelihood of a seamless and successful process. By staying informed and using the provided solutions, users can minimize the challenges involved in SQL Server uninstallation.
Reinstalling SQL Server After Uninstallation
Reinstalling SQL Server after having uninstalled it can be an easy process if done carefully. There are just a few steps to follow, whether you’re a seasoned professional or new to SQL Server administration. This article focuses on the key aspects associated with reinstalling SQL Server after a successful uninstallation process.
The first crucial step when reinstalling SQL Server is to ensure a clean uninstallation. This means clearing out any remaining files, folders, and registry entries. Here’s a brief list of items that may still be present after you uninstall SQL Server:
- Folders in Program Files and Program Files (x86) directories
- Registry entries related to SQL Server installations and configurations
- User databases that may still reside in the Microsoft SQL Server folder
Next, before starting the SQL Server installation process, it’s essential to verify system requirements. This includes:
- Checking the hardware and software specifications needed for the new SQL Server version
- Ensuring that any required patches or updates are in place for your operating system
- Verifying the presence of any additional required software, such as .NET Framework
To successfully reinstall SQL Server, carefully follow these steps:
- Acquire the SQL Server installation media or download the latest version from the Microsoft website.
- Launch the SQL Server installation wizard and complete the product key, licensing, and feature selections.
- When prompted, choose a new instance or overwrite an existing instance if needed.
- Configure the instance settings, such as server collation and SQL Server Agent startup.
- Select authentication mode and specify any additional administrators.
- Proceed through the installation wizard, confirming settings and clicking “Next” until the process is complete.
Lastly, when reinstating SQL Server, remember to consider the following best practices:
- Keep your SQL Server installation up-to-date with the latest security patches and service packs.
- Regularly backup your databases to avoid data loss or any potential downtime.
- Monitor SQL Server performance, and optimize system settings to improve query execution and overall efficiency.
By following the guidelines above, you’ll quickly and effectively reinstall SQL Server after uninstallation. Properly managing your SQL Server environment ensures a stable database platform for your applications to run smoothly.
Conclusion: Ensuring a Smooth and Successful Uninstall
When it comes to uninstalling SQL Server, it’s essential to ensure the process goes smoothly and successfully. This final section highlights important aspects to be considered before embarking on the uninstallation journey.
- Maintaining backups of databases and configurations
- Following a step-by-step uninstallation guide
- Ensuring all dependencies are removed
- Using the right software and tools for the job
One crucial step before uninstalling SQL Server is making sure to backup all important databases and configurations. This will allow for easy recovery and restoration in case a reinstallation is needed in the future.
Following a comprehensive, step-by-step guide during the process is paramount to avoid mistakes and make sure the uninstallation runs without any issues. Avoiding abrupt deviations from the procedure can prevent errors and save time in the long run.
Moreover, it’s important to ensure all dependencies related to SQL Server are removed or updated accordingly. Neglecting to do so may lead to installation conflicts, obsolete files, or unstable systems.
Lastly, utilize the right tools, such as the SQL Server Setup program, to perform a complete and thorough uninstallation. This ensures that all components are correctly removed and provides a clean slate for any future installations.
By taking these necessary precautions and steps, the uninstallation of SQL Server can be successful and hassle-free, allowing users to fully achieve their goals and maintain an efficient and well-functioning system.
Get Exclusive SQL Tips Right In Your Email Inbox
Plus SQL Cheat Sheets and more bonuses, all for FREE!
Related articles
- How to Convert DATETIME to DATE in SQL Server Effortlessly
- How to Restart SQL Server: A Quick Guide
- How to Connect to SQL Server: A Quick and Efficient Guide
- How to Check SQL Server Version: A Quick Guide
В этой статье мы рассмотрим несколько способов удаления инстанса Microsoft SQL Server с компьютера Windows. Статья применима для всех поддерживаемых версий: Microsoft SQL Server 2019/2017/2014/2012.
Прежде, чем приступать к удалению, рекомендуется остановить все службы SQL Server (SQL Server Configuration Manager -> SQL Server Services -> SQL Server -> Stop).

- Удаление MS SQL с помощью программы установки Setup.exe
- Удалить SQL Server через панель управления Windows
- Как удалить SQL Server из командной строки?
Содержание:
Удаление MS SQL с помощью программы установки Setup.exe
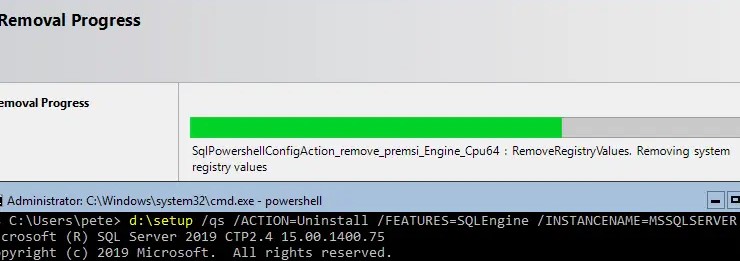
Для корректного удаления Microsoft SQL Server можно использовать программу установки setup.exe с оригинального установочного образп. Смонтируйте ISO образ и запустите командную строку с правами администратора. Для удаления дефолтного инстанса MSSQL воспользуйтесь командой:
setup.exe /ACTION=UNINSTALL /FEATURES=SQL /INSTANCENAME=MSSQLSERVER
- В опции
/FEATURESуказывается список компонентов для удаления; /INSTANCENAME– здесь задается имя экземпляра SQL Server, который нужно удалить.
Если вы хотите, чтобы процесс удаления SQL Server был выполнен в тихом режиме, добавьте параметр /q (или /QUIET).
Если нужно отобразить графический интерфейс, но запретить отменять установку и менять настройки, добавьте /QS (/QUIETSIMPLE). В этом режиме также отображаются любые ошибки, которые появляются при удалении SQL Server.
Вы можете вызвать графический мастер удаления SQL Server с помощью команды:
setup.exe /ACTION=UNINSTALL
Если на компьютере установлены несколько экземпляров MSSQL, появится диалоговое окно Remove SQL Server, в котором нужно выбрать имя экземпляра MSSQLSERVER, который вы хотите удалить.
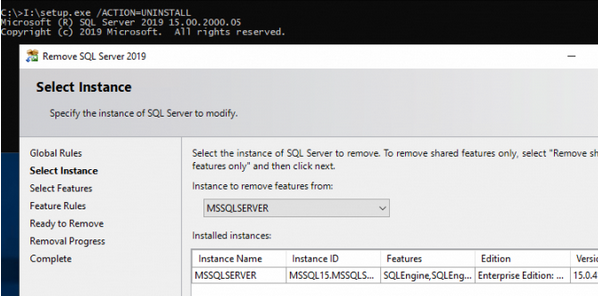
Далее нужно выбрать компоненты SQL, которые нужно удалить и нажать Next.
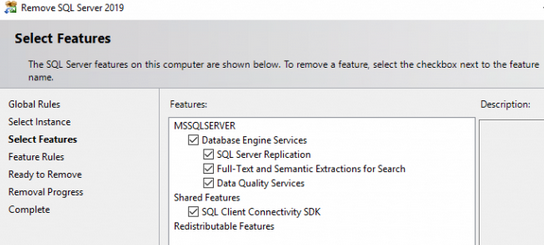
Этот способ позволяет удалить только компоненты, которые входят в дистрибутив SQL Server. Дополнительные компоненты, такие как SQL Server Management Studio или Reporting Services, нужно удалять отдельно.
Удалить SQL Server через панель управления Windows
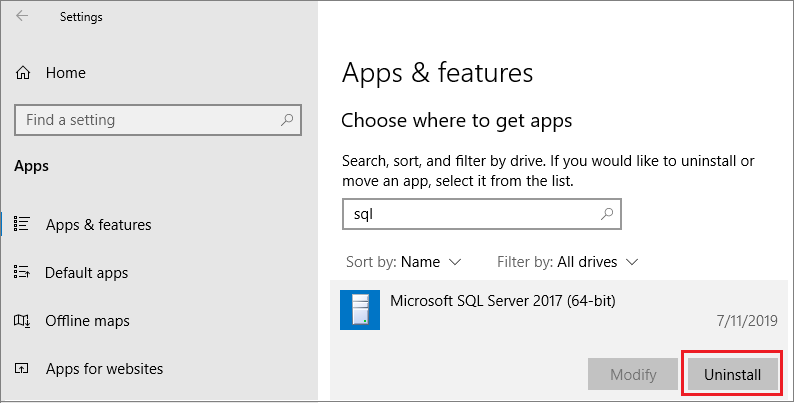
Если у вас нет установочного образа SQL Server, вы можете удалить SQL Server как стандартное приложение из панели управления Windows. Перейдите в Settings -> Apps and Features (или выполните команду ms-settings:appsfeatures)и найдите в списке вашу версию Microsoft SQL Server. Нажмите на кнопку Uninstall и затем Remove.
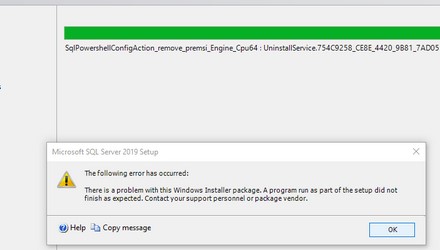
При удалении SQL Server может появится ошибка:
Microsoft SQL Server 2019 Setup
The following error has occurred:
There is a problem with one of the Windows Installer package. A program run as part of the setup didn’t finish as expected. Contact your support personnel or package vendor.
Или:
There are validation error on this page. Click OK to close this dialog box.
There are no valid SQL Server 2022 features to perform this operation.

При возникновении любых ошибок при удалении SQL Server вы можете выполнить удаление компонентов SQL Server из командной строки по их идентификаторам (GUID). Для этого используется утилита msiexec с параметром /x (описана ниже).
Как удалить SQL Server из командной строки?
Вы можете использовать встроенную утилиту установщика Windows (msiexec) для удаления программ. Для удаления любой программы, установленной через Windows Installer нужно выполнить такую команду:
msiexec /x {guid}
Здесь нужно указать GUID приложения. Чтобы получить GUID MS SQL Server на вашем компьютере, выполните команду:
wmic product get Name,IdentifyingNumber
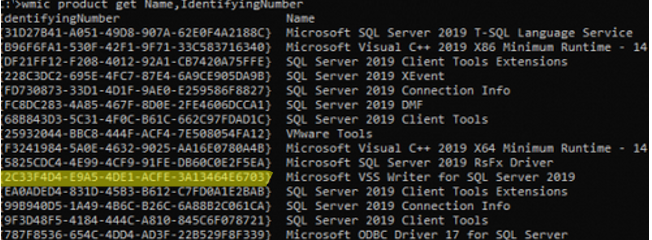
У каждого из компонентов SQL Server свой GUID. Чтобы удалить определенный компонент, найдите его в списке и выполните команду:
msiexec /x {2C33F4D4-E9A5-4DE1-ACFE-3A13464E6703}
Подтвердите удаление компонента SQL Server.
По аналогии нужно удалить другие компоненты SQL Server.
С помощью следующего PowerShell скрипта можно получить GUID всех компонентов SQL Server и удалить их все по очереди.
$SQLVer = Get-ChildItem -Path HKLM:\SOFTWARE\Microsoft\Windows\CurrentVersion\Uninstall, HKLM:\SOFTWARE\Wow6432Node\Microsoft\Windows\CurrentVersion\Uninstall | Get-ItemProperty | Where-Object { $_.DisplayName -match "SQL Server " } | Select-Object -Property DisplayName, UninstallString
ForEach ($ver in $SQLVer) {
If ($ver.UninstallString) {
$uninst = $ver.UninstallString
Start-Process cmd -ArgumentList "/c $uninst /quiet /norestart" -NoNewWindow
}
После удаления компонентов SQL Server нужно удалить его данные и записи в реестре.
Совет. В моем случае размер папки C:\Program Files\Microsoft SQL Server составлял более 100 Гб (в основном это *.dmp файлы в папке MSSQL15.MSSQLSERVER).
- Удалите папки SQL Server. Можно удалить их из проводника Windows или командами:
rmdir /S /Q "c:\Program Files\Microsoft SQL Server"
rmdir /S /Q "c:\Program Files (x86)\Microsoft SQL Server"
rmdir /S /Q "c:\ProgramData\Microsoft\Microsoft SQL Server"
rmdir /S /Q "%userprofile%\AppData\Roaming\Microsoft\Microsoft SQL Server"
rmdir /S /Q "%userprofile%\AppData\Local\Microsoft\Microsoft SQL Server" - Откройте редактор реестра и удалите следующе ветки (если существуют):
HKEY_LOCAL_MACHINE\Software\Microsoft\Microsoft SQL Server
HKEY_LOCAL_MACHINE\Software\Microsoft\MSSQLServer
HKEY_LOCAL_MACHINE\System\CurrentControlSet\Services\MSSQLServer
HKEY_CURRENT_USER\Software\Microsoft\Microsoft SQL Server - Перейдите в ветку
HKEY_LOCAL_MACHINE\SYSTEM\CurrentControlSet\Servicesи удалите все службы SQL Server - Перезагрузите Windows
Last Updated :
21 Jun, 2021
SQL Server is a Relational Database Management system that was developed and marketed by Microsoft. In this article, we will look into how to uninstall an instance of SQL Server setup:
Prerequisites:
- To uninstall SQL Server, you need to have local administrator permissions.
- Back up your data. You could create full backups of all databases, including system databases, or manually copy the .mdf and .ldf files to a separate location.
- Stop all SQL Server services.
Uninstall:
- To start the removal process from Windows Server 2008, Windows Server 2012 and Windows 2012 R2 navigate to the Control Panel, then select Programs and Features.
- Right-click Microsoft SQL Server (Version) (Bit) and choose Uninstall.
OR
- To start the removal process from Windows 10, Windows Server 2016, Windows Server 2019 navigate to Settings from the Start menu and then choose Apps.
- Search for SQL within the search box, select Microsoft SQL Server (Version) (Bit). As ab example, Microsoft SQL Server 2016 (64-bit) shown below:

- Select Uninstall.
- Select Remove on the SQL Server pop-up dialog box to launch the Microsoft SQL Server wizard.

- Use the drop-down to select Instance, mark the SQL Server instance name, or the option to remove only SQL Server shared features and management tools. To continue, select Next.
- On the Select Features page, choose the features which required to be removed from the instance of SQL Server.

- On the Remove page, preview the list of features and components which will be uninstalled. Click Remove to start the un-installation.

- Refresh the Apps and Features window in Windows 10, Windows Server 2016, Windows Server 2019, or Programs and Features in Windows Server 2008, Windows Server 2012 and Windows 2012 R2 to verify the SQL Server instance has been removed with success.
Similar Reads
-
How to Install SQL Server Agent on Windows?
SQL Server Agent is a component of Microsoft SQL Server. It schedules jobs and handles other automated task on a database.This windows service can automatically start when we boot up the system or set it up manually. SQL Server Agent enables us to automate all the task which are repetitive in nature
3 min read -
How to Install and Use MS SQL Server on Linux?
Microsoft SQL Server is a relational database management system (RDBMS) that supports a broad range of transaction processing, business intelligence, and analytics applications. Along with Oracle Database and IBM’s DB2, Microsoft SQL Server is one of the three market-leading database technologies. M
4 min read -
How to Install SQL Server Client on Windows?
The Client / Server Application is a computer program that allows users to access what is stored on the server. Of course, both computers can be workstations running the same type of operating system. In most network environments, the server contains a database that requires users to access this dat
2 min read -
How to install SQL Server Agent on Linux?
SQL Server Agent is a Microsoft Windows service that runs SQL Server jobs, which are scheduled administration activities. SQL Server Agent stores job information in SQL Server. One or more job steps can be found in a job. Each phase has its own set of tasks, such as backing up a database. Installing
2 min read -
How to Install SQL Server Agent on MacOS?
SQL Server is a Relational Database Management system(RDBMS) developed by Microsoft. SQL Server consists of two major components namely Database Engine and SQLOS. Along with the creation and execution of triggers Database Engine also processes queries and manages Database fields. SQLOS provides serv
2 min read -
How to Install SQL Server on Azure VM?
Microsoft Azure provides us with multiple database services which help us to run popular relational database management systems, like MySQL, SQL Server, and PostgreSQL in the cloud. We can use an SQL server on Azure Virtual machines by running a virtual machine in Azure and installing an SQL server
5 min read -
How to Install SQL Express Server on Windows?
Downloading and installation of SQL Express Server is an easy process, but first, let us understand what is SQL Server Express, then we will see the download and installation process of SQL server express. SQL Express Server SQL Express Server is a free Microsoft database edition. It is a version of
4 min read -
How to Install or Uninstall a Windows Service in C#?
Windows Services is a core component of the Microsoft Windows NT operating system that allows the creation and regulation of processes. Windows Services can start without user intervention and may continue to run long after the user has logged off. Windows services run in the background of the OS an
3 min read -
How to Install SQL Server on MacOS?
In this article, we are going to learn «How to install SQL Server Express in MacOs». Now, before we jump to the setup part, Let’s learn about SQL Server Express. So, SQL Server Express is an open-source RDBMS database management system i.e. Relational database management system which is used to stor
5 min read -
How to Install SQL Server Management Studio?
SQL Server Management Studio is a software application launched with Microsoft SQL Server 2005 that is used for configuring, managing, and administrating all components within the Microsoft SQL Server. It is one of the SQL Server management tools, regardless of your location used for designing queri
2 min read