
Среди различных советов на тему оптимизации Windows 10 или работы системы с SSD вы можете встретить рекомендацию отключить индексирование. Сам метод оптимизации неоднозначный, но, если вы решили, что это требуется сделать, а поиск не используете, вполне можете применить его.
Отключение индексирования возможно путем изменения соответствующих параметров системы в панели управления, в том числе и для каждого диска отдельно, так и путем отключения соответствующей службы. В этой простой инструкции подробно о том, как отключить индексирование Windows 10 различными способами. Также может быть интересным: Настройка SSD для Windows 10, Программы для SSD.
- Отключение индексирования в панели управления Windows 10 и свойствах диска
- Отключить службу индексирования (Windows Search)
Отключаем индексирование Windows 10 в параметрах панели управления
Стандартный метод настройки и отключения индексирования Windows 10 — использование соответствующего раздела в панели управления:
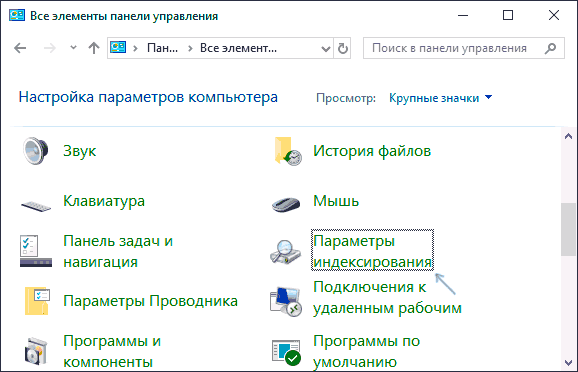
- Откройте панель управления, а затем — Параметры индексирования. Можно просто начать набирать в поиске на панели задач слово «Индексирование», чтобы быстро открыть нужный пункт.

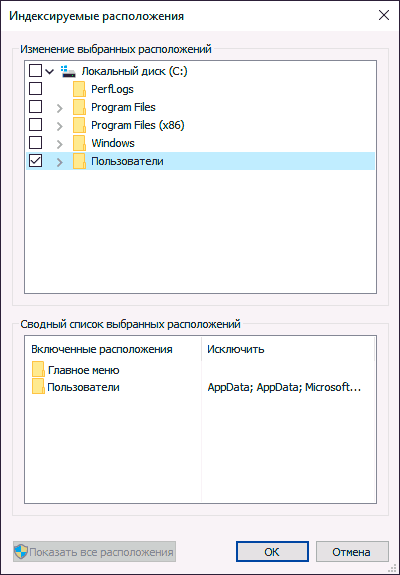
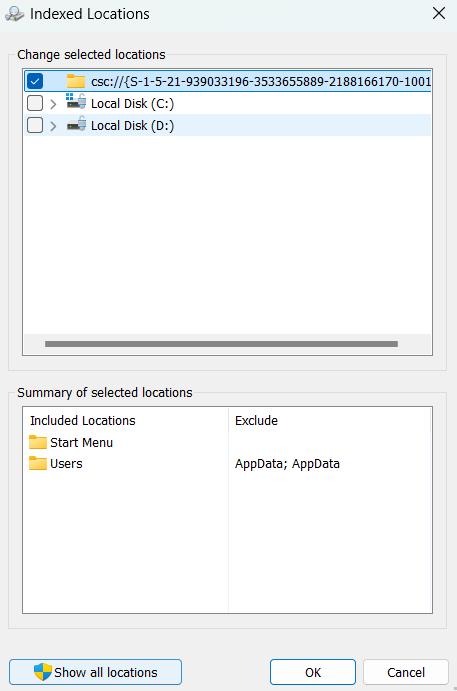
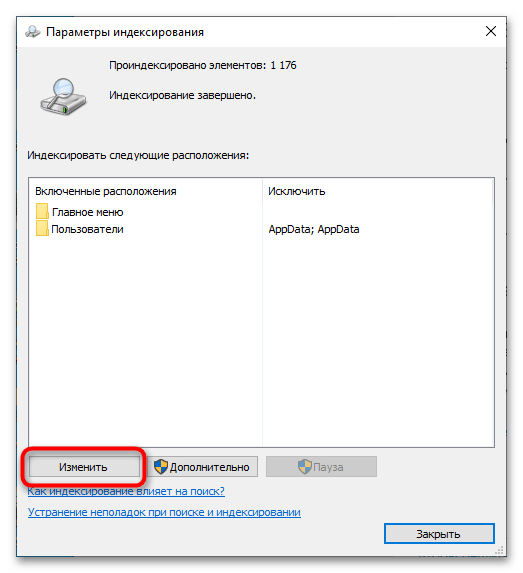
- В открывшемся окне вы увидите список расположений, для которых включено индексирование. Чтобы изменить этот список нажмите кнопку «Изменить».

- Снимите отметки с тех расположений, которые не требуется индексировать и примените настройки.


Дополнительно, вы можете отключить индексирование содержимого файлов на отдельных дисках (например, только для SSD) как самую затратную по ресурсам операцию индексирования. Для этого достаточно выполнить следующие шаги.
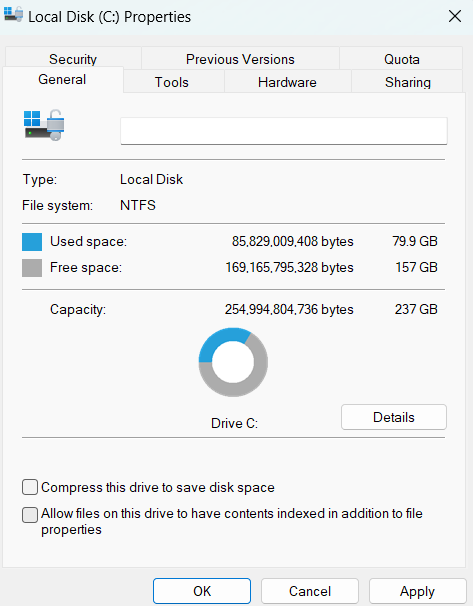
- Откройте свойства нужного диска.
- Снимите отметку «Разрешить индексировать содержимое файлов на этом компьютере в дополнение к свойствам файлам» и примените сделанные настройки.
Как видите, все сравнительно несложно, но при этом сама служба индексирования на компьютере продолжает работать.
Отключение службы индексирования Windows 10 (Windows Search)
Если вам требуется полностью отключить индексирование Windows 10, сделать это можно путем отключения соответствующей системной службы, которая называется Windows Search:
- Нажмите клавиши Win+R на клавиатуре, введите services.msc
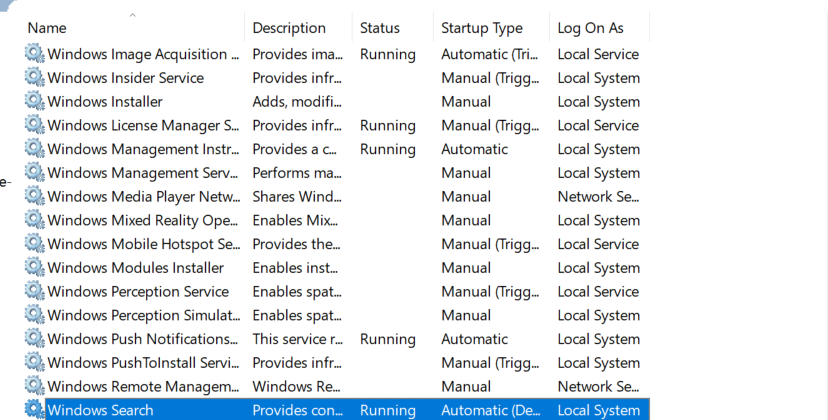
- Найдите в списке служб «Windows Search».

- В типе запуска установите «Отключена», примените настройки и перезагрузите компьютер (если просто отключить и остановить, она запустится снова).


После этого индексирование в Windows 10 будет полностью отключено, но поиск по параметрам, системным элементам и установленным программам в панели задач продолжит работать, равно как и поиск по файлам, если использовать окно поиска в проводнике (в последнем случае вы будете видеть уведомление о том, что поиск может быть медленным, так как индексирование не выполняется).
Индексирование поиска в Windows повышает скорость и эффективность поиска за счет создания индекса файлов и их свойств на устройстве. Этот индекс позволяет Windows быстро находить и извлекать необходимые сведения.
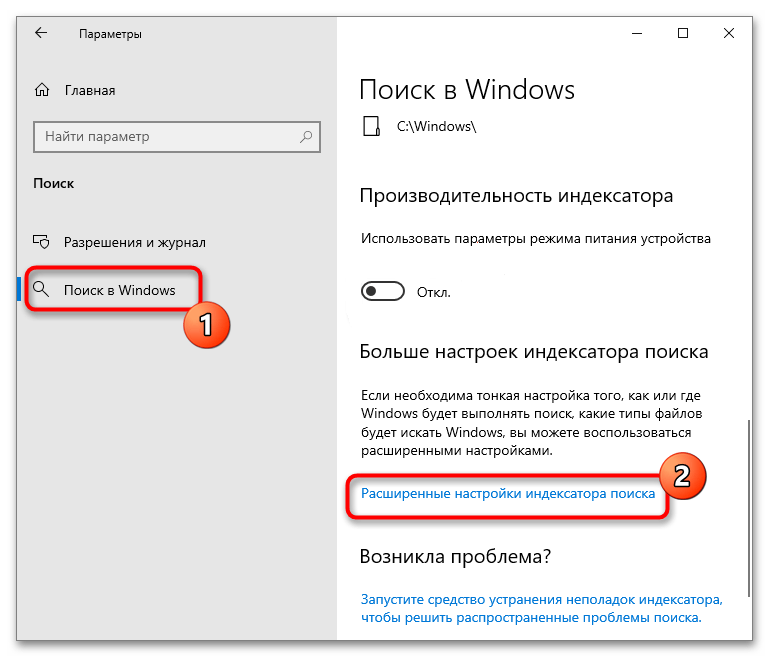
Чтобы получить доступ к параметрам индексирования поиска, перейдите в раздел Параметры > Конфиденциальность & безопасность > поиск в Windows.
Перейдите к параметрам индексирования поиска
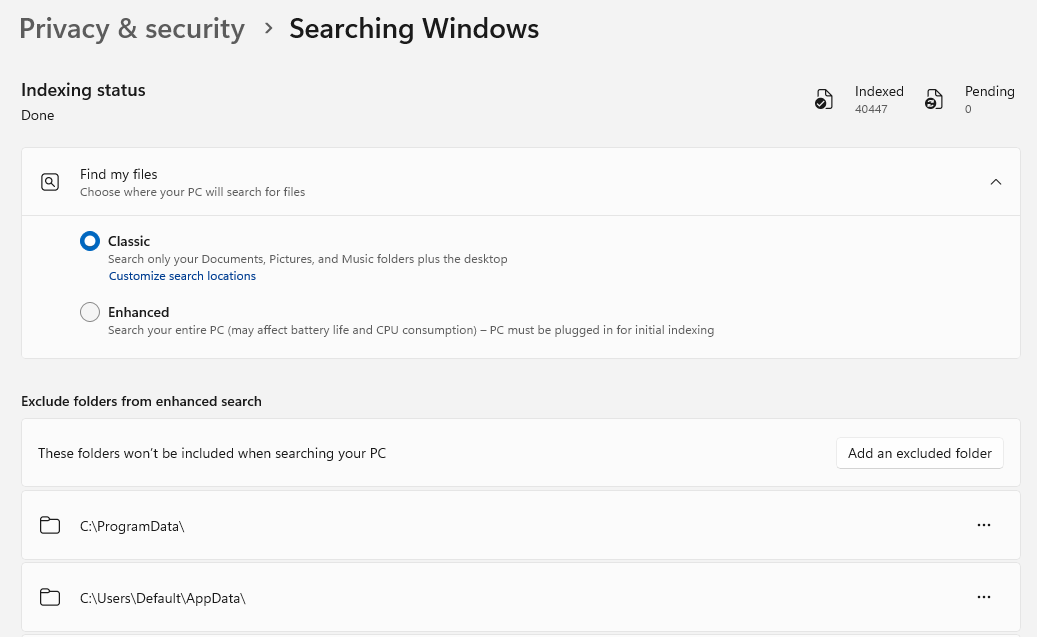
Выберите, где компьютер будет искать файлы
Windows предлагает два режима индексирования поиска: классический и расширенный.
-
Классическая модель. В этом режиме по умолчанию индексируются папки «Документы», «Рисунки» и «Музыка», а также рабочий стол. Он подходит для пользователей, которые в основном хранят свои файлы в этих расположениях. Классический режим обеспечивает баланс между производительностью поиска и использованием системных ресурсов.
Чтобы добавить другое расположение для индексирования, выберите Настроить расположения поиска, а затем выберите Изменить , чтобы просмотреть индексированные расположения и выберите папки, которые нужно добавить.
-
Улучшено: этот режим индексирует весь компьютер, включая все пользовательские папки и файлы. Он идеально подходит для пользователей, которые хранят файлы в различных расположениях на устройстве. Расширенный режим предоставляет более полные результаты поиска, но может использовать больше системных ресурсов.
Вопросы и ответы
Индексирование — это процесс просмотра файлов, электронных сообщений и другого содержимого на компьютере и классификации информации о них, например содержащихся в них слов и метаданных. При выполнении поиска на компьютере после индексирования система анализирует индекс терминов, чтобы быстрее найти результаты.
Первое индексирование может занять несколько часов. После этого индексирование будет выполняться в фоновом режиме на компьютере во время его использования, при этом проводится только повторное индексирование обновленных данных.
Как и указатель в книге, цифровой индекс позволяет компьютеру и приложениям быстрее находить содержимое, анализируя термины или общие свойства, такие как дата создания файла. Полностью построенный индекс может возвращать правильные музыкальные файлы для поискового термина «Бетховен» за долю секунды по сравнению с минутами, которые могут занять без индекса.
По умолчанию индексируются все свойства файлов, в том числе имена и полные пути к файлам. Для файлов с текстом индексируются их содержимое, что позволяет искать слова в файлах.
Устанавливаемые приложения также могут добавлять собственные сведения в индекс для ускорения поиска. Например, Outlook добавляет все сообщения электронной почты, синхронизированные с компьютером, в индекс по умолчанию и использует индекс для поиска в приложении.
Многие из встроенных приложений на компьютере используют индекс тем или иным образом. проводник использует его для доступа к файлам и отслеживания изменений. Microsoft Edge использует индекс для отображения результатов журнала браузера в адресной строке. Outlook использует его для поиска электронной почты при работе в автономном режиме.
Ваш компьютер с Windows постоянно отслеживает изменения файлов и обновляет индекс с учетом последних сведений. Для этого он открывает недавно измененные файлы, изучает изменения и сохраняет новые сведения в индексе.
Все данные, полученные в результате индексирования, хранятся локально на компьютере. Они не передаются на любой другой компьютер или корпорации Майкрософт. Однако приложения, устанавливаемые на компьютере, могут читать данные в индексе, поэтому будьте осторожны при установке и убедитесь, что вы доверяете источнику приложения.
Как правило, индекс занимает менее 10 процентов от размера индексированных файлов. Например, если у вас 100 МБ текстовых файлов, индекс для них будет занимать менее 10 МБ.
Индекс может занимать больше места, если у вас большое количество небольших файлов (< 4 КБ) или если индексируется компьютерный код. В обоих случаях размер индекса будет значительно увеличен относительно размера файлов. Если у вас много небольших файлов и вам нужно сэкономить место на компьютере, попробуйте удалить расположение этих файлов из индексирования, перейдя в раздел Параметры > Конфиденциальность & безопасность > поиск Windows > Дополнительные параметры индексирования, выберите Изменить.
Для улучшения результатов поиска Copilot+ PC выполняют семантическую индексацию наряду с традиционной индексацией. Поддерживаемые форматы файлов включают .txt, .pdf, .docx, .doc, .rtf, .pptx, .ppt, .xls, .xlsx для документов и .jpg/.jpeg, .png, .gif, .bmp, .ico для изображений. Семантическое индексирование делает поиск более эффективным, поскольку элементы, которые близки и связаны с поисковыми терминами, также будут включены в результаты поиска. Например, если вы искали паста, вы также можете получить результаты по запросу лазанья, включая изображения, содержащие пасту или лазанью.
Все данные, собранные в результате семантического индексирования, хранятся локально на компьютере. Ничто из этого не отправляется в Майкрософт и не используется для обучения моделей ИИ. Семантическое индексирование включено по умолчанию на Copilot+ PC. Если вы хотите отключить индексацию и поиск определенных местоположений или типов файлов, вы можете сделать это, выбрав соответствующие параметры в разделе Настройки > Конфиденциальность и безопасность > Поиск в Windows > Расширенные возможности индексации.
Примечания:
-
Улучшенный поиск Windows теперь доступен в предварительной версии для Copilot+ PC через Программу предварительной оценки Windows. Дополнительные сведения см. в статье Предварительный просмотр улучшенного Windows Search на Copilot+ PC с участниками программы предварительной оценки Windows на канале Dev.
-
Для улучшения Windows Search на Copilot+ PC рекомендуется подключить Copilot+ PC для завершения начальной индексации поиска. Проверить состояние индексации поиска можно в разделе Настройки > Конфиденциальность и безопасность > Поиск в Windows.
Приверженность корпорации Майкрософт ответственному использованию ИИ
Майкрософт работает над ответственным развитием ИИ с 2017 года, когда мы впервые определили наши принципы в области ИИ, а затем ввели в действие наш подход с помощью Стандарта ответственного применения ИИ. Конфиденциальность и безопасность — главные принципы для нас при разработке и развертывании систем ИИ. Мы работаем над тем, чтобы помочь нашим клиентам ответственно использовать наши продукты ИИ, делимся накопленным опытом и строим доверительные партнерские отношения. Дополнительные сведения о наших усилиях в области ответственного применения ИИ, принципах, которыми мы руководствуемся, а также об инструментах и возможностях, которые мы создали для обеспечения ответственной разработки технологий ИИ, см. в разделе Ответственное применение ИИ.
Традиционное индексирование и поиск по-прежнему эффективно работают для всех поддерживаемых языковых пакетов в Windows. Однако улучшенный поиск оптимизирован только для следующих языков: английский (США, CA, AU, GB), французский (FR, CA), немецкий (DE), испанский (ES, MX), японский (JP) & китайский (упрощенное письмо). Следующая таблица может быть хорошей справкой о том, что следует ожидать от Поиска Windows на разных языках:
|
Системный язык |
Язык ввода поиска |
Язык индексируемого содержимого |
Результаты поиска |
|---|---|---|---|
|
Английский (США, CA, AU, GB), французский (FR, CA), немецкий (DE), испанский (ES, MX), японский (JP) & китайский (упрощенное письмо) |
Английский (США, CA, AU, GB), французский (FR, CA), немецкий (DE), испанский (ES, MX), японский (JP) & китайский (упрощенное письмо) |
Английский (США, CA, AU, GB), французский (FR, CA), немецкий (DE), испанский (ES, MX), японский (JP) & китайский (упрощенное письмо) |
Улучшено (семантические и лексические) |
|
Все остальные языки |
Английский (США, CA, AU, GB), французский (FR, CA), немецкий (DE), испанский (ES, MX), японский (JP) & китайский (упрощенное письмо) |
Английский (США, CA, AU, GB), французский (FR, CA), немецкий (DE), испанский (ES, MX), японский (JP) & китайский (упрощенное письмо) |
Улучшено (семантические и лексические) |
|
Английский (США, CA, AU, GB), французский (FR, CA), немецкий (DE), испанский (ES, MX), японский (JP) & китайский (упрощенное письмо) |
Английский (США, CA, AU, GB), французский (FR, CA), немецкий (DE), испанский (ES, MX), японский (JP) & китайский (упрощенное письмо) |
Все остальные языки |
Традиционное (лексическое) |
|
Английский (США, CA, AU, GB), французский (FR, CA), немецкий (DE), испанский (ES, MX), японский (JP) & китайский (упрощенное письмо) |
Все остальные языки |
Английский (США, CA, AU, GB), французский (FR, CA), немецкий (DE), испанский (ES, MX), японский (JP) & китайский (упрощенное письмо) |
Традиционное (лексическое) |
|
Английский (США, CA, AU, GB), французский (FR, CA), немецкий (DE), испанский (ES, MX), японский (JP) & китайский (упрощенное письмо) |
Все остальные языки |
Все остальные языки |
Традиционное (лексическое) |
|
Все остальные языки |
Все остальные языки |
Все остальные языки |
Традиционное (лексическое) |
Список типов файлов, которые можно индексировать, см. в разделе Параметры > конфиденциальность & безопасность > поиск в Windows > Дополнительные параметры индексирования, а затем выберите вкладку Типы файлов.
Да. Существует два способа индексирования файлов: только свойства или свойства и содержимое. При индексировании только свойств система не изучает содержимое файла или не делает его доступным для поиска. Вы по-прежнему сможете выполнять поиск по имени файла, но не по его содержимому.
Если вы решите не индексировать содержимое файлов, вы сможете уменьшить размер индекса, но в некоторых случаях файлы станет труднее найти.
Чтобы выбрать вариант для каждого типа файлов, перейдите в раздел Параметры > Конфиденциальность & Безопасность > Поиск Windows > Расширенные параметры индексирования, выберите Дополнительно, а затем перейдите на вкладку Типы файлов .
Windows Search can cause high load situations on Windows 10 machines — and on previous versions of Windows as well — especially when search indexing runs.
Basically, what search indexing does is scan all folders that are configured for indexation on the Windows device to add, change and remove the index to take into account file changes in those locations.
While that works well on many devices, it may cause big performance issues on others. It depends on factors such as the speed of the processor and hard drive, the selected folders and the files they contain, and the number of changes since the last indexing process.
Generally speaking it is a good idea to turn Windows Search indexing off if you don’t search often, or use a different desktop search program for that instead.
Turning off indexation does not mean that Windows Search won’t work at all, it just means that it may be slower when you run searches.
You have three options when it comes to Windows Search Indexing:
- Remove folders from indexation to reduce the scan time
- Disable content indexation
- Disable Windows Search indexing completely
Remove folders from indexation
It may be enough sometimes to limit the folders that you want Windows Search to index. Windows Search indexes some folders, like Downloads, Documents or Desktop by default. If you are a heavy downloader, the downloads folder may be full of files and folders all the time. Additionally, file and folders may get deleted regularly as well which means that indexing has a lot of work to do to process that folder.
Tip: It is a good idea to limit indexation to folders that you want Windows Search to index. If you work with a lot of documents and use Windows Search to find them, you may want to keep the Documents folder but remove others that you don’t require.
Indexing Options
You manage the indexing locations in the Indexing Options. To load the configuration, tap on the Windows-key, type indexing options, and select the result of the same name.
The Indexing Options window lists all folders that are included or excluded from indexation. It furthermore highlights the number of items that are in the index currently, and the status of indexing.
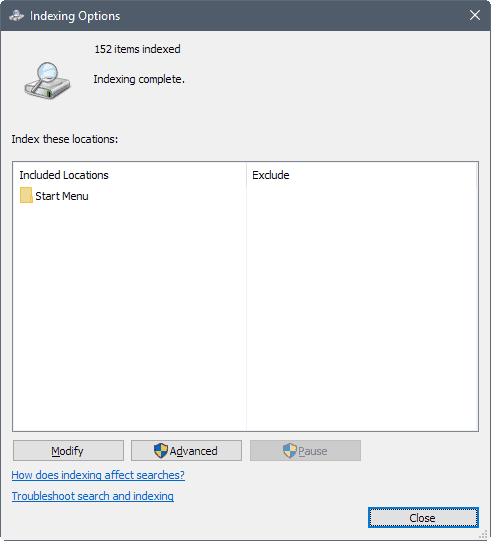
Select Modify at the bottom to manage the indexing locations. This opens a dual-pane window that lists all available locations in the top pane, and all folders selected for indexation at the bottom.
Tip: Make sure you click on the «show all locations» button to reveal locations that may not be shown by default.

You add new locations by checking boxes in front of items in the top pane, and remove existing ones by removing the checkmarks from the boxes. Since you may not want to navigate the top folder structure to locate all indexed locations, you may click on a location in the lower pane to jump straight to it. This allows you to remove it with just two clicks.
When you remove a location from Windows Search indexing, Windows Search won’t scan it anymore when it runs scans for changes in those locations.
You may also exclude subfolders from indexation. This is useful if you want some locations of a folder to be indexed but not others. Using exclude options may further help reduce the load of indexation when Windows Search indexing runs.
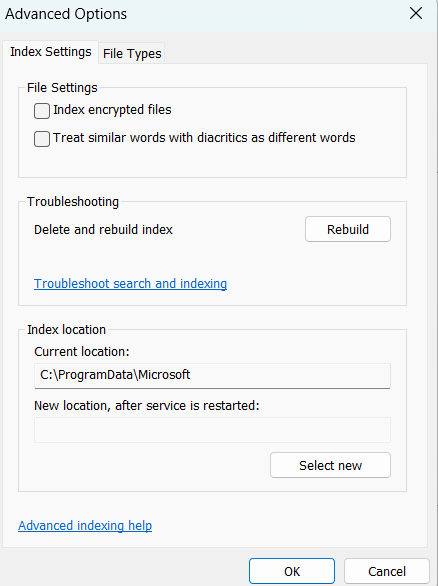
Check the Advanced options once you are done. Make sure that the options «index encrypted files» and «treat similar words with diacritics as different words» are not selected.
You may delete and recreate the index on the page as well, and change the location of the index. The latter may be useful if the computer’s main drive is slower than another drive connected to the device.
Disable content indexation
Another thing that you may want to check is whether Windows Search is allowed to index file content and not only file properties on select drives. It takes more time obviously to scan the content of files as well, and if you don’t need that, you may want to make sure that this is not done on the Windows machine in question.
You need to repeat the following steps for any drive of the Windows 10 PC:
- Open File Explorer.
- Right-click on the drive, e.g. Local Disk (c:), and select properties from the context menu.
- Go to the General tab if it does not open automatically.
- Remove the checkmark from «Allow files on this drive to have contents indexed in addition to file properties».
- Confirm the Attribute changes by selecting «apply changes to drive, subfolders and files, and click ok.
The process may take a while before it completes. It can run for minutes and even longer than that depending on the size of the drive.
You may get an access denied error. I suggest you select «ignore all» when that happens to tell Windows that it should ignore any future access denied error automatically.
Disable Windows Search Indexing completely
The final option that you have is to disable Windows Search indexing completely. This prevents any indexation processes and should improve the situation on all devices that are affected by high load or performance issues that are caused by Windows Search indexing.
- Tap on the Windows-key, type services.msc, and tap on the Enter-key. This opens the Windows Services Manager.
- Locate Windows Search when the services listing opens. The services are sorted automatically, so jump to the bottom to find it more quickly.
- Right-click on Windows Search and select properties from the menu.
- Switch the startup type to «disabled».
- Select «stop» under service status to block the service from running in that session.
- Click apply and then ok.
You may still run searches, but without indexing. This means that searches may take longer to complete.
Summary
Article Name
Manage Windows 10 Search Indexing
Description
Find out how to ease the load on your Windows 10 PC if Windows Search Indexing is causing a high load and performance issues on it regularly.
Author
Martin Brinkmann
Publisher
Ghacks Technology News
Logo
Advertisement
Table of contents
- What Is Microsoft Windows Search Indexer?
- Should I Disable Windows Search Indexing on Windows 10/11?
- How to Disable Windows Search Indexing in Windows 10/11
- Method 1: Disable Windows Search
- Method 2: Use the Command Prompt
- Method 3: Disable indexing for specific areas
- Method 4: Disable Windows Search indexing by hard drive
- Method 5: Turn off indexing for Microsoft Outlook
- Method 6: Rebuild your index
- How to Disable Indexing in Windows 10/11: Explained
- FAQ
There’s an ongoing conversation about whether to disable Windows Search indexing or keep it running. Microsoft introduced Microsoft Windows Search Indexer in Windows 2000 and hasn’t thought about dropping it. While you had to enable it in Windows 2000, it now comes enabled by default.
So, if you’re one of those who are against the service, you’ll have to disable it. Thankfully, this article shows you how to do that.
However, if you’re wondering whether you should disable indexing or not, you’re also in the right place. We’ll explain the concept of Windows Search indexing and tell you when it’s ideal to keep or disable the feature.
What Is Microsoft Windows Search Indexer?
Microsoft Windows Search Indexer (or simply Windows Search indexing) is a background service that scans and catalogs files, emails, and other content on your computer to speed up search results. Basically, it saves you from looking through every file manually each time you search. Instead, Windows uses this index—like a digital table of contents—to deliver faster, more accurate results.
Here’s how it works:
⇢ When Windows builds an index, it registers information for email messages, files, documents, and other content on your PC. The info it catalogs for the index includes things like file data, metadata, and contents.
⇢ After indexing, when you search for something, your PC refers to the created index rather than going through the actual file locations—this way, you get faster results.
So, for example, if you’re looking for a file, Windows checks its indexed information and pulls it up instead of going through your hard drive.
⇢ As you add, delete, or modify files, the index is updated in real time, keeping it current. Windows attempts to track all the changes on your computer. So, whenever you create or delete a file, the indexing service notes the changes. The same goes for new downloads and app installation and uninstallation.
Download Auslogics BoostSpeed
Your one-stop PC maintenance and optimization tool, this program will clean, speed up, repair and tweak your system to ensure maximum speed and efficiency.
Should I Disable Windows Search Indexing on Windows 10/11?
The answer to this question depends on your system. If you’re using a low-end PC or notice high disk or CPU usage , disabling Microsoft Windows Search Indexer might improve performance. The constant indexing may use up processing power and slow down your computer.
Also, depending on the type, number, and size of files on your computer, indexing may take up a significant chunk of your hard drive . But if you often search for files, keeping Microsoft Windows Search Indexer enabled ensures faster results and may be the more convenient option.
For example, Outlook uses indexed data to search your emails. Microsoft Edge uses it to display browser history results when you type in the address bar. In addition, the Settings app depends on it to show up-to-date results.
More so, some apps you download through the Microsoft Store rely on indexed data to search for your files and other PC content. Disabling indexing will increase the time it takes for Windows and other apps to return search results. So, if you have a fast CPU and a standard hard drive, you can keep indexing on. Since hard drives are slow to read, Windows will take longer searching for files without indexed data.
And with a fast CPU, you won’t have to worry about continuous background indexing. However, if you don’t rely on search a lot and are using a slow CPU and an SSD , it will be a good idea to turn indexing off. Windows can quickly look up files on SSDs since these drives are fast.
Also read:SSD vs. HDD: What’s the Difference and What to Choose?
Note
Microsoft Windows Search Indexer uses your RAM and CPU, so you may have to turn off the service if your RAM is low and your CPU is slow.
Let’s sum this up:
Pros of disabling Windows Search indexing
- Improved performance on low-end PCs: It frees up system resources like CPU, RAM and disk, especially noticeable on older or slower machines
- Reduced disk usage: It can help reduce constant disk activity, particularly useful for HDD users
- Less background activity: You will be minimizing background processes, leading to smoother performance for gaming or intensive tasks
- Fewer heat and noise issues: Lower disk activity can mean cooler temperatures and less fan noise
Cons of disabling Windows Search indexing
- Slower file searches: Searching for files, emails, or apps may become noticeably slower without indexing
- Real-time results may lag: Newly added or changed files won’t show up as quickly in search results
- Limited search features: Some advanced search features in File Explorer or Outlook may not work properly
- Not ideal for frequent searchers: If you rely heavily on Windows Search, the experience may become frustrating
PRO TIP
You might be considering disabling search indexing because you believe it’s the reason for your system’s poor performance. While that may be true, it’s not always the case. Your computer could be running slow for lots of other reasons.
For example, the accumulation of junk files could clog your hard drive, unnecessary background applications could weigh down your CPU and RAM, and leftover or faulty registry keys could cause glitches. Fortunately, you can use an optimizer such as Auslogics BoostSpeed to manage these issues.
This way, you don’t necessarily have to turn off indexing. The program deletes junk and bad registry keys and protects your hard drive against spyware.
So, how do you disable search indexing? Let’s get right to it.
How to Disable Windows Search Indexing in Windows 10/11
There are different ways to manage search indexing. If you rely on it, you can limit the amount of system resources such as your RAM and CPU. For example, you can disable search indexing for specific folders and drives or partitions.
We’ll show the different ways to disable and modify Microsoft Windows Search Indexer.
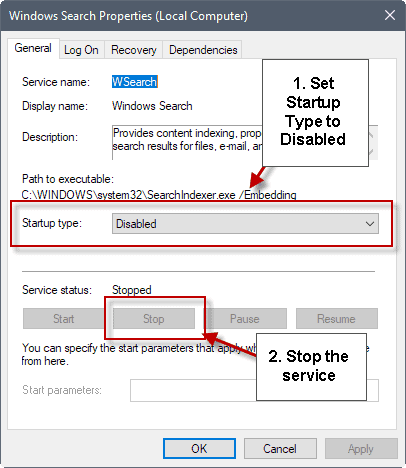
Method 1: Disable Windows Search
If you don’t need Windows Search, you can disable it. However, once disabled, you will no longer be able to use search functions across the OS. These areas include the Settings app, Microsoft Store, and the Start menu. It also means Windows will no longer run indexing operations in the background. So, follow these steps to turn off the service:
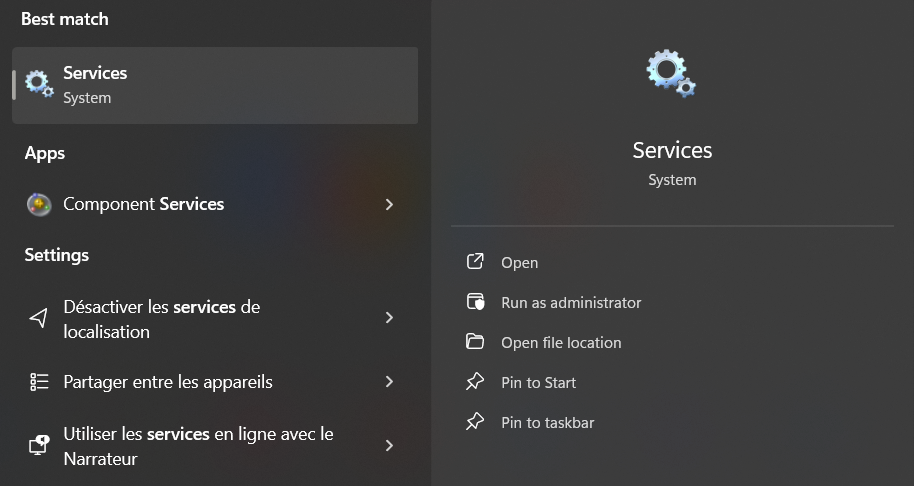
- Go to the Start menu and type services .
- Click on the Services application’s icon once the search panel brings it up.
- After the Services application opens, scroll down to the Windows Search entry and double-click it.
- The Windows Search Properties window will now open.
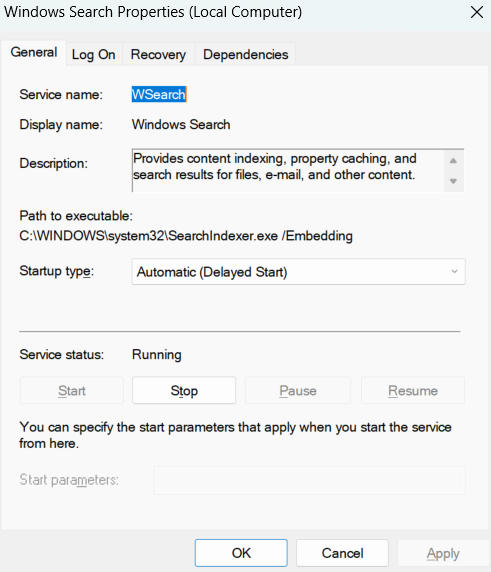
- Under the General tab, select Disabled in the Startup type drop-down.
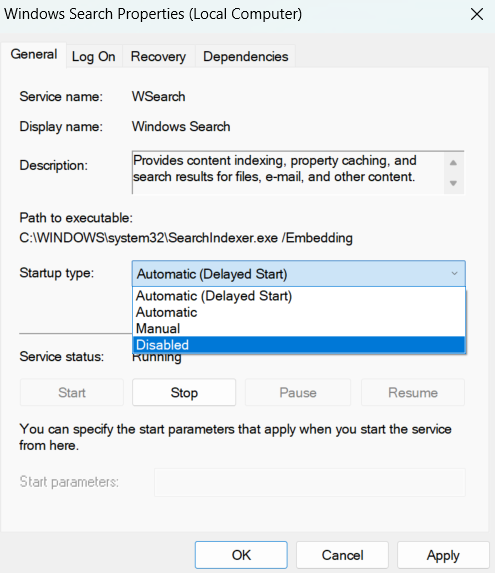
- Click on the Stop button.
- Click OK .
- Restart your PC.
Method 2: Use the Command Prompt
You can enter a code in the Command Prompt to disable the Windows Search service and prevent it from launching on startup.
Note
This method is faster than going through the Services app. However, if you’re not comfortable using the Command Prompt, follow the steps above. You can also move on to the next solution to find a different method.
Follow these steps:
- Open the Run dialog window using the
Windows + Rcombo. - After the Run box opens, type CMD and tap
CTRL + Shift + Enteron your keyboard. - Click on Yes in the pop-up.
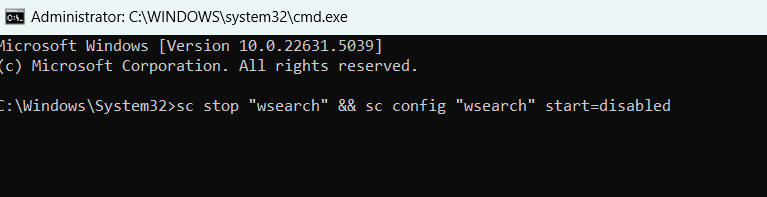
- Now, type the line below into the Administrator: Command Prompt window and hit the Enter key:
sc stop “wsearch” && sc config “wsearch” start=disabled
You can enable Windows Search again using this line:
sc config “wsearch” start=delayed-auto && sc start “wsearch”

That’s it.
PRO TIP
Ensure your PC runs smoothly and efficiently by keeping all your drivers updated. Auslogics Driver Updater automatically detects outdated drivers and installs the latest versions with just a few clicks. Prevent hardware issues and improve overall system performance.
Method 3: Disable indexing for specific areas
Windows provides the option to turn off indexing for specific folders. So, if there are areas where you don’t use search, you can disable indexing for them.
On the other hand, you can keep Microsoft Windows Search Indexer on for regularly used folders.
This option allows you to save RAM and CPU resources without completely getting rid of indexing.
Also, since the size of indexed data depends on the number and size of files Windows indexes, this option will reduce the storage strain.
So, follow these steps:
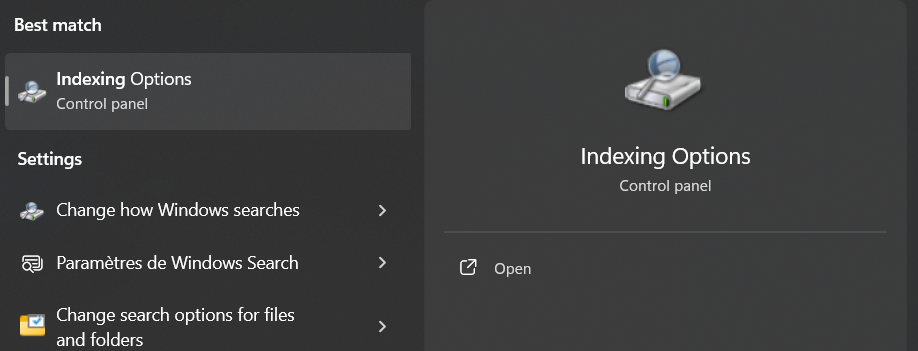
- Open the Start menu and type indexing .
- Click on Indexing Options.
Note
You can also go through the Control Panel to open the Indexing Options dialog:
Windows + R to open Run, then type control panel in the Run dialog box and hit Enter.) After the Control Panel opens, go to the top-right corner and select Large icons in the View by drop-down. Click on Indexing Options .
- Click on Modify in the Indexing Options dialog window.
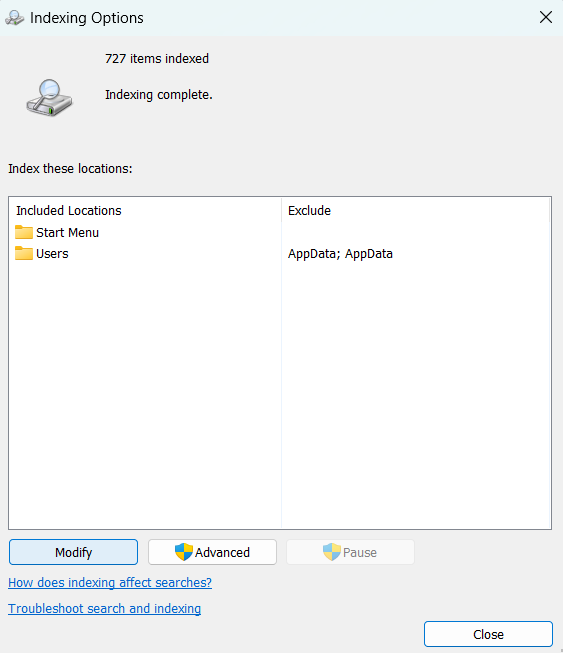
- Your indexing locations will now show up. Click on Show all locations if you can’t see your hard drive.
- Now, expand your hard drive by clicking on the arrow beside it.
Note
If you click on the checkbox beside the drive, you tell Windows to index the entire drive.
- After expanding the drive, navigate to the folders you don’t want Windows to index and check the boxes beside them.
- After completing this exercise, click on the OK button.
- You’ll see the included and excluded locations under corresponding columns in the lower segment of the Indexed Locations dialog window.
Method 4: Disable Windows Search indexing by hard drive
You can turn off indexing on a particular hard drive or partition if you don’t search for files on it. This substantially reduces the resources indexing takes from your CPU and RAM.
Follow these steps:
- Use the
Windows + Ecombo to open File Explorer. - Once File Explorer shows up, head over to the left pane and click on This PC .
- Now, click on the hard drive you want indexing turned off for and right-click it.
- Click on Properties .
- Under the General tab, uncheck the box next to Allow files on this drive to have context indexed and click on the OK button.
Windows will ask if you want the changes to apply to the root directory only or all the subfolders in the drive. Choose your option and select OK .
Download Auslogics BoostSpeed
Your one-stop PC maintenance and optimization tool, this program will clean, speed up, repair and tweak your system to ensure maximum speed and efficiency.
Method 5: Turn off indexing for Microsoft Outlook
As we mentioned, Microsoft Outlook uses indexed data to search for emails. If you don’t want that, you can turn off the feature for the program. And since Outlook doesn’t show up in the Indexed Locations dialog, you’ll have to make the changes in the app. Here’s how to disable Outlook’s indexing:
- Launch Outlook.
- Click on File and select Options .
- Once you get to the Options screen, go to the left pane and select Search .
- Now, go to the main page and click on Indexing Options .
- The Indexing Options dialog will now show up with Outlook included on the list.
- Next, click on Outloo k and click on the Modify button.
- After the Indexed Locations window appears, uncheck the box beside Outlook and click on the OK button.
What about apps like Microsoft Edge or apps from the Microsoft Store?
If they are installed and use indexing, they’ll usually appear in the Indexing Options window. Simply return to the Control Panel , go to Indexing Options , click Modify , and then uncheck any apps you don’t want indexed. Keep in mind that turning off indexing for certain apps may affect how quickly and accurately they return search results, especially for browsing history or in-app content.
Method 6: Rebuild your index
If you use search regularly but keep getting slow results, something is wrong with your search index. The problem could be due to a corrupt or malfunctioning index. In this case, you need to rebuild the index.
Follow this guide:
- Open the Start menu and type indexing .
- Click on Indexing Options in the search results.
- After the Control Panel opens, go to the top-right corner and select Large icons in the View by drop-down. Click on Indexing Options .
- Click on Advanced in the Indexing Options dialog window.
- Click on the Rebuild button and select OK.
How to Disable Indexing in Windows 10/11: Explained
So, there you have it. If you have made up your mind to turn off indexing on Windows, there are several ways in which you can do that. Let’s recap:
- You can disable Windows Search via Services or the Command Prompt.
- You can also disable indexing for specific folders via Indexing Options or disable indexing on a specific hard drive via File Explorer.
- Additionally, you can turn off indexing for Microsoft Outlook and other specific apps.
There is also a chance that there may be an issue with your search index—if it’s working particularly slow. In this case, you can rebuild the search index using the steps above. Remember that you can always reverse your changes if you’re not comfortable with the way your search works. In the end, what matters is up to you. If you don’t mind waiting a few seconds—or minutes—more for your search results to show up, you can do without Windows indexing.
FAQ
Yes, it’s safe. Disabling indexing won’t harm your system, but it may slow down file searches.
In a lot of cases, yes. SSDs are already fast, so turning off indexing can reduce unnecessary wear and free up resources without affecting search speed too much.
No. You can still search for files, but the process will be slower and less efficient without the index.
Yes, it can. Start menu results may take longer to load, especially if you’re searching for apps, settings, or documents.
Yes. You can use third-party search tools like Everything or manually browse folders—but these may lack Windows integration.
Go to Control Panel > Indexing Options > Modify and uncheck the boxes for apps listed under your user profile. Not all Store apps use indexing, but those that do will appear there.
Try pausing or restarting the indexing service, limiting indexed locations, or disabling it entirely. You can also troubleshoot it under Settings > Search > Searching Windows in Windows 10 or Settings > Privacy & security > Searching Windows in Windows 11.
Все способы:
- Способ 1: Изменение параметров индексирования
- Способ 2: Отключение службы индексирования
- Способ 3: Отключение службы поиска в консоли
- Способ 4: Настройка локальных политик
- Способ 5: Изменение атрибутов файлов
- Вопросы и ответы: 1
Способ 1: Изменение параметров индексирования
К отключению индексирования обычно прибегают пользователи компьютеров с SSD небольшого объема. В Windows 10 отключить создание индексной базы файлов можно как минимум двумя способами, из которых наиболее очевидным является использование оснастки «Параметры индексирования».
- Откройте приложение «Параметры», перейдите в раздел «Поиск» → «Поиск в Windows» и кликните по ссылке «Расширенные настройки индексатора поиска».
- Также для перехода к настройкам вы можете использовать команду
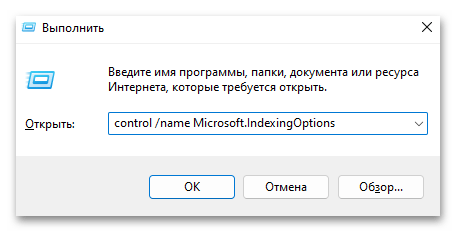
control /name Microsoft.IndexingOptions, открыв для нее окно «Выполнить» клавишами Win + R. - В окне настроек индексации нажмите кнопку «Изменить».
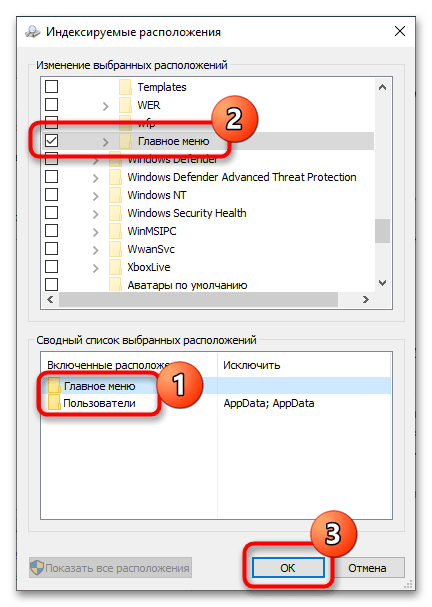
- В области «Сводный список выбранных расположений» кликните по первому же индексируемому каталогу. При этом элемент появится в древовидной структуре области «Изменение выбранных расположений». Снимите с него флажок, повторите те же действия в отношении других индексируемых каталогов и сохраните настройки.
Способ 2: Отключение службы индексирования
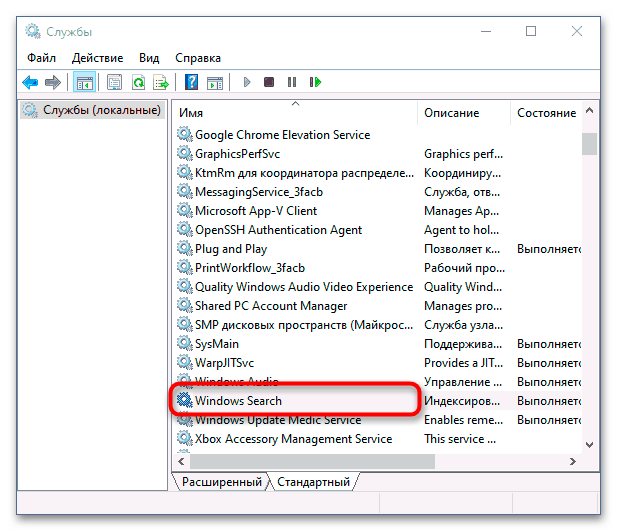
Полностью запретить создание индексной базы всех файлов можно путем отключения системной службы «Windows Search».
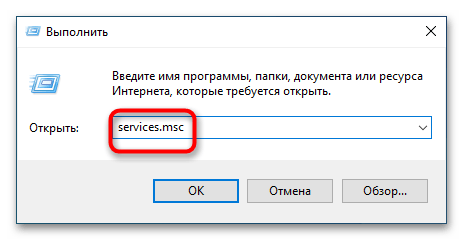
- Откройте оснастку управления службами, для чего вызовите нажатием Win + R окошко «Выполнить», введите в него команду
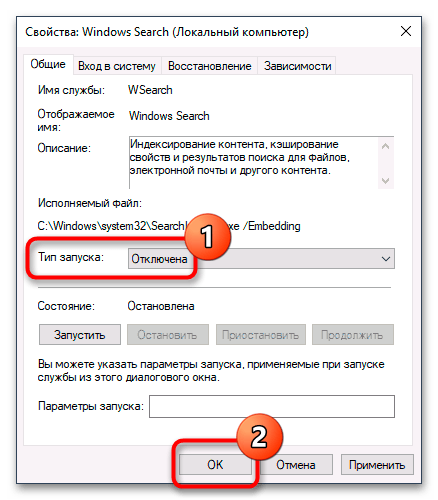
services.mscи нажмите клавишу ввода. - Отыщите в правой колонке службу «Windows Search» и откройте ее свойства из контекстного меню или двойным по ней кликом.
- Тип запуска службы выставьте «Отключена», сохраните настройки и перезагрузите компьютер.
Способ 3: Отключение службы поиска в консоли
Этот вариант дублирует предыдущий способ, разница лишь в том, что служба индексирования отключается из консоли.
- Откройте «Командную строку» или «Windows PowerShell» от имени администратора.
- Выполните команду
sc stop "wsearch" && sc config "wsearch" start=disabled.

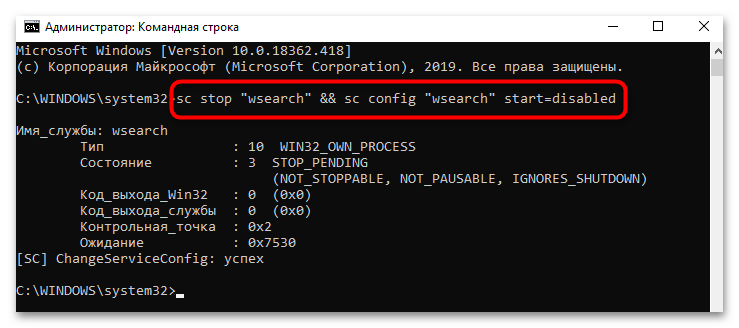
Перезагружать компьютер в данном случае необязательно, так как команда не только изменяет тип запуска службы, но и сразу отключает ее.
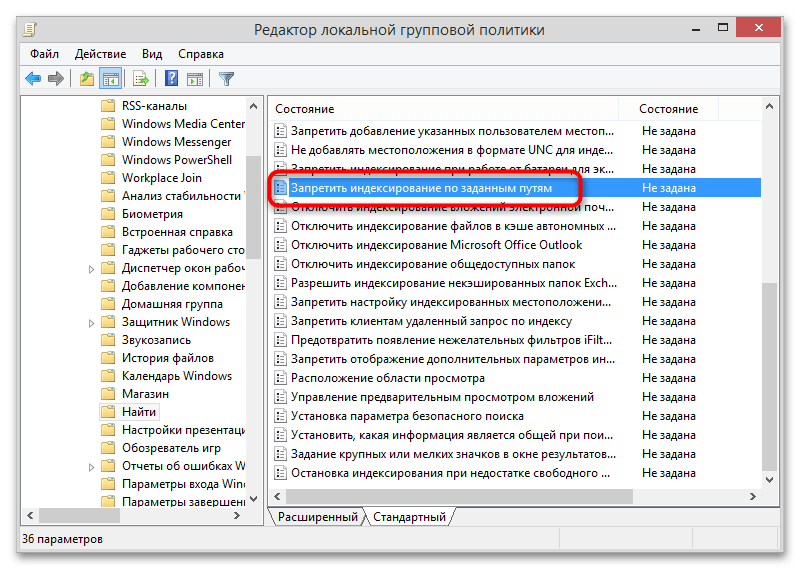
Способ 4: Настройка локальных политик
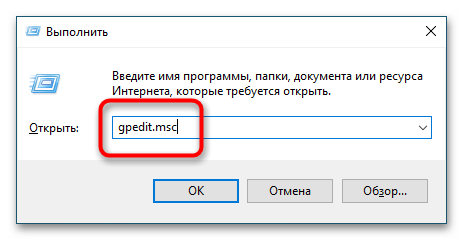
Более гибкие возможности в плане управления индексированием предлагает «Редактор локальных групповых политик». Воспользоваться этим способом вы можете только в Windows 10 редакции Pro и выше.
- Запустите оснастку изменения локальных групповых политик командой
gpedit.mscв диалоговом окошке «Выполнить», вызванном нажатием клавиш Win + R. - Перейдите в раздел «Конфигурация компьютера» → «Административные шаблоны» → «Компоненты Windows» → «Найти».
- В правой колонке отыщите политику «Запретить индексирование по заданным путям» и откройте ее свойства двойным кликом.
- Включив политику, нажмите кнопку «Показать».
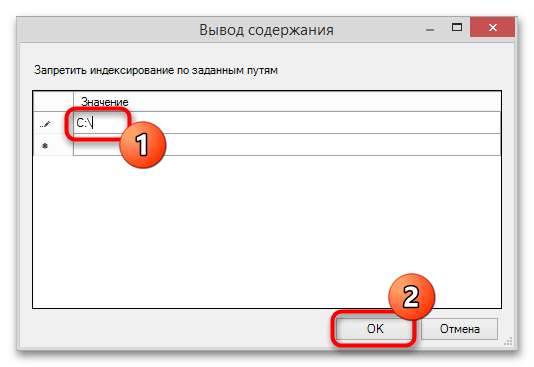
- В новом окне «Вывод содержания» в поле «Значение» укажите полный путь к разделу или каталогу, содержимое которого хотите защитить от индексирования.
- Последовательно сохраните настройки.
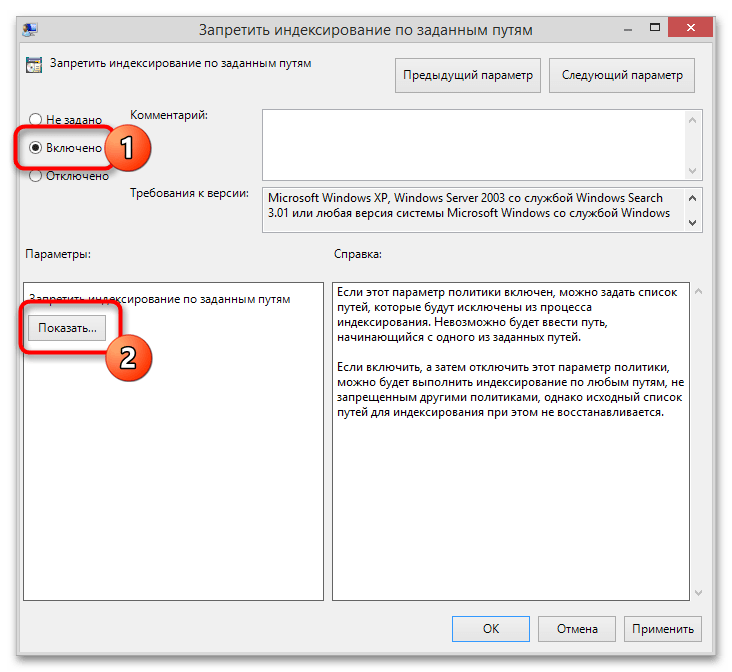
Обратите внимание, что в разделе «Найти» имеются также и другие политики настройки индексирования. Так, с их помощью вы можете запретить индексирование определенных типов файлов, кешированных файлов, вложений электронной почты и так далее.
Способ 5: Изменение атрибутов файлов
Альтернативное решение, позволяющее заблокировать индексирование файлов на уровне свойств. При этом сама служба индексации не отключается.
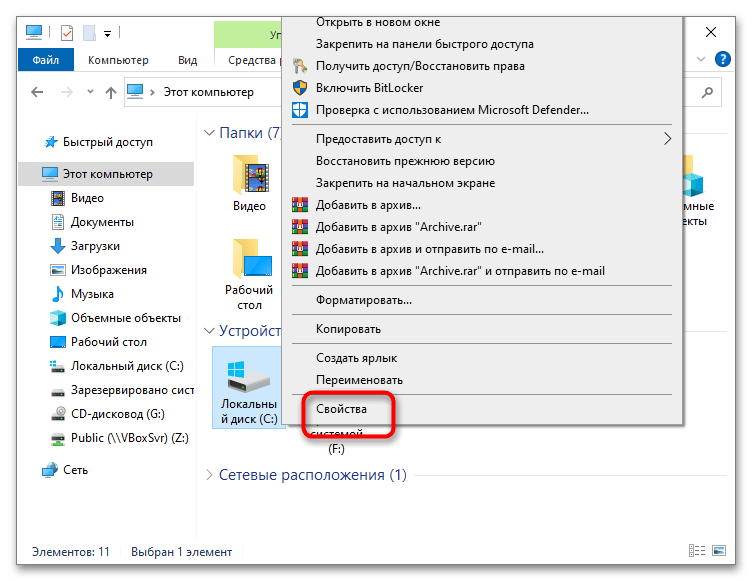
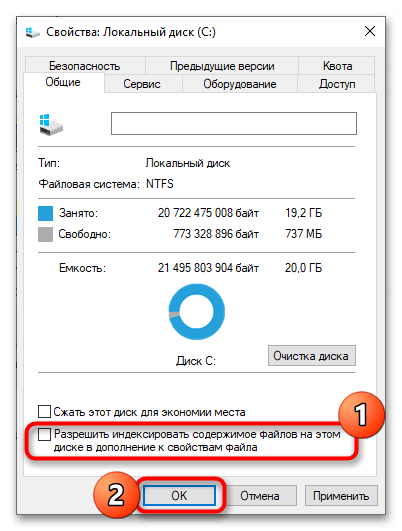
- Кликните правой кнопкой мыши по разделу, содержимое которого не хотите индексировать, и выберите в меню «Свойства».
- На вкладке «Общие» снимите флажок с чекбокса «Разрешить индексировать содержимое файлов на этом компьютере в дополнение к свойствам файла» и нажмите «Применить».
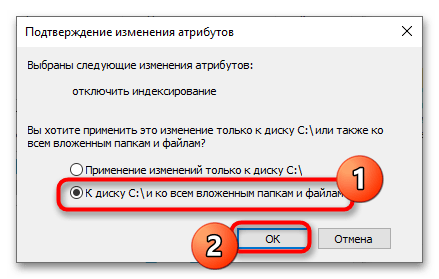
- Подтвердите в открывшемся диалоговом окошке изменение атрибутов, выбрав опцию «К диску и всем вложенным папкам и файлам».
- Дождитесь завершения процедуры изменения атрибутов.
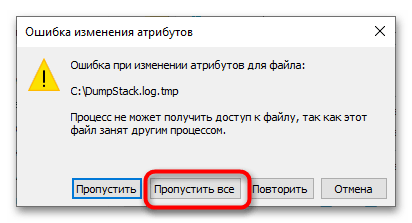
В случае запрета индексации на системном разделе вы получите ошибку, так как многие файлы в данный момент используются процессами Windows 10. Чтобы изменить атрибуты неиспользуемых системой объектов, нажмите в окошке с ошибкой кнопку «Пропустить все» и дождитесь завершения процедуры.
Данный способ позволяет изменять атрибуты файлов не только в целых разделах, но и в конкретных каталогах. Для этого вам нужно будет открыть свойства исключаемой папки, нажать кнопку «Атрибуты» и снять флажок с разрешающего индексацию содержимого файлов чекбокса.
Наша группа в TelegramПолезные советы и помощь