
The Weather app is a pre-installed core app on Windows 10/11 that provides up-to-date weather information such as temperature, local weather, forecast, and historical data. It is useful for individuals who require weather information for their work or daily activities.
Please note that the instructions provided in this article are intended for users with administrative access to their computers. Certain steps, especially those involving system settings changes and app uninstallation, may require administrative permissions. Proceed with caution, and only if you’re comfortable with the steps outlined.
Whether you find the Weather app useful or not depends on your individual needs. Some may find it consumes unnecessary resources, while others may find it essential. If you’re considering uninstalling it, it could be due to reasons such as:
- To free up memory and storage space
- To tidy up your app list
- To remove apps that are not needed or not being used
- To remove an app that gets in the way of other apps
The common misconception about Windows 10/11 core apps is that you can’t uninstall them. It’s worth noting that there’s no direct way to remove the Weather app in Windows 10/11 because it is a core part of the operating system.
But just like Android’s bloatware, Windows 10/11 core apps, such as the Weather app are not impossible to uninstall. There are several ways to uninstall core apps on Windows 10/11, but you need to take a couple of extra steps to make it possible.
There are three methods to uninstall the Weather app in Windows 10/11: via the Start Menu, via the Settings app, and via PowerShell. The uninstallation methods mentioned here may not be as straightforward as the regular uninstallation process, but they are easy to follow nonetheless.
How to Uninstall the Weather App in Windows 10/11
Before you try this guide to removing the Weather app in Windows 10/11, it is important to understand that these core apps were included in Windows 10/11 for a purpose. Deleting one of them could affect the performance of other apps related to it. Fortunately, deleting the Weather app does not affect other major apps or Windows functionality, so you can safely remove it using the methods below.
The simplest and easiest way to uninstall any Windows 10/11 core app is by using the right-click menu. To do this:
- Click the Start menu, and type Weather in the search box.
- When you see the Weather app appear in the list of search results, right-click on it.
- Click Uninstall and follow the on-screen instructions to completely remove the Weather app in Windows 10/11.
Another option is to click Start, scroll through the list of apps and right-click Weather. From the right-click menu, choose Uninstall.
Method #2: Uninstall via the Settings App.
If you’re not able to uninstall the Weather app from the Start menu for some reason or another, you can try doing so using the Settings app.
Just follow the steps below:
- Click the Start menu, then select Settings (it looks like a gear icon).
- Click Apps, then Apps and Features.
- Wait for the window to load the list of all apps.
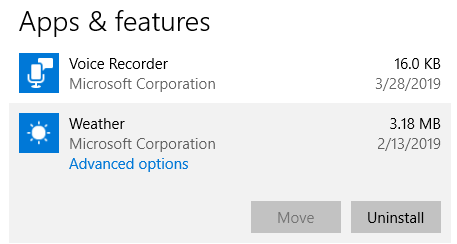
- Click on the Weather app.
- You will see two options, Move and Uninstall.
- Click Uninstall to remove the Weather app from your computer.

Method #3: Uninstall Using PowerShell Command.
The third option is to uninstall the Weather app by using a PowerShell command. This method is useful when you can’t access the Settings menu.
To use PowerShell, follow the instructions below:
- Click Start and search for PowerShell using the search box.
- When you see Windows PowerShell from the search results, right-click on it and choose Run as administrator.
- When UAC asks for your consent, click Yes to open an elevated PowerShell prompt.
- Type in Get-AppxPackage to reveal the name of every single app installed on your system. Find the full name of the Weather app and copy it.
- Next, type in the following command in the window: Get-AppxPackage *bingweather* | Remove-AppxPackage.
- Press Enter to execute the command.
Once the command has been completed, the Weather app should have been successfully deleted from your device.
Here’s a tip: After uninstalling the Weather app, you might want to consider using a tool like Outbyte PC Repair or any other reliable tool of your choice to completely delete all cached data and junk files on your computer.
How to Restore the Weather App on Windows 10/11
If you changed your mind and you want to restore the Weather app on your computer, you can do so using the PowerShell prompt. Make sure to close all applications before opening an elevated PowerShell command prompt, then type in the following command:
Get-AppxPackage -AllUsers| Foreach {Add-AppxPackage -DisableDevelopmentMode -Register “$($_.InstallLocation)\AppXManifest.xml”
Close PowerShell and restart your computer. The Weather app should now be back on your computer.
Summary
The Weather app is a core Windows app that does nothing except to provide information regarding the current weather in your area. If you need to tidy up your computer and want to get rid of unused apps, you can uninstall them using the Start menu or the Settings app. If these options are not available, you can remove the Weather app using a PowerShell command instead.
Give us some love and rate our post!
Windows 10 has a pre-installed Weather app that offers the local weather information, forecast, temperature gradient, historical data, multiple locations, and many more. It can be handy especially if you tend to check on the weather. However, if you are one of those users who barely use this app, you have the option to uninstall it from your computer and that’s exactly what we’re going to do in this post.
There are several methods to uninstall the Weather app in Windows 10. You can uninstall it via Settings or Start Menu or even using a command in Windows PowerShell. Note that uninstalling the Weather app does not affect the functionality of your Windows 10 computer by any means so you shouldn’t worry about uninstalling it. To get started, follow the instructions provided below.
Option 1 – Uninstall the Weather app through Settings
The first option you can try to uninstall the Weather app is through Settings. It’s a very simple process so you wouldn’t have any trouble following it.
- First, click on the Start menu and go to Settings.
- From there, select System > Apps & Features.
- After that, wait until the list of apps is opened, and then look for the Weather app and click on it.
- Next, click on Uninstall in the given menu to uninstall the Weather app from your computer.
Option 2 – Uninstall the Weather app through the Start Menu
Another simple way to uninstall the Weather app is through the Start Menu. It only takes a right click and there are actually two ways to go about this – one is new with the recent feature update of Windows. How? Refer to these steps:
- Click on the Start button and type in “weather” and right-click on the Weather app which appears in the list.
- Next, click on the Uninstall option. This will uninstall the Weather app.
- You can also use the other uninstall option which you can find on the right side of the list that also shows other quick action for the app.
Option 3 – Uninstall the Weather app through a command in Windows PowerShell
- Tap the Win + X key combination and click on the “Windows PowerShell (Admin)” option to open PowerShell with admin privileges.
- After that, execute the following Remove App package command for the Weather app to uninstall it.
Get-AppxPackage Microsoft.BingWeather | Remove-AppxPackage
- Once done, it will remove the Weather app from your computer.
Do You Need Help with Your Device?
Our Team of Experts May Help
Troubleshoot.Tech Experts are There for You!
GET HELP
Troubleshoot.Tech experts work with all versions of Microsoft Windows including Windows 11, with Android, Mac, and more.
Share this article:
You might also like
This post will guide you in fixing a particular problem where your Windows 10 computer does not even let you turn it on and it appears as soon as it starts to boot the operating system and it displays an error message that says, “The Boot Configuration Data for your PC is missing or contains errors, Error code 0xc0000185”. On the other hand, it may also display a different error message saying, “The operating system couldn’t be loaded because a required file is missing or contains errors”.
There are various suggestions you can try to resolve this error. You could check the physical status of your hardware or rebuild the Boot Configuration Data, use the Automatic Startup Repair or System Restore, or better yet, reset your Windows 10 computer.
Since your computer will not boot, you will have to either try to get into the Advanced Startup Options screen, boot Windows 10 in Safe Mode, or use a bootable Windows 10 media to boot your computer.
Option 1 – Try to rebuild the BCD files
The first thing you can do to resolve the issue is to Rebuild Boot Configuration Data or BCD files.
- You can start by booting into the installation environment for Windows 10 from an installation media.
- After that, click on Repair your computer and on the blue screen, select Troubleshoot and then select the Advanced options menu.
- From there, select Command Prompt and once you open it, enter each one of the commands given below by sequence.
- bootrec /FixMbr
- bootrec /FixBoot
- bootrec /ScanOS
- bootrec /RebuildBcd
- Once you’re done executing the commands given above, type “exit” to close the Command Prompt window and then restart your computer and see if it fixed error code 0xc000014c.
Option 2 – Try to run Automatic Startup Repair
In this option, you need to boot your computer into the Advanced Startup Options and from there, run the Automatic Startup Repair and then wait until the process is completed.
Option 3 – Try running System Restore in Advanced Startup Options
Since you probably can’t boot into your Windows 10 computer, you can try to run System Restore again in the Advanced Startup Options.
- Boot your computer into the Advanced Startup Options screen.
- From there, you will see some options to troubleshoot when you can’t log in to Windows in the usual way.
- Now select Troubleshoot > Advanced Options > Command Prompt.
- After that, type “rstrui” and hit Enter to execute the command which will start the System Restore process.
Option 4 – Try to perform repair install by creating a Windows 10 installation media
- Click this link and then click the Download Tool Now button.
- Next, click the “Use the tool to create installation media (USB flash drive, DVD, or ISO file)…” option and follow the next given instructions on the screen.
- Now select the ISO file option in step 5.
- After that, you should now have an ISO file.
- Next, go to the location where you’ve downloaded the ISO file.
- Then right-click on the Windows 10 ISO file and select the Open with option and then select File Explorer.
- Now click on “setup.exe” and follow the next instructions that appear on the screen. When asked, you have to select either Nothing (clean install) or Keep personal files only option. Take note that you must not select the “Keep personal files, apps, and Windows settings since it doesn’t really work.
Option 5 – Try to physically check the hardware
You should also check the physical status of the hardware in your computer. You can clean the dust off the hardware components like the Network Card of the computer. You might want to use a small blower or you could also use a soft cloth and run the components gently. Make sure that you don’t damage any parts with moisture or cause harm to any circuits while you carry out this task.
Read More
Regular and gaming headphones have many differences between them and not knowing what they are can lead you to get yourself the wrong one. In this article, our goal is to analyze the differences between them so you can choose the right one for you.

Price
One thing that goes in both worlds is that the cheapest models on both sides are not really worth the purchase since both the quality and longevity will be very low. If we compare high-end models, regular headphones are far far more expensive than gaming ones. Hi-end gaming models can go as far as 400$, perhaps a little more but hi-end audio regular headphones are going even for over 2000$.
If we compare same-price headphones generally regular ones will offer you a little better sound quality but gaming headphones will offer some features such as positional audio that regular ones do not have.
Surround sound and positional audio
One of the main advantages of gaming headsets is positional audio and true surround sound. this technology is built-in so you can hear more clearly where your enemy is coming from that is a big help in competitive games. This is achieved by positioning multiple speakers in various positions and angles inside them. Each speaker has a different sound channel that is mixed with another speaker in order to provide you with a full surround experience.
Regular headphones have typically one or two speakers on both sides aimed at the same angle and can not offer precise surround or positional audio.
Noise cancellation
Both gaming and hi-fi headphones offer some sort of noise cancelation to minimize outside noise but if you really want to focus and have good noise cancelation you will have to look out for headphones with active noise cancelation or ANC.
Microphone quality
Let us say this right at the start, most middle and quality regular audio headphones do not have a microphone at all, and ones that might pack one usually have it at a lower quality than gaming ones. This of course makes perfect sense since regular headphones will focus on audio, and gaming ones will focus on playing games where having a good microphone is essential in order to game properly.
Speaker and sound quality
Speaker quality will reflect directly on the sound quality and fidelity. This is where audio regular headphones have an advantage over gaming ones. Since they do not have many small speakers positioned at various angled and instead have just a few, usually 2 or 1 large one, that one is of much better quality and range for audio than a pack of small ones. If you are searching for clarity and quality of the audio itself, especially if you are listening to some FLAC uncompressed music, then regular HiFi ones are a much better choice.
Longevity and durability
Another area where regular ones have an advantage but that is no surprise since their price goes far up compared to gaming ones. Most of the time everything in hi-end audio headphones is made from quality materials and designed to last a long time and therefore advantage. Most of the time gaming headphones will come in plastic versions whereas higher quality audio ones pack a lot of durable metal in frames and in buds making them much more durable. Of course, we are talking here about proper headphone use, not extreme cases of throwing, etc.
Read More
There are times when you install a Windows update to your Windows 10 computer but you only got an error message saying, “The update isn’t applicable to your computer”. This is unusual as Windows was the one that downloaded them in the first place. To understand the reason behind this error, read on as this post will also give you a couple of suggestions you can try to fix the problem.
One of the main reasons why this error occurs is that your computer might not have the required installed updates and many more. Other reasons include:
- The update might be replaced. There are instances when a newer Windows version is already available on the computer and that the version you are trying to manually install is an older version which is why the Windows update failed.
- The update might already be installed. There are times when the update process is still in progress and the earlier payload might have already been installed.
- It could also be that it’s a wrong update for architecture. As you know, updates are designed accordingly based on the architecture of the computer so if the update you are trying to install does not match the architecture of your CPU then it’s no wonder you’re getting an error message.
- Your computer might be missing a prerequisite update. There are Windows updates that depend on other updates so if you missed one and you’re installing another one, it could be the reason why you’re getting the error.
To fix the problem, here are some suggestions that might help.
Option 1 – Try verifying the package and the Processor Architecture
As pointed out earlier, updates are made according to the Windows versions. Thus, if one of the updates failed to install, you need to check if it’s applicable or not. The best way to do that is by searching the Windows update name on the official website of Windows.
It could be that the Processor Architecture is not compatible with the Windows Update you are trying to install. If you have an X86-based processor, you can’t install x64-based installations of Windows and vice-versa. This usually happens when you’ve downloaded the update manually and then tried installing it.
Option 2 – Try checking if the update is old
The issue might be because you are trying to install an old Windows update which is why it didn’t work. To check, go to Settings > Update and Security > View Update history. From there, you can look for the update.
Option 3 – Try checking if the update is already installed
To verify the update, just go to the Windows Update history once more as you did in option 2, and then see if the update is already installed or not.
Option 4 – Try checking the prerequisites
AS mentioned earlier, there are some updates that depend on other updates before they get installed on your computer. The best way to verify is by checking the Microsoft Knowledge Base (KB). And to verify if the prerequisite updates are installed or not, just run the command below in PowerShell:
get-hotfix KB1111111, KB2222222, KB3333333
Note: In the command given above, you need to replace “KB1111111, KB2222222, KB3333333” with the actual update KB numbers.
Option 5 – Try running the Windows Update Troubleshooter
As you know, Windows 10 has various auto-repair built-in tools to help users fix small issues which used to get fixed manually. And in this case, you will need the Windows Update Troubleshooter to fix the issue.
- Go to Settings and click on Update and Security.
- From there, click Troubleshoot and click on Windows Update and then click the “Run the troubleshooter” option.
- After that, it will try to detect and automatically fix common issues in the Windows Updates which can be resolved by Windows itself. Note that the process may take several minutes before it completes so you need to wait until it’s done. Once it’s done, in case you have some pending update that wasn’t realized by the system early on, it will apply the fix right away and restart the Windows Update service.
Read More
What is a QR Code
QR code or if you want to be more technical Quick Response code is a two-dimensional code made of square dots creating a pattern that can be scanned via QR scanner and then interpreted. Usually, they are present on product packaging, on business cards, websites, etc.
When you decode a QR code you can get a link to a website or link to a file or whatever, you can get text, image, email, contact information, etc.
QR Code Desktop Reader & Generator sample code
How to decode a QR Code? You can scan it with your mobile devices like iPhone, iPad, Android or Blackberry equipped with additional software for scanning QR Codes. You might want to check out tools like Barcode Scanner or Red Laser. If you don’t have a mobile device or you need to scan a barcode on your PC, simply use CodeTwo QR Code Desktop Reader & Generator.
How this program works
QR Code reading
CodeTwo QR Code Desktop Reader & Generator is a free tool that will let you quickly scan any QR Code from your screen – be it a part of the website, email, banner, or document. Simply run the program and hit From the screen on the top menu.
Your standard mouse cursor will change into a cross to help you make a selection on your screen. Simply select an area with a QR Code and the program will automatically scan it. You can scan QR codes from websites, documents, movie files – you name it.
You can also select an image file that contains a QR Code and the program will locate it automatically and decode it. To do that, simply click From file on the top menu of the program and select the desired image from your hard drive.
If you have a file copied to your clipboard, or if you make a screenshot of a QR Code, QR Code Desktop Reader & Generator will let you decode those QR codes in one click. Just click From clipboard and the program will automatically locate and decode the QR code for you.
That is not all, you can also use your camera to scan QR codes. If you have more than one camera, the program will let you choose which one to use. To use this option, simply click From webcam, and you will be able to scan QR codes with your recording device.
QR Code generation
- CodeTwo QR Code Desktop Reader & Generator also acts as a QR code generator. Creating QR codes is as easy as reading them. Here is how to generate a QR code:
- In the top menu, click Generate mode on and enter the text you want to translate into QR Code
- Choose if you want to copy it to the clipboard or save it in a file. The QR Code will be scaled automatically, but you can resize it in the Size settings tab.
- The resulting QR code can be used however you like. To name just a few options, you can:
- Upload it to your blog/website which is especially useful for mobile users.
- Print it on a poster, providing easily accessible links with more information on your event.
- Send it in newsletters, or include it in your email signature.
QR Codes in email signatures
Inserting QR codes in email signatures lets mobile users quickly grab your contact details, or provides them with links so that they can get more information on your company or topic you were discussing. You can also provide your recipients with a link to QR Code Desktop Reader & Generator. This will help them easily decode QR codes when they open your email on a PC.
QR code
If you want to include a QR code automatically in email signatures throughout a whole organization, try CodeTwo central email signature management solution. It is a very useful tool, which enables you to unify email signatures on Exchange Server and Office 365 (Microsoft 365).
Read More
File Transfer Protocol Server, also known as FTP Server, is a private or public service that can host files that can be accessed both locally and globally. It is a quick, flexible and seamless service that allows you to store any kind of files depending on the total size of the server. If you’ve always found an FTP server useful, then the good thing is you can now create your FTP server since Windows 10 now allows it. You can host this server locally and later on make it globally available via the internet. So if you are planning to set up an FTP server on your Windows 10 computer, read on as this post will guide you on how to do so.
To set up the FTP server, you need to configure it first and then configure the Windows Firewall for the connections to go through. For more details, refer to the following steps:
Step 1: You need to configure the FTP server on Windows 10.
- In the Search box, type in “Turn Windows Features On or Off” to search for it.
- Then click on the appropriate result which will open a mini window.
- From this mini window, scroll down to the list and expand “Internet Information Services where you have to expand the FTP Server section.
- Next, select all the checkboxes to enable all the entries under FTP Server and then click the OK button to apply the changes made.
- And now, since your computer is now allowed to host an FTP server, you need to configure it. To do so, type “Internet Information Services (IIS) Manager” in the Search box and click on the appropriate entry.
- Next, right-click on Sites under the navigation bar of Connections and select Add FTP Site. This will open a new window where you have to input some information about your FTP hosting.
- Now enter the details and click on Next.
- Upon clicking Next, you will be prompted to give some authentication details. Enter the following details in the screenshot below.
- Now click on Finish. After that, you will get an FTP Server being hosted on your Windows 10 PC.
And now that you’ve successfully configured the FTP Server, the next thing you have to do is to allow connections from and to the FTP server. Refer to the next step below.
Step 2: Configure the Windows Firewall for FTP connections to pass-through
- In the Start Search, type “Allow an app or feature through Windows Firewall” and click on the related search result which will open a window with all the settings.
- From there, click on the Change Settings button. This will display a list where you have to mark all the checkboxes for the FTP server to enable them in both the Private and Public configurations.
- After that, click OK. This will allow you access to the FTP server on your local network.
Read More
So, you have finished with work, game, movie, music, email, or whatever on your PC, you look at the clock, it is late, you decide to go to sleep or outside, you click on the power button and choose shutdown. Now when a PC is shut down you feel good and go with your business but the next time you power it up you get the same error like the computer never really shut down in the first place. You wonder why and reboot it, just in case and all of the sudden error is gone.
If something similar has happened to you or you had the feeling that after shutting down your computer has not really felt like shutting it down, do not seek professional help, everything is OK with you because when you click on shut down, your computer does not really shut down!
Truth is that Microsoft has changed how to shut down works and how rebooting works in Windows with an update but has not publicly said anything about it so some users may experience this feeling of not shutdown phenomenon and might even think there is something wrong with their PC.
Why this change?
A few years ago shutdown button and option in Windows were really shutting down OS, but things changed when Microsoft wanted to increase boot-up speed. Now when that decision was made shutdown option was changed. So, what was changed? Well in order to increase Windows booting time, the shutdown will now turn off power to PC components and it will look like everything is indeed shutdown but the Windows kernel will actually be saved to a hard drive with all settings and just awaken once the PC is turned back ON. This will result in all errors and other stuff being just still present same as they were once the system was instructed to be turned off.
Rebooting your PC will now clear kernel and file from the hard drive and you will get a clean system startup without any issues tied with the kernel itself.
Workaround
Now that we know why and what change has been made to Windows logical question is can we shut down our PC at all properly? Luckily for us, the answer is yes and we will not need any external application to do it, we can still do it inside Windows itself and it is quite quick and easy.
Bringing back the old shutdown
In order to bring the old shutdown functionality of your PC please follow the instructions but be aware that by doing this your PC will boot a little bit slower since it will have to load the kernel from scratch each time computer is turned ON.
First thing is to go to settings and go to System

Then once you are inside the system, navigate to the power and sleep and click on it to select it. Once you have it selected to all the way to the right and click on additional power settings.

When you click on advanced power settings you should be led to the control panel’s power options. Inside this panel click on top left link where it says Choose what the power button does.

Inside options, you will need to untick the box next to Turn on fast startup (recommended), this option has been ticked ON by the Windows update and probably without notifying you. Option means exactly what was described, it will save kernel state on the hard drive for faster boot time but sadly it can cause some issues since it will never be reloaded from 0.
If you are unable to uncheck the box click on the text beside the shield icon that says: Change settings that are currently unavailable (you will have to be logged in as administrator).

Conclusion
Altho turning off fast startup and shutting down the PC completely will for sure extend your bootup time I still believe that it is the right choice since sometimes a lot of clutter and bad things accumulate over time inside the OS and can cause a vast variety of problems in a long run. So stay safe and shut down that PC as it used to be in the past.
Read More

Originally Microsoft has imagined its widgets menu as Microsoft-only widgets but it seems that they have changed their mind.
Due to the latest leak, it seems that Microsoft will open the widgets menu to 3rd party developers as well but at launch, it will be only official widgets. It was hinted that later widgets menu will be open to developers who want to bring their own stuff into it.
Distribution, date, and technology that will need to be used in order to create your widget have not been discussed nor leaked at a given time but in some way, I am very glad that at least some customization will be in Windows 11.
It is funny and amusing how some things that were in Windows Vista are getting back like glass design, round corners, and widgets. Let’s just hope Windows 11 will be a better Windows than Vista was.
Read More

Next-generation of RAM, DDR5 supposed to hit shelves around late summer or fall in 2021if everything goes as planned.
Its goal is to increase speed and efficiency, wants to pack more memory in a single stick, and have better power management.
Hardware requirements for DDR5
Using the latest memory technology will require other hardware to follow certain standards and the first ones that will need to follow are CPUs and Motherboards.
Intel is already prepared with its Alder Lake CPUs that suppose to come out also later this year. AMD on other hand has not stated anything at the time of this writing but it is a bet that their next generation that will come in 2022 will have full support.
It is speculated that bot companies and their respective CPUs will have both support for DDR4 and DDR5.
A story about motherboards is a little different. Motherboards will support DDR4 or DDR5 memory banks, not both, so make sure that your motherboard will support the memory you plan on getting.
Capacity of memory
The goal and aim for the DDR5 memory stick are to reach a whopping 126GB per stack. This will be done by using a dual in-line module or DIMM enabling larger capacity.
That being said, the first modules that we will see are more likely to be 16GB as standard and 8GB as low entry ones.
Power consumption of DDR5 memory
The standard voltage that DDR4 operates under is 1.2V. DDR5 wants to lower this to 1.1V without sacrificing speed.
Voltage regulation on modules themselves will be now integrated on memory banks instead of leaving that to motherboards which will help to detect memory errors directly on the memory bank.
Speed of memory
The most common speed of DD4 memory banks is 2,666MHz, more expansive ones go from 3,600 to 4,000MHz.
DD5 aims to raise this bar to 4,800MHz and offers greater speed.
Should you get it right away?
Hardware is ever-evolving, we have PCIe 3.0 to PCIe 4.0, and taking into account that sometimes the newest tech can cause some unexpected behavior it is always the best strategy to wait for a little.
Price for the newest tech has also been in its heist just when it is released and seeing how DDR5 will benefit mostly servers mostly since even today memory, processors, and other available equipment can tackle all daily tasks.
Read More
The GameStream is an NVIDIA service that allows users to stream games from their Windows 10 computers to other supported devices which includes the NVIDIA SHIELD devices. However, a number of users reported that the NVIDIA GameStream is not working on their Windows 10 computers. This kind of issue is most likely caused by improper installation, some glitches with the network, and many more.
To fix this issue in the NVIDIA GameStream, there are several options you need to check out to fix the problem. You can try to lo logout of GameStream and try logging back in again. You could also try to update or uninstall and reinstall the drivers related to NVIDIA or fix some network glitches or update the NVIDIA SHIELD device. For more details, you can refer to each one of the given potential fixes below.
Option 1 – Try to logout and log back into NVIDIA GameStream
The first thing you can do is to log out and then log back into NVIDIA GameStream. Some users claimed that by doing this simple task, they were able to resolve the problem. This is probably because with the re-login, the entire cache of the system and service is rebuilt and any bad sectors of that data will be replaced with the fresh one so this should resolve the problem with the NVIDIA GameStream, if not, refer to the other given options below.
Option 2 – Try updating the drivers from the official site of NVIDIA
If both the first and second given options didn’t work, you can also try updating the drivers from the official NVIDIA website. And in case you don’t know the type of Nvidia graphics card that your computer is on, follow the steps below:
- Tap the Win + R keys to open the Run dialog box.
- Next type in “dxdiag” in the field and click OK or hit Enter to open the DirectX Diagnostic Tool.
- From there, you can see what type of Nvidia graphics card that your system is on.
- Take note of your graphics card information and then look for the best drivers for your operating system. Once you’ve downloaded and installed the file, restart your PC.
Option 3 – Try to roll back the driver to the previous version
If updating the NVIDIA display drivers didn’t work for you, then it’s time to roll back the device drivers. It is most likely that after you updated your Windows computer that your driver also needs a refresh.
- Tap the Win + R keys to launch the Run window and then type in the “MSC” command and hit Enter to open the Device Manager window.
- Under the Device Manager, you will see a list of drivers. From there, look for the NVIDIA Drivers and expand it.
- Next, select the driver entries that are labeled appropriately.
- Then select each one of them and double click to open a new mini window.
- After that, make sure that you’re on the Driver tab and if you are not, just navigate to it then click the Roll Back Driver button to switch back to the previous version of the NVIDIA Drivers.
- Now restart your computer to successfully apply the changes made.
Option 4 – Try fixing your network
The next thing you can do to fix the problem with the NVIDIA GameStream is to fix the glitches in your network. Make sure that you connect both of your devices to a 5 GHz Wi-Fi network and you also have to ensure that the Wi-Fi connection you’re connected to is strong enough for both the devices for the latency to go down. Once you’ve covered all of these things with your network, restart your computer and change the Wi-Fi channel both devices are connected to. This should resolve the problem.
Option 5 – Try to update the NVIDIA SHIELD device
You might also want to update the NVIDIA SHIELD device. There are times when an outdated NVIDIA SHIELD device can result to several issues like the problem with the NVIDIA GameStream. Thus, you need to update NVIDIA SHIELD and check if it fixes the problem or not.
Read More
What is Error 0x8024a11a or 0x8024a112 ? If you are trying to update your Windows 10 computer and just when you were done downloading the feature update and about to install it, you encounter an error message saying:
“We’re having trouble restarting to finish the install, Error 0x8024a11a, 0x8024a112, 0x80070005 or 0x80070032”
And so to fix this problem, this post will give you a couple of possible solutions. Refer to the options given below to get started.
Option 1 – Restart your computer many times
This is the first thing you can try since there are instances when the Windows Update process gets stuck for a minor thing and restarting the computer usually helps in resolving the issue. All you have to do is click the Restart now button. However, if it does not work, you can use the Power buttons from the Start Menu or WinX Menu. Aside from that, you can also use your power buttons such as Alt + Ctrl + Del to restart your computer. And during the boot process, it is recommended that you restart your computer in Safe Mode or even in a Clean Boot State. After that, you can restart your computer in normal mode. This will make sure that no third-party processes will be able to interfere with the Windows Update process. To put your PC in a Clean Boot State, here’s what you have to do:
- Log onto your PC as an administrator.
- Type in MSConfig in the Start Search to open the System Configuration utility.
- From there, go to the General tab and click “Selective startup”.
- Clear the “Load Startup items” check box and make sure that the “Load System Services” and “Use Original boot configuration” options are checked.
- Next, click the Services tab and select the “Hide All Microsoft Services” check box.
- Click Disable all.
- Click on Apply/OK and restart your PC. (This will put your PC into a Clean Boot State. And configure Windows to use the usual startup, just simply undo the changes.)
- After that, try to install the Windows Updates or upgrade again.
Option 2 – Try running the Windows Module Installer
The Windows Module Installer is a built-in service in the Windows operating system that could help you resolve the Windows update error 0x8024a11a or 0x8024a112. You need to make sure that this service is Started and that its Startup type is set to Automatic – you can do this via Services Manager or by executing the command given below in an elevated Command Prompt.
- Tap the Win + R keys to open the Run dialog box.
- Then type “command prompt” in the field and hit Enter to open Command Prompt.
- And in the elevated Command Prompt type in the following command and hit Enter:
SC config trustedinstaller start=auto
- After executing the command successfully, you should see the “[SC] ChangeServiceConfig SUCCESS” message on the Command Prompt window.
Option 3 – Run the DISM tool
You can also run the DISM Tool as it helps in repairing the Windows System Image as well as the Windows Component Store in Windows 10. Using this built-in tool, you have various options such as the “/ScanHealth”, “/CheckHealth”, and “/RestoreHealth” which could help in fixing the Windows update error 0x8024a11a or 0x8024a112.
- Open the Command Prompt with admin privileges.
- Then type in the following commands and make sure to hit Enter right after you type each one of them:
- Dism /Online /Cleanup-Image /CheckHealth
- Dism /Online /Cleanup-Image /ScanHealth
- exe /Online /Cleanup-image /Restorehealth
- Do not close the window if the process takes a while as it will probably take a few minutes to finish.
Option 4 – Run the System File Checker
System File Checker or SFC is a built-in command utility that helps in restoring corrupted files as well as missing files. It replaces bad and corrupted system files to good system files that might be the cause why you’re getting the errors 0x8024a11a and 0x8024a112. To run the SFC command, follow the steps given below.
- Tap Win + R to launch Run.
- Type in cmd in the field and tap Enter.
- After opening Command Prompt, type in sfc /scannow
The command will start a system scan which will take a few whiles before it finishes. Once it’s done, you could get the following results:
- Windows Resource Protection did not find any integrity violations.
- Windows Resource Protection found corrupt files and successfully repaired them.
- Windows Resource Protection found corrupt files but was unable to fix some of them.
Option 5 – Run the Windows Update Troubleshooter
Running the built-in Windows Update troubleshooter could also help you resolve the Windows update error 0xca00a000. To run it, go to Settings and then select Troubleshoot from the options. From there, click on Windows Update and then click the “Run the troubleshooter” button. After that, follow the next on-screen instructions and you should be good to go.
Option 6 – Run Microsoft’s online troubleshooter
Running Microsoft’s online troubleshooter might also help you fix the Windows update error 0x8024a11a or 0x8024a112. This online troubleshooter is known to help in fixing Windows Update errors, it scans your computer for issues that might be causing the problem and then fixes them automatically.
Read More
Copyright © 2023, ErrorTools. All Rights Reserved
Trademark: Microsoft Windows logos are registered trademarks of Microsoft. Disclaimer: ErrorTools.com is not affiliated with Microsoft, nor claims direct affiliation.
The information on this page is provided for information purposes only.
В одном из недавних обновлений на панели задач появился виджет с погодой и новостями. Нельзя сказать, что он полностью бесполезен, но если вам он не по душе, его можно легко убрать.
Благодаря тому, что Windows 10 автоматически обновляется, пользователи могут быть уверены в безопасности системы и в том, что все работает как надо. Однако обновления не всегда идут на пользу: бывает, что очередной апдейт что-то ломает или же добавляет функционал, который нужен далеко не всем.
Как отключить виджет погоды
Погода относится к функции «Новости и интересы», которую можно найти, кликнув правой кнопкой мыши на панели задач. Чтобы отключить виджет полностью, нажмите «Отключить». Таким же способом можно отключить и другие значки на панели задач: «Поиск», «Люди» и другие.
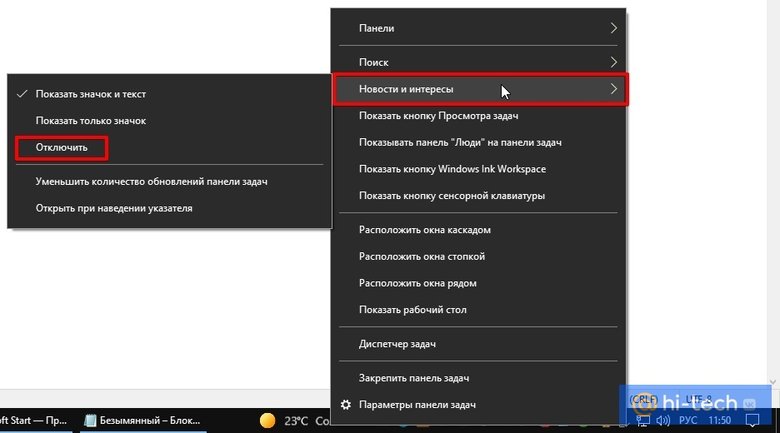
Если вы захотите вернуть значок, то есть несколько опций. Настройка «Показать значок и текст» вернет виджет в полном размере. Если выбрать «Показать только значок», на панели останется лишь иконка, по которой можно кликнуть.
Чтобы при наведении на значок не появлялось всплывающее окно, снимите галочку с «Открыть при наведении указателя». Таким образом, у вас на панели задач останется виджет с текущей погодой. Чтобы открыть блок с новостями, нужно кликнуть на него.
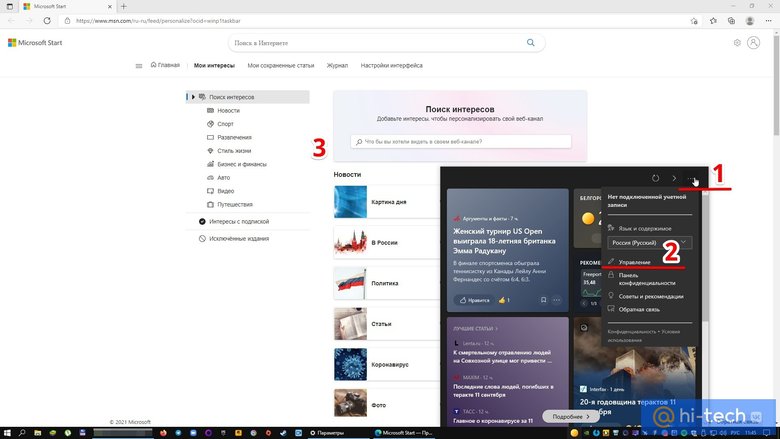
Кроме того, можно настроить и саму ленту, если текущая выборка новостей вам не нравится. Для этого нужно кликнуть на три точки в правом верхнем углу и далее «Управление». Откроется новая вкладка в браузере, где вы сможете выбрать интересы. Также вы можете кликнуть на значке с тремя точками в конкретной новости в самой ленте. В открывшемся окне можно скрыть все материалы источника, чтобы они больше вам не предлагались.
- Как отключить всю рекламу в прошивке MIUI 12 на смартфонах Xiaomi, Redmi и Poco
- Как отключить Алису на телефоне
You are here:
Home » Windows 10 » Reset Or Reinstall The Weather App In Windows 10
Windows 10 ships with many default apps. One of them is the Weather app. The Weather app, as the name says it all, brings you the weather information.
The Weather app works great almost all the time. But if you have issues with the Weather app, you can reset or reinstall the Weather app to fix its issues.
The following are the two ways to reset/reinstall the Weather app.
Reset the Weather app when it’s not working properly. For instance, if the Weather app is not opening or loading data, you can try resetting the Weather app.
Step 1: Open the Settings app. Click Apps and then click Apps & features.
Step 2: Scroll down the apps list to see Weather app entry. Click on it to see Advanced options link. Click Advanced options link.

Step 3: In the Reset section, click the Reset button.

Starting with Windows 10 Spring Creators Update (v1803), resetting will reinstall the app. You will lose all Weather app data saved on your PC.

Click the Reset button again to complete the reset and reinstall job.
Method 2 of 2
Manually uninstalling Weather and then installing
If the above method did not help you resolve the issue, you can manually uninstall the Weather app and then install a fresh copy of the same. Here is how to do that.
Step 1: Navigate to Settings app > Apps > Apps & features.
Step 2: Locate the Weather app entry, click on it, and then click the Uninstall button.

Step 3: Click the Uninstall button again when you see the confirmation dialog to uninstall the app.

Step 4: Open the Store app, search for the MSN Weather app, and then install it.

That’s it!
AccuWeather is another good weather app for Windows 10
В Windows 10 предустановлен набор стандартных приложений (программ для нового интерфейса), таких как OneNote, календарь и почта, погода, карты и другие. При этом не все из них можно легко удалить: их получается убрать из меню Пуск, но из списка «Все приложения» они не удаляются, равно как и нет пункта «Удалить» в контекстном меню (для тех приложений, что вы установили сами, такой пункт имеется). См. также: Удаление программ Windows 10.
Тем не менее, удаление стандартных приложений Windows 10 возможно с помощью команд PowerShell, что и будет по шагам продемонстрировано далее. Сначала — об удалении встроенных программ по одной, а затем — про то, как удалить все приложения для нового интерфейса (ваши программы не будут затронуты) сразу. См. также: Быстрое удаление встроенных приложений Windows 10 в деинсталляторе Bulk Crap Uninstaller.
Удаление отдельного приложения Windows 10
Для начала запустите Windows PowerShell, для этого начните набирать в строке поиска в панели задач «powershell», а когда соответствующая программа будет найдена, кликните по ней правой кнопкой мыши и выберите пункт «Запустить от имени администратора».
Для удаления встроенных программ будут использоваться две встроенные команды PowerShell — Get-AppxPackage и Remove-AppxPackage, о том, как именно ими пользоваться для этой цели — далее.
Если вы введете в PowerShell команду Get-AppxPackage и нажмете Enter, вы получите полный список всех установленных приложений (имеются в виду только приложения для нового интерфейса, а не стандартные программы Windows, которые вы можете удалить через панель управления). Правда, после ввода такой команды, список будет не очень удобным для анализа, поэтому рекомендую использовать следующий вариант этой же команды: Get-AppxPackage | Select Name, PackageFullName
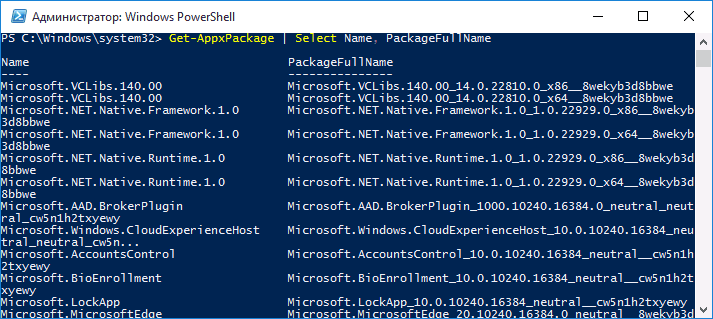
В этом случае мы получим удобный для просмотра список всех установленных программ, в левой части которого отображается краткое имя программы, в правой — полное. Именно полное имя (PackageFullName) и требуется использовать для удаления каждого из установленных приложений.
Для удаления конкретного приложения используется команда Get-AppxPackage PackageFullName | Remove-AppxPackage
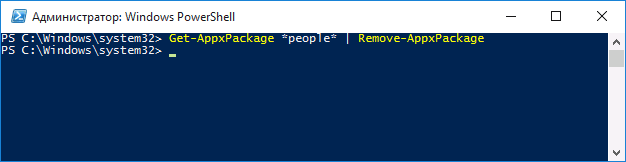
Однако, вместо написания полного имени приложения, имеется возможность применить символ «звездочка», который заменяет любые другие символы. Например, для удаления приложения «Люди», мы можем выполнить команду: Get-AppxPackage *people* | Remove-AppxPackage (во всех случаях также можно использовать краткое имя из левой части таблицы, окруженное звездочками).
При выполнении описанных команд, приложения удаляются только для текущего пользователя. Если вам нужно удалить его для всех пользователей Windows 10, то используйте параметр allusers следующим образом: Get-AppxPackage -allusers PackageFullName | Remove-AppxPackage
Приведу список имен приложений, которые вы с большой вероятностью захотите удалить (я привожу краткие имена, которые можно использовать со звездочками в начале и конце для удаления конкретной программы, как это было показано выше):
- people — приложение Люди
- communicationsapps — Календарь и Почта
- zunevideo — Кино и ТВ
- 3dbuilder — 3D Builder
- skypeapp — загрузить Skype
- solitaire — Microsoft Solitaire Collection
- officehub — загрузить или улучшить Office
- xbox — приложение XBOX
- photos — Фотографии
- maps — Карты
- calculator — Калькулятор
- camera — Камера
- alarms — Будильники и часы
- onenote — OneNote
- bing — Приложения Новости, спорт, погода, финансы (все сразу)
- soundrecorder — Запись голоса
- windowsphone — Диспетчер телефонов
Как удалить все стандартные приложения
Если вам требуется удалить все имеющиеся встроенные приложения, вы можете использовать команду Get-AppxPackage | Remove-AppxPackage без каких-либо дополнительных параметров (хотя можно так же использовать параметр allusers, как это было продемонстрировано ранее, чтобы удалить все приложения для всех пользователей).
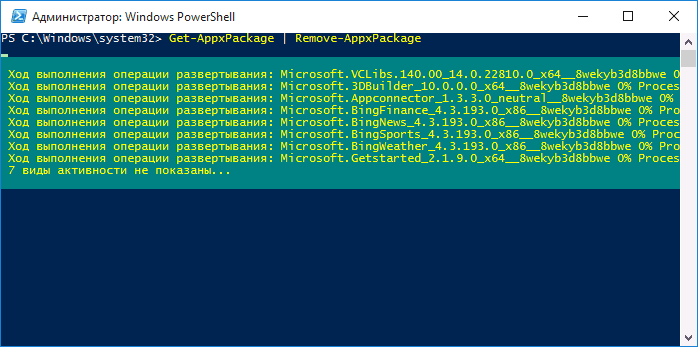
Однако, в этом случае рекомендую быть осторожными, поскольку в список стандартных приложений входит также магазин Windows 10 и некоторые системные приложения, обеспечивающие правильную работу всех остальных. В ходе удаления, вы можете получить сообщения об ошибках, но приложения все равно будут удалены (кроме браузера Edge и некоторых системных приложений).
Как восстановить (или переустановить) все встроенные приложения
Если результаты предыдущих действий вас не порадовали, то вы также можете переустановить все встроенные приложения Windows 10 с помощью команды PowerShell:
Get-AppxPackage -allusers | foreach {Add-AppxPackage -register "$($_.InstallLocation)\appxmanifest.xml" -DisableDevelopmentMode}
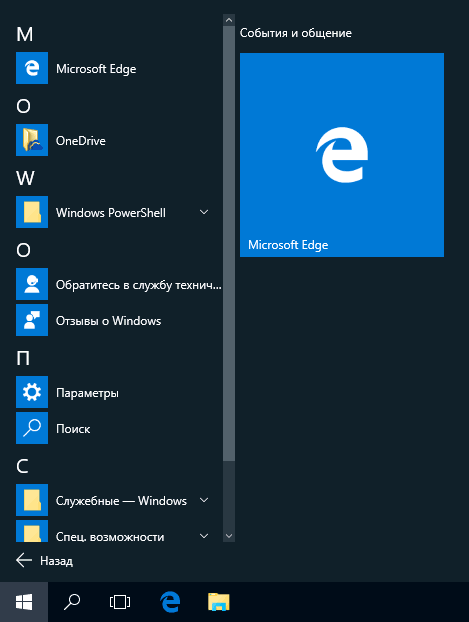
Ну и в заключение о том, где хранятся ярлыки программ из списка «Все программы», а то пришлось уже несколько раз ответить: нажмите клавиши Windows + R и введите: shell:appsfolder после чего нажмите Ок и вы попадете в ту самую папку.
O&O AppBuster — бесплатная утилита для удаления приложений Windows 10
Небольшая бесплатная программа O&O AppBuster позволяет удалить встроенные приложения Windows 10 как от Майкрософт, так и от сторонних разработчиков, а при необходимости — заново установить те из них, которые входят в комплект поставки ОС.
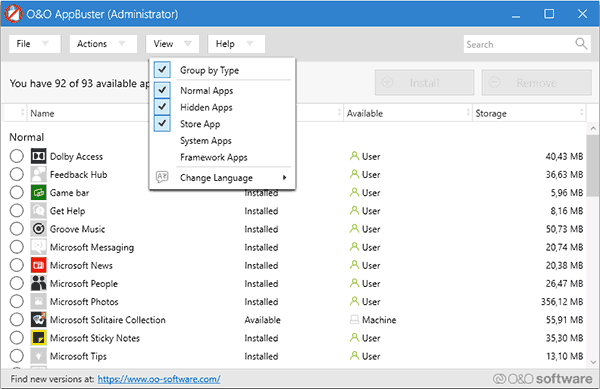
Подробно об использовании утилиты и её возможностях в обзоре Удаление встроенных приложений Windows 10 в O&O AppBuster.
Удаление встроенных приложений Windows 10 в CCleaner
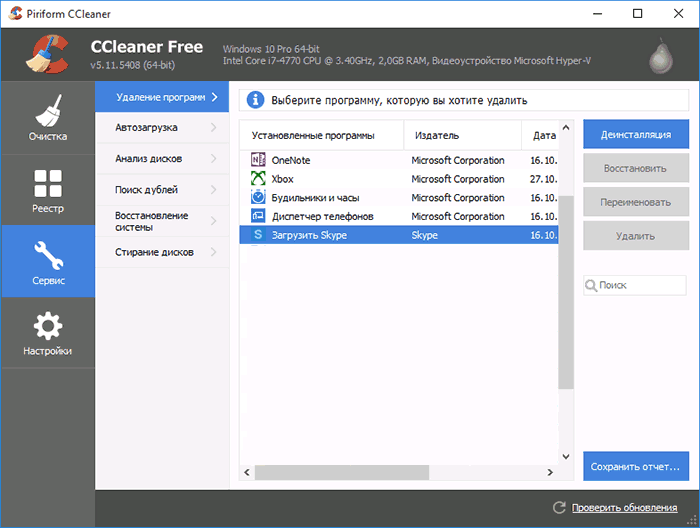
Как сообщили в комментариях, новая версия CCleaner, вышедшая 26 октября, имеет возможность удалять предустановленные приложения Windows 10. Найти данную функцию вы можете в разделе Сервис — Удаление программ. В списке вы обнаружите как обычные программы для рабочего стола, так и приложения меню пуск Windows 10.
Если вы не были ранее знакомы с бесплатной программой CCleaner, рекомендую почитать Использование CCleaner с пользой — утилита действительно может быть полезной, упрощая и ускоряя многие привычные действия по оптимизации работы компьютера.