
If you installed Service Pack 1 (SP1) for Windows 7, you might experience some stability issues with it. If so, you can uninstall it, provided you haven’t deleted the SP1 backup files with the Disk Cleanup utility. Today we’ll take a look at the process and what to look out for.
1. So, you installed Windows 7 SP1 and you notice your system is unstable, certain programs or hardware isn’t working correctly. If that’s the case, you might want to uninstall it.
![sshot-2011-02-25-[00-00-32]](http://www.simplehelp.net/wp-content/uploads/sshot-2011-02-25-00-00-32_thumb.png)
Ensure You Have Service Pack Backup Files
2. To make sure you are able to uninstall SP1 you’ll need to make sure you don’t delete the SP1 Backup files. If you run the Disk Cleanup utility, make sure you don’t delete them.
Note: If you get a computer with Windows 7 SP1 pre-installed, you won’t be able to uninstall it.
If you installed SP1 through Windows Updates, first verify you have the SP1 Backup Files. Click Start then Computer.
![sshot-2011-02-25-[14-47-25]](http://www.simplehelp.net/wp-content/uploads/sshot-2011-02-25-14-47-25_thumb.png)
3. Right-Click on your local drive then click Properties from the context menu.
![sshot-2011-02-25-[14-54-18]](http://www.simplehelp.net/wp-content/uploads/sshot-2011-02-25-14-54-18_thumb.png)
4. Click on the General tab – which should be open by default – then click the Disk Cleanup button.
![sshot-2011-02-25-[14-54-50]](http://www.simplehelp.net/wp-content/uploads/sshot-2011-02-25-14-54-50_thumb.png)
5. Wait for Windows to scan your local drive.
6. Then go through the list until you find Service Pack Backup Files – where in this case it’s 650 MB.
![sshot-2011-02-25-[14-56-36]](http://www.simplehelp.net/wp-content/uploads/sshot-2011-02-25-14-56-36_thumb.png)
7. If you want to want the ability to remove Windows 7 SP1 Don’t Delete these files. Otherwise according to the Windows Website, you’ll have to do a fresh install of Windows 7 and start over.
![sshot-2011-02-25-[15-07-37]](http://www.simplehelp.net/wp-content/uploads/sshot-2011-02-25-15-07-37_thumb.png)
Uninstall Windows 7 SP1
8. Provided you still have the Service Pack Backup Files, the uninstall process is pretty basic through Programs and Features in Control Panel. Click on Start then Control Panel.
![sshot-2011-02-25-[15-10-56]](http://www.simplehelp.net/wp-content/uploads/sshot-2011-02-25-15-10-56_thumb.png)
9. When Control Panel opens click to View by Large Icons then click on Programs and Features.
![sshot-2011-02-25-[15-12-12]](http://www.simplehelp.net/wp-content/uploads/sshot-2011-02-25-15-12-12_thumb.png)
10. In the next screen click on View installed updates.
![sshot-2011-02-25-[15-13-40]](http://www.simplehelp.net/wp-content/uploads/sshot-2011-02-25-15-13-40_thumb.png)
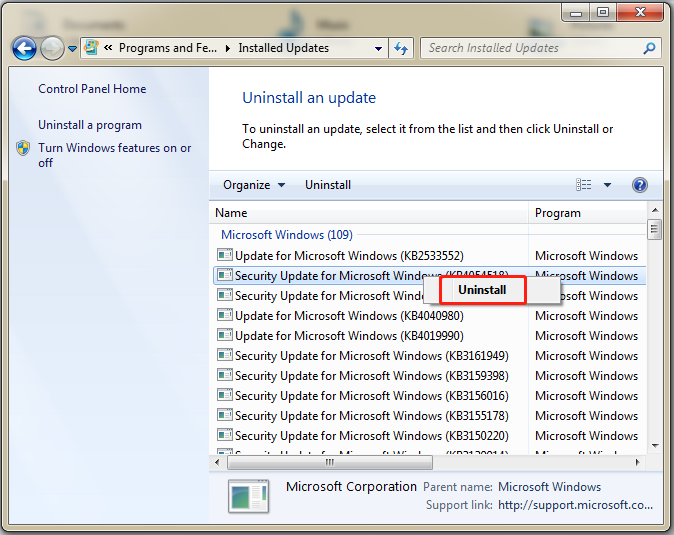
11. Then scroll until you find Service Pack for Microsoft Windows (KB976932) – right-click on it and Uninstall.
![sshot-2011-02-25-[15-14-23]](http://www.simplehelp.net/wp-content/uploads/sshot-2011-02-25-15-14-23_thumb.png)
12. Click Yes in the dialog asking if you’re sure you want to uninstall it.
13. Then wait while Service Pack 1 is uninstalled…it really does take several minutes…about 7 minutes on our Dual-Core test system.
14. Then a restart is required to complete the uninstall process.
15. While your computer restarts you’ll see the a couple of messages following message it’s being uninstalled.
![sshot-2011-02-25-[15-25-25]](http://www.simplehelp.net/wp-content/uploads/sshot-2011-02-25-15-25-25_thumb.png)
16. When you get back from the Restart, right-click on Computer and you’ll see Service Pack 1 has been successfully uninstalled.
![sshot-2011-02-25-[15-31-56]](http://www.simplehelp.net/wp-content/uploads/sshot-2011-02-25-15-31-56_thumb.png)
If you’ve installed Service Pack 1 for Windows, make sure you test out the computer for a week or two and verify there are no stability issues. If not, then it’s probably safe to uninstall the backup files in Disk Cleanup. If you have a large enough drive, you can keep them there for a while, just to be safe in case you want to uninstall SP1 in the future.
If this article helped you, I’d be grateful if you could share it on your preferred social network — it helps me a lot. If you’re feeling particularly generous, you could buy me a coffee and I’d be super grateful 
-
Home
-
News
- Windows 7 Service Pack 1 – How to Download/Install/Uninstall?
By Daisy | Follow |
Last Updated
Microsoft released a major update to Windows 7 called Service Pack 1 (SP1) in February 2011. Although now Microsoft has ended the support for Windows 7, there are still some Windows 7 users who want to download Windows 7 Service Pack 1. This post from MiniTool provides a detailed guide.
Microsoft has ended support for Windows 7 ends on January 14, 2020. It’s recommended to you use the latest Windows operating system – Windows 11 to continue receiving security updates from Microsoft.
Some users are sticky to using Windows 7 and want to download Windows 7 Service Pack 1 for PC’s security. The following provides features of Windows 7 Service Pack 1 and tells you how to download and install it.
What Is Windows 7 Service Pack 1
What is Windows 7 Service Pack 1? It brings a large number of bug fixes and security fixes to Windows 7. Keeps the security features of the operating system up-to-date, which in turn helps improve system reliability.
- It improves the reliability of HDMI audio device connections.
- It improves the compatibility of programs.
- It enhances visualization capabilities.
How to Check If Service Pack 1 Is Installed Windows 7
How do I know if I have Service Pack 1 for Windows 7? To do that, here are the steps:
Step 1: Select the Start button and right-click Computer to select Properties.
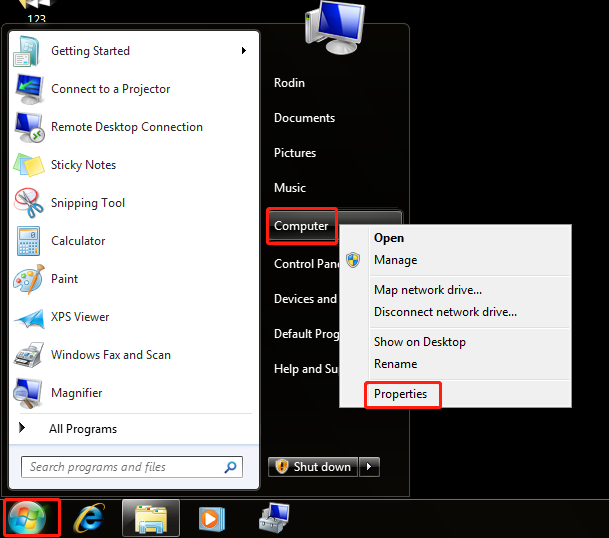
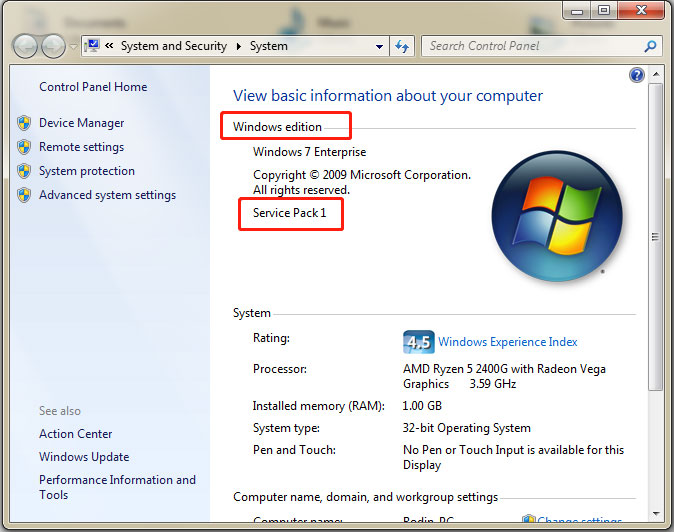
Step 2: Then, you can check if Service Pack 1 is listed under the Windows edition part.
Windows 7 Service Pack 1 Download and Install
If Windows 7 Service Pack 1 is not installed on your PC, you can download and install Windows 7 Service Pack 1 by following the below instructions. There are two ways for you – via Windows Update or Microsoft Update Catalog.
Way 1: Download and Install Windows 7 Service Pack 1 via Windows Update
Step 1: Click the Start menu > Control Panel.
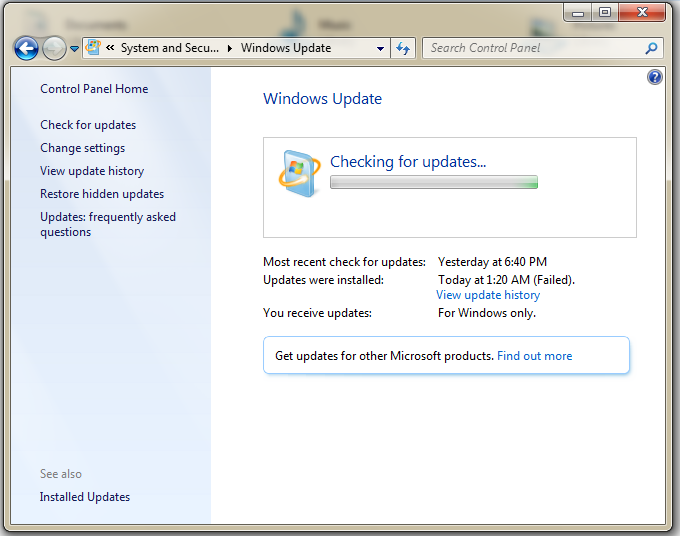
Step 2: Go to System and Security > Windows Update > Check for updates.
Step 3: If any important updates are found, select the link to view available updates. Then, select Service Pack for Microsoft Windows (KB976932) and then select OK.
Step 4: Click Install updates and follow the on-screen instructions to install Windows 7 Service Pack 1.
Way 2: Download and Install Windows 7 Service Pack 1 via Microsoft Update Catalog
You can also download and install Windows 7 Service Pack 1 via Microsoft Update Catalog.
Step 1: Go to the Windows 7 Service Pack 1 download page.
Step 2: Select the Download link that corresponds to your version of Windows 7. You can also search for Windows 7 Service Pack 1 (KB976932) or Windows 7 Service Pack 1 KB976932 directly.

Step 3: After downloading the package, double-click the exe file to install it.
How to Uninstall Windows 7 Service Pack 1
How to uninstall Windows 7 Service Pack 1? To do that, go to Contro Panel > Programs > Programs and Features > View installed updates. Find and right-click Windows 7 Service Pack 1 to choose Uninstall.
Final Words
What is Service Pack 1? How to check if Service Pack 1 is installed Windows 7? How to uninstall Windows 7 Service Pack 1? How to update Windows 7 Service Pack 1 offline? How to get Windows 7 Service Pack 1 download 64-bit? You can find answers in the above content.
About The Author
Position: Columnist
Having been an editor at MiniTool since graduating college as an English major, Daisy specializes in writing about data backups, disk cloning, and file syncing as well as general computer knowledge and issues. In her free time, Daisy enjoys running and going with friends to the amusement park.
There have not been many complaints yet from users who have installed the service pack update on their Windows PCs. Still, there are always some cases where users want to uninstall the update again, likely because it is causing instabilities or other problems on the system that were not experienced before.
Those users need to uninstall the Windows 7 Service Pack 1 to restore the old state of the system prior to the update.
The Control Panel provides access to the easiest service pack uninstallation option.
Users need to click on the Start orb on the taskbar and select Control Panel from the options. The uninstallation applet is available under Programs > Uninstall a program, or if all apples are displayed at once under Programs and Features.
Locate the View installed updates link in the left sidebar and click it to open the list of updates that have been installed on the computer system.

Windows displays a list of all updates that have been installed on the system. The service pack is basically nothing more than a larger update. Locate the Service Pack for Microsoft Windows (KB976932) entry under Microsoft Windows. This is the Windows 7 Service Pack 1. To uninstall it select it with a left-click and click the Uninstall link to uninstall it. you need to confirm your selection and restart the computer after the uninstallation process has finished.
The uninstallation removes the service pack from the operating system.
Some users may not be able to uninstall the program via the Control Panel applet. This is for instance the case if the service pack installation corrupted the system.
It is then possible to use the command prompt to try and uninstall the service pack. An elevated command prompt is required. To get there, users need to click on the start orb, then All Programs > Accessories, and right-click on the Command Prompt entry there and select Run as administrator.
They then need to use the following command to uninstall the service pack again:
wusa.exe /uninstall /kb:976932
A confirmation is again required before the service pack is uninstalled by Windows.
System restore, or previously created backups, are another alternative if they have been created before the service pack was installed on the Windows 7 system. (via)
Advertisement
В октябре Microsoft выпустила ряд обновлений для пользователей своих продуктов, некоторые из них привели к печальным последствиям, но есть одно обновление, появление которого уже очень долгое время ждали все поклонники Windows 7. Речь идет об обновлении KB2852386 (http://support.microsoft.com/kb/2852386), позволяющем удалять устаревшие обновления (обновления, которые были заменены на более новые обновлений) с помощью нового параметра стандартного мастера очистки диска Windows 7 — Windows Cleanup Tool (cleanmgr.exe). Данное обновление не является обязательным, его можно установить через службу Windows Update или, скачав вручную с сайта Microsoft.
Напомним, что в Windows 7 при установке любого системного обновления, системные файлы заменяются новыми, а их старые версии сохраняются в каталоге WinSxS (C:\Windows\WinSxS). Благодаря такому подходу в любой момент можно безопасно удалить любое системное обновление. Однако, этот подход приводит к тому, что со временем по мере установки новых обновлений, каталог WinSxS существенно увеличивается в размерах (получается, что чем больше возраст системы и чем большее количество обновлений установлено – тем больше размер папки WinSxS ), что не может не волновать пользователей, особенно счастливых обладателей SSD дисков и дисков с небольшим размером системного раздела. Ранее в Windows 7 отсутствовала штатная утилита удаления файлов устаревших обновление, поэтому чтобы уменьшить размер папки WinSxS приходилось прибегать к различным трюкам.
Примечание. В Windows 7/2008 можно было удалить неиспользуемые файлы, которые остались после установки SP1. Сделать это можно было с помощью следующей команды любимой нами утилиты DISM:
dism /online /cleanup-image /spsuperseded
Естественно, что после выполнения данной команды откатить установку Windows 7 SP 1 станет невозможно.
Теперь благодаря обновленной версии мастера очистки Windows 7 можно удалить устаревшие обновления Windows, что позволит существенно уменьшить размер папки WinSxS.
Требования к установке обновления KB2852386
- Обновление предназначено только для Windows 7 SP 1
- Если вы скачиваете обновление самостоятельно с сайта Microsoft (ссылка есть в начале статьи), вас попросят запустить утилиту проверки подлинности Windows (Genuine Windows Validation). При установке обновления через центр установки обновлений, ручную валидацию выполнять не придется.
Как в Windows 7 очистить папку WinSxS, удалив устаревшие обновления
- Скачайте и установите обновление KB 2852386
- Запустите мастер очистки диска (Cleanup Manager), набрав в командной строке с правами администратора:
cleanmgr
- Укажите диск, на котором установлена Windows 7 (обычно это C:\)
- Нажмите кнопку «Clean up system files» (Очистить системные файлы)
- После этого запустится сканирование системы (Scanning: Windows Update Cleanup) и в списке появится ряд опций очистки системы, которые при первом запуске были недоступны.
- В появившемся окне отметьте опцию Windows Update Cleanup (Очистка обновлений Windows). Утилита покажет приблизительный размер места, высвобождающегося после удаления устаревших обновлений. В нашем примере, на системном освободится около 4 Гб.
Примечание. Опция очистки обновлений Windows доступена только в том случае, если мастер очистки диска обнаруживает обновления Windows 7, которые более не требуются и могут быть удалены.
- Нажмите Ок, после чего система приступит к удалению неиспользуемых файлов (обычно процесс занимает довольно продолжительное время).
- После окончания процедуры очистки, перезагрузите систему. При загрузке системы может появиться окно с предопределением «Cleaning up» — Не выключайте свой компьютер…


Примечание. Важно понимать, что после выполнения очистки диска с помощью данного мастера, будет невозможно отменить установку обновлений, которые заменили удаленные апдейты,
Как автоматизировать очистку папки WinSxS
В том случае, если необходимо провести удаление неиспользуемых обновлений Windows 7 сразу на множестве машин (не бегать же по всем и не выполнять все эти операции вручную!), прибегнем к простой автоматизации.
Для этого нам нужно внести определенные изменения в реестр и по расписанию запускать команду очистки.
В реестр нужно добавить параметр типа DWORD с именем StateFlags0011 (по сути две последние цифры могут быть любыми в диапазоне от 0 до 65535, главное запомнить их, т.к. в дальнейшем мы будет их использовать) и значением 2 в ветку реестра
HKEY_LOCAL_MACHINE\SOFTWARE\Microsoft\Windows\CurrentVersion\Explorer\Update Cleanup
Совет. Указанное изменение в реестр можно внести, например, с помощью групповых политик (логон скрипт, GPP и т.п.).
Осталось любым средством автоматизации (напрмиер, с помощью планировщика заданий schtasks, at, SCCM или logon скрипта) выполнить команду:
cleanmgr /sagerun:11
Указанная команда запустит автоматическое удаление устаревших обновлений Windows 7 и удалит неиспользуемые файлы из каталога WinSxS
Совет. Логично было бы запускать данное обновление 1 раз в месяц, например каждый первый понедельник месяца, т.е. перед очередным Patch Tuesday.
А как же Windows 8?
В Windows 8 и 8.1 мастер очистки устаревших обновлений (Windows Update Cleanup) является штатной фичей.
Windows 7 Service Pack 1 (SP1) is an important update that includes previously released security, performance, and stability updates for Windows 7. Installing SP1 helps keep Windows 7 up to date, but if you encounter a problem with hardware or a program after installing the service pack, you might want to temporarily uninstall it to troubleshoot the problem.
In this article, we will show you how to uninstall Windows 7 Service Pack 1 (SP1). The process is simple and you can do it by using the Programs and Features or using the Command Prompt.
Uninstall SP1 using Programs and Features
-
Click the Start button, next click Control Panel, click Programs, and then click Programs and Features.
-
Click View installed updates link present in the left hand side.
-
Click “Service Pack for Microsoft Windows (KB 976932),” and then click Uninstall.

-
It’ll ask for confirmation, click on “Yes” button.

Note: If you don’t see Service Pack for Microsoft Windows (KB 976932) in the list of installed updates, your computer likely came with SP1 already installed, and you can’t uninstall the service pack. If the service pack is listed but grayed out, you can’t uninstall the service pack.
Uninstalling SP1 using the Command Prompt
-
Click the Start button, and then, in the search box, type Command Prompt or
cmd. In the list of results, right-click Command Prompt, and then click Run as administrator. If you’re prompted for an administrator password or confirmation, type the password or provide confirmation. -
Type the following:
wusa.exe /uninstall /kb:976932
-
Press the Enter key.

Note: If you’ve used Disk Cleanup since installing SP1, the backup files needed to uninstall the service pack might have been deleted from your computer. To remove the service pack, you’ll need to reinstall Windows 7. If you installed SP1 yourself, you can uninstall it. However, if your computer came with SP1 already installed, it can’t be uninstalled. [source]
But, If you still is brave enough and want to delete the backup files read here.