
UPDATE: In newer Windows 10 versions, the option name has been changed from “Share with” to “Give access to” but the method given in this tutorial still works to remove the new option.
In previous tutorial, we told you how to remove “Restore Previous Versions” option from right-click context menu and “Previous Versions” tab from properties window:
[Windows Tip] Remove “Restore Previous Versions” Option from Context Menu
Today in this tutorial, we’ll cover another context menu option called “Share with“. In Windows 7, Windows 8/8.1 or Windows 10, when you right-click on a folder or a drive, you get “Share with” option in the context menu which contains various sub-options such as Nobody, Homegroup (Read), Homegroup (Read/Write), Specific people or Advanced Sharing depending upon the installed operating system.
If you right-click on a folder or drive and select Properties option, you also get the “Sharing” tab present in its properties window.
If you don’t use this feature and want to remove “Share with” option from context menu and “Sharing” tab from properties window, this tutorial will help you.
You can get rid of these things by using following simple steps:
1. Press “WIN+R” key combination to launch RUN dialog box then type regedit and press Enter. It’ll open Registry Editor.
To Remove “Share With” Option from Context Menu:
2. Go to following keys one by one:
HKEY_CLASSES_ROOT\*\shellex\ContextMenuHandlers\
HKEY_CLASSES_ROOT\Directory\Background\shellex\ContextMenuHandlers\
HKEY_CLASSES_ROOT\Directory\shellex\ContextMenuHandlers\
HKEY_CLASSES_ROOT\Drive\shellex\ContextMenuHandlers\
HKEY_CLASSES_ROOT\LibraryFolder\background\shellex\ContextMenuHandlers\
HKEY_CLASSES_ROOT\UserLibraryFolder\shellex\ContextMenuHandlers\
3. Under “ContextMenuHandlers” key, you’ll get “Sharing” key.

Delete this key and it’ll immediately remove “Share with” option from context menu of drives and folders.
To Remove “Sharing” Tab from Properties Window:
4. Go to following keys one by one:
HKEY_CLASSES_ROOT\Directory\shellex\PropertySheetHandlers\
HKEY_CLASSES_ROOT\Drive\shellex\PropertySheetHandlers\
5. Under “PropertySheetHandlers” key, you’ll get “Sharing” key.

Delete this key and it’ll immediately remove “Sharing” tab from properties window of drives and folders.
NOTE: If you are not familiar with Registry editing and want a ready-made Registry script to do the task automatically, download following ZIP file, extract it and run the extracted REG file. It’ll ask for confirmation, accept it:
The ZIP file also contains a restore registry script to restore the context menu option and properties window tab.
Also Check:
[Windows Tip] Remove “Customize This Folder” Option from Context Menu
[Windows Tip] Remove “Sharing”, “Security”, “Customize” and “Previous Versions” Tabs from Properties
You are here: Home » Windows 10 » [Windows Tip] Remove “Share With” or “Give Access to” Option from Context Menu
article

Do you need an easy way to add the Take Ownership entry to the right-click menu in Windows 7 or Windows 8? If you do, we have two options for you, both of them quick and reliable. They work with both Windows Explorer and File Explorer.
NOTE: If you access this option from the contextual menu, the owner of the selected file or folder will automatically change to your username.
Add a Take Ownership Entry to the Right Click Menu — Method 1
There are several ways to add the Take Ownership option to the right-click menu in Windows or File Explorer. The quickest is to use an application named Ownership. You can find it here: Downloads Datumza. There you will see several apps listed. Look for the one named Ownership and download it to your computer.
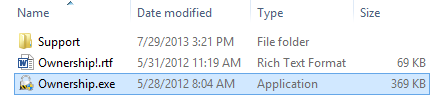
Extract the archive you just downloaded and run the Ownership.exe file. A UAC (User Account Control) prompt is displayed. Confirm that you want the application to run.
Then, click Install. That’s it!
Add a Take Ownership Entry to the Right Click Menu — Method 2
Another way is to edit the Windows Registry and add some custom entries at HKEY_CLASSES_ROOT*shelltakeownership.
Since this is a complex thing to do manually, we have created a registry file that you can download and run.
It is found in the archive attached at the end of this article. Download the archive and extract its contents. You will see a file named Add_Take_Ownership.reg. Run it!
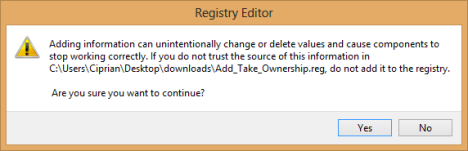
You will receive several prompts. First, a security warning is shown. Press Run.

Then, a User Account Control (UAC) prompt is shown. Click Yes.

Then, the Registry Editor asks you whether you want to run this file. Click Yes.
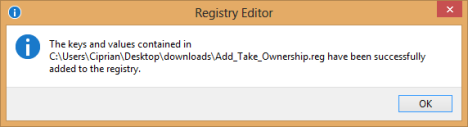
Finally, you are informed that the keys and values contained in this file were added to the Windows Registry. Click OK.
Talk about encountering too many prompts. 🙂
At the end of this exercise, right click on any folder, and you will see the Take Ownership entry.
Remove the Take Ownership Entry — Method 1
If you have used the Ownership application to add the Take Ownership to the right-click menu, you can remove this entry using the same program.
Run the Ownership.exe file, click Yes in the UAC prompt and then click Uninstall.
Without any further confirmation, the entry is removed.
Remove the Take Ownership Entry — Method 2
You can also use the archive attached at the end of this article. Download it and extract its contents. You will see a file named Remove_Take_Ownership.reg.
Run it and you will go through the exact same prompts that were displayed when adding this entry. Confirm that you want to run this file and let it do its thing. Now the Take Ownership entry is removed from the right-click menu in Windows/File Explorer.
Conclusion
The two solutions mentioned in this article will help you take ownership of files and folders with minimum effort. I hope you found them useful. For more useful tips and tricks, read the articles recommended below.
Download Link: ownership.zip
Subscribe:
RSS Feed
Google News
YouTube

This tutorial will show you how to add or remove the Share context menu from files for your account or all users in Windows 11.
When you right click on one or more selected files, click/tap on Show more options, and click/tap on Share, you will then be able to share the file(s) using nearby sharing or an app of your choice.
This remove Share from the old Shift+Right Click context menu, after you click/tap on Show more options.
This will also remove Share from the command bar (toolbar) at the top of the new Show more options context menu.
This will not remove Share from within the new Show more options context menu though.
Contents
- Option One: Add or Remove «Share» Context Menu for Current User
- Option Two: Add or Remove «Share» Context Menu for All Users
EXAMPLE: Share on toolbar of new context menu, and Share on Shift+Right Click context menu
Option One
Add or Remove «Share» Context Menu for Current User
1 Do step 2 (add) or step 3 (remove) below for what you would like to do.
2 Add «Share» Context Menu for Current User
This is the default setting.
A) Click/tap on the Download button below to download the file below, and go to step 4 below.
Add_Share_context_menu_for_current_user.reg
(Contents of REG file for reference)
Code:
Windows Registry Editor Version 5.00

[HKEY_CURRENT_USER\Software\Microsoft\Windows\CurrentVersion\Shell Extensions\Blocked]
"{e2bf9676-5f8f-435c-97eb-11607a5bedf7}"=-
3 Remove «Share» Context Menu for Current User
A) Click/tap on the Download button below to download the file below, and go to step 4 below.
Remove_Share_context_menu_for_current_user.reg
(Contents of REG file for reference)
Code:
Windows Registry Editor Version 5.00

[HKEY_CURRENT_USER\Software\Microsoft\Windows\CurrentVersion\Shell Extensions\Blocked]
"{e2bf9676-5f8f-435c-97eb-11607a5bedf7}"="Share"
4 Save the .reg file to your desktop.
5 Double click/tap on the downloaded .reg file to merge it.
6 When prompted, click/tap on Run, Yes (UAC), Yes, and OK to approve the merge.
7 Either restart explorer process, sign out and sign in, or restart the computer to apply.
8 You can now delete the downloaded .reg file if you like.
Option Two
Add or Remove «Share» Context Menu for All Users
You must be signed in as an administrator to use this option.
1 Do step 2 (add) or step 3 (remove) below for what you would like to do.
2. Add «Share» Context Menu for All Users
This is the default setting.
A) Click/tap on the Download button below to download the file below, and go to step 4 below.
Add_Share_context_menu_for_all_users.reg
(Contents of REG file for reference)
Code:
Windows Registry Editor Version 5.00

[HKEY_CLASSES_ROOT\AllFilesystemObjects\shellex\ContextMenuHandlers\ModernSharing]
@="{e2bf9676-5f8f-435c-97eb-11607a5bedf7}"

[HKEY_CURRENT_USER\Software\Microsoft\Windows\CurrentVersion\Shell Extensions\Blocked]
"{e2bf9676-5f8f-435c-97eb-11607a5bedf7}"=-

[HKEY_LOCAL_MACHINE\SOFTWARE\Microsoft\Windows\CurrentVersion\Shell Extensions\Blocked]
"{e2bf9676-5f8f-435c-97eb-11607a5bedf7}"=-
3. Remove «Share» Context Menu for All Users
This will override Option One.
A) Click/tap on the Download button below to download the file below, and go to step 4 below.
Remove_Share_context_menu_for_all_users.reg
(Contents of REG file for reference)
Code:
Windows Registry Editor Version 5.00

[HKEY_LOCAL_MACHINE\SOFTWARE\Microsoft\Windows\CurrentVersion\Shell Extensions\Blocked]
"{e2bf9676-5f8f-435c-97eb-11607a5bedf7}"="Share"
4 Save the .reg file to your desktop.
5 Double click/tap on the downloaded .reg file to merge it.
6 When prompted, click/tap on Run, Yes (UAC), Yes, and OK to approve the merge.
7 Either restart explorer process, sign out and sign in, or restart the computer to apply.
8 You can now delete the downloaded .reg file if you like.
That’s it,
Shawn Brink
Related Tutorials
- Turn On or Off Nearby Sharing in Windows 11
- Share Files with Nearby Devices in Windows 11
- Share File with App in Windows 11
- Share File with Email Contact in Windows 11
- Change Device Friendly Name for Nearby Sharing in Windows 11
- Add or Remove Sharing tab in Drive and Folder Properties in Windows 11
- Add or Remove «Give access to» context menu in Windows 11
-
Add_Share_context_menu_for_all_users.reg
Add_Share_context_menu_for_all_users.reg
1.2 KB
· Views: 729
-
Add_Share_context_menu_for_current_user.reg
Add_Share_context_menu_for_current_user.reg
720 bytes
· Views: 905
-
Remove_Share_context_menu_for_all_users.reg
Remove_Share_context_menu_for_all_users.reg
722 bytes
· Views: 1,574
-
Remove_Share_context_menu_for_current_user.reg
Remove_Share_context_menu_for_current_user.reg
728 bytes
· Views: 2,082
Отправляет email-рассылки с помощью сервиса Sendsay
-
Выпуски
-
Группы
-
Подборки
-
Все вместе -
Автомобили -
Бизнес и карьера -
Дом и семья -
Мир женщины -
Hi-Tech -
Компьютеры и интернет -
Культура, стиль жизни -
Новости и СМИ -
Общество -
Прогноз погоды -
Спорт -
Страны и регионы -
Туризм -
Экономика и финансы -
Email-маркетинг
Компьютеры и интернет → Софт → Операционные системы
Азы компьютера
3192
Вступить в группу
| Открытая группа |
|
7262 участника |
Администратор
АDмин
Администратор
Сергей В..
Важные темы:
- Для авторов и участников! ВНИМАНИЕ!
- Рассылки, за которыми следит группа:
- Мой компьютер
Модератор
Streetdog
Модератор
Horov
Модератор
Компьютер для чайников
Модератор
SergiSan
Модератор
Азы компьютера
Модератор
Biznesdim
Активные участники:
IMPULSE
Horov
Последние откомментированные темы:
-
Вставка видео в документ Word
(1)
Михаил…
,
04.07.2021
20250506094926
Реклама
- Темы
- Галерея
- Файлы
- Поиск по группе
← Предыдущая тема
Все темы
Следующая тема →
А.В
пишет:
Вступите в группу, и вы сможете просматривать изображения в полном размере
|
Это интересно +6 |
|||
А.В
09.06.2013
В избранное
Пожаловаться
Просмотров: 7944
Комментарии 4
← Предыдущая тема
Все темы
Следующая тема →
Комментарии временно отключены
Контекстное меню файлов и папок в Windows 10 пополнилось новыми пунктами, многими из которых некоторые никогда не пользуются: Изменить с помощью приложения Фотографии, Изменить с помощью Paint 3D, Передать на устройство, Проверка с использованием Windows Defender и некоторыми другими.
В случае, если эти пункты контекстного меню мешают вам работать, а возможно вы хотите удалить и какие-то другие пункты, например, добавленные сторонними программами, вы можете сделать это несколькими способами, о которых и пойдет речь в этой инструкции. См. также: Как удалить и добавить пункты в контекстном меню «Открыть с помощью», Редактирование контекстного меню Пуск Windows 10.
Сначала — об удалении некоторых «встроенных» пунктов меню вручную, появляющихся для файлов изображений и видео, других типов файлов и папок, а затем — о некоторых бесплатных утилитах, позволяющих сделать это автоматически (а также удалить дополнительные ненужные пункты контекстного меню).
Примечание: производимые операции теоретически могут что-то сломать. Прежде чем приступать рекомендую создать точку восстановления Windows 10.
Проверка с использованием Windows Defender
Пункт меню «Проверка с использованием Windows Defender» появляется для всех типов файлов и для папок в Windows 10 и позволяет проверить элемент на вирусы с помощью встроенного защитника Windows.

Если вы хотите удалить этот пункт из контекстного меню, сделать это можно с помощью редактора реестра.
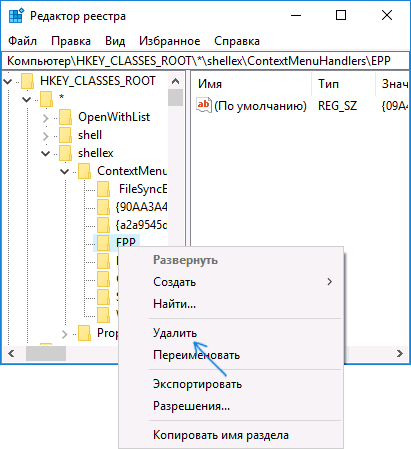
- Нажмите клавиши Win+R на клавиатуре, введите regedit и нажмите Enter.
- В редакторе реестра перейдите к разделу
HKEY_CLASSES_ROOT\*\shellex\ContextMenuHandlers\EPP
и удалите этот раздел.

- Повторите то же самое для раздела
HKEY_CLASSES_ROOT\Directory\shellex\ContextMenuHandlers\EPP
После этого закройте редактор реестра, выйдите и зайдите в систему (или перезапустите проводник) — ненужный пункт исчезнет из контекстного меню.
Изменить с помощью Paint 3D
Чтобы удалить пункт «Изменить с помощью Paint 3D» в контекстном меню файлов изображений, проделайте следующие шаги.
- В редакторе реестра перейдите к разделу
HKEY_LOCAL_MACHINE\SOFTWARE\Classes\SystemFileAssociations\.bmp\Shell
и удалите из него значение «3D Edit».
- Повторите то же самое для подразделов .gif, .jpg, .jpeg, .png в HKEY_LOCAL_MACHINE\ SOFTWARE\ Classes\ SystemFileAssociations\
После удаления, закройте редактор реестра и перезапустите проводник, либо выйдите из системы и снова войдите.
Изменить с помощью приложения «Фотографии»
Еще один пункт контекстного меню, появляющийся для файлов изображений — Изменить с помощью приложения фотографии.
Для его удаления в разделе реестра HKEY_CLASSES_ROOT\ AppX43hnxtbyyps62jhe9sqpdzxn1790zetc\ Shell\ ShellEdit создайте строковый параметр с именем ProgrammaticAccessOnly.

Передать на устройство (воспроизвести на устройстве)
Пункт «Передать на устройство» может быть полезен для передачи контента (видео, изображений, аудио) на бытовой телевизор, аудио-систему или другое устройство по Wi-Fi или LAN при условии поддержки устройством воспроизведения по DLNA (см. Как подключить телевизор к компьютеру или ноутбуку по Wi-Fi).
Если этот пункт вам не нужен, то:
- Запустите редактор реестра.
- Перейдите к разделу
HKEY_LOCAL_MACHINE\SOFTWARE\Microsoft\Windows\CurrentVersion\Shell Extensions
- Внутри этого раздела создайте подраздел с именем Blocked (если он отсутствует).
- Внутри раздела Blocked создайте новый строковый параметр с именем {7AD84985-87B4-4a16-BE58-8B72A5B390F7}


После выхода и повторного входа в Windows 10 или после перезагрузки компьютера пункт «Передать на устройство» пропадет из контекстного меню.
Программы для редактирования контекстного меню
Изменить пункты контекстного меню можно и с помощью сторонних бесплатных программ. Иногда это удобнее, чем вручную что-то исправлять в реестре.
Если вам требуется только убрать пункты контекстного меню, появившиеся в Windows 10, то могу рекомендовать утилиту Winaero Tweaker. В ней необходимые опции вы найдете в разделе Context Menu — Remove Default Entries (помечаем пункты, которые нужно убрать из контекстного меню). Еще одна программа, на русском языке — EasyContextMenu.

На всякий случай переведу пункты:
- 3D Print with 3D Builder — убрать 3D печать с помощью 3D Builder.
- Scan with Windows Defender — проверить с помощью Windows Defender.
- Cast to Device — передать на устройство.
- BitLocker context menu entries — пункты меню BiLocker.
- Edit with Paint 3D — изменить с помощью Paint 3D.
- Extract All — извлечь всё (для архивов ZIP).
- Burn disc image — Записать образ на диск.
- Share with — Поделиться.
- Restore Previous Versions — Восстановить предыдущие версии.
- Pin to Start — Закрепить на начальном экране.
- Pin to Taskbar — Закрепить на панели задач.
- Troubleshoot Compatibility — Исправить проблемы с совместимостью.
Подробнее о программе, где ее скачать и других полезных функциях в ней в отдельной статье: Настройка Windows 10 с помощью Winaero Tweaker.
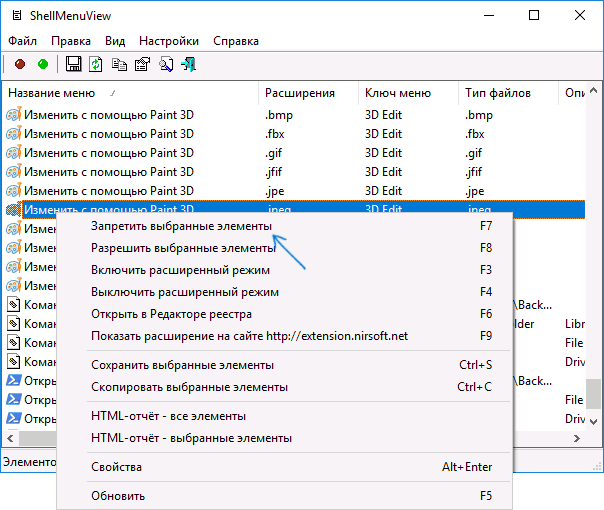
Еще одна программа, с помощью которой можно убрать и другие пункты контекстного меню — ShellMenuView. С помощью нее вы можете отключить как системные, так и сторонние ненужные пункты контекстного меню.
Для этого нажмите по данному пункту правой кнопкой мыши и выберите пункт «Запретить выбранные элементы» (при условии, что у вас русская версия программы, в противном случае пункт будет называться Disable Selected Items). Скачать ShellMenuView можно с официальной страницы https://www.nirsoft.net/utils/shell_menu_view.html (на этой же странице находится файл русского языка интерфейса, который необходимо распаковать в папку с программой, чтобы включить русский язык).