
Все способы:
- Вариант 1: Удаление Grub в MBR
- Вариант 2: Удаление Grub в UEFI
- Способ 1: Сторонние программы
- Способ 2: «Командная строка»
- Вопросы и ответы: 5
Вариант 1: Удаление Grub в MBR
К удалению линуксового загрузчика Grub обычно приходится прибегать после удаления раздела с операционной системой Linux, установленной рядом с Windows 10. Если на жестком диске используется таблица разделов MBR, для удаления загрузчика Grub можно воспользоваться «Командной строкой» в WinPE.
- Загрузите компьютер с установочной флешки Windows, а когда на экране появится окно мастера-установщика, нажмите комбинацию клавиш Shift + F10, чтобы вызвать «Командную строку».
- Выполните в открывшейся консоли одну за другой команды
bootrec /fixbootиbootec /fixmbr. - Закройте «Командную строку», выйдите из программы-установщика и загрузите компьютер в обычном режиме.

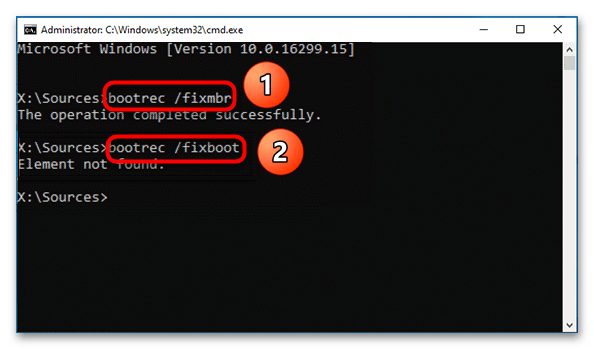
Чтобы проверить корректность удаления линуксового загрузчика, перезагрузите Windows 10.
Вариант 2: Удаление Grub в UEFI
Процедура удаление загрузчика Grub на компьютере с жестким диском GPT и на базе UEFI немного отличается и имеет свои особенности.
Способ 1: Сторонние программы
Проще всего избавиться от загрузочной записи второй операционной системы с помощью уже упомянутой бесплатной утилиты Bootice.
- Скачав и запустив утилиту, переключитесь на вкладку «UEFI» и нажмите кнопку «Edit Boot entries».
- В открывшемся окне выделите загрузчик Grub и нажмите кнопку «Del». Как правило, он имеет название второй операционной системы Linux и располагается в самом верху списка.
- Закройте окно утилиты и перезагрузите компьютер.
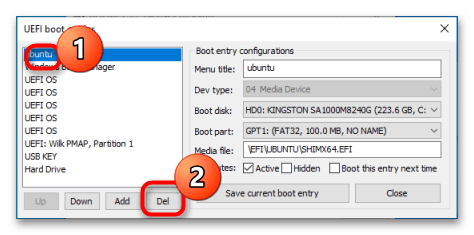
К сожалению, данный способ имеет один недостаток. Он удаляет лишь загрузочную запись, однако физически файлы загрузчика остаются на накопителе. Если их нужно удалить полностью, используйте следующий вариант.
Способ 2: «Командная строка»
Способ не слишком сложный, однако он требует внимания и последовательности. Используйте его, если хотите удалить загрузочные файлы UEFI физически.
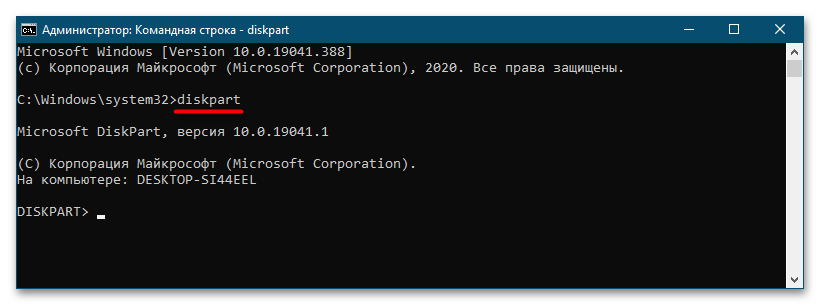
- Откройте «Командную строку» от имени администратора из поиска Windows или другим способом.
- Запустите встроенную утилиту управления дисками и разделами командой
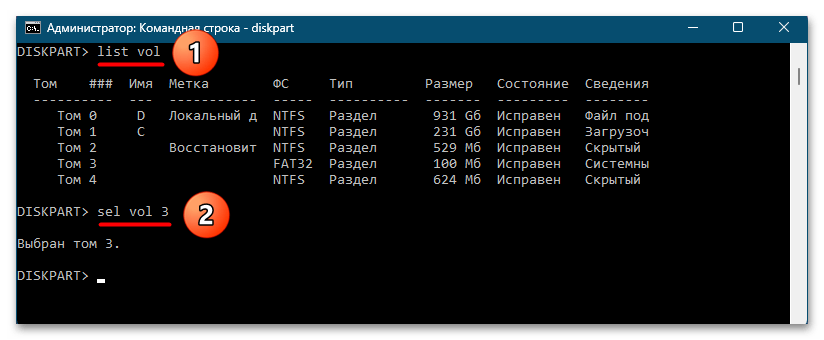
diskpart. - Командой
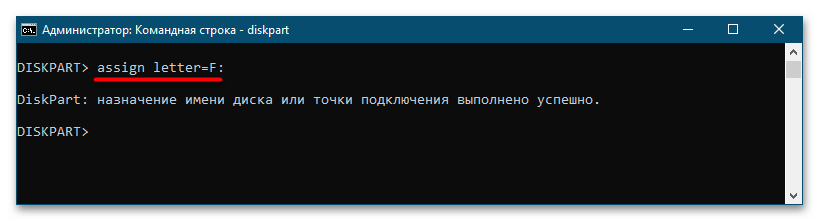
list volвыведите список разделов на дисках, после чего выберите раздел с файлами EFI, используя для этого командуsel vol №. Найти его нетрудно: он имеет файловую систему FAT32, тип «Системный» и небольшой размер в пределах 100 МБ. Исключение составляют жесткие диски расширенного формата 4K Native, на которых размер раздела EFI составляет 260 МБ. - Так как EFI-раздел не имеет буквы, чтобы работать с ним дальше, присвойте ему литеру командой
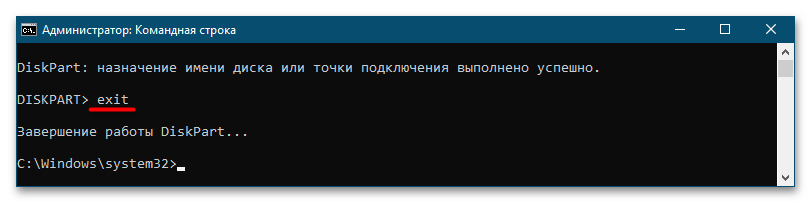
assign letter=F:. Буква может быть любой незанятой. - Выйдите из «Diskpart» командой
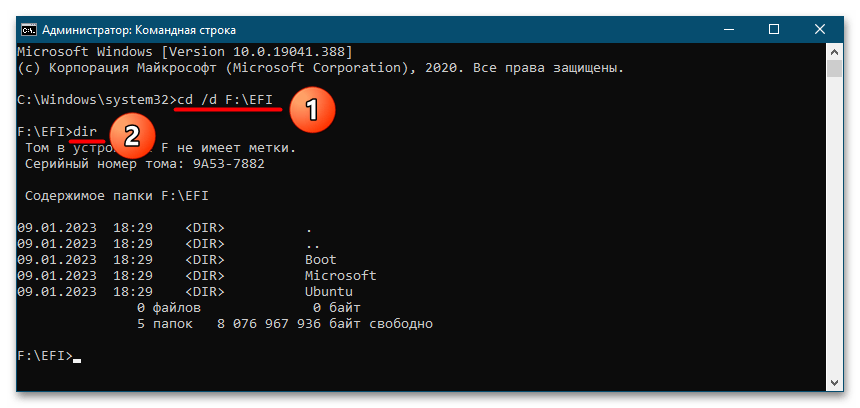
exit. - Перейдите в расположение каталога EFI на диске, для чего выполните команду
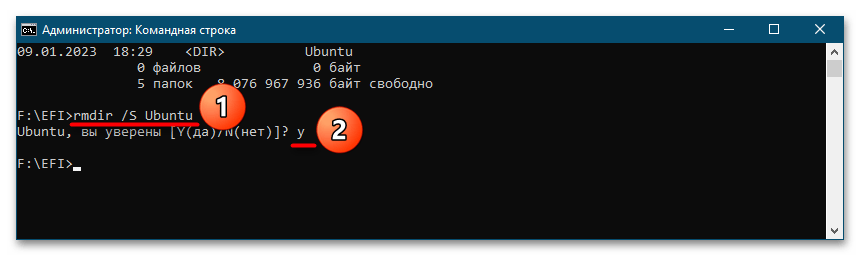
cd /d F:\EFI, а затем выведите ее содержимое командойdir. - Удалите каталог с названием операционной системы, использующей загрузчик Grub. В данном примере это папка Ubuntu. Удаление выполняется командой
rmdir /S Ubuntu. Чтобы подтвердить удаление, введите Y и нажмите клавишу ввода.

Готово. На этом удаление загрузчика Grub из Windows 10 можно считать завершенным.
Наша группа в TelegramПолезные советы и помощь
Before we start talking about removing grub from Windows, let us start by understanding what grub is. Grub stands for GRand Unified Boot-loader. It is a boot loader package that supports the installation of different operating systems on the same computer. We can also say that this is the first program your computer runs whenever it starts.
If you install a Linux distro, for instance, Ubuntu alongside Windows, the grub boot loader also gets installed, allowing you to choose the operating system would wish to boot.
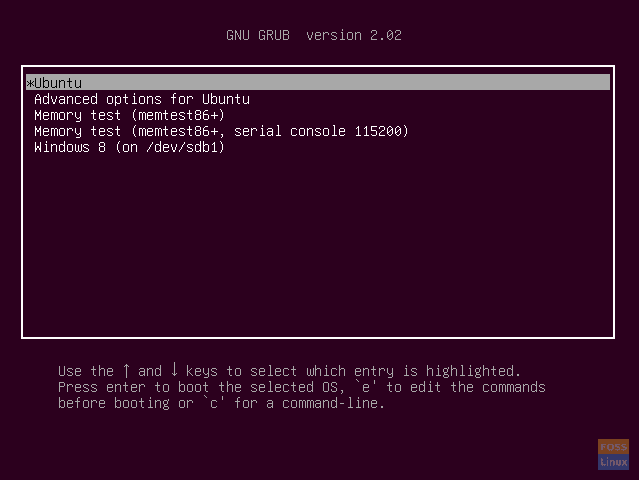
Grub Bootloader
If grub lacks the grub folder, you might get some of the errors as shown below:
Sample 1
error: no such partition.
Entering rescue mode…
grub rescue > _
Sample 2
error: unknown filesystem.
grub rescue > _
Causes of Grub rescue
Grub rescue means the grub files are corrupted, and you can no longer boot into your operating system. You simply need to “rescue” the grub boot-loader. Some of the causes of these errors occur due to deleting the Linux partition and forgetting to update the bootloader. Secondly, this might occur in the scenario where one is installing Windows after installing Linux. This is not the recommended method to dual-boot a PC. Windows initiates its own Master Boot Record. The grub is no longer available, and you will be unable to boot from Linux/Ubuntu.
With that said, to avoid getting the “grub rescue”, let’s look at how to remove grub from windows 10 after uninstalling the Linux operating system.
Removing grub from Windows 10
The first thing you want to do is open the “command prompt”. You can do this by clicking the start button and typing ‘command prompt’, it should come at the top, right-click and select ‘Run as administrator.
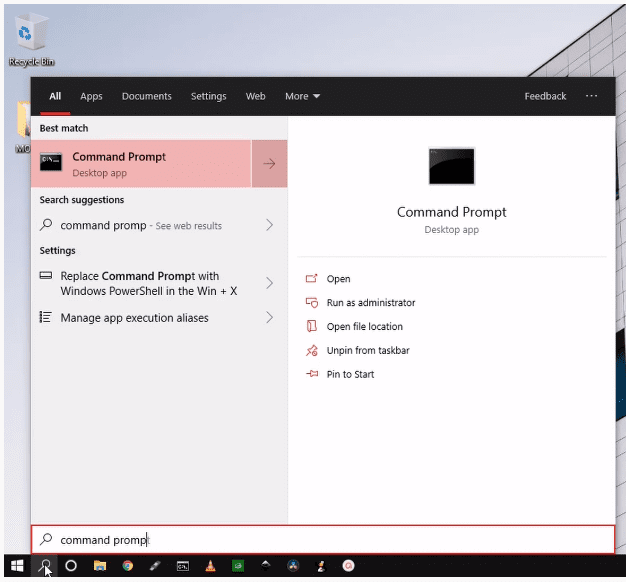
Command search
You can also achieve this by pressing Windows key + R simultaneously, which pens the run box. Type in “cmd”
Command Prompt Administrator
Now that the command prompt is open, we will use some commands to achieve what we desire. Let’s get to it.
In the first command, in the command prompt, type ‘diskpart’ and press Enter, as shown below. This command lets you manage disk partitions or volumes in windows. We intend to do just that.
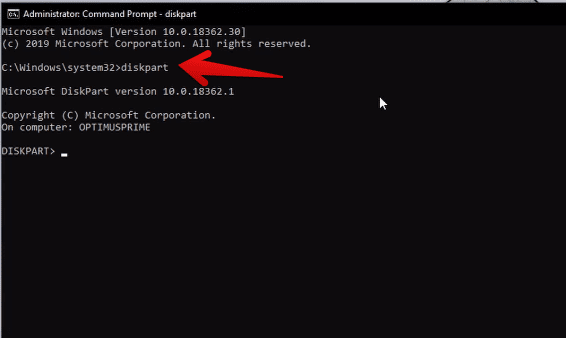
Diskpart
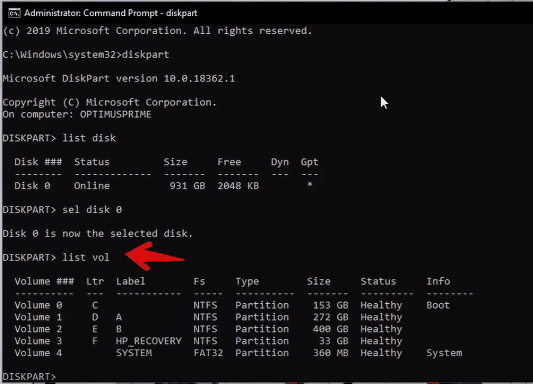
The second command is ‘list disk’. This command lists all the volumes installed on your computer. Type ‘list disk’ as shown below and press Enter after.
List disk partitions
The next command is ‘select disk’. This command lets you select the disk or partition you want to manage from the list of your disks. In our case, we have only one disk on the list, disk 0. This means we only have one disk installed on our computer: type ‘select disk 0’ and press Enter.
Select Disk
List Volume
The next command is ‘list vol’. These commands list all the volumes in the selected disk. Some people would think ‘list disk’ and ‘list vol’ are the same commands, but they are not. When you refer to ‘disk,’ it is the whole storage device and cannot shrink or expand. ‘Volumes’ are partitions of a disk. A disk, therefore, can have several volumes. Volumes can shrink and expand. So, type ‘list vol’ and press Enter.
From the list of volumes, you can see volume 4 has the label ‘System. You will also note that all the other partitions are in NTFS, but this is an EFI/system volume; hence it’s always in FAT32 format. This is the volume that has Grub boot loader, and this is why you have to select this volume in the next step. So, type ‘select vol 4’ and press Enter.
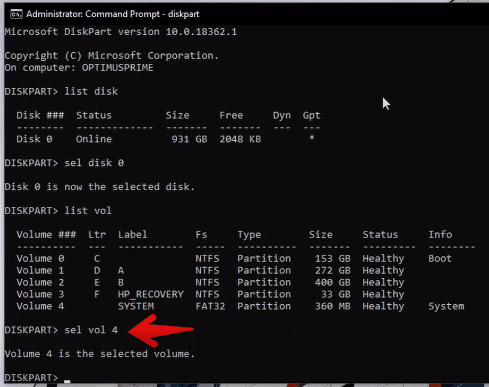
Select specific partition
Now that we have a volume selected, we want to assign a letter of the alphabet to manage it using an easier name easily. So, in the command prompt, type ‘assign letter=A:’ and press Enter.
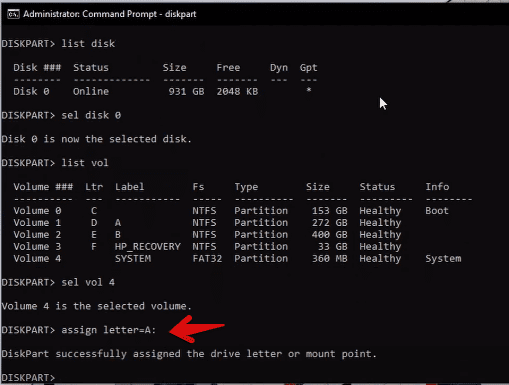
Assign letter
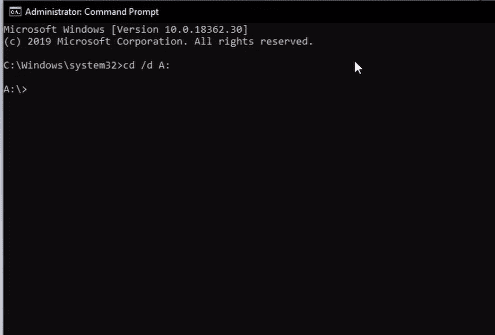
Exit the command prompt and open it again as administrator.
This time, we are using different commands. The first command is ‘cd /d A:’ or just “A:” to access the EFI drive. This is just selecting the path of the volume we assigned a letter to—press Enter.
Cd to assigned letter
The command is ‘dir’ which basically displays details about the volume we selected and assigned a letter. You should have results similar to mine below. Type ‘dir’ in the command prompt and press Enter.
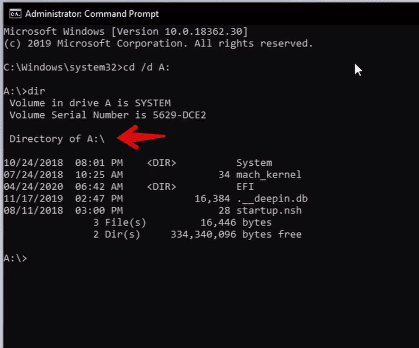
dir command and file system
If you have more partitions, you can then type in “cd EFI” to go inside the EFI directory and then “dir” to view the directory inside. You will get more than one directory, one been for Ubuntu, second for Microsoft Windows.
The second last command is ‘rmdir /s’. This command removes all directories and files in the selected volume, in our case ‘volume A’, in addition to the directory itself. Therefore in our command prompt, type ‘rmdir /s ubuntu and press Enter. If it is another operating system listed, make sure to type the label there instead of Ubuntu. Remember Ubuntu is the operating system I installed to duo boot with windows. So I am specifying to remove it from my volumes.
Remove Ubuntu
Lastly, you will be asked if you are sure. This is to confirm if you really want to remove everything from the volume specified, that is, volume A, and you have to say ‘yes’ by typing ‘Y’ and pressing Enter as shown below.
Conclusion
In this tutorial, we have discussed how to remove grub from Windows 10. Users assume that all is done, and their PC is back to normal after deleting the Linux partition, but that is not the case. They actually deleted the Linux partition but not the grub bootloader.
When it comes to removing Grub from Windows 11, there are a few key considerations to keep in mind. Grub, or GRand Unified Bootloader, is a common bootloader used in many Linux distributions. However, it can sometimes cause issues when dual-booting with Windows. So, how can you efficiently remove Grub from your Windows 11 system?
The process of removing Grub from Windows 11 involves accessing the command prompt through the Windows recovery environment. This can be done by booting from a Windows installation media or by using the Advanced Startup options. Once you’re in the command prompt, you’ll need to use the «diskpart» command to select and delete the partition where Grub is installed. It’s essential to follow the steps carefully to avoid any data loss or system instability. By removing Grub from Windows 11, you can ensure a smoother and more seamless experience with your operating system.
If you need to remove GRUB from Windows 11, here’s a professional guide. The first step is to boot into Windows 11 and open the Command Prompt as an administrator. Then, type in the command «bootrec /fixmbr» and hit Enter. This will repair the Master Boot Record and remove GRUB. Finally, restart your computer and GRUB should no longer appear. Remember to proceed with caution and make sure you have a backup of your important files before making any changes.

What is GRUB in Windows 11?
Grub stands for GRand Unified Bootloader, and it is a commonly used boot loader for Linux-based operating systems. However, in some cases, users may have both Linux and Windows 11 installed on their computers, leading to the installation of Grub along with the Windows Boot Manager. While this can be convenient for dual-booting purposes, there may come a time when you want to remove Grub from Windows 11 to revert back to the default Windows Boot Manager. In this article, we will explore the steps involved in removing Grub from Windows 11, ensuring a seamless transition back to the Windows-only environment.
Before Removing Grub From Windows 11
Before you proceed with removing Grub from Windows 11, it is essential to understand the potential implications and take necessary precautions. Here are a few key points to consider:
- Make sure you have a backup of all your important data. Although the steps mentioned here should not cause any data loss, it is always recommended to have a backup for added safety.
- Ensure that you have a Windows 11 installation disk or a bootable USB drive ready. It is crucial to have a recovery option in case anything goes wrong during the process.
- If you are not confident about carrying out these steps on your own, it is advisable to seek assistance from a professional or someone experienced in handling Windows operating systems.
Removing Grub From Windows 11
Now that you are aware of the precautions and ready to proceed, here are the steps to remove Grub from Windows 11:
Step 1: Access Windows 11 Recovery Environment
To begin the process, you need to access the Windows 11 Recovery Environment. Here’s how:
| In Windows 11, go to the Start menu and click on the «Settings» icon. |
| In the Settings menu, select «Update & Security.» |
| Click on the «Recovery» tab in the left sidebar. |
| Under the «Advanced startup» section, click on the «Restart now» button. |
| Windows 11 will restart and present you with the «Choose an option» screen. |
| Choose «Troubleshoot» from the options. |
| Select «Advanced options.» |
| Now, choose «Command Prompt» to access the recovery environment. |
Step 2: Execute Bootrec Commands
Once you have access to the Command Prompt in the recovery environment, follow these steps:
Type the following command and press Enter: bootrec /fixmbr
|
| Wait for the command to complete its execution. |
Next, enter the command bootrec /fixboot and press Enter. |
| Again, wait for the command to finish its execution. |
Finally, type exit and press Enter to exit the Command Prompt. |
Step 3: Restart Windows 11
After executing the bootrec commands, you can restart your computer to complete the process:
- Type
shutdown /r /t 0in the Command Prompt and press Enter to restart your computer immediately. - Your computer will reboot, and Windows 11 should now load using the default Windows Boot Manager.
Final Thoughts
Removing Grub from Windows 11 can be a straightforward process if you follow the steps outlined in this article. However, it is crucial to ensure that you have a backup of your data and a recovery option in case of any complications. Remember to seek assistance if you are not confident in carrying out the process on your own. By successfully removing Grub, you can restore your Windows 11 system to its original configuration with the default Windows Boot Manager.

Step-by-Step Guide to Remove Grub From Windows 11
Grub, which stands for GRand Unified Bootloader, is a commonly used bootloader in Linux systems that allows users to choose between multiple operating systems during startup. However, if you have installed Windows 11 alongside a Linux distribution and want to remove Grub, here is a step-by-step guide:
Method 1: Using Command Prompt
1. Boot into Windows 11 and open Command Prompt as an administrator.
2. Type the following command and press Enter: bcdedit /set {bootmgr} path \EFI\Microsoft\Boot\bootmgfw.efi.
3. Restart your computer and Grub should be removed.
Method 2: Using Disk Management
1. Open Disk Management by right-clicking on the Start button and selecting «Disk Management».
2. Locate the partition where Grub is installed (usually labeled as «EFI System Partition») and delete it.
3. Restart your computer and Windows 11 should boot directly without Grub.
Note: Removing Grub may cause the Linux distribution to become unbootable. Make sure you have a backup of your important data before proceeding.
Key Takeaways — Remove Grub From Windows 11
- Grub can be removed from Windows 11 by using the Command Prompt.
- First, open the Command Prompt as an administrator.
- Type the command «bootrec /fixmbr» to fix the Master Boot Record (MBR) and remove Grub.
- Press Enter to execute the command and wait for the process to complete.
- Restart your computer to see the changes and verify that Grub has been removed.
Frequently Asked Questions
Here are some common questions and answers about removing Grub from Windows 11:
1. How can I remove Grub from Windows 11?
To remove Grub from Windows 11, you will need to access the Command Prompt or PowerShell with administrative privileges. Follow these steps:
- Type «cmd» or «PowerShell» in the Windows Search bar and right-click on «Command Prompt» or «PowerShell» to select «Run as administrator.»
- In the Command Prompt or PowerShell window, execute the following command: «
bcdedit /deletevalue {bootmgr} path \EFI\ubuntu\grubx64.efi«. This command will remove the Grub bootloader entry from the system. - Restart your computer, and you will no longer see the Grub bootloader.
2. Will removing Grub affect my Windows 11 installation?
No, removing Grub will not affect your Windows 11 installation. Grub is a bootloader used primarily for Linux-based operating systems. If you are using Windows 11 as your primary operating system and no longer require the Grub bootloader, removing it will not impact your Windows 11 installation in any way.
However, it is always recommended to create a backup of your important files and perform the removal process carefully to avoid any unforeseen issues.
3. Can I uninstall Linux to remove Grub from Windows 11?
Yes, if you have a dual-boot setup with Linux alongside Windows 11, uninstalling Linux will remove Grub from the Windows 11 bootloader. However, this method will remove Linux completely from your system.
Keep in mind that uninstalling Linux will also delete any files or data stored in the Linux partition, so make sure to backup any important files before proceeding with the uninstallation process.
4. Are there any third-party tools to remove Grub from Windows 11?
Yes, there are third-party tools available that can help you remove Grub from Windows 11. One popular tool is «EasyBCD.» EasyBCD provides a graphical interface to manage the Windows bootloader and can be used to remove the Grub bootloader entry. However, it is important to note that using third-party tools carries some risks, so proceed with caution and ensure you have a backup of your important files before making any changes.
Additionally, always download such tools from trusted sources to minimize the risk of malware or other security issues.
5. Is it possible to remove Grub without reinstalling Windows 11?
Yes, it is possible to remove Grub from Windows 11 without reinstalling the operating system. Following the steps mentioned earlier, using the Command Prompt or PowerShell with administrative privileges, you can delete the Grub bootloader entry from the system’s boot manager without affecting your Windows 11 installation.
Reinstalling Windows 11 should only be considered as a last resort if none of the other methods work or if there are other underlying issues with your operating system.
In conclusion, removing Grub from Windows 11 can be done by following a few simple steps. The first step is to access the Command Prompt as an administrator. This can be done by right-clicking on the Start menu and selecting «Command Prompt (Admin)». Once in the Command Prompt, you need to use the appropriate command to fix the Master Boot Record (MBR) and remove Grub. The command to use is «bootrec /fixmbr». After executing this command, you can restart your computer, and Grub should no longer be present on your Windows 11 system.
It’s important to note that removing Grub should be done with caution, as it is the bootloader for many Linux distributions and may affect your ability to boot into Linux if you have a dual-boot setup. If you no longer need Grub and want to switch to a different bootloader or remove it entirely, following these steps can help you achieve that. However, always remember to back up your important data before making any changes to your system to avoid any potential loss of data.
How to remove GRUB from Windows laptop (MS Surface Pro 3) — the 4x BootRec commands did not work
From Windows 11
=====================
- Run a
cmd.exeprocess with administrator privileges
cmd.exe
- Run
diskpart
diskpart.exe
- Type: list disk then sel disk X where X is the drive your boot files reside on
    list disk
    select disk X
- Type list vol to see all partitions (volumes) on the disk (the EFI volume will be formatted in FAT, others will be NTFS)
list vol
- Select the EFI volume by typing: sel vol Y where Y is the SYSTEM volume (this is almost always the EFI partition)
select vol Y
- For convenience, assign a drive letter by typing: assign letter=Z: where Z is a free (unused) drive letter
assign letter=Z:
- Type exit to leave disk part
exit
- While still in the cmd prompt, type: Z: and hit enter, where Z was the drive letter you just created.
Z:
- Type dir to list directories on this mounted EFI partition
dir
- Type cd EFI and then dir to list the child directories inside EFI
cd EFI
- Type rmdir /S linux-entry to delete the linux boot directory
rmdir /S entry other than Boot and Microsoft
From Linux
=====================
- Run
efibootmgrto see current boot order and entries
- Change boot order to boot from from Windows
            $ # if windows bootnum is 000, and other entries are 003, 004 etc
            $ sudo efibootmgr -o 0,3, 4
- Delete Linux boot entries
            $ # if windows bootnum is 000, and other entries are 003, 004 etc
            $ sudo efibootmgr -b 3 -B
            $ sudo efibootmgr -b 4 -B
- Go to EFI directory most probably
/boot/efi
- Remove that foder having the name of your Linux distribution
- Reboot your system
If you want to remove GRUB and dual boot Windows 10, you can follow these steps:
1. Boot into Windows 10 and open the Control Panel.
2. Go to System and Security > Recovery.
3. Under Advanced startup, click on Restart now.
4. Windows will now reboot and take you to the Advanced Options menu.
5. Click on Troubleshoot > Advanced options > Command Prompt.
6. In the Command Prompt, type in the following command and hit Enter:
bootrec /fixmbr
7. Reboot your computer and GRUB should now be gone.
How do I get rid of grub boot?
How do I remove grub from Grub rescue?
There are a few ways to remove GRUB from GRUB rescue. One way is to use the «ls» command to list all the available partitions and drives. Then, use the «set» command to set the root partition to the partition that you want to boot from. Finally, use the «boot» command to boot the system. Another way is to use the «ls» command to list all the available partitions and drives. Then, use the «set» command to set the root partition to the partition that you want to boot from. Finally, use the «insmod» command to load the module for the filesystem that the root partition is on. Finally, use the «boot» command to boot the system.
How do I remove grub from EFI?
There are a few different ways to remove GRUB from your EFI partition, depending on your operating system and setup.
If you’re using Windows, you can use the Bootrec.exe tool to remove GRUB from your EFI partition.
Boot into Windows and open the Command Prompt.
Type in the following command and press Enter:
bootrec.exe /fixboot
This will remove GRUB from your EFI partition and allow you to boot into Windows.
If you’re using Linux, you can use the Grub Customizer tool to remove GRUB from your EFI partition.
Boot into Linux and install the Grub Customizer tool.
Open the Grub Customizer tool and select the «Remove GRUB» option.
This will remove GRUB from your EFI partition and allow you to boot into Linux.
How do I disable dual boot?
There are a few ways to disable dual boot, depending on your operating system and setup.
If you’re using Windows, you can disable dual boot by opening the System Properties window and selecting the Advanced tab. Under Startup and Recovery, click the Settings button. In the System Startup section, select the Windows installation you want to boot by default and uncheck the box next to any other operating systems. Click OK and restart your computer.
If you’re using Linux, you can disable dual boot by opening the Grub Customizer tool and selecting the Windows entry in the list. Click the minus (-) button to remove it, then click the Save button. Reboot your computer and the dual boot option should be gone.
If you want to completely remove one of the operating systems from your computer, you can do so by uninstalling it from within the operating system itself. For Windows, this can be done by opening the Control Panel and selecting the Programs and Features option. For Linux, you can use the apt-get command to remove the desired operating system.
How do I change Windows from Grub bootloader?
If you want to change your Windows bootloader from Grub, you can follow the steps below:
1. Boot into your Windows operating system.
2. Open the Command Prompt as an administrator.
3. Type in the following command and press Enter: bcdedit /set {bootmgr} path \EFI\Microsoft\Boot\bootmgfw.efi
4. Close the Command Prompt and restart your computer.
5. Your computer should now boot directly into Windows without going through the Grub bootloader.
How do I fix grub rescue dual boot?
There are a few steps you can take to fix a dual boot system with grub rescue.
1. Boot into your Linux system and open a terminal.
2. Type in the following command to install and update grub:
sudo apt-get install grub
3. Once grub is installed, type the following command to update your bootloader:
sudo update-grub
4. Reboot your system and you should now see your dual boot options again.
How do I remove grub rescue unknown filesystem?
If you are getting the «grub rescue unknown filesystem» error, it means that GRUB is unable to find your Linux filesystem. This can happen for a number of reasons, but the most common is that the boot order in your BIOS is set incorrectly.
To fix this, you will need to change the boot order in your BIOS so that your Linux filesystem is listed first. For more information on how to do this, consult your motherboard’s documentation.
Once you have changed the boot order, reboot your computer and the «grub rescue unknown filesystem» error should no longer appear.
How do I delete a GRUB partition?
There is no such thing as a GRUB partition. GRUB is a bootloader, and is typically installed to the MBR or a boot partition. To delete GRUB, you would need to reinstall your primary bootloader.
How do I change dual boot to single Boot?
There are a few different ways to change a dual boot system to a single boot system, depending on your specific needs and configuration. One way to change a dual boot system to a single boot system is to simply remove the second operating system from your computer. This can be done by uninstalling the second operating system, or by deleting the partition that contains the second operating system. Another way to change a dual boot system to a single boot system is to change the boot order in your BIOS so that the computer only boots into the operating system that you want to keep.
How do I remove EasyBCD boot menu?
To remove EasyBCD boot menu, you need to:
1. Open EasyBCD
2. Click on the «Bootloader Setup» tab
3. Click on the «Remove EasyBCD Bootloader» button
4. Click on the «Yes» button to confirm
5. Click on the «Finish» button to exit
How remove BIOS Boot options?
There are a few different ways to remove BIOS boot options, depending on the BIOS and the system. One way is to enter the BIOS setup and look for an option to delete or remove the boot option. Another way is to use a BIOS utility to delete the boot option. And finally, some systems may have a jumper or switch that can be used to clear the BIOS boot options.
How do I change Windows bootloader?
The Windows bootloader can be changed by editing the Boot Configuration Data (BCD) store. The BCD store contains boot configuration parameters and controls the boot sequence of the operating system. To change the Windows bootloader, you must first open the BCD store using the BCDEdit tool. Then, you must change the default boot entry to point to the new bootloader. Finally, you must save the changes to the BCD store and reboot the system.
How do I change the default grub entry?
The default GRUB entry is the entry that is selected when the GRUB countdown timer expires. To change the default GRUB entry, you must first edit the GRUB configuration file. This file is usually located at /etc/default/grub.
Once you have edited the GRUB configuration file, you must run the grub-update command to update the GRUB bootloader. This will update the GRUB menu entries and make the new default entry the first entry in the list.
What is the default Windows bootloader?
The default Windows bootloader is the Windows Boot Manager (BOOTMGR). BOOTMGR is a small piece of software that is used to load the Windows operating system. When you turn on your computer, the BOOTMGR software is responsible for loading the Windows operating system into memory and then handing control over to the Windows kernel.