Прочитано: 12 361
Если Вам надо администрировать рабочие станции пользователей в Вашей сети, к примеру, подключиться к пользователю, посмотреть что у него не, получается, посмотреть последовательность действий приводящих к ошибке да многое чего. Для этих целей существует много разного стороннего софта, номы воспользуемся тем, что предоставляет сама операционная система Windows. Это удалённый помощник. Далее я покажу, как на базе домена polygon.local настроить групповую политику и распространить её на компьютеры в домене.
Ранее в серии заметок на моем блоге www.ekzorchik.ru я описывал, как делегировать добавление в домен polygon.local рабочих станций пользователей. Продолжим серию настройки для этого контейнера (в данном случае IT). В вашем случае контейнер может отличаться.
Итак, у нас есть домен polygon.local на базе операционной системы Windows Server 2008 R2 Standard SP1.
Политика будет применять на компьютеры находящиеся в определённом контейнере.
Создадим групповую политику, на контейнер IT:
Запускаем «Start – Control Panel – Administrative Tools – Group Policy Management и после на контейнер IT создадим групповую политику.
И назовём её: – GPO_RemoteAssistant
Проверяем пока созданный шаблон групповой политики, которую будем настраивать.
На контейнер IT и на кого применять, т.е. в фильтры безопасности лучше добавить все аутентифицированные пользователи (Прошедшие проверку или Authenticated Users).
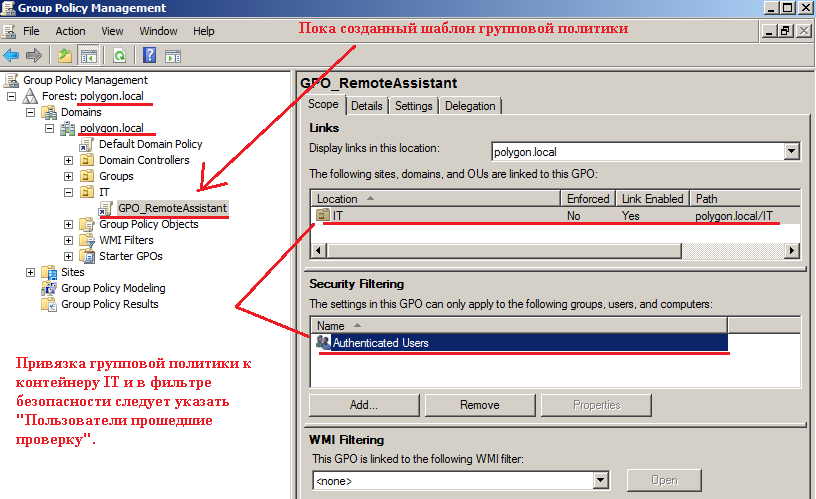
Теперь перейдем к редактированию созданной политики “GPO_RemoteAssistant”, следует
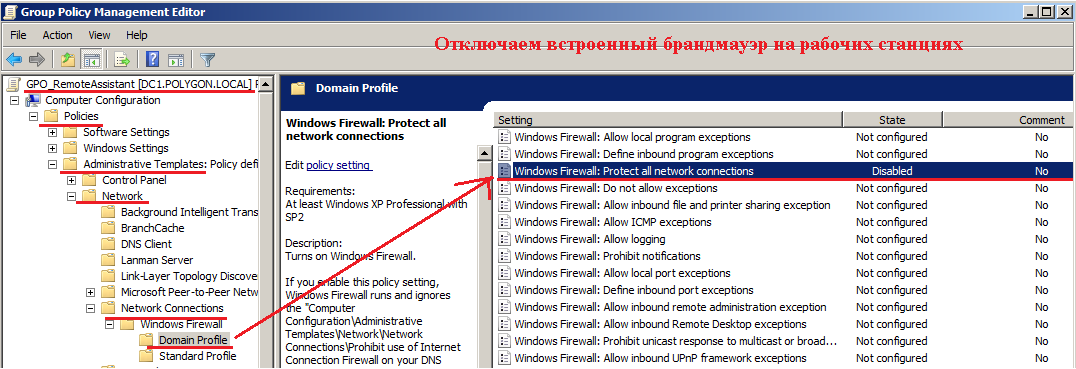
Отключаем политикой встроенный брандмауэр и включаем в свойствах компьютера подключение с использование удалённого помощника.
Computer Configuration (Конфигурация компьютера) – Policies ( Политики) – Administrative Templates (Административные шаблоны ) – Network (Сеть) – Network Connections (Сетевые подключения ) – Windows Firewall (Брандмауэр Windows ) – Domain Profile (Профили домена) :
Windows Firewall: Protect all network connections – Disabled
Брандмауэр Windows: Защита всех сетевых подключений – ОТКЛЮЧЕНО.
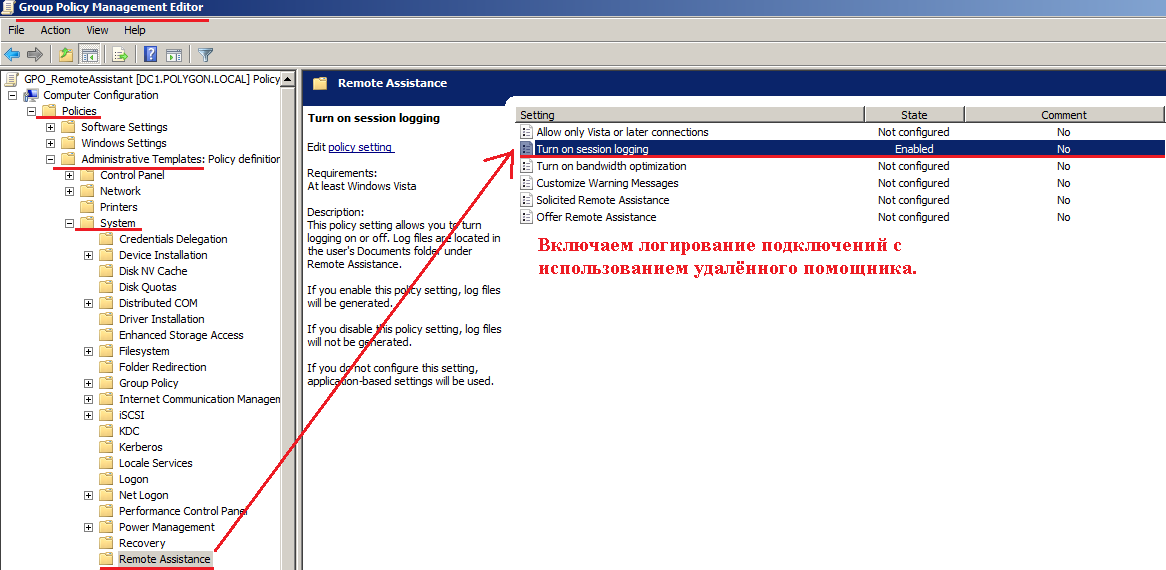
Включаем ведение журналов подключения с использованием удалённого помощника:
Computer Configuration (Конфигурация компьютера) – Policies (Политики) – Administrative Templates (Административные шаблоны) – System(Система) – Remote Assistance (Удалённый помощник ) :
Turn on session logging – Enabled
Включить ведение журналов сеансов – ВКЛЮЧЕНО.
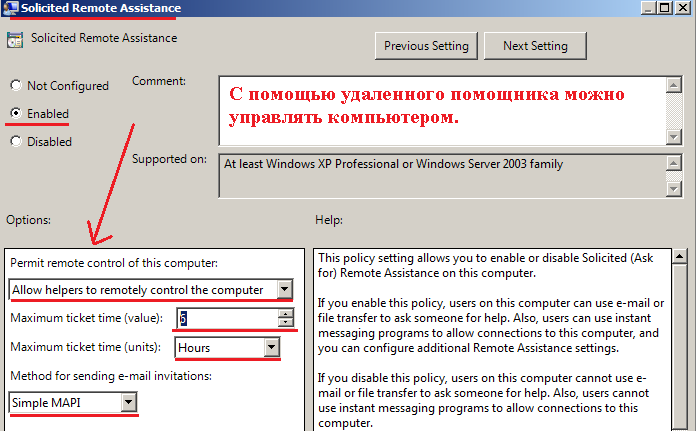
Удалённый помощник можно настроить в двух вариантах (разрешить взаимодействие с удалённой рабочей станцией и разрешить только просмотр выполняемых действий), но я покажу на примере первого варианта:
Computer Configuration (Конфигурация компьютера) – Policies (Политики) – Administrative Templates (Административные шаблоны) – System(Система) – Remote Assistance (Удалённый помощник )
Solicited Remote Assistance (Allow helpers to remotely control the computer, 6 Hours, Simple MAPI)
Запрос удалённой помощи – ВКЛЮЧЕНО. (Помощники могут управлять компьютером, 6 часов, Simple MAPI)
А теперь делегируем определённым сотрудникам использование функции удалённого помощника.
Создадим пользователя и группу которая будет заниматься обслуживание рабочих станций и добавим туда этого пользователя.
Создание пользователя через командную строку, но можно и через GUI интерфейс оснастки Active Directory Users and Computers.
Создаём учётную запись test в контейнере IT:
C:\Windows\system32>dsadd user "cn=test,ou=it,dc=polygon,dc=local"
dsadd succeeded:cn=test,ou=it,dc=polygon,dc=local
Назначаем пароль для созданной учётной записи:
C:\Windows\system32>dsmod user "cn=test,ou=it,dc=polygon,dc=local" -pwd Aa1234567
dsmod succeeded:cn=test,ou=it,dc=polygon,dc=local
По умолчанию, создаваемые через командную строку пользователи помечаются, как блокируемые, разблокируем:
C:\Windows\system32>dsmod user "cn=test,ou=it,dc=polygon,dc=local" -disabled no
dsmod succeeded:cn=test,ou=it,dc=polygon,dc=local
Создаём группу:
C:\Windows\system32>dsadd group "CN=Remote_Assistance,ou=it,dc=polygon,dc=local"
dsadd succeeded:CN=Remote_Assistance,ou=it,dc=polygon,dc=local
Добавляем в созданную группу, созданную учётную запись:
C:\Windows\system32>dsmod group "CN=Remote_Assisntant,ou=it,dc=polygon,dc=local" -addmbr "CN=test,ou=it,dc=polygon,dc=local"
dsmod succeeded:CN= Remote_Assistance,ou=it,dc=polygon,dc=local
Предоставим созданной группе Remote_Assistance право на подключение к рабочим станциям пользователям:
Действия ниже включают политику для рабочих станций под управлением Windows 7:
Computer Configuration (Конфигурация компьютера) – Policies (Политики) – Administrative Templates (Административные шаблоны) – System(Система) – Remote Assistance (Удалённый помощник )
Offer Remote Assistance – Enable
Предлагать удалённую помощь – ВКЛЮЧЕНО (указываем, кому предоставляем доступ на подключение к другим рабочим станциям)
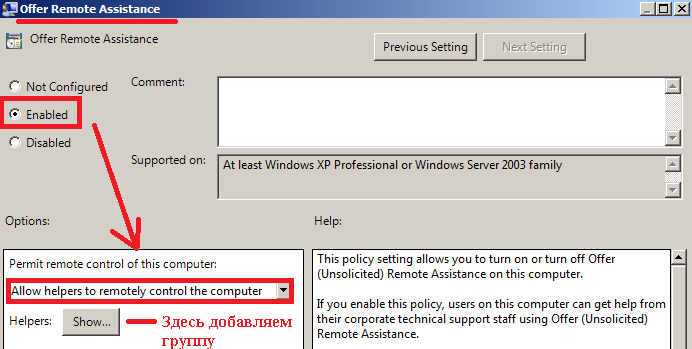
Открываем Show…, где прописываем домен (polygon.local)\Remote_Assistance
Действия ниже включают политику для рабочих станций под управлением Windows XP, нужно в эту же политику добавить внесение изменений в реестр, что я имею ввиду:
Создаём reg-файл следующего содержания и называем, его, к примеру, AllowToGetHelp.reg
Windows Registry Editor Version 5.00
[HKEY_LOCAL_MACHINE\SYSTEM\CurrentControlSet\Control\Terminal Server]
"fAllowToGetHelp"=dword:00000001
Данный файл следует поместить по адресу –
Computer Configuration – Policies – Windows Settings – Scripts (Startup / Shutdown) – Startup

Вы должны привести вот к такому виду –
Regedit
/s AllowToGetHelp.reg
На окне, свойств загрузки у Вас должно получиться вот так:
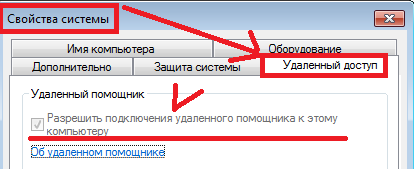
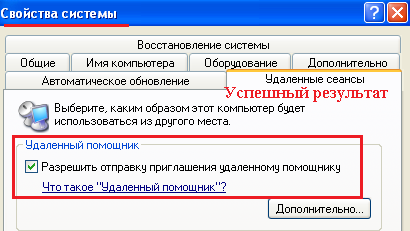
Нажимаем Apply, закрываем созданную политику. Политика настроена. Следует перезагрузить рабочие станции и удостовериться, что на рабочие станции применилась политика. В итоге должна быть установлена галочка, которая разрешает подключение к рабочей станции посредством функционала Windows, т.е. удалённого помощника. :::::Результат::::
На Windows 7:
Компьютер – Свойства – Дополнительные параметры системы – Удалённый доступ
На Windows XP:
Мой Компьютер – Свойства – Удалённые сеансы
Вот собственно и всё, в следующей заметке я рассмотрю, как пользоваться удалённым помощником. Следите за обновлениями на моём блоге.
Unlike other Microsoft operating systems where Remote Assistance feature is by default enabled in order to allow users to offer or request technical help from a technically skilled professional Windows server 2008 looks at Remote Assistance as a separate and individual entity. This means that if a Windows server 2008 user needs to use Remote Assistance he needs to install the feature in order to do so. This further means that this configuration enhances the security which of network operating system and as an administrator if you want to install Remote Assistance feature on a Windows server 2008 computer you need to follow the steps given below:
1. Logon to Windows server 2008 computer (domain controller member server or a standalone server) with any account that has administrative privileges.
2. Click on Start button and from the available menu click on Server Manager option.
3. On the opened window from the left pane click on Features option and from the right pane click on Add Features link.
4. On Select Features page click on Remote Assistance checkbox to select it.
5. Click on Next button.
6. On Confirm Installation Selections page click on Install button to start Remote Assistance feature installation process.
7. Restart the computer if prompted you don’t need to though.
Remote Assistance is a Windows feature by which a client operating system can send request for help to an administrator or friend. The Helper can even be allowed complete control of the user’s desktop, provided its allowed by the assisted person. There are also features in Active Directory (Windows Server 2008) that can be configured to set preferred remote assistance settings. In this post we will explain remote assistance methods in Windows Server 2008 Domain and Windows 7.
To configure Remote Assistance settings in Windows Server 2008 Domain, open Active Directory Users And Computers from Start, Administrative Tools ,Active Directory Users And Computers. Then, select a user and open user properties. And go to the Remote Control tab. From there, check the Enable Remote Control check box and set user permissions. For example, choose whether you would like to view the user’s session or interact by taking over remote control of the system.
Make sure that Remote Assistance is enabled on the client computer(s). To do that, open computer (My Computer) properties and select Advanced settings. Next, go to the Remote tab and enable remote assistance.
When a user has to send a request for Remote Assistance, he/she can simply type remote from the start menu to access Windows Remote Assistance or from Start, All Programs, Maintenance, Windows Remote Assistance.
If you are asking for help, then choose “Invite Someone who you trust…”, if you are providing assistance then select “Help someone who…”.
After that you can either Save an invitation file or open an email program to send assistance request. In this example we are going to save an invitation file.
You will get a password that will have to be sent, with the file via some medium (e.g. such as email) to the one asking for assistance.
The helper will open the received file and enter the valid password (provided by the host) and enter the password. This will begin the remote assistance session over a local network or the internet between the expert and the helper. The same procedure can also be used via Windows Live Messenger by accessing the Remote Assistance Feature in it.
В сети есть множество программ для удаленного управления компьютером. И все они так или иначе платные с различными ограничениями для бесплатной версии.
Однако, в операционной системе Windows есть встроенные функции, которые позволяют выполнять удаленное управление рабочим столом и называется данный инструмент « Удаленный помощник Windows 7 » и если им пользоваться так, как описано в руководстве, то, это крайне не удобный инструмент. Так как для каждого сеанса связи требуется создать файл приглашения и отправить его человеку, который будет подключаться.
И это еще нормально, если вы выполняете разовое подключение через Интернет, чтобы решить какой-то вопрос. А если Вам нужно постоянно подключаться к компьютеру, то каждый раз просить пользователя создавать и отправлять файл приглашения дело накладное. По этому, рассмотрим режим, который предназначен для управления клиентскими машинами в локальной сети без отправки приглашения.
Стандартный алгоритм работы программы следующий. Сначала нужно разрешить управлять (Мой компьютер \ ПКМ \ Свойства \ Дополнительные параметры системы \ Разрешить подключения к этому ПК \ Дополнительно \ Разрешить управление \ Задаем придельный срок, в течении которого приглашение будет оставаться открытым)
Теперь нужно создать файл приглашение, через который можно будет подключиться к рабочему столу через интернет (Пуск \ Все программы \ Обслуживание \ Удаленный помощник Windows \ Пригласить того, кому вы доверяете, для оказания помощи \ Сохранить приглашение как файл). Сохраняем файл на общедоступном ресурсе или отправляем его через интернет вместе с паролем!
Далее запускаем удаленный помощник на компьютере, с которого будем выполнять подключение (Пуск \ Все программы \ Обслуживание \ Удаленный помощник Windows 7, в Windows 10 и 8 из меню убрали доступ к помощнику, по этому нужно будет запускать через Выполнить (Win+R) \ msra \ Помочь тому, кто вас пригласил \ Использовать файл приглашения \ Вводим пароль \ Далее клиент должен разрешить просматривать свой рабочий стол \ Запросить управление, для возможности управлять мышкой и клавиатурой)
Как вы видите, данный процесс довольно долгий и не удобный. По этому, настроим работу удаленного помощника без необходимости отправлять файл приглашения. Но, этот способ будет работать только в локальной сети, в которой вы можете напрямую, через IP адрес, подключиться к компьютеру. Если вам нужно подключиться через интернет, то придется формировать файл приглашения!
Чтобы настроить удаленный доступ на всех компьютерах, я воспользуюсь групповой политикой домена. Как вы уже поняли, я демонстрирую работу удаленного помощника в виртуальной сети, которую мы создали в результате прохождения бесплатного видеокурса « Установка и настройка Windows Server 2008R2 ». Хотя, данный метод предназначен для работы в доменной сети, он так же подойдет и для работы в рабочей группе или одноранговой сети.
Перейдем в настройки групповой политики (Пуск \ Администрирование \ Управление групповой политикой \ Домены \ office.local \ Default Domain Policy \ Параметры \ ПКМ \ Изменить \ Конфигурация компьютера \ Политика \ Административные шаблоны \ Система \ Удаленный помощник).
Здесь необходимо настроить 2 параметра:
— Запрос помощи \ Включить \ Помощники могут управлять компьютером;
— Предлагать помощь \ Включить \ Помощники \ Показать \ Значение (вводим имя учетной записи пользователя, который будет иметь доступ на подключение к компьютеру с указанием домена): office\sysadmin.
Теперь нам необходимо применить политику к компьютерам, мы можем либо перезагрузить рабочие станции либо принудительно обновить политику через Выполнить \ cmd \ gpupdate.
Попробуем подключиться к рабочей станции, для этого нужно запустить «Удаленный помощник» в режиме предложения помощи. Чтобы это сделать к имени программы добавим ключ /offerra в результате чего получится msra.exe /offerra. Лучше всего создать ярлык с командой msra.exe /offerra !
Вводим IP адрес или доменное имя компьютера, к которому хотим подключиться, разрешаем доступ на подключение, а потом и на управление! Так же можно запустить чат «Разговор» чтобы переписываться с пользователем.
Как вы видите, при таком методе никаких манипуляций со стороны пользователя не требуется, кроме разрешения на подключение и управление, и совершенно бесплатно! Если вас интересует реализация данного метода в рабочей группе, то пишите в комментариях, если тема будет популярна, сделаю видео для рабочей группы.
Как вы понимаете, для того, чтобы подключиться к компьютеру нужно знать его IP адрес или DNS имя. Если пользователь слабоват, то будет сложно ему объяснить, где посмотреть IP адрес машины. На этот случай, я использую программу BGinfo которая пририсовывает к обоям рабочего стола различные параметры. Я уже делал обзор программы BGinfo и её настройку для доменной сети.
Я бы добавил сюда следующее, в видео по данной программе я делал черный фон, чтобы были видны характеристики на обоях любого цвета. Но, можно просто продублировать адрес в белом и черном цвете. Таким образом, пользователь в любом случае увидит требуемые настройки.
Install and Enable Remote Assistance in Windows Server 2008
- 1. Logon to Windows server 2008 computer (domain controller member server or a standalone server) with any account that has administrative privileges.
- 2. Click on Start button and from the available menu click on Server Manager option.
- 3. On the opened window from the left pane click on Features option and from the right pane click on Add Features link.
Enable Windows Server 2008 R2 Remote Desktop Services
- On the Windows ® Server 2008 R2 computer, click Start > Administrative Tools > Server Manager. …
- Click Roles, and then click Add Roles. …
- Select Remote Desktop Services, and then click Next. …
- Select the Remote Desktop Session Host and Remote Desktop Licensing check boxes.
Full
Answer
How do I enable remote desktop on my server?
On the right side of your Server Manager window, you will see a link to Configure Remote Desktop under Computer Information. Click on this link to view your Remote Desktop settings. Normally, all servers have Remote Desktop enabled for all users.
How to remotely connect to a Windows computer?
To make sure that your system can remotely connect, go to Computer (My Computer) Properties from the right-click context menu to enable incoming remote desktop connections. Click on Advanced System Settings and move over to the Remote tab.
How do I connect a Windows Server 2008 to another computer?
On the computer you wish to use as the management machine (running either Windows Server 2008 R2 or Windows & with RSAT), open Server Manager. Right-click on the Server Manager item and select “Connect to Another Computer”. In the Connect to Another Computer window, type the name or browse to the server you wish to connect to.
How do I enable remote desktop with Network Level Authentication?
Click on Advanced System Settings and move over to the Remote tab. From here select Allow Connections Running Remote Desktop With Network Level Authentication (for a more secure environment).
Right-click on «Computer» and select «Properties». Select «Remote Settings». Select the radio button for «Allow remote connections to this computer». The default for which users can connect to this computer (in addition to the Remote Access Server) is the computer owner or administrator.
How do I enable remote access to the server is not enabled?
Go to the Start menu and type “Allow Remote Desktop Connections.” Look for an option called “Change settings to allow remote connections to this computer.” Click on the “Show settings” link right next to it. Check the “Allow Remote Assistance Connections to this Computer.” Click Apply and OK.
How do I enable RDP on a remote server?
To enable RDP on a local computer, you need to open the “System” Control Panel item, go to the “Remote Settings” tab and enable the Allow remote connections to this computer option in the Remote Desktop section.
How do I know if my server is remote access enabled?
Navigate to HKEY_LOCAL_MACHINE\SYSTEM\CurrentControlSet\Control\Terminal Server and to HKEY_LOCAL_MACHINE\SOFTWARE\Policies\Microsoft\Windows NT\Terminal Services. If the value of the fDenyTSConnections key is 0, then RDP is enabled. If the value of the fDenyTSConnections key is 1, then RDP is disabled.
Why can’t I connect to my remote server?
The most common cause of a failing RDP connection concerns network connectivity issues, for instance, if a firewall is blocking access. You can use ping, a Telnet client, and PsPing from your local machine to check the connectivity to the remote computer. Keep in mind ping won’t work if ICMP is blocked on your network.
How can I access a server from outside the network?
How does it work?Open Remote Desktop Connection on your computer.Type in your organisation’s public IP address and click connect.Enter your organisation’s username and password.
How do I force remote access?
If you like using the Control Panel, you can enable RDP using the following steps.Open Control Panel > click on System and Security.On System and Security Screen, click on Allow Remote Access option.On the next screen, select Allow Remote connections to this computer option.More items…
How do I enable RDP on Windows?
How to allow RDP connections on Windows 10 using SettingsOpen Settings on a Windows 10 device and select “System”.Click “Remote Desktop”.Toggle the “Enable Remote Desktop” switch to “On”.Hit “Confirm”.
How do I check for remote access?
Click the Tools tab. In the Windows Tools section, click Remote Control. Click. against the name of a computer to view its remote-control history.
How do I set up an RDP?
0:563:13How to EASILY Set Up Remote Desktop on Windows 10 — YouTubeYouTubeStart of suggested clipEnd of suggested clipBut one thing you will need is the name of this PC. Because once you go to the other computer toMoreBut one thing you will need is the name of this PC. Because once you go to the other computer to connect to it it’s going to ask you for its name that is the name of the PC.
Is RDP enabled by default?
The Remote Desktop or RDP feature is disabled by default, so you will need to enable it in the settings.
Table of Contents
Click Start – All programs – Administrative Tools – Group Policy Management.
1- We can use Group Policy setting to (enable or disable) Remote Desktop
Click Start – All programs – Administrative Tools – Group Policy Management.
How to connect to a remote system?
You can simply enter the IP of the system that you wish to connect remotely to and hit Connect or configure advanced options for managing your connection. For instance, in the General tab, login credentials can be entered to automatically login to the system that you are connecting to (e.g. Domain admin credentials). To visit Advanced Options, click Options button to expand the interface.
How to remotely connect to a computer?
To make sure that your system can remotely connect, go to Computer (My Computer) Properties from the right-click context menu to enable incoming remote desktop connections. Click on Advanced System Settings and move over to the Remote tab. From here select Allow Connections Running Remote Desktop With Network Level Authentication …
What is Server Manager 2008 R2?
Server to server – Server Manager on a full installation of Windows Server 2008 R2 can be used to manage roles and features that are installed on another server that is running Windows Server 2008 R2.
Can you remotely manage a server 2008 R2?
Windows Server 2008 R2, unlike Windows Server 2008 RTM, has a nice feature that allows you to remotely manage it, from another server or from a Windows 7 workstation , by using Server Manager.
Can you use Server Manager in Windows Server 2008 RTM?
Note: Windows Server 2008 RTM also has remote management capabilities. You can easily manage these servers by using almost any MMC Snap-In. However, the fact that you can use Server Manager to do it is new in R2.
How to access remote desktop settings?
To access your Remote Desktop settings, click on the Server Manager icon in the lower-left corner of your desktop next to your Start button. On the right side of your Server Manager window, you will see a link to Configure Remote Desktop under Computer Information. Click on this link to view your Remote Desktop settings.
Who has access to remote desktop?
Remote Desktop Users. Administrators have access by default.
Can you restrict remote desktop access to a few users?
Normally, all servers have Remote Desktop enabled for all users. While this works well, you may want to restrict remote desktop access to a few select users. To do this, click on the third option then click on the Select Users… button.
Can you modify user access for remote desktop?
All user access for Remote Desktop can be modified from here in the future. Once you see that the user is added to the list, click OK. Note that as long as Remote Desktop is enabled the Administrator account will always have access. You can then click Apply to apply the settings to the server and OK to exit the configuration.
Question
The machine I am trying to remote desktop FROM is on the same network subnet as the 2008 server machine
Answers
Please check if the user account you use to log on Windows server 2008 is a member of remote desktop users as Tim suggested.
