
В этой статье мы рассмотрим способы установки шрифтов на компьютерах в домене Active Directory с помощью групповой политики и PowerShell скрипта. Данная инструкция протестирована на актуальных билдах Windows 10 20H2 и Windows Server 2016/2019.
Содержание:
- Установка шрифта через групповые политики
- Установка шрифтов с помощью логон скрипта PowerShell
Установка шрифта через групповые политики
Если вам нужно установить один-два новых шрифта, можно выполнить эту задачу с помощью возможностей Group Policy Preferences в GPO. Для установки шрифта нужно скопировать *.ttf файл на клиентский компьютер в каталог %WindowsDir%\Fonts\ и внести информацию о новом шрифте в ветку реестра HKEY_LOCAL_MACHINE\SOFTWARE\Microsoft\Windows NT\CurrentVersion\Fonts.
- Скопируйте ttf файл шрифта в общую папку на файловом сервере (если шрифтов немного, можно использовать для хранения шрифтов каталог SYSVOL на контроллере домена);

- Запустите редактор доменных GPO (
gpmc.msc
), создайте новую политику GPO_InstallFonts и назначьте ее на OU с компьютерами; - Перейдите в режим редактирования политики;
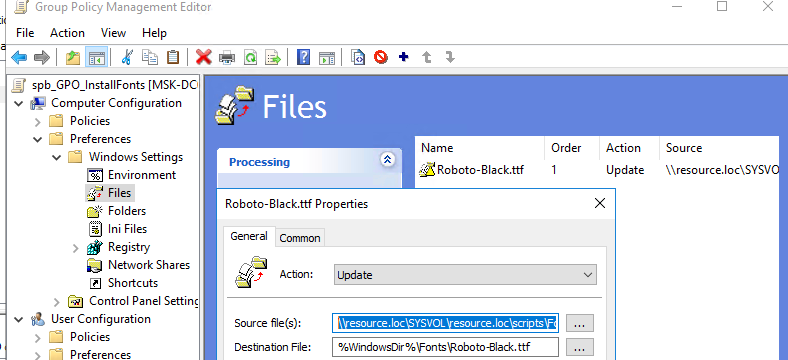
- С помощью Group Policy Preferences нужно создать правило для копирования файла шрифта из сетевой папки в каталог
%WindowsDir%\Fonts\
на клиентах. Ранее мы показывали, как скопировать файл на компьютеры через GPO. Создайте политику по аналогии. Перейдите в Computer Configuration -> Preferences -> Windows Settings -> Files. Создайте политику с параметрами:Source:
\\resource.loc\SYSVOL\resource.loc\scripts\Fonts\Roboto-Black.ttf
Destination:
%WindowsDir%\Fonts\Roboto-Black.ttf
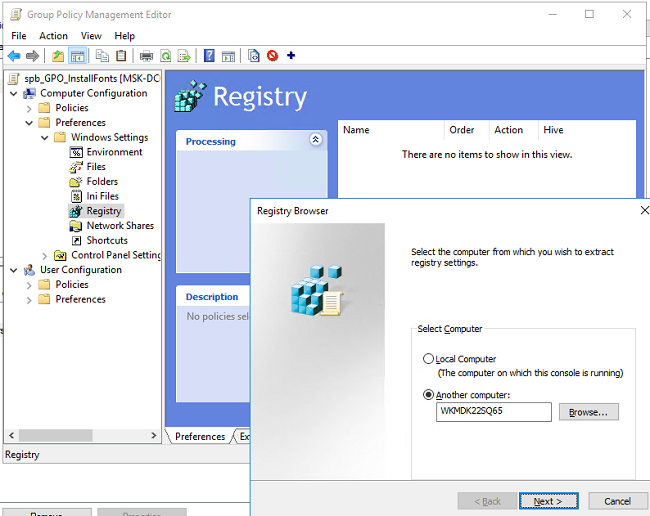
- Теперь нужно внести в реестр информацию о новом шрифте. Для внесения изменения в реестр через GPO можно также использовать GPP (Computer Configuration -> Preferences -> Windows Settings -> Registry);
- Вы можете вручную указать информацию о шрифте в реестре. Но гораздо проще вручную установить шрифт на любой компьютером и с помощью мастера импортировать настройки ключа реестра (Computer Configuration -> Preferences -> Windows Settings -> Registry -> New -> Registry Wizard);
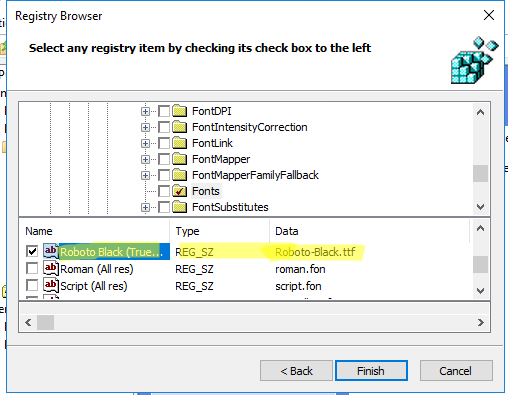
- С помощью Registry Browser перейдите в ветку HKLM\SOFTWARE\Microsoft\Windows NT\CurrentVersion\Fonts на удаленном компьютере. Найдите и выделите параметр реестра с именем шрифта, который вы хотите установить;
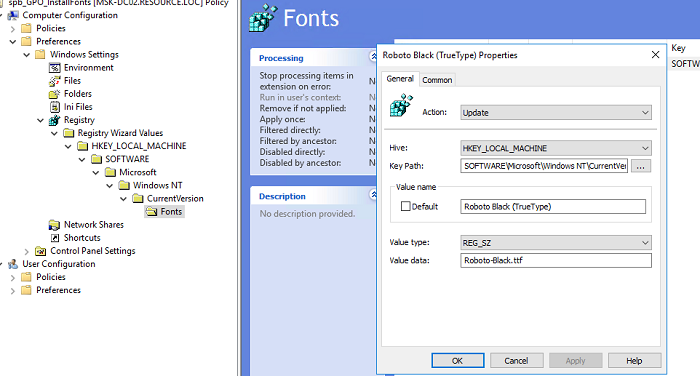
- В редакторе GPO должен появиться этот параметр реестра.

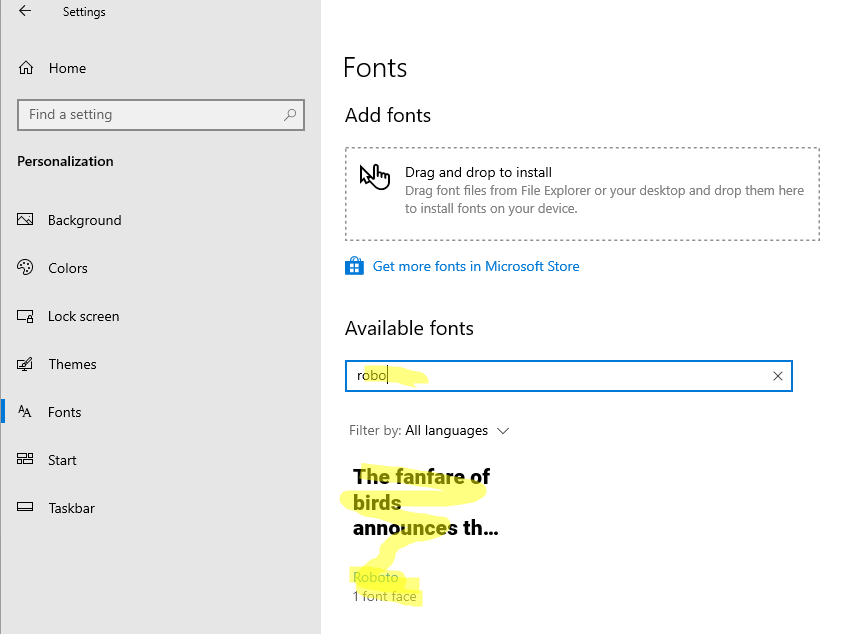
Теперь нужно обновить настройки групповых политик на клиенте и проверить, что новый шрифт установился. В Windows 10 список установленных шрифтов доступен в новой панели управления (Settings -> Personalization -> Fonts).
Установка шрифтов с помощью логон скрипта PowerShell
Рассмотренные выше способ установки шрифтов через GPO удобно использовать, если нужно установить несколько шрифтов. Если вы хотите установить сразу множество новых файлов шрифтов, лучше воспользоваться PowerShell скриптом, т.к. создание для каждого шрифта отдельных параметров политики может быть утомительным.
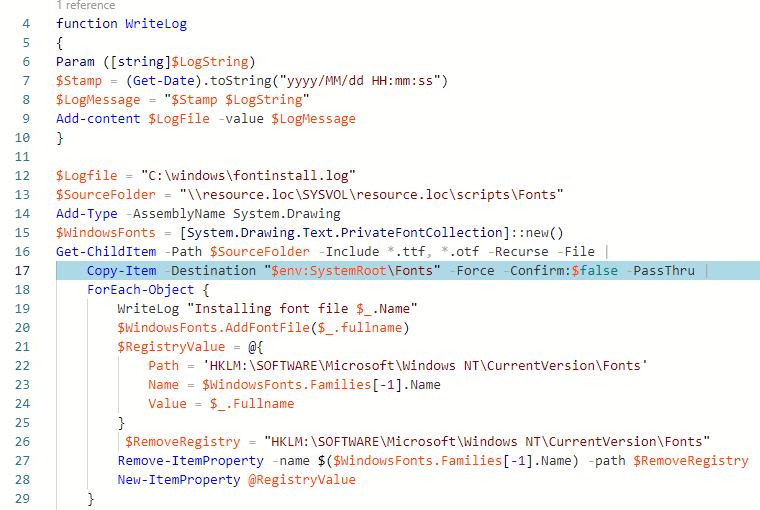
Следующий PowerShell скрипт установит все *.ttf и *.otf файлы шрифтов, которые хранятся в указанной сетевой папке. Дополнительно скрипт с помощью функции WriteLog записывает информацию о действиях в лог файл.
function WriteLog
{
Param ([string]$LogString)
$Stamp = (Get-Date).toString("yyyy/MM/dd HH:mm:ss")
$LogMessage = "$Stamp $LogString"
Add-content $LogFile -value $LogMessage
}
$Logfile = "C:\windows\fontinstall.log"
$SourceFolder = "\\resource.loc\SYSVOL\resource.loc\scripts\Fonts"
Add-Type -AssemblyName System.Drawing
$WindowsFonts = [System.Drawing.Text.PrivateFontCollection]::new()
 Get-ChildItem -Path $SourceFolder -Include *.ttf, *.otf -Recurse -File |
Copy-Item -Destination "$env:SystemRoot\Fonts" -Force -Confirm:$false -PassThru |
ForEach-Object {
WriteLog "Installing font file $_.Name"
$WindowsFonts.AddFontFile($_.fullname)
$RegistryValue = @{
Path = 'HKLM:\SOFTWARE\Microsoft\Windows NT\CurrentVersion\Fonts'
Name = $WindowsFonts.Families[-1].Name
Value = $_.Fullname
}
$RemoveRegistry = "HKLM:\SOFTWARE\Microsoft\Windows NT\CurrentVersion\Fonts"
Remove-ItemProperty -name $($WindowsFonts.Families[-1].Name) -path $RemoveRegistry
New-ItemProperty @RegistryValue
}
Сохраните данный PowerShell скрипт в PS1 файл и запускайте как логон скрипт через GPO.
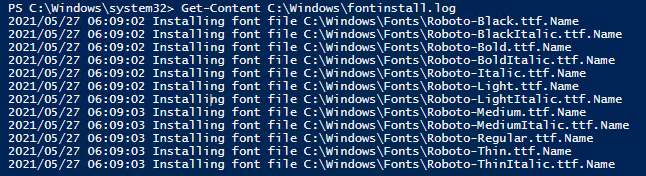
В результате все файлы шрифтов из указанной папки будут установлены в Windows, а в лог файл попадет информацию о времени установки шрифта.
Если вам нужно удалить все сторонние шрифты в Windows и восстановить исходные, воспользуйтесь этой инструкцией.
Бывает иногда обычная человеческая лень, когда вставать из-за компьютера не хочется, а помочь пользователю с ограниченными правами в системе надо. Можно, конечно, зайти по RDP и выкинуть пользователя, но это некрасиво, да и пользователь сможет выкинуть тебя простым ресетом  Можно попросить его запустить teamviewer, но это верх наглости: из-за собственной лени напрягать человека. И вот тут приходят на помощь различные мелкие утилитки. Так было и сегодня.
Возникла необходимость у одного сотрудника, который работает с правами обычного пользователя на windows 7 установить один шрифт в систему. Не идти же под конец дня к нему… Быстрый поиск в гугле вывел меня на страничку маленькой утилиты для установки шрифта из командной строки: http://code.kliu.org/misc/fontreg/
А дальше дело техники:
— копируем, например, в C:\temp софтинку и шрифт;
— запускаем с правами администратора домена psexec (из комплекта sysinternals) с параметрами -w C:\temp \\computer-name c:\temp\fontreg.exe /copy;
— проверяем наличие шрифта в C:\Windows\Fonts;
— радуемся, что не пришлось вставать
This guide will show you how to install fonts on remote machine using PsExec.
- Install PsExec tools from here (put psexec.exe into your System32 directory).
- Download FontReg from here.
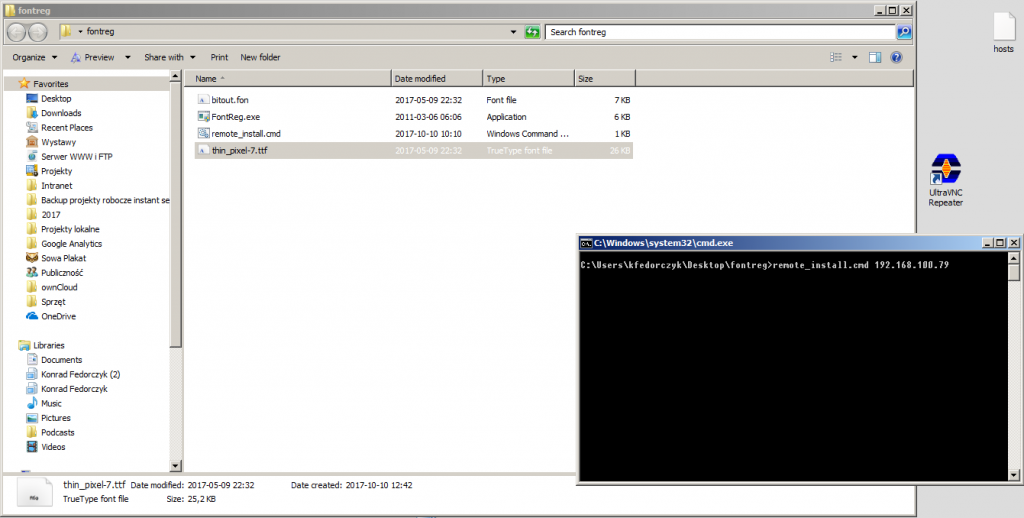
- Create a temporary directory wherever you want. Call it fontreg (Desktop is OK for this purpose).
- Put FontReg.exe into that directory (you have 32 and 64 bit versions to choose – I’ve used first one on 64 bit system without any problems).
- Put fonts that you want to install into that directory.
- Create a new text text file, call it remote_install.cmd.
- Copy this contents into newly created file:
:: This example shows you copying and registering the fonts on a remote machine
:: This will copy the fonts and fontreg.exe to remote machine %h% into a folder "c:\temp\fonts", then push to that folder, then execute fontreg.
:: Note, you cant execute fontreg from a different working directory else it wont see the fonts, you must change to that dir first.

:: usage remote_install REMOTE_COMPUTER

:: Param remote host to copy fonts
set h=%1

:: %~dp0* means current script path

xcopy /i /s /y "%~dp0*" "\\%h%\c$\temp\fonts\"
psexec -e \\%h% cmd /c (pushd c:\temp\fonts ^& fontreg.exe /copy)
- Run cmd and go to directory created just before this step.
- Now type and run:
remote_install.cmd REMOTE_COMPUTER_NAME
And voilà!
Troubleshooting:
Running psexec might be tricky. By default it uses privileges of currently logged local user. If you’re in a domain network mind your account abilities on remote machine. In case of trouble google your error or write comment below.
Update:
Fully working example can be found here (no virus inside but I would not trust exe downloaded from some random IT guy 😀 JOKE or not? JOKE 😛 ).

Каждый пользователь Windows рано или поздно сталкивается с необходимостью изменить системный шрифт — будь то для улучшения читаемости текста или создания уникального оформления рабочего стола. Замена шрифта позволяет настроить размер букв, их начертание и стиль отображения, что особенно актуально при работе с документами или веб-страницами.
В этой статье мы разберем конкретные технические способы установки новых шрифтов в Windows 10/11, включая добавление файлов через папку Fonts, использование драг-энд-дроп метода и применение сторонних менеджеров шрифтов. Особое внимание уделим проверке совместимости форматов TTF, OTF и WOFF с системой.
Многие пользователи не знают, что Windows позволяет настраивать не только стандартные параметры шрифтов, но и создавать собственные наборы для разных программ. Мы покажем, как правильно управлять коллекцией шрифтов, не перегружая систему, и настраивать их автоматическую активацию для определенных приложений.
Где найти и скачать новые шрифты для установки
Современный пользователь Windows может выбрать несколько надежных источников для загрузки новых шрифтов:
Google Fonts — бесплатная библиотека с более чем 1000 шрифтов. Каждый файл проверен на совместимость с операционными системами и браузерами. Достаточно нажать кнопку ‘Download family’ для сохранения архива на компьютер.
Adobe Fonts — профессиональная коллекция из 20 000+ шрифтов. Доступна по подписке Creative Cloud. Автоматическая активация через специальное приложение упрощает способ установки.
DaFont.com — популярный каталог с удобной сортировкой по категориям: рукописные, декоративные, технические. Перед скачиванием можно проверить лицензию и просмотреть все символы шрифта.
Font Squirrel — собрание качественных бесплатных шрифтов для коммерческого использования. Каждая статья о шрифте содержит примеры применения и технические характеристики.
При выборе источника обращайте внимание на:
- Формат файлов (.ttf, .otf)
- Лицензию использования
- Поддержку кириллицы
- Наличие полной знаковой системы
Рекомендуется загружать шрифты только с проверенных ресурсов во избежание вредоносного кода в файлах.
Как проверить совместимость шрифта с вашей операционной системой
Перед установкой нового шрифта необходимо убедиться в его совместимости с вашей системой. Для Windows поддерживаются форматы TTF, OTF и FON. Проверьте размер файла шрифта — он обычно не должен превышать 30 МБ.
Простой способ проверки совместимости:
1. Откройте файл шрифта двойным щелчком. Если система показывает предварительный просмотр с символами — шрифт совместим.
2. Проверьте кодировку шрифта через свойства файла. Для корректной работы в Windows требуется поддержка Unicode.
Автоматическая проверка через специальные утилиты:
— NexusFont позволяет проверить целостность файла шрифта
— FontExpert сканирует шрифт на наличие поврежденных символов
— MainType выявляет конфликты с уже установленными шрифтами
Признаки несовместимого шрифта:
— Отсутствие предпросмотра в системе
— Сообщения об ошибках при открытии файла
— Некорректное отображение символов
— Конфликты с другими шрифтами после установки
Пользователь может создать тестовый документ и проверить отображение шрифта во всех необходимых программах перед окончательной установкой в систему.
Установка шрифта через панель управления Windows
Этот способ установки поможет пользователям, которые предпочитают работать через стандартные инструменты Windows. В отличие от прямой установки двойным щелчком, данный метод позволяет увидеть предварительный просмотр шрифта и его размер до установки.
1. Откройте ‘Панель управления’ через меню ‘Пуск’ или поиск Windows
2. Выберите раздел ‘Шрифты’ (или найдите его через поиск в панели управления)
3. В верхней части окна нажмите ‘Установить шрифт’
4. Укажите папку с новыми шрифтами
5. Отметьте нужные файлы галочками
6. Нажмите ‘ОК’ для завершения установки
Особенность этого метода — возможность проверить наличие дубликатов. Если в системе уже есть шрифт с таким именем, Windows предупредит об этом. В статье с техническими характеристиками каждого файла можно увидеть формат, размер и количество начертаний.
При установке через панель управления система автоматически создает резервные копии файлов шрифтов. Это защищает от случайного повреждения или удаления оригиналов. Для удаления достаточно выделить ненужный шрифт и нажать клавишу Delete.
Способы удаления ненужных шрифтов без повреждения системы
Удаление неиспользуемых шрифтов помогает ускорить загрузку Windows и освободить место на диске. Для безопасного удаления существует несколько проверенных методов.
Встроенный способ Windows
- Откройте ‘Параметры’ → ‘Персонализация’ → ‘Шрифты’
- Выберите шрифт для удаления
- Нажмите ‘Удалить’
Через папку Fonts
- Нажмите Win + R
- Введите C:\Windows\Fonts
- Удерживая Ctrl, выделите ненужные шрифты
- Нажмите Delete
Перед удалением создайте резервную копию шрифтов:
- Скопируйте содержимое папки Fonts на внешний носитель
- Сохраните список установленных шрифтов через командную строку: dir C:\Windows\Fonts > fonts_backup.txt
Безопасные для удаления шрифты
- Декоративные шрифты (Comic Sans MS, Webdings)
- Дублирующиеся версии шрифтов
- Шрифты неиспользуемых языков
Системные шрифты Windows защищены от случайного удаления. При попытке их удаления пользователь получит сообщение об ошибке доступа.
Для восстановления случайно удаленного шрифта используйте команду в PowerShell:
Add-Font -Path 'путь_к_файлу_шрифта'
Настройка шрифта по умолчанию в популярных программах
Microsoft Office предоставляет быстрый доступ к настройкам шрифта через меню ‘Файл’ > ‘Параметры’ > ‘Дополнительно’. В разделе ‘При создании документов’ пользователь может указать стандартный шрифт для новых файлов Word, Excel и PowerPoint.
В браузере Google Chrome изменение шрифта выполняется через ‘Настройки’ > ‘Оформление’ > ‘Настройка шрифтов’. Здесь можно задать размер и стиль текста для всех веб-страниц. Mozilla Firefox предлагает аналогичные настройки в разделе ‘Настройки’ > ‘Основные’ > ‘Язык и внешний вид’.
Для Notepad++ смена шрифта осуществляется через ‘Настройки’ > ‘Стиль’ > ‘Общие’. Windows 10 позволяет менять системный шрифт через редактор реестра: HKEY_LOCAL_MACHINE\SOFTWARE\Microsoft\Windows NT\CurrentVersion\Fonts.
Adobe Photoshop хранит настройки шрифта по умолчанию в меню ‘Редактирование’ > ‘Установки’ > ‘Текст’. После изменения параметров новые текстовые слои будут создаваться с выбранными характеристиками.
В статье рассмотрены основные программы, но принцип настройки схож и в других приложениях – поиск соответствующего раздела в настройках и выбор параметров шрифта.
Решение типичных проблем при установке новых шрифтов
При попытке установить новый шрифт в Windows часто возникает ошибка ‘Файл шрифта поврежден’. В большинстве случаев способ исправления — очистка кэша шрифтов. Откройте командную строку от администратора и выполните команду ‘net stop spooler’, затем удалите содержимое папки C:\Windows\Temp.
Если установленный шрифт не отображается в программах, проверьте его размер — файлы более 30 МБ могут некорректно обрабатываться системой. Разделите большой файл шрифта на несколько меньших с помощью специальных утилит типа FontForge.
При конфликте версий одного шрифта удалите все дубликаты через ‘Параметры → Персонализация → Шрифты’. Оставьте только актуальную версию, перезагрузите компьютер для применения изменений.
Некоторые шрифты могут отказываться устанавливаться из-за блокировки системой безопасности. В этом случае щелкните правой кнопкой по файлу шрифта, выберите ‘Свойства’ и снимите галочку ‘Блокировать’.
В случае появления артефактов при отображении текста, измените настройки сглаживания шрифтов в Windows через ‘Параметры → Система → Экран → Дополнительные параметры масштабирования’. Выберите ‘ClearType’ и следуйте инструкциям настройки.
Комментарии
In this article, we’ll explore multiple methods to deploy fonts on Windows 10 and Windows 11 devices via Intune. The fonts can be installed on Windows devices via Intune using methods such as PowerShell scripts, a Win32 app, and the Master Packager tool.
Last week, our customer wanted to deploy multiple licensed fonts to all their Windows devices with Intune. Because there is no default option for installing fonts via Intune on Windows devices, we needed to suggest a simple method for fonts deployment.
On Windows devices, there is a dedicated folder for fonts. Both Windows computers and Mac devices come with a set of preinstalled fonts. On Windows, when you install a custom font, it is installed in the C:\Windows\fonts directory. In addition, the font information is added to the following registry path: HKEY_LOCAL_MACHINE\SOFTWARE\Microsoft\WindowsNT\CurrentVersion\Fonts.

On Windows devices, if you right-click a custom font and select Install, the font gets installed in no time. This is called manual installation of fonts. Users cannot perform manual font installation in organizations because it is restricted. However, if your Windows devices are managed by Intune, you can automate the font installation using different techniques.
Ways to install fonts on Windows devices using Intune
The font deployment process in Intune can be accomplished using the following methods.
- PowerShell Script: You can use PowerShell scripts to install and uninstall fonts on Windows devices through Intune. The same PowerShell scripts help you to deploy fonts with Configuration Manager.
- Intune Win32 App: With this method, you package the fonts into a Win32 app and then deploy it with Intune along with PowerShell scripts. Many people prefer the Win32 app font deployment method because it offers detection rules, more thorough troubleshooting options, and delivery optimization. Learn more about using Win32 apps in Intune.
- Master Packager Tool: This tool can create and edit Microsoft Windows Installer (MSI) files for free. You can package and build the fonts into an MSI file and deploy it as a LOB MSI package using Intune.
Each of the above methods has a common thing: they install the fonts in the C:\Windows\Fonts directory and update the information in the following registry path: HKEY_LOCAL_MACHINE\SOFTWARE\Microsoft\WindowsNT\CurrentVersion\Fonts.
In this guide, we will go over all the methods mentioned above and walk you through the font deployment process with Microsoft Intune.
Prepare the Font Files for Deployment
Before you think of deploying fonts using Intune, you should have the font files ready with you. Most organizations are licensed to use specific fonts, and these fonts are the ones that you are required to deploy. In this example, we have a set of Windows fonts that we have chosen for deployment.
Windows font types primarily consist of .TTF and .OTF files. The custom fonts that you wish to deploy to your Windows devices should have one of these file extensions. In the screenshot below, we have selected two custom fonts for deployment. There is no limit to the number of fonts that you can distribute through Intune. In your case, it could be some other licensed fonts that need to be deployed or even Google fonts.

Method 1: Use a PowerShell Script to deploy fonts using Intune
Microsoft GitHub has numerous PowerShell scripts that can assist you in using Intune to deploy fonts for Windows devices. Before you use these scripts, you’ll need to edit the script and specify the source path of the font files. The source path is nothing but the location of the fonts that you wish to deploy.
You can use PowerShell scripts to install or uninstall specific fonts on Windows devices. The majority of these scripts should work, but you should test them to ensure they meet your needs.
For example, the below PowerShell script lets you deploy fonts using Intune. The PowerShell script reads both .TTF and .OTF files from the Fonts source directory, installs each of them in the C:\Windows\Fonts directory, and updates the registry for new fonts. As for deploying this script, you can refer to the guide on deploying PowerShell scripts using Intune.
You can download the PowerShell script to install fonts from GitHub.

Method 2: Create Win32 App for Fonts Deployment
A better way to deploy fonts is to create a Win32 app package that includes the required fonts and then deploy it to Windows devices. The .Intunewin file will contain the fonts that you intend to deploy along with the necessary PowerShell scripts.
Before you can add a Win32 app to Microsoft Intune, you must prepare the app by using the Microsoft Win32 Content Prep Tool. The tool converts application installation files into the .intunewin format.
In the following example, we will package the following files into a .intunewin file.
- Fonts: This folder contains the fonts that you want to deploy.
- FontsInstall.ps1: This script installs the fonts on Windows devices.
- FontsUninstall.ps1: This script removes the installed fonts from Windows devices.
- DetectionCheck.ps1: This script detects if the fonts are already present on the clients.
Note: The below PowerShell scripts were written for the customer who wanted us to install fonts using Intune. As mentioned earlier, if you require those PowerShell scripts, you can get similar ones from GitHub or other trusted sources. Most of the PS scripts that you download from GitHub should help you with font installation. Thoroughly test those scripts before deploying them in your organization. If you find it difficult to get those scripts, please let us know in the comments section, and we’ll assist you.

Now that you have gathered the necessary fonts and PowerShell scripts, let us look at how to deploy custom fonts to Intune-managed devices.
Step 1: Create .IntuneWin File
In this step, we will use the Microsoft Win32 content prep tool to package font files into the .intunewin file. This resulting font package will be a .intunewin file that will be distributed using Intune.
On your Windows PC, launch the command prompt as administrator and change the path to the folder that contains the Win32 content prep tool. Run the command IntuneWinAppUtil.exe.
When you enter the above command, you need to input the details.
- Please specify the source folder: Specify the folder that contains font files.
- Please specify the setup file: Specify the PS script file for font installation.
- Specify the output folder: The Win32 Content Prep tool will place the final .intunewin file in this folder. In this example, the output folder is C:\Temp.
- Do you want to specify catalog folder: Type N.

Wait for a few minutes while the Win32 Content Prep Tool runs and prepares the installfonts.intunewin app for you.

Step 2: Add the Fonts Package to Intune as Win32 App
In this step, we will upload the fonts .intunewin file (Win32 App) to Intune. Use the following steps to upload the Win32 app to Intune:
- Sign in to the Microsoft Intune admin center.
- Select Apps > Windows > Add.
- On the Select app type pane, under the Other app types, select Windows app (Win32).

On the App Information tab, click on Select app package file. On the app package file pane, click the browse button. Then, select the fontsinstall.intunewin file. When you’re finished, select OK in the App package file pane.

Step 3: Configure App Information
On the App Information tab, make sure you have selected the correct Win32 app for deployment. Enter the app name as “Install Fonts using Intune.” You can add a brief description of this Win32 app by clicking Edit Description.
Enter the publisher information and the category to which this app belongs. You may choose to display this as a featured app in the company portal by turning that slider to Yes. Specify other optional details about the app and when you are done, click Next.

Step 4: Specify Program Information
In this step, we’ll specify important information about the Win32 app that contains the fonts to be deployed. These are critical details that you must supply before you deploy fonts using Intune. Note that fonts deployment in Intune will fail with error 0x80070002 if the installation or uninstall command is entered incorrectly.
- Install Command: %windir%\sysnative\windowspowershell\v1.0\powershell.exe -ExecutionPolicy Bypass -file .\fontsinstall.ps1
- Uninstall Command: %windir%\sysnative\windowspowershell\v1.0\powershell.exe -ExecutionPolicy Bypass -file .\fontsuninstall.ps1
- Installation time required (mins): 20 minutes
- Allow available uninstall: Yes
- Install behavior: System
- Device restart behavior: No specific action
When done, click on Review+Save.

Step 4: Configure Requirements for Deploying Fonts
On the Requirements page, specify the requirements that Windows devices must meet before the Fonts Win32 app is installed. We have configured the following requirements for the app:
- Operating system architecture: Select the OS architecture as 64-bit.
- Minimum operating system: Select the minimum operating system, Windows 10 22H2.
If you want to configure additional requirement rules, you can do so by clicking the +Add option. Click Next.

Step 6: Configure Detection Rules
While performing fonts deployment on Windows devices via Intune, a detection rule is essential. The detection rules are very similar to what we have in Configuration Manager for applications. The Win32 app installation is entirely determined by the rules that you specify here.
Add the detection rule by specifying the following:
- Rules format: Use a custom detection script
- Script file: Click on the browse icon and select the font detection script.
- Run script as 32-bit process on 64-bit clients: No
- Enforce signature check and run script silently: No.

You can specify app dependencies where the applications must be installed before fonts can be installed. Any Win32 app dependency needs to also be a Win32 app. It doesn’t support depending on other app types, such as single MSI LOB apps or Microsoft Store apps. Click Next.

Step 7: Font Package Assignments
In this step, you must assign the font package to Windows devices. On the Assignments tab, you can select the Required, Available for enrolled devices, or Uninstall group assignments for the app. The options are explained below.
- Required: The Win32 app is installed on devices in the selected groups.
- Available for enrolled devices: Users install the Win32 app from the company portal app.
- Uninstall: The Win32 app is uninstalled from devices in the selected groups.
After you select your groups, you can also configure End user notifications, Availability, and Installation deadline for Win32 apps.
Click Next.

Step 8: Review + Create
On the Review+Create tab, go through the values and settings that you entered for the Win32 app, consisting of fonts. Verify that you configured the app information correctly. Select Create to add the Win32 app to Intune. We have successfully added fonts from the Win32 app to Intune.

Step 9: Monitor the Fonts Deployment using Intune
Once you have installed fonts as a Win32 app on your Windows devices, you can track their deployment status and installation progress in the Intune admin center. Intune provides detailed reports and logs, allowing you to troubleshoot any deployment issues and ensure a successful app installation. Learn how to collect Intune logs from Windows devices.
When you create a Win32 app in Intune using the above steps, you must wait until the app is uploaded to Intune. To monitor the progress of Win32 app installation on Windows devices, go to the Microsoft Intune admin center > Apps > Windows > Install Fonts Win32 app and select Overview.
If the installation of fonts is delayed or not happening, you can perform Intune policy sync on Windows devices. This will force Windows devices to check with Intune for the latest policies.
Step 10: End User Experience: Check Fonts Installation
After the Windows devices within the assigned groups receive the Fonts Install Win32 app, the fonts are installed on the computers. There are several ways to check if the new fonts are installed on Windows devices, which we will discuss in the following section. For now, to confirm if the fonts are installed by Intune on the Windows PC, go to the C:\Windows\Fonts directory. In the search box, type the name of the font that we installed, and now you should see these fonts in the list as installed.
The custom fonts that we uploaded to Intune as a Win32 app are both installed on the device, as shown in the screenshot below. This confirms that you can deploy fonts as a Win32 app using Intune on Windows devices.

Method 3: Use Master Packager to Install Fonts using Intune [MSI Installer]
In this method, we will use the Master Packager tool to create an MSI installer that installs fonts on our Windows devices via Intune. This is a relatively new tool, but it is extremely useful for administrators who package applications. Using this tool will save you time because the process of packing fonts into .msi files is quick and simple. So let’s get started.
Download and Install Master Packager
Download and install the Master Package tool from their homepage. The community edition (free version) of the tool can create MSI installers and is sufficient for most of the tasks. However, if you like the tool, you can go ahead and purchase the professional edition (paid version) to enjoy additional features.
Installing the Master Packager application is simple and straightforward. Double-click the installer and follow the wizard to install the tool. Once the master packager is installed, launch the application.

Create Fonts MSI Package
In this section, we will demonstrate the steps to create a .MSI installer containing custom fonts. Master Packager makes it effortless to package the fonts into an MSI installer file. Once the fonts MSI installer has been created, it will be deployed as a Line-of-Business app via Intune.
Launch the Master Packager tool and select New MSI.

Before you add the fonts to the MSI installer package, save the installer to a known location. In the screenshot below, we are going to specify the installer name as InstallFonts.msi.

On the General Information tab, specify the product name, product version and other basic details about the font package. Next, in the left pane, select Files. This is where you add the fonts to the MSI package and build the installer.
In the Files section, go to [TARGETDIR] > WindowsFolder > FontsFolder. Browse to the folder where you have saved your custom fonts and drag the custom font files into the FontsFolder. On the Select CAB File window, select Build Now.
Note: In case you would like to add additional fonts to the MSI package, you can edit the installer and add it.

The Fonts Folder now shows the fonts that you have added to the MSI package.

To save the above configuration, click File > Save. That’s it; the Fonts MSI package is ready for deployment. In the next step, we will distribute the fonts MSI package as an LOB app through Intune.

Deploy Fonts as LOB app in Intune
In this step, we will deploy the font MSI package using Intune. As this is an .msi installer, we will upload the installer as an LOB app in Intune and deploy it to Windows 10 and Windows 11 devices.
In our previous guide, we covered the steps for deploying MSI applications using Intune. We’ll use the same procedure to deploy fonts MSI app using Intune.
In the Intune admin center, go to Apps > Windows and select Add. Select the app type as a line-of-business app.

Click on Select app package file, click Browse and select the InstallFonts.msi file. The font package details are presented on the screen. Click OK.

On the App Information tab, enter some basic details about the application, such as name, description, publisher, developer, etc. Additionally, you may specify a logo for this application, which will appear in the company portal for users. Click Next.

Assign the application to Entra ID device groups. You can choose to assign the app as Required or Available for enrolled devices. In the below example, we have assigned the app to a device group as Required. Click Next.

Review all the app settings and click on Create. The MSI application is now uploaded to Intune for deployment.

Monitor Fonts Deployment in Intune
You can monitor the Fonts MSI application deployment in the Intune admin center. Under Apps > Windows, select the InstallFonts MSI app and go to the Overview tab. Here you can see the total number of devices on which the fonts have been installed successfully.

How to Verify Font Installation on Windows Devices
No matter what method you have selected for installing fonts using Intune, there are multiple ways to confirm if the font installation was successful. The majority of these methods necessitate manual verification, which can be done on a few devices to confirm the deployment.
Verify font installation from C:\Windows\Fonts location
When you deploy fonts using Intune on Windows devices, they are installed in the C:\Windows\Fonts directory. To verify if the custom fonts have been installed via Intune, go to the C:\Windows\Fonts directory and check for the fonts.

Check the font installation using Registry
For advanced users, the registry contains the list of fonts that are installed on the computer. Run the regedit.exe command on a Windows computer to launch the registry editor. Browse to the following registry path: HKEY_LOCAL_MACHINE\SOFTWARE\Microsoft\Windows NT\CurrentVersion\Fonts. Here, you can find all the fonts that are installed on the PC.

Verify the Fonts Installation using Notepad
When you install custom fonts on a Windows computer, you can use those fonts in the Notepad application. To confirm if the fonts are installed via Intune, open the Notepad application on a Windows computer. Go to Edit > Font, and under Font Settings, click the drop-down to choose a font. Here, you should find all the custom fonts installed on the computer.

Verify Custom Fonts Installation using Microsoft Word
If you are running Microsoft 365 apps or Office 2021 on your computer, launch the Microsoft Word app. If the font has been installed by Intune, it should appear in Microsoft Word when you select Fonts.

How to Uninstall Fonts with Intune
To uninstall the fonts from the devices, go to the Win32 Fonts deployment app in the Intune admin center and select Properties. Remove the devices from the Required section and add them to the Uninstall section. Select Review+Save. The uninstallation of fonts will begin on the devices once they sync with Intune.
If you have deployed fonts as an MSI app, they can be uninstalled by going to Control Panel > Programs and Features. This will require administrator privileges because you’re uninstalling an app from the system. From the list of apps, select the InstallFonts app and click Uninstall. The fonts will be uninstalled from the Windows PC.

Still Need Help?
If you need further assistance on the above article or want to discuss other technical issues, check out some of these options.