
❌️ Defender Remover / Defender Disabler

❓️ What does the app do?
This application removes / disables Windows Defender, including the Windows Security App, Windows Virtualization-Based Security (VBS), Windows SmartScreen, Windows Security Services, Windows Web-Threat Service, Windows File Virtualization (UAC), Microsoft Defender App Guard, Microsoft Driver Block List, System Mitigations and the Windows Defender page in the Settings App on Windows 10 or later.
❓️ What components are removing?
Removing Security Components
This script removes/disables following security components:
    - support for Windows Security Center including Windows Security Center Service (wscsvc), Windows Security Service (SgrmBroker, Sgrm Drivers) which are needed to run Windows Security App.
    - virtualization support.
        - Hypervisor startup (this fixes disablation of Virtualization Based Security, this will auto enable if you use Hyper-V and/or WSL (Windows Subsystem for Linux), WSA (Windows Subsystem for Android))
        - LUA (disables File Virtualization and User Account Control, which will run all apps as administrator priviliges (also fixes old app errors))
        - Exploit Guard (something about Exploits)
        - Windows Smart Control
        - Tamper Protection (for Windows 11 21H2 or earlier)
    - SecHealthUI (Windows Security UWP App)
    - SmartScreen
    - Pluton Support and Pluton Services Support
    - System Mitigations
      - "Services Mitigations" (search on admx.help for more informations, its policy)
      - Spectre and Meltdown Mitigation (for get +30% performance on old Intel CPUs)
    - Windows Security Section from Settings App.
Removing Antivirus Components
This script forcily removes following antivirus components:
  - Windows Defender Definition Update List (this will disable updating definitions of Defender because its removed)
  - Windows Defender SpyNet Telemetry
  - Antivirus Service
  - Windows Defender Antivirus filter and windows defender rootkit scanner drivers
  - Antivirus Scanning Tasks
  - Shell Associations (Context Menu)
  - Hides Antivirus Protection section from Windows Security App.
📃 Instructions
Note
A system restore point is recommended before you run the script. (if you don’t know what are you doing)
- Download the packed script from Releases
- Run the «.exe» as administrator
- Follow the instructions displayed
OR
you can use git
git clone https://github.com/ionuttbara/windows-defender-remover.git
cd windows-defender-remover
Script_Run.bat
OR
you can use download entire source code
- Download the source code from Releases.
- Choose the file Source Code(.zip) from last version and download it.
- Unarchive the file into a folder and run the Script_Run.bat.
You can file an issue if you experience any problems.
📃 Automation of the script
You can remove Defender with arguments.
Removing
# Removal
Defender.Remover.exe /r <# or /R #>
Disable or Remove Windows Defender Application Guard Policies (advanced)
If you have any problems when opening an app (extremely rare) and get the message «The app can not run because Device Guard» or «Windows Defender Application Guard Blocked this app», you have to remove 4 files with the same name, from different locations.
- In EFI Partition
Remove-Item -LiteralPath "$((Get-Partition | ? IsSystem).AccessPaths[0])Microsoft\Boot\WiSiPolicy.p7b"
- In Code Integrity Folder
Remove-Item -LiteralPath "$env:windir\System32\CodeIntegrity\WiSiPolicy.p7b"
- In Windows Folder
Remove-Item -LiteralPath "$env:windir\Boot\EFI\wisipolicy.p7b"
- In WinSxS Folder
Remove-Item -Path "$env:windir\WinSxS" -Include *winsipolicy.p7b* -Recurse
Creating an ISO with Windows Defender and Services disabled
You can create an ISO with Windoows Defender and Security Services Disabled. It’s easy, so this is a fiie which it can helps you.
Here are the rules:
- Mount the ISO and extract it into location.
- Open the sources folder and create the $OEM$ folder. (this is needed to run the DefenderRemover part in OOBE).
- Open the $OEM$ folder and create the folder with $$ name.
- Open the $$ folder and create the folder with Panther name.
- Open the Panther folder.
The path it shown like to
*%location of extracted ISO%\sources$OEM$$$\Panther* - Download the unnatended.xml file from repo in ISO_Maker folder and put it in Panther folder.
- Save this as bootable ISO. (for now the script can’t do this automaticly, but it will do in next version).
❓ Frequently Asked Questions
⭕ How to remove Windows Security Center / Windows SecurityApp from PC without downloading Script?
Paste this code into a powershell file and after Run as Administrator.
$remove_appx = @("SecHealthUI"); $provisioned = get-appxprovisionedpackage -online; $appxpackage = get-appxpackage -allusers; $eol = @()
$store = 'HKLM:\SOFTWARE\Microsoft\Windows\CurrentVersion\Appx\AppxAllUserStore'
$users = @('S-1-5-18'); if (test-path $store) {$users += $((dir $store -ea 0 |where {$_ -like '*S-1-5-21*'}).PSChildName)}
foreach ($choice in $remove_appx) { if ('' -eq $choice.Trim()) {continue}
  foreach ($appx in $($provisioned |where {$_.PackageName -like "*$choice*"})) {
    $next = !1; foreach ($no in $skip) {if ($appx.PackageName -like "*$no*") {$next = !0}} ; if ($next) {continue}
    $PackageName = $appx.PackageName; $PackageFamilyName = ($appxpackage |where {$_.Name -eq $appx.DisplayName}).PackageFamilyName
    ni "$store\Deprovisioned\$PackageFamilyName" -force >''; $PackageFamilyName
    foreach ($sid in $users) {ni "$store\EndOfLife\$sid\$PackageName" -force >''} ; $eol += $PackageName
    dism /online /set-nonremovableapppolicy /packagefamily:$PackageFamilyName /nonremovable:0 >''
    remove-appxprovisionedpackage -packagename $PackageName -online -allusers >''
  }
  foreach ($appx in $($appxpackage |where {$_.PackageFullName -like "*$choice*"})) {
    $next = !1; foreach ($no in $skip) {if ($appx.PackageFullName -like "*$no*") {$next = !0}} ; if ($next) {continue}
    $PackageFullName = $appx.PackageFullName;
    ni "$store\Deprovisioned\$appx.PackageFamilyName" -force >''; $PackageFullName
    foreach ($sid in $users) {ni "$store\EndOfLife\$sid\$PackageFullName" -force >''} ; $eol += $PackageFullName
    dism /online /set-nonremovableapppolicy /packagefamily:$PackageFamilyName /nonremovable:0 >''
    remove-appxpackage -package $PackageFullName -allusers >''
  }
}
⭕ Why is the downloaded executable being flagged as a virus?
That is a false positive.
Some security apps flag this app as a virus because of the way the «.exe» files are created. Download with git or source code .zip will indicate virus-free.
Starting with Defender 12.6.x , some versions are considered as virus, some are not (its a bug from me, so do not file for this).
⭕ Why is the patch not working when Windows is updated?
Windows Update includes a Intelligence Update which blocks certain actions and modifies Windows Defender/Security policies.
If the script is not working for you, check if you have the Windows Security Intelligence Update installed. If you do, disable tamper protection, and re-run the script.
⭕ How to use the package remover without downloading the executable from the release?
Run the desired «.bat» file from cmd with PowerRun (by dragging to the executable). You must reboot for the changes to take effect.
⭕ How to disable VBS if the removal script does not work
Disable with this command and reboot.
bcdedit /set hypervisorlaunchtype off
Table of Contents
- Registry configuration
- Disable Defender: the Microsoft way
- DisableAntiSpyware
- GPO
- Temporary solution
- Disable Defender: the hacker way
- How it works
- Scripting in PowerShell
Once again, after a Windows update, Windows Defender activated itself again. It finally bothered me enough to take an actual look at how to disable it permanently and reliably, in a fully automated way (a PowerShell script), on my Windows 10 20H2 (build 19042).
WARNING (please read me):
This script is not intended as a “stop/start” solution. It aims at disabeling permanently windows defender, even removing its files if you chose to. I made it as a malware analyst, for my usage, and decided to share it to help others. The “general public” might find another, easier to use solution that suit their need better.
I would also add that some alternative working solutions have been added in the comments of this article (many thanks to their writers !) : it’s definitly worth checking.
TL;DR : the final script can be found here : https://github.com/jeremybeaume/tools/blob/master/disable-defender.ps1
Registry configuration
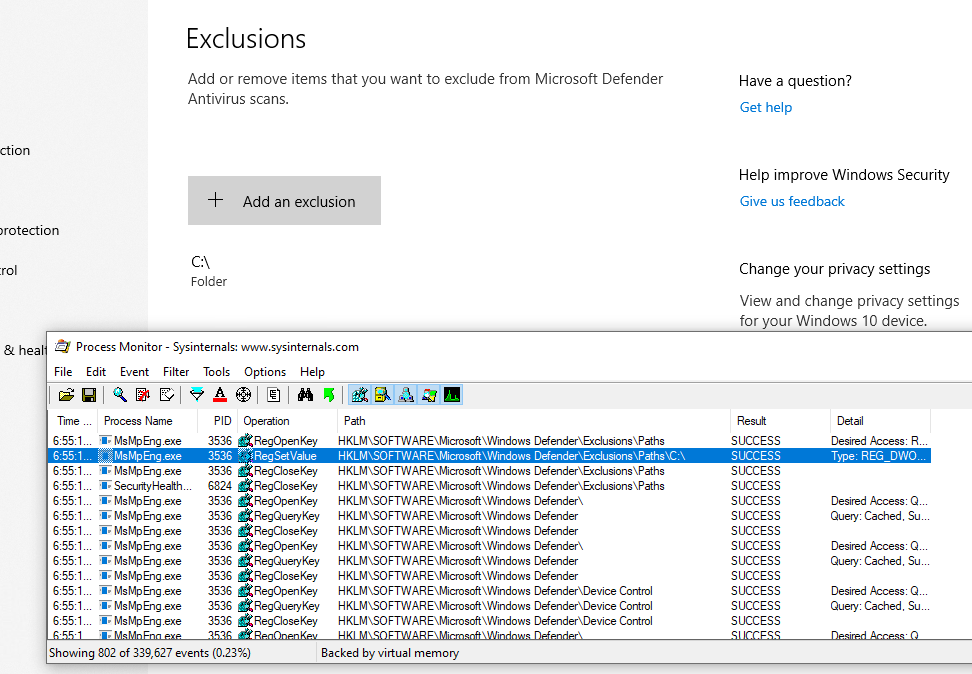
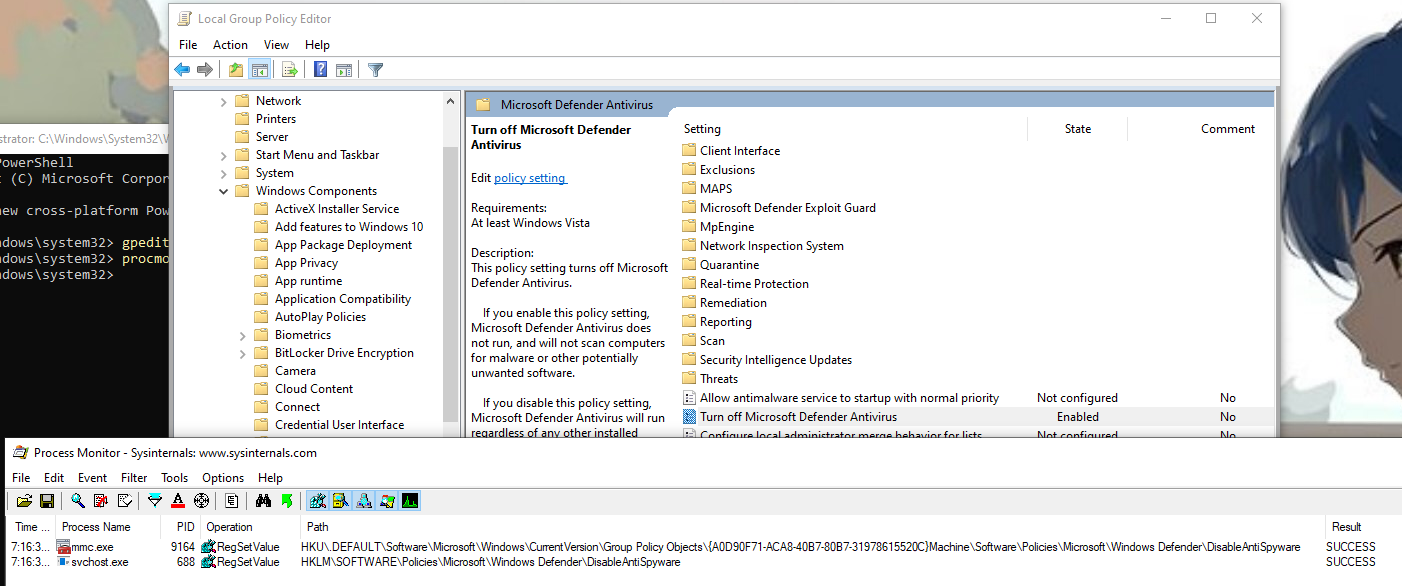
First, I took some time to look at the registry configuration, where are the parameters located, and how/when the values were changed. Procmon, from SysInternals, is a very convenient tool for this kind of research.
I looked for registry access with “Defender” in the path, and this is the result:
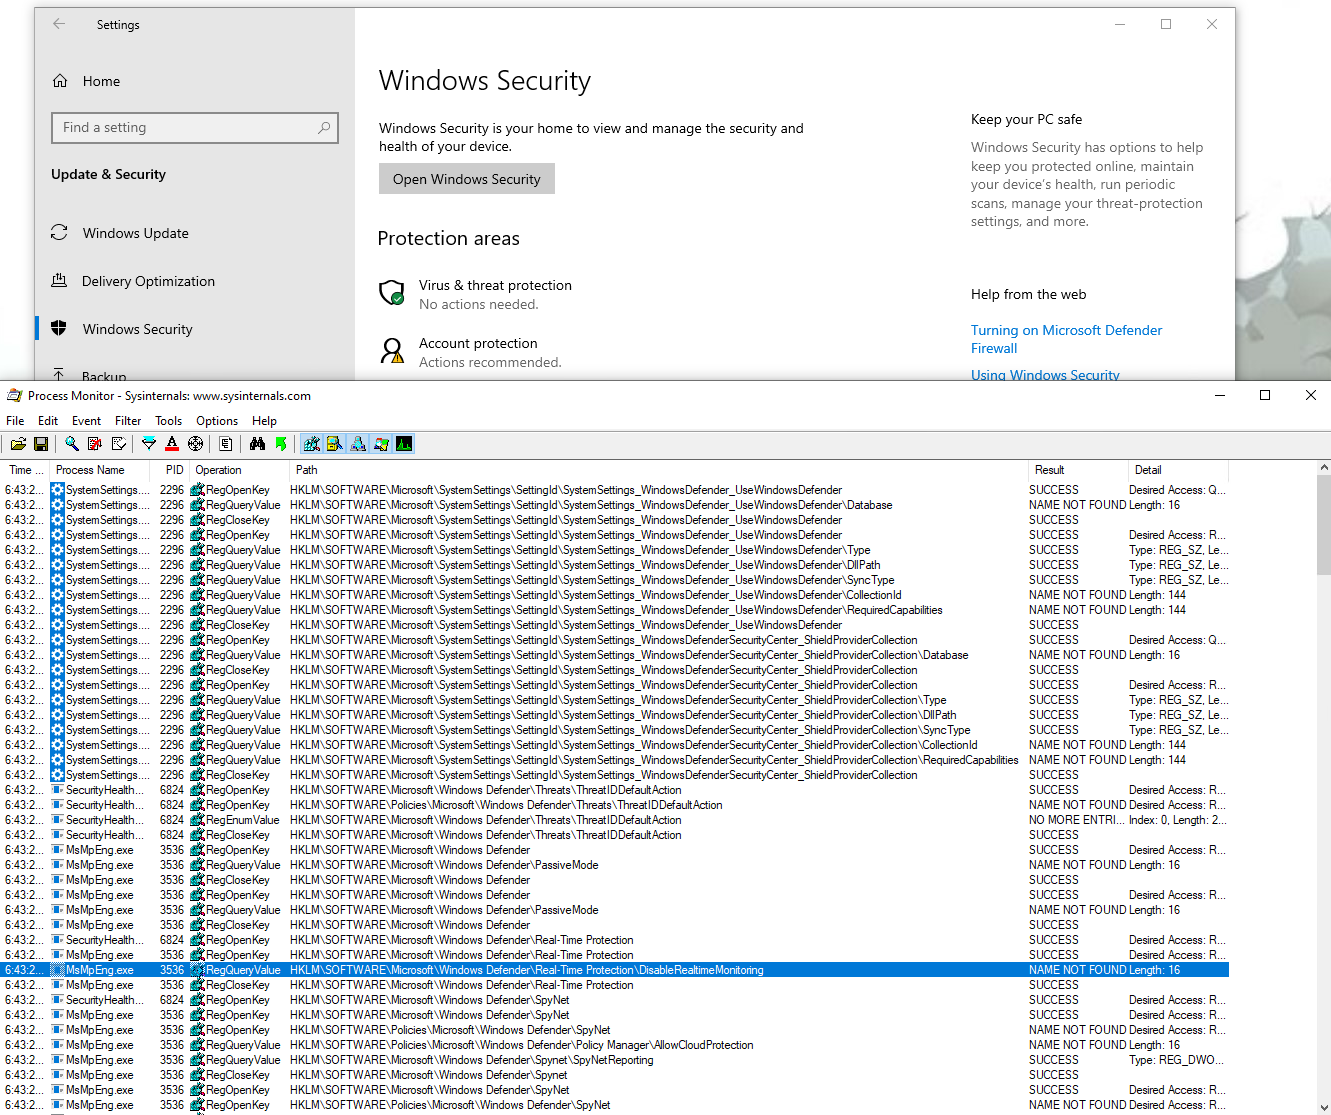
We get a first idea of the configuration location, most interesting keys seems to be under HKLM\SOFTWARE\Microsoft\Windows Defender.
Then I proceeded to check the keys for each parameter.
First on the list is the “Real-Time protection”, modifying the key HKLM\SOFTWARE\Microsoft\Windows Defender\Real-Time Protection\DisableRealtimeMonitoring
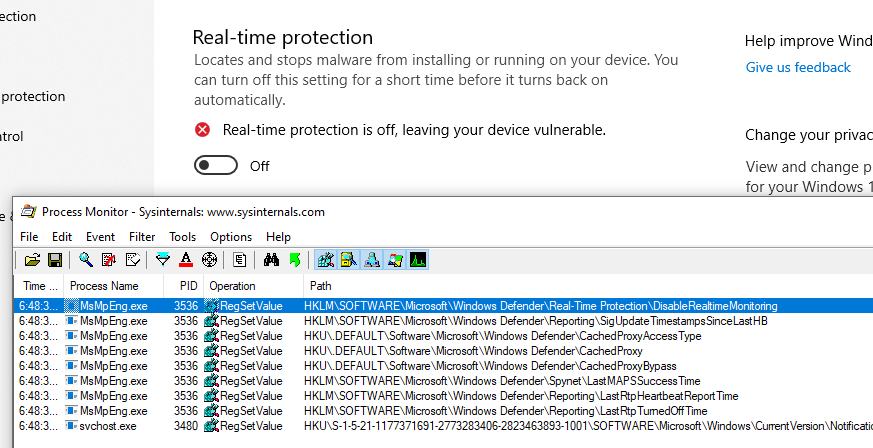
Then the “cloud-delivered protection”, with the key HKLM\SOFTWARE\Microsoft\Windows Defender\SpyNet\SpyNetReporting :
(For reference, the key for “Automatic sample submission” is HKLM\SOFTWARE\Microsoft\Windows Defender\SpyNet\SubmitSampleConsent)
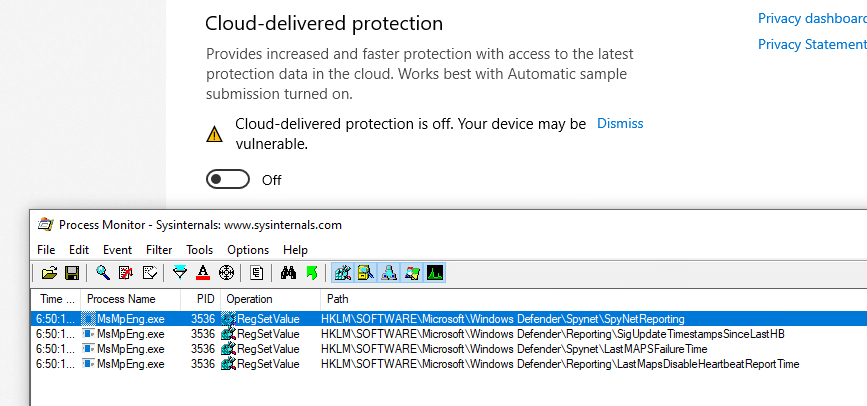
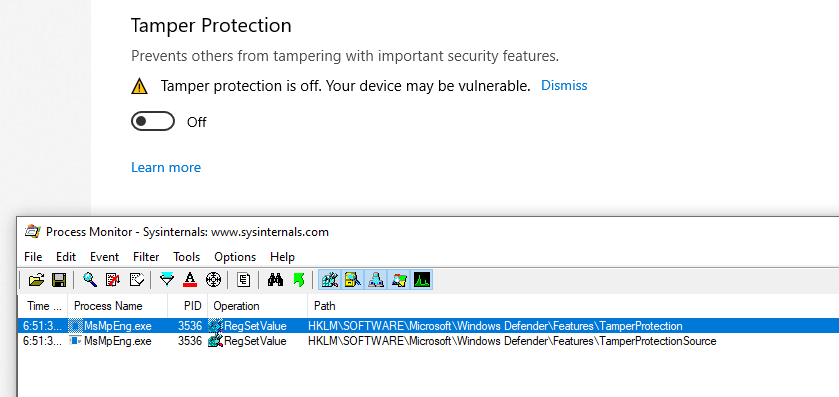
The “Tamper Protection” is next, using 2 keys: HKLM\SOFTWARE\Microsoft\Windows Defender\Features\TamperProtection (4 when disabled) and HKLM\SOFTWARE\Microsoft\Windows Defender\Features\TamperProtectionSource (2 when disabled)
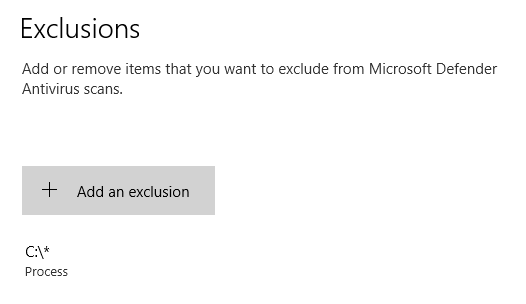
And lastly, exclusions are stored in subkeys of HKLM\SOFTWARE\Microsoft\Windows Defender\Exclusions depending on their type:
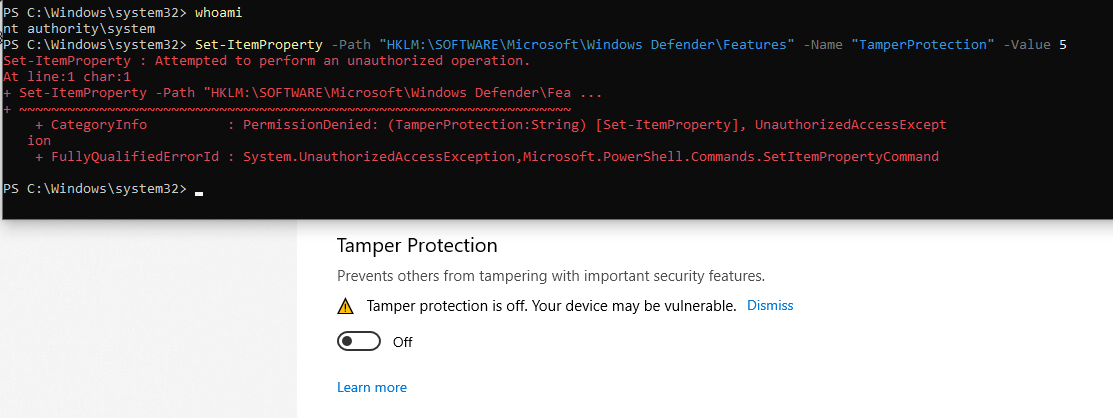
Now, one thing to note is that the Administrator (meaning members of the BUILTIN\Administrators group) cannot change those keys (only SYSTEM can):
An even as SYSTEM, with tamper protection off, writing is still not authorized:
So here we are :
- There is not option to disable “Tamper Protection” in powershel (that’s the point ….).
- We can’t edit the configuration directly in the registry, even as SYSTEM.
What I used to do was using Set-MpPreference to add whole drives as exception, but sometimes I would still get alerts : Defender is still running and analyzing my actions.
Of course, Microsoft provides ways and documentation to disable Defender, so let’s check them out.
Disable Defender: the Microsoft way
DisableAntiSpyware
Searching on the internet (like ), there seems to be a registry key for that, named DisableAntiSpyware. It is indeed read when opening the configuration:
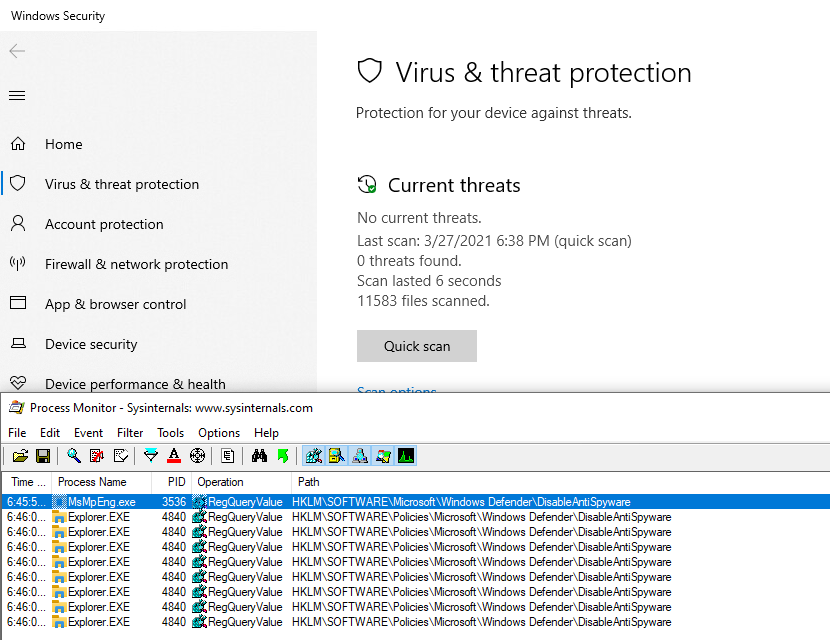
2 Keys are read, one in the “main configuration” key, and one under HKLM\SOFTWARE\Policies. This second one, we can write, to let’s go for it!
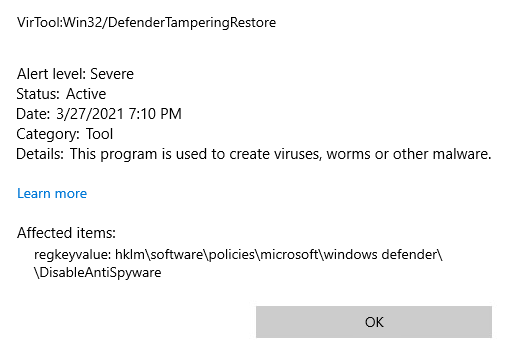
I created it, Defender was still running, without warning or anything, so it doesn’t seem to have any effect. But it gets better, it is actually considered a Severe security alert!
Maybe we need to be more subtle, and use gpedit to edit this policy, let’s try that!
GPO
Here is what we get when editing the policy with gpedit :
The previous key is actually written by a service (svchost.exe -k netsvcs -p -s gpsvc) and another one is written in a policy object. This time is doesn’t raise a security alert, so the second key must be necessary. I also noted that a 3rd key is written when the tamper protection is off:

This 3rd key is written by MsMpEng.exe which happens to be the binary run by the Microsoft Defender service: this is the Defender userland engine. So, we should be good to go then?
Well, nothing is disabled yet, and after reboot …. the policy is removed! So this seems to be completely ignored.
Temporary solution
I finally managed to disable it, by adding a process exclusion (including regedit.exe):
Then, with “Tamper Protection” off, and as SYSTEM, the key HKLM\SOFTWARE\Microsoft\Windows Defender\DisableAntiSpyware finally becomes writable. Setting its value to 1 immediately stops Windows Defender:
So here we are! But …. no 🙂 This is still overwritten on reboot! This a good enough temporary solution, but as we need to disable the “Tamper Protection”, it cannot be scripted in PowerShell.
Disable Defender: the hacker way
How it works
So I did not found any way to configure Defender itself to stop running. But it actually runs in a Service, so maybe there is something there. The service cannot be modified using services.msc as we would usually do:
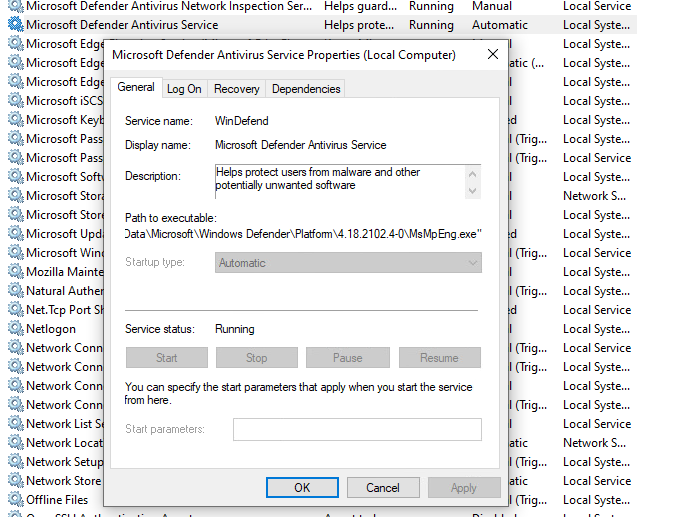
See how everything is greyed out?
We can also find the kernel drivers used by Defender, with msinfo32:

But, and that’s what we’re going to use : we can edit (at least for now) the registry keys associated to those services and drivers, in HKLM\SYSTEM\CurrentControlSet\Services\. We set they Start value to 4, meaning “Disabled”, and after next reboot, the services and driver will not be loaded / started, and so Defender will not be working anymore ! And indeed, after the reboot :

We’re good to go, finally! It’s weird that we can edit those registry keys, when services.msc doesn’t let us modify the service, but well … It works! Let’s script the whole thing.
Scripting in PowerShell
I put everything in a convenient script that disables what it can directly in defender (Set-MpPreference), then modify the registry to disable the services, and set itself up to run again after reboot, to complete the removal. I’ll break it down below.
First, I make sure to elevate to Administrator (mandatory, and actually used when the scripted is run after rebooting), and SYSTEM if psexec is available. SYSTEM is optional, but we need it to write in the registry to modify the parameters in case Defender would still re-enable itself one day (because it sure will …).
if(-Not $($(whoami) -eq "nt authority\system")) {
    $IsSystem = $false

    # Elevate to admin (needed when called after reboot)
    if (-Not ([Security.Principal.WindowsPrincipal] [Security.Principal.WindowsIdentity]::GetCurrent()).IsInRole([Security.Principal.WindowsBuiltInRole] 'Administrator')) {
        Write-Host "    [i] Elevate to Administrator"
        $CommandLine = "-ExecutionPolicy Bypass `"" + $MyInvocation.MyCommand.Path + "`" " + $MyInvocation.UnboundArguments
        Start-Process -FilePath PowerShell.exe -Verb Runas -ArgumentList $CommandLine
        Exit
    }

    # Elevate to SYSTEM if psexec is available
    $psexec_path = $(Get-Command PsExec -ErrorAction 'ignore').Source
    if($psexec_path) {
        Write-Host "    [i] Elevate to SYSTEM"
        $CommandLine = " -i -s powershell.exe -ExecutionPolicy Bypass `"" + $MyInvocation.MyCommand.Path + "`" " + $MyInvocation.UnboundArguments
        Start-Process -WindowStyle Hidden -FilePath $psexec_path -ArgumentList $CommandLine
        exit
    } else {
        Write-Host "    [i] PsExec not found, will continue as Administrator"
    }

} else {
    $IsSystem = $true
}
Then the script use the Set-MpPreference command to disable everything we can, adding exception for all drive leter, and disabling all available engines.
67..90|foreach-object{
    $drive = [char]$_
    Add-MpPreference -ExclusionPath "$($drive):\" -ErrorAction SilentlyContinue
    Add-MpPreference -ExclusionProcess "$($drive):\*" -ErrorAction SilentlyContinue
}

Write-Host "    [+] Disable scanning engines (Set-MpPreference)"

Set-MpPreference -DisableArchiveScanning 1 -ErrorAction SilentlyContinue
Set-MpPreference -DisableBehaviorMonitoring 1 -ErrorAction SilentlyContinue
Set-MpPreference -DisableIntrusionPreventionSystem 1 -ErrorAction SilentlyContinue
Set-MpPreference -DisableIOAVProtection 1 -ErrorAction SilentlyContinue
Set-MpPreference -DisableRemovableDriveScanning 1 -ErrorAction SilentlyContinue
Set-MpPreference -DisableBlockAtFirstSeen 1 -ErrorAction SilentlyContinue
Set-MpPreference -DisableScanningMappedNetworkDrivesForFullScan 1 -ErrorAction SilentlyContinue
Set-MpPreference -DisableScanningNetworkFiles 1 -ErrorAction SilentlyContinue
Set-MpPreference -DisableScriptScanning 1 -ErrorAction SilentlyContinue
Set-MpPreference -DisableRealtimeMonitoring 1 -ErrorAction SilentlyContinue

Write-Host "    [+] Set default actions to Allow (Set-MpPreference)"

Set-MpPreference -LowThreatDefaultAction Allow -ErrorAction SilentlyContinue
Set-MpPreference -ModerateThreatDefaultAction Allow -ErrorAction SilentlyContinue
Set-MpPreference -HighThreatDefaultAction Allow -ErrorAction SilentlyContinue
Then the services and drivers are disabled, and the script checks if it need to reboot :
$need_reboot = $false

# WdNisSvc Network Inspection Service
# WinDefend Antivirus Service
# Sense : Advanced Protection Service

$svc_list = @("WdNisSvc", "WinDefend", "Sense")
foreach($svc in $svc_list) {
    if($(Test-Path "HKLM:\SYSTEM\CurrentControlSet\Services\$svc")) {
        if( $(Get-ItemProperty -Path "HKLM:\SYSTEM\CurrentControlSet\Services\$svc").Start -eq 4) {
            Write-Host "        [i] Service $svc already disabled"
        } else {
            Write-Host "        [i] Disable service $svc (next reboot)"
            Set-ItemProperty -Path "HKLM:\SYSTEM\CurrentControlSet\Services\$svc" -Name Start -Value 4
            $need_reboot = $true
        }
    } else {
        Write-Host "        [i] Service $svc already deleted"
    }
}

Write-Host "    [+] Disable drivers"

# WdnisDrv : Network Inspection System Driver
# wdfilter : Mini-Filter Driver
# wdboot : Boot Driver

$drv_list = @("WdnisDrv", "wdfilter", "wdboot")
foreach($drv in $drv_list) {
    if($(Test-Path "HKLM:\SYSTEM\CurrentControlSet\Services\$drv")) {
        if( $(Get-ItemProperty -Path "HKLM:\SYSTEM\CurrentControlSet\Services\$drv").Start -eq 4) {
            Write-Host "        [i] Driver $drv already disabled"
        } else {
            Write-Host "        [i] Disable driver $drv (next reboot)"
            Set-ItemProperty -Path "HKLM:\SYSTEM\CurrentControlSet\Services\$drv" -Name Start -Value 4
            $need_reboot = $true
        }
    } else {
        Write-Host "        [i] Driver $drv already deleted"
    }
}

# Check if service running or not
if($(GET-Service -Name WinDefend).Status -eq "Running") {
    Write-Host "    [+] WinDefend Service still running (reboot required)"
    $need_reboot = $true
} else {
    Write-Host "    [+] WinDefend Service not running"
}
To execute after reboot, a shortcut is added in C:\ProgramData\Microsoft\Windows\Start Menu\Programs\StartUp\, and deleted after use.
$link_reboot = "C:\ProgramData\Microsoft\Windows\Start Menu\Programs\StartUp\disable-defender.lnk"
Remove-Item -Force "$link_reboot" -ErrorAction 'ignore' # Remove the link (only execute once after reboot)

if($need_reboot) {
    Write-Host "    [+] This script will be started again after reboot." -BackgroundColor DarkRed -ForegroundColor White

    $powershell_path = '"C:\Windows\System32\WindowsPowerShell\v1.0\powershell.exe"'
    $cmdargs = "-ExecutionPolicy Bypass `"" + $MyInvocation.MyCommand.Path + "`" " + $MyInvocation.UnboundArguments

    $res = New-Item $(Split-Path -Path $link_reboot -Parent) -ItemType Directory -Force
    $WshShell = New-Object -comObject WScript.Shell
    $shortcut = $WshShell.CreateShortcut($link_reboot)
    $shortcut.TargetPath = $powershell_path
    $shortcut.Arguments = $cmdargs
    $shortcut.WorkingDirectory = "$(Split-Path -Path $PSScriptRoot -Parent)"
    $shortcut.Save()
Finally, if we don’t need to reboot, we can finish cleaning up : configure the registry, and delete the files if we wish to :
} else {
    if($IsSystem) {

        # Configure the Defender registry to disable it (and the TamperProtection)
        # editing HKLM:\SOFTWARE\Microsoft\Windows Defender\ requires to be SYSTEM

        Write-Host "    [+] Disable all functionnalities with registry keys (SYSTEM privilege)"

        # Cloud-delivered protection:
        Set-ItemProperty -Path "HKLM:\SOFTWARE\Microsoft\Windows Defender\Real-Time Protection" -Name SpyNetReporting -Value 0
        # Automatic Sample submission
        Set-ItemProperty -Path "HKLM:\SOFTWARE\Microsoft\Windows Defender\Real-Time Protection" -Name SubmitSamplesConsent -Value 0
        # Tamper protection
        Set-ItemProperty -Path "HKLM:\SOFTWARE\Microsoft\Windows Defender\Features" -Name TamperProtection -Value 4

        # Disable in registry
        Set-ItemProperty -Path "HKLM:\SOFTWARE\Microsoft\Windows Defender" -Name DisableAntiSpyware -Value 1
        Set-ItemProperty -Path "HKLM:\SOFTWARE\Policies\Microsoft\Windows Defender" -Name DisableAntiSpyware -Value 1

    } else {
        Write-Host "    [W] (Optional) Cannot configure registry (not SYSTEM)"
    }


    if($MyInvocation.UnboundArguments -And $($MyInvocation.UnboundArguments.tolower().Contains("-delete"))) {

        # Delete Defender files

        function Delete-Show-Error {
            $path_exists = Test-Path $args[0]
            if($path_exists) {
                Remove-Item -Recurse -Force -Path $args[0]
            } else {
                Write-Host "    [i] $($args[0]) already deleted"
            }
        }

        Write-Host ""
        Write-Host "[+] Delete Windows Defender (files, services, drivers)"

        # Delete files
        Delete-Show-Error "C:\ProgramData\Windows\Windows Defender\"
        Delete-Show-Error "C:\ProgramData\Windows\Windows Defender Advanced Threat Protection\"

        # Delete drivers
        Delete-Show-Error "C:\Windows\System32\drivers\wd\"

        # Delete service registry entries
        foreach($svc in $svc_list) {
            Delete-Show-Error "HKLM:\SYSTEM\CurrentControlSet\Services\$svc"
        }

        # Delete drivers registry entries
        foreach($drv in $drv_list) {
            Delete-Show-Error "HKLM:\SYSTEM\CurrentControlSet\Services\$drv"
        }
    }
}

Write-Host ""
Read-Host -Prompt "Press any key to continue"
And we are done ! Final result can be downloaded here : https://github.com/jeremybeaume/tools/blob/master/disable-defender.ps1
It can be executed from anywhere in the file system. The parameter -Delete will delete the files linked to Defender after reboot. And it should work fine, until the Tamper Protection also protects the services ergistry key, which is bound to happen someday. I’m actually surprised it doesn’t already …
Если понадобилось удалить встроенный защитник Windows, например он удаляет кряк и не дает активировать систему или просто хотим установить свой любимый антивирус которому мы доверяем больше и лишних процессов нагружающих систему нам не нужно.
Что нам даст удаление Защитника Windows? Удалив защитник мы освобождаем системные ресурсы, решим вопрос с удалением фалов без спроса, а также избавимся от “дырявого” антивируса, главное не забыть заменить его на надежный.
И так удалив Windows Defender Мы:
- – Ускорим работу компьютера так как освободим ресурсы процессора и оперативную память, это особенно актуально для старых ПК да и новым не помешает.
- – Решим вопрос с активаторами системы и удалением файлами, которые перестанут бесследно пропадать без вашего ведома.
- – Освободим примерно 600 Мб., дискового пространства, немного, но возможно для кого-то и это хорошо.
Назвать защитника надежным нельзя, особенно вспоминая случай заражения хостинга сайта вредоносом который был замечен защитой самого хостинга. А чем был занят антивирус Windows в это время, наверное, отсылал отчеты в Microsoft.
Удалить защитник windows средствами самой системы не получиться, так как его удаление не предполагается. Для удаления защитника воспользуемся программой от стороннего разработчика.
Ссылка на официальный сайт утилиты вот тут.
Перед началом удаления нам нужно отключить функцию “Защита от подделки”.
Кликнув по защитнику, попадаем в главное окно “Кабинет”, жмем по иконке со щитом “Защита от вирусов и угроз”.

Пункт “Параметры защиты от вирусов и угроз”, под ним – Управление настройками, кликаем по нему.

Четвертый пункта “Защита от подделки”, перетягиваем ползунок в положение откл.

Соглашаемся с предупреждением системы безопасности.

Все готово, теперь можно приступать к удалению защитника.

Распаковываем наш архив прямо на рабочий стол.

Нам нужно запустить файл DefenderKiller и нажать Да когда система безопасности попросит подтвердить действие.

Программа запустилась, интерфейс у нее довольно простой, нам нужно первое действие, поэтому жмем на клавиатуре 1 и Enter.

Программа проверила отключена ли защита от подделок, и предложила сделать резервную копию файлов антивируса на случай если мы передумаем. Нужна ли копия для восстановления решаем для себя сами.

Процесс запущен, программа удаляет службы, драйвера и папки, ждем завершения процесса удаления windows defender и перезагружаем систему.


Защитник может не удалиться с первого раза, утилита нам об этом сообщит и предложит сделать перезагрузку системы и повторить, поэтому жмем Нет на окне предупреждения и перезагружаемся.

После перезагрузки и повторного запуска утилиты мы видим что все прошло успешно, программа показывает список удаленных служб и папок защитника. Теперь можно установить свой любимый антивирус.

Как видите процесс удаления защитника windows довольно прост и не занимает много времени к тому же все изменения при наличии бэкапа можно откатить обратно. На этом все. Всем успехов!
Защитник Windows — это антивирусное приложение, установленное по умолчанию в Windows 10. Защитник предназначен для защиты компьютера от вирусов и обеспечивает лучшую защиту от всех видов вредоносных программ. Однако, если вы предпочитаете использовать альтернативное решение для защиты вашего ПК, вы можете отключить Защитник Windows.
Во время установки, некоторые антивирусные программы просят пользователя вручную отключить Защитник Windows в Windows 10.
В предыдущей версии Windows отключить защитника Windows было легко. Параметры Защитника Windows позволяли включить или отключить защитник. В Windows 10 Fall Creators Update, Майкрософт перенесла параметры приложения в – Центр безопасности Защитника Windows.
Отключить Защитник Windows в Windows 10.
Ниже представлены 3 способа отключения Защитника Windows:
- Временное – Возможность отключить защитник с помощью Центра безопасности Защитника Windows
- Постоянное — Отключение Защитника Windows с помощью редактора реестра.
- С помощью скрипта PowerShell
В первом случае, Windows 10 через непродолжительное время, обнаруживает, что Защитник отключен и включит его автоматически. Многим пользователям, вполне достаточно временного отключения.
Во 2 м и 3 случае — Защитник Windows в Windows будет полностью отключен.
Способ 1 — Отключить Защитник в Windows 10 с помощью Центра безопасности
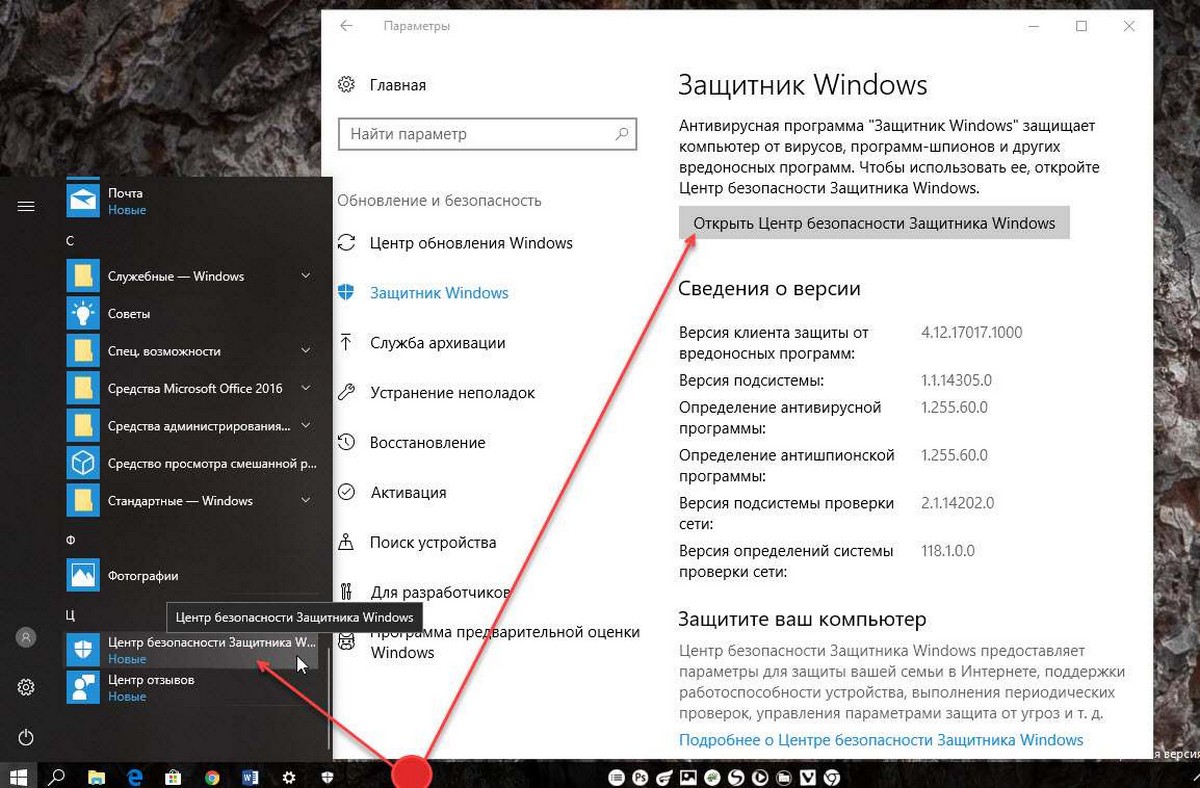
- Откройте Центр безопасности Защитника Windows. Вы можете открыть Центр безопасности защитника Windows из меню «Пуск» или с помощью приложения «Параметры Windows», нажав сочетание клавиш Win + I и перейдя по следующему пути Обновление и безопасность → Защитник Windows → Открыть центр безопасности защитника Windows
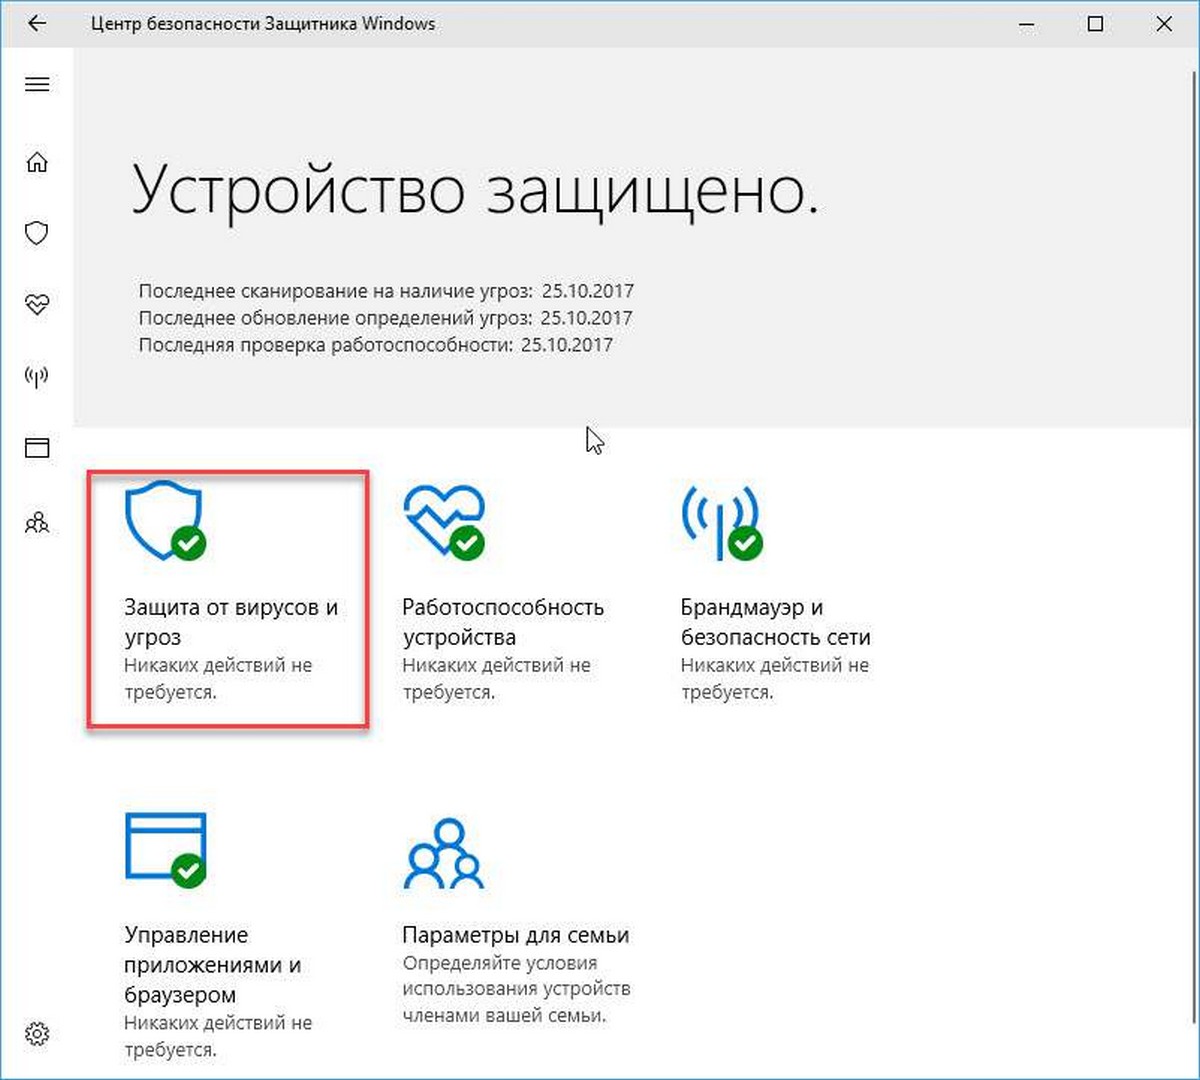
- В пользовательском интерфейсе приложения нажмите значок «Защита от вирусов и угроз».
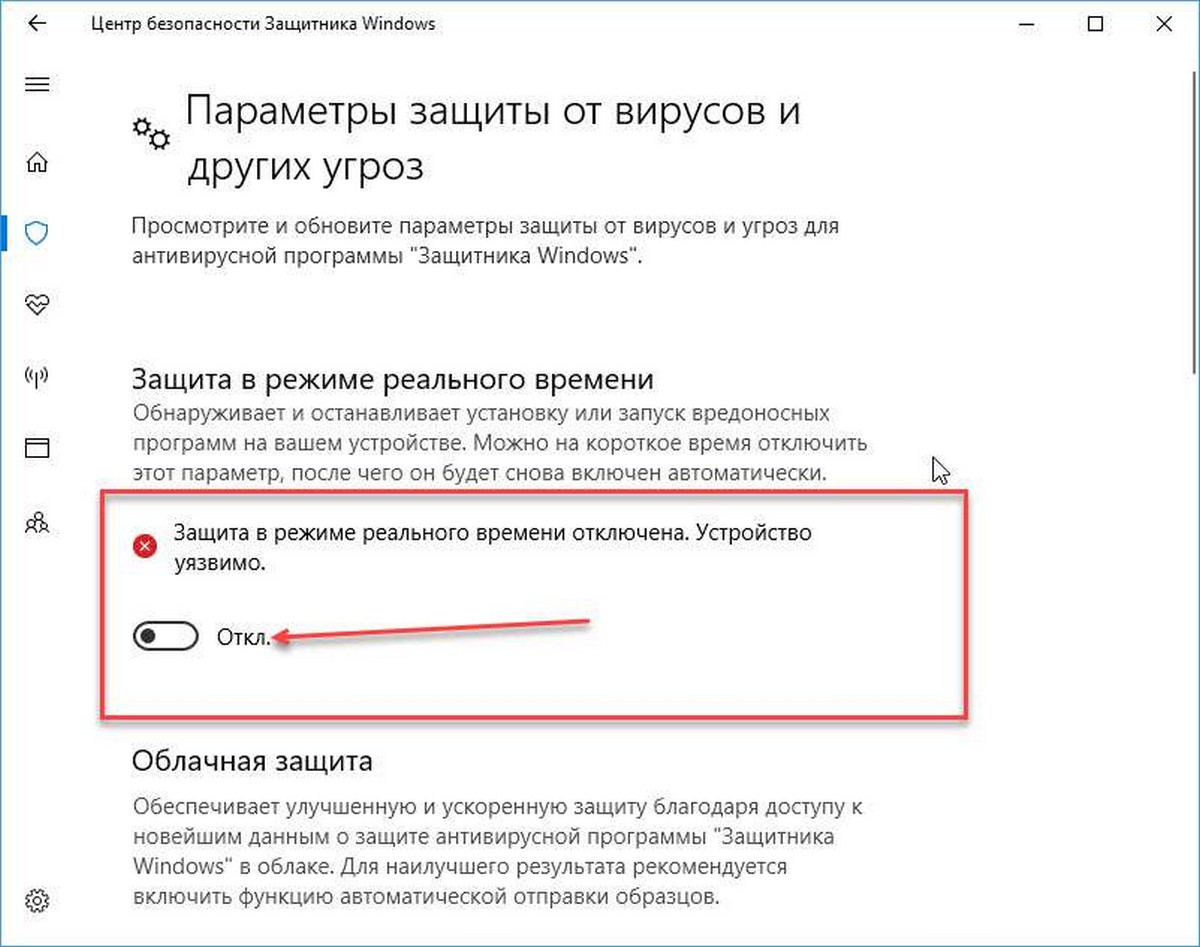
- На следующей странице нажмите ссылку «Параметры защиты от вирусов и угроз».

- На следующей странице установите переключатель «Защита в реальном времени» в положение «Откл.». Это временно отключит Защитник Windows в Windows 10.
К сожалению, невозможно использовать описанный выше метод, если вам необходимо постоянно отключать Защитник Windows. Вместо этого вам нужно использовать Способ 2.
Примечание: Это не приведет к удалению значка Защитник Windows на панели задач, чтобы скрыть значок, обратитесь к следующей статье: Как отключить иконку Защитника Windows, в Windows 10 ?
Способ 2 — Отключить Защитник Windows в Windows 10.
Чтобы навсегда отключить Защитник Windows в Windows 10, выполните следующие действия.
- Откройте «Блокнот» и вставьте следующий текст в новый текстовый документ:
Windows Registry Editor Version 5.00
[HKEY_LOCAL_MACHINE\SOFTWARE\Policies\Microsoft\Windows Defender]
"DisableAntiSpyware"=dword:00000001
[HKEY_LOCAL_MACHINE\SOFTWARE\Policies\Microsoft\Windows Defender\Real-Time Protection]
"DisableBehaviorMonitoring"=dword:00000001
"DisableOnAccessProtection"=dword:00000001
"DisableScanOnRealtimeEnable"=dword:00000001

2. В «Блокноте» нажмите Ctrl + S или выберите пункт «Сохранить как» в меню Файл. Откроется диалоговое окно «Сохранить». Введите или скопируйте-вставьте следующее имя «Отключить Защитник.reg», включая кавычки. Двойные кавычки важны для обеспечения того, чтобы файл получил расширение * .reg, а не * .reg.txt.
Вы можете сохранить файл в любом месте, например, «Рабочий стол».

3. Дважды кликните файл * .reg. которые вы создали. Подтвердите запрос UAC и нажмите «Да», чтобы внести изменения в реестр.
4. Перезагрузите Windows 10.
Вы можете сэкономить время и загрузить готовые к использованию файлы реестра, с их помощью вы можете включить и отключить Защитник.
Загрузите файлы реестра «Отключить Защитник»
Примечание: Файл «Включить Защитник Windows 10.reg» позволяет снова включить защитника Windows. Поэтому нет необходимости создавать точку восстановления вручную перед отключением защитника, если вы планируете включить защитник Windows в будущем.
Способ 3 — Отключить Защитник Windows с помощью скрипта PowerShell
Ниже мы рассмотрим, как создать, простой скрипт PowerShell. При первом запуске, скрипт отключит «Защитник», запустив его второй раз, и он снова включит Защитник Windows. Вам нужно будет запустить сценарий от имени администратора, поскольку обычные пользователи не могут отключать Защитник Windows.
Шаг 1: Откройте «Блокнот» и вставьте в него следующее.
$preferences = Get-MpPreference

Set-MpPreference -DisableRealtimeMonitoring (!$preferences.DisableRealtimeMonitoring)
Сохраните его с расширением файла PS1.
Вы можете открыть PowerShell с правами администратора, указать его на этот скрипт и запустить его. Конечно, вам понадобится более простой способ сделать это, особенно если вы не можете запускать сценарии PowerShell .
Вы можете создать ярлык на рабочем столе, который будет запускать скрипт, вам нужно будет запустить ярлык с правами администратора.
Шаг 2: Кликните правой кнопкой мыши на пустой области рабочего стола и выберите «Создать» → «Ярлык». Вставьте следующее в поле «Укажите расположение объекта», но измените «Путь к скрипту» на фактический путь к скрипту который создали в Шаге 1.
%SystemRoot%\system32\WindowsPowerShell\v1.0\powershell.exe -ExecutionPolicy Bypass -File "Путь к скрипту"
После того, как вы создали ярлык, кликните на нем, правой кнопкой мыши и выберите «Запуск от имени администратора». Когда вы запускаете скрипт, Защитник Windows отключен, вы увидите всплывающее сообщение о отключении.
Внимание!
Защитник Windows не будет автоматически запущен. После того, как вы закончите выполнение нужных задач, вам нужно снова запустить этот скрипт и активировать Защитник Windows.
Все.
- Главная
- Форум
- Личные форумы.
- Полезности от dimo70
DefenderControlPlus — полное отключение или включение Windows Defender без детекта.
|
Последний раз редактировалось: dimo70 (2022-11-08 19:01), всего редактировалось 93 раз(а) _________________ |
Отправлено: 08-Июн-2020 19:58
(спустя 3 месяца 21 день)
Отправлено: 08-Июн-2020 19:58
(спустя 3 месяца 21 день)
dimo70 |
_________________ |
Отправлено: 08-Июн-2020 20:21
(спустя 22 минуты)
Отправлено: 08-Июн-2020 20:21
(спустя 22 минуты)
sergeysvirid |
78108
Пришла в голову идея чего не хватает в данном варианте программы. Так как теперь есть отдельный вариант простого отключения ,то нужен вариант обратного включения. Было бы ну очень замечательно. А то получилось не совсем логично. Есть удаление — удаляем наглухо. Есть отключение — включить обратно не можем этой прогой, нужно другим скриптом. С одной стороны, да, логично. Если есть простое отключение, то нужно добавить такое же простое включение. |
Отправлено: 08-Июн-2020 20:33
(спустя 12 минут)
Отправлено: 08-Июн-2020 20:33
(спустя 12 минут)
UserX |
78111
Главное только вот с «хвостом» и другие части не зацепить бы… и не снести всю Винду. |

Отправлено: 08-Июн-2020 20:41
(спустя 7 минут)
Отправлено: 08-Июн-2020 20:41
(спустя 7 минут)
sergeysvirid |
78116
и не снести всю Винду Если в виртуалке, то не жалко. А иначе никак… «Наш путь тернист, ухабист и не прост, но путь такой мы избирали сами…» |
Отправлено: 08-Июн-2020 21:11
(спустя 30 минут)
Отправлено: 08-Июн-2020 21:11
(спустя 30 минут)
sergeysvirid |
78119
Я бы сам добавил, но нужен скрипт обратного включения Ну так Вы же знаете где взять такой скрипт. |
Отправлено: 08-Июн-2020 21:50
(спустя 38 минут)
Отправлено: 08-Июн-2020 21:50
(спустя 38 минут)
dimo70 |
_________________ |
Отправлено: 08-Июн-2020 22:33
(спустя 43 минуты)
Отправлено: 08-Июн-2020 22:33
(спустя 43 минуты)
Ander_73 |
for /f «skip=2 tokens=3» %%i in (‘reg query «HKCU\Control Panel\International» /v Locale’) do set /a lang=0x%%i Соотв. 1033 = Инглиш, 1049 = Русский и т.д. |
Отправлено: 08-Июн-2020 22:41
(спустя 7 минут)
Отправлено: 08-Июн-2020 22:41
(спустя 7 минут)
Ander_73 |
|
Отправлено: 09-Июн-2020 07:34
(спустя 8 часов)
Отправлено: 09-Июн-2020 07:34
(спустя 8 часов)
sergeysvirid |
|
Отправлено: 09-Июн-2020 17:47
(спустя 10 часов)
Отправлено: 09-Июн-2020 17:47
(спустя 10 часов)
UserX |
78179
Я вчера почти также сделал себе, но только надписи чуть по другому. Мне нравится… Интересно посмотреть на сообщения вашего скрипта, который будет запущен второй раз после предварительного запуска с выбором пункта 3. |

Отправлено: 09-Июн-2020 18:43
(спустя 55 минут)
Отправлено: 09-Июн-2020 18:43
(спустя 55 минут)
UserX |
78182
Решили меня троллить? Зачем мне это? Мне просто не совсем понятна логика выполнения пунктов 1 и 2 при втором запуске вашей прогаммки, если ДО этого она была запущена с пунктом 3. |
Отправлено: 09-Июн-2020 20:37
(спустя 1 час 54 минуты)
Отправлено: 09-Июн-2020 20:37
(спустя 1 час 54 минуты)
xowlet |
78188
UserX, Вам давали дельный совет. Скрипт, в написании которого, между прочим, приняли участие уважаемые конструкторы, только выиграл бы от этого. |
Отправлено: 10-Июн-2020 01:44
(спустя 5 часов)
Отправлено: 10-Июн-2020 01:44
(спустя 5 часов)
sergeysvirid |
|
Отправлено: 10-Июн-2020 02:14
(спустя 30 минут)
Отправлено: 10-Июн-2020 02:14
(спустя 30 минут)
sergeysvirid |
|
Отправлено: 10-Июн-2020 05:19
(спустя 3 часа)
Отправлено: 10-Июн-2020 05:19
(спустя 3 часа)
sergeysvirid |
78183
Мне просто не совсем понятна логика выполнения пунктов 1 и 2 при втором запуске вашей прогаммки, если ДО этого она была запущена с пунктом 3. UserX, |
Страница 12 из 19
Текущее время: 13-Май 09:01
Часовой пояс: UTC + 3
Вы не можете начинать темы
Вы не можете отвечать на сообщения
Вы не можете редактировать свои сообщения
Вы не можете удалять свои сообщения
Вы не можете голосовать в опросах
Вы не можете прикреплять файлы к сообщениям
Вы можете скачивать файлы