
Когда вы используете компьютер на базе ОС Windows, он автоматически создает временные файлы, которые помогают программам работать быстрее. Однако со временем эти временные файлы могут накапливаться и замедлять работу вашего компьютера. Поэтому важно регулярно удалять эти файлы, чтобы повысить скорость и производительность вашего компьютера.
от Anatoliy | Обновнено 07.06.2024 | от Anatoliy
![5 практических способов удаления временных файлов в Windows [2023]](https://s3.amazonaws.com/www-itopvpn-com/blog/20230713/1689245473476375.png "5 практических способов удаления временных файлов в Windows [2023]")
Что означает временный файл?
Временные файлы создаются всякий раз, когда вы запускаете задачу или программу на своем компьютере. Например, при установке программного обеспечения могут быть созданы временные файлы для хранения временной информации об установке. Точно так же, когда вы просматриваете Интернет, создаются временные файлы для хранения данных текущего сеанса, такие как файлы cookie, история просмотров или кеш. Как правило, эти файлы создаются для повышения производительности компьютера за счет ускорения доступа к данным или сохранения необходимой информации.
Почему важно удалять временные файлы
Хотя временные файлы могут быть полезны, они также могут вызвать проблемы при неправильном обращении. Например, они могут занимать место на жестком диске, что может снизить производительность вашего компьютера. Кроме того, временные файлы могут представлять угрозу безопасности вашего компьютера, поскольку они могут содержать конфиденциальную информацию, такую как имена пользователей и пароли, которые могут быть восстановлены киберпреступниками. Регулярно удаляя временные файлы, вы можете снизить эти риски.
Как удалить временные файлы в Windows?
Способ 1: очистить временные файлы, удалив временную папку Windows
Удаление временной папки может освободить место на жестком диске, что может повысить производительность вашего компьютера. Однако важно отметить, что удаление временной папки потенциально может вызвать проблемы с некоторыми программами или приложениями. Вот почему рекомендуется сделать резервную копию всех важных файлов перед удалением временной папки и перезагрузить компьютер после удаления. Действия по удалению временных файлов путем удаления временной папки Windows:
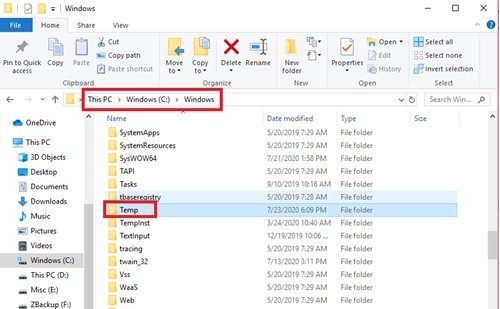
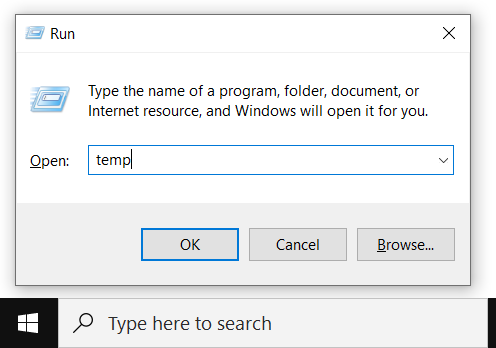
Шаг 1. Нажмите клавиши Windows + R, чтобы открыть диалоговое окно «Выполнить».
Шаг 2. Введите %temp% в диалоговом окне и нажмите клавишу Ok.
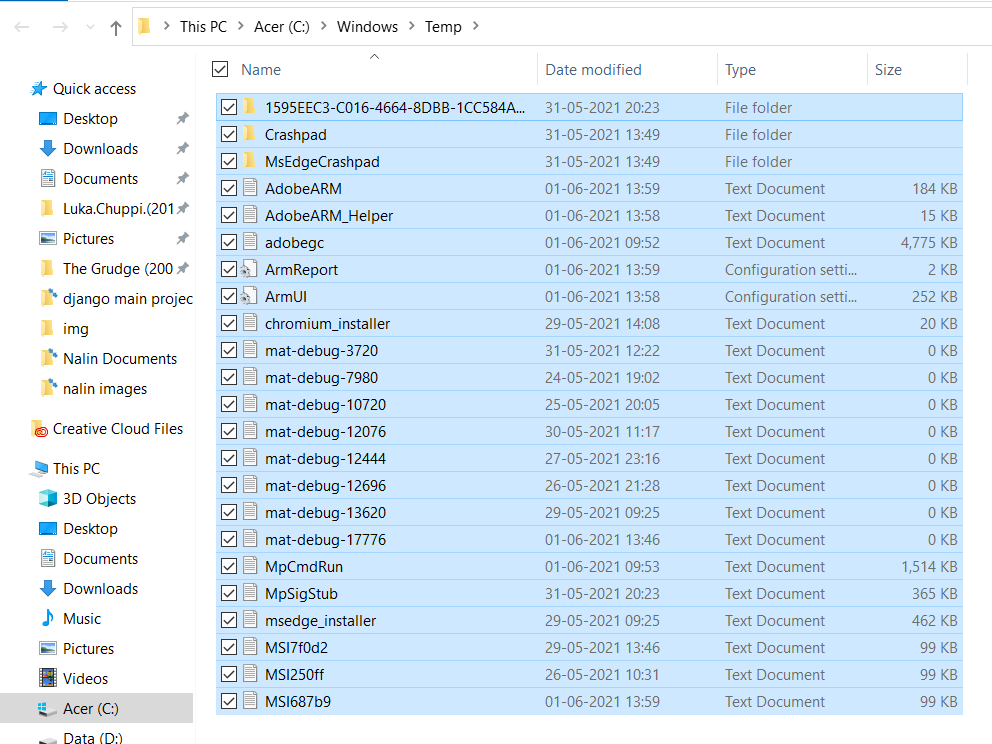
Шаг 3. Выберите все файлы и папки во временной папке. Затем нажмите клавишу Delete, чтобы стереть все временные файлы. Вы также можете удалить их выборочно. Как правило, большинство программ хранят свои файлы в папке с таким же именем, поэтому вы можете щелкнуть по папкам, чтобы проверить содержащиеся файлы, а затем удалить их.
Способ 2: удалить временные файлы с помощью командной строки
Удаление временных файлов с помощью командной строки — это быстрый и простой метод. Командная строка Windows — это очень полезный инструмент, который позволяет выполнять различные команды для выполнения определенных задач. Чтобы удалить временные файлы с компьютера с помощью этого метода, выполните следующие действия:
Шаг 1. Откройте командную строку, нажав клавишу Windows + R, затем введя cmd и нажав Enter.
Шаг 2. Введите cd /d %temp% в окне командной строки и нажмите Enter.
Шаг 3. Введите del * /s /q и нажмите Enter.

Дождитесь завершения процесса удаления.
Способ 3. Очистите временные файлы, очистив диск Windows
Очистка жесткого диска вашего компьютера является важным шагом для поддержания его оптимальной работы. Это связано с тем, что со временем временные файлы накапливаются на жестком диске, занимая место для хранения и замедляя работу вашей системы. Далее мы расскажем вам, как очистить временные файлы, очистив диск Windows.
Поскольку в Windows есть встроенный инструмент для очистки жесткого диска, вам не нужно загружать какое-либо стороннее программное обеспечение.
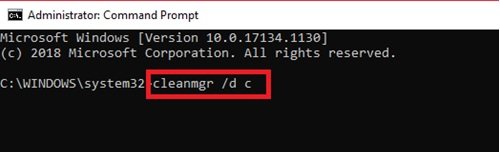
Шаг 1. Откройте командную строку: нажмите клавишу Windows + R, введите cmd и нажмите Enter.
Шаг 2. Введите следующую команду: cleanmgr /d C: и нажмите Enter. Эта команда запустит инструмент очистки диска и попросит вас выбрать раздел, который вы хотите очистить.
Шаг 3. Выберите раздел, который вы хотите очистить, и нажмите OK.
Появится сообщение с вопросом, действительно ли вы хотите удалить файлы, нажмите «Да», чтобы удалить их.
Способ 4. Очистите временные файлы в настройках Windows
Еще один быстрый и простой способ — очистить временные файлы, накопленные на вашем компьютере, в настройках Windows. Этот метод также полезен для очистки других типов ненужных файлов, таких как файлы кэширования, эскизы файлов и файлы журналов.
Шаг 1. Нажмите кнопку «Пуск» и перейдите в «Настройки Windows». Вы также можете нажать клавиши Windows + I, чтобы получить к нему более быстрый доступ.
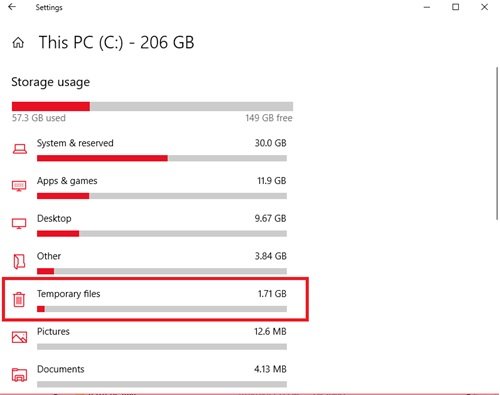
Шаг 2. В разделе «Параметры Windows» нажмите «Система», а затем выберите «Хранилище».
Шаг 3. В разделе «Память» нажмите «Временные файлы».

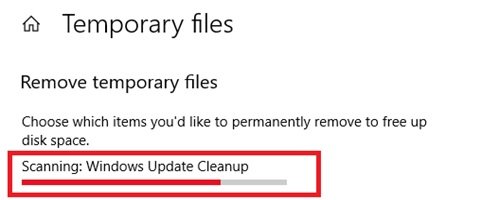
Windows просканирует ваш компьютер на наличие временных файлов. Когда сканирование будет завершено, выберите элементы, которые вы хотите стереть, затем нажмите «Удалить файлы» вверху, чтобы очистить их.

Способ 5. Удаляйте временные фишеры в один клик с помощью Advanced SystemCare
Advanced SystemCare — это универсальный очиститель ПК, который предлагает удобное решение для удаления временных файлов в Windows. В отличие от других методов, требующих технических знаний или сложных ручных действий, Advanced SystemCare предлагает простой и эффективный способ очистки временных файлов одним щелчком мыши. Мы рекомендуем вам сделать резервную копию важных данных, прежде чем использовать этот инструмент для полного удаления временных файлов.
Шаг 1. Загрузите и установите Advanced SystemCare на свой компьютер.
Шаг 2. Запустите программу, нажмите «Пуск».

Шаг 3. Подождите, пока программа оценит состояние вашего компьютера, после завершения сканирования вам нужно только нажать «Исправить», чтобы удалить ненужные файлы на вашем компьютере, включая временные файлы.

Вы также можете настроить элементы для сканирования в ручном режиме.

Помимо очистки временных файлов, Advanced SystemCare также предлагает дополнительные функции, такие как оптимизация системы, защита конфиденциальности в Интернете, ускорение Интернета, защита от вирусов и т. д.
Заключение
Короче говоря, регулярное удаление временных файлов необходимо для повышения производительности вашего компьютера и освобождения места для хранения. Методы, представленные в этой статье, предлагают несколько вариантов выполнения этой задачи, каждый из которых имеет свои преимущества и недостатки. Однако, если вы ищете быстрый и простой способ очистить временные файлы одним щелчком мыши, мы рекомендуем использовать Advanced SystemCare. Это программное обеспечение предлагает функции автоматической очистки временных файлов, а также другие функции для оптимизации производительности вашего компьютера. Регулярно используя Advanced SystemCare, вы сможете поддерживать свой компьютер в хорошем рабочем состоянии и продлить срок его службы.
Your Windows operating system and many third-party applications create hundreds of Temporary files on your system in one single day. Normally, these files do not cause any issue, but when they increase exponentially in numbers, they block valuable space on the hard drive and degrade the overall performance of your system.
By deleting all such Cache files, you can free up a lot of disk space and keep your machine running at peak efficiency. There are many ways to delete Temporary files on Windows 10. Read further to know them.
Temporary files are created by both the Operating System and the software running on your computer system. Temporary files are denoted with a file type of .tmp or prefaced with a tilde (~). Typically, temporary files are created in the Windows Temp folder and are used for many reasons, these include the following:
- OS requirements, like providing space for virtual memory.
- Back-up files created for work-in-progress like MS Office creates for its open documents.
- Work files for applications that hold data while the program is running.
There are two main reasons to clear out the temporary files in Windows 10 or any other version of Windows. These include regaining storage space and improving computer performance. For these reasons, it is advised that you delete the temporary files periodically.
This folder is located at c:/Windows/Temp and mainly used by the operating system to store the temporary files. You can press Win + R key, type ‘temp’ and hit ‘Enter’ to go to this folder.
Used by the current logged in user:
This folder is related to the user logging into the system. You can use the search field on the Windows Start menu to locate this temp folder. Click open the start menu and type %temp% and select the top result from the option.
Here is the guide that will take you through the steps of clearing temporary files. Some of these methods are as follows:
- Using Windows Settings
- Using File Explorer (Manual Method)
- Use “Storage sense” to automatically delete temporary files
- Create a BAT file
- Using Command Prompt
- Using Disk Cleanup
- Use 3rd-party Disk Cleaner software.
Let us look at each of these methods in more detail.
1] Using Windows Settings
Windows allows you to use its Settings App to remove the temporary files. Here is how you can use this application:
1] Open the Start Menu and select the Settings shortcut appearing on the left sidebar. Once you select the little gear-shaped icon, the Windows Settings page opens in front of you.
2] In the new windows, navigate to the System section.
3] From the left side options, select Storage
4] You will see your disk’s option on the right section, select your disk, and click on the Temporary files option.
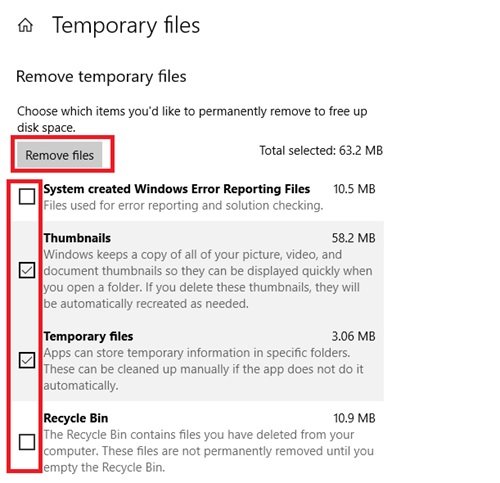
5] Windows will now scan the temporary files folder; once the process is completed, you can select the files you want to remove.
6] To delete check the boxes and then click Remove files to confirm your action.
Done! After you successfully complete the above steps, the junk files will be removed from your system.
2] Using File Explorer (Manual Method)
Using the Windows File Explorer is another simple way of removing temporary files in Windows 10. Follow these steps:
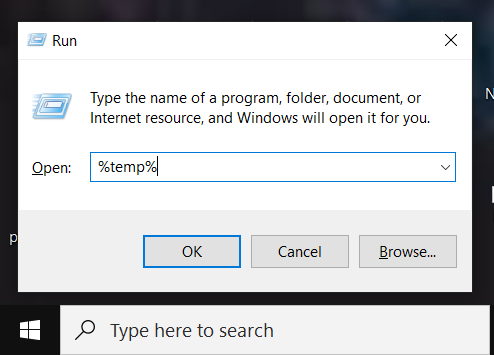
1] Press Win + R keys to open the Run dialog.
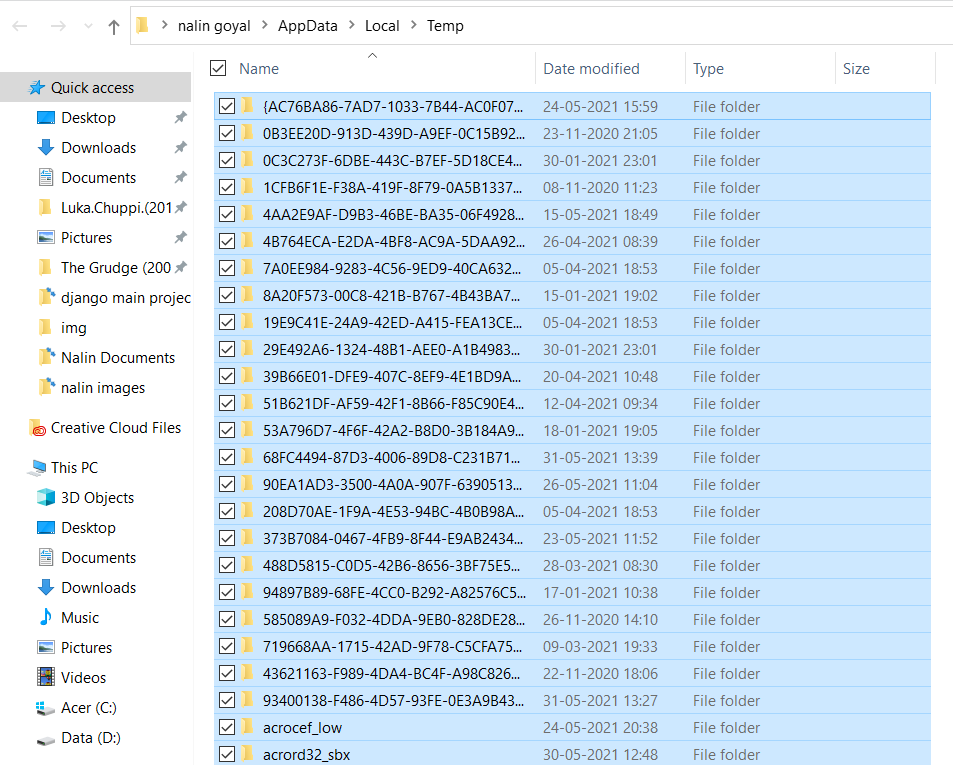
2] Type the command %temp% and press Enter to open the temporary files folder on your system.
3] Use shortcut Ctrl + A to select all the files inside the folder. Once the files are selected, right-click and select the Delete option from the context menu.
Please note – you will need an administrator account to perform this action. Also, once the temporary files are deleted, these are moved to the Recycle Bin hence, restoring them is possible.
3] Use Storage sense to automatically delete temporary files
A user can use Storage Sense to remove temporary files automatically from the system. Here is how you can use:
1] Go to the Settings application.
2] Click on the System option and select Storage from the left-hand panel options.
3] In the Storage section, turn the toggle named Storage Sense ON.
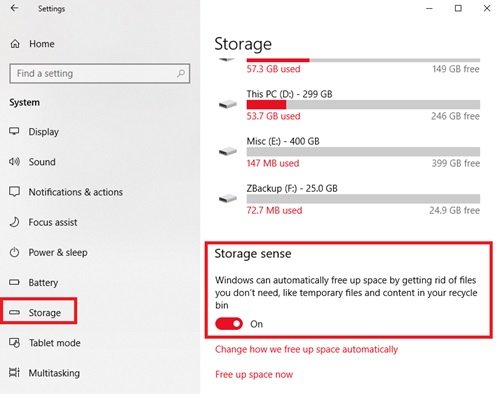
Once you activate Storage sense on your system, it will delete the temporary files including the ones which have been in the recycle bin for more than 30 days. This was the default configuration, but the user can always configure the default settings of Storage Sense.
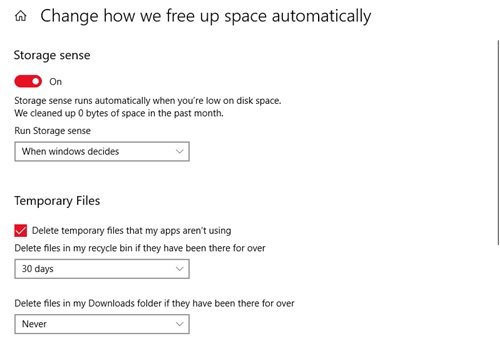
To do this, click Change how we free up space automatically tab and adjust the cleanup settings or run Storage Sense on-demand.
4] Create a BAT file
In this method, you need to create a BAT file. Once this file is created it can be used repeatedly to delete the temporary files on Windows 10. This very simple option works quickly. To create a BAT File, follow these steps:
1] From the Start Menu open the Notepad
2] In the Notepad app, copy the following:
del C:\Users\%username%\AppData\Local\Temp /f /s /q

rd C:\Users\%username%\AppData\Local\Temp /s /q

del c:\Windows\Temp /f /s /q

rd c:\Windows\Temp /s /q

pause
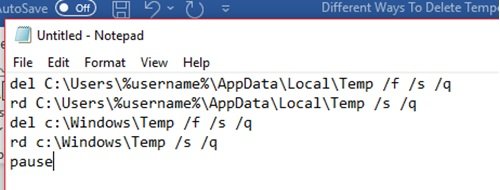
3] Save this file to your desktop using the extension .bat. Here the file is named as Clean Temp.
4] Once done, a BAT file will be created on your desktop.

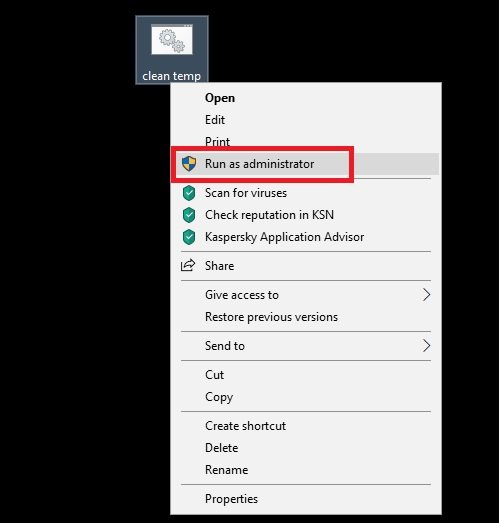
5] Now, whenever you wish to delete the temporary files on Windows 10, right-click on this file and select the option Run as Administrator.
Done!
5] Using Command Prompt
Temporary files on Windows 10 can also be deleted by running some commands in the Command Prompt. Follow these steps:
1] Open the Start Menu and type cmd.
2] In the search results, right-click and click the Run as Administrator option.
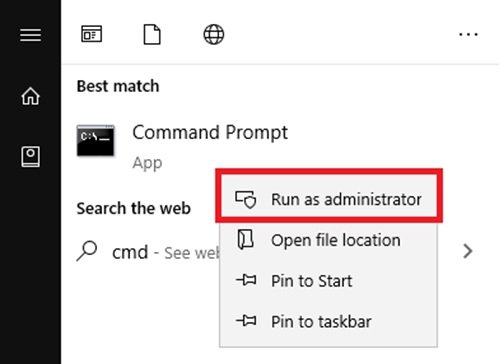
3] Once the command prompt window is open with the administrative right, copy the following command:
cleanmgr /d <driveletter>
Do not forget to alter the <driveletter> field in the command and remove the brackets.
4] Now, execute the command by hitting the Enter key.
Wait for the process to complete.
6] Using Disk Cleanup
The Disk Cleanup utility is another simple and efficient way to clean temporary files on Windows 10. Read our guide Delete Temporary Files using Disk Cleanup Tool.
7] Use 3rd-party Disk Cleaner software
You can also use a free junk file and disk cleaner software to delete your junk files.
TIP: See this post if Temporary files not deleting in Windows.
We hope that this guide did help you in deleting the temporary files on Windows 10 and you successfully made some room for storing new files. If you any similar tricks to perform this process, do share them with us in the comments section below.
Вопрос: Как удалить временные файлы из Windows 10?
“Моя система сильно зависает из-за временных файлов, занимающих ценное место на моем диске. Я хочу удалить их, чтобы освободить место на моем ПК с Windows. Кто-нибудь может сказать мне, как удалить эти временные файлы? И каков наилучший способ убедиться, что я делаю это безопасно и эффективно?”
Временные файлы, также называемые temp или foo-файлами, — это файлы, которые ваша операционная система или программа создает для ускорения и бесперебойной работы вашего компьютера. Временные файлы Windows могут доставлять неудобства, так как чаще всего компьютеры не удаляют их автоматически, и со временем они могут накапливаться, занимая место на вашем диске и иногда приводя к замедлению работы системы и сбоям. Знание того, как удалить временные файлы в Windows 10/11, повысит производительность вашего компьютера, гарантируя его бесперебойную работу. В этой статье мы кратко объясним, где хранятся временные файлы. Мы также обсудим пять лучших способов удаления временных файлов ручными и автоматическими методами.
- Часть 1: Где хранятся Временные файлы?
- Часть 2: Как удалить временные файлы в Windows 10/11?
- Способ 1: Удалите временные файлы в Windows 10/11 с помощью Run
- Способ 2: Удалите временные файлы в Windows 10/11 из настроек
- Способ 3: Автоматическое удаление временных файлов Windows 10/11 путем активации Storage Sense
- Способ 4: Удалите временные файлы в Windows 10/11 с помощью очистки диска
- Способ 5: Используйте командную строку для удаления временных файлов Windows 10/11
- Бонусный совет: Как восстановить удаленные временные файлы в Windows 10/11
- Часто задаваемые вопросы о временных файлах в Windows 10/11
Часть 1: Где хранятся Временные файлы?
Прежде чем мы перейдем к методам удаления временных файлов, давайте сначала разберемся с вопросом – где хранятся временные файлы Windows 10/11?
Временные файлы можно найти расположенными в разных папках в зависимости от того, что их создало. Те, которые создает ОС Windows, обычно хранятся в папке “%system%\Windows\Temp” — вероятно, именно там хранится большинство временных файлов на вашем компьютере. В то время как другие, которые создают “Пользователи”, сохраняются в папке их профиля пользователя “%userprofile%\AppData\Local\Temp.”
Чтобы получить доступ к этим файлам и удалить их, вы можете легко воспользоваться поиском Windows, который мы объясним далее в следующих разделах.
Когда необходимые временные файлы не удаляются регулярно, они превращаются в ненужные файлы, которые накапливаются и замедляют работу вашего компьютера. Чтобы повысить производительность вашей системы, ниже мы перечислили пять способов безопасного удаления временных файлов Windows 10/11. Проверьте их:
Способ 1: Удалите временные файлы в Windows 10/11 с помощью Run
Первый способ удалить временные файлы Windows 10 вручную и полностью — это использовать встроенное в систему средство запуска. Вот как удалить временные файлы в Windows 10 с помощью команды Выполнить:
- Нажмите клавиши Win + R вместе, чтобы открыть диалоговое окно “Выполнить”.
-
Введите %temp% и нажмите “ОК”. Это откроет временную папку.
- Выберите конкретные ненужные папки и временные файлы или выделите все элементы, одновременно нажав клавиши Ctrl + A.
-
Нажмите клавишу “Удалить” и выберите “Да” при появлении запроса. Если в окне использования появится папка, просто нажмите Пропустить, чтобы продолжить удаление выбранных временных файлов.
Удаленные временные файлы отправятся в корзину. Если вы хотите удалить их безвозвратно, перейдите в корзину и очистите ее.
Способ 2: Удалите временные файлы в Windows 10/11 из настроек
Другой способ вручную удалить временные файлы из Windows — это перейти к хранилищу через настройки. Вот как удалить временные файлы в Windows 10/11 из настроек:
-
Откройте настройки Windows 10, нажав клавиши Win + I , и перейдите в раздел «Система».
- Выберите “Хранилище” на левой панели.
-
В разделе “Локальный диск” (C:) выберите «Временные файлы». Если вы не можете увидеть этот параметр, возможно, они скрыты. Итак, выберите “Показать больше категорий”.
-
Вы увидите список временных файлов, которые вы можете удалить. Выберите все временные файлы, которые вы хотите удалить, и нажмите “Удалить файлы”.
Теперь ваш ПК с Windows начнет удалять выбранные временные файлы.
Способ 3: Автоматическое удаление временных файлов Windows 10/11 путем активации Storage Sense
Если вы не хотите удалять временные файлы Windows 10 вручную, вы можете использовать функцию Storage Sense, чтобы удалять их автоматически и с заданной периодичностью. Вот как автоматически удалить временные файлы в Windows 10, активировав Storage Sense:
- Нажмите клавиши Win + I, чтобы открыть настройки.
- Перейдите в раздел «Система» > «Хранилище(Storage)».
-
В разделе Хранилище нажмите на “Настроить Storage Sense или запустите его сейчас”.
-
Включите функцию Storage Sense. Затем установите флажок рядом с опцией “Удалить временные файлы, которые не используются моими приложениями”.
Примечание: Вы также можете запланировать очистку диска и указать, хотите ли вы удалять временные файлы из корзины и папки загрузок по мере необходимости.
- После настройки параметров очистки по требованию нажмите “Очистить сейчас” внизу, Storage Sense начнет освобождать место, удаляя большинство временных файлов, которые оставались в корзине более 30 дней.
Способ 4: Удалите временные файлы в Windows 10/11 с помощью очистки диска
Если на диске не хватает места, вы также можете воспользоваться встроенной утилитой Windows — Очистка диска для сканирования и удаления временных файлов, которые больше не нужны. Давайте посмотрим, как очистить временные файлы в Windows 10 с помощью очистки диска:
-
Нажмите клавиши Win+ E, чтобы запустить “Проводник файлов”. Затем выберите “Этот компьютер”.
-
Щелкните правой кнопкой мыши на жестком диске и затем выберите “Свойства”.
-
На вкладке “Общие” нажмите «Очистка диска».
-
В разделе Файлы для удаления выберите файлы или папки, которые вы хотите удалить. В качестве альтернативы вы можете выбрать “Очистить системные файлы”, очистка диска подсчитает, сколько места система может безопасно освободить.
-
Нажмите “ОК”. Дождитесь окончания уборки, и все будет в порядке.
Способ 5: Используйте командную строку для удаления временных файлов Windows 10/11
Вы также можете использовать командную строку Windows для удаления временных файлов из вашей Windows. Вот как удалить временные файлы в Windows 10 с помощью CMD:
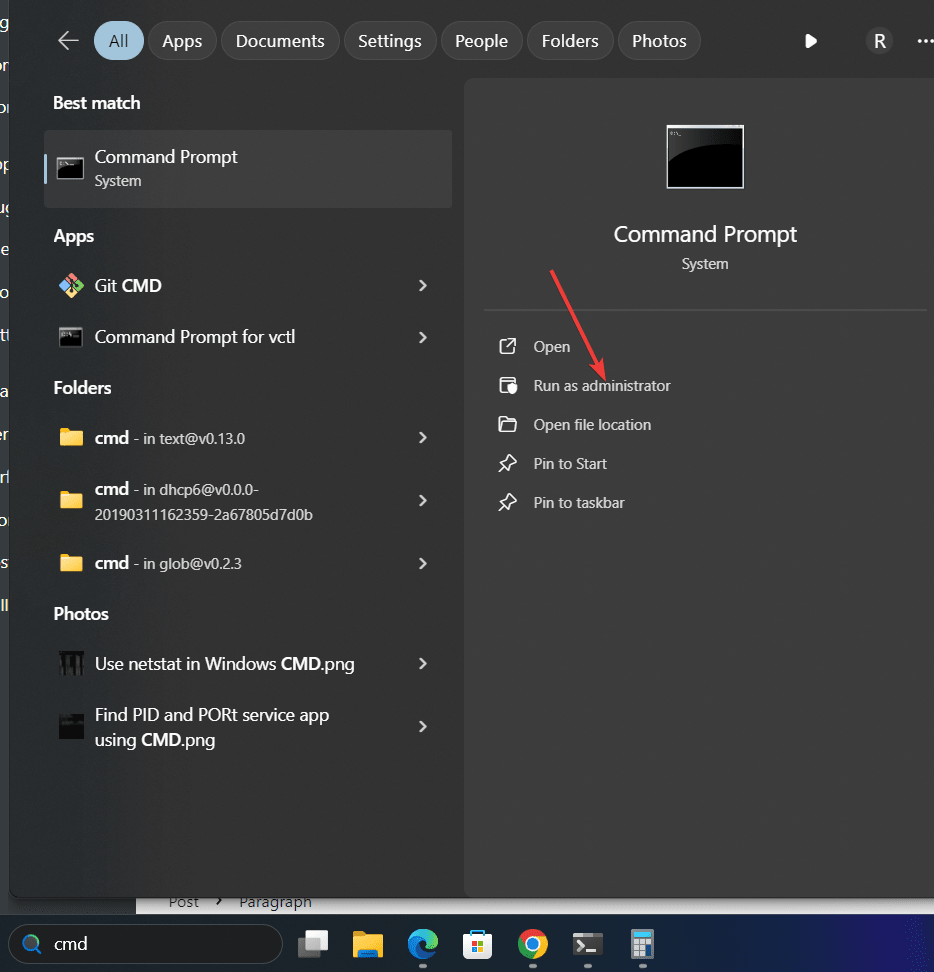
- Нажмите клавиши Win + S и введите “CMD” в появившейся строке поиска.
-
В списке результатов щелкните правой кнопкой мыши командную строку и выберите опцию Запуск от имени администратора.
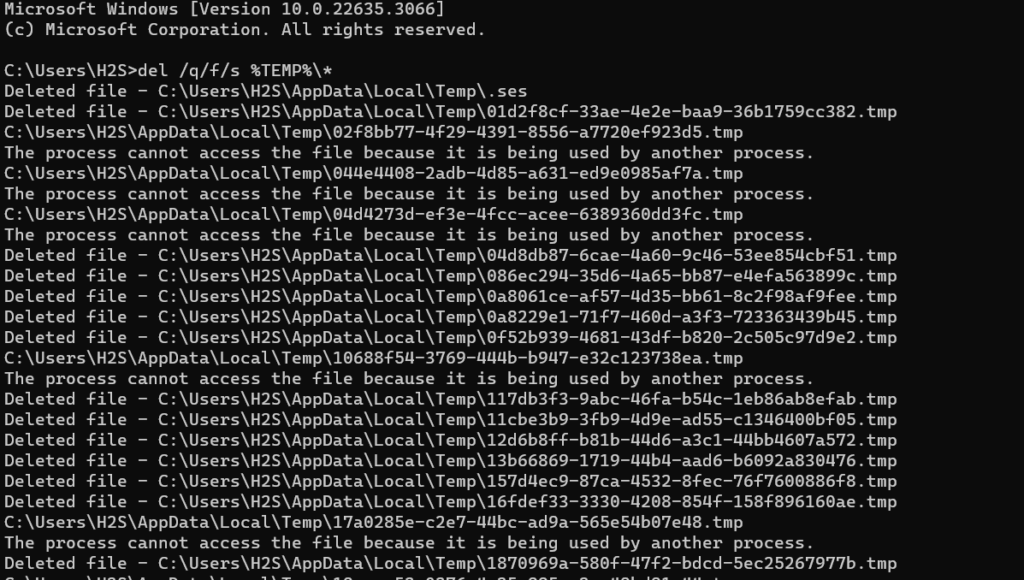
-
Появятся окна командной строки. Введите команду “del /q/f/s %TEMP%\*” и затем нажмите Enter.
- Как только команда будет запущена, вы увидите строки кода, которые указывают на то, что временные файлы были удалены из папки Temp.
Бонусный совет: Как восстановить удаленные временные файлы в Windows 10/11
Иногда при удалении ненужных временных файлов пользователи могут также удалить некоторые временные файлы, которые необходимы приложениям. Если это случилось с вами, вы можете легко восстановить их с помощью стороннего программного обеспечения, такого как Tenorshare 4DDiG Windows Data Recovery. Это универсальное решение для восстановления удаленных, потерянных, скрытых и поврежденных файлов с внешних и внутренних устройств хранения. Вот что еще предлагает 4DDiG:
- Восстанавливает более 1000 типов файлов, включая фотографии, аудио, видео и документы.
- Восстанавливает данные с жестких дисков, USB-накопителей, корзины, SD-карт и цифровых камер.
- Восстанавливает удаленные данные с потерянных разделов, при сбоях системы и вирусных атаках.
- Удобный для пользователя и простой в навигации интерфейс.
- Поддерживает все старые и новые версии ОС Windows.
Вот как вы можете использовать 4DDiG для восстановления ваших удаленных временных файлов:
- Выберите локальный диск
- Просканируйте локальный диск
- Предварительный просмотр и восстановление удаленных временных файлов
Скачайте и установите инструмент 4DDiG на свой компьютер. Запустите инструмент и выберите диск, с которого вы удалили временные файлы.
Нажмите кнопку “Начать». Инструмент будет искать случайно удаленные файлы. Вы также можете указать тип целевого файла в правом верхнем углу.
Как только сканирование начнется, вы можете приостановить или остановите его, чтобы просмотреть нужные файлы. Нажмите “Восстановить” после того, как вы определили свои целевые временные файлы.
Сохраните восстановленные временные файлы в безопасном месте на вашем компьютере, и вы готовы к работе.
Часто задаваемые вопросы о временных файлах в Windows 10/11
Вопрос 1: Почему я должен удалять временные файлы?
Со временем временные файлы занимают место на диске и могут привести к системным ошибкам и зависанию. Таким образом, необходимо удалить избыточные временные файлы, чтобы избежать различных проблем, вызванных поврежденными или зараженными файлами, хранящимися на вашем компьютере, и повысить производительность системы.
Вопрос 2: Безопасно ли удалять временные файлы?
Да, удалять ненужные временные файлы совершенно безопасно. Временные файлы создаются для хранения временной информации, чтобы задача могла быть выполнена плавно во время ее выполнения. И их не нужно постоянно хранить на вашем компьютере. Но имейте в виду, что не удаляйте их, когда они запущены, потому что это может привести к программным ошибкам.
Вопрос 3: Когда вам нужно удалить временные файлы?
Когда у вас заканчивается место для хранения, самое время удалить все или некоторые временные файлы, чтобы освободить место для других файлов и данных и ускорить работу вашего компьютера.
Вывод
Надеемся, мы ответили на ваш запрос “Как удалить временные файлы в Windows 10”, используя пять проверенных методов. Временные файлы необходимо удалить, поскольку они замедляют работу системы, а также занимают много места на диске. Удаление их поможет вам повысить производительность вашей системы.
Однако, если вы случайно удалили какие-то важные данные вместе с временными файлами, вы можете легко восстановить их с помощью программного обеспечения для восстановления данных Tenorshare 4DDiG. Это ваш незаменимый инструмент и лучший вариант для восстановления случайно удаленных файлов со всех видов устройств хранения. Восстановите ваши файлы прямо сейчас всего за три клика!
Tenorshare 4DDiG Data Recovery
4DDiG — это ваш непревзойденный выбор для восстановления всех потерянных данных на компьютере Windows / Mac после различных сценариев потери, таких как удаление, форматирование, RAW и т.д. с более высокой вероятностью успеха.
Скачать Бесплатно
Скачать Бесплатно
Купить Сейчас
Купить Сейчас
Accumulation of Cache files with time can cause the Windows 11 or 10 systems to slow down and also consume costly storage space, especially if you are using M.2 drives. Therefore, clearing Cache files perhaps improves the system’s efficiency if done often, and with that many times small problems could also be solved. Now, coming to the main topic of this article is “how we can use the command prompt in Windows 11 or 10 to delete cache files quickly“; so, let’s see the steps we can follow to achieve this.
Steps to clear different Cache on Windows using CMDOpen Command Prompt as Administrator1: Clear DNS Cache2: Clear Windows System Cache3: Reset Windows Microsoft Store to clear its Cache4: Clear Temporary Files5. Clearing Thumbnail CacheConclusionFAQs
What is the role of Cache files?
The cache files on our system whether it is a PC or smartphone, the role of them is to store the data temporarily that accessed repeatedly by the user so that the app or system can perform better and serve the required data quickly. For example, a browser stores a cache of websites we visit often so that it can load them quickly.
Steps to clear different Cache on Windows using CMD
There are multiple types of cache files generated by different applications on our Windows system. Here we show the commands to clear the most common cache files such as the ones created by applications, DNS cache, Microsoft Windows store cache, and Thumbnail Cache.
Open Command Prompt as Administrator
The first step is ofcourse we need to access the command line interface and that can be done by using the CMD. To open that, click on the Windows Start button and then search for “Command Prompt“, as it appears click on “Run as Administrator“.
1: Clear DNS Cache
DNS cache’s main task like any other cache file is to speed up the process, but instead of Windows system, DNS cache helps in loading websites fast by storing the address of websites to improve our browsing experience. But sometimes this great feature can also cause issues if the information it has cached becomes corrupted or outdated. Let’s take an example, what if a website’s IP address has been changed but still not updated in the DNS cache and it keeps using the old IP address to resolve the website?
In such as scenario, the browser would through an error. But such meager problems can be resolved by just clearing the DNS cache on Windows, Here is the command that, we can use in our command prompt to clear the Windows DNS cache.
ipconfig /flushdnsType the above command and hit the Enter key, in return, it will give a message- “Windows IP Configuration Successfully flushed the DNS Resolver Cache.”
2: Clear Windows System Cache
We can use the inbuilt Disk Cleanup utility of Windows to clear the System cache via GUI, however, this can be possible with CMD as well, a single command will invoke the Disk Cleanup utility which will also clear the system cache, here is the command to follow.
In the command prompt, execute the given command that will in return run the Disk cleanup with a predefined set of options instructed in the command using the flag 1.
cleanmgr /sagerun:13: Reset Windows Microsoft Store to clear its Cache
Windows 10 and 11 come with an application store to install various popular software programs, it is known as the Microsoft Store. Many times common issues such as being stuck while updating apps through the store or apps not downloading or installing properly on Windows, can be resolved by cleaning the Microsoft Store cache.
In your command prompt type “WSReset.exe” and hit the Enter key to clear the Microsoft Store cache. The command will reset the Windows apps store without deleting any already installed applications or changing any user settings.
WSReset.exe4: Clear Temporary Files
To store the information temporarily for performing various actions properly on the system: running programs, file transfer, or the system itself creates temporary files. Although, most of the time these files get deleted automatically, however, if you need to do that manually then for that the command is given below:
Type the following command to delete all files in your Windows TEMP folder:
del /q/f/s %TEMP%\*
5. Clearing Thumbnail Cache
On Windows, the Thumbnail Cache is generated by the system which helps in loading the images and icons faster. For example, when we open a folder with hundreds of images, it will take a few seconds to show their Thumbnails, however, once the system creates the cache for the images, the next time it will quickly load the Thumbnails, and eventually, this will increase the performance and also speed up the process. However, if for some reason the Thumbnail cache is corrupted then here is the command to delete it, so that our system can generate the same again.
First, stop the Windows Explorer process by typing:
taskkill /f /im explorer.exeRunt the command to clear all Thumbnail cache:
del /f /s /q %LocalAppData%\Microsoft\Windows\Explorer\thumbcache_*.db Restart the Explorer again using the command:
start explorer.exe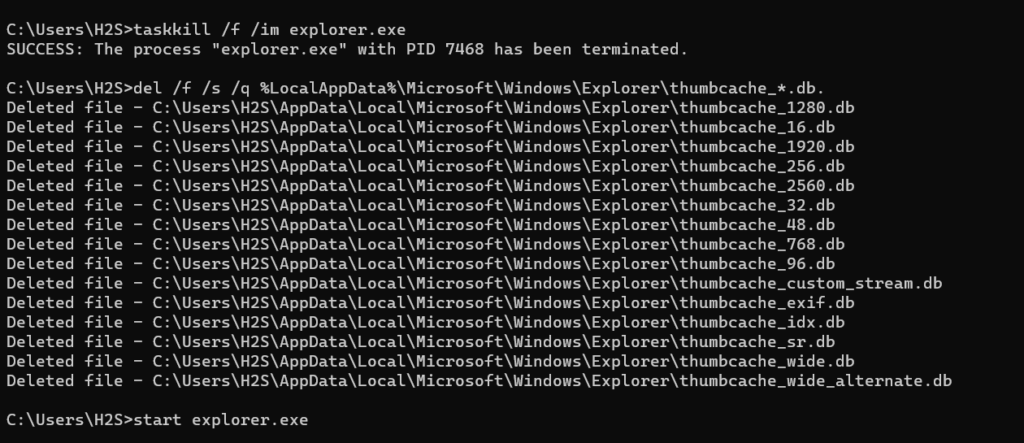
Conclusion
We have listed a few commands that are easy to remember and also help in quickly removing unwanted cache files to resolve various system issues along with freeing up disk space. Apart from that, removing cache files from time to time ensures our system’s smooth performance.
FAQs
Q: Is there any chance that clearing the Windows cache deletes personal files or settings?
A: No, clearing the Windows cache will not affect the user’s settings or files. It will only delete the temporary files that are not essential in the working or operations of the system.
Q: When and how many times a user should clear Cache files?
A: There is no specific time but if you install and uninstall programs often or perform internet browsing a lot then it is a good idea to clear the Cache at least once in a month.
Q: Will deleting the DNS cache increase the internet or web browsing speed?
A: No, clearing the DNS cache could solve some internet connectivity issues if there is a problem in Domain name resolution however, will not directly impact or increase the internet speed.
Over time, temporary files in Windows 10 can accumulate and take up valuable disk space, potentially slowing down your system. These files are usually created by various applications for short-term use, but they can linger long after they’re needed. Knowing how to delete temporary files in Windows 10 is a quick and effective way to free up space and improve your computer’s performance. In this article, we’ll show you several methods to clear temp files safely and efficiently.
Table of Content
- Are Temporary Files the Same as Junk Files?
- Why Should You Delete Temporary Files From Your PC?
- How to Delete Temporary Files in Windows 10?
- Automated Methods
- Method 1: Delete Temporary Files in Windows Using System Settings
- Method 2: Delete Temporary Files in Windows Using Disk Cleanup Tool
- Manual Methods
- Method 1: Delete Temporary Files in Windows Using CMD
- Method 2: Delete All Temp Files Using Run Command
- Method 3: Delete local Temp Files Using Run Command
- Method 4: Delete Local Temp Files Using Prefetch
- Delete Hidden Temporary Files by Cleaning Up Browser Cache
- Delete Browser Cache from Windows 10
Are Temporary Files the Same as Junk Files?
Temporary files are created by programs to store information temporarily. Temporary files speed up tasks by storing data temporarily. For example, while working on a document, a temporary file may be created to save the changes made, reducing the time it takes for processes to complete.
However, not all temporary files become junk. Junk files are unnecessary, or unused files that gather over time, and they may include temporary files. Therefore, while some temporary files may become junk, not all temporary files are considered junk.
Why Should You Delete Temporary Files From Your PC?
Deleting temporary files from your PC is important for several reasons. First, it frees up space on your computer systems, helping your computer run faster. It also maintains your online privacy by removing traces of your activities. Deleting temporary files can improve system performance and prevent potential errors. Moreover, it reduces the risk of malware hiding in these files. In short, advantages include increased storage, enhanced privacy, improved speed, error prevention, and better protection against malware.
How to Delete Temporary Files in Windows 10?
Deleting temporary files ensures that your system doesn’t hang due to unnecessary space occupied by temporary files in your system. So delete these temp files and keep your system cool. Here we have segregated the methods of deleting temp files into automated and manual methods. So go ahead and try these methods and improve your PC’s performance now.
Automated Methods
These methods involve system configuration changes that remove temp files from your Windows regularly. Once you make these changes, your system will delete these temp files periodically when accumulated over time.
Method 1: Delete Temporary Files in Windows Using System Settings
Step 1: Open Settings by pressing Win + I.
Step 2: Go to System > Storage.
Step 3: Now click on “Temporary files», under the “Local Disk (C:)” section.

Step 4: Check the boxes for the types of files you want to remove.
Step 5: Click “Remove files” to clear the cache.

Step 6: Click on “Continue”
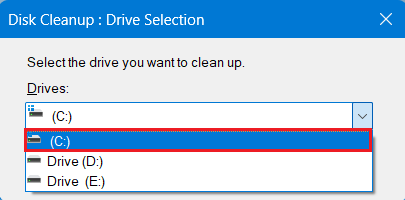
Method 2: Delete Temporary Files in Windows Using Disk Cleanup Tool
Microsoft has included disk cleanup as a part of your Windows 10 that will enable you to get rid of temporary and cached files from your PC.
Step 1: Type “Disk Cleanup” in the search bar.
Step 2: Now select the drive you want to clean up and click “OK.”
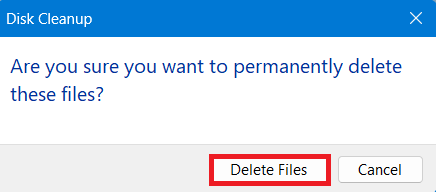
Step 3: Check the box next to file you want to delete, Click “OK” at the bottom.
.png)
Step 4: A Dialogue box to confirmation will appear claiming to permanently delete files from your PC. Click «Delete Files»
Alternatively, you can perform Disk Cleanup Using Powershell Scripts to delete temp files or recycle bin data
Manual Methods
Unlike automated methods these methods don’t remove temp files on regular basis. Manual methods are performed explicitly. Here we have provided four different methods to delete temp files from your Windows PC.
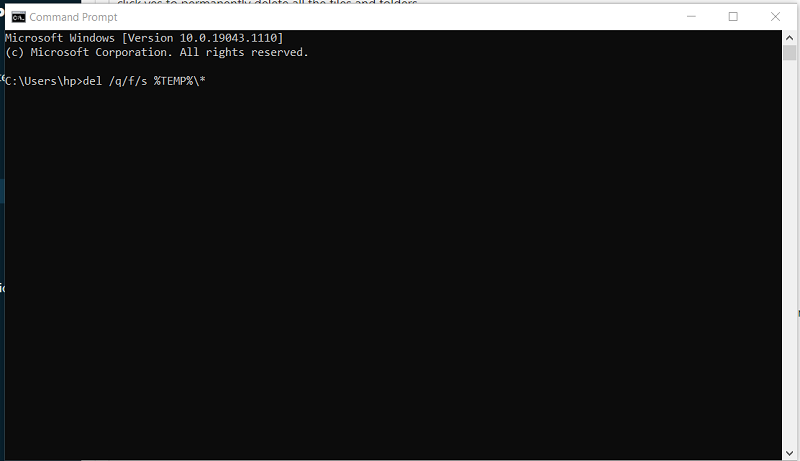
Method 1: Delete Temporary Files in Windows Using CMD
To delete the temporary files from the command prompt:
- Open Command Prompt.
- Run the following command
del /q/f/s %TEMP%\*
Method 2: Delete All Temp Files Using Run Command
To delete all the temporary files follow these simple steps:
Step 1: Press the Windows key + R to open the Run command. Then type «temp» in the search field and press OK.
Step 2: Now, select all temp files using ctrl + A and then press delete.
Method 3: Delete local Temp Files Using Run Command
There are some local temporary files into your system, you can delete these specific files using following steps:
Step 1: Press the Windows key + R to open the Run command. Then type «%temp%» in the search field and press OK.
Step 2: Now, select all local temp files using Ctrl + A and then press delete.
Method 4: Delete Local Temp Files Using Prefetch
To delete the local temporary files using Prefetch follow the below steps:
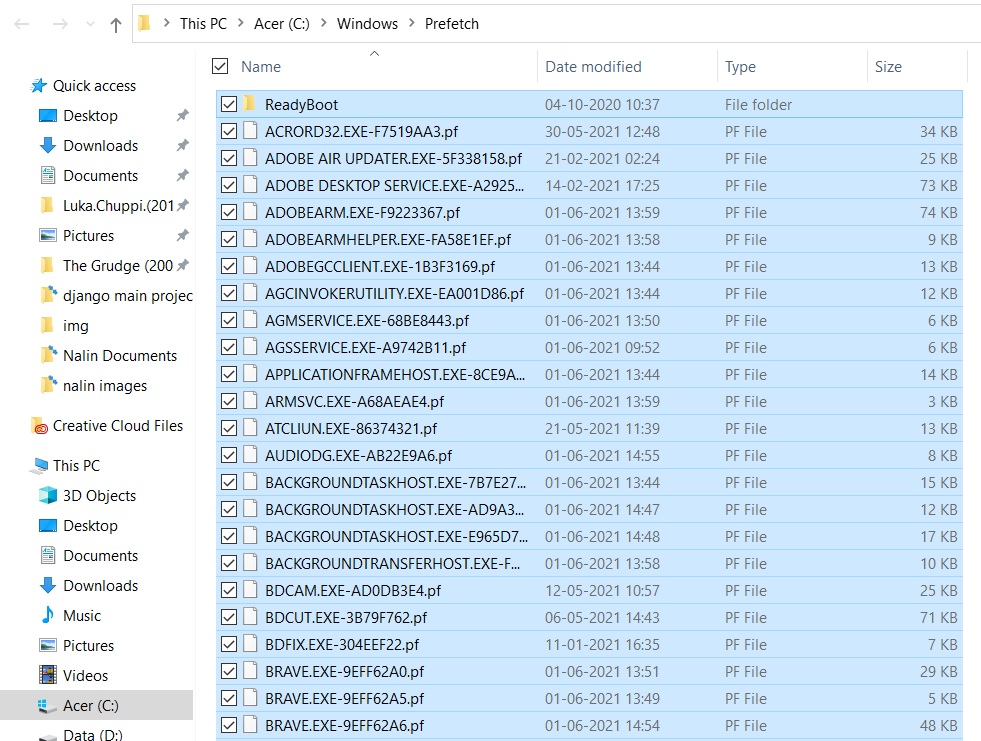
Step 1: Press Windows key + R to open the Run command. Then type «Prefetch» in the search field and press OK.
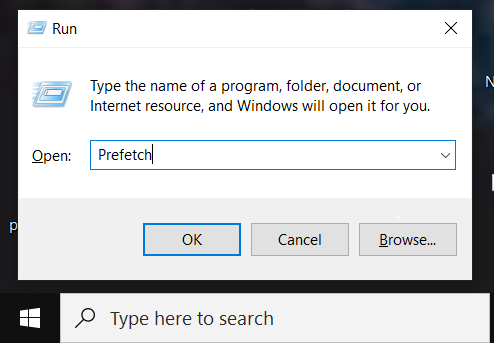
Step 2: Now, select all prefetch files using ctrl + A and then press delete.
Finally, delete all the files from recycle bin too. All temporary files are deleted, and now you are good to go!!
Temporary files are generated in various segments of application programs. Even after deleting all visible temporary files, browser cache often remains unnoticed. Is it important to clear browser cache? The answer is yes! It’s essential to regularly clear these hidden files as they occupy significant space in your system. So don’t overlook the browser cache; cleaning it helps maintain system performance by freeing up storage space and ensuring a smoother experience. Regularly cleaning up browsers cache helps to speed up internet browsing speed.
There are different Browser Cache Stored in Your System like stored data from websites, like images, pages, your saved passwords and other browsing activities are stored to speed up future visits. These Cached data are stored in specific folders on your system.
Delete Browser Cache from Windows 10
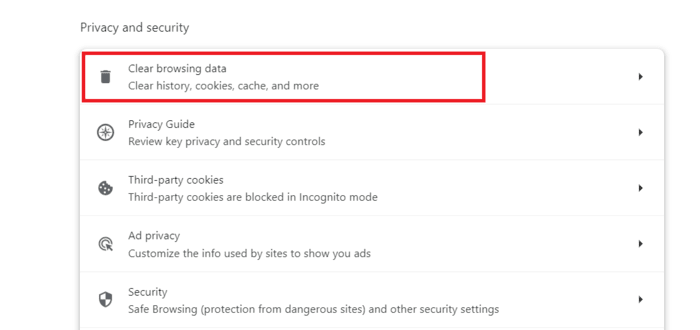
Step 1: Open your browser and Go to Settings > Privacy and security
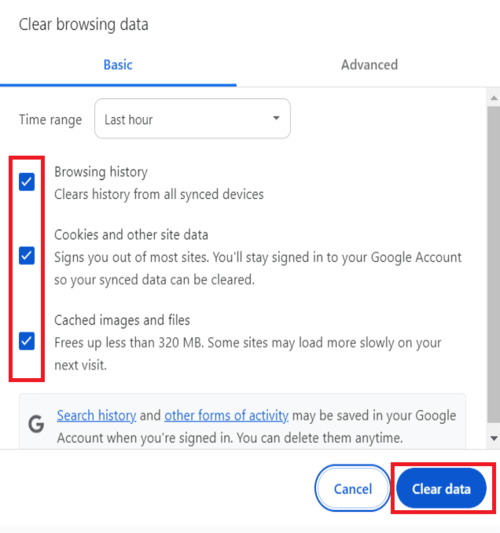
Step 2: Select «Clear Browsing Data».
Step 3: Check the box as per your preference and hit «Clear Data» to remove the cache.
Regularly clearing browser cache helps maintain privacy and ensures updated content.
Alternatively, you can clear your Browser Cache using run command
Conclusion
Regularly deleting temporary files in Windows 10 is an important maintenance task that can help keep your system running smoothly. Whether you use the built-in Disk Cleanup tool, manually delete files from the Temp folder, or automate the process with Storage Sense, these methods will ensure that your system remains clutter-free. By following the steps outlined in this guide, you can easily clear temp files in Windows 10 and enjoy a more responsive computer.
Also Read
- How to Format a Hard Drive in Windows?
- How to clean temporary files from Ubuntu?
- How to Create Partitions of a Hard Drive in Windows 10?