
Даже полезные программы иногда мешают работе. Например, встроенный в операционную систему защитник периодически блокирует установку стороннего софта или замедляет устройство. В этот момент приходится выяснять, как отключить антивирус Windows. Убрать его возможно как на время, так и насовсем.
Зачем отключать
В Windows 10 и 11
В Windows 7
После отключения
Чек-лист
Зачем отключать
В Windows 10 и 11
В Windows 7
После отключения
Чек-лист

Разберемся, как отключить антивирус в разных версиях Windows. Выясним, зачем иногда требуется временная деактивация встроенной защиты, какие при этом возникают риски, и что обязательно нужно сделать после отключения.
Стоит ли отключать Windows Defender и когда это может понадобиться
Windows Defender запускается в фоновом режиме и, подобно другим антивирусам, защищает компьютер от вредоносных программ. Отключая защиту, вы оставляете компьютер уязвимым, однако иногда приходится пойти на риск.
Отключение может понадобиться в нескольких случаях.
-
При установке определенных программ или игр, которые ошибочно распознаются как угрозы.
-
Для тестирования программного обеспечения или системных настроек.
-
При переходе на сторонний антивирус — например, Kaspersky, Avast и другие.
-
Когда Defender потребляет слишком много ресурсов и тормозит работу операционной системы.
Помните: не стоит надолго оставлять компьютер совсем без защиты. Если выключили «Защитника Windows», будьте особенно осторожны при загрузке файлов и серфинге в интернете, чтобы не заразить систему вредоносным ПО.
Как отключить защиту Windows 10 и 11
Современные версии операционной системы позволяют временно деактивировать защитник. Также существуют методы его полного отключения. Пошагово разберем все варианты.
Через «Параметры»
1. Откройте «Параметры» с помощью сочетания клавиш Win + I, выберите «Конфиденциальность и защита», далее «Безопасность Windows».

2. Откройте раздел «Защита от вирусов и угроз», после чего переходите в настройки.


3. Перетащите ползунок защиты в режиме реального времени в положение «Выключено».

Алгоритм временно отключает защиту. Она включится автоматически после перезагрузки. Можно сразу активировать Defender. Для этого достаточно вернуть ползунок в положение «Включено».
Учтите, что уже запланированную проверку антивирус выполнит, но новые файлы не тронет до следующей диагностики.
Через реестр
Деактивировать программу насовсем получится через реестр. Схема тоже несложная.
1. Чтобы попасть в реестр, нажмите Win + R, введите команду regedit, затем задайте путь или пройдите его вручную: HKEY_LOCAL_MACHINE\SOFTWARE\Policies\Microsoft\Windows Defender.

2. Щелкните мышкой справа, чтобы создать параметр DWORD.

3. Дайте ему имя DisableAntiSpyware.
4. В графе «Значение» поставьте единицу. Отправьте компьютер на перезагрузку.

5. Чтобы вновь активировать защиту, поставьте нулевое значение или лишите параметр имени.
Важно. Этот способ работает только в старых версиях платформы безопасности, выпущенных до августа 2021 года.
Если у вас установлена платформа антивируса версии 4.18.2108.4 или новее (а это практически все системы на Windows 10 версии 1903+ и Windows 11), то параметр DisableAntiSpyware больше не действует. Его просто игнорирует система.
Это связано с тем, что Microsoft включила функцию Tamper Protection (защита от несанкционированных изменений). Она блокирует любые попытки отключить встроенную защиту через реестр или сторонние программы, чтобы злоумышленники не могли сделать это без ведома пользователя.
Чтобы проверить свою версию платформы безопасности, откройте «Центр безопасности Windows» → «Параметры» → «О программе». Найдите строку «Платформа антивируса».
Если версия 4.18.2108.4 и выше — способ с реестром работать не будет. Отключить Defender можно в настройках, как мы описывали выше, или при установке другого антивируса. Чтобы избежать конфликта ПО, встроенный защитник Windows отключится автоматически.

Через редактор групповой политики
Профессиональные и корпоративные версии Windows 10 и 11 оснащены редактором групповой политики. Он тоже позволяет избавиться от срабатывания защиты навсегда.
1. Зажмите Win + R, используйте команду gpedit.msc.
2. По папкам проделайте такой путь: «Конфигурация компьютера» → «Административные шаблоны» → «Компоненты Windows» → «Антивирусная программа».

3. Откройте параметр «Выключить антивирусную программу» и выберите опцию «Отключено».

4. В папке «Антивирусная программа» также есть раздел «Защита в режиме реального времени». Деактивируйте все элементы.
5. Антивирус отключится после перезагрузки. Включить его получится, если возвратить параметры в прежнее положение.
Как отключить защиту Windows 7
В «семерке» процесс немного другой, но выключить встроенный антивирус тоже несложно.
1. Откройте «Панель управления» и перейдите в блок «Защитник Windows».
2. Нажмите «Программы» → «Параметры» → «Администратор».
3. Снимите галочку с опции «Использовать эту программу» и сохраните изменения.
Что делать после отключения встроенного антивируса «Защитник Windows»
После выполнения задач, которым мешал Defender, не забывайте включать его снова. В процессе работы с отключенным защитником придерживайтесь мер безопасности.
-
Установите альтернативный антивирус или хотя бы блокировщик рекламы, если у вас его еще нет.
-
Ограничьте время работы без защиты — оставлять так ПК насовсем не стоит.
-
Не посещайте сомнительные сайты, не загружайте и не открывайте подозрительные файлы.
-
Пользуйтесь только проверенными сетями Wi-Fi.
-
Проведите полное сканирование системы, когда закончите и включите встроенный антивирус снова.
Если антивирус каждый раз ложно блокирует определенные программы или файлы, а отключать его не хочется, некоторые папки можно внести в исключения Defender. Но не злоупотребляйте этой функцией, добавляйте только проверенные объекты.
Чек-лист: как отключить антивирус Windows Defender
Выключать антивирус не рекомендуется, но если защита блокирует программы или затрудняет работу, это допустимо.
-
Снимите защиту в реальном времени. Вам нужны параметры «Безопасность Windows» → «Защита от вирусов» → «Управление настройками».
-
Для Windows 7 — снимите галочку «Использовать эту программу» в параметрах защитника.
-
Соблюдайте осторожность и не блокируйте антивирус надолго.
-
Установите альтернативную антивирусную программу.
-
После повторной активации защиты просканируйте систему на вирусы.
Если по какой-то причине вам потребовалось отключить Защитник Windows 11, который сейчас называется Microsoft Defender навсегда или на время, сделать это можно несколькими способами: вручную или с помощью сторонних программ и скриптов.
В этой инструкции подробно о работающих способах отключения Microsoft Defender в Windows 11, часть из которых работает постоянно, часть — отключают его лишь на время.
Отключение антивирусной защиты в окне «Безопасность Windows»
Базовый способ отключения Защитника Windows 11, работающий лишь некоторое время, после чего система вновь включает его — использование интерфейса «Безопасность Windows». Обратите внимание: если причина необходимости отключения антивируса в том, что он удаляет нужные файлы, вы можете просто добавить папки с ними в исключения.
Учитывайте, что всё далее описанное вы выполняете под свою ответственность: возможно, программу, которую не даёт использовать Защитник Windows, действительно не стоит запускать. Чтобы отключить Microsoft Defender в его параметрах, достаточно выполнить следующие шаги:
- Откройте окно «Безопасность Windows», используя значок в области уведомлений, либо Параметры — Конфиденциальность и защита — Безопасность Windows.
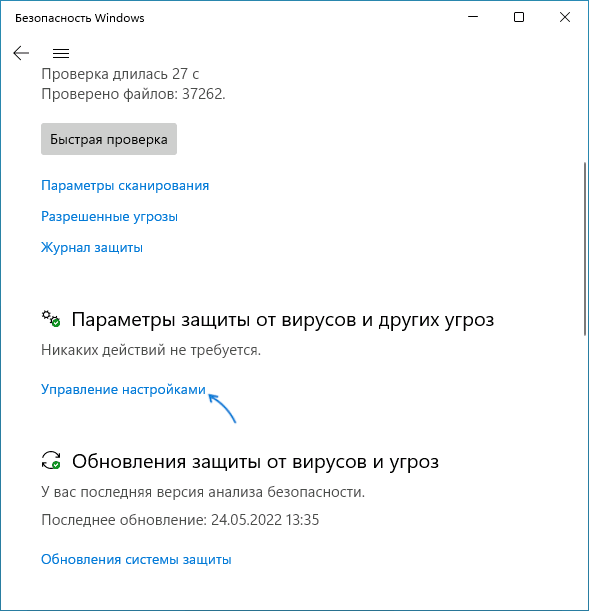
- Откройте пункт «Защита от вирусов и угроз».

- В разделе «Параметры защиты от вирусов и угроз» нажмите «Управление настройками».
- Отключите пункты «Защита в режиме реального времени», «Облачная защита», «Автоматическая отправка образцов». Если вы отключаете Microsoft Defender, чтобы использовать какие-то программы, которые модифицируют его работу, отключите также пункт «Защита от подделки» в этом же окне.

- Если после проделанных действий какие-то программы не запускаются с сообщением «Вредоносный файл», в окне «Безопасность Windows» зайдите в раздел «Управление приложениями/браузером», откройте «Параметры защиты на основе репутации» и отключите проверку и блокировку потенциально нежелательных приложений, а в свойствах самого файла, если он был скачан из Интернета поставьте отметку «Разблокировать» и примените настройки.


В результате функции антивирусной защиты Microsoft Defender будут временно отключены. Однако, через некоторое время или после перезагрузки защита вновь будет включена.
Скрипт для полного отключения Защитника Windows 11
ToggleDefender — простой bat-скрипт, полностью отключающий все функции защиты в Защитнике Windows (Microsoft Defender), фильтр SmartScreen, уведомления, а также используемые ими службы. Один нюанс: включить антивирус повторно после использования скрипта может быть затруднительным, поэтому рекомендую предварительно создать точку восстановления системы.
Использование скрипта для отключения защитника:
- Перейдите в Безопасность Windows — Защита от вирусов и угроз — Управление настройками параметрами защиты от вирусов и угроз и отключите опцию «Защита от подделки».

- Скачайте скрипт с официального сайта https://www.majorgeeks.com/files/details/toggledefender.html
- Откройте свойства скачанного файла (правый клик — свойства), установите отметку «Разблокировать» и нажмите «Ок».
- Запустите скачанный скрипт.
- Через короткое время появится окно с текущим статусом Защитника Windows и предложением отключить его — «Disable Windows Defender?». Нажмите «Да».
- В течение короткого времени (несколько секунд, какие-либо уведомления появляться не будут) защитник будет полностью отключен, но желательно также перезагрузить компьютер.

- Внутри скрипта в разделе «Personal Configuration Tweak» присутствуют дополнительные опции, например параметры для включения и отключения отправки образов в облако или защиты от потенциально нежелательных программ, которые можно расскомментировать, чтобы они также применялись при использовании скрипта.


Если вы также захотите убрать значок «Безопасность Windows» из области уведомлений панели задач, просто отключите его автозагрузку (подробнее: Как убрать программы из автозагрузки Windows 11).
Полное отключение антивирусной защиты Microsoft Defender в редакторе локальной групповой политики и редакторе реестра
Для использования этого метода предварительно потребуется отключить опцию «Защита от подделки» в Защитнике Windows, для этого:
- Откройте окно «Безопасность Windows», перейдите в пункт «Защита от вирусов и угроз».
- Нажмите «Управление настройками» в пункте «Параметры защиты от вирусов и угроз».
- Отключите пункт «Защита от подделки».
Дальнейшие шаги можно выполнить в редакторе реестра (в Windows 11 любой редакции) или в редакторе локальной групповой политики (только Pro и Enterprise).
В редакторе реестра
- Нажмите клавиши Win+R на клавиатуре, введите regedit и нажмите Enter.
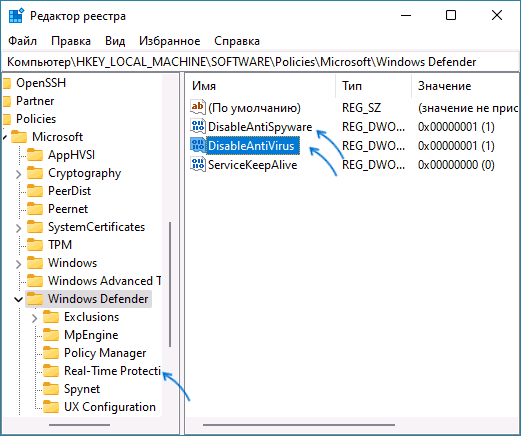
- Перейдите к разделу реестра HKEY_LOCAL_MACHINE\SOFTWARE\Policies\Microsoft\Windows Defender
- В правой панели редактора реестра нажмите правой кнопкой мыши, выберите «Создать» — «Параметр DWORD» и создайте параметр с именем DisableAntiSpyware.
- Дважды нажмите по параметру и задайте значение 1 для него.
- В том же разделе создайте параметр DisableAntiVirus и задайте значение 1 для него.
- В разделе Windows Defender создайте подраздел с именем Real-Time Protection, а в нём — параметр DWORD с именем DisableRealtimeMonitoring и значением 1.

- Обновление: вариант из этого, 7-го шага, похоже, больше не работает, параметры возвращаются в исходное состояние. В разделе реестра HKEY_LOCAL_MACHINE\SOFTWARE\Microsoft\Windows Defender (потребуется получить права на изменение раздела реестра, может потребоваться перезагрузка в безопасном режиме) создайте параметры DWORD с именами DisableAntiSpyware, DisableAntiVirus и ServiceStartStates и установить значение 1 для каждого из них, перезагрузить компьютер. Для отключения защиты от потенциально нежелательных программ, измените значение параметра PUAProtection в этом разделе на 0.
- Если необходимо отключить службы, имеющие отношение к работе Защитника Windows, перезагрузите компьютер в безопасном режиме, а затем измените значение параметра Start на 4 в каждом из следующих разделов реестра:
HKEY_LOCAL_MACHINE \SYSTEM\CurrentControlSet\Services\Sense\
HKEY_LOCAL_MACHINE \SYSTEM\CurrentControlSet\Services\WdBoot\
HKEY_LOCAL_MACHINE \SYSTEM\CurrentControlSet\Services\WdFilter\
HKEY_LOCAL_MACHINE \SYSTEM\CurrentControlSet\Services\WdNisDrv\
HKEY_LOCAL_MACHINE \SYSTEM\CurrentControlSet\Services\WdNisSvc\
HKEY_LOCAL_MACHINE \SYSTEM\CurrentControlSet\Services\WinDefend\
После выполнения указанных действий, перезагрузите компьютер, защита будет отключена.
В редакторе локальной групповой политики
- Нажмите правой кнопкой мыши по кнопке «Пуск», выберите пункт «Выполнить», введите gpedit.msc и нажмите Enter.
- В открывшемся редакторе локальной групповой политики перейдите к разделу Конфигурация компьютера — Административные шаблоны — Компоненты Windows — Антивирусная программа Microsoft Defender.
- Дважды нажмите по параметру «Выключить антивирусную программу Microsoft Defender», выберите пункт «Включено» и примените настройки.

- Зайдите во вложенный раздел «Защита в режиме реального времени» и включите политику «Выключить защиту в реальном времени».

После выполнения указанных действий может потребоваться перезагрузка компьютера.
Полное отключение в программе Defender Control
Бесплатная утилита Defender Control — одна из самых эффективных утилит для полного отключения Защитника Windows и его последующего включения при необходимости, регулярно обновляемая с учётом последних изменений защиты.
Внимание: утилита имеет множество обнаружений в VirusTotal. Большинство из них говорит о том, что она служит для отключения Microsoft Defender и обнаружение типа «Not-a-virus», но есть и иные. Гарантий полной безопасности дать не могу.
Порядок использования утилиты будет следующим:
- Перейдите в Безопасность Windows — Защита от вирусов и угроз — Управление настройками (в разделе Параметры защиты от вирусов и угроз) и отключите опцию «Защита от подделки».
- Скачайте архив с Defender Control с официального сайта https://www.sordum.org/9480/defender-control-v2-1/
- Распакуйте архив в папку, которую предварительно следует добавить в исключения Защитника Windows (либо отключить его первым способом). Внутри архива есть ещё один архив, пароль — sordum, распакуйте и его тоже.
- Нажмите правой кнопкой мыши по файлу dControl в папке, выберите пункт «Свойства», установите отметку «Разблокировать» и нажмите Ок. Запустите файл dControl.exe.
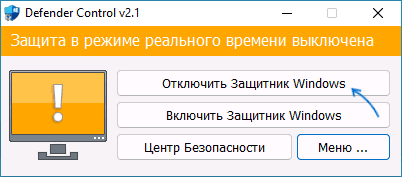
- Интерфейс программы очень простой, в разделе Menu — Languages можно включить русский язык интерфейса. В программе есть 3 состояния с соответствующим цветом оформления: Зелёный — Защитник Windows включен, Красный — отключен, Оранжевый — частично отключен (например, в параметрах).

- Для того, чтобы полностью отключить Защитник Windows в Defender Control, просто нажмите соответствующую кнопку и дождитесь смены статуса.

После отключения, программу можно закрыть, но лучше сохранить где-то, либо помнить о том, где её можно скачать при необходимости на случай, если включить Microsoft Defender потребуется снова.
Readers help support Windows Report. We may get a commission if you buy through our links.
Read our disclosure page to find out how can you help Windows Report sustain the editorial team. Read more
Disabling Windows Defender permanently can be tricky since it involves modifying the integral settings of Windows. A wrong step while making the changes might result in the malfunction of your computer.
In this guide, we will discuss all the methods that can help you turn off Windows Defender on your Windows 11 computer for good.
How to temporarily disable Windows Defender on Windows 11?
If you want to disable Windows Defender for a while to make some changes to your computer, follow these steps:
- Press Windows + I to open Settings.
- Go to Privacy & Security and click Windows Security.

- Now go to Virus & threat protection.
- Click Manage Settings.
- Now toggle off the switch underneath Real-time protection.


Note: Real-time protection will be active after you restart your computer.
Now that we covered the situation in which you want to disable the Windows Defender app on Windows 11 for a limited amount of time, we can also look into how to do it permanently.
How do I permanently disable Windows Defender on Windows 11?
Before making changes, turn off the Real-time protection of Windows Defender so that it doesn’t hinder the process.
1. Change Folder Ownership
1.1 Boot your computer in Safe Mode
- Press Windows + R to get the Run console.
- Type msconfig to open System Configuration.

- Go to Boot. Under Boot options, put a checkmark to select Safe boot and Minimal.

- Click Apply and OK.
- Your computer will restart in Safe mode.


1.2 Modify Permissions
- Press Windows + E to open Windows Explorer.
- Now copy and paste the below-mentioned path and hit Enter.
C:\ProgramData\Microsoft\Windows Defender - Navigate to the Platform folder and right-click on it to select Properties.

- Go to the Security tab, then click Advanced.
- On Advanced Security Settings for Platform, locate Owner and click Change.

- In the Enter the object name to select box, type the Owner name and click OK.

- Under Permission Entries, select System and click Remove.
- Head to Trusted Installer and click Remove.
- Checkmark Replace owner on subcontainers and objects.
- Now put a checkmark on Replace all child object permission entries with inheritable permissions from this object.
- Click Apply and then OK.


1.3 Disable Safe Boot
- Press Windows + R to open the Run window.
- Type msconfig and hit Enter.
- Go to boot and select Boot options.
- Uncheck the Safe boot option.
- Click Apply and OK.
- Restart your computer.

2. Using Regedit
Editor’s tip
Before making any changes to Registry Editor values, make sure you take a backup. To do that, on the Registry Editor window, click File, then select Export. Now save the .reg file to a desirable location.
- Boot your computer to Safe Mode by following the steps mentioned above.
- Press Windows + R to open the Run window.

- Type regedit and hit Enter.
- Copy and paste these paths to the address bar of Registry Editor one by one and for the DWORD Start, change the Value data to 4 and click OK.

Computer\HKEY_LOCAL_MACHINE\SYSTEM\CurrentControlSet\Services\Sense
Computer\HKEY_LOCAL_MACHINE\SYSTEM\CurrentControlSet\Services\WdNisDrv
Computer\HKEY_LOCAL_MACHINE\SYSTEM\CurrentControlSet\Services\WdNisSvc
Computer\HKEY_LOCAL_MACHINE\SYSTEM\CurrentControlSet\Services\WdBoot
Computer\HKEY_LOCAL_MACHINE\SYSTEM\CurrentControlSet\Services\WinDefend
Computer\HKEY_LOCAL_MACHINE\SYSTEM\CurrentControlSet\Services\WdFilter
Next, follow Disable Safe Boot steps to get your computer to normal mode.
These steps can help you disable Windows Defender permanently and also prevent issues like can’t turn off real-time protection on Windows 11,
- Microsoft Defender will allow SOC teams and admins to refine the threat detection process
- How to Delete Windows 11 Saved Passwords
- How to Download DirectX 12 Agility SDK [Installation Guide]
3. Using Group Policy Editor
3.1 Disable Tamper Protection
- Press Windows + I to get Settings.
- Go to Privacy & Security and click Windows Security.
- Click Virus & threat protection.
- Now click Manage Settings.
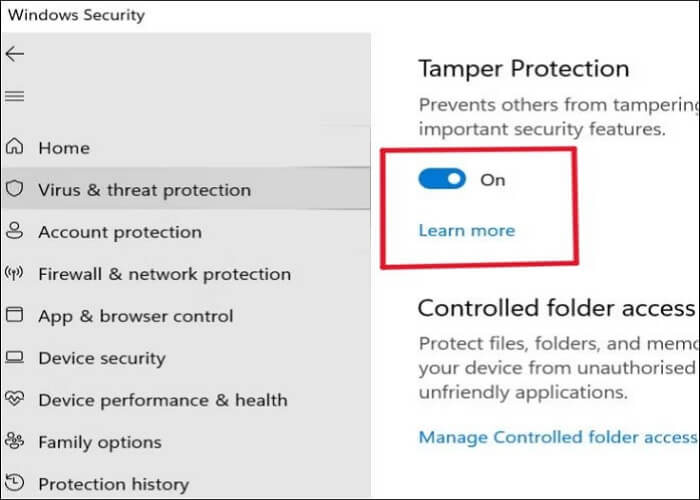
- Toggle off the switch under Tamper Protection and press OK to confirm.

3.2 Make changes in Group Policy Editor
- Press Windows + R to open the Run console.
- Type gpedit.msc and hit Enter to open Group Policy Editor.
- Follow this path to get to Microsoft Defender Antivirus.
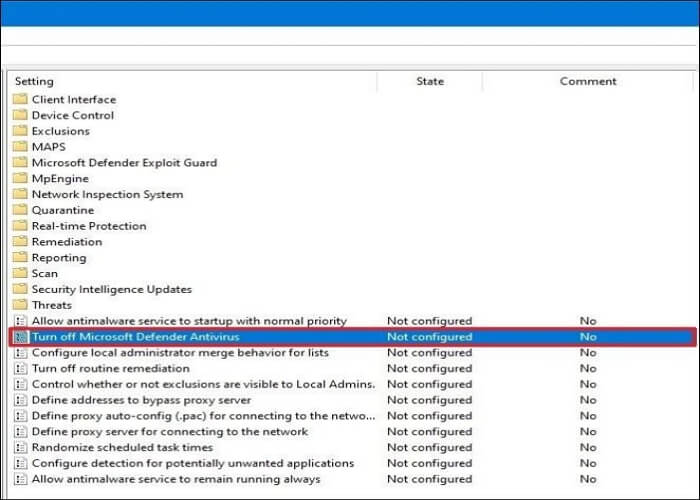
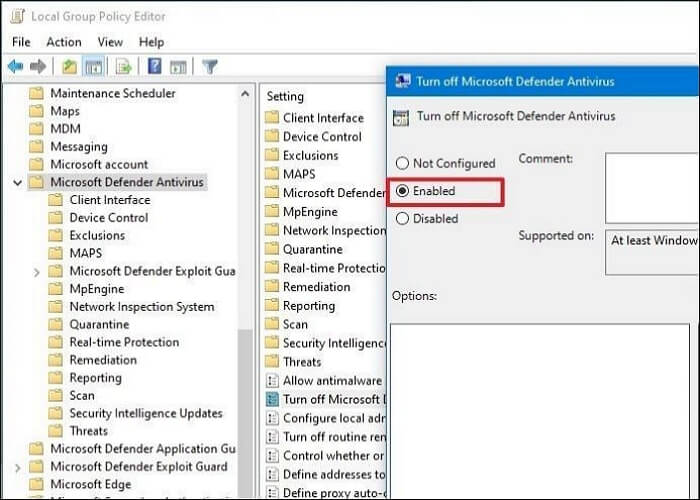
Computer Configuration\ Administrative Templates\ Windows Components\Microsoft Defender Antivirus - On the right pane, double-click on Turn off Microsoft Defender Antivirus.

- Now click on the radio button beside Enabled to disable Windows Defender permanently.

- Click Apply and then OK.


4. Use Autoruns
- Download Autoruns and extract the zip file to the desired location.
- Use the above-mentioned method to go into Safe Mode and restart your computer.
- In Safe mode, right-click on the Autoruns.exe file and choose Run as administrator.

- Navigate to the Services tab.
- Now click on Options from the menu bar and remove the checkmark from Hide Windows Entries.

- Locate and remove the checkmark beside the WinDefend service to turn off Windows Defender.
- Now, disable the Safe Boot mentioned above and restart your PC.


So, these are the ways to disable Windows Defender permanently on your Windows 11 computer. To ensure Windows Defender is disabled, you can open Windows Security. Then, on the Virus & Threat Protection page, you will see the Getting Protection info message implying that Windows Defender is turned off.
Also, do not forget to discover the best Windows Defender settings and enforce them if you ever plan to re-enable the built-in antivirus.
Try them and let us know what worked for you in the comments below.
Vladimir Popescu
Being an artist his entire life while also playing handball at a professional level, Vladimir has also developed a passion for all things computer-related.
With an innate fascination for research and analysis, and realizing many other people share his passion for this subject, he delved into writing Windows-related articles, so other people can also benefit from the acquired information.
When not writing kick-ass articles, Vladimir likes to spend his time doing Crossfit and creating art.
Microsoft Defender is an essential security tool preinstalled on the Windows 11 operating system. The security suite is fully baked into the operating system to protect your system from malware, but not everyone likes it. Would you prefer to install an alternative antivirus/antispyware to kick Microsoft Defender to the curb? We have two options: temporarily disable the real-time scanning component of the security suite or disable the entire suite long-term in favor of a competing app.
Temporarily Disable Microsoft Defender Real-time Antivirus Protection
If you want a relatively easy way to disable Microsoft Defender’s real-time scanning engine, we have you covered with the following steps:
1. Click on the Start menu and search for the Windows Security app.
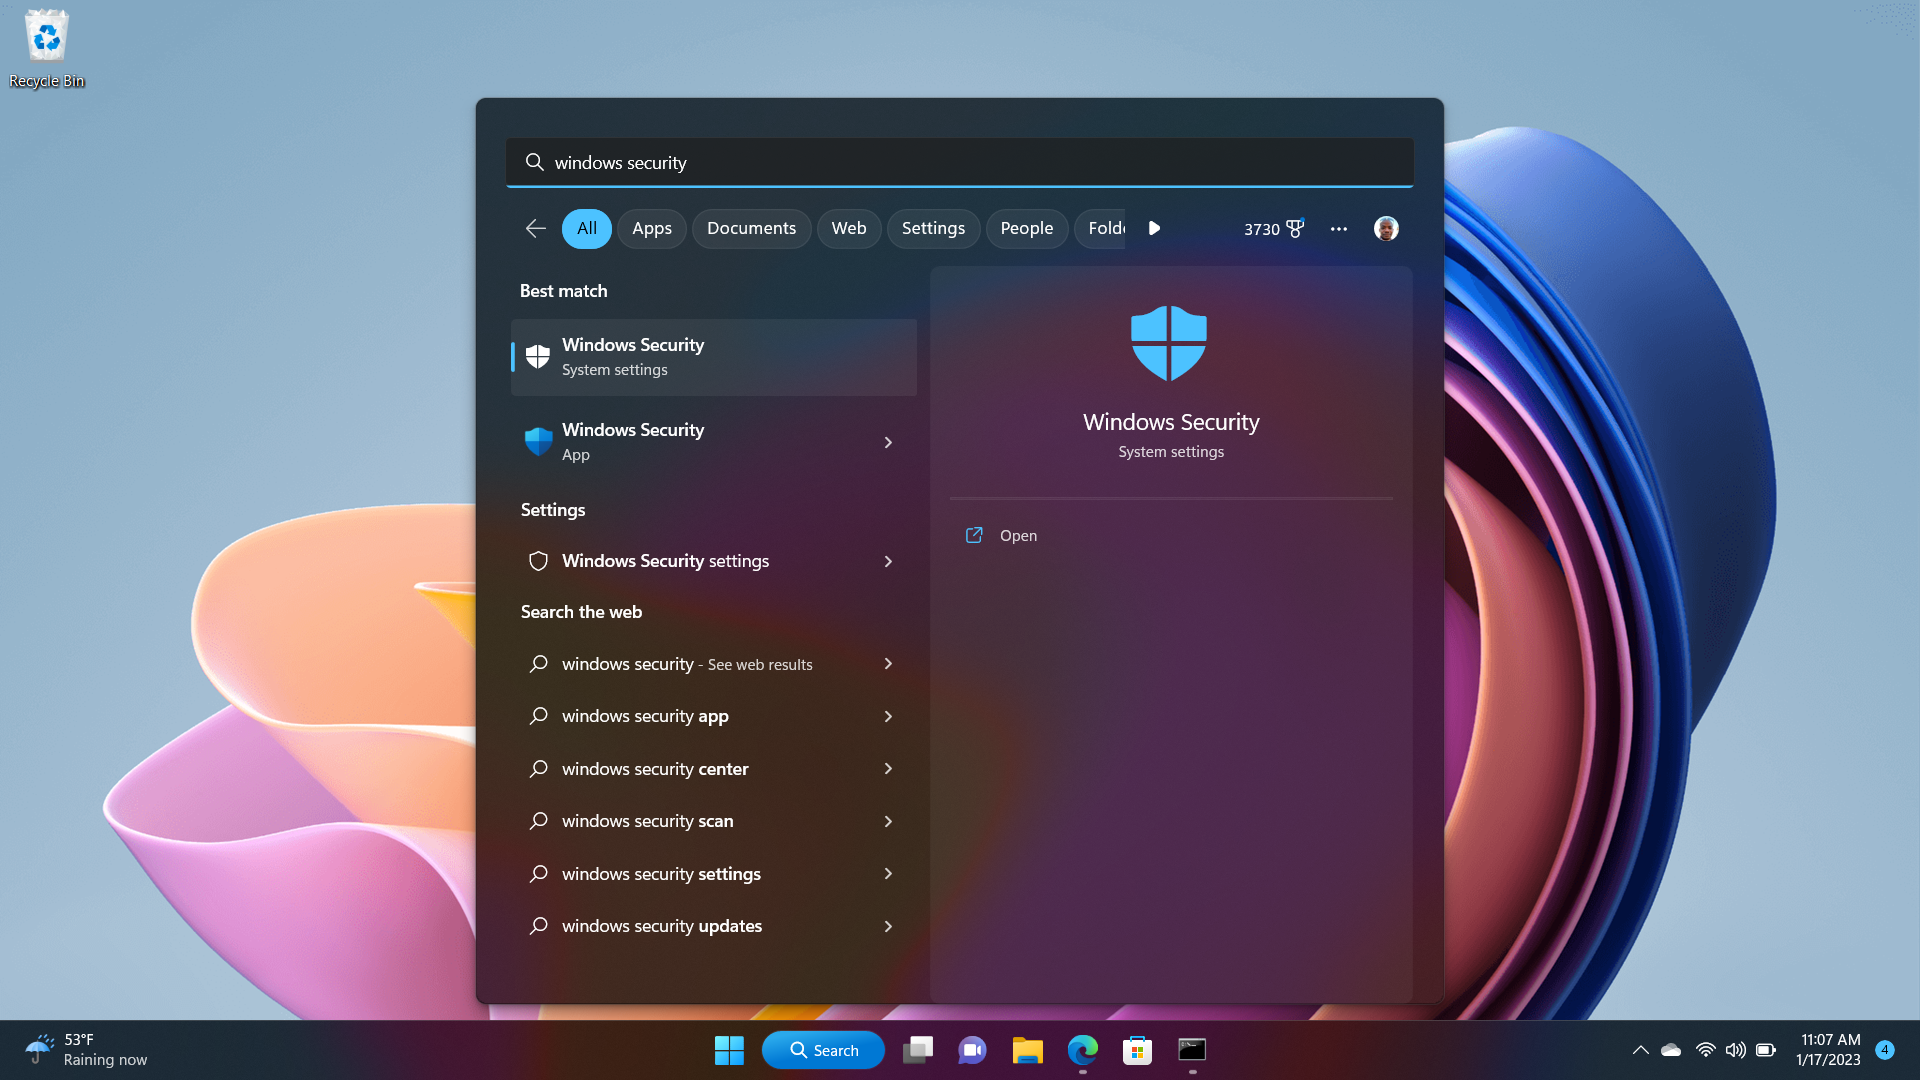
2. Once in the Windows Security app, click on Virus & threat protection.
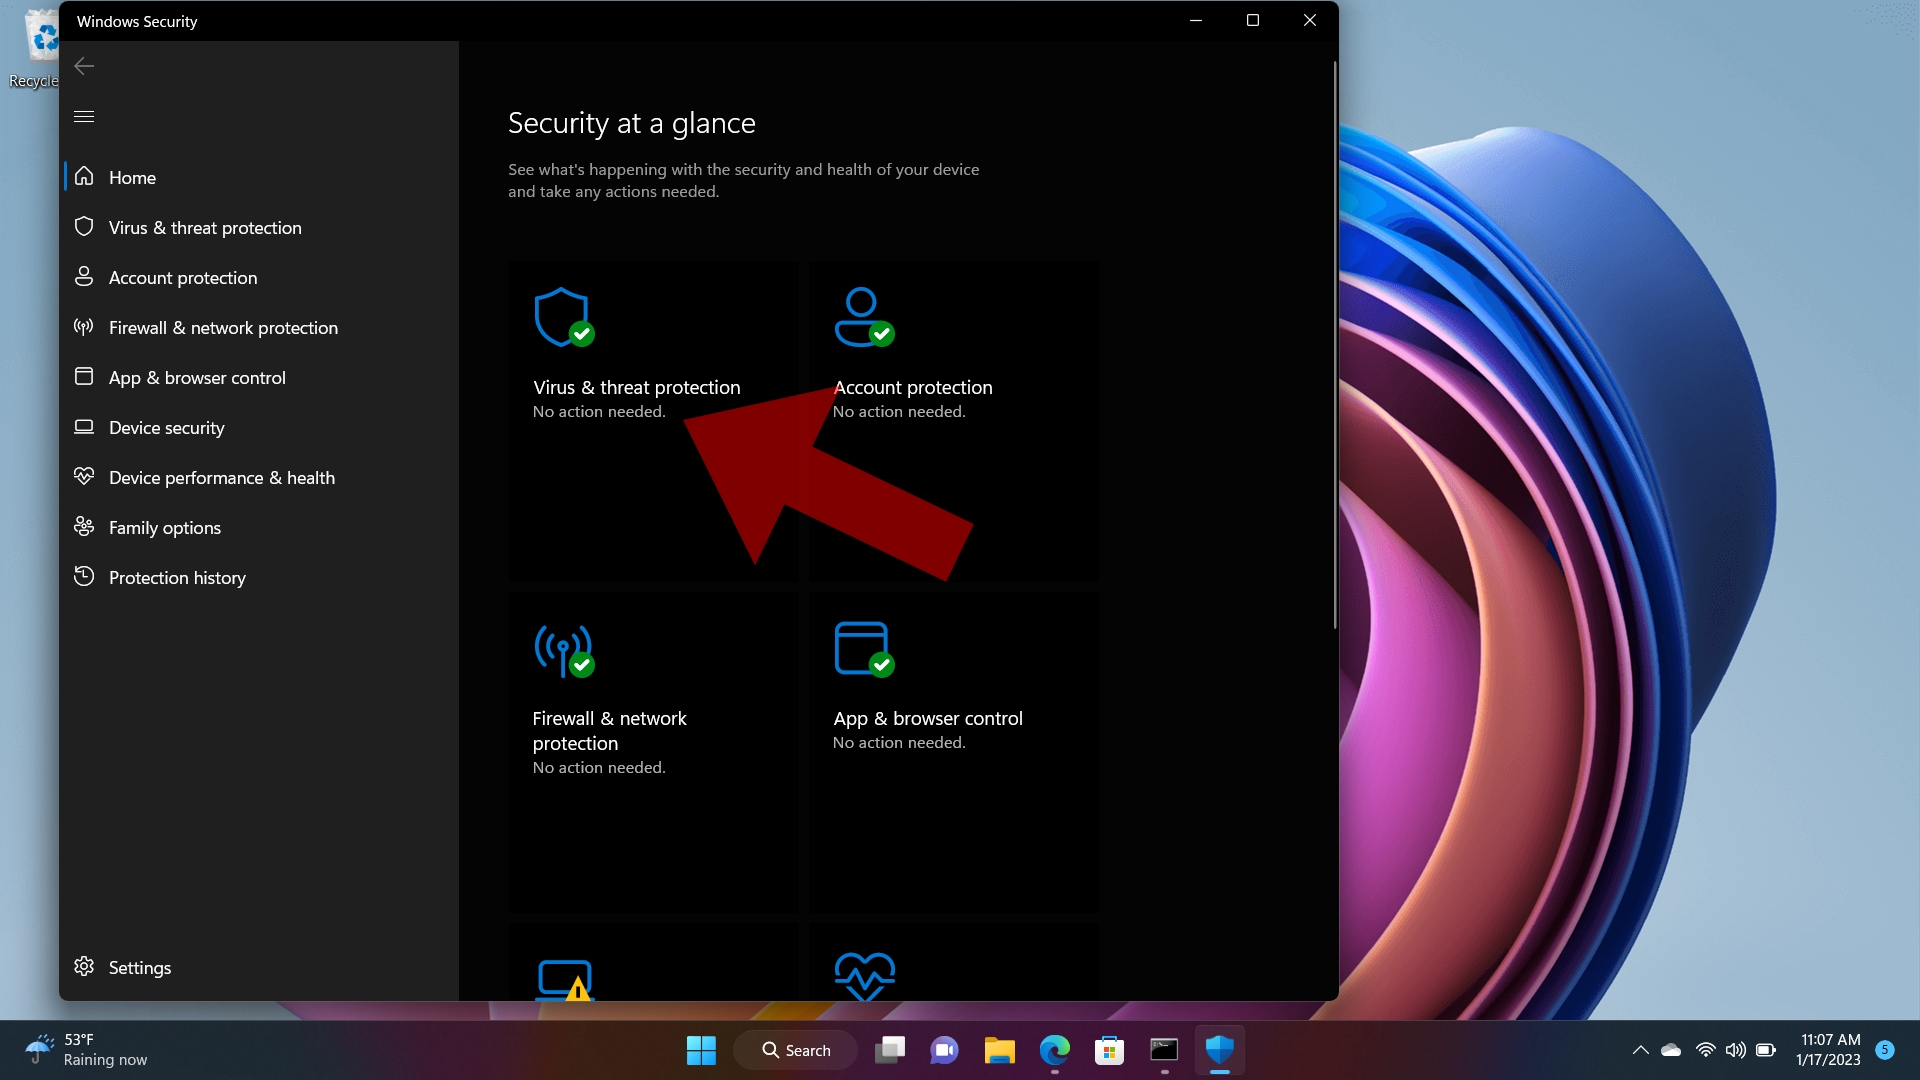
3. Select Manage settings under Virus & threat and protection settings.
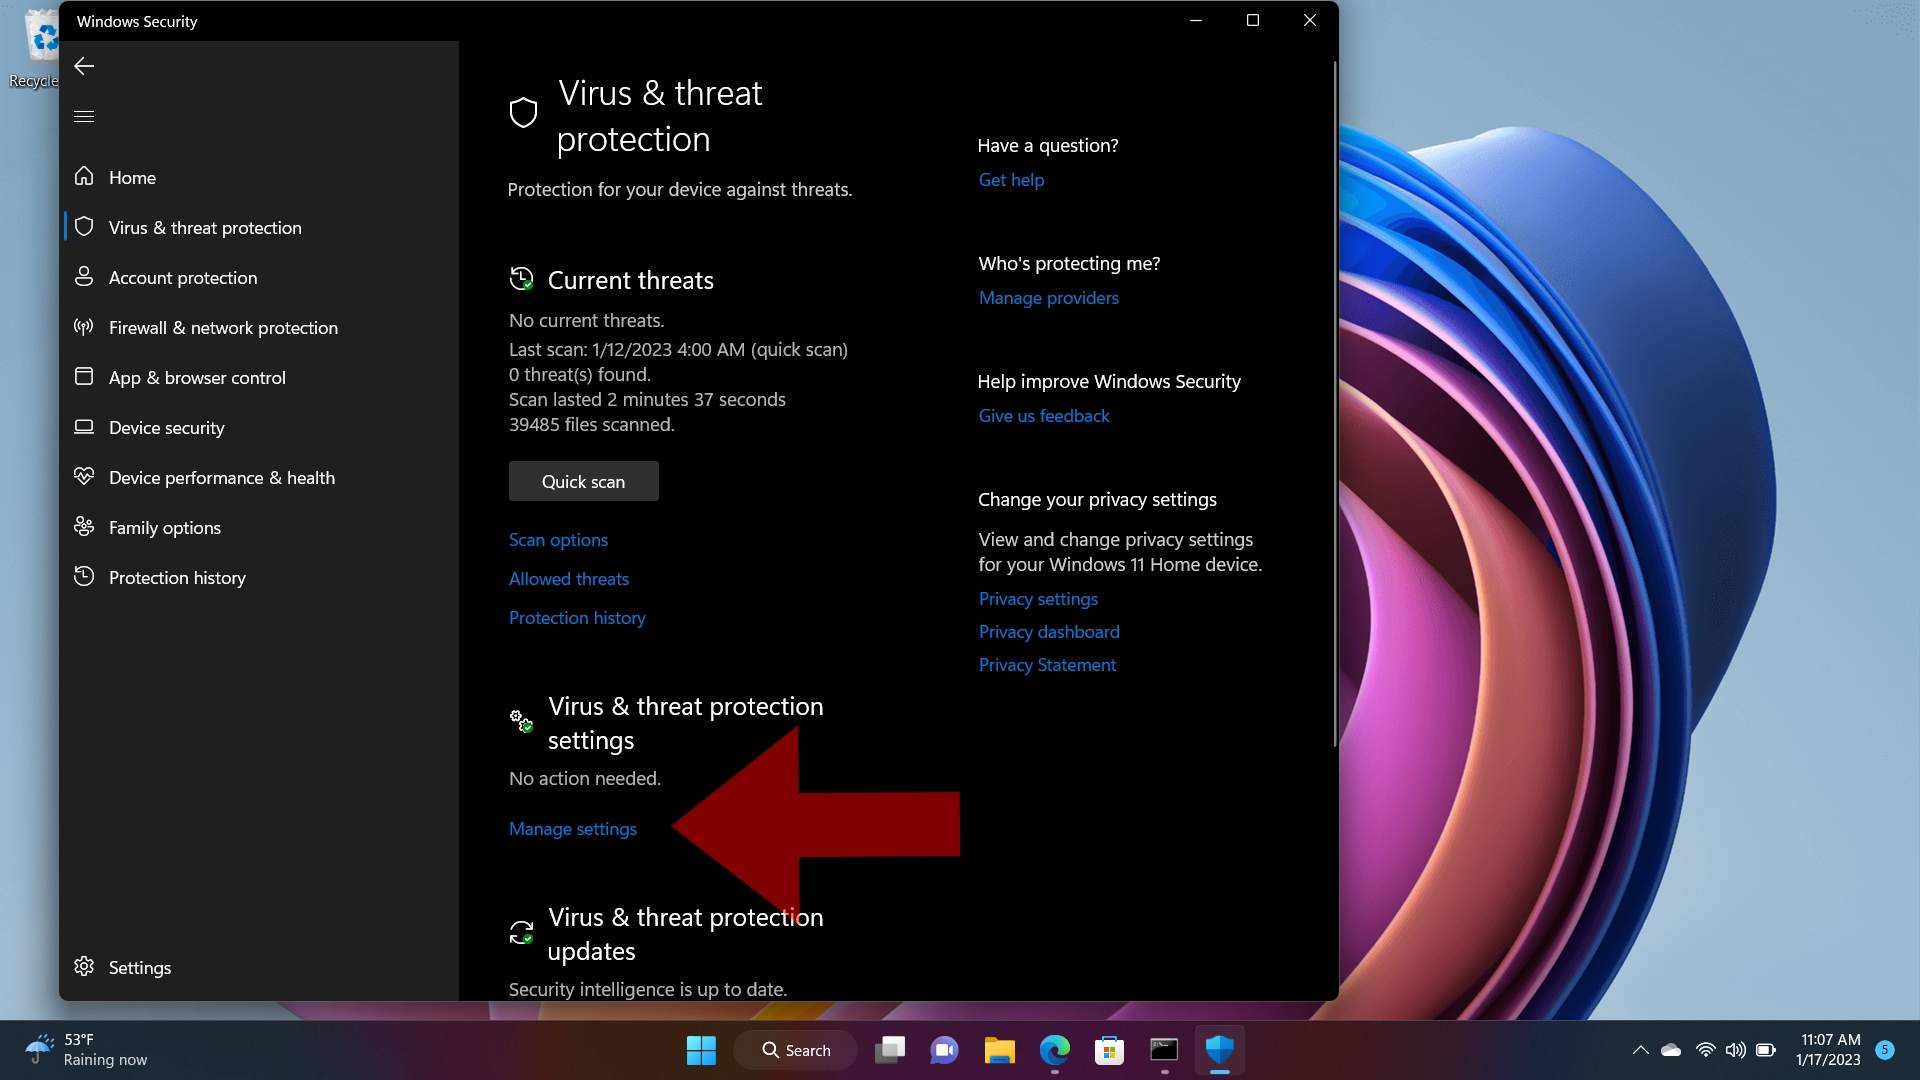
4. You’ll see a button for Real-time protection; turn it off.
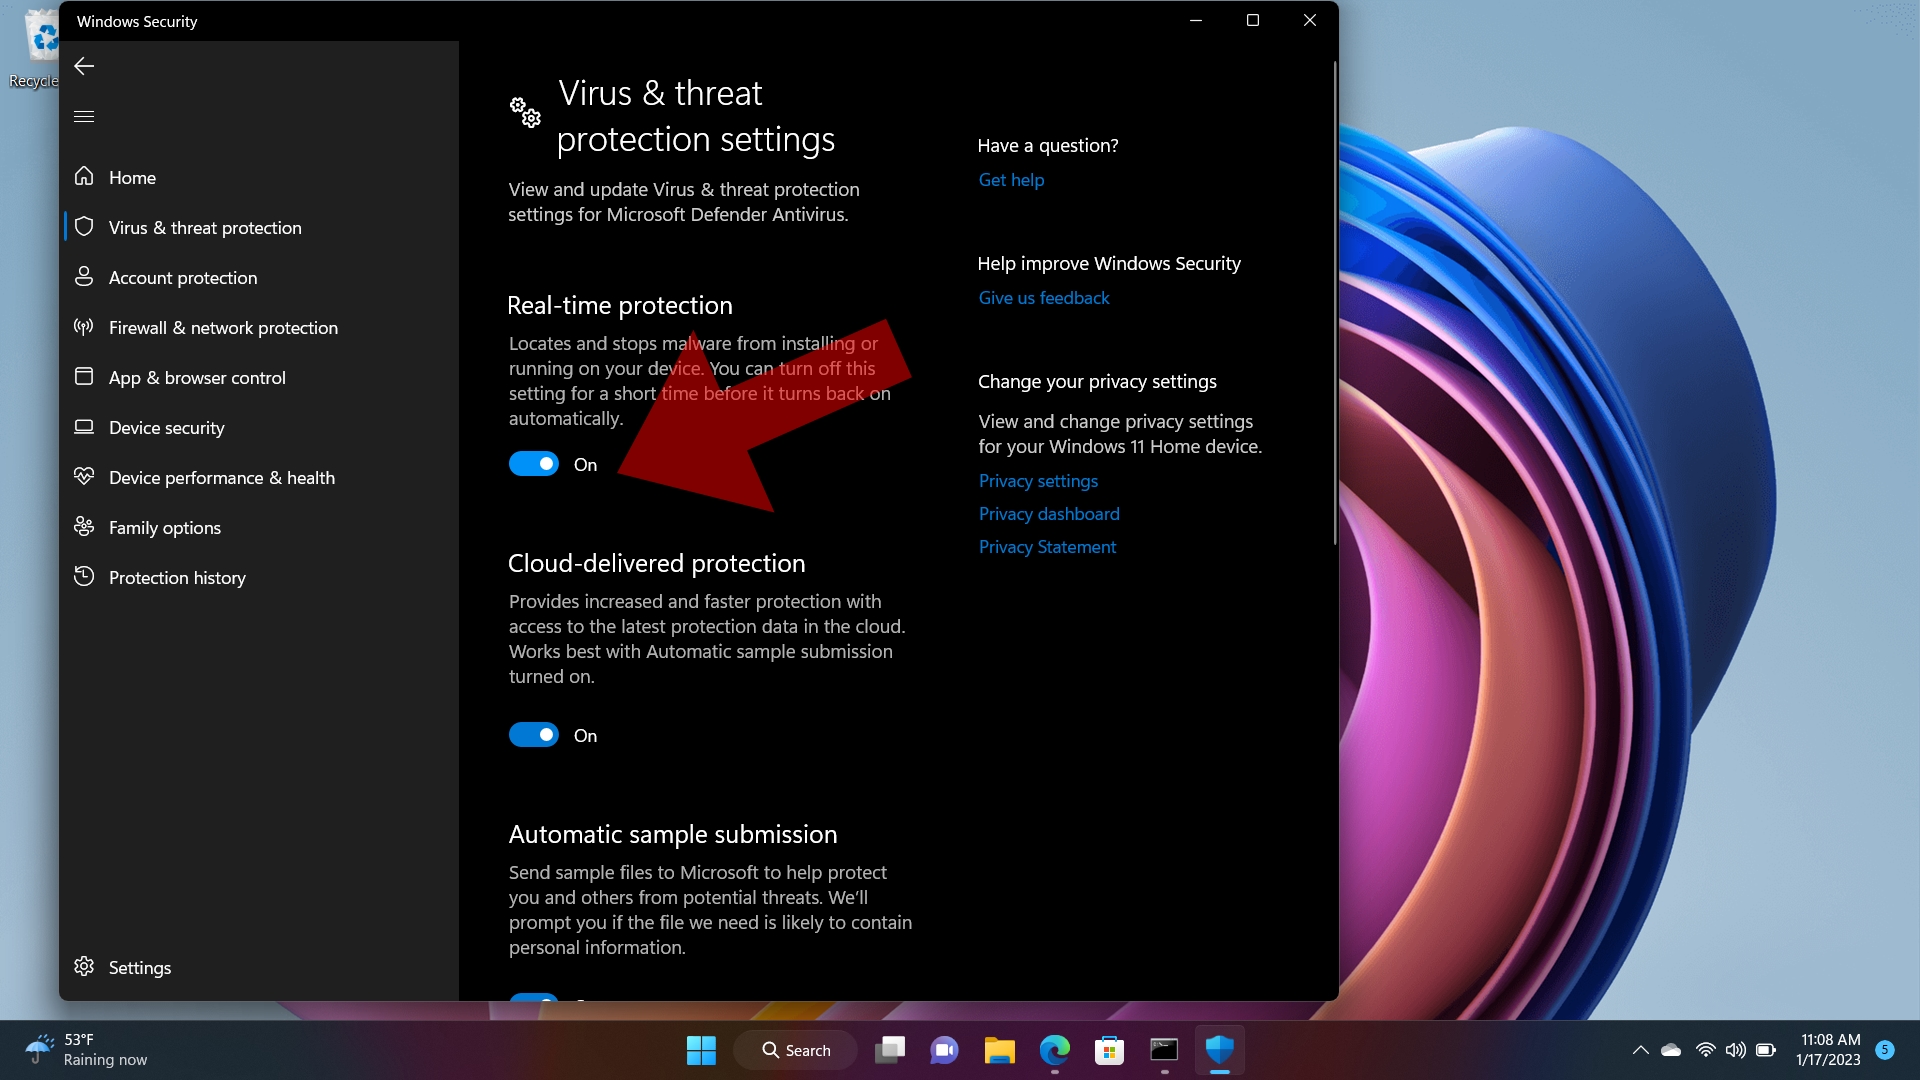
5. Turning off Real-time protection will present a red X and a warning message about your computer being vulnerable to attacks.
Get Tom’s Hardware’s best news and in-depth reviews, straight to your inbox.
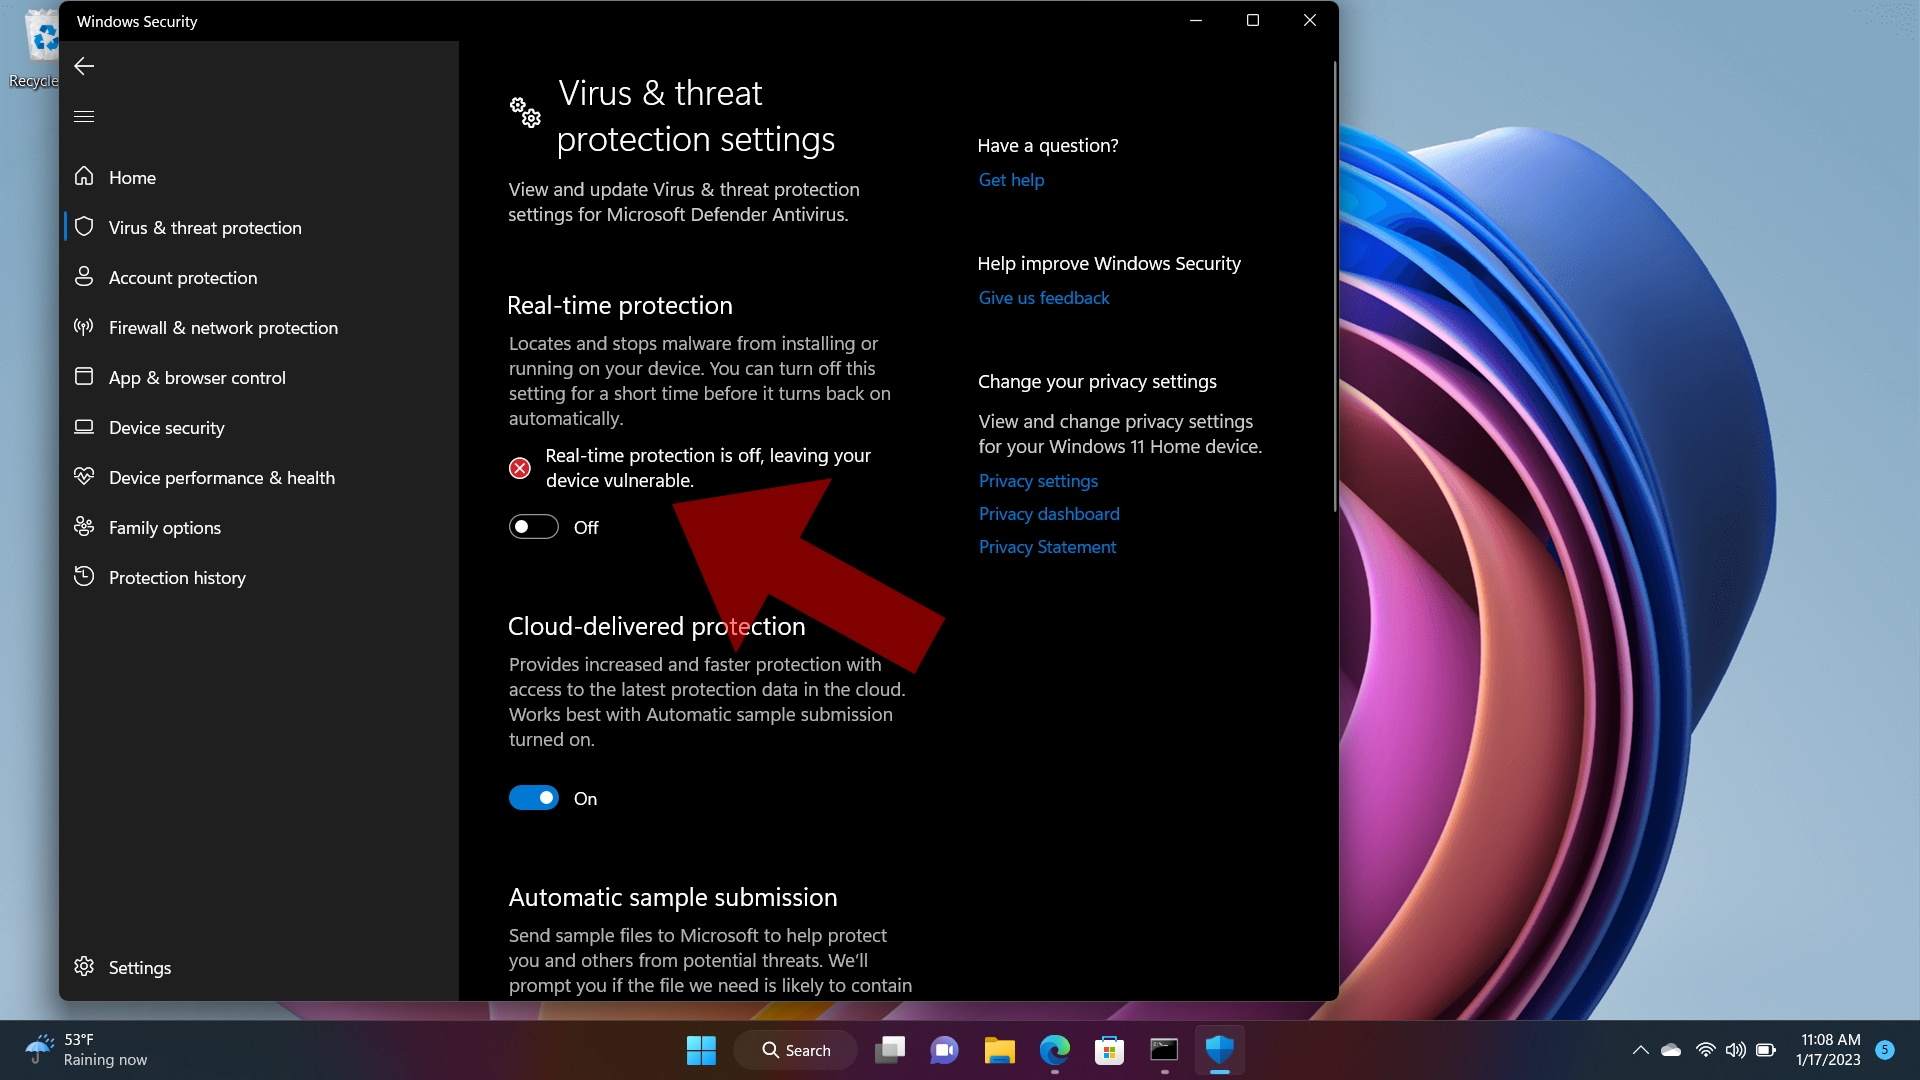
Remember, this only temporarily disables real-time antivirus protection. Microsoft warns that potentially harmful apps and files downloaded from the Internet are not scanned when real-time protection is disabled. However, scans already scheduled for your system will continue unabated.
Disable Microsoft Defender by Installing Another Antivirus Program
There’s another way to disable Microsoft Defender once and for all, and not just the real-time antivirus function. Installing a third-party antivirus security suite will automatically put Microsoft Defender on the back burner.
Let’s use AVG Antivirus Free as an example. It’s a free, no-frills Microsoft Defender alternative that has been around for two decades. Although our example uses AVG Antivirus Free, installing any credible antivirus program will have the same effect in disabling Microsoft Defender.
1. Install your preferred antivirus software (in this case, AVG Antivirus Free). This action will automatically disable Microsoft Defender.
2. Once your software is installed, open the Windows Security app.
You should now see that Windows 11 now recognizes AVG Antivirus (or your preferred antivirus app) protecting your computer.
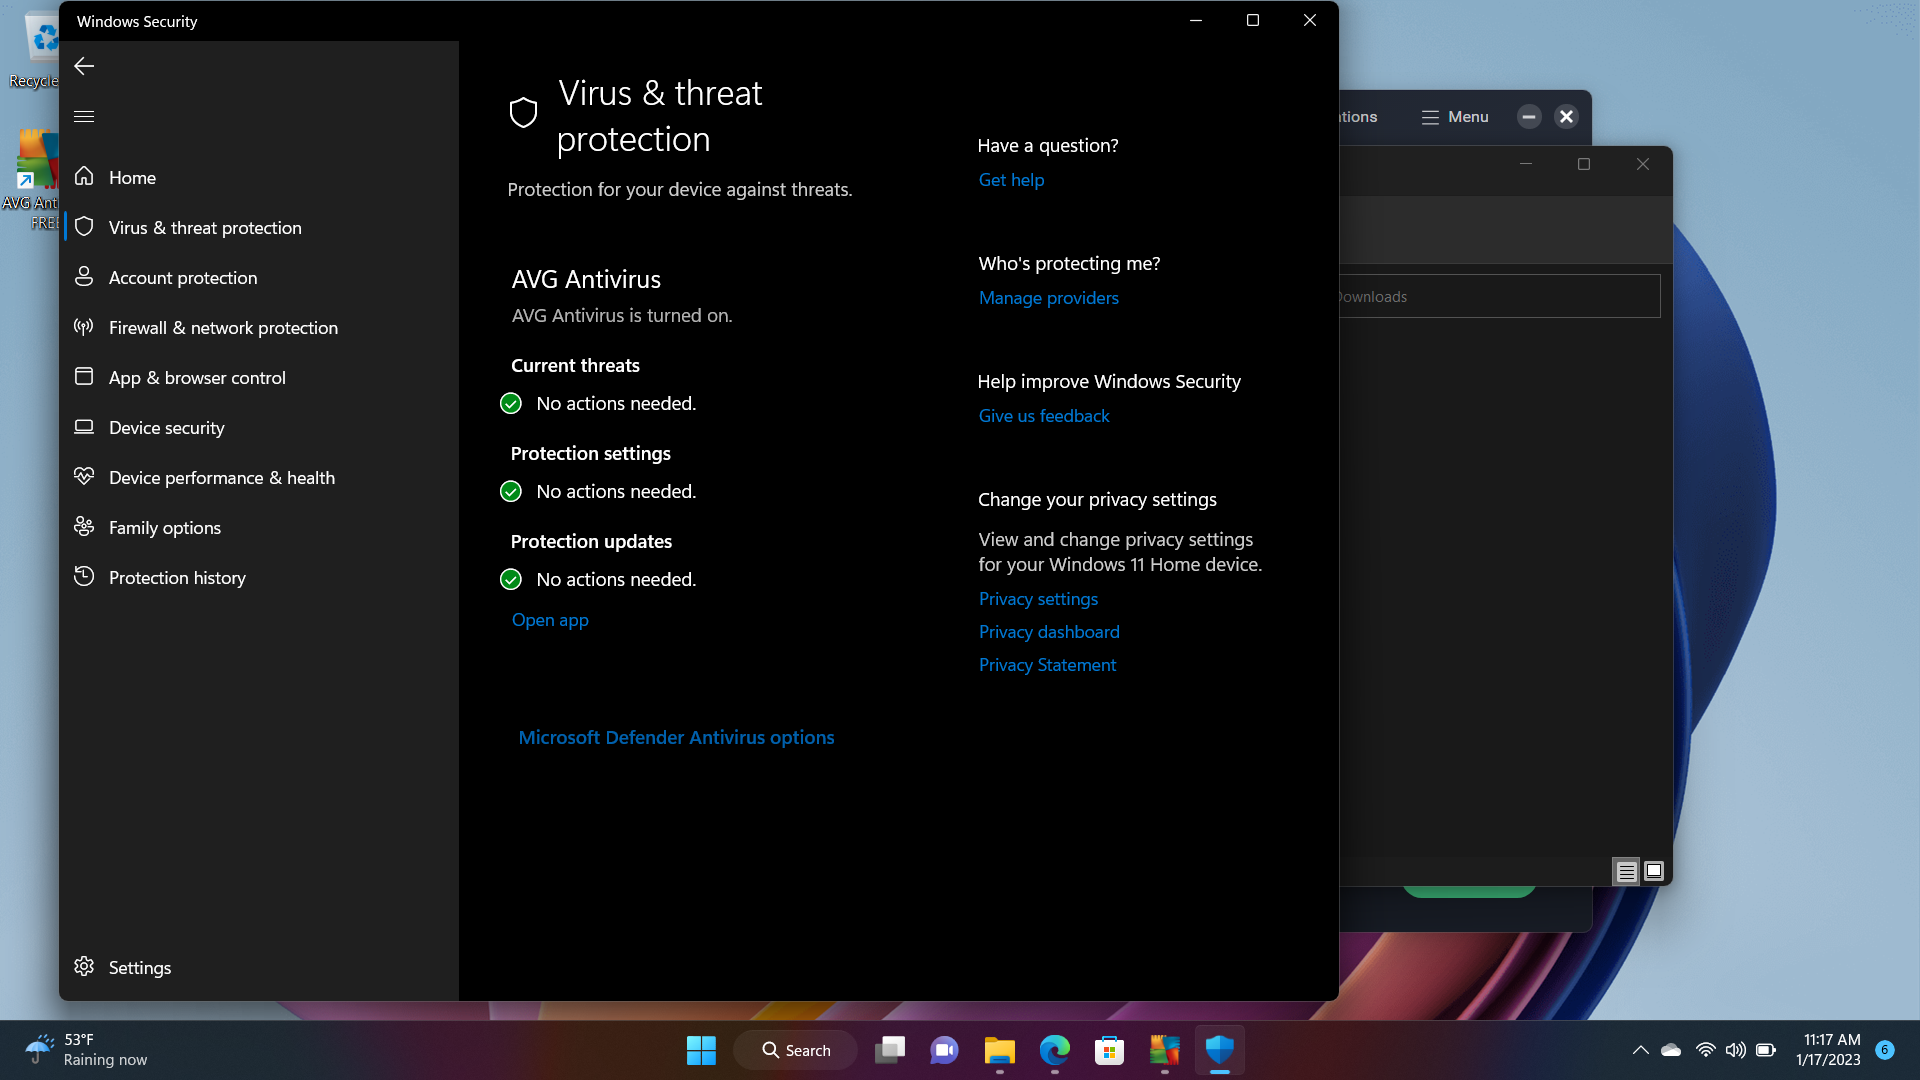
At this point, your installed antivirus software has complete control over real-time scanning and manual scans of your computer with no intervention from Microsoft Defender. However, if you want increased protection, you can click on Microsoft Defender Antivirus options.
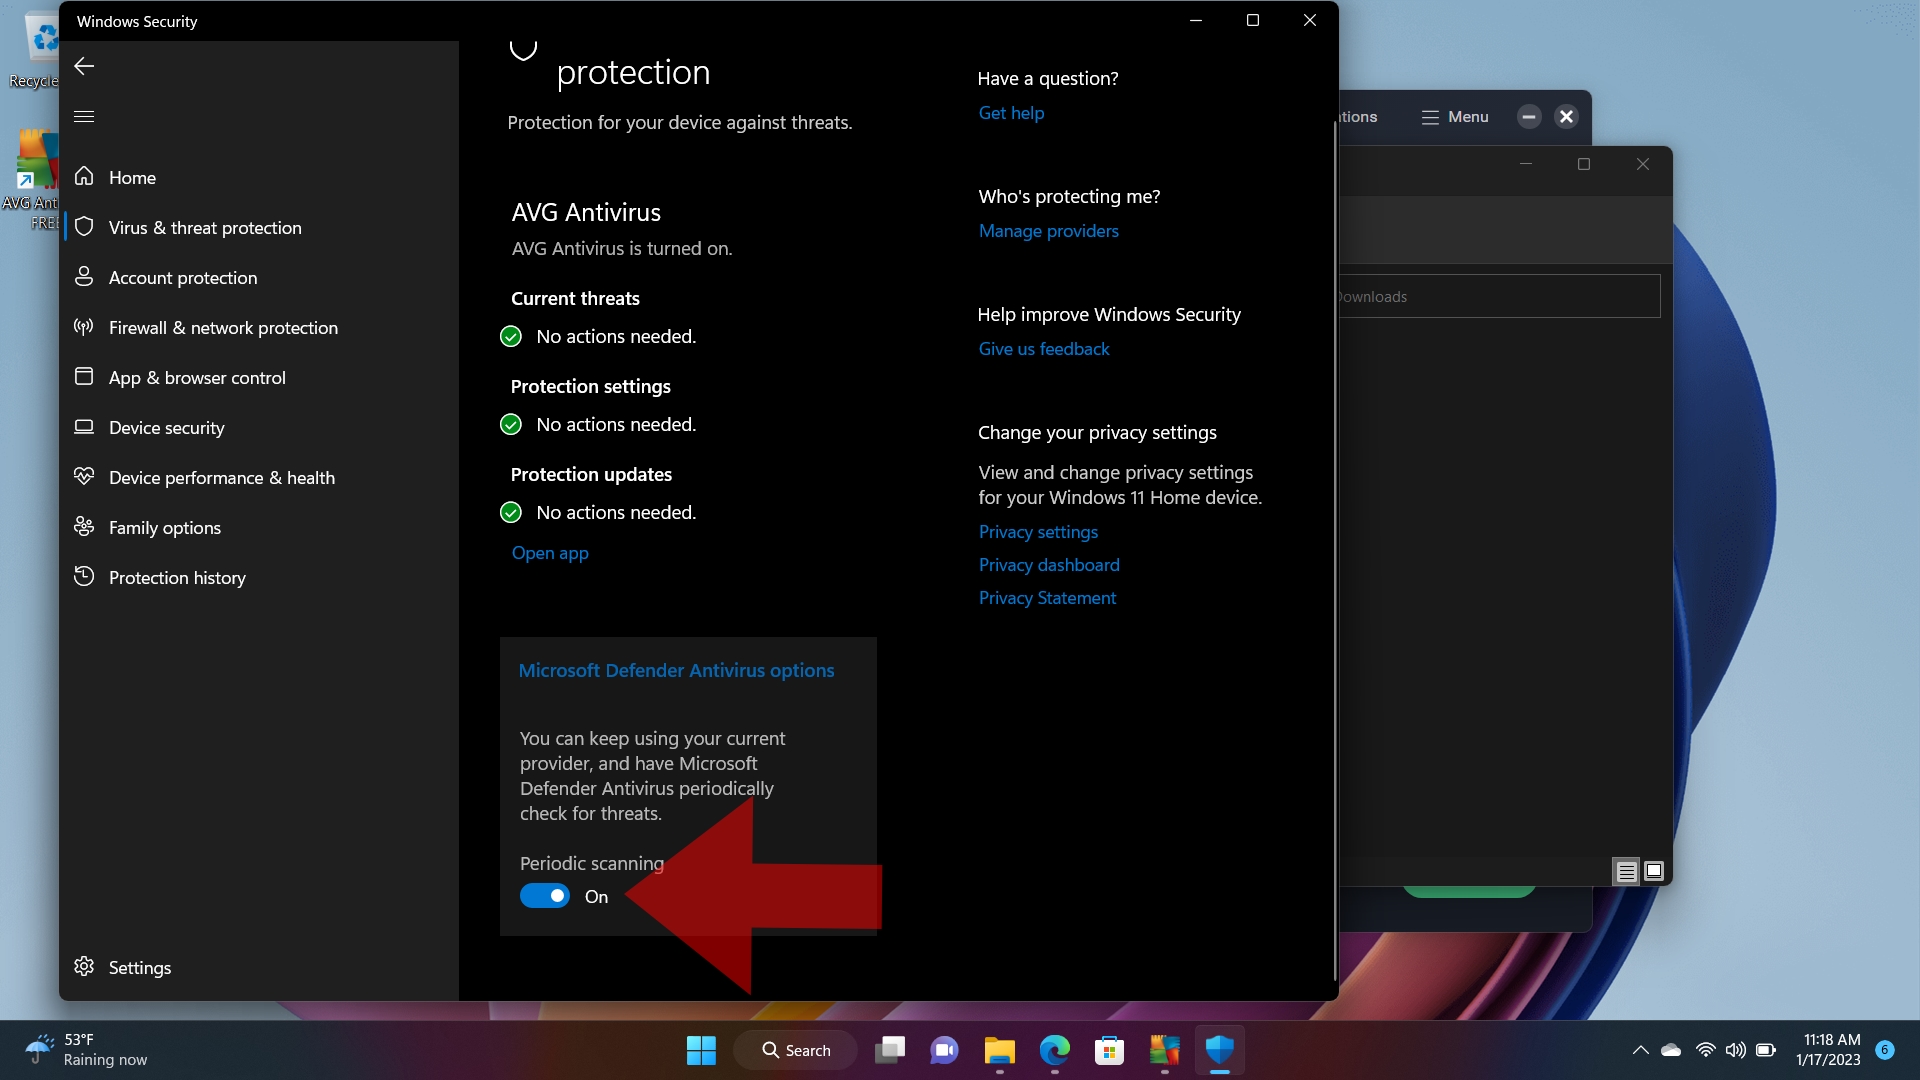
Here, you can turn on Periodic scanning to have the software occasionally scan for threats in the background.
We should caution that, while it is possible to disable Microsoft Defender in varying degrees, it is not advisable (in most instances) to run without real-time protection on an internet-connected computer for an extended period.
Highlights
- Windows has an inbuilt antivirus called Windows Defender to protect your computer from external threats.
- Is Windows Defender any good? Is it enough to protect your data on your computer? In fact, many Windows users want to know how to permanently disable Windows Defender.
- Windows Defender is by no means your sole solution to protect your data. You’d better add a layer of protection to your computer via free backup software like EaseUS Todo Backup.
Microsoft does not provide an option to delete or uninstall the Defender. If you disable it normally, the system turns it back on as a fail-safe method. Anyhow, you must do more now to disable the Microsoft Defender. Let us see how to do it in 3 ways.
- Way 1. Using Group Policy Editor
- Way 2. Using Registry Editor
- Way 3. Using CMD
Before making any changes to the Windows Defender or its files, we must disable Tamper Protection first. Tamper Protection is a Windows setting to restrict other apps from making any changes to Microsoft Defender.
Navigate to Settings > Windows Security > Virus and Threat Protection > Virus and threat protection settings > Manage settings > Disable Tamper Protection.
Way 1. Using Group Policy Editor
Group Policy Editor is a tool to change and customize Windows OS settings. As we cannot uninstall Windows Defender, we can tweak some changes in Group Policy Editor to disable it. See the instructions below:
Step 1. Press Windows + R to open the Run dialog box. Type gpedit.msc and click Enter.
Step 2. Open the Local Group Policy Editor and click on the Computer Configuration option on the landing page.
Step 3. Navigate to the following path: Computer Configuration > Administrative Templates > Windows Components > Microsoft Defender Antivirus.
Step 4. Double-click on Turn off Microsoft Defender Antivirus to open it.
Step 5. Select the Enabled option from the options to disable Microsoft Defender permanently.
Step 6. Click Apply, and OK. Restart the computer to see the changes.
You can share this article on your social platforms.
Way 2. Using Registry Editor
If you have Windows 11 Home, you may be unable to access Group Policy Editor. But you can tweak some changes in the Registry to disable Microsoft Defender on Windows.
Note: Registry Editor contains important files to run your Windows OS and its functions smoothly. So, make a backup on Registry and create a system restore point in case of any emergencies.
Follow these steps to disable Microsoft Defender:
Step 1. Press Windows + S, and type Regedit. You will see the Registry Editor app and click on Run as administrator.
Step 2. In the Regedit window, paste the below path in the address bar:
Computer\HKEY_LOCAL_MACHINE\SOFTWARE\Policies\Microsoft\Microsoft Defender
Step 3. Right-click on empty space and select New > DWORD (32-bit) Value.
Step 4. Click on the new DWORD (32-bit) Value and name it as DisableAntivirus.
Step 5. Double-click on DisableAntivirus value, change the Value data to 1 and select the Base as Hexadecimal.

Step 6. Click OK, and close the Registry Editor. Restart the PC to apply changes.
After restarting, open the Windows Security and navigate to Virus and Threat Protection settings. You will see a «No active antivirus provider. Your device is vulnerable». Confirm the action.
Way 3. Using CMD
The Command Prompt can also be handy to disable the Defender Antivirus. You have to paste a registry modification command, and it will remove the antivirus from your device. Here are the steps:
Step 1. Search for Command Prompt and open it as an Administrator.
Step 2. Enter the command below and press Enter to execute it:
reg add «HKEY_LOCAL_MACHINE\SOFTWARE\Policies\Microsoft\Microsoft Defender» /v DisableAntiSpyware /t REG_DWORD /d 1 /f
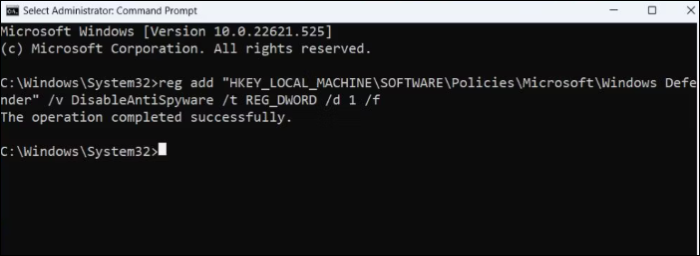
Step 3. If the operation is successful, you will see a «The operation completed successfully.» message.
Step 4. Close the CMD and restart your system.
Pro Tip: Always Backup Your PC for Data Security
Even with the advanced antivirus programs, your device is still vulnerable to external threats. And one should always keep a backup of your data in case of emergencies. Be it a security threat, a failing device or hard drive, or physical damage, there is always a risk of losing data. So, reliable backup software — EaseUS Todo Backup — ensures your data is safe and secure against all the odds.
EaseUS Todo Backup is the best backup tool to make a copy of your entire system against all emergencies. It can help you back up your files, disks, and computer apps and create a system image on a USB. With advanced backup, cloning, and restoration options, this software is a complete backup and restoration solution for personal and business use.
Other Features of EaseUS Todo Backup:
- Install Windows on a new PC without an operating system
- Create full, incremental, differential, scheduled, and auto backups
- Create a sector-by-sector backup and compress backups
- Offer 250G free Cloud and a Security Zone to keep data safe
- Image a hard drive and create an image of an SD card
To add an extra layer of protection, you can safeguard data in the security zone. Download the tool now, and make a backup of your computer.
Step 1. Launch EaseUS Todo Backup on your computer, and click Create Backup on the home screen and then hit the big question mark to select backup contents.

Step 2. To back up your Windows operating system, click «OS» to begin the backup task.

Step 3. Your Windows operating system information and all system related files and partitions will be automatically selected so you don’t need to do any manual selection at this step. Next, you’ll need to choose a location to save the system image backup by clicking the illustrated area.

Step 4. The backup location can be another local drive on your computer, an external hard drive, network, cloud or NAS. Generally, we recommend you use an external physical drive or cloud to preserve the system backup files.

Step 5. Customiztion settings like enabling an automatic backup schedule in daily, weekly, monthly, or upon an event, and making a differential and incremental backup are available in the Options button if you’re interested. Click «Backup Now«, and the Windows system backup process will begin. The completed backup task will display on the left side in a card style.

Why Do You Turn Off Windows Defender on Windows 10/11
The Defender is an excellent antivirus in the Windows ecosystem to tackle malware, viruses, and external threats while using your system online or offline. You can keep your system safe without spending a dime on other third-party apps. But why do you turn off/disable Windows Defender on Windows?
Here are some of the reasons why one wants to disable Windows Defender on Windows:
- When you want to install a third-party antivirus app, like TotalAV, it may be hard to coexist with the Defender.
- If the Defender blocks or flags a legitimate website or app as a threat.
- Windows Defender may conflict with some important system settings as it may be considered a threat.
- Finally, If you do not like Windows antivirus.
To Wrap Things Up
While Microsoft Defender is built into Windows and tough to disable, we can still find ways. Learn how to permanently disable Windows Defender using the 3 methods in this article. Along with antivirus, the best way to protect your data from various external emergencies is to create a backup with a reliable backup tool, like EaseUS Todo Backup. Download EaseUS Todo Backup and quickly make a backup of your system.
How to Permanently Disable Windows Defender FAQs
Here are some of the most frequent FAQs asked about how to permanently disable Windows Defender. I hope you find these queries helpful.
1. Why can’t I turn off Windows Defender?
Microsoft believes that the system can be exposed to threats if you turn off Windows Defender. So, it makes the Defender turn on after some time as a fail-safe method.
2. How can I disable Windows Defender Antivirus temporarily?
- Open Settings and go to Windows Security.
- Navigate to Virus & Threat Protection > Virus & threat protection settings > Manage Settings.
- Turn off Real-Time protection.
3. Is it OK if I turn off Windows Defender?
Yes, only if you have any other antivirus program installed on your device. If you disable Windows Defender without any antivirus programs, your device will be vulnerable to viruses, ransomware, and malware.
4. How do I turn my Windows Defender back on?
Open Settings and navigate to Windows Security > Virus & Threat Protection > Virus & Threat Protection Settings> Manage Settings. Turn on the Real Time protection toggle.