
Secure Shell (SSH) keys are a fundamental part of modern authentication and secure communication between computers over a network. SSH keys provide a secure way to access remote servers and perform various administrative tasks. However, managing SSH keys is essential to maintain the security of your systems. In some cases, you may need to delete an SSH key for a user. This article will walk you through the process of deleting SSH key pairs, covering every aspect of it.
Understanding SSH Keys
Before diving into the deletion process, let’s briefly understand what SSH keys are and how they work.
SSH keys come in pairs: a public key and a private key. The public key is placed on remote servers you want to access securely, while the private key is kept on your local machine. When you attempt to connect to a remote server, the server checks whether your public key matches the private key you provide for authentication.
Reasons to Delete SSH Keys
There are various reasons why you might need to delete SSH keys for a user:
- Security Concerns: If you suspect that a user’s private key has been compromised or is no longer secure, it’s crucial to delete it to prevent unauthorized access.
- User Departure: When an employee or team member leaves your organization, you should remove their SSH keys to ensure they no longer have access to your servers.
- Key Rotation: Periodically, it’s a good security practice to rotate SSH keys. Deleting old keys is part of this process.
Now that we understand why we might need to delete SSH keys, let’s delve into the step-by-step process of doing so.
Deleting SSH Keys
The process of deleting SSH keys involves locating and removing the public key file from the remote server. Here’s how to do it:
Step 1: Log into the Remote Server
You need to have administrative access to the remote server to delete SSH keys for a user. Log in using SSH with an account that has the necessary permissions.
ssh username@remote_server_ip
Step 2: Locate the SSH Directory
SSH key files are typically stored in the user’s home directory within a hidden folder called .ssh. Navigate to this directory.
cd ~/.ssh
Step 3: Identify the Key to Delete
Inside the .ssh directory, you’ll find files with names like id_rsa.pub, id_ecdsa.pub, or id_ed25519.pub. These files correspond to the public keys associated with the user. Identify the key you want to delete.
Step 4: Delete the Key
Use a text editor or command-line tools like rm to delete the public key file associated with the user.
rm id_rsa.pub
Step 5: Verify Deletion
To confirm that the key has been deleted, attempt to list the contents of the .ssh directory again.
ls -l
The deleted key should no longer appear in the directory listing.
Step 6: Restart SSH Service (Optional)
In some cases, it may be necessary to restart the SSH service for the changes to take effect.
sudo service ssh restart
Examples
Deleting an SSH Key for User «shivansh» on a Linux Server
Let’s say you want to delete an SSH key for a user named «shivansh» on a Linux server with the IP address «192.168.1.47.»
Log into the remote server using SSH:
ssh shivansh@192.168.1.47
Navigate to the .ssh directory:
cd ~/.ssh
Identify and delete the SSH key:
If, for example, you want to delete the `id_rsa.pub` key for John, you would run:
rm id_rsa.pub
Verify deletion:
To make sure the key has been removed, you can list the contents of the `.ssh` directory again:
ls -l
The id_rsa.pub file should no longer be present in the directory listing.
Deleting an SSH Key for User «rishabh» on a Windows Server
Deleting an SSH key on a Windows server is similar to the process on a Linux server, with slight differences in commands.
Log into the remote Windows server using SSH:
You may use an SSH client like PuTTY to connect to a Windows server.
Navigate to the `.ssh` directory:
Windows typically stores SSH keys in the user’s home directory under the .ssh folder, just like in Linux.
cd C:\Users\rishabh\.ssh
Identify and delete the SSH key:
To delete an SSH key, for example, id_rsa.pub for rishabh, you can use the del command:
del id_rsa.pub
Verify deletion:
Confirm that the key has been deleted by listing the contents of the .ssh directory:
dir
The id_rsa.pub file should no longer be listed in the directory.
Q1.What Are SSH Keys, and Why Are They Important?
Anwer:
SSH keys consist of a public and a private key and are essential for secure communication and authentication between computers over a network. They play a crucial role in accessing remote servers securely and performing administrative tasks. This article explains their significance.
Q2.What Are the Common Reasons for Deleting SSH Keys?
Answer:
There are various reasons for deleting SSH keys, including security concerns, employee departures, and key rotation. This article outlines these reasons in detail and highlights the importance of managing SSH keys for security.
Q3.How Can I Delete an SSH Key for a User on a Remote Server?
Answer:
The article provides a step-by-step guide on how to delete an SSH key for a user on a remote server. It covers the process, from logging into the server to verifying the deletion. The instructions are suitable for both Linux and Windows servers.
Q4.What Precautions Should I Take When Deleting SSH Keys?
Answer:
It’s crucial to exercise caution when deleting SSH keys to prevent accidental removal of important access credentials. The article does not go into specific precautions but emphasizes the importance of understanding the process before proceeding.
Q5.Do I Need to Restart the SSH Service After Deleting an SSH Key?
Answer:
While not always necessary, the article mentions that in some cases, you may need to restart the SSH service for the changes to take effect after deleting an SSH key. It provides a command for restarting the SSH service as an optional step.
Conclusion
Managing SSH keys is a critical aspect of maintaining the security of your servers and systems. Knowing how to delete SSH keys for a user is essential when dealing with security concerns, employee departures, or key rotation. By following the steps outlined in this guide, you can confidently remove SSH keys from a remote server, ensuring that only authorized individuals have access to your systems. Remember to exercise caution when deleting keys to avoid accidental removal of important access credentials.
Unveiling the Mystery: Deleting an SSH Key on Windows
Secure Shell (SSH) keys are essential tools for secure communication between computers. They provide a means to authenticate access to servers without needing to input a password, enhancing both security and convenience. However, there may come a time when you need to delete an SSH key on your Windows machine. This article will guide you through the process, troubleshooting tips, and best practices to ensure your SSH keys are managed securely and effectively.
Understanding SSH Keys
Before we delve into the deletion process, it’s crucial to understand what an SSH key is. An SSH key is a pair of cryptographic keys used to authenticate and establish a secure connection between a client and a server. Each pair consists of a public key and a private key:
- Public Key: This key is shared with the server you want to access. It can be distributed widely and does not need to be kept secret.
- Private Key: This key is kept secret and should never be shared. It is used to authenticate your identity to the server.
SSH keys offer several advantages over traditional passwords, including:
- Stronger security through complex cryptographic algorithms.
- Convenience of password-less logins.
- Reduction in the risk of brute-force attacks.
Why Delete an SSH Key?
There are various reasons you might want to delete an SSH key, including:
- Security: If your private key is compromised, you need to delete the existing key pair immediately and generate a new one.
- Access Management: Removing SSH keys for users who no longer need access to a server.
- Organization: Keeping your SSH keys organized and reducing clutter.
Step-by-Step Process to Delete an SSH Key on Windows
Now, let’s go through the steps to delete an SSH key on your Windows system.
Step 1: Locate Your SSH Keys
SSH keys are typically stored in a specific directory on your Windows machine. Follow these steps to locate them:
1. Open File Explorer.2. Navigate to your user directory. This is usually found at C:UsersYourUsername.3. Open the .ssh folder. If you don’t see it, you may need to enable viewing hidden items from the View tab in File Explorer.
Step 2: Identify the SSH Key to Delete
Inside the .ssh folder, you will find various files. The files you’re looking for typically include:
id_rsa(private key)id_rsa.pub(public key)- Other key pairs named differently (e.g.,
id_ed25519,id_ed25519.pub)
Identify the specific key pair you want to delete. Ensure you have a backup if necessary.
Step 3: Delete the SSH Key
To delete the SSH key, simply follow these steps:
1. Select the key files (both private and public) you want to delete.2. Right-click on the selected files and choose Delete.3. Confirm the deletion when prompted.
Step 4: Verify the Deletion
To ensure that the SSH keys have been successfully deleted:
1. Refresh the .ssh folder in File Explorer.2. Check that the files you deleted no longer appear in the directory.
Troubleshooting Common Issues
While deleting SSH keys is a straightforward process, you may encounter some issues. Here are some common problems and their solutions:
Problem 1: SSH Key Not Found
If you can’t find your SSH keys, ensure that:
- You are looking in the correct
.sshfolder. - The folder is not hidden; enable hidden items in File Explorer.
- You have the correct user permissions to access the folder.
Problem 2: Unable to Delete Files
If you encounter an error while trying to delete the SSH key files:
- Ensure you have administrative privileges. Try running File Explorer as an administrator.
- Close any applications that might be using the SSH keys, such as terminal sessions or SSH clients.
Problem 3: Access Issues After Deletion
If you find yourself locked out of a server after deleting an SSH key:
- Make sure to have an alternative access method, such as a password, enabled before deleting the key.
- If necessary, generate a new SSH key pair and add the new public key to your server’s
~/.ssh/authorized_keysfile.
Best Practices for Managing SSH Keys
Maintaining a clean and secure SSH key environment is essential for ensuring security and ease of access. Here are some best practices:
- Regularly Audit Your Keys: Periodically check which keys are in use and remove any that are no longer needed.
- Use Strong Passphrases: Protect your private keys with strong, unique passphrases.
- Backup Your Keys: Store backups of your SSH keys in a secure location to prevent loss.
- Limit Key Access: Only give access to users who need it, and revoke access when it’s no longer necessary.
Conclusion
Deleting an SSH key on Windows may seem daunting, but it’s a simple process when broken down into manageable steps. By following this guide, you can ensure that your SSH keys are properly managed and that your secure connections remain intact. Remember to keep your keys organized and follow best practices for security.
For more information on SSH keys and their management, check out this detailed tutorial on SSH key generation. If you’re interested in learning more about secure practices, consider visiting our related articles.
This article is in the category Guides & Tutorials and created by Windows Portal Team
Changing SSH keys on a running server using the Customer Portal will reinstall and wipe all data on the server. You can manually change SSH keys without reinstalling the server by following this Quickstart Guide.
Prerequisites
- To follow this guide, you must have an SSH key in OpenSSH format. See our guide to create an SSH key.
- This guide applies to Linux and BSD servers.
- This guide is suitable for Linux, Mac, or Windows workstations.
Add SSH Key to Vultr Instance
Deploy a new SSH key from a Linux or Mac workstation with ssh-copy-id.
Linux and Mac workstations
The ssh-copy-id utility is pre-installed on most Linux distributions. Mac workstations can install it via Homebrew, MacPorts, or using Curl.
Use the utility to add your public key to the server.
-
Specify the correct public key with the -i [path to public key] parameter.
-
Specify the username and server IP address (or domain name) as shown. For example, the root user at 192.0.2.123:
$ ssh-copy-id -i ~/.ssh/id_rsa.pub root@192.0.2.123The utility will report some basic information and prompt for your password.
  /usr/bin/ssh-copy-id: INFO: Source of key(s) to be installed: "/home/example_user/.ssh/id_rsa.pub"
  /usr/bin/ssh-copy-id: INFO: attempting to log in with the new key(s), to filter out any that are already installed
  /usr/bin/ssh-copy-id: INFO: 1 key(s) remain to be installed -- if you are prompted now it is to install the new keys
  root@192.0.2.123's password:
Enter your password and the utility installs the key.
  Number of key(s) added: 1

  Now try logging into the machine, with:   "ssh 'root@192.0.2.123'"
  and check to make sure that only the key(s) you wanted were added.
Windows workstations
Windows workstations can mimic the ssh-copy-id utility with a one-line PowerShell command. The example shown pipes the the public key through SSH from the current user’s profile to the root user’s ~/.ssh/authorized_keys.
PS> type $env:USERPROFILE\.ssh\id_rsa.pub | ssh root@192.0.2.123 "cat >> .ssh/authorized_keys"Alternate method for any workstation type
- SSH to the server.
- Edit ~/.ssh/authorized_keys.
- Append your public key to the file.
- Save and exit.
Delete SSH Key
There are no common automatic methods to delete a public key, you must remove it manually.
- SSH to your server.
- Edit ~/.ssh/authorized_keys.
- Remove the line containing your key.
- Save and exit.
Manage SSH Keys via API
The Vultr API offers several endpoints to manage SSH keys.
- Create a new SSH key for use with future instances. This does not update any running instances.
- List all SSH keys in your account.
- Get information about an SSH key.
- Update an SSH key.
- Delete an SSH key.
More Information
For more information about managing SSH keys, see our other guides:
- How to Generate SSH Keys
- Deploy a New Server with an SSH Key
- Connect to a Server Using an SSH Key
- Use an SSH Key for Non-root Users
IT — это «жизнь»
Дядя, дядя, наши сети, притащили.
cookieOptions
пятница, 23 августа 2013 г.
Удалить устаревшие ключи SSH, управление ключами
Первый раз, когда вы заходите на сервер, ssh вас спрашивает, доверяете ли вы ключу. Если отвечаете нет, соединение закрывается. Если да — ключ сохраняется в файл
/.ssh/known_hosts . Узнать, где какой ключ нельзя (ибо несекьюрно).
Если ключ сервера поменялся (например, сервер переустановили), ssh вопит от подделке ключа. Обратите внимание, если сервер не трогали, а ssh вопит, значит вы не на тот сервер ломитесь (например, в сети появился ещё один компьютер с тем же IP, особо этим страдают всякие локальные сети с 192.168.1.1, которых в мире несколько миллионов). Сценарий «злобной man in the middle атаки» маловероятен, чаще просто ошибка с IP, хотя если «всё хорошо», а ключ поменялся — это повод поднять уровень паранойи на пару уровней (а если у вас авторизация по ключу, а сервер вдруг запросил пароль — то паранойю можно включать на 100% и пароль не вводить).
Удалить известный ключ сервера можно командой ssh-keygen -R server . При этом нужно удалить ещё и ключ IP (они хранятся раздельно): ssh-keygen -R 127.0.0.1 .
Ключ сервера хранится
в /etc/ssh/ssh_host_rsa_key и /etc/ssh/ssh_host_rsa_key.pub . Их можно:
а) скопировать со старого сервера на новый.
б) сгенерировать с помощью ssh-keygen. Пароля при этом задавать не надо (т.е. пустой). Ключ с паролем ssh-сервер использовать не сможет.
Заметим, если вы сервера клонируете (например, в виртуалках), то ssh-ключи сервера нужно обязательно перегенерировать.
Старые ключи из know_hosts при этом лучше убрать, иначе ssh будет ругаться на duplicate key.
Источник
Remove ssh key windows
For Windows users: see Deleting an SSH key from Git Gui: the easy Windows solution for a much easier way, which I didn’t know at the time when I wrote this post here.
For my current hobby project, I’m using Git and GitHub regularly for the first time.
I don’t like using source control via the command line (for Mercurial, I’m using TortoiseHG), so I’m still experimenting with several GUI clients in order to find the one I like best.
At the moment I’m evaluating the “official” GUI tools which come with the Git for Windows download (git-gui and gitk), and I started connecting to GitHub with SSH instead of user/password via https.
So I created my first SSH key in Git GUI via Help в‡’ Show SSH key and then Generate Key:
…and then tried to delete it again, because I created it with passphrase, but I wanted to try a new one without passphrase instead.
But Git GUI didn’t let me delete it. Generating a key disables the Generate Key button, and there’s no Delete Key button:
It’s obvious from the screenshot that the key is in a file named id_rsa.pub , which is in a folder .ssh somewhere on my machine, and that I apparently just needed to delete this file.
This is probably easy to solve for regular Git Bash / Linux users, but as a Windows user with no Git/Bash/Linux experience, it took me some time to find out how to do it.
Here’s the solution:
1. List all keys
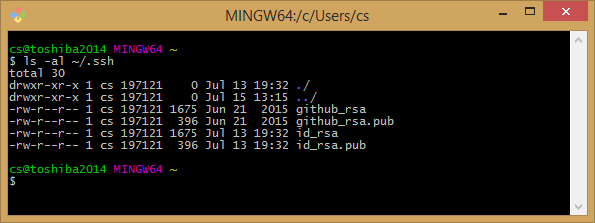
Apparently a SSH key consists of two files, in this case id_rsa and id_rsa.pub .
(the two github_rsa files are probably left from a previous GitHub Desktop installation some time ago)
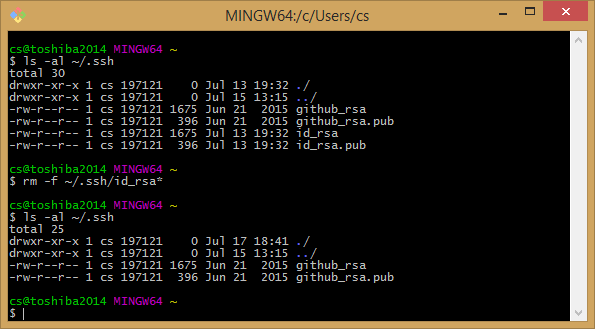
2. Delete the id_rsa files
The Bash command for deleting files is rm -f , so I needed to do this:
After this, the files are gone:
…and I can create a new SSH key by clicking Generate Key in the previously shown Git GUI window.
Источник
Управление ключами OpenSSH
Область применения Windows Server 2019, Windows 10: Windows Server 2022,
Чаще всего при аутентификации в Windows используется пара «имя пользователя — пароль», что подходит для систем с общим доменом. При работе с несколькими доменами, например с локальными и облачными системами, возникает риск атак методом перебора.
С другой стороны, среды Linux традиционно используют для аутентификации пару открытого и закрытого ключей, что делает ненужным использование угадываемых паролей. OpenSSH содержит средства, поддерживающие такой сценарий:
- ssh-keygen для создания защищенных ключей;
- ssh-agent и ssh-add для защищенного хранения закрытых ключей;
- scp и sftp для защищенного копирования файлов открытого ключа при первом использовании сервера.
В этом документе описано, как использовать эти средства в Windows для перехода на аутентификацию на основе ключей по протоколу SSH. Если вы ничего не знаете об управлении ключами через SSH, мы настоятельно рекомендуем ознакомиться с документом NIST IR 7966 о защите интерактивного и автоматизированного управления доступом через Secure Shell (SSH).
Сведения о парах ключей
Парой ключей называются файлы открытого и закрытого ключей, которые используются в некоторых протоколах аутентификации.
При аутентификации SSH на основе открытого ключа используются асимметричные алгоритмы шифрования для создания двух файлов ключей, один из которых считается закрытым, а второй открытым. Файлы закрытых ключей выполняют функцию паролей, а значит, должны быть постоянно защищены. Если кто-то получит ваш закрытый ключ, он сможет войти от вашего имени на любой сервер с поддержкой SSH, к которому у вас есть доступ. Открытый ключ размещается на сервере SSH. Его можно свободно распространять, не компрометируя закрытый ключ.
Если на сервере SSH используется аутентификация с помощью ключей, сервер и клиент SSH сравнивают открытый ключ, связанный с предоставленным именем пользователя, с закрытым ключом. Если открытый ключ на стороне сервера не проходит проверку по закрытому ключу, сохраненному на стороне клиента, аутентификация не будет выполнена.
Многофакторную проверку подлинности можно реализовать с помощью пар ключей, введя парольную фразу при создании пары ключей (см. раздел о создании пользовательских ключей ниже). При аутентификации пользователю предлагается ввести эту парольную фразу. Она применяется вместе с закрытым ключом для аутентификации пользователя.
Создание ключей узла
Для открытых ключей действуют определенные требования к ACL, которые в среде Windows соответствуют предоставлению доступа только администраторам и системной учетной записи. При первом использовании sshd будет автоматически создана пара ключей для узла.
Сначала необходимо установить OpenSSH Server. См. статью о начале работы с OpenSSH.
По умолчанию служба sshd настроена для запуска вручную. Чтобы запускать ее каждый раз при перезагрузке сервера, выполните следующие команды в командной строке PowerShell с повышенными привилегиями на сервере:
Так как со службой sshd не связан какой-либо пользователь, ключи узла сохраняются в папке C:\ProgramData\ssh.
Создание ключей пользователя
Чтобы использовать аутентификацию на основе ключей, необходимо заранее создать для клиента одну или несколько пар открытого и закрытого ключей. Программа ssh-keygen.exe используется для создания файлов ключей, при этом вы можете задать алгоритмы DSA, RSA, ECDSA или Ed25519. Если алгоритм не указан, используется RSA. Необходимо использовать надежный алгоритм и соответствующую длину ключа, например Ed25519 в этом примере.
Чтобы создать файлы ключей с помощью алгоритма Ed25519, выполните следующую команду в командной строке PowerShell или в командной строке на клиенте:
Эта команда возвращает такие выходные данные (username заменяется вашим именем пользователя):
Можно нажать клавишу ВВОД, чтобы принять вариант по умолчанию, или указать путь и (или) имя файла для создания файлов ключей. На этом этапе вам будет предложено указать парольную фразу для шифрования файлов закрытого ключа. Она может быть пустой, но это не рекомендуется. Парольная фраза в сочетании с файлом ключа позволяет выполнить двухфакторную аутентификацию. В нашем примере парольная фраза остается пустой.
Теперь у вас есть пара открытого и закрытого ключей Ed25519 в указанном расположении. Файлы PUB являются открытыми ключами, а файлы без расширения — закрытыми.
Помните, что файлы закрытых ключей выполняют функцию пароля и должны защищаться так же тщательно. Для этого, чтобы безопасно хранить закрытые ключи в контексте безопасности Windows, связанным с определенным именем входа Windows, используйте ssh-agent. Запустите службу ssh-agent от имени администратора и выполните ssh-add, чтобы сохранить закрытый ключ.
После этого при каждом выполнении аутентификации с этого клиента с использованием закрытого ключа, ssh-agent будет автоматически извлекать его и передавать клиенту SSH.
Мы настоятельно рекомендуем создать резервную копию закрытого ключа в безопасном расположении, а затем удалить его из локальной системы после добавления в ssh-agent. Закрытый ключ нельзя получить из агента, если использовался надежный алгоритм, например Ed25519 в этом примере. Если вы утратите доступ к закрытому ключу, вам нужно будет создать новую пару ключей и обновить открытый ключ во всех системах, с которыми вы работаете.
Развертывание открытого ключа
Чтобы использовать созданный выше ключ пользователя, поместите содержимое открытого ключа (
\.ssh\id_ed25519.pub) на сервер в текстовый файл, имя и расположение которого зависят от того, принадлежит ли учетная запись пользователя к учетной записи участника группы локальных администраторов или обычного пользователя.
Обычный пользователь
Содержимое открытого ключа (
\.ssh\id_ed25519.pub) нужно разместить на сервере в текстовом файле authorized_keys в папке C:\Users\username\.ssh\. Клиентский компонент OpenSSH включает scp (служебная программа безопасной передачи файлов) для упрощения этого процесса.
В приведенном ниже примере открытый ключ копируется на сервер (username заменяется именем пользователя). Изначально необходимо будет использовать пароль для учетной записи пользователя на сервере.
Администратор
Содержимое открытого ключа (
\.ssh\id_ed25519.pub) нужно разместить на сервере в текстовом файле administrators_authorized_keys в папке C:\ProgramData\ssh\. Клиентский компонент OpenSSH включает scp (служебная программа безопасной передачи файлов) для упрощения этого процесса. Список управления доступом для этого файла должен быть настроен на предоставление доступа только администраторам и системе.
В приведенном ниже примере открытый ключ копируется на сервер и настраивает список управления доступом (username заменяется именем пользователя). Изначально необходимо будет использовать пароль для учетной записи пользователя на сервере.
В этом примере показаны шаги для создания administrators_authorized_keys file . Если он выполняется несколько раз, он будет перезаписывать этот файл каждый раз. Чтобы добавить открытый ключ для нескольких пользователей с правами администратора, необходимо добавить этот файл в каждый открытый ключ.
Эти действия завершают настройку, которая требуется для использования аутентификации OpenSSH на основе ключей в среде Windows. Теперь пользователь может подключаться к узлу sshd с любого клиента, где есть закрытый ключ.
Источник
Remove ssh key windows
Sometimes when connecting to a computer with SSH, things can get jumbled up and an error can occur that looks like this:
The purpose of the known_hosts file is for the client to authenticate the server they are connecting to. This error will occur when the public key the host has changes.To fix this we must remove the key causing the error.
Linux / Mac / Windows with MobaXterm
Finding the known_hosts File:
After you have connected to a computer using ssh, the key you used to connected is stored in a file called known_hosts which is located in a hidden file (.ssh) in your home directory. It can be opened in a text editor of your choice with:
You will notice the file is arranged: computer name, ip-address veryLongKey , where each line is its own computer and key. If you have a smaller screen the key will continue on to the next line, but is still counted as one line.
Method 1 — Getting Rid of It All
If you only have one host in your know_host file then removing the entire file is a solution. The file will be recreated the next time you ssh into that computer. Before you remove the file you should back up the contents:
Method 2 — Targeting the Key Individually
If you look at the error message you will notice this line:
This tells which is the offending host, so now you can remove that key by running:
This will give you the following output when it is successful:
You can also edit the known_hosts file directly and remove the entire offending line which is indicated by: Offending key in /home/user/.ssh/known_hosts:1 . In this case the line is 1. You may end up deleting something you did not intend to so back the file up first:
Windows with PuTTY
Unlike the other options above, PuTTy does not create a convenient known_hosts folder in your home directory. Instead we need to edit the registry it creates:
Источник
Памятка пользователям ssh
abstract: В статье описаны продвинутые функций OpenSSH, которые позволяют сильно упростить жизнь системным администраторам и программистам, которые не боятся шелла. В отличие от большинства руководств, которые кроме ключей и -L/D/R опций ничего не описывают, я попытался собрать все интересные фичи и удобства, которые с собой несёт ssh.
Предупреждение: пост очень объёмный, но для удобства использования я решил не резать его на части.
Оглавление:
- управление ключами
- копирование файлов через ssh
- Проброс потоков ввода/вывода
- Монтирование удалённой FS через ssh
- Удалённое исполнение кода
- Алиасы и опции для подключений в .ssh/config
- Опции по-умолчанию
- Проброс X-сервера
- ssh в качестве socks-proxy
- Проброс портов — прямой и обратный
- Реверс-сокс-прокси
- туннелирование L2/L3 трафика
- Проброс агента авторизации
- Туннелирование ssh через ssh сквозь недоверенный сервер (с большой вероятностью вы этого не знаете)
Управление ключами
Теория в нескольких словах: ssh может авторизоваться не по паролю, а по ключу. Ключ состоит из открытой и закрытой части. Открытая кладётся в домашний каталог пользователя, «которым» заходят на сервер, закрытая — в домашний каталог пользователя, который идёт на удалённый сервер. Половинки сравниваются (я утрирую) и если всё ок — пускают. Важно: авторизуется не только клиент на сервере, но и сервер по отношению к клиенту (то есть у сервера есть свой собственный ключ). Главной особенностью ключа по сравнению с паролем является то, что его нельзя «украсть», взломав сервер — ключ не передаётся с клиента на сервер, а во время авторизации клиент доказывает серверу, что владеет ключом (та самая криптографическая магия).
Генерация ключа
Свой ключ можно сгенерировать с помощью команды ssh-keygen. Если не задать параметры, то он сохранит всё так, как надо.
Ключ можно закрыть паролем. Этот пароль (в обычных графических интерфейсах) спрашивается один раз и сохраняется некоторое время. Если пароль указать пустым, он спрашиваться при использовании не будет. Восстановить забытый пароль невозможно.
Сменить пароль на ключ можно с помощью команды ssh-keygen -p.
Структура ключа
/.ssh/id_rsa.pub — открытый ключ. Его копируют на сервера, куда нужно получить доступ.
/.ssh/id_rsa — закрытый ключ. Его нельзя никому показывать. Если вы в письмо/чат скопипастите его вместо pub, то нужно генерировать новый ключ. (Я не шучу, примерно 10% людей, которых просишь дать ssh-ключ постят id_rsa, причём из этих десяти процентов мужского пола 100%).
Копирование ключа на сервер
/.ssh/authorized_keys и положить туда открытый ключ, то можно будет заходить без пароля. Обратите внимание, права на файл не должны давать возможность писать в этот файл посторонним пользователям, иначе ssh его не примет. В ключе последнее поле — user@machine. Оно не имеет никакого отношения к авторизации и служит только для удобства определения где чей ключ. Заметим, это поле может быть поменяно (или даже удалено) без нарушения структуры ключа.
Если вы знаете пароль пользователя, то процесс можно упростить. Команда ssh-copy-id user@server позволяет скопировать ключ не редактируя файлы вручную.
Замечание: Старые руководства по ssh упоминают про authorized_keys2. Причина: была первая версия ssh, потом стала вторая (текущая), для неё сделали свой набор конфигов, всех это очень утомило, и вторая версия уже давным давно переключилась на версии без всяких «2». То есть всегда authorized_keys и не думать о разных версиях.
Если у вас ssh на нестандартном порту, то ssh-copy-id требует особого ухищрения при работе: ssh-copy-id ‘-p 443 user@server’ (внимание на кавычки).
Ключ сервера
/.ssh/known_hosts. Узнать, где какой ключ нельзя (ибо несекьюрно).
Если ключ сервера поменялся (например, сервер переустановили), ssh вопит от подделке ключа. Обратите внимание, если сервер не трогали, а ssh вопит, значит вы не на тот сервер ломитесь (например, в сети появился ещё один компьютер с тем же IP, особо этим страдают всякие локальные сети с 192.168.1.1, которых в мире несколько миллионов). Сценарий «злобной man in the middle атаки» маловероятен, чаще просто ошибка с IP, хотя если «всё хорошо», а ключ поменялся — это повод поднять уровень паранойи на пару уровней (а если у вас авторизация по ключу, а сервер вдруг запросил пароль — то паранойю можно включать на 100% и пароль не вводить).
Удалить известный ключ сервера можно командой ssh-keygen -R server. При этом нужно удалить ещё и ключ IP (они хранятся раздельно): ssh-keygen -R 127.0.0.1.
Ключ сервера хранится в /etc/ssh/ssh_host_rsa_key и /etc/ssh/ssh_host_rsa_key.pub. Их можно:
а) скопировать со старого сервера на новый.
б) сгенерировать с помощью ssh-keygen. Пароля при этом задавать не надо (т.е. пустой). Ключ с паролем ssh-сервер использовать не сможет.
Заметим, если вы сервера клонируете (например, в виртуалках), то ssh-ключи сервера нужно обязательно перегенерировать.
Старые ключи из know_hosts при этом лучше убрать, иначе ssh будет ругаться на duplicate key.
Копирование файлов
Передача файлов на сервер иногда может утомлять. Помимо возни с sftp и прочими странными вещами, ssh предоставляет нам команду scp, которая осуществляет копирование файла через ssh-сессию.
scp path/myfile user@8.8.8.8:/full/path/to/new/location/
Обратно тоже можно:
scp user@8.8.8.8:/full/path/to/file /path/to/put/here
Fish warning: Не смотря на то, что mc умеет делать соединение по ssh, копировать большие файлы будет очень мучительно, т.к. fish (модуль mc для работы с ssh как с виртуальной fs) работает очень медленно. 100-200кб — предел, дальше начинается испытание терпения. (Я вспомнил свою очень раннюю молодость, когда не зная про scp, я копировал
5Гб через fish в mc, заняло это чуть больше 12 часов на FastEthernet).
Возможность копировать здорово. Но хочется так, чтобы «сохранить как» — и сразу на сервер. И чтобы в графическом режиме копировать не из специальной программы, а из любой, привычной.
sshfs
Теория: модуль fuse позволяет «экспортировать» запросы к файловой системе из ядра обратно в userspace к соответствующей программе. Это позволяет легко реализовывать «псевдофайловые системы». Например, мы можем предоставить доступ к удалённой файловой системе через ssh так, что все локальные приложения (за малым исключением) не будут ничего подозревать.
Собственно, исключение: O_DIRECT не поддерживается, увы (это проблема не sshfs, это проблема fuse вообще).
Использование: установить пакет sshfs (сам притащит за собой fuse).
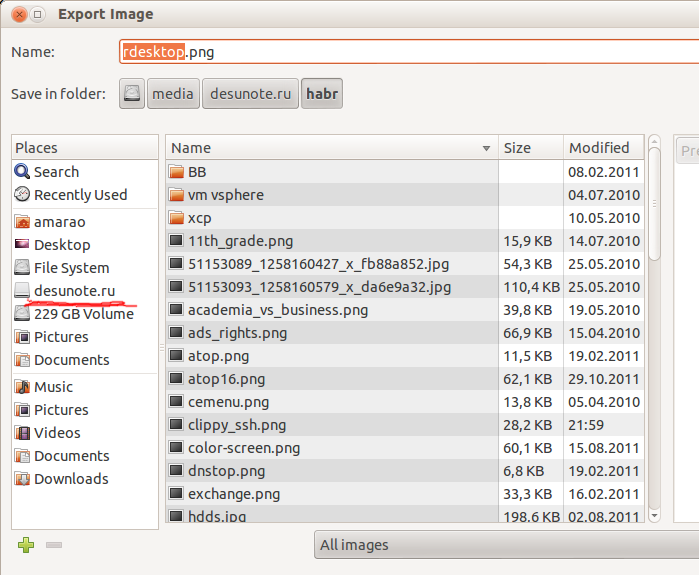
Собственно, пример моего скрипта, который монтирует desunote.ru (размещающийся у меня на домашнем комьютере — с него в этой статье показываются картинки) на мой ноут:
Делаем файл +x, вызываем, идём в любое приложение, говорим сохранить и видим:
Параметры sshfs, которые могут оказаться важными: -o reconnect (говорит пытаться пересоединиться вместо ошибок).
Если вы много работаете с данными от рута, то можно (нужно) сделать idmap:
-o idmap=user. Работает она следующим образом: если мы коннектимся как пользователь pupkin@server, а локально работаем как пользователь vasiliy, то мы говорим «считать, что файлы pupkin, это файлы vasiliy». ну или «root», если мы коннектимся как root.
В моём случае idmap не нужен, так как имена пользователей (локальное и удалённое) совпадают.
Заметим, комфортно работать получается только если у нас есть ssh-ключик (см. начало статьи), если нет — авторизация по паролю выбешивает на 2-3 подключение.
Отключить обратно можно командой fusermount -u /path, однако, если соединение залипло (например, нет сети), то можно/нужно делать это из-под рута: sudo umount -f /path.
Удалённое исполнение кода
ssh может выполнить команду на удалённом сервере и тут же закрыть соединение. Простейший пример:
ssh user@server ls /etc/
Выведет нам содержимое /etc/ на server, при этом у нас будет локальная командная строка.
Некоторые приложения хотят иметь управляющий терминал. Их следует запускать с опцией -t:
ssh user@server -t remove_command
Кстати, мы можем сделать что-то такого вида:
ssh user@server cat /some/file|awk ‘‘ |local_app
Это нас приводит следующей фиче:
Проброс stdin/out
Допустим, мы хотим сделать запрос к программе удалённо, а потом её вывод поместить в локальный файл
ssh user@8.8.8.8 command >my_file
Допустим, мы хотим локальный вывод положить удалённо
mycommand |scp — user@8.8.8.8:/path/remote_file
Усложним пример — мы можем прокидывать файлы с сервера на сервер: Делаем цепочку, чтобы положить stdin на 10.1.1.2, который нам не доступен снаружи:
mycommand | ssh user@8.8.8.8 «scp — user@10.1.1.2:/path/to/file»
Есть и вот такой головоломный приём использования pipe’а (любезно подсказали в комментариях в жж):
tar -c * | ssh user@server «cd && tar -x»
Tar запаковывает файлы по маске локально, пишет их в stdout, откуда их читает ssh, передаёт в stdin на удалённом сервере, где их cd игнорирует (не читает stdin), а tar — читает и распаковывает. Так сказать, scp для бедных.
Алиасы
Скажу честно, до последнего времени не знал и не использовал. Оказались очень удобными.
В более-менее крупной компании часто оказывается, что имена серверов выглядят так: spb-MX-i3.extrt.int.company.net. И пользователь там не равен локальному. То есть логиниться надо так: ssh ivanov_i@spb-MX-i3.extrt.int.company.net. Каждый раз печатать — туннельных синдромов не напасёшься. В малых компаниях проблема обратная — никто не думает о DNS, и обращение на сервер выглядит так: ssh root@192.168.1.4. Короче, но всё равно напрягает. Ещё большая драма, если у нас есть нестандартный порт, и, например, первая версия ssh (привет цискам). Тогда всё выглядит так: ssh -1 -p 334 vv_pupkin@spb-MX-i4.extrt.int.company.net. Удавиться. Про драму с scp даже рассказывать не хочется.
Можно прописать общесистемные alias’ы на IP (/etc/hosts), но это кривоватый выход (и пользователя и опции всё равно печатать). Есть путь короче.
/.ssh/config позволяет задать параметры подключения, в том числе специальные для серверов, что самое важное, для каждого сервера своё. Вот пример конфига:
Все доступные для использования опции можно увидеть в man ssh_config (не путать с sshd_config).
Опции по умолчанию
По подсказке UUSER: вы можете указать настройки соединения по умолчанию с помощью конструкции Host *, т.е., например:
То же самое можно сделать и в /etc/ssh/ssh_config (не путать с /etc/ssh/sshd_config), но это требует прав рута и распространяется на всех пользователей.
Проброс X-сервера
Собственно, немножко я проспойлерил эту часть в примере конфига выше. ForwardX11 — это как раз оно.
Теория: Графические приложения в юникс обычно используют X-сервер (wayland в пути, но всё ещё не готов). Это означает, что приложение запускается и подключается к X-серверу для рисования. Иными словами, если у вас есть голый сервер без гуя и есть локальный x-сервер (в котором вы работаете), то вы можете дать возможность приложениям с сервера рисовать у вас на рабочем столе. Обычно подключение к удалённом X-серверу — не самая безопасная и тривиальная вещь. SSH позволяет упростить этот процесс и сделать его совсем безопасным. А возможность жать трафик позволяет ещё и обойтись меньшим трафиком (т.е. уменьшить утилизацию канала, то есть уменьшить ping (точнее, latency), то есть уменьшить лаги).
Ключики: -X — проброс X-сервера. -Y проброс авторизации.
Достаточно просто запомнить комбинацию ssh -XYC user@SERVER.
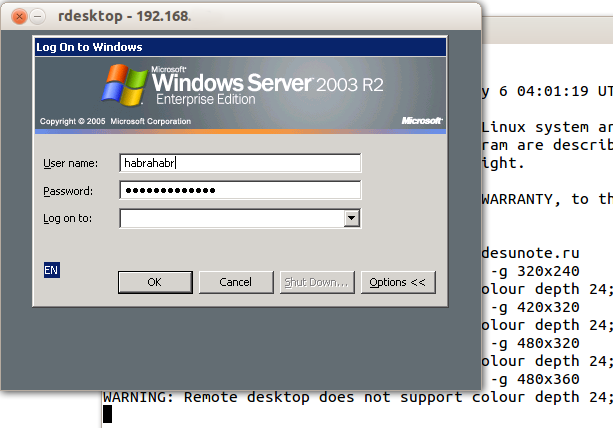
В примере выше (названия компании вымышленные) я подключаюсь к серверу ооо-рога-и-копыта.рф не просто так, а с целью получить доступ к windows-серверу. Безопасность microsoft при работе в сети мы все хорошо знаем, так что выставлять наружу голый RDP неуютно. Вместо этого мы подключаемся к серверу по ssh, а дальше запускаем там команду rdesktop:
ssh ric
rdesktop -k en-us 192.168.1.1 -g 1900×1200
и чудо, окошко логина в windows на нашем рабочем столе. Заметим, тщательно зашифрованное и неотличимое от обычного ssh-трафика.
Socks-proxy
Когда я оказываюсь в очередной гостинице (кафе, конференции), то местный wifi чаще всего оказывается ужасным — закрытые порты, неизвестно какой уровень безопасности. Да и доверия к чужим точкам доступа не особо много (это не паранойя, я вполне наблюдал как уводят пароли и куки с помощью банального ноутбука, раздающего 3G всем желающим с названием близлежащей кафешки (и пишущего интересное в процессе)).
Особые проблемы доставляют закрытые порты. То джаббер прикроют, то IMAP, то ещё что-нибудь.
Обычный VPN (pptp, l2tp, openvpn) в таких ситуациях не работает — его просто не пропускают. Экспериментально известно, что 443ий порт чаще всего оставляют, причём в режиме CONNECT, то есть пропускают «как есть» (обычный http могут ещё прозрачно на сквид завернуть).
Решением служит socks-proxy режим работы ssh. Его принцип: ssh-клиент подключается к серверу и слушает локально. Получив запрос, он отправляет его (через открытое соединение) на сервер, сервер устанавливает соединение согласно запросу и все данные передаёт обратно ssh-клиенту. А тот отвечает обратившемуся. Для работы нужно сказать приложениям «использовать socks-proxy». И указать IP-адрес прокси. В случае с ssh это чаще всего localhost (так вы не отдадите свой канал чужим людям).
Подключение в режиме sock-proxy выглядит так:
В силу того, что чужие wifi чаще всего не только фиговые, но и лагливые, то бывает неплохо включить опцию -C (сжимать трафик). Получается почти что opera turbo (только картинки не жмёт). В реальном сёрфинге по http жмёт примерно в 2-3 раза (читай — если вам выпало несчастье в 64кбит, то вы будете мегабайтные страницы открывать не по две минуты, а секунд за 40. Фигово, но всё ж лучше). Но главное: никаких украденных кук и подслушанных сессий.
Я не зря сказал про закрытые порты. 22ой порт закрывают ровно так же, как «не нужный» порт джаббера. Решение — повесить сервер на 443-й порт. Снимать с 22 не стоит, иногда бывают системы с DPI (deep packet inspection), которые ваш «псевдо-ssl» не пустят.
Вот так выглядит мой конфиг:
/etc/ssh/sshd_config:
(фрагмент)
Port 22
Port 443
/.ssh/config с ноутбука, который описывает vpn
(обратите внимание на «ленивую» форму записи localhost — 127.1, это вполне себе законный метод написать 127.0.0.1)
Проброс портов
Мы переходим к крайне сложной для понимания части функционала SSH, позволяющей осуществлять головоломные операции по туннелированию TCP «из сервера» и «на сервер».
Для понимания ситуации все примеры ниже будут ссылаться на вот эту схему:
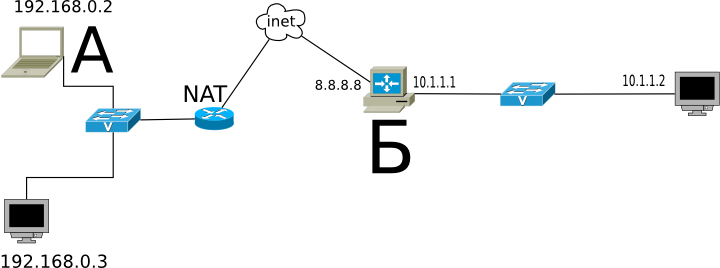
Комментарии: Две серые сети. Первая сеть напоминает типичную офисную сеть (NAT), вторая — «гейтвей», то есть сервер с белым интерфейсом и серым, смотрящим в свою собственную приватную сеть. В дальнейших рассуждениях мы полагаем, что «наш» ноутбук — А, а «сервер» — Б.
Задача: у нас локально запущено приложение, нам нужно дать возможность другому пользователю (за пределами нашей сети) посмотреть на него.
Решение: проброс локального порта (127.0.0.1:80) на публично доступный адрес. Допустим, наш «публично доступный» Б занял 80ый порт чем-то полезным, так что пробрасывать мы будем на нестандартный порт (8080).
Итоговая конфигурация: запросы на 8.8.8.8:8080 будут попадать на localhost ноутбука А.
ssh -R 127.1:80:8.8.8.8:8080 user@8.8.8.8
Опция -R позволяет перенаправлять с удалённого (Remote) сервера порт на свой (локальный).
Важно: если мы хотим использовать адрес 8.8.8.8, то нам нужно разрешить GatewayPorts в настройках сервера Б.
Задача. На сервере «Б» слушает некий демон (допустим, sql-сервер). Наше приложение не совместимо с сервером (другая битность, ОС, злой админ, запрещающий и накладывающий лимиты и т.д.). Мы хотим локально получить доступ к удалённому localhost’у.
Итоговая конфигурация: запросы на localhost:3333 на ‘A’ должны обслуживаться демоном на localhost:3128 ‘Б’.
ssh -L 127.1:3333:127.1:3128 user@8.8.8.8
Опция -L позволяет локальные обращения (Local) направлять на удалённый сервер.
Задача: На сервере «Б» на сером интерфейсе слушает некий сервис и мы хотим дать возможность коллеге (192.168.0.3) посмотреть на это приложение.
Итоговая конфигурация: запросы на наш серый IP-адрес (192.168.0.2) попадают на серый интерфейс сервера Б.
ssh -L 192.168.0.2:8080:10.1.1.1:80 user@8.8.8.8
Вложенные туннели
Разумеется, туннели можно перенаправлять.
Усложним задачу: теперь нам хочется показать коллеге приложение, запущенное на localhost на сервере с адресом 10.1.1.2 (на 80ом порту).
Решение сложно:
ssh -L 192.168.0.2:8080:127.1:9999 user@8.8.8.8 ssh -L 127.1:9999:127.1:80 user2@10.1.1.2
Что происходит? Мы говорим ssh перенаправлять локальные запросы с нашего адреса на localhost сервера Б и сразу после подключения запустить ssh (то есть клиента ssh) на сервере Б с опцией слушать на localhost и передавать запросы на сервер 10.1.1.2 (куда клиент и должен подключиться). Порт 9999 выбран произвольно, главное, чтобы совпадал в первом вызове и во втором.
Реверс-сокс-прокси
Если предыдущий пример вам показался простым и очевидным, то попробуйте догадаться, что сделает этот пример:
ssh -D 8080 -R 127.1:8080:127.1:8080 user@8.8.8.8 ssh -R 127.1:8080:127.1:8080 user@10.1.1.2
Если вы офицер безопасности, задача которого запретить использование интернета на сервере 10.1.1.2, то можете начинать выдёргивать волосы на попе, ибо эта команда организует доступ в интернет для сервера 10.1.1.2 посредством сокс-прокси, запущенного на компьютере «А». Трафик полностью зашифрован и неотличим от любого другого трафика SSH. А исходящий трафик с компьютера с точки зрения сети «192.168.0/24» не отличим от обычного трафика компьютера А.
Туннелирование
Если к этому моменту попа отдела безопасности не сияет лысиной, а ssh всё ещё не внесён в список врагов безопасности номер один, вот вам окончательный убийца всего и вся: туннелирование IP или даже ethernet. В самых радикальных случаях это позволяет туннелировать dhcp, заниматься удалённым arp-спуфингом, делать wake up on lan и прочие безобразия второго уровня.
(сам я увы, таким не пользовался).
Легко понять, что в таких условиях невозможно никаким DPI (deep packet inspection) отловить подобные туннели — либо ssh разрешён (читай — делай что хочешь), либо ssh запрещён (и можно смело из такой компании идиотов увольняться не ощущая ни малейшего сожаления).
Проброс авторизации
Если вы думаете, что на этом всё, то…… впрочем, в отличие от автора, у которого «снизу» ещё не написано, читатель заранее видит, что там снизу много букв и интриги не получается.
OpenSSH позволяет использовать сервера в качестве плацдарма для подключения к другим серверам, даже если эти сервера недоверенные и могут злоупотреблять чем хотят.
Для начала о простом пробросе авторизации.
Допустим, мы хотим подключиться к серверу 10.1.1.2, который готов принять наш ключ. Но копировать его на 8.8.8.8 мы не хотим, ибо там проходной двор и половина людей имеет sudo и может шариться по чужим каталогам. Компромиссным вариантом было бы иметь «другой» ssh-ключ, который бы авторизовывал user@8.8.8.8 на 10.1.1.2, но если мы не хотим пускать кого попало с 8.8.8.8 на 10.1.1.2, то это не вариант (тем паче, что ключ могут не только поюзать, но и скопировать себе «на чёрный день»).
ssh предлагает возможность форварда ssh-агента (это такой сервис, который запрашивает пароль к ключу). Опция ssh -A пробрасывает авторизацию на удалённый сервер.
Вызов выглядит так:
ssh -A user@8.8.8.8 ssh user2@10.1.1.2
Удалённый ssh-клиент (на 8.8.8.8) может доказать 10.1.1.2, что мы это мы только если мы к этому серверу подключены и дали ssh-клиенту доступ к своему агенту авторизации (но не ключу!).
В большинстве случаев это прокатывает.
Однако, если сервер совсем дурной, то root сервера может использовать сокет для имперсонализации, когда мы подключены.
Есть ещё более могучий метод — он превращает ssh в простой pipe (в смысле, «трубу») через которую насквозь мы осуществляем работу с удалённым сервером.
Главным достоинством этого метода является полная независимость от доверенности промежуточного сервера. Он может использовать поддельный ssh-сервер, логгировать все байты и все действия, перехватывать любые данные и подделывать их как хочет — взаимодействие идёт между «итоговым» сервером и клиентом. Если данные оконечного сервера подделаны, то подпись не сойдётся. Если данные не подделаны, то сессия устанавливается в защищённом режиме, так что перехватывать нечего.
Эту клёвую настройку я не знал, и раскопал её redrampage.
Настройка завязана на две возможности ssh: опцию -W (превращающую ssh в «трубу») и опцию конфига ProxyCommand (опции командной строки, вроде бы нет), которая говорит «запустить программу и присосаться к её stdin/out». Опции эти появились недавно, так что пользователи centos в пролёте.
Выглядит это так (циферки для картинки выше):
Ну а подключение тривиально: ssh raep .
Повторю важную мысль: сервер 8.8.8.8 не может перехватить или подделать трафик, воспользоваться агентом авторизации пользователя или иным образом изменить трафик. Запретить — да, может. Но если разрешил — пропустит через себя без расшифровки или модификации. Для работы конфигурации нужно иметь свой открытый ключ в authorized_keys как для user@8.8.8.8, так и в user2@10.1.1.2
Разумеется, подключение можно оснащать всеми прочими фенечками — прокидыванием портов, копированием файлов, сокс-прокси, L2-туннелями, туннелированием X-сервера и т.д.
Источник
You’re working on an important project, and you’ve been carefully managing your SSH keys to ensure secure access. Suddenly, you realize that one of the keys is no longer needed, or perhaps it has been compromised. What do you do now? Don’t panic. Deleting an SSH key can be a simple process if you know the right steps to take. In this article, we will guide you through the process of deleting an SSH key, ensuring that your connections are secure and up-to-date.
Why Delete an SSH Key?
Before diving into the actual deletion process, let’s discuss the reasons why you might want to delete an SSH key. Typically, it could be due to one of the following reasons:
– The key has been compromised
– You no longer require access to the host associated with the key
– A team member has left the organization, and their key needs to be removed
– You’ve decided to replace the existing key with a new one for improved security
Whatever the reason might be, it’s crucial to keep your SSH keys up-to-date and secure to maintain the integrity of your infrastructure.
Locating the SSH Key
First, you need to locate the necessary SSH key you wish to delete. SSH keys are stored in the `~/.ssh` directory, and they usually come in pairs – a private key with the `.pem` or `.key` extension and a public key with the `.pub` extension. The private key should be kept secret, while the public key can be shared with others.
Now, let’s assume you want to delete an SSH key pair named `my_key`. You can find this pair within the `~/.ssh` directory with these two files: `my_key.pem` (private key), and `my_key.pub` (public key).
Deleting the Private Key
To delete the private key, simply use the command below, replacing `my_key.pem` with the name of your private key file:
“`
rm ~/.ssh/my_key.pem
“`
This command will remove the private key, and in doing so, you will no longer be able to access any hosts using this key.
Please keep in mind: Deleting a private key cannot be undone. Ensure that it is the correct key and that it is no longer needed before proceeding with deletion.
Deleting the Public Key
The process of deleting a public key varies depending on the setup. If the key was added to your local SSH agent, you’d need to remove it from there. If the key was added directly to the remote host, you’ll have to delete it from the authorized keys file on the host.
# Removing the Public Key from Your Local SSH Agent
If you have added the key to your local SSH agent, you can remove it using the `ssh-add` command with the `-d` flag. Here’s the command you would use, replacing `my_key.pub` with your public key file:
“`
ssh-add -d ~/.ssh/my_key.pub
“`
This command will delete the specified public key from your SSH agent, ensuring that it does not get accidentally used for future connections.
# Removing the Public Key from the Remote Host’s Authorized Keys File
If you’ve added the public key to the remote host’s authorized keys file, you’ll need to remove it from there. By default, the authorized keys file is located at `~/.ssh/authorized_keys` on the remote host.
To find and delete the specific public key, use the following command, replacing `my_key.pub` with your public key file:
“`
ssh user@remote-host “grep -v -F $(cat ~/.ssh/my_key.pub) ~/.ssh/authorized_keys > ~/.ssh/temp && mv ~/.ssh/temp ~/.ssh/authorized_keys”
“`
This command will first find the public key within the authorized keys file, then create a temporary file without that key, and finally replace the original authorized keys file with the new one.
Validating Key Deletion
After deleting the SSH key, you might want to ensure that it has been removed successfully. To check if the key is still present in your local SSH agent, use the following command:
“`
ssh-add -l
“`
If the key is not listed in the output, it has been successfully removed from your SSH agent. To verify the key’s removal from the remote host, attempt to connect to the host using the deleted key. If the connection fails as expected, it confirms that the key has been removed.
Conclusion
In this article, we’ve provided a comprehensive guide on how to delete an SSH key, ensuring secure and up-to-date connections. By following these steps, you can maintain the integrity of your infrastructure and keep your systems safe from potential breaches. Always remember to validate your actions, and with practice, key management will become second nature in your daily workflow.
GitHub SSH key is Leaked – How bad is this?
SSH To Windows Using Public Key
SSH Key Authentication | How to Create SSH Key Pairs
Is it secure to remove SSH keys?
It is generally secure to remove SSH keys if you no longer need them or if you suspect that they have been compromised. Removing an SSH key can help you maintain the security of your system by limiting the number of access points into your server.
When you remove an SSH key, you are essentially revoking access for the associated user or service that was using the key for authentication. As a result, this can help protect your system from unauthorized access, especially if the key has been leaked or exposed in any way.
However, it’s important to keep in mind that removing an SSH key does not automatically secure your system if there are other security vulnerabilities present. Be sure to follow best practices for overall system security and configure your server properly to minimize potential risks.
In summary, removing an SSH key can be a secure action to take when it is no longer needed or has been compromised; however, it should be accompanied by additional security measures to maintain the safety of your system.
How can I remove SSH keys from Windows?
To remove SSH keys from Windows, follow these steps:
Step 1: Open File Explorer and navigate to the following directory:
C:UsersYour_Username.ssh
This folder usually contains your public (id_rsa.pub) and private (id_rsa) SSH key files. To see the hidden “.ssh” folder, ensure the “Hidden items” checkbox is enabled in the “View” tab.
Step 2: Select the specific SSH key files you want to remove. The most common types of key files include:
- id_rsa (private key)
- id_rsa.pub (public key)
- known_hosts (a list of known SSH hosts)
Step 3: Right-click on the selected files and click “Delete” to remove them. Alternatively, press the “Delete” key on your keyboard.
Note: Removing the keys will prevent you from using those specific keys to connect to remote servers via SSH. Make sure you have a backup or another way to access your servers before you delete the keys.
How can I remove SSH keys from my Mac?
To remove SSH keys from your Mac, follow these steps:
1. Open the Terminal application: You can find it in the Applications > Utilities folder or by searching for it using Spotlight.
2. Navigate to the SSH folder: The SSH keys are stored in a hidden folder in your user directory called `.ssh`. To access this folder, type the following command and press Enter:
“`
cd ~/.ssh
“`
If you receive an error message stating that the folder does not exist, it might be because you have not created any SSH keys yet.
3. List the SSH keys: To view all the available SSH keys, execute the following command:
“`
ls -la
“`
This will display a list of files, including your public (`.pub`) and private keys. The default key names usually look like `id_rsa` (private key) and `id_rsa.pub` (public key).
4. Delete the desired SSH key: To remove a specific SSH key pair, use the `rm` command followed by the key names. For example, to delete the default keys, run:
“`
rm id_rsa id_rsa.pub
“`
Replace `id_rsa` and `id_rsa.pub` with the appropriate key names if they are different. This will permanently delete both the private and public keys.
5. Verify the deletion: Run the `ls -la` command again to ensure that the keys have been removed successfully.
Always exercise caution when deleting SSH keys, as losing access to a private key may prevent you from connecting to remote systems. Consider backing up your keys or moving them to a safe location before taking any action.
How can one delete an SSH key from a Git repository?
To delete an SSH key from a Git repository, follow these steps:
1. Access your Git account: Sign in to your Git platform, such as GitHub, GitLab, or Bitbucket.
2. Navigate to your settings: In your account, locate the settings menu, which typically appears as a gear icon.
3. Locate SSH keys or SSH and GPG keys section: In the settings menu, find the section pertaining to SSH keys or SSH and GPG keys.
4. Identify the key to be deleted: Within this section, you will see a list of your added SSH keys. Look for the specific key you want to remove and take note of the associated title or description.
5. Delete the SSH key: Click the “Delete” button or trash icon next to the targeted key. Confirm the deletion if prompted.
Remember that by deleting an SSH key, you will lose access to any repositories or services that require it for authentication. Be sure to obtain a new SSH key and update your repositories’ access settings accordingly if necessary.
How can you permanently delete an SSH key from a server using command line methods?
To permanently delete an SSH key from a server using command line methods, follow these steps:
1. First, log in to the server using your SSH credentials.
2. Go to the user’s home directory, where the SSH keys are stored. In most cases, this is located in the ~/.ssh directory. Use the following command to navigate to the directory:
“`
cd ~/.ssh
“`
3. List all the keys stored in that directory using the ls command:
“`
ls
“`
4. Identify the key you want to delete. Typically, the public key has a file name ending with .pub.
5. To permanently delete the identified key, use the rm command followed by the file name. For example, if the key to be deleted is named id_rsa.pub, use the following command:
“`
rm id_rsa.pub
“`
6. If you also want to delete the private key associated with the public key, use the same command without the .pub extension. For example:
“`
rm id_rsa
“`
7. If the key was added to the authorized_keys file, open the file using a text editor (e.g., nano or vi) and remove the corresponding entry:
“`
nano authorized_keys
“`
Locate the relevant key, delete it, and save the file.
By following these steps, you can permanently delete an SSH key from a server using command line methods.
What is the process to remove an SSH key from the authorized_keys file on a specific user account?
To remove an SSH key from the authorized_keys file on a specific user account, follow the steps below:
1. Log in to the user account on the server where you want to remove the SSH key.
2. Navigate to the user’s home directory by typing:
“`
cd ~
“`
3. Now, go to the .ssh directory where the authorized_keys file is located:
“`
cd .ssh
“`
4. Open the authorized_keys file using your preferred text editor, such as nano, vi, or vim. For example:
“`
nano authorized_keys
“`
5. In the authorized_keys file, locate the SSH key you want to remove. The SSH keys are usually organized in separate lines, and each line represents a unique key.
6. Delete the specific line containing the SSH key you want to remove. Be careful not to modify or delete any other lines.
7. Save the changes and close the authorized_keys file.
8. To ensure the security of your server, set the correct file permissions for the authorized_keys file, if needed, by executing:
“`
chmod 600 authorized_keys
“`
9. Finally, test your connection to make sure that the SSH key has been successfully removed. You should no longer be able to access the server using the removed key.
By following these steps, you have successfully removed an SSH key from the authorized_keys file on a specific user account.
How do you disable or delete a specific SSH key for a user in a Git repository?
To disable or delete a specific SSH key for a user in a Git repository, follow these steps:
1. Log in to the Git repository hosting platform (e.g., GitHub, GitLab, Bitbucket) using your account.
2. Navigate to the Settings or Profile Settings page of your account.
3. Find and click on the SSH and GPG keys section.
4. Locate the SSH key you want to delete or disable. You can identify it by the key’s title or the unique fingerprint.
5. Click on the Delete or Remove button next to the SSH key.
6. You may be prompted to confirm your action. Click on the appropriate confirmation button (e.g., “Yes, remove it” or “Delete”).
By following these instructions, you will disable or delete the specific SSH key for your user account in the Git repository hosting platform. Keep in mind that this will revoke access for any systems using this key, so ensure you update those systems with a new key if necessary.
What are the security implications when deleting a previously used SSH key from a cloud service like AWS or Google Cloud?
When deleting a previously used SSH key from a cloud service like AWS or Google Cloud, there are several security implications to consider:
1. Loss of access: If you delete an SSH key without deploying an alternative in place, you may lose access to your instances or server. This can lead to a lot of wasted time and resources trying to regain access.
2. Audit trail: Deleting an SSH key may disrupt the audit trail, making it difficult to track historical activities on the server. This can impact your ability to identify and investigate security breaches or unauthorized access.
3. Key management: When you delete an SSH key, you need to make sure that all instances of the key are removed from your infrastructure. Failing to do so can leave your server exposed to potential security risks if the deleted key is still in use somewhere within your infrastructure.
4. Rotating keys: Deleting an SSH key should be part of a regular key rotation process where new keys are generated, deployed, and old keys are removed. This helps to reduce the risk of a compromised key being used to gain unauthorized access.
5. Effect on authorized users: If other authorized users still need access to the system, they will require new SSH keys to be generated and deployed. Make sure to communicate the changes to ensure a smooth transition.
6. Effect on automated processes: If you have automated processes that rely on the deleted SSH key, you will need to update those processes to use the new key. Failing to do so can cause disruptions in your automated workflows.
In conclusion, when deleting a previously used SSH key from a cloud service, take care to manage the security implications by implementing proper key rotations, ensuring consistent access for authorized users, and maintaining a robust audit trail. Always remember to use strong and unique keys to protect your infrastructure.
Can you revoke an SSH key without deleting it, and if so, how do you accomplish this?
Yes, you can revoke an SSH key without deleting it. To accomplish this, you will need to update the “authorized_keys” file on the remote server where the SSH key is being used for authentication.
Follow these steps to revoke an SSH key:
1. Log in to the remote server using another valid SSH key or another authentication method, such as a password.
2. Navigate to the SSH directory for the user whose key you want to revoke. Usually, this is located at “~/.ssh/” directory.
3. Open the “authorized_keys” file using your preferred text editor. This file contains a list of public keys, one per line, that are authorized to access the server.
4. Locate the key you wish to revoke in the “authorized_keys” file. It should match the public key portion of the key pair you wish to revoke.
5. Comment out the key by adding a “#” symbol at the beginning of the line containing the key. This will prevent the SSH server from recognizing the key, effectively revoking it.
6. Save and close the “authorized_keys” file.
By following these steps, you have revoked the SSH key without deleting it. The key will no longer be authorized to access the server, but the corresponding line in the “authorized_keys” file can be easily uncommented if you want to restore access in the future.
Post Views: 1,082