Remote Server Administration Tools to the rescue!
PC Guide is reader-supported. When you buy through links on our site, we may earn an affiliate commission. Read More
Table of Contents
- Install RSAT via Settings
- Uninstall RSAT Via the User Interface
- How to install RSAT via Command Line
- How to install RSAT via Command Line #2
Install RSAT via Settings
To install Windows RSAT via the user interface, rather than the command line, you can do this through the settings. However, if your version of Windows 10 isn’t fully up to date (after October 2018), you won’t have the requirements to find it. On some PCs – like our work one – the option is also not there and this will have to be done via the command line or contact your IT administrator for access.
Go into Settings and type in Optional Features, search for RSAT and it should display all the components of the feature that you can install. After this, you’ll have all the tools installed for use.
Uninstall RSAT Via the User Interface
If you need to install the RSAT toolset, you can head back into the settings to the “Optional Features” and then choose “Manage Optional Features”. This will let you uninstall everything, but Microsoft has a weird method of uninstalling these that seems counterintuitive.
According to Microsoft, if you uninstall one part that relies on another, it will refuse to uninstall. You’ll want to uninstall everything backwards essentially, so if you need to get rid of A, you’ll need to get rid of B.
How to install RSAT via Command Line
This is really easy, it’s actually quicker than the usual method. Open the Command Prompt by hitting the Start Search bar and typing in CMD. Right-click it and choose “Run as Administrator” to get full access, then you’ll want to copy-paste this in (highlight, CTRL+C and then in Command Prompt just right click):
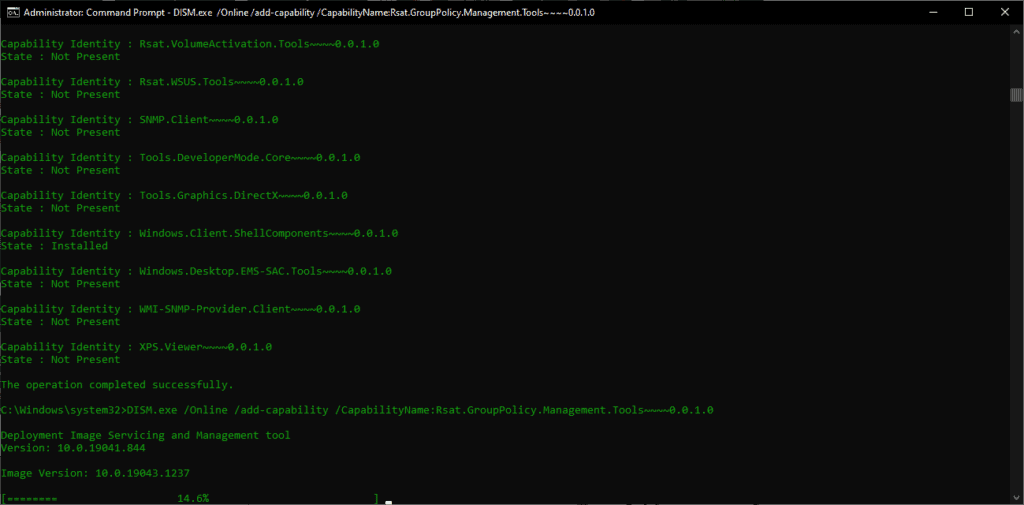
DISM.exe /Online /Get-Capabilities
This will list everything you can acquire from the additional features Microsoft allows you to install.
How to install RSAT via Command Line #2
With the list of options to install from DSIM, we can now choose the different things we need. The last command should have given us a list of options, so we can easily copy-paste the text without having to manually type each one in.
You start the command with this:
DISM.exe /Online /add-capability /CapabilityName:
Once you’ve done that, you can then add each of the following onto the end after the colon:
- Rsat.ActiveDirectory.DS-LDS.Tools~~~~0.0.1.0
- Rsat.BitLocker.Recovery.Tools~~~~0.0.1.0
- Rsat.CertificateServices.Tools~~~~0.0.1.0
- Rsat.DHCP.Tools~~~~0.0.1.0
- Rsat.Dns.Tools~~~~0.0.1.0
- Rsat.FailoverCluster.Management.Tools~~~~0.0.1.0
- Rsat.FileServices.Tools~~~~0.0.1.0
- Rsat.GroupPolicy.Management.Tools~~~~0.0.1.0
- Rsat.IPAM.Client.Tools~~~~0.0.1.0
- Rsat.LLDP.Tools~~~~0.0.1.0
- Rsat.NetworkController.Tools~~~~0.0.1.0
- Rsat.NetworkLoadBalancing.Tools~~~~0.0.1.0
- Rsat.RemoteAccess.Management.Tools~~~~0.0.1.0
- Rsat.RemoteDesktop.Services.Tools~~~~0.0.1.0
- Rsat.ServerManager.Tools~~~~0.0.1.0
- Rsat.Shielded.VM.Tools~~~~0.0.1.0
- Rsat.StorageMigrationService.Management.Tools~~~~0.0.1.0
- Rsat.StorageReplica.Tools~~~~0.0.1.0
- Rsat.SystemInsights.Management.Tools~~~~0.0.1.0
- Rsat.VolumeActivation.Tools~~~~0.0.1.0
- Rsat.WSUS.Tools~~~~0.0.1.0
Remote Server Administration Tools (RSAT) for Windows 10 is a set of tools that allows IT administrators to manage roles and features installed on Windows Server from a Windows 10 PC. This utility becomes crucial in environments where servers are deployed, providing flexibility and control without moving to the server physically. This article will guide you through the step-by-step process of installing RSAT on Windows 10, as well as how to uninstall it when it is no longer needed.
Understanding RSAT
Before we dive into the installation process, it is essential to understand what RSAT is and how it can benefit Windows 10 users. RSAT includes a range of tools for managing Windows Server, such as the Active Directory Users and Computers console, Group Policy Management, and DNS Server Tools, among others. These tools enable systems administrators to configure and manage server roles efficiently.
Advantages of Using RSAT
- Centralized Management: Manage multiple servers from a single workstation.
- Time Efficiency: Save time by managing settings remotely rather than accessing each server individually.
- Enhanced Control: Administer user accounts, group policies, and server configurations with tailored tools.
- Remote Operations: Ensure effective system management without geographical limitations.
System Requirements for RSAT
Before installing RSAT, ensure that your version of Windows 10 is compatible. RSAT is available for Windows 10 Professional, Enterprise, and Education editions. It is not supported on Windows 10 Home.
Minimum System Requirements:
- Operating System: Windows 10 (professional, enterprise, or education)
- Processor: 1 GHz or faster
- RAM: At least 1 GB (32-bit) or 2 GB (64-bit)
- Disk Space: At least 16 GB (32-bit) or 20 GB (64-bit)
How to Install RSAT on Windows 10
Step 1: Check Windows Version
Before proceeding with the installation, verify your Windows 10 version to ensure compatibility with RSAT. You can check your version by:
- Pressing
Windows key + Rto open the Run dialog. - Typing
winverand pressing Enter.
This will show you the version and edition of Windows installed on your system. If you have one of the compatible editions, continue to the next step.
Step 2: Update Windows 10
It is a good practice to update your system before installing RSAT. Microsoft regularly releases updates that can improve the functionality and stability of Windows 10.
- Open Settings by clicking on the Start button and choosing the gear icon.
- Navigate to Update & Security and click on Windows Update.
- Click on Check for updates and install any available updates.
- Restart your computer if prompted to do so.
Step 3: Install RSAT via Settings
In recent versions of Windows 10 (starting from Windows 10 Version 1809), RSAT is included as «Features on Demand» in Windows 10. Here’s how to install it through Settings:
- Open the Settings app.
- Click on Apps.
- Select Optional features.
- Click on the Add a feature button.
- In the search box, type «RSAT» to filter the results.
- You will see a list of RSAT tools available for installation. Click on the ones you need (for example, RSAT: Active Directory Domain Services and Lightweight Directory Tools, RSAT: DHCP Server Tools, etc.) and then click on the Install button.
Step 4: Install RSAT via PowerShell (Optional)
If you prefer working with PowerShell, you can also install RSAT using this method. Here’s how:
-
Open PowerShell as an Administrator. You can do this by searching for ‘PowerShell’ in the Start menu, right-clicking it, and selecting Run as administrator.
-
Use the following command to install all RSAT tools at once:
Get-WindowsCapability -Name RSAT* -Online | Add-WindowsCapability -Online -
If you want to install specific features, replace the
*with the name of the desired tool, for example:Add-WindowsCapability -Online -Name Rsat.ActiveDirectory.DS-LDS.Tools~~~~0.0.1.0
Step 5: Verify Installation
After installation, you can verify that RSAT has been successfully installed:
- Click on the Start Menu and scroll down to find the Windows Administrative Tools folder.
- Open it, and you should see all the installed RSAT tools listed.
You can now launch any of these tools to manage your server settings remotely.
How to Use RSAT Tools
Once RSAT is installed, the usage varies depending on the specific tools you’ve installed. Here are a few examples:
- Active Directory Users and Computers: You can use this tool to create, modify, and delete user accounts and groups.
- Group Policy Management: This tool allows you to manage Group Policies applied to different users and computers within a network.
- DNS Management: Use this to manage DNS records for your organization.
Simply open these tools from the Start menu, and you’ll be prompted to connect to a server where you have administrative permissions.
Troubleshooting Common Installation Issues
While installing RSAT, you might face some issues. Here are some common problems and solutions:
Installation Fails
If the installation fails, ensure that you are using a compatible version of Windows 10 and that it is fully updated. You can also attempt to reset the Windows Update components.
Missing RSAT Tools
Sometimes not all the tools are visible in the Optional Features list. If you do not see the RSAT tools, ensure the Windows installation is the correct version and check for any pending updates or system requirements.
How to Uninstall RSAT
When you no longer need the RSAT tools, it’s wise to uninstall them to free up system resources. Here’s how to do that:
Step 1: Uninstallation via Settings
- Open the Settings app.
- Click on Apps.
- Navigate to Optional features.
- Scroll down to find the RSAT tool you wish to uninstall.
- Click on it and select Uninstall.
Step 2: Uninstallation via PowerShell (Optional)
Using PowerShell can also streamline the uninstallation process:
-
Launch PowerShell as an Administrator.
-
Use the following command to see all installed RSAT tools:
Get-WindowsCapability -Name RSAT* -Online | Where-Object { $_.State -eq 'Installed' } -
To uninstall a specific RSAT feature, use:
Remove-WindowsCapability -Online -Name Rsat.ActiveDirectory.DS-LDS.Tools~~~~0.0.1.0 -
If you need to uninstall all RSAT tools, you can combine the removal commands for each installed tool.
Step 3: Verify Uninstallation
After you have uninstalled the RSAT tools, you may want to verify that they have indeed been removed:
- Check the Windows Administrative Tools folder from the Start Menu to see if the tools still appear.
- If necessary, open PowerShell again and re-run the previous command that lists installed RSAT capabilities.
Conclusion
Installing and uninstalling RSAT on Windows 10 is a straightforward process that can significantly enhance the capabilities of system administrators. RSAT provides critical tools for managing server roles and features remotely, reducing the need for physical presence in server rooms and data centers.
By following the steps outlined in this article, you can easily install, utilize, and remove RSAT as needed, ensuring your Windows 10 setup is efficient and tailored to your management needs. Whether you’re a seasoned IT professional or a newcomer, RSAT is an essential toolkit for managing Windows Server environments effectively.
This article will serve as an informative guide and give you a clear understanding of how to perform silent or interactive installs and uninstalls of RSAT for Windows 10 (Offline) using the Powershell App Deployment Toolkit. The PowerShell App Deployment Toolkit can be used to replace your WiseScript, VBScript and Batch wrapper scripts with one versatile, re-usable and extensible tool. This tool is an absolute must for Microsoft Endpoint Manager Configuration Manager (MEMCM) / (SCCM) Administrators or anyone who is responsible for packaging and deploying software.
How to Install RSAT for Windows 10 (Offline) Using the PowerShell App Deployment Toolkit
- Download the Powershell App Deployment Toolkit 3.8.4:
- https://github.com/PSAppDeployToolkit/PSAppDeployToolkit/releases/download/3.8.4/PSAppDeployToolkit_v3.8.4.zip
- Download the zip file to a folder created at (C:\Downloads)
- Open Windows PowerShell by Right-Clicking on Windows PowerShell and selecting Run as Administrator
- Enter the following command to remove the Zone.Identifier:
Unblock-File -Path C:\Downloads\PSAppDeployToolkit_v3.8.4.zip
- Enter the following command to extract the contents of the zip file:
Expand-Archive -Path C:\Downloads\PSAppDeployToolkit_v3.8.4.zip -DestinationPath C:\Downloads\PADT
- Enter the following commands to copy the AppDeployToolkit & Files folders to “C:\Downloads\RSAT_Win10_Offline”:
Copy-Item -Path "C:\Downloads\PADT\Toolkit\AppDeployToolkit" -Destination "C:\Downloads\RSAT_Win10_Offline\AppDeployToolkit" -RecurseCopy-Item -Path "C:\Downloads\PADT\Toolkit\Files" -Destination "C:\Downloads\RSAT_Win10_Offline\Files"
You should now see the AppDeploymentToolkit folder with files & the empty Files folder at “C:\Downloads\RSAT_Win10_Offline”
Next we’ll want to download and extract both the 32-bit & 64-bit .MSU installers for RSAT for Windows 10.
- Navigate to: https://download.microsoft.com/download/1/D/8/1D8B5022-5477-4B9A-8104-6A71FF9D98AB/WindowsTH-RSAT_WS2016-x86.msu
- Download the WindowsTH-RSAT_WS2016-x86.msu to a folder created at (C:\Downloads)
- Open an Elevated Command Prompt by Right-Clicking on Command Prompt and select Run as Administrator
- Navigate to the C:\Downloads folder
- Enter the following commands to extract the contents of the WindowsTH-RSAT_WS2016-x86.msu:
MKDIR C:\Downloads\RSAT_Win10_Offline\Files\x86 |
expand -f:* C:\Downloads\WindowsTH-RSAT_WS2016-x86.msu C:\Downloads\RSAT_Win10_Offline\Files\x86 |
- Navigate to: https://download.microsoft.com/download/1/D/8/1D8B5022-5477-4B9A-8104-6A71FF9D98AB/WindowsTH-RSAT_WS2016-x64.msu
- Download the WindowsTH-RSAT_WS2016-x64.msu to a folder created at (C:\Downloads)
- Open an Elevated Command Prompt by Right-Clicking on Command Prompt and select Run as Administrator
- Navigate to the C:\Downloads folder
- Enter the following commands to extract the contents of the WindowsTH-RSAT_WS2016-x64.msu:
MKDIR C:\Downloads\ |
expand -f:* C:\Downloads\WindowsTH-RSAT_WS2016-x64.msu C:\Downloads\ |
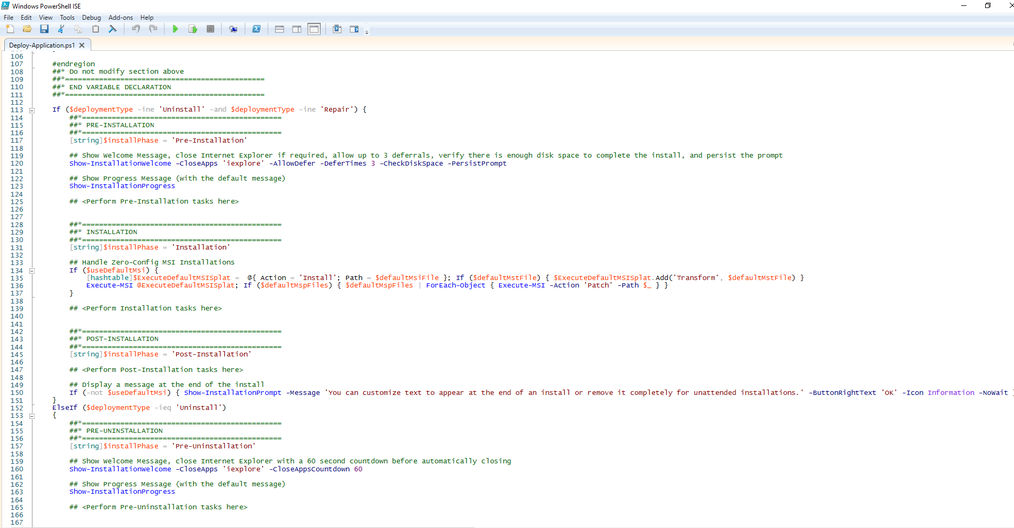
- Copy the PowerShell script below to “C:\Downloads\RSAT_Win10_Offline“ & name it Deploy-RSAT_Win10_Offline.ps1
<#
.SYNOPSIS
	This script performs the installation or uninstallation of Remote Server Administration Tools (RSAT) for Windows 10.
	# LICENSE #
	PowerShell App Deployment Toolkit - Provides a set of functions to perform common application deployment tasks on Windows.
	Copyright (C) 2017 - Sean Lillis, Dan Cunningham, Muhammad Mashwani, Aman Motazedian.
	This program is free software: you can redistribute it and/or modify it under the terms of the GNU Lesser General Public License as published by the Free Software Foundation, either version 3 of the License, or any later version. This program is distributed in the hope that it will be useful, but WITHOUT ANY WARRANTY; without even the implied warranty of MERCHANTABILITY or FITNESS FOR A PARTICULAR PURPOSE. See the GNU General Public License for more details.
	You should have received a copy of the GNU Lesser General Public License along with this program. If not, see <http://www.gnu.org/licenses/>.
.DESCRIPTION
	The script is provided as a template to perform an install or uninstall of an application(s).
	The script either performs an "Install" deployment type or an "Uninstall" deployment type.
	The install deployment type is broken down into 3 main sections/phases: Pre-Install, Install, and Post-Install.
	The script dot-sources the AppDeployToolkitMain.ps1 script which contains the logic and functions required to install or uninstall an application.
.PARAMETER DeploymentType
	The type of deployment to perform. Default is: Install.
.PARAMETER DeployMode
	Specifies whether the installation should be run in Interactive, Silent, or NonInteractive mode. Default is: Interactive. Options: Interactive = Shows dialogs, Silent = No dialogs, NonInteractive = Very silent, i.e. no blocking apps. NonInteractive mode is automatically set if it is detected that the process is not user interactive.
.PARAMETER AllowRebootPassThru
	Allows the 3010 return code (requires restart) to be passed back to the parent process (e.g. SCCM) if detected from an installation. If 3010 is passed back to SCCM, a reboot prompt will be triggered.
.PARAMETER TerminalServerMode
	Changes to "user install mode" and back to "user execute mode" for installing/uninstalling applications for Remote Destkop Session Hosts/Citrix servers.
.PARAMETER DisableLogging
	Disables logging to file for the script. Default is: $false.
.EXAMPLE
    PowerShell.exe .\Deploy-RSAT_Win10_Offline.ps1 -DeploymentType "Install" -DeployMode "NonInteractive"
.EXAMPLE
    PowerShell.exe .\Deploy-RSAT_Win10_Offline.ps1 -DeploymentType "Install" -DeployMode "Silent"
.EXAMPLE
    PowerShell.exe .\Deploy-RSAT_Win10_Offline.ps1 -DeploymentType "Install" -DeployMode "Interactive"
.EXAMPLE
    PowerShell.exe .\Deploy-RSAT_Win10_Offline.ps1 -DeploymentType "Uninstall" -DeployMode "NonInteractive"
.EXAMPLE
    PowerShell.exe .\Deploy-RSAT_Win10_Offline.ps1 -DeploymentType "Uninstall" -DeployMode "Silent"
.EXAMPLE
    PowerShell.exe .\Deploy-RSAT_Win10_Offline.ps1 -DeploymentType "Uninstall" -DeployMode "Interactive"
.NOTES
	Toolkit Exit Code Ranges:
	60000 - 68999: Reserved for built-in exit codes in Deploy-Application.ps1, Deploy-Application.exe, and AppDeployToolkitMain.ps1
	69000 - 69999: Recommended for user customized exit codes in Deploy-Application.ps1
	70000 - 79999: Recommended for user customized exit codes in AppDeployToolkitExtensions.ps1
.LINK
	http://psappdeploytoolkit.com
#>
[CmdletBinding()]
Param (
	[Parameter(Mandatory=$false)]
	[ValidateSet('Install','Uninstall','Repair')]
	[string]$DeploymentType = 'Install',
	[Parameter(Mandatory=$false)]
	[ValidateSet('Interactive','Silent','NonInteractive')]
	[string]$DeployMode = 'Interactive',
	[Parameter(Mandatory=$false)]
	[switch]$AllowRebootPassThru = $false,
	[Parameter(Mandatory=$false)]
	[switch]$TerminalServerMode = $false,
	[Parameter(Mandatory=$false)]
	[switch]$DisableLogging = $false
)

Try {
	## Set the script execution policy for this process
	Try { Set-ExecutionPolicy -ExecutionPolicy 'ByPass' -Scope 'Process' -Force -ErrorAction 'Stop' } Catch {}

	##*===============================================
	##* VARIABLE DECLARATION
	##*===============================================
	## Variables: Application
	[string]$appVendor = ''
	[string]$appName = 'Remote Server Administration Tools (RSAT) for Windows 10'
	[string]$appVersion = ''
	[string]$appArch = ''
	[string]$appLang = ''
	[string]$appRevision = ''
	[string]$appScriptVersion = '1.0.0'
	[string]$appScriptDate = 'XX/XX/20XX'
	[string]$appScriptAuthor = 'Jason Bergner'
	##*===============================================
	## Variables: Install Titles (Only set here to override defaults set by the toolkit)
	[string]$installName = ''
	[string]$installTitle = 'Remote Server Administration Tools (RSAT) for Windows 10'

	##* Do not modify section below
	#region DoNotModify

	## Variables: Exit Code
	[int32]$mainExitCode = 0

	## Variables: Script
	[string]$deployAppScriptFriendlyName = 'Deploy Application'
	[version]$deployAppScriptVersion = [version]'3.8.4'
	[string]$deployAppScriptDate = '26/01/2021'
	[hashtable]$deployAppScriptParameters = $psBoundParameters

	## Variables: Environment
	If (Test-Path -LiteralPath 'variable:HostInvocation') { $InvocationInfo = $HostInvocation } Else { $InvocationInfo = $MyInvocation }
	[string]$scriptDirectory = Split-Path -Path $InvocationInfo.MyCommand.Definition -Parent

	## Dot source the required App Deploy Toolkit Functions
	Try {
		[string]$moduleAppDeployToolkitMain = "$scriptDirectory\AppDeployToolkit\AppDeployToolkitMain.ps1"
		If (-not (Test-Path -LiteralPath $moduleAppDeployToolkitMain -PathType 'Leaf')) { Throw "Module does not exist at the specified location [$moduleAppDeployToolkitMain]." }
		If ($DisableLogging) { . $moduleAppDeployToolkitMain -DisableLogging } Else { . $moduleAppDeployToolkitMain }
	}
	Catch {
		If ($mainExitCode -eq 0){ [int32]$mainExitCode = 60008 }
		Write-Error -Message "Module [$moduleAppDeployToolkitMain] failed to load: `n$($_.Exception.Message)`n `n$($_.InvocationInfo.PositionMessage)" -ErrorAction 'Continue'
		## Exit the script, returning the exit code to SCCM
		If (Test-Path -LiteralPath 'variable:HostInvocation') { $script:ExitCode = $mainExitCode; Exit } Else { Exit $mainExitCode }
	}

	#endregion
	##* Do not modify section above
	##*===============================================
	##* END VARIABLE DECLARATION
	##*===============================================

	If ($deploymentType -ine 'Uninstall' -and $deploymentType -ine 'Repair') {
		##*===============================================
		##* PRE-INSTALLATION
		##*===============================================
		[string]$installPhase = 'Pre-Installation'

		## Show Welcome Message
		Show-InstallationWelcome

        ## Show Progress Message
        Show-InstallationProgress

		##*===============================================
		##* INSTALLATION
		##*===============================================
		[string]$installPhase = 'Installation'

        If ($ENV:PROCESSOR_ARCHITECTURE -eq 'x86'){
        Write-Log -Message "Detected 32-bit OS Architecture." -Severity 1 -Source $deployAppScriptFriendlyName

        ## Install Remote Server Administration Tools for Windows 10 on x86-based Systems
        $CABx86 = Get-ChildItem -Path "$dirFiles\x86" -Include WindowsTH-KB2693643-x86.cab -File -Recurse -ErrorAction SilentlyContinue
        If($CABx86.Exists)
        {
        Write-Log -Message "Found $($CABx86.FullName), now attempting to install Remote Server Administration Tools for Windows 10 Version 1803 and earlier on x86-based Systems."
        Show-InstallationProgress "Installing Remote Server Administration Tools for Windows 10 on x86-based Systems. This may take some time. Please wait..."
        Execute-Process -Path "$envSystem32Directory\DISM.exe" -Parameters "/LogPath:C:\Windows\Logs\Software\RSAT-Install.log /LogLevel:4 /Online /Add-Package /PackagePath:""$CABx86"" /Quiet /NoRestart" -WindowStyle Hidden
        }
        }

        Else
        {
        Write-Log -Message "Detected 64-bit OS Architecture" -Severity 1 -Source $deployAppScriptFriendlyName

        ## Install Remote Server Administration Tools for Windows 10 on x64-based Systems
        $CABx64 = Get-ChildItem -Path "$dirFiles\x64" -Include WindowsTH-KB2693643-x64.cab -File -Recurse -ErrorAction SilentlyContinue
        If($CABx64.Exists)
        {
        Write-Log -Message "Found $($CABx64.FullName), now attempting to install Remote Server Administration Tools for Windows 10 Version 1803 and earlier on x64-based Systems."
        Show-InstallationProgress "Installing Remote Server Administration Tools for Windows 10 on x64-based Systems. This may take some time. Please wait..."
        Execute-Process -Path "$envSystem32Directory\DISM.exe" -Parameters "/LogPath:C:\Windows\Logs\Software\RSAT-Install.log /LogLevel:4 /Online /Add-Package /PackagePath:""$CABx64"" /Quiet /NoRestart" -WindowStyle Hidden
        }
        }

		##*===============================================
		##* POST-INSTALLATION
		##*===============================================
		[string]$installPhase = 'Post-Installation'

	}
	ElseIf ($deploymentType -ieq 'Uninstall')
	{
		##*===============================================
		##* PRE-UNINSTALLATION
		##*===============================================
		[string]$installPhase = 'Pre-Uninstallation'

		## Show Welcome Message
		Show-InstallationWelcome

        ## Show Progress Message (With a Message to Indicate the Application is Being Uninstalled)
        Show-InstallationProgress -StatusMessage "Uninstalling $installTitle. Please Wait..."


		##*===============================================
		##* UNINSTALLATION
		##*===============================================
		[string]$installPhase = 'Uninstallation'

        If ((Get-Hotfix -Id KB2693643 -ErrorAction SilentlyContinue)) {
        Write-Log -Message "Uninstalling the RSAT Windows Update (KB2693643)."

        $SearchUpdates = DISM /Online /Get-Packages | findstr "Microsoft-Windows-RemoteServerAdministrationTools-Client-Package-TopLevel"
        $PackageId = $SearchUpdates.replace("Package Identity : ", "")
        Execute-Process -Path "$envSystem32Directory\DISM.exe" -Parameters "/LogPath:C:\Windows\Logs\Software\RSAT-Uninstall.log /LogLevel:4 /Online /Remove-Package /PackageName:$PackageId /Quiet /NoRestart" -WindowStyle Hidden
        }


		##*===============================================
		##* POST-UNINSTALLATION
		##*===============================================
		[string]$installPhase = 'Post-Uninstallation'


	}
	ElseIf ($deploymentType -ieq 'Repair')
	{
		##*===============================================
		##* PRE-REPAIR
		##*===============================================
		[string]$installPhase = 'Pre-Repair'


		##*===============================================
		##* REPAIR
		##*===============================================
		[string]$installPhase = 'Repair'


		##*===============================================
		##* POST-REPAIR
		##*===============================================
		[string]$installPhase = 'Post-Repair'


    }
	##*===============================================
	##* END SCRIPT BODY
	##*===============================================

	## Call the Exit-Script function to perform final cleanup operations
	Exit-Script -ExitCode $mainExitCode
}
Catch {
	[int32]$mainExitCode = 60001
	[string]$mainErrorMessage = "$(Resolve-Error)"
	Write-Log -Message $mainErrorMessage -Severity 3 -Source $deployAppScriptFriendlyName
	Show-DialogBox -Text $mainErrorMessage -Icon 'Stop'
	Exit-Script -ExitCode $mainExitCode
}
Ok, all the hard work is done and now you can install or uninstall RSAT for Windows 10 (Offline) using one single PowerShell script. Simply change the DeploymentType parameter to install or uninstall. Logging functionality is built-in automatically and you can view the log files under “C:\Windows\Logs\Software”.
RSAT for Windows 10 (Offline) NonInteractive Install (PowerShell)
NonInteractive means Very Silent, i.e. no blocking apps. This is automatically set if it is detected that the process is not running in the user session and it is not possible for anyone to provide input using a mouse or keyboard.
- Open Windows PowerShell by Right-Clicking on Windows PowerShell and selecting Run as Administrator
- Change the directory to “C:\Downloads\RSAT_Win10_Offline”
- PS C:\Downloads\RSAT_Win10_Offline>
- Enter the following command:
Powershell.exe -ExecutionPolicy Bypass .\Deploy-RSAT_Win10_Offline.ps1 -DeploymentType "Install" -DeployMode "NonInteractive"
RSAT for Windows 10 (Offline) Silent Install (PowerShell)
Silent means no dialogs (progress and balloon tip notifications are suppressed).
- Open Windows PowerShell by Right-Clicking on Windows PowerShell and selecting Run as Administrator
- Change the directory to “C:\Downloads\RSAT_Win10_Offline“
- PS C:\Downloads\RSAT_Win10_Offline>
- Enter the following command:
Powershell.exe -ExecutionPolicy Bypass .\Deploy-RSAT_Win10_Offline.ps1 -DeploymentType "Install" -DeployMode "Silent"
RSAT for Windows 10 (Offline) Interactive Install (PowerShell)
Interactive means the install will show dialogs including progress and balloon tip notifications.
- Open Windows PowerShell by Right-Clicking on Windows PowerShell and selecting Run as Administrator
- Change the directory to “C:\Downloads\RSAT_Win10_Offline”
- PS C:\Downloads\RSAT_Win10_Offline>
- Enter the following command:
Powershell.exe -ExecutionPolicy Bypass .\Deploy-RSAT_Win10_Offline.ps1 -DeploymentType "Install" -DeployMode "Interactive"
How to Uninstall RSAT for Windows 10 (Offline) Using the PowerShell App Deployment Toolkit
RSAT for Windows 10 (Offline) NonInteractive Uninstall (PowerShell)
NonInteractive means Very Silent, i.e. no blocking apps. This is automatically set if it is detected that the process is not running in the user session and it is not possible for anyone to provide input using a mouse or keyboard.
- Open Windows PowerShell by Right-Clicking on Windows PowerShell and selecting Run as Administrator
- Change the directory to “C:\Downloads\RSAT_Win10_Offline“
- PS C:\Downloads\RSAT_Win10_Offline>
- Enter the following command:
Powershell.exe -ExecutionPolicy Bypass .\Deploy-RSAT_Win10_Offline.ps1 -DeploymentType "Uninstall" -DeployMode "NonInteractive"
RSAT for Windows 10 (Offline) Silent Uninstall (PowerShell)
Silent means no dialogs (progress and balloon tip notifications are suppressed).
- Open Windows PowerShell by Right-Clicking on Windows PowerShell and selecting Run as Administrator
- Change the directory to “C:\Downloads\RSAT_Win10_Offline“
- PS C:\Downloads\RSAT_Win10_Offline>
- Enter the following command:
Powershell.exe -ExecutionPolicy Bypass .\Deploy-RSAT_Win10_Offline.ps1 -DeploymentType "Uninstall" -DeployMode "Silent"
RSAT for Windows 10 (Offline) Interactive Uninstall (PowerShell)
Interactive means the install will show dialogs including progress and balloon tip notifications.
- Open Windows PowerShell by Right-Clicking on Windows PowerShell and selecting Run as Administrator
- Change the directory to “C:\Downloads\RSAT_Win10_Offline“
- PS C:\Downloads\RSAT_Win10_Offline>
- Enter the following command:
Powershell.exe -ExecutionPolicy Bypass .\Deploy-RSAT_Win10_Offline.ps1 -DeploymentType "Uninstall" -DeployMode "Interactive"
Always make sure to test everything in a development environment prior to implementing anything into production. The information in this article is provided “As Is” without warranty of any kind.
RSAT Installer
The scripts can be used to silently install or uninstall the complete RSAT suite with SCCM. As of Win 10 1809, RSAT is installed as a Feature on Demand (FoD). There is no standalone installer anymore.
Dependencies and pending reboots must be handled carefully.
The uninstall script relies on the Application Model of SCCM and the fact that the script will be launched again, if the detection method is not satisfied. The scripts have a placeholder for a custom footprint that you want to use as the detection method. Use a registry key or alike for the footprint.
Install
Installation is quite straight forward.
Call the script with powershell -ExecutionPolicy Bypass -NoProfile -File Add-Rsat.ps1.
Uninstall
Some RSAT FoD have dependencies and need to be uninstalled in the
corret order.
Some RSAT FoD may require a reboot. The reboot is required before
trying to uninstall a dependent FoD.
Configure the SCCM Deployment Type to Determine behavior based on return codes.
If a reboot is required or a FoD failes to uninstall because of dependencies,
exit code 3010 is returned. In this case, SCCM will reboot the device and launch the
script again until all FoD are removed.
There should be no dependency related failures, if the order in the $packages variable isn’t
changed.
Call the script with powershell -ExecutionPolicy Bypass -NoProfile -File Remove-Rsat.ps1.
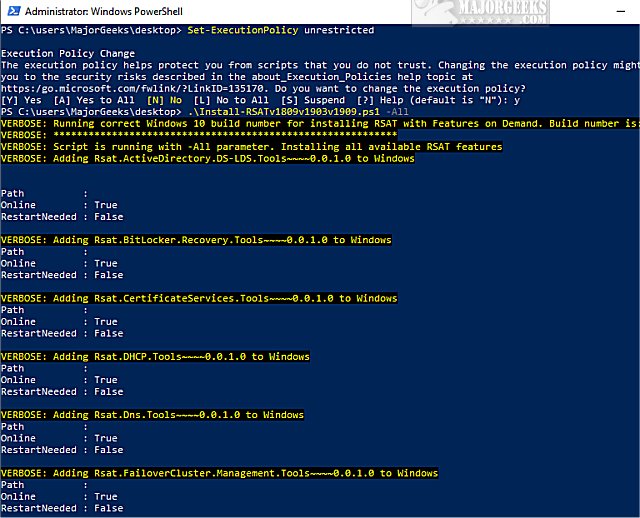
RSAT (Remote Server Administration Tools) in Windows 10 1809 and 1903 are no longer a downloadable add-on to Windows. Instead, its included as a set of «Features on Demand» directly in Windows. Using this PowerShell script, you can easily install RSAT in Windows 10.
RSAT (Remote Server Administration Tools) in Windows 10 1809 and 1903 are no longer a downloadable add-on to Windows. Instead, its included as a set of «Features on Demand» directly in Windows. Using this PowerShell script, you can easily install RSAT in Windows 10.
The script will only run on Windows 10 v1809 or v1903 or v1909.
The script requires administrative rights as well as access to the Internet (RSAT is installed through Microsoft Update).
The script is built around Get-WindowsCapability, Add-WindowsCapability, and Remove-WindowsCapability.
If running scripts is disabled, see Powershell Cannot Be Loaded Because Running Scripts Is Disabled On This System.
The script comes with 4 options:
.\Install-RSATv1809v1903v1909.ps1 -All (-All is installing ALL the features within the RSAT bundle)
.\Install-RSATv1809v1903v1909.ps1 -Basic (-Basic is only installing AD DS, DHCP, DNS, Group Policy Management and Server Manager)
.\Install-RSATv1809v1903v1909.ps1 -ServerManager (-ServerManager is only installing the Server Manager)
.\Install-RSATv1809v1903v1909.ps1 -Uninstall (-Uninstall removes all RSAT features again)
Download