
Администраторы время от времени должны удалять старые профили пользователей (уволенные пользователи, неактивные пользователи, и т.д.) в каталоге C:\Users на рабочих станциях и серверах Windows. Чаще всего с задачей очисткой профилей пользователей Windows сталкиваются на терминальных серверах RDS (Remote Desktop Services).
Основная проблема терминальных серверов – постоянный рост размеров каталогов профилей пользователей на диске. Частично эта проблема решается политиками квотирования размера профиля пользователя с помощью FSRM или NTFS квот, использованием профилей типа FSLogix или User Profile Disk, перемещаемыми папками и т.д. Но при большом количестве RDS пользователей в папке C:\Users со временем накапливается огромное количество каталогов с неиспользуемыми профилями пользователей.
Содержание:
- Как вручную удалить профиль пользователя в Windows?
- Групповая политика для автоматической очистки старых профилей
- PowerShell скрипт для удаления старых профилей пользователей в Windows
Как вручную удалить профиль пользователя в Windows?
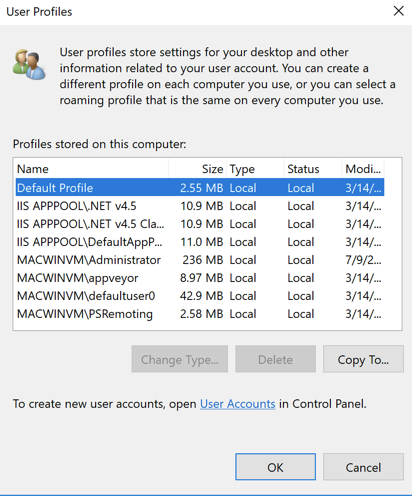
В Windows вы можете вручную удалить профиль пользователя через панель управления.
- Откройте Advanced System Settings (команда
SystemPropertiesAdvanced
) -> User Profiles -> Settings; - В этом окне перечислен список всех профилей пользователей (локальных и доменных), которые хранятся на этом компьютере. Размер каждого профиля пользователя на диске указан в столбце Size.
- Выберите пользователя, чей профиль нужно удалить и нажмите кнопку Delete.


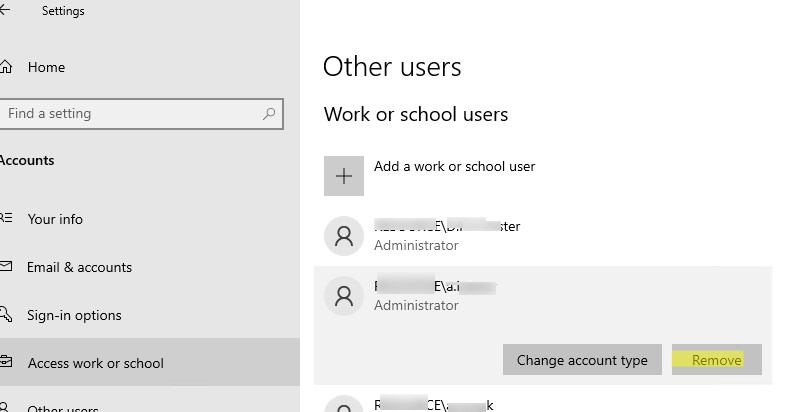
В Windows 11/10 и Windows Server 2022/2019 вы можете удалить профили пользователей с диска через приложение Settings. Перейдите в раздел Accounts -> Access work and school (или выполните команду быстрого доступа
ms-settings:otherusers
). Выберите пользователя и нажмите Remove чтобы удалить его данные с компьютера.
При корректном удалении профиля пользователя с диска будет удален каталог профиля в C:\Users и запись о пользователе в реестре.
Многие начинающиеся администраторы пытаются вручную удалить каталог с профилем пользователя из папки C:\Users. В этом случае нужно обязательно вручную удалить информацию о профиле из реестра Windows:
- Откройте редактор реестра
regedit.exe
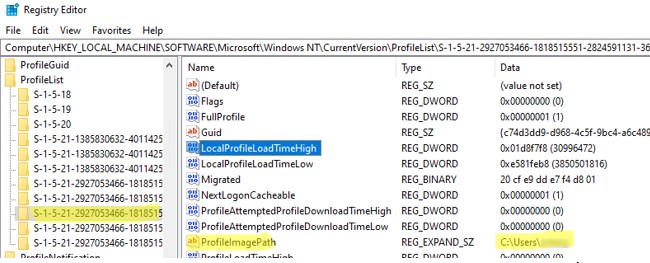
; - Перейдите в ветку HKEY_LOCAL_MACHINE\SOFTWARE\Microsoft\Windows NT\CurrentVersion\ProfileList
- Для каждого пользователя, выполнившего локальный вход в систему (этот метод входа должен быть разрешен пользователю настройками параметра Allow log on locally в GPO), создается отдельная ветка с SID пользователя в качестве имени;
- Вы можете найти раздел реестра, соответствующий пользователю по SID, или можете вручную просмотреть содержимое всех вложенных разделв, пока не найдете раздел, в котором значение ProfileImagePath указывает на каталог с профилем пользователя на диске (например,
C:\Users\kbuldogov
);
- Удалите данный раздел реестра, чтобы завершить корректное удаление профиля.
Также вы можете удалить профиль конкретного пользователя с помощью PowerShell:
Get-CimInstance -Class Win32_UserProfile | Where-Object { $_.LocalPath.split(‘\’)[-1] -eq 'kbuldogov' } | Remove-CimInstance
Эта команда удалит как каталог на диске, так и ссылку на профиль пользователя kbuldogov в реестре HKEY_LOCAL_MACHINE\SOFTWARE\Microsoft\Windows NT\CurrentVersion\ProfileList.
Эта команда будет работать как в Windows PowerShell, так и в новых версиях PowerShell Core 6.x,7.x
Можно удалить профиль пользователя на удаленном компьютере с помощью PowerShell Remoting и командлета Invoke-Command:
$compname="wks21s32"
$user = "kbuldogov"
Invoke-Command -ComputerName $compname -ScriptBlock {
param($user)
Get-CimInstance -Class Win32_UserProfile | Where-Object { $_.LocalPath.split(‘\’)[-1] -eq $user } | Remove-CimInstance
} -ArgumentList $user
Групповая политика для автоматической очистки старых профилей
В Windows есть специальный параметр групповой политики для автоматического удаления старых профилей пользователей старше xx дней. Вы можете включить этот параметр с помощью локального редактора GPO (
gpedit.msc
) или с помощью консоли управления доменными GPO (
gpmc.msc
). В этом примере на назначим политику автоматической очистки профилей на хосты в ферме RDS, которые вынесены в отдельный контейнер (Organizational Unit) Active Directory.
Прежде чем применять политику удаления старых профилей ко всем хостам, настоятельно рекомендуем проверить ее на тестовом сервере. Выведите один из серверов RDSH в режим обслуживания и протестируйте политику на нем.
- Найдите OU с компьютерами/серверами, на который вы хотите применить политику очистки старых профилей пользователей. Щелкните по OU и выберите Create a GPO in this domain and Link it here;
- Укажите имя политики и отредактируйте GPO;
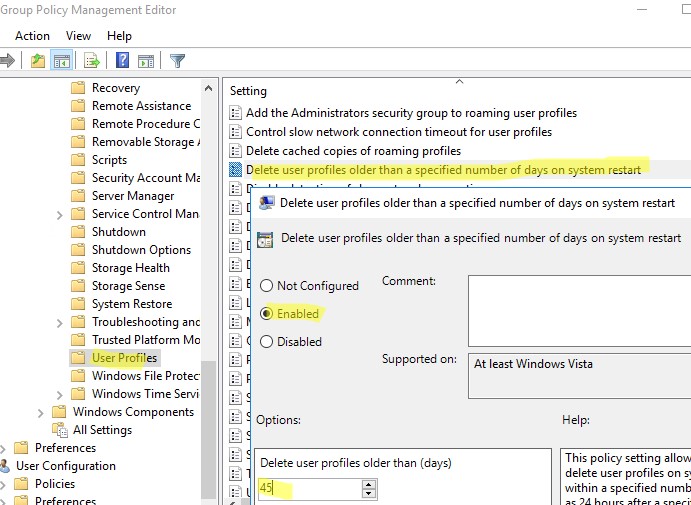
- Перейдите в раздел Конфигурация компьютера -> Административные шаблоны -> Система -> Профили пользователей (Computer Configuration -> Administrative Templates -> System -> User Profiles);
- Откройте параметр “Удалять при перезагрузке системы профили пользователей по истечении указанного числа дней” (Delete user profiles older than a specified number days on system restart);
- Включите политику и укажите через сколько дней профиль пользователя считается неактивным и “Служба профилей пользователей Windows” можно автоматически удалить такой профиль при следующей перезагрузке. Обычно тут стоит указать не менее 45-90 дней;

- После применения новых настроек групповых политк, служба User Profile Services на ваших серверах Windows будет автоматически удалять старые профили пользователей. Удаление выполняется при перезагрузке сервера.
При использовании этой политики нужно быть уверенным, что при выключении/перезагрузке сервера нет проблем с системным временем (время не сбивается), иначе могут быть удалены профили активных пользователей.
Другой недостаток — вы не можете запретить удаление определенных профилей, например, локальных учетных записей, администраторов и т.д.
В версиях до Windows 11/10 и Windows Server 2022/2019 эта политика работала некорректно. Дело в том, что неактивноть профиля пользователя ранее определялась по дате именения файла NTUSER.dat. При установке обновлений Windows, служба Trusted Installer может менять дату изменения файла NTUSER.dat в профиле каждого пользователя. В результате служба Win32_UserProfile считает, что профиль использовался недавно.
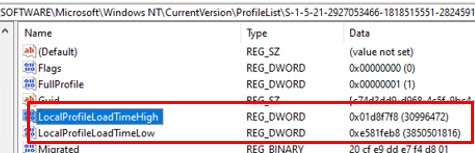
В современных версиях Windows эта политика проверяет активность профиля пользователей по параметрам LocalProfileUnloadTimeLow и LocalProfileUnloadTimeHigh в ветке
HKEY_LOCAL_MACHINE\SOFTWARE\Microsoft\Windows NT\CurrentVersion\ProfileList\<User Sid>
.
Вы можете получить значения параметров реестра LocalProfileLoadTimeLow и LocalProfileUnloadTimeHigh в привычном формате времени с помощью скрипта:
$profilelist = Get-ChildItem "HKLM:\SOFTWARE\Microsoft\Windows NT\CurrentVersion\ProfileList"
foreach ($p in $profilelist) {
    try {
        $objUser = (New-Object System.Security.Principal.SecurityIdentifier($p.PSChildName)).Translate([System.Security.Principal.NTAccount]).value
    } catch {
        $objUser = "[UNKNOWN]"
  }
    Remove-Variable -Force LTH,LTL,UTH,UTL -ErrorAction SilentlyContinue
    $LTH = '{0:X8}' -f (Get-ItemProperty -Path $p.PSPath -Name LocalProfileLoadTimeHigh -ErrorAction SilentlyContinue).LocalProfileLoadTimeHigh
    $LTL = '{0:X8}' -f (Get-ItemProperty -Path $p.PSPath -Name LocalProfileLoadTimeLow -ErrorAction SilentlyContinue).LocalProfileLoadTimeLow
    $UTH = '{0:X8}' -f (Get-ItemProperty -Path $p.PSPath -Name LocalProfileUnloadTimeHigh -ErrorAction SilentlyContinue).LocalProfileUnloadTimeHigh
    $UTL = '{0:X8}' -f (Get-ItemProperty -Path $p.PSPath -Name LocalProfileUnloadTimeLow -ErrorAction SilentlyContinue).LocalProfileUnloadTimeLow
    $LoadTime = if ($LTH -and $LTL) {
        [datetime]::FromFileTime("0x$LTH$LTL")
    } else {
        $null
    }
    $UnloadTime = if ($UTH -and $UTL) {
        [datetime]::FromFileTime("0x$UTH$UTL")
    } else {
        $null
    }
    [pscustomobject][ordered]@{
        User = $objUser
        SID = $p.PSChildName
        Loadtime = $LoadTime
        UnloadTime = $UnloadTime
    }
}

PowerShell скрипт для удаления старых профилей пользователей в Windows
Вы можете удалять профили неактивных или заблокированных пользователей с помощью скрипта PowerShell.
Сначала попробуем подсчитать размер профиля каждого пользователя в папке C:\Users c помощью простого скрипта из статьи “Вывести размер папок с помощью PowerShell”:
gci -force ‘C:\Users\’-ErrorAction SilentlyContinue | Where { !($_.Attributes -match " ReparsePoint") }| ? { $_ -is [io.directoryinfo] } | % {
$len = 0
gci -recurse -force $_.fullname -ErrorAction SilentlyContinue | % { $len += $_.length }
$_.fullname, ‘{0:N2} GB’ -f ($len / 1Gb)
$sum = $sum + $len
}
“Общий размер профилей”,'{0:N2} GB’ -f ($sum / 1Gb)
Итого суммарный размер всех профилей пользователей в каталоге C:\Users около 22 Гб.
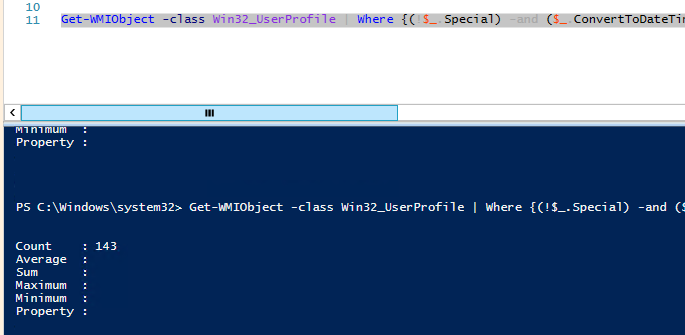
Теперь выведем список пользователей, профиль которых не использовался более 60 дней. Для поиска можно использовать значение атрибута профиля LastUseTime.
Get-WMIObject -class Win32_UserProfile | Where {(!$_.Special) -and ($_.ConvertToDateTime($_.LastUseTime) -lt (Get-Date).AddDays(-60))}| Measure-Object
У меня на терминальном сервере оказалось 143 профиля неактивных пользователей (общим размером около 10 Гб).
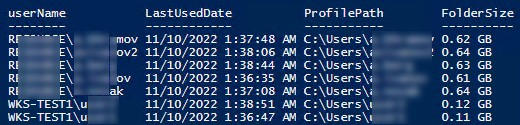
Следующий PowerShell скрипт выведет список подробную информацию о профилях пользователей, которые не обновлялись более 60 дней. Скрипт сконвертирует SID пользователя в имя, посчитает размер профиля каждого пользователя и выведет все в таблице:
$allprofilesinfo = @()
$OldProfiles=Get-WMIObject -class Win32_UserProfile | Where {(!$_.Special) -and ($_.ConvertToDateTime($_.LastUseTime) -lt (Get-Date).AddDays(-60))}
Foreach ($OldProfile in $OldProfiles)
   {$objSID = New-Object System.Security.Principal.SecurityIdentifier ($OldProfile.SID)
    $objUser = $objSID.Translate( [System.Security.Principal.NTAccount])
        $userinfo = New-Object PSObject -Property @{
            userName = $objUser.Value
            ProfilePath = $OldProfile.localpath
            LastUsedDate = $OldProfile.ConvertToDateTime($OldProfile.LastUseTime)
            FolderSize =  "{0:N2} GB" -f ((gci –force $OldProfile.localpath –Recurse -ErrorAction SilentlyContinue| measure Length -s).sum / 1Gb)
        }
    $allprofilesinfo += $userinfo
   }
$allprofilesinfo
Чтобы удалить все эти профили достаточно добавить перенаправить список на команду Remove-WmiObject (перед использование скрипта удаления желательно несколько раз перепроверить его вывод с помощью параметра –WhatIf ):
Get-WMIObject -class Win32_UserProfile | Where {(!$_.Special) -and (!$_.Loaded) -and ($_.ConvertToDateTime($_.LastUseTime) -lt (Get-Date).AddDays(-30))} | Remove-WmiObject –WhatIf
Как мы уже упомянули выше, при установке некоторых обновлений Windows, служба Trusted installer может менять дату изменения файла NTUSER.dat в профиле каждого пользователя.
На скриншоте выше видно, что все профили были изменены примерно в одно и тоже время. Проверьте дату последней установки обновлений в Windows:
gwmi win32_quickfixengineering |sort installedon |select InstalledOn -Last 1
Или с помощью модуля PSWindowsUpdate:
Get-WUHistory | Select-Object -First 20
Скорее всего она совпадет с датой изменения профилей. Поэтому в старых версиях Windows можно получить список неактивных профилей с помощью другого скрипта, который проверяет атрибуту lastwritetime каталога пользователя:
$USERS= (Get-ChildItem -directory -force 'C:\Users' | Where { ((Get-Date) — $_.lastwritetime).days -ge 60 } | % {'c:\users\' + $_.Name})
foreach ($User in $USERS) {
Get-WMIObject -class Win32_UserProfile | Where {(!$_.Special) -and (!$_.Loaded) -and ($_.LocalPath -eq $User)} | Remove-WmiObject WhatIf }
Чтобы не удалять профили некоторых пользователей, например, специальные аккаунты System и Network Service, учетную запись локального администратора, пользователей с активными сессиями, список аккаунтов-исключений), нужно модифицировать скрипт следующим образом:
#Список аккаунтов, чьи профили нельзя удалять
$ExcludedUsers ="Public","zenoss","svc",”user_1”,”user_2”
$LocalProfiles=Get-WMIObject -class Win32_UserProfile | Where {(!$_.Special) -and (!$_.Loaded) -and ($_.ConvertToDateTime($_.LastUseTime) -lt (Get-Date).AddDays(-60))}
foreach ($LocalProfile in $LocalProfiles)
{
if (!($ExcludedUsers -like $LocalProfile.LocalPath.Replace("C:\Users\","")))
{
$LocalProfile | Remove-WmiObject
Write-host $LocalProfile.LocalPath, "профиль удален” -ForegroundColor Magenta
}
}
Вы можете настроить запуск этого скрипта через shutdown скрипт групповой политики или по расписанию заданием планировщика. (перед настройкой автоматического удаления профилей внимательно протестируйте скрипт в своей среде!).
Можно модифицировать скрипт, чтобы автоматически удалять пользователи всех пользователей, которые добавлены в определенную группу AD. Например, вы хотите автоматически удалять профили уволившихся пользователей. Просто добавьте такие учетные записи в группу DisabledUsers и выполните на сервере скрипт:
$users = Get-ADGroupMember -Identity DisabledUsers | Foreach {$_.Sid.Value}
$profiles = Get-WmiObject Win32_UserProfile
$profiles | Where {$users -eq $_.Sid} | Foreach {$_.Delete()}
Windows-User-Profile-Remover
PowerShell script that will remove user profiles based on age
DESCRIPTION
This script will delete user profiles based on age. This works using a scheduled task that writes a date to a file in the user profile. The scheduled task will run at logon of any user, and runs every 60 minutes while they are logged in. Please see «How it Works» section that explains how profile age and cleanup occurs. Tested on Windows 10 21H2.
THINGS YOU NEED TO DO TO MAKE THE SCRIPT WORK
If you need to make exclusions to user accounts search «ACCOUNT EXCLUSIONS HERE» in the RemoveUserProfiles.ps1 to bring you to the IF statement you will need to modify.
You will need to create the working folder location (ex. c:\ProfileRemover) and put the below files in it, and then define the working folder when running the script. You will also need to adjust the WriteLastLogonDate.vbs file and hard code the path to the PS1 file it references. The RemoveUserProfiles.ps1 must run as an administrator or system account.
WriteLastLogonDate.vbs
WriteLastLogonDate.ps1
RemoveUserProfiles.ps1
EXAMPLE
Below will remove profiles that are older than 8 days
RemoveUserProfiles.ps1 -DeleteProfileOlderInDays 8 -WorkingFolder C:\temp
EXAMPLE
Below will remove profiles that are older than 0 days, which will delete all profiles on the computer unless they are on exclusion list.
RemoveUserProfiles.ps1 -DeleteProfileOlderInDays 0 -WorkingFolder C:\temp
BACKGROUND OF WHY THIS WAS CREATED
In the past we have used Delprof2.exe which is a common 3rd party utility for removing user profiles. In the last year 2020/2021 or so something changed and it seems now the ntuser.dat which resides in the C:\Users\username folder is being written to when a Cumulative Update is run, whether the user has logged in or not.
This causes issues as many of the local functions to get the last logon date are based off this file. This causes the Group Policy setting that can cleanup old profiles, The WMI Win32_UserProfile class, as well as with Delprof2.exe to not cleanup old profiles properly. Also the last modified date of the c:\Users\username folder isn’t always accurate with the last logon of the user, so it can’t be used either. Another note is the Win32_networkloginprofile WMI class pulls from AD, and will not work if not domain connected, and just retrieve the last logon on the domain not the computer. At first it was determined that the only file the worked was «C:\Users\username\AppData\Local\IconCache.db» at it closely reflected the logon time, but as later found not all user profiles had the file, only some did.
HOW IT WORKS
It will create a scheduled task that will run at logon, and at 60 minute intervals that will write a date to the LastLogonDate.txt file located in the user profile ex. C:\users\username\LastLogonDate.txt. Using a scheduled task ensure that users that are logged in that may not restart/logoff in weeks have the date updated continuously so they don’t accidently get removed. The script will perform checks to ensure the scheduled task, and necessary files are present for writing the LastLogonDate.txt file.
It will them generate a list of all user profiles before cleanup. Next it will go through each of the user accounts in the Win32_UserProfile class, except for special accounts (SYSTEM, NetworkService, and LocalService accounts), it will also avoid service profiles (ex. SQL) that have a local path of C:\Windows\ServiceProfiles. It will also avoid user accounts missing a local path (a local path being ex. c:\users\jsmith), if this is missing it assumes something is wrong and/or corrupt, another query is run checking for empty local paths and will record the SID for you to investigate.
For each user profile it will create the file LastLogonDate.txt and populate it with today’s date. This only happens if the user profile folder exists, and the LastLogonDate.txt DOES NOT exist. This creates a starting point for all accounts on the machine to determine how old they are. This means if you try and delete profiles older than 15 days, you will need to wait 15 days after the initial launch of this script for them to delete.
Next it will check if the LastLogonDate.txt file exist and continue if so. It will check the last logon date retrieved from the contents of the LastLogonDate.txt file, if the account is older than the specified amount of days it will continue. It will then check if the username is excluded, if not it will continue and attempt to delete the user profile from the machine. Please note if the user profile is in use it will not process, you will see an error in the log and this is normal.
Log file can be found in the working folder called RemoveUserProfiles.log
A common pain point in an IT administrator’s career is user profiles. User profiles are a ubiquitous part of a Windows IT pro’s life; especially those that manage virtual desktop environments like Remote Desktop Services (RDS) or Citrix. In this post, I’m going to demonstrate a way you take out your aggression by using PowerShell to delete user profiles (and discover them).
Windows system administrators have to deal with:
- corrupted user registry hives
- files that need shared across all user profiles
- figuring out how to recreate corrupt profiles
- …and more
What was once a frustrating experience has gotten a little less frustrating with PowerShell. Here are a few ways that PowerShell can make managing Windows user profiles easier.
Enumerating User Profiles
It’s easy to take a peek at user profiles on the file system on a single Windows computer. Simply look in the C:\Users folder. But not only are you not getting the full picture when you do this, it’s also troublesome due to potential file system access problems. There’s a better way and that’s through WMI or CIM. In CIM, a class exists called Win32_UserProfile. This class contains all of the profiles that exist on a machine and lots of other useful information that a simple file system folder won’t tell you.
Using PowerShell, you can access this CIM class with the Get-CimInstance command.
Below, I’m finding the first user profile on the the local computer. You’ll notice many useful tidbits of information like LastUseTime, SID and so on.
PS C:\> Get-CimInstance -ClassName win32_userprofile | Select-Object -First 1


AppDataRoaming                   : Win32_FolderRedirectionHealth
Contacts                         : Win32_FolderRedirectionHealth
Desktop                          : Win32_FolderRedirectionHealth
Documents                        : Win32_FolderRedirectionHealth
Downloads                        : Win32_FolderRedirectionHealth
Favorites                        : Win32_FolderRedirectionHealth
HealthStatus                     : 3
LastAttemptedProfileDownloadTime :
LastAttemptedProfileUploadTime   :
LastBackgroundRegistryUploadTime :
LastDownloadTime                 :
LastUploadTime                   :
LastUseTime                      : 3/14/2019 3:06:39 PM
Links                            : Win32_FolderRedirectionHealth
Loaded                           : False
LocalPath                        : C:\Users\.NET v4.5 Classic
Music                            : Win32_FolderRedirectionHealth
Pictures                         : Win32_FolderRedirectionHealth
RefCount                         :
RoamingConfigured                : False
RoamingPath                      :
RoamingPreference                :
SavedGames                       : Win32_FolderRedirectionHealth
Searches                         : Win32_FolderRedirectionHealth
SID                              : S-1-5-82-3876422241-1344743610-1729199087-774402673-2621913236
Special                          : False
StartMenu                        : Win32_FolderRedirectionHealth
Status                           : 0
Videos                           : Win32_FolderRedirectionHealth
PSComputerName                   :
The Get-CimInstance cmdlet not only works locally but remotely as well. By using the ComputerName parameter, you can specify, 1, 10 or 100 different remote computers and it will happily query each one.
PS C:\> Get-CimInstance -ClassName Win32_UserProfile -ComputerName localhost,WINSRVDeleting User Profiles
Once you understand how to enumerate user profiles on computers, you can take it one step further and delete those user profiles as well.
I can’t count how many times I’ve had to delete user profiles because something got corrupted and I just needed the user to log in again and recreate it. At one time, I would simply have the user log off and remove the C:\Users<UserName> folder from the file system. Usually it works, sometimes it didn’t. What I didn’t realize was that I was actually leaving some remnants behind.
The proper way to do this is to initiate a removal via CIM.
Using the same CIM class you just went over, it’s possible to not only just view profiles but you can completely remove them as well. This is the same as going into the User Profiles box under System settings and hitting the Delete button.
To do this, enumerate the user profiles again and this time apply a filter to pick a single user profile to remove. In this case, remove the user profile called UserA. You can do this by using PowerShell’s Where-Object cmdlet and some string manipulation to grab the user folder name from the LocalPath property as shown below.
Once you’re able to narrow down that single profile you can pass that CIM instance to the Remove-CimInstance cmdlet for each object that Get-CimInstance returns. This process will remove the user profile from the file system and the registry.
Get-CimInstance -Class Win32_UserProfile | Where-Object { $_.LocalPath.split('\')[-1] -eq 'UserA' } | Remove-CimInstanceAgain, if you’d like to extend this to multiple computers you’d simply use the ComputerName parameter on Get-CimInstance.
Get-CimInstance -ComputerName SRV1,SRV2,SRV3 -Class Win32_UserProfile | Where-Object { $_.LocalPath.split('\')[-1] -eq 'UserA' } | Remove-CimInstanceManage and Report Active Directory, Exchange and Microsoft 365 with ManageEngine ADManager Plus. Download Free Trial!
Summary
You’ve now seen an easy way to enumerate and delete Windows user profiles. If you weren’t aware of the CIM class Win32_UserProfile you may have been correlating the C:\Users<Username> folder as the profile but you should know to delete the Win32_UserProfile CIM instance now.
You can see there’s much more to the user profile than a simple file system folder. Use CIM the next time you need to query or delete user profiles from Windows computers in your environment.
Тема управления обновлениями Windows 10: их отключения, ручной установки или удаления одна из самых популярных у пользователей этой операционной системы, поскольку сама Майкрософт очень неохотно дает возможности полноценной настройки автоматических обновлений.
В этом обзоре — о двух эффективных программах для работы с обновлениями Windows, которые позволяют отключить автоматические обновления Windows 10, настроить то, как именно они будут устанавливаться, ознакомиться со списком установленных и доступных обновлений, удалить или скачать их. Если вам нужна программа для простого отключения, без возможности установки и поиска, то рекомендую попробовать Windows Update Blocker.
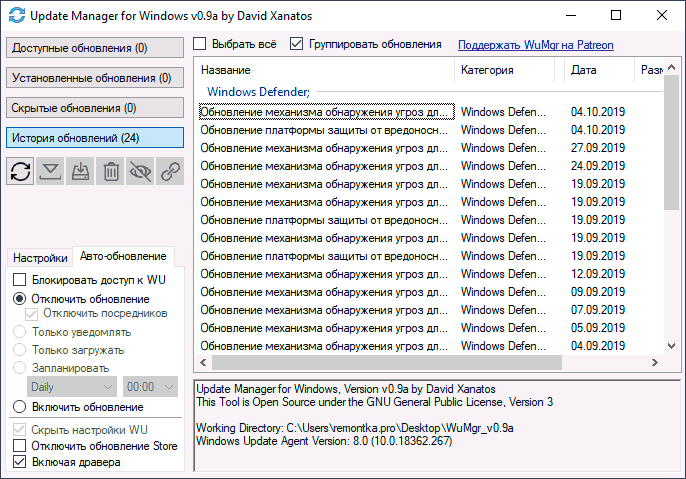
WUMgr (Update Manager for Windows)
WUMgr — программа управления обновлениями Windows 10, созданная на базе популярной Windows Update MiniTool, но, в отличие от последней, продолжающая обновляться, что в контексте рассматриваемой темы и постоянных изменений со стороны Майкрософт очень важно.
Интерфейс WUMgr не должен быть сложным, особенно для тех, кто ранее использовал утилиту-предшественник, к тому же он полностью на русском языке. С помощью Update Manager for Windows вы можете:
- Отключить автоматические обновления Windows 10, для этого на вкладке «Авто-обновление» установите «Отключить обновление», «Блокировать доступ к WU», а после применения настроек перезагрузите компьютер. Также вы можете оставить обновления включенными, но отключить их автоматическую загрузку, оставив только уведомления.

- Просмотреть историю обновлений, список установленных обновлений с возможностью их удаления.
- Просмотреть список доступных для скачивания и установки обновлений Windows 10 с возможностью их ручной установки.
Скачать WUMgr можно с официальной страницы разработчика на GitHub — https://github.com/DavidXanatos/wumgr/releases
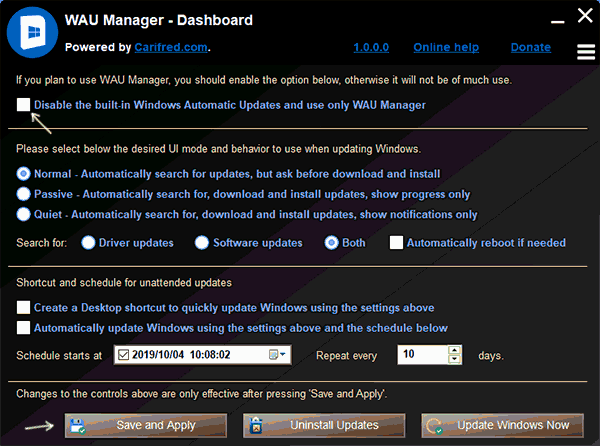
WAU Manager
Утилита WAU Manager — еще одно средство с аналогичными, но слегка иначе реализованными функциями, другим интерфейсом и без русского языка интерфейса.
Основные возможности программы те же, что и в предыдущем случае:
- Чтобы отключить автоматические обновления установите отметку Disable the built-in Windows Automatic Updates, после чего нажмите Save and Apply, чтобы применить настройки и перезагрузите компьютер: будут отключены автоматические обновления, служба «Центр обновлений Windows».

- Остальные пункты в главном окне программы позволяют настроить установку обновлений (по умолчанию они не будут скачиваться сами), а также включить их установку по графику или с помощью ярлыка на рабочем столе.
- Кнопка Uninstall Updates служит для удаления установленных обновлений и их скрытия (так, чтобы они не устанавливались в дальнейшем).
- Кнопка Update Windows Now открывает окно со списком доступных к установке обновлений Windows 10 с возможностью их ручной установки на компьютер или ноутбук.
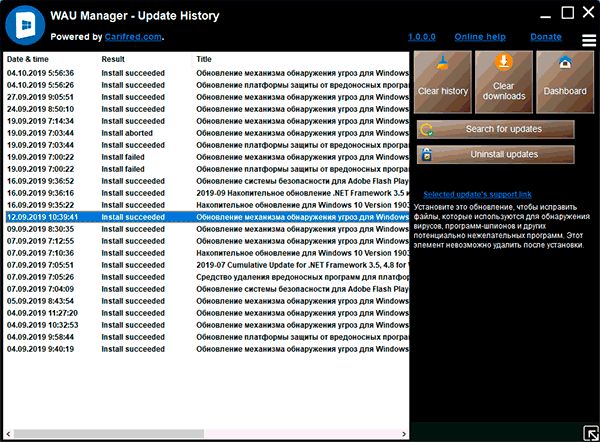
- Через кнопку меню можно открыть историю обновлений и там же очистить скачанные файлы уже установленных обновлений (Clear Downloads).

Скачать WAU Manager можно бесплатно с официального сайта https://www.carifred.com/wau_manager/
Насколько эти утилиты работоспособны, особенно в контексте отключения автоматических обновлений Windows 10? Я уже не берусь чего-то гарантировать: слишком часто полностью рабочие методы неожиданно переставали работать, но, насколько я могу судить, отключение обновлений второй из описанных утилит пока срабатывает (тестировал в течение длительного промежутка времени) и обновления не включаются сами.
Привет. Сегодня хочу показать очередной скрипт PowerShell. В этот раз будем удалять профили пользователей в Windows. При этом удаляться будут все профили, которые есть на сервере разом, за исключением указанных нами.
Скачать скрипт.
Проект на github.
Сразу покажу вам текст скрипта:
Function Set-Owner {
<#
.SYNOPSIS
Changes owner of a file or folder to another user or group.
.DESCRIPTION
Changes owner of a file or folder to another user or group.
.PARAMETER Path
The folder or file that will have the owner changed.
.PARAMETER Account
Optional parameter to change owner of a file or folder to specified account.
Default value is 'Builtin\Administrators'
.PARAMETER Recurse
Recursively set ownership on subfolders and files beneath given folder.
.NOTES
Name: Set-Owner
Author: Boe Prox
Version History:
1.0 - Boe Prox
- Initial Version
.EXAMPLE
Set-Owner -Path C:\temp\test.txt
Description
-----------
Changes the owner of test.txt to Builtin\Administrators
.EXAMPLE
Set-Owner -Path C:\temp\test.txt -Account 'Domain\bprox
Description
-----------
Changes the owner of test.txt to Domain\bprox
.EXAMPLE
Set-Owner -Path C:\temp -Recurse
Description
-----------
Changes the owner of all files and folders under C:\Temp to Builtin\Administrators
.EXAMPLE
Get-ChildItem C:\Temp | Set-Owner -Recurse -Account 'Domain\bprox'
Description
-----------
Changes the owner of all files and folders under C:\Temp to Domain\bprox
#>
[cmdletbinding(
SupportsShouldProcess = $True
)]
Param (
[parameter(ValueFromPipeline=$True,ValueFromPipelineByPropertyName=$True)]
[Alias('FullName')]
[string[]]$Path,
[parameter()]
[string]$Account = 'Builtin\Administrators',
[parameter()]
[switch]$Recurse
)
Begin {
#Prevent Confirmation on each Write-Debug command when using -Debug
If ($PSBoundParameters['Debug']) {
$DebugPreference = 'Continue'
}
Try {
[void][TokenAdjuster]
} Catch {
$AdjustTokenPrivileges = @"
using System;
using System.Runtime.InteropServices;
public class TokenAdjuster
{
[DllImport("advapi32.dll", ExactSpelling = true, SetLastError = true)]
internal static extern bool AdjustTokenPrivileges(IntPtr htok, bool disall,
ref TokPriv1Luid newst, int len, IntPtr prev, IntPtr relen);
[DllImport("kernel32.dll", ExactSpelling = true)]
internal static extern IntPtr GetCurrentProcess();
[DllImport("advapi32.dll", ExactSpelling = true, SetLastError = true)]
internal static extern bool OpenProcessToken(IntPtr h, int acc, ref IntPtr
phtok);
[DllImport("advapi32.dll", SetLastError = true)]
internal static extern bool LookupPrivilegeValue(string host, string name,
ref long pluid);
[StructLayout(LayoutKind.Sequential, Pack = 1)]
internal struct TokPriv1Luid
{
public int Count;
public long Luid;
public int Attr;
}
internal const int SE_PRIVILEGE_DISABLED = 0x00000000;
internal const int SE_PRIVILEGE_ENABLED = 0x00000002;
internal const int TOKEN_QUERY = 0x00000008;
internal const int TOKEN_ADJUST_PRIVILEGES = 0x00000020;
public static bool AddPrivilege(string privilege)
{
try
{
bool retVal;
TokPriv1Luid tp;
IntPtr hproc = GetCurrentProcess();
IntPtr htok = IntPtr.Zero;
retVal = OpenProcessToken(hproc, TOKEN_ADJUST_PRIVILEGES | TOKEN_QUERY, ref htok);
tp.Count = 1;
tp.Luid = 0;
tp.Attr = SE_PRIVILEGE_ENABLED;
retVal = LookupPrivilegeValue(null, privilege, ref tp.Luid);
retVal = AdjustTokenPrivileges(htok, false, ref tp, 0, IntPtr.Zero, IntPtr.Zero);
return retVal;
}
catch (Exception ex)
{
throw ex;
}
}
public static bool RemovePrivilege(string privilege)
{
try
{
bool retVal;
TokPriv1Luid tp;
IntPtr hproc = GetCurrentProcess();
IntPtr htok = IntPtr.Zero;
retVal = OpenProcessToken(hproc, TOKEN_ADJUST_PRIVILEGES | TOKEN_QUERY, ref htok);
tp.Count = 1;
tp.Luid = 0;
tp.Attr = SE_PRIVILEGE_DISABLED;
retVal = LookupPrivilegeValue(null, privilege, ref tp.Luid);
retVal = AdjustTokenPrivileges(htok, false, ref tp, 0, IntPtr.Zero, IntPtr.Zero);
return retVal;
}
catch (Exception ex)
{
throw ex;
}
}
}
"@
Add-Type $AdjustTokenPrivileges
}
#Activate necessary admin privileges to make changes without NTFS perms
[void][TokenAdjuster]::AddPrivilege("SeRestorePrivilege") #Necessary to set Owner Permissions
[void][TokenAdjuster]::AddPrivilege("SeBackupPrivilege") #Necessary to bypass Traverse Checking
[void][TokenAdjuster]::AddPrivilege("SeTakeOwnershipPrivilege") #Necessary to override FilePermissions
}
Process {
ForEach ($Item in $Path) {
Write-Verbose "FullName: $Item"
#The ACL objects do not like being used more than once, so re-create them on the Process block
$DirOwner = New-Object System.Security.AccessControl.DirectorySecurity
$DirOwner.SetOwner([System.Security.Principal.NTAccount]$Account)
$FileOwner = New-Object System.Security.AccessControl.FileSecurity
$FileOwner.SetOwner([System.Security.Principal.NTAccount]$Account)
$DirAdminAcl = New-Object System.Security.AccessControl.DirectorySecurity
$FileAdminAcl = New-Object System.Security.AccessControl.DirectorySecurity
$AdminACL = New-Object System.Security.AccessControl.FileSystemAccessRule('Builtin\Administrators','FullControl','ContainerInherit,ObjectInherit','InheritOnly','Allow')
$FileAdminAcl.AddAccessRule($AdminACL)
$DirAdminAcl.AddAccessRule($AdminACL)
Try {
$Item = Get-Item -LiteralPath $Item -Force -ErrorAction Stop
If (-NOT $Item.PSIsContainer) {
If ($PSCmdlet.ShouldProcess($Item, 'Set File Owner')) {
Try {
$Item.SetAccessControl($FileOwner)
} Catch {
Write-Warning "Couldn't take ownership of $($Item.FullName)! Taking FullControl of $($Item.Directory.FullName)"
$Item.Directory.SetAccessControl($FileAdminAcl)
$Item.SetAccessControl($FileOwner)
}
}
} Else {
If ($PSCmdlet.ShouldProcess($Item, 'Set Directory Owner')) {
Try {
$Item.SetAccessControl($DirOwner)
} Catch {
Write-Warning "Couldn't take ownership of $($Item.FullName)! Taking FullControl of $($Item.Parent.FullName)"
$Item.Parent.SetAccessControl($DirAdminAcl)
$Item.SetAccessControl($DirOwner)
}
}
If ($Recurse) {
[void]$PSBoundParameters.Remove('Path')
Get-ChildItem $Item -Force | Set-Owner @PSBoundParameters
}
}
} Catch {
Write-Warning "$($Item): $($_.Exception.Message)"
}
}
}
End {
#Remove priviledges that had been granted
[void][TokenAdjuster]::RemovePrivilege("SeRestorePrivilege")
[void][TokenAdjuster]::RemovePrivilege("SeBackupPrivilege")
[void][TokenAdjuster]::RemovePrivilege("SeTakeOwnershipPrivilege")
}
}
function Get-UserSession {
<#
.SYNOPSIS
Retrieves all user sessions from local or remote computers(s)
.DESCRIPTION
Retrieves all user sessions from local or remote computer(s).
Note: Requires query.exe in order to run
Note: This works against Windows Vista and later systems provided the following registry value is in place
HKEY_LOCAL_MACHINE\SYSTEM\CurrentControlSet\Control\Terminal Server\AllowRemoteRPC = 1
Note: If query.exe takes longer than 15 seconds to return, an error is thrown and the next computername is processed. Suppress this with -erroraction silentlycontinue
Note: If $sessions is empty, we return a warning saying no users. Suppress this with -warningaction silentlycontinue
.PARAMETER computername
Name of computer(s) to run session query against
.parameter parseIdleTime
Parse idle time into a timespan object
.parameter timeout
Seconds to wait before ending query.exe process. Helpful in situations where query.exe hangs due to the state of the remote system.
.FUNCTIONALITY
Computers
.EXAMPLE
Get-usersession -computername "server1"
Query all current user sessions on 'server1'
.EXAMPLE
Get-UserSession -computername $servers -parseIdleTime | ?{$_.idletime -gt [timespan]"1:00"} | ft -AutoSize
Query all servers in the array $servers, parse idle time, check for idle time greater than 1 hour.
.NOTES
Thanks to Boe Prox for the ideas - http://learn-powershell.net/2010/11/01/quick-hit-find-currently-logged-on-users/
.LINK
http://gallery.technet.microsoft.com/Get-UserSessions-Parse-b4c97837
#>
[cmdletbinding()]
Param(
[Parameter(
Position = 0,
ValueFromPipeline = $True)]
[string[]]$ComputerName = "localhost",
[switch]$ParseIdleTime,
[validaterange(0,120)]
[int]$Timeout = 15
)
Process
{
ForEach($computer in $ComputerName)
{
#start query.exe using .net and cmd /c. We do this to avoid cases where query.exe hangs
#build temp file to store results. Loop until we see the file
Try
{
$Started = Get-Date
$tempFile = [System.IO.Path]::GetTempFileName()
Do{
start-sleep -Milliseconds 300
if( ((Get-Date) - $Started).totalseconds -gt 10)
{
Throw "Timed out waiting for temp file '$TempFile'"
}
}
Until(Test-Path -Path $tempfile)
}
Catch
{
Write-Error "Error for '$Computer': $_"
Continue
}
#Record date. Start process to run query in cmd. I use starttime independently of process starttime due to a few issues we ran into
$Started = Get-Date
$p = Start-Process -FilePath C:\windows\system32\cmd.exe -ArgumentList "/c query user /server:$computer > $tempfile" -WindowStyle hidden -passthru
#we can't read in info or else it will freeze. We cant run waitforexit until we read the standard output, or we run into issues...
#handle timeouts on our own by watching hasexited
$stopprocessing = $false
do
{
#check if process has exited
$hasExited = $p.HasExited
#check if there is still a record of the process
Try
{
$proc = Get-Process -id $p.id -ErrorAction stop
}
Catch
{
$proc = $null
}
#sleep a bit
start-sleep -seconds .5
#If we timed out and the process has not exited, kill the process
if( ( (Get-Date) - $Started ).totalseconds -gt $timeout -and -not $hasExited -and $proc)
{
$p.kill()
$stopprocessing = $true
Remove-Item $tempfile -force
Write-Error "$computer`: Query.exe took longer than $timeout seconds to execute"
}
}
until($hasexited -or $stopProcessing -or -not $proc)
if($stopprocessing)
{
Continue
}
#if we are still processing, read the output!
try
{
$sessions = Get-Content $tempfile -ErrorAction stop
Remove-Item $tempfile -force
}
catch
{
Write-Error "Could not process results for '$computer' in '$tempfile': $_"
continue
}
#handle no results
if($sessions){
1..($sessions.count - 1) | Foreach-Object {
#Start to build the custom object
$temp = "" | Select ComputerName, Username, SessionName, Id, State, IdleTime, LogonTime
$temp.ComputerName = $computer
#The output of query.exe is dynamic.
#strings should be 82 chars by default, but could reach higher depending on idle time.
#we use arrays to handle the latter.
if($sessions[$_].length -gt 5){
#if the length is normal, parse substrings
if($sessions[$_].length -le 82){
$temp.Username = $sessions[$_].Substring(1,22).trim()
$temp.SessionName = $sessions[$_].Substring(23,19).trim()
$temp.Id = $sessions[$_].Substring(42,4).trim()
$temp.State = $sessions[$_].Substring(46,8).trim()
$temp.IdleTime = $sessions[$_].Substring(54,11).trim()
$logonTimeLength = $sessions[$_].length - 65
try{
$temp.LogonTime = Get-Date $sessions[$_].Substring(65,$logonTimeLength).trim() -ErrorAction stop
}
catch{
#Cleaning up code, investigate reason behind this. Long way of saying $null....
$temp.LogonTime = $sessions[$_].Substring(65,$logonTimeLength).trim() | Out-Null
}
}
#Otherwise, create array and parse
else{
$array = $sessions[$_] -replace "\s+", " " -split " "
$temp.Username = $array[1]
#in some cases the array will be missing the session name. array indices change
if($array.count -lt 9){
$temp.SessionName = ""
$temp.Id = $array[2]
$temp.State = $array[3]
$temp.IdleTime = $array[4]
try
{
$temp.LogonTime = Get-Date $($array[5] + " " + $array[6] + " " + $array[7]) -ErrorAction stop
}
catch
{
$temp.LogonTime = ($array[5] + " " + $array[6] + " " + $array[7]).trim()
}
}
else{
$temp.SessionName = $array[2]
$temp.Id = $array[3]
$temp.State = $array[4]
$temp.IdleTime = $array[5]
try
{
$temp.LogonTime = Get-Date $($array[6] + " " + $array[7] + " " + $array[8]) -ErrorAction stop
}
catch
{
$temp.LogonTime = ($array[6] + " " + $array[7] + " " + $array[8]).trim()
}
}
}
#if specified, parse idle time to timespan
if($parseIdleTime){
$string = $temp.idletime
#quick function to handle minutes or hours:minutes
function Convert-ShortIdle {
param($string)
if($string -match "\:"){
[timespan]$string
}
else{
New-TimeSpan -Minutes $string
}
}
#to the left of + is days
if($string -match "\+"){
$days = New-TimeSpan -days ($string -split "\+")[0]
$hourMin = Convert-ShortIdle ($string -split "\+")[1]
$temp.idletime = $days + $hourMin
}
#. means less than a minute
elseif($string -like "." -or $string -like "none"){
$temp.idletime = [timespan]"0:00"
}
#hours and minutes
else{
$temp.idletime = Convert-ShortIdle $string
}
}
#Output the result
$temp
}
}
}
else
{
Write-Warning "'$computer': No sessions found"
}
}
}
}
$ErrorActionPreference='Continue'
$excludes = new-object 'System.Collections.Generic.List[string]'
Get-ChildItem "HKLM:\SOFTWARE\Microsoft\Windows NT\CurrentVersion\ProfileList\" -rec -ea SilentlyContinue | foreach {
$CK = (Get-ItemProperty -Path $_.PsPath)
if ($CK.ProfileImagePath -match "systemprofile" -or $CK.ProfileImagePath -match "LocalService" -or $CK.ProfileImagePath -match "NetworkService" -or $CK.ProfileImagePath -match "administrator" -or $CK.ProfileImagePath -match "администратор" -or $CK.ProfileImagePath -match "MSSQL" -or $CK.ProfileImagePath -match ".NET " -or $CK.ProfileImagePath -match "sanglyb") {
$a = $CK
$excludes.add(($a.PSPath -split '\\')[7])
}
}
$loggedOnUsers = Get-UserSession
$User = "$env:userdomain\$env:username"
$mass_length=$excludes.Count
Get-ChildItem "HKLM:\SOFTWARE\Microsoft\Windows NT\CurrentVersion\ProfileList\" -rec -ea SilentlyContinue | foreach {
$CurrentKey = (Get-ItemProperty -Path $_.PsPath)
$temp_uid=($CurrentKey.PSPath -split '\\')[7]
$test=1
for ($i=0; $i -le $mass_length-1; $i++ ) {if ($temp_uid -like $excludes[$i]) {$test=0}
}
if ($test -eq 1) {
$a = $CurrentKey
$pat = $CurrentKey.ProfileImagePath
$test1=1
foreach ($loggedOnUser in $loggedOnUsers){
if ($pat -like "*"+$loggedOnUser.Username -or $pat -match $loggedOnUser.username+"\."){
$test1=0
}
}
if ($test1 -eq 1){
if ($pat -ne $null) {
$pat
Set-Owner -Path $Pat -Account $user -Recurse -ErrorAction SilentlyContinue
cmd /c "rd /s /q $pat"
}
if ($a.PSPath -ne $null) {Remove-Item -Path $a.PSPath -Recurse}
}
}
}
Теперь немного разберем его, но перед тем, как разбирать скрипт, необходимо понять как вообще удаляются профили пользователей в винде.
Для правильного удаления профиля нужно сделать 3 вещи:
- Убедиться, что пользователь не залогинен в системе. Т.к. если пользователь окажется активен, при удалении его папки не удалятся некоторые файлы, и у пользователя будут проблемы с последующим входом в систему. Решиться проблемы после такого, скорее всего смогут, только после перезагрузки сервера.
- Необходимо найти ветку пользователя в реестре. Находятся пользовательские ветки по пути – HKLM:\SOFTWARE\Microsoft\Windows NT\CurrentVersion\ProfileList\
В этой ветке необходимо посмотреть, где находится папка пользователя.
- Нужно удалить пользовательскую ветку в реестре и пользовательскую папку.
Ни чего сложного =).
Итак, разберем немного скрипт. Я не стал изобретать велосипед, и решил использовать для скрипта две функции, найденные на просторах TechNet. Для просмотра залогиненых пользователей, и для задания владельца папок и файлов. Об этих функциях ни чего говорить не буду.
Думаю, логично, что мы не хотим удалять профили всех пользователей. Нужно оставлять администраторские, общие и всякие сервисные профили. За это отвечает следующий кусок скрипта:
$excludes = new-object 'System.Collections.Generic.List[string]'
Get-ChildItem "HKLM:\SOFTWARE\Microsoft\Windows NT\CurrentVersion\ProfileList\" -rec -ea SilentlyContinue | foreach {
   $CK = (Get-ItemProperty -Path $_.PsPath)
   if ($CK.ProfileImagePath -match "systemprofile" -or $CK.ProfileImagePath -match "LocalService" -or $CK.ProfileImagePath -match "NetworkService" -or $CK.ProfileImagePath -match "administrator" -or $CK.ProfileImagePath -match "администратор" -or $CK.ProfileImagePath -match "MSSQL" -or $CK.ProfileImagePath -match ".NET " -or $CK.ProfileImagePath -match "sanglyb") {
      $a = $CK
      $excludes.add(($a.PSPath -split '\\')[7])
    }
}
Тут мы берем пользовательские ветки реестров, и исходя из путей до папок, через условия определяем исключения. Для определения исключений можно использовать часть имени.
Дальше мы получаем список вошедших в систему пользователей, а также определяем пользователя от имени которого запущен скрипт:
$loggedOnUsers = Get-UserSession
$User = "$env:userdomain\$env:username"
В следующем куске мы перебираем все профили пользователей из реестра и отсеиваем исключения:
$mass_length=$excludes.Count
Get-ChildItem "HKLM:\SOFTWARE\Microsoft\Windows NT\CurrentVersion\ProfileList\" -rec -ea SilentlyContinue | foreach {
   $CurrentKey = (Get-ItemProperty -Path $_.PsPath)
   $temp_uid=($CurrentKey.PSPath -split '\\')[7]
   $test=1
   for ($i=0; $i -le $mass_length-1; $i++ ) {if ($temp_uid -like $excludes[$i]) {$test=0}
   }
   if ($test -eq 1) {
    $a = $CurrentKey
    $pat = $CurrentKey.ProfileImagePath
Далее мы смотрим что бы владелец профиля, который сейчас на очереди удаления не был залогинен в системе:
    $test1=1
    foreach ($loggedOnUser in $loggedOnUsers){
        if ($pat -like "*"+$loggedOnUser.Username -or $pat -match $loggedOnUser.username+"\."){
            $test1=0
        }
    }
    if ($test1 -eq 1){
И наконец, если существуют ветка и папка удаляем их, предварительно став владельцем папки.
    if ($pat -ne $null) {
        $pat
        Set-Owner -Path $Pat -Account $user -Recurse -ErrorAction SilentlyContinue
        cmd /c "rd /s /q $pat"
    }
    if ($a.PSPath -ne $null) {Remove-Item -Path $a.PSPath -Recurse}
    }
   }
}
Такой вот скрипт. Надеюсь, он окажется вам полезным.
