
Аннотация
С помощью диспетчера печати вы можете создать новый адрес принтера, но не можете удалить старый. Чтобы удалить старый, необходимо удалить запись из реестра.
Дополнительная информация
Предупреждение: неправильное использование редактора реестра может привести к серьезным неполадкам на уровне системы, которые могут потребовать повторной установки Windows NT для их исправления. Корпорация Майкрософт не несет ответственности за то, что проблемы, возникающие в результате использования редактора реестра, могут быть устранены. Используйте это средство на свой страх и риск. Принтеры могут иметь один из следующих типов: локальный порт, сетевой порт Hewlett-Packard или устройства печати AppleTalk.
Удаление пункта назначения сетевого принтера Hewlett-Packard
-
В редакторе реестра удалите сетевой принтер Hewlett-Packard из следующего раздела: HKEY_LOCAL_MACHINE\System\CurrentControlSet\Control\Print\Monitors\ Hewlett-Packard Network Port\Portnames
-
Закройте редактор реестра и перезапустите Windows NT.
Удаление пункта назначения для принтера AppleTalk
-
В редакторе реестра удалите принтер AppleTalk из следующего раздела: HKEY_LOCAL_MACHINE\System\CurrentControlSet\Control\Print\Monitors\ AppleTalk Printing Devices\Ports
-
Закройте редактор реестра и перезапустите Windows NT.
Удаление пункта назначения принтера LPR
-
В редакторе реестра удалите принтер LPR из следующего раздела: HKEY_LOCAL_MACHINE\System\CurrentControlSet\Control\Print\Monitors\ LPR Port\Ports
-
Закройте редактор реестра и перезапустите Windows NT.
Нужна дополнительная помощь?
Нужны дополнительные параметры?
Изучите преимущества подписки, просмотрите учебные курсы, узнайте, как защитить свое устройство и т. д.
Readers help support Windows Report. We may get a commission if you buy through our links.
Read our disclosure page to find out how can you help Windows Report sustain the editorial team. Read more
Today we’ll show you how to uninstall a printer port in Windows 10. When you change printers, unused ports may remain on your system. It’s important to remove these to avoid interference with new printers.
Let’s get started.
How do I remove a printer port in Windows 10?
1. Stop and restart the Printer Spooler
- Press Windows + R key to open the Run dialog box, type services.msc, and click on OK to open the Service Manager.
- Double-click on the Print Spooler service, select Stop from the new window, and click OK.

- Right-click on Print Spooler again, select Start from the new window, and click OK.


Restarting the Printer Spooler will break any impediments that may prevent you from deleting the Printer port. Check our article on what to do if the Local print spooler service is not running on your PC.
2. Uninstall Printer using the Control Panel
- Left-click the Start button, type Control Panel, then select it from the result.
- Navigate to Hardware and Sound.

- Click on Devices and Printers and select the printer device you want to remove.

- Right-click on the printer, select Remove device from the drop-down and click Yes to confirm the action.


So, this is how to remove a printer in Windows 10. Read our guide on fixing the Windows driver not available error on your PC if you cannot access the printer driver.
3. Delete the Printer port from Control Panel
- Left-click the Start button, type Control Panel, then select it from the result.
- Navigate to Hardware and Sound and click on Devices and Printers.
- Tap on any listed printer devices, then select Printer server properties.

- Click on the Ports tab, select the port you want to delete, and then click Delete port.


The above steps will remove the Printer port from your PC. However, there’s a possibility that you will run into an error saying delete printer port access denied.
Alternatively, you can read our guide on what to do if you can’t remove the Printer in Windows 10 if you run into any issues.
4. Uninstall the printer device
- Press Windows + I key to open the Settings app.
- Click on Apps, search for the printer software, and click on it.

- Select Uninstall from the drop-down and click on Uninstall to confirm the action.

- Restart your PC.


- Fix: PRIMARY_TRANSPORT_CONNECT_FAILED Error
- ERROR_IO_PRIVILEGE_FAILED: How to Fix
5. Remove the Printer Port from the Registry
- Press Windows + R keys to open the Run dialog box, type regedit, and click on OK to open the Registry Editor.
- Copy and paste the following path into the registry box:
HKEY_LOCAL_MACHINE\SYSTEM\Currentcontrolset\Control\Print\printers\
- Right-click on the Printer Name and select Delete from the drop-down.
- Restart your PC and check if the printer port is completely deleted.

6. Remove printer from Device Manager
- Press Windows + X and select Device Manager.
- Expand Print queues and locate the printer you want to delete.

- Right-click on the printer, select Uninstall device, and confirm the action.
- Restart your PC.

We hope that our guide offered you the complete methods on how to remove a printer in Windows 10 and its ports.
Also, users may run into printer port is in use errors, making it inaccessible.
Further, you can read our guide on fixing the problem with the printer setup on the PC. Also, our readers may be interested in our article about what to do if your printer won’t recognize your router.
In conclusion, follow all the solutions to find the best way to delete the printer port. If you have any questions on this guide or other queries in general, kindly leave them in the comments section.
Henderson Jayden Harper
Windows Software Expert
Passionate about technology, Crypto, software, Windows, and everything computer-related, he spends most of his time developing new skills and learning more about the tech world.
He also enjoys gaming, writing, walking his dog, and reading and learning about new cultures. He also enjoys spending private time connecting with nature.
If you are unable to delete TCP/IP Printer Port from the computer, the problem is due to the Printer still being in use, which should be clear from “The requested resource is in use” error message.
However, Windows is also known to come up with “The requested resource is in use” error message, when there is actually no such Printer attached to the Port.
In such cases, the problem could be due to a reference to a previously used Printer still being available in the registry, which is making Windows behave as if the Printer is attached to the computer.
If you are unable to delete an unused Printer Port from the computer due to “The requested resource is in use” error message, you should be able to fix the problem using the following methods.
Advertisement
1. Restart Print Spooler
In a majority of cases, Stopping and Restarting the Print Spooler service should fix the Error Message and allow you to delete TCP/IP Printer port on your computer.
1. Press Win + R keys to open Run Command.
2. In the Run Command window, type services.msc and click on OK.
3. On the next screen, right-click on Print Spooler service and click on Stop.

Next, right-click on Print Spooler again and click on Restart.
After this, you should be able to remove the printer port from your computer.
2. Remove Printer Port from Registry
If restarting the Print Spooler Service did not help, you will have to delete the printer in registry.
1. 1. Press Win + R keys to open Run Command.
2. Type regedit in the Run Command window and click on OK.
Advertisement
3. Navigate to HKEY_LOCAL_MACHINE\SYSTEM\CurrentControlSet\Control\Print\Printers\PrinterName > Right-click on the Printer Name and click on Delete.

After deleting the Printer from registry, make sure that you Restart the computer.
Несколько раз сталкивался с ситуациями, когда в Windows не удается удалить установленные принтеры. Принтер может не отображаться в панели управления Windows (но быть доступным в диалоговом окне печати во всех программах), или при удалении принтера появляются различные ошибки (нет доступа, порт печати используется, ошибка очереди печати и т.д). В этой статье рассмотрим, как полностью удалить принтер в Windows 10 и 11.
Содержание:
- Штатные способы удаления принтера в Windows
- Принудительное удаление принтера в Windows
- Удаление драйвера принтера в Windows
Штатные способы удаления принтера в Windows
Сначала рассмотрим стандартные способы удаления принтеров в Windows, которые нужно обязательно попробовать.
- Укройте панель управления Settings -> Devices -> Printers and Scanners (или выполните команду быстрого доступа
ms-settings:printers
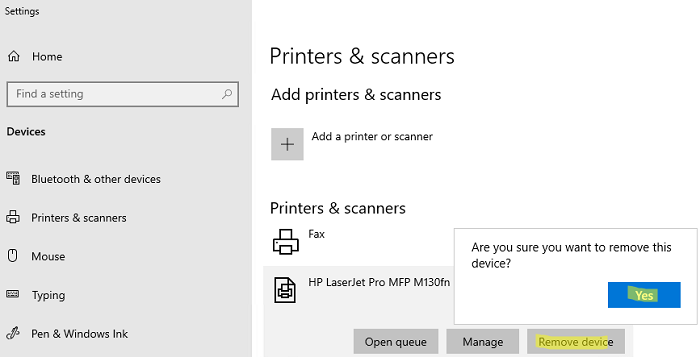
); - Выберите принтер, который вы хотите удалить и нажмите Remove Device;

- Подтвердите удаление принтера
Если при удалении принтера появляется ошибка “Локальная подсистема печати не выполняется”, проверьте настройки службы spooler согласно инструкции.
Также вы можете удалить принтер из классической Панели управления Windows:
- Выполните команду
control /name Microsoft.DevicesAndPrinters
; - Выберите принтер в списке и нажмите на кнопку Remove Device;
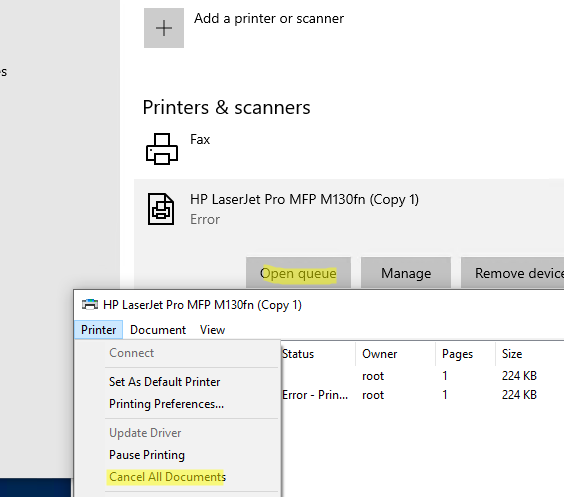
Обратите внимание, что, если в очереди печати принтера есть активные задания печати, вы не сможете удалить его, пока не очистите очередь печати. Чтобы очистить очередь печати, найдите принтер в панели управления и выберите опцию Open queue. Выберите опцию Printer -> Cancel All Document.
Попробуйте удалить принтер после очистки очереди печати.
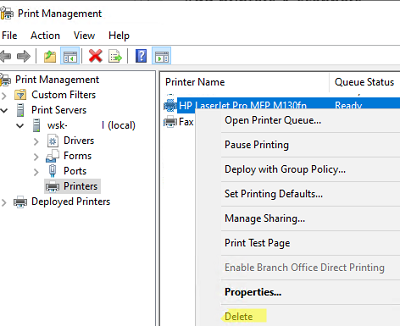
Для удаления принтера можно использовать mmc консоль Print Management (несколько раз она помогла мне удалить принтер, который не отображался в панели управления Windows).
- Запустите консоль командой
printmanagement.msc
; - Перейдите в раздел Print Manager -> Print Servers -> выберите ваш компьютер -> Printers;
- Выбелите принтер и в контекстном меню нажмите Delete.
Принудительное удаление принтера в Windows
Если по каким-то причинам принтер не отображается в панели управления или не удаляется с ошибкой, вы можете принудительно удалить его.
Сначала выполните принудительную очистку очереди печати с помощью команд:
net stop spooler
del %systemroot%\system32\spool\printers\*.shd /F /S /Q
del %systemroot%\system32\spool\printers\*.spl /F /S /Q
net start spooler
Команды удалят все файлы *.shd и *.spl из каталога
%systemroot%\system32\spool\printers
.
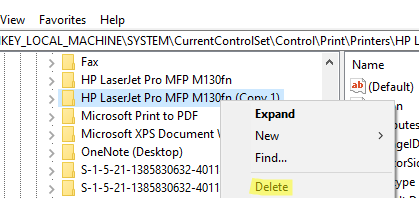
Теперь вы можете удалить запись о принтере из реестра Windows.
- Запустите
regedit.exe
; - Перейдите в ветку HKEY_LOCAL_MACHINE\SYSTEM\CurrentControlSet\Control\Print\Printes;
- Найдите раздел с именем вашего принтера (в моем примере это
HP LaserJet Pro MFP M130fn (Copy 1)
; - Удалите ветку реестра принтера;
- Перезагрузите компьютер и проверьте, что принтер исчез из панели управления. Если он не исчез, но его статус изменился на Not Connected, просто удалите его.
При удалении принтера может появится ошибка:
Операция отменена из-за ограничений, действующих на этом компьютере. Обратитесь к системному администратору.
This operation has been cancelled due to restrictions in effect on this computer. Please contact your system administrator.
В этом случае проверьте, не включена ли параметр групповой политика, запрещающий удалять принтеры. Этот параметр находится в следующем разделе локального редактора GPO (gpedit.msc): User Configuration –> Administrative Templates –> Control Panel –> Printers.

На доменном компьютере проверьте результирующие настройки GPO с помощью утилиты gpresult.
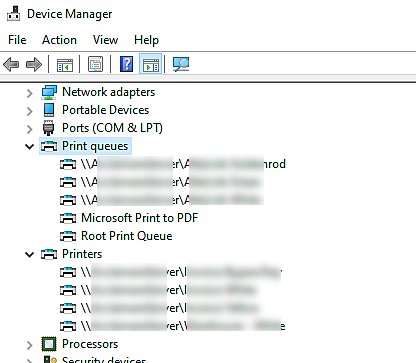
Если политика отключена или не настроена, нужно удалить скрытые принтеры и очереди печати в диспетчере устройств. Такая проблема часто встречается с сетевыми принтерами.
- Запустите Device Manager (
devmgmt.msc
); - Включите опцию View -> Show hidden devices
- Разверните секции Print queues и Printers и удалите ненужные принтеры.
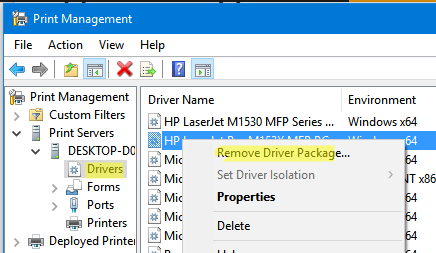
Удаление драйвера принтера в Windows
При удалении принтера из панели управления, его драйвера остаются в Windows. Если вы удалили принтер из панели управления, и хотите удалить его драйвер печати:
- Откройте оснастку
services.msc
и перезапустите службу Диспетчер Печати (Print Spooler). Можно перезапустить службу PowerShell командой: Restart-Service spooler -Verbose - Откройте оснастку управления печатью
printmanagement.msc
; - Разверните секцию Print Manager -> Print Servers -> выберите ваш компьютер -> Drivers;
- В списке перечислены все установленные драйвера принтеров;
- Щелкните правой кнопкой по драйверу, который вы хотите удалить и выберите Удалить пакет драйвера (Remove driver package).
- Подтвердите удаление драйвера, его inf файла и всех связанных файлов.
Также вы можете удалить ненужные драйвера в свойствах сервера печати. Для этого выполните команду
printui /s /t2
, выделите драйвер принтера и нажмите кнопку Delete.