
Все способы:
- Способ 1: «Командная строка»
- Способ 2: Удаление вручную
- Способ 3: Сторонние деинсталляторы
- Вариант 1: IObit Uninstaller
- Вариант 2: Geek Uninstaller
- Вариант 3: Uninstall Tool
- Вопросы и ответы: 0
Способ 1: «Командная строка»
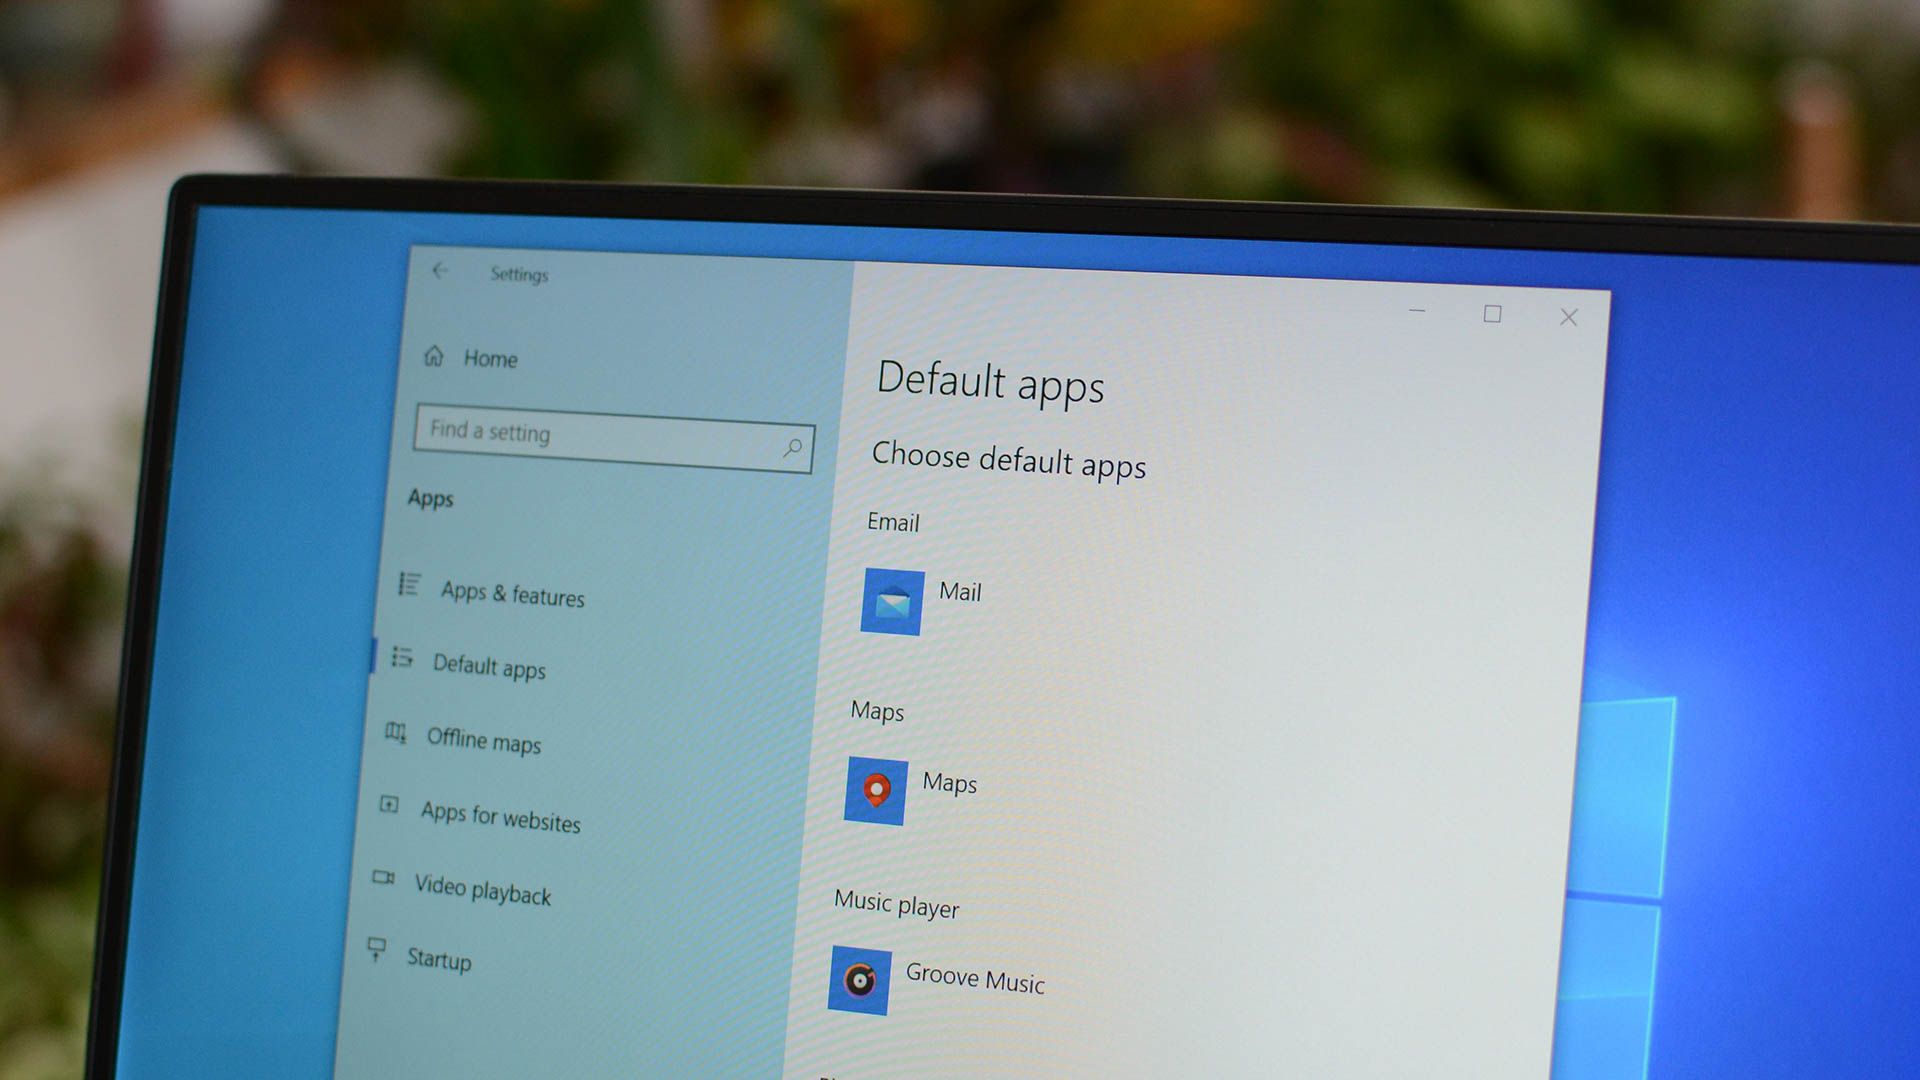
Если программа не удаляется традиционным способом, то есть через приложение «Параметры» или классическую «Панель управления», можно попробовать воспользоваться «Командной строкой».
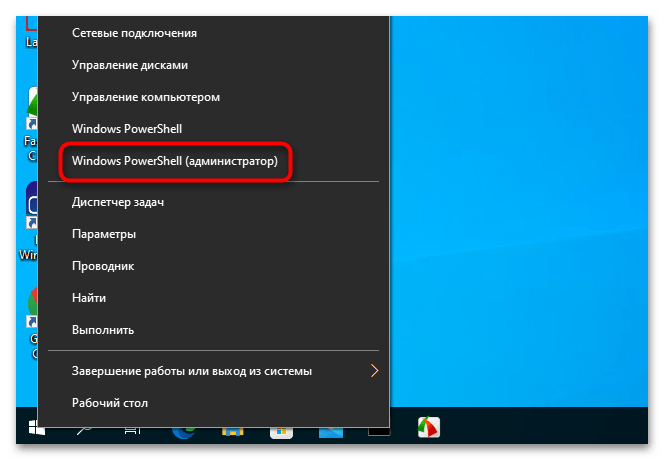
- Запустите «Командную строку» либо «Windows PowerShell» от имени администратора.
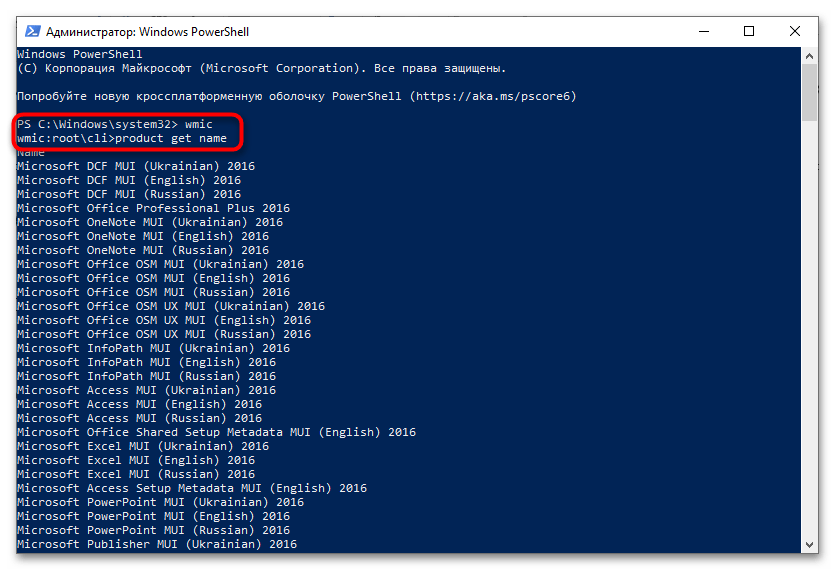
- Выполните сначала команду
wmic, а за ней командуproduct get name. Это выведет список установленных в системе программ и компонентов. Найдите в нем название программы, которую хотите удалить. - Сформируйте и выполните команду
product where name="ProductName" call uninstall /nointeractive, где ProductName – полное имя удаляемого приложения или компонента.

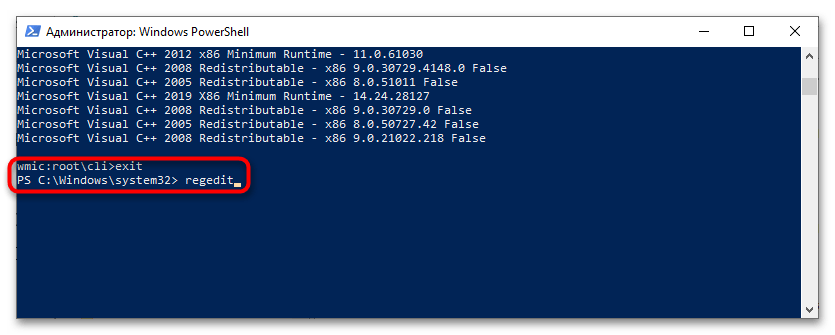
Удаление будет выполнено в тихом режиме. Если названия нужной вам программы в списке не окажется, что очень даже может быть, сделайте следующее.
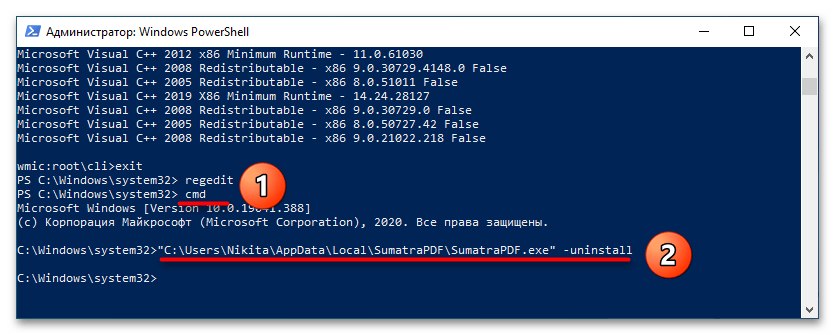
- Откройте «Редактор реестра», для чего тут же в «PowerShell» выйдите из интерфейса wmic командой
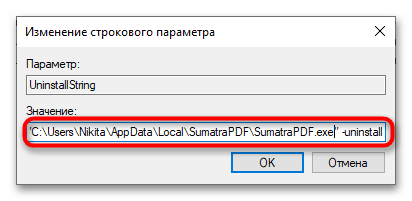
exitи выполните командуregedit. - В левой колонке редактора разверните ключ
HKLM\SOFTWARE\Microsoft\Windows\CurrentVersion\Uninstall— он содержит полный список установленных программ и компонентов. Отыщите подраздел с именем приложения, которое хотите удалить, и выделите его мышкой. При этом в правой колонке отобразится список параметров. Найдите параметр «UninstallString». - Кликните по нему дважды, чтобы открыть окошко редактирования, и скопируйте значение параметра.
- Вернитесь в «PowerShell» и выполните команду
cmdдля перехода в интерфейс классической «Командной строки». - Вставьте ранее скопированное в буфер значение параметра «UninstallString» и нажмите клавишу ввода. В результате должен запуститься процесс удаления программы.

Способ 2: Удаление вручную
Если удалить приложение указанным выше способом не удалось, можно прибегнуть к радикальным мерам – удалению каталогов и записей реестра программы вручную. Делать это лучше в безопасном режиме или даже из-под LiveCD, чтобы исключить удержание файлов и каталогов системными процессами.
Читайте также: Инструкция по записи LiveCD на флешку
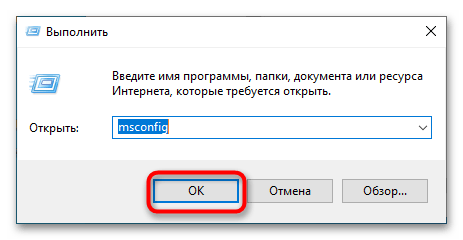
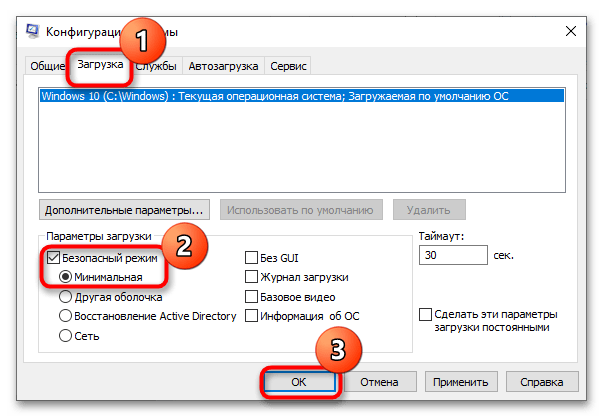
- Загрузите компьютер в безопасном режиме. Для этого командой
msconfigв окошке «Выполнить» (оно открывается клавишами Win + R) откройте утилиту «Конфигурация системы». - Переключитесь на вкладку «Загрузка», отметьте флажком опцию «Безопасный режим» и нажмите «OK».
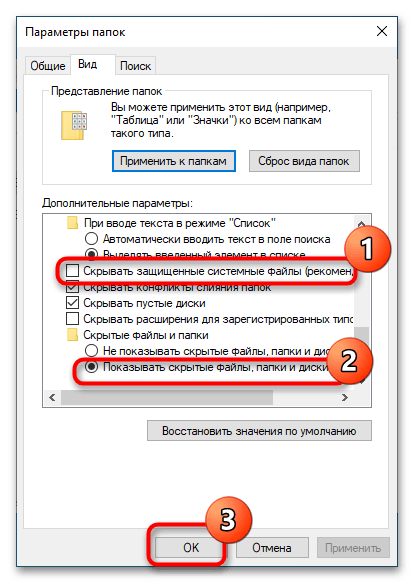
- Зайдите в параметры папок и поиска, открыв «Проводник», переключившись на вкладку «Вид» и на панели выбрав «Параметры». При отсутствии таковой панели разверните ее, кликнув по иконке маленькой стрелочки вверх в правом верхнем углу.
- Включите на вкладке «Вид» пункт «Показывать скрытые файлы, папки и диски» и снимите галочку с пункта «Скрывать защищенные системные файлы».
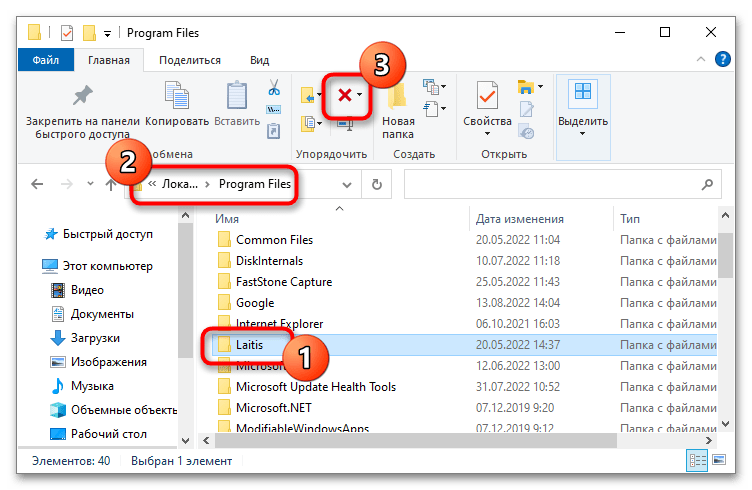
- Перейдите в расположение
C:\Program FilesилиC:\Program Files (x86), отыщите там папку с названием ненужной программы и удалите ее со всем ее содержимым. - Проверьте также следующие расположения:
C:\Users\USERNAME\AppData\Local\C:\Users\USERNAME\AppData\RoamingC:\ProgramData\PiriformC:\ProgramData\Microsoft\Windows\Start Menu\Programs
Удалите папки с именем программы, если таковые будут найдены. Не забудьте заменить USERNAME в путях вашим именем пользователя.
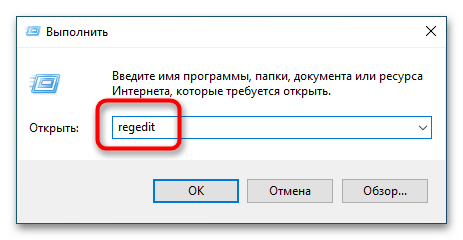
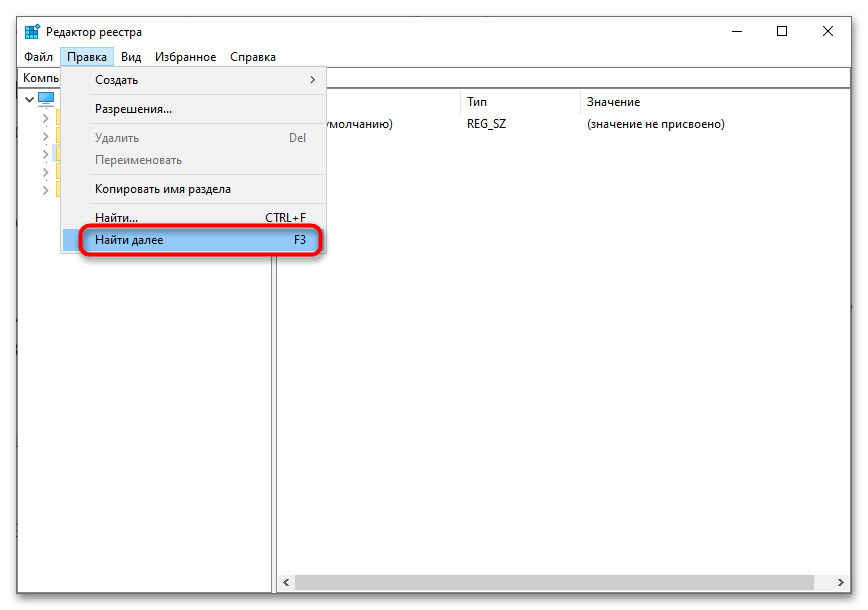
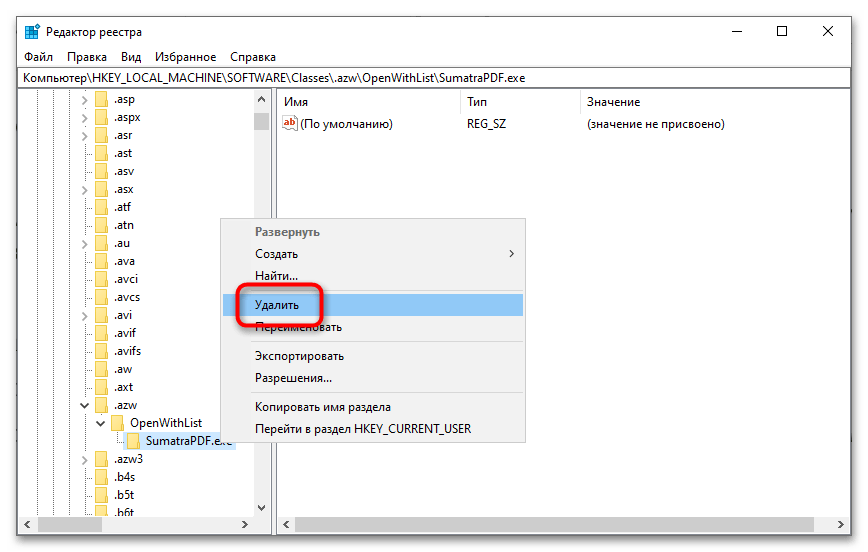
- Откройте штатный «Редактор реестра» командой
regeditв окошке «Выполнить». - Выделите слово «Компьютер», чтобы поиск был по всему реестру. В меню «Правка» выберите опцию «Найти далее» или просто нажмите F3.
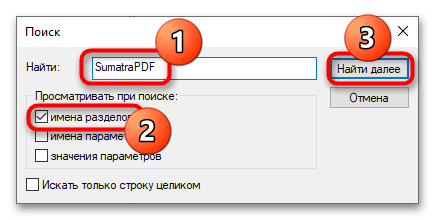
- В открывшемся диалоговом окошке поиска введите название принудительно удаленной программы, снимите флажки со всех пунктов кроме «имена разделов» и нажмите «Найти далее».
- Удалите все найденные ключи с именем приложения.

Способ 3: Сторонние деинсталляторы
Более простым, удобным и эффективным способом принудительного удаления программ является использование специализированных приложений-деинсталляторов. С наиболее популярными решениями из этой категории вы можете познакомиться, перейдя по ссылке ниже, мы же выбрали несколько наиболее удобных.
Читайте также: Приложения для принудительного удаления программ
Вариант 1: IObit Uninstaller
IObit Uninstaller – простое и интуитивно понятное приложение, с помощью которого можно принудительно удалить любую стороннюю программу на компьютере вместе с остаточными файлами. Оно поставляется в двух версиях: бесплатная и PRO. Первой вполне достаточно для нашей задачи, а платная версия программы предусматривает встроенные функции антивируса. Также она пригодится, если нужно оптимизировать обновления инсталлированного ПО.
Скачать IObit Uninstaller
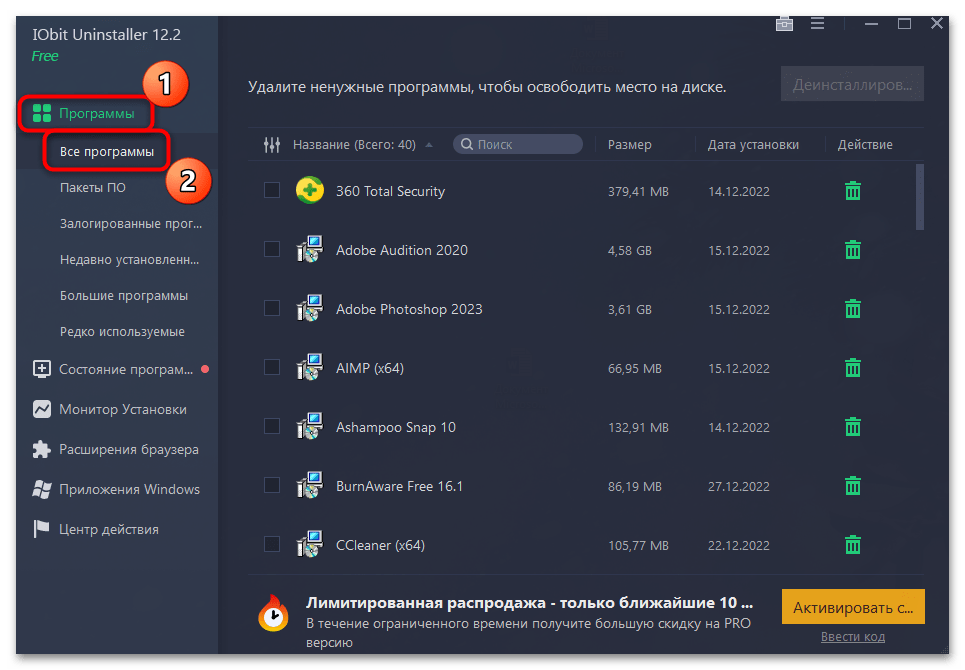
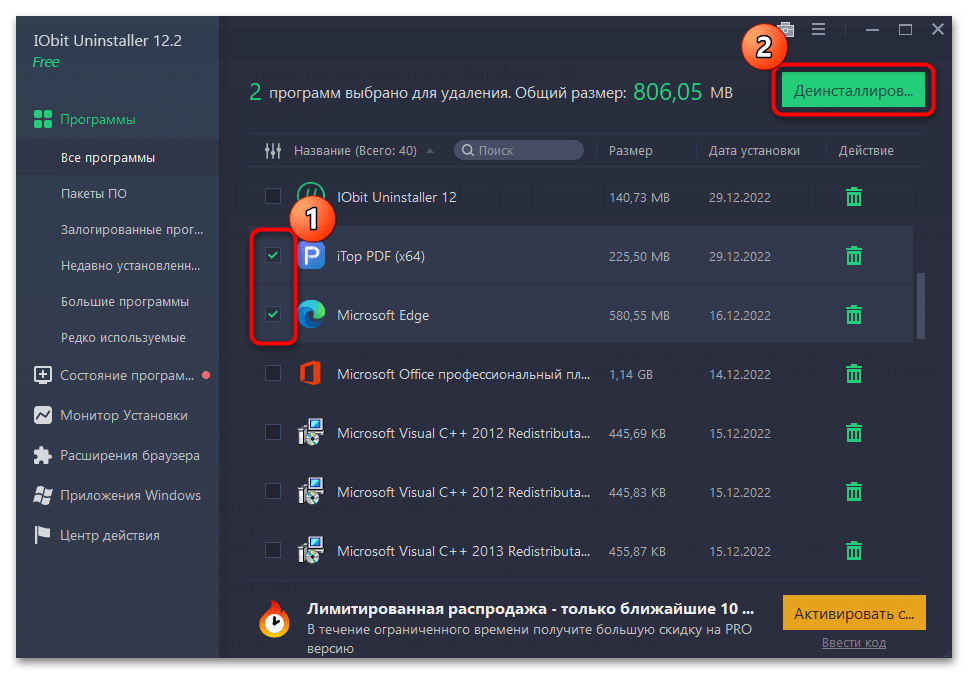
- Скачайте по ссылке выше приложение, затем запустите его. В разделе «Программы», выбранном на панели слева, отображается список всех установленных программ. Нажмите на «Все программы».
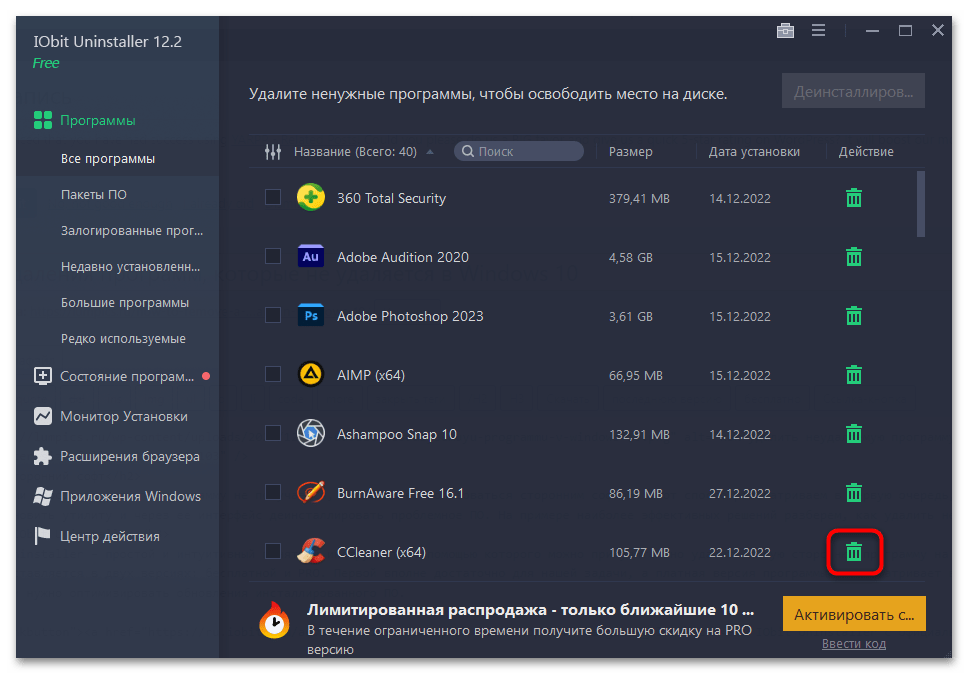
- В центральной части окна найдите софт, который нужно удалить, затем кликните по иконке в виде мусорной корзины справа.
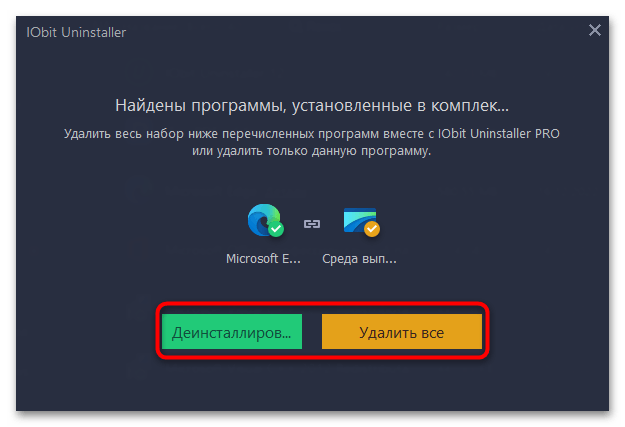
- Может появиться уведомление с информацией о том, что с удаляемым приложений связаны и другие компоненты. Выберите вариант деинсталляции: только выбранной программы или удалить все.
- Чтобы пакетно стереть софт, отметьте нужные пункты галочкой, затем нажмите на кнопку «Деинсталлировать» в верхнем правом углу.
Особенность софта заключается в том, что, помимо сторонних программ, он способен очистить систему от предустановленных приложений без прав администратора. Кроме того, он полностью очищает ПК от реестровых записей, остаточных файлов и папок, а также создает точку восстановления Windows 10 и позволяет установить обновления для программ.
Вариант 2: Geek Uninstaller
Geek Uninstaller – еще один простой инструмент, предусматривающий возможность удаления сторонних и встроенных приложений с Windows 10. Интерфейс представляет собой одно окно со списком софта, а все действия совершаются через соответствующую вкладку на верхней панели. Платная версия позволяет выполнить пакетное удаление, а также она глубоко сканирует систему на наличие следов, которые оставлены сттраемым ПО.
Скачать Geek Uninstaller с официального сайта
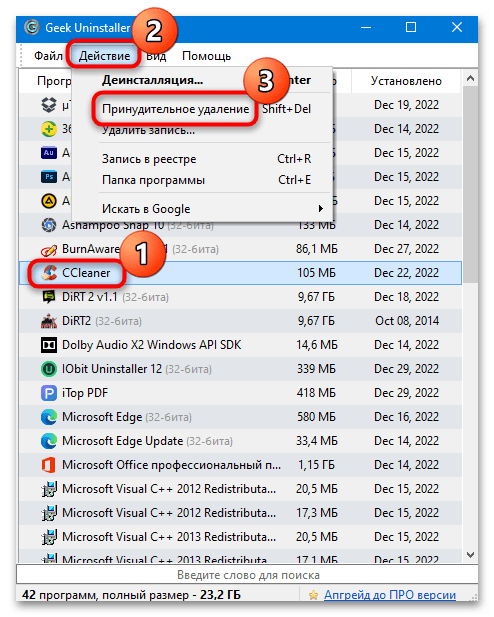
- После скачивания запустите утилиту и отыщите то приложение, которое нужно удалить. Выделите его и нажмите на вкладку «Действие», где выберите пункт «Принудительное удаление».
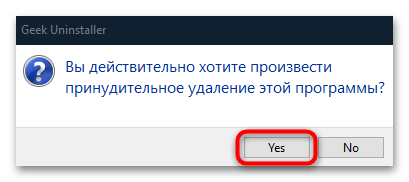
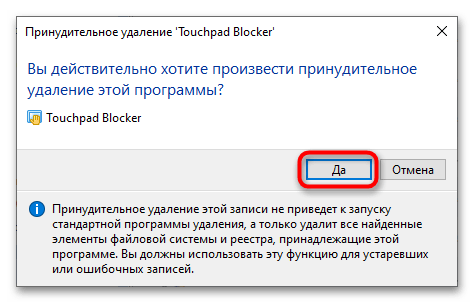
- В появившемся окне подтвердите действие, нажав на кнопку «Yes».
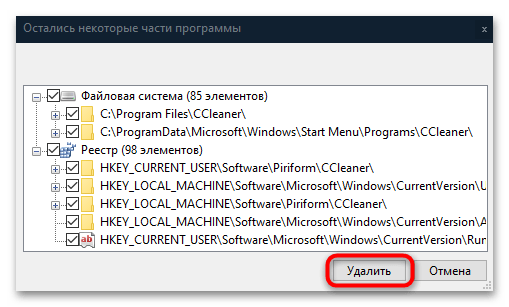
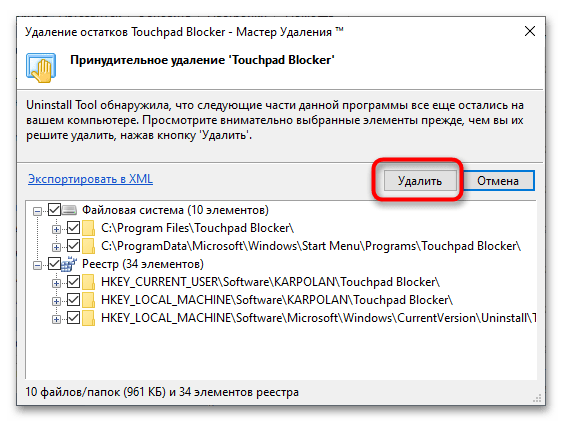
- Утилита произведет поиск в системе на наличие реестровых записей и отобразит в дополнительном окне. Щелкните по кнопке «Удалить».
Бесплатная версия Geek Uninstaller не предусматривает пакетное удаление, но при этом позволяет деинсталлировать системные средства Windows 10. Как и в предыдущем случае, лучше создавать точки восстановления, чтобы вернуть состояние системы, если после деинсталляции штатного приложения и очистки реестра возникли проблемы.
Вариант 3: Uninstall Tool
Еще один простое средство для удаления программ – это приложение Uninstall Tool, которое оснащено простым русскоязычным интерфейсом. Оно не перегружено лишними функциями, при этом справляется с поиском реестровых записей и файлов, оставленных удаленной программой. Чтобы полностью стереть софт, потребуется активированная версия Uninstall Tool.
Скачать Uninstall Tool
- Для работы вам понадобится активированная (платная) версия программы. Установите и запустите деинсталлятор.
- Найдите в списке проблемное приложение, кликните по нему правой кнопкой мыши и выберите из контекстного меню опцию «Принудительное удаление».
- Подтвердите действие в открывшемся диалоговом окне.
- Uninstall Tool выполнит анализ удаляемого приложения, найдет связанные с ним файлы и ключи реестра и предложит их удалить, на что дайте согласие.

К слову, Uninstall Tool умеет удалять не только десктопные программы от сторонних разработчиков, но и некоторые системные компоненты Windows, а также предустановленные универсальные приложения, которые нельзя деинсталлировать через приложение «Параметры» и классический апплет «Установка и удаление программ».
Наша группа в TelegramПолезные советы и помощь
В этой инструкции я покажу, как можно удалить программы с компьютера, используя командную строку (причем не удалить файлы, а именно деинсталлировать программу), не заходя при этом в панель управления и не запуская апплет «Программы и компоненты». Не знаю, насколько большинству читателей это будет полезно на практике, но думаю сама возможность будет кому-то интересна.
Также может быть полезным: Лучшие деинсталляторы (программы для удаления программ). Раньше я уже писал две статьи на тему удаления программ, рассчитанных на начинающих пользователей: Удаление программ Windows 10, Как правильно удалять программы Windows и Как удалить программу в Windows 8 (8.1), если вас интересует именно это, можете просто перейти к указанным статьям.
Деинсталлируем программу в командной строке
Для того, чтоб удалить программу через командную строку, прежде всего запустите ее от имени администратора. В Windows 10 можно начать набирать Командная строка в поиске на панели задач, а затем выбрать пункт для запуска от имени администратора. В Windows 7 для этого найдите ее в меню «Пуск», кликните правой кнопкой мыши и выберите «Запуск от имени Администратора», а в Windows 8 и 8.1 можно нажать клавиши Win + X и выбрать нужный пункт в меню.

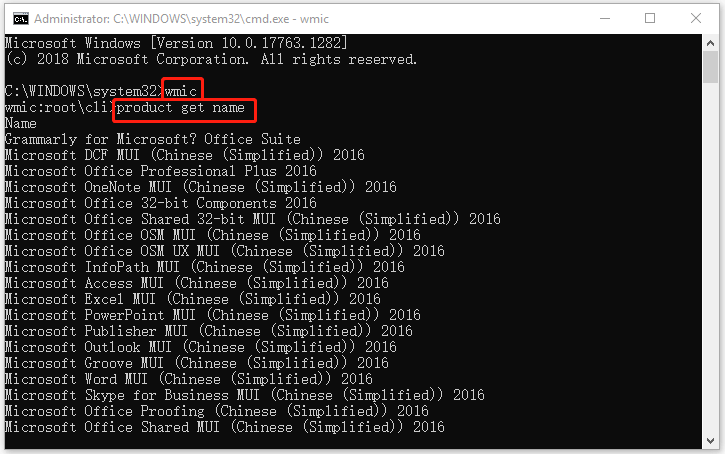
- В командной строке введите wmic

- Введите команду product get name — это отобразит список установленных на компьютере программ.
- Теперь, чтобы удалить конкретную программу, введите команду: product where name=”имя программы” call uninstall — в этом случае перед удалением вас попросят подтвердить действие. Если вы добавите параметр /nointeractive то запрос не появится.
- По завершении удаления программы вы увидите сообщение Method execution successfull. Можно закрыть командную строку.


Как я уже сказал, эта инструкция предназначена лишь для «общего развития» — при обычном использовании компьютера команда wmic вам скорее всего не понадобится. Используются же такие возможности для получения информации и удаления программ на удаленных компьютерах в сети, в том числе и одновременно на нескольких.
-
Home
-
News
- How to Uninstall Program Using CMD/PowerShell Windows 10/11
By Alisa |
Last Updated
This post teaches you how to uninstall programs using CMD (Command Prompt) or PowerShell in Windows 10 or Windows 11 computer. Force uninstall the program that cannot be uninstalled. For more computer tips and tricks, you can visit the News library of MiniTool Software website.
To delete unwanted apps on Windows 10/11, you can not only use the Add or Remove Programs feature but also use Command Prompt or PowerShell. This post mainly introduces how to uninstall programs by using CMD or PowerShell. This is useful if you can’t uninstall a program or the program doesn’t show in Control Panel.
Quick Video Guide:
How to Uninstall Programs Using CMD (Command Prompt) in Windows 10/11
Step 1. Press Windows + R, type cmd, and press Ctrl + Shift + Enter to open elevated Command Prompt on Windows 10/11.
Step 2. In Command Prompt window, type wmic command and press Enter. Then type product get name command and press Enter. You will get a list of programs that are installed on your computer. Find and note the name of the product that you want to uninstall.
Step 3. Next type the following command product where name=”program name” call uninstall, e.g. product where name=”Google Update Helper” call uninstall. Press Enter to execute the command.
Then you will be asked to confirm if you really want to uninstall the program, if yes, type Y and press Enter. After a while, you will receive a message saying that “Method execution successful”. You have uninstalled the program with Command Prompt in Windows 11/10
Tips:
Experience a faster system with MiniTool System Booster – your solution to effortless program uninstallation.
MiniTool System Booster TrialClick to Download100%Clean & Safe
How to Uninstall a Program Using PowerShell in Windows 10/11
Step 1. Press Windows + X and select Windows PowerShell (Admin) to open PowerShell utility on your Windows 10 or Windows 11 computer.
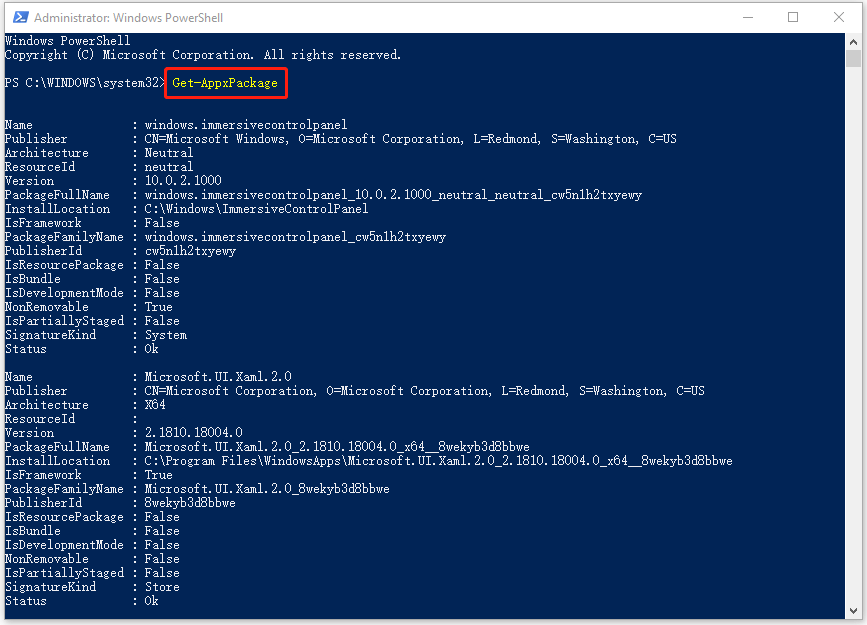
Step 2. In Windows PowerShell window, you can type the command Get-AppxPackage, and press Enter. This will display all the apps installed on your Windows 10/11 computer.
Scroll down to find the target program that you want to uninstall. Check and take down the program name next to Name option.
You can also right-click on the title bar of PowerShell utility and select Edit -> Find, type a part of the app name and click Find Next until you find the target app.
Step 3. Next, type the command Remove-AppxPackage <App Name>, e.g. Remove-AppxPackage Microsoft.Print3D. Press Enter to uninstall the program using PowerShell.
Alternatively, you can also use a simpler way to remove unwanted apps with PowerShell on Windows 10/11.
In PowerShell window, you can type the command Get-AppxPackage *program name* | Remove-AppxPackage and press Enter to directly remove the target program. For instance, type Get-AppxPackage *3dbuilder* | Remove-AppxPackage and press Enter will uninstall 3D Builder program from your Windows 10/11 computer.
Related tutorials:
How to Uninstall, Restore, Reinstall Windows 10 Built-in Apps
How to Recover Uninstalled Programs on Windows 10 (2 Ways)
Bottom Line
This post includes a detailed guide for how to uninstall programs using CMD (Command Prompt) or PowerShell on Windows 11 or Windows 10 computer. If you have trouble with uninstalling a program on your PC, you can try to force to uninstall the program with CMD or PowerShell.
MiniTool Software, a top software developer, has developed MiniTool Power Data Recovery, MiniTool Partition Wizard, MiniTool ShadowMaker, MiniTool Video Converter, and some other products. If you are interested in these products, you can find and try them from MiniTool Software official website.
About The Author
Position: Columnist
Alisa is a professional English editor with 4-year experience. She loves writing and focuses on sharing detailed solutions and thoughts for computer problems, data recovery & backup, digital gadgets, tech news, etc. Through her articles, users can always easily get related problems solved and find what they want. In spare time, she likes basketball, badminton, tennis, cycling, running, and singing. She is very funny and energetic in life, and always brings friends lots of laughs.
Categories
- Transfer Programs from C Drive to D Drive
- Transfer Installed Software to New PC
- Transfer Files from Old PC to New PC
- Transfer Microsoft Office
- Find Office Product Key
- Move User Folder
- Move Google Chrome Bookmarks
Typically, unwanted programs are uninstalled using the Add or Remove Programs utility or the Settings app in Windows. However, uninstalling a program via Command Prompt (CMD) provides a more direct and efficient approach than conventional methods. EaseUS delves into uninstalling programs via CMD, offering users a comprehensive understanding of how to harness this potent tool for software removal.
Better Alternative: Free Uninstaller to Force Uninstall a Program
Uninstalling programs through CMD offers a more direct approach, but sometimes, even the power of CMD can cause stubborn programs to resist traditional methods. In these cases, a dedicated uninstaller tool like EaseUS Todo PCTrans Free can streamline the uninstallation process, offering a powerful «Force Uninstall» feature that tackles even the most resistant programs. This feature removes the main program files and eliminates any leftover registry entries or hidden files that can clutter your system.
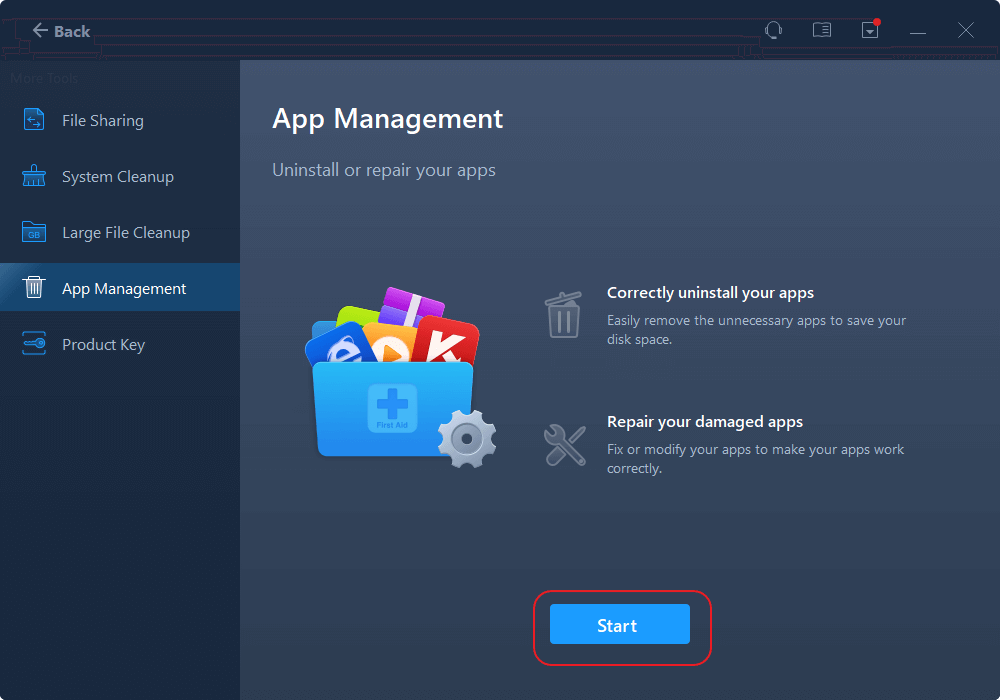
Step 1. Launch EaseUS Todo PCTrans, click «More Tools». Choose App Management, Click «Start» to securely uninstall your apps and repair your damaged apps.
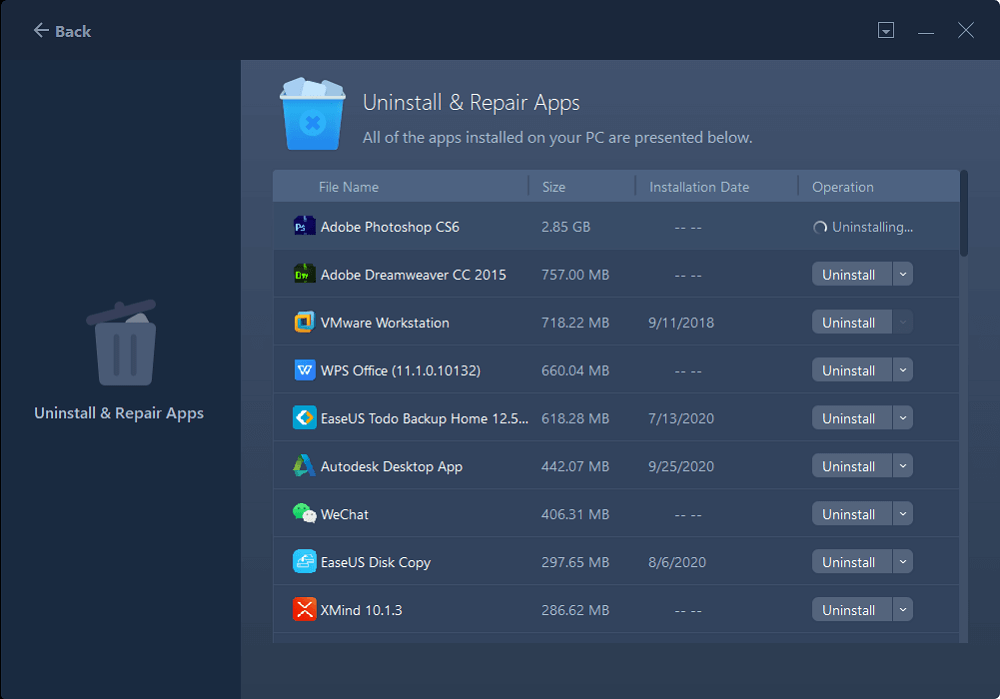
Step 2. All of apps installed on your PC, choose the selected one you want to uninstall or repair. (If your uninstall process fails, you can click the small triangle icon and select «Delete».)
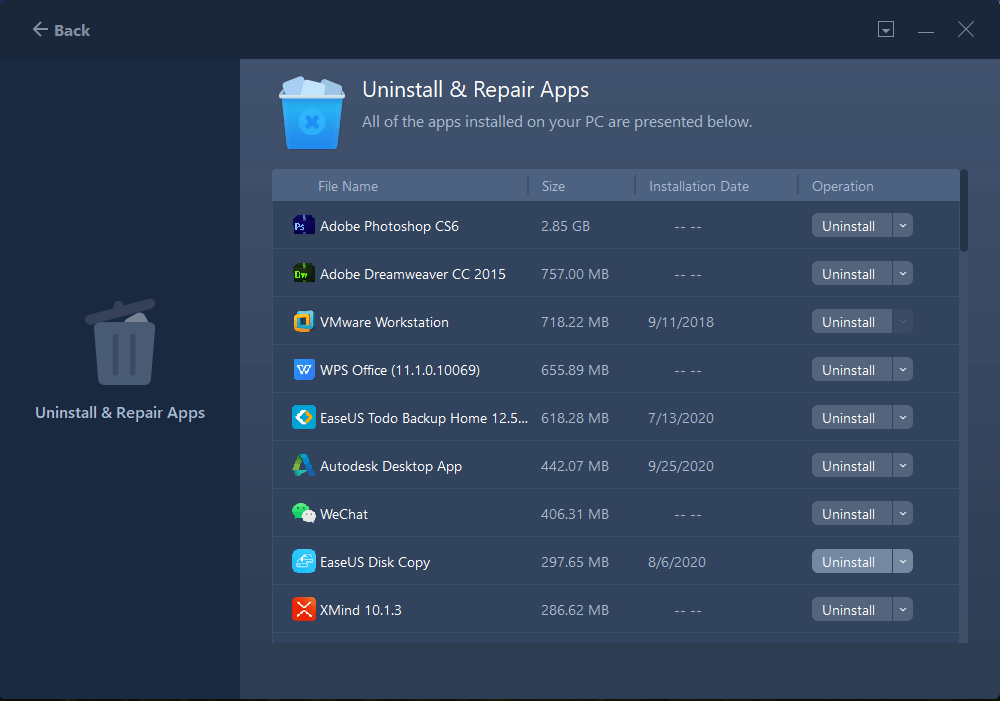
Step 3. Click «Uninstall». (If you want to repair apps, click the icon right behind «Uninstall» and choose «Repair».)
Key Features of EaseUS Todo PCTrans:
- Uninstall Microsoft Edge from Windows 11
- Backup and restore system and data
- User state migration tool download
- Relocate OS to SSD/HDD without reinstalling Windows
- Uninstall Wuthering Waves on PC/Mobile devices
We highly recommend users try EaseUS Todo PCTrans for a hassle-free and efficient uninstallation experience.
How to Uninstall a Program Using CMD — Full Steps
To uninstall a program using CMD, we’ll utilize the Windows Management Instrumentation Command-line (WMIC) software utility. Follow the steps:
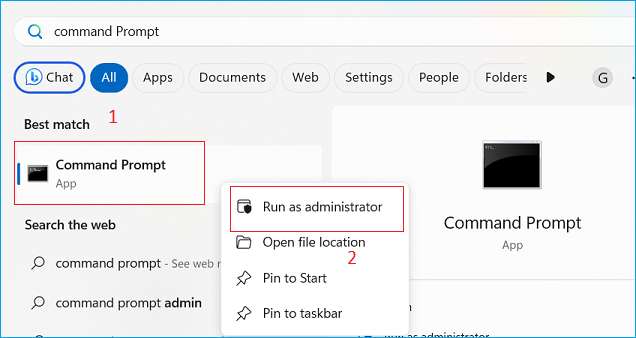
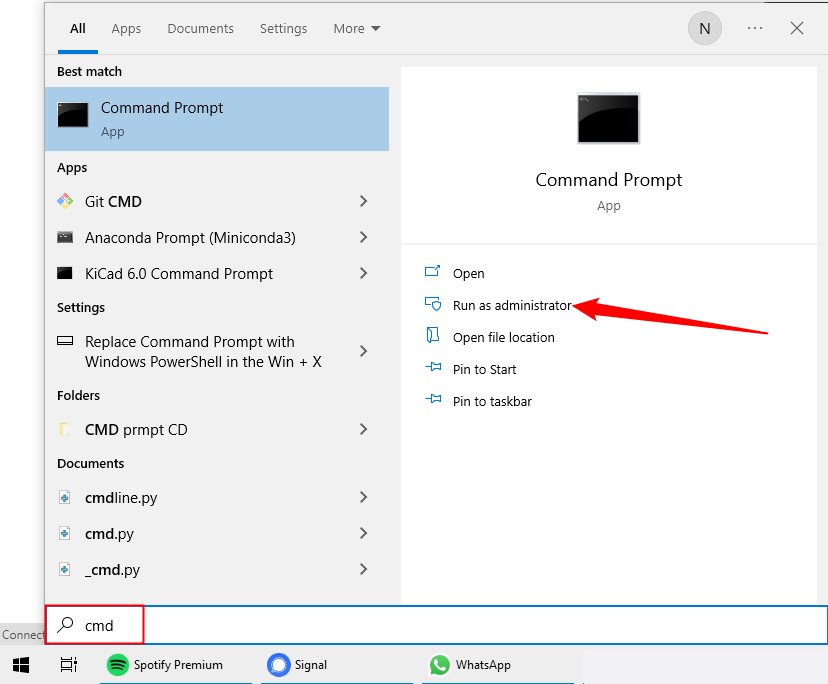
Step 1. Type «cmd»/»Command Prompt» in the Windows Search dialog, then select «Run as Administrator» from the menu that appears.
Step 2. In the Command Prompt windows, type «wmic» and press the Enter button.
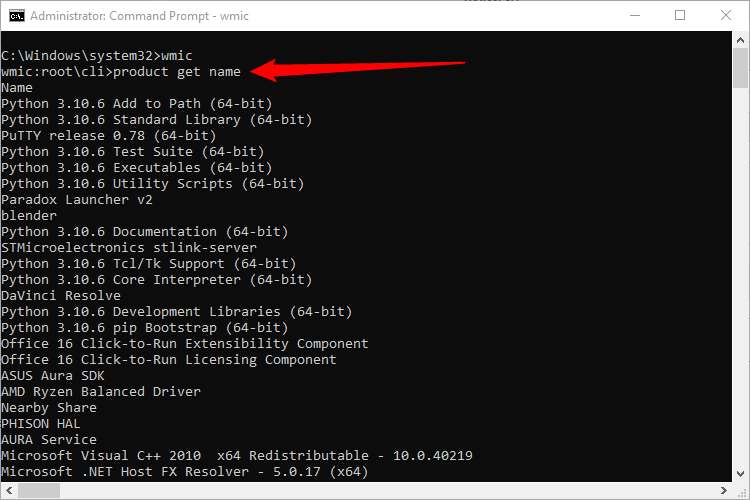
Step 3. Now, getting a list of installed programs in Command Prompt is crucial. This ensures you have the accurate product name required for the uninstall command to work properly. Type «product get name» and press Enter button.
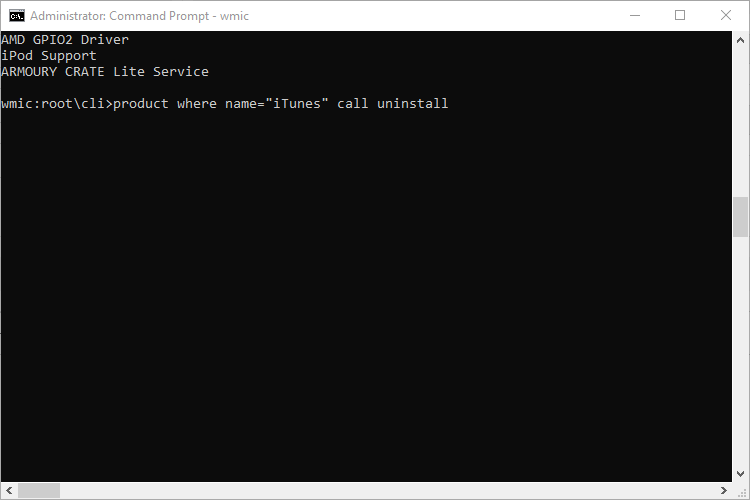
Step 4. Find the unwanted program you wish to uninstall in the list. Then, run the following command to uninstall it:
product where name=»program name» call uninstall
Change «program name» to the name of the program you want to remove. For example, to uninstall iTunes, use this command:
product where name=»iTunes» call uninstall
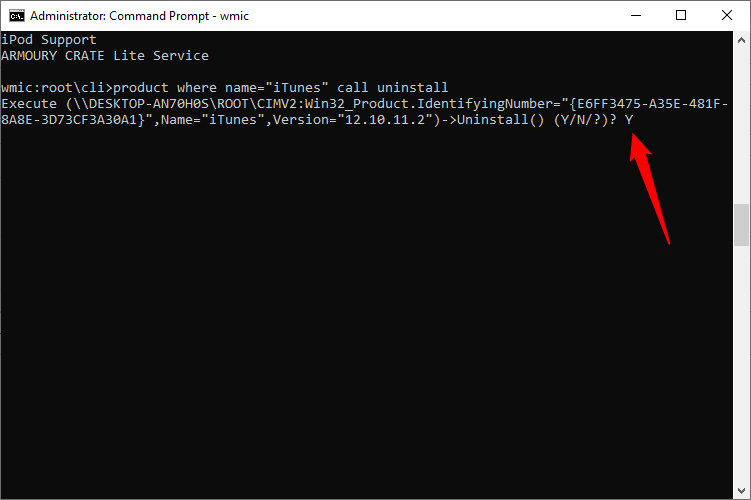
Step 5. Confirm the command execution by typing Y when prompted, then press Enter.
Once the unwanted program is uninstalled, you’ll receive a confirmation message indicating «Method execution successful.» The application has been uninstalled from your computer.
Conclusion
It’s crucial to understand and learn the exact commands if you’re going to uninstall a program through Command Prompt, as it’s a command-line utility, so only one wrong command can lead to severe consequences. This guide simplifies the process, offering step-by-step instructions for a hassle-free experience.
However, a dedicated uninstaller tool like EaseUS Todo PCTrans can be invaluable for stubborn programs that resist traditional methods. We highly recommend users try this free tool for a seamless and efficient uninstallation experience, ultimately leading to a cleaner and more optimized system. Remember, a clean and uncluttered PC, free from unnecessary programs, is better.
FAQs About How to Uninstall a Program Using CMD
Need more help uninstalling with CMD? Check out the FAQs below!
1. How do you force uninstalling a program through cmd?
While CMD doesn’t have a built-in «force uninstall» feature, some programs can resist traditional methods. In these cases, software like EaseUS Todo PCTrans can force uninstall and tackle stubborn programs.
2. How do you uninstall a file using cmd?
While CMD is primarily for uninstalling programs, you can delete a single file using the following steps with caution (deleted files cannot be recovered):
- Open Command Prompt as administrator (search for «cmd» and right-click «Run as administrator»).
- Use the cd command to navigate to the directory containing the file (e.g., cd Documents to access your Documents folder).
- Use the del «filename» command, replacing «filename» with the actual name of the file you want to delete (including quotation marks).
For example, to delete a file named «image.jpg» in your Documents folder, you would type:
del «image.jpg»
Remember, using CMD to delete files carries inherent risks. Make sure you’re confident about the file you’re deleting before proceeding.
3. How do you delete apps using the command line?
Follow the steps to delete apps using the command line:
- Open Command Prompt as administrator (search «cmd» and right-click «Run as administrator»).
- To get a list of installed programs in Command Prompt, type «product get name» and press the Enter key.
- Run the command «product where name=»program name» call uninstall» to delete the unwanted app.
- Change «program name» to the name of the program you want to uninstall or delete.
- Confirm with «Y» and press Enter.
Sign in to your How-To Geek account
If you’re using Windows 10 and need to free up some disk space, you can uninstall apps you no longer use straight from the Command Prompt. Here’s how it’s done.
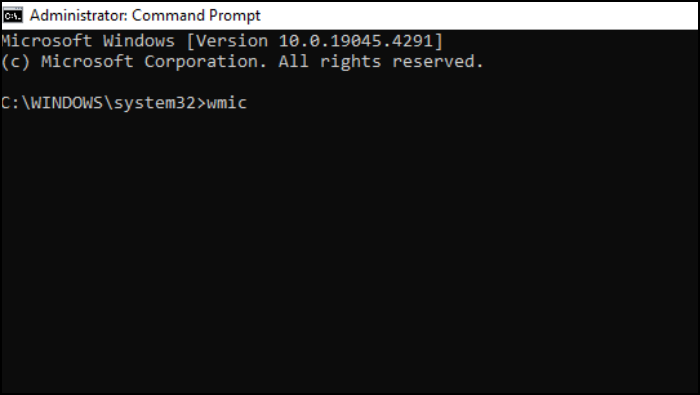
First, you’ll have to run Command Prompt as an administrator to uninstall a program. In the Windows Search box, type «cmd» or «Command Prompt» then click «Run as Administrator» in the menu that appears.
Command Prompt will now launch with administrator permissions. To uninstall a program using Command Prompt, you have to use the Windows Management Instrumentation Command-line (WMIC) software utility.
At the prompt, type the following command, and then press Enter:
wmic
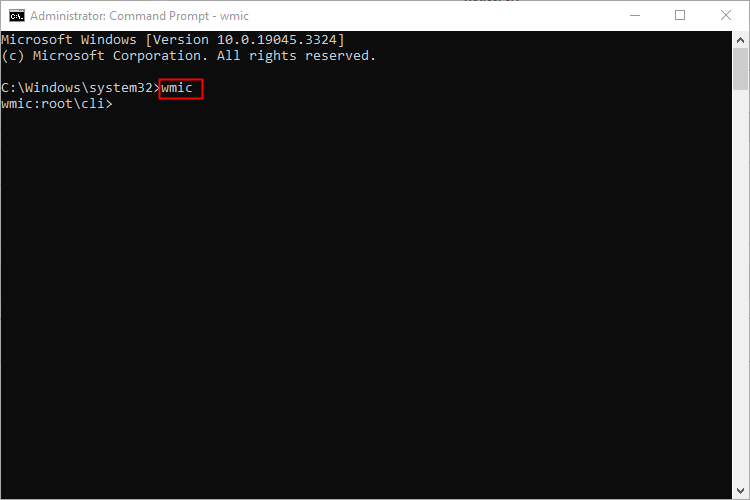
You’ll see the wmic:root\cli> prompt in the console once you run the WMIC command. This means you can now use Windows Management Instrumentation (WMI) operations.
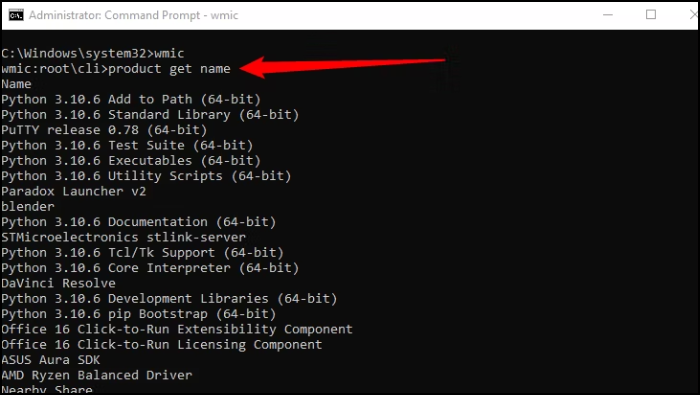
Next, you’ll want a list of the programs installed on your computer. Getting this list is essential because you must provide an accurate product name to successfully execute the uninstall command.
Type the following command to get the list:
product get name
You can also run wmic commands directly from the standard command line, without running «wmic» and entering the WMIC prompt first. To do so, prepend them with «wmic.» For example, «wmic product get name» works the same as running «wmic,» and then «product get name.«
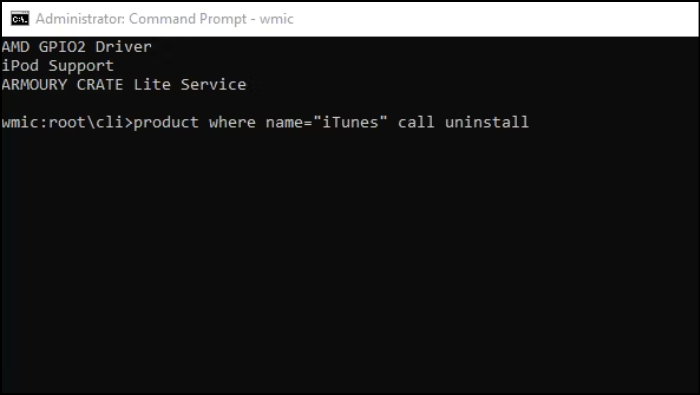
Find the name of the program you want to uninstall from the list. You can uninstall the program by running this command:
product where name="program name" call uninstall
Just replace program name with the name of the program you want to install. For example, if we want to uninstall the iTunes App, we would type this command:
product where name="iTunes" call uninstall
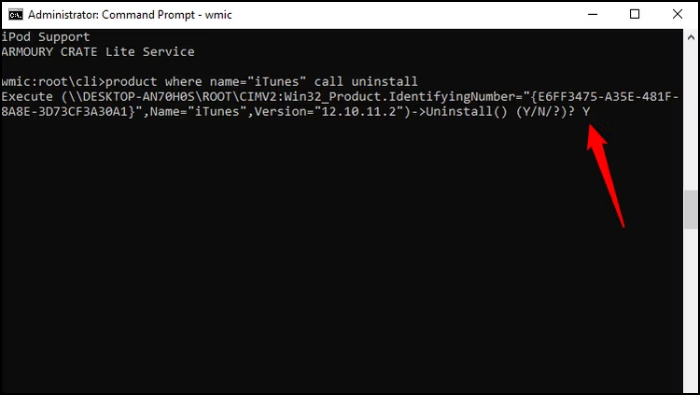
You’ll then be asked to confirm if you really want to execute the command. Type Y to confirm, and then press Enter. Type N to cancel the operation.
After a few moments, you’ll receive a message telling you the method was successfully executed.
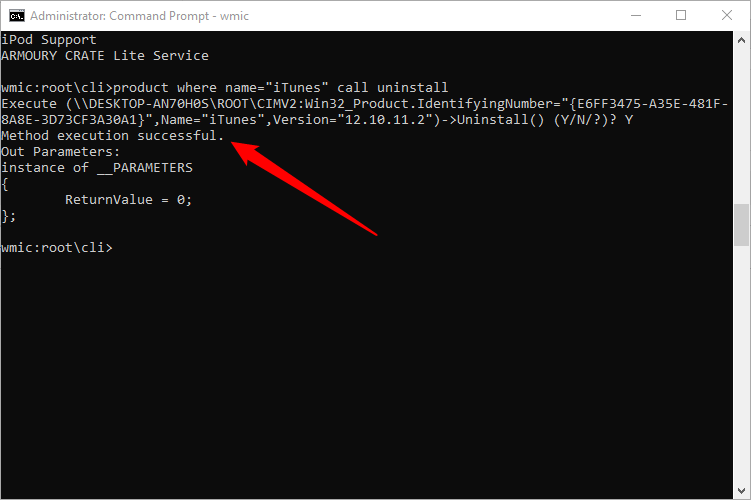
The application has now been uninstalled from your computer.
This is just one of the many ways you can uninstall an application on Windows 10. You can also do so from the Control Panel, Start menu, or Settings window.