Sometimes you need to create static route entries to make communication with different networks that are connected via a different gateway. A gateway is simply a network router that routes the network traffic between different networks. When you have more than one gateway (router) on your network, then you may need to implement static route technique on Windows 10/Windows 11 or Windows servers/any Operating system.
A static route will tell the Operating System to send network packets to the appropriate router instead of sending them to the default router. This simple guide shows how to add, delete and modify a static route to the routing table on Windows 11/10 and Microsoft Server Operating Systems.
There are a few useful commands you must know. Route delete, add and print. These commands will be handy to any user who has administrative access and know which router/gateway should be used for which network.
Why Add Static Route?
It mostly depends on the network setup. Usually, you can add these static routes on your default router (if it can support) or core switch. When you have this kind of proper network setup, you do not need to add a static route to each computer separately on the network. But in a few exceptional cases, you may need to implement static routes on individual computers. Here are a few examples.
- You have more than one internet router on the network and you need to send traffic to certain websites (based on their IP addresses) via a different router than the default gateway. Let’s say, for example, all traffic to Netflix can be sent via the 2nd internet router where other website traffic can go through the 1st internet router.
- There are several VLANs or subnets available on the network. Before building the proper routing table on the router or core switch, adding a static route on your Windows computer will help you to test the connectivity see the traffic flow.
- For network security or isolation purpose, certain routes can’t be added to the default gateway device. In this case, as a network administrator, you can add the static route on a local computer to make network communication.
Route Add on Windows 11/10 and Windows Servers
Though there are major changes and interface upgrades in the latest Windows 11, the below steps remain the same.
Make sure you run the below commands on command prompt (or PowerShell) which is opened as Administrator.
Here is the command to add a static route to the routing table.
route ADD destination_network MASK subnet_mask gateway_ip metric_cost
route add 10.10.10.0 mask 255.255.255.0 10.10.29.1
It indicates that any packets to 10.10.10.0 (in class C – 255.255.255.0) network should be forwarded to the 10.10.29.1 router (gateway).
Obviously, the PC/server in which we run this command is in the 10.10.29.0/24 network because it should communicate to the gateway from the same network.
The issue with the above command is when you shut down or restart the computer, these route entries will be removed. To make it permanent and add to the Windows OS routing table, we should use the –p key with the add command. So, adding a persistent (or permanent) static route on Windows 10 command will be like this;
route add –p 10.10.10.0 mask 255.255.255.0 10.10.29.1
Route Print
Route print command is another useful command to view the entries on the routing table and which routes are active at the moment. If you need to modify an entry that is already in the routing table, better to confirm the entries before changing. To do it, use the route print command.
Route print

Also, we can view the persistent routes in a Windows OS by checking the following registry path. Look for the entries in this area before or after modifying any routing table entries.
HKEY_LOCAL_MACHINE->SYSTEM->CurrentControlSet-> Services->Tcpip->Parameters->PersistentRoutes
Route Delete on Windows 11/10 & Windows 2022/2019/2016 Servers
The below command is to delete an existing persistent route from a computer. Even though we added a route entry with the network, network mask and gateway, but to delete, we need to mention the network only. So, it goes like this;
route delete 10.10.10.0
That will delete the 10.10.10.0 route entry from the computer. You do not need to restart the computer to take effect. Adding and deleteting route entries take effect instantly.
Let’s say that after the recent network change, now the network 10.10.10.0 should be routed through the 10.10.29.200 gateway. Obviously, you have to modify the existing route for this network and change the gateway to 10.10.29.200.
So, how to modify the existing route entry? You can’t modify an existing entry.
The simple method is to delete it and add the new entry. So, in this case, you would perform the below commands.
Route delete 10.10.10.0

Route add –p 10.10.10.0 mask 255.255.255.0 10.10.29.200
We hope this simple guide is helpful in understanding the route add, delete and print commands in Windows 10/Windows 11 client PC and other server Operating Systems. Make sure you open the command prompt or PowerShell as Administrator to perform these commands. If you want to use cosmetic variables to identify the fast hops to reach a network, you can use the metric key as described at the Microsoft site here.
- 28.08.2020
- 65 695
- 3
- 30.01.2021
- 39
- 35
- 4
- Содержание статьи
- Описание
- Синтаксис
- Параметры
- Примеры
- Справочная информация
- Комментарии к статье ( 3 шт )
- Добавить комментарий
Описание
ROUTE — Выводит на экран и изменяет записи в локальной таблице IP-маршрутизации. Запущенная без параметров, команда route выводит справку.
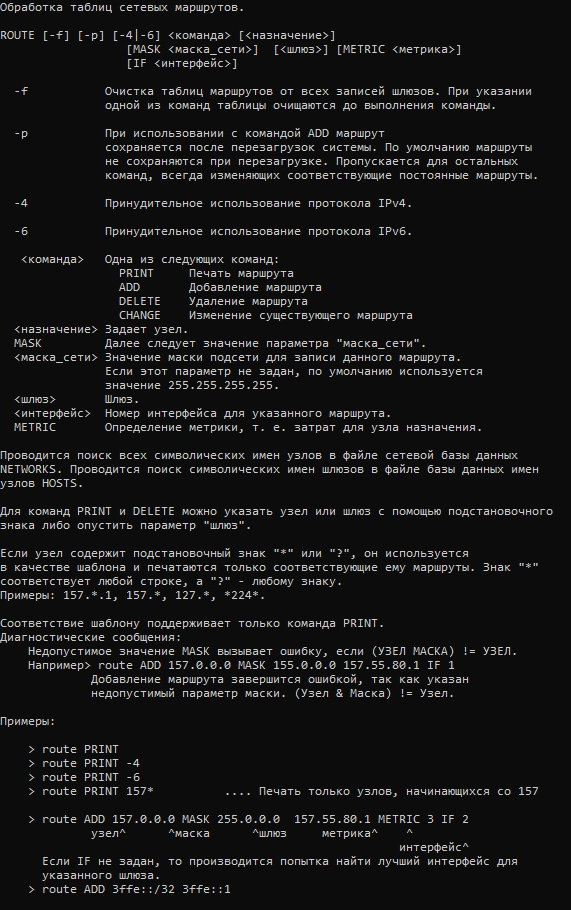
Синтаксис
route [-f] [-p] [команда [конечная_точка] [mask маска_сети] [шлюз] [metric метрика]] [if интерфейс]]Параметры
| Параметр | Описание |
|---|---|
| -f | Очищает таблицу маршрутизации от всех записей, которые не являются узловыми маршрутами (маршруты с маской подсети 255.255.255.255), сетевым маршрутом замыкания на себя (маршруты с конечной точкой 127.0.0.0 и маской подсети 255.0.0.0) или маршрутом многоадресной рассылки (маршруты с конечной точкой 224.0.0.0 и маской подсети 240.0.0.0). При использовании данного параметра совместно с одной из команд (таких, как add, change или delete) таблица очищается перед выполнением команды |
| -p | >При использовании данного параметра с командой add указанный маршрут добавляется в реестр и используется для инициализации таблицы IP-маршрутизации каждый раз при запуске протокола TCP/IP. По умолчанию добавленные маршруты не сохраняются при запуске протокола TCP/IP. При использовании параметра с командой print выводит на экран список постоянных маршрутов. Все другие команды игнорируют этот параметр. Постоянные маршруты хранятся в реестре по адресу HKEY_LOCAL_MACHINE\SYSTEM\CurrentControlSet\Services\Tcpip\Parameters\PersistentRoutes |
| команда | Указывает команду, которая будет запущена на удаленной системе. Доступны следующие команды: add — Добавление маршрута change — Изменение существующего маршрута delete — Удаление маршрута или маршрутов print — Печать маршрута или маршрутов |
| конечная_точка | Определяет конечную точку маршрута. Конечной точкой может быть сетевой IP-адрес (где разряды узла в сетевом адресе имеют значение 0), IP-адрес маршрута к узлу, или значение 0.0.0.0 для маршрута по умолчанию |
| mask маска_сети | Указывает маску сети (также известной как маска подсети) в соответствии с точкой назначения. Маска сети может быть маской подсети соответствующей сетевому IP-адресу, например 255.255.255.255 для маршрута к узлу или 0.0.0.0. для маршрута по умолчанию. Если данный параметр пропущен, используется маска подсети 255.255.255.255. Конечная точка не может быть более точной, чем соответствующая маска подсети. Другими словами, значение разряда 1 в адресе конечной точки невозможно, если значение соответствующего разряда в маске подсети равно 0 |
| шлюз | Указывает IP-адрес пересылки или следующего перехода, по которому доступен набор адресов, определенный конечной точкой и маской подсети. Для локально подключенных маршрутов подсети, адрес шлюза — это IP-адрес, назначенный интерфейсу, который подключен к подсети. Для удаленных маршрутов, которые доступны через один или несколько маршрутизаторов, адрес шлюза — непосредственно доступный IP-адрес ближайшего маршрутизатора |
| metric метрика | Задает целочисленную метрику стоимости маршрута (в пределах от 1 до 9999) для маршрута, которая используется при выборе в таблице маршрутизации одного из нескольких маршрутов, наиболее близко соответствующего адресу назначения пересылаемого пакета. Выбирается маршрут с наименьшей метрикой. Метрика отражает количество переходов, скорость прохождения пути, надежность пути, пропускную способность пути и средства администрирования |
| if интерфейс | Указывает индекс интерфейса, через который доступна точка назначения. Для вывода списка интерфейсов и их соответствующих индексов используйте команду route print. Значения индексов интерфейсов могут быть как десятичные, так и шестнадцатеричные. Перед шестнадцатеричными номерами вводится 0х. В случае, когда параметр if пропущен, интерфейс определяется из адреса шлюза |
| /? | Отображает справку в командной строке |
Примечания:
- Большие значения в столбце
metricтаблицы маршрутизации — результат возможности протокола TCP/IP автоматически определять метрики маршрутов таблицы маршрутизации на основании конфигурации IP-адреса, маски подсети и стандартного шлюза для каждого интерфейса ЛВС. Автоматическое определение метрики интерфейса, включенное по умолчанию, устанавливает скорость каждого интерфейса и метрики маршрутов для каждого интерфейса так, что самый быстрый интерфейс создает маршруты с наименьшей метрикой. Чтобы удалить большие метрики, отключите автоматическое определение метрики интерфейса в дополнительных свойствах протокола TCP/IP для каждого подключения по локальной сети. - Имена могут использоваться для параметра конечная_точка, если существует соответствующая запись в файле базы данных Networks, находящемся в папке системный_корневой_каталог\System32\Drivers\Etc. В параметре шлюз можно указывать имена до тех пор, пока они разрешаются в IP-адреса с помощью стандартных способов разрешения узлов, таких как запрос службы DNS, использование локального файла Hosts, находящегося в папке системный_корневой_каталог\system32\drivers\etc, или разрешение имен NetBIOS.
- Если команда —
printилиdelete, параметр шлюз опускается и используются подстановочные знаки для указания точки назначения и шлюза. Значение конечной_точки может быть подстановочным значением, которое указывается звездочкой (*). При наличии звездочки (*) или вопросительного знака (?) в описании конечной точки, они рассматриваются как подстановки, тогда печатаются или удаляются только маршруты, соответствующие точке назначения. Звездочка соответствует любой последовательности символов, а вопросительный знак — любому одному символу. 10.*.1, 192.168.*, 127.* и *224* являются допустимыми примерами использования звездочки в качестве подстановочного символа. - При использовании недопустимой комбинации значений конечной точки и маски подсети (маски сети) выводится следующее сообщение об ошибке : «Маршрут: неверная маска подсети адреса шлюза». Ошибка появляется, когда одно или несколько значений разрядов в адресе конечной точки равно 1, а значения соответствующих разрядов маски подсети — 1. Для проверки этого состояния выразите конечную точку и маску подсети в двоичном формате. Маска подсети в двоичном формате состоит из последовательности единичных битов, представляющей часть сетевого адреса конечной точки, и последовательности нулевых битов, обозначающей часть адреса узла конечной точки. Проверьте наличие единичных битов в части адреса точки назначения, которая является адресом узла (как определено маской подсети).
- Параметр
-pподдерживается в команде route только в операционных системах Windows NT 4.0, Windows 2000, Windows Millennium Edition и Windows XP. Этот параметр не поддерживается командой route в системах Windows 95 и Windows 98. - Эта команда доступна, только если в свойствах сетевого адаптера в объекте Сетевые подключения в качестве компонента установлен протокол Интернета (TCP/IP).
Примеры
Чтобы вывести на экран все содержимое таблицы IP-маршрутизации, введите команду:
route printЧтобы вывести на экран маршруты из таблицы IP-маршрутизации, которые начинаются с 10., введите команду:
route print 10.*Чтобы добавить маршрут по умолчанию с адресом стандартного шлюза 192.168.12.1, введите команду:
route add 0.0.0.0 mask 0.0.0.0 192.168.12.1Чтобы добавить маршрут к конечной точке 10.41.0.0 с маской подсети 255.255.0.0 и следующим адресом перехода 10.27.0.1, введите команду:
route add 10.41.0.0 mask 255.255.0.0 10.27.0.1Чтобы добавить постоянный маршрут к конечной точке 10.41.0.0 с маской подсети 255.255.0.0 и следующим адресом перехода 10.27.0.1, введите команду:
route -p add 10.41.0.0 mask 255.255.0.0 10.27.0.1Чтобы добавить маршрут к конечной точке 10.41.0.0 с маской подсети 255.255.0.0 и следующим адресом перехода 10.27.0.1 и метрикой стоимости 7, введите команду:
route add 10.41.0.0 mask 255.255.0.0 10.27.0.1 metric 7Чтобы добавить маршрут к конечной точке 10.41.0.0 с маской подсети 255.255.0.0 и следующим адресом перехода 10.27.0.1 и использованием индекса интерфейса 0х3, введите команду:
route add 10.41.0.0 mask 255.255.0.0 10.27.0.1 if 0x3Чтобы удалить маршрут к конечной точке 10.41.0.0 с маской подсети 255.255.0.0, введите команду:
route delete 10.41.0.0 mask 255.255.0.0Чтобы удалить все маршруты из таблицы IP-маршрутизации, которые начинаются с 10., введите команду:
route delete 10.*Чтобы изменить следующий адрес перехода для маршрута с конечной точкой 10.41.0.0 и маской подсети 255.255.0.0 с 10.27.0.1 на 10.27.0.25, введите команду:
route change 10.41.0.0 mask 255.255.0.0 10.27.0.25Справочная информация
Static routes define fixed paths for network traffic that would otherwise have their path calculated automatically. This guide explains static routes, why you would use them, and provides step-by-step instructions showing how to add and remove static routes on Windows. It also looks at adding persistent routes and other tips for network management on Windows.
Get full control over your Windows networks with NinjaOne’s powerful endpoint management tools.
Try it for free.
What are static routes?
In computer networking, a “route” is the path network packets take to reach their destination. Data from your computer is broken into small packets for transfer over the local network (for example, between your computer and wireless printer), or for transmission over the internet (such as when you submit an online form). Network routing then takes care of making sure all of these packets reach their destination where they can be re-assembled into the original complete message.
Computer networks are designed in this way so that if there’s a disruption somewhere in the network, packets can be re-routed through a different connection. When there is no disruption, routing protocols can optimize for efficiency, sending data through different paths simultaneously to improve speed.
The key components in network routing are:
- Routing table: This is where each device (including your Windows PC) stores the information about the routes to different destinations.
- Next hop: Most network routes need to cover large distances over complex networks. The “next hop” is the next stop along the path to the destination (for example, there is a hop between your PC and a wireless printer — packets need to go first to your Wi-Fi router, then your printer).
- Routing protocols and metrics: Routing protocols are the software that is used by network devices to keep routing tables up-to-date with the latest paths data should take. This is done based on the number of hops, bandwidth, and/or latency.
Usually, routes are automatically calculated by the routing protocol and stored in a routing table based on routing metrics. These dynamic routes change based on network conditions. The default route can be set for all traffic with no route otherwise assigned in the routing table.
Static routes can be manually configured in a devices routing table, to set fixed paths traffic should take instead of dynamic routes or the default route. If this route is broken, traffic will not be able to reach the destination and a dynamic alternate route will not be calculated.
Why do you need to use static routes?
In some situations, the dynamic route is not the route you want specific traffic to take. You may want to take a known optimal route or send traffic along a secure connection. Example use-cases for static routes include:
- Sending traffic via a known reliable route that avoids faulty networking conditions that are outside your control or that fully utilizes a better connection for optimization.
- Building efficient networks using low-power devices that do not need to run routing protocols.
- Maintaining full control over the path network traffic takes for optimization or to ensure protected data only travels over your secure network infrastructure.
- Ensuring network traffic takes a predictable path for troubleshooting or easier management.
- Adding redundancy and resiliency to your networks by providing a known alternative path as a fallback to dynamic routes.
Static routes are frequently used to ensure certain traffic is sent over a VPN connection. This can be important when you handle sensitive data that you do not want routed over the internet. While static routes are usually not required for day-to-day tasks on home Windows PCs, there are situations where they are added for troubleshooting or to set up remote networks for work-from-home setups.
IP addresses and network masks
Route tables use the IPV4 or IPV6 IP address of the destination and hops to identify routes. You’ll need a basic understanding of IP addresses and network masks to write effective static routes.
How to use the route command for Windows
The route command is built-in to Windows and lets you view currently set static routes, as well as adding, removing, and editing them. The route command is available in all versions of Windows including Windows 11, Windows 10, and Windows Server. The route command can be run from either the Command Prompt or PowerShell, and needs to be run as an administrator.
To open PowerShell or the Command Prompt to use the route command, right-click on the Start menu, and then:
- Click Terminal (Admin) if you’re using Windows 11
- Click Command Prompt (Admin) if you’re using Windows 10
How to list static routes on Windows
To list the existing static routes, enter the following command:
route print
This will output the current route table, showing all the currently configured static routes. You can use this command to verify that you’ve successfully added, removed, or edited a static route.
How to add a static route on Windows
The below example route command adds a static route:
route add 0.0.0.0 mask 0.0.0.0 192.168.77.1
The command is constructed as follows:
- The route executable is called.
- The add command tells it to add a static route to the routing table.
- The first 0.0.0.0 is the destination network. In this case, 0.0.0.0 matches all networks.
- The second 0.0.0.0 specifies the subnet mask this static route should apply to, in this case again matching all subnets.
- 192.168.77.1 specifies the gateway address. This is the next hop through which all matching traffic will be sent.
This static route sends all network traffic to 192.168.77.1, effectively adding a default route.
The next example adds a route to a specific network:
route add 192.168.10.0 mask 255.255.255.0 192.168.77.1
The command differs from the previous example:
- 192.168.10.0 is the destination network.
- 255.255.255.0 specifies the subnet mask this static route should apply to, in this case matching all addresses in the 192.168.10.0 subnet.
- 192.168.77.1 specifies the gateway address. This is the next hop through which all matching traffic will be sent.
In effect, this static route sends traffic destined for the 192.168.10.0 network to 192.168.77.1.
How to remove a static route on Windows
To delete a static route, use the route delete command, and match the details with the static route you wish to delete.
route delete 0.0.0.0 mask 0.0.0.0 192.168.77.1
The above command deletes the static route created in the previous step.
How to remove all static routes on Windows
To delete all static routes on Windows, use the command:
route -f
Make a static route permanent/persistent on Windows
Static routes will be cleared from the route table on Windows when you reboot. To make a persistent route — one that is permanent and will survive a reboot — add the -p parameter to your route add command:
route -p add 0.0.0.0 mask 0.0.0.0 192.168.77.1
Troubleshooting and best practices for managing static routes
If you are manually managing static routes on Windows machines, you should document which routes are set on which machines to avoid a forgotten static route, causing a troubleshooting issue.
You should also regularly review which static routes are set (this can be done using the route print command in Windows), and remove ones that are no longer required. Network monitoring solutions will assist with identifying network changes and broken routes that may need to be addressed.
If you are working in an enterprise environment with multiple devices that all require the same static routes, you should implement them at the network level rather than per device.
Windows route management tools
In addition to the route command that is built into Windows, you can use the following tools to manage routes and perform other networking tasks on Windows:
- NetRouteView is a free routing utility for Windows that provides a graphical interface for viewing, adding, and modifying static routes.
- Angry IP Scanner and Advanced IP Scanner can help you find and identify devices on your local network, and manage static routes on connected Windows devices by executing remote commands or scripts.
Effortlessly manage your Windows networks with NinjaOne’s time-saving automations and comprehensive control over devices.
➤ Find out more.
Not sure how to learn routing manually? Watch our video on how to add or remove a static route on Windows.
Managing large Windows networks efficiently
If you need to manage static routes on a fleet of Windows devices, either on a single network or in bring-your-own-device (BYOD) scenarios with traveling or remote employees, you shouldn’t rely on manually adding static routes and other network configurations to individual devices.
The NinjaOne remote management and monitoring platform (RMM) helps you secure, manage, and monitor Windows devices at scale, ensuring that they are all correctly configured. This allows you to deploy updated networking and security policies from a centralized interface, removing the time-consuming tasks of updating, cataloging, and enforcing static routes and other policies.
Ответ на частые вопросы:
- Как добавить статический маршут ?
- Как посмотреть таблицу маршрутизации ?
Для примера будем добавлять маршрут в сеть 10.10.0.0/16 (маска 255.255.0.0) через gateway 10.10.1.1/24
Не забывайте, что маршрут добавится ТОЛЬКО если на вашем компьютере есть IP-адрес который входит в одну подсеть с gateway (в данном примере gateway 10.10.1.1, значит у вас должен быть настроен IP-адрес из сети 10.10.1.0/24 т.к IP-адрес gateway имеет маску /24 (255.255.255.0))
FreeBSD
Добавление:
route add 10.10.0.0/16 10.10.1.1
если после выполнения команды вам говорится, что команда не найдена, то используйте полный путь до команды route (и для других команд):
/sbin/route
так же если прочитать:
man route
то можно узнать, что статический роутинг можно добавить и так:
/sbin/route add -net 10.10.0.0 -netmask 255.255.0.0 10.10.1.1
Просмотр таблицы маршрутизации выполняется командой:
netstat -rn
с полным путем:
/usr/bin/netstat -rn
Удаление:
/sbin/route delete 10.10.0.0/16
Linux
Добавление:
route add -net 10.10.0.0/16 gw 10.10.1.1
альтернатива:
ip route add 10.10.0.0/16 via 10.10.1.1
Просмотр таблицы:
route -n
или используйте:
ip route
Удаление:
route delete -net 10.10.0.0 netmask 255.255.0.0
Windows
Откройте командную строку (cmd).
Добавление:
route add 10.10.0.0 mask 255.255.0.0 10.10.1.1
Просмотр:
route print
Удаление:
route delete 10.10.0.0 mask 255.255.0.0 10.10.1.1
Если у Вас все ещё есть вопросы, то прочтите мануал (инструкцию) к данным командам в Вашей ОС.
З.Ы. При копировании статьи ссылка на источник ОБЯЗАТЕЛЬНА !
Автор: Николаев Дмитрий (virus (at) subnets.ru)
Похожие статьи:
- Не найдено
Прочитано: 249 002 раз(а)
Загрузка…
Отправить на почту
Эта статья размещена virus 23.09.2008 в 11:19 в рубриках Networks. Метки: FreeBSD, Linux, routing, Windows.
Вы можете оставить отзыв или trackback с вашего собственного сайта. Отслеживайте все отзывы и комментарии к этой статье при помощи новостной ленты RSS.
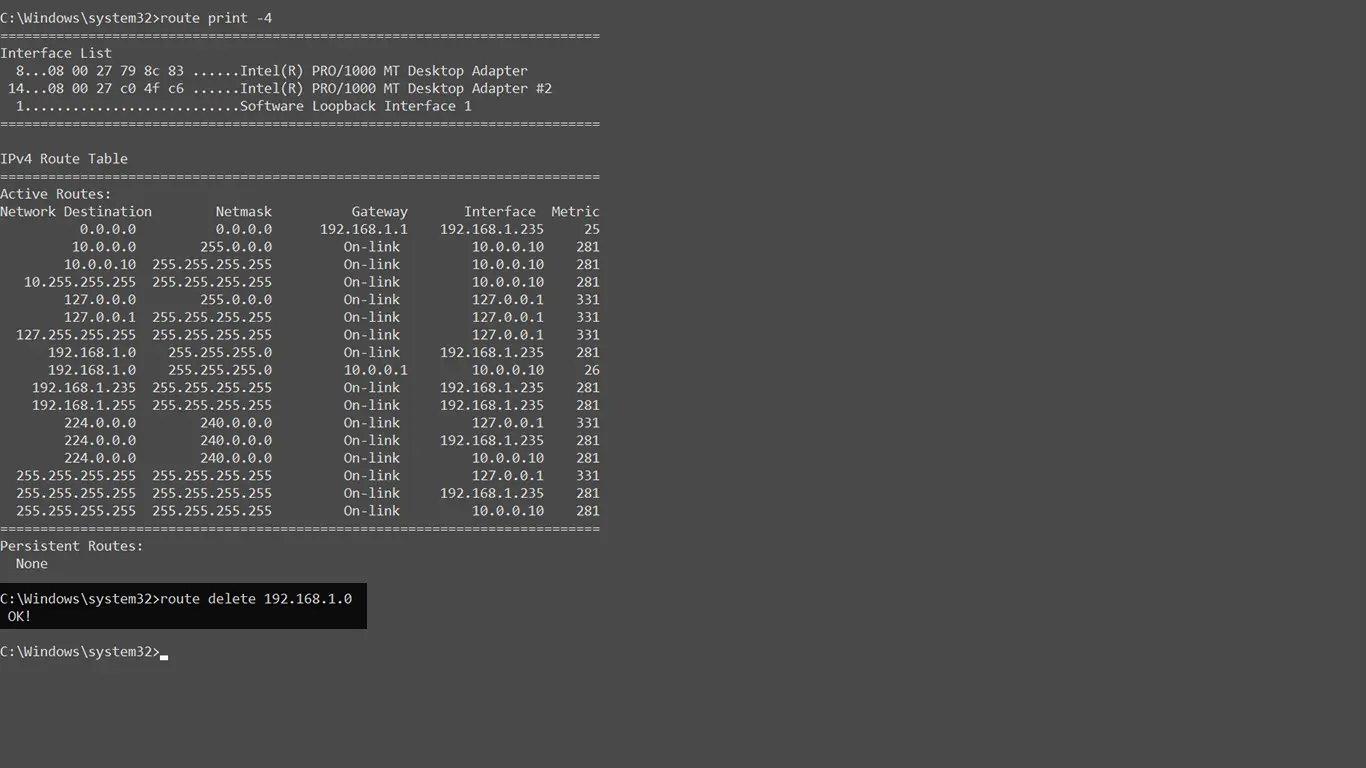
The command to delete a route from the Windows routing table is route delete.
route delete <SUBNET_ID>To delete a route in Windows, use the route delete command followed by the subnet ID (IP address of the destination network/host).
For example, to delete routes to the 192.168.1.0 network, issue the route delete command as follows:
route delete 192.168.1.0To be more specific, for example, to delete the route to the destination network 10.10.0.0 with the subnet mask of 255.255.255.0, enter the route delete command as follows:
route delete 10.0.0.0 mask 255.255.255.0You can issue the route print command to check the Windows routing table.