Need Space in PC or only want to remove or uninstall codecs On PC ( Windows 7, 8, 10, and Mac )? but how to, after it still having files in C: drive? If the application run on the pc, windows 7, 8, & 10 so you can uninstall using Control Panel or CMD Or If this applicaion run in Mac so you know that how to uninstall in MAC. With this article, you will able to delete or kick out all of those files also after uninstalling the codecs.
Are you bored, or tired of using codecs? Now, wanna kick-off this software from your PC ( Windows 7, 8, 10, and Mac )? There is no condition to follow up before installing, so, you can remove it without getting any confusion about it.
There are 10 methods that users can adapt if they want to uninstall codecs :
Method #1
- Go to Start Menu, then click on the Control Panel.
- In Control Panel, under programs, go through the list of the ones that are installed on your computer
- Right-click on codecs, and then click on uninstall a program
- Follow the prompt on the screen, and you will get to see a progress bar that will take you to remove the codecs from the computer.


Method #2
The second method involves uninstaller.exe, through which codecs can be uninstalled. Just follow the instructions below to execute this step:
- Go to the installation folder of codecs.
- Find a file that is named uninstall.exe or unins000.exe
- Double click on the file, and then follow the instructions that appear on the screen.


Method #3
The third method involves System Restore. For those who don’t know, System Restore is a utility, which helps the user restore their system to its previous state. System Restore removes all those programs, which interfere with the operation and performance of the computer.


If you have created a system restore point before you installed codecs, then you can use this software to restore the system, and remove such unwanted programs. However, before you do so, make sure that you save all the important data.Follow the steps below to know more from this method:
- Close all the files and programs, which are currently running on your PC
- Open Computer from the desktop, and then select Properties
- System Window will open
- On the left side and click on System Protection
- System Properties will open.
- Then do click on the option of System Restore, and a new window will again open.
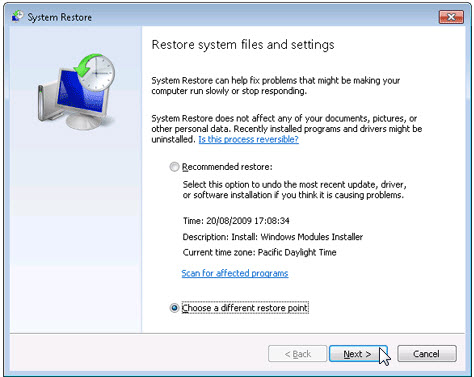
- Now, choose the ‘different restore point’ option, and click on Next.
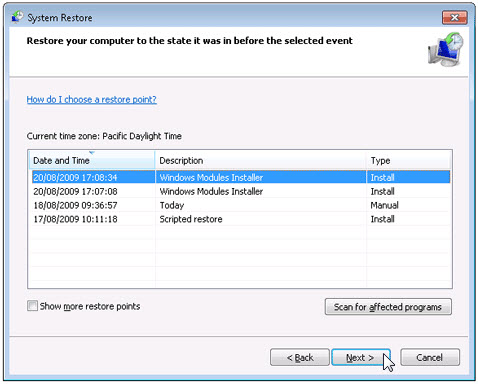
- You have to select a date and time from the given options; when you select a date, the drivers that you installed after the chosen date won’t work.
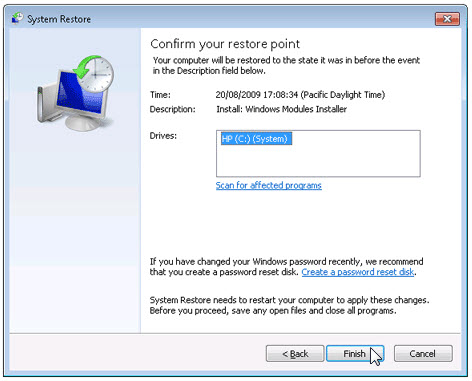
- Click on Finish and then Confirm the ‘Restore Point’ on the screen.
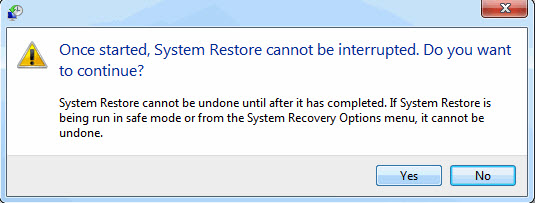
- When you click Yes to confirm, the codecs would be uninstalled.
Method #4
If you have an antivirus, then you can use it to uninstall codecs.There is much malware or codecs software in the computer applications that we download nowadays. They have become very difficult to remove from the system, like Trojan and spyware.
- If you cannot remove codecs with the above methods.
- It means that there is malware or codecs in it, and only a good antivirus can be used for removing it.
You can either download Norton Antivirus or AVG antivirus, as these are reputable software and will surely remove the malware, codecs on the system.

Method #5
If you want to uninstall codecs, then you can do so using Command Displayed in the Registry. A registry is a place where all the settings of Windows, along with information, are stored. This also includes the command to uninstall a software or program.
You can try this method with codecs as well, but it is a very risky method. If you make any mistake and delete the wrong information, then the system is most likely to crash. It would become difficult for you to bring it back from deletion.

To execute this method, To follow the steps given below:
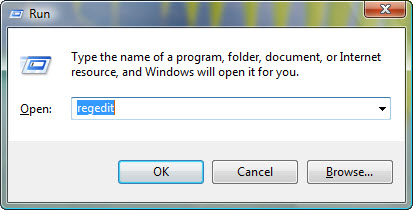
- Hold Windows + R together, and then Run command
- When the command box opens, type Regedit in the box and then click on OK
- You have to navigate and find the registry key for the codecs
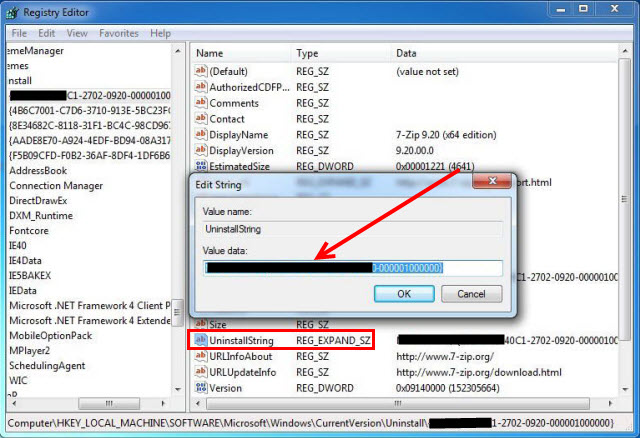
- You will see an uninstall string on the next window; double click on it, and also copy ‘Value Data’
- Again hold Windows + R keys, and run the Command; paste the value data that you just copy and click on OK
Follow what comes on the screen and then uninstall codecs.
Method #6
The seventh method is to uninstall the codecs using a third-party uninstaller.
At times, those who don’t have any knowledge of computer language, won’t be able to manually uninstall the software fully.
Many files occupy the hard disk of the computer, so it is best to use third-party software to uninstall them.

Method #7
There are some codes that users can type into the command prompt, and they would be able to uninstall the codecs. For example, if they want to remove the package, then just type.
sudo apt-get remove codecs
If you want to uninstall codecs and its dependencies as well, then type:
sudo apt-get remove –auto-remove codecs
For those who don’t know, some of the dependencies of codecs are GCC-5, libc6, libgcc1, codecs dev, and gc++-5.

Method #8
If the user wants to remove the configuration and data files of codecs, then they need to run the following code on the Command Prompt:
sudo apt-get purge codecs

Method # 9
It depends on you that are you willing to kick-out the data or you want to remove the configuration data or data files, along with the dependencies, then the following code is most likely to work for you:
sudo apt-get auto-remove -purge codecs

To uninstall codecs on mac because anytime we need space or only want to remove from pc due to some viruses and also many problems which are needed to remove or uninstall from pc.
So I will show you some steps of uninstalling codecs on the mac so follow my this step or method if you have still confusion so you may contact with us for uninstall of codecs on pc or mac.
How to Uninstall codecs on Mac?
For uninstalling codecs on the mac so as I told you that there is a simple method to uninstall apps on mac. As there are installed some apps on your Mac and now you want to remove or uninstall from your pc successfully and want to install some other apps on my mac so follow my these steps to uninstall codecs on mac.
Method #1
In method 1, you have to open mac on your pc as I’m showing in the image follow the images to uninstall codecs on your mac.

In the image, there is a codecs app on your mac dashboard and now we have to uninstall it from our mac we will uninstall this app and will remove it in of mac now double-click-on-app showing in the image.

Now you double-clicked on the app mac will ask that are you sure to uninstall codecs click on the Delete button so go to Trash of mac to uninstall completely from mac. Showing in image trash bin click on trash bin and go inside there will be codecs which we had to delete before so have to uninstall completely from mac.

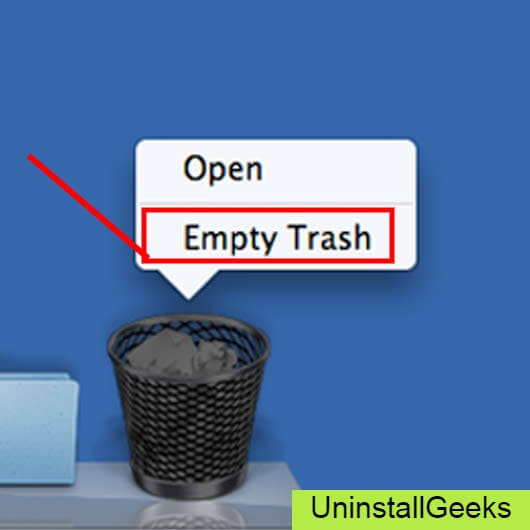
Not right-click on trash to remove all data or app which we had uninstalled before seeing in the image. Click on Empty Trash the whole data which is in the trash will auto remove successfully.
Now we uninstalled codecs on the mac so as you see that how to uninstall or remove any app on the mac so if you liked this so share once. This method doesn’t require any antivirus or uninstaller software from them we are to uninstall.
I described only a simple method of uninstalling codecs on mac. This method more people are using but some people take it is too hard uninstalling in mac but in this step, anyone can understand this simple method.
How To Install?
For those who don’t know much about codecs, they might lean more towards uninstalling it. These codecs create an environment, where users can create a high GPU-accelerated application. If you want to install this codecs, then make sure that your system is compatible with it.
Firstly, verify that the system you are using has a codecs capable GPU, and then download the codecs. Install it, and then test that the software runs smoothly on the system. If it doesn’t run smoothly, then it could be because its communication with the hardware is corrupted.


Conclusion
There are other methods of uninstalling the codecs as well as in pc or windows, but these could be difficult for those, who don’t have much technical expertise. Execute these methods, and they will surely work. These methods don’t require the user to have much knowledge of the technical side of an operating system. They can follow simple steps and uninstall codecs.
Что такое кодеки и зачем они нужны?
Нужно декодировать файл? Воспользуйтесь Мовавика Конвертер:
- Конвертация видео, аудио и изображений
- Поддержка популярных кодеков и форматов
- Пресеты для конкретных устройств
- Сжатие файлов под нужный размер

Если в Windows Media Player или другой программе у вас на компьютере не воспроизводится аудио- или видеофайл, скорее всего, проблема в отсутствии подходящих кодеков. Более подробно о кодеках и о том, как правильно их выбирать, вы можете узнать из нашей статьи. Перейдем от теории к практике и расскажем вам, как происходит установка кодеков, их обновление и удаление.
Поставить кодеки для проигрывания звука и видео можно как отдельно для каждого формата, так и пакетом, что наиболее удобно.
Один из самых популярных и полных пакетов аудио- и видеокодеков – K-Lite Codec Pack – подходит для операционных систем Windows XP, 7, 8 и 10, 32 и 64-bit. Его можно скачать бесплатно практически с любого софт-портала – сайта для скачивания программ. Чтобы загрузить самую последнюю версию пакета со всеми обновлениями, лучше зайти на официальный сайт производителя. К тому же, вы обезопасите себя от возможных вирусов.
Как установить и обновить кодеки K-Lite Codec Pack
Как установить кодеки?
-
Скачайте на компьютер или ноутбук установочный файл последней версии K-Lite Codec Pack с сайта Codec Guide или K-Lite Codec.
-
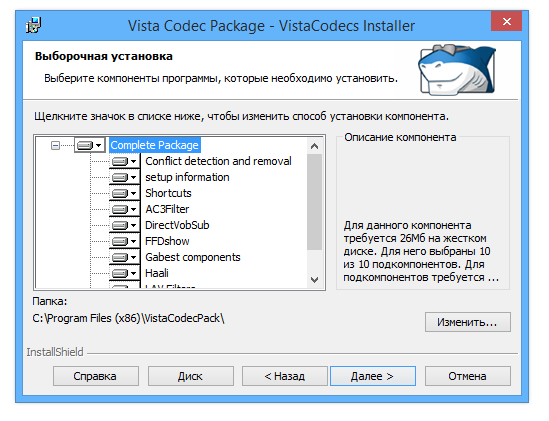
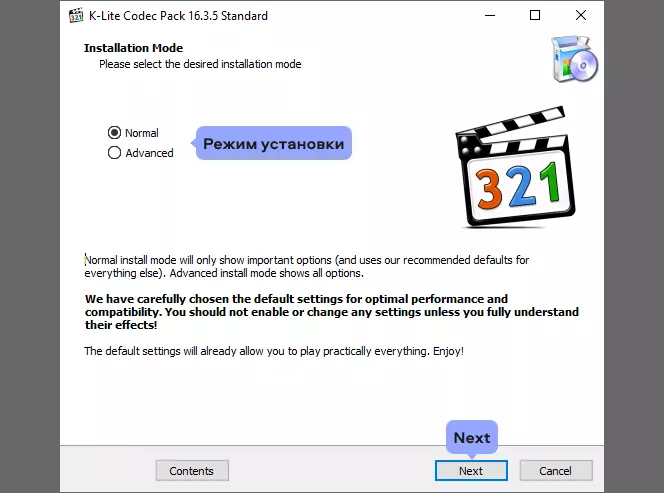
Запустите дистрибутив и следуйте инструкциям Мастера установки. Вначале вам будет предложено выбрать режим установки. В зависимости от выбранного режима потребуется указать форматы, плеер, аудиосистему (например, Stereo соответствует двум колонкам, 2.1 – двум колонкам и сабвуферу) и другие параметры. Отметив необходимые вам опции, нажимайте Next, чтобы перейти к следующему шагу. Если сомневаетесь, какой именно вариант вам подходит, оставляйте настройки по умолчанию – вы сможете изменить их позже.
-
Кликните по кнопке Install, затем нажмите Finish для завершения установки. Кодеки работают не как другие программы – вы не увидите ярлыка на рабочем столе и не будете запускать их при каждом проигрывании файлов. Поэтому перед вами не будет стоять вопрос, куда установить кодеки – по умолчанию они устанавливаются в папку “Program Files”.
Как обновить, переустановить или удалить кодеки?
-
Если нужно обновить кодеки, просто установите новую версию поверх уже имеющейся.
-
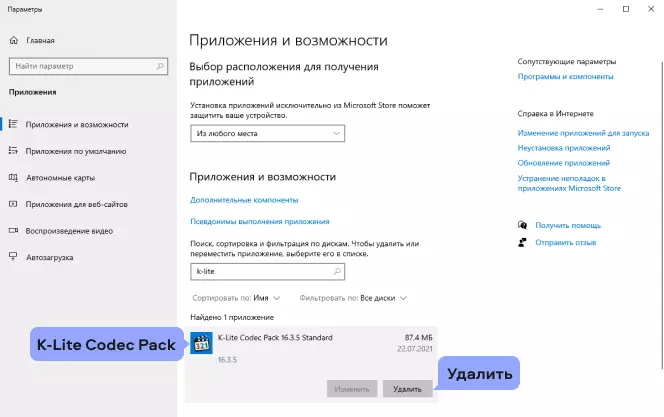
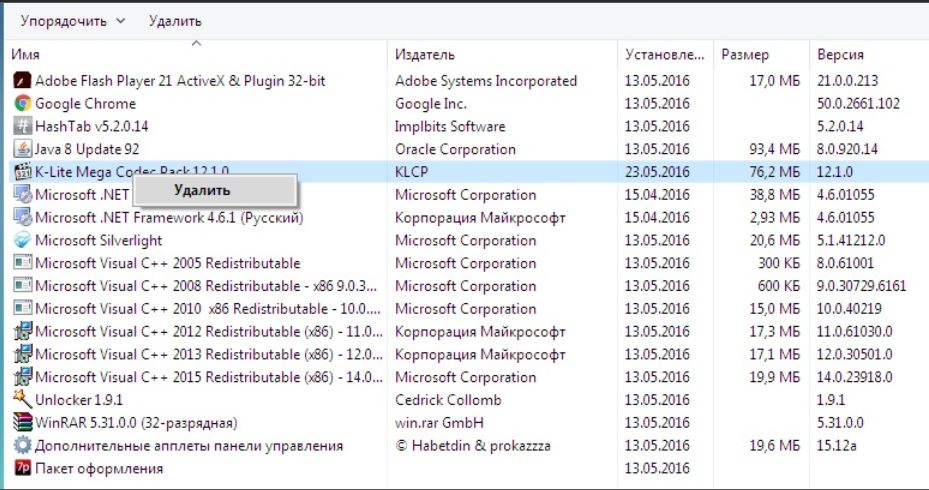
Если же вы решили установить другой пакет кодеков, лучше сначала удалите старые кодеки. Сделать это можно следующим образом: нажмите кнопку Пуск, наберите Установка и удаление программ в строке поиска и нажмите Enter. В списке программ выделите строку K-Lite Codec Pack и нажмите кнопку Удалить. Теперь вы удалили старое программное обеспечение и можете устанавливать новый сборник кодеков.
Как решить проблему без установки кодеков
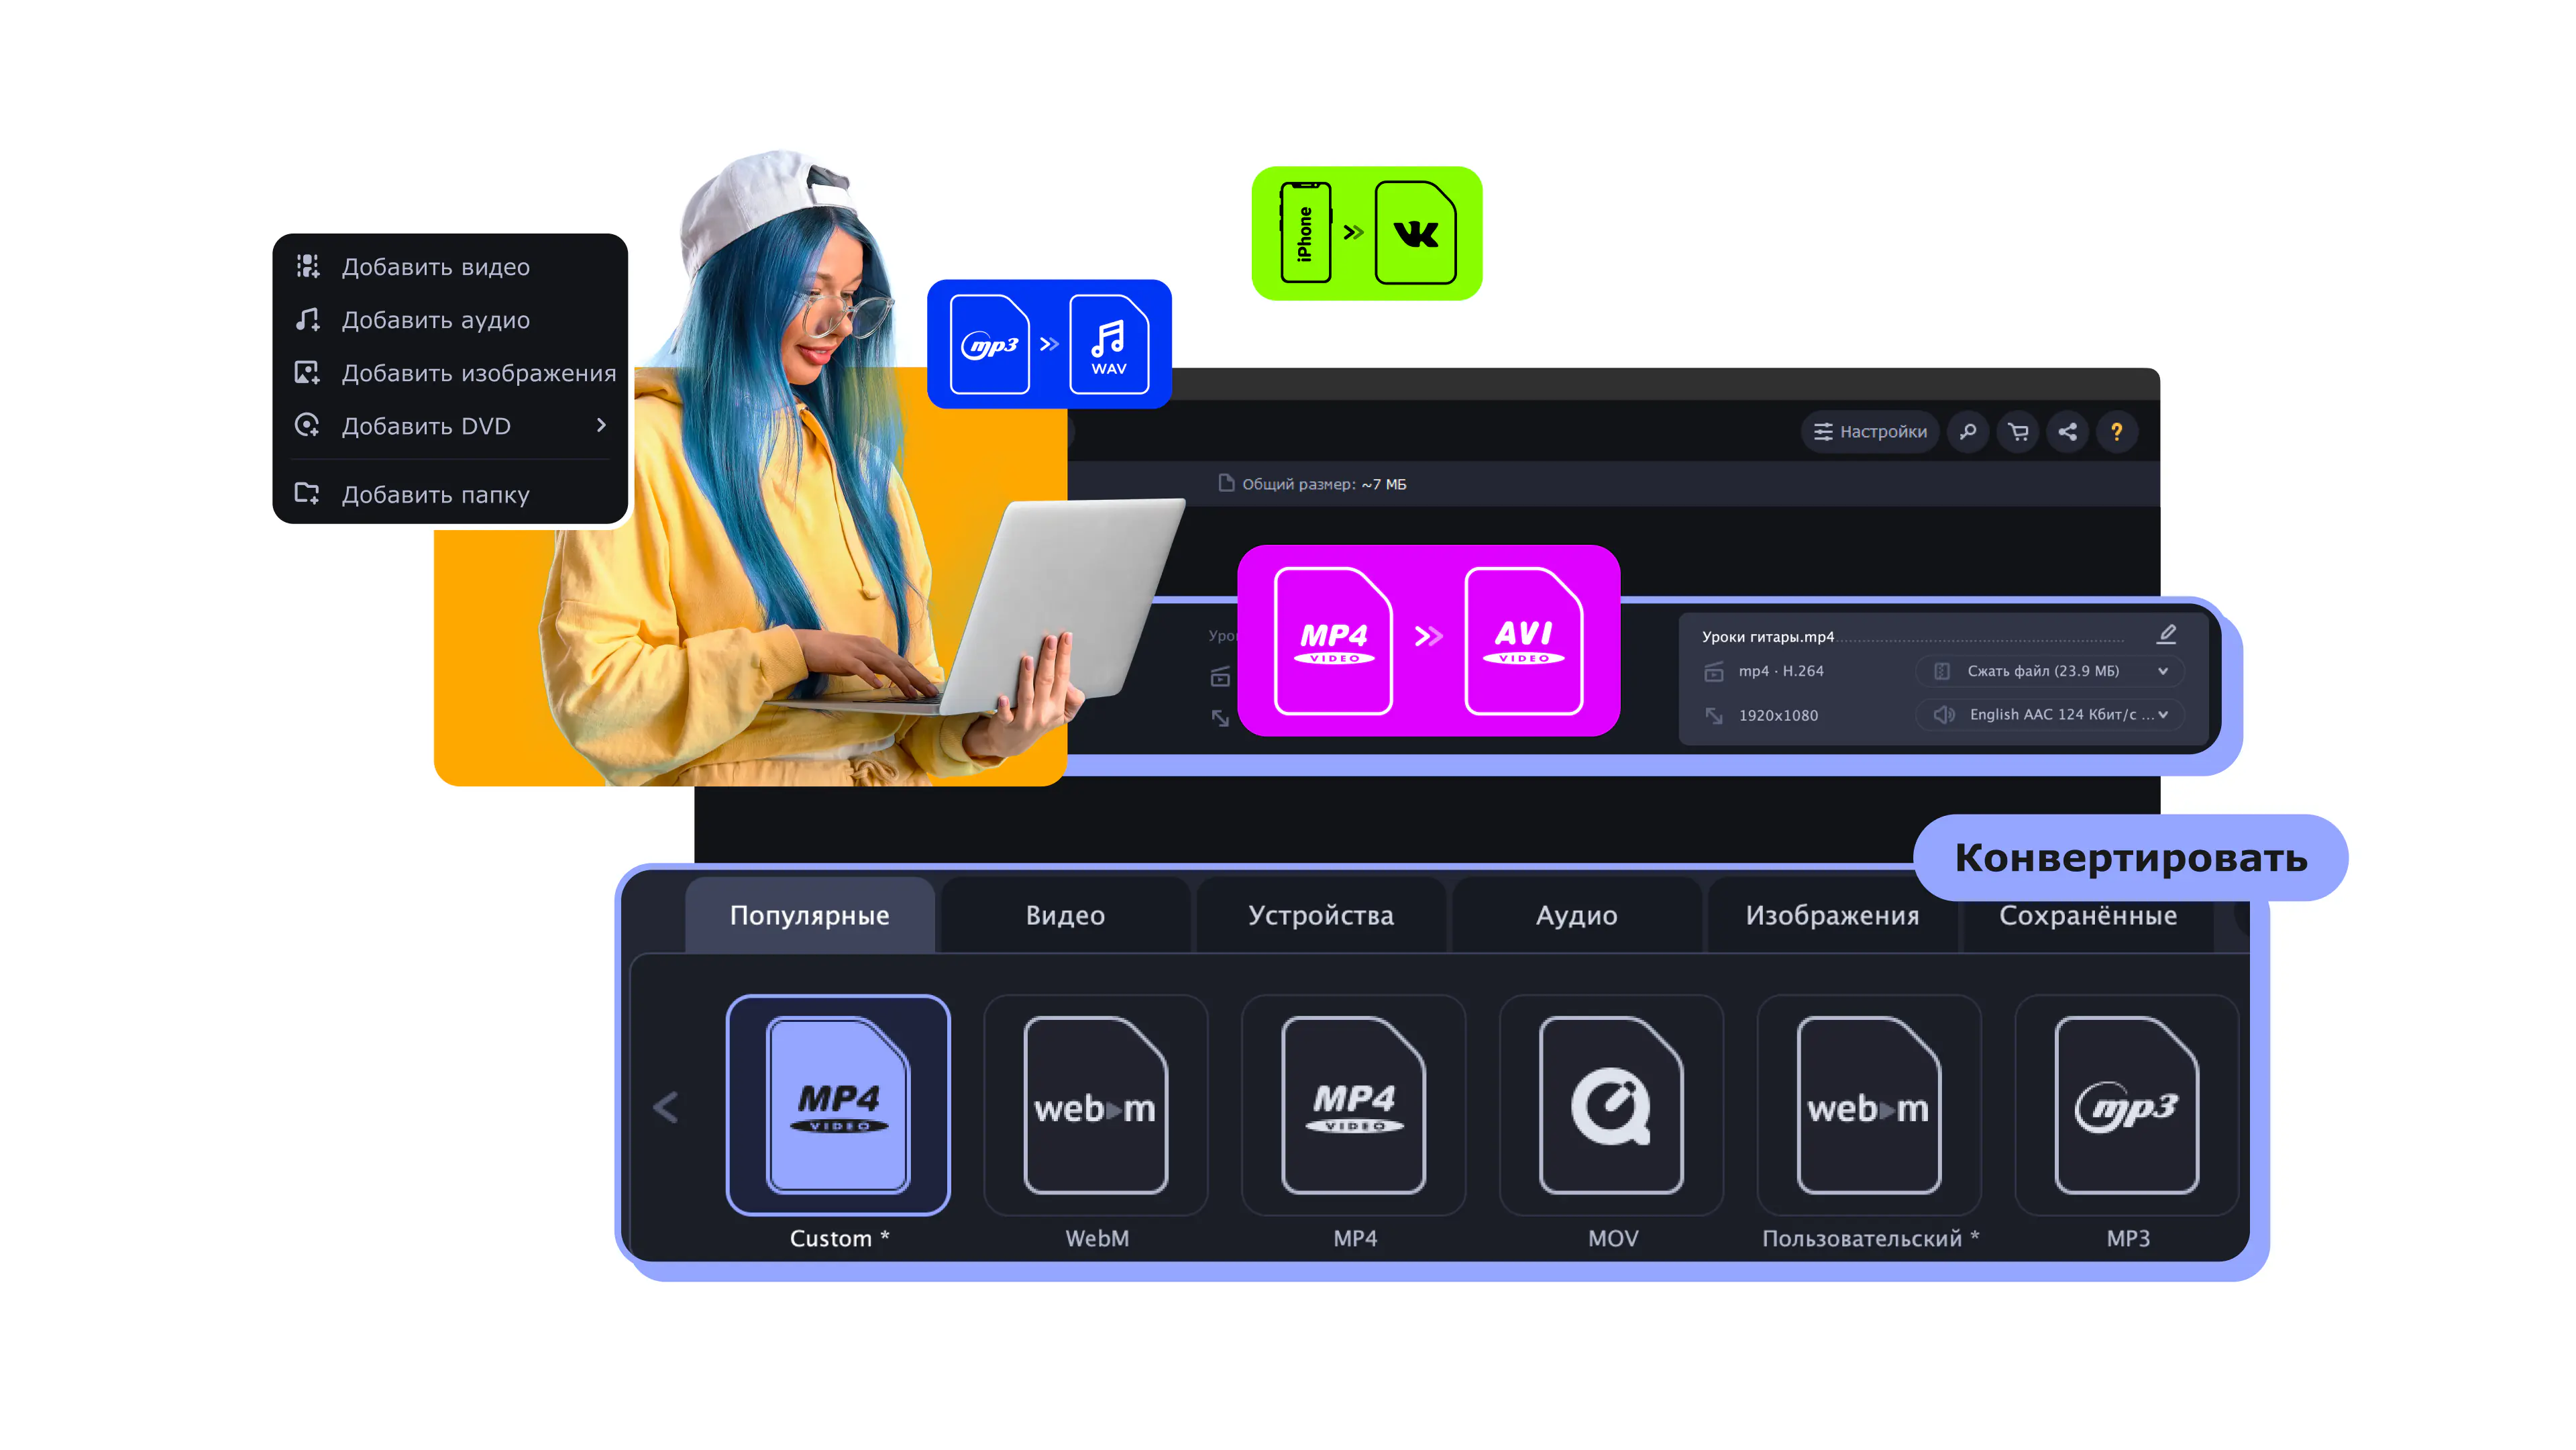
Вы установили кодеки и теперь можете воспроизводить на своем компьютере мультимедиа в любом формате. Но что если вам нужно, чтобы файл воспроизводился на другом устройстве, например на телевизоре? Установить нужные кодеки на телевизор не выйдет. Однако, есть другой способ – декодировать файл с помощью Мовавика Конвертер в подходящий формат. Программа поддерживает различные популярные кодеки и форматы, включая AVI, MOV, MKV и другие, а также позволяет выбрать настройки специально для вашего телефона, планшета или телевизора. В отличие от наборов кодеков, у Мовавика Конвертер есть версия на русском языке. Скачайте установочный файл для вашей ОС (Mac или Windows) и следуйте инструкции ниже, чтобы научиться кодировать мультимедийные файлы для вашего устройства.
Шаг 1. Установите Мовавика Конвертер
Запустите скачанный файл и следуйте инструкциям в программе. По окончании процесса запустите установленный конвертер.
Шаг 2. Загрузите файлы в программу
Нажмите Добавить файлы и выберите подходящую опцию из списка. Либо просто перетащите нужные файлы в окно программы.

Шаг 3. Выберите подходящий формат для конвертации
Есть несколько способов установить формат будущих файлов:
-
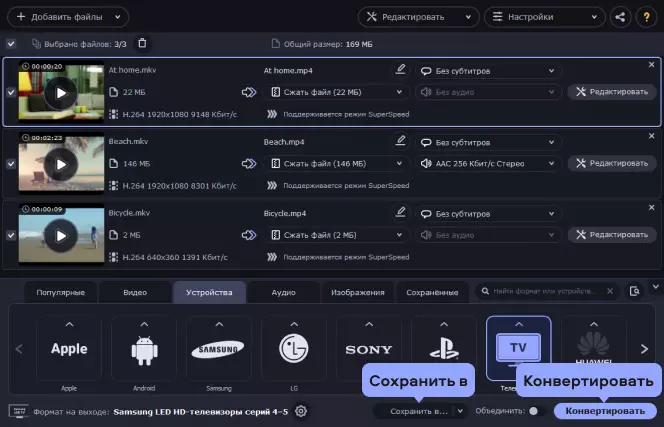
Если вы хотите сконвертировать видео для воспроизведения на телефоне, телевизоре или планшете, зайдите во вкладку Устройства и найдите ваш гаджет в списке. Программа автоматически поставит настройки, которые предназначены для указанного устройства, и вам не придется разбираться с форматами, кодеками и разрешениями самостоятельно.
-
Если вы не нашли своего устройства в списке или просто ищете наиболее универсальный формат для видео, нажмите на вкладку Видео и выберите подходящий пункт среди форматов MP4 H.264. Формат не новейший, но бесплатный, поэтому его поддерживает подавляющее число устройств и сайтов.
-
Если вы хотите сконвертировать аудиофайл, выбирать формат нужно на вкладке Аудио. Хорошим выбором будет MP3, этот формат работает на многих телефонах и плеерах.
-
Если нужно сконвертировать картинки, зайдите на вкладку Изображения и выберите формат JPG. Его, в отличие от RAW, PNG и GIF, читают почти любые устройства, даже телевизоры.
Если вы хотите проверить, что выставлен нужный кодек, нажмите на иконку шестерёнки. На вкладках Аудио и Видео вы сможете посмотреть доступные кодеки для формата и выбрать подходящий.

Шаг 4. Отредактируйте файл (опционально)
С Мовавика Конвертер можно не только поменять формат файла. Вот список того, чем ещё может быть полезен этот инструмент:
-
Сжать файл. Обычно у телефонов и плееров небольшое разрешение экрана. Небольшое сжатие файлов будет незаметно при просмотре, но освободит место на устройстве.
-
Найти и вшить субтитры в фильм. Эта функция подойдет тем, кто любит смотреть фильмы с субтитрами и хочет быстро находить нужные файлы. Откройте меню субтитров, нажмите Добавить и впишите название фильма в строку поиска. Найденный файл вы сможете вшить в видеодорожку.
-
Удалить ненужные аудиодорожки. Зачастую файлы фильмов содержат аудио на многих языках: не только русском и английском, но и французском, польском, китайском и т. д. При этом из них нужна одна или две. Чтобы убрать лишние дорожки, откройте меню аудио и снимите галочки с ненужных треков.
-
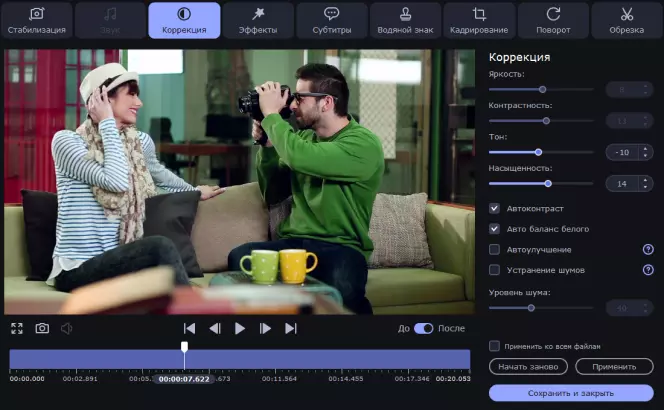
Добавить фильтры и эффекты. Вы можете слегка подредактировать видео перед конвертацией, например стабилизировать изображение, сделать цветовую коррекцию, добавить фильтры или водяные знаки. Нажмите Редактировать и сделайте корректировки в появившемся окне.
-
Кадрировать, обрезать, повернуть видео. Также в окне редактирования можно кадрировать фото и видео, укоротить аудио- или видеофайл, повернуть изображение, если при съемке картинка получилась повернутой на бок.
-
Объединить несколько аудио- или видеофайлов в один. В главном окне программы в нижнем правом углу есть переключатель Объединить. Нажмите на него, если хотите сшить несколько мультимедийных файлов вместе.
Шаг 5. Запустите конвертацию
Чтобы выбрать папку для сохранения файлов, нажмите Сохранить в. Вы можете загрузить файлы сразу на устройство, если оно подключено к компьютеру, или на флешку, если хотите подключить её к телевизору. Чтобы начать конвертацию, нажмите Конвертировать. В режиме SuperSpeed процесс не займет много времени.
Готово! С работой в Мовавика Конвертер справится даже начинающий пользователь. А режим SuperSpeed поможет изменить формат видео без потери качества. Попробуйте программу и решите, подходит ли она вам!
Удобная программа для сверхбыстрой конвертации видео, аудио и изображений
Другие полезные инструкции
-
Как действовать, если «тормозит» видео при просмотре
-
Как пользоваться программой для сжатия видео
-
Как конвертировать аудио
-
Топ-8 H.264 проигрывателей
-
Конвертировать MOV в AVI онлайн и без потери качества
-
Конвертировать MKV в MP4 и другие форматы | Скачать конвертер MKV
-
Формат видео для телевизора – какой лучше?
-
Оптимальный формат видео для YouTube | В каком формате сохранять видео для Ютуб
-
8 лучших плееров для FLAC на Windows, Mac, Android и iPhone
-
OGG в MP3 — конвертировать онлайн и бесплатно на ПК

Остались вопросы?
Если вы не можете найти ответ на свой вопрос, обратитесь в нашу службу поддержки.
Подпишитесь и получайте скидки, советы по монтажу и идеи для контента
На нашу рассылку подписалось уже более 1,5 млн. пользователей
Are you in need of uninstalling Codec Pack for Windows 7 Full Package to fix some problems? Are you looking for an effective solution to completely uninstall it and thoroughly delete all of its files out of your PC? No worry! This page provides detailed instructions on how to completely uninstall Codec Pack for Windows 7 Full Package.
Possible problems when you uninstall Codec Pack for Windows 7 Full Package
* Codec Pack for Windows 7 Full Package is not listed in Programs and Features.
* You do not have sufficient access to uninstall Codec Pack for Windows 7 Full Package.
* A file required for this uninstallation to complete could not be run.
* An error has occurred. Not all of the files were successfully uninstalled.
* Another process that is using the file stops Codec Pack for Windows 7 Full Package being uninstalled.
* Files and folders of Codec Pack for Windows 7 Full Package can be found in the hard disk after the uninstallation.
Codec Pack for Windows 7 Full Package cannot be uninstalled due to many other problems. An incomplete uninstallation of Codec Pack for Windows 7 Full Package may also cause many problems. So, it’s really important to completely uninstall Codec Pack for Windows 7 Full Package and remove all of its files.
How to Uninstall Codec Pack for Windows 7 Full Package Completley?
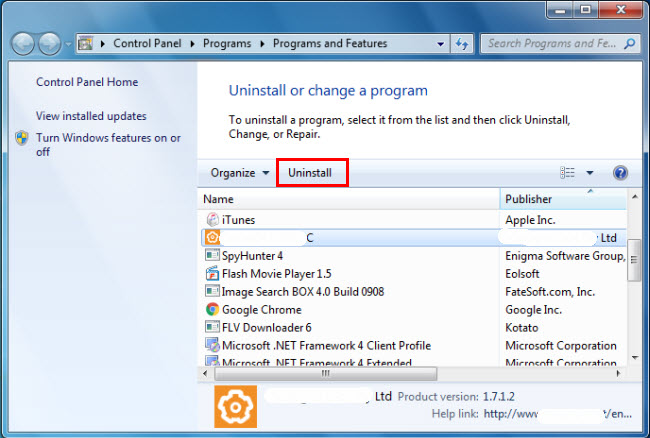
Method 1: Uninstall Codec Pack for Windows 7 Full Package via Programs and Features.
When a new piece of program is installed on your system, that program is added to the list in Programs and Features. When you want to uninstall the program, you can go to the Programs and Features to uninstall it. So when you want to uninstall Codec Pack for Windows 7 Full Package, the first solution is to uninstall it via Programs and Features.
Steps:
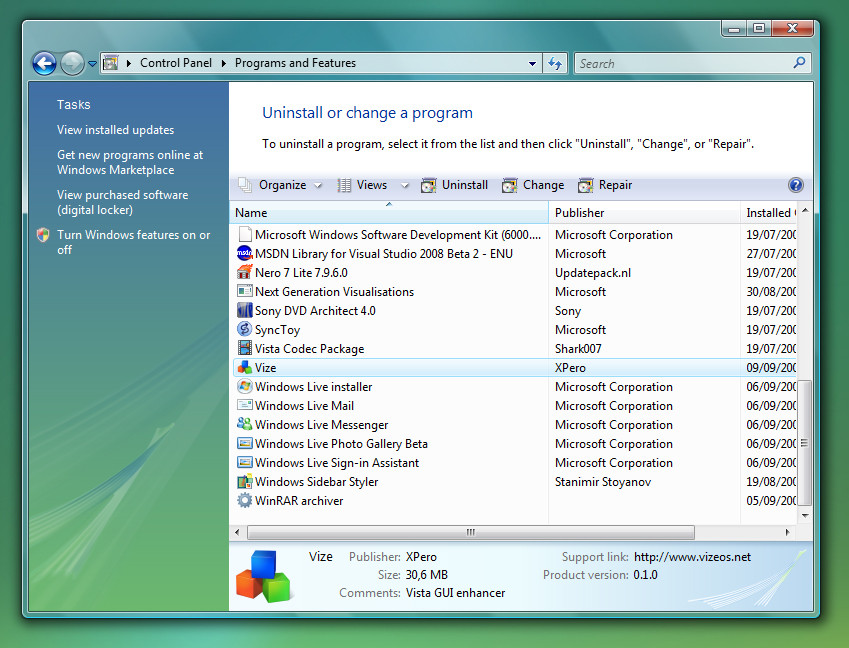
a. Open Programs and Features.
Windows Vista and Windows 7
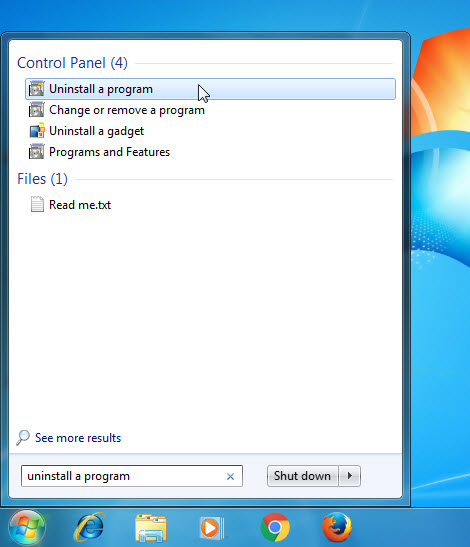
Click Start, type uninstall a program in the Search programs and files box and then click the result.
Windows 8, Windows 8.1 and Windows 10
Open WinX menu by holding Windows and X keys together, and then click Programs and Features.
b. Look for Codec Pack for Windows 7 Full Package in the list, click on it and then click Uninstall to initiate the uninstallation.
Method 2: Uninstall Codec Pack for Windows 7 Full Package with its uninstaller.exe.
Most of computer programs have an executable file named uninst000.exe or uninstall.exe or something along these lines. You can find this files in the installation folder of Codec Pack for Windows 7 Full Package.
Steps:
a. Go to the installation folder of Codec Pack for Windows 7 Full Package.
b. Find uninstall.exe or unins000.exe.
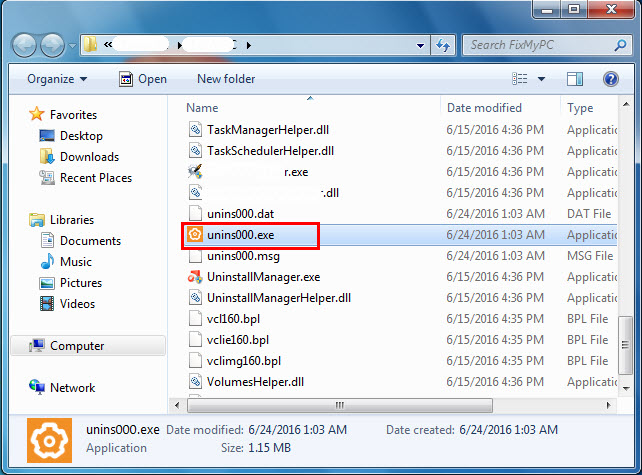
c. Double click on its uninstaller and follow the wizard to uninstall Codec Pack for Windows 7 Full Package.
Method 3: Uninstall Codec Pack for Windows 7 Full Package via System Restore.
System Restore is a utility which comes with Windows operating systems and helps computer users restore the system to a previous state and remove programs interfering with the operation of the computer. If you have created a system restore point prior to installing a program, then you can use System Restore to restore your system and completely eradicate the unwanted programs like Codec Pack for Windows 7 Full Package. You should backup your personal files and data before doing a System Restore.
Steps:
a. Close all files and programs that are open.
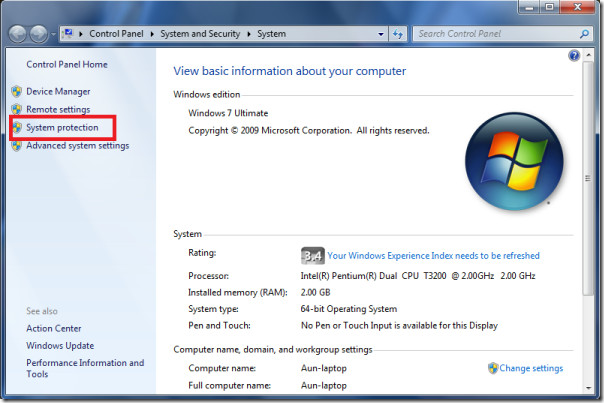
b. On the desktop, right click Computer and select Properties. The system window will display.
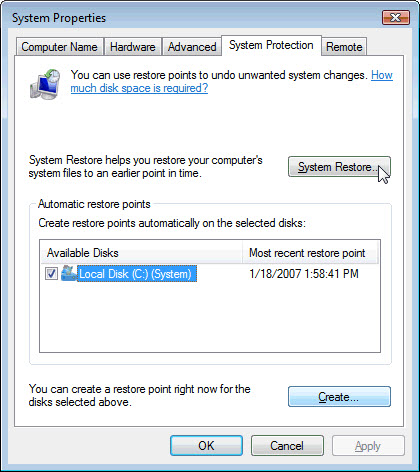
c. On the left side of the System window, click System protection. The System Properties window will display.
d. Click System Restore and the System Restore window will display.
e. Select Choose a different restore point and click Next.
f. Select a date and time from the list and then click Next. You should know that all programs and drivers installed after the selected date and time may not work properly and may need to be re-installed.
g. Click Finish when the «Confirm your restore point» window appears.
h. Click Yes to confirm again.
Method 4: Uninstall Codec Pack for Windows 7 Full Package with Antivirus.
Nowadays, computer malware appear like common computer applications but they are much more difficult to remove from the computer. Such malware get into the computer with the help of Trojans and spyware. Other computer malware like adware programs or potentially unwanted programs are also very difficult to remove. They usually get installed on your system by bundling with freeware software like video recording, games or PDF convertors. They can easily bypass the detection of the antivirus programs on your system. If you cannot remove Codec Pack for Windows 7 Full Package like other programs, then it’s worth checking whether it’s a malware or not.
Method 5: Reinstall Codec Pack for Windows 7 Full Package to Uninstall.
When the file required to uninstall Codec Pack for Windows 7 Full Package is corrupted or missing, it will not be able to uninstall the program. In such circumstance, reinstalling Codec Pack for Windows 7 Full Package may do the trick. Run the installer either in the original disk or the download file to reinstall the program again. Sometimes, the installer may allow you to repair or uninstall the program as well.
Method 6: Use the Uninstall Command Displayed in the Registry.
When a program is installed on the computer, Windows will save its settings and information in the registry, including the uninstall command to uninstall the program. You can try this method to uninstall Codec Pack for Windows 7 Full Package. Please carefully edit the registry, because any mistake there may make your system crash.
Steps:
a. Hold Windows and R keys to open the Run command, type in regedit in the box and click OK.
b. Navigate the following registry key and find the one of Codec Pack for Windows 7 Full Package:
HKEY_LOCAL_MACHINE\SOFTWARE\Microsoft\Windows\CurrentVersion\Uninstall
c. Double click on the UninstallString value, and copy its Value Data.
d. Hold Windows and R keys to open the Run command, paste the Value Data in the box and click OK.
e. Follow the wizard to uninstall Codec Pack for Windows 7 Full Package.
Method 7: Uninstall Codec Pack for Windows 7 Full Package with Third-party Uninstaller.
The manual uninstallation of Codec Pack for Windows 7 Full Package requires computer know-how and patience to accomplish. And no one can promise the manual uninstallation will completely uninstall Codec Pack for Windows 7 Full Package and remove all of its files. And an incomplete uninstallation will many useless and invalid items in the registry and affect your computer performance in a bad way. Too many useless files also occupy the free space of your hard disk and slow down your PC speed. So, it’s recommended that you uninstall Codec Pack for Windows 7 Full Package with a trusted third-party uninstaller which can scan your system, identify all files of Codec Pack for Windows 7 Full Package and completely remove them. Download this powerful third-party uninstaller below.
Кодеки могут вызывать проблемы с воспроизведением медиафайлов на Windows Узнайте, как безопасно удалить ненужные кодеки и улучшить работу системы.

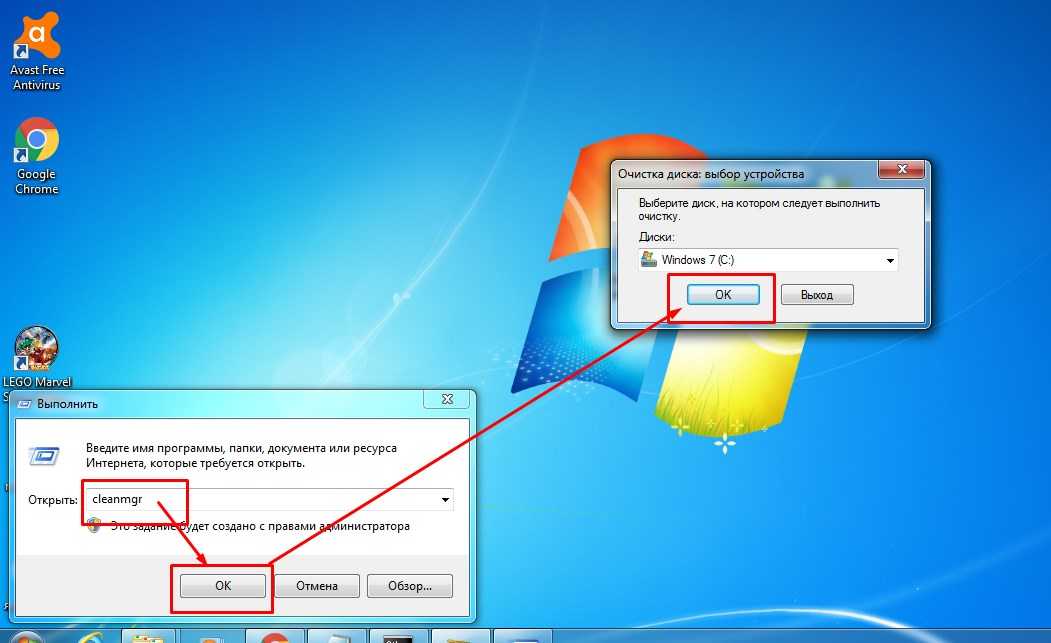
Проверьте список установленных кодеков через Панель управления, чтобы выявить ненужные или проблемные кодеки.
Как правильно удалять игры и программы с Windows 7
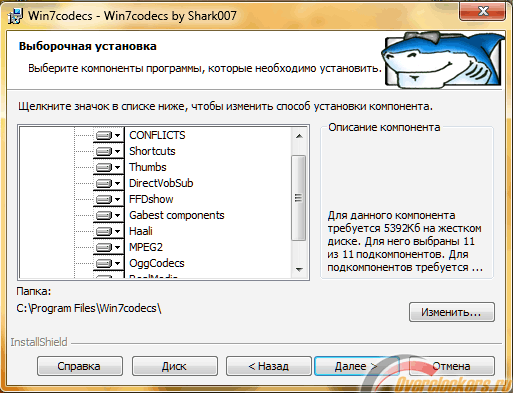
Используйте программу деинсталляции, предоставляемую с пакетом кодеков, для их удаления.

Windows 7 Codec Pack
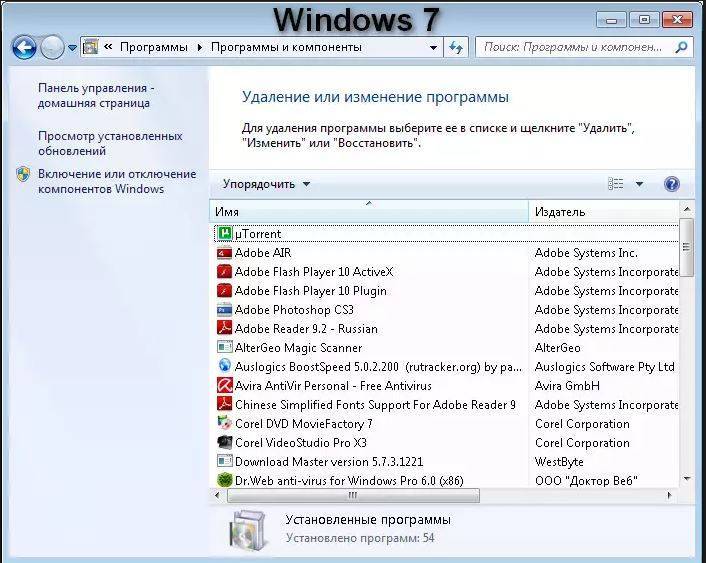
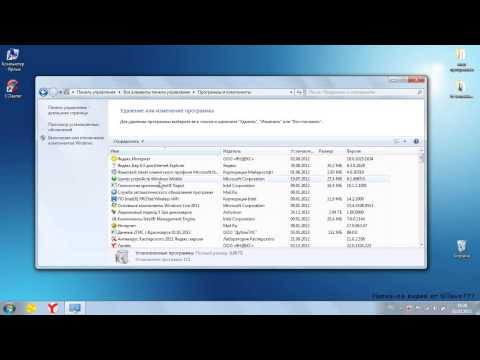
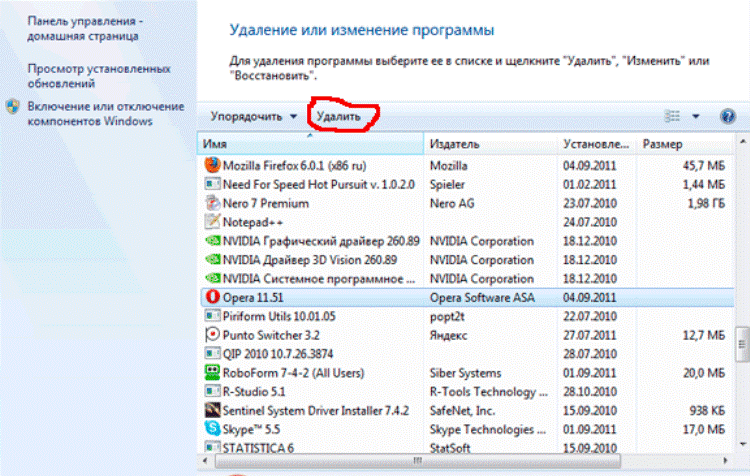
Удалите кодеки вручную через Панель управления, если программа деинсталляции отсутствует.
How to install windows 7 codecs
Очистите реестр после удаления кодеков с помощью специальных программ, чтобы избежать ошибок.

K-Lite Codec Pack как правильно установить [Устанавливаем кодеки аудио и видео] кодеки K-Lite
Перезагрузите компьютер после удаления кодеков, чтобы изменения вступили в силу.

Music and Video Problems:Windows 7 Codecs Installation

Используйте актуальные версии кодеков, чтобы избежать проблем с воспроизведением.
Убедитесь, что у вас установлены обновления Windows, которые могут решать проблемы с кодеками.
Регулярно проверяйте наличие обновлений для медиаплееров и драйверов.

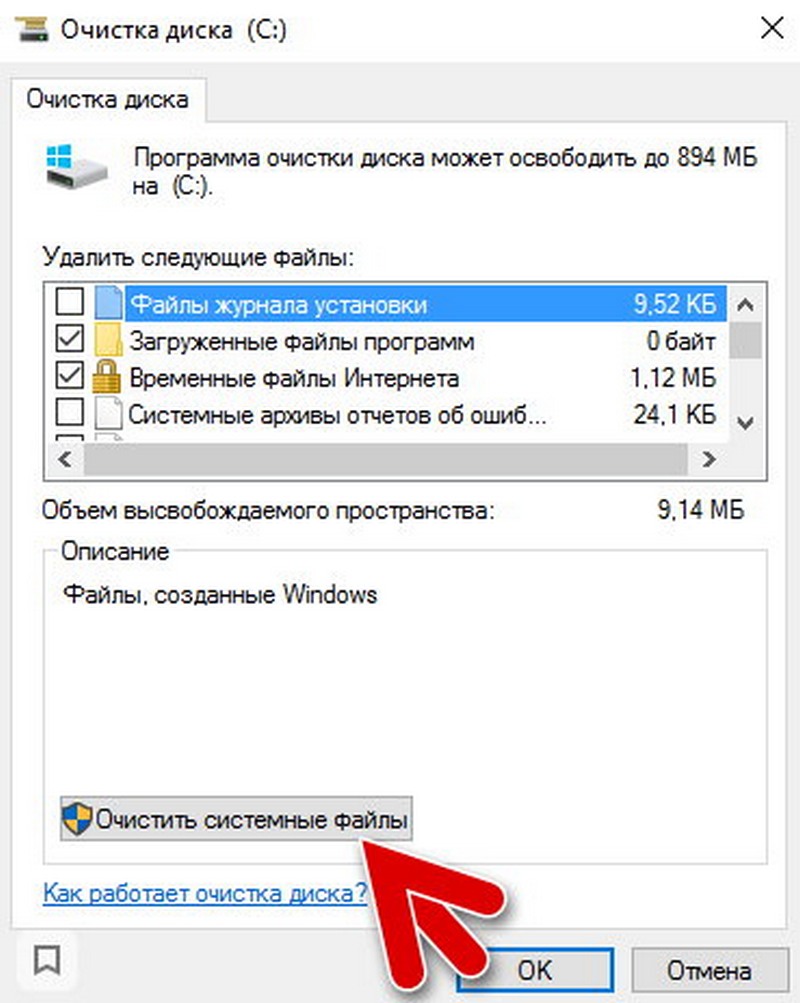
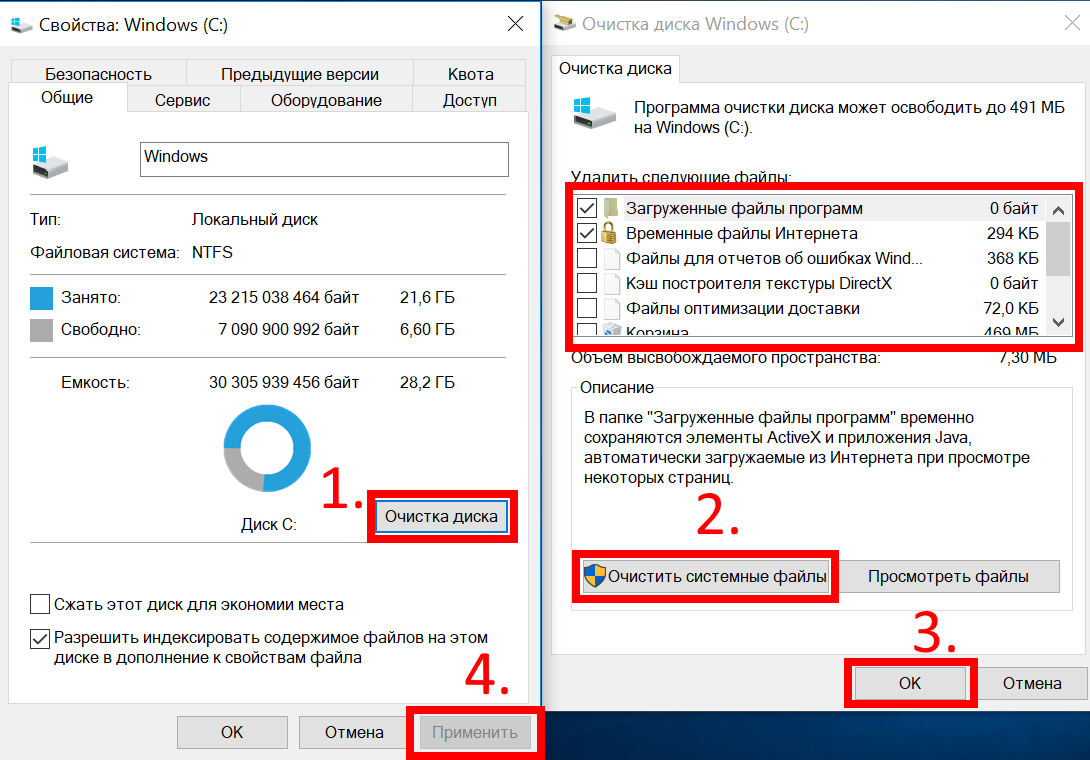
Что можно удалить на диске С? Что нельзя удалять? Руководство для пользователей ПК

При необходимости используйте альтернативные медиаплееры, поддерживающие большее количество форматов без дополнительных кодеков.
Как удалить программу в Windows 7. Два способа.
Создайте точку восстановления системы перед удалением кодеков, чтобы можно было вернуть изменения в случае проблем.