
There are plenty of good reasons why you might want to set up Windows 10 backups. When something goes wrong, a backup can help you restore your files and system with little to no data loss. Unfortunately, the downside is a loss of space—these files can fill up your hard drive, especially on smaller-sized drives.
While we’d always recommend that you maintain automatic system backups, Windows will fill up your drive with unnecessary backup files that you can delete from time to time, including older Windows update files. If you want to know how to delete backup files in Windows 10, here’s what you need to do.

Deleting Windows File History
Windows 10 offers a far better system for regular file backups than older Windows versions, thanks to a built-in file backup system. Using Windows File History, copies of files in certain critical folders are saved on a regular basis, from every 10 minutes to once daily, with copies saved indefinitely.
Over time, that can mean a vast increase in the storage space being used. If you want to know how to delete backup files in Windows 10, deleting your Windows File History backups should be the first task on your list.
- To start, you’ll need to open the Windows Settings menu—right-click the Windows Start menu and press Settings. From here, press Update & Security > Backup. If you’re using Windows File History already, press the More options button.

- In the Backup options menu, you can change how often file backups are made and how often they’re saved before being deleted. Change these under the Back up my files and Keep my backups drop-down menus.
By default, the Keep my backups option is set to Forever—changing this to delete backups every month, or when space is needed, will increase your available disk space.

- You can also disable Windows File History entirely by pressing the Stop using this drive option in the Backup options menu. This will remove your current Windows file backup drive, therefore disabling the feature entirely.

- If you want to immediately remove any saved backup files kept by File History, you’ll need to right-click the Windows Start menu and press the Windows PowerShell (Admin) option.
- In the PowerShell window that appears, type fhmanagew.exe -cleanup 0 to remove all but the most recent file backups, then hit enter to run the command. You can replace 0 with another set of days to leave a longer period of backups saved. If the command is successful, a pop-up window will appear to confirm.

Removing Windows System Restore Points
Backing up files in older Windows versions was an all or nothing affair—at least where built-in features were concerned. One of the earliest backup features was the System Restore feature, which stored a snapshot of your current Windows installation and files.
This feature still exists in Windows 10 and is used to create restore points for major system updates. If it’s enabled and too many restore points are made, it can take up valuable disk space. Removing some of these restore points can be a good way to clear some space for other files.
- To remove System Restore points, press the Windows + R keys on your keyboard to open the Run window, type systempropertiesprotection and hit enter.
- This will open the System Properties window. In the System Protection tab, press the Configure button.

- In the System Protection window, press the Delete button. This will remove any saved System Restore points. You can also change how much disk space this feature uses by moving the Max Usage slider.

- While it isn’t recommended, you can also disable this feature and restore all of the System Protection reserved space for general usage by pressing the Disable system protection radio button. Press OK to save your settings once you’re done.

Once disabled, any space previously reserved for System Restore points will be released for you to use elsewhere.
Deleting the Windows.old Folder After Windows 10 Updates
If you want to clear space after a major Windows 10 update, you should start by deleting the Windows.old folder. This folder is automatically created as a backup of your older Windows installation when a major Windows update takes place.
You don’t have to worry about deleting this folder in most cases—Windows will automatically remove it a month after an upgrade takes place. If you want to remove it sooner to regain the space faster, however, you can.
- To delete the Windows.old folder, you’ll need to run the Disk Cleanup tool. Press the Windows + R key and type cleanmgr, then click OK to launch it.
- In the Disk Cleanup window, press the Clean up system files option to view options to clear system files.
- In the Files to delete list, make sure that the Previous windows installation(s) checkbox is enabled. To save additional space, you can also enable other settings or folders to be wiped at this point. Once you’re ready, press OK to begin the deletion process.
This will remove the Windows.old folder, restoring several gigabytes of space in the process. You won’t be able to restore the older Windows installation once you do this, however, so make sure that any updates or new installations are working correctly before you proceed.
Clearing Disk Space with Windows 10
While you should be able to delete any unnecessary backup files in Windows itself, there are other and better ways to create more space in Windows 10. You could, for instance, look for larger files and remove them to free up space for other apps and files.
If that doesn’t work, you may need to look at uninstalling Windows 10 software to make room for other essential files—including your important Windows 10 backup files.
Related Posts
- How to Fix a “This file does not have an app associated with it” Error on Windows
- How to Fix an Update Error 0x800705b4 on Windows
- How to Resolve “A JavaScript error occured in the main process” Error on Windows
- How to Fix the Network Discovery Is Turned Off Error on Windows
- How to Change Folder Icons in Windows
22.08.22
Содержание:
- Основные причины удаления резервных копий в Windows 10
- Переполнение дискового пространства
- Неактуальность копий источника
- Как удалить резервные копии Windows 10 через интерфейс
- Шаги для доступа к настройкам резервного копирования
- Процесс удаления резервных копий через панель управления
- Удаление резервных копий Windows 10 с помощью командной строки
- Открытие командной строки с правами администратора
- Команды для удаления конкретных копий или всех резервных данных
- Использование сторонних программ для удаления копий операционной системы Windows 10
- Вопрос-ответ

Перед вами ключевой шаг в поддержании чистоты и эффективности вашей операционной среды. Системы хранения данных в современном мире требуют систематической оптимизации, а эффективное удаление резервных копий – неотъемлемая часть этого процесса. Ваша система Windows 10 обладает множеством резервных данных, но ненужные копии могут занимать ценное пространство и создавать потенциальные уязвимости в безопасности.
Эта статья представляет собой комплексный подход к избавлению от резервных копий в вашей операционной системе Windows 10. Вам предоставляется шаг за шагом руководство по осуществлению этого процесса безопасным и эффективным способом. Мы пройдем через важные шаги и стратегии удаления резервных данных, обеспечивая вам основательное понимание проблемы и простые инструкции для ее решения.
Вас ждет исследование методов удаления резервных копий вашей операционной системы. Научитесь определять, какие копии следует сохранить, а какие безопасно удалить, освобождая ценное дисковое пространство и снижая потенциальные риски утечки данных. Готовы приступить к освобождению резервных копий и обеспечить более гладкую и безопасную работу вашей Windows 10? Давайте начнем!
Основные причины удаления резервных копий в Windows 10
В процессе управления хранилищем данных операционная система Windows 10 автоматически создает резервные копии файлов и системных настроек. Однако, с течением времени, накопление таких копий может привести к ряду проблем и негативных последствий.
- Ограничение доступного дискового пространства.
- Повышенное использование ресурсов компьютера для поддержания резервных копий.
- Риск конфликтов при выполнении резервного копирования.
- Потенциальная угроза безопасности данных в случае несанкционированного доступа к резервным копиям.
- Необходимость оптимизации процесса управления резервными копиями для повышения эффективности системы.

Мы знаем, как предотвратить потери данных. Наши специалисты выстраивают надежную многоуровненую систему защиты информации. Ваши данные будут защищены от ошибок и саботажа собственного персонала, внешних атак, вирусов, мошенничествав, поломок оборудования. Обращайтесь и мы предолжим вам лучшее решение!

Понимание основных причин, побуждающих к удалению резервных копий в Windows 10, позволяет пользователям эффективно управлять хранилищем данных и обеспечивать безопасность своих файлов и системных настроек.
Переполнение дискового пространства
При наличии избыточного количества данных на вашем компьютере возникает проблема нехватки места на диске, что может замедлить работу системы и привести к нежелательным последствиям. Регулярное удаление излишних файлов и оптимизация использования дискового пространства помогут избежать переполнения и сохранить производительность компьютера.

Читайте также: Как сделать резервную копию Windows 7
- Избыточные файлы. Удаление ненужных или устаревших файлов поможет освободить место на диске и улучшить доступ к данным.
- Временные файлы. Часто при использовании компьютера создаются временные файлы, которые с течением времени накапливаются и могут занимать значительное пространство на диске.
- Ненужные программы. Периодическое удаление неиспользуемых программ поможет освободить место на диске и улучшить производительность системы.
- Оптимизация хранения данных. Структурирование данных и перенос их на внешние носители или в облачное хранилище помогут эффективно использовать дисковое пространство и предотвратить его переполнение.
Неактуальность копий источника

В данном разделе обсуждается проблема сохранения излишних дубликатов информации, которые могут замедлять работу системы и занимать ценное место на устройстве. Необходимость в устаревших копиях источника может быть оспорена в контексте эффективного управления данными.
|
Синонимы |
Описание |
|
Удаление |
Процесс избавления от избыточных данных или файлов. |
|
Резервных |
Связанный с созданием дубликатов для обеспечения сохранности информации. |
|
Резервной |
Относящийся к дополнительной копии, созданной для предотвращения потерь данных. |
В данном контексте необходимо оценить не только полезность сохраненных копий источника, но и их актуальность в соответствии с текущими потребностями и требованиями безопасности.
Как удалить резервные копии Windows 10 через интерфейс
Шаг 1: Открытие панели управления
Для начала процесса удаления резервных копий Windows 10 откройте Панель управления операционной системы. Это можно сделать через меню «Пуск» или с помощью поиска в строке задач.
Читайте также: Как создать резервную копию реестра Windows 10
Шаг 2: Переход в раздел «Система и безопасность»
В Панели управления найдите и выберите раздел «Система и безопасность». В этом разделе находятся основные инструменты для управления безопасностью и настройками системы Windows 10.
Шаг 3: Открытие «История файлов»
В разделе «Система и безопасность» найдите и выберите опцию «История файлов». Этот раздел позволяет управлять резервными копиями файлов и папок на вашем компьютере.
Шаг 4: Выбор опции «Управление местом хранения»
В разделе «История файлов» найдите и выберите опцию «Управление местом хранения». Здесь вы сможете просмотреть все резервные копии, сохраненные на вашем устройстве, и выполнить операции по их удалению.
Шаг 5: Удаление ненужных резервных копий
В открывшемся окне у вас будет возможность просмотреть список доступных резервных копий и выбрать те, которые вы хотите удалить. Выбрав нужные копии, выполните операцию удаления, чтобы освободить место на диске и оптимизировать хранение данных на вашем устройстве.
Шаги для доступа к настройкам резервного копирования
Оптимизация системы зачастую включает в себя процесс удаления резервных копий, что позволяет освободить место на диске и повысить общую производительность компьютера. Для выполнения этой задачи необходимо получить доступ к настройкам резервных копий операционной системы Windows.
|
Шаг 1: |
Откройте Панель управления. |
|
Шаг 2: |
Выберите категорию «Система и безопасность». |
|
Шаг 3: |
В разделе «Администрирование» выберите «Резервное копирование и восстановление (Windows 7)». |
|
Шаг 4: |
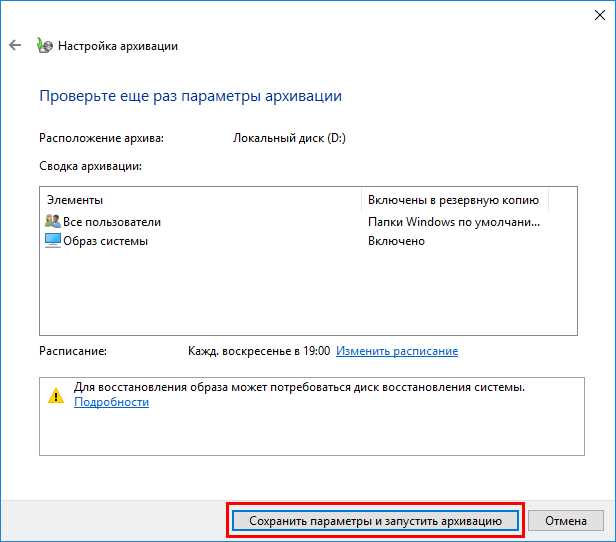
Нажмите на ссылку «Настроить резервное копирование». |
|
Шаг 5: |
В открывшемся окне выберите «Удаление файлов резервных копий». |
|
Шаг 6: |
Выберите нужные опции удаления копий и подтвердите действие. |
Поможем вам создать безопасную и функциональную систему резервирования данных. Соблюдаем все требования и пожелания заказчика. Используем различные гибридные решения: диски, NAS-хранилища, сервера, облачные решения, дата-центры. Ваши данные будут сохраняться сразу в несколько локаций, что позволит обеспечить высочайший уровень надежности. Свяжитесь с нами и мы предложим лучшее решение!

Следуя этим простым шагам, вы сможете легко получить доступ к настройкам резервного копирования операционной системы Windows и выполнить удаление лишних копий, освободив ценное дисковое пространство.
Процесс удаления резервных копий через панель управления
В данном разделе мы рассмотрим процедуру удаления сохраненных версий данных вашей операционной системы. Этот шаг необходим для оптимизации использования дискового пространства и поддержания системы в актуальном состоянии.
|
Шаг 1: |
Откройте Панель управления вашей операционной системы. |
|
Шаг 2: |
Перейдите в раздел «Система и безопасность». |
|
Шаг 3: |
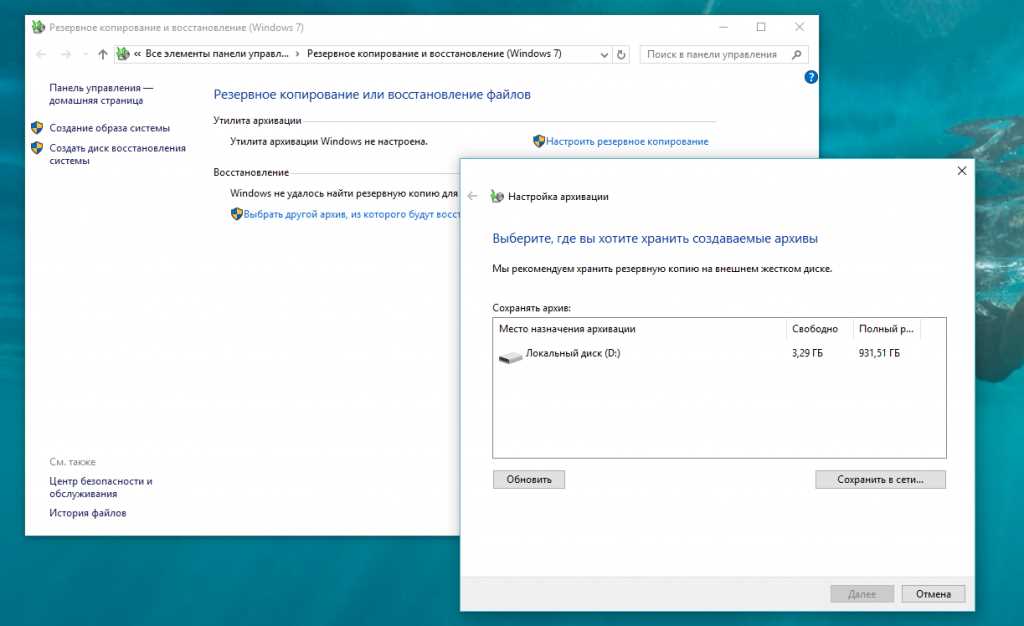
Выберите опцию «Резервное копирование и восстановление (Windows 7)». |
|
Шаг 4: |
В открывшемся окне выберите «Управление местом хранения на диске». |
|
Шаг 5: |
Выберите резервное хранилище, которое вы хотите удалить. |
|
Шаг 6: |
Нажмите на кнопку «Удалить резервное хранилище». |
|
Шаг 7: |
Подтвердите свое намерение удалить резервное хранилище в появившемся диалоговом окне. |
После завершения этих шагов резервное хранилище и его копии данных будут полностью удалены с вашего устройства. Помните, что этот процесс необратим, поэтому убедитесь, что вы выбрали правильное хранилище для удаления, прежде чем продолжить.
Удаление резервных копий Windows 10 с помощью командной строки
Освобождение пространства и обеспечение более эффективного использования хранилища – ключевая задача для поддержания оптимальной производительности вашей системы.
В этом разделе мы рассмотрим процесс удаления резервных копий операционной системы Windows 10 при помощи командной строки. Зная эффективные команды, вы сможете освободить место, которое ранее было занято резервными копиями, и улучшить общую производительность вашего устройства.
Удаление резервных данных Windows 10 может быть не только необходимым шагом для освобождения места, но и стратегическим ходом для оптимизации системы и обеспечения ее стабильной работы.
Читайте также: Как сделать резервную копию драйверов Windows
Мы рассмотрим, как использовать командную строку для поиска и удаления резервных копий, обеспечивая тем самым более эффективное использование ресурсов вашего компьютера. После выполнения нескольких простых шагов вы сможете освободить место на диске и обеспечить более плавную и стабильную работу вашей операционной системы Windows 10.
Открытие командной строки с правами администратора
При выполнении определенных операций в операционной системе Windows необходимо обладать расширенными правами, чтобы осуществить определенные действия. Один из способов получения этих прав – открытие командной строки с привилегиями администратора. Этот процесс позволяет пользователю осуществлять изменения в системе, которые недоступны в обычном режиме.

|
Шаг |
Описание |
|
1 |
Нажмите клавиши Win + X на клавиатуре для открытия меню быстрого доступа. |
|
2 |
В меню выберите опцию Командная строка (администратор). |
|
3 |
Если вас попросят подтвердить ваш выбор, щелкните Да. |
После выполнения этих шагов вы получите доступ к командной строке с расширенными правами, что позволит вам проводить необходимые операции, такие как управление системными файлами или изменение настроек, требующих повышенных привилегий.
Команды для удаления конкретных копий или всех резервных данных
При работе с операционной системой Windows 10 важно иметь контроль над резервными данными, включая возможность удаления ненужных копий. Для этого можно воспользоваться специальными командами, которые предоставляют пользователю гибкость выбора между удалением отдельных резервных копий или полной очисткой всех сохраненных данных. Эти команды обеспечивают эффективное управление резервными данными, сохраняя при этом целостность основной операционной системы.
Удаление конкретной резервной копии
Для удаления конкретной резервной копии операционной системы Windows 10 можно воспользоваться соответствующей командой, которая позволяет указать конкретный набор данных для удаления. Это полезно в случае, когда необходимо освободить место на диске или удалить устаревшие резервные копии для оптимизации хранилища.
Пример: Используя команду «удалить конкретную копию», можно указать путь к резервной копии и выполнить удаление.
Полное удаление всех резервных данных
Для случаев, когда требуется очистить все резервные данные операционной системы Windows 10, существует специальная команда, позволяющая удалить все резервные копии сразу. Это может быть необходимо, например, при переносе системы на новый носитель или при желании освободить пространство на диске без выборочного удаления отдельных копий.
Пример: Команда «полное удаление резервных данных» позволяет удалить все сохраненные копии и сбросить настройки резервного копирования.
Использование сторонних программ для удаления копий операционной системы Windows 10
Существует ряд альтернативных решений, предназначенных для эффективного управления сохраненными резервными данными на компьютерах под управлением операционной системы Windows 10. Программы данного типа обладают разнообразными функциональными возможностями, позволяющими пользователю управлять резервными копиями операционной системы, а также предоставляют гибкие настройки удаления избыточных данных.
Хотите подобрать надежный, быстрый и безопасный дата-центр? Хотите работать как передовые мировые компании и безопасно хранить свои данные? Обращайтесь к нашим специалистам и мы подберем лучший для вас ЦОД! Бесплатно перенесем ваши данные, проведем настройку и развернем настройку вашего бизнеса на удаленном сервере.

|
Преимущества использования сторонних программ |
Функциональные возможности |
Гибкие настройки |
|
Повышенная эффективность удаления |
Автоматизированное сканирование и удаление |
Настройка частоты выполнения резервного копирования |
|
Минимизация риска потери данных |
Ручное управление процессом удаления |
Выборочное удаление конкретных файлов или каталогов |
|
Поддержка различных типов носителей |
Создание резервных копий на внешние диски, облако и другие устройства |
Установка прав доступа к резервным данным |
Использование сторонних программ для управления резервными копиями Windows 10 позволяет эффективно организовать процесс удаления избыточных данных, обеспечивая надежное сохранение важной информации и минимизацию риска потери данных в случае непредвиденных ситуаций.
Вопрос-ответ
Как удалить резервные копии в Windows 10?
Чтобы удалить резервные копии в Windows 10, следует перейти в «Параметры» > «Обновление и безопасность» > «Резервное копирование». Затем выбрать «Просмотр истории резервного копирования» и в окне «История файлов» выбрать пункт «Удалить версии резервных копий». Далее выбрать, какие версии удалить, и подтвердить удаление.
Можно ли удалить все резервные копии Windows?
Да, можно удалить все резервные копии Windows. Для этого нужно открыть «Панель управления», выбрать «Система и безопасность», затем «Файл и история файлов». Далее нужно выбрать «Параметры истории файлов» и затем «Очистить историю файлов». После этого будет удалена вся история резервных копий.
Как освободить место, удалив резервные копии Windows 10?
Чтобы освободить место, удалив резервные копии Windows 10, нужно пройти в «Параметры» > «Обновление и безопасность» > «Резервное копирование». Затем выбрать «Управление местом» и нажать на кнопку «Удалить старые резервные копии». Это позволит удалить старые копии и освободить место на диске.
Как удалить все резервные копии Windows?
Чтобы удалить все резервные копии Windows, можно воспользоваться утилитой «Параметры» > «Система» > «Хранение». Затем выбрать «Управление местом» и «Очистить резервное копирование». После этого все резервные копии будут удалены с вашего компьютера.
Можно ли удалить резервную копию Windows без вреда для системы?
Да, можно удалить резервную копию Windows без вреда для системы. Однако перед удалением следует убедиться, что у вас есть другие способы восстановления данных в случае необходимости. В противном случае, удаление резервной копии может привести к потере важных файлов в случае сбоя системы.
Как удалить резервные копии в Windows 10?
Для удаления резервных копий в Windows 10 необходимо открыть «Параметры» (можно найти через Пуск или в панели управления), затем выбрать «Обновление и безопасность», далее перейти в раздел «Резервное копирование». Там вы сможете увидеть список существующих резервных копий и выбрать ту, которую хотите удалить. Нажмите на нее правой кнопкой мыши и выберите «Удалить». Подтвердите свое решение, и резервная копия будет удалена с вашего компьютера.
Читайте также:
- Currently 4.7/5
- 1
- 2
- 3
- 4
- 5
Оценка: 4.7/5 (Проголосовало: 35)
Спасибо за ваш отзыв!
Как можно улучшить эту статью?
The Windows Operating System protects your data by backing it up. However, with time, this data keeps growing, and the amount of space it takes keeps increasing. In this case, if you want to delete backup files in Windows 10, you can follow the methods given in this article.
In order to protect your data from risks, it is essential that you do not let the backup disk go complete. This is because you should always have space for new backup files. Therefore, to delete backup files in Windows 10, we suggest the below mentioned three methods:
Method 1: Use Device Manager and Command Prompt to Delete Backup Files in Windows 10:
To delete backup files using the Device Manager and Command Prompt, follow these steps:
1. In the Search menu, type Command Prompt and select Run as administrator option.

2. In the Command Prompt, type any of the following commands. Along with the command, type the period of the version you want to delete—lastly, press Enter.
More than one month: FhManagew.exe-cleanup 30
More than three months: FhManagew.exe-cleanup 90
More than six months: FhManagew.exe-cleanup 180
More than 1 year (default option): FhManagew.exe-cleanup 365
Method 2: Use the built-in tool to Delete Backup Files in Windows 10:
To use the built-in tool to delete the backup files in Windows 10, follow these steps:
1. Click Settings from the Start Menu and select Update & security.

2. Now, click the Go to Backup and Restore (Windows 7) link on the Backup Page.

3. Next, in the Backup section, you need to click the Manage space option.
4. Finally, after the Manage Windows Backup disk space window appears, you need to choose to Free up disk space on the backup disk from the two options.
Method 3: Use Disk Cleanup
To use disk cleanup to delete the backup files in Windows 10, follow these steps:
1. Go to Device Manager and click the File icon.
2. Now, tap the options.
3. Next, click on the delete files under Disk Cleanup section.

5. Finally, click on yes.
Frequently Asked Question
Q1. How do I manage the disk space used by this Windows 10 backup?
Answer: To manage the disk space in Windows 10, follow these steps:
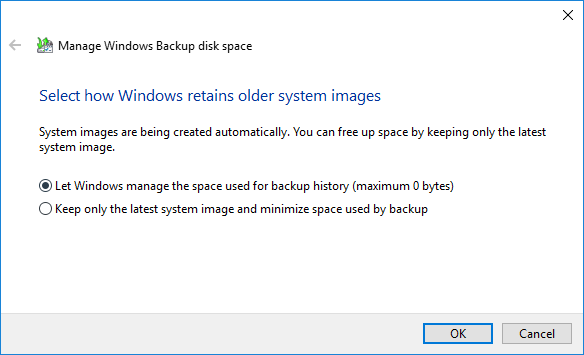
1. Click on Change settings under the System image section in the Manage Windows Backup disk space
2. Then, in the next screen, select Keep only the latest system image. Further, minimize the space used by backup, which will allow Windows to delete old backups automatically and save only one system image.
3. Lastly, click OK to save the changes you’ve made.
Q2. What do I do when my backup drive is full?
Answer: If your backup drive is full, you can delete all your older backup files. To delete them, you can take help from the methods we have discussed above for deleting backup files in Windows 10.
Q3. How big should my backup drive be?
Answer: Ideally, your backup drive must be two times as large as your internal hard drive.
Q4. How can I tell if my backup drive is working?
Answer: To check if your backup drive is working, the best way is to verify if the already backed up data is in good shape. You can do so by restoring all of it.
Q5. Are backup drive and an external hard drive different?
Answer: Yes, there is a difference between a backup drive and an external hard drive. The backup drives store a copy of your files in case a total system failure occurs. Thus, it somewhat works as an archive library for all your data. On the other hand, the external hard drive stores your original data, which can be relocated manually or automatically.
Conclusion
We hope this article can help you understand how to delete backup files in Windows 10. However, if you are still not able to solve the problem, then you can connect with us via the chat box at the bottom right or through the comment section below. We’ll try to help you solve the issues with Windows.
29 July 2019 Senior Program Developer
Summary
Many users say that the disk is full after the PC is used for a long time. This is because backup files or data are increasing. Read this article and you will learn about four solutions of deleting backup files in Windows 10.
Reasons of Deleting Backup Files
After using the computer for a period of time, constantly increasing backup files and data will take up more and more disk space. In addition, the files of the previous version will be saved after upgrading to Windows 10, which will take up a lot of space. If the disk for saving backup files gets full, it will be hard to create backup data any more which is not good to manage data and operating systems. So it is necessary to clean up the backup files. And releasing a lot of space can make the operating system run smoothly.
Hot Topic — ADsRenee Undeleter – Simple & Powerful Software for Data Recovery

Easy to use Recover data by 3 steps;
Multiple scan modes Fast partition scan, whole partition scan and whole disk scan;
Supported file types Image, video, audio, text, email and so on;
Image creation Create a partition image to read and back up data;
Supported devices SD card, SDHC, SDXC, USB flash drive, hard disk and computer.
Easy to use Recover data by 3 steps;
Multiple scan modes Fast partition/whole partition/whole disk scan;
Supported devices SD card/USB/hard disk.
Free TrialFree TrialFree Trial 800 people have downloaded!
Solution 1: Delete Backup Files via File History
Generally, the copies of your computer’s documents, music, pictures, videos, and desktop folders can be saved in File History. If the original files are missing, damaged, or deleted, you can restore the lost files with File History. However, the accumulated backup files will take up more space. You could also clean them up via File History.
Step 1: Press the “Win” + “R” key to open the Run box. Type in: control. Press Enter.
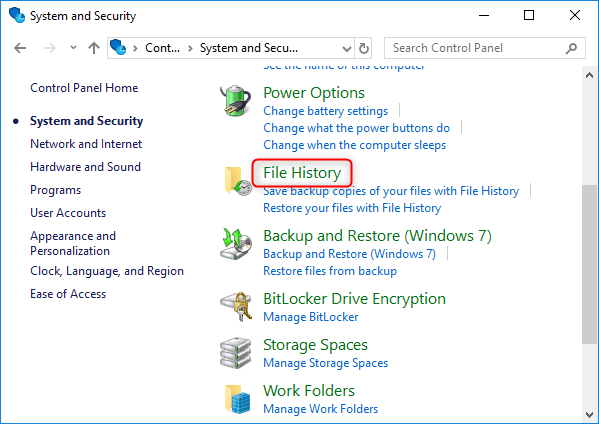
Step 2: In the Control Panel, click “System and Security” and then click “File History”.
Step 3: In the File History window, click “Advanced settings” on the left side.
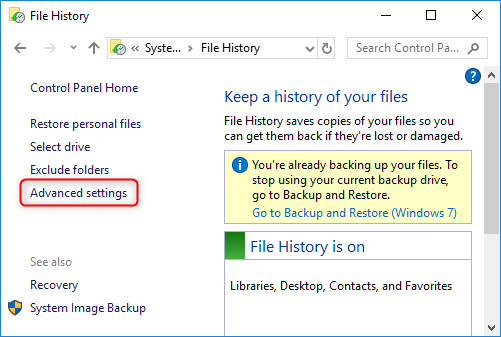
Step 4: After entering “Advanced Settings”, click “Clean up versions”. Once the “File History Cleanup” box pops up, select target time period of the files and then click “Clean up”.
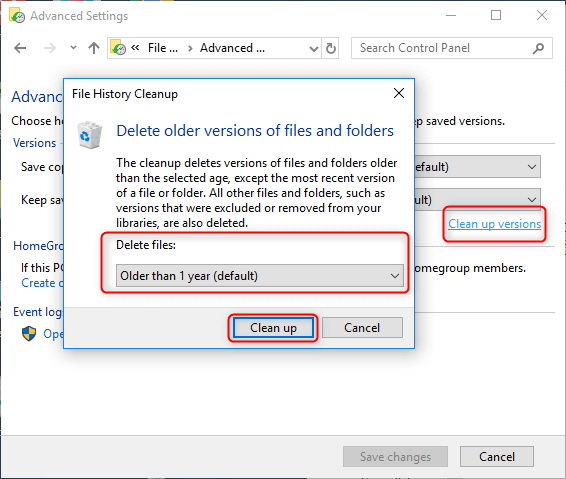
Step 5: When the cleaning process is completed, click “OK”.
Solution 2: Delete Backup Files Using Command Prompt
Fhmanagew.exe is a file history management tool. Executing it in Command Prompt can directly delete all file versions within a specified number of days.
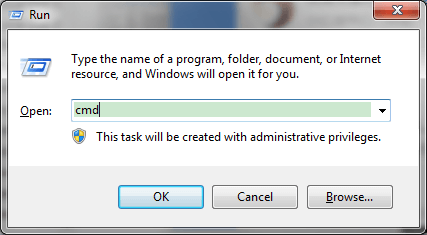
Step 1: Press the “Win” + “R” key to open the Run box. Then type “cmd” and press Enter.
Step 2: After opening the Command Prompt, type in one of the following commands according to the time period of the version you want to delete and then press Enter.
- More than 1 month: FhManagew.exe -cleanup 30
- More than 3 months: FhManagew.exe -cleanup 90
- More than 6 months: FhManagew.exe -cleanup 180
- More than 1 year (default option): FhManagew.exe -cleanup 365
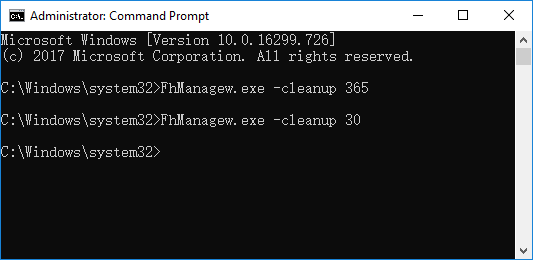
Step 3: If previous version of the files can’t be found, try deleting the recent files. For example, execute the command line – FhManagew.exe -cleanup 30.
Solution 3: Delete System Image Backup by Managing Windows Backup Disk Space
In Windows 10, backup of files and data in desktop or default Windows folders, system image will be created automatically as long as you set the backup plan. However, with the increasing of backup data, disk space will be insufficient. So you could delete backup files and Windows system image backups by managing disk space.
Step 1: Press the “Win” + “R” key to open the Run box. Then type: cmd. Press Enter.
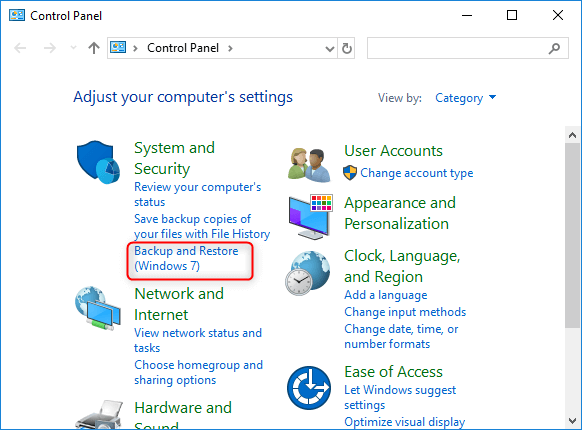
Step 2: After opening the Control Panel, click “Backup and Restore (Windows 7)” under “System and Security”. Then click on “Manage Space”.

Step 3: In the “Manage Windows Backup disk space” window, there are two options “View Backup” and “Change Settings”.
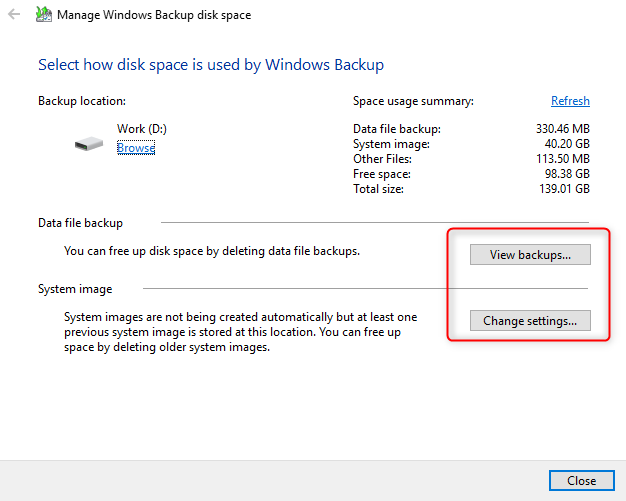
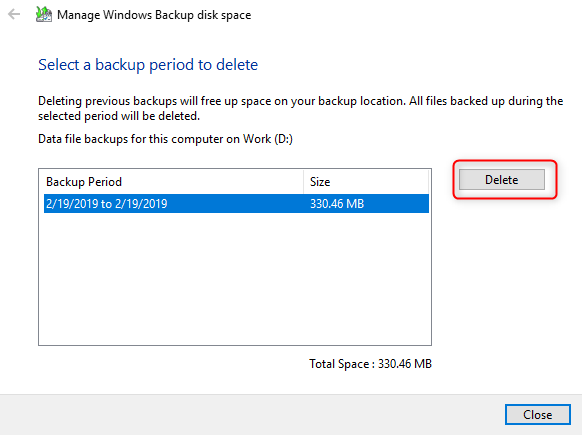
a. If you select the option “View Backup”, then choose the time period of the backup file you want to delete and click “Delete”.
b. If you select the “Change Settings” option, you can choose to delete the system image to free up disk space.
Solution 4: Remove the System Backup Folder Windows.old by Disk Cleanup
After upgrading to Windows 10, a backup folder named Windows.old will appear in the system disk. The Windows.old folder contains the system files and software installation files of the previous system version.
You can choose to manually remove folder Windows.old, but please note that you will not be allowed to revert back to the previous Windows version once the folder deleted.
Step 1: Right-click on the system disk and select “Properties”.
Step 2: In the Properties window, click “Disk Cleanup”. Then go to “Clean up system files”.
Step 3: In the list of “Files to delete”, check the box of “Previous Windows Installation” and click “OK”.
How to Recover Accidentally Deleted Files
In the process of cleaning up the backup files, if you accidentally delete the important files, you should stop the cleaning process immediately and use the data recovery tool to recover the target file as soon as possible. It is recommended to use Renee Undeleter which is a professional data recovery software! It can help you quickly recover deleted files as long as they don’t get overwritten.
- Fast Partition & Whole Disk Scan
- Office Documents Preview
- Memory Card Data Recovery
- Amazing Photo Recovery
- Formatted Data Recovery
- Recycle Bin Data Recovery
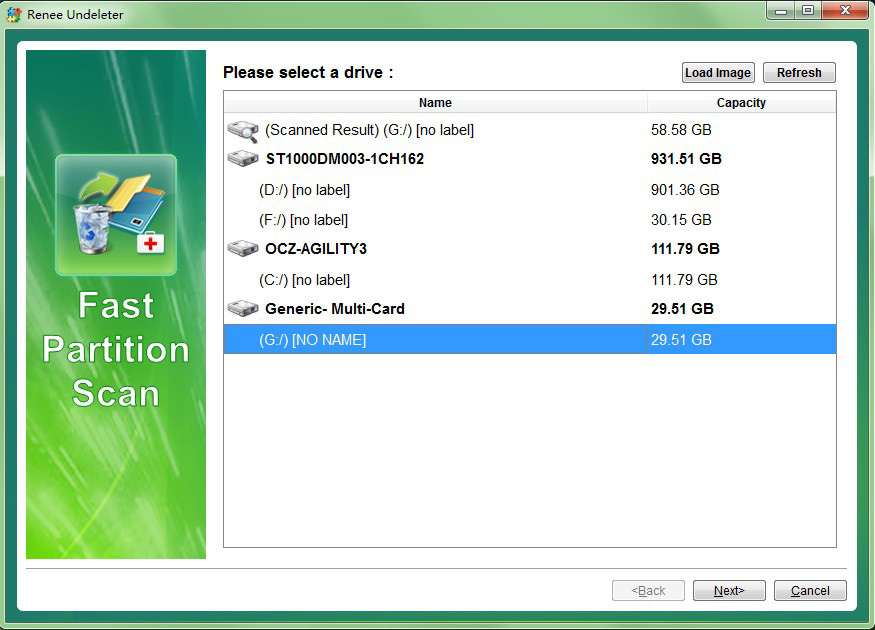
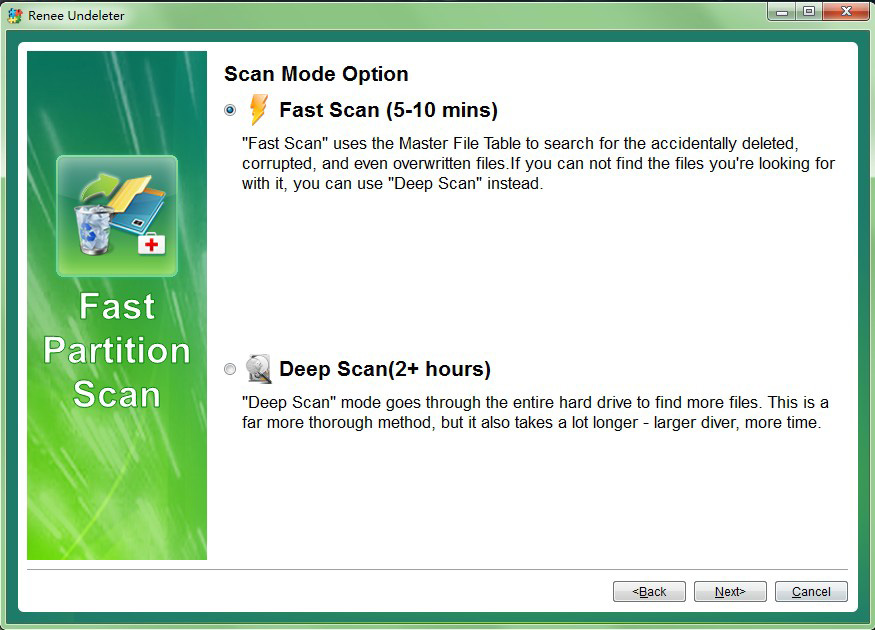
Step 1: Launch Renee Undeleter and select “Fast Partition Scan” function.
This function supports to recover deleted files due to emptied recycle bin or Shift + Del.

Step 2: Choose the partition where you save the deleted files to scan.
If the files were saved in desktop or disk C, please stop using the computer and disconnect it from Internet. Because any Internet surfing operation will create cache which will overwrite your lost files. Then you may lose the chance to recover the data back.
Step 3: Select “Fast Scan” and click “Next” to process the scan.
Please note that “Fast Scan” in “Fast Partition Scan” will just scan the 30GB of the free space. If you can not find the target files after scanning, please use ”Deep Scan” in “Fast Partition Scan”. Of course, this scan mode will take more time.
Step 4: Preview files in the scan result to check the quality when scan is processing.
Files in BMP, GIF, PNG, JPEG, JPG, TIF, DOC, DOCX, HTM, PDF, PPT, PPTX, RAR, XLS, XLSX, ZIP formats could be preview before recovery.
Easily free up storage space
PC Guide is reader-supported. When you buy through links on our site, we may earn an affiliate commission. Read More
Table of Contents
- How To Delete Windows 10 File History Backups
- Load up the Disk Clean-up Tool
- System Files
- Check necessary files
- Go To Backup Settings
- Adjust Backup Options
- A Quicker Option
- Removing Old System Restore Points
- Open System Properties
- Configure
- Delete
- Deleting Windows.Old Backup
You are incredibly wise for setting up Windows 10 backups for if/when you need to restore your system following tireless troubleshooting an issue. Whilst it’s a great idea, Windows 10 backups (File History, Restore Points, etc.) and third-party services such as EaseUS can end up taking up a large chunk of hard drive storage. After a while, it’s wise to get rid of older backups to help alleviate this issue, even more so as they’re not up-to-date backups.
For third-party apps, it’s best to check the vendor’s instructions on this process. It’s best practice and general advice probably won’t cut it. For Windows 10, we’ve detailed some steps below to help save some hard drive space.
How To Delete Windows 10 File History Backups
Whilst most people wouldn’t see this as a big deal in the grand scheme of things, File History backups can clog up a hard drive over a long period of time. It’s a good feature to have enabled, some sometimes old files need clearing out.
Load up the Disk Clean-up Tool
Either search for it or hit the windows key + R and run ‘cleanmgr’
System Files
Once loaded, click on the ‘Clean Up System Files’ button
Check necessary files
We are looking for ‘Temporary Windows Installation Files’ in this example, but feel free to have a spring clean whilst you’re there. Click OK to delete, this may take a while depending on how many gigabytes are being cleared.
We’re dedicated to building a web of Windows 10 related support content to take the pain of searching for help away for users, make sure to bookmark us for help making the most of Windows 10 and Windows 11.
Go To Backup Settings
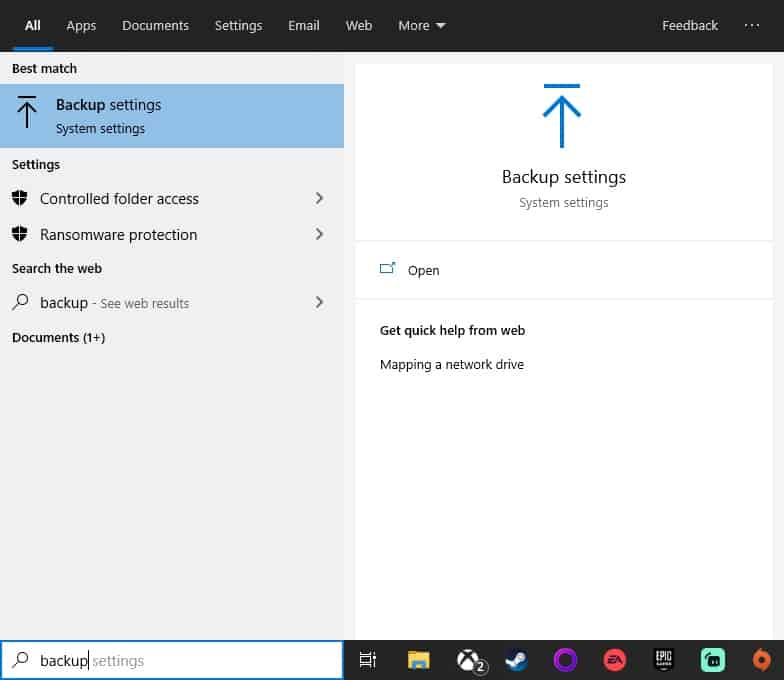
Either right-click the start buttons and go to Settings > Update & Security > Backup or simply search backup in the Windows 10 search bar.
Adjust Backup Options
If you don’t have a drive setup to use File History backups, then you can rest easy about your hard drive space woes. However, if enabled, click more options to change how often and when backups are made. Clicking the ‘Stop Using Drive’ button will instantly delete all backups if needed.
A Quicker Option
If you want to delete all backups quickly, search ‘CMD’ or ‘Powershell’ and ‘Run As Administrator. Copy and Paste ‘fhmanagew.exe -cleanup 0′ onto the command line followed by Enter to make quick work of this task.
Removing Old System Restore Points
Another great Windows 10 function that can save the day when Windows 10 starts misbehaving. If enabled and an error occurs that can’t be pin-pointed, a System Restore reverts all programs and settings back to how they were on the restore points date and time. However, old restore points aren’t very useful and can clog up storage space.
Open System Properties
This can either be looked up on the search bar or by hitting the windows key + R and running ‘systempropertiesprotection’
Configure
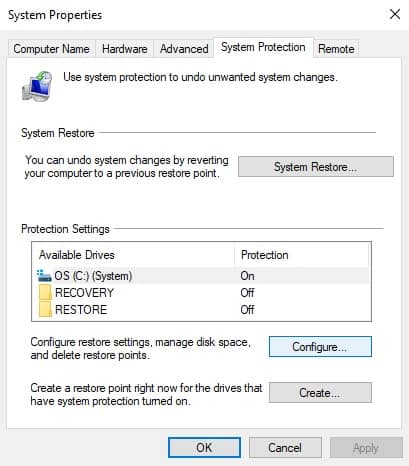
Under the ‘System Protection’ tab, click ‘Configure’
Delete
Hit delete to remove all system restore points on your local drive. You can also do this via Disk Cleanup, also take note of the max usage slider for restore point storage usage.
Deleting Windows.Old Backup
Every time Windows updates, old backup files get dumped into this folder which isn’t needed. It’s not so much an issue for newer systems, but for older PCs and Laptops this could free up a few gigabytes of storage.