
Диспетчер учетных данных Windows (Credential Manager) позволяет безопасно хранить учетные записи и пароля для доступа к сетевым ресурсам, веб сайтам и приложениям. Благодаря сохраненным в Credential Manager паролям вы можете подключаться без ввода пароля к сетевым ресурсам, которые поддерживаются проверку подлинности Windows (NTLM или Kerbersos), аутентификацию по сертификату, или базовую проверку подлинности.
Содержание:
- Используем диспетчер учетных данных Windows для хранения паролей
- Управление сохраненными учетными данными Windows из командной строки
- Доступ к менеджеру учетных данных Windows из PowerShell
Используем диспетчер учетных данных Windows для хранения паролей
Диспетчер учетных данных встроен в Windows и позволяет безопасно хранить три типа учетных данных:
- Учетные данные Windows (Windows Credentials) — учетные данные доступа к ресурсам, которые поддерживаются Windows аутентификацию (NTLM или Kerbersos). Это могут быть данные для подключения сетевых дисков или общим SMB папкам, NAS устройствам, сохраненные пароли для RDP подключений, пароли к сайтам, поддерживающих проверку подлинности Windows и т.д;
- Учетные данные сертификатов (Certificate-Based Credentials) – используются для доступа к ресурсам с помощью сертификатов (из секции Personal в Certificate Manager);
- Общие учетные данные (Generic Credentials) – хранит учетные данные для доступа к сторонним приложениям, совместимым с Credential Manager и поддерживающим Basic аутентификацию;
- Учетные данные для интернета (Web Credentials) – сохранённые пароли в браузерах Edge и Internet Explorer, приложениях Microsoft (MS Office, Teams, Outlook, Skype и т.д).
Например, если при доступе к сетевой папке вы включите опцию “Сохранить пароль”, то введенный вами пароли будет сохранен в Credential Manager.

Аналогично пароль для подключения к удаленному RDP/RDS серверу сохраняется в клиенте Remote Desktop Connection (mstsc.exe).
Открыть диспетчер учетных данных в Windows можно:
- из классической панели управления (Control Panel\User Accounts\Credential Manager, Панель управления -> Учетные записи пользователей -> Диспетчер учетных данных);
- изкоманднойстроки:
control /name Microsoft.CredentialManager
На скриншоте видно, что в Credential Manager хранятся два пароля, которые мы сохранили ранее.
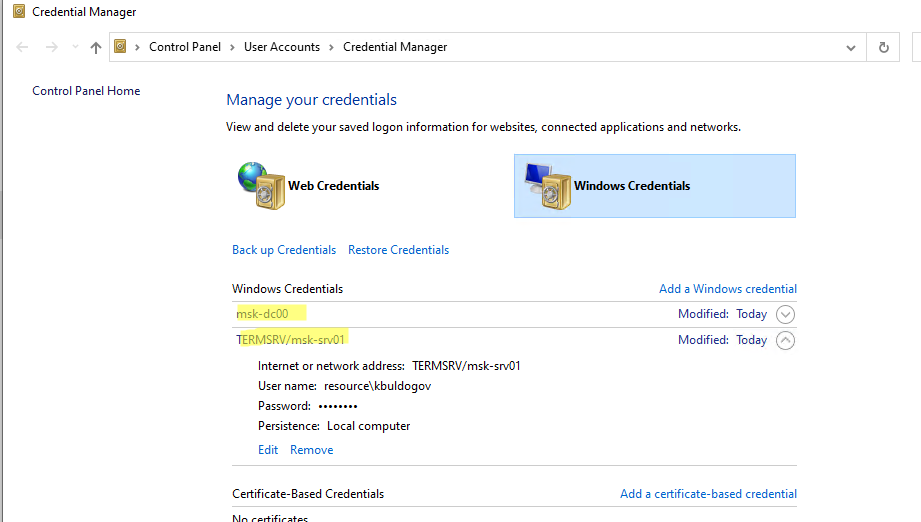
Сохраненный пароль для RDP подключения сохраняется в формате
TERMSRV\hostname
.
Здесь вы можете добавить сохранённый пароль, отредактировать (просмотреть сохраненный пароль в открытом виде из графического интерфейса нельзя) или удалить любую из записей.
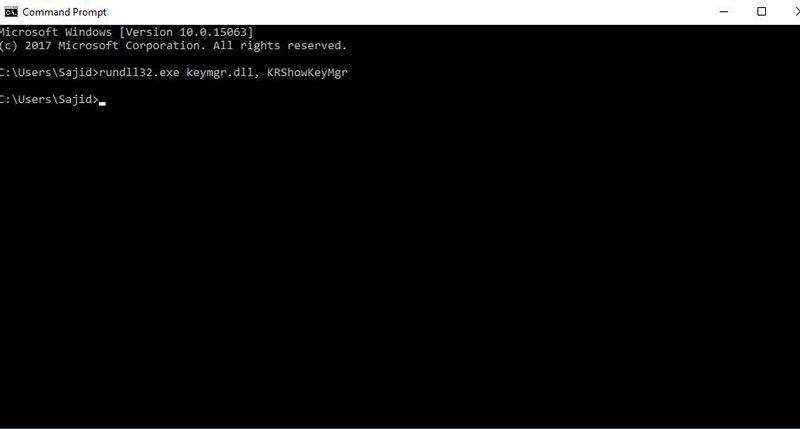
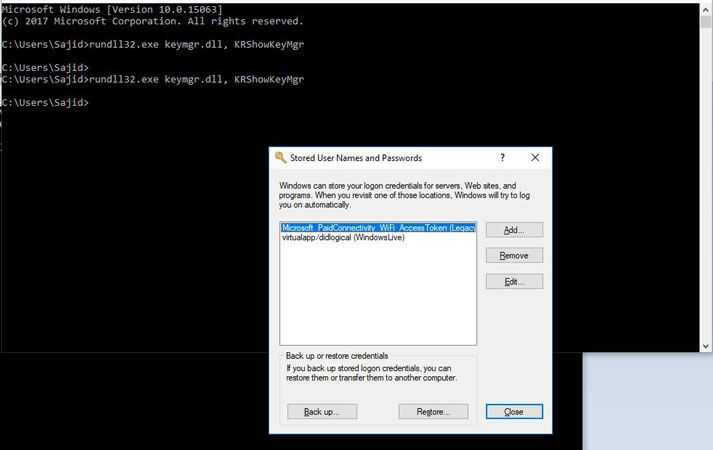
Для управления сохраненными паролями можно использовать классический диалоговый интерфейс Stored User Names and Password. Для его запуска выполните команду:
rundll32.exe keymgr.dll,KRShowKeyMgr
Здесь вы также можете управлять сохраненными учетными данными, а также выполнить резервное копирование и восстановление записей в Credential Manager (можно использовать для переноса базы Credential Manager на другой компьютер).
Управление сохраненными учетными данными Windows из командной строки
Вы можете добавить удалить и вывести сохраненные учетные данных в Credentil Manager из командной строки с помощью утилиты cmdkey.
Добавить в диспетчер учетные данные для доступа к серверу FS01:
cmdkey /add:FS01 /user:kbuldogov /pass:Passw0rdd1
Если нужно сохранить доменную учетную запись:
cmdkey /add:fs01.winitpro.local /user:[email protected] /pass:Passw0rdd1
Сохранить учетные данные для доступа к RDP/RDS серверу:
cmdkey /generic:termsrv/MSKRDS1 /user:kbuldogov /pass:Passw0rdd1
Вывести список сохраненных учетных данных:
cmdkey /list
Вывести список хранимых учетных данных для указанного компьютера:
cmdkey /list:fs01.winitpro.local
Удалить ранее сохраненные учетные данные:
cmdkey /delete:FS01
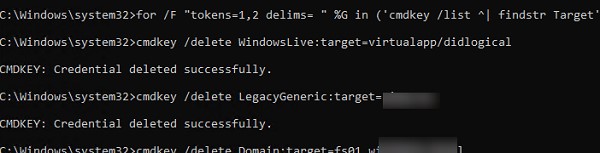
Удалить из Credential Manager все сохраненные пароли для RDP доступа:
For /F "tokens=1,2 delims= " %G in ('cmdkey /list ^| findstr "target=TERMSRV"') do cmdkey /delete %H
Полностью очистить пароли в Credential Manager:
for /F "tokens=1,2 delims= " %G in ('cmdkey /list ^| findstr Target') do cmdkey /delete %H
Также для управления сохраненными учетными данными можно использовать утилиту vaultcmd.Вывести список сохраненных учетных данных типа Windows Credentials:
vaultcmd /listcreds:"Windows Credentials"

Все сохраненные пароли хранятся в защищенном хранилище Windows Vault. Путь к хранилищу можно получить с помощью команды:
vaultcmd /list

По умолчанию это
%userprofile%\AppData\Local\Microsoft\Vault
. Ключ шифрования хранится в файле Policy.vpol. Клю шифровани используется для рашировки паролей в файлах .vcrd.
Для работы Credential Manager должна быть запущена служба VaultSvc:
Get-Service VaultSvc
Если служба отключена, при попытке получить доступ к Credential Manager появится ошибка:
Credential Manager Error
The Credential Manager Service is not running. You can start the service manually using the Services snap-in or restart your computer to start the service.
Error code: 0x800706B5
Error Message: The interface is unknown.
Если вы хотите заблокировать пользователям возможность сохранения сетевых паролей в Credential Manager, нужно включить параметр Network access: Do not allow storage of passwords and credentials for network authentication в разделе GPO Computer Configuration -> Windows Settings -> Security Settings -> Local Policies -> Security Options.
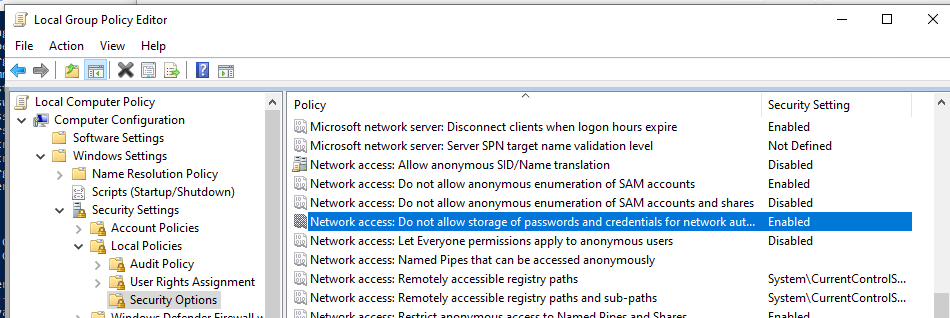
Теперь, если пользователь попытается сохранить пароль в хранилище, появится ошибка:
Credential Manager Error
Unable to save credentials. To save credentials in this vault, check your computer configuration.
Error code: 0x80070520
Error Message: A specified logon session does not exist. It may already have been terminated.
Доступ к менеджеру учетных данных Windows из PowerShell
В Windows нет встроенных командлетов для обращения к хранилищу PasswordVault из PowerShell. Но вы можете использовать модуль CredentialManager из галереи PowerShell.
Установите модуль:
Install-Module CredentialManager

В модуле всего 4 командлета:
- Get-StoredCredential – получить учетные данные из хранилища Windows Vault;
- Get-StrongPassword – сгенерировать случайный пароль;
- New-StoredCredential – добавить учетные данные в хранилище;
- Remove-StoredCredential – удалить учетные данные.
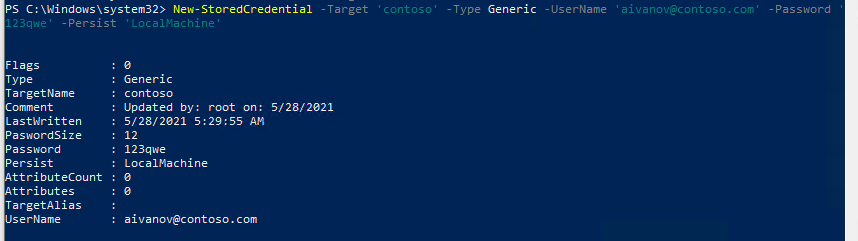
Чтобы добавить новые учетные данные в хранилище CredentialManager, выполните команду:
New-StoredCredential -Target 'contoso' -Type Generic -UserName '[email protected]' -Password '123qwe' -Persist 'LocalMachine'
Проверить, есть в хранилище сохраненные данные:
Get-StoredCredential -Target contoso
С помощью командлета Get-StoredCredential вы можете вывести сохраненный пароль, хранящийся в диспетчере учетных данных в отрытом виде.
Выведите список сохраненных учетных данных:
cmdkey.exe /list
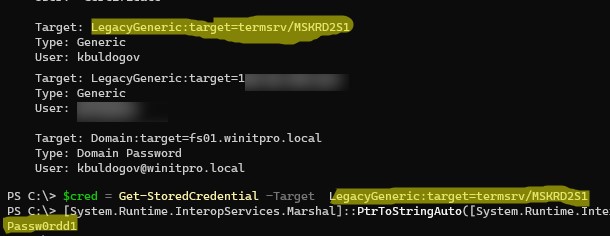
Скопируйте значение Target для объекта, пароль которого вы хотите извлечь и вставьте его в следующую команду:
$cred = Get-StoredCredential -Target  LegacyGeneric:target=termsrv/MSKRD2S1
[System.Runtime.InteropServices.Marshal]::PtrToStringAuto([System.Runtime.InteropServices.Marshal]::SecureStringToBSTR($cred.Password))
Команда выведет сохраненный пароль в открытом виде.
Также для получения сохраненных паролей из credman в открытом виде можно использовать утилиты типа Mimikatz (смотри пример).
Сохраненные пароли из Credential Manager можно использовать в ваших скриптах PowerShell. Например, в следующем примере я получаю сохраненные имя и пароль в виде объекта PSCredential и подключаюсь с ними к Exchange Online из PowerShell:
$psCred = Get-StoredCredential -Target "Contoso"
Connect-MSolService -Credential $psCred
Также вы можете использовать Get-StoredCredential для безопасного получения сохранённых учетных данных в заданиях планировщика.
Также обратите внимание на модуль PowerShell Secret Management, который можно использовать для безопасного хранения паролей в Windows (поддерживает различные хранилища паролей: KeePass, LastPass, HashiCorp Vault, Azure Key Vault, Bitwarden.
Чтобы удалить сохраненные учетные данные из Windows Vault, выполните:
Remove-StoredCredential -Target Contoso
Windows Credential Manager view password is a helpful feature that allows you to view and delete any of your saved credentials for signing into websites, networks, and other connected applications. Additionally, it can help you manage your sensitive information by adding, removing, changing, backing up, or restoring information. So this article mainly talks about how to view saved password in it. Let’s dive in!
Part 1: How to View Saved Passwords in Windows Credential Manager?
- 1. Using Control Panel
- 2. Using CMD
- 3. Using Powershell
- 4. Windows Credential Manager Show Password Missing
Way 1. Using Control Panel
By proceeding in his guide, we will learn how to view password in credential manager windows 10.
The steps of using the control panel to access Credential Manager are as follows:
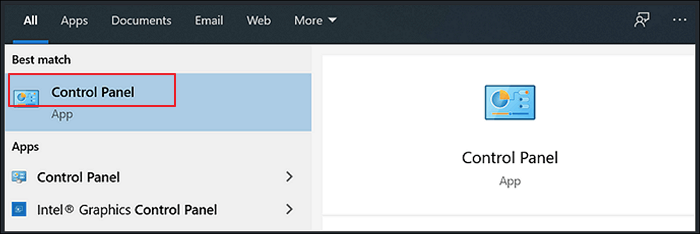
Step 1: To open Credential Manager, type credential in the search bar. You will see Credential Manager appearing in the search results. Click on it.
Step 2: Now, you will be able to see two results. i.e., Web Credentials or Windows Credentials. Details of these two are as follows:
Note:
- Web Credentials: These contain passwords that are saved using Internet Explorer or Microsoft Edge. If you use a different web browser, such as Chrome or Firefox, you will have to use the respective Credential Manager of that browser.
- Windows Credentials: This section is useful for those operating their PCs on corporate networks. All the passwords stored here are used for network-related windows services. People who are not corporate users will not be able to see any information in this section.
Step 3: After getting to the Credential Manager, click the arrow beside the account you want to view. It will display more information about that account, such as the option to look at the password. Furthermore, expanding the Windows Credentials section by clicking the Generic Credentials arrow will allow you to see all the saved-authentication tokens.
Step 4: In the Web Credentials windows, you can click the Show button next to the password you want to see. Before you see the password, a confirmation window will appear to authorize the action.
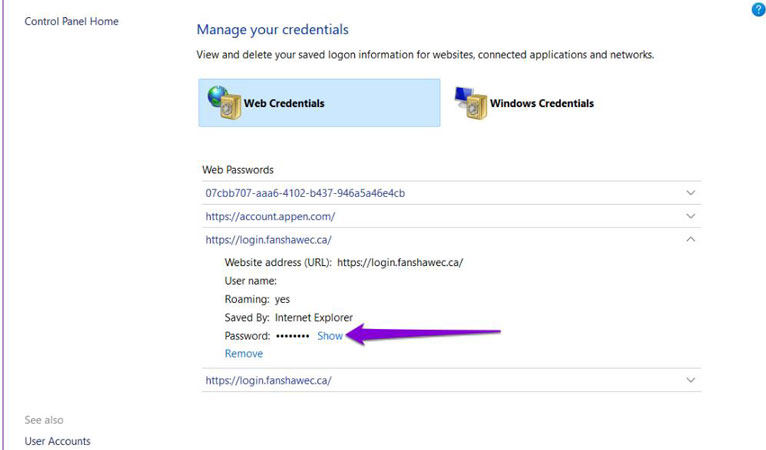
Step 5: Now, by entering your PIN or password, you can see your saved password appearing in the plaintext form.
Way 2. Using CMD
Windows passwords can be access easily by various way, and one of the most guru way to access them is using Command Prompt. Windows credential manager view password cmd is a few step technique to view the saved passwords in web/windows.
Step 1: First you need to press the window key and write command prompt.
Step 2: Now for Credential Manager to reveal the hidden user passwords to you, write the command rundll32.exe keymgr.dll, KRShowKeyMgr.
Step 3: Now press Enter.
Step 4: A new window will list all the login credentials and saved passwords in front of you, and you can click Add, Remove, Edit, buttons to modify, or save new login credentials.
Through the Windows Credential Manager command line, you can easily add, remove or edit files to your liking.
Way 3. Using Powershell
Using Powershell is one of the many ways to view windows passwords in credential manager. This method is quite simple, as you need the following three steps only:
Step 1: In Powershell5, type Install-Module CredentialManager -force.
Step 2: Now, type New-StoredCrdential -Target $url -Username $ENV:Username -Pass …..
Step 3: The final code that you are going to use in your Powershell will be Get-StoredCredential –Target.

Now at this point in the guide, we would like to point out that you might have come across various answers in your question for how to view saved passwords in windows credential manager. In this regard, one of the most promising solutions is using a windows password recovery software to help you discover your lost passwords.
Moreover, many people find it difficult to retrieve their saved passwords and username simply because they forget them. And since they cannot verify their identity, they are unable to login into their PCs. With products like windows recovery tools and windows credential manager you can regain access to your lost passwords, however, you can also reset or delete your passwords with them.
Way 4. Windows Credential Manager Show Password Missing
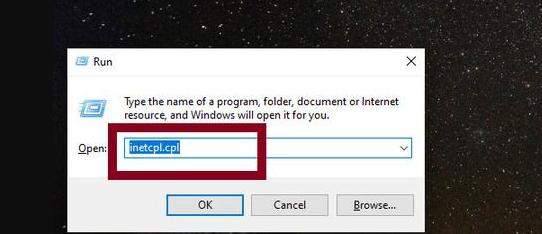
You may be unable to view the ‘windows 7 credential manager view password’ feature on your PC. To get rid of this problem, you can use your PC’s run box by following these steps:
Step 1: Press Windows and R keys together to open the Run box.
Step 2: In the box, type inetcpl.cpl and press Enter to open the Internet Properties.
Step 3: Now, switch to the Content tab. Find and click Settings in the AutoComplete section.
Step 4: Clear all the checked boxes and proceed by clicking OK. Now, reselect entries again as they were before and click OK.
Step 5: Switch to the General tab in Internet Properties. There, click the Delete button. This action will prompt the opening of the Delete Browsing History window.
Step 6: In the Delete Browsing History window, select all the available options and click Delete to clear all the cache.
As an added measure, reboot your PC to implement these changes.
Part 2. How to Get Windows Password to Verify Identity?
As we have mentioned before, viewing the saved password and credentials on your PC requires you to know your PC’s password and username. This approach helps your PC to verify your identity and provides you access to the saved credentials. And if you can’t verify your identity on your PC for any given reason, you will not be able to view the saved passwords.
Thus, to get help in such situations, you can use UnlockGo – Windows Password Recovery. UnlockGo is the all-in-one tool for you if you are willing to verify your identity on your PC and also looking to reset Microsoft account password online and offline. This tool has some of the most advanced features to recover the passwords and usernames for locked Windows accounts.
UnlockGo (Windows) also helps you to recover your Microsoft account online, in the case if you loss the credentials to it, and won’t be able to recover it online.
UnlockGo (Windows)
- It only takes a single click to create a Windows password disk
- You can reset/remove passwords from all types of Windows accounts such aslocal, guest, admin, domain accounts
- You can even create and delete local/domain admin,guest account.
- All versions of Windows are supported
- All major PC brands are supported
How to Use UnlockGo – Windows Password to Verify Identity?
UnlockGo – Windows Password Recovery is an ultimate tool to help view windows passwords in credential manager. Downloading and using UnlockGo – Windows Password Recovery is very easy and requires only three steps:
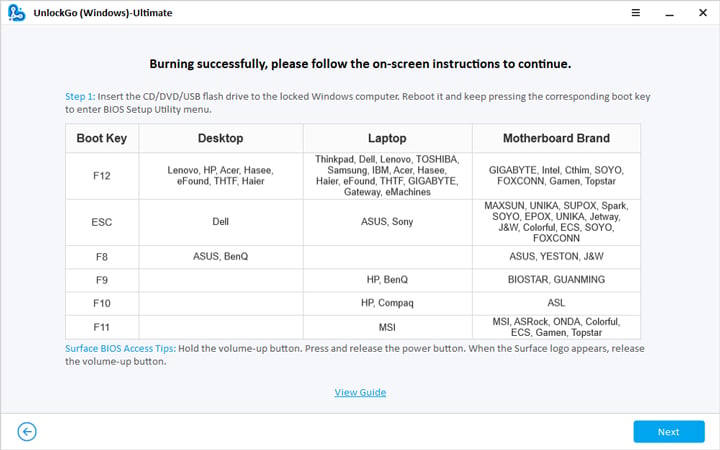
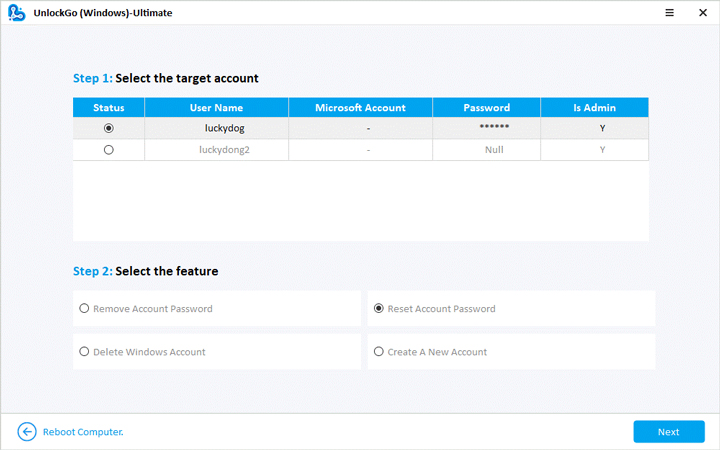
Step 1 Get another PC and install UnlockGo – Windows Password Recovery. Prepare a blank bootable USB/CD/DVD, insert it into PC and start to burn.

Step 2 On its main interface, you will come across different options to choose your password recovery media. Choose the one you like (in the form of a DVD, CD, or USB). Click Next.
Step 3 The password recovery process will begin now and take some time to complete. After that you can reset/remove password or add a new user, or delete/edit any existing user as well easily.
In a Nutshell
The basic purpose of writing this guide was to help you view windows passwords in credential manager. For this purpose, you can use different methods and imply different tricks, as mentioned in the guide below. And in case you fail to prove your identity to your PC and are unable to get access to your credential manager, then you can use UnlockGo – Windows Password Recovery.
How do I find saved passwords in Windows 10? A large number of programs and websites usually prompt its users’ to save their passwords for later use in their PCs and mobile phones. This gets usually stored on software like Instant Messenger, Windows Live Messengers and popular browsers like Google Chrome, Internet Explorer, Microsoft Edge, Mozilla Firefox, Opera (for both PCs and smart-phones) also provide this password saving feature. This password is usually stored in the secondary memory and can be retrieved even when the system is turned off. Specifically, these usernames, as well as their associated passwords, get stored in the registry, within the Windows Vault or within credential files. All such credentials get accumulated in an encrypted format, but can easily be decrypted just by entering your Windows password.
A frequent task that comes into play for all end-users is to uncover all the stored passwords on his/her computer. This eventually helps in recovering lost or forgotten access details to any specific online service or application. This is an easy task but depends on some of the aspects like the OS that the user is using or the application someone is using. In this article, we will show you different tools that can help you view different hidden encrypted passwords in your system.
Table of Contents
Method 1: Using Windows Credential Manager
Let us first get to know about this tool. It is a built-in Credential Manager of Windows that allows users to store their confidential username and passwords as well as other credentials that are entered in when a user logs on to any website or network. Storing these credentials in a manageable manner can help you automatically log you on to that site. This eventually reduces the time and effort of a user as they don’t have to type their login credentials every time they use this site. To see these usernames and passwords stored in the Windows Credential Manager, you have to go through the following steps –
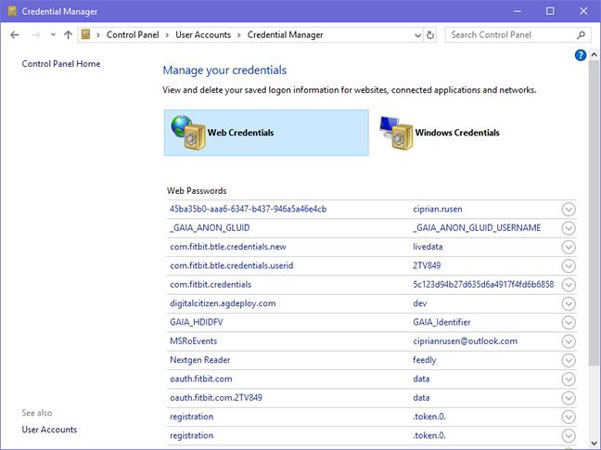
1. Search for “Credential Manager” in the Start menu search box. Click on the search result to open.
Note: You’ll notice there are 2 categories: Web Credentials & Windows Credentials. Here your entire web credentials, as well as any passwords from sites which you saved during browsing using different browsers will be listed here.
2. Choose and Expand the link to see the password by clicking on the arrow button under the Web Passwords option and click on the “Show” button.
3. It will now prompt you to type your Windows password for decrypting the password and show it to you.
4. Again, when you click on Windows Credentials next to the Web Credentials, you will most likely see lesser credentials stored there unless you’re into a corporate environment. These are application and network-level credentials as and when you connect to network shares or network devices like the NAS.

Recommended: Reveal Hidden Passwords behind asterisk without any software
Method 2: Find Saved Passwords using Command Prompt
1. Press Windows Key + S to bring up search. Type cmd then right-click on Command Prompt and select Run as Administrator.
2. Now type the following command into cmd and hit Enter:
rundll32.exe keymgr.dll,KRShowKeyMgr
3. Once you hit Enter, stored Usernames and Passwords window will open.

4. You can now add, remove or edit the stored passwords.
Method 3: Using third-party tools
There are other 3rd party tools available that will help you view your passwords stored in your system. These are:
a) CredentialsFileView
1. Once downloaded, right-click on the “CredentialsFileView” application and choose Run as Administrator.
2. You will see the main dialog which will pop up. You will have to type in your Windows password at the bottom side and then press “OK”.
Note: Now it will be possible for you to see the list of different credentials stored on your computer. If you are on a domain, you will also see a lot more data in the form of a database having Filename, version modified time etc.

b) VaultPasswordView
This has the same functionality as that of CredentialsFileView, but it will look inside the Windows Vault. This tool is essential particularly for Windows 8 & Windows 10 users as these 2 OS stores the passwords of different apps like Windows Mail, IE, and MS. Edge, in the Windows Vault.

c) EncryptedRegView
1. Run this program, a new dialog box will pop up where the ‘Run as administrator’ box will be checked, press the “OK” button.
2. The tool will automatically scan the registry & decrypt your existing passwords it will fetch from the registry.

Also read: How to Create a Password Reset Disk
Using any of the three methods you will be able to view or find the saved passwords on Windows 10, but if you still have questions or doubts regarding this tutorial then feel free to ask them in the comment section.
| Workable Solutions | Step-by-step Troubleshooting |
|---|---|
| Fix 1. EaseUS Key Finder | Launch EaseUS Key Finder, and click «Windows Credentials» on the left pane…Full steps |
| Fix 2. Credential Manager | Open Control Panel using Cortana or search through the search bar…Full steps |
Introduction
When using your Windows computer, you interact with tons of applications. Most of the applications on your computer or the web require some authentication. Usually, it’s the password for authentication.
With tremendous amounts of growing applications, the possibility of losing or forgetting the password is real. So, you need help to find the Windows Credential passwords. The task may sound difficult, but in reality, it is much simpler than you think.
Our article enlists two simple methods to help you find Windows credential passwords. The first method uses EaseUS Key Finder software which is extremely reliable for this scenario.
The second method involves using Windows in-built tool that is Credential Manager. If you are unaware or haven’t used any of the methods before, our article will help you. The upcoming sections will show what these methods are and how to use them. Let’s begin!
The first method that can help you show Windows credentials password is using third-party software. You can easily see any forgotten or lost password with just simple clicks using the software. Let’s see in detail about the software.
EaseUS Key Finder
EaseUS is a well-known and reliable brand, and therefore its software EaseUS Key Finder is written here.
EaseUS Key Finder is a tool that can help you get any product key or credentials from your Windows system. It works by scanning your storage drive and finding the product key or any stored password or credentials easily.
The software is available to download for Windows 11/10/8.1/8/7 and Windows Server. You can also try its free trial version before buying its premium version.
Key Features
You can easily find Windows credentials using EaseUS Key Finder by performing simple steps. However, apart from that, the software also provides some other features that can be helpful. Let’s see the features provided by EaseUS Key Finder below:
- Best Key Finder: EaseUS Key Finder can easily scan your PC and retrieve your Windows System product keys and product keys for tons of application software. Also, you can easily see passwords from the web, WiFi, and Windows credentials.
- Backup for Activation Keys: To be on the safe side, you can always store all your password in a single document. The EaseUS Key Finder also provides backup for activation keys.
- Scan and Recover from Dead Disks: If your HDD or SSD is unbootable, then that doesn’t mean you have lost your credentials or product keys from them. EaseUS Key Finder also helps to find keys from dead or unbootable disks.
- 24/7 Technical Support: The software comes with excellent technical support. You can get in touch with their professional any time to resolve your queries.
- Try before you Buy: EaseUS Key Finder comes with a free trial.
Steps to use EaseUS Key Finder
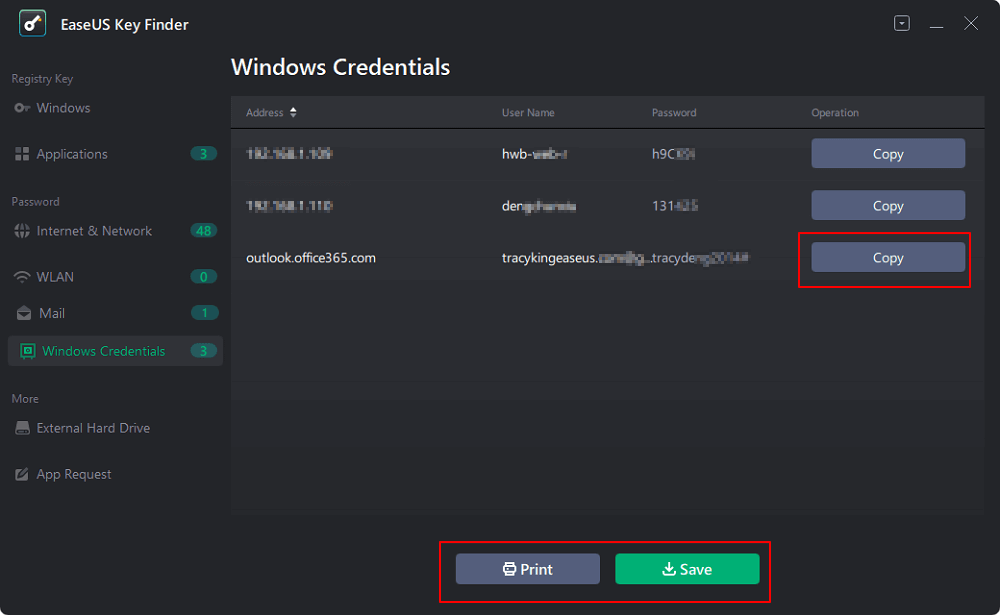
Step 1. Launch EaseUS Key Finder, and click «Windows Credentials» on the left pane.
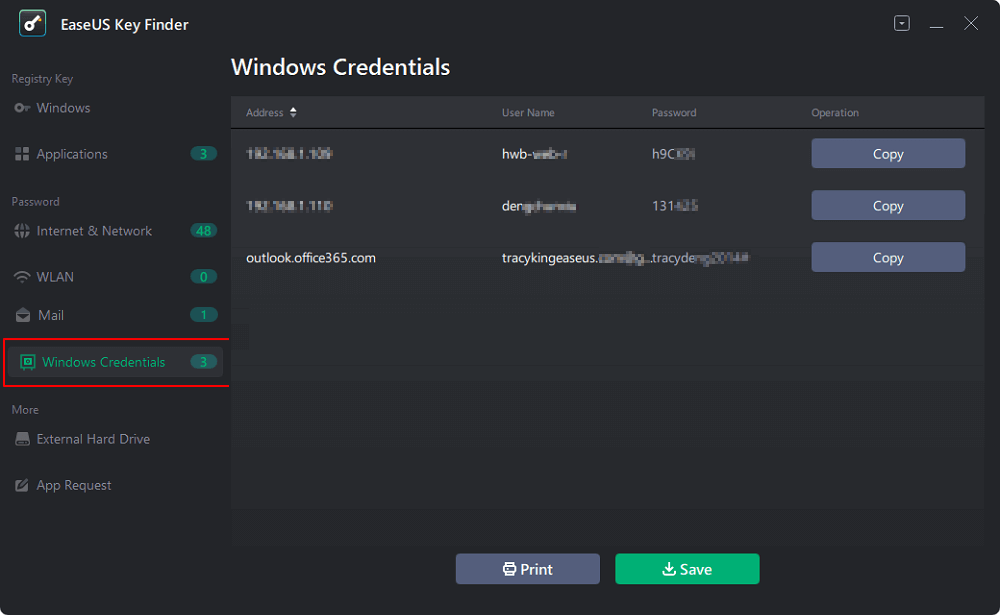
Step 2. Now, you can check all available Windows Credential addresses with respective user names, and passwords.
You can click «Copy», «Print», or «Save» these Windows Credentials’ accounts and passwords at one time.
Pros
- Trusted and reliable brand.
- 100% guarantee to find the Windows credentials.
- Completely safe to use.
- The user interface is simple and easier to learn for beginners.
- Few clicks to required to use the software.
Cons
- Limited use for the free version, so you have to buy the premium version.
Key Finder Windows Built-in Tool: How to View Password in Credential Manager
If you do not wish to download any external tool, you can also use Windows built-in tool to view Windows stored credentials. Let’s see below how you can do that.
Windows Credential Manager
Windows credential manage is a built-in tool that comes with your installed Windows operating system. It keeps track of your saved passwords, login credentials, and web passwords.
The tool becomes useful when you forget any password. It easily helps you to know your credentials without much of a hassle. Let’s see below the steps to use this software.
Steps to use Windows Credential Manager
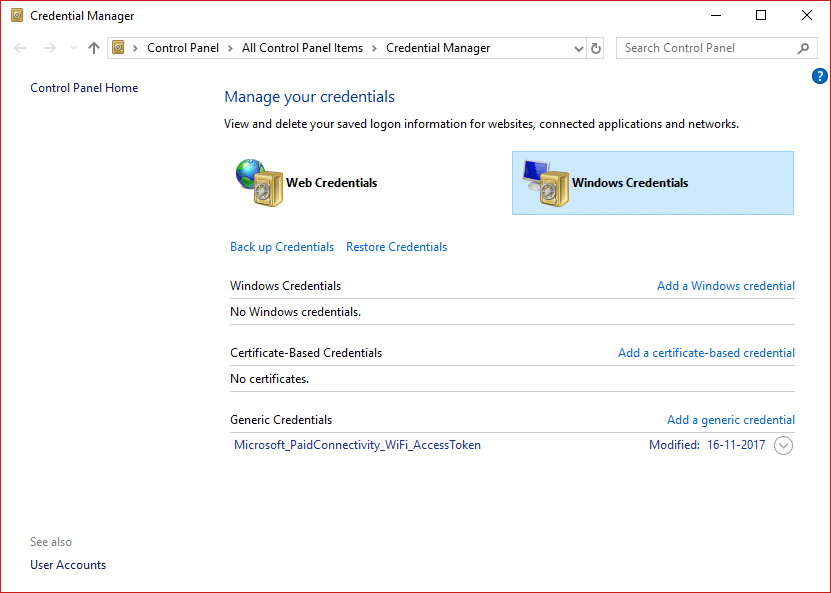
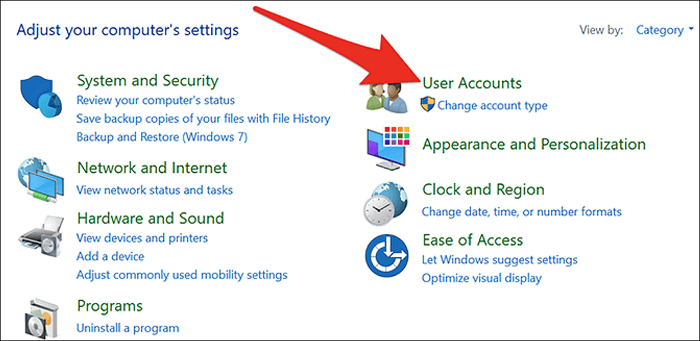
Step 1: Open Control Panel using Cortana or search through the search bar.
Step 2: Open User Accounts from Control Panel.
Step 3: From User Accounts, select Credential Manager.
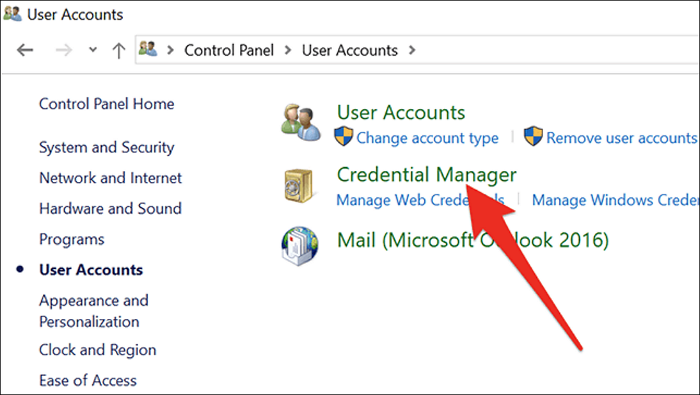
Step 4: Explore Web Credentials or Windows Credentials through Credential Manager.
Web credentials hold all the saved passwords from Microsoft Edge or Internet Explorer. At the same time, Windows Credentials shows you the authentication details.
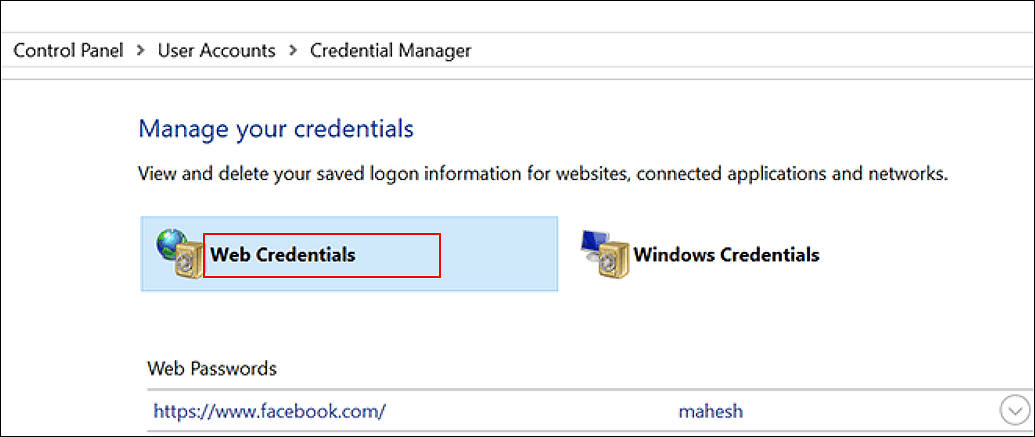
By clicking on any options, you can easily see the passwords by pressing the Show button.
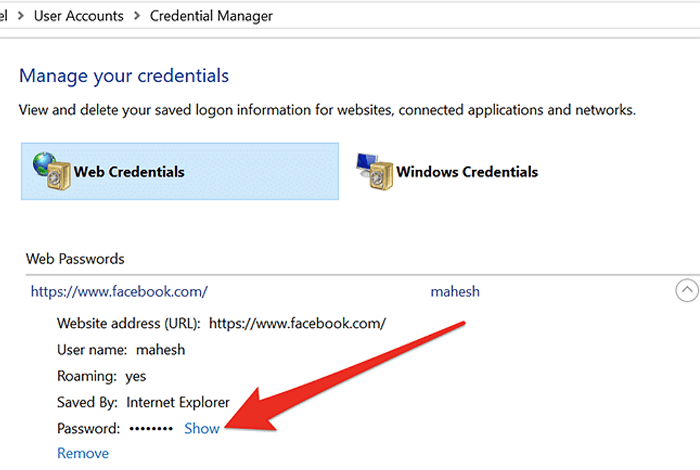
Note: Windows prevent users from seeing password without authentication. When you click on the show button, a pop-up will appear asking you to identify yourself. The identification method depends on how you use the system. Usually, you have to enter a password, give the fingerprint, or face scan.
Pros
- Built-in tool and does not require any 3rd party installation
- Free to use because it does not have any premium version.
- Automatically manages the passwords for you.
Cons
- It does not guarantee to show every password.
- «Windows Credential Manager not showing password» has been reported by its users.
- Not available for all Windows versions.
Conclusion
Passwords are a great way to protect data and secure it from unauthorized users. But, you can sometimes forget your password. You can not access the system without a password and hence be worse.
Therefore, whenever you forget credentials in Windows, you can easily see them. Windows keep track of your saved password through its tool known as Credential Manager. But, it does not work on every Windows version and does not guarantee saving passwords.
Therefore, the most recommended way is to use EaseUS Key Finder software. It helps you to show Windows credentials easily within just a few clicks. Also, it is recommended because it gives you activation backup, 24/7 tech support, and many other features.
Все способы:
- Способ 1: Учетные записи пользователей
- Способ 2: «Панель управления»
- Решение возможных проблем
- Дополнительная информация
- Отключение запроса пароля
- Отключение сохранения паролей
- Вопросы и ответы: 2
Способ 1: Учетные записи пользователей
При подключении нового оборудования или пользователя к сети система требует пароль, если он изначально задан во время настройки общего доступа и локальной сети. Иногда пользователи теряют или забывают учетные данные, но есть способы, которые позволяют посмотреть их с помощью встроенных средств операционки:
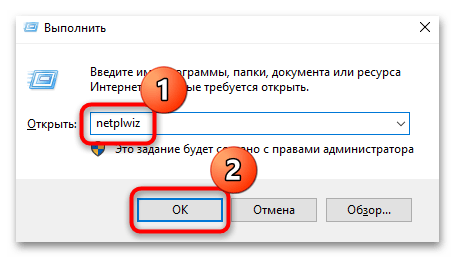
- Одновременно нажмите на клавиши «Win + R» — отобразится встроенная оснастка «Выполнить», где в текстовом поле нужно ввести
netplwizи нажать на кнопку «ОК». - В открывшемся окне «Учетные записи пользователей» переключитесь на вкладку «Дополнительно», затем кликните по «Управление паролями».
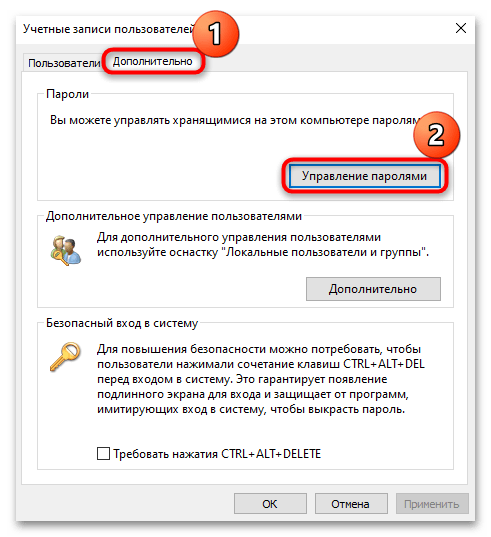
Запустится «Диспетчер учетных данных», где и можно узнать сетевые учетные данные в Windows 10 и пароли от веб-сайтов. Кроме того, здесь есть возможность изменять данные, удалять их или добавлять новые учетные записи.
Способ 2: «Панель управления»
Есть еще один способ посмотреть сетевые логин и пароль, но он срабатывает не во всех случаях. Для этого потребуется инструментарий «Панели управления» и созданная «Домашняя группа» в Windows 10.
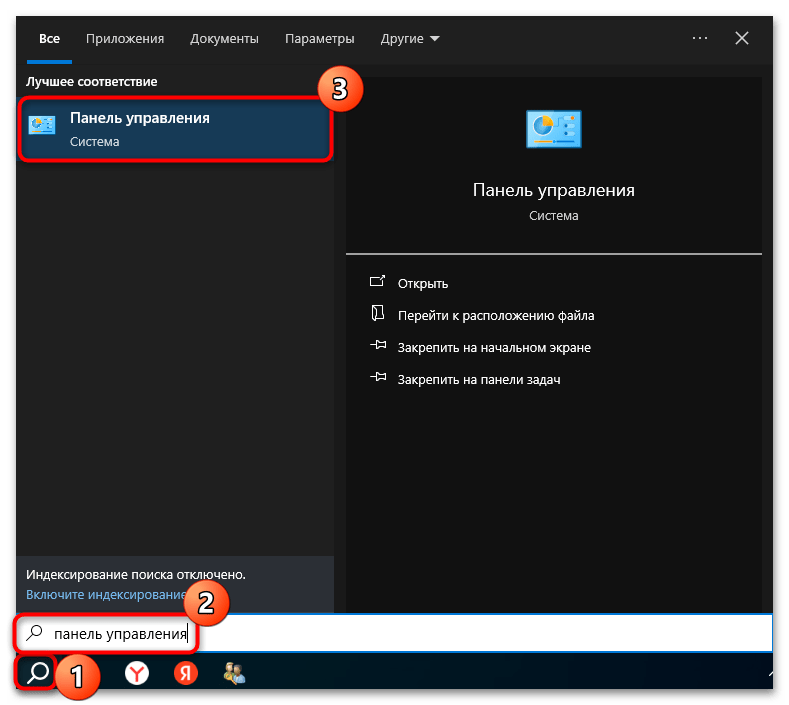
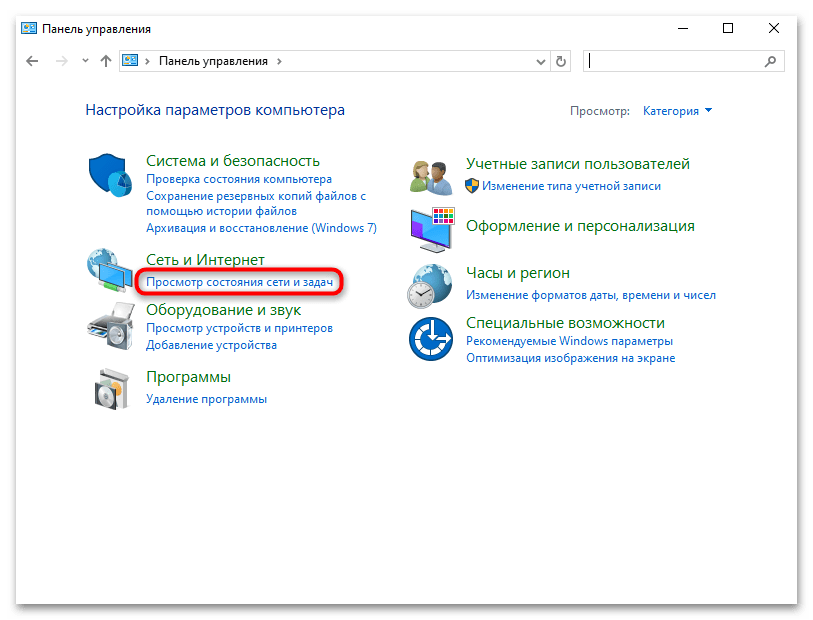
- Воспользовавшись строкой системного поиска, отыщите «Панель управления».
- В качестве просмотра разделов выберите «Категория», затем кликните по строке «Просмотр состояния сети и задач» в категории «Сеть и Интернет».
- Если на панели слева внизу есть ссылка «Домашняя группа», кликните по ней. После этого откроется окно, где нужно выбрать пункт «Показать или распечатать пароль домашней группы».
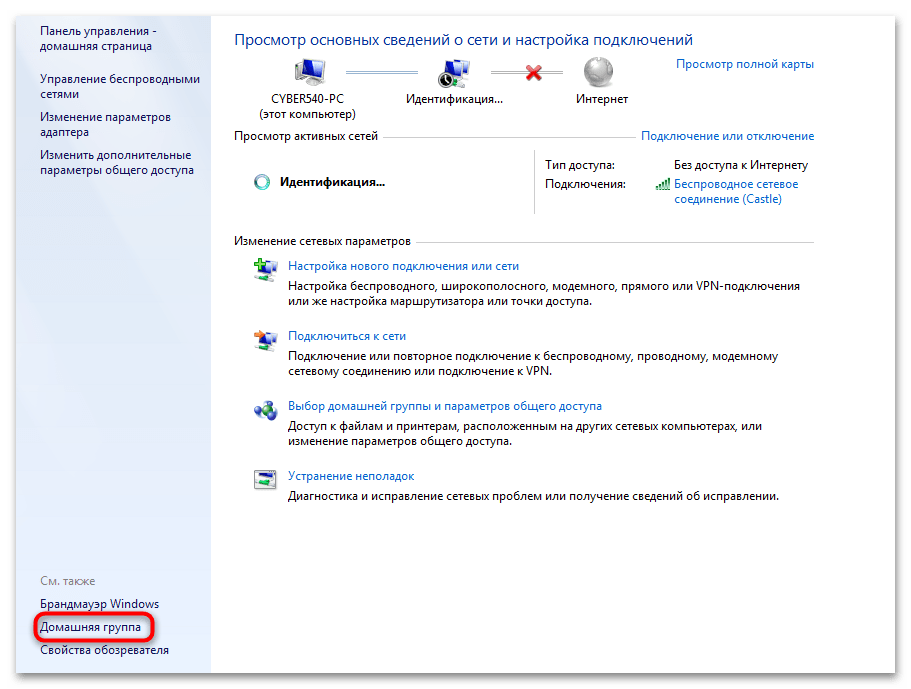
Останется сохранить или переписать учетные данные. К слову, о том, как правильно создать домашнюю группу, наш автор разбирал в отдельном материале на сайте.
Читайте также: Создание домашней группы в Windows 10
Решение возможных проблем
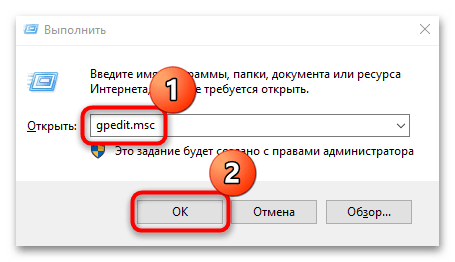
Часто бывает такое, когда система требует пароль, хотя он не был установлен или есть уверенность, что данные были введены правильно. В этом случае может потребоваться изменение некоторых параметров через «Редактор локальной групповой политики».
Данный вариант подойдет для владельцев таких редакций Windows 10, как Pro и Enterprise. В домашней версии «Редактор локальной групповой политики» не предусматривается.
- Вызовите диалоговое окно «Выполнить» и используйте запрос
gpedit.msc, чтобы запустить встроенное средство. - На панели слева перейдите по следующему пути: «Конфигурация компьютера» — «Конфигурация Windows» — «Параметры безопасности» — «Локальные политики» — «Параметры безопасности».
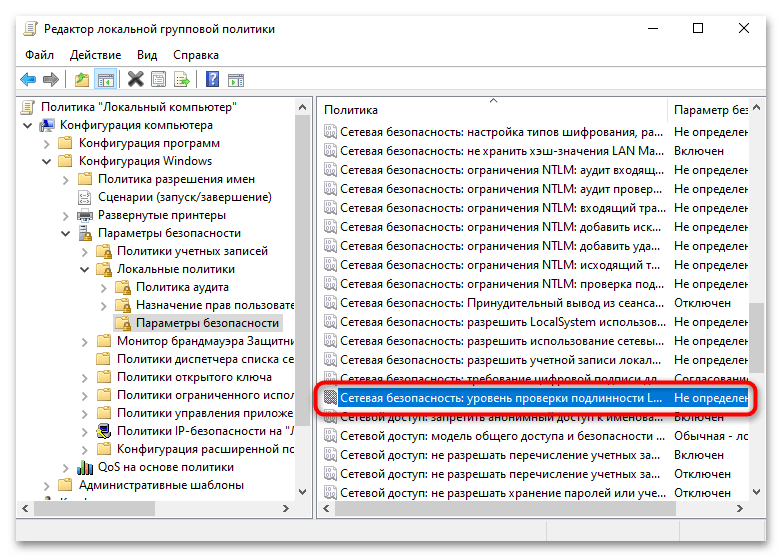
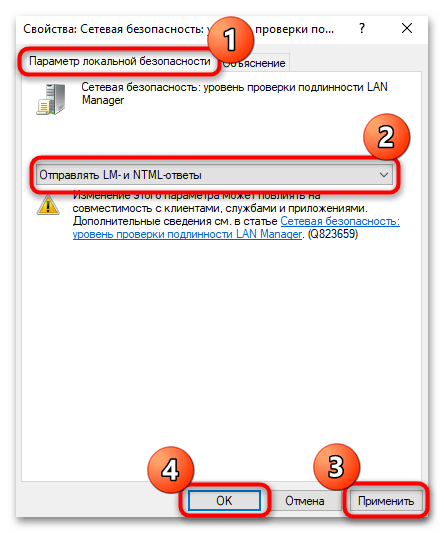
- В центральной части окна найдите строку «Сетевая безопасность: уровень проверки подлинности LAN Manager» и дважды кликните по ней левой кнопкой мыши.
- В новом окне, оставаясь на вкладке «Параметр локальной безопасности», выберите из выпадающего меню пункт «Отправлять LM- и NTML-ответы». Примените и сохраните настройки.

Следует отметить, что это решение подойдет не для каждой версии операционной системы Windows 10. По каким-то причинам в некоторых случаях система продолжает запрашивать пароль, несмотря на редактирование параметра локальной групповой политики. Вероятно, тогда оптимальным вариантом для исправления такой ситуации станет проверка настроек общего доступа и внесение изменений, если это потребуется.
Подробнее: Настройка общего доступа в операционной системе Windows 10
Дополнительная информация
В Windows 10 можно вовсе убрать запрос пароля, который требуется при подключении устройства к общей сети. А если нужно сделать так, чтобы пароли не сохранялись (и их не было возможности посмотреть как описано в инструкциях выше), тогда можно воспользоваться встроенными средствами операционки.
Отключение запроса пароля
Как правило, запрос пароля отключается в случаях, когда есть полная уверенность в безопасности домашней сети:
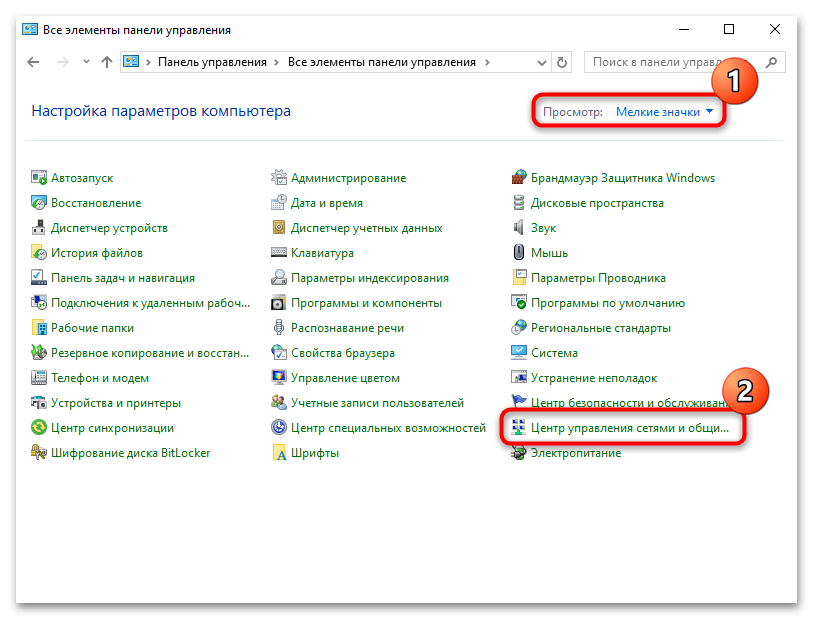
- Запустите классическую «Панель управления» и в меню «Просмотр» выставьте отображение разделов как значки (мелкие или крупные), затем нажмите на «Центр управления сетями и общим доступом».
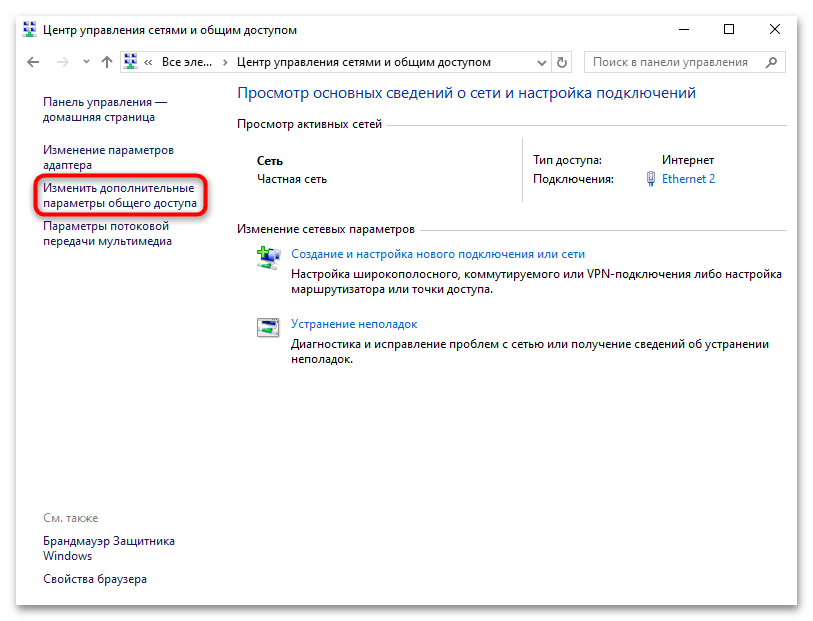
- На панели слева кликните по строке «Изменить дополнительные параметры общего доступа».
- Разверните меню «Все сети», затем включите общий доступ, а ниже отметьте пункт «Отключить общий доступ с парольной защитой». Сохраните изменения, нажав на соответствующую кнопку внизу.
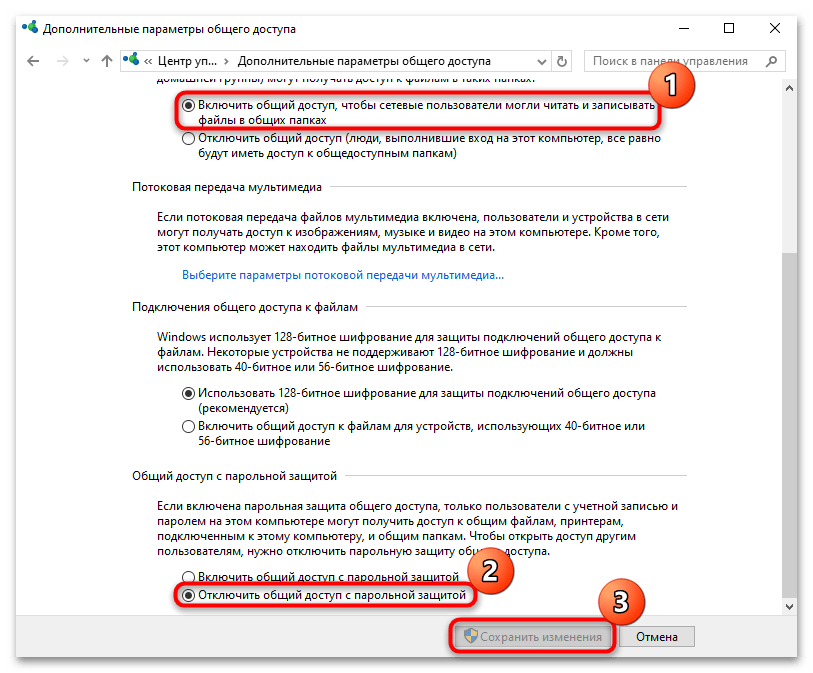
После этих действий требование ввода сетевого пароля прекратится, но имейте в виду, что тогда любое устройство сможет подключиться к локальной сети, поскольку она будет уже не защищена.
Отключение сохранения паролей
В целях обеспечения безопасности в Windows 10 можно отключить сохранение паролей – тогда никто не сможет посмотреть и переписать учетные данные, которые позволят без проблем подключиться к локальной сети:
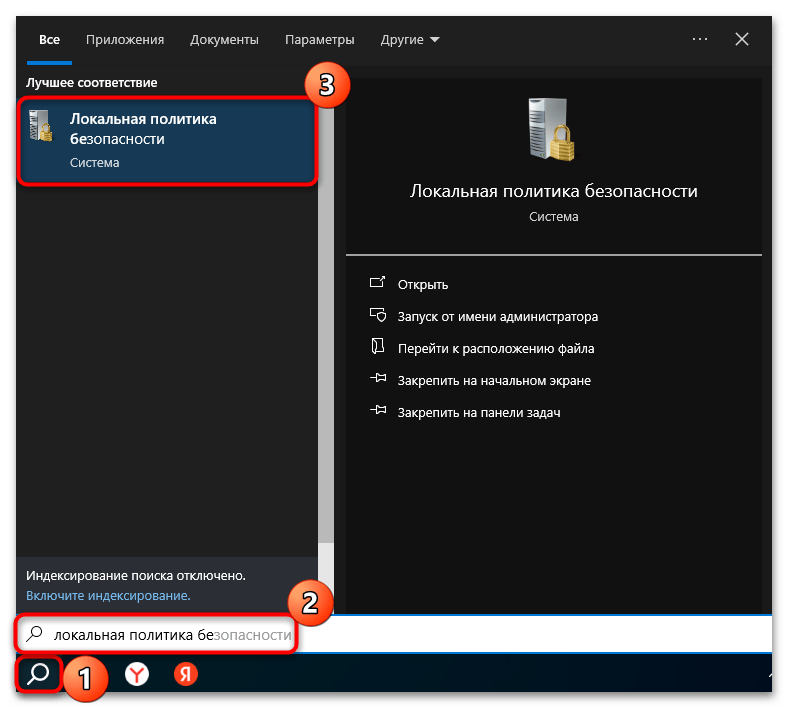
- Запустите оснастку «Локальная политика безопасности». Для этого можно воспользоваться системным поиском.
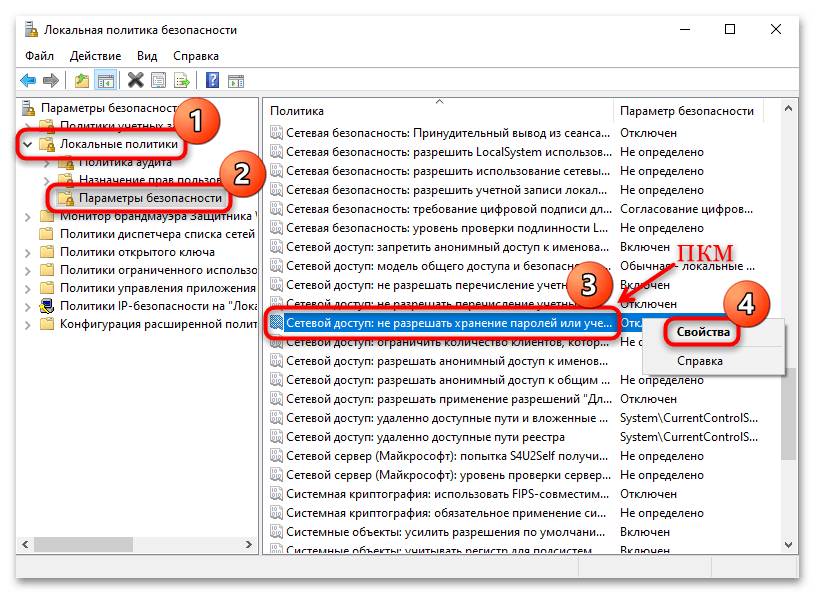
- Разверните меню «Локальные политики» через навигационную панель, затем выберите каталог «Параметры безопасности». В основной части окна найдите пункт «Сетевой доступ: не разрешать хранение паролей и учетных данных пользователей» — кликните по нему правой кнопкой мыши и перейдите в его «Свойства».
- На вкладке «Параметр локальной безопасности» отметьте опцию «Включен», примените и сохраните настройки.
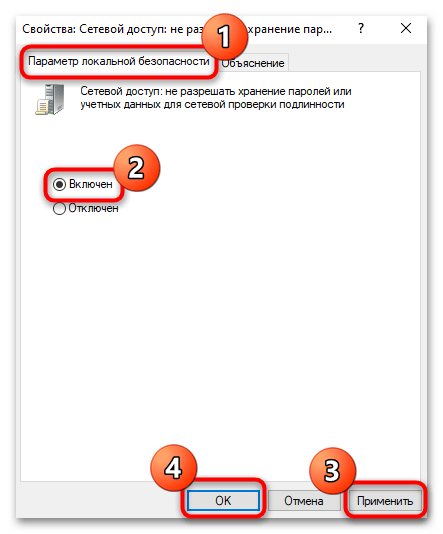
Чтобы новые параметры начали действовать незамедлительно, лучше перезагрузить компьютер или выйти, затем снова войти в учетную запись. После этого операционная система больше не будет сохранять пароли веб-сайтов и сетевых подключений. Имейте в виду, что посмотреть забытые учетные данные уже не получится.
Наша группа в TelegramПолезные советы и помощь