
In this tutorial I am going to show you how to install Windows Server 2022 on Ubuntu Nested KVM.
You can download the Windows Server 2022 from the official Microsoft Evaluation Download site. You need to enter you information do download the eval.
https://www.microsoft.com/en-us/evalcenter/evaluate-windows-server-2022
You can download the virtual IO drivers from here.
https://fedorapeople.org/groups/virt/virtio-win/direct-downloads/stable-virtio/virtio-win.iso
To install the necessary packages to run KVM virtualized software packages, install the following.
sudo apt -y install bridge-utils cpu-checker libvirt-clients libvirt-daemon qemu qemu-kvm virt-manager
Check if you Ubuntu machine allows running of KVM or nested KVM.
sudo kvm-ok

Add your sudoer user to the following group.
sudo adduser <username> kvm
sudo adduser <username> libvirt
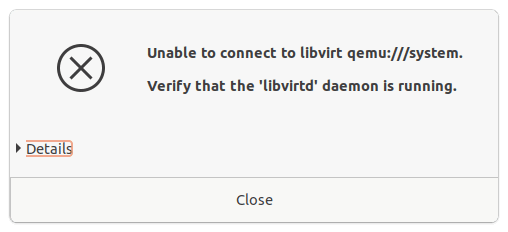
Make sure that your Virtualized Daemon is running
sudo systemctl status libvirtd
If you have not create a directory where there is enough space you might want to do so.
sudo ln -s /mnt/ /mnt/
sudo mkdir -p /
Make sure you have install remote access tool such as VNC. You can follow the following tutorial if you need the steps to do it.
https://old.dracocybersecurity.com/install-tightvncserver-on-ubuntu-20-04/
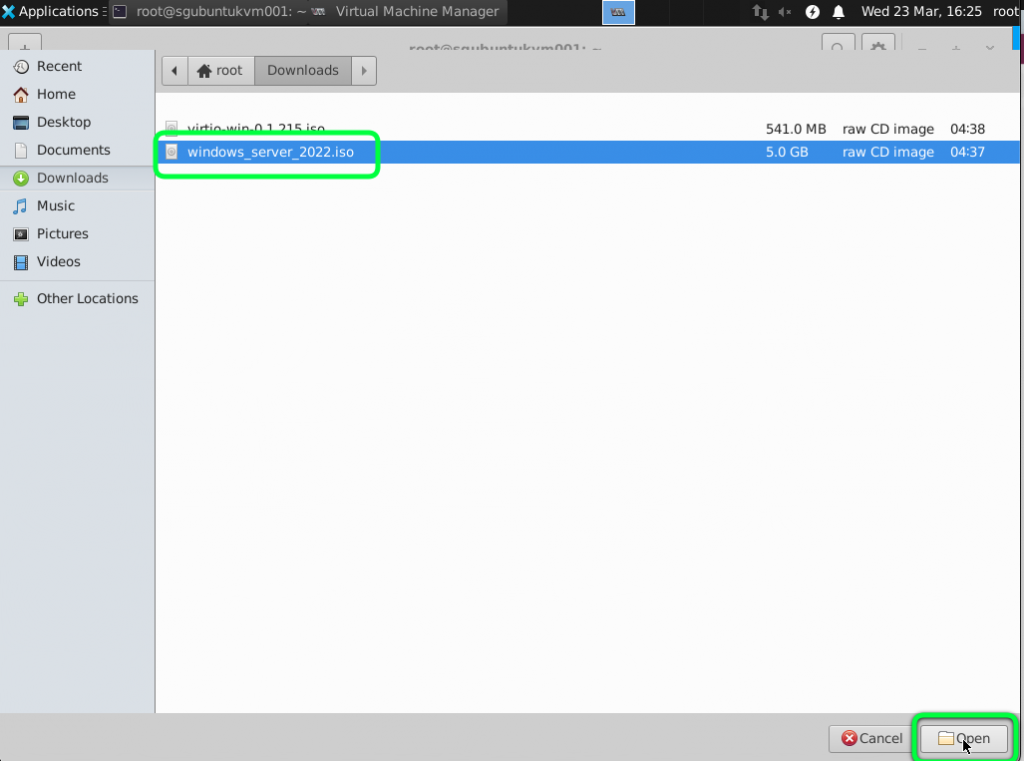
First copy or download the windows iso and virtio windows driver file necessary for the installation to the Ubuntu Server
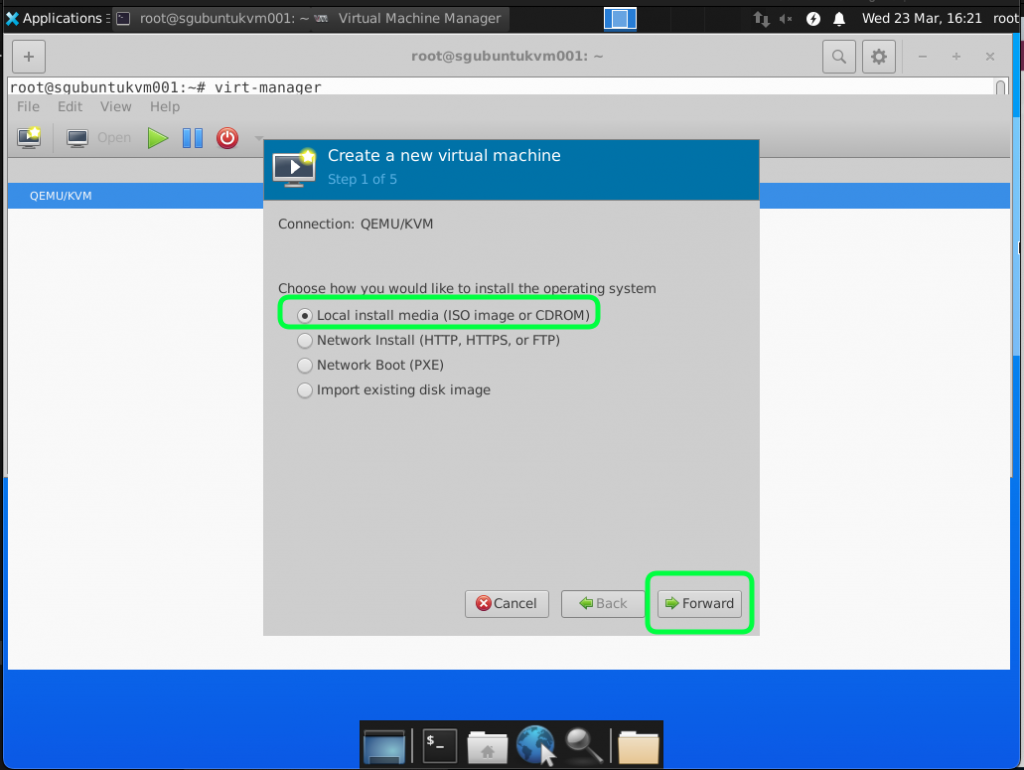
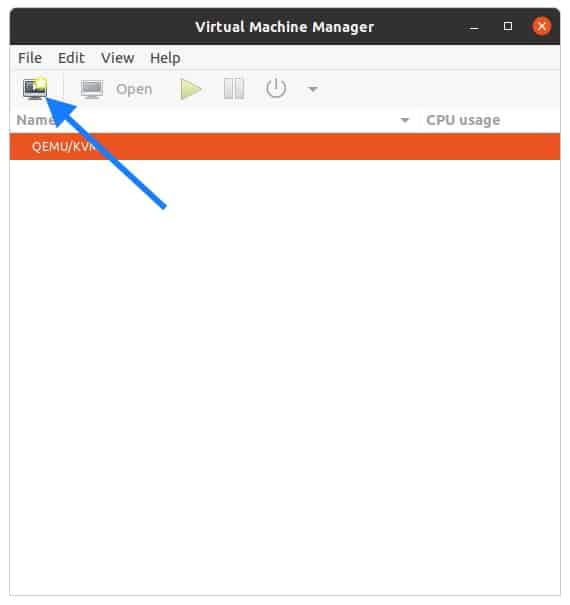
We are going to use virtual manager (virt-manager) to install the Windows Server 2022.
Next you can follow the step by step guide to install Windows Server 2022 using Virtual Manager (virt-manager)
Run virt-manager from the terminal in the GDE

Right Click on QEMU/KVM and select New.

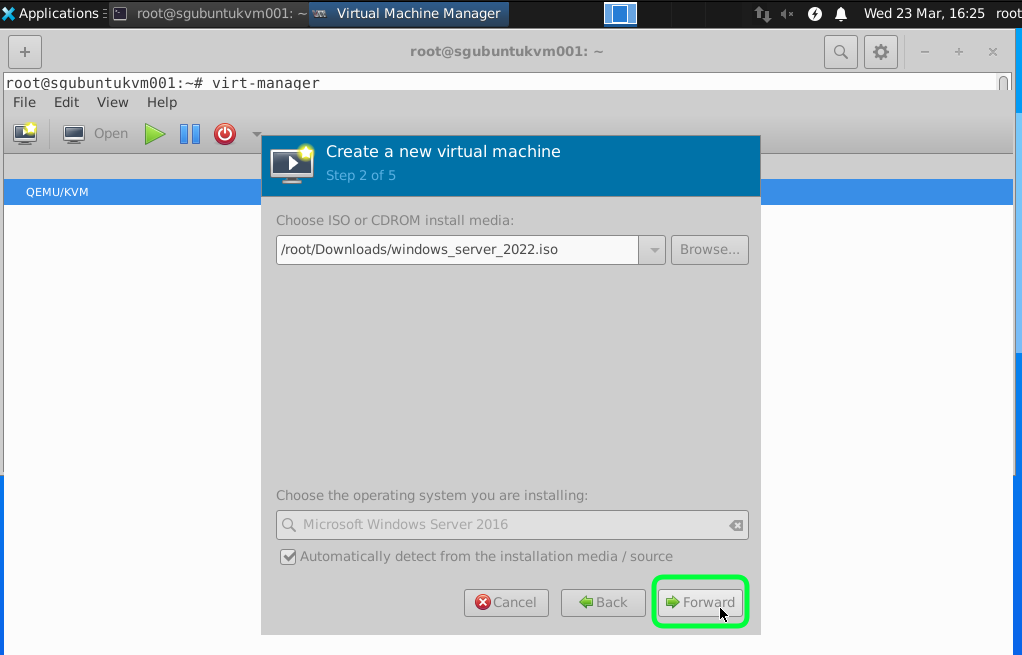
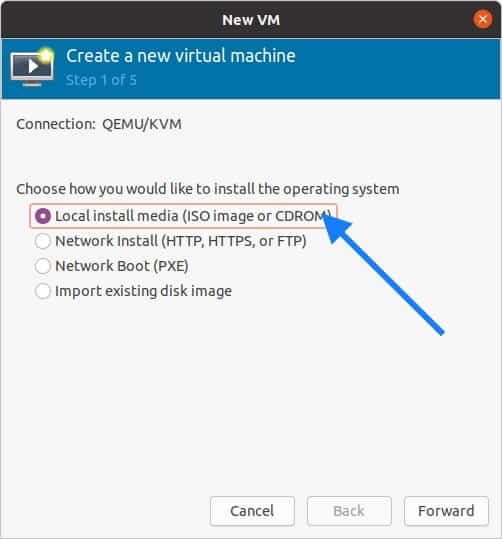
We are using local images that we have copied into the Ubuntu so select Local install media and click Forward.
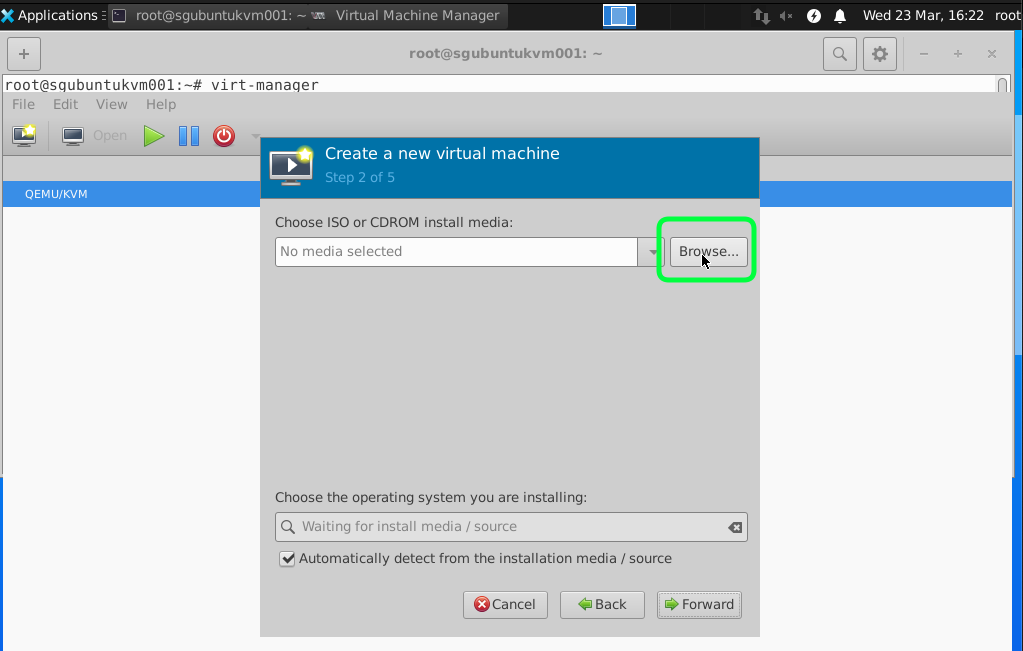
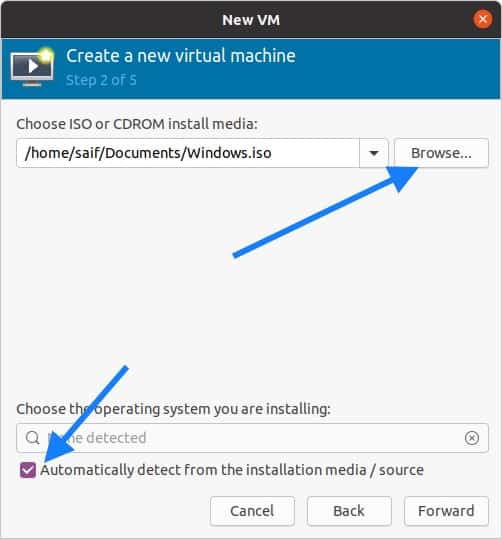
Click on Browse and Select the Windows Image.
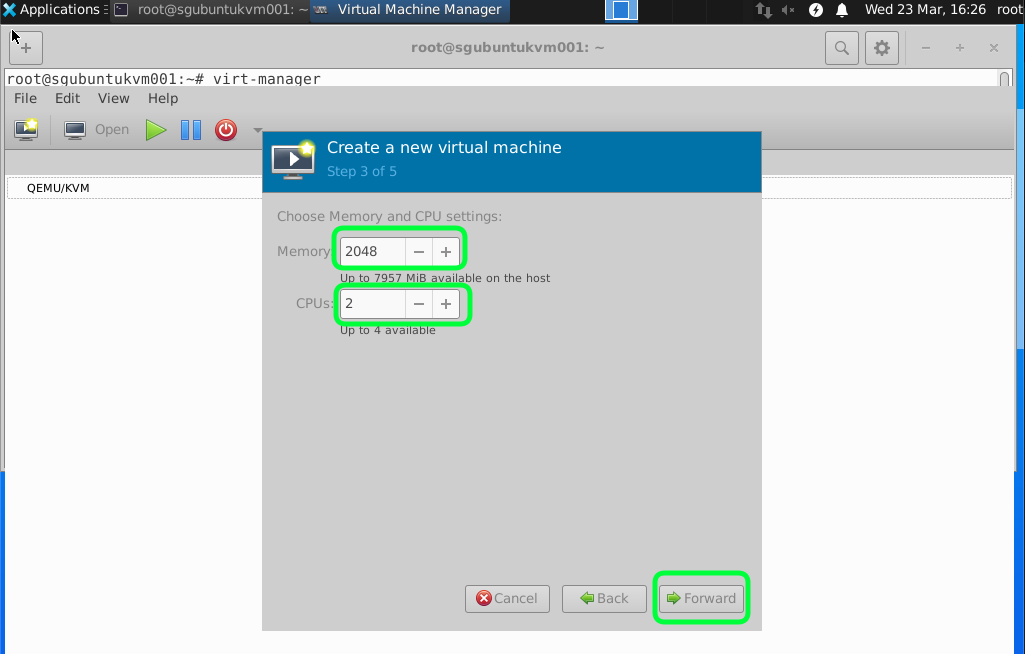
I would recommend having minimum 2GB RAM and 2 vCPUs for a start. As anything lower than this make the VM very slow and can become unstable.
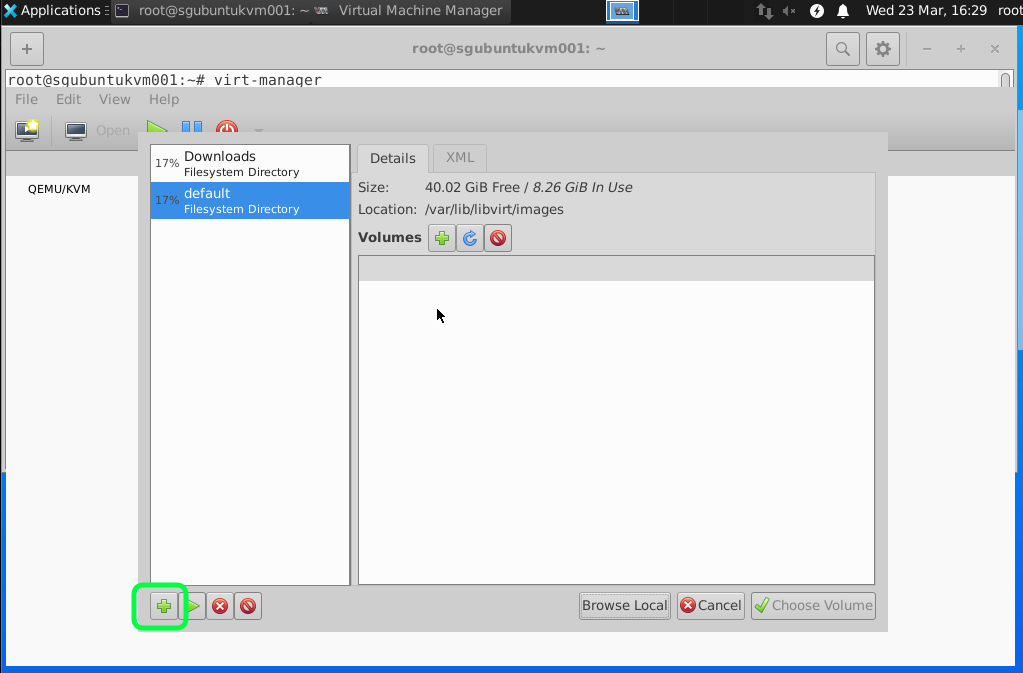
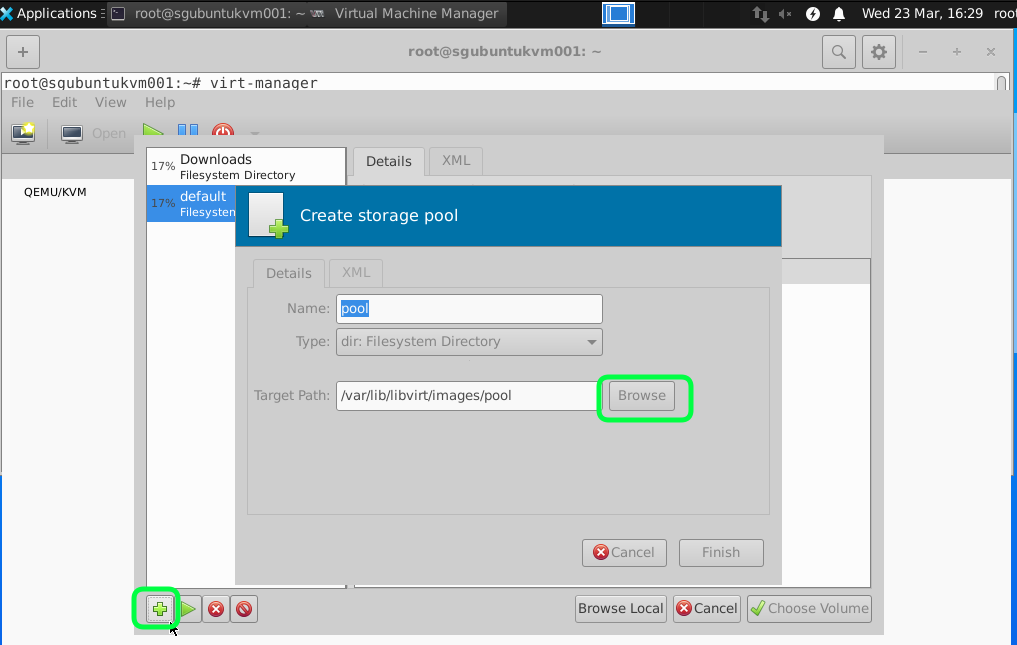
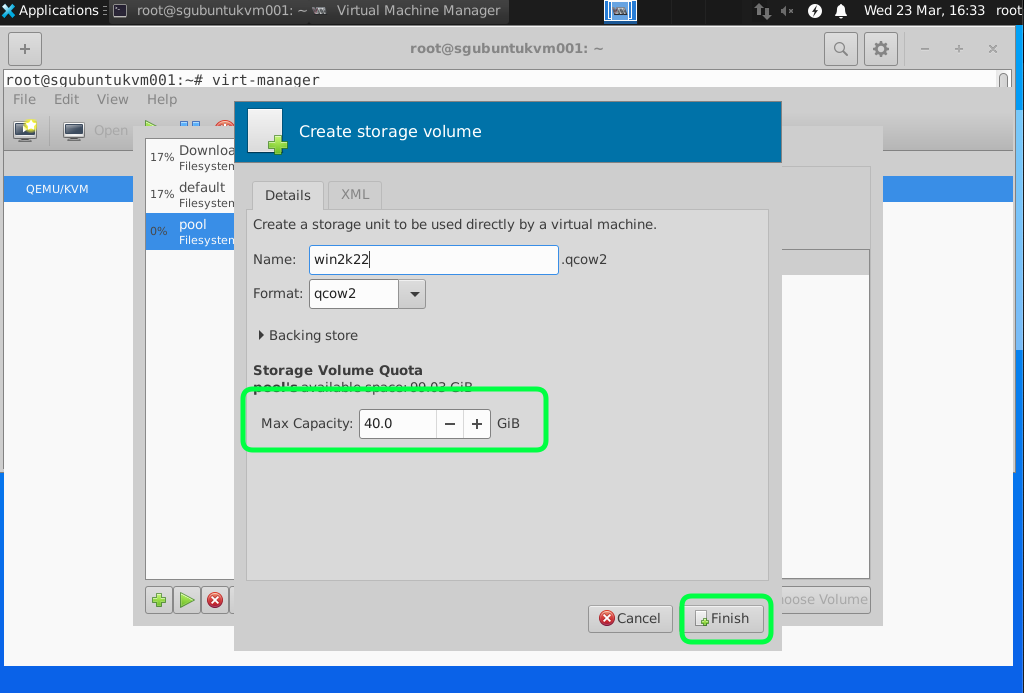
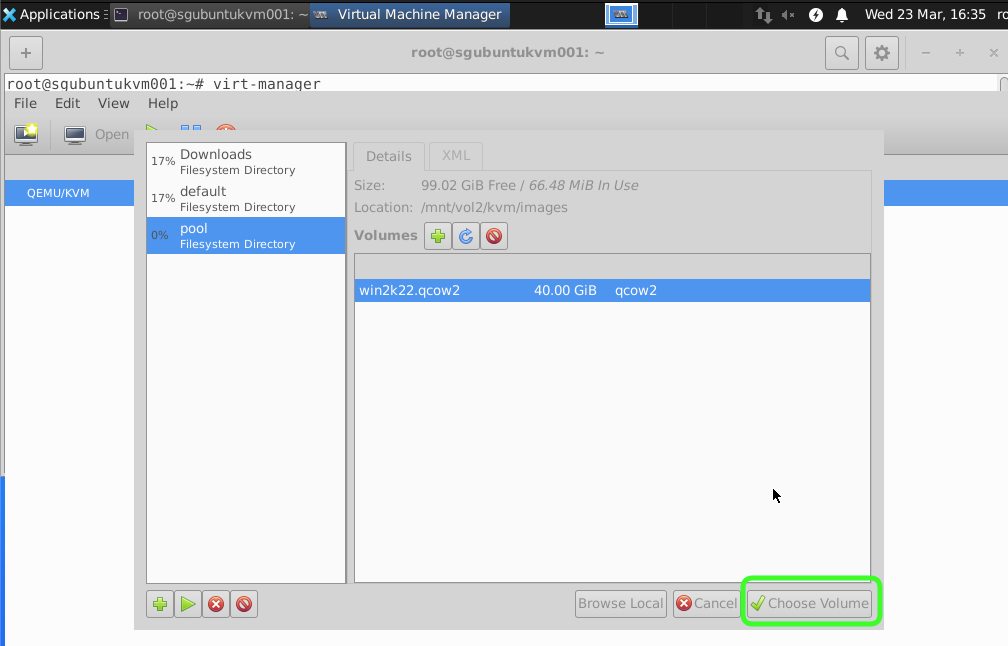
For this tutorial we are going to add and select a attached storage.
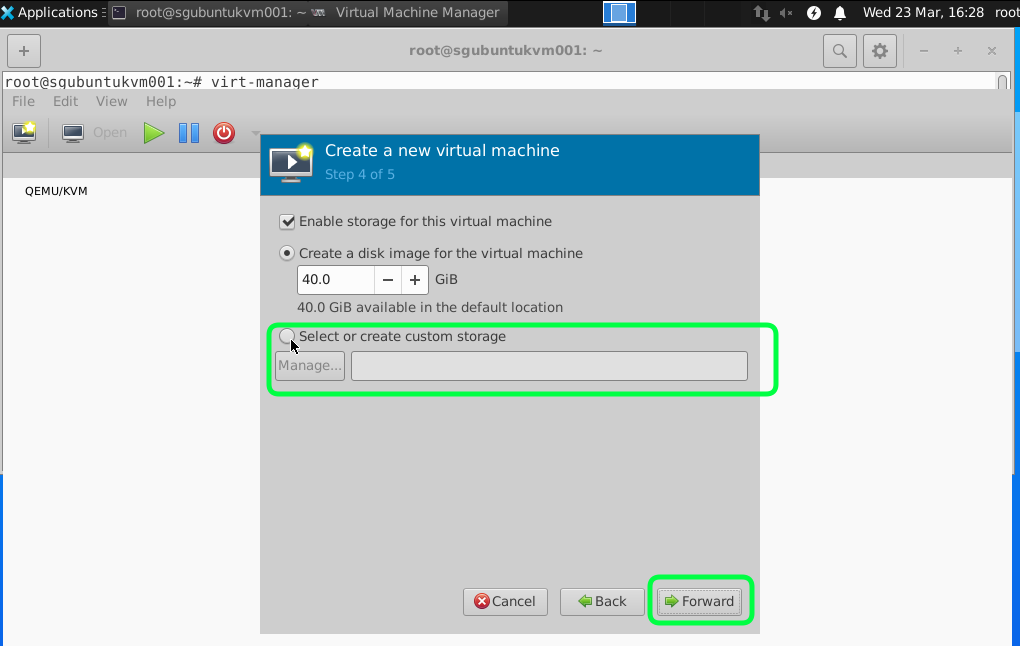
Click on the add icon to select a new Directory.
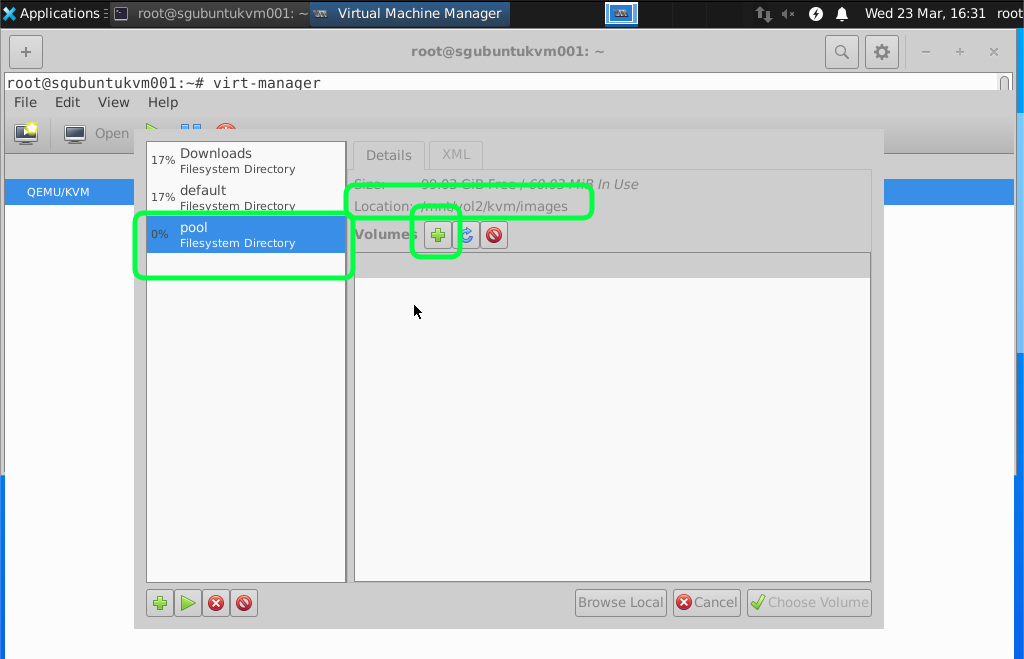
Recommend to have 40GB of Hard disk space you can start with a smaller size and fix disk with more capacity later but setting the minimum of 40GB it should last you for a while. If you are using the Windows Server just as a Active Directory for my lab.
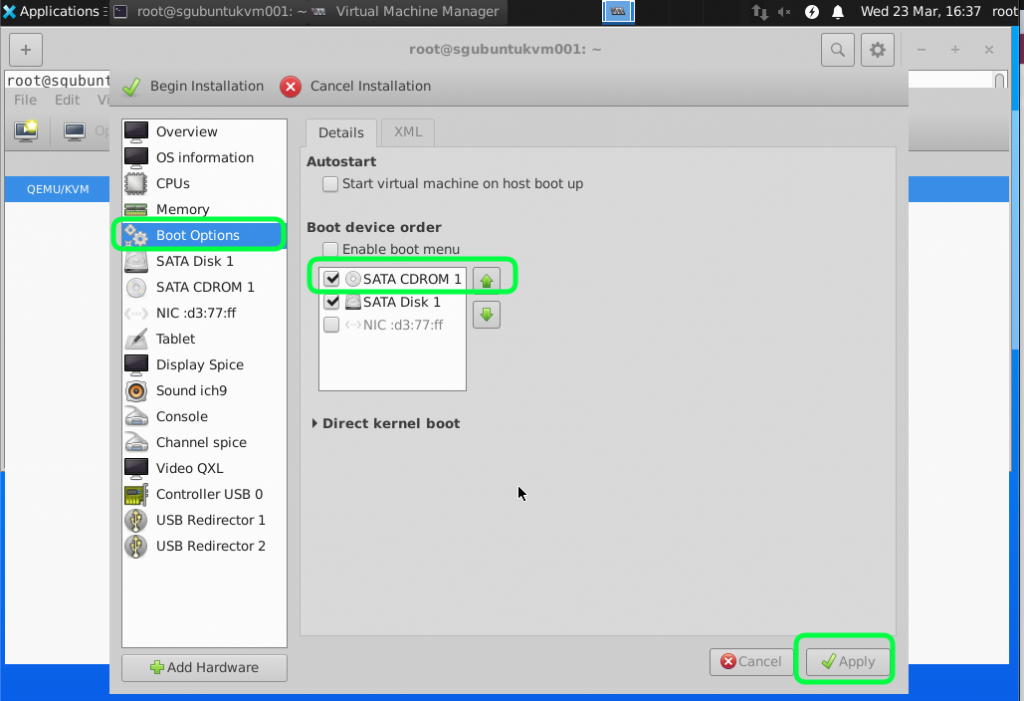
Click on Customize Configuration before install to adjust a few settings.
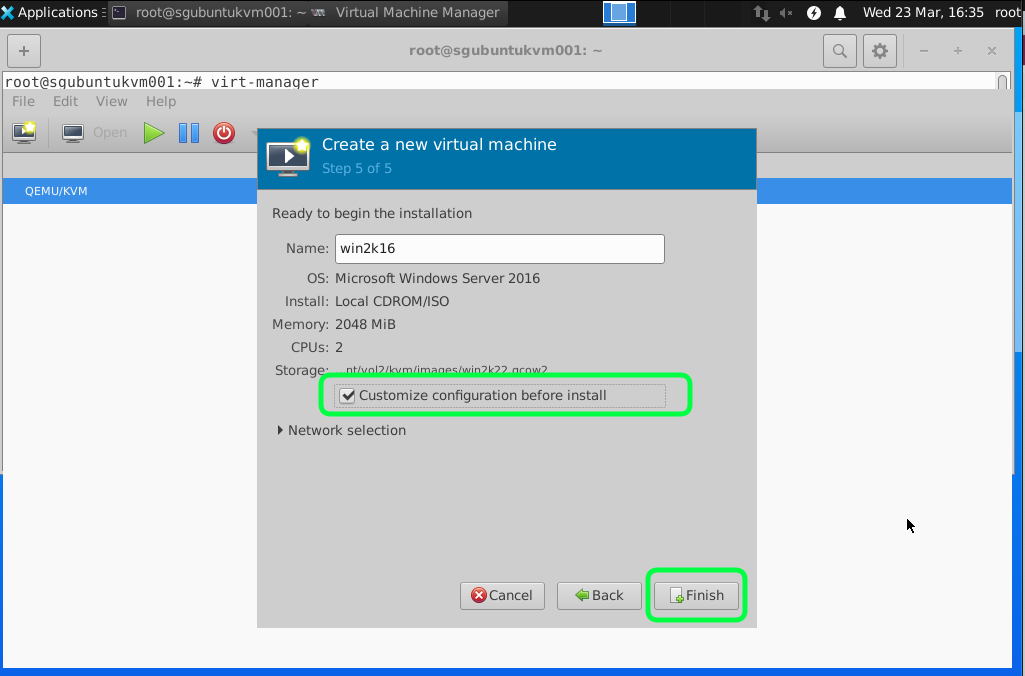
Set the boot option to boot from the CD ROM where the Windows Server ISO is stored.
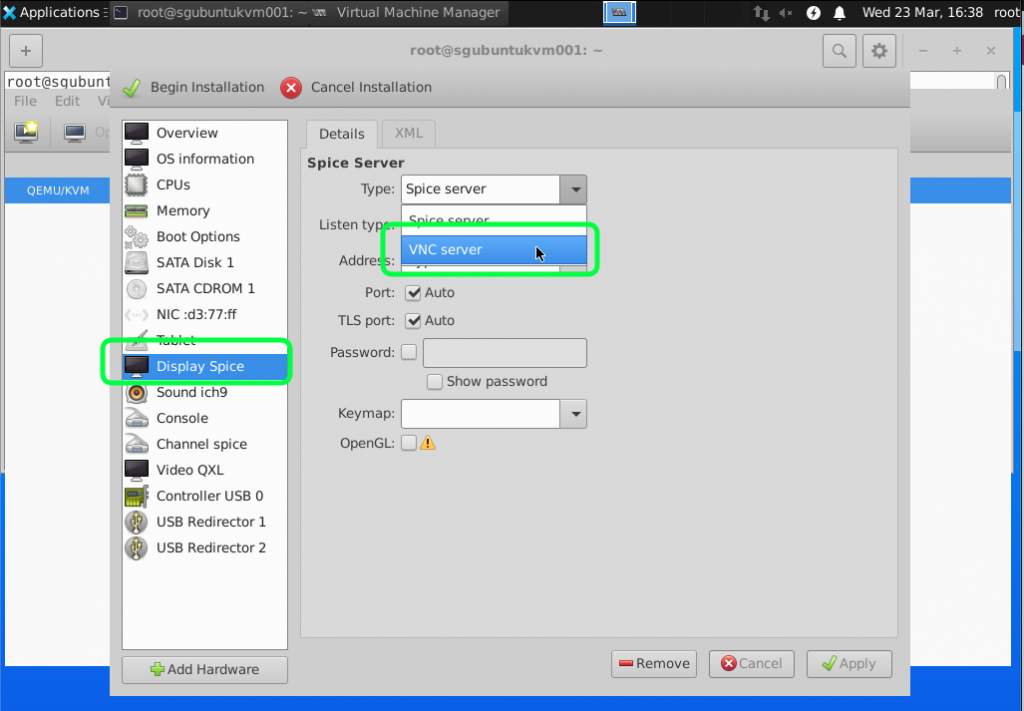
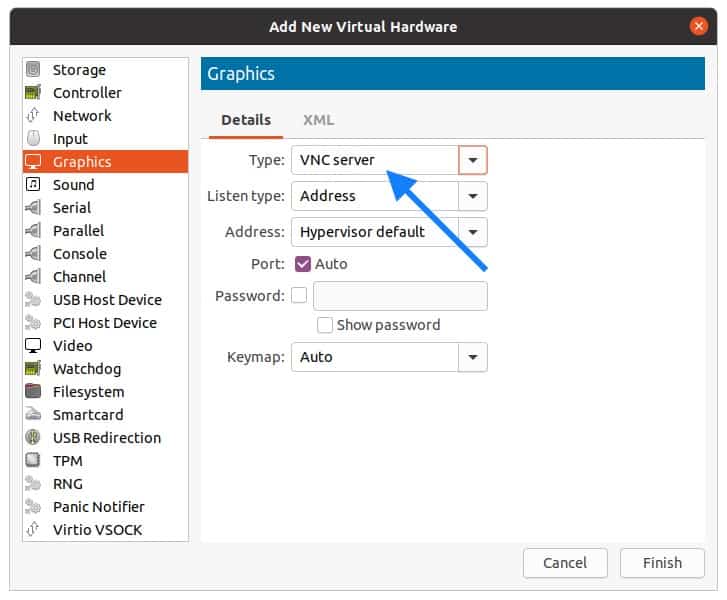
I find VNC Server Display better for installing Windows Server. For Spice I sometime lose the keyboard control.
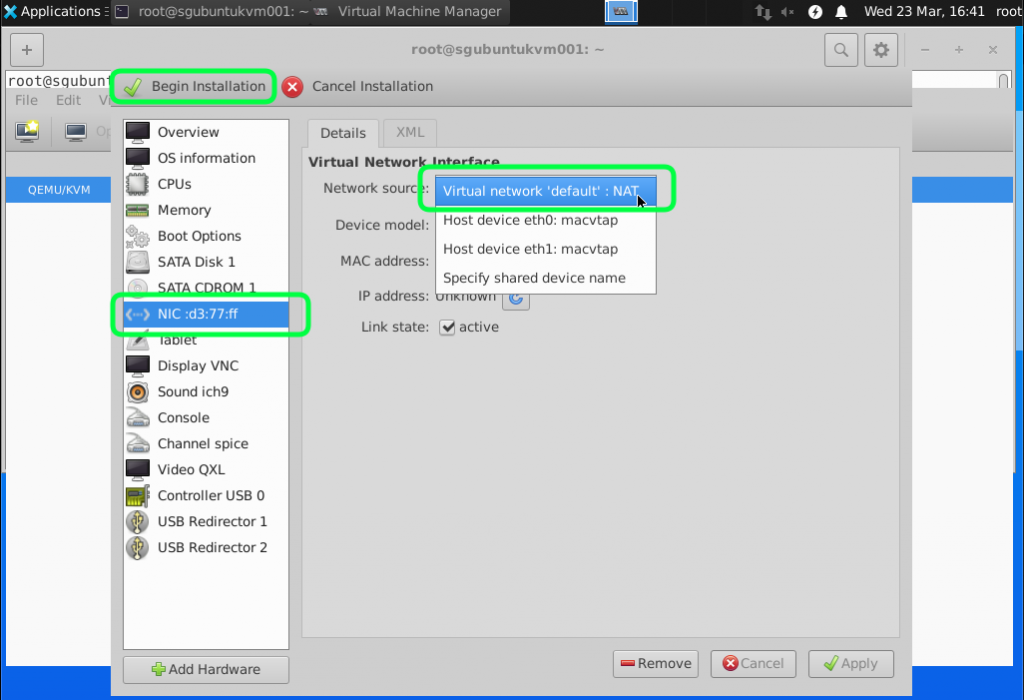
We are going to use the default NAT just to test the connectivity and ensure that the virtual nic/network is working. We will go through the bridge mode in the next tutorial. You can start the installation by clicking on Begin Installation.
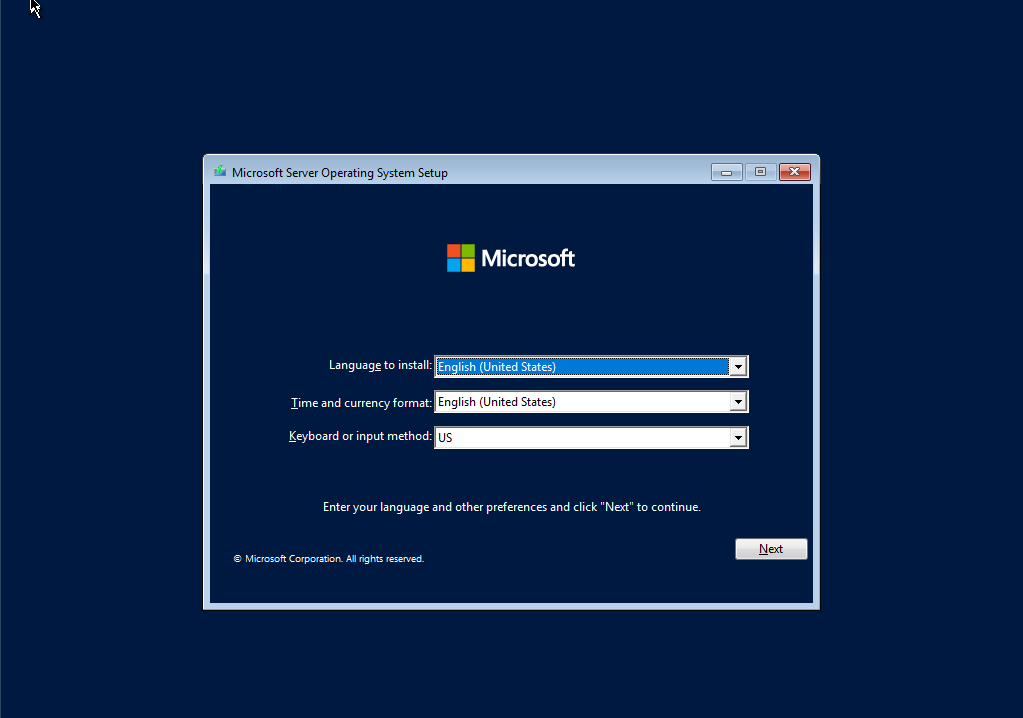
Once that is done you can go through the normal windows installation process. Depend on the resources and the connection to the internet it might take some time to complete the installation.
To allow non root (sudo) users that you have added to the libvirt group to be able to configure the VM you need to edit the /etc/libvirt/libvirtd.conf file.
nano /etc/libvirt/libvirtd.conf
Add or uncomment the following and change the permission accordingly.
unix_sock_group = “libvirt”
unix_sock_rw_perms = “0770”

Restart the libvirtd service.
sudo systemctl restart libvirtd.service
I love Ubuntu, especially when I wanted to work with python programming, But I also love windows 10 because of its GUI and the vast variety of software support.
In the last blog, I covered how you can install windows 10 on Centos/Redhat KVM. But in this tutorial I going to cover the Debian derivative Ubuntu.
And the steps mentioned here are exactly the same for the other Debian derivative Linux mint.
Since I get a lot of questions with regards to Ubuntu specifically I decided to write separate blogs for Ubuntu and Redhat, so if you are using Centos/Redhat/Fedora you may click here.
Prerequisite.
Ubuntu machine with good configuration.
Download the Windows ISO image by following the guide here.
Windows virtio drivers iso download latest.
Download Spice guest tools.
1. How to install KVM on Ubuntu?
The first step is to prepare the environment by installing the KVM utilities on the Ubuntu host.
On my PC I am using Ubuntu version 20.04 so enter the below commands to install KVM on an ubuntu machine. The Same command can be used with as well.
sudo apt update
sudo apt install qemu-kvm bridge-utils virt-manager libosinfo-bin -y
You may now go ahead and reboot the host, if you dont reboot the machine then you will end getting a below error.
2. Open the virtualization manager and create the VM.
Open terminal and type virt-manager
In the virtual machine manager window click on create a new virtual machine.
A new window now will pop up. In the New VM wizard select Local install media and click on forward.
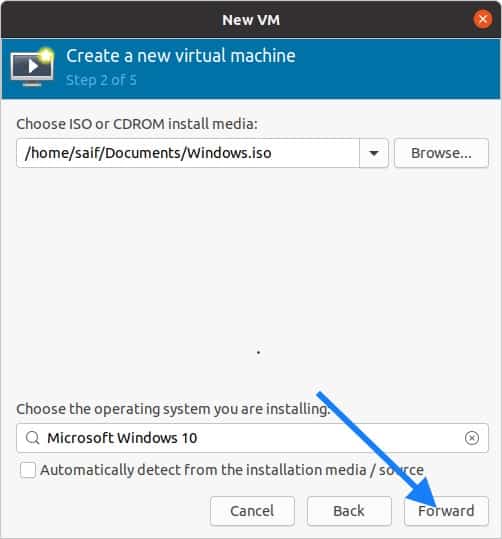
You will now have to browse for the windows 10 iso that you have downloaded and Uncheck the option which says automatically detect from the installation media.
Start searching for the window10 under choose operating system, and check the box which says include end of life operating system. Once you check the box you will be able to see the Microsoft Windows 10 operating system in the list.
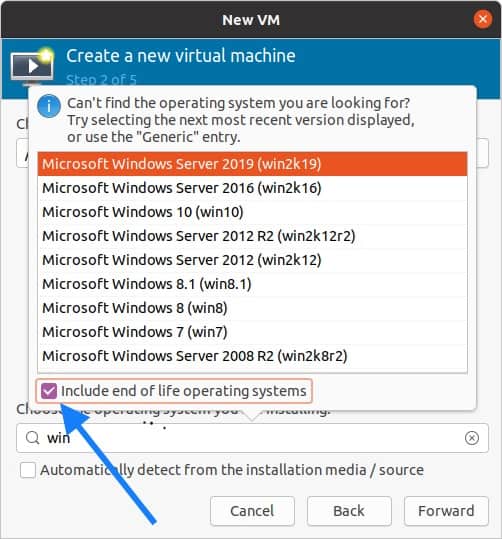
Once you select the Microsoft Windows 10 click on forward.
3. Configure the virtual machine resources.
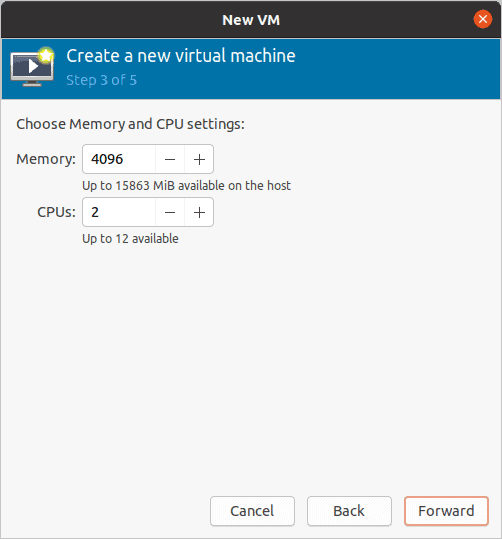
Next, you will be asked to define the memory and the CPU, I am giving 4GB of memory and 2 CPU’s and click on forward.
Depends on your configuration you may choose yours.
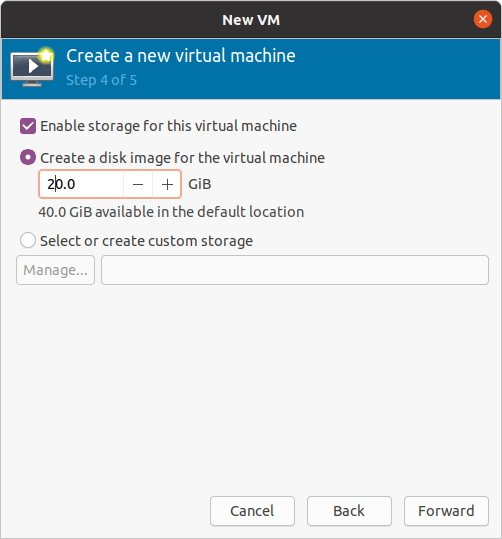
When you configure the virtual hard disk, by default Ubuntu KVM would pick up 40GB, since I don’t require that much space I just added only 20GB and clicked forward.
You may choose 40GB or more.
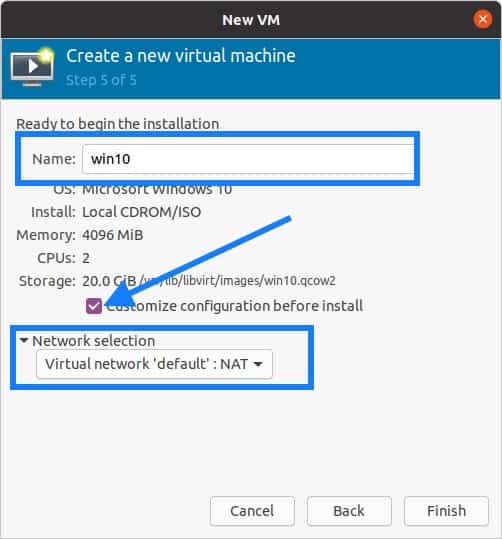
Finally, you will have to Name the windows KVM VM and check the option Customize configuration before install.
I also selected the network as Virtual network ‘default’ NAT. By selecting this network you guest VM will start using the Ubuntu host internet connection.
Click on Finish at this moment now.
4. Configure the virtual Hardware’s.
Since you selected customize option you will now be presented with the KVM customization screen.
Do not click on Begin installation yet, before that we have to modify some hardware changes.
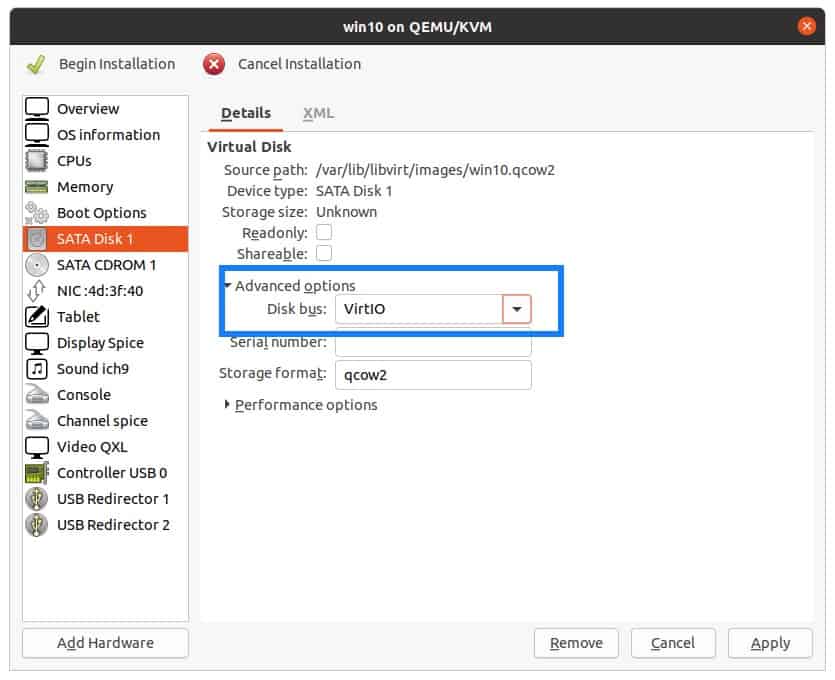
Click on the SATA Disk1 , and on the right side expand the advanced options and click on the Disk bus drop-down list.
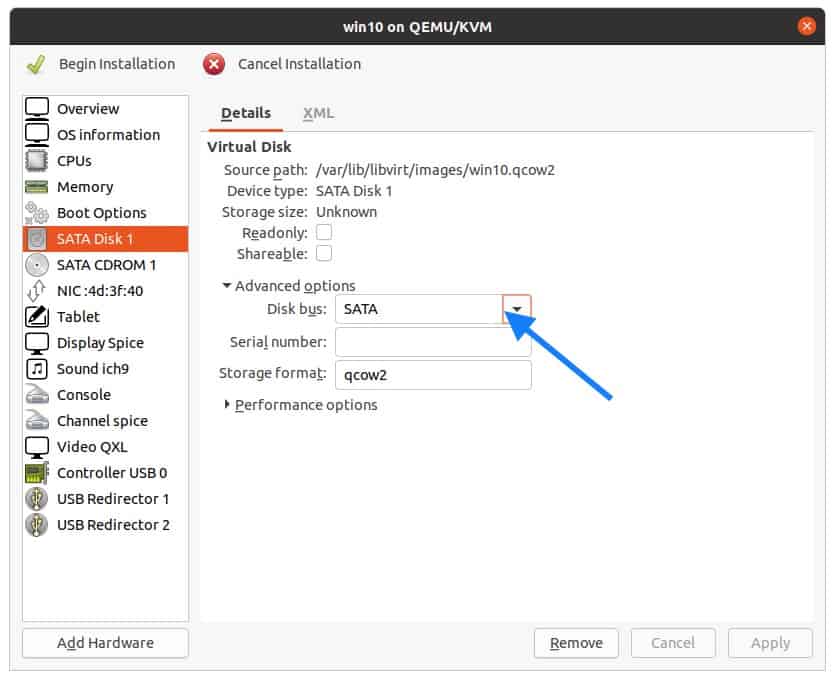
Select VirtIO as the disk bus, and then click on Apply.
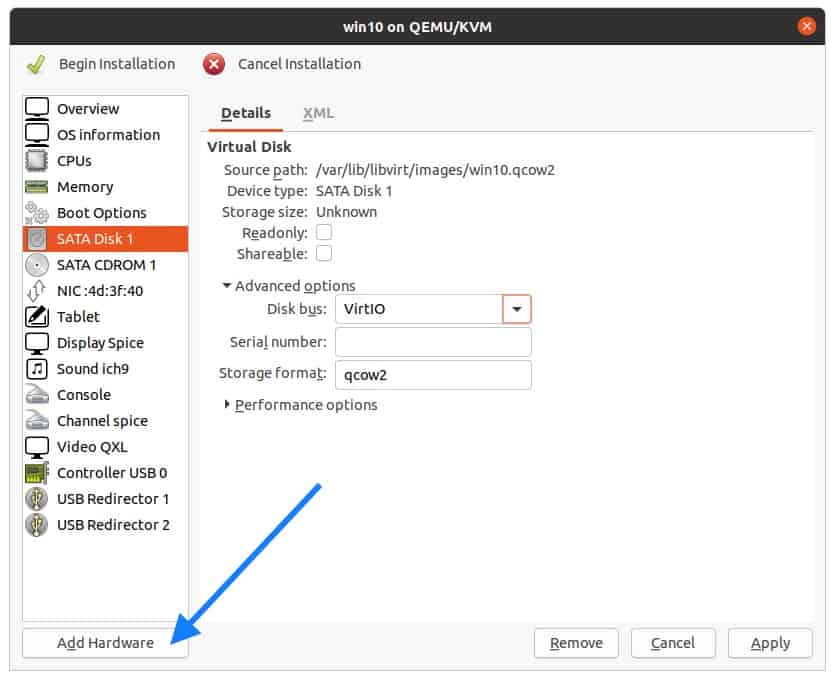
You now have to add VNC Viewer as the graphics, so click on Add hardware from the bottom left.
In the add New virtual hardware windows, select Graphics and in the Type select VNC Server and click on Finish.
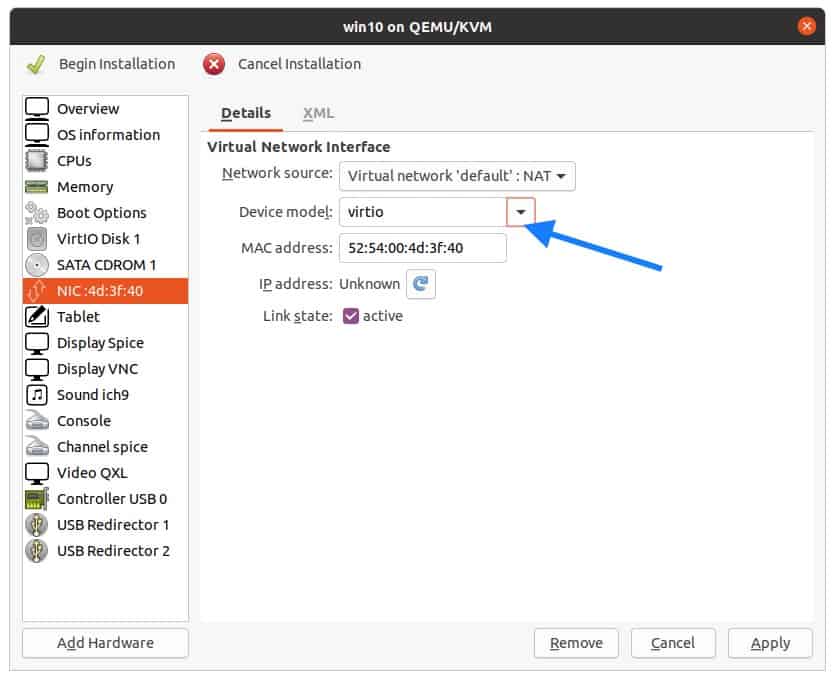
Click on Network interface card (NIC), change the device model to VirtIO, and click on Apply.
5. Add the Windows 10 virt drivers and configure the boot loader.
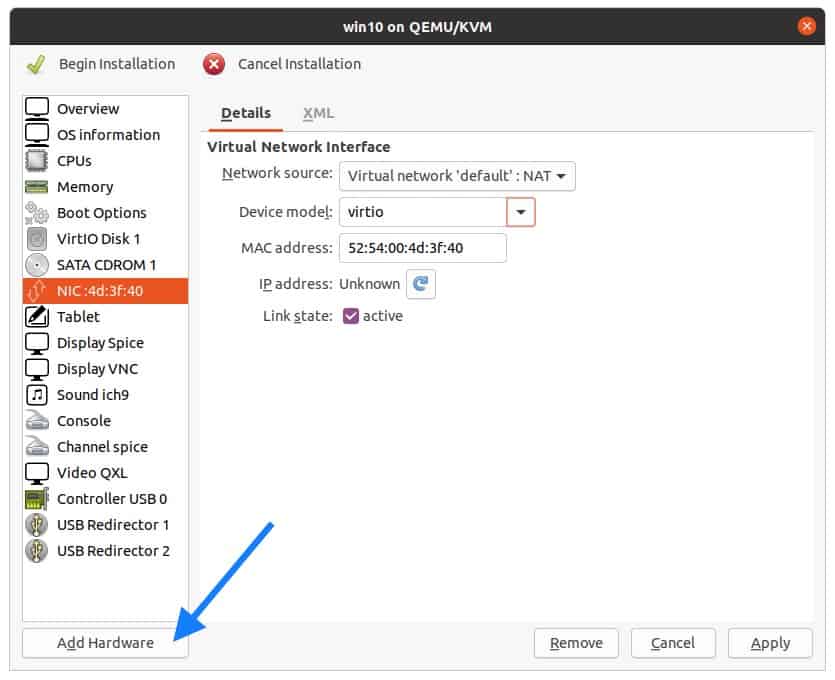
Remember that we have downloaded VirtIO Windows drivers for Ubuntu KVM, let’s attach that now. So click on Add hardware.
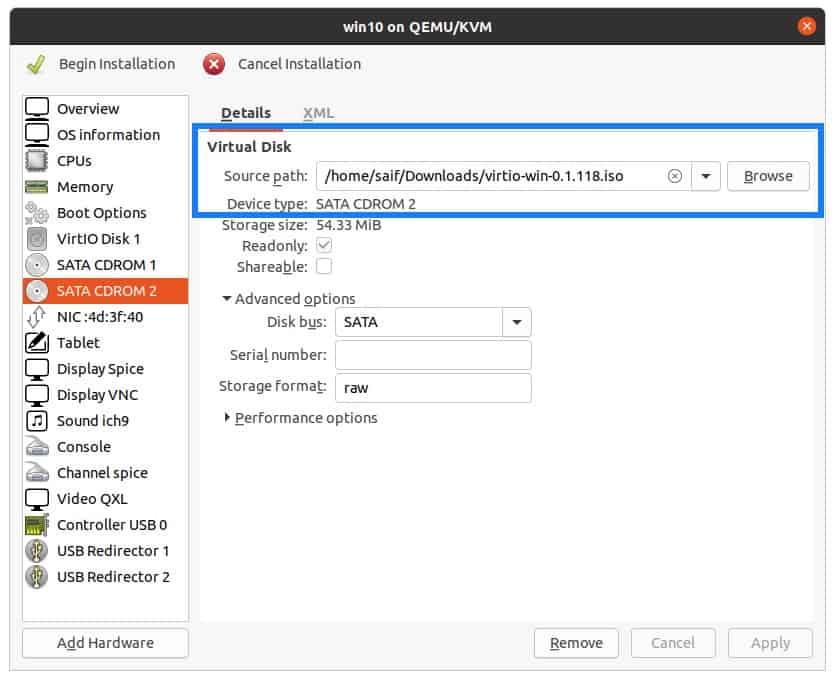
Select the storage and click on manage and attach the VirtIO iso file that we have downloaded, and also change the Disk type to CDROM device and click on Finish.

The second CDROM now has VirtIO drivers and the first one has the windows 10 ISO image.
Change the boot order for windows
Let’s go ahead and change the Boot order of the device, first being the CDROM1 and the VirtIO disk and the CDROM2.
Note : The important part is for the KVM to load the windows 10 image from the list.
Check the option Enable boot menu.
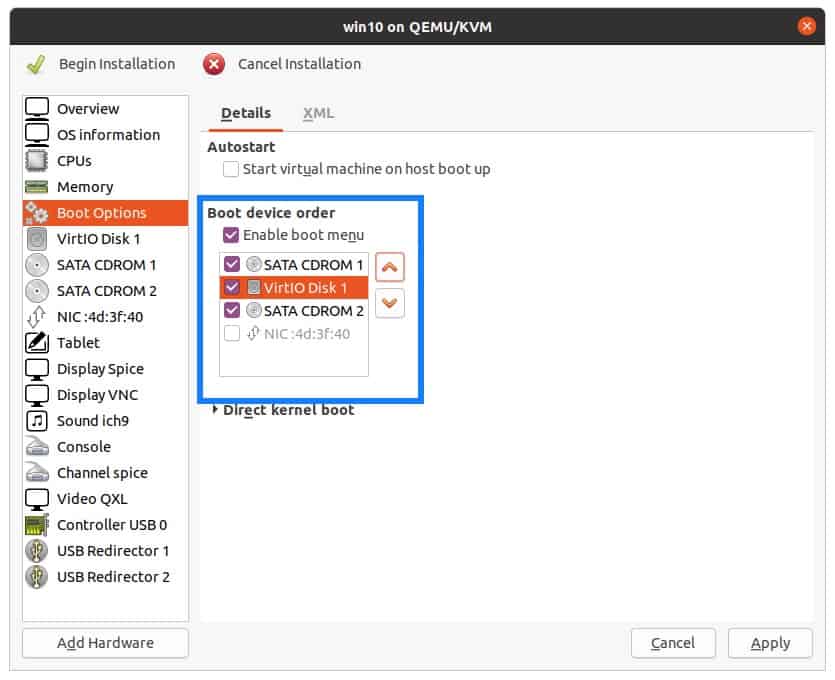
Once you rearranged the boot loader click on Apply.
6. Configure the qemu CPU the right way.
Click on CPU and change the current allocations to 4
Check the options which say manually set CPU topology.
In the topology assign 1 socket, 2cores and 2threads.
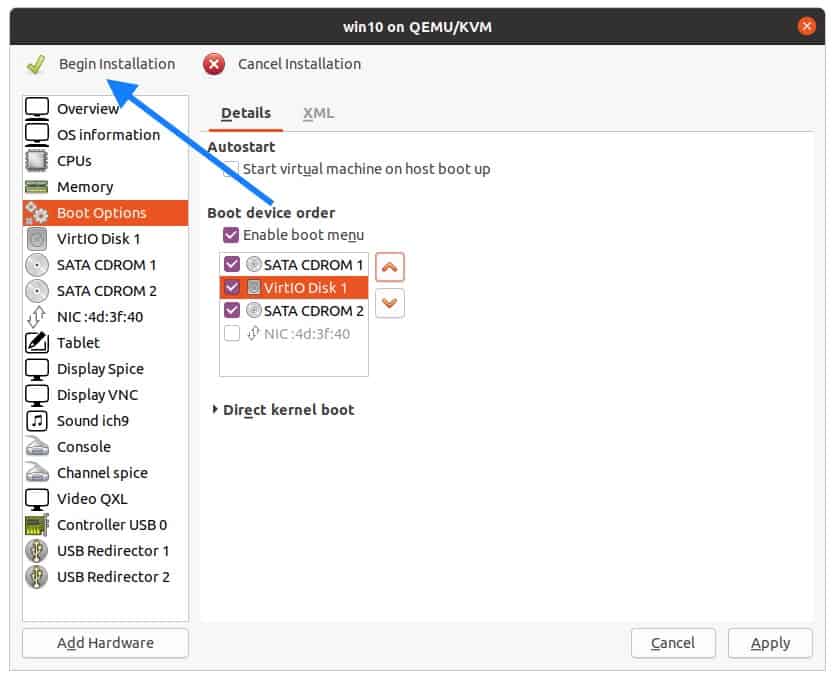
7. Begin the windows 10 VM installation.
We just finished adding the required virtual hardware, you may now click on Begin installation.
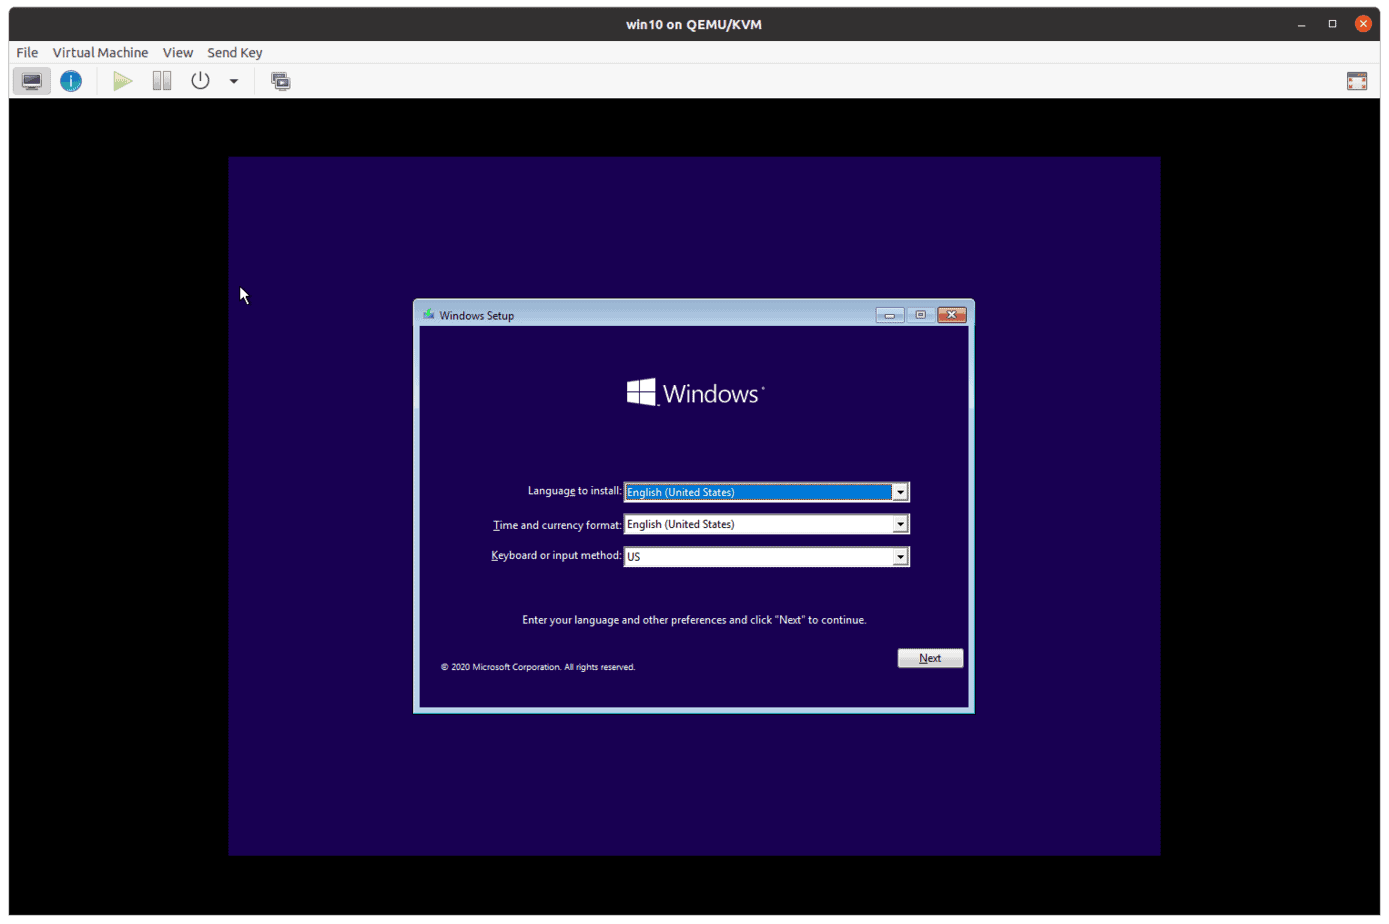
If everything went well, you should be able to see the windows logo, and after few seconds Windows prompt where you have to choose the language and the time and date and the keyboard click on Next.
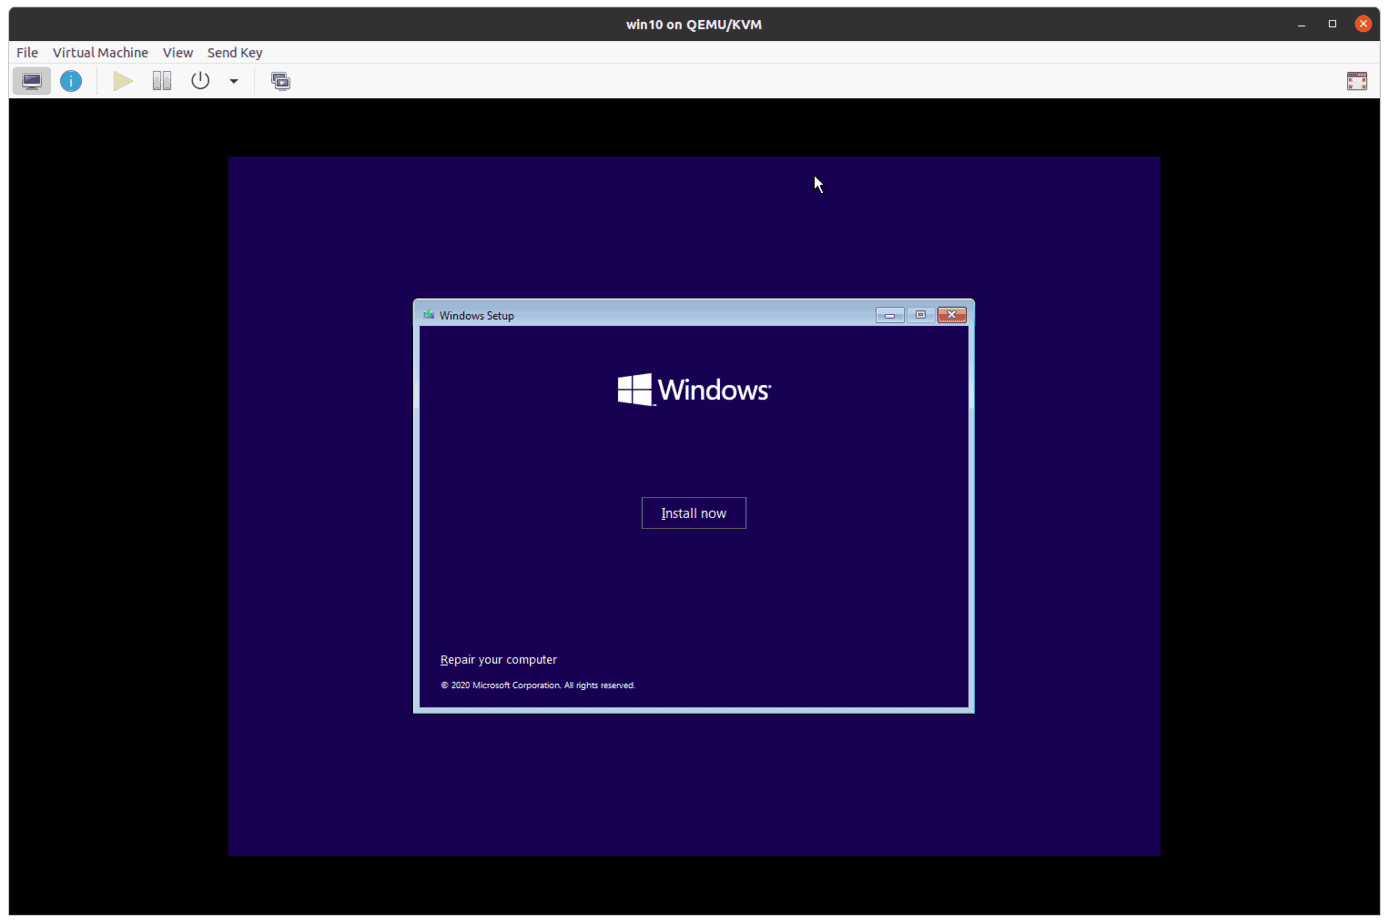
You will have to click on install now on the next prompt.
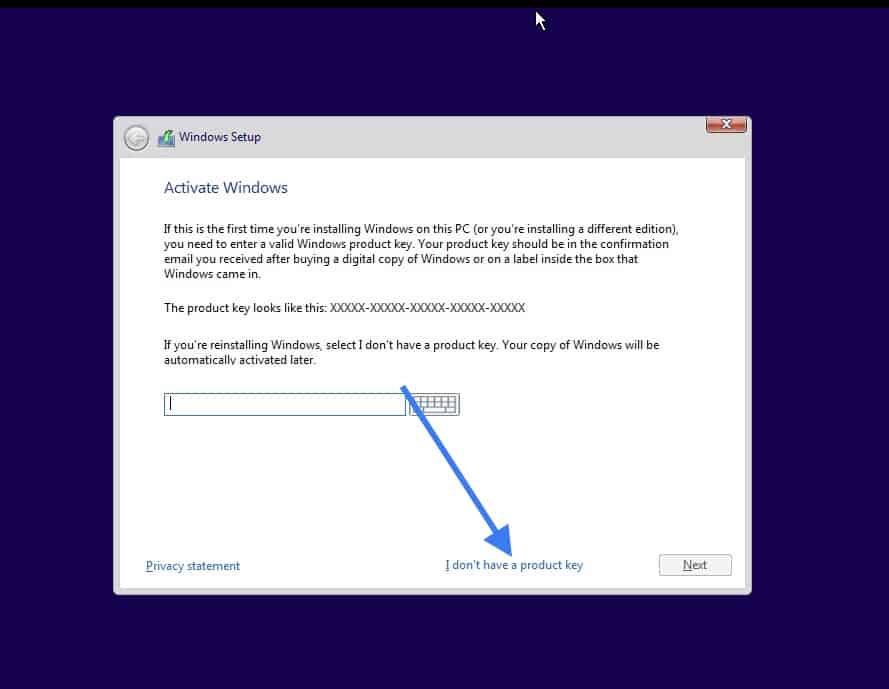
If you have the product license key, you may enter it now. Else click on I don’t have a product key, I choose the same as I didn’t have the product key during the installation.
Select the version that you would like to install, I am choosing the version Windows 10 Pro.

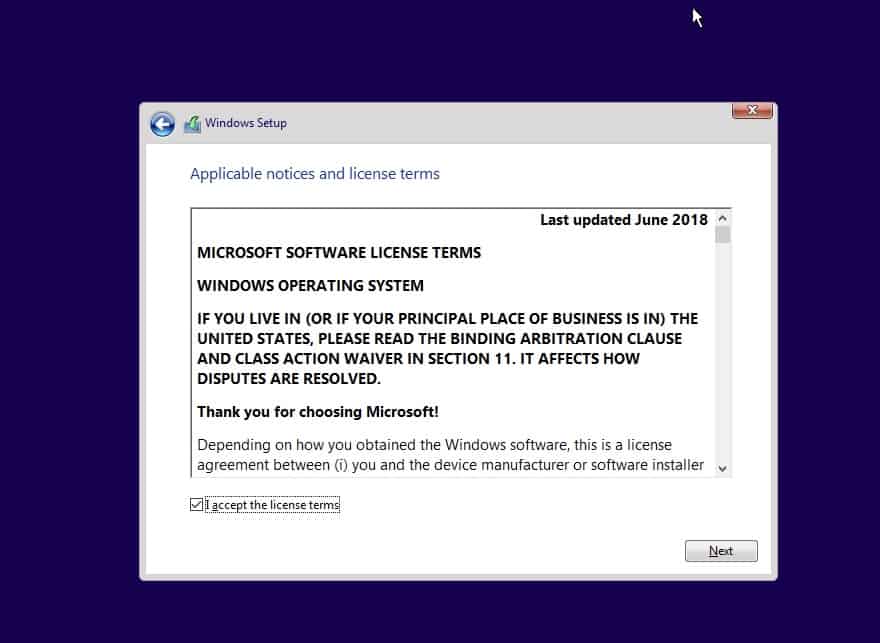
Accept the license agreement and click on Next.
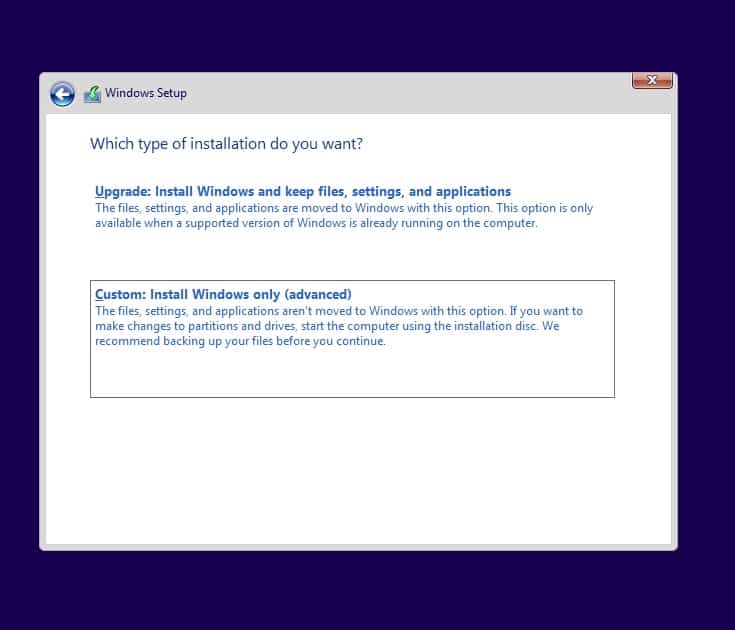
You now have two options to install the windows, Either upgrade or Custom, Choose custom here.
8. Install the Redhat SCSI controller driver.
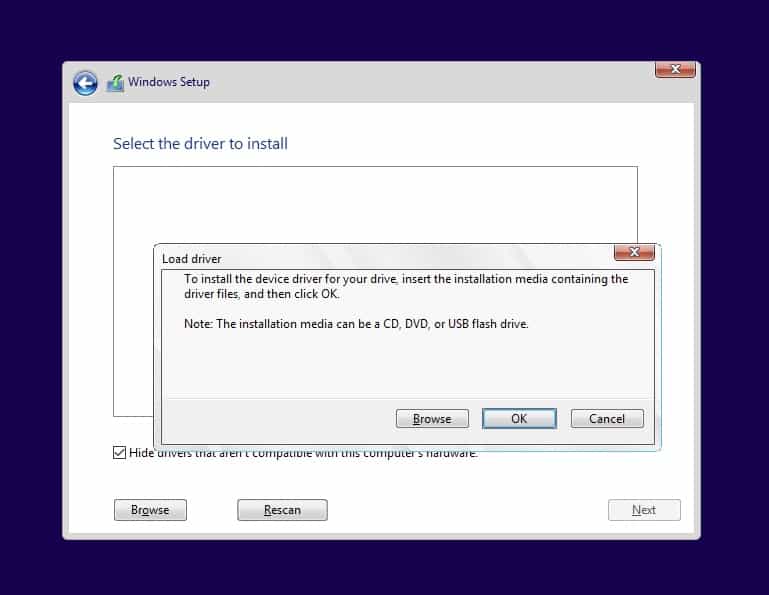
Remember we have added the storage of 20GB in the beginning, but we are not able to see them so click on Load driver here.
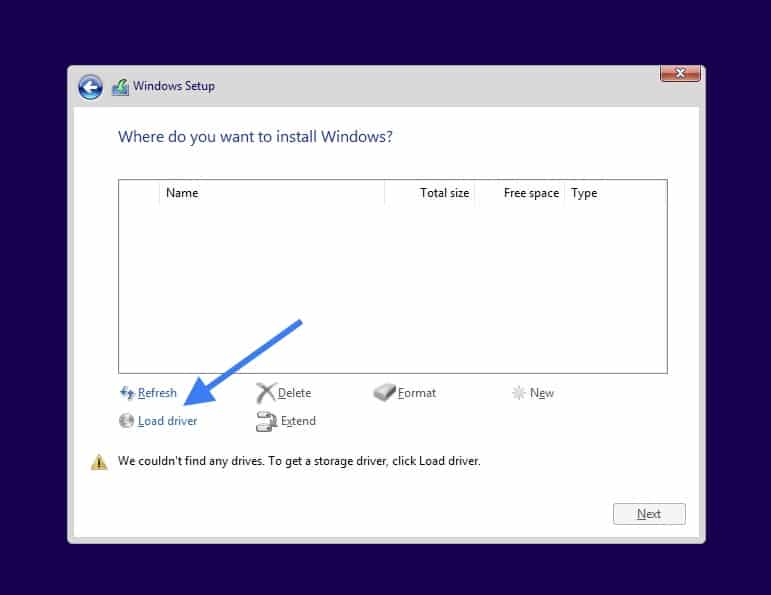
You will get a load driver prompt click on OK.
Once you click on OK you will be able to see all the drivers like below.
Select the windows 10 SCSI driver and click on Next.
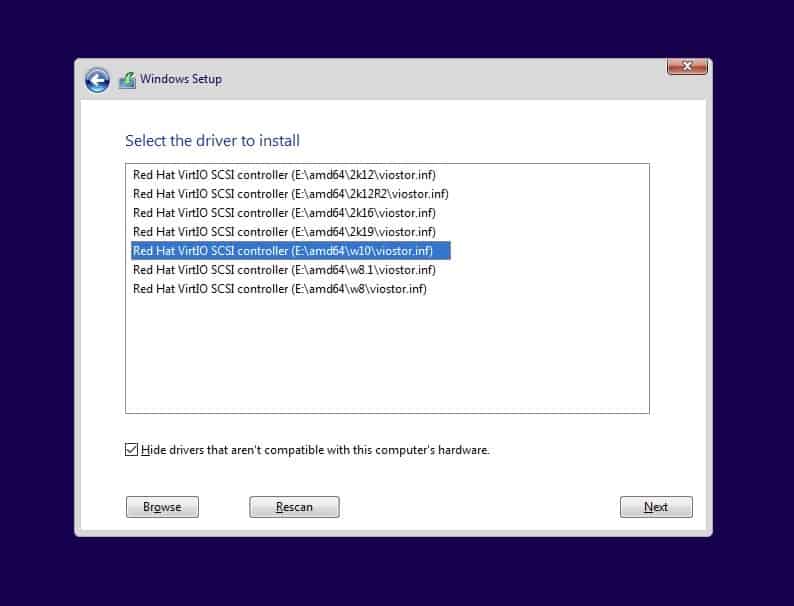
Note: If the driver doesn’t show up then you may follow the below steps.
- Click on Browse and expand the VirtIO driver iso file CDROM.
- Go down and expand the folder viostor.
- Expand Win10
- And select amd64 and click on OK.
- You should now be able to see the drive listed now.
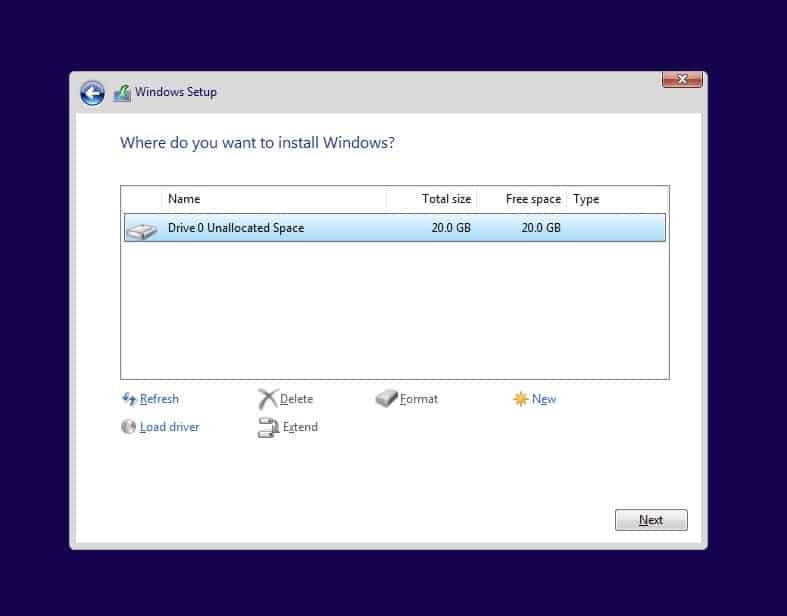
After you selected the drive and once you click on Next after a few seconds you should be able to see the virtual hard disk that you have attached earlier, select that and click on Next.
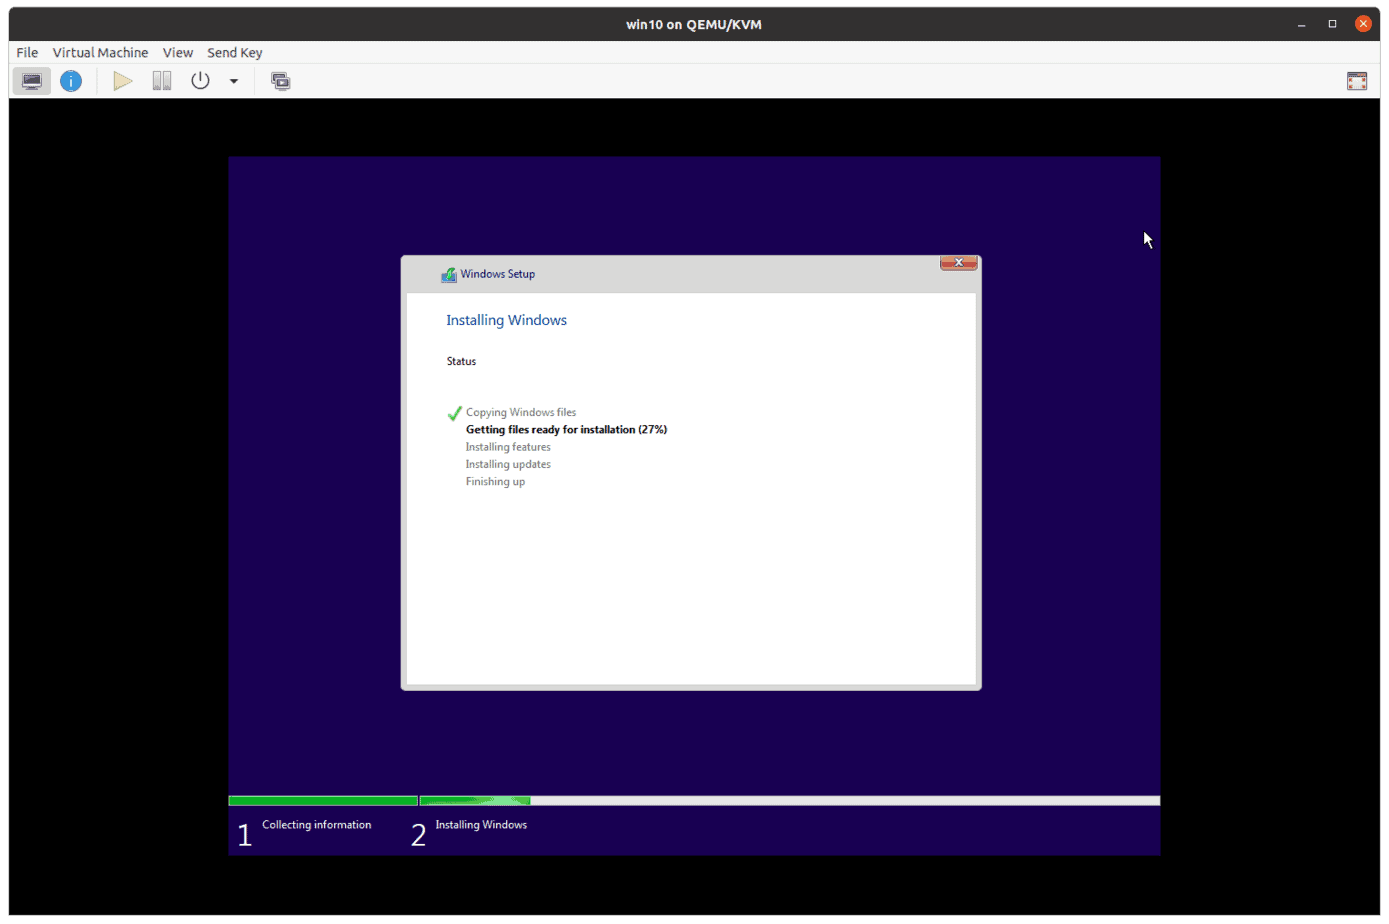
The windows installation now begins and starts to copy the files now.
After a couple of restarts, you should get the windows setup screen where you need to have the basic configuration to be done.
During the process, you could either connect the Microsoft account or create a local account.

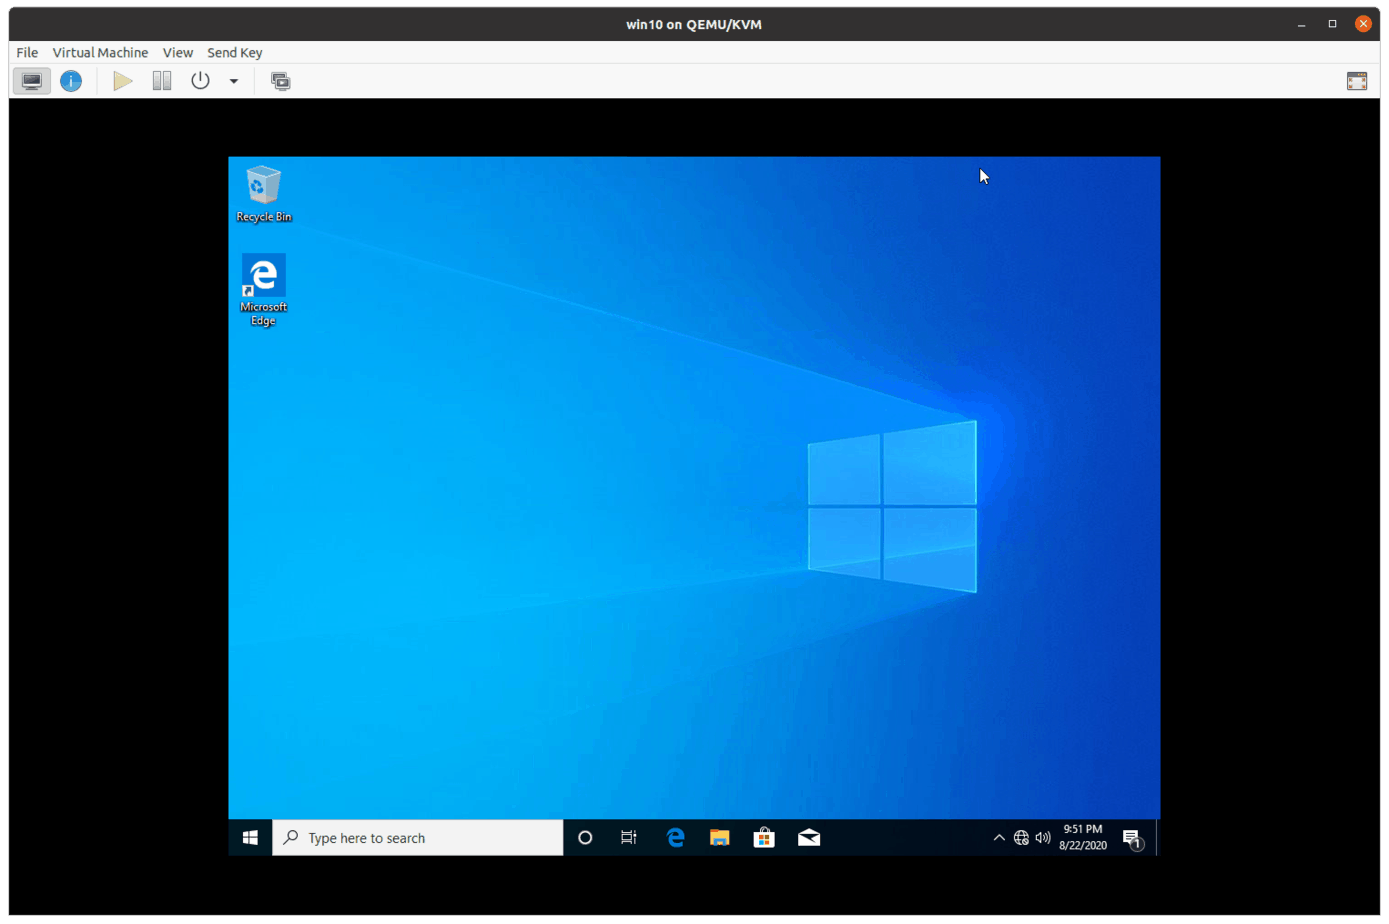
And you should be presented with the windows home screen like below.
9. How to install virtio drivers windows 10.
After the windows 10 installation is completed, you now have to install the VirtIO drivers to windows 10. Post which the networking, display graphics, copy-paste functionality, and others should work.
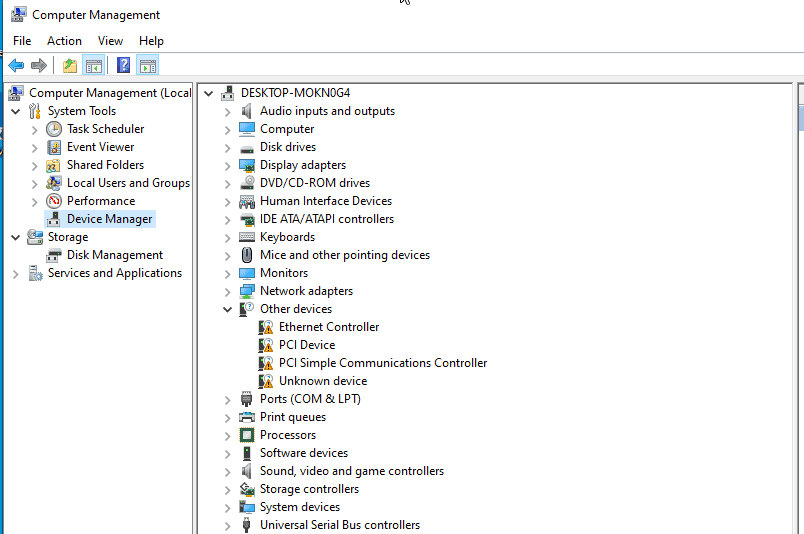
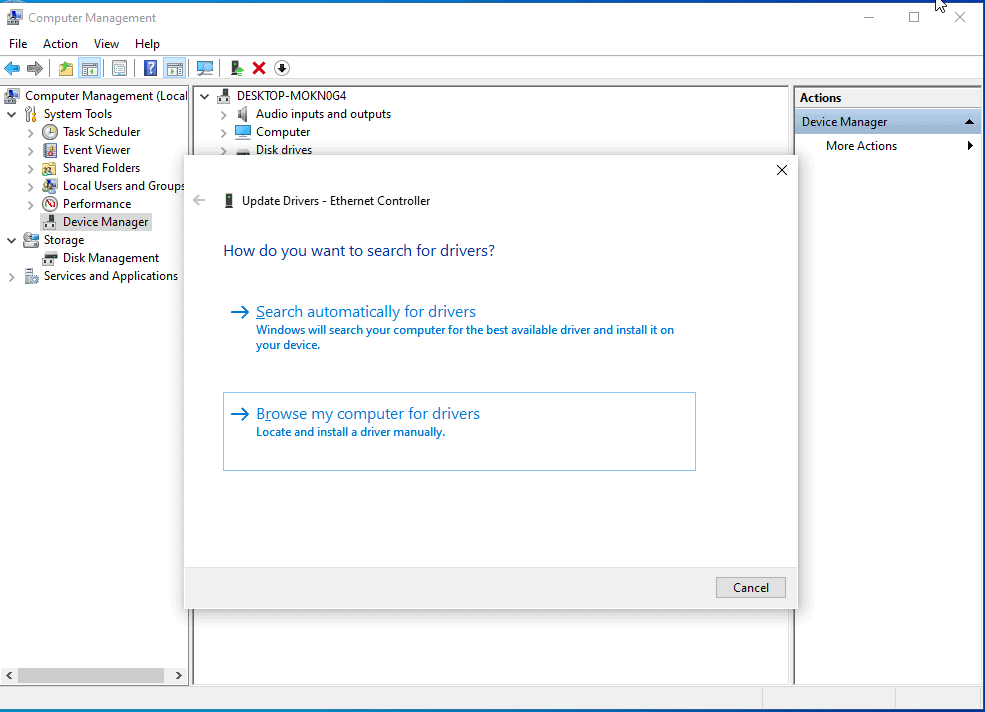
Type This PC and right click and click on Manage.
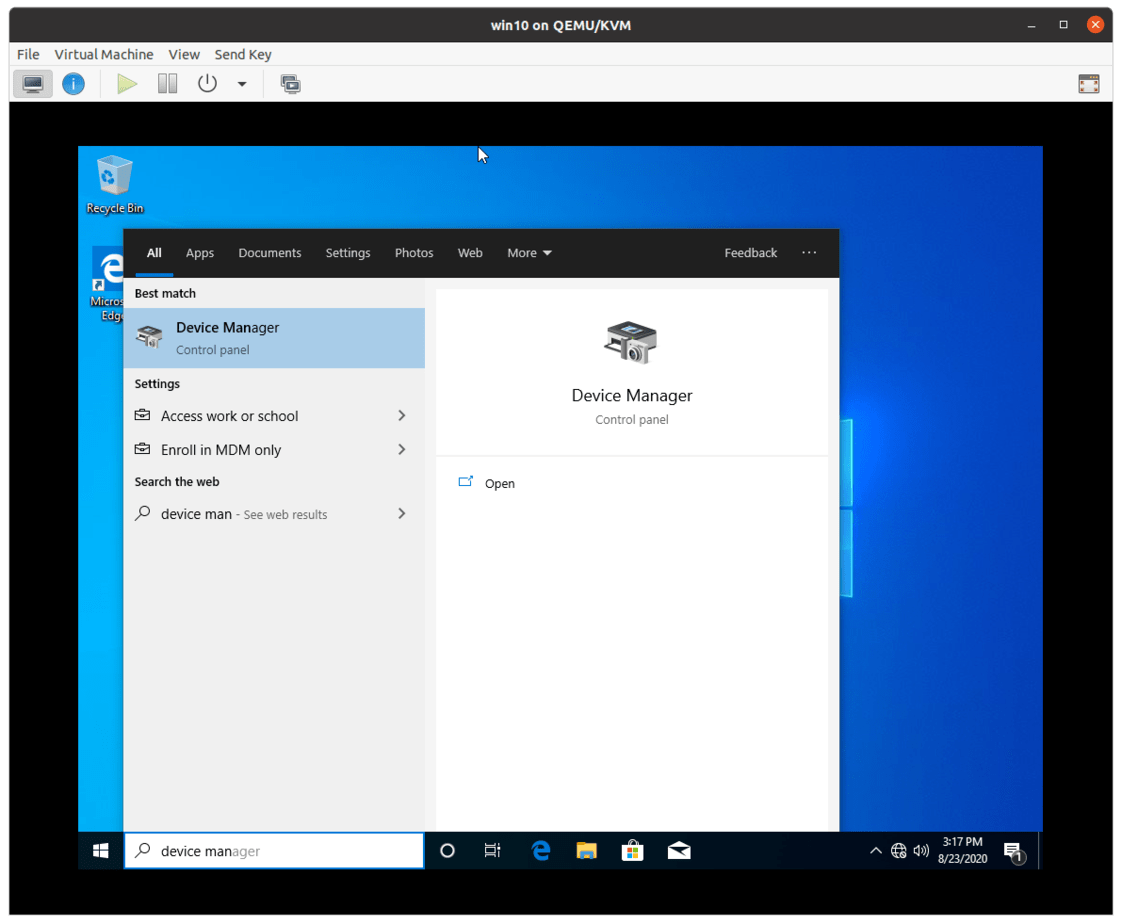
In the device manager, you should be able to see there are some drivers that are not installed under Other devices.
Just right click on each driver and click on update driver. Let’s see how we can do it for the Ethernet controller.
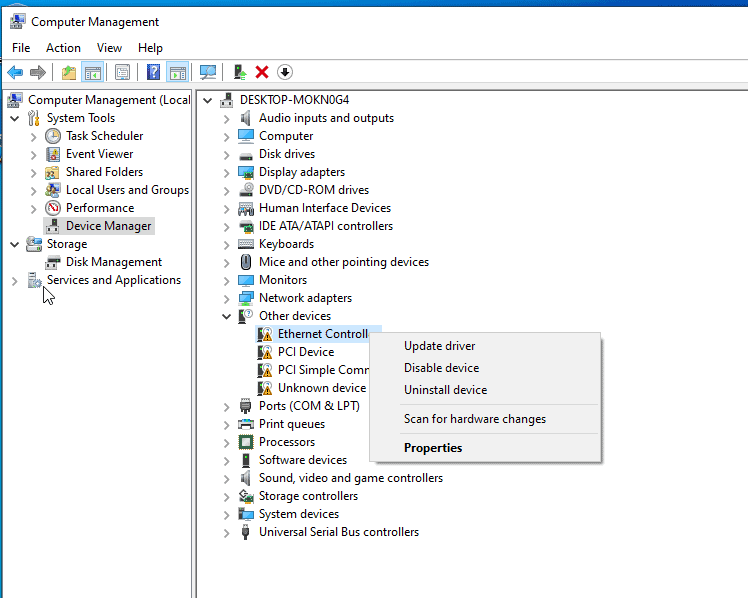
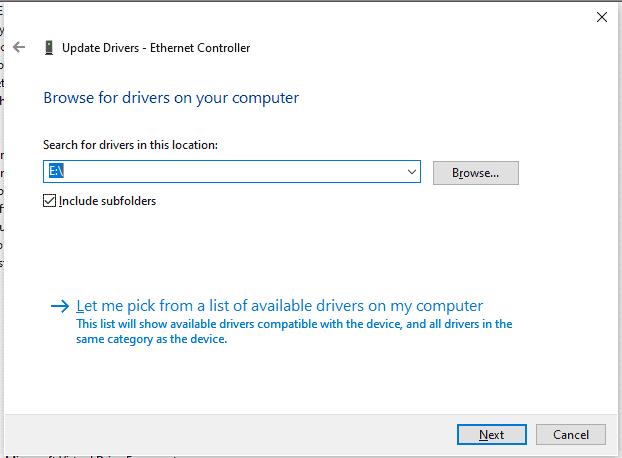
Click on Browse my computer for drivers
In the browse section select the VirtIO iso CDROM that we have attached.

You should be able to see the drive letter as E, check the box which says include subfolders, and click on Next.
You should be able to see the pop up to install the Redhat ehternet Adapter driver to the machine click on Install.
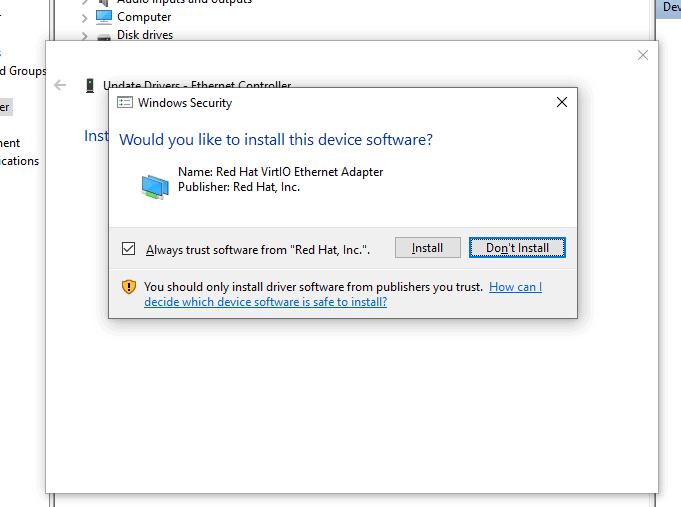
Similarly do it for other dirvers as well.
Note: I couldn’t quite get the ‘Unknown device’ to get it working under other drivers, so it should be fine.
There is one more driver that you need to install, which is Display adapters, By default it has picked up Microsoft Basic Display Adapter.

Just like you did the driver update for other devices, do the same thing for the display adapter as well.
10. Install SPICE Guest tools.
There is a SPICE Guest agent that you need to install now. For that you need to transfer the file from Ubuntu host machine to the windows.
Steps to transfer files from Ubuntu host to Windows 10 guest vm.
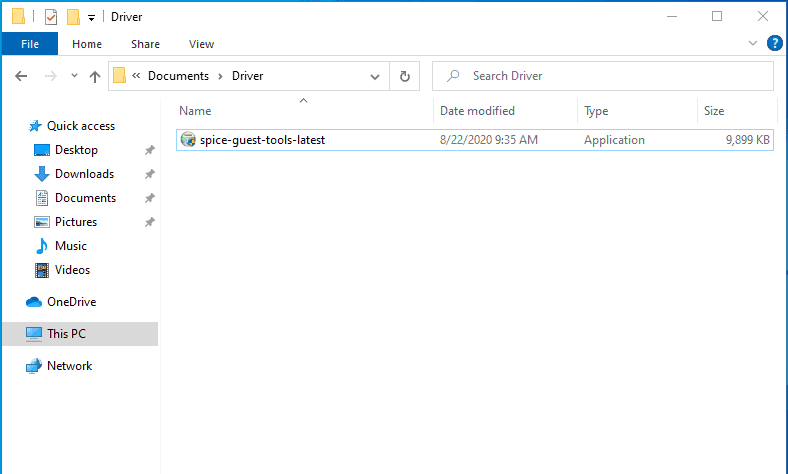
In windows create folder called Driver.
Now right click and click on properties.
Click on the Sharing tab, and click on Advanced sharing.
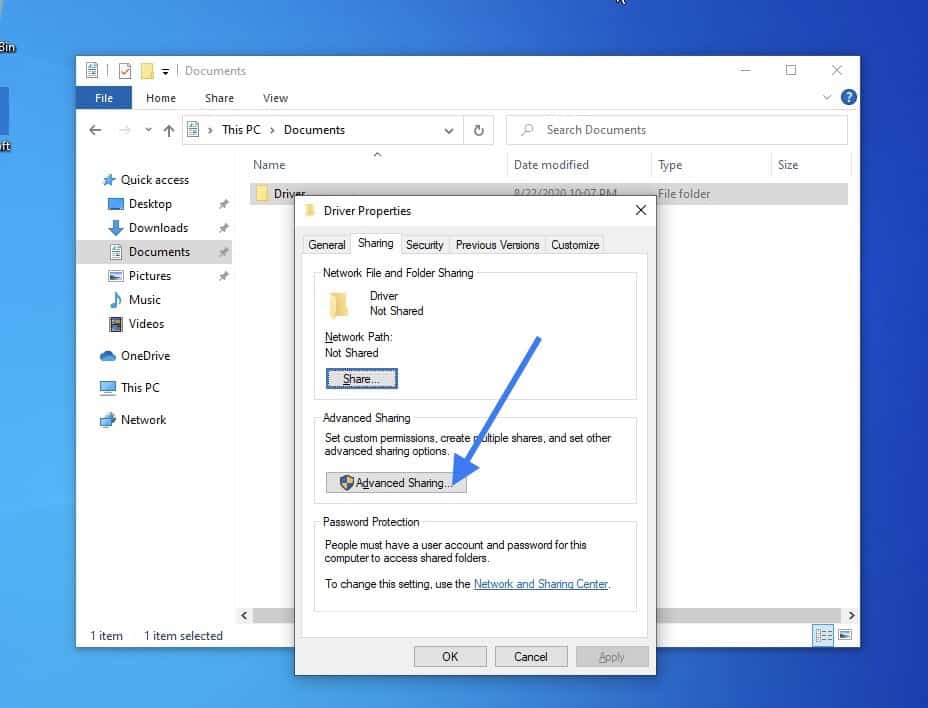
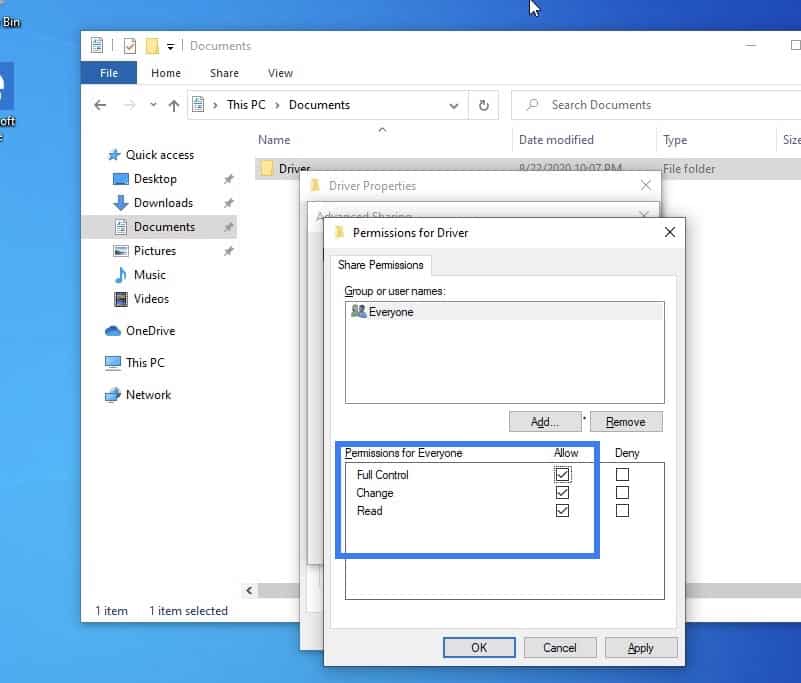
Check the option Share this folder and click on Permissions.
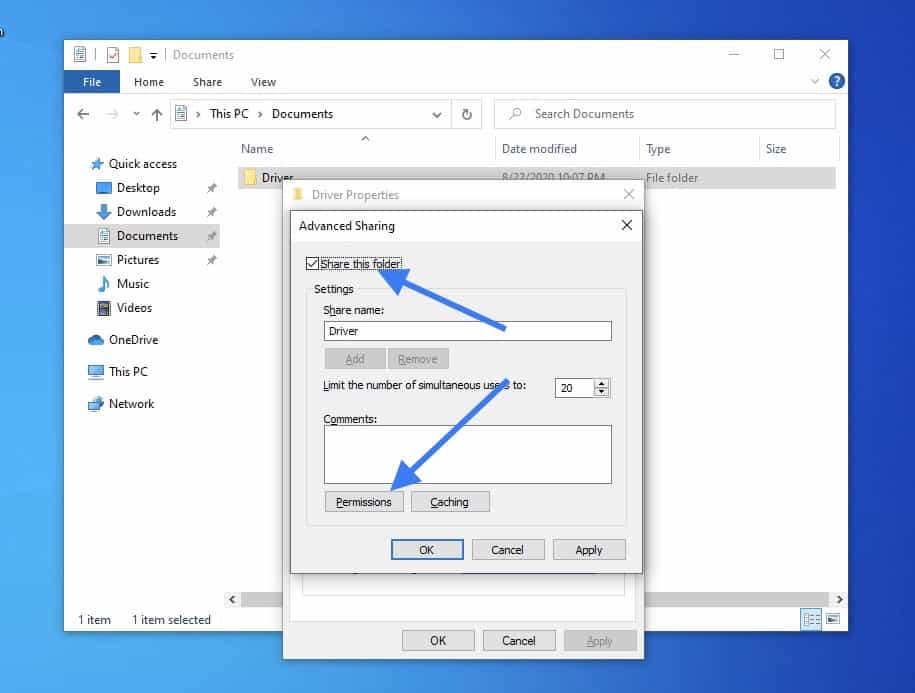
Check all the permissions now, you may cancel this later once you transfer the files.
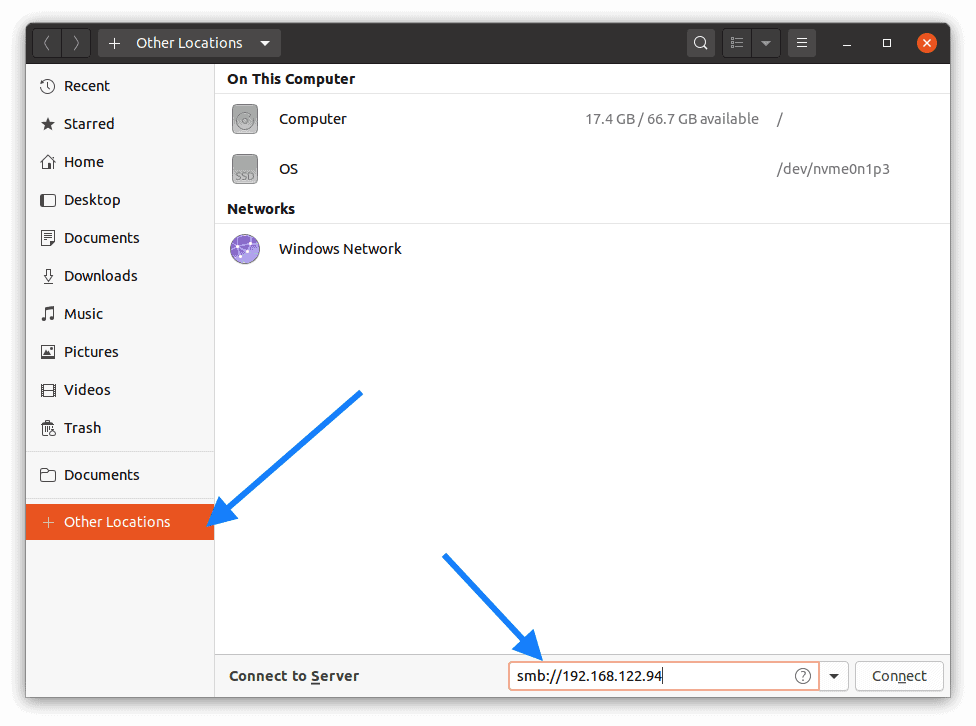
Now the folder is shared, go to Files in Ubuntu and click on Other locations.
In the connect to server address bar, type smb://windows host IP and hit enther.
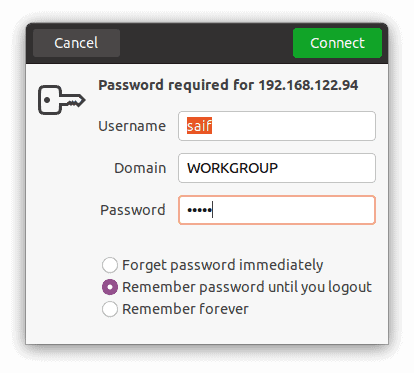
You will be asked to provide the windows 10 credentials, enter it now.
Paste the Spice guest tools here
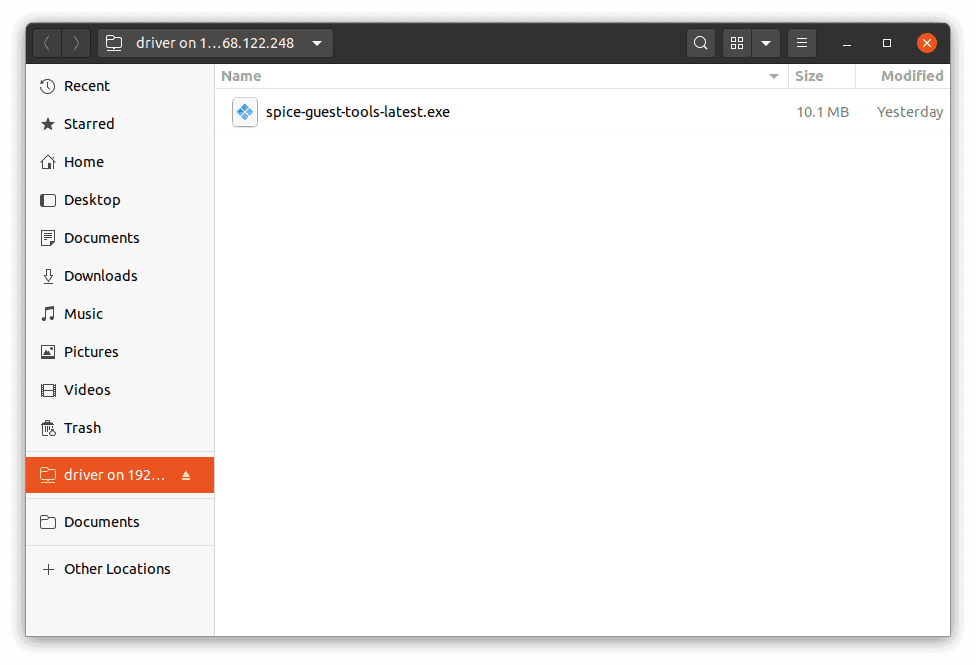
Now go back to the windows 10 and you should be able to see the Spcie guest tools software there, double click on it install the software, and you should be good to go.
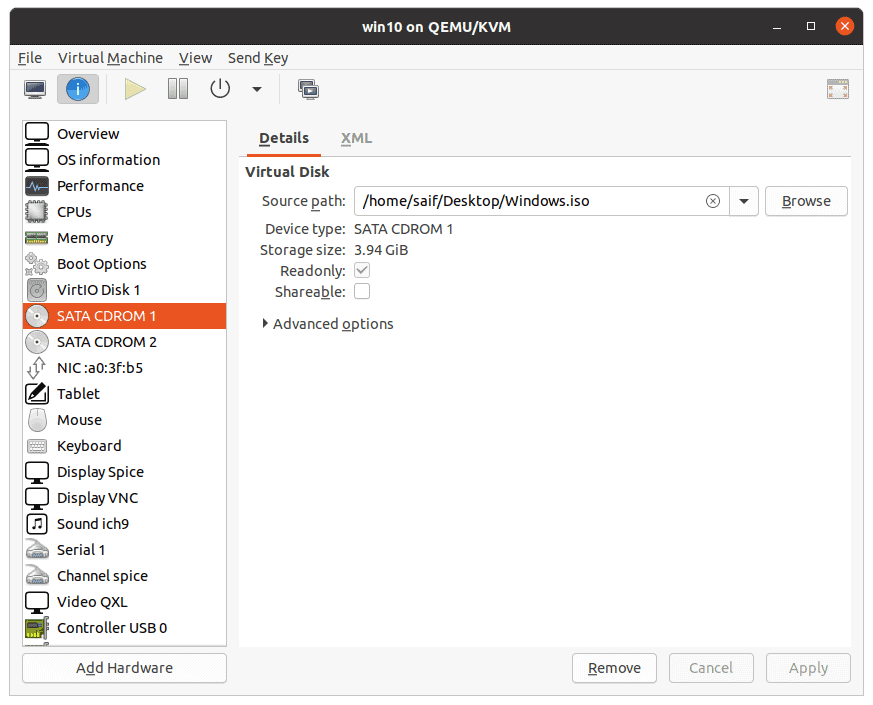
11. Detach the CDROM1 and 2.
Awesome! you just installed windows 10 on your Ubuntu KVM. If you wanted to know how you can manage this VM when you wanted to access it, you can check out the article here.
At this point you should be good to go however, next time when you shutdown the Guest VM, you need to make sure that you remove the CDROM drive 1 and two that you had attached during the installation.
In source path, you may click on the x icon to detach.
Below is the video, if you prefer to watch over video.
without using libvirt
install kvm
apt-get install kvm qemu
now create a disk image
qemu-img create -f raw /vm/windows.img 100G
(note: creating a raw image has severale advantages: if your filesystem supports sparse files, it only uses the actually used space of your virtual disk on your physical disk.. all journalling filesystems that use inodes support that, so ext4 for example works fine. second you can easily mount it using mount -o loop <imgfile> <mountpoint> at any time. however, it does not support snapshots, use qcow2 if you need snapsots or if your filesystem does not support sparse files)
in my case i had a windows 7 cd that i installed from.. if your server dos not have a cd rom you can also us an iso image instead.
since I want to use virtio for fast hdd emulation, we also need the virtio drivers
cd /vm
wget https://fedorapeople.org/groups/virt/virtio-win/direct-downloads/stable-virtio/virtio-win.iso
run qemu and install windows. access the display via VNC
qemu-system-x86_64 -enable-kvm -k de-ch -name windows -vnc :1 -cdrom /dev/cdrom -drive file=/vm/virtio-win.iso,media=cdrom -boot d -drive file=/vm/windows.img,if=virtio,format=raw,index=0 -m 4096
now connect with your favourite vnc client to the ip of your server and install windows. you need to load the derivers from the second cdrom that is emulated. make sure you choose the correct virtio storage driver for your windows version. it may load the wrong one if you just select the root directory and let the installer search for it, resulting in an unstable windows vm
once the installation is done, shut down your windows vm. it is now time to make it autostart upon boot of your linux machine.. in order to do that i used Thomas Martin’s kvm-simple-init of which i keep a local copy (dated 2016-01-23)
this script will also send a shutdown command to all vms once the server shuts down, so no need to manually do that in order to gracefully shutdown your vm’s
by default qemu uses nat-ed network, so that the vm is in its own network and the vm host acts as a nat router. if you want your vm to be part of your network like any physical machine you have connected to your swich you can use a bridged connection..
you need to install bridge-utils to be able to create a bridge network device
apt-get install bridge-utils
now change your /etc/network/scripts file and basically replace eth0 with br0 and then add three lines for the bridge config. here the end result on mine:
auto br0
iface br0 inet static
	address 192.168.168.1
	netmask 255.255.255.0
	network 192.168.168.0
	broadcast 192.168.168.255
	gateway 192.168.168.254
	bridge_ports eth0
	bridge_stp off
	bridge_maxwait 5
Notice: you won’t need any block for eth0 after you defined the bridge interface.
now either reboot your machine or try to get your eth0 down using ifconfig and then get br0 up using ifup however be careful when you are doing this all remoetely!! in that case make really really sure you got your config right or even better, setup a backdoor, make sure your remote management module is accessible, whatever.. and then reboot your server.. and hope 
now in your qemu command line you ened to add the parameters
-net nic,model=virtio-net-pci -net tap
the default qemu-ifup script in /etc/ will do the rest for you.
Notice you will need virtio drivers for the nic to work. you can leave the model= option away on the first boot in order to download the virtio iso and install the drivers before switching over to virtio. however, using the e1000 (default if no model is given) is not recommended for windows VM’s as this model has a tendency to crash and lose connection under heavy use. I’ve experienced this first hand on a CCTV server that had to monitor a couple of cameras. once the nic crashes, one has to go to network settings in windows and disable, then enable the card and it will be back online. I followed the suggestions in a Proxmox forum thread and switched to virtio.
here is an example configuration for a windows 7 machine using the above mentioned init script.. if you use another init script or run kvm manually you can simply use all the cli options listed below as an example of what you might want to pass on to qemu.. also take a look at the man page it is very informative and helpful!
# Should be unique among all VMs
MONITOR_PORT=5801

# Not mandatory, but useful to keep it in a distinct variable
VNC_DISPLAY=1

# KVM parameters
KVM_OPTS="\
-enable-kvm \
-k de-ch \
-name windows \
-drive file=/vm/windows.img,if=virtio,format=raw,index=0 \
-m 4096 \
-net nic,model=virtio-net-pci \
-net tap \
-vnc :$VNC_DISPLAY \
-monitor tcp:127.0.0.1:$MONITOR_PORT,server,nowait \
-monitor vc \
-daemonize \
I had a windows 7 license laying around so i used that but wanted to upgrade to win 10. unfortunately the update crashed with error
0xC1900101 - 0x20017 The installation failed in the SAFE_OS phase with an error during BOOT operation
this was easily fixed by adding a
-cpu core2duo
to my options in the above config file. keep in mind you need to stop your VM and start it again for this change to be activated.. I first removed this setting again after the update and windows 10 ran fine, but when it installed an automatic update and i accidently killed the vm during the installation it wouldn’t boot anymore and it repeatedly showed a BSOD saying there was a SYSTEM_THREAD_EXCEPTION_NOT_HANDLED. at first i tried fixing my windows installation using a wind10 dvd but that was not successfull as i couldn’t even boot from the dvd.. when i ran out of options i re-enabled the core2duo cpu and voilà, it bootet straight away, finished its updates and we’re all good
that brings me to another note regarding windows vm’s:
when the host system is shut down, akk kvm vm’s will be sent a acpi power down message to gracefully shut down. the problem is, if the vm does not support this feature or crashes during shutdown, the host system will in turn hang on its shutdown and you might loose control over it when you connect from remotely.. so Thomas set a timout for the shutdown command to complete and after this timeout, his init script will simply switch the vm off. this is very good in order to keep the host system under control but it can badly harm especially Windows VM’s as windows likes to install updates during the shutdown of a machine and therefore can take literally hours to shut down.
there are two solutions to this problem.. an easy one and a more complex one:
-
Easy: disable automatic updates and do your updates manually so you can reboot your VM and give it all the time it wants to complete the updates
-
Complex: use the qemu monitor command
screendump <filename>then run some command line ocr across the screen dump and see what it is actually doing.. using this output, prolong the timeout in the init script..
for once i decided to go the easy way.. the problem about the complex solution is, that this only works once you know what to look for in the screenshot.. and who knows what microsofts “i am updating, don’t you turn me off” message might look like in the future.. in times of error messages like “something went wrong” my expectations aren’t too high regarding a consisten message in that stage.. further more, my host system is improtant to me, it does lots of thing sand my windows vm is only used to do one single nice-to-have job (OCR on PDF Files) which i can easily live without for a moment.. so the host system has absolute priority over the windows VM and therefore i don’t want to wait hours for the windows machine to complete its updates and not have any of my other other services (files, mails etc.) available at that time..
windows 10 gives you a hard time when it comes to disabling updates.. it really insists on doing some of its updates automatically..
in windows 10 pro you can set some goup policies and disable automatic updates but in windows 10 home you need to work around this issue by setting your network connection to be a “metered connection” so windows won’t download updates over it.
Pro — set group policies
since i am using a windows 7 pro on my vm (i upgraded from a 7 ultimate i had laying around which turned into 10 pro upon the upgrade) i will disable auto updates using the official way:
В данной инструкции используется железный сервер с установленной ОС Ubuntu 22.04 LTS. Главным условием для запуска KVM является наличие процессора с поддержкой аппаратной виртуализации (Vt-d+Vt-x, AMD-V). Обратите внимание, что количество ресурсов, требуемых для дальнейшей эксплуатации KVM варьируется в зависимости от задач. Для подключения по SSH будем использовать машину на Windows 10 LTSC.
Подготовка сервера
Ищем и применяем обновления, если такие уже появились:
sudo apt update && sudo apt upgrade
Установка и настройка ключей ssh
Устанавливаем ssh для удалённого управления (если ещё не установлен):
Проверяем, запустился ли сервис:
sudo systemctl status ssh
Сервис должен быть в состоянии Active.
Настроим безопасную аутентификацию по ключам:
Сохраняем ключи в предлагаемую директорию, а затем разрешим подключаться по приватному ключу:
touch ~/.ssh/authorized_keys && cat ~/.ssh/id_rsa.pub > ~/.ssh/authorized_keys
Теперь необходимо скопировать приватный ключ на машину, с которой будем подключаться, сделать это можно с помощью scp. Для этого выполним ряд действий.
Если локальная машина на Linux, то достаточно скопировать в ключ поддиректории домашней папки пользователя
Если локальная машина на ОС Windows, то необходимо создать отдельную папку для ключей, и дать права ТОЛЬКО на пользователя, из-под которого заходите по ssh.
Для этого создаём папку, заходим в Свойства -> Безопасность -> Дополнительно -> Отключить наследование -> Удалить все унаследованные разрешения из этого объекта.
Затем в этом же окне добавляем себя: Добавить” -> “Выберите субъект” -> “Дополнительно” -> ищем пользователя -> OK.
Выбираем права полный доступ” -> OK.
Затем в созданную папку с модифицированными копируем приватный ключ, команда выглядит так:
scp <имя_пользователя>@<имя_хоста_или_IP>:/home/<имя_пользователя>/.ssh/id_rsa %папка_на_локальном_компьютере%id_rsa
Теперь заходим на наш сервер по приватному ключу:
ssh <имя_пользователя>@<имя_хоста> -i <расположение-ключа>
Пример:
ssh efsol_it@efsol-vm -i C:Usersefsol_itssh_keysid_rsa
Проверяем успешна ли прошла аутентификация и в случае успеха продолжаем настраивать сервер:
Установка виртуализации
Устанавливаем пакеты:
sudo apt install qemu qemu-kvm libvirt-daemon-system libvirt-clients bridge-utils virtinst virt-manager libvirt-daemon virt-top libguestfs-tools libosinfo-bin qemu-system
По завершению проверяем статус сервиса виртуализации:
sudo systemctl status libvirtd
Статус должен быть Active.
Установка панели управления cockpit
Для облегчения эксплуатации хост-машины установим панель управления cockpit:
sudo apt install cockpit-machines
Теперь нужно проверить статус сервиса cockpit:
sudo systemctl status cockpit
Дополнительно проверим работу сервиса, зайдя по адресу в браузере по ссылке: https://ip-адрес-машины:9090.
Если всё установилось правильно, то увидим страницу авторизации.
Также нужно убедиться, что модуль vhost_net включён и работает:
Назначаем права на текущего пользователя
Если нужно назначить права управления виртуализацией на текущего не-root пользователя, то вводим следующие команды:
sudo usermod -aG libvirt $USER
sudo usermod -aG kvm $USER
Если нужно назначить на другого пользователя, то $USER заменяем на имя требуемого пользователя.
Настройка сети
Мост с именем virbr0 создается в процессе установки. Это устройство использует NAT для подключения компьютеров гостей к внешнему миру.
Отображает все мосты, к которым подключены гостевые машины.
При создании мостов всё управление сетью на хост-машине осуществляется в ручном режиме и изменения необходимо вносить в /etc/netplan/01-network-manager-all.yaml. В общем случае мы имеем 1 интерфейс управления и доп.интерфейсы для создания мостов и проброса сети в виртуальные машины.
Получаем актуальный список сетевых интерфейсов в ОС, чтобы задействовать их в сетевой конфигурации:
Далее редактируем файл:
sudo nano nano /etc/netplan/01-network-manager-all.yaml
Примерное содержание:
# Let NetworkManager manage all devices on this system
network:
  version: 2
  renderer: networkd
  ethernets:
    enp0s3:
      dhcp4: false
      dhcp6: false
      addresses: [192.168.0.26/24]
      gateway4: 192.168.0.1
      mtu: 1500
      nameservers:
        addresses: [8.8.8.8]
    enp0s8:
      dhcp4: false
      dhcp6: false

  bridges:
    br0:
      interfaces: [enp0s8]
      addresses: [192.168.0.22/16]
      mtu: 1500
      nameservers:
        addresses: [8.8.4.4, 8.8.8.8]
      parameters:
        stp: true
        forward-delay: 4
      dhcp4: no
      dhcp6: no
Содержимое файла указано выше, составлено на основе текущих данных системы. Сначала идет описание сетевых интерфейсов. Если интерфейс не участвует в мостовом соединении, ему необходимо прописать реквизиты в первой части. Если интерфейс задействован в мостовом соединении, то реквизиты сети задаются в параметрах моста.
Важно! Если машина подключена к VLAN, то интерфейсом моста нужно выбрать именно vlan. В таком случае, конфигурация будет выглядеть примерно так:
# Let NetworkManager manage all devices on this system
network:
  version: 2
  renderer: networkd
  ethernets:
    enp0s3:
      dhcp4: false
      dhcp6: false
      addresses: [192.168.0.26/24]
      gateway4: 192.168.0.1
      mtu: 1500
      nameservers:
        addresses: [8.8.8.8]
    enp0s8:
      dhcp4: false
      dhcp6: false

  vlans:
    vlan252:
    id: 252
    link: enp0s8
    dhcp4: false
    dhcp6: false

  bridges:
    br0:
      interfaces: [vlan252]
      addresses: [10.15.252.21/24]
      routes:
        - to: default
          via: 10.15.252.254
      nameservers:
        addresses: [8.8.4.4, 8.8.8.8]
Также назначаем маршрут по умолчанию, где в параметр via вписываем адрес сетевого шлюза в vlan.
Затем применяем настройки:
sudo netplan generate
sudo netplan apply
Возможно кратковременное прерывание связи с сервером, так что придётся переподключиться по ssh. Теперь нужно проверить, что настройки применились:
Должен появиться новый интерфейс br0 с адресом 192.168.0.22, а у интерфейса enp0s8 адрес исчез. Значит настроено корректно. Далее необходимо сообщить службе виртуализации что она может использоваться новый сетевой интерфейс. Создаем файл host-bridge0.xml:
<network>
  <name>host-bridge0</name>
  <forward mode="bridge"/>
  <bridge name="br0"/>
</network>
Применяем настройки. Определяем интерфейс:
virsh net-define host-bridge0.xml
Запускаем:
virsh net-start host-bridge0
Настраиваем автозапуск:
virsh net-autostart host-bridge0
Создание ВМ
Скачиваем .iso-файл нужной ОС и размещаем его в директории с общими правами доступа для всех:
sudo chmod 777 -R /vm/images
sudo chmod 777 /vmhttps://efsol.ru/images/ubuntu2204.iso
Далее создаём виртуальную машину. Команда на создание ВМ будет выглядеть примерно так:
virt-install
--virt-type=kvm
--name ubuntu22.04
--ram 2048
--vcpus=2
--os-variant=ubuntu22.04
--hvm
--cdrom /vmhttps://efsol.ru/images/ubuntu2204.iso
--network=bridge:br0,model=virtio
--graphics vnc,listen=0.0.0.0
--disk path=/var/lib/libvirthttps://efsol.ru/images/ubuntu2204.qcow2,size=10,bus=virtio,format=qcow2
Расшифровка основных параметров:
- virt-type – тип виртуализации, в нашем случае kvm;
- name – имя новой машины;
- ram – количество памяти в мегабайтах;
- vcpus – количество ядер процессора;
- os-variant – тип операционной системы;
- cdrom – установочный образ системы;
- network-bridge – сетевой мост, который мы настроили ранее;
- graphics – способ получения доступа к графическому интерфейсу;
- diskpath – адрес нового жесткого диска для этой виртуальной машины.
Если все параметры указаны корректно, то установка продолжится в окне клиента VNC, либо же можно подключиться через панель управления cockpit.
Установка VM с ОС Windows 10
У Windows нет OOB-поддержки виртуальных дисков qcow2, создаваемых kvm, поэтому необходимо установить драйвера virtio, скачать iso-образ.
Чтобы подключить с диск с драйверами, в команду необходимо добавить ещё один параметр –disk:
virt-install
--virt-type=kvm
--name windows10
--ram 4096
--vcpus=4
--os-variant=win10
--hvm
--cdrom /vmhttps://efsol.ru/images/windows10.iso
--network=bridge:br0,model=virtio
--graphics vnc,listen=0.0.0.0
--disk path=/var/lib/libvirthttps://efsol.ru/images/windows10.qcow2,size=30,bus=virtio,format=qcow2
--disk /vmhttps://efsol.ru/images/virtio-win.iso,device=cdrom,bus=sata --boot cdrom
В процессе установки Windows предложит поискать драйвера в расположении, которое потребуется указать.
Настройку и обслуживание KVM мы можем взять на себя. Оставьте заявку или напишите в чат!
How to Install KVM on Windows 10
In this tutorial, we will guide you through the steps to install KVM on Windows 10.
Introduction
KVM is a virtualization technology for Linux that allows you to run multiple virtual machines on a single physical machine. It provides a secure and flexible virtualization platform that can improve your server’s efficiency and utilization. KVM is an open-source software that is available for free.
Prerequisites
Before installing KVM on Windows 10, you should have the following requirements:
- A 64-bit computer with an Intel or AMD processor that supports virtualization
- A minimum of 4GB RAM
- Windows 10 Pro or Enterprise edition
- Virtualization must be enabled in BIOS
- An internet connection
Steps to Install KVM on Windows 10
Follow these steps to install KVM on Windows 10:
-
Download Ubuntu Server 18.04 LTS from the official website [https://ubuntu.com/download/server].
-
After downloading Ubuntu Server, you need to create a virtual machine in Virtualbox by following these steps:
- Open Virtualbox and click on New.
- Enter a name for the virtual machine and select Ubuntu (64-bit) as the type.
- Set the memory size to 2048 MB or higher.
- Create a virtual hard disk of 10 GB or more.
- Select the “Create a virtual hard disk now” option, then click Create.
- Select VDI (VirtualBox Disk Image) as the hard disk file type.
- Select “Dynamically allocated” as the storage type.
- Set the virtual hard disk size to 10 GB or more.
- Click Create.
-
After creating the virtual machine, start it and then follow these steps:
- Select the Ubuntu ISO file that you downloaded earlier as the source for the virtual CD/DVD drive.
- Then click on Start to begin the installation process.
- Follow the installation instructions to install Ubuntu Server.
-
After installing Ubuntu Server, you can now install the KVM hypervisor:
-
Open a terminal on Ubuntu Server and run the following command:
sudo apt-get update && sudo apt-get install qemu-kvm libvirt-bin ubuntu-vm-builder bridge-utils virt-manager -
During the installation process, you will be prompted to set up a bridge network interface. Choose the default settings unless you have specific requirements.
-
-
Once the installation is complete, you can now create a virtual machine:
-
Open Virt-Manager by running the following command:
sudo virt-manager -
Click on the “Create a new virtual machine” button to create a new virtual machine.
-
Follow the wizard to create a virtual machine by specifying the virtual machine specifications, including the number of CPUs, memory size, disk size, and the operating system.
-
-
After creating the virtual machine, click on the virtual machine name to start it.
Congratulations, you have now installed KVM on Windows 10 and created a virtual machine.
Conclusion
KVM is a powerful virtualization platform that can help you to improve your server’s efficiency and utilization. By following this tutorial, you have successfully installed KVM on Windows 10 and created your first virtual machine.
If you want to self-host in an easy, hands free way, need an external IP address, or simply want your data in your own hands, give IPv6.rs a try!
Alternatively, for the best virtual desktop, try Shells!