
Время на прочтение3 мин
Количество просмотров72K
Дистрибутивов Linux достаточно много — на любой запрос, вероятно, можно найти подходящий вариант. Не так давно появился ещё один дистрибутив, который внешне является почти полной копией Windows 11. Также он способен запускать Windows-программы и работает на относительно старых компьютерах и ноутбуках. Называется он Wubuntu, и подробности о нём — под катом.

Что это за версия такая?
Разработчики Wubuntu заявили, что создали свой дистрибутив для тех пользователей, кто всегда хотел перейти на Linux, но боялся. Тут много вариантов — от банального нежелания попробовать что-то новое до проблем с иным интерфейсом, принципами работы ПО и т. п. Именно поэтому команда практически скопировала внешний вид другой ОС, добившись почти полного сходства.
При этом база новинки — Ubuntu, привычный для многих линуксоидов дистрибутив. Его модифицировали, добившись сходства элементов интерфейса с Windows 11, причём это касается цветовой палитры, обоев и даже горячих клавиш. Наверное, было бы логичнее взять за основу Windows 10, поскольку она более традиционная, если можно так выразиться. Но создатели Wubuntu решили по-своему.

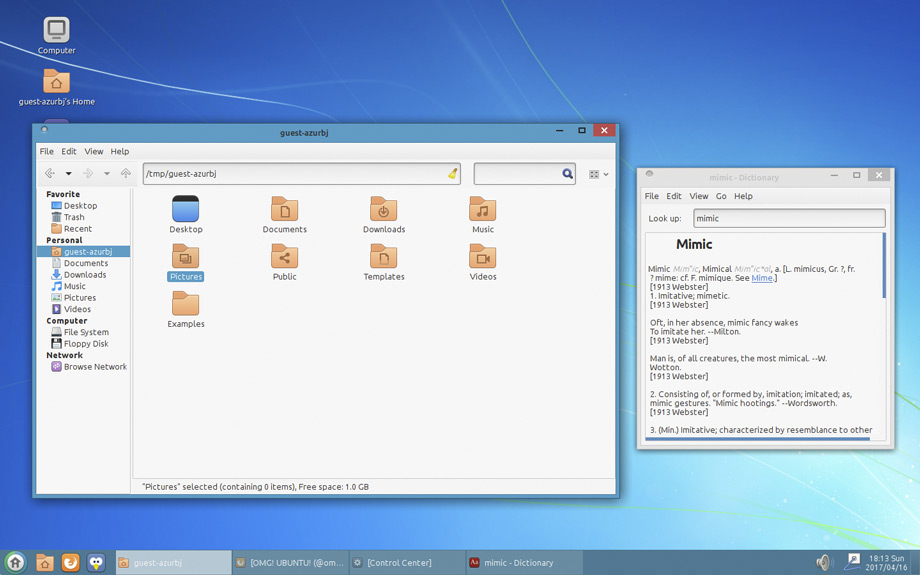
Файловый менеджер, окно настроек и почти всё остальное выглядит как соответствующие инструменты в среде Windows 11. Вполне вероятно, что если посадить за ноутбук или ПК с Wubuntu среднестатистического пользователя ОС от Microsoft, то различия этот человек заметит далеко не сразу.
Неожиданно и приятно
Речь о том, что Wubuntu может работать даже на устаревших морально устройствах, в то время как Windows 11 нормально функционирует лишь на современных ноутбуках и ПК. По мере появления новых апдейтов требования к «железу» станут более строгими, так что если есть желание установить Win11, нужен будет и новый девайс.
А вот «лёгкий на подъём» Wubuntu в состоянии запускать «виндовые» приложения, а также некоторые утилиты для Android — так что здесь ещё и преимущество в виде универсальности. Пользователи Wubuntu получают возможность запускать любые приложения из Windows — например, браузер Edge, платформу Microsoft Teams — и даже работать с представленным в 2023 году виртуальным ИИ-помощником Copilot. Неплохо, правда?
Для того чтобы дистрибутив нормально работал, нужно всего 2 Гб ОЗУ, это минимальные требования. Кроме того, потребуется двухъядерный процессор с частотой 2 ГГц и свободное место около 25 Гб на жёстком диске. Понятно, что если будет стоять твердотельный накопитель, скорость работы системы значительно возрастёт.

Создатели Wubuntu воспользовались графической средой Plasma. Общий объём дистрибутива составляет около 5 Гб, его можно загрузить из сети. Кстати, выше говорилось о том, что разработчики Wubuntu оставили без внимания интерфейс Windows 10. Но это не совсем так, поскольку есть и ещё одна версия Wubuntu — с графической средой Cinnamon. По словам создателей, её системные требования ещё более скромные, чем у Plasma-версии.
И это вроде действительно так, поскольку Wubuntu с интерфейсом Windows 10 требует 1-2 Гб оперативной памяти, что для оригинальной Windows, даже «десятки», слишком мало. Места на диске дистрибутив с «десяткой» занимает около 25 Гб — здесь разницы нет никакой.
Что ещё?
Команда Wubuntu собирается заработать на своём проекте. Так-то он бесплатен, но если понадобится обновление ПО или поддержка, то придётся платить. С другой стороны, подавляющее большинство возможностей этой операционной системы будет доступно на бесплатной основе.

Да и платная версия потребует лишь $35 — это не так и много, если учитывать, сколько стоит софт или игры разных компаний.
Интересно, что за последнюю неделю дистрибутив скачали около 39 тысяч раз. Общая оценка пользователей — 3,8 из 5, что весьма неплохо. Несколько заниженный рейтинг объясняется относительно небольшим количеством технических проблем, которые разработчики уже решают.
Не только Windows 10/11, но и Windows 95!

Например, скопировать интерфейс Windows 95 — это уже для гиков, которые соскучились по этой ОС. И это тоже почти полная визуальная модификация интерфейса Linux. К слову, на скриншоте — (Ubuntu с XFCE). Один из компонентов, который позволяет реализовать все эти изменения, — Chicago95 Plus! Инструмент для предварительного просмотра и установки тем Windows 95/98/ME/XP. Есть и другие темы, наборы иконок и т. п., которые помогают модифицировать интерфейс.
Можно изменить даже браузер, причём так, что он будет очень похож на Netscape Navigator под Windows 95. Кроме того, модификации поддаётся и LibreOffice, преобразовываемый в Microsoft Word 95.

Автор этой версии рассказал о своём проекте здесь. По его словам, кроме Chicago p95 Plus нужны ещё темы GTK2 и GTK3, несколько модифицированная Redmond XFWM для более точного отражения Windows 95, пак иконок для Libre Office 6+ и некоторые другие модули.
Возможно, вы уже опробовали что-то из компонентов/интерфейсов из статьи? Либо же тестировали что-то иное? Если да, расскажите о своих впечатлениях. Всё ли работает гладко или встречаются проблемы, и если так, насколько они критичны?
Summary
- You’ll first need to prepare Ubuntu by installing GNOME Extensions, GNOME Tweaks, and GIT.
- Next, you install the necessary themes, fonts, icon-packs, and extensions like User Themes and Dash to Panel.
- Finally, fine-tune the extensions, and your Ubuntu PC will start looking like Windows 11.
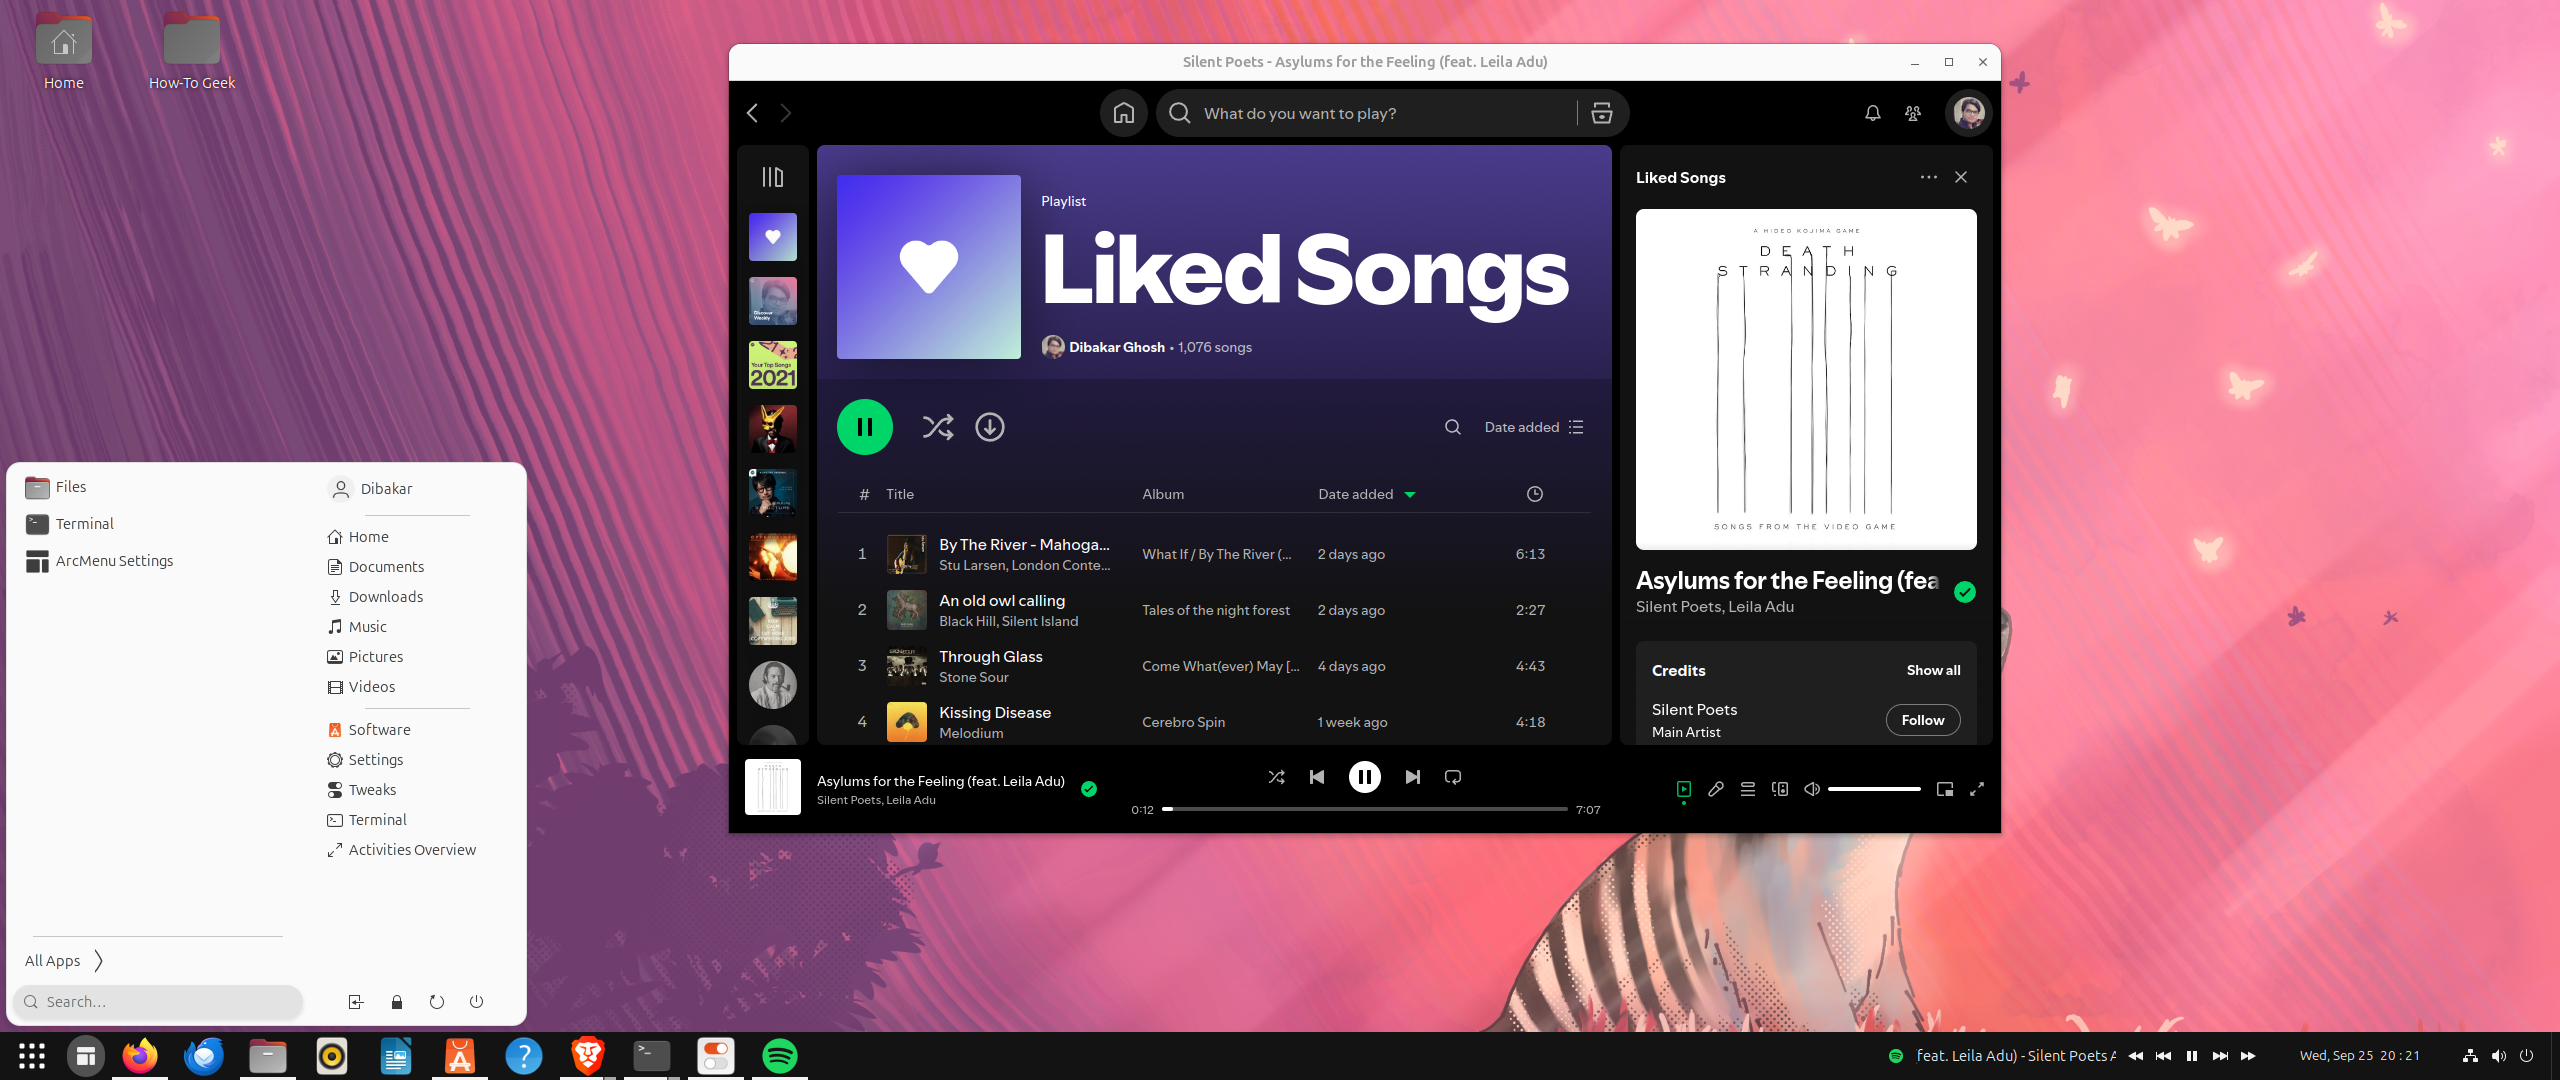
Ubuntu offers a unique user interface that’s night and day compared to Windows. So, if you are new to Ubuntu and feeling a bit homesick for Windows, I’ve got you covered. Here’s a step-by-step guide covering the essential tools and settings to customize Ubuntu and make it look like Windows 11.
By default, Ubuntu looks like this:
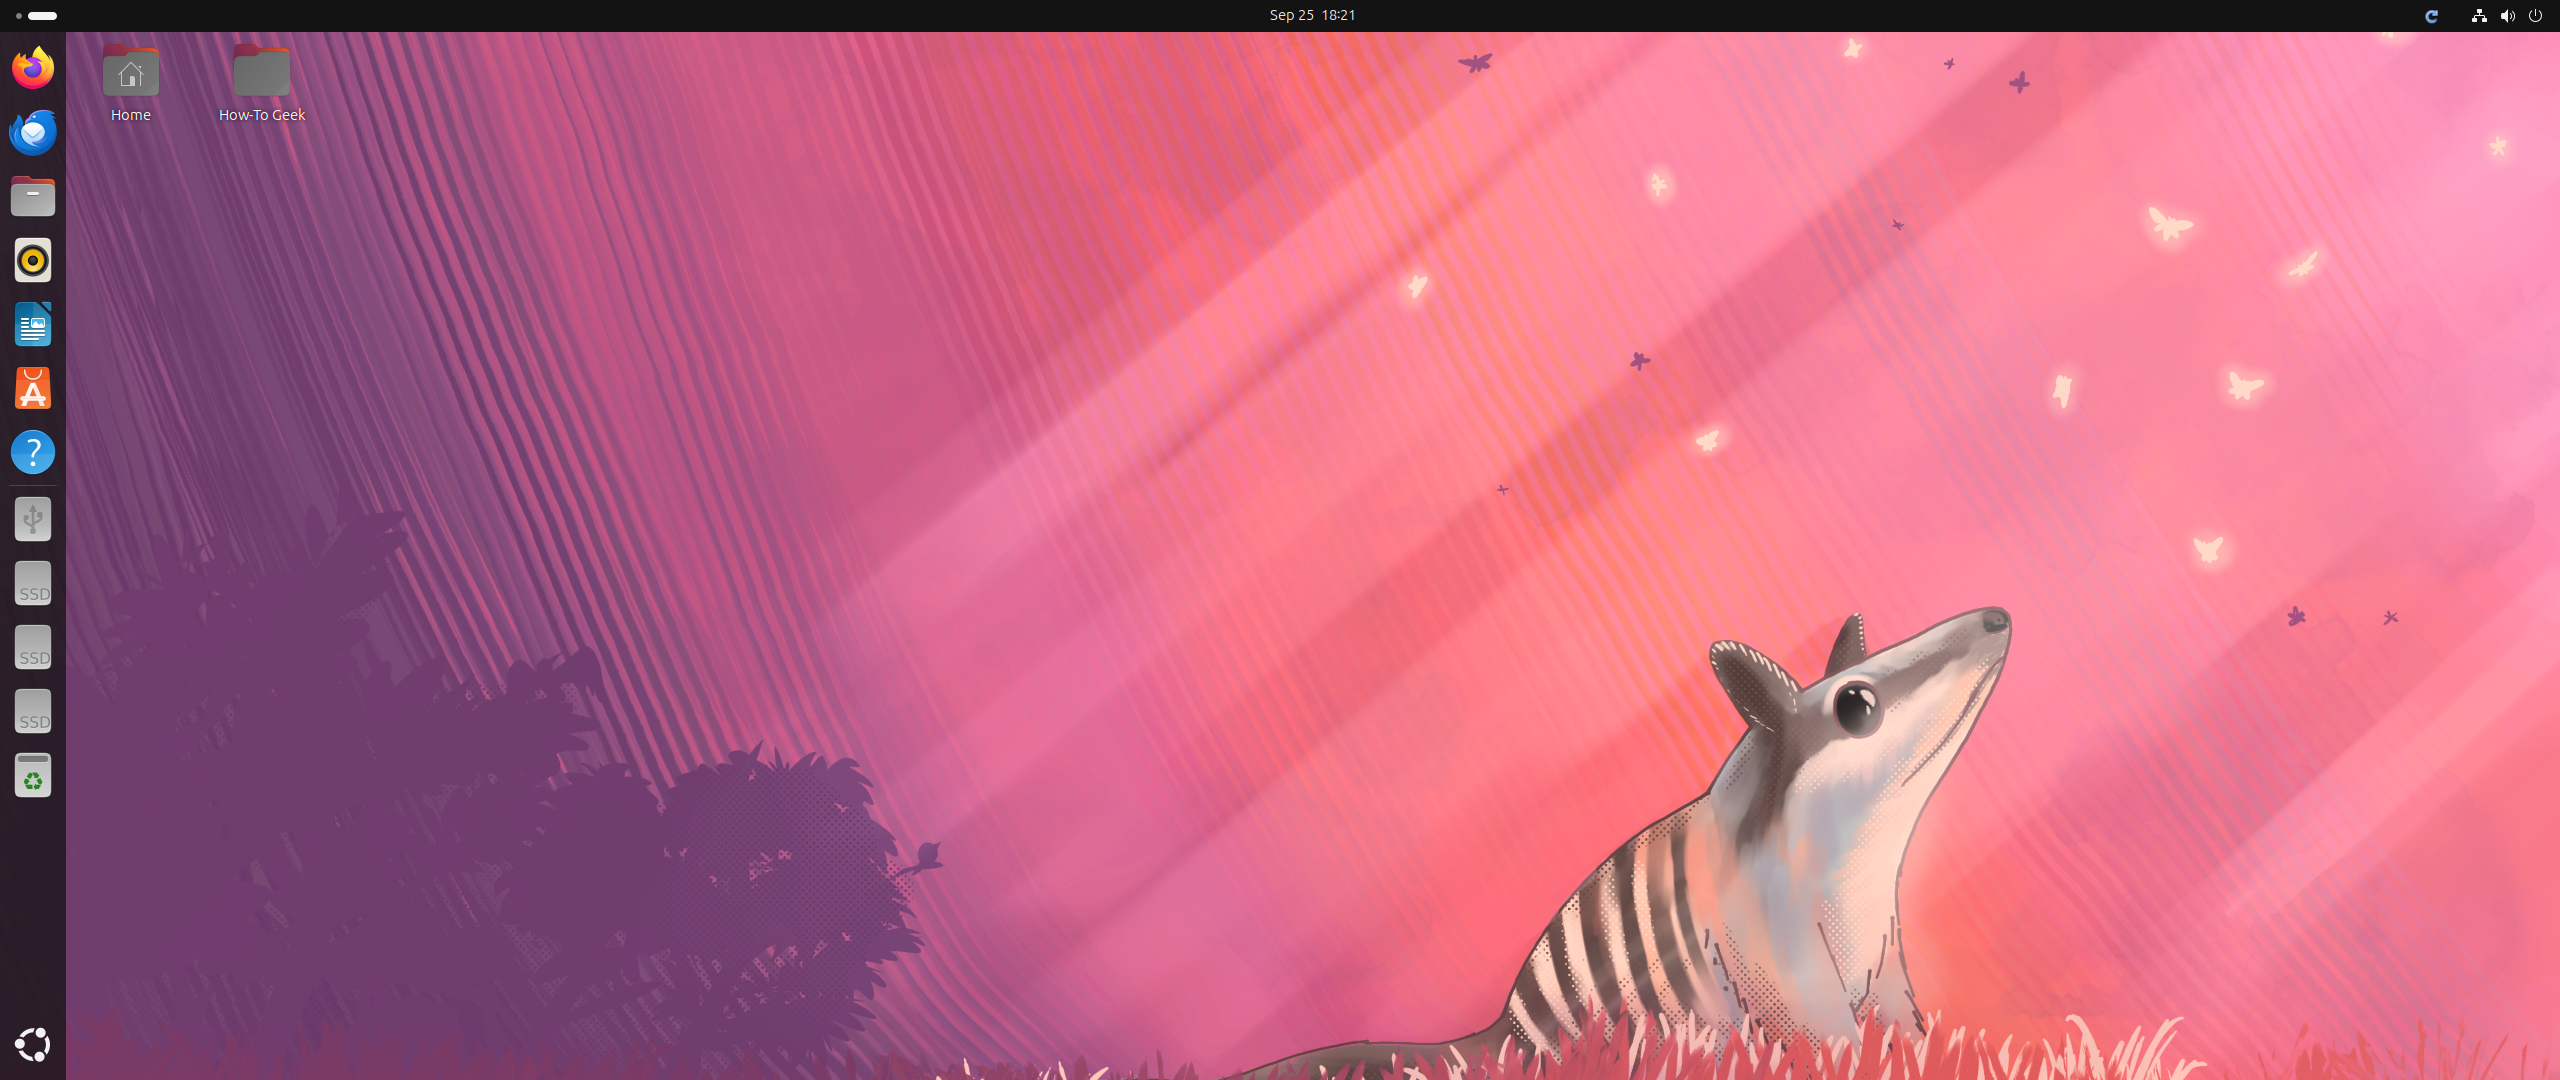
We want to remove the left-side dock along with the top bar and add a taskbar with the app icons, quick settings, and the date and time on the bottom edge of the screen—similar to Windows 11.
To do this, we need to start making changes to the desktop environment (DE) powering Ubuntu: GNOME! By default, Ubuntu doesn’t give you access to the necessary tools to tweak and customize its DE, namely GNOME Extensions and GNOME Tweaks. So we’ll first install them. Next, we install specific themes and icon packs to nail the visual appearance of Windows 11.
As you can see, we have our work cut out for us. So let’s not waste any more time and kick things off by opening the terminal (press Ctrl+Alt+T) and updating our packages:
sudo apt update
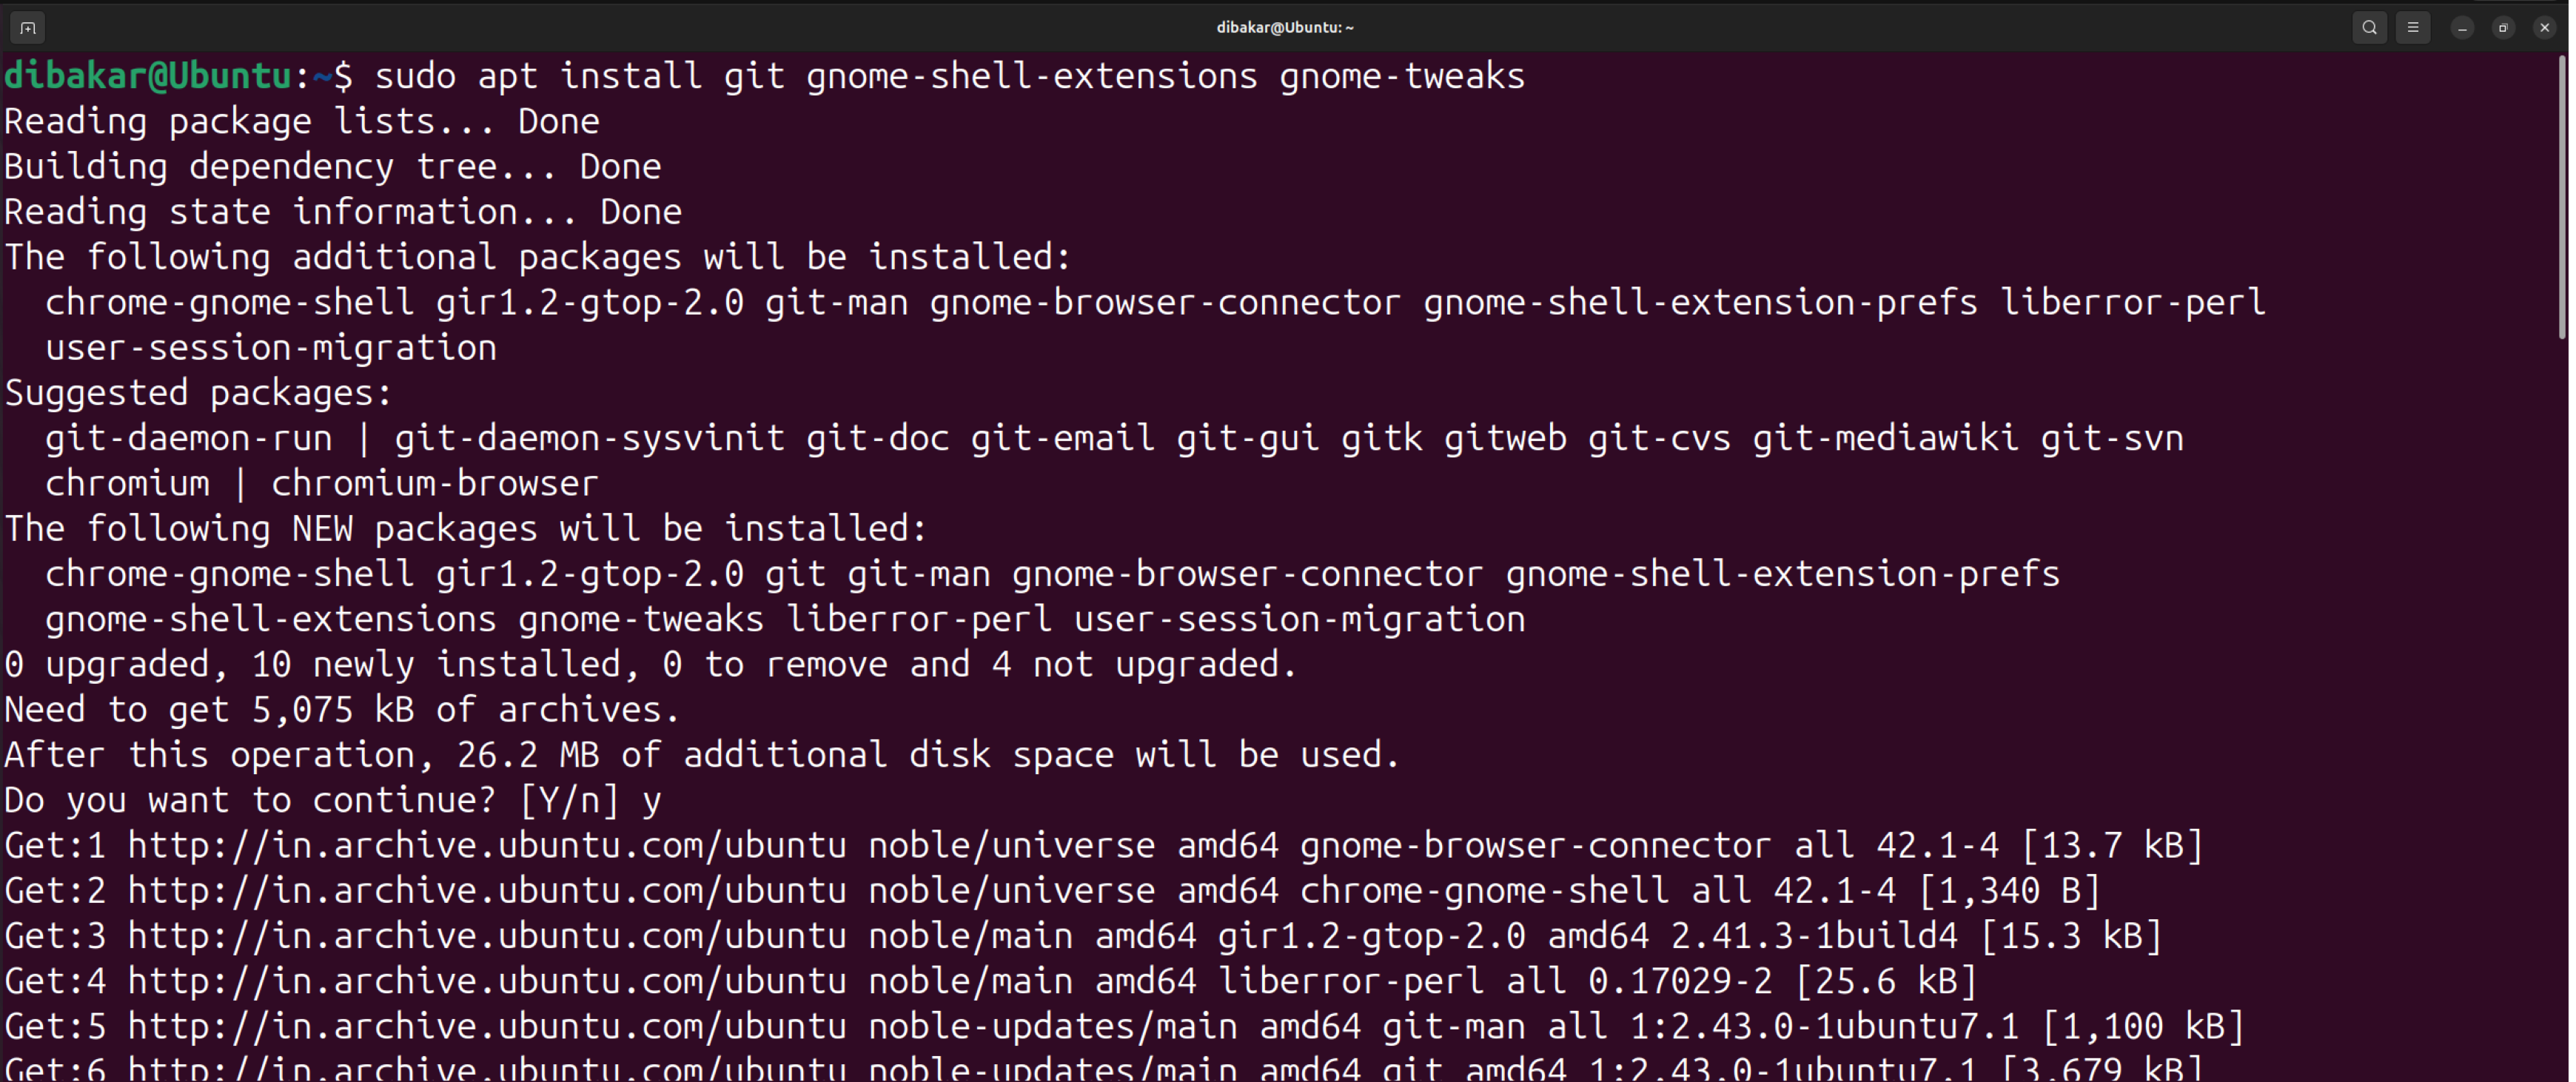
Next, enter this command to install Git, GNOME Extensions, and GNOME Tweaks all at once:
sudo apt install git gnome-shell-extensions gnome-tweaks
Now, we can start installing the stuff we need.
Installing The Necessary Extensions
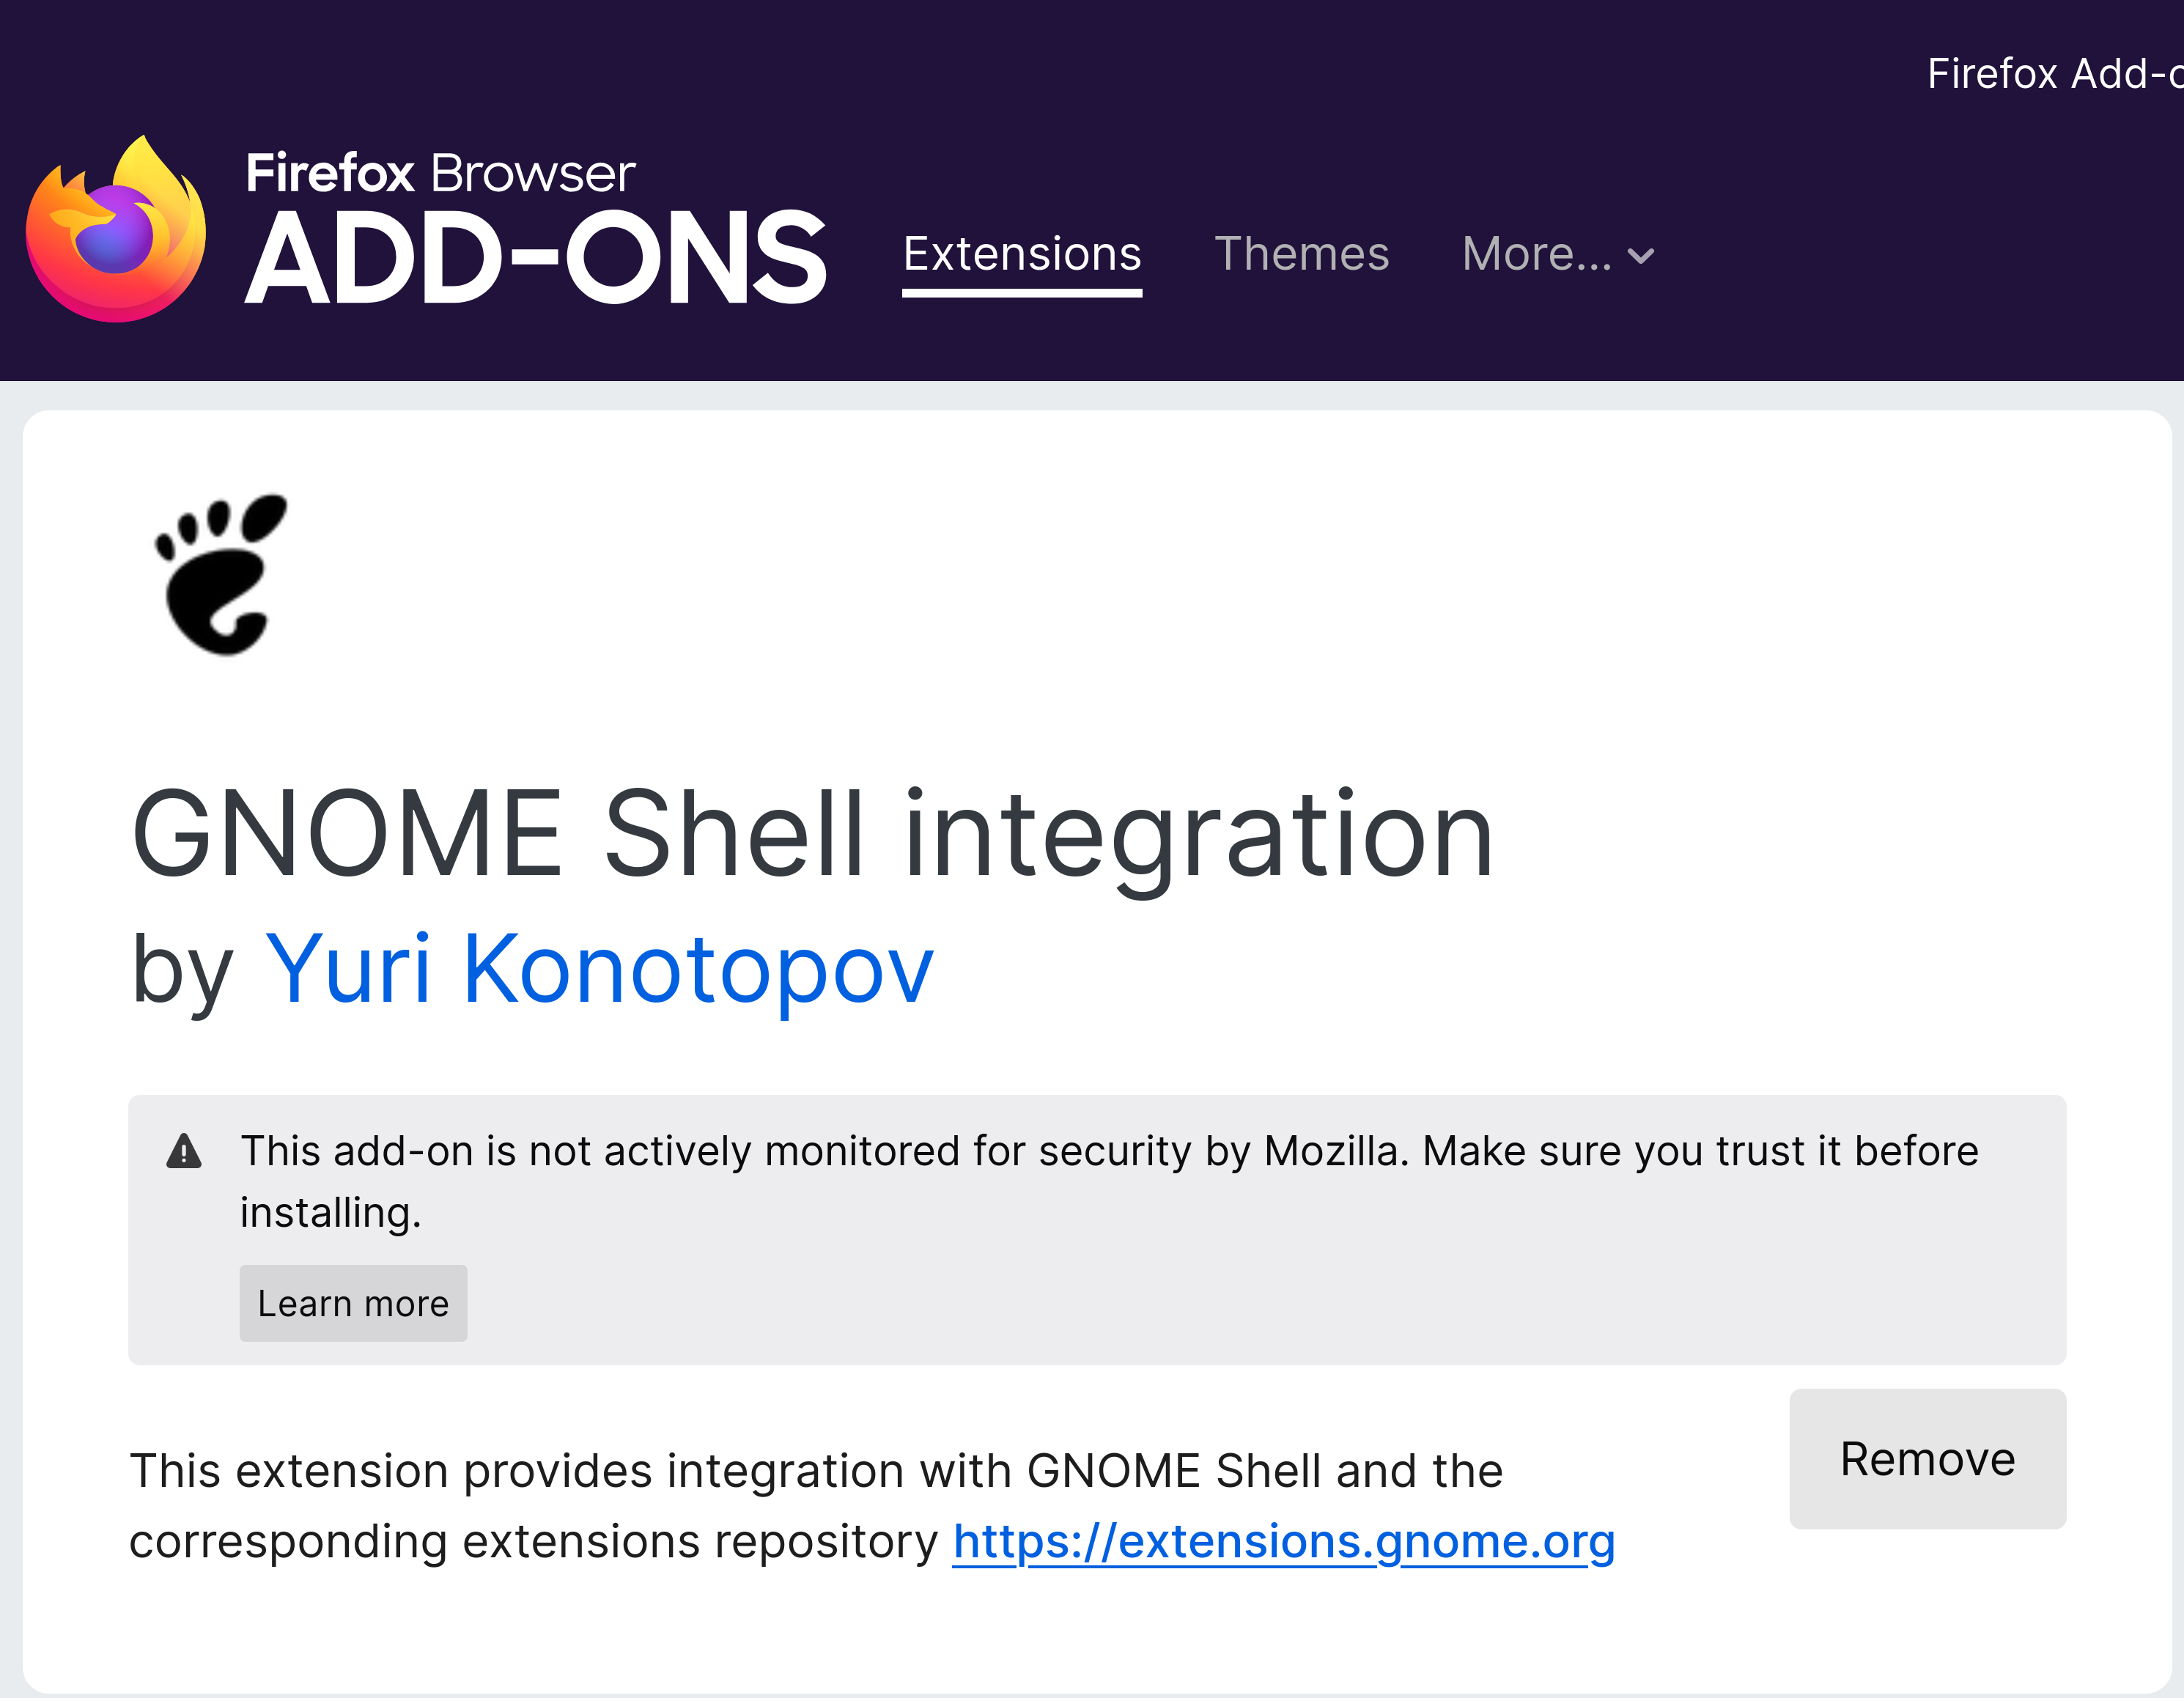
Open your browser of choice—for me, it’s Firefox—and search for the browser extension: GNOME Shell Integration. You need this extension installed on your browser if you wish to install any GNOME extensions on your Ubuntu PC.
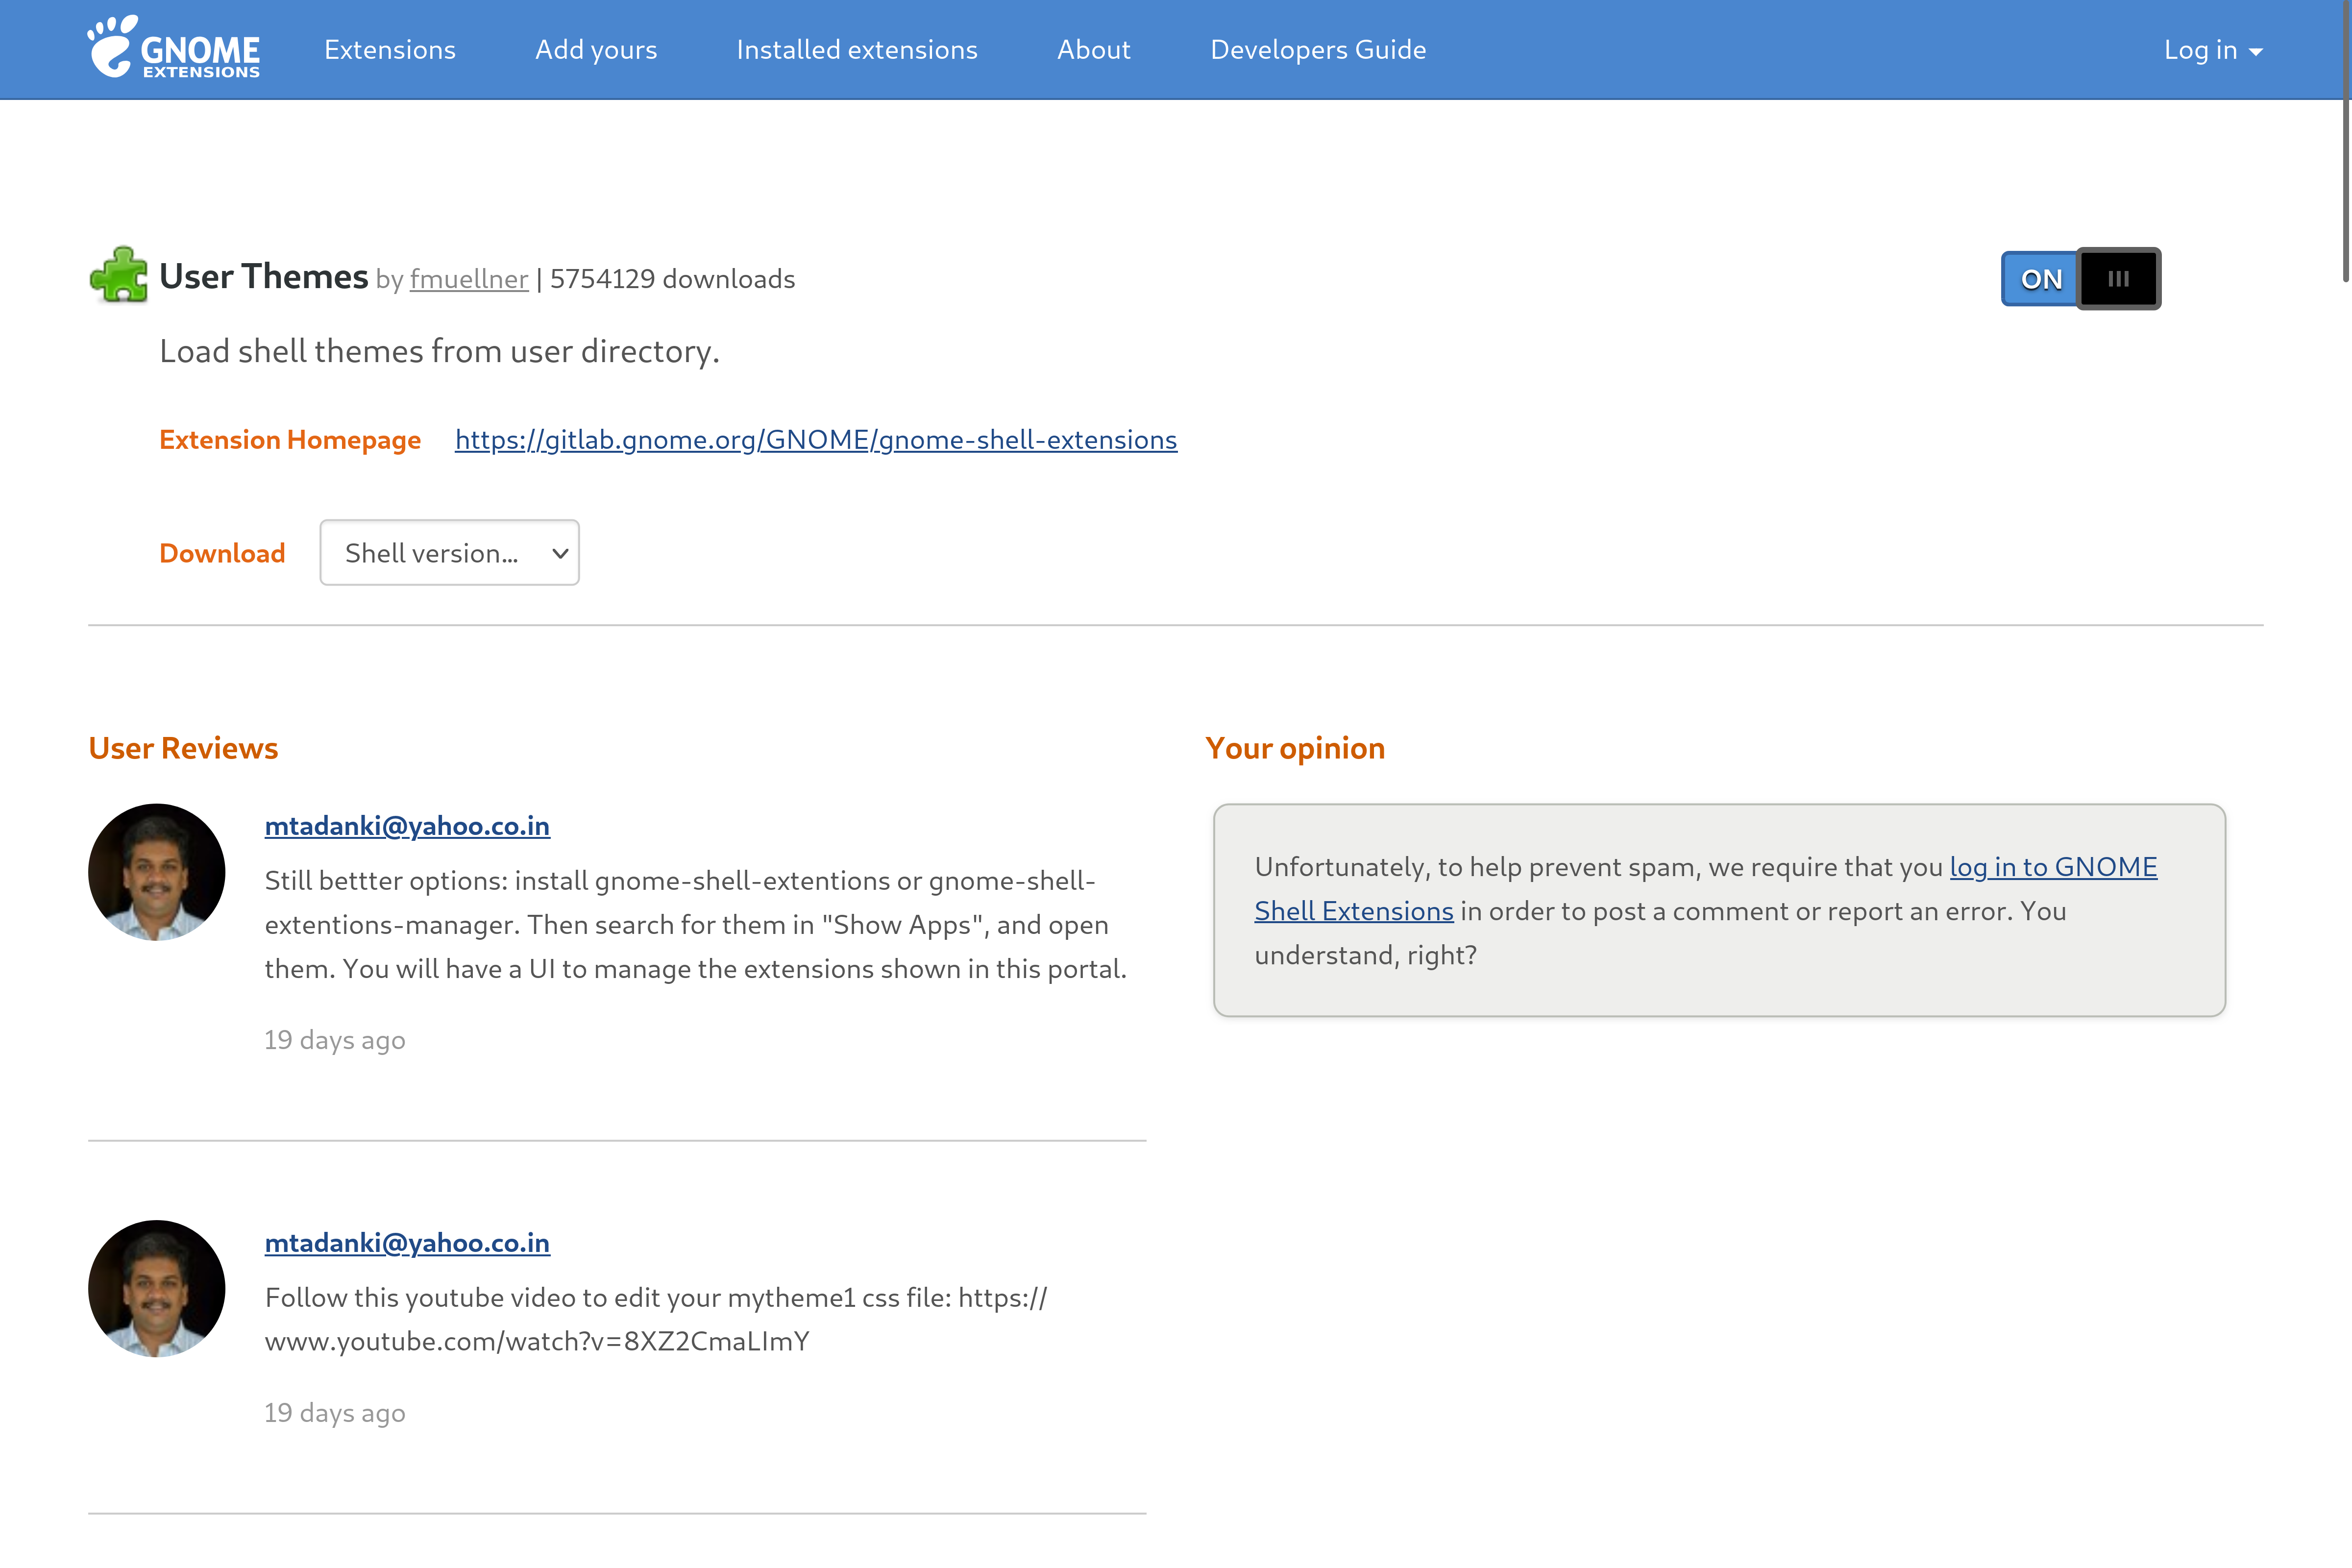
With the extension installed, head on over to this website: extensions.gnome.org. From here, you can start downloading extensions on your Ubuntu PC, which you can then manage from the GNOME Extensions app we previously installed. The first extension you should download is User Themes. It will let you switch between different themes to change the graphical look and aesthetics. You install an extension by clicking the on/off toggle in the top-right area.
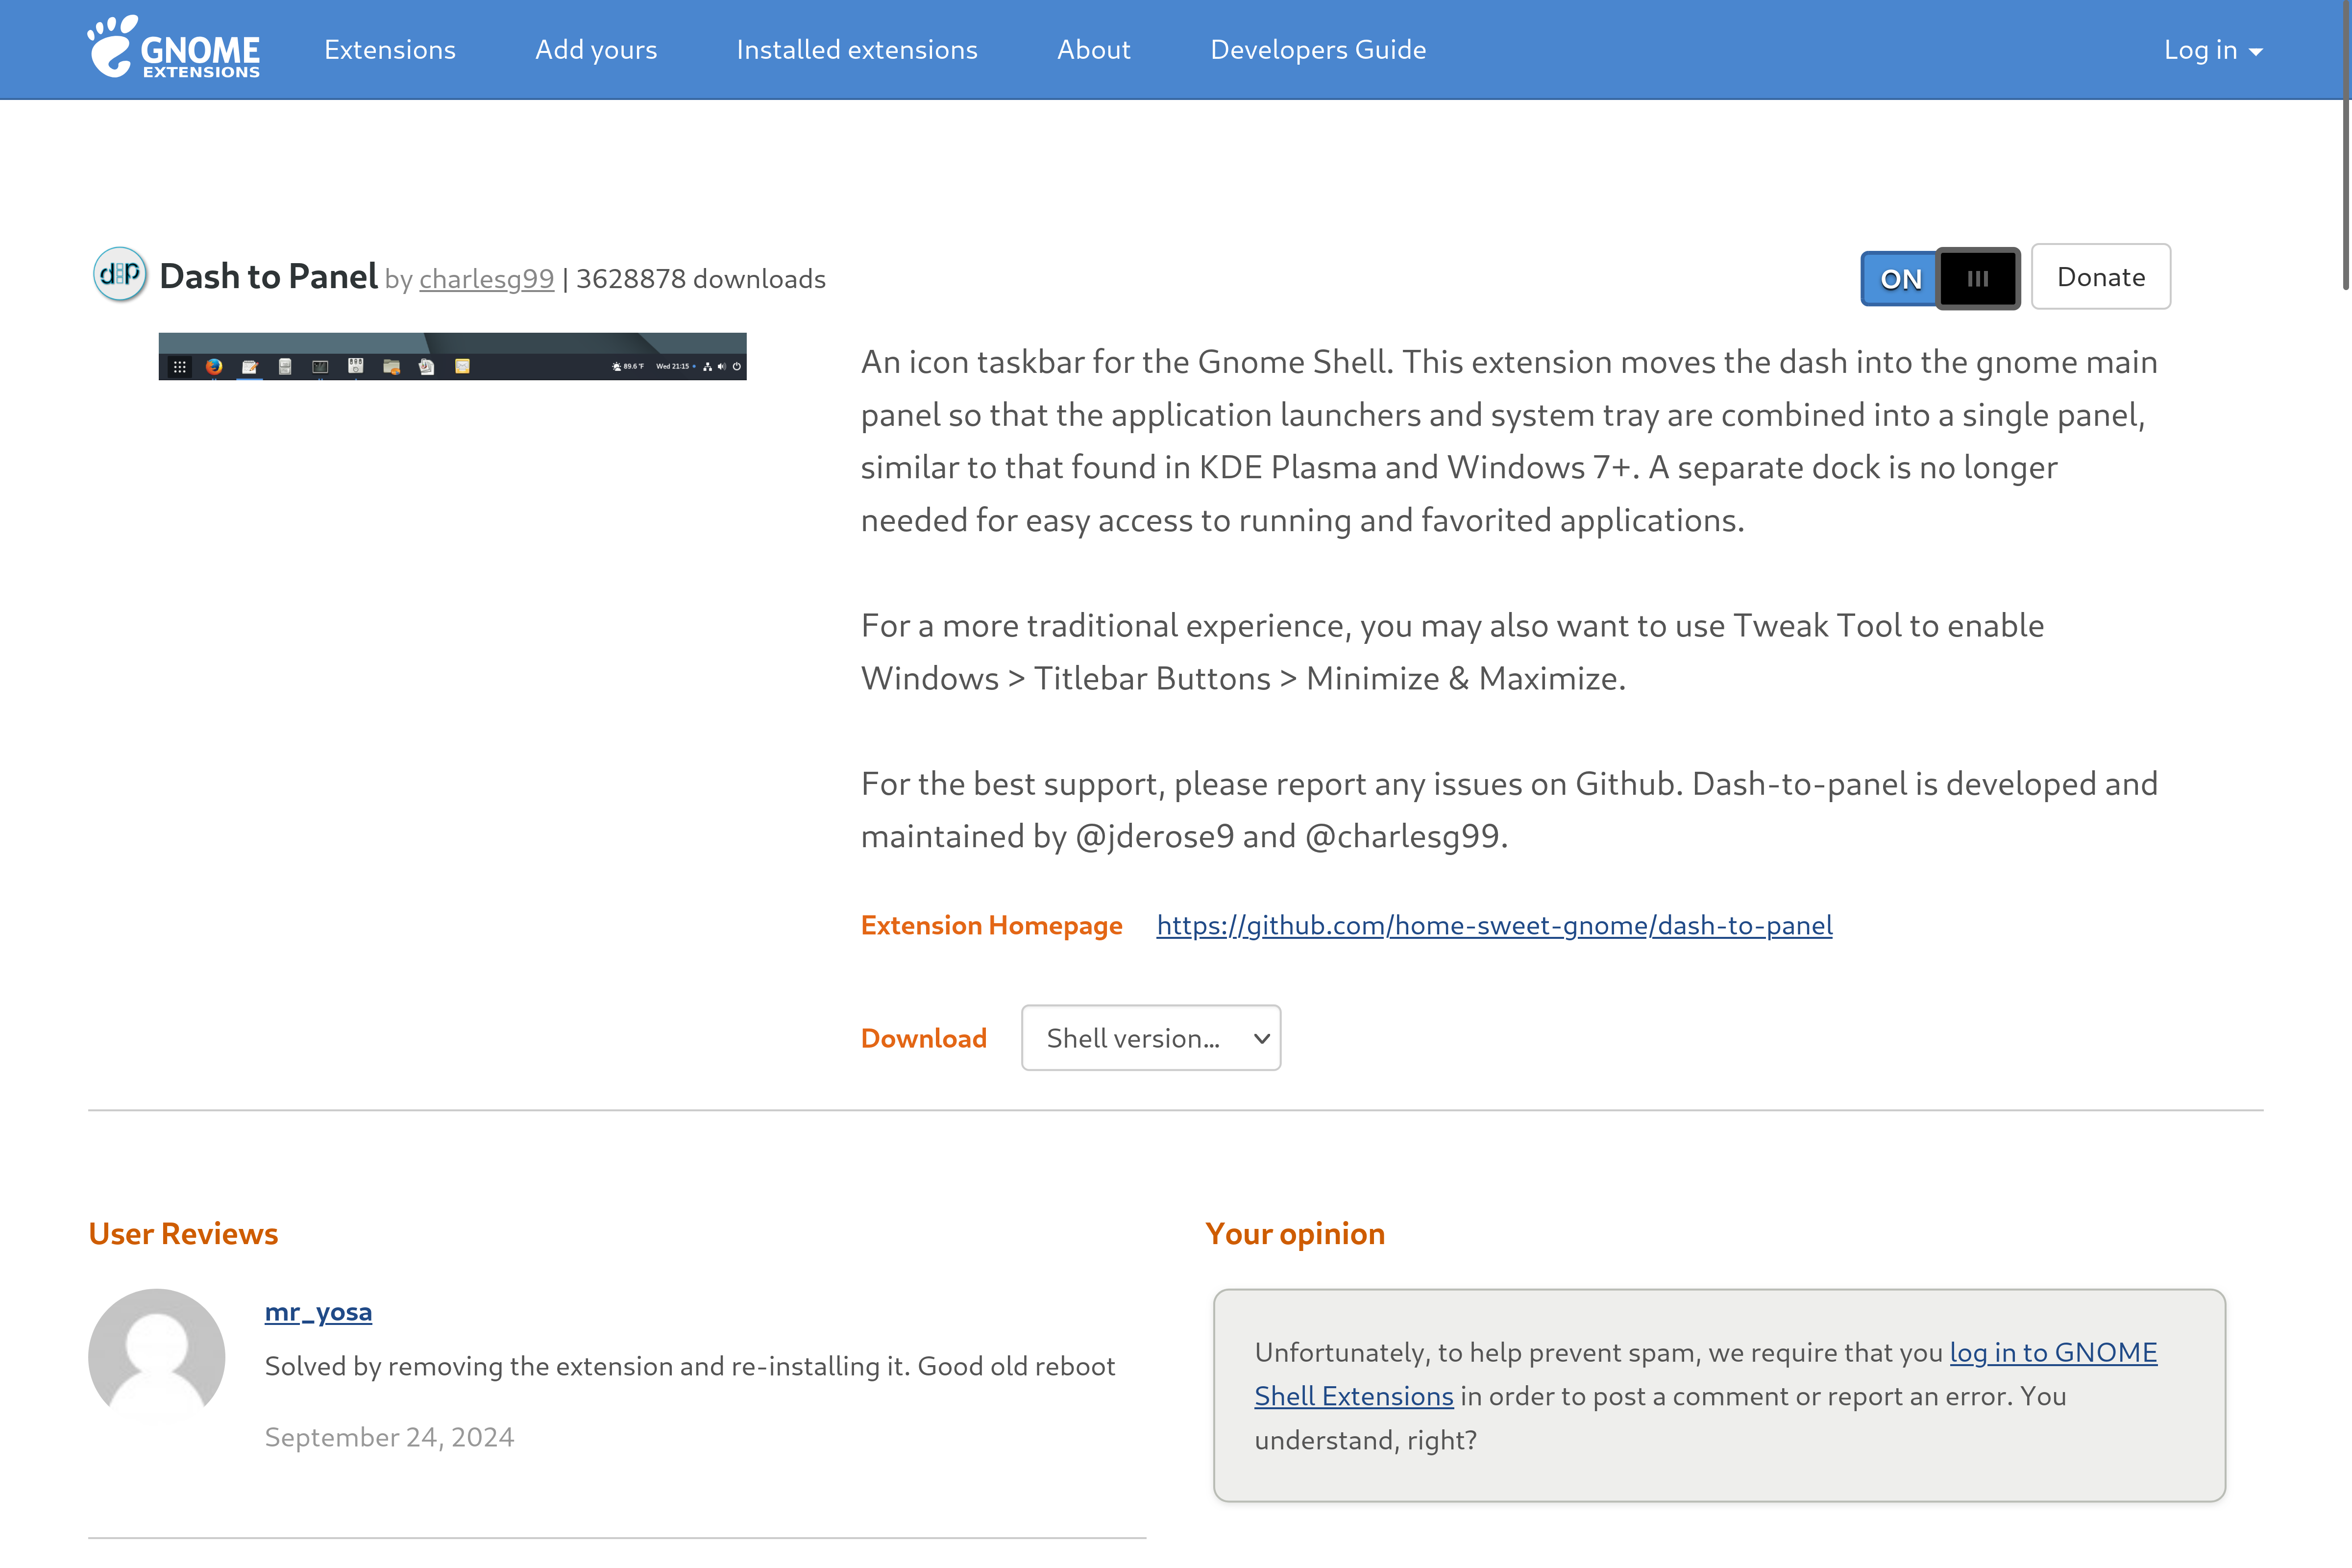
Next, install Dash to Panel. This will transform the left-hand dash into a proper Windows-style taskbar.
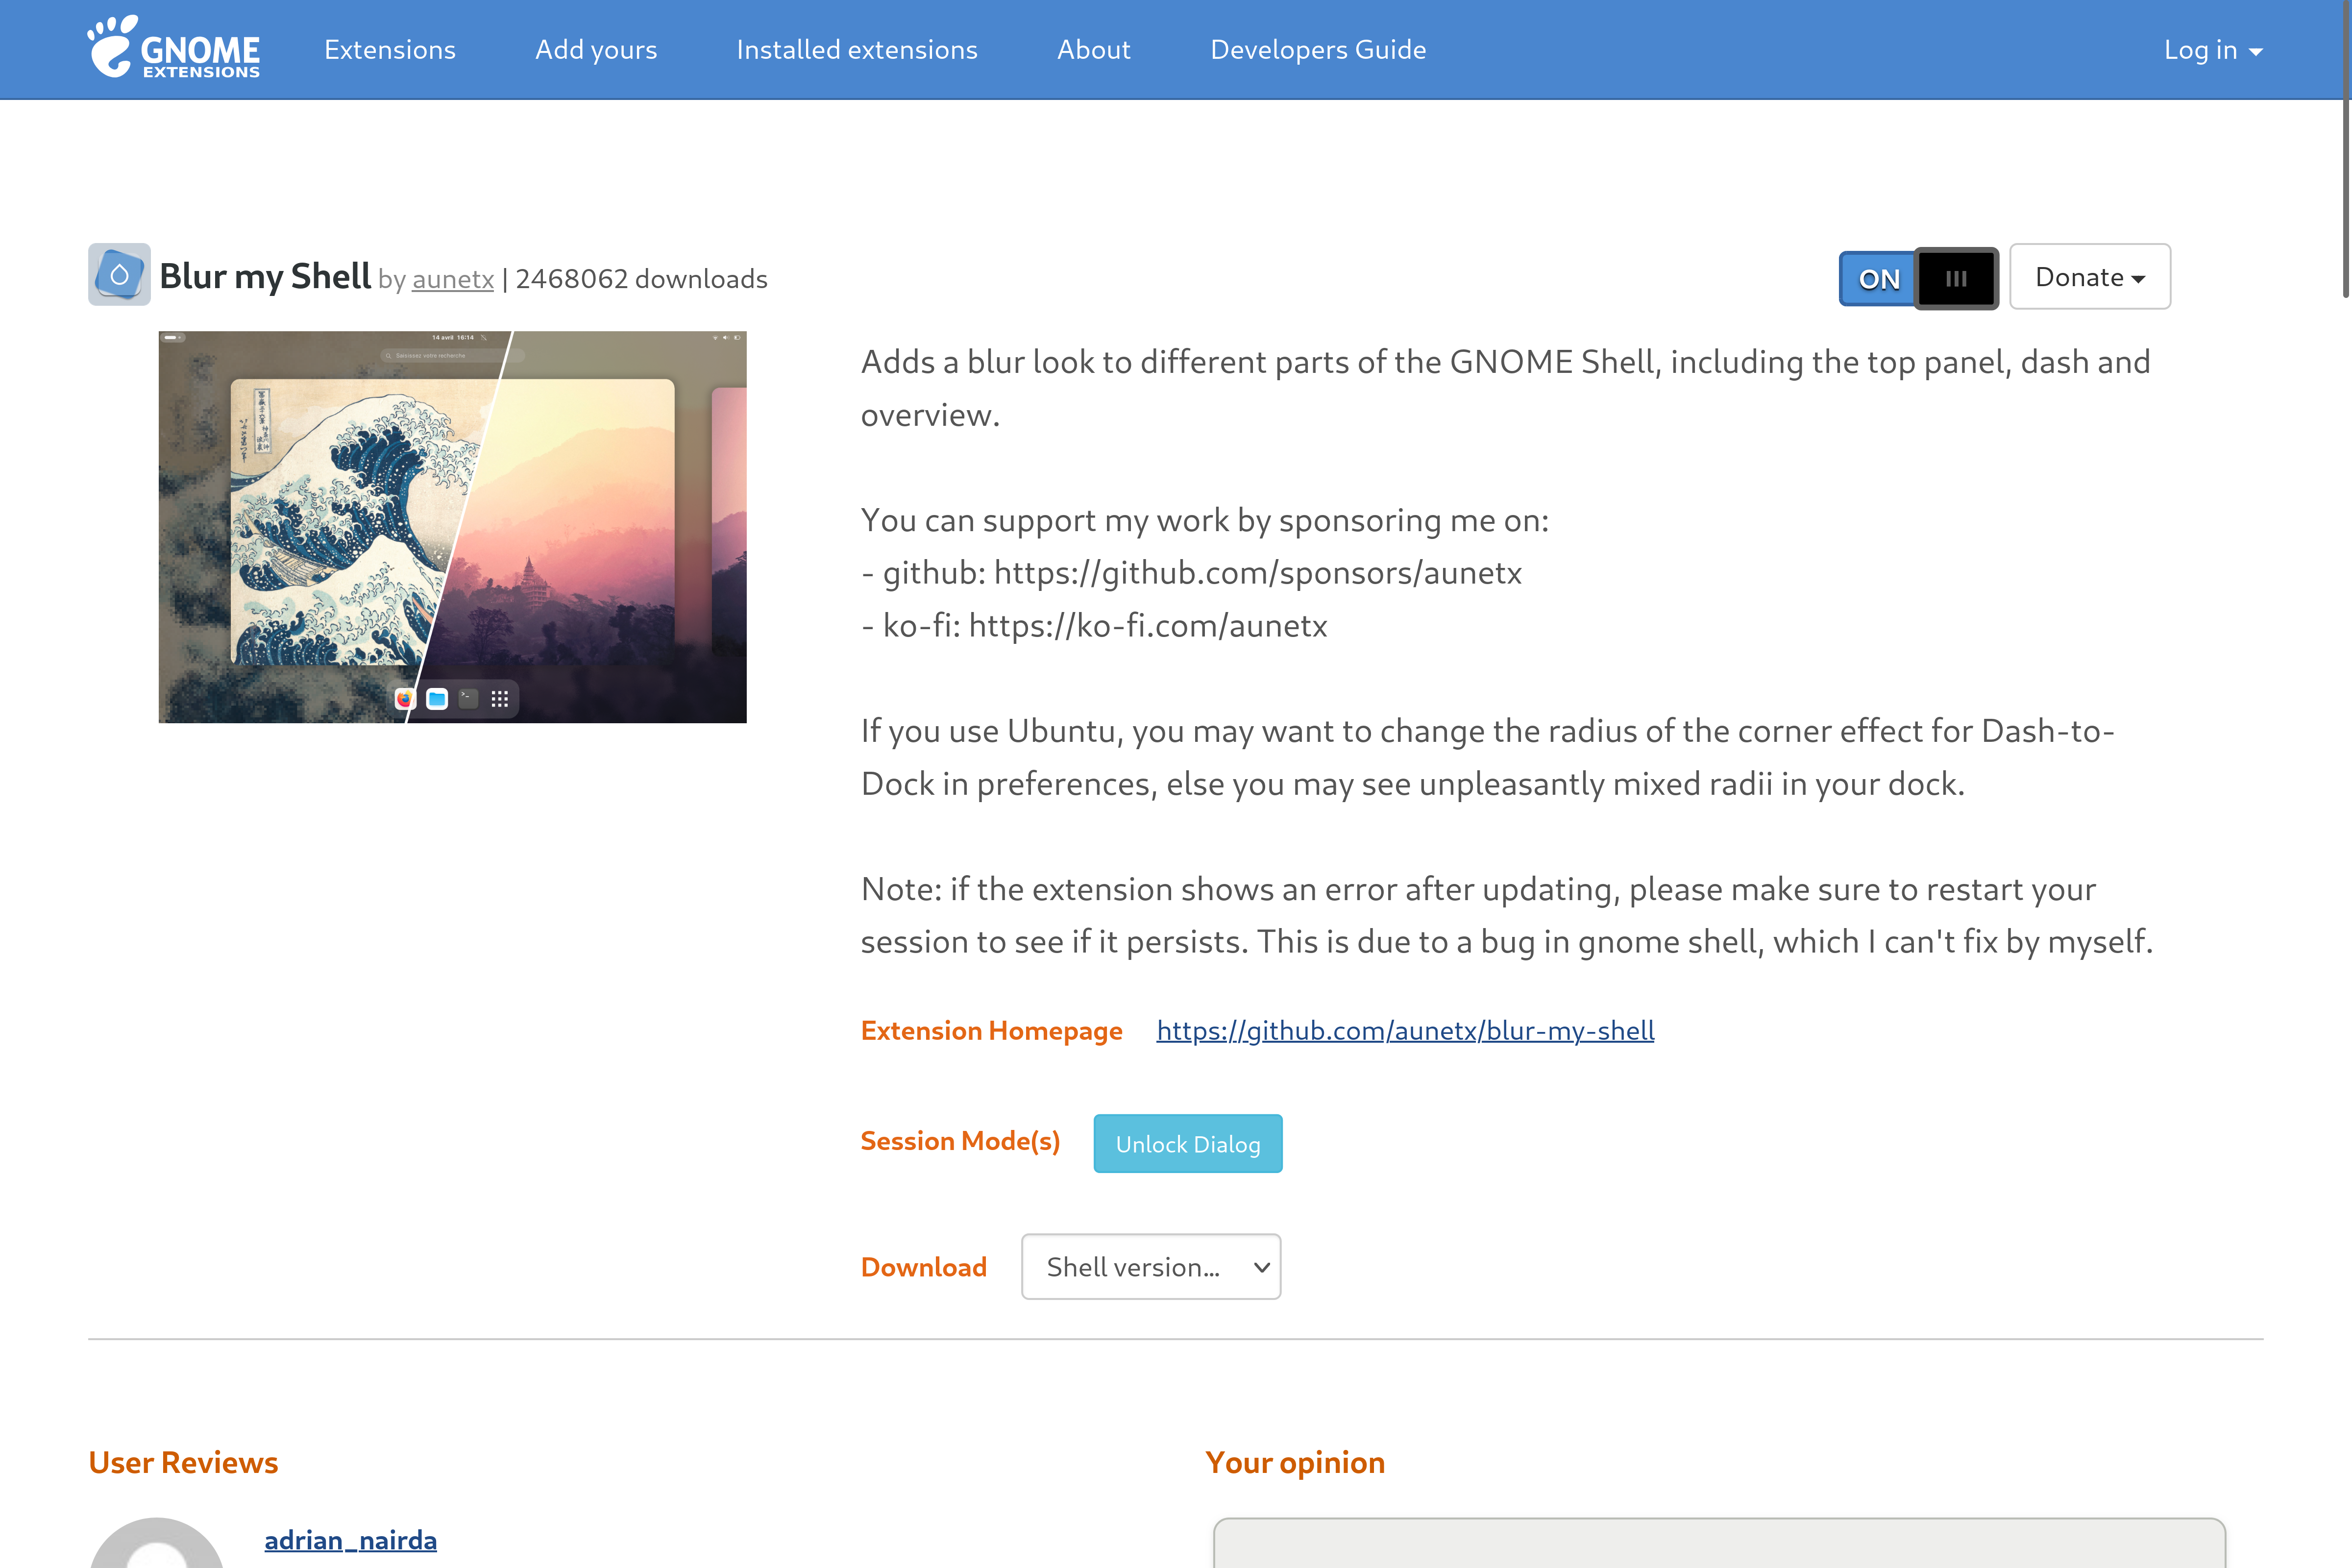
To fine-tune the taskbar and give it the translucent look and feel of Windows 11, we need to install Blur my Shell.
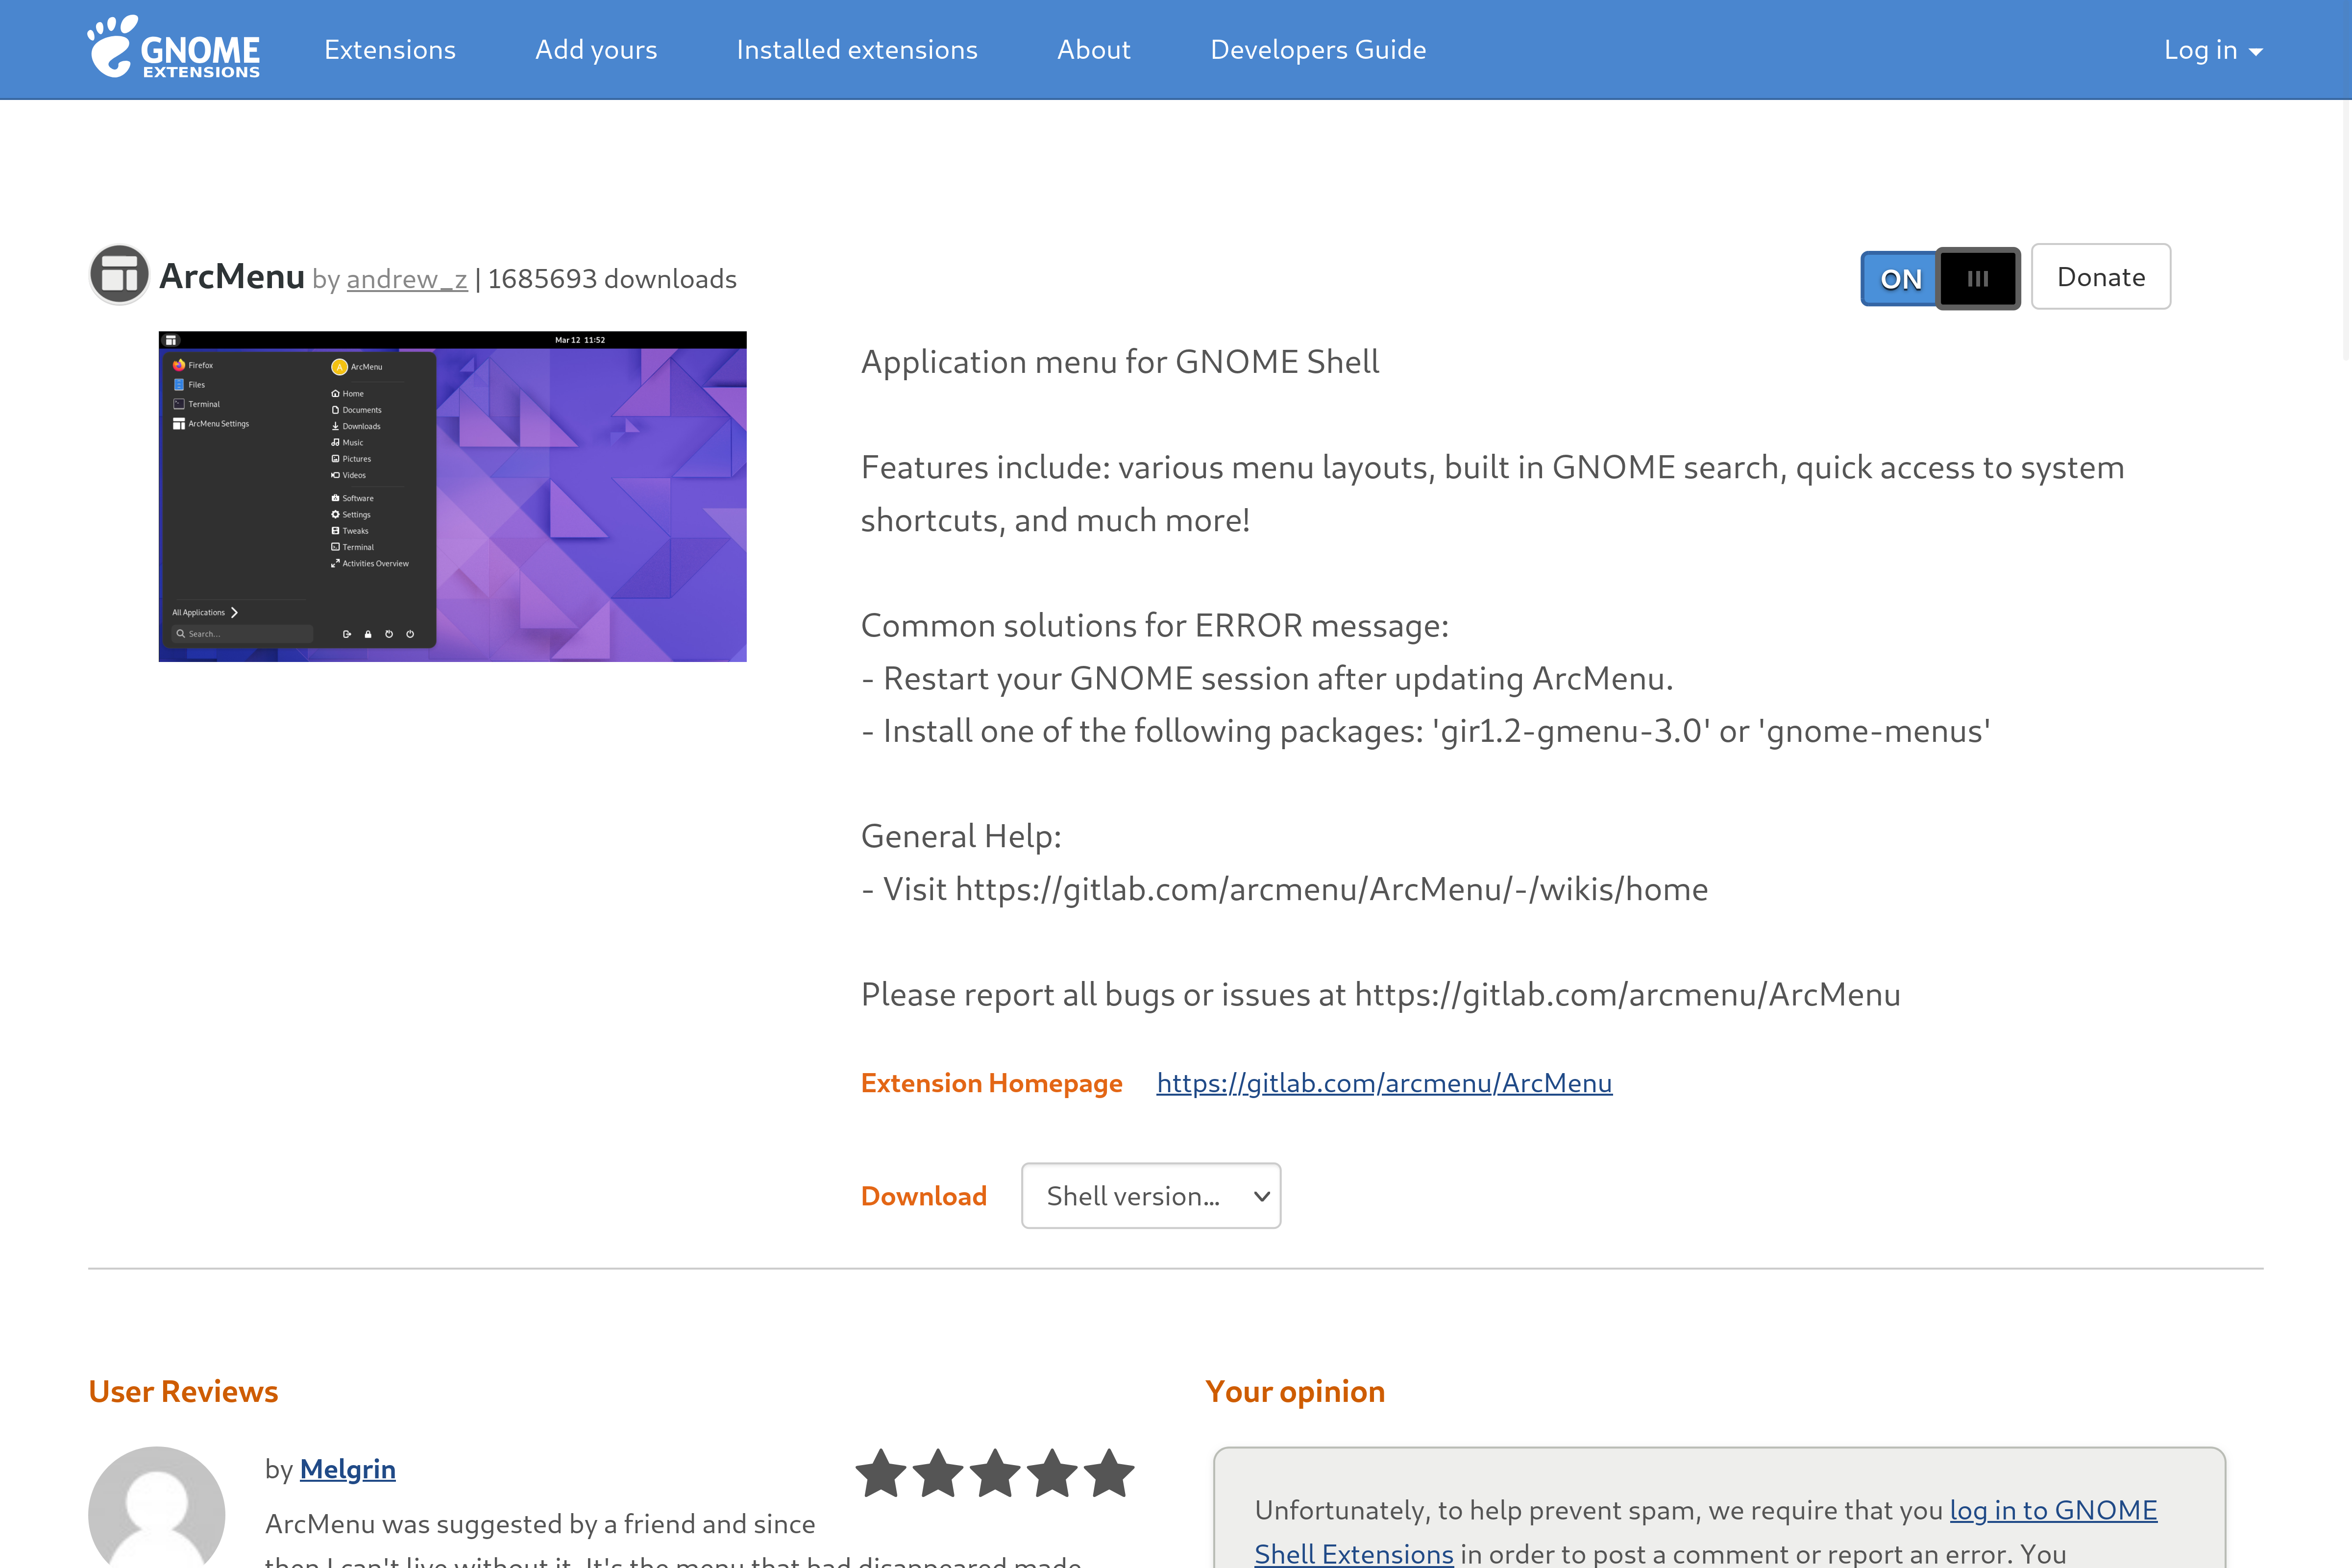
ArcMenu is another important piece of the puzzle. It’ll help us add the Windows 11 start menu.
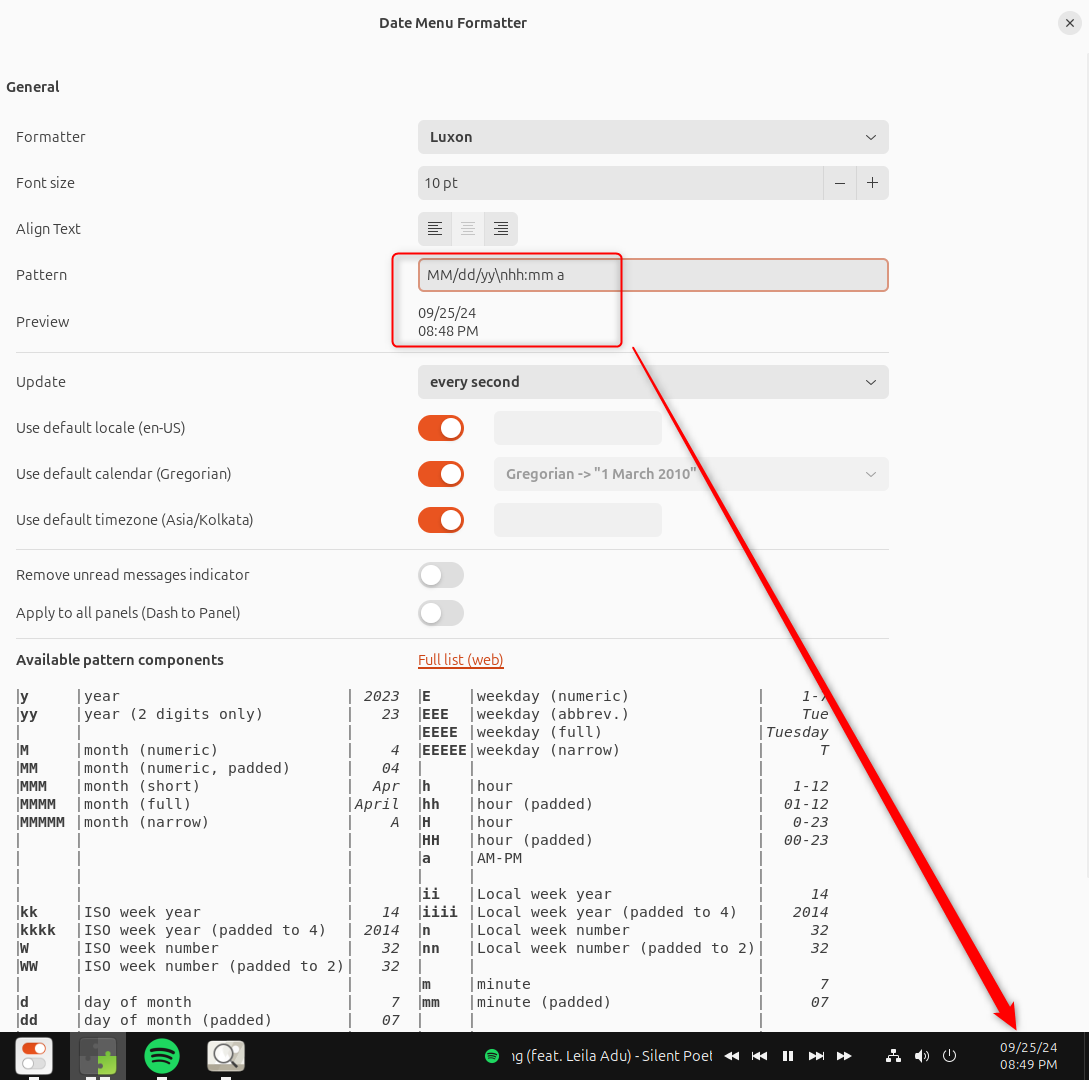
Date Menu Formatter will help us get the Windows 11 time and date format, where the date is stacked on top of the time.

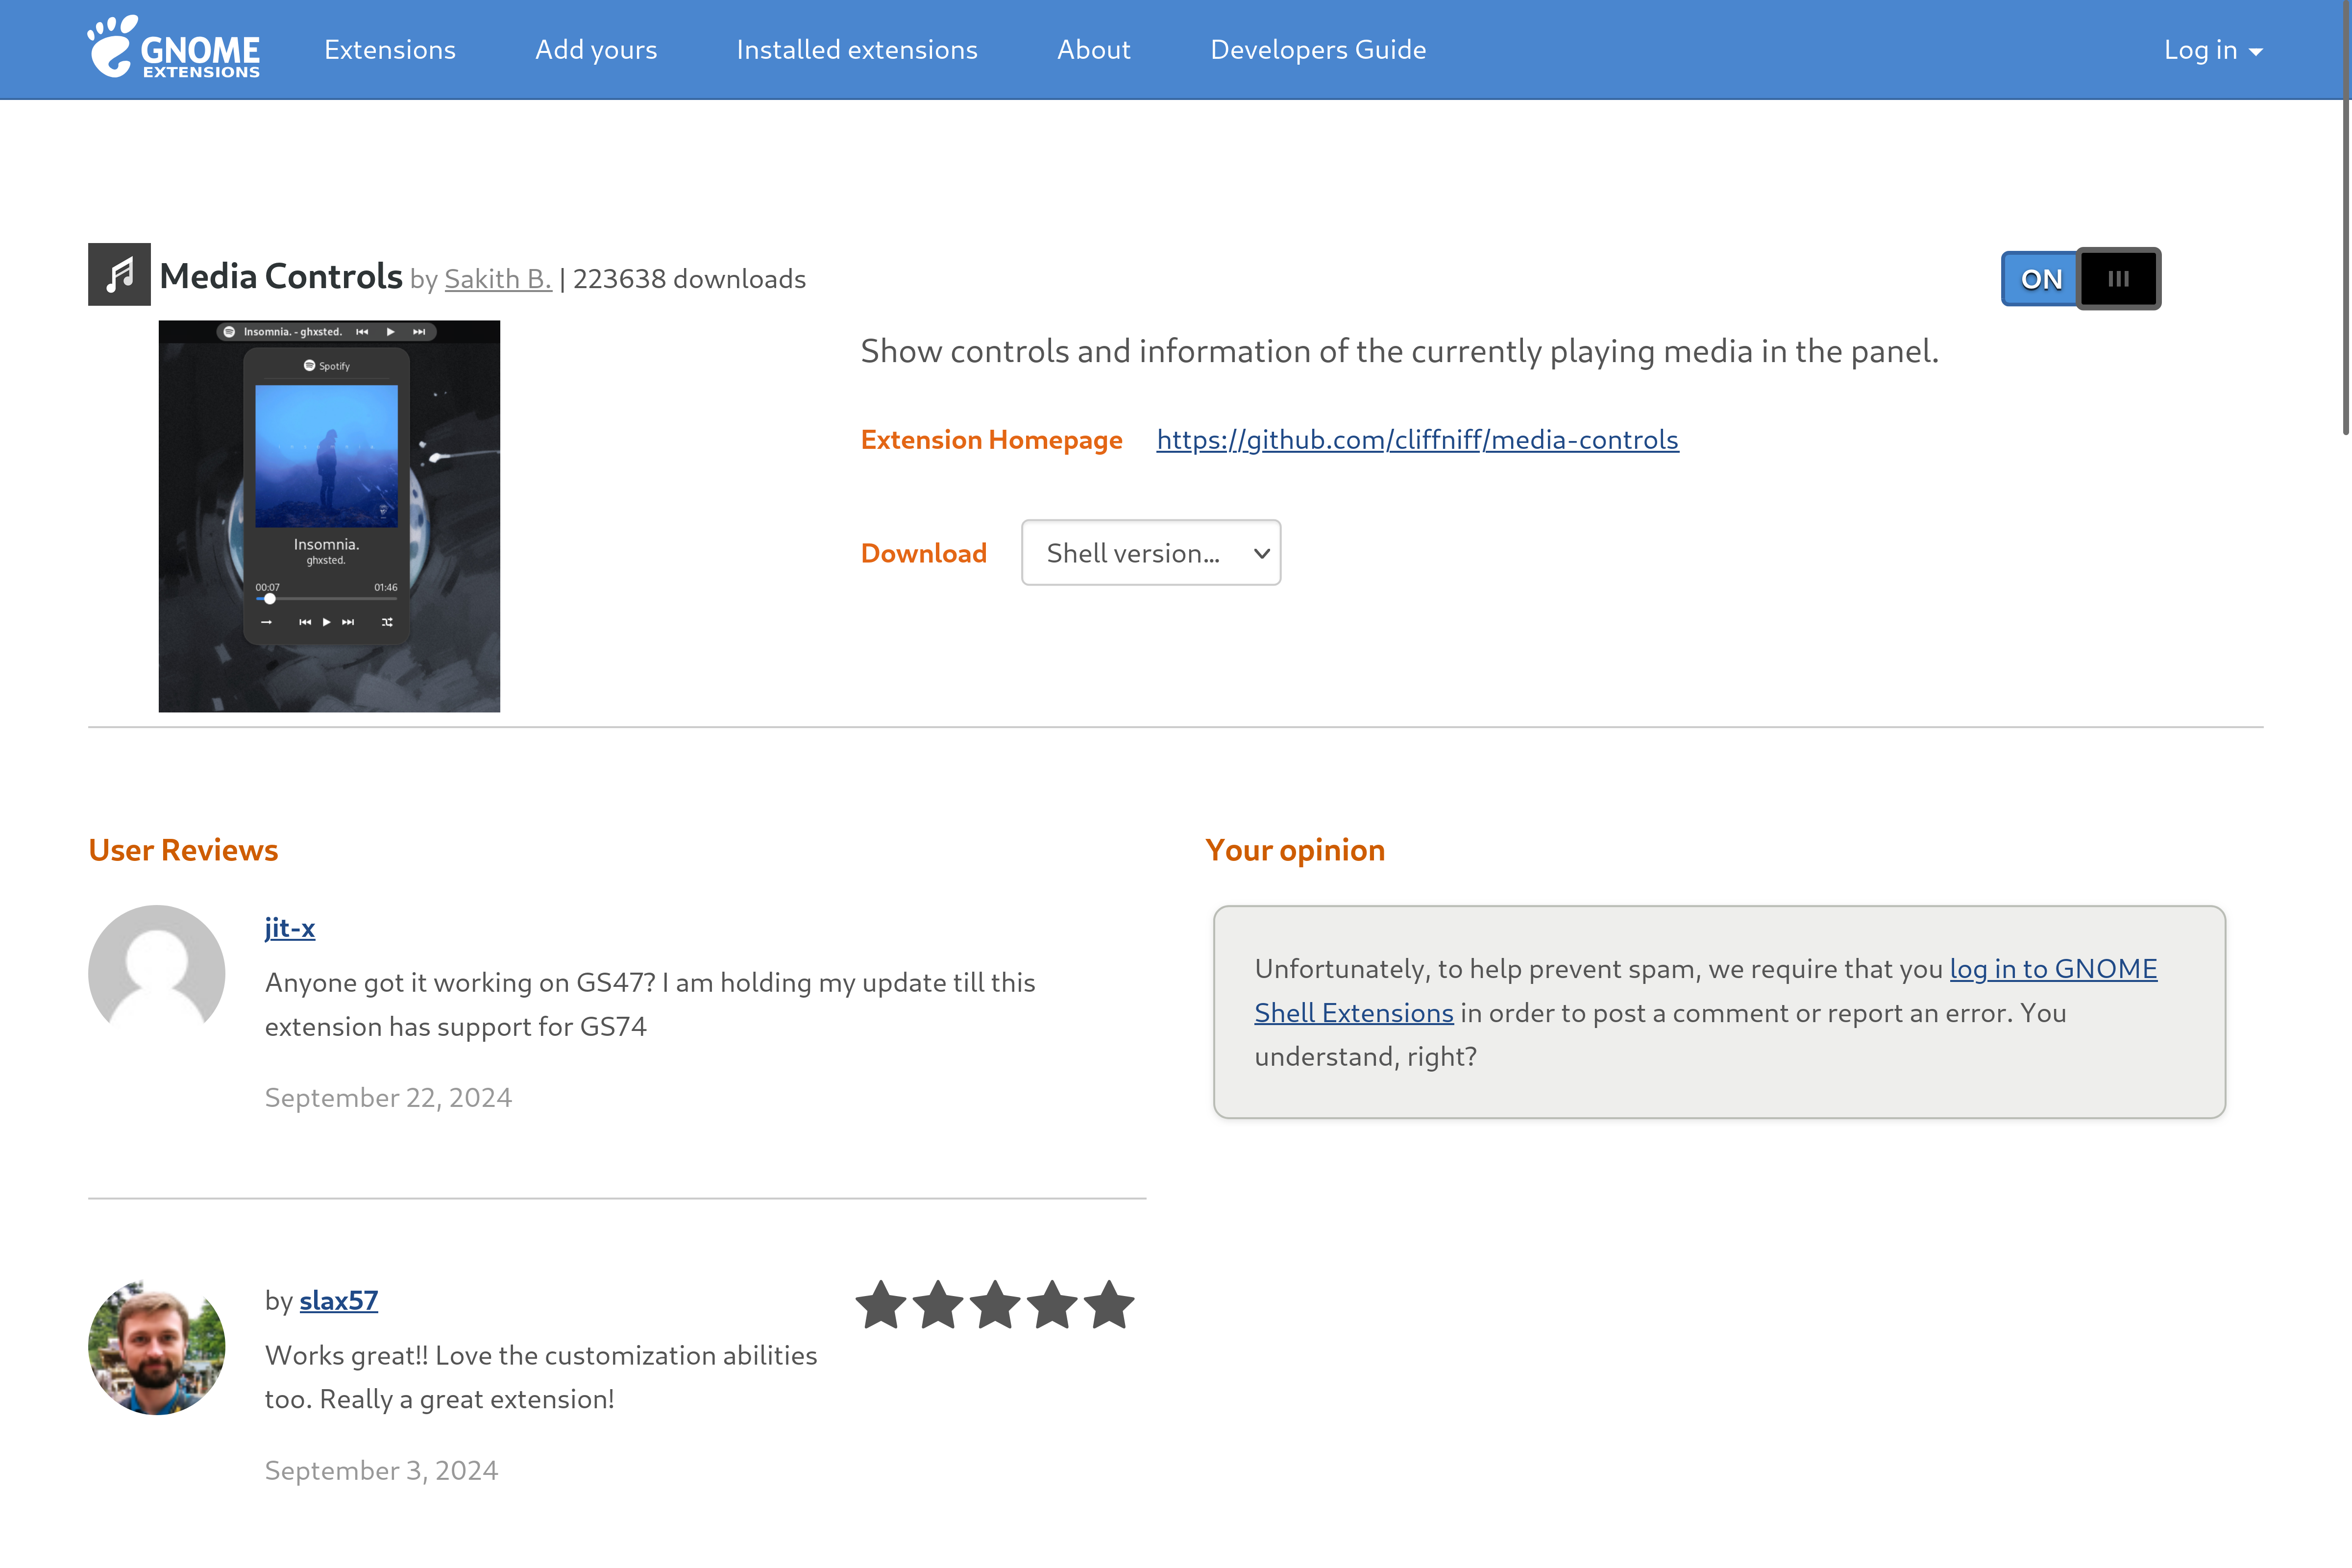
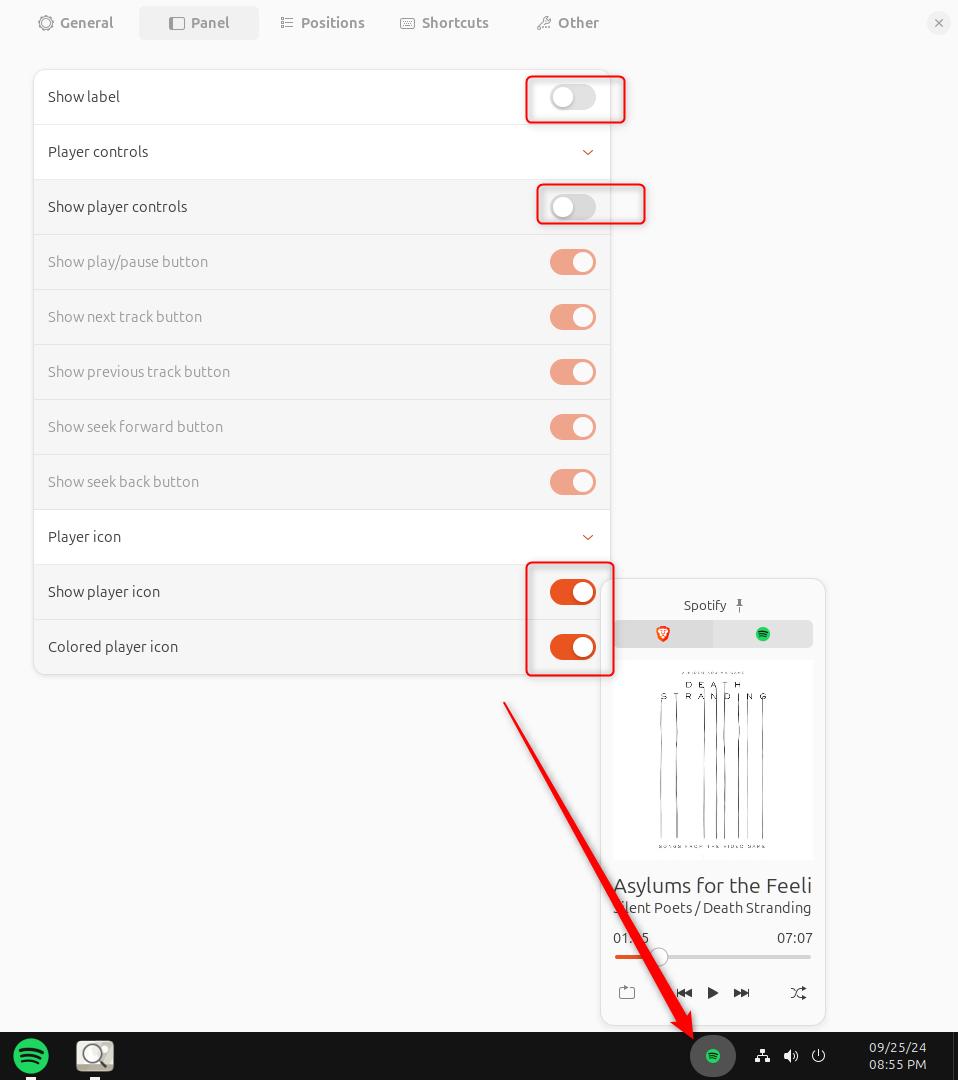
Now, Windows 11 does allow you to access media controls through the volume quick settings. Unfortunately, we can’t get Ubuntu to work like that. However, the Media Controls extension will give us a dedicated icon in the quick settings area to manage all music or videos playing on our system easily.
And finally, you might have noticed that Ubuntu doesn’t show the apps running in the background on its panel. To fix this, we’ll install Tray Icons: Reloaded.
Installing a Windows Theme, Icon Pack, and Fonts
The extensions will help structurally change how the Ubuntu desktop looks. However, to make it more graphically in line with Windows, we need a few more assets. We’ll first install the Windows 11 icon pack. I personally found this one on GitHub excellent!
You can install it by getting the remote repository URL and cloning it on your system using the following command:
git clone https://github.com/yeyushengfan258/Win11-icon-theme.git
Next, change the directory to the folder containing the icon pack.
cd Win11-icon-theme
And finally, install the icon pack using this command:
./install.sh
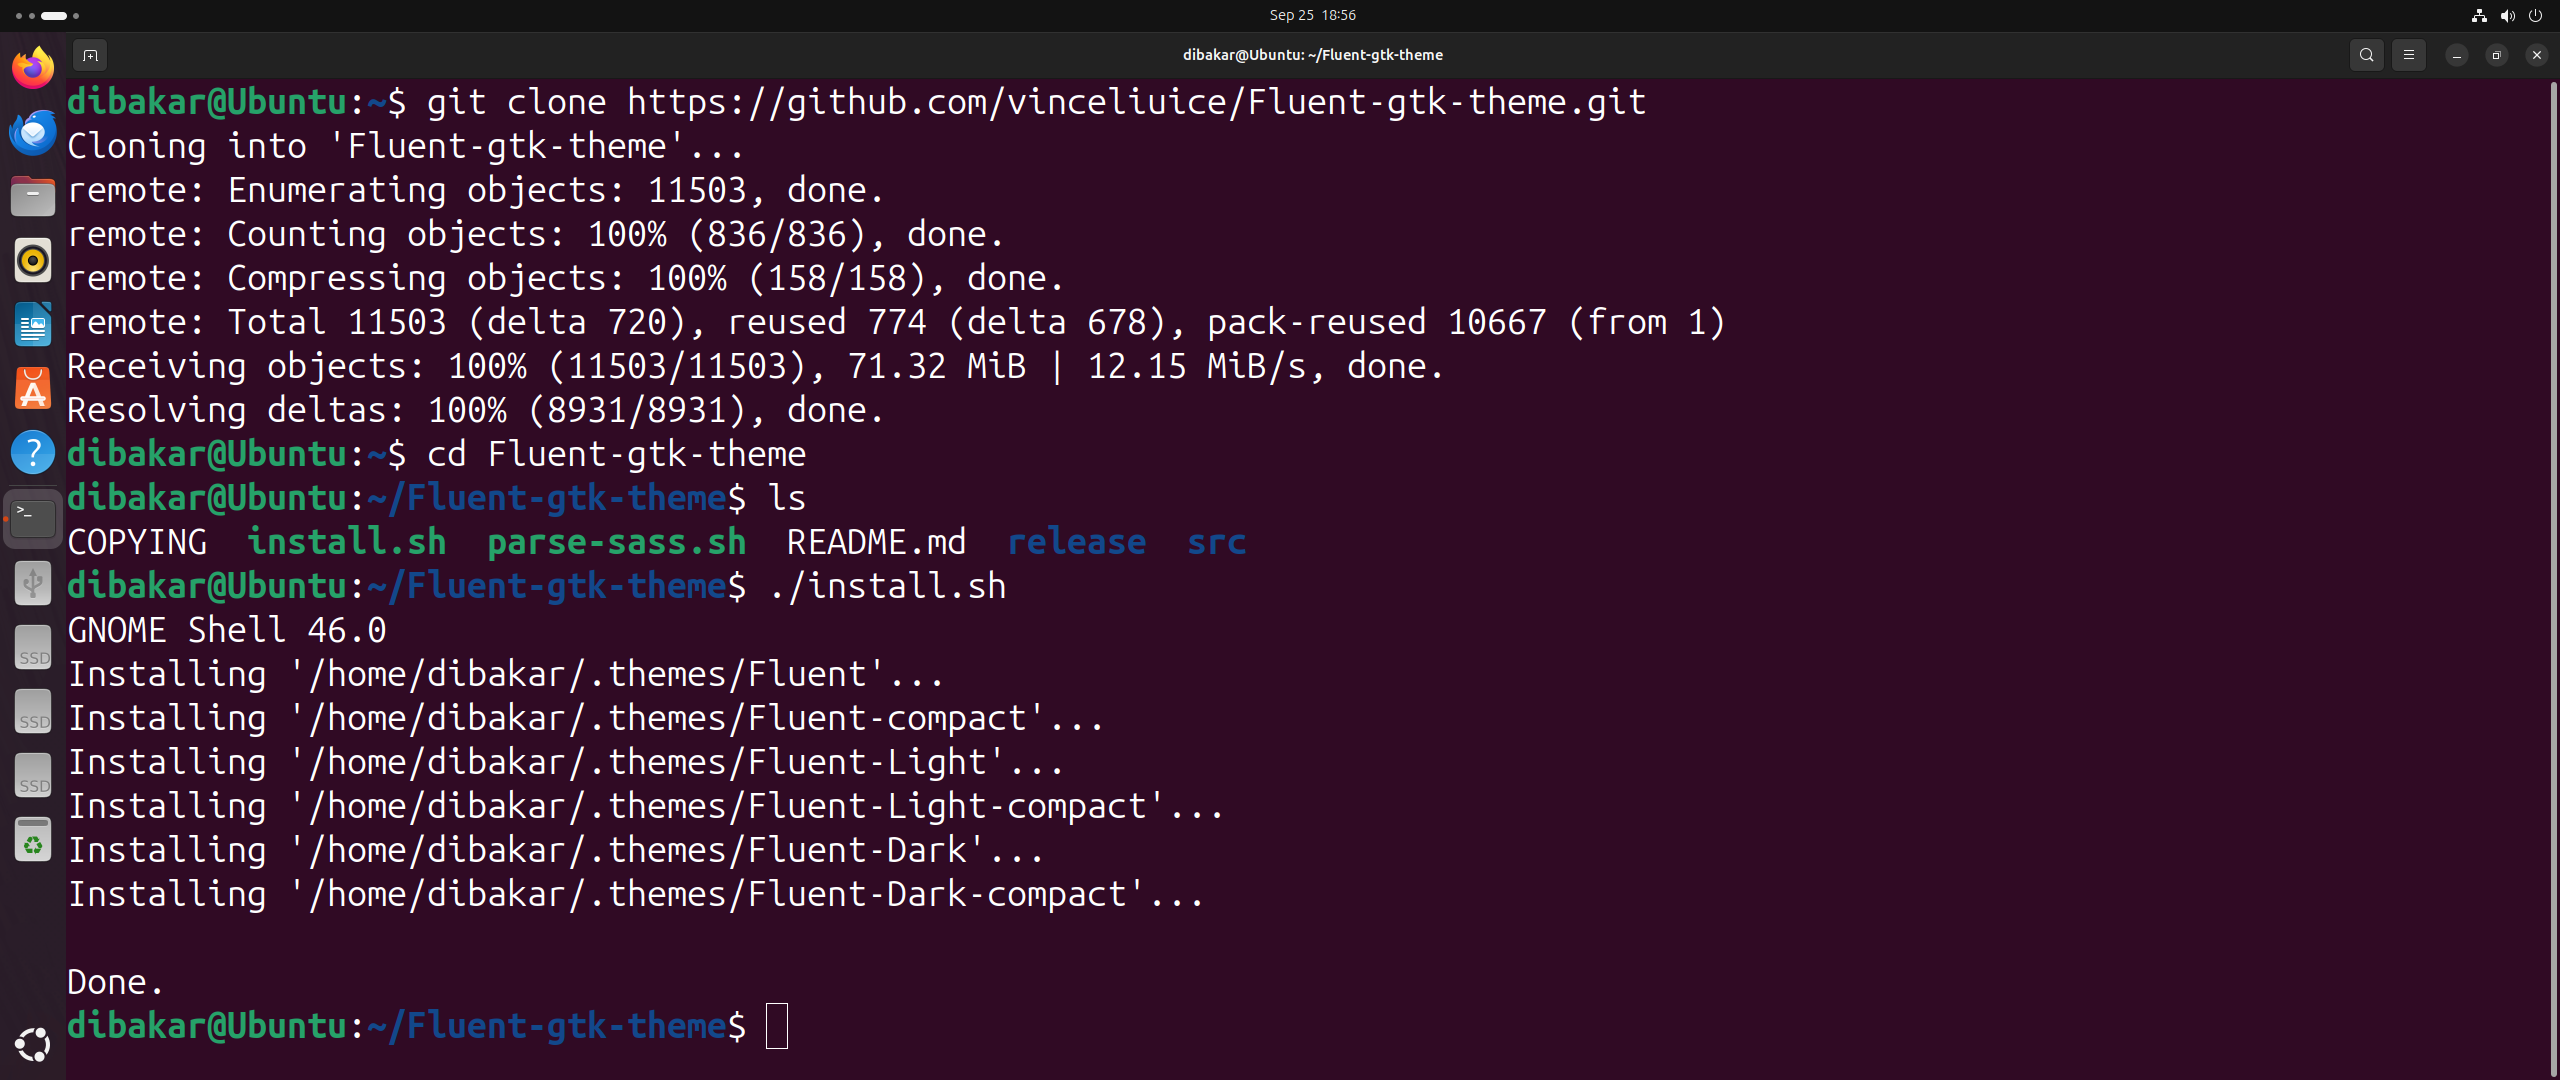
I also tested a lot of GNOME themes and found the Fluent GTK theme to be the most Windows-like. To install it, you can visit its GitHub page, copy its remote repository URL (found in the «Code» menu), and clone it on your system.
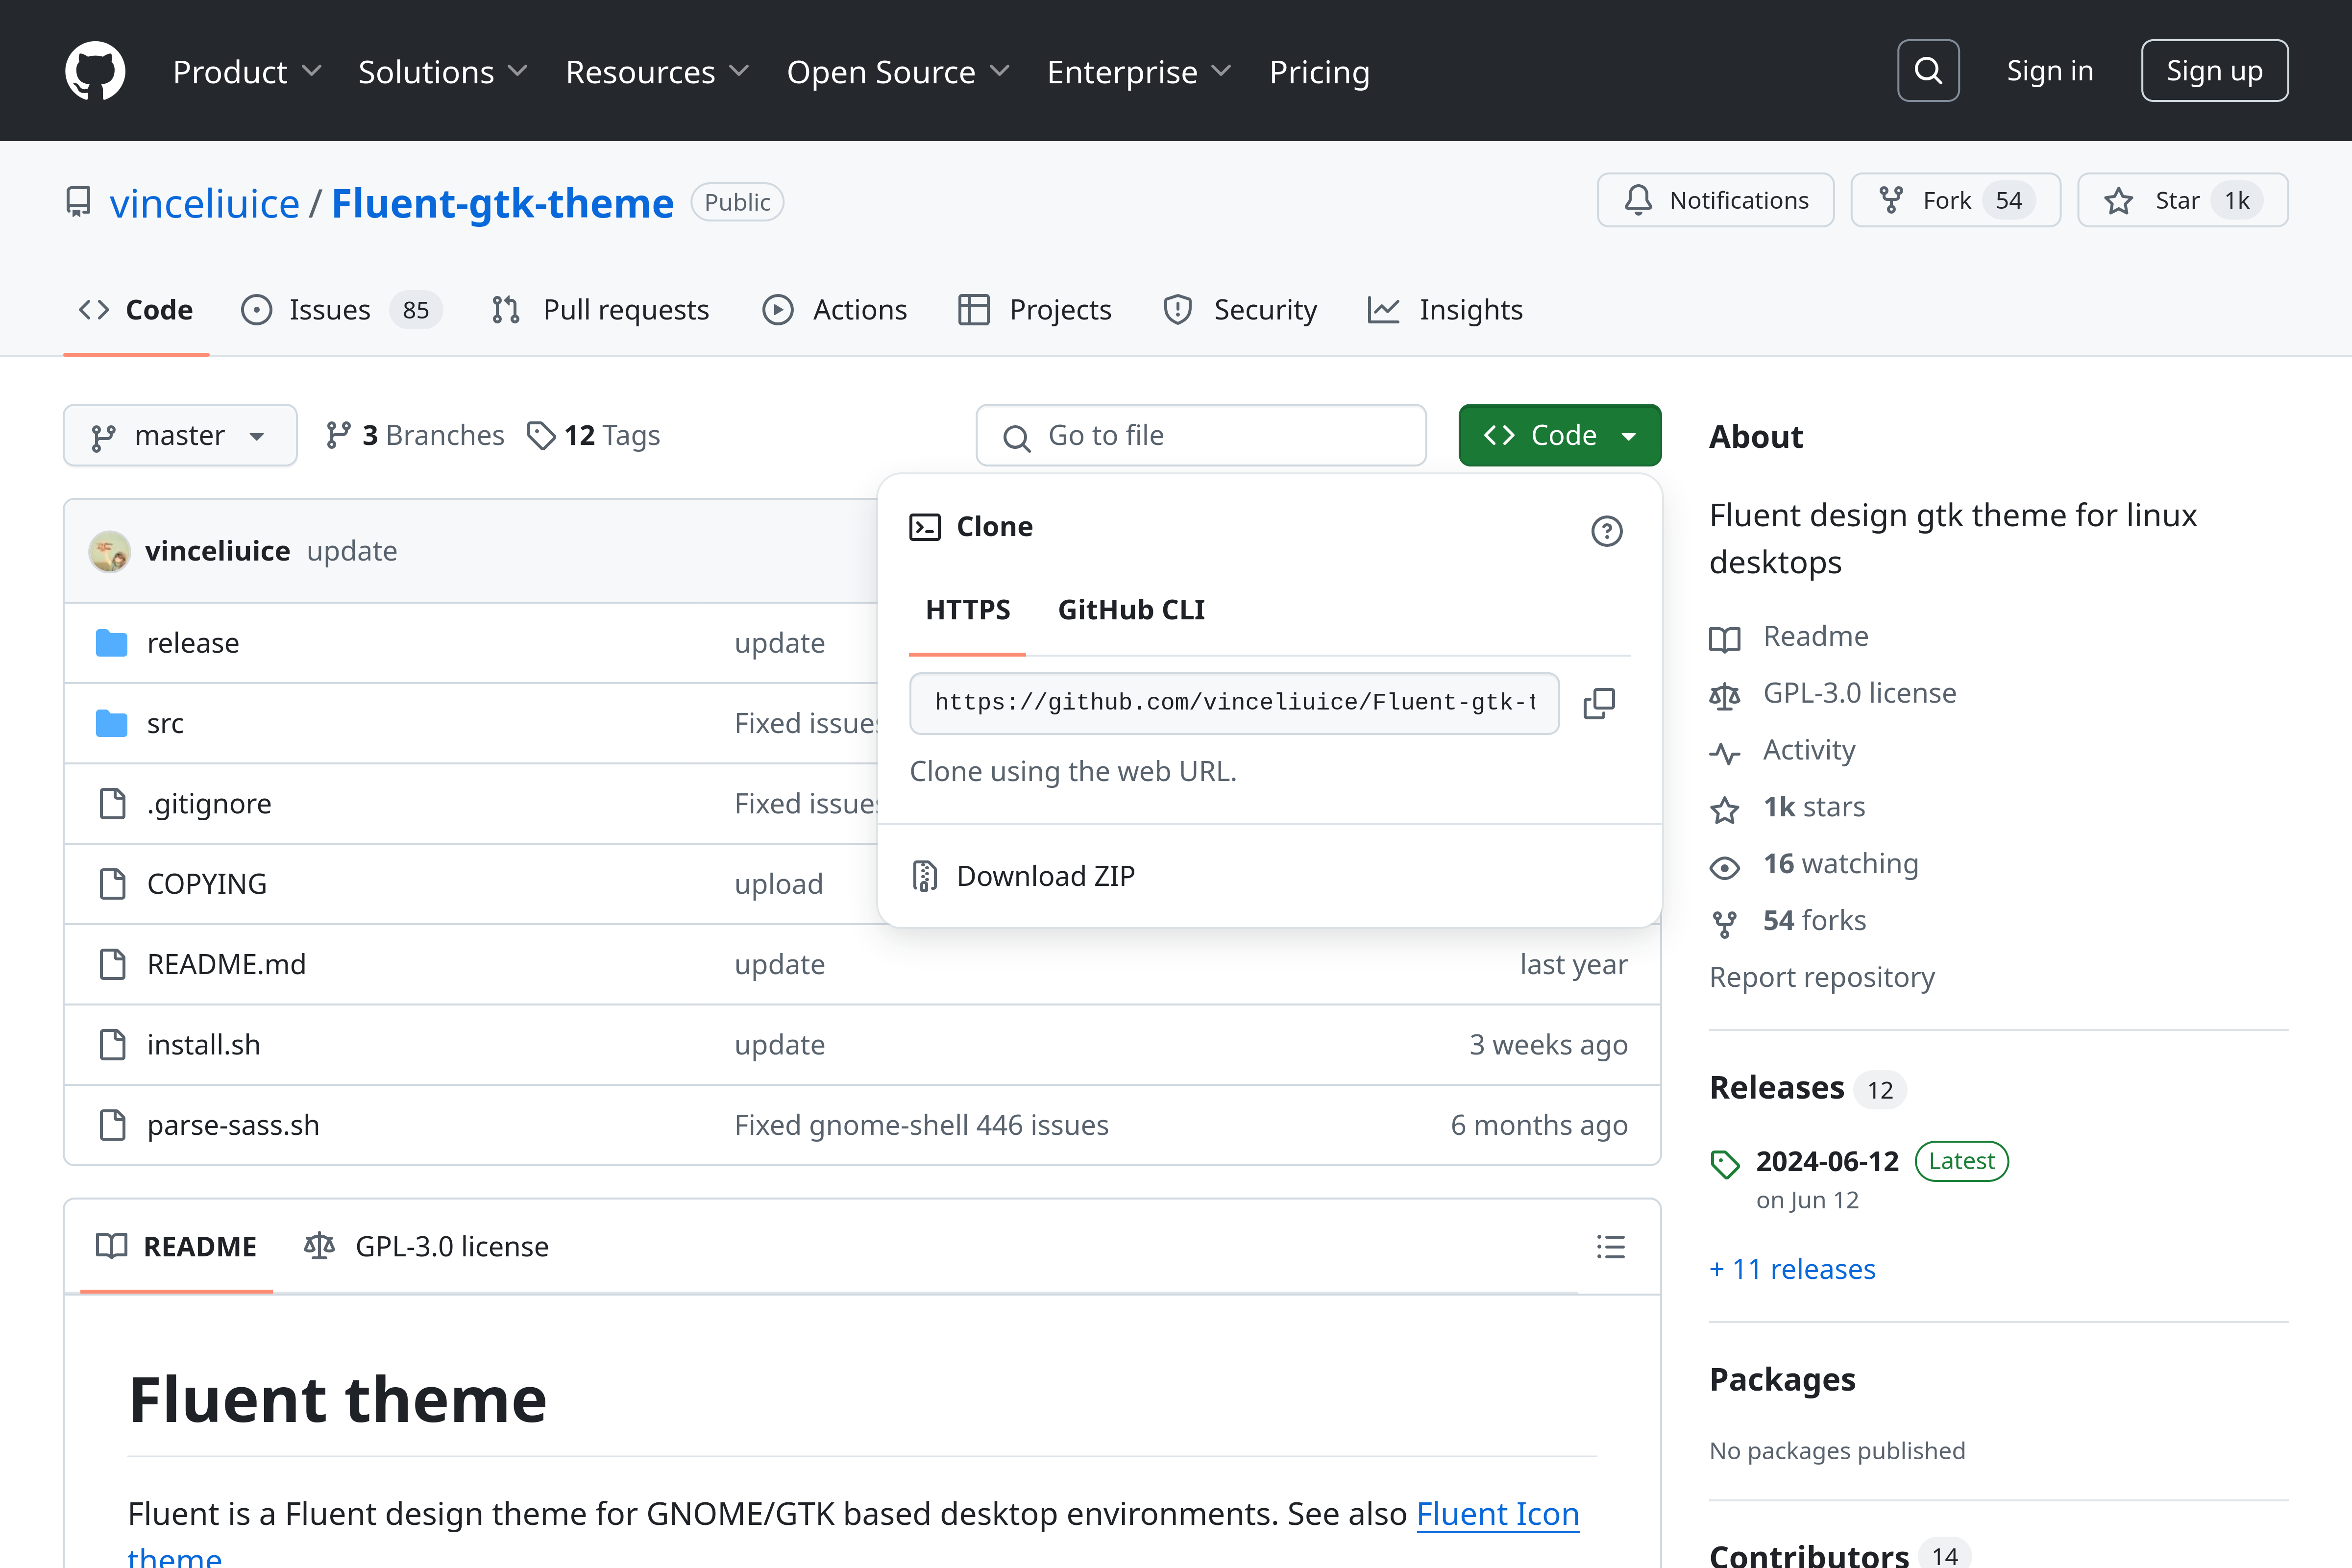
Similar to before, you’ll enter the following commands one after the other:
        git clone https://github.com/vinceliuice/Fluent-gtk-theme.git
cd Fluent-gtk-theme
./install.sh
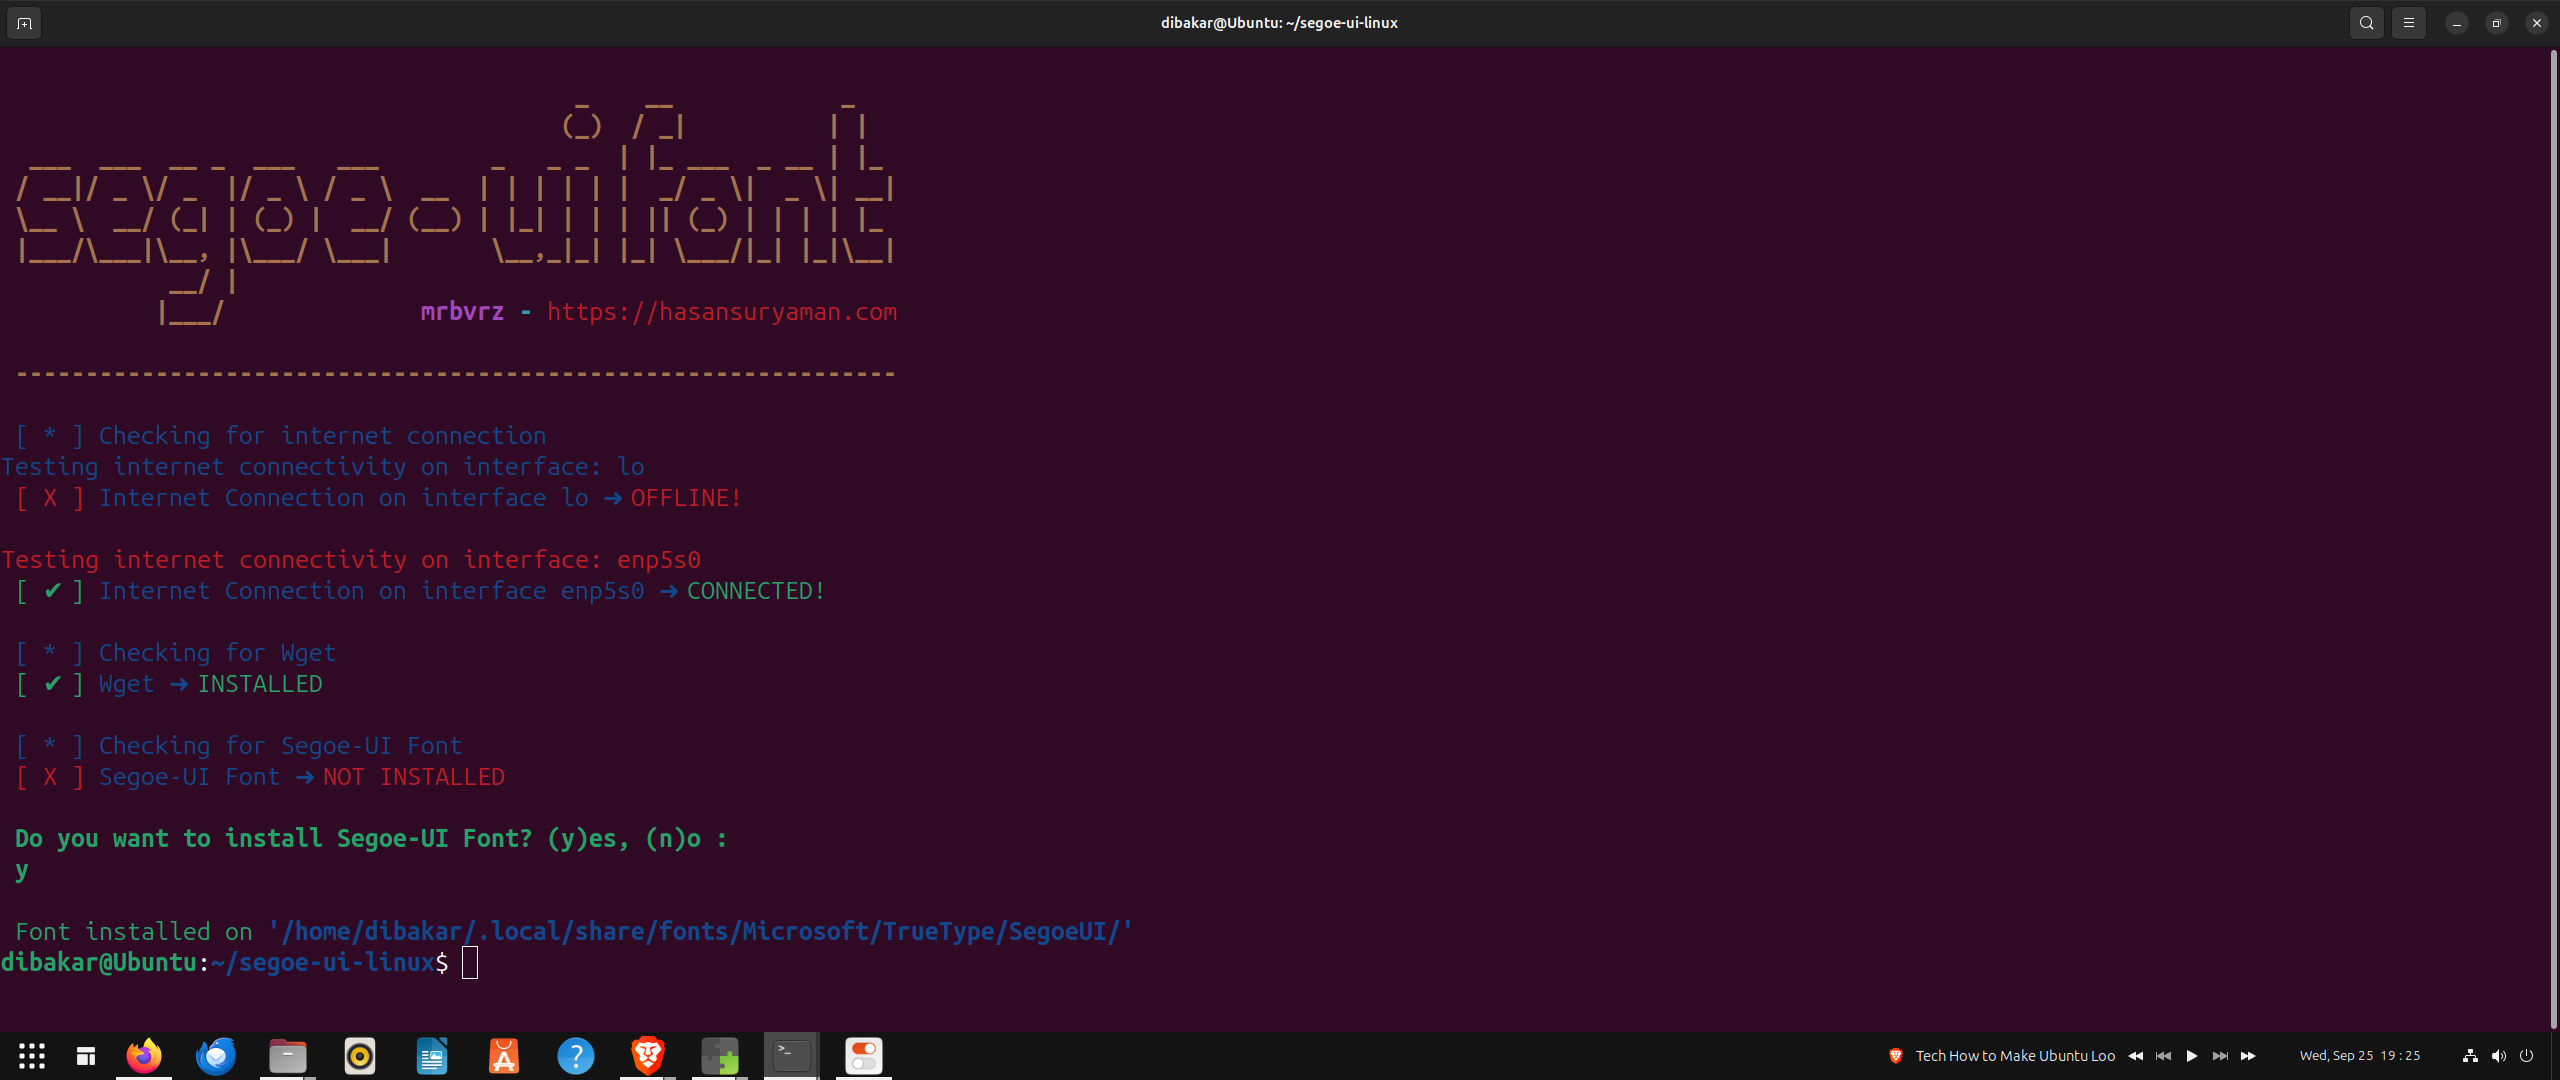
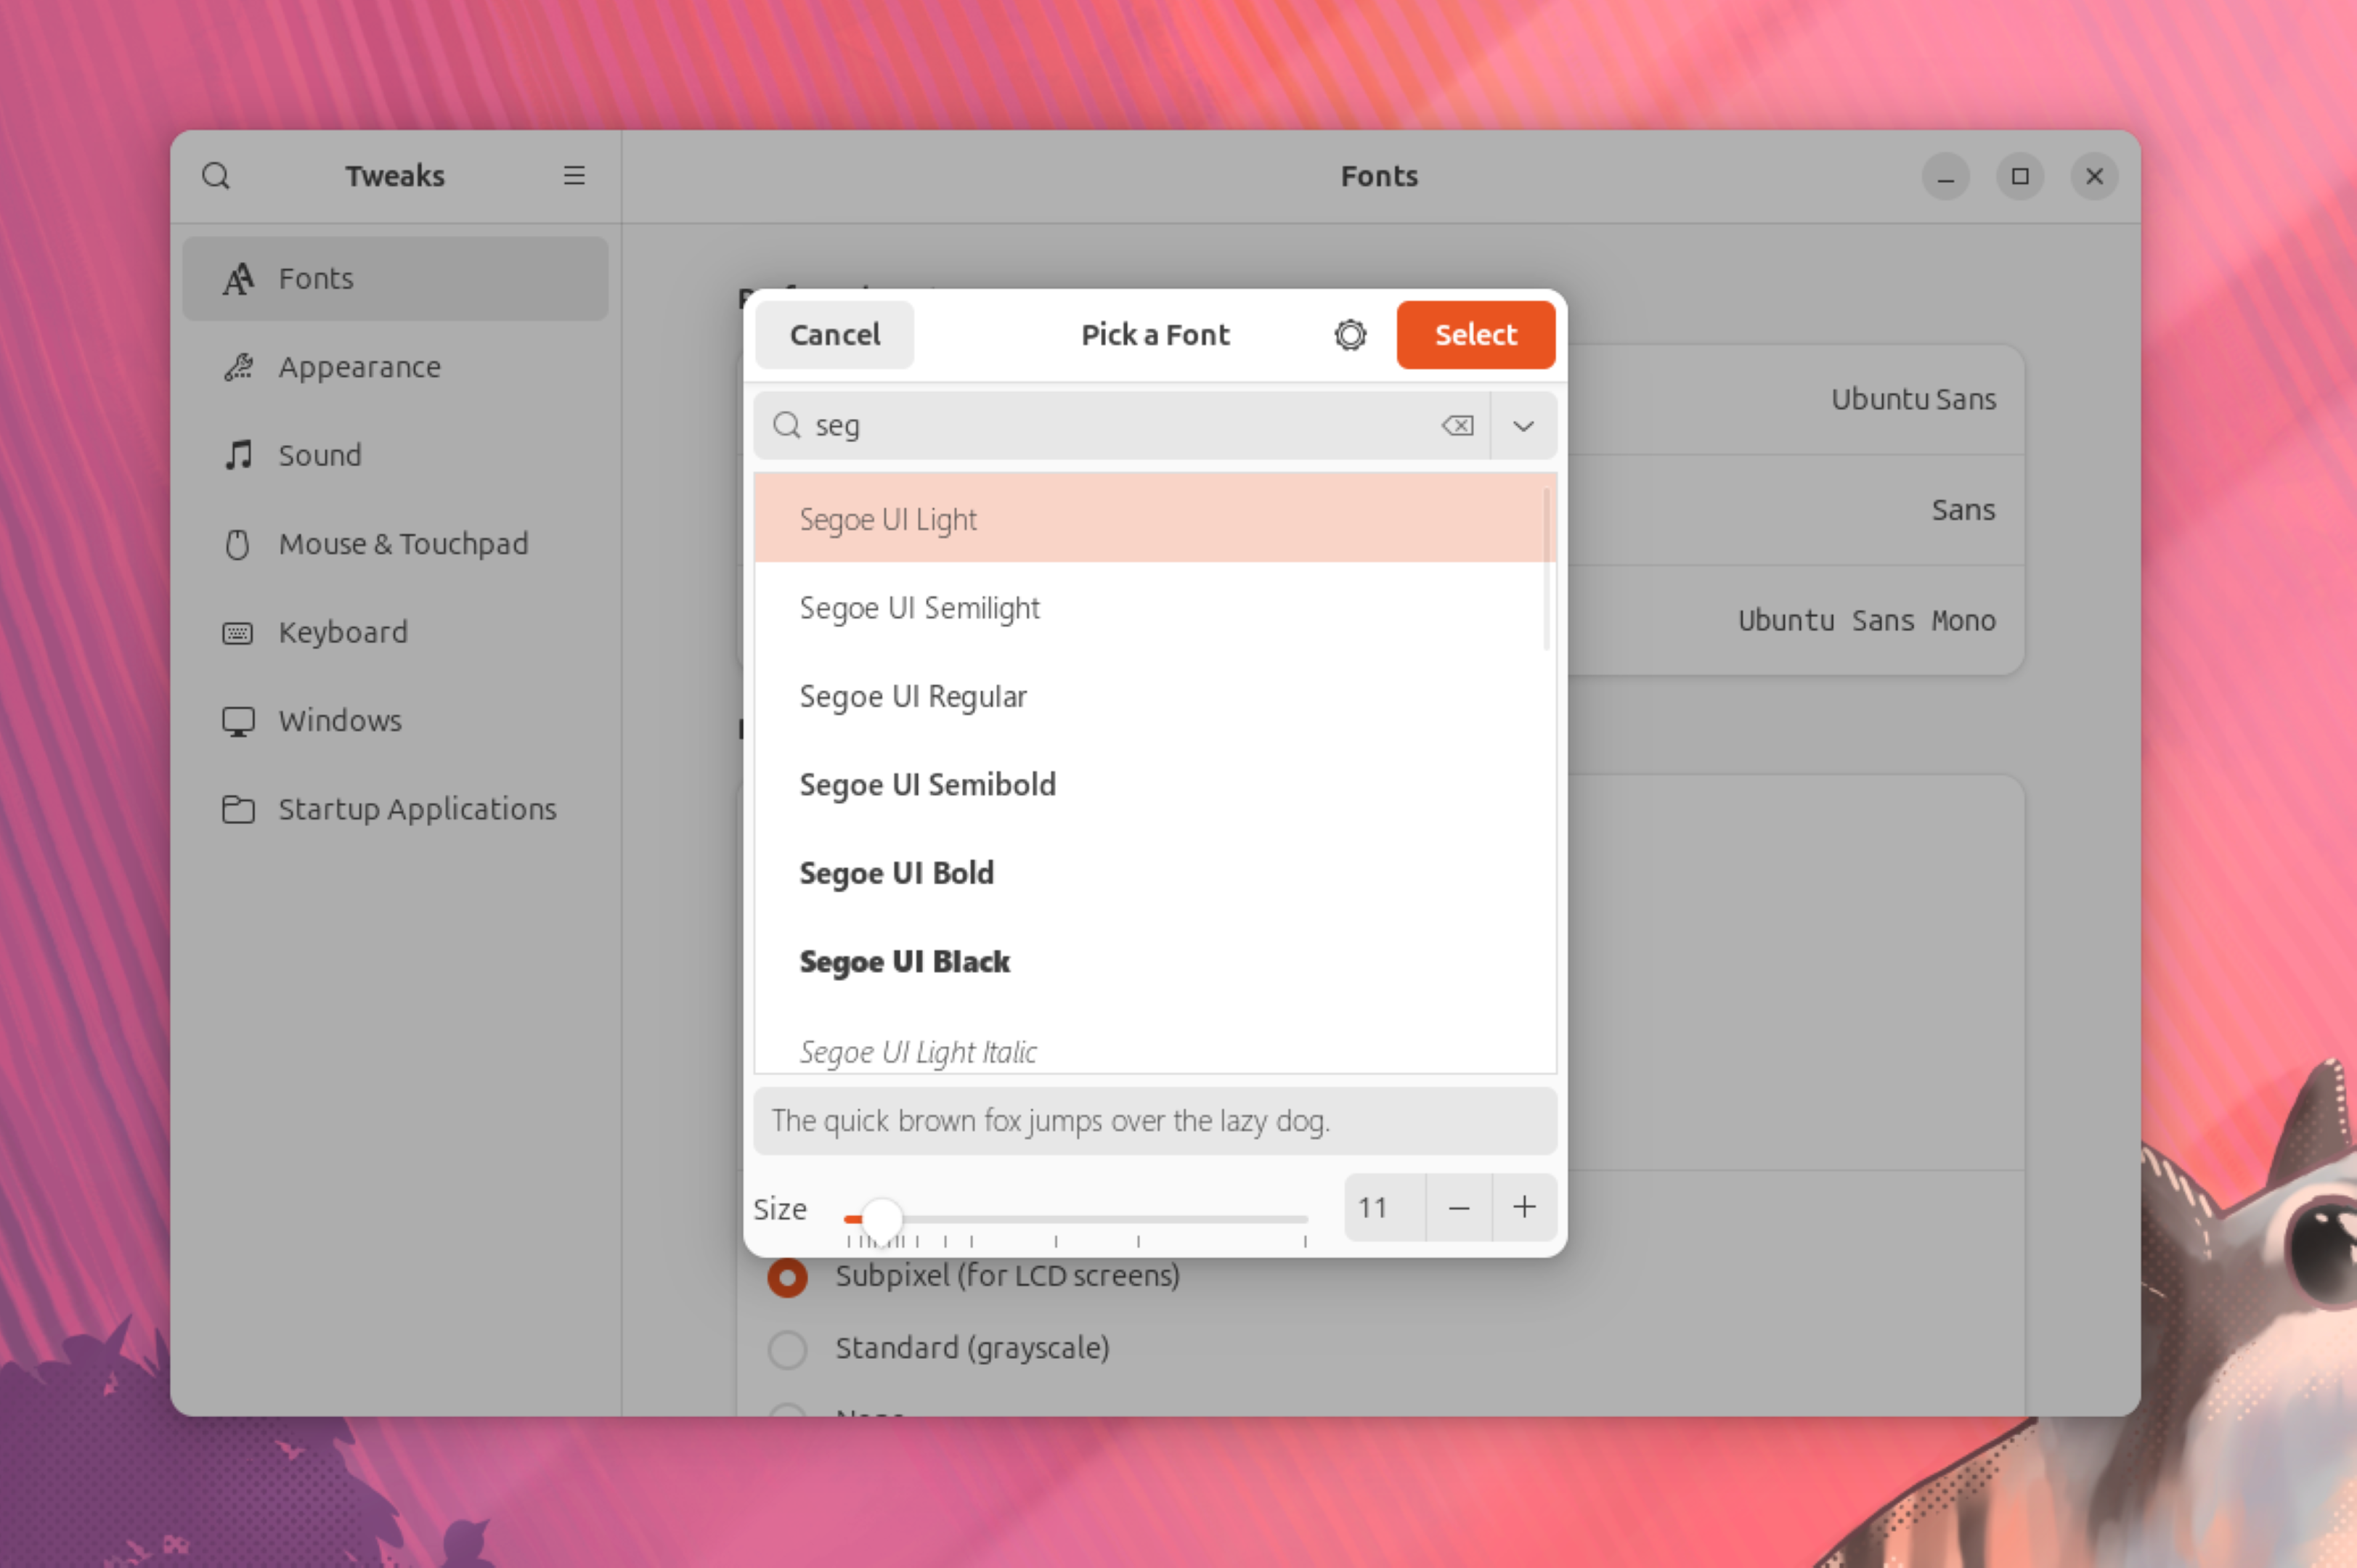
Last but not least, let’s install a Windows-like font pack—Segoe-UI Font.
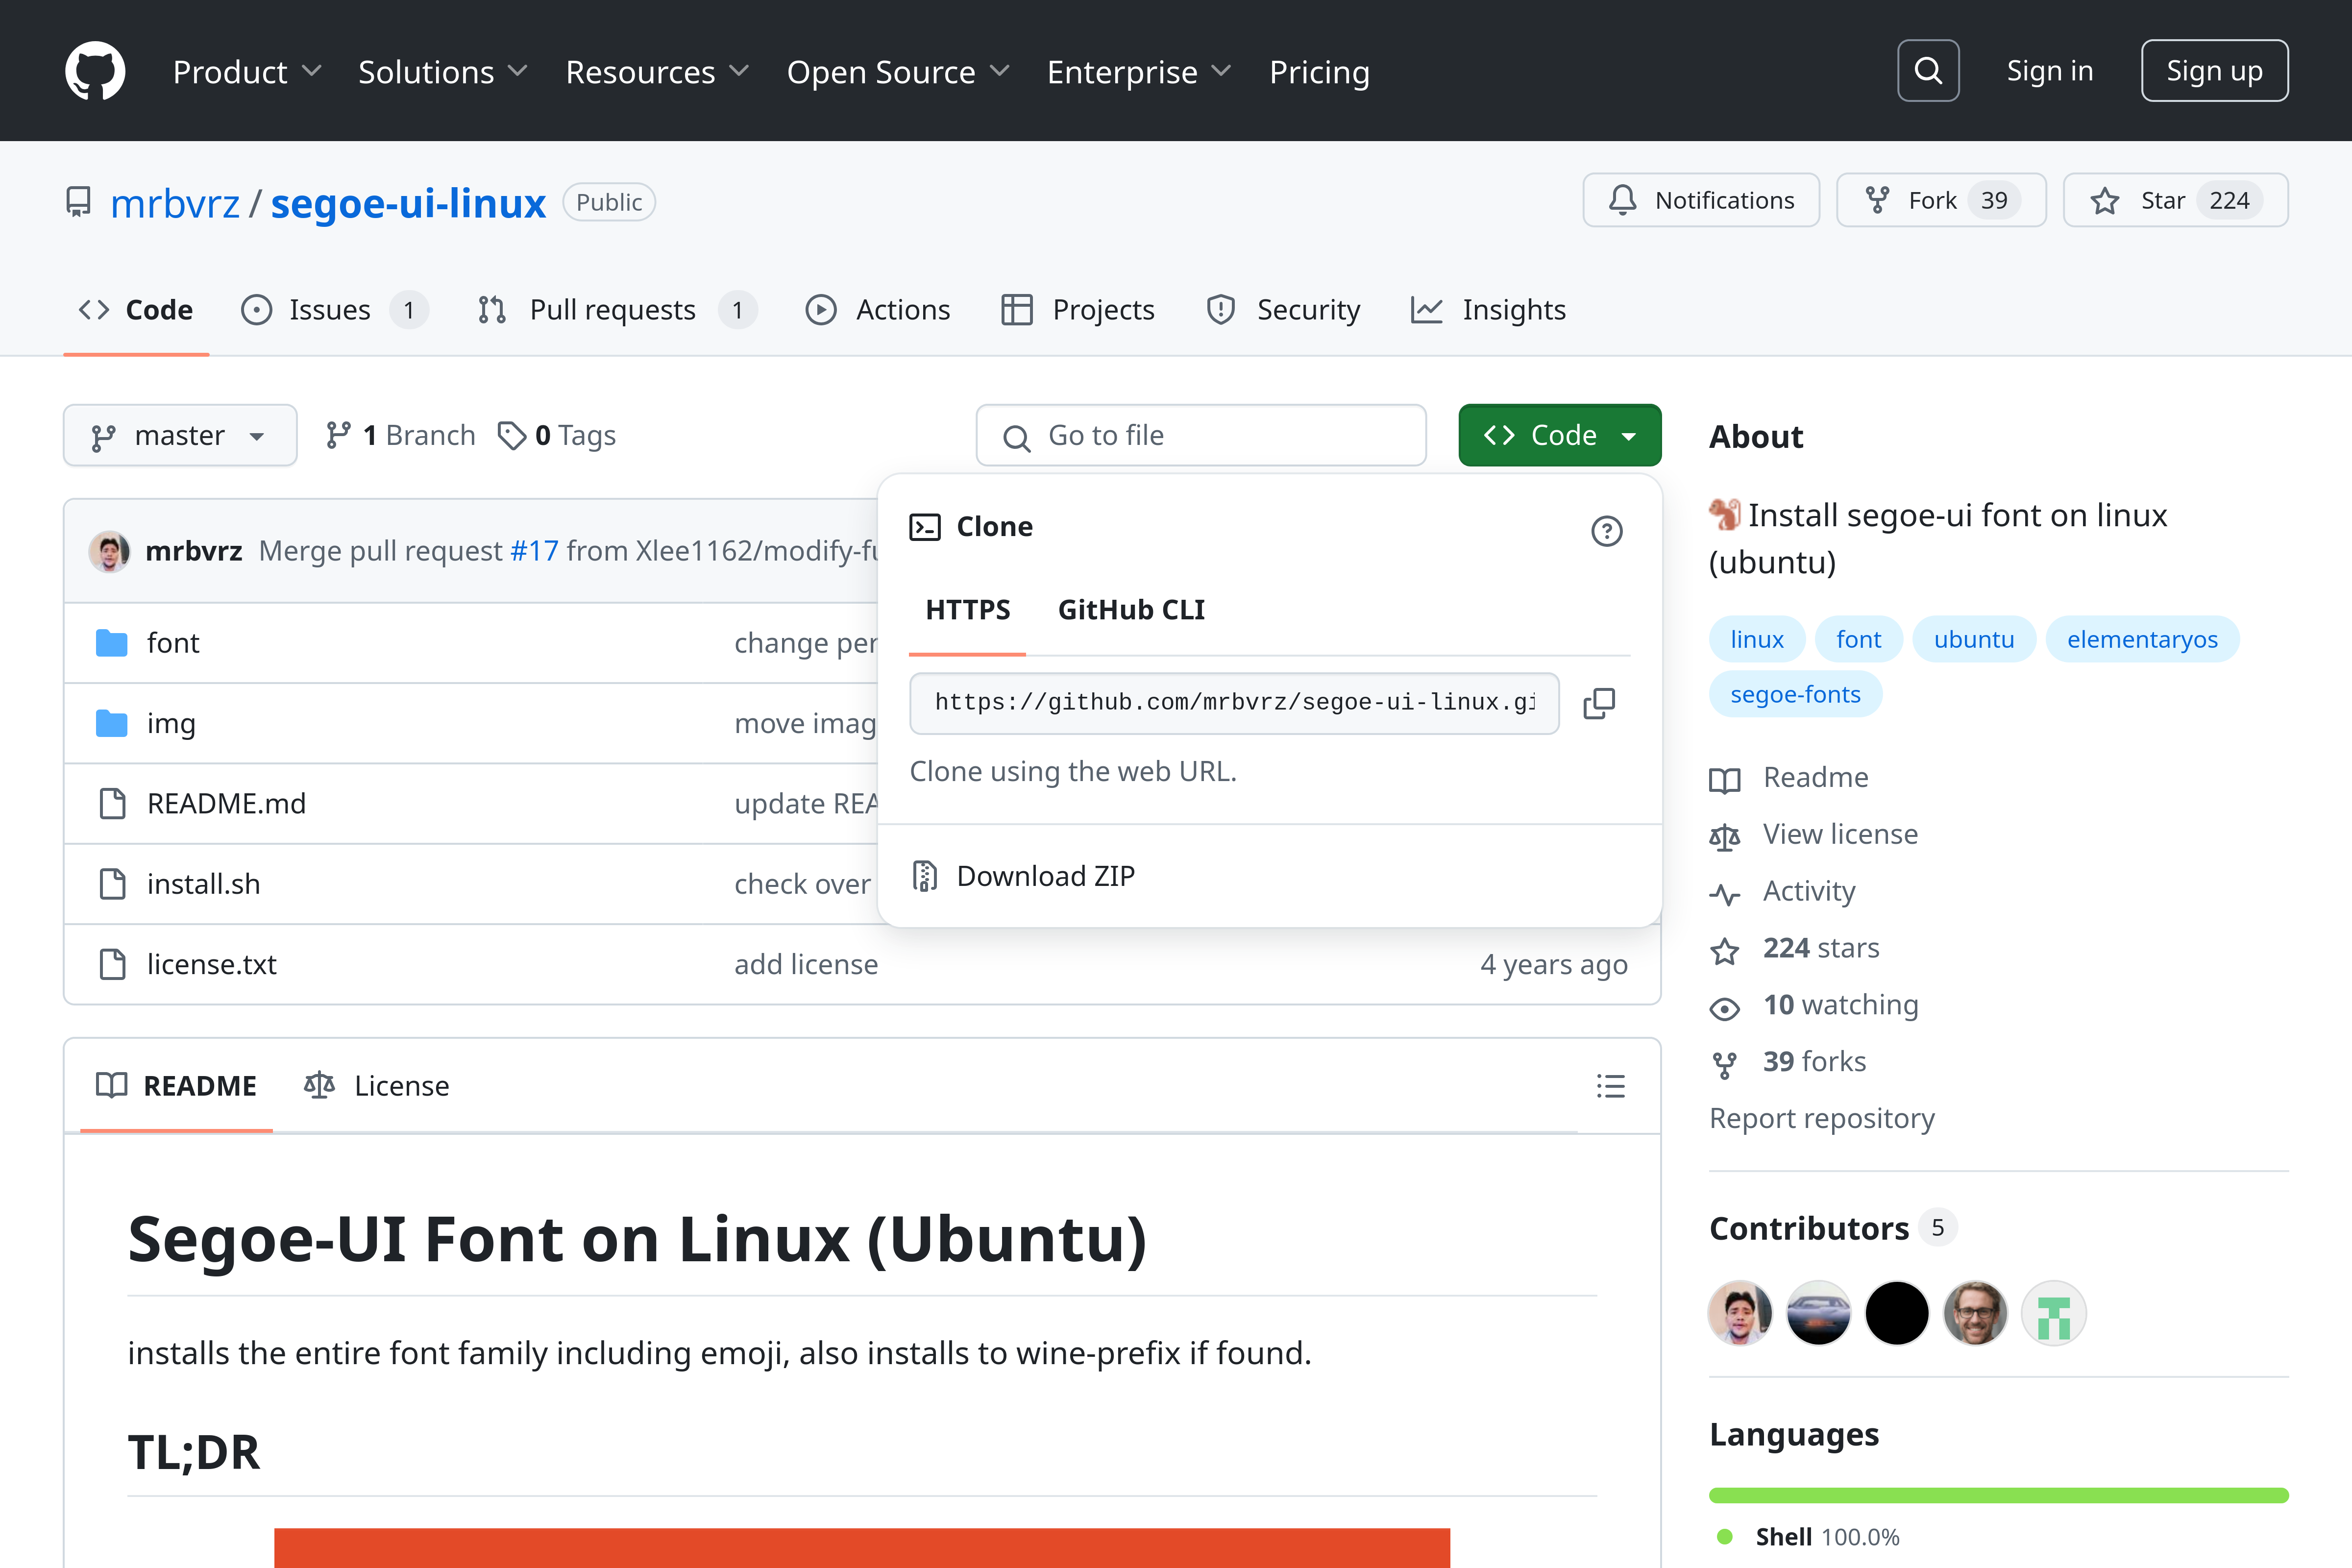
Again, it is hosted on GitHub, and we can install it following similar steps as before:
        git clone https://github.com/mrbvrz/segoe-ui-linux.git
cd segoe-ui-linux
./install.sh
With everything installed, we can now start the fine-tuning process.
Ubuntu is already starting to look more like Windows 11.
However, it’s not 100% there yet. But we can easily solve that with some minor fine-tuning. To do this, we’ll need to open the GNOME Extensions app and tweak each extension we installed.
Let’s start with Dash to Panel. Head into its settings and make the following changes:
- In the Position tab, hide the Show Applications Button and Activities Buttons. Click on the Visible button beside them, and they’ll become white, meaning they are deactivated.
- Change the Left Box and Taskbar to Monitor Center.
- Use the arrow buttons to move the Date Menu to the second-last position right above the Desktop Button.
- In the Style tab, change the Running Indicator Style from Metro to Dashes for both Focused and Unfocused apps.
- In the Behavior tab, toggle on Disable Show Overview on Startup.
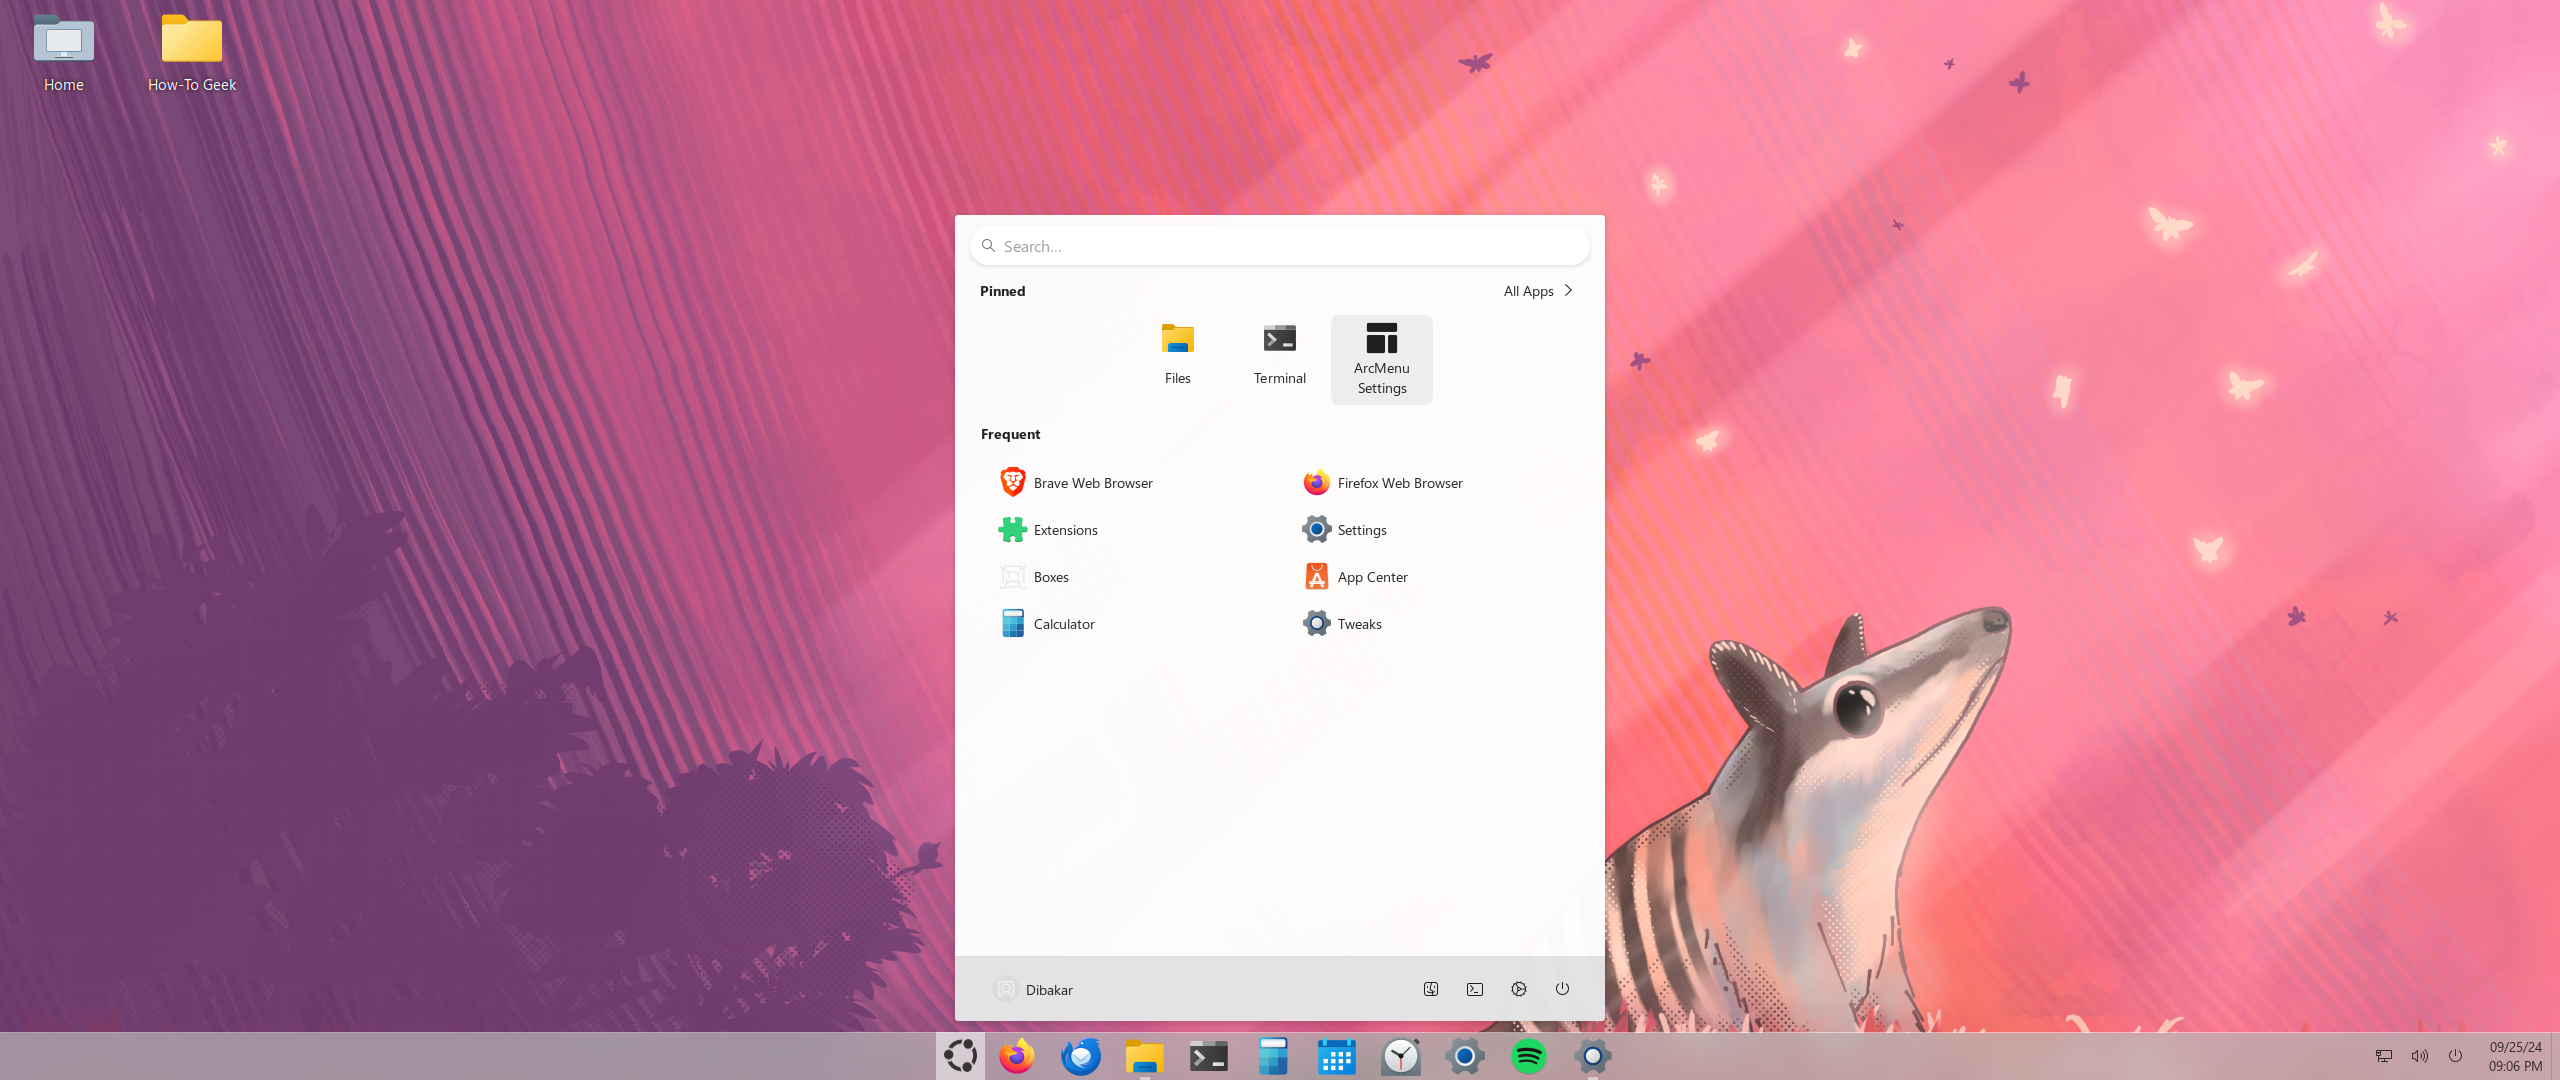
Once done, move into the ArcMenu extension settings.
- In the Menu tab, click on Menu Layout > Modern Menu Layout > 11.
- Go back to the Menu tab, click on Menu Visual Appearance, and change Height=800, Left-Panel Width=200, Right-Panel Width=200.
- While in Menu Visual Appearance, select Overview Menu Location to Bottom Centered.
- Again, go back and now head into the Menu Button tab. From here, you can «Choose A New Icon for the Start Button (ArcMenu).» If you have a Windows 11 icon, you can upload it here. I’ve picked the Ubuntu logo for this tutorial. Also, change the Icon Size to 33.
Next, let’s tweak Blur my Shell settings.
- From the Panel tab, Disable «Overview Background» and enable «Blur Original Panel with Dash to Panel».
- In Other Settings, set Window List Extension blur Sigma to 0 and Brightness to 1.
Moving on to the Date Menu Formatter, we just need to change the Pattern from the default to this value: MM/dd/yy\nhh:mm a
Finally, for Media Controls, head to the Panel tab and just disable Show Label and Show Player Controls. This will give you a dedicated Media Control button on the taskbar which you can click to control media playback.
Adding the Finishing Touches
It’s finally time to apply the themes, icon packs, and fonts. To do this, open the GNOME Tweaks app. From the Font tab, select Change Interface Text to Segoe UI Light.
Next, head into the Appearance tab and make the following changes:
- Cursor: DMZ-White
- Icons: Win11-dark
- Shell: Fluent-Light
- Legacy Applications: Fluent-Light
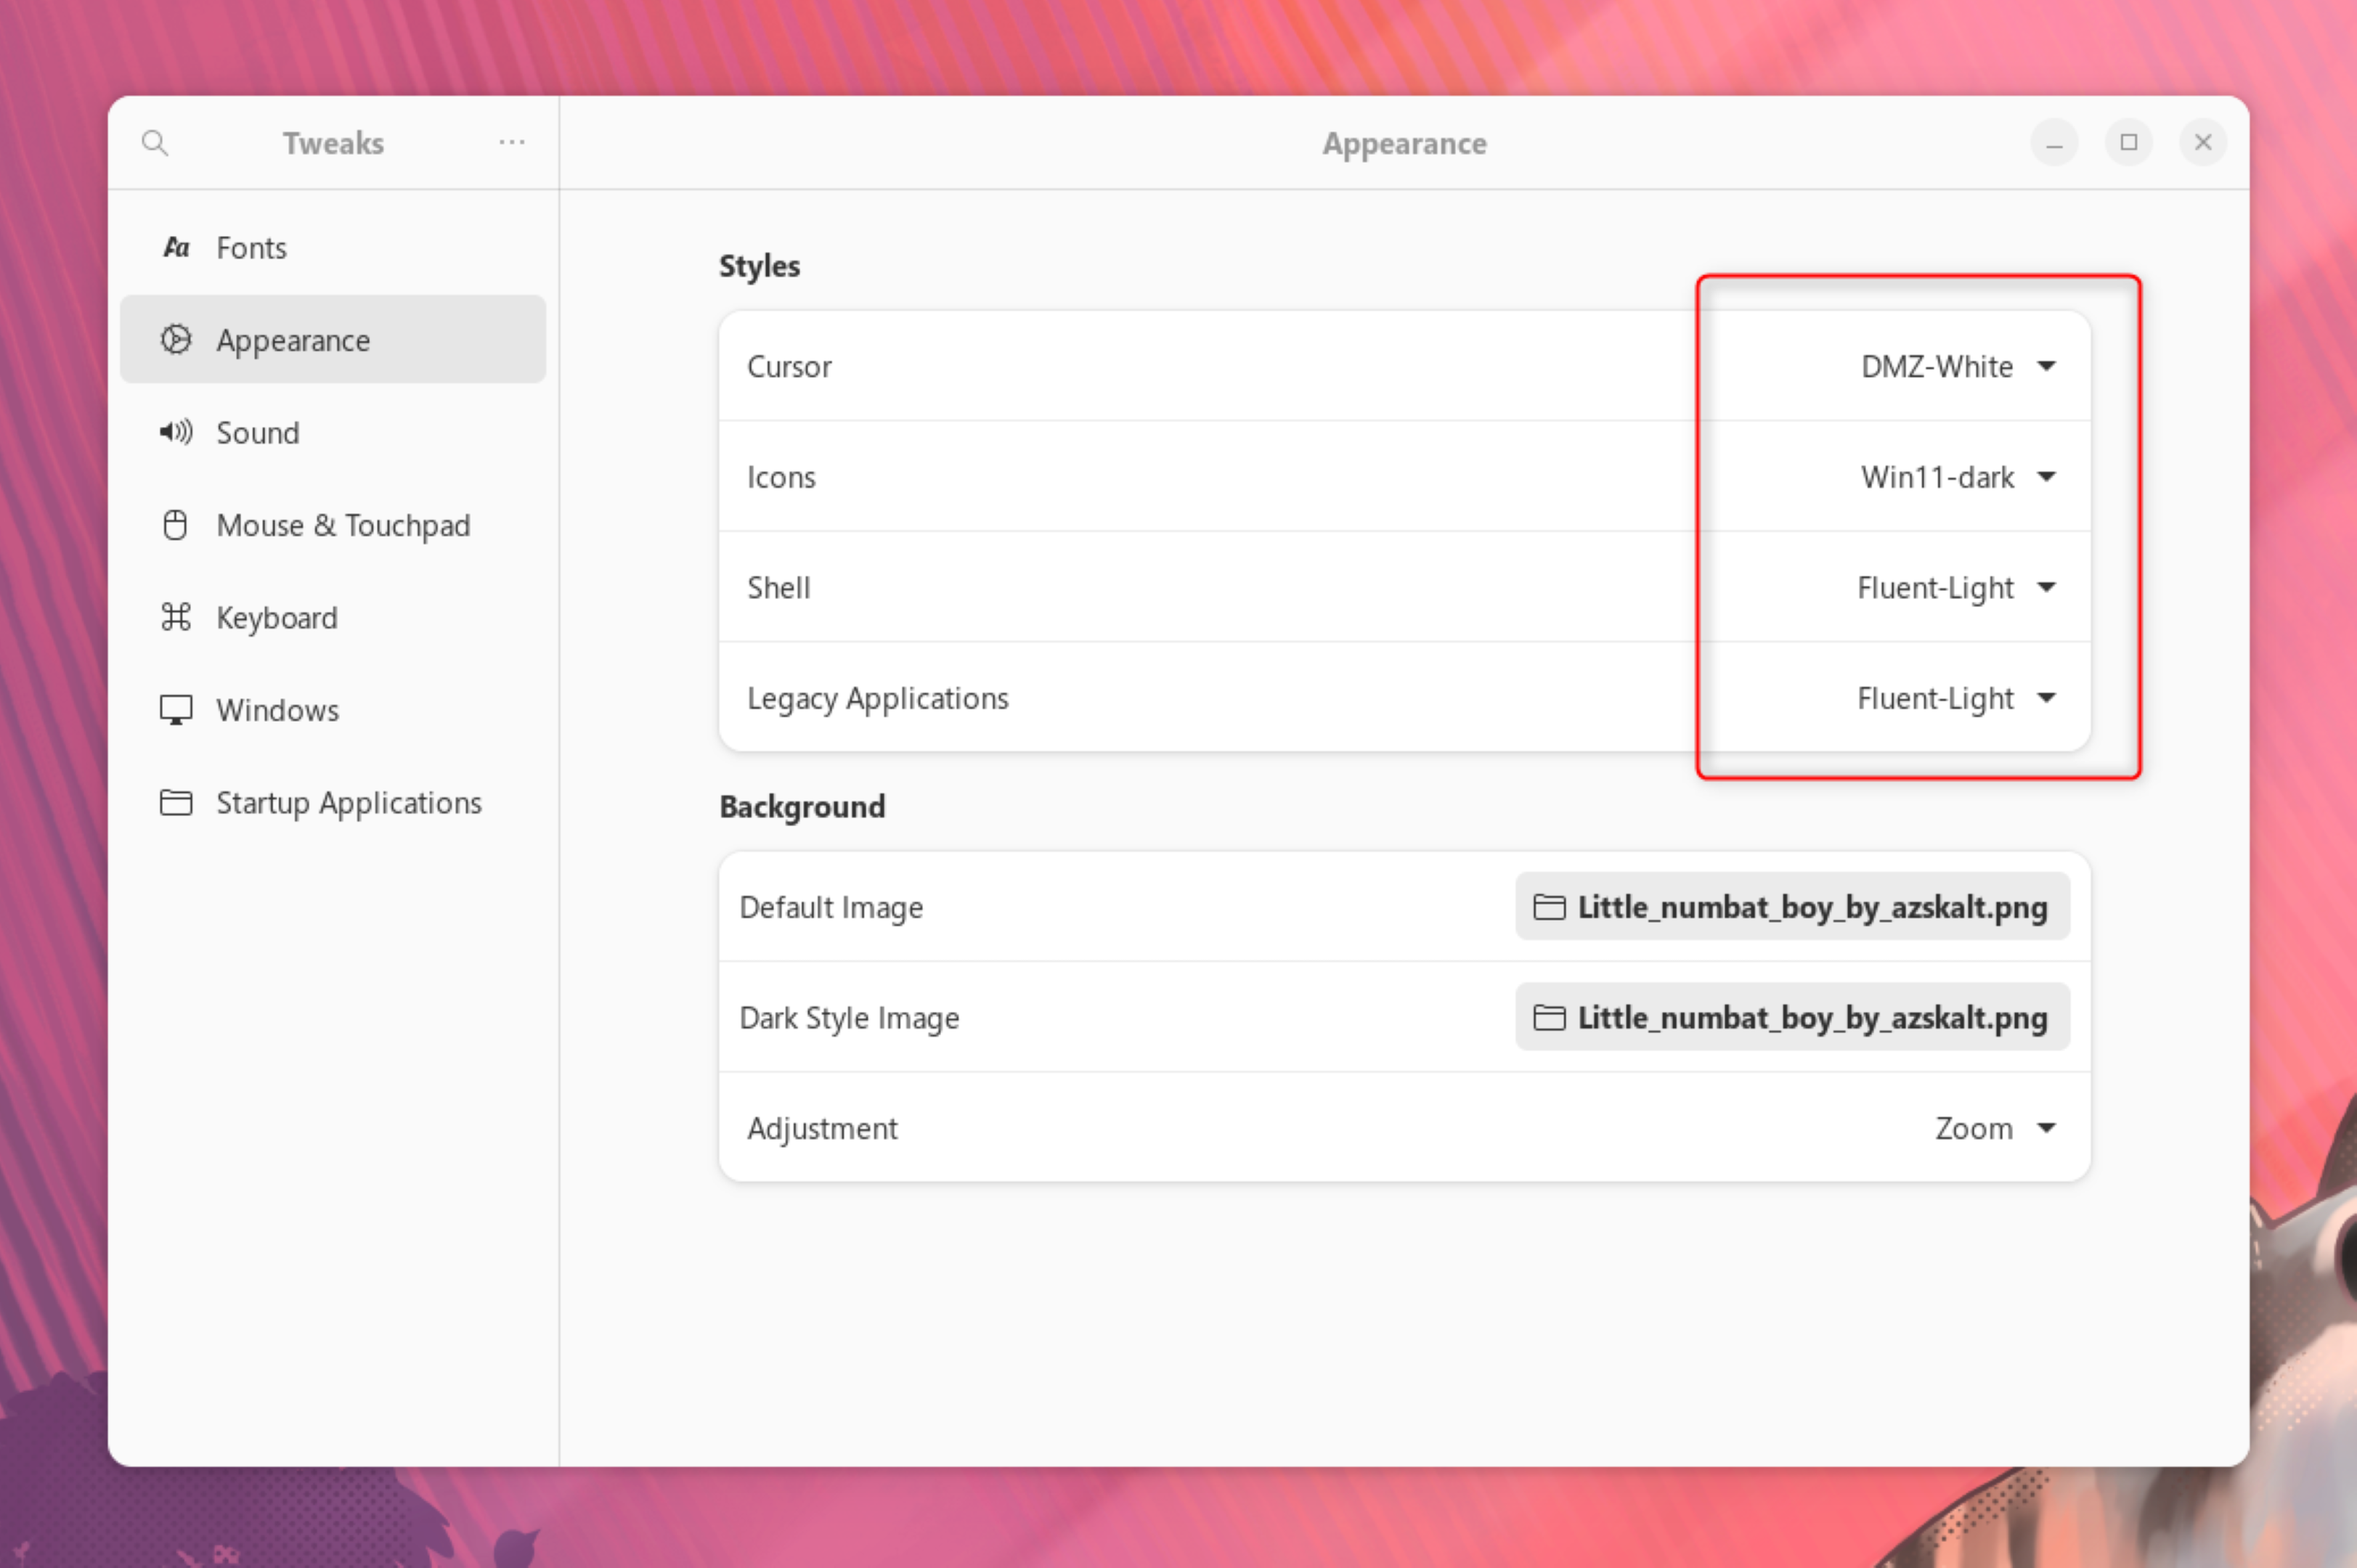
And as you can see, Ubuntu now looks more like Windows 11.
If you still can’t see, here’s another look at it with a Windows 11-like wallpaper.
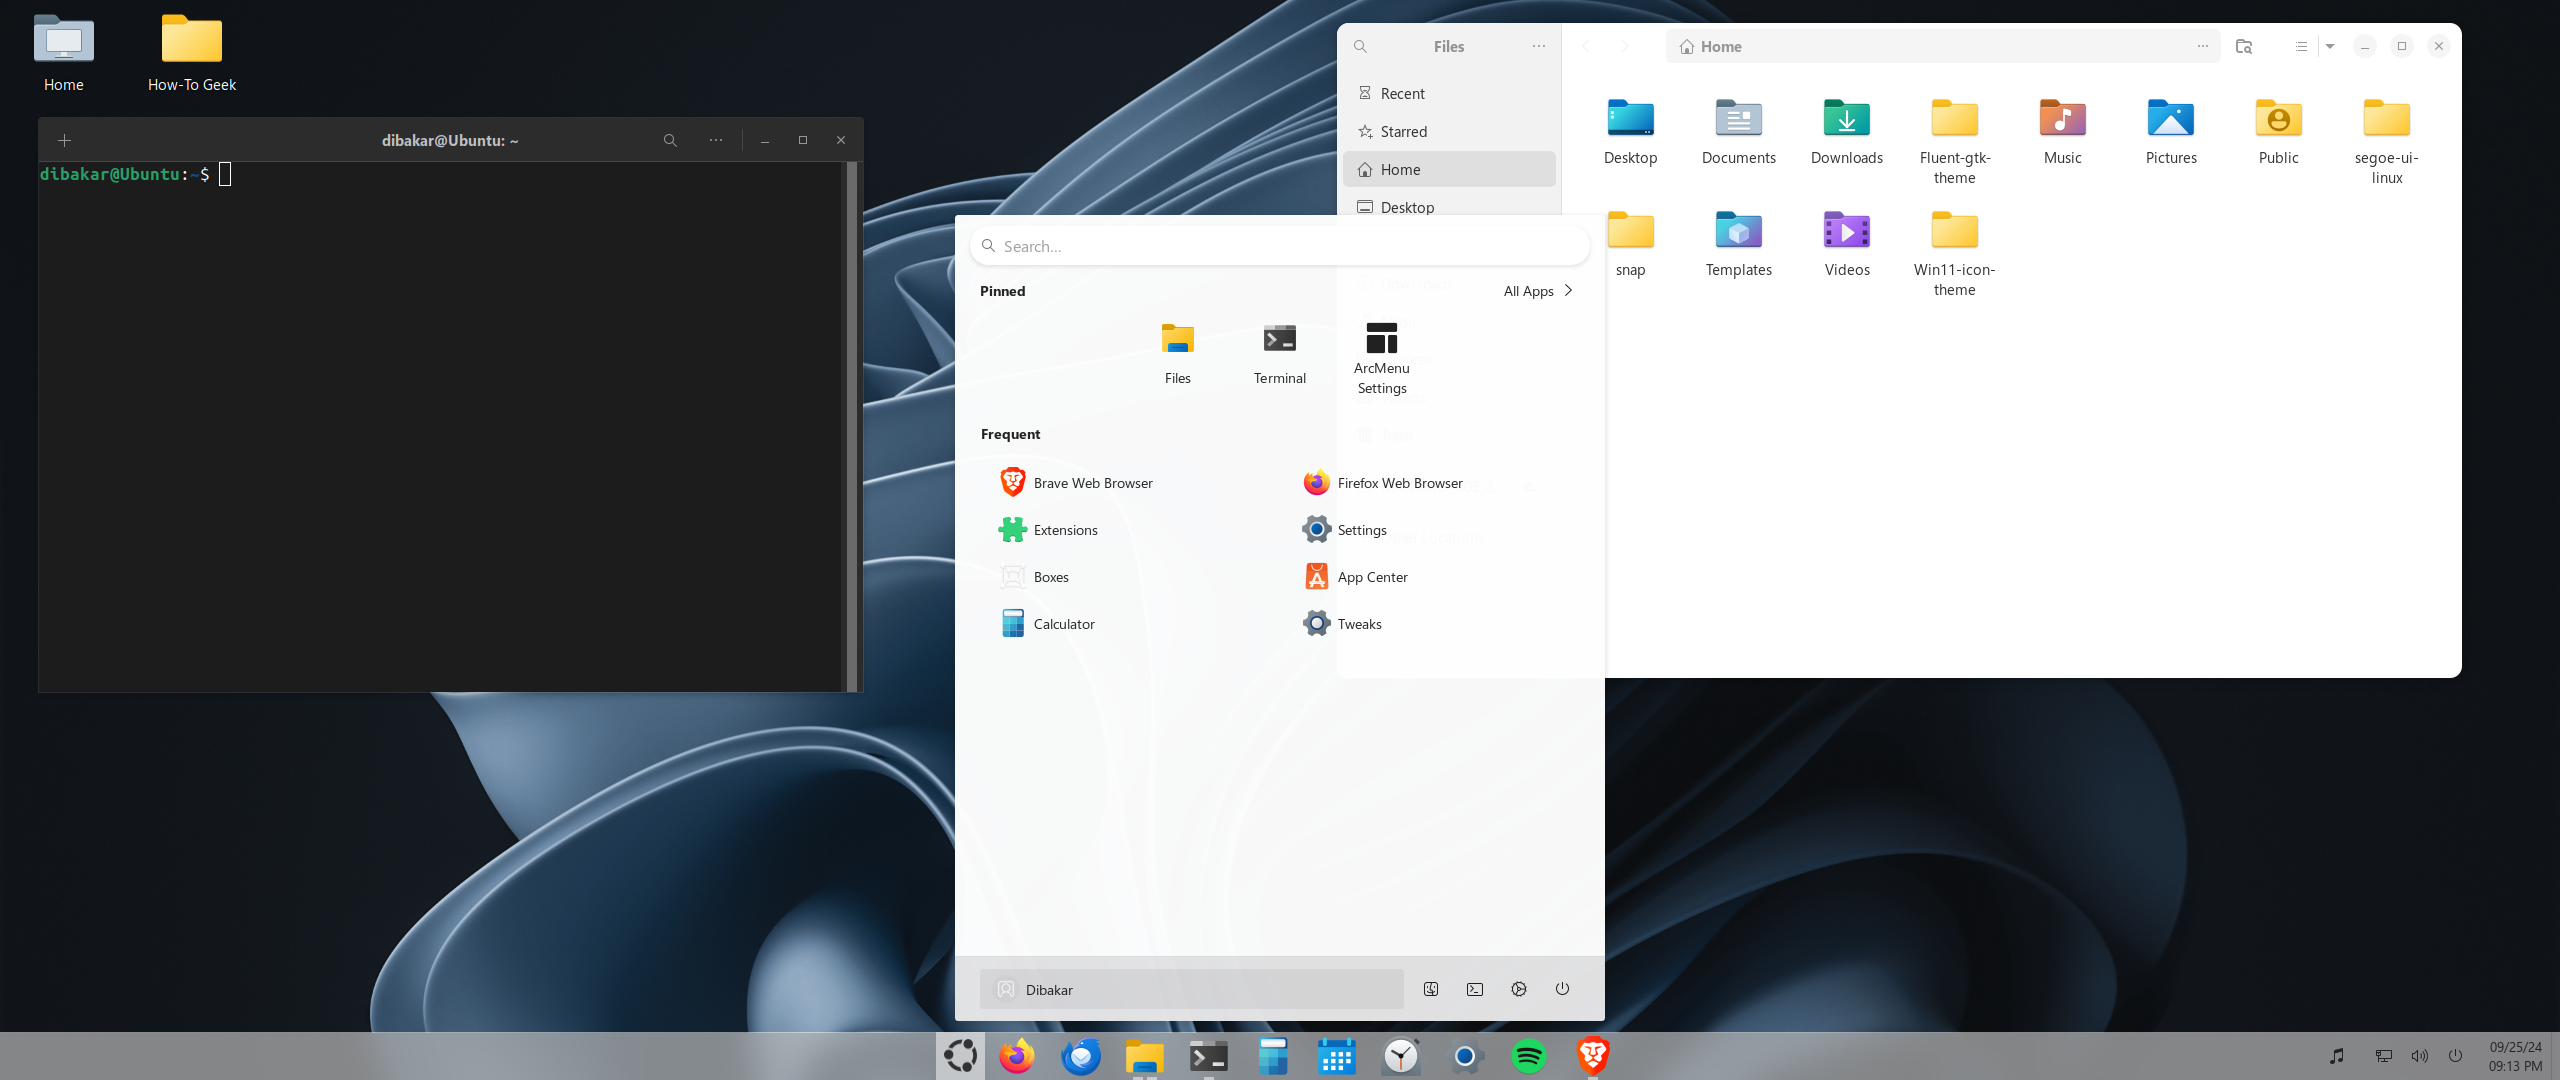
While we have managed to make the desktop look more like Windows 11, it’s important to remember that the system apps will not look like or have a layout similar to Windows 11 apps.
And there you have it, folks! Your Ubuntu PC is now rocking a convincing Windows 11 costume. Other than making your Ubuntu look more like Windows, I hope this also showcases the customization potential of Ubuntu and, in turn, the GNOME desktop environment.
|
Вышел Linux-дистрибутив Wubuntu, в точности копирующий интерфейс Windows 11 и способный без труда запускать Windows-программы. ОС потребляет минимум системных ресурсов и может стать полноценной заменой оригинальной Windows 11 для владельцев старых компьютеров.
Симбиоз Windows и Linux
В свободном доступе в интернете появился новый дистрибутив Linux, получивший название Wubuntu. Вероятнее всего. Это будет самый легкий в освоении дистрибутив для тех, кто давно хочет отказаться от Windows в пользу свободного ПО. Особенность Wubuntu в том, что его интерфейс почти на 100% повторяет оболочку системы Windows 11. Первым внимание на это обратил портал ITHome.
В основе дистрибутива, как видно из названия, лежит дистрибутив Linux Ubuntu – самый известный в мире. Его создатели, к слову, в марте 2022 г. на фоне всем известных событий лишили россиян технической поддержки.
Разработчики Wubuntu постарались перенести в свою ОС все, что визуально отличает Windows 11 от прочих операционных систем. Это и цветовая палитра интерфейса, и обои рабочего стола, и «горячие клавиши». Даже обновленная панель задач с меню «Пуск» посередине – в наличии.
Сходство действительно почти 100-процентное
Местный файловый менеджер – это копия «Проводника», а меню настроек в точности повторяет оснастку «Параметры» в Windows 11, которую Microsoft продвигает как замену классической «Панели управления».
Когда Linux лучше
Wubuntu получил от Windows 11 не только внешнее сходство, но и возможность почти нативно запускать Windows-приложения, включая .exe и .msi. Также ОС умеет работать и с утилитами для Android.
В то же время негативные черты ОС Microsoft этому дистрибутиву не передались. Windows 11 известна своими завышенными системными требованиями, и к концу 2024 г. они, как сообщал CNews, станут еще более жесткими, что сильно усложнит установку системы на старые ПК. С Wubuntu таких проблем не возникнет – апгрейд не потребуется, и единственное, что понадобится докупить – это USB-флешку хотя бы на 8 ГБ.
Для работы Wubuntu необходимо наличие в компьютере 2 ГБ ОЗУ (опционально – 4 ГБ), двухъядерного процессора с частотой 2 ГГц и свободного места на диске в пределах 25 ГБ. Разработчики рекомендуют SSD, но и на жестком диске система вполне сможет работать. В наличии модуля безопасности TPM или другого модуля доверенной загрузки в компьютере Wubuntu не нуждается.
Основу интерфейса Wubuntu в данном случае составляет графическая среда Plasma.
Если Windows 11 не нравится
Дистрибутив Wubuntu с интерфейсом Windows 11 «весит» около 5,1 ГБ и доступен для свободного скачивания и установки. Но существует еще одна его версия, на этот раз с графической средой Cinnamon (она стала популярной благодаря дистрибутиву Linux Mint). В этой модификации Wubuntu нет интерфейса Windows 11 — система копирует оболочку Windows 10, сохраняя все возможности, включая запуск Win-приложений. Такая ОС «весит» 5 ГБ ровно и потребляет еще меньше системных ресурсов.
Обзор NG SOAR: решение для управления инцидентами и оркестрацией
Безопасность

Wubuntu в работе
Wubuntu с оболочкой Windows 10 нужно лишь 1, максимум 2 ГБ оперативной памяти. Многоядерный процессор не требуется – достаточно будет 2-гигагерцевого одноядерного. Занимаемый на диске объем такой же – от 25 ГБ после чистой установки. Оба дистрибутива можно устанавливать как с флешки, так и с DVD-диска, но потребуется двухслойная болванка, поскольку обычная однослойная вмешает лишь 4,5 ГБ информации.
Linux за деньги
Wubuntu доступен для свободного скачивания, однако в бесплатной версии пользователю будут доступны не все функции, хотя и подавляющее большинство. В числе того, что им не достанется – автоматическое обновление приложений и техническая поддержка со стороны разработчиков.
Получить все это можно, притом за сравнительно небольшие по современным меркам деньги. Платная версия Wubuntu стоит примерно вдвое дешевле игры для актуальных приставок PlayStation 5 и Xbox Series X – за них на мировом рынке просят $60 (5565 руб. по курсу ЦБ на 26 февраля 2024 г.), а за поддержку Wubuntu и другие опции придется заплатить $35 (3250 руб.).
- Подобрать оптимальный тариф на IaaS на ИТ-маркетплейсе Market.CNews среди десятков поставщиков
Do you want to change the interface of Ubuntu 20.04 or 18.04 LTS Linux Distros to make it look like Windows 10 or 7, then here are the steps to follow.
What is UKUI- Ubuntu Kylin?Open command terminalAdd UKUI PPA RepositoryUpdate and Upgrade PackagesInstall Windows-like UI on Ubuntu 20.04Logout and Login to UKUI- Windows 10 like interface on UbuntuUninstall UKUI- Ubuntu Kylin Desktop environment
Ubuntu 20.04, 18.03, 19.04, 17.04, or 16.04 out of the box come with GNOME graphical user interface or environment. Although it is very intuitive and easy to use, the users are shifting from Windows 10 or 7 yet find it difficult to operate. Because of the unfamiliar user interface and arrangements of options.
Therefore, if you want to have the benefits of Ubuntu Linux and its packages but with a Windows-like interface then here in this tutorial, we will show some quick commands to install the UKUI Desktop environment on Ubuntu.
What is UKUI- Ubuntu Kylin?
UKUI is a desktop environment for Linux distributions available on Github, it meant to provide a simple and easy to use Windows similar graphical user interface.
So, let’s see its installation on Ubuntu 20.04 LTS, however, the steps will be the same for the previous versions such as 18.04 and 16.04 including Linux Mint and Debian. However, if you don’t want to do the installation of Kylin on Ubuntu 20.04 then go for the official Ubuntu 20.04 Kylin Linux Distro available to download on the official website.
Open command terminal
To install Windows 10 interface UI for Linux we need to use the Command line on Ubuntu, to access that either click on “Show Applications” and search for Terminal or simply press Ctrl + Alt + T (shortcut key to open the Command terminal).
Add UKUI PPA Repository
This Linux desktop environment’s packages may not available in the default official repository of Ubuntu Linux, thus we need to add it manually. Therefore, copy-paste the below command in the terminal and press the Enter key.
sudo add-apt-repository ppa:ubuntukylin-members/ukui3.0
When it asks for your User password then provide that and then hit the Enter button.
Update and Upgrade Packages
To make sure the added repository get recognized by the system, rebuild the cache and then upgrade the existing packages using below two commands:
sudo apt update

sudo apt upgrade
Install Windows-like UI on Ubuntu 20.04
Finally, run a single command as given in this step. It will fetch all the required packages and tools to create a Windows 10 or 7 like the Desktop environment on Ubuntu 20.04 or earlier versions. Hence, here is it.
sudo apt install ukui-desktop-environment

or
sudo apt install ubuntukylin-desktop
The output shows, it will take around 559 MB of space on your disk:
The following NEW packages will be installed:
attr desktop-base fonts-quicksand ibverbs-providers kactivities-bin kactivitymanagerd kde-config-screenlocker kio
kpackagelauncherqml kpackagetool5 kwayland-data kwayland-integration libcephfs2 libdbusmenu-qt5-2 libgsettings-qt1
libhfstospell10 lib ui-kwin-x11 ukui-media ukui-media-common ukui-menu ukui-panel ukui-polkit....
.......ukui-power-manager ukui-power-manager-common ukui-screensaver ukui-session-manager ukui-settings-daemon
ukui-settings-daemon-common ukui-sidebar
0 upgraded, 207 newly installed, 0 to remove and 50 not upgraded.
Need to get 183 MB of archives.
After this operation, 559 MB of additional disk space will be used.
Do you want to continue? [Y/n]
Logout and Login to UKUI- Windows 10 like interface on Ubuntu
Once the installation gets completed, go to the Ubuntu Taskbar and at the right end, you will see an arrow icon pointed downwards, click that select “power off/log out” and select the Log out option.
Now, click on your user name, and before entering the password, click on the gear icon available at the left bottom side of the screen. Select UKUI and then enter your user password to log in again.
Note: After installing Ubuntu Kylin UI you will have a dual desktop environment on your OS, thus if you want the default one back then again log out and select Ubuntu instead UKUI.


Uninstall UKUI- Ubuntu Kylin Desktop environment
In case you are facing some problem with UKUI- Windows 10 like interface then we can uninstall it completely. To remove the UKUI, log out the system and again click on the Gear icon available on the right bottom side. This time instead of selecting UKUI, select Ubuntu, the default UI.
Now, open the command terminal and run the below command to fully purge and remove this desktop environment, we have installed in this tutorial.
sudo apt purge ukui-desktop-environment ubuntukylin-default-settings peony-common
Restart, the system and you will see it would not be available to access any more on your Linux.
Теперь превратить Ubuntu в Windows 10 стало еще легче.
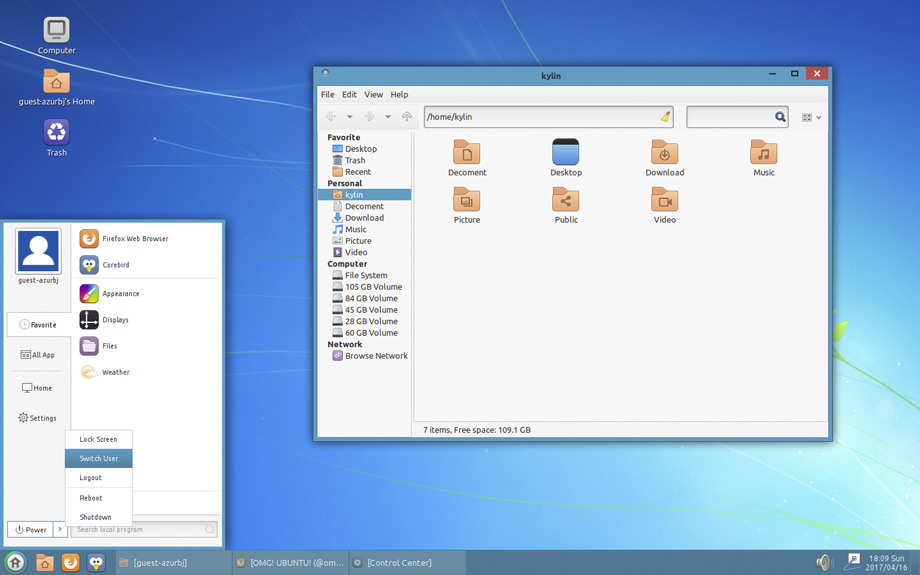
У Ubuntu 17.04 есть среда рабочего стола UKUI, которая была специально создана для удобства пользователей Windows. Она доступна в архиве пакетов.
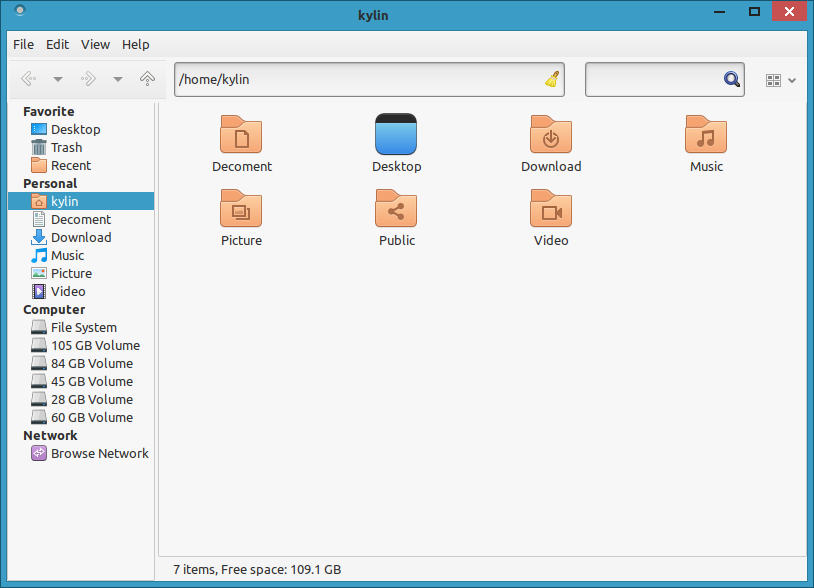
Это рабочий стол, основанный на Mate. Он поставляется в собственной компоновке, со своими стилями иконок, окон, темами. Присутствует файловый менеджер в стиле Windows Explorer («Peony») и меню запуска в стиле Windows.
UKUI разработана китайским сообществом создателей Ubuntu Kylin. Для 17.04 Kylin они в самый последний момент совершили переход с Unity на собственную, основанную на Mate, среду рабочего стола UKUI. Такая поспешность была обусловлена объявлением Canonical об уходе от Unity и переходе на простой GNOME.
Ядро UKUI составлено из из одинарной панели MATE с оригинальным набором апплетов и индикаторов, куда входят апплет время/дата в стиле Windows, простой ползунок, отвечающий за звук и меню Пуск.
У рабочего стола есть свое приложение для настройки, которое является заменой Windows Control Centre.
Благодаря общим усилиям с командой рабочего стола MATE UKUI доступна в репозитории Ubuntu Zesty. Ее можно установить рядом с Unity, GNOME и другими средами рабочего стола, хотя не без последствий (смотреть предостережения).
Это значит, что не придется скачивать и устанавливать темы, в ручную выставлять внешний вид панелей, добавлять персональные архивы пакетов или менять основные приложения системы на какие-то их альтернативы.
Предостережения
Вместе с UKUI придется установить Kylin Greeter (экран блокировки и входа в систему) и настройки рабочего стола Ubuntu Kylin. Последний пакет окажет влияние на базовую структуру рабочего стола Unity — заменит ее базой Ubuntu Kylin (к примеру, средство запуска снизу, китайский язык и т.д.).
Базовая тема UKUI GTK лишена нормальной поддержки GTK3.
Так как рабочий стол базируется на среде рабочего стола MATE, вам придется бороться со всем вытекающим из их параллельной работы. Я устанавливал UKUI после MATE; на последнюю повлияла база Kylin, на первую — MATE.
Все эти изменения можно исправить в ручную, если, конечно, UKUI — это действительно то, что вам надо и вы не будете слишком скучать по Unity или обычной MATE. Может оно того и будет стоить.
Установка UKUI на Ubuntu 17.04
UKUI полностью бесплатное программное обеспечение с открытым кодом. Оно доступно для установки на Ubuntu 17.04 из Ubuntu Software:
Установить UKUI на Ubuntu 17.04
Удаление
Для удаления UKUI — рабочего стола, приложений и смежных настроек — просто запустите данную команду в новом окне терминала:
sudo apt purge ukui-desktop-environment ubuntukylin-default-settings peony-common
Вам также надо будет открыть «ПО и обновления» («Software & Updates») > «иное ПО» («Other Software») и удалить репозиторий Ubuntu Kylin.
Новости Ubuntu Linux в Telegram
Телеграм канал об Ubuntu и Linux! 🐧 Здесь вы найдёте свежие новости, полезные советы, инструкции, а также обсуждения новых функций и обновлений. Подписывайтесь, чтобы изучать Linux, оптимизировать систему и делиться опытом.