
1. Overview
With a bootable Ubuntu USB stick, you can:
- Install or upgrade Ubuntu
- Test out the Ubuntu desktop experience without touching your PC configuration
- Boot into Ubuntu on a borrowed machine or from an internet cafe
- Use tools installed by default on the USB stick to repair or fix a broken configuration
This tutorial will show you how to create a bootable USB stick on Microsoft Windows using Rufus.
For most users we recommend balenaEtcher instead of Rufus which is simpler to use and also available on MacOS and Ubuntu. Instructions are now included in the primary Install Ubuntu Desktop tutorial.
Creating a bootable Ubuntu USB stick from Microsoft Windows is very simple and we’re going to cover the process in the next few steps.
Alternatively, we also have tutorials to help you create a bootable USB stick from both Ubuntu and Apple macOS.

2. Requirements
You will need:
- A 4GB or larger USB stick/flash drive
- Microsoft Windows XP or later
- Rufus, a free and open source USB stick writing tool
- An Ubuntu ISO file. See Get Ubuntu for download links

Take note of where your browser saves downloads: this is normally a directory called ‘Downloads’ on your Windows PC. Don’t download the ISO image directly to the USB stick! If using Windows XP or Vista, download version 2.18 of Rufus.
3. USB selection
Perform the following to configure your USB device in Rufus:
- Launch Rufus
- Insert your USB stick
- Rufus will update to set the device within the Device field
- If the Device selected is incorrect (perhaps you have multiple USB storage devices), select the correct one from the device field’s drop-down menu

You can avoid the hassle of selecting from a list of USB devices by ensuring no other devices are connected.
4. Select the Ubuntu ISO file
To select the Ubuntu ISO file you downloaded previously, click the SELECT to the right of “Boot selection”. If this is the only ISO file present in the Downloads folder you will only see one file listed.
Select the appropriate ISO file and click on Open.

5. Write the ISO
The Volume label will be updated to reflect the ISO selected.
Leave all other parameters with their default values and click START to initiate the write process.

6. Additional downloads
You may be alerted that Rufus requires additional files to complete writing the ISO. If this dialog box appears, select Yes to continue.

7. Write warnings
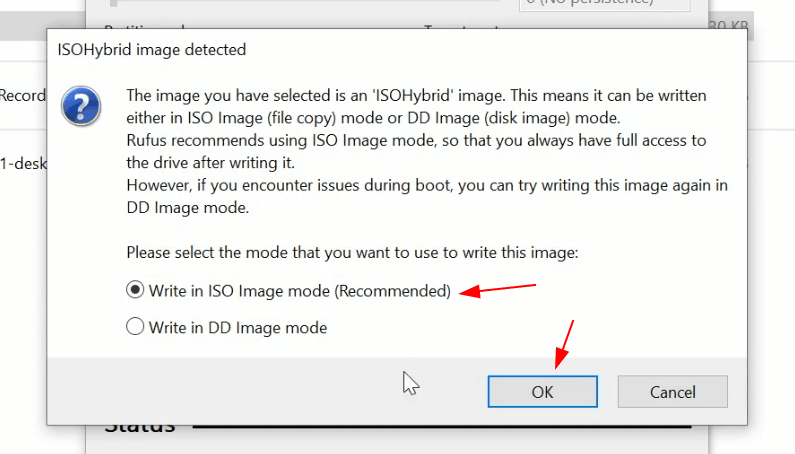
You will then be alerted that Rufus has detected that the Ubuntu ISO is an ISOHybrid image. This means the same image file can be used as the source for both a DVD and a USB stick without requiring conversion.
Keep Write in ISO Image mode selected and click on OK to continue.

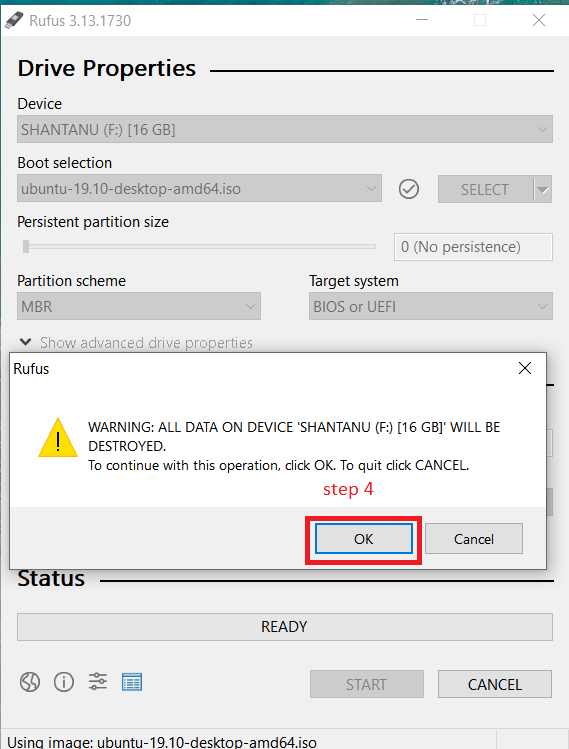
Rufus will also warn you that all data on your selected USB device is about to be destroyed. This is a good moment to double check you’ve selected the correct device before clicking OK when you’re confident you have.

If your USB stick contains multiple partitions Rufus will warn you in a separate pane that these will also be destroyed.
8. Writing the ISO
The ISO will now be written to your USB stick, and the progress bar in Rufus will give you some indication of where you are in the process. With a reasonably modern machine, this should take around 10 minutes. Total elapsed time is shown in the lower right corner of the Rufus window.

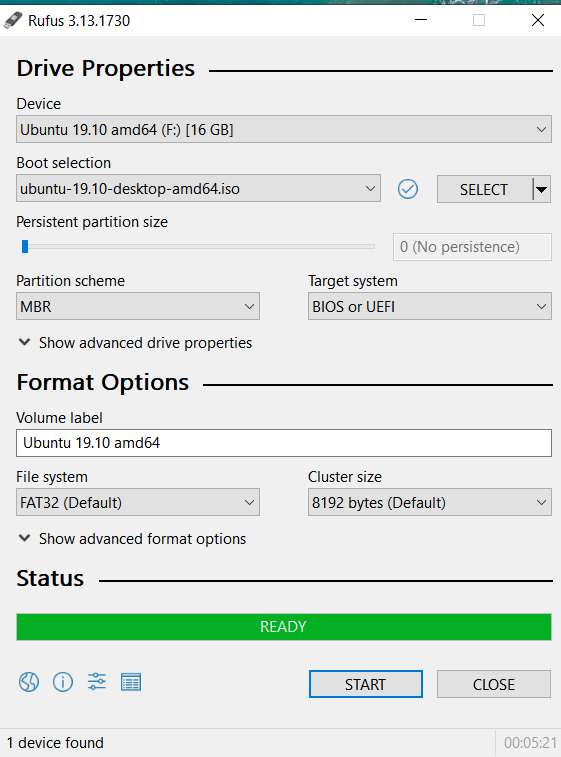
9. Installation complete
When Rufus has finished writing the USB device, the Status bar will be filled green and the word READY will appear in the center. Select CLOSE to complete the write process.

Congratulations! You now have Ubuntu on a USB stick, bootable and ready to go.
To use it you need to insert the stick into your target PC or laptop and reboot the device. It should recognise the installation media automatically during startup but you may need to hold down a specific key (usually F12) to bring up the boot menu and choose to boot from USB.
For a full walkthrough of installing Ubuntu, take a look at our install Ubuntu desktop tutorial.
Finding help
If you get stuck, help is always at hand:
- Ubuntu Discourse
- Ask Ubuntu
- IRC-based support
Was this tutorial useful?
Thank you for your feedback.

One of the first few steps for installing Ubuntu is to create a bootable USB of Ubuntu.
There are several free live USB creation tools available in Windows. You may use any of these free applications.
In this tutorial, I’ll show two methods using two different applications for creating live Ubuntu USB in Windows:
- Rufus (recommended)
- Universal USB Installer
You can try Ubuntu without installing it with a live USB on your computer. You can, of course, use the same live USB to install Ubuntu on a computer as well.
Let me highlight some of the easiest methods. Before you start creating the bootable USB, get the essentials first.
Getting Things Ready
Make sure that you have the following:
- A USB key (pen drive) with at least 8 GB of size with no important data on it (the USB key will be formatted)
- Internet connection to download Ubuntu ISO (this could be done on any computer)
- It would be a good idea to know if your system uses MBR or GPT (Rufus will create live USB accordingly)
- You should also check if your system uses UEFI or legacy BIOS
Download Ubuntu ISO
ISO is an image file. You download this single file of around 4.9 GB, consisting of an “image” of Ubuntu Linux. You then use a tool to extract the content of the ISO file in such a manner that you can boot the Ubuntu operating system from the USB itself.
Go to the official website and choose the Ubuntu version of your choice. You may choose Ubuntu LTS if you do not want to upgrade your system every six to nine months.
You can also download Ubuntu via torrents from the alternative downloads link on the same page.
Suggested Read 📖
Explained: Which Ubuntu Version Should I Use?
Confused about Ubuntu vs Xubuntu vs Lubuntu vs Kubuntu?? Want to know which Ubuntu flavor you should use? This beginner’s guide helps you decide which Ubuntu should you choose.
It’s FOSSAbhishek Prakash
Method 1: Make a live Ubuntu USB with Rufus (recommended)
Rufus is an excellent free, open-source tool for making bootable Linux USB disks. On Windows, I prefer and recommend using Rufus.
If you prefer videos to text, I have made this video to show the steps in action.
Step 1: Download Rufus
Go to the website of Rufus and download the .exe file:
This is an exe file, so you do not need to install Rufus. Just double-click on it to run it.
Step 2: Creating the live Ubuntu USB
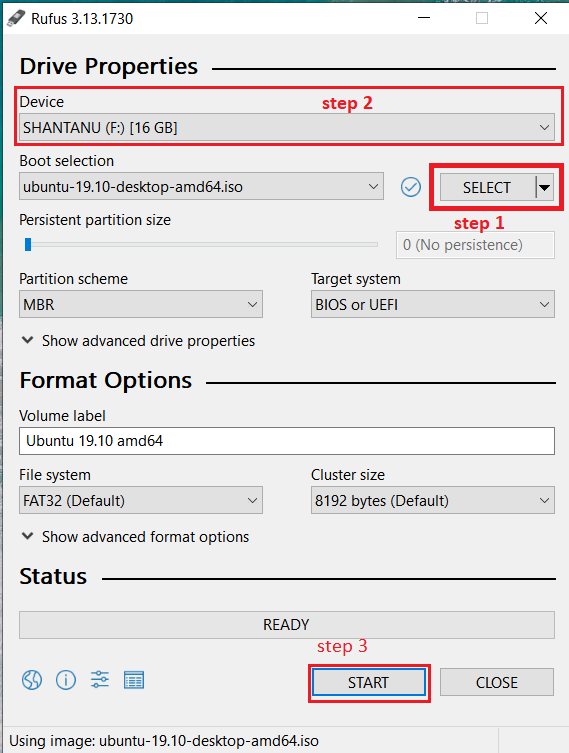
Plug in your USB key (pen drive) to the computer. Now double-click on the download Rufus exe file, which should be in the Downloads folder.
When you run Rufus with the USB plugged in, it automatically recognizes it. If more than one USB key is plugged in, please select the correct USB under Device.
It may also automatically find the Ubuntu ISO. If not, you can always browse to the ISO by clicking on the SELECT button.
I hope you have checked the partitioning scheme and BIOS type, as I mentioned in the prerequisite section. Based on that, select the Partition Scheme and Target System in Rufus.
Everything looks good? Hit the START button.
You may be asked to choose how to write the image. Choose ‘Write in ISO Image mode’:
It will take a few minutes to complete the process. You’ll see a green signal when the live USB is ready.
I’ll show you how to boot from the live USB in a moment.
Method 2: Using Universal USB Installer to make bootable Linux USB
Go to the Universal USB installer project website and download the latest version of Universal USB Installer.
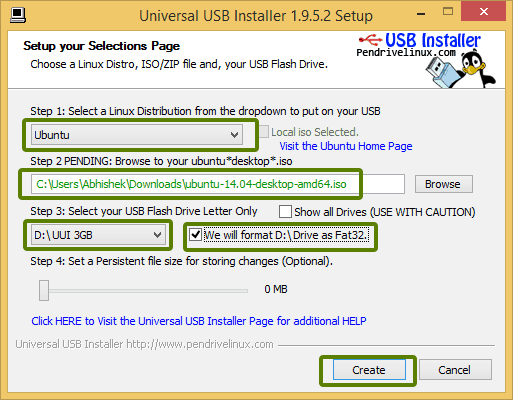
Plugin the USB drive in the computer and run Universal USB Installer. You need to do the following things now:
- Select Ubuntu under Step 1
- Browse to the location of the downloaded Ubuntu ISO in the Step 2 section
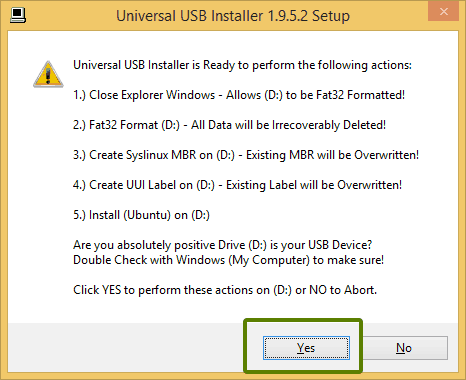
- In Step 3, select the USB drive and check the format option.
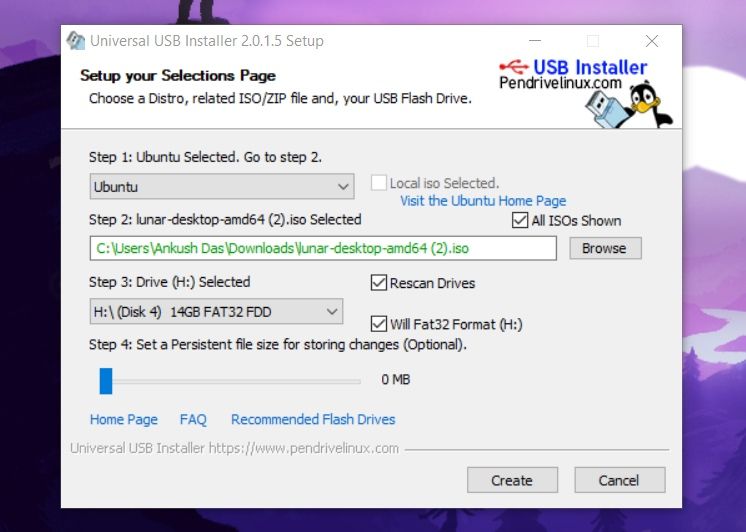
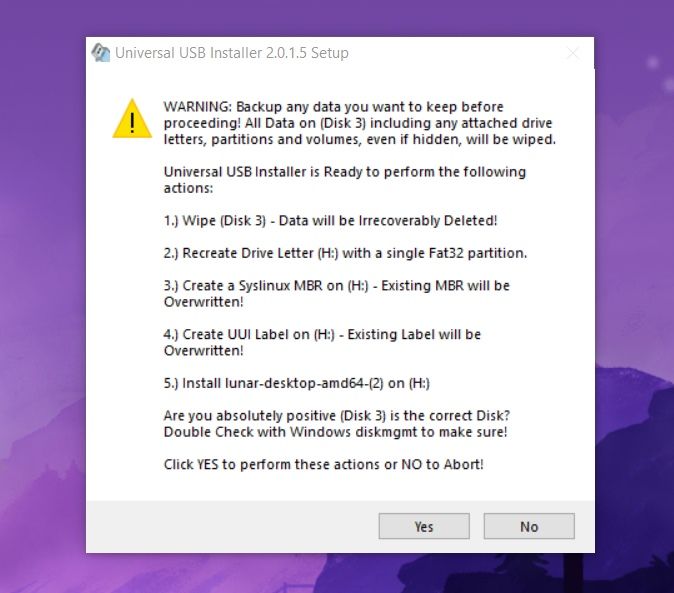
It will present you with obvious warnings; click Yes.
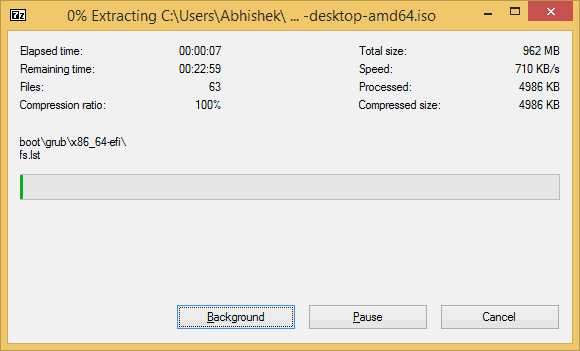
Wait for some time for the process to complete. You can push it to the background if you like.

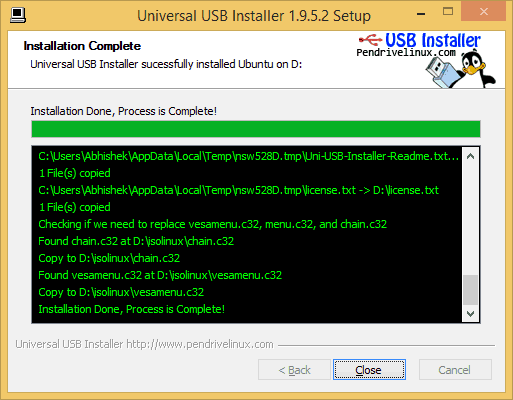
That said, your Ubuntu USB should be created in a few minutes.

That’s it.
How to boot from live Ubuntu USB
Once the live USB is created, you can test Ubuntu in live mode. The bootable USB can be used on any system, not only on the one where you created it.
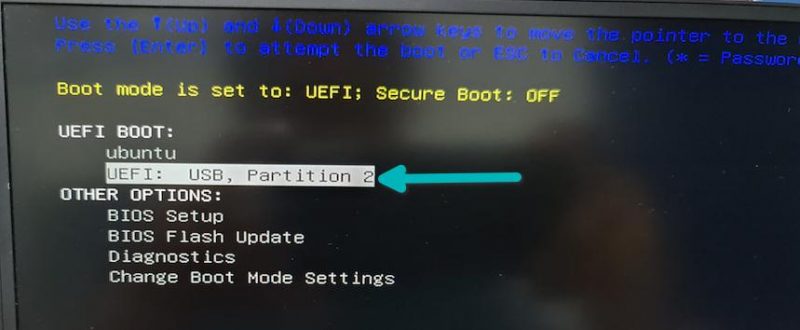
Plug in the live USB on the desired computer. What you need to do is restart or power on your computer.
At the screen that shows the logo of your system manufacturer, press the F2 or F10 or F12 key. You may try pressing all of them individually if you are unsure of the key. But be quick when you do that otherwise, it will boot into the operating system.
This key is different for different brands of computers. Some may even use Esc or Del keys for this purpose.
In rare cases, you may have to access the UEFI boot settings from within Windows.
In the BIOS settings, normally, you should see a screen like this. Here, you use the arrow keys to move down to the USB option and press enter to boot from the USB. Please note that the screen may look different in different systems.
Once you boot into the USB, you will notice the grub screen with the following options:
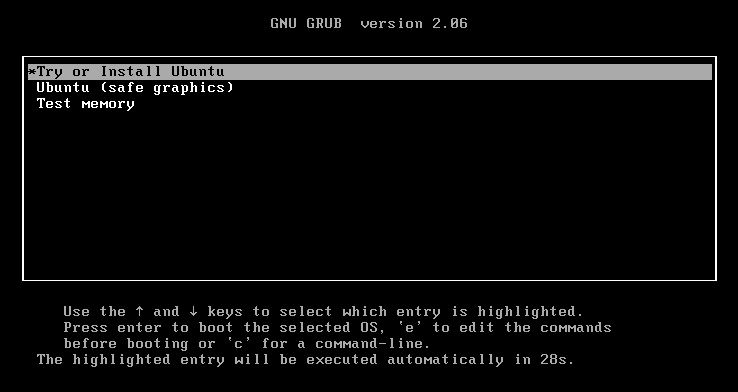
- Try or Install Ubuntu
- Ubuntu (safe graphics)
- Test memory
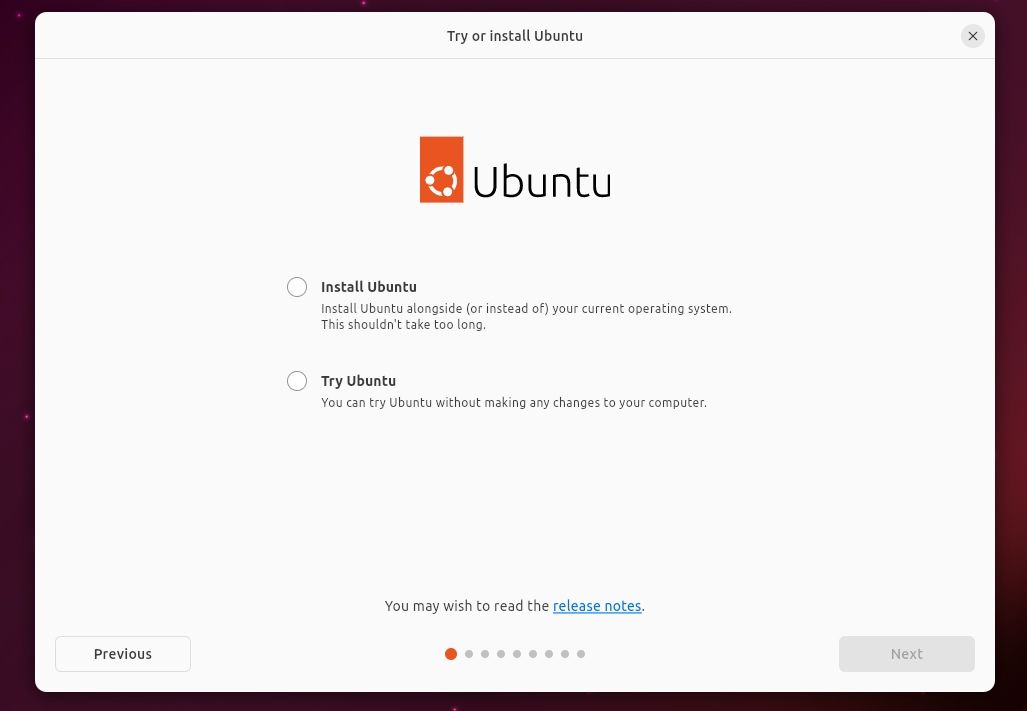
You need to click on «Try or Install Ubuntu». You do not need the safe graphics option unless your graphics card has an issue working with Ubuntu or if you are debugging some issue with graphics disabled.
In case you get different options, you need to select «Try Ubuntu» to use the Live USB session and do not want to install it immediately.
Once you go ahead with the first option, it will start the live USB session.
If you like it, you can install Ubuntu after selecting the preferred language.
Note that if you make any changes to the live Ubuntu system, like saving some files or installing applications, your changes will be lost if you boot from the live USB again.
Please remember that some systems may not allow you to boot from a bootable USB. If you see some error (like PCIe initialization on Dell systems) or cannot boot from the USB, disable secure boot and try booting from the USB again.
Ultimate Guide: Getting Started With Ubuntu
So you are thinking of using Ubuntu? Or perhaps you have already started using Ubuntu? But you do not know how to use Ubuntu or what to do after installing Ubuntu. Don’t worry, every beginner faces more or less the same issues. This is the reason why I have
It’s FOSSAbhishek Prakash
Considering that you are just starting, I advise you to follow this beginner’s guide to Ubuntu and learn how to use Ubuntu. Let me know if you need some help.
Last Updated :
07 May, 2025
A Ubuntu live USB is a bootable flash drive that contains a full Ubuntu operating system, allowing you to run Ubuntu without touching your Windows hard drive.
In this article, we will look into the process of creating an Ubuntu live USB on a Windows machine. This USB drive can be further used to either install Ubuntu on your Windows machine or use Ubuntu directly from the USB drive.
Requirements:
- A USB drive (8GB minimum, 16GB+ recommended)
- A Windows PC with internet access
Create Ubuntu Live USB
Here are the steps to create a live USB to install Ubuntu.
Step 1: Download the Ubuntu ISO Image
First, you need to download the Ubuntu ISO image file, before installing it on USB. You can download any version of Ubuntu at no cost.
Step 2: Download a USB Installer Tool (Rufus)
Once you have downloaded the ISO of Ubuntu, download the latest version of Universal USB Installer. For the sake of demonstration, we will be using the Rufus USB installer.
Note: Rufus is a utility that helps format and create bootable USB flash drives, such as USB keys/pendrives, memory sticks, etc.
The user can also use the
- Balena Etcher: User-friendly, cross-platform
- Universal USB Installer: Lightweight but slower
- Ventoy: Supports multiple ISOs on one USB
Step 3: Create a Bootable Ubuntu Live USB
Now we need to create a bootable USB. To do so, Plugin the USB drive in the computer and run Universal USB Installer. Follow the below steps to work with the installer:
- Step 1: Browse to the location of the downloaded Ubuntu ISO
- Step 2: Select the USB drive in which you want to flash Ubuntu.
- Step 3: Click on the start button to start the process.
- Step 4: Click OK
Now Wait for some time for the process to complete.
Once your Ubuntu live USB is prepared, it’s time to start it up and try Ubuntu in live mode or install it, according to Ubuntu Official Documentation. Booting from the USB means restarting your Windows computer, entering the boot menu, and choosing the USB drive. Live mode allows you to try Ubuntu without altering your Windows system, similar to taking a test drive in a car.
Conclusion
Building a Ubuntu live USB on your Windows system is essentially availing a free ticket to explore Ubuntu Linux without venturing out of your comfort zone. Using just a USB stick, a Ubuntu ISO, and an instrument such as Rufus, you can test Ubuntu 24.04 LTS, recover Windows files, or even install a dual-boot setup in less than an hour
От Ztrekosa Da
в
Инструкции
—
Лайв USB — не только один из основных этапов установки Ubuntu в вашу систему, но и возможность потрогать живую операционную систему еще до установки.

Краткое описание: туториал, который покажет вам, как создать загрузочную флешку Ubuntu в Windows. Инструкции действительны для всех версий Ubuntu и Windows.
Одним из первых этапов установки Ubuntu является создание загрузочной USB-флешки. Если вы используете Windows 7 или 10, вы можете использовать такой инструмент, как Universal USB Installer, чтобы легко создать лайв USB. Это мой любимый и невероятно легкий в использовании инструмент.
Как создать загрузочный USB Ubuntu в Windows:
Шаг 1. Загрузите установочный образ Ubuntu
Перейдите на страницу Ubuntu и загрузите ISO-образ предпочитаемой версии Ubuntu. В настоящее время доступны две версии: Ubuntu 20.04 LTS и Ubuntu 20.10. Вы можете скачать ту, которая вам больше нравится.
И будет совершенно не лишним проверить контрольную сумму файла ISO, загруженного из Интернета.
Шаг 2. Загрузите Universal USB Installer
После того, как вы загрузили ISO-образ Ubuntu, перейдите на эту страницу и загрузите последнюю версию универсального установщика USB.
СкачатьUniversal USB Installer
Шаг 3: Создайте загрузочный USB
Вставьте флешку в ваш компьютер и запустите универсальный установщик USB. Теперь вам нужно сделать следующее:
· Выберите Ubuntu – шаг 1 на картинке ниже;
· Укажите путь к загруженному ISO-образу Ubuntu – Шаг 2;
· И наконец, выберите USB-накопитель, а также поставьте галочку в чекбоксе «Форматирование»;
Далее появятся очевидные предупреждения, некогда объяснять, жамкайте «Да».
Подождите, пока процесс завершится. Вы можете переместить его в фоновый режим, если хотите.
Тем не менее, ваша загрузочная USB Ubuntu должна быть создана за несколько минут.
После создания лайв USB-накопителя вы можете продолжить тестирование Ubuntu в живом режиме. Все, что вам нужно сделать, это перезагрузить компьютер. Во время загрузки нажмите F2, F10 или F12 (в зависимости от вашей системы), чтобы получить доступ к меню загрузки.
В этом меню выберите загрузку с USB или съемного носителя. Вот оно! Вы можете использовать Ubuntu без установки в лайв режиме или продолжить установку, если хотите.
В этом видео я показал процесс создания загрузочного USB-накопителя Ubuntu Linux с помощью инструмента Rufus:
Я очень надеюсь, что это руководство помогло вам легко создать Ubuntu Live USB в Windows.
Учитывая, что вы только начинаете, я советую следовать этому руководству по Ubuntu для начинающих и узнать, как использовать Ubuntu.
Дайте мне знать, если вам понадобится помощь.
Новости Ubuntu Linux в Telegram
Телеграм канал об Ubuntu и Linux! 🐧 Здесь вы найдёте свежие новости, полезные советы, инструкции, а также обсуждения новых функций и обновлений. Подписывайтесь, чтобы изучать Linux, оптимизировать систему и делиться опытом.
Do you want to try the latest version of Ubuntu on your computer without installing it? Want to create an Ubuntu Live USB but not sure how to prepare the same on a PC running Windows 10? This guide will show you how to prepare a bootable Ubuntu Live USB in Windows 10.

What is a Live Ubuntu USB?
An Ubuntu Live USB lets you boot and run Ubuntu operating system from a USB drive. You do not need to install Ubuntu on your computer. With the help of Live USB, you can try Ubuntu on your computer without installing it or you can also use the Live USB to back up data from an unbootable Windows 10 PC.
There are multiple applications out there to create Ubuntu Live USB. In this guide, we are using the popular Rufus software. The software is free, fast, and easy-to-use as well.
Complete the steps given below to make your Ubuntu Live USB.
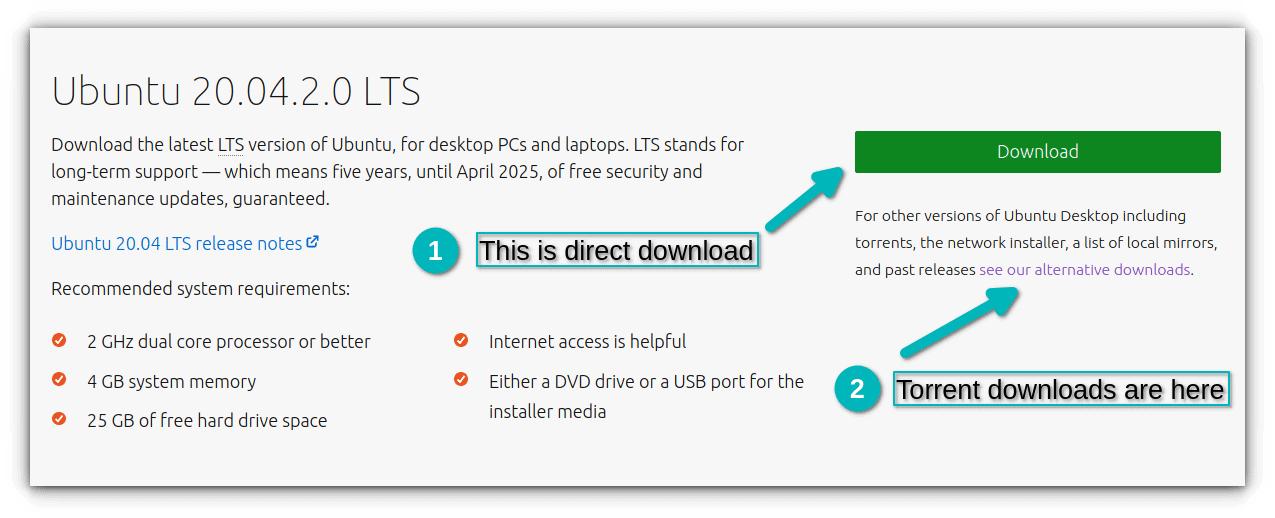
Step 1: The first step is to download the Ubuntu Desktop ISO, if not done already. Visit the official Ubuntu download page and get the latest version of Ubuntu Desktop. As of writing this article, 20.04.2.0 is the newest version, and its size is 2.7 GB.

Step 2: Once you have the Ubuntu ISO image, get the Rufus software from this page. As you might know by now, Rufus (free) is the best-in-class bootable USB-making utility out there for Windows. It can be used to prepare the bootable USB of Windows and Linux versions.
As we are using the Rufus just once, get the portable version (does not require an installation) from this official download page.
Step 3: Connect the USB drive that you intend to use as the Ubuntu Live USB. Back up or move all data from the connected USB drive as it will be erased before transferring files from the Ubuntu ISO.
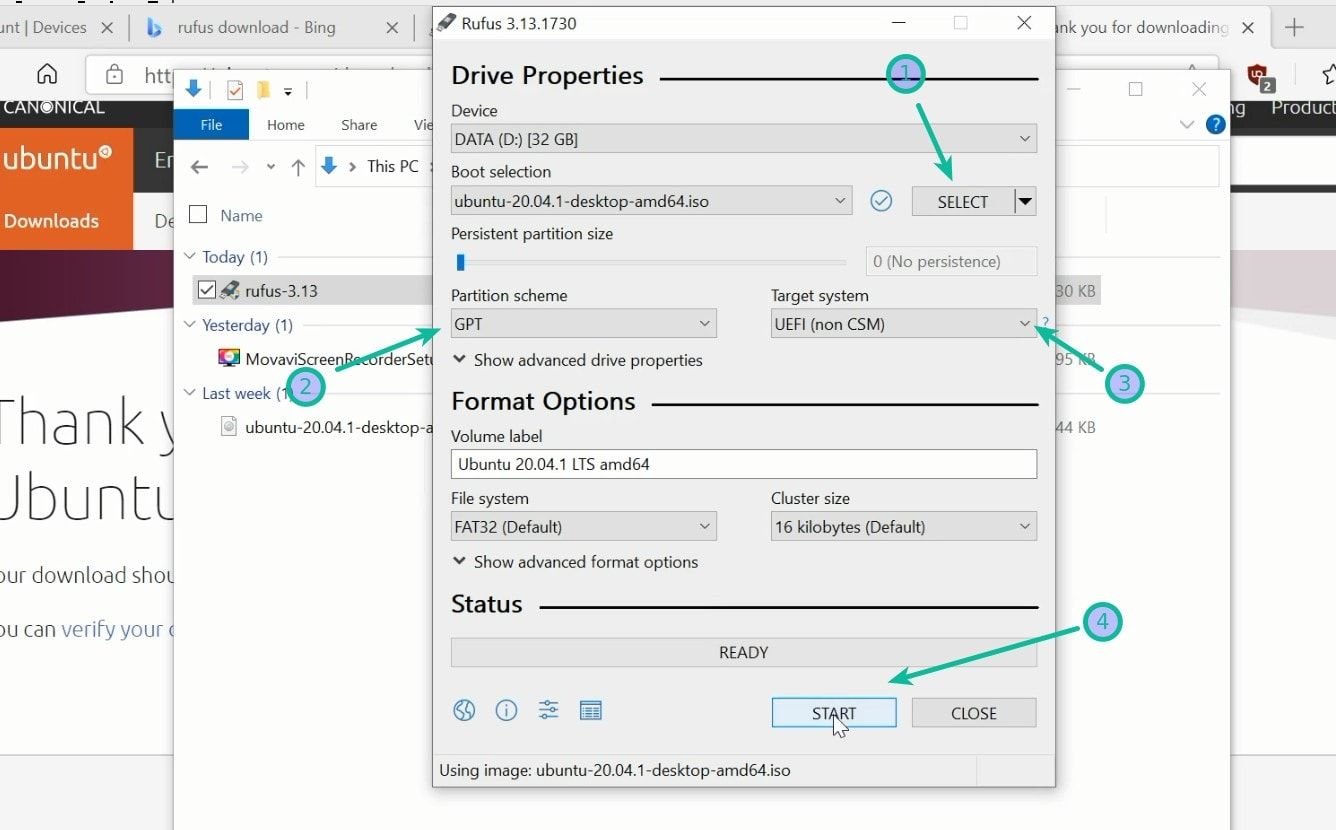
Step 4: Run the Rufus software. Once running, it will automatically detect and select the connected USB drive. If you have multiple USB drives connected, select the USB drive that you want to make it as Ubuntu Live.
Next, in the Boot selection section, click on the Select button, browse to the Ubuntu ISO file, select the same and then click the Open button.

Now, if you are using Ubuntu 19 or later version, you will see a new section called Persistent partition size upon selecting the Ubuntu ISO image.
What is a persistent partition?
Generally, when you shut down Ubuntu or any other Linux distros running from a USB drive (Live USB), all changes or saved files will be deleted. However, while using an Ubuntu Live USB with a persistent partition, you can save files and even update many Ubuntu apps to the latest version. The persistent partition is used to save files and changes. Ubuntu Live USB with a persistent partition works more or less like a proper Ubuntu installation. It is just that you cannot update the operating system.
We recommend you create a persistent partition if you plan to use the Ubuntu Live USB for a long time without installing it on your PC. To create a persistent partition, move the slider in the Persistent partition size section. If your intention of making the Live USB is to try Ubuntu for a short time, you can ignore the persistent partition section.
Step 5: In the Partition scheme section, select MBR or GPT depending on your PC’s type, and then select UEFI (non CSM) or BIOS/UEFI from the Target system drop-down menu.
Step 6: Make sure that the File system is selected as FAT32. Finally, click on the Start button.

Step 7: When you get the following prompt, click on the OK button to give the Rufus tool permission to delete all data on the selected USB drive. If you have not backed up your data from the USB drive, please do so before clicking on the OK button.

Rufus might take approximately 20 minutes to prepare the Ubuntu Live USB. Once done, you will see the Ready message.

You may now connect the Ubuntu Live USB to any PC, make changes to BIOS startup settings to enable booting from USB, and then boot from the Ubuntu Live USB drive.
How to make the bootable USB of Ubuntu on Windows 10 guide might also interest you.