
Are you eager to run Ubuntu alongside your Windows 10 system? With the Windows Subsystem for Linux (WSL) 2, you can easily achieve that, for more details WSL 2 was introduced in Windows 10 version 2004. This guide will walk you through the steps to install either Ubuntu 20.04 or 22.04 in WSL 2 on your Windows 10 machine.
Before you start, ensure you have the following:
- A Windows 10 machine with version 2004 or later.
- A Microsoft account with admin privileges.
- Windows Subsystem for Linux (WSL) feature enabled on your Windows 10 machine.
- Open PowerShell with administrative privileges.
These are the step-by-step process what you need to do:
- Check your Windows version and build number.
- Verify administrator privileges.
- Enable the Windows Machine Platform feature.
- Enable the Windows Subsystem for Linux (WSL) feature.
- Install Ubuntu 20.04 or 22.04 in WSL 2.
- Optional: Install Ubuntu in WSL 2 via PowerShell.
- Configure Ubuntu user account and password.
Step 1: Check your Windows version and build number
Firstly, you need to check your Windows version and build number to ensure compatibility with the Windows Subsystem for Linux (WSL) feature. Follow these steps:
- Open PowerShell with administrative privileges.
- Type the following command and press Enter:
systeminfo | findstr /B /C:"OS Name" /C:"OS Version"

- Look for the output that includes your “OS Name” and “OS Version.”
- For compatibility with WSL 2, your Windows version should be 2004 or later, and the build number should be 19041 or later.
- Ensure that the output includes the Windows version and build number that meets or exceeds these requirements.
If your Windows version and build number meet these criteria, then your system is compatible with Windows Subsystem for Linux (WSL) 2. If not, you may need to update your Windows operating system to a compatible version.
Step 2: Verify administrator privileges
To determine if your user account has administrative privileges using the whoami /groups command in Windows, look for the presence of the “Administrators” group in the output. Here’s how to do it:
- Open PowerShell with administrative privileges.
- Type the following command and press Enter:
- Look for the “S-1-5-32-544” entry in the output.
- If you see “S-1-5-32-544” listed, it means your user account belongs to the “Administrators” group, indicating administrative privileges.
- If you don’t see “S-1-5-32-544” listed, it means your user account does not have administrative privileges.
If your user does not have administrator privileges, log in as an administrator or ask an administrator to elevate your privileges.
Step 3: Enable Windows features
Enable the required Windows features for WSL 2:
- Open PowerShell with administrative privileges.
- Run the following command:
dism.exe /online /enable-feature /featurename:Microsoft-Windows-Subsystem-Linux /all /norestart
The command above typically enables the Windows Subsystem for Linux (WSL) feature without requiring a restart. However, there can be cases where a restart is necessary for the changes to fully take effect, depending on your system configuration or settings. So, much better to restart your machine ?.
Step 4: Enable WSL feature
To determine if WSL 2 is enabled on your machine using both PowerShell and the DISM command, follow these steps:
- Open PowerShell with administrative privileges.
- Enter the following command and press Enter:
Get-WindowsOptionalFeature -Online | Where-Object {$_.FeatureName -eq "VirtualMachinePlatform"}
- If WSL 2 is enabled, you’ll see output similar to:
FeatureName : VirtualMachinePlatform
State       : Enabled
- Additionally, you can use the DISM command to check:
dism.exe /online /get-features | Where-Object { $_ -match "Microsoft-Windows-Subsystem-Linux" }
Output:
Feature Name : Microsoft-Windows-Subsystem-Linux
Otherwise, you can go to ‘Turn Windows features on or off‘ in your Windows settings to verify if the Windows Subsystem for Linux is enabled.
Once the WSL feature is enabled, you can install Ubuntu from the Microsoft Store or using the wsl command. Here’s how:
- Open the Microsoft Store and search for “Ubuntu 20.04” or “Ubuntu 22.04”.
- Click on the desired app and click the “Get” button to download and install it.
- After installation, launch Ubuntu from the Start menu.

Step 6: Optional – Installing Ubuntu in WSL 2 via PowerShell
Alternatively, you can install Ubuntu in WSL 2 using PowerShell commands:
- List the available WSL distributions:
- Install Ubuntu:
wsl --install -d Ubuntu-20.04
- Set WSL 2 as the default version:
wsl --set-default-version 2
- Check the installed distributions:
- Verify the Ubuntu version:
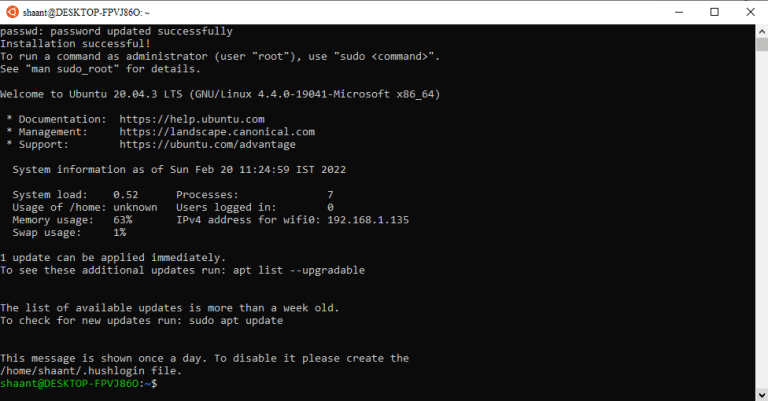
Final Step: Configure Ubuntu user account and password
Upon installation, follow the prompts to create a user account and password for Ubuntu.
Creating new user account...
username:
After following these steps, you’ll have Ubuntu 20.04 or 22.04 installed in WSL 2 on your Windows 10 machine. Enjoy the seamless integration of Linux with your Windows environment!
Welcome to Ubuntu 20.04 LTS (GNU/Linux 4.19.104-microsoft-standard x86_64)

 * Documentation:  https://help.ubuntu.com
 * Management:     https://landscape.canonical.com
 * Support:        https://ubuntu.com/advantage

0 packages can be updated.
0 updates are security updates.


The programs included with the Ubuntu system are free software;
the exact distribution terms for each program are described in the
individual files in /usr/share/doc/*/copyright.

Ubuntu comes with ABSOLUTELY NO WARRANTY, to the extent permitted by
applicable law.

username@Ubuntu:~$
For troubleshooting Windows Subsystem for Linux, refer to Microsoft’s official documentation.
How to install Linux on Windows 10? How to install Ubuntu on Windows 10? How to install Kali on Windows 10? Still, a lot of users are interested in Linux OS trying. MiniTool here provides the detailed instructions and how to dual boot Windows 10 and Linux.
In the field of the embedded desktop operating system, Windows, Mac OS, and Linux are three major operating systems occupying nearly all markets. For computer users, Windows is the most commonly used operating system, but Linux is always a dual-boot trying due to its various advantages: open source, more secure, stable, flexible, revive old computer, totally free, and more.
Thus, a lot of Windows users would like to have a try on Linux, and they wonder how to install Linux on Windows 10.
In fact, Linux is divided into many distributions, and Ubuntu (distribution based on Debian) is probably the most well-known one. Here are top 10 Linux distributions according to PCworld:
- Ubuntu
- Fedora
- Linux Mint
- openSUSE
- PCLinuxOS
- Debian
- Mandriva
- Sabayon/Gentoo
- Arch Linux
- Puppy Linux
Since Ubuntu is the one most people have heard of, today I will go through the process of how to install Linux on Windows 10 using Ubuntu for example. Installing the other has a very similar process.
Note: This installation has the potential to go wrong very easily as it involves editing existing partitions. Please take care of what partitions you are modifying and where you are installing Ubuntu to. Having a Windows computer backup is a good idea in the event something goes wrong.
Way 1. Install Linux (Ubuntu) on Windows 10 for Dual Boot
Step 1. Download Ubuntu IOS
To install Ubuntu on Windows 10, the first thing you need to prepare is the ISO file of Ubuntu. You can get it by visiting clicking here. Just select the OS you prefer.
–image from ubuntu.com
Step 2. Create a Bootable USB Drive for Ubuntu
Now prepare a USB flash drive that is formatted to FAT32. Check out how for format USB drive to FAT32. Then use a tool like UNetbootin and Rufus to burn the Ubuntu ISO to this USB drive.
Step 3. Make Unallocated Space Where Ubuntu Will Be Installed
To install Linux on Windows 10, it is recommended that your computer has at least 10 GB free space (2 for the OS, while the rest for the files and applications). So now you have got the task to release some free space form your Windows computer.
Here you have multiple choices. If you are familiar with Windows Disk Management utility, you can shrink the C drive, or delete a non-system partition to make some unallocated space (please ensure that you have made the file backup before the deletion).
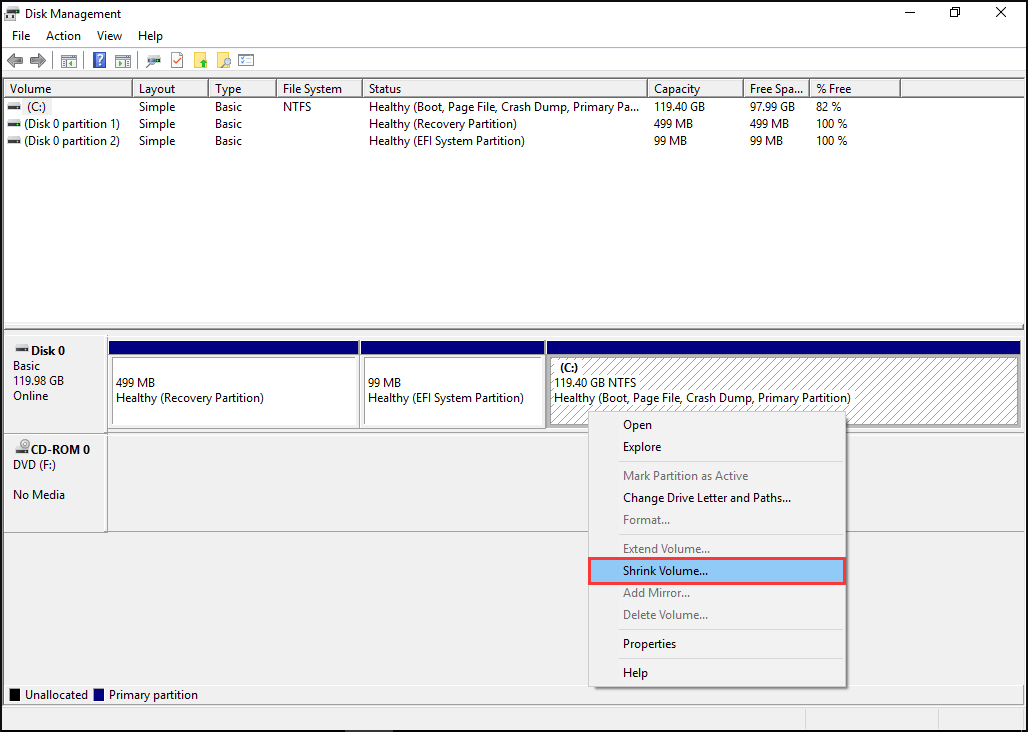
For those who are unfamiliar with this tool, or who get stuck in receiving the error “
there is not enough space available on the disk(s) to complete this operation”, I believe using MiniTool Partition Wizard is much easier due to its wizard-like interface and its stable functioning.
MiniTool Partition Wizard FreeClick to Download100%Clean & Safe
Step 4. Install Ubuntu along with Windows 10
Here comes to the main point of how to install Ubuntu on Windows 10, please take care of the step-by-step guide.
#1. Boot from the USB Drive
First of all, set your device to boot from the bootable Ubuntu USB drive. To do this, you will need to enter the BIOS setting and change the boot priority.
Usually, you can get into the BIOS system by pressing a specific key repeatedly before the Windows logo appears. That key can be F2, F10, F12, Dele, or some combinations. Please read the instructions of your mainboard to check.
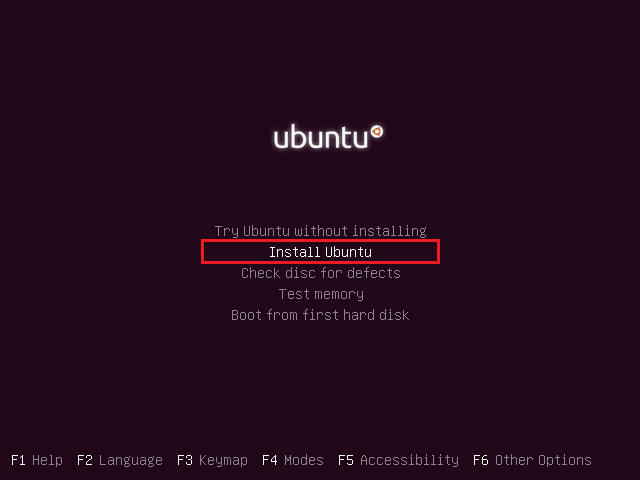
When you are in, navigate to Boot Option and set the target to boot from the USB flash drive. Once the USB media boots up, a new grub screen should appear on your monitor where you are able to select Install Ubuntu to continue.
#2. Complete Installation Process
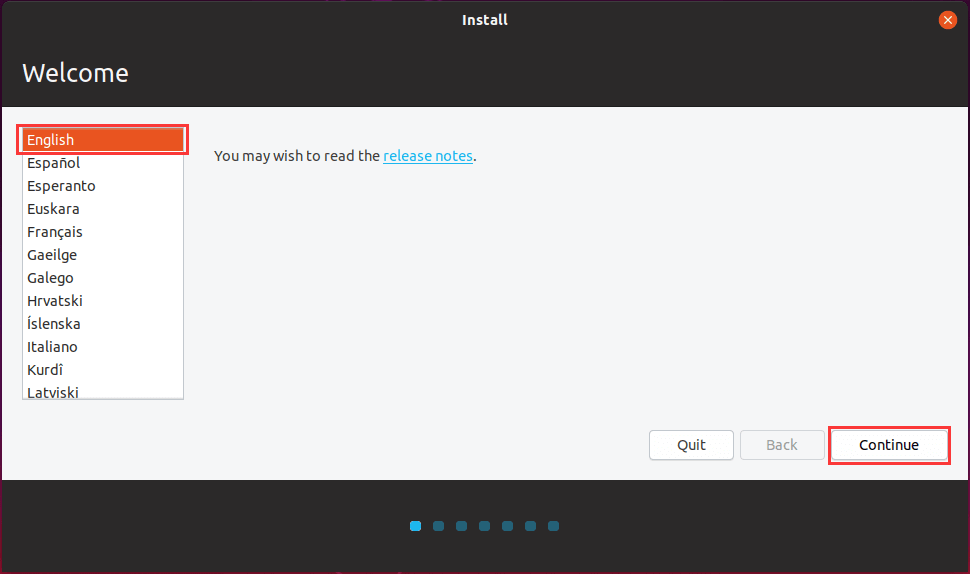
When you see a functional Ubuntu system running in live-mode, select Install Ubuntu, then the installer will start. Select the Language to perform the installation and click Continue to proceed.
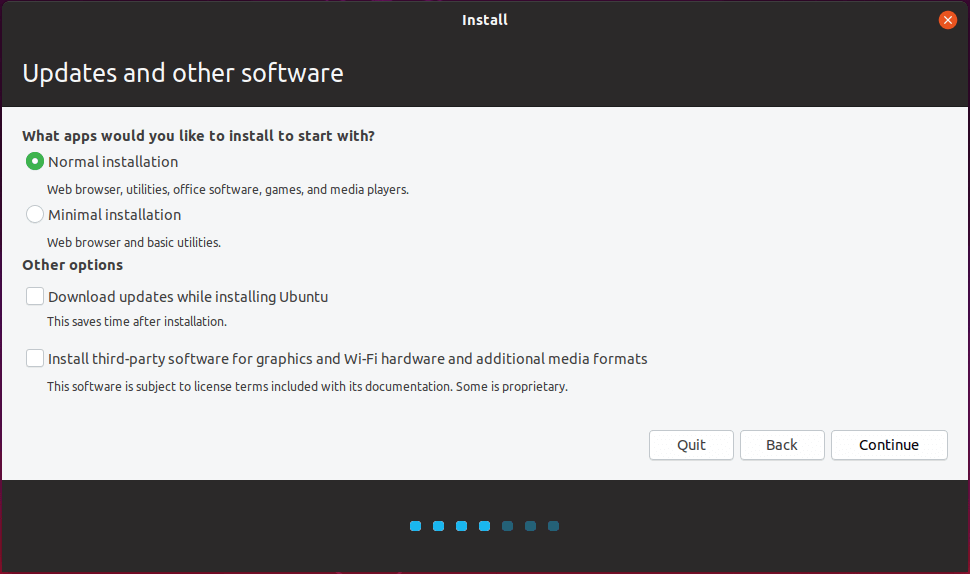
In the next screen, choose the first option Normal installation, then click Continue.
Tip: Select Other options if you have a decent internet connection and do have the requirement. Or else you may just skip this option.
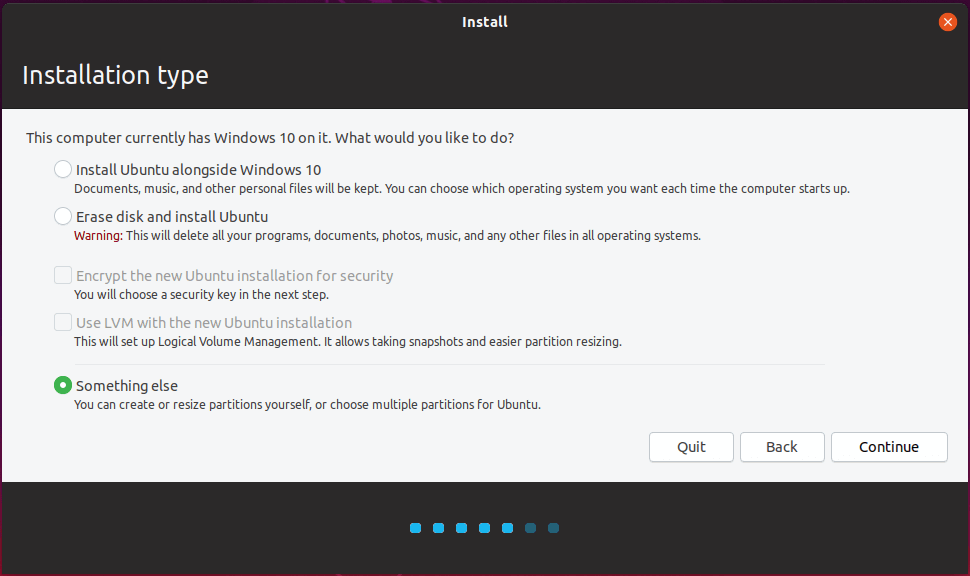
In the next window, you get 3 options to choose from:
- Install Ubuntu alongside Windows 10: If you choose this to continue, all the options will be made automatically for the partition steps. please take care of the information on the new window showing what will happen to your disk before you confirm. Otherwise, select Something else to make further changes manually.
- Erase disk and install Ubuntu: This will erase the whole disk and then install Ubuntu. Do not choose this option if you are intending for dual boot Windows 10 and Linux.
- Something else: Customize the partition for Ubuntu. How to go through Something else setting? Check the details below.
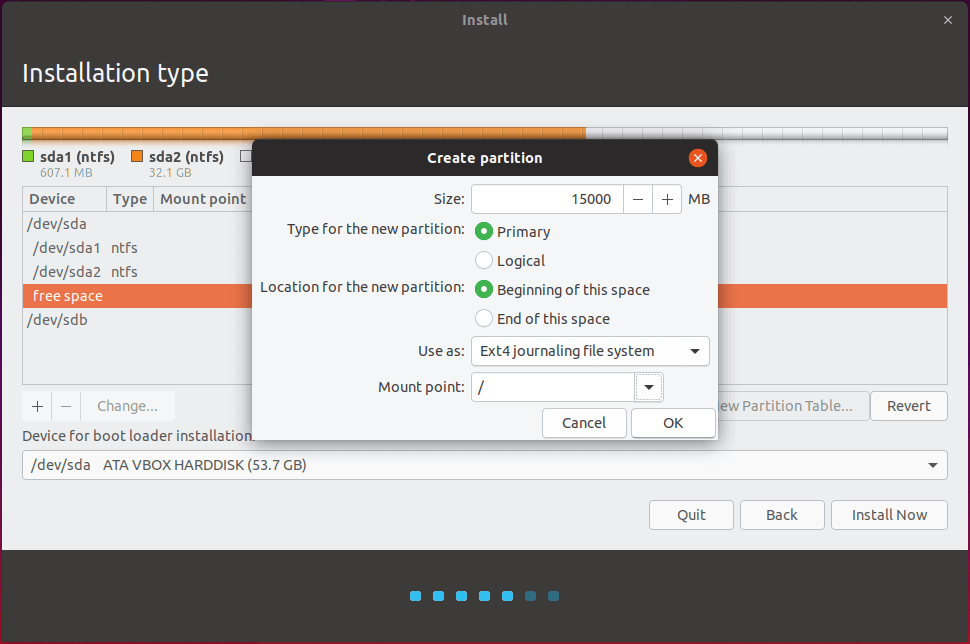
In short, this is to require you create necessary partitions for Ubuntu. You are suggested to create 2 partitions, one for root and the other one for home accounts data. Swap partition is not indispensable. Use a Swap partition only when you have limited RAM resources.
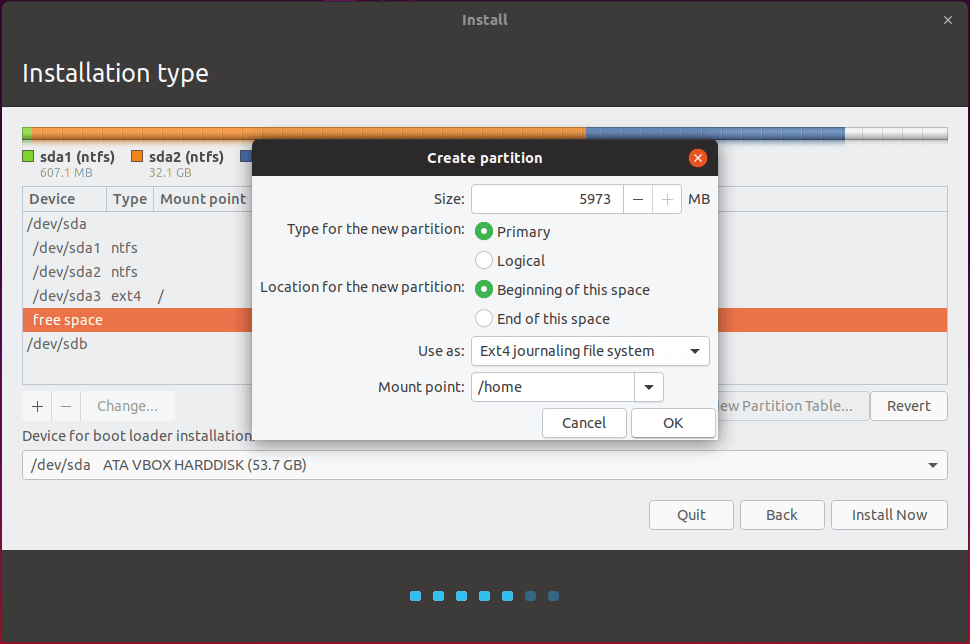
To create the first partition, the root partition, select the free space which you obtain from Step 3 and hit the + icon from the lower-left corner.

Please use the following configurations for the first Root partition and hit OK to apply changes:
- Size: at least 20000 MB
- Type for the new partition: Primary
- Location for the new partition: Beginning of this space
- Use as: Ext4 journaling file system
- Mount point: /
Create the second Home partition using the same steps as above. The partition configurations should look like this:
- Size: all remaining free space
- Type for the new partition: Primary
- Location for the new partition: Beginning of this space
- Use as: Ext4 journaling file system
- Mount point: /home
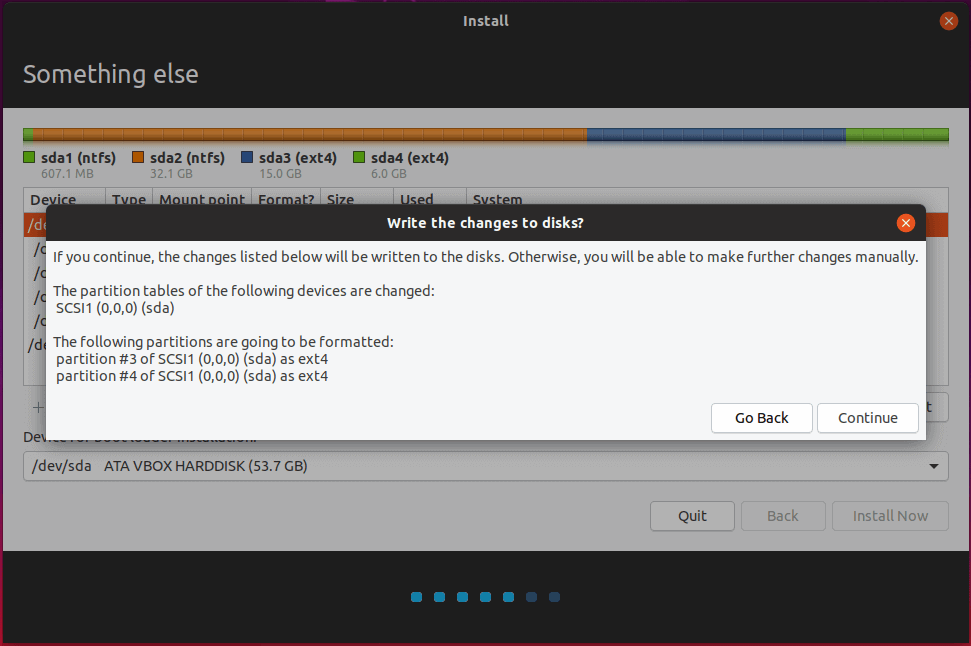
When finished, hit the Install Now button and read carefully the message in the pop-up window before you click Continue. Be sure it is the newly created partitions to be changed.
The installation process will now start. Please hang on, for this is the whole story.
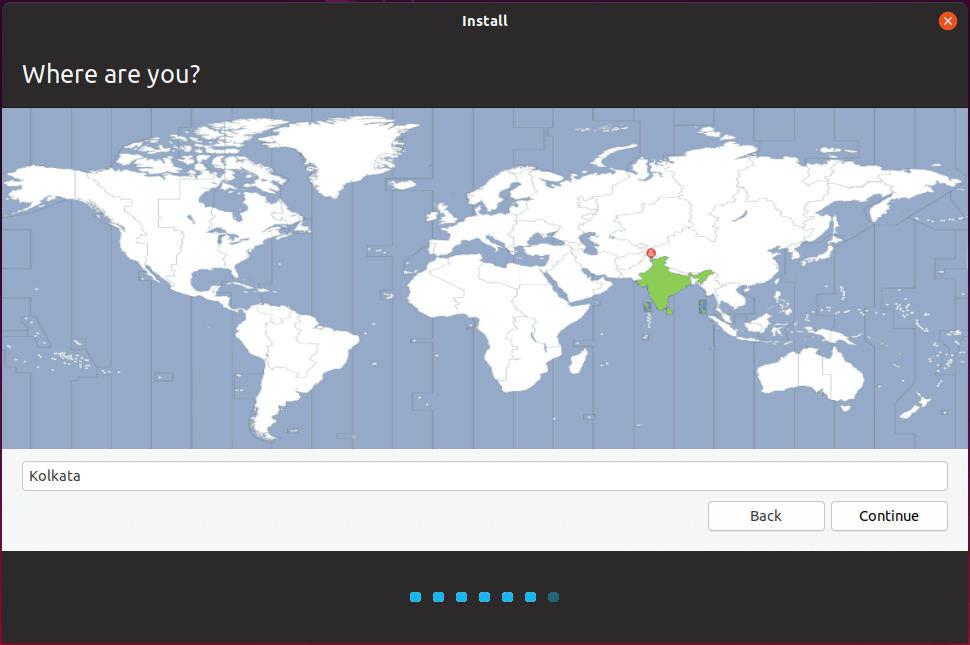
The next screen will ask you location. Just select your city or a city nearby from the map. When done, hit Continue to move ahead.
If you are asked to select your keyboard layout, make your own choice and continue.
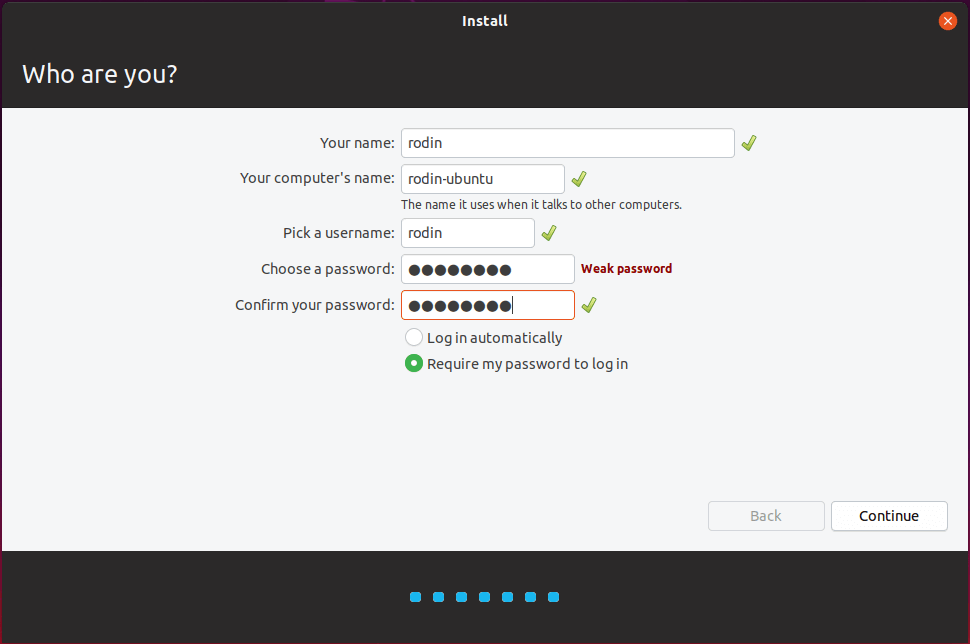
Next, it will ask your name, your computer name, username, and password to create a default user. Please input and save the information as they are required for the Ubuntu login in the future. After doing these, hit Continue to finalize the installation.
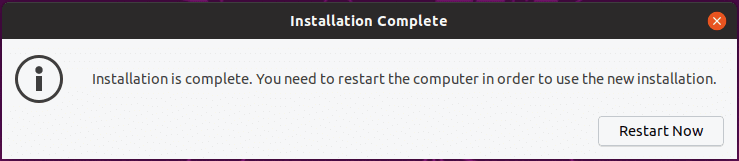
Now all the settings required for customizing Ubuntu installation are finished. From here on the installation process will run automatically until it reaches the end. Click Restart Now.
How to install Ubuntu on Windows 10? See the detailed guide here!Click to tweet
Step 5. Dual Boot Windows 10 and Linux
Here is a simple guide to dual boot Windows 10 and Linux.
Once the system has been rebooted, you will see the Grub menu asking which operating system you want to start. Select Ubuntu (default) or Windows 10 as per your requirement.
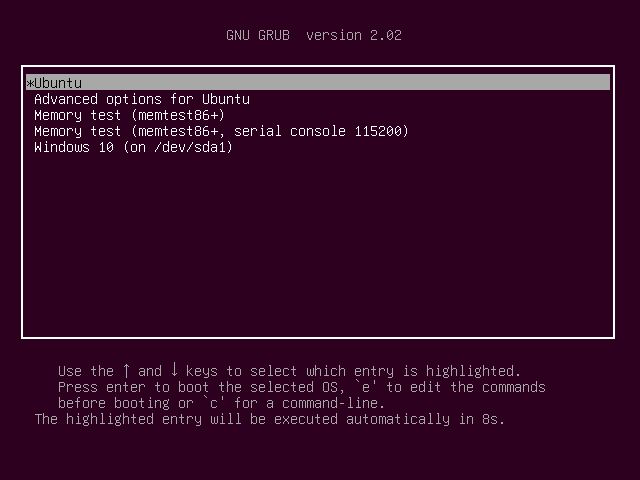
Tip: Ubuntu provides NTFS file system support. So you can access the Windows partitions without difficulty.
That’s it! In case you need to switch back to Windows 10, reboot your computer and select Windows from the Grub menu.
Further reading: How to install Kali on Windows 10?
Way 2. Install Linux on VirtualBox on Windows 10
If you only want to use Linux for a trial sometimes, you can install Linux on VirtualBox. Installing Linux will take you at least 15 GB free disk space. Use MiniTool Partition Wizard to help you in this case.
Here is a simple guide for you to install Linux on VirtualBox:
- Click to download VirtualBox.
- Obtain Linux OS (Linux Mint) from here.
- Run VirtualBox, set the system name, type (Linux), and version.
- Set how much RAM for this Linux OS to use.
- Set the hard drive.
- Choose the iso file of your Linux.
- Install and configure the Linux OS.
Wrapping Things Up
Now I believe you already know how to install Ubuntu inside Windows 10 and dual boot Windows 10 and Linux. The whole procedure is quite simple if all the steps are followed correctly. Let us know if you have successfully installed Ubuntu on Windows 10 in the comment zone below. Any questions using MiniTool software, contact [email protected].
Install Linux on Windows 10 FAQ
Can I install Linux on Windows 10?
Yes of course. Linux not only can be installed on Windows 10 but also can be installed on a USB flash drive. However, for regular use, you may prefer to install Linux on your computer.
Is Windows 10 Linux based?
Nope. Microsoft isn’t making Windows 10 into a Linux distribution. All Windows operating systems will still be based on the Windows kernel.
Will Linux replace Windows?
For the computer market, Linux always ranks after Windows and Mac OS. However, Linux will get more popularity in the future and increase its market share thanks to the great support from its active community.
Does Linux need antivirus?
It seems that Linux does not need any antivirus software. But if your Linux is running together with Windows, it is still vulnerable to get infected for your Windows computer is likely to get affected.
I think so; a few weeks back, I was doing something on my Ubuntu 20.04. Suddenly my friend knocks on my door, and he was curiously peeking on my laptop screen. I asked what happen, Benhur?
Benhur replied, what are you doing on your laptop, It is totally different from my laptop screen, and It fascinated me. Will you tell me what it is?
I have explained to him the basics about Linux, Ubuntu, and open-source he was amazed by OpenSource technology. He eagerly asked will you guide me on how can I do the same with my Windows laptop.
So, I have decided to make a series on Basic Get started from Windows to Ubuntu system. This guided article will cover how to create a bootable Image for Ubuntu 20.04 using balenaetcher in the Windows system.
Prerequisite
- USB Drive
- Ubuntu .ISO Image (Not problem will cover too)
- Your motivation to learn new thing
Download Ubuntu ISO Image
If you have already downloaded Ubuntu ISO Image, you can skip this. For those who have not download the ISO Image, read the process.
Step 1. Visit to the Official Ubuntu Download Page
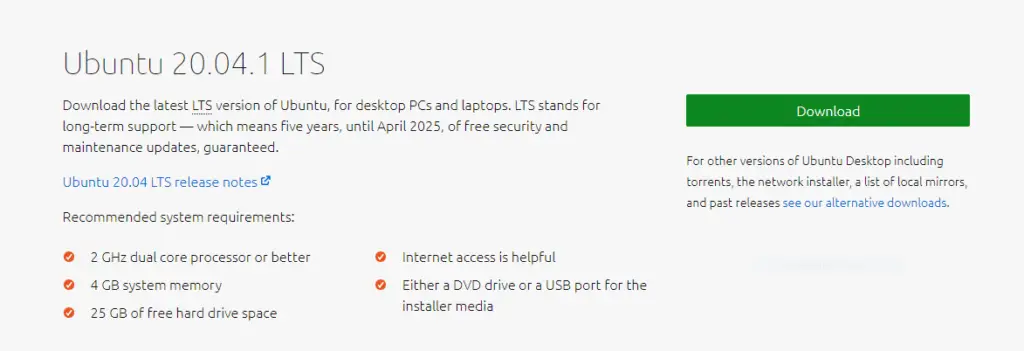
Step 2. Click on the Download Button, which is in Green colour. In a few seconds, the download will start, and the file size is around 2.6 GB.
In the meantime, we will download balenaEtcher to make the bootable USB drive.
Download balenaEtcher on Windows
There are many tools available to create a bootable USB stick in Windows. Etcher is one of them, and we recommend using it as it is way faster to create a bootable USB stick than other utilities.
Step 1. To download balenaEtcher visit official site.

Step 2. Click on Download for Windows (x86|x64) wait for a few seconds to start downloading balenaEtcher.
Step 3. We need to Install balenaEtcher to our Windows PC, go to the directory where you have downloaded the file, and make a double click on a download file, click on Run.
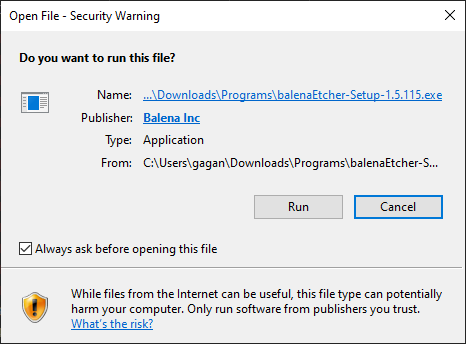
Step 4. When you click on Run balenaEtcher installation wizard will pop up and ask you to agree with License and Agreement.
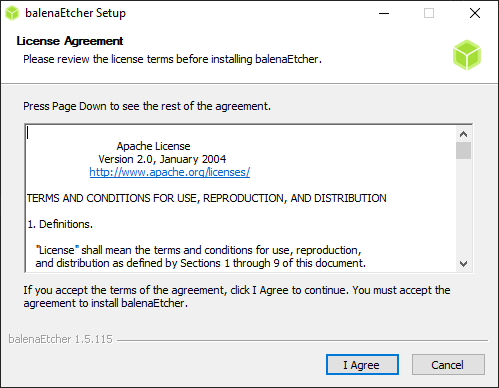
As you click on, I Agree balenaEtcher get start Installing.
How to create an Ubuntu bootable disk using balenaEtcher?
I hope you have already completed above step now we will Create bootable disk using balenaEtcher.
Step 1. Connect USB drive to your system
Step 2. We need to Click on Flash from file
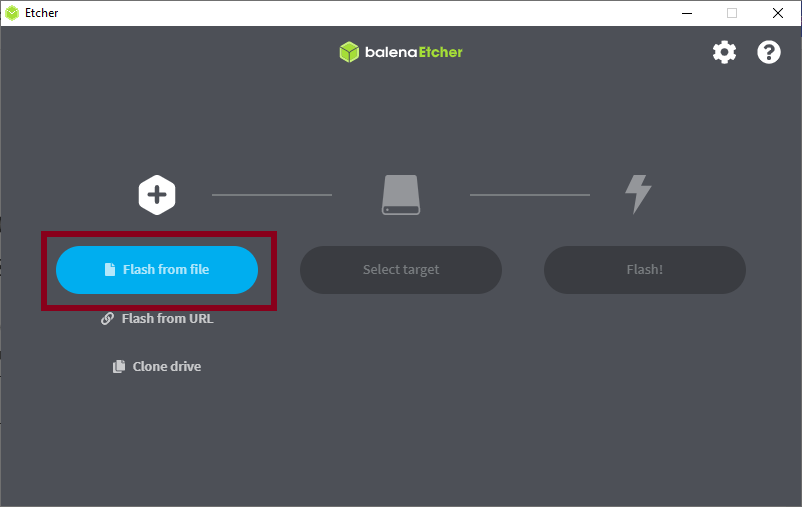
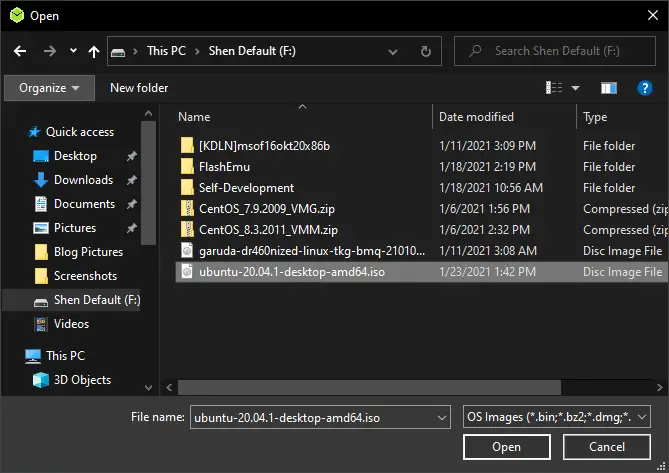
Provide the Ubuntu 20.04.1 iso file location.
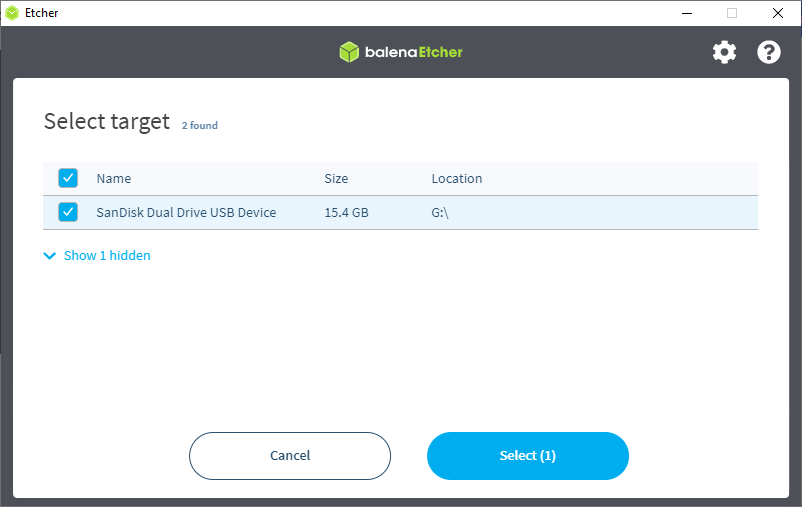
Step 3. After providing the .iso file details click on Select target.
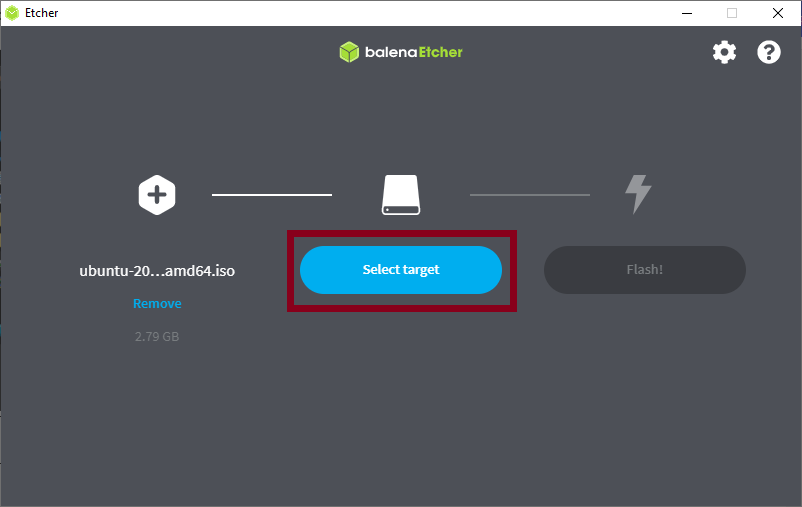
If you are confused, what is a target? A target is like a device you want to make a bootable disk, and It’s better to connect a single USB drive to avoid confusion and data loss.
Click on the right USB Disk Inmy case I have SanDisk Dual Drive USB Drive which size is 15.4 GB, after that click on Select(1).
Step 4. Finally click on Flash!
Before clicking to Flash! Make sure you have selected right USB Drive; otherwise, you may lose you valuable data.
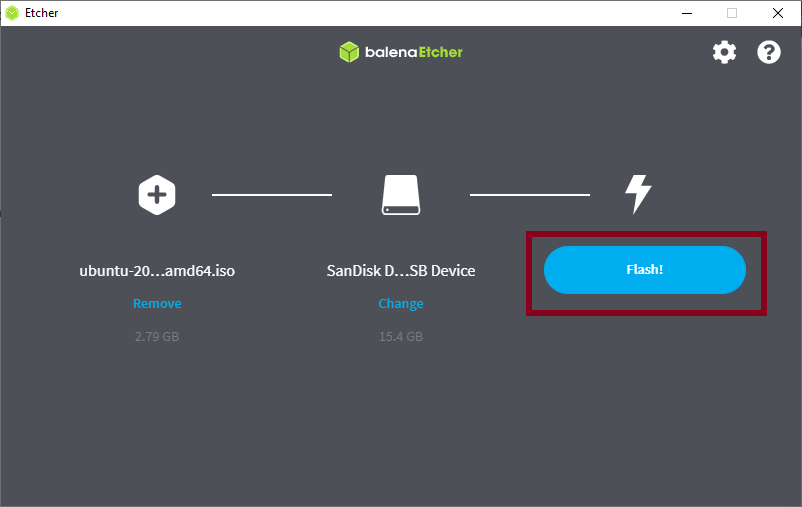
When you click on Flash! You will get the Dialog Box of User Acess Control (UAC), click on Yes and proceed.
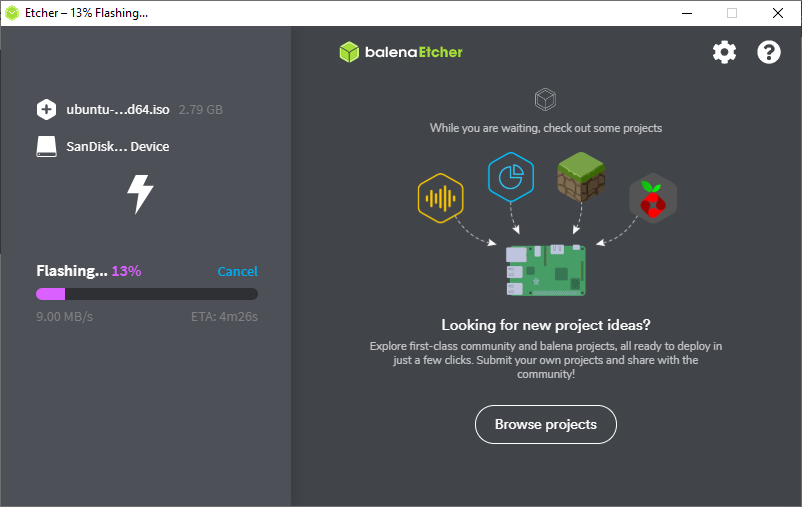
That’s all you need to wait for some time to complete the Flashing and Validating process.
In the meantime, you can read 30 Basic commands which every Linux user should know
Alright, you are able to create Ubuntu bootable device using balenaEtcher on Windows 10.

Wrap-up
That’s it for today my reader and make sure to bookmark this page we are on the way to create complete get started course for our budding Linux user at absolutely free.
If you want to give feedback or any suggestion, feel free to comment down below.
Updated December 27, 2022.
So you want to install Ubuntu on Windows 10 or Windows 11? Don’t worry, you’re at the right place. You might be surprised to know, but there’s no single, universal way to install and run Ubuntu on Windows.
In this post, we lay out 3 ways to install and run Unbuntu on Windows 10 or Windows 11, including:
- WSL (Windows Subsystem for Linux).
- Using a USB stick.
- Using a VM (Virtual Machine).
So, without further ado, let’s get started.
1. Install Ubuntu on Windows with Windows Subsystem for Linux (WSL)
The Windows Subsystem for Linux, WSL for short, is an environment created on top of the Windows operating system that helps users run the Linux environment on their Windows 10 or Windows 11.
WSL includes things like command line tools, utilities, and other applications. But, keep in mind that you won’t get the default GNOME GUI that comes with other methods of installing Ubuntu in Windows 10.
That is to say, you can only run Ubuntu through the Windows Terminal by using WSL. Also, to run WSL, you’ve to meet certain minimum requirements on Windows 10 or Windows 11; here they are:
- 64-bit operating system.
- Windows 10 build 14393 or later.
If you meet the above minimum requirements, you should be able to run Ubuntu on Windows without any difficulties. Here’s how:
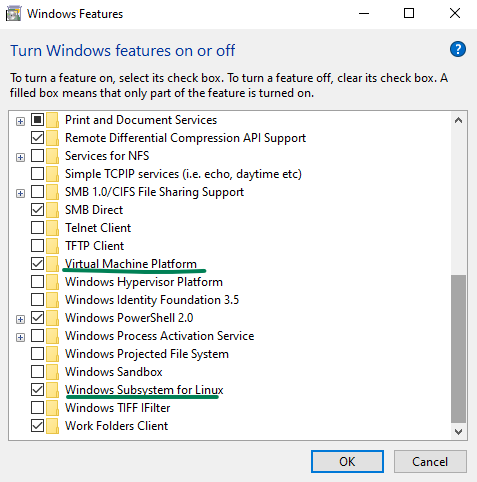
On your Windows machine, go to the Start menu search bar, type in ‘windows features,’ and select the Best match. The Windows Features will be launched.
On it, select the Turn Windows Features on or off feature. From there, scroll down to the Windows Subsystem for Linux, select the checkbox and click on OK.
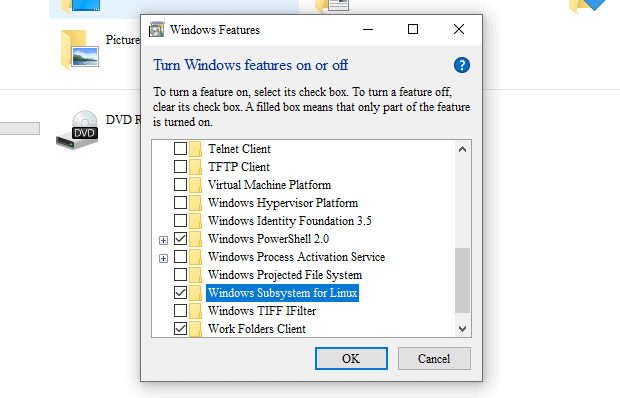
Windows will begin installing the WSL files, so give it a few minutes. After the installation is finished, reboot your PC or let it reboot by itself if you have the option.
After the reboot, launch the Command prompt. Go to the Start menu search bar, type in ‘cmd,’ and select the Best match. In the Command prompt, type bash and hit Enter.
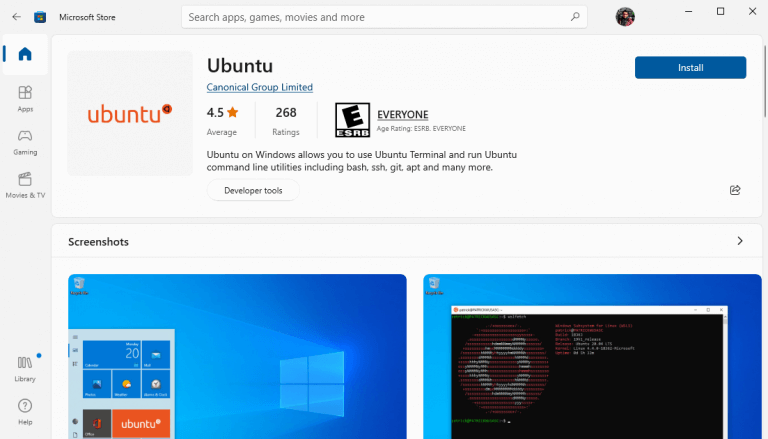
Now you need to install Ubuntu on Windows, so head to https://aka.ms/wslstore. As soon as you enter the website URL in the address bar, Microsoft Store will be launched on your PC.
There, you’ll see a host of different Linux distributions that you are free to run side-by-side on your Windows operating system. Click on Ubuntu. From there, click on Get to download Ubuntu on Windows.

Next, click Install to install Ubuntu on Windows.
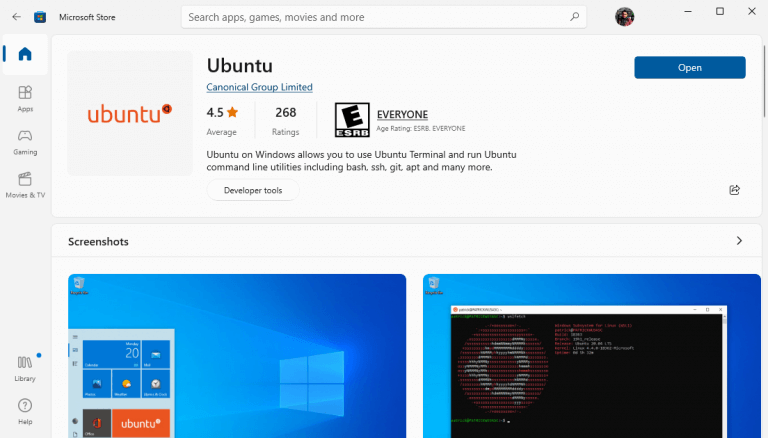
The Ubuntu environment installation will begin on your PC. When the installation gets finished, click on Open to open Ubuntu on Windows.
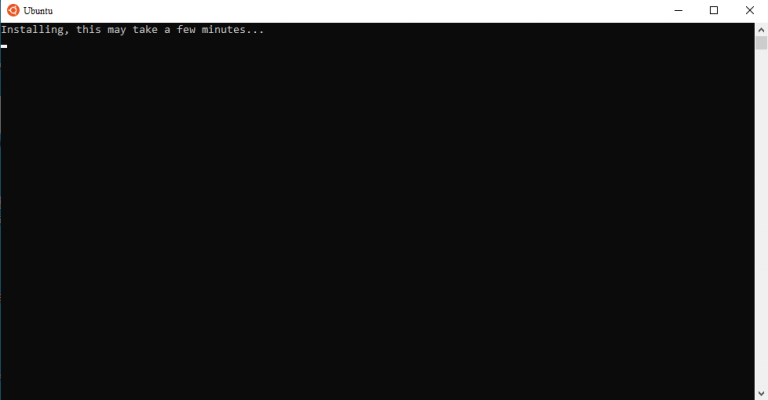
A new window will get launched and the Ubuntu installation will begin in your WSL. The installation might take a few minutes to complete, depending on your internet speed. So don’t worry if it takes a while.
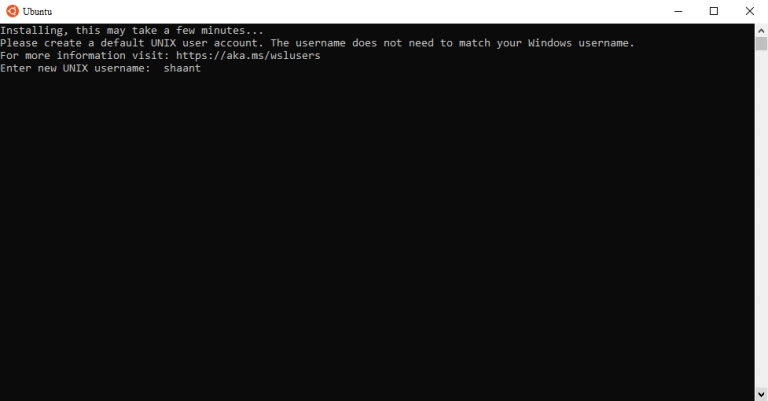
When Ubuntu installation is complete, you’ll be prompted to set a username. Type in a relevant name and hit Enter. Next, you’ll have to set a password. Do that. Once you’re done with all the credentials, Ubuntu will be all set up.
After everything’s set and done, it’s a good idea to do a quick update for your Ubuntu. Run the following command and hit Enter:
# sudo apt updateWait till the update gets completed and by the time you’re done, Ubuntu will be successfully running on your PC. Now you can access the Ubuntu command line whenever you want on Windows 10 or Windows 11.
2. Install Ubuntu on Windows from a USB stick
Installing Ubuntu on Windows through the above method works. But, it doesn’t really give you the complete feel of the Ubuntu operating system, which nowadays comes with a GNOME GUI.
The second method on our list is designed to get around just this problem. You can run Ubuntu on Windows from a USB stick without any difficulties.
All you need is the Ubuntu ISO installation media, a USB drive, and software to make your USB stick bootable and write the ISO file onto the stick. There’s a plethora of apps online that can help make your USB bootable.
For this example, we’ve chosen Rufus. You can pick whichever you like.
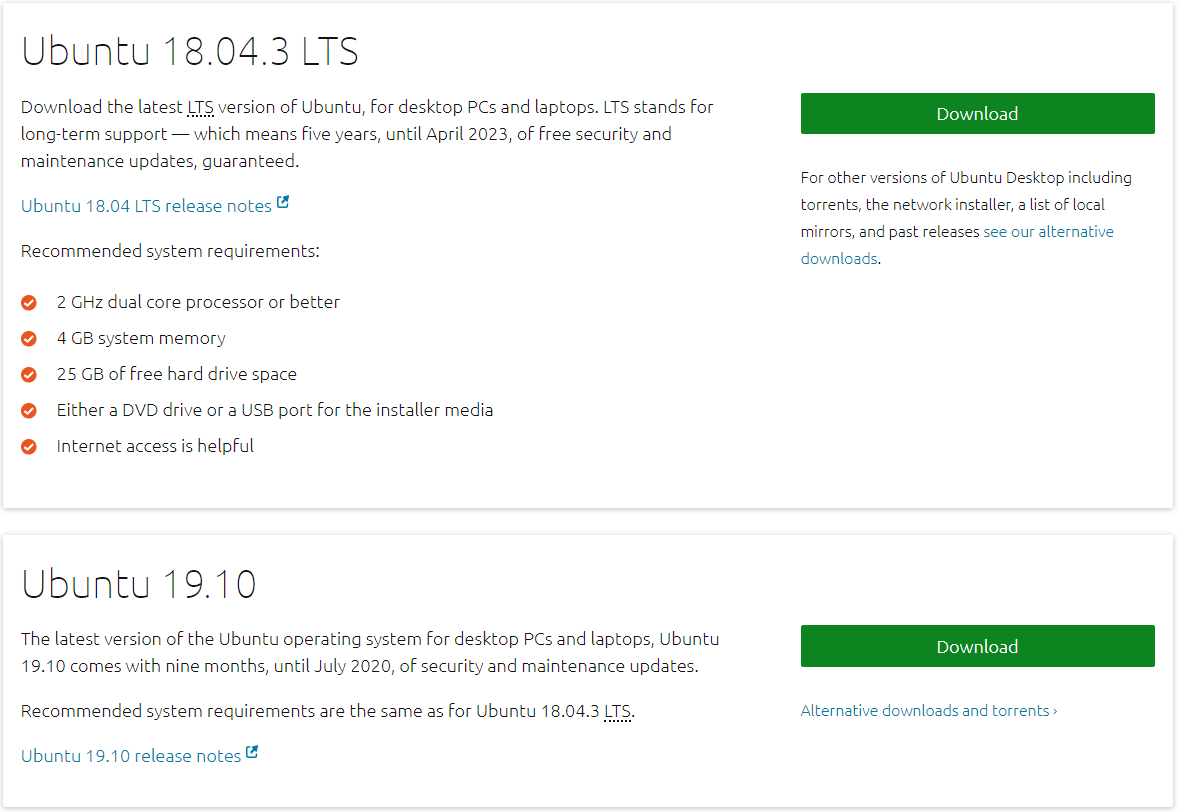
Let’s first download the Ubuntu ISO file. Head to the official Ubuntu download page, and get the file from there. Currently, the latest LTS version is Ubuntu 20.04.3, so we’ll download that.

After you’ve downloaded the relevant file, you now need to download the Rufus app from the official website. When the download is complete, run the application and then insert your USB stick to make it bootable.
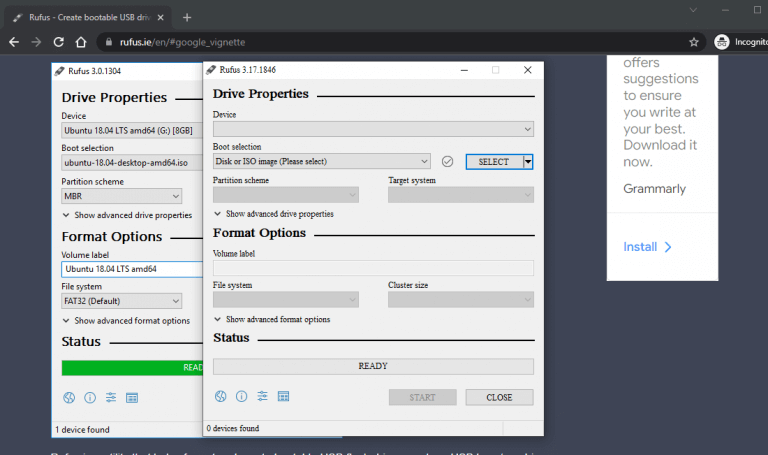

On the main menu of Rufus, click on SELECT, and pick the ISO file you’ve just downloaded. Set the Partition scheme to MBR and Target system to BIOS or UEFI. Under the Format Options section, leave everything as default. Then click on START.
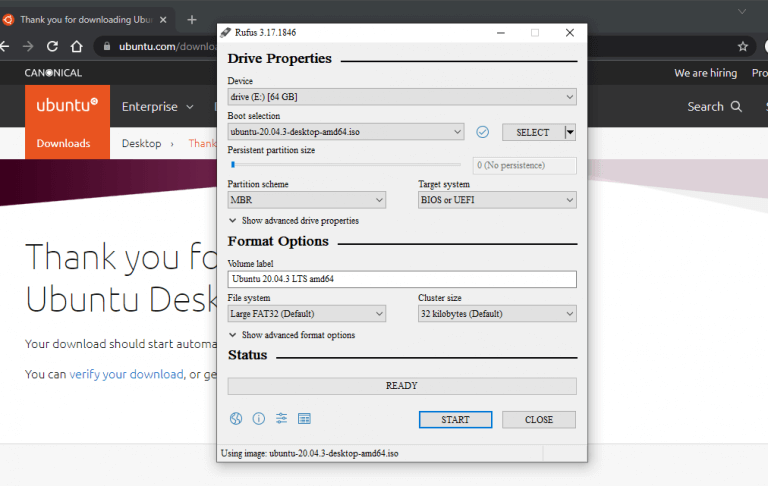
You might get a dialog box asking you to download some additional files. Click on Yes and the files will be downloaded, following which, the ISO copying process will also begin. In the next dialog box, select the Write in ISO Image mode (Recommended), and click on OK.
The copying will get completed in a few seconds and when everything’s done, click on Close.
Now whenever you need to run Ubuntu on Windows, simply plug in the USB before starting up your PC and the computer will boot up from your USB drive. You’ll then get taken to the Ubuntu installation menu and from there, click Try Ubuntu.
That’s it! You’ll now be able to run Ubuntu on Windows 10 or Windows 11 whenever you want.
3. Install Ubuntu on Windows from a Virtual Machine (VM)
A Virtual Machine, or just VM for short, is a virtual environment that helps you run a computer within your computer. Think of it as running an operating system inside a specific VM app.
We’ve already covered how you can install Windows 11 on a Virtual Machine, so it’s no surprise that in the third method, we’ll install Ubuntu on Windows 10 or Windows 11 with a Virtual Machine.
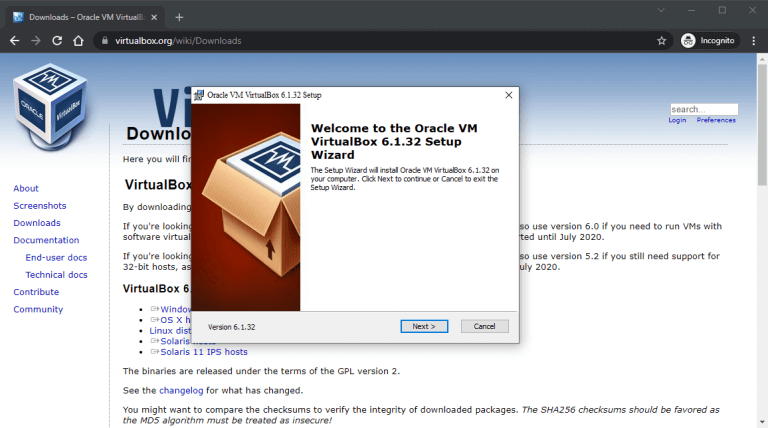
We’ll be making use of Virtual Box here, an open-source Virtual Machine developed by Oracle. To get started, head to the official Virtual Box website and download the app from there; then install the app when you’re done with the download.
Now, we also need an Ubuntu ISO file again. You can download it from official Ubuntu download page as we did in the above step. After the download is complete, launch the VirtualBox and select New from the taskbar above.
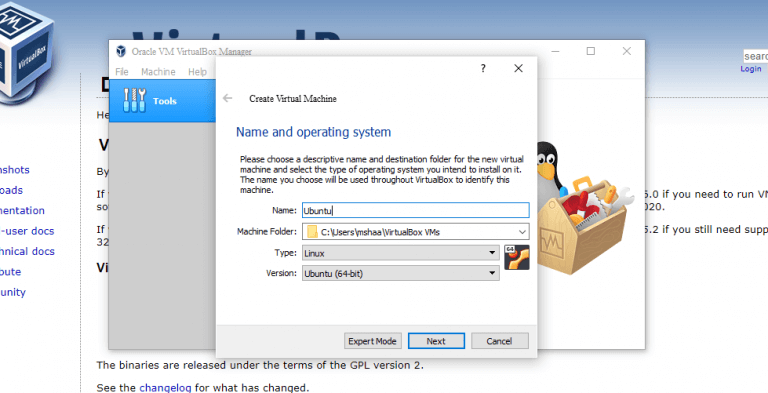
In the new dialog box, give a specific name to your new virtual machine (I’ll be setting the name as Ubuntu), set the type as Linux, choose the Version as Ubuntu and click on Next.
Then decide a specific amount of RAM, which you want to assign to your virtual machine, and click on Next.
Finally, select the Create a virtual hard disk now radio box and select Create.
In the next dialog box, select VDI (VirtualBox Disk Image) and click on Next. On the next menu, pick Dynamically allocated and click on Next. Finally, set the size for your virtual hard drive and click on Create
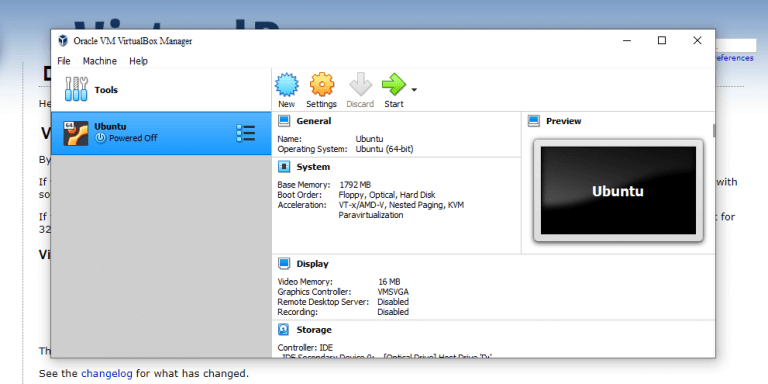
If you look at the left-hand side of your VirtualBox Manager, you’ll see the name of your virtual machine. To get it up and running, simply click on Start and your VM will be launched.
Now we’ve to pick the Ubuntu ISO file that you downloaded earlier. Click on Add, choose the Ubuntu image, and select Open. Then click on Choose > Start.
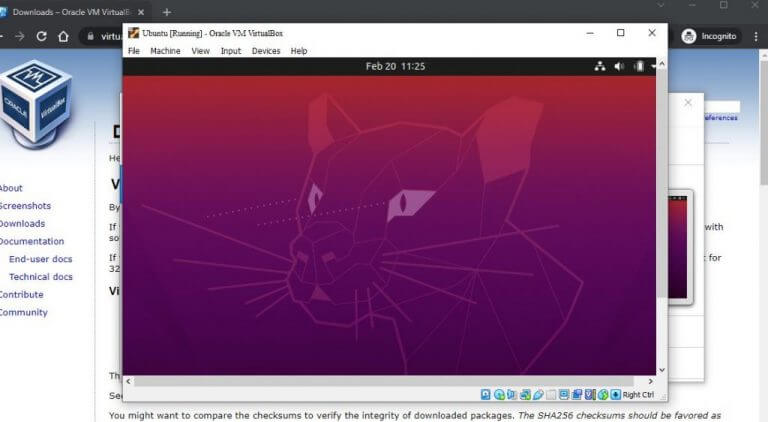
Ubuntu will be launched on your Virtual Machine. From there, select the language of your choice, and you’ll see two options again: you can either ‘try’ Ubuntu or you can simply install it.
Pick the one you like, follow the on-screen instructions, and you’ll be able to run to Ubuntu on Windows through the VM from now on.
Ubuntu on Windows
And that’s it, folks. These are some of the easiest ways to install and run Ubuntu on Windows. Hopefully, you found the method that worked best for you and can run the Ubuntu OS without any hiccups.
Скачать Ubuntu
Системы семейства Ubuntu
Вы также можете скачать другие системы, сделанные на основе Ubuntu, которые отличаются графическим интерфейсом и набором предустановленных программ.
Ubuntu Budgie, Kubuntu, Ubuntu MATE, Xubuntu, Lubuntu, Ubuntu Kylin, Ubuntu Studio
Ubuntu Netboot — минимальный образ системы без графической оболочки, позволяет создать систему на свой вкус. Это сложный вариант, новичкам не рекомендуется. В Ubuntu 20.04 объединили образы Netboot и Server, теперь остался только Ubuntu Server. Для Ubuntu Server выпускается официальное руководство по установке и настройке.