
Connecting Ubuntu to a Windows network can seem daunting, especially for those who are new to Linux or unfamiliar with networking protocols. However, with the right guidance, the process can be straightforward and rewarding. This article will take you through every step, from identifying your network settings to accessing shared files and printers. Let’s dive in!
Understanding the Basics of Network Connectivity
Before we begin the steps to connect Ubuntu to a Windows network, it’s essential to understand some fundamental components. Networking typically involves multiple devices communicating over a network using protocols. The most relevant protocols in this context are:
- SMB/CIFS: This is the protocol used by Windows to share files and printers. Ubuntu can connect to Windows shares using this protocol.
- DNS and DHCP: DNS translates a hostname to an IP address, while DHCP automatically assigns IP addresses to devices on a network.
When connecting Ubuntu to a Windows network, you’re essentially enabling your machine to communicate seamlessly with Windows devices, share resources, and access files.
Prerequisites for Connecting Ubuntu to a Windows Network
Before moving forward, ensure you have the following:
- Ubuntu Installed: This guide assumes you are running a modern version of Ubuntu. As of October 2023, versions like 22.04 LTS and 22.10 are commonly used.
- Network Access: Confirm that your Ubuntu machine is connected to the same local network as the Windows machines.
- Windows Network Shared Folder: Identify the Windows shared folder that you wish to access. Ensure that you have the necessary permissions to access this folder.
- Samba Installed: Samba is the suite of programs that enables file sharing between Linux and Windows. By default, this may be pre-installed on your system.
Step-by-Step Guide to Connect Ubuntu to a Windows Network
Now that we have the basics covered, let’s walk through the steps to connect Ubuntu to a Windows network effectively.
Step 1: Install Required Software
Although Samba might already be installed, it’s always good to ensure you have the latest version. To install or upgrade Samba, follow these commands:
sudo apt update
sudo apt install samba samba-common-bin
This command will ensure that you have all the necessary packages for accessing Windows shares.
Step 2: Find Your Workgroup Name
Windows networks typically use a workgroup name to group the computers. Most Windows machines use “WORKGROUP” as their default name. To find your Ubuntu workgroup name, follow these steps:
- Open your terminal.
- Type the following command to view your current Samba configuration:
testparm | grep workgroup
Check the output for a line indicating “workgroup”. This is the name you’ll need later.
Step 3: Accessing Windows Shares Using Nautilus
One of the simplest ways to connect to a Windows shared folder is through the file manager, Nautilus. Here’s how:
- Open Nautilus by clicking on “Files” from your launcher.
- In the menu, click on “Other Locations” at the bottom left.
- In the “Connect to Server” field, enter the following:
smb:///
Replace <Windows_IP_Address> with the IP address of the Windows machine and <Shared_Folder_Name> with the name of the shared folder.
- Click “Connect.” If prompted, enter your Windows credentials.
This should allow you to access the shared folder.
Step 3.1: Accessing Public Shares
If the shared folder is public and does not require authentication, you can simply browse and view the contents without entering your credentials.
Step 3.2: Accessing Private Shares
If the shared folder requires authentication, you will be prompted for a username and password. Enter the Windows credentials that have access to the share.
Step 4: Mounting Windows Shares on Startup
If you frequently access a particular shared folder, you might want to mount it automatically at startup. Here’s how to do it:
- Create a directory where the share will be mounted:
sudo mkdir /mnt/windows_share
- Open the fstab file for editing:
sudo nano /etc/fstab
- Add the following line at the end of the file:
smb:/// /mnt/windows_share cifs guest,uid=1000,iocharset=utf8 0 0
For a private share, replace guest with your actual username and password like so:
username=,password=
-
Save changes and exit the editor.
-
To mount all entries in fstab, run the command:
sudo mount -a
Your Windows share should now mount automatically at the specified location whenever you boot up your Ubuntu machine.
Troubleshooting Common Issues
While connecting Ubuntu to a Windows network is generally smooth, you might encounter some common issues. Here are a few troubleshooting tips to help resolve problems:
Issue 1: Cannot Find the Windows Share
- Check Network Connectivity: Make sure both Ubuntu and Windows machines are on the same network and can communicate.
- Firewall Settings: Ensure firewall settings on Windows allow file sharing. You may need to adjust the settings in Windows Firewall to allow File and Printer Sharing through the network.
Issue 2: Permission Denied Errors
- Check Permissions: Verify that you have the necessary permissions to access the shared folder.
- User Credentials: Ensure you are using the correct username and password for a private share.
Advanced Configuration: Using Samba to Share Files from Ubuntu to Windows
Not only can you connect Ubuntu to a Windows network and access Windows shares, but you can also make your Ubuntu machine a file server to share files with Windows users. Here’s how to set up Samba for file sharing:
Step 1: Configure Samba to Share a Directory
- Create a shared directory on Ubuntu:
sudo mkdir /srv/samba/shared
- Adjust the directory permissions:
sudo chmod 777 /srv/samba/shared
- Open the Samba configuration file for editing:
sudo nano /etc/samba/smb.conf
- Add the following configuration to the end of the file:
[Shared]
   path = /srv/samba/shared
   available = yes
   valid users = @smbusers
   read only = no
   browsable = yes
   public = yes
   writable = yes
-
Save and close the file.
-
Restart the Samba service to apply the changes:
sudo systemctl restart smbd
Step 2: Create a Samba User
- To access the shared folder from Windows, you need to create a Samba user:
sudo smbpasswd -a
- Follow the prompts to set a password.
Step 3: Accessing the Shared Folder from Windows
To access the shared folder from a Windows machine, follow these steps:
- Open File Explorer on your Windows machine.
- Type in the address bar:
\\\Shared
Replace <Ubuntu_IP_Address> with your Ubuntu machine’s IP address.
- Enter the Samba username and password you created earlier when prompted.
Conclusion
Connecting Ubuntu to a Windows network is not only feasible but also enhances your productivity by allowing you to share resources seamlessly. By following the steps outlined in this guide, you can access Windows shared folders, mount them for easy access, and even share your Ubuntu files with Windows users.
With Samba and the right configurations, your Ubuntu machine can communicate efficiently within a mixed network environment. Embrace the versatility of Ubuntu and explore the benefits of a connected workflow today!
What is the purpose of connecting Ubuntu to a Windows network?
Connecting Ubuntu to a Windows network allows users to share resources such as files, printers, and applications between the two operating systems. This integration is beneficial in mixed-OS environments, enabling seamless communication and collaboration among users. By connecting to a Windows network, Ubuntu users can access shared folders and other network services provided by Windows devices.
Additionally, facilitating this connection enhances productivity and workflow. For organizations that use both Windows and Ubuntu systems, it’s crucial for teams to collaborate smoothly without needing to switch devices or operating systems. Moreover, it simplifies the management of resources, making it easier to share important information across different platforms.
Can I access Windows shared folders from Ubuntu?
Yes, you can access Windows shared folders from Ubuntu. This is possible using the Samba protocol, which enables file and printer sharing between different operating systems. By installing and configuring Samba on your Ubuntu system, you can view and interact with shared folders on Windows computers within the same network.
Once properly set up, accessing these shared folders is straightforward. You can use the File Manager in Ubuntu to browse and connect to Windows shares, allowing you to open and manage files just like you would on a native Windows system. This functionality streamlines workflows and enhances collaboration across different platforms.
What is Samba and how does it work?
Samba is an open-source software suite that enables file and print sharing between computers running Windows and Unix-like operating systems, including Linux and Ubuntu. It implements the Server Message Block (SMB) protocol, which facilitates communication and data transfer across different operating systems. By using Samba, Ubuntu users can access shared resources available on Windows machines.
When Samba is installed on an Ubuntu system, it acts as a bridge between the two environments, allowing users to read and write to shared folders on Windows. Samba can be configured to provide different levels of access and security, ensuring that users can only access resources according to their permissions. This makes it a powerful tool for networking in mixed environments.
How do I install Samba on Ubuntu?
To install Samba on Ubuntu, you can use the terminal with a simple command. First, open your terminal and update your package list by running sudo apt update. After that, you can install Samba by executing the command sudo apt install samba. This will download and install the necessary packages for Samba on your system.
Once installed, it is essential to configure the Samba settings according to your preferences. You can do this by editing the Samba configuration file, typically located at /etc/samba/smb.conf. After making the necessary changes, restart the Samba service with sudo systemctl restart smbd for the changes to take effect. This process ensures that your Ubuntu system is ready to connect to Windows shares.
What steps should I take to share a folder from Ubuntu to Windows?
To share a folder from Ubuntu to Windows, first, you need to install and configure Samba as described earlier. After ensuring Samba is running, navigate to the folder you want to share in the File Manager. Right-click on the folder, select “Properties,” and go to the “Sharing” tab. Here, you can turn on folder sharing, allowing you to set permissions for other users.
Once you’ve configured the sharing settings, you can adjust Samba configurations if necessary to allow access to Windows users. Remember to note the network path to your shared folder, as it will be needed for Windows users to access the resource. After that, users on Windows can connect using the network path, making it easy to access and utilize shared resources.
What network settings should I check before connecting Ubuntu to a Windows network?
Before connecting Ubuntu to a Windows network, ensure that both devices are on the same local network. Check your Ubuntu system’s network settings using the terminal command ifconfig or by navigating to “Settings” -> “Network.” Verify that it has a valid IP address and confirm that the network you’re connected to is the same subnet as the Windows devices.
It’s also crucial to check for firewall settings that may obstruct connections. Both Ubuntu and Windows computers may have firewall rules that could restrict Samba traffic. Ensure that ports 137, 138, 139, and 445 are open for SMB traffic on both systems, allowing them to communicate effectively without interruptions.
How do I troubleshoot connectivity issues between Ubuntu and Windows?
If you encounter connectivity issues between Ubuntu and Windows, start by verifying that both systems can see each other on the network. You can use the command ping [Windows_IP_address] from your Ubuntu terminal to check connectivity. If the ping fails, the two devices might not be correctly connected to the same network or could be facing issues with their network configurations.
Additionally, inspect the Samba configuration on the Ubuntu machine. Ensure that the shared folders are appropriately defined in the Samba configuration file and that the Samba services are running. If problems persist, reviewing the logs located in /var/log/samba/ can provide insights into any errors occurring during the connection attempts, helping you identify the root cause of the issue.
Is it secure to share files between Ubuntu and Windows?
Sharing files between Ubuntu and Windows can be secure, provided proper security measures are taken. Use strong passwords for shared folders and regulate access permissions carefully to ensure only authorized users can access sensitive files. This control minimizes the risk of unauthorized access, which is critical when sharing data in mixed environments.
Furthermore, consider using encryption for sensitive data transfer. You can implement encrypted SMB connections through additional configuration in Samba. Maintaining regular updates of both the Ubuntu and Windows operating systems will also enhance security by protecting against vulnerabilities that could be exploited during file sharing.
Contents
-
Client Access — Browsing SMB shares
- Ubuntu Clients
- Windows Clients (XP,Server,Vista, Win7)
-
Samba Client — Manual Configuration
- Connecting using CIFS
- Connecting using SMBFS (deprecated)
The samba package is a meta-package intended to be installed on file and printer sharing servers. Clients do not need this meta-package (you are acting as a client if you need to access files on another computer). For example, installing samba is not necessary if you only need your Ubuntu system to do any of the following:
-
Access shared folders, drives and printers on a Windows computer (that is, act as a client with Windows servers). To do this, you only need the smbfs plugin. See MountWindowsSharesPermanently for more information.
- Have your Windows computer use (via a network) a printer that is attached to a Linux computer. CUPS can be configured to make the printer accessible to the network.
-
Share directories between two Linux computers. You can use NFS or setup an SSH server on one computer and access it from other computers using an scp or sftp client, or Places -> Connect to Server… and choose «SSH» as the service type.
Ubuntu Clients
Ubuntu and Gnome make it easy to access files on a Windows network share. Open the Places Menu, then click on Network. You will see a Windows network icon. Double-click to open it. The next window shows all the domains/workgroups found on your network. Inside each domain/workgroup you will see all the computers on the domain/workgroup with sharing enabled. Double-click on a computer icon to access its shares and files.
-
If you want to be able to share folders with nautilus (the file browser), install the nautilus-share package (installed by default in Ubuntu 9.10 Desktop edition):
sudo apt-get install nautilus-share
Alternate: From the menu at the top select «Location» -> «Connect to a server». In the «Service type» pull down select «Windows share». Enter the server ip address in the «Server:» box and the share name in the «Share:» box. Click «Connect» and then «Connect» again on the second dialog box
Alternate 12.04: Double clicking on ‘Windows network’ did not work for me. So I went to ‘Go’ menu in the nautilus file browser and clicked ‘Location’. I got an address bar at the top of the window. I entered «smb://192.168.2.148» (substitute the IP address of your Samba server) — I was presented with user/password window — After typing in user/passwd I was able to see the samba shares on the server and browse the files/folders.
Note: The default installation of Samba does not synchronize passwords. You may have to run «smbpasswd» for each user that needs to have access to his Ubuntu home directory from Microsoft Windows.
Windows Clients (XP,Server,Vista, Win7)
Microsoft Windows clients connect and browse through their corresponding network interface.
Example: XP clients can open Windows Network Neighborhood or My Network Places to browse available SMB shares.
Samba Client — Manual Configuration
This section covers how to manually configure and connect to a SMB file server from an Ubuntu client. smbclient is a command line tool similar to a ftp connection while smbfs allows you to mount a SMB file share. Once a SMB share is mounted it acts similar to a local hard drive (you can access the SMB share with your file browser (nautilus, konqueror, thunar, other).
Connecting to a Samba File Server from the command line
Connecting from the command line is similar to a ftp connection.
List public SMB shares with
smbclient -L //server -U user
Connect to a SMB share with
smbclient //server/share -U user
Enter you user password.
You can connect directly with
smbclient //server/share -U user%password
but your password will show on the screen (less secure).
Once connected you will get a prompt that looks like this :
smb: \>
Type «help» , without quotes, at the prompt for a list of available commands.
Connecting using CIFS
CIFS is included in the smbfs package and is a replacement for smbfs (I know, the terminology here is a little confusing).
Reference : http://linux-cifs.samba.org/
As above, install by any method, smbfs, on Ubuntu 12.10, smbfs has been replaced by cifs-utils.
Allow non-root users to mount SMB shares
By default only root may mount SMB shares on the command line. To allow non-root users to mount SMB shares you could set the SUID, but I advise you configure sudo. You should configure sudo with visudo
You may either allow the group «users» to mount SMB shares, or add a group, samba, and add users you wish to allow to mount SMB shares to the samba group.
sudo groupadd samba
sudo adduser user samba
Change «user» to the username you wish to add to the samba group.
sudo visudo
In the «group» section add your group you wish to allow to mount SMB shares
Add a line  in the "group" section :
## Members of the admin group may gain root privileges
%admin ALL=(ALL) ALL
%samba   ALL=(ALL) /bin/mount,/bin/umount,/sbin/mount.cifs,/sbin/umount.cifs
Change «%samba» to «%users» if you wish to allow members of the users group to mount SMB shares.
The following will mount the myshare folder on myserver to ~/mnt (it will be in your home directory):
mkdir ~/mnt
sudo mount -t cifs //myserver_ip_address/myshare ~/mnt -o username=samb_user,noexec
Note: «samba_user» = the user name on the samba server (may be different from your log-in name on the client).
The «noexec» option prevents executable scripts running from the SMB share.
You will be asked for BOTH your sudo and then your samba_user password.
To umount,
sudo umount ~/mnt
Automagically mount SMB shares
In order to have a share mounted automatically every time you reboot, you need to do the following:
With any editor, create a file containing your Windows/Samba user account details:
gksu gedit /etc/samba/user
KDE users must use kdesu rather than gksu and instead of Gedit they can use Kwrite as editor.
… it should contain two lines as follows:
username=samba_user
password=samba_user_password
Note: «samba_user» = the user name on the samba server (may be different from your log-in name on the client). «samba_user_password» is the password you assigned to the samba_user on the samba server.
Save the file and exit gedit.
Change the permissions on the file for security:
sudo chmod 0400 /etc/samba/user # permissions of 0400 = read only
Now create a directory where you want to mount your share (e.g. /media/samba_share):
sudo mkdir /media/samba_share
Now, using any editor, and add a line to /etc/fstab for your SMB share as follows:
sudo cp /etc/fstab /etc/fstab.bak
gksu gedit /etc/fstab
Add a line for your SMB share:
//myserver_ip_address/myshare /media/samba_share cifs credentials=/etc/samba/user,noexec 0 0
The share will mount automatically when you boot. The «noexec» option prevents executable scripts running from the SMB share.
To mount the share now, without rebooting,
sudo mount /media/samba_share
You can unmount the share with :
sudo umount /media/samba_share
If you wish to increase security at the expense of convenience, use this line in /etc/fstab
//myserver_ip_address/myshare /media/samba_share cifs noauto,credentials=/etc/samba/user,noexec 0 0
The noexec» option prevents executable scripts running from the SMB share.
Edit /etc/samba/user, remove the password (leave just the samba user).
Now the share will NOT automatically mount when you boot and you will be asked for your samba password.
Mount the share with :
sudo mount /media/samba_share
CIFS may cause a shutdown error.
CIFS VFS: Server not responding.
There is a fix in the troubleshooting section of this forum post.
Back to top
Connecting using SMBFS (deprecated)
Note: This method still works, but as outlined under the «CIFS» section above is «deprecated» (no longer maintained and pending removal from the kernel).
Mounting a share on the local filesystem allows you to work around programs that do not yet use GnomeVFS to browse remote shares transparently. To mount a SMB share, first install smbfs:
sudo apt-get update
sudo apt-get install smbfs
To allow non root accounts to mount shares, change the permissions on the smbmnt program thus:
sudo chmod u+s /usr/bin/smbmnt /usr/bin/smbumount
Note: This may be a security risk as after setting the SUID bit anyone can mount a SMB share. I advise you configure sudo, as above.
The working line in /etc/sudoers is as follows (see CIFS section above):
%samba ALL=(ALL) /bin/mount,/bin/umount,/sbin/mount.cifs,/sbin/umount.cifs,/usr/bin/smbmount,/usr/bin/smbumount
This allows any user in the samba group to mount SMB shares (you will need to create a samba group and add users).
The following will mount the myshare folder on myserver to ~/mnt (it will be in your home directory):
mkdir ~/mnt
smbmount //myserver/myshare ~/mnt
To umount,
smbumount ~/mnt
In order to have a share mounted automatically every time you reboot, you need to do the following:
Open a shell as root
sudo -s
Create a file containing your Windows/Samba user account details:
vi /etc/samba/user
…it should contain two lines as follows:
username=george
password=secret
Change the permissions on the file for security:
chmod 0600 /etc/samba/user
Now create a directory where you want to mount your share (e.g. /mnt/data):
mkdir /mnt/data
Now edit the file system table (/etc/fstab) and add a line as follows:
//server/share /mnt/data smbfs credentials=/etc/samba/user,rw,uid=bob 0 0
…where ‘bob’ is the non-root user you log into ubuntu with, ‘server’ is the name or address of the Windows machine and ‘share’ is the name of the share.
To mount the share now, just use the following command as root. It will mount automatically on subsequent reboots.
mount /mnt/data
to be continued…
Ubuntu Client
On the Ubuntu client using the menu at the top, go to «Places» -> «Network». You will see an icon «Windows network» and should be able to browse to your shared folder. You will be asked for a password, leave it blank. Click the «Connect button.
(no need for a password).
If you would like to mount your SMB share using your (server) hostname rather than the IP Address, edit /etc/hosts and add your samba server (syntax IP Address hostname).
192.168.1.100 hostname
Where «hostname» = the name of your samba server.
Windows Client
On Windows open «My Computer» and navigate to «My Network Places». Navigate to your Ubuntu server and your share will be available without a password.
Alternate : From the menu at the top select «Tools» -> «Map Network Drive». Select an available letter for your SMB share (Default is z: ). In the «Folder:» box enter \\samba_server_ipaddress\share. Tic (Select with the mouse) the option «Reconnect at login» if you want the share to be automatically mounted when you boot Windows. Click the «Finish» box. A dialog box will appear, enter your samba user name and password. Click «OK».
If you would like to mount your SMB share using your (server) hostname rather than the IP Address, edit C:\WINDOWS\system32\drivers\etc\hosts and add your samba server (syntax IP Address hostname).
192.168.1.100 hostname
Where «hostname» = the name of your samba server.
Access a Windows shared folder from Linux, using Nautilus
- Open Nautilus.
- From the File menu, select Connect to Server.
- In the Service type drop-down box, select Windows share.
- In the Server field, enter the name of your computer.
- Click Connect.
- How do I access Windows drive from Linux?
- Can Windows and Linux work together?
- How do I connect my Ubuntu computer to a Windows network?
- How do I map a network drive from Linux to Windows?
- Can I access Windows files from Ubuntu?
- Can Linux read Windows hard drive?
- Is Windows 10 better than Linux?
- How do I replace Windows with Linux?
- Does dual boot slow down laptop?
- How do I connect to a Windows workgroup from Ubuntu?
- How do I connect to Smbclient?
- How do I connect to a network on Ubuntu?
How do I access Windows drive from Linux?
To be able to get access to your Windows drive/partition under Linux you will need to perform two steps.
- Create a directory under Linux that will link to your Windows drive/partition. …
- Then mount your Windows drive and link it to this new directory under Linux at the prompt type exactly:
Can Windows and Linux work together?
Linux can run from just a USB drive without modifying your existing system, but you’ll want to install it on your PC if you plan on using it regularly. Installing a Linux distribution alongside Windows as a “dual boot” system will give you a choice of either operating system each time you start your PC.
How do I connect my Ubuntu computer to a Windows network?
To connect to Windows shares, use the guide below:
- In the file manager, click Other Locations in the sidebar.
- In Connect to Server, enter the address of the server, in the form of a URL. Details on supported URLs are listed below. …
- Then click the Click Connect button. The files on the server will be shown.
How do I map a network drive from Linux to Windows?
You can map your Linux home directory on Windows by opening Windows Explorer, clicking on «Tools» and then «Map network drive». Choose drive letter «M» and path «\\server\loginname». While any drive letter will work, your profile on Windows has been created with M: mapped to your HOMESHARE.
Can I access Windows files from Ubuntu?
Yes, just mount the windows partition from which you want to copy files. Drag and drop the files on to your Ubuntu desktop. That’s all. … Now your windows partition should be mounted inside /media/windows directory.
Can Linux read Windows hard drive?
Linux can mount Windows system drives read-only even if they’re hibernated.
Is Windows 10 better than Linux?
Linux and Windows Performance Comparison
Linux has a reputation for being fast and smooth while Windows 10 is known to become slow and slow over time. Linux runs faster than Windows 8.1 and Windows 10 along with a modern desktop environment and qualities of the operating system while windows are slow on older hardware.
How do I replace Windows with Linux?
How to Make the Switch From Windows to Linux
- Choose Your Distribution. Unlike Windows and macOS, there isn’t just one version of Linux. …
- Create Your Installation Drive. Head to Mint’s download page and choose the 64-bit «Cinnamon» version. …
- Install Linux on Your PC. …
- How to Install and Uninstall Apps.
Does dual boot slow down laptop?
If you don’t know anything about how to use a VM, then it is unlikely that you have one, but rather that you have a dual boot system, in which case – NO, you will not see the system slowing down. The OS you are running will not slow down. Only the hard disk capacity will be decreased.
How do I connect to a Windows workgroup from Ubuntu?
The easy way is to install sharing on ubuntu , right click on a folder and select share. The first time you do this it will want to intall packages and log out. when shared you can type the unc path ubuntuhostname or ip in wondow and get the shares. It should also show up on wondows network places thing.
How do I connect to Smbclient?
The command smbclient -M pc004 establishes contact with \\PC004 and waits for you to type your message. When you end the message (by pressing Ctrl+D), smbclient sends it. As with many UNIX and Linux commands, the option’s case is significant—the -M option must be uppercase.
How do I connect to a network on Ubuntu?
Connect to a wireless network
- Open the system menu from the right side of the top bar.
- Select Wi-Fi Not Connected. …
- Click Select Network.
- Click the name of the network you want, then click Connect. …
- If the network is protected by a password (encryption key), enter the password when prompted and click Connect.
This article explains how to connect to shares on Windows 11 from the Ubuntu desktop.
By default, when you open the Ubuntu file manager, it automatically detects network shares that are advertised on the local network. Similar to Windows systems, Ubuntu uses the SMB protocol to connect to these shared Windows resources.
When shared resources are advertised, Ubuntu and other desktop computers should be able to view and connect to them.
However, if the shares are not advertised, users on the same network must manually connect to the shares by entering the resource network address.
The steps below will guide you on how to do that.
Enable Network Discovery in Windows 11
As mentioned above, shares must be advertised for other devices to view or access. Network Discovery needs to be turned on in Windows to advertise shares to be viewed from other devices.
If your Windows devices cannot see or discover each other on your private network, Network Discovery will likely be disabled.
First, turn on Network Discovery in Windows 11.
If you haven’t done so, read the post below to learn how to enable Network Discovery in Windows 11.
How to enable Network Discovery on Windows 11
When you’re done, exit, and network discovery should be enabled.
Turn on Public Folder Sharing in Windows 11
Use the steps below to set up file sharing.
Windows 11 has a centralized location for the majority of its settings. Everything can be done, from system configurations to creating new users and updating Windows from its System Settings pane.
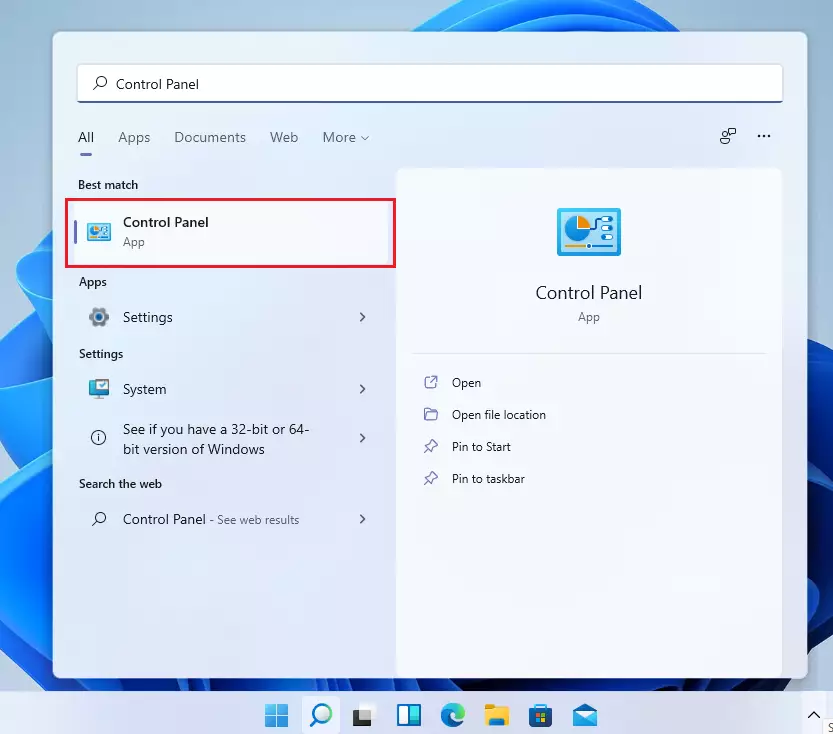
However, changing the account username is still done in the old Control Panel. To get to Control Panel, you can click on Start and start typing Control Panel as shown in the image below:
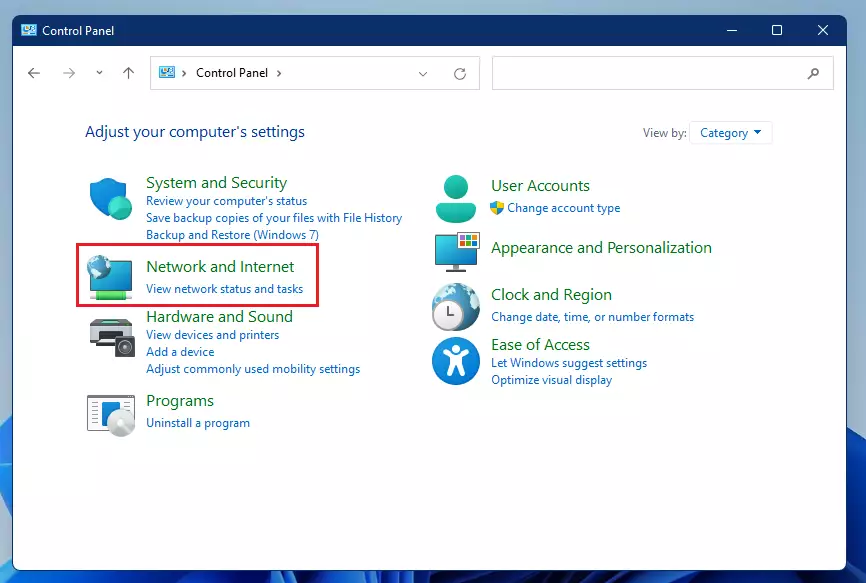
In the Control Panel, select Network and Internet, as highlighted in the image below.
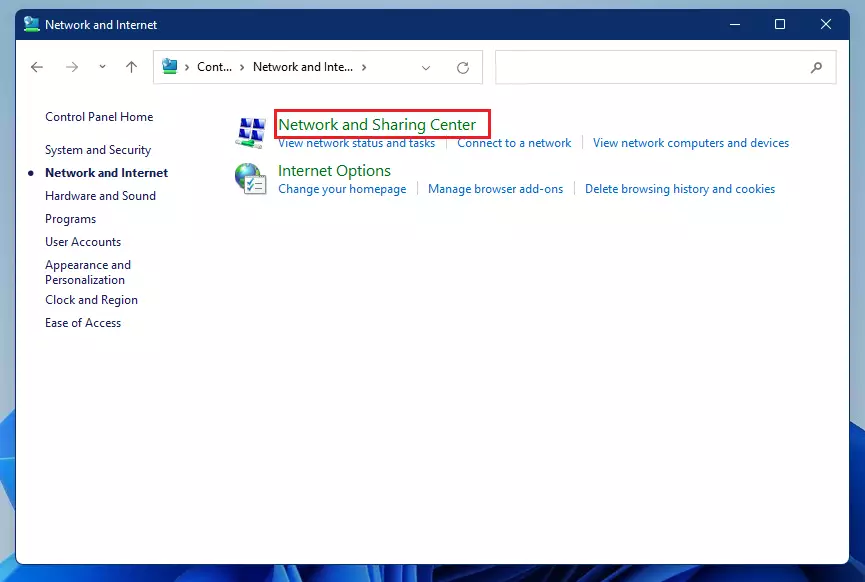
Select Network and Sharing Center on the next page, as highlighted below.
Next, select Change advanced sharing settings as highlighted below.

Select ‘Private’ (current profile) and enable File and printer sharing in the Advanced Sharing Center.
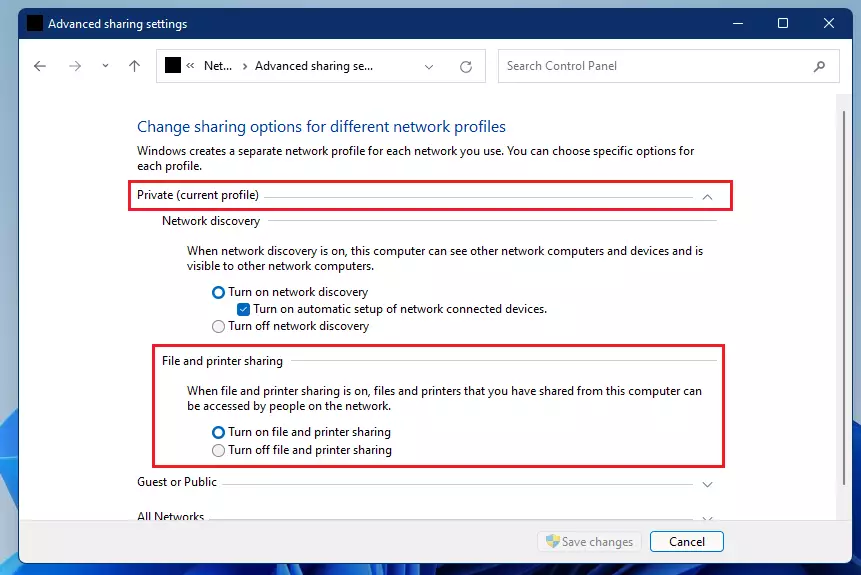
Save your changes and exit.
On the same Advance sharing options page, scroll down All networks.
You should see settings for Public folder sharing, Media streaming, File sharing connections, and Password-protected sharing. Windows should automatically turn on File and printer sharing in private networks. However, in some instances, this will not be enabled.
If you can not automatically find printers and shared resources in your private Network, then the File sharing option may be disabled.
Only people with accounts on the local computer or in the domain environment can access shared files and printers if you enable password-protected sharing.

Make your changes and save, then exit.
The settings above can easily be done using the commands below as administrator.
netsh advfirewall firewall set rule group="File and Printer Sharing" new enable=Yes
netsh advfirewall firewall set rule group="Network Discovery" new enable=Yes
It would be best to open the command prompt as administrator to run the above commands.
Access shares on Windows 11 from Ubuntu
Now that Network Discovery and file sharing are enabled, you can connect to Ubuntu and view shares on Windows devices.
To browse Windows files over the Network, open the File Manager application from the Activities overview (top left corner), click File Manager on the dock, and click Other Locations in the sidebar.
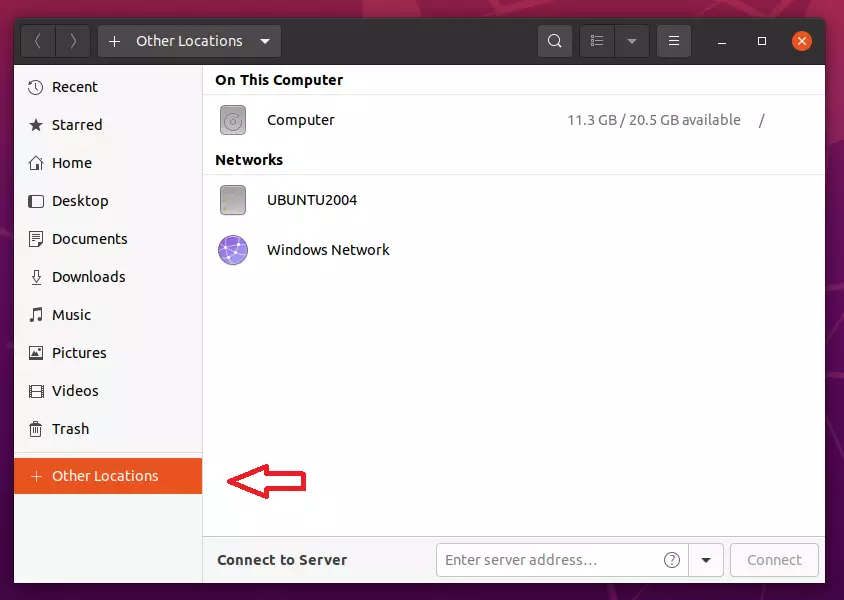
If Network Discovery and file sharing are enabled, you should see shared files and folders in the Windows Network folder above.
If not, run the commands below to install Samba.
sudo apt update
sudo apt install samba
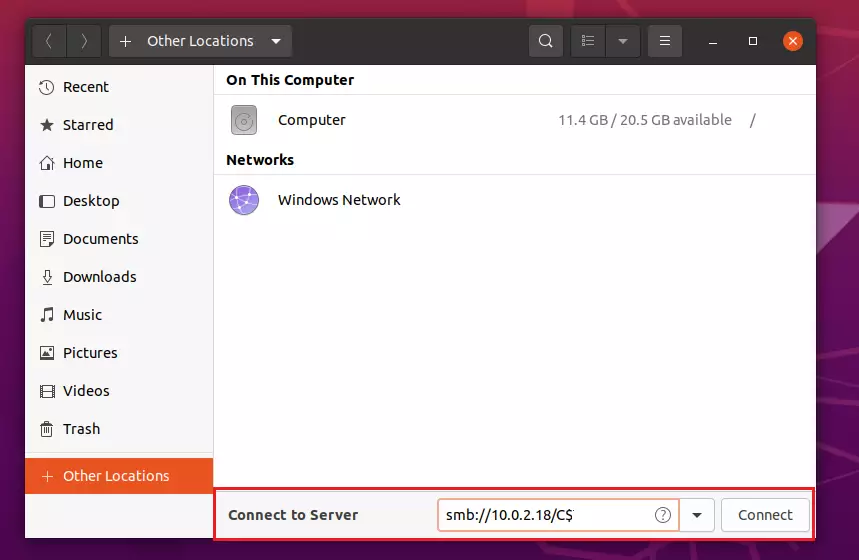
In the file manager, click Other Locations in the sidebar. In Connect to Server, enter the server’s address as a URL. Details on supported URLs are listed below. If you have connected to the server before, you can select it from the Recent Servers list.
Then click the Connect button when you’re ready to connect.
smb://servername/Share_name
Another format with multiple shared folders:
smb://10.0.2.18/users/Richard/Documents
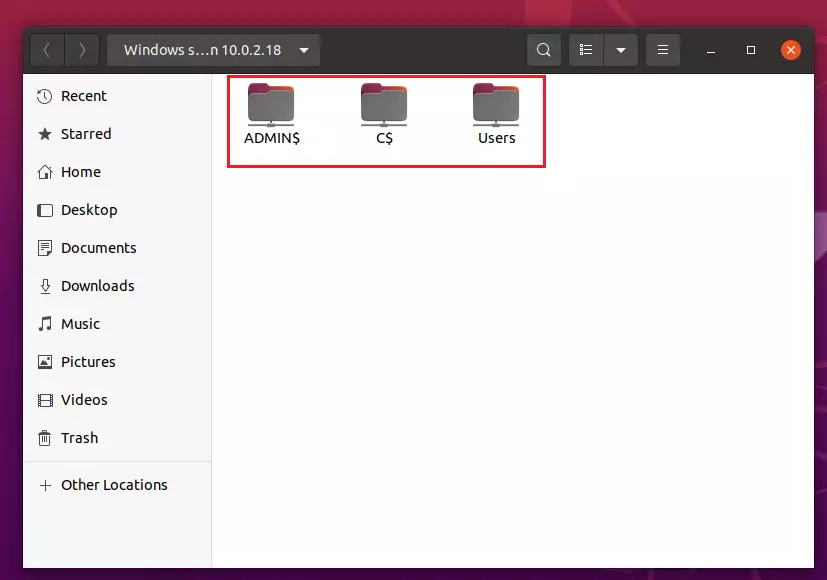
Windows computers use a proprietary protocol to share files over a local area network. Computers on a Windows network are sometimes grouped into domains for organization and to better control access. If you have the right permissions on the remote computer, you can connect to a Windows share from the file manager.
You should see Windows shares if you have access to them.
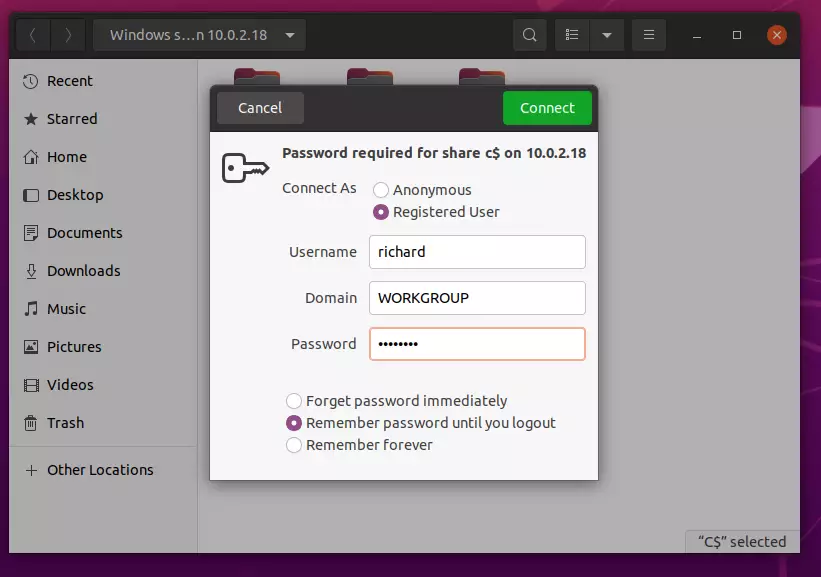
If accessing the shares and you’re prompted for login name and password, type in the Windows account login info. This account must have access to view the shared content.
How to access Ubuntu files from Windows
We’ll want to create a folder to share with Windows systems on the Ubuntu machine. Run the commands below to create a Samba folder in the system root directory.
sudo mkdir /samba
After that, set the group ownership to sambashare and permission to allow group members to access the folder.
sudo chgrp sambashare /samba
sudo chmod 2770 /samba
After changing the folder permission to allow sharing, run the commands below to add your Ubuntu account to allow access via Samba.
Replace yourusername with your Ubuntu account.
sudo smbpasswd -a yourusername
Next, set Samba’s Password and enable your Ubuntu account to access Samba shares.
sudo smbpasswd -a yourusername
sudo smbpasswd -e yourusername
Next, add your user account to the sambashare group.
sudo usermod -a -G sambashare yourusername
After that, open the Samba configuration file by running the commands below.
sudo nano /etc/samba/smb.conf
Then, add these lines at the bottom of the File and save.
[share]
    path = /samba
    browseable = yes
    read only = no
    force create mode = 0660
    force directory mode = 2770
    valid users = @sambashare
After saving the File, restart Samba by running the commands below.
sudo systemctl restart smbd
sudo systemctl restart nmbd
You should be able to access the /samba folder on the Ubuntu system using your account. When prompted, type in your Ubuntu username and Password.
That should do it!
Conclusion:
In summary, connecting Ubuntu to Windows 11 shares can streamline file sharing and collaboration across different systems. Here are the key takeaways:
- Seamless Integration: Ubuntu and Windows 11 can effectively communicate over the SMB protocol for file sharing.
- Network Discovery: Ensure that Network Discovery is enabled in Windows 11 for other devices to see shared resources.
- Public Folder Sharing: Set up Public Folder Sharing in Windows to allow easier access to shared files.
- Accessing Windows Shares from Ubuntu: Use the Ubuntu File Manager to browse and connect to Windows shares.
- Creating Samba Shares on Ubuntu: Easily create and share folders on Ubuntu by configuring Samba settings.
- User Permissions: Ensure correct user permissions are set for secure access to shared files.
- Troubleshooting: If issues arise, check for proper installation of Samba and confirm network settings on both systems.
By following these steps, users can enhance their productivity and ability to collaborate across the two platforms.
Learn how to access Windows SMB shares on Ubuntu 22.04 in this comprehensive guide. With step-by-step instructions and clear explanations, this guide is perfect for beginners and experts alike.
Are you struggling to access Windows SMB shares on your Ubuntu 22.04 machine? Do you feel lost in the sea of technical jargon and complicated instructions? Fear not, as this comprehensive guide will walk you through the process step-by-step and make it as easy as possible for you to access Windows SMB shares on Ubuntu 22.04.
Introduction
Ubuntu 22.04 is a popular open-source operating system that has gained a lot of popularity in recent years. Many users are switching to Ubuntu from other operating systems like Windows and macOS. One of the common issues that Ubuntu users face is accessing Windows SMB shares on Ubuntu. This is especially important for those who work in a mixed environment where some machines are running Windows and others are running Ubuntu. In this guide, we will explore how to access Windows SMB shares on Ubuntu 22.04.
To access Windows SMB shares on Ubuntu 22.04, follow the steps below:
1. You can either SSH to your Ubuntu 22.04 Server or if you have a GUI version you can open the Terminal on your Ubuntu machine by pressing the Ctrl+Alt+T keys.
2. Install the cifs-utils package by running the following command:
sudo apt-get install cifs-utils
3. Create a folder where you want to mount the Windows SMB share. For example, you can create a folder named win_share in your home directory by running the following command:
4. Mount the Windows SMB share by running the following command:
sudo mount -t cifs //windows-machine-name/share-name ~/win_share -o username=windows-username,password=windows-password,domain=windows-domain
Replace windows-machine-name, share-name, windows-username, windows-password, and windows-domain with the appropriate values. You may also use the IP address of the Windows machine instead of the machine name.
For example, if the Windows machine name is mywinpc, the share name is myshare, the Windows username is myuser, the password is mypassword, and the domain is mydomain, the command will look like this:
sudo mount -t cifs //mywinpc/myshare ~/win_share -o username=myuser,password=mypassword,domain=mydomain
5. Once you have successfully mounted the Windows SMB share, you can access it like any other folder on your Ubuntu machine. You can copy files to and from the Windows SMB share and perform other file operations.
Why Can’t I Access Windows SMB Shares on Ubuntu 22.04?
If you are unable to access Windows SMB shares on Ubuntu 22.04, there could be several reasons for it. Here are some common reasons:
- Incorrect credentials: Make sure you are using the correct Windows username, password, and domain in the mount command.
- Firewall settings: Check if the firewall on the Windows machine is blocking access to the SMB share.
- Network connectivity: Ensure that both the Ubuntu and Windows machines are on the same network and can communicate with each other.
- SMB version: Make sure that the Windows SMB share is using a version of SMB that is supported by your Ubuntu machine.
FAQs
Q1. What is SMB?
SMB stands for Server Message Block and is a protocol used for sharing files, printers, and other resources of a network. It is commonly used in Windows-based networks.
Q2. What is cifs-utils?
cifs-utils is a package in Ubuntu that provides utilities for mounting and managing SMB shares.
Q3. Can I mount multiple SMB shares on Ubuntu 22.04?
Yes, you can mount multiple SMB shares on Ubuntu 22.04. You just need to create different folders for each share and use a different mount command for each share.
Q4. Can I access Windows SMB shares without using the Terminal?
Yes, you can access Windows SMB shares without using the Terminal by using the Files application. Open the Files application and click on Other Locations. In the Connect to Server dialog, enter the address of the SMB share in the format smb://windows-machine-name/share-name and click Connect.
Q5. How do I unmount a Windows SMB share in Ubuntu 22.04?
To unmount a Windows SMB share in Ubuntu 22.04, use the following command:
sudo umount /path/to/mount/folder
Replace /path/to/mount/folder with the actual path to the folder where the Windows SMB share is mounted.
Q6. How do I make the Windows SMB share mount automatically on startup?
To make the Windows SMB share mount automatically on startup, you need to add an entry to the /etc/fstab file. Open the /etc/fstab file in a text editor and add the following line at the end of the file:
//windows-machine-name/share-name /path/to/mount/folder cifs username=windows-username,password=windows-password,domain=windows-domain 0 0
Replace windows-machine-name, share-name, windows-username, windows-password, windows-domain, and /path/to/mount/folder with the appropriate values. Save the file and reboot your Ubuntu machine.
Conclusion
Accessing Windows SMB shares on Ubuntu 22.04 may seem daunting at first, but with the right instructions and a little patience, it can be a breeze. In this guide, we have walked you through the steps required to access Windows SMB shares on Ubuntu 22.04, as well as provided some common troubleshooting tips. With this knowledge, you can now work seamlessly in a mixed environment with both Windows and Ubuntu machines.
Remember, the key to success is to take it one step at a time, and don’t be afraid to ask for help if you need it. Now, go ahead and access those Windows SMB shares on your Ubuntu 22.04 machine!
I hope this article was helpful, if you have any questions, please feel free to contact me. If you would like to be notified of when I create a new post you can subscribe to my blog alert.
Discover more from Patrick Domingues
Subscribe to get the latest posts sent to your email.