
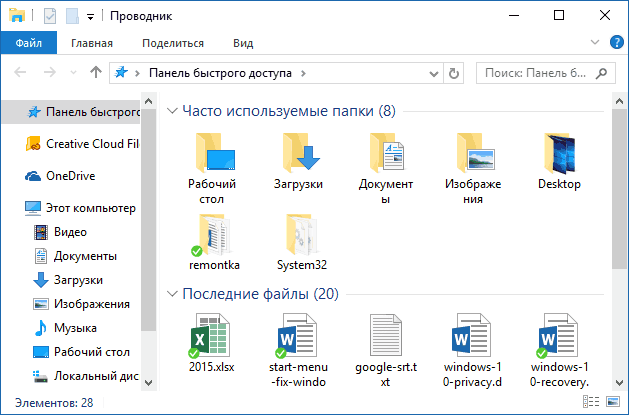
При открытии проводника в Windows 10, по умолчанию вы увидите «Панель быстрого доступа» в которой отображаются часто используемые папки и последние файлы, при этом, многим пользователям такая навигация пришлась не по душе. Также при правом клике на значке программы в панели задач или меню Пуск могут отображаться последние открытые в этой программе файлы.
В этой короткой инструкции — о том, как отключить показ панели быстрого доступа, и, соответственно часто используемых папок и файлов Windows 10 таким образом, чтобы при открытии проводника просто открывался «Этот компьютер» и его содержимое. Дополнительно описывается как убрать последние открытые файлы при правом клике по значку программы в панели задач или в Пуске. На схожую тему: Как убрать недавние файлы и документы, последние закрытые сайты из панели задач Windows 10.
Примечание: способ, описанный в этом руководстве убирает часто используемые папки и последние файлы в проводнике, но оставляет саму панель быстрого запуска. Если же требуется убрать и её, для этого можно использовать следующий метод: Как убрать быстрый доступ из проводника Windows 10.
Включаем автоматическое открытие «Этот компьютер» и убираем панель быстрого доступа
Все, что требуется для выполнения задачи — зайти в Параметры папок и изменить их необходимым образом, отключив хранение информации о часто используемых элементах системы и включив автоматическое открытие «моего компьютера».
Для входа в изменение параметров папок, вы можете перейти на вкладку «Вид» в проводнике, кликнуть по кнопке «Параметры», а затем выбрать «Изменить параметры папок и поиска». Второй способ — открыть панель управления и выбрать пункт «Параметры проводника» (в поле «Просмотр» панели управления должно стоять «Значки»).
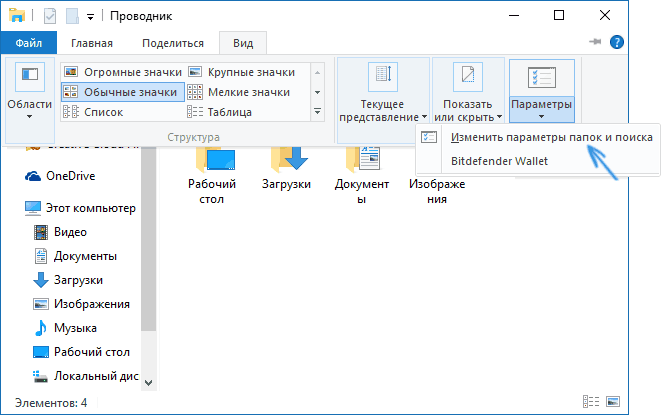
В параметрах проводника, на вкладке «Общие» вам следует изменить всего пару настроек.
- Для того, чтобы открывалась не панель быстрого доступа, а этот компьютер, вверху в поле «Открыть проводника для» выберите «Этот компьютер».
- В разделе конфиденциальность снимите отметку «Показать недавно использовавшиеся файлы на панели быстрого доступа» и «Показать часто используемые папки на панели быстрого доступа».
- Заодно, рекомендую нажать кнопку «Очистить» напротив «Очистить журнал проводника». (Так как в случае, если этого не сделать, любой, кто снова включит отображение часто используемых папок, увидит, какие папки и файлы вы часто открывали перед тем, как отключить их показ).
Нажмите «Ок» — готово, теперь никаких последних папок и файлов отображаться не будет, по умолчанию будет открывать «Этот компьютер» с папками документов и дисками, а «Панель быстрого доступа» хоть и останется, но будет отображать лишь стандартные папки документов.
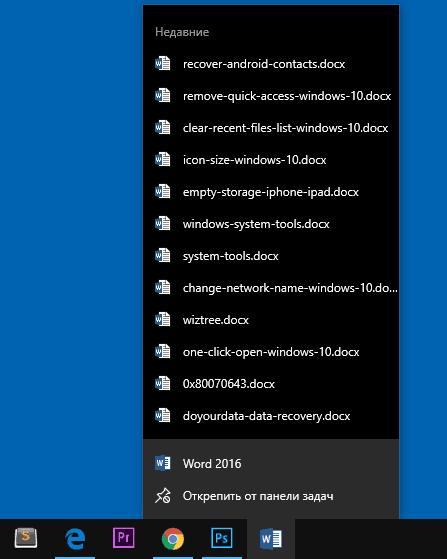
Как убрать последние открытые файлы в панели задач и меню Пуск (появляются при нажатии правой кнопкой мыши по значку программы)
Для многих программ в Windows 10 при нажатии правой кнопкой мыши по значку программы в панели задач (или меню Пуск) появляется «Список переходов», отображающий файлы и другие элементы (например, адреса сайтов для браузеров), которые открывались этой программой в последнее время.
Чтобы отключить последние открытые элементы в панели задач, выполните следующие действия: зайдите в Параметры — Персонализация — Пуск. Найдите пункт «Показывать последние открытые элементы в списке переходов в меню Пуск или на панели задач» и выключите его.
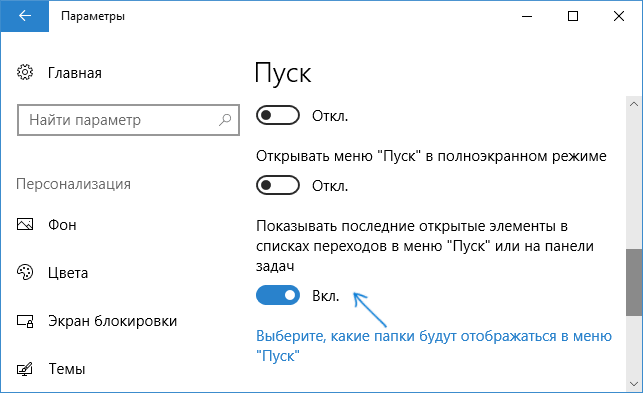
После этого можно закрыть параметры, последние открытые элементы больше отображаться не будут.
Windows 10 shows you the frequently accessed folders and recent files in the Quick access view when you open File Explorer. While this feature can be useful if you need quick access to your frequent resources, it might also be an annoyance if you are using a shared computer, and you do not want other people to see what you are doing on the same computer. These lists can be cleared manually or hidden permanently. Read on to learn how to it is done:
NOTE: This guide covers Windows 10. If you do not know the version of Windows that you have, read What version of Windows do I have installed?.
How to clear the Recent files and Frequent folders in File Explorer
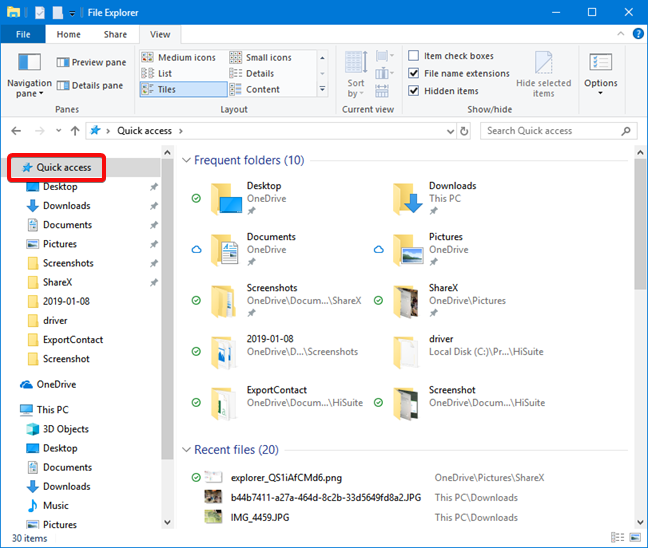
By default, the Quick access section in the navigation panel on the left side of File Explorer, always displays the recent files that you have used and the frequent folders that you open when working on your Windows 10 PC.
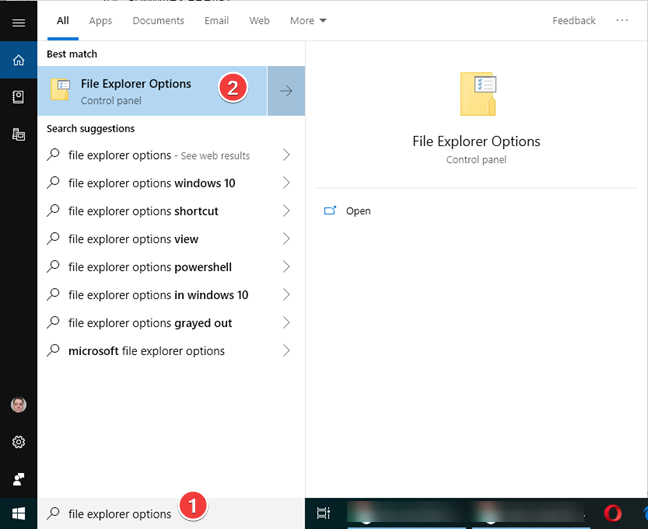
You may want to clear the recent files in Windows 10 and the list of frequent folders, as a temporary choice. You can do that, but, then Windows 10 starts to build up the lists again, based on your usage of File Explorer. If you want to do this, you clear these lists from File Explorer Options (or Folder Options). One easy way to open this window is to search using «file explorer options» in the search box near the Start Menu. Click or tap File Explorer Options in the list of search results.
For all the ways to open File Explorer Options, read 8 ways to open the Folder Options window, in Windows (all versions).
In the File Explorer Options window, on the General tab, identify the Privacy section. Click or tap the Clear button, and then OK to close the window.
The recently used files and frequently used folders lists are cleared. If you have a File Explorer window open, the clearing is visible right away. Otherwise, you see the effect the next time you open the Quick access view in File Explorer. The clearing does not affect the files and folders pinned to Quick access. The only way to eliminate them from the Quick access view is to unpin them. Read this article if you want to learn how to view, pin and unpin items to Quick access.
How to hide Recent files and Frequent folders in File Explorer
If you need to get rid of the lists with recent files and frequent folders, you may be better served by hiding these lists altogether. Once you hide them, they never show up again, and you do not need to worry about clearing the lists all the time.
Just like the clearing, the hiding is done from File Explorer Options (or Folder Options). In the General tab, look for the Privacy section. Uncheck the «Show recently used files in Quick access» and «Show frequently used folders in Quick access» and press OK to close the window.
The effect is immediate in File Explorer.
How to clear individual items from Recent files or Frequent folders
You can also eliminate individual items from Quick access, without clearing all your recent files or frequently used folders. If you want to retain the majority of the lists and get rid of a couple of items only, then you do not need to clear the entire list. However, those items may show up again in the future, if you use them again. Here is how it is done:
First, open File Explorer, and open the Quick access view by clicking or tapping on it.
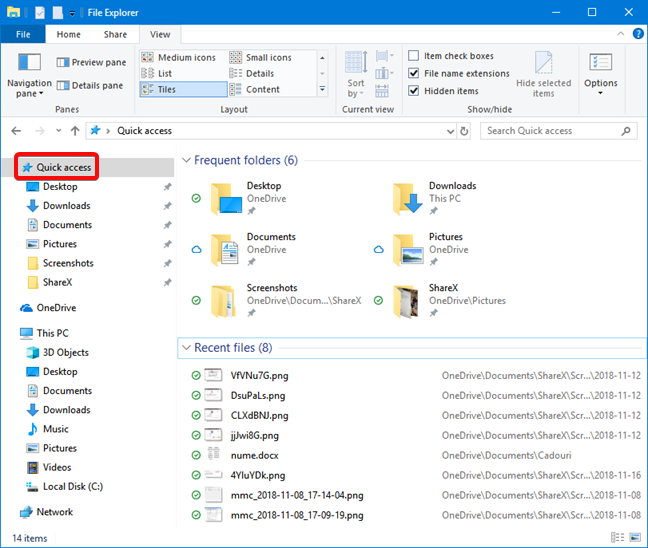
Identify the file or folder that you want to delete from the list of recent files of frequent folders, and right-click or tap and hold on it. Choose «Remove from Quick access» in the menu that opens.
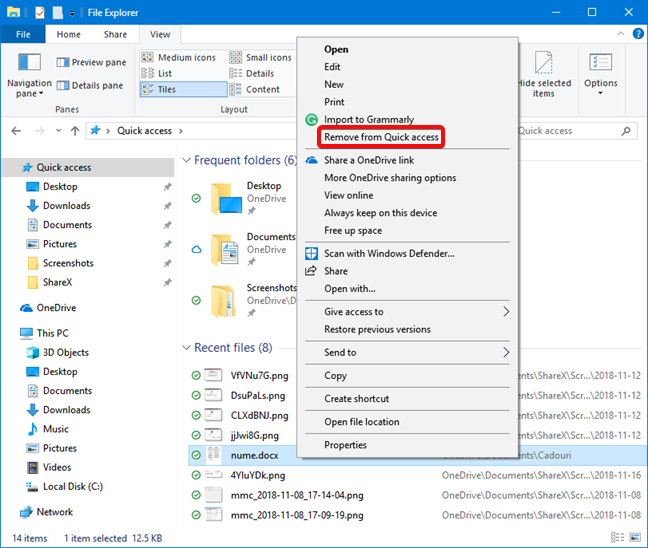
The file or folder is eliminated from the list immediately.
Do you have any concerns regarding privacy when using files and folders in Windows 10?
Now that you know how to hide recent files and frequently used folders from File Explorer, you should be able to make better use of this option and configure it according to your preferences. Before closing this tutorial, tell us your reason for clearing recent files and frequent folders, from File Explorer. Are you concerned about your privacy or there is another reason for this choice?
Windows 10 has many advanced features for day-to-day use designed to improve your productivity. One of these is the “Recent Files” section, which stores information about recently used documents and folders.
If you’re the sole user of your PC, you’ll probably find this quick access folder quite convenient. You’ll be able to quickly carry on from where you left off before you last shut down your device. You don’t have to open specific folders to view the files you opened last. But if you share your PC with your family, friends, or colleagues at work, you probably won’t be too comfortable sharing what you’ve been working on with everyone.
The good news is that you can clear or turn off Recent Files in just a few clicks. This article will show you how to go about it.
The Recent Files menu is a simple, yet powerful and convenient Windows feature that enables quick access to your most recently used items. It also allows you to quickly open any one of those items again without having to go through the normal process for opening an item. If you’re working on multiple documents each day, this will save time when trying to find what you need to work with next.
To further increase the efficiency of your computer, you may opt to pin specific files that are frequently accessed. Pinned files will always be part of the Recent Files list, no matter how long you go without accessing them.
Most applications in Windows also display a list of the most recently used or the most recently created items as soon as you open them. For example, Microsoft Word will show all recent documents, Microsoft Excel will show all recent worksheets, and Internet Explorer will display all the websites you’ve visited recently.
The Windows 10 algorithm behind the Recent Files menu is designed to work as follows:
- Files are ordered in chronological order, with the most recently used file appearing at the top of the list.
- The default number of items listed is 10, but the user can increase this number by adjusting markup.
- Over time, older items will move down the list as newer items take up positions at the top of the list.
- If you open an item that’s already on the list, then that item will move back to the top of the list.
- Pinned items will move up and down the list like any other items, but they will never vanish.
- If the number of items you’ve pinned to the list equals the maximum number specified in markup, there will be no new additions to the list until some items are unpinned.
How to Clear Recent Files in Windows 10
There are several ways to clear your Recent Files history in Windows 10:
(a) Using the File Explorer Icon in the Task Bar
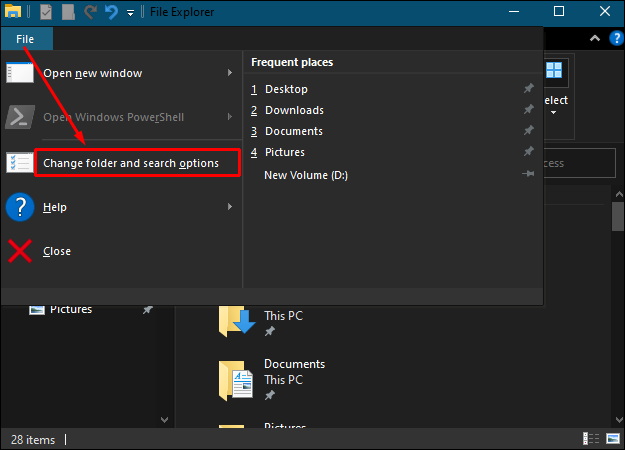
- Launch File Explorer on your computer. By default, the File Explorer icon is pinned to your taskbar. The icon itself is shaped like a suitcase with a pale blue handle.

- Once the File Explorer window opens, click on File in the top left corner and then select Change folder and search options.

- Under Privacy, click on Clear. This will immediately clear your Recent Files history, and you’ll now start populating the list afresh.


Unlike most commands in Windows 10, clearing Recent Files doesn’t come with a confirmation dialog box. Your recent files are cleared immediately without any further action.
(b) Clearing Recent Files Manually
Any files you open on your PC are automatically stored in the form of cached data. If you want to wipe clean your Recent Files menu, you can find this information and safely delete it. Here’s how:
- Open the Run window by typing “run” in the search bar in the bottom left corner of your screen. Alternatively, press the Windows key + R simultaneously.

- Type the following command in the Run prompt:
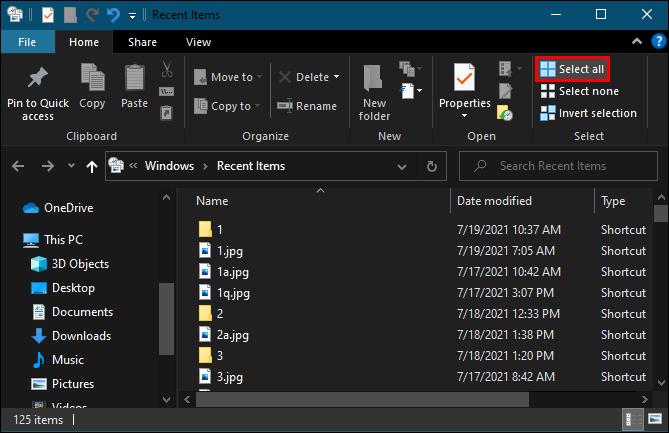
%AppData%\Microsoft\Windows\Recent\
- Click on Select all in the menu bar.

- Once you’ve selected all the items in the list, click on Delete and then select Permanently delete from the dropdown menu. At this point, all the files you’ve accessed recently will disappear from File Explorer.
How to Disable Recent Files in Windows 10
Recent Files is undoubtedly a nifty feature that allows you to quickly jump back to your most recently used documents or folders. However, this feature also comes with more clutter. There will be more and more items in your File Explorer as you continue using your computer. If you’d rather start with a clean slate every time you log on, you need to disable Recent Files permanently. There are several ways to do it. Let’s see how each works:
(a) Disabling Through the Group Policy Editor
If your computer runs on the “Pro” version of Windows 10, you can use the Group Editor Policy to modify various settings on your system.
The Group Policy Editor is a tool that can be used to manage policies and settings within Windows configuration. It’s most commonly used to manage password policies, controls for system security, or account-related options on computers in an organizational domain. It may also be possible to use this tool with your home computer. However, you should consult the documentation for your device before attempting any changes.
Here’s how you can clear your Recent Files history using the Group Editor Policy:
- Open the Run window by typing “run” in the search bar in the bottom left corner of your screen. Alternatively, press the Windows key and “R” simultaneously.
- Type the following command in the Run prompt:
gpedit.msc - Click on OK to run the command. This should launch the “Local Group Policy Editor” window.
- Under User Configuration, click on Administrative templates.
- Double click on Start Menu and Taskbar.
- Double click on Remove recent items menu from Start Menu.
- From the resulting window, select the Enabled option and then click on OK.
(b) Disabling Through the Control Panel
The control panel can help you to tweak your system so that it will never keep track of your files history no matter how often you use a program or application. To disable Recent Files using this approach:
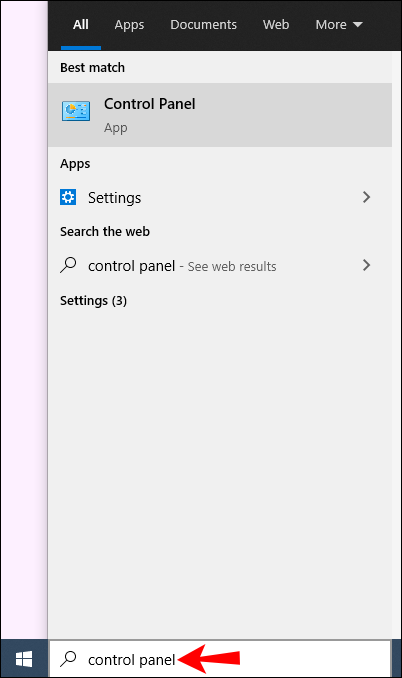
- Type “
control panel” in the windows search bar.
- Once the control panel opens, click on Appearance and Personalization.

- Click on Taskbar and Navigation.
- Click on Start.

- Turn off the button next to Show recently opened items in Jump Lists on the Start or the Taskbar.


(c) Disabling Through the Registry Editor
To disable Recent Files through the Registry Editor:
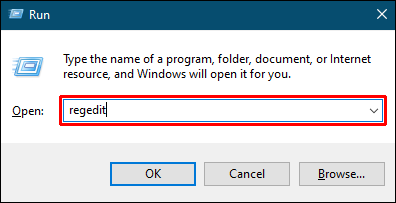
- Open the Run window by typing “run” in the search bar in the bottom left corner of your screen. Alternatively, press the Windows key + R simultaneously.
- Type the following command in the Run prompt:
regedit
- Click on OK to run the command. This should launch the “Registry Editor” window.
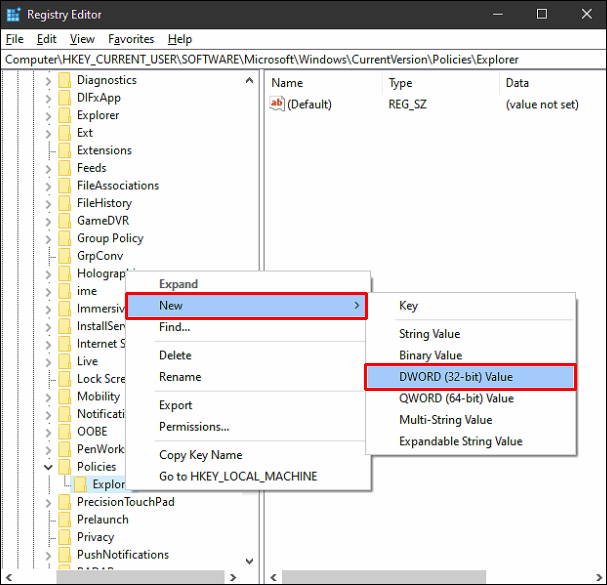
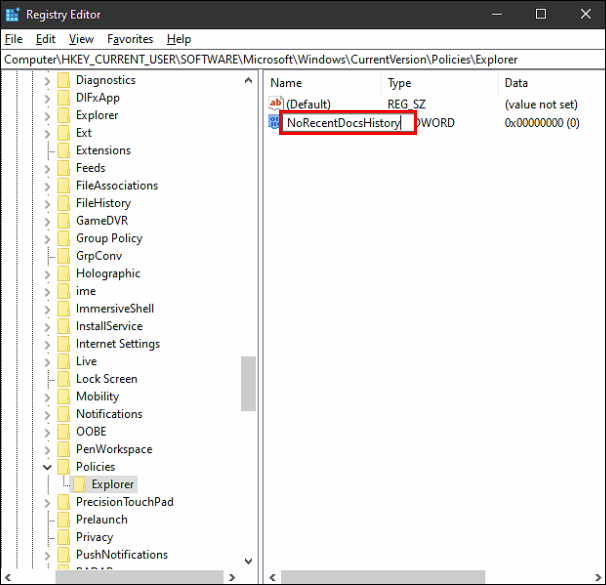
- Open the following key:
HKEY_CURRENT_USER\Software\Microsoft\Windows\CurrentVersion\Policies\Explorer
- Right-click on the right pane, click on New >DWORD (32-bit) Value from the dropdown. This will instantly create a new value named “New Value #1.”

- Rename the name as “NoRecentDocsHistory.”

- Right-click on the new value and then click Modify.

- Enter 1 under Value data and then click OK.
- Restart your computer.


After restarting your computer, Windows will no longer display your Recent Files menu in File Explorer.
Additional FAQs
1. Why should I clear recent files from time to time?
Clearing Recent Files frequently comes with several benefits. First, you’re able to declutter your system and ensure that important documents do not accidentally get deleted or overwritten. Second, no one will be able to track your Windows usage history if you share your computer with others. In addition, a packed File Explorer can slow down your computer and make it take much longer to start up. It can also lead to other problems, such as out-of-memory errors or error messages that pop up when you work with certain programs, slowing your overall PC performance.
2. How can I delete individual files from recent files?
If you want to clear some items and keep others:
1. Open the Run window by typing “run” in the search bar in the bottom left corner of your screen. Alternatively, press the Windows key + R simultaneously.

2. Type the following command in the Run prompt:
%AppData%\Microsoft\Windows\Recent\

This should launch a new window with a list of your entire Recent Files history.
3. Click on the specific item you’d like to delete.
4. Click on Delete and then select Permanently delete from the dropdown menu. At this point, the item you’ve selected will no longer be in the Recent Files window.

3. How can I hide recent files in File Explorer?
If you want to get rid of the Recent Files list without tweaking your system too much, you may be better served by hiding the list altogether. Here’s how:
1. Launch File Explorer on your computer.

2. Click File in the top left corner and then select Change folder and search options.
3. Under Privacy, uncheck the boxes next to Show recently used files in Quick access and Show frequently used folders in Quick access.

4. Click OK to save your new settings.

Keep Your History Private
Windows 10 is designed with privacy in mind. If you don’t want others viewing what you have been writing or using recently, you should either clear or turn off Recent Files on your computer. In this article, we’ve shown you how to go about it.
Why do you like clearing your Recent Files history from time to time? How exactly do you do it?
Let us know in the comments section below.
This article explains how to turn off recent files in File Explorer on Windows 11.
For those who share their computer with others or use it publicly, disabling recent files is a key step in maintaining your privacy. It prevents others from seeing what you have been working on, ensuring your personal and professional information remains secure.
Disabling this feature can help reduce clutter in your Start Menu and File Explorer, making it easier to find the files you are looking for without distractions
Disable recent files in File Explorer
As mentioned, you can disable recent files and folders in File Explorer on Windows 10.
Here’s how to do it
First, open File Explorer.
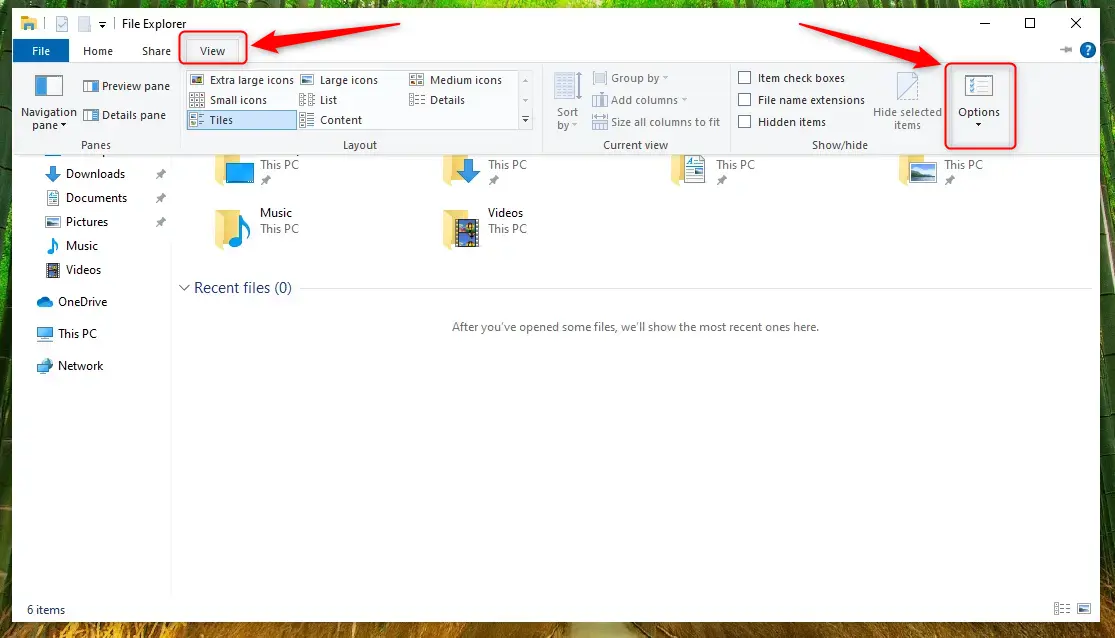
When File Explorer opens, click the View tab, then Options, as shown in the image below.
On the ‘Folder Options‘ window, select the ‘General‘ tab. Under the ‘Privacy‘ section, uncheck box items:
- Show recently used files in Quick access
- Show frequently used folders in Quick access
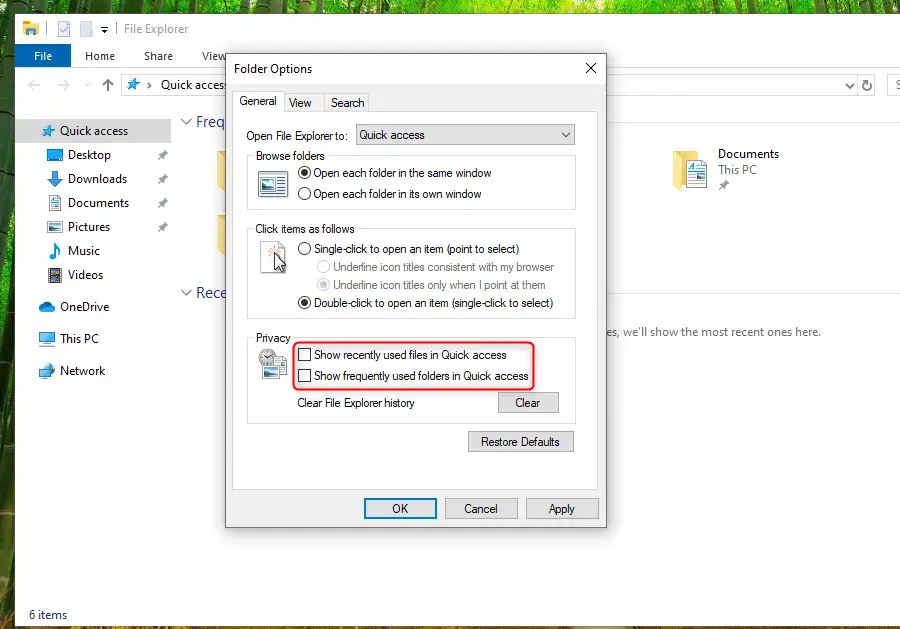
While there, also click the Clear button to delete the File Explorer history of existing listings.
Click the OK button to save your changes.
That’s it!
Conclusion
Disabling recent files in File Explorer on Windows 11 can significantly enhance your privacy and streamline your user experience. Here are the key takeaways:
- Prevents unauthorized access to your recent documents and folders.
- Helps maintain your personal and professional information confidentiality.
- Reduces clutter in File Explorer and the Start Menu for easier navigation.
- Simple steps enable you to customize your File Explorer settings effectively.
By following the outlined procedures, you can ensure a more secure and organized workspace on your Windows 11 device.